Samsung MIM-E03CN Manual de usuario

Tipo
Manual de usuario
ߢߣ
ߢߤ
ߢߧ
ߢߦ
ߢߨ
ߢߩ
A
ĮЇϩʒͱͱθ ߢߥࢩߤߪࢩߤߢߣ߫ߣࡑߥߢťđ
Ȑͱ͝ʪߣ
Ȑͱ͝ʪߤ
ߥߢ
²ʪɇϩ
Ɗʪϩ
ߤߪ࢏ߤ
࢏ߢ
ߤߦ
²ʪɇϩ
Ɗʪϩ
࢏ߢ
U²Ǯ
ߦߧ
kʀͱ͝ͱ͔̈ʀ
Ɗʪϩ
࢏ߢ
ߢߥ
A
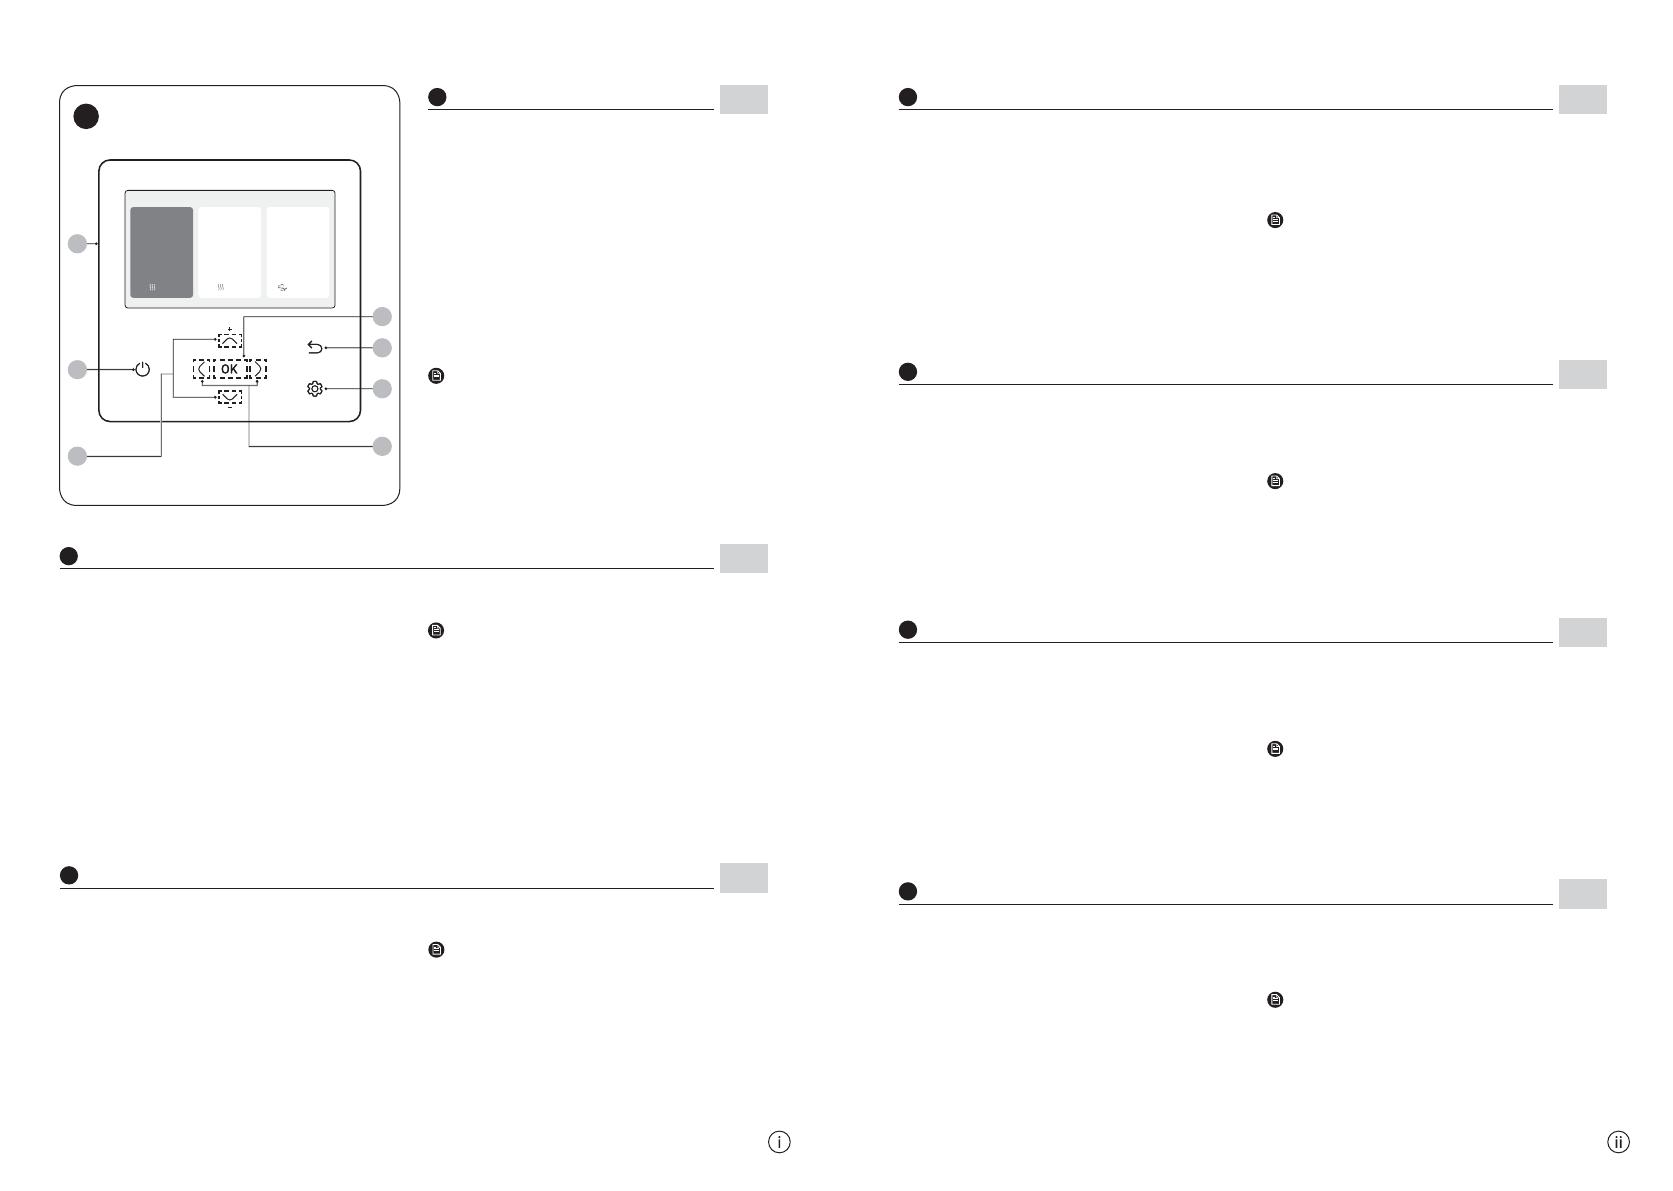
Remote Controller Overview
EN
01 Operation status display
Displays the operation/function settings and statuses.
02 Operation On/Off button (LED display)
Turns the Air to Water Heat Pump power On/Off.
03 Up/Down button
Moves between items vertically or changes the set temperature.
04 Left/Right button
Moves between items horizontally or changes the item value.
05 OK button
Saves your new settings.
06 Save & Return button
Saves your new settings and returns to the previous step.
07 Option button
Selects the detailed setting function.
NOTE
࡙ The operation mode display on the remote controller changes
depending on the selected language.
࡙ Some functions may not be available, depending on the product
specifications.
࡙ You can see the operation status on the LED display.
ON: Operating,
Blinking: An error occurred,
OFF: Turns off
01 Affichage de l’état de fonctionnement
Affiche les réglages et les états du fonctionnement/de la fonction.
02 Bouton de mise en marche/arrêt (affichage LED)
Met hors/sous tension la pompe à chaleur air-eau.
03 Bouton haut/bas
Parcourt les éléments verticalement ou modifie la température configurée.
04 Bouton gauche/droite
Parcourt les éléments horizontalement ou modifie la valeur de l’élément.
05 Bouton OK
Enregistre vos nouveaux réglages.
06 Bouton d’enregistrement et de retour
Enregistre vos nouveaux réglages et retourne à l’étape précédente.
07 Bouton Option
Sélectionne la fonction de réglage avancé.
REMARQUE
࡙ Laffichage du mode de fonctionnement sur la télécommande change
en fonction de la langue sélectionnée.
࡙ La disponibilité de certaines fonctions dépend des spécifications du
produit.
࡙ Vous pouvez voir l’état de fonctionnement sur l’affichage LED.
ĮĘईࡠk͝˙ͱ͝ʀϩ̈ͱ͝͝ʪ͔ʪ͝ϩࡡ
Ä̷˝͝ͱϩɇ͝ϩईࡠƸ͝ʪʪθθʪЇθϑ࣭ʪϑϩΧθͱʒЇ̈ϩʪࡡ
ĮईࡠƊ࣭ʭϩʪ̈͝ϩ
01 Display stato di funzionamento
Consente di visualizzare gli stati e le impostazioni di
funzionamento/delle varie funzioni.
02 Pulsante di accensione/spegnimento (display LED)
Accende e spegne la pompa di calore aria/acqua.
03 Pulsanti Su/Giù
Consentono di spostarsi da un elemento all’altro in senso
verticale oppure di modificare la temperatura impostata.
04 Pulsanti Sinistra/Destra
Consentono di spostarsi da un elemento all’altro in senso
orizzontale oppure di modificare il valore di un elemento.
05 Pulsante OK
Consente di salvare le nuove impostazioni.
06 Pulsante Salva e indietro
Consente di salvare le nuove impostazioni e tornare al passaggio precedente.
07 Pulsante Opzione
Consente di selezionare la funzione delle impostazioni
dettagliate.
NOTA
࡙ La visualizzazione della modalità di funzionamento sul telecomando
varia a seconda della lingua selezionata.
࡙ A seconda delle specifiche del prodotto, alcune funzioni potrebbero
non essere disponibili.
࡙ È possibile visualizzare lo stato di funzionamento sul display LED.
ACCENSIONE in funzione,
Lampeggiante: si è verificato un errore,
OFF: Spegnimento
01 Ǯцϒӥʪϩ̷ɇʀіϑϩɇ͝Їʒїɇ͐ɇ̈͝ɇ
Ǯцϒӥʪϩ̷ɇЇϑϩɇӥʪ̈͝ɇ̈ϑϩɇ͝цʒїɇ͐ɇ̈͝ɇࢥ˙Ї̧͝ʀ̟̈ࢋ
02 ťθіцʀ̈ϑ̧Ǯ͐ࢋࢥǮц͐ࢋϩθцɵЇ࣍ицϒӥʪϩ̷ɇʀіøkU࣎
Ǯ͐ɦʀіɇࢥиц͐ɦʀіɇіɇϑ̷̈ɇ̈͝ʪΧͱ͔Χцʀ̈ʪΧ͐ɇΧͱӥʪϩθіʪࣗиͱʒɇࢋ
03 ťθіцʀ̈ϑ̧ͷθɇࢥUͷ͐
ťͱіиɇ̷ɇΧθіʪʀ˵ͱʒїʂ͔̈˄ʒіцΧͱіцʀ̟ɇ͔̈иΧ̈ͱ̈͝ʪ̷Їɵї͔ʪ̈͝ɇʂіɇʒɇ͝ɦ
ϩʪ͔ΧʪθɇϩЇθ˄ࢋ
04 Przycisk Lewo/Prawo
ťͱіиɇ̷ɇΧθіʪʀ˵ͱʒїʂ͔̈˄ʒіцΧͱіцʀ̟ɇ͔̈иΧͱїͱ͔̈ʪ̷Їɵї͔ʪ̈͝ɇʂ
иɇθϩͱϒʂЇϑϩɇӥʪ̈͝ɇࢋ
05 Przycisk OK
ȐɇΧ̈ϑЇ̟ʪ͝ͱиʪЇϑϩɇӥʪ̈͝ɇЇќцϩ̧ͱӥ̧͝ɇࢋ
06 ťθіцʀ̈ϑ̧ȐɇΧ̈ϑі̈иθͷʂ
ťͱіиɇ̷ɇіɇΧ̈ϑɇʂ͝ͱиʪЇϑϩɇӥʪ̈͝ɇ̈Χͱиθͷʀ̈ʂʒͱΧͱΧθіʪʒ̈͝ʪ˝ͱ̧θͱ̧Їࢋ
07 Przycisk ĮΧʀ̟ɇ
Ǯцɵ̈ʪθɇ˙Ї̧͝ʀ̟˄Їϑϩɇӥʪ͞ϑіʀіʪ˝ͷ͐ͱицʀ˵ࢋ
UWAGA
࡙ ķθɇ͝ϩθцɵЇʒїɇ͐ɇ̈͝ɇицϒӥʪϩ̷ɇ͝ц͝ɇицϒӥʪϩ̷ɇʀіЇϑϩʪθͱӥ̧͝ɇіʒɇ̷͝ʪ˝ͱ
͔ͱќʪϑ̈˄ї͔ʪ̈͝ɇʂиіɇ̷ʪќ͝ͱϒʀ̈ͱʒицɵθɇ͝ʪ˝ͱ̟˄іц̧ɇࢋ
࡙ Ę̈ʪ̧ϩͷθʪ˙Ї̧͝ʀ̟ʪ͔ͱ˝ɦ̈͝ʪɵцʂʒͱϑϩ˄Χ͝ʪиіɇ̷ʪќ͝ͱϒʀ̈ͱʒϑΧʪʀц˙̧̈ɇʀ̟̈
produktu.
࡙ Ɗϩɇ͝ʒїɇ͐ɇ̈͝ɇицϒӥʪϩ̷ɇϑ̈˄͝ɇицϒӥʪϩ̷ɇʀіЇøkU
ǮďࢋUїɇ͐ɇࡡ
đ̈˝ɇࡠǮцϑϩɦΧ̈͐ɵ͐ɦʒࡡ
ǮǽďࢋࡠǮц͐ɦʀіͱ͝ц
01 Betriebsstatusanzeige
Zeigt die Betriebs-/Funktionseinstellungen und Status an.
02 Betriebstaste (LED-Display)
Schaltet die Stromversorgung der Luft-Wasser-Wärmepumpe Ein/Aus
03 Auf-/Ab-Taste
Blättert zwischen den Elementen nach oben oder unten oder
ändert die Solltemperatur.
04 Links/Rechts-Taste
Blättert zwischen den Elementen nach links oder rechts oder
ändert den Elementwert.
05 Taste OK
Speichert die neuen Einstellungen.
06 Taste zum Speichern und Zurückkehren
Speichert die neuen Einstellungen und kehrt zum vorherigen
Schritt zurück.
07 Optiontaste
Wählt die detaillierte Einstellungsfunktion.
HINWEIS
࡙ Üʪ9ʪϩθ̈ʪɵϑ͔ͱʒЇϑɇ͝іʪ̈˝ʪɇЇ˙ʒʪθʪθ͝ɵʪʒ̈ʪ͝Ї͝˝ɘ͝ʒʪθϩϑ̈ʀ˵̟ʪ
nach der ausgewählten Sprache.
࡙ đɇ͝ʀ˵ʪЇ̧͝ϩ̈ͱ͝ʪ͝ϑ̈͝ʒ̟ʪ͝ɇʀ˵ʒʪ͝ťθͱʒЇ̧ϩϑΧʪї˙̧̈ɇϩ̈ͱ͝ʪ͝
eventuell nicht verfügbar.
࡙ Der Betriebsstatus wird auf der LED-Anzeige angezeigt.
EIN: In Betrieb,
Blinkt: Fehler,
AUS: Ausschalten
01 Pantalla de estado
đЇʪϑϩθɇ̷ͱϑɇ̟Їϑϩʪϑцʪϑϩɇʒͱϑʒʪ̷˙Ї͝ʀ̈ͱ͝ɇ͔̈ʪ͝ϩͱࢋ
02 Botón de Funcionamiento On/Off (pantalla LED)
Activa y desactiva la bomba de calor aire-agua.
03 9ͱϩͷ͝θθ̈ɵɇࢥɵɇ̟ͱ
Se mueve verticalmente entre los elementos o cambia la
temperatura establecida.
04 Botón Izquierda/Derecha
Se mueven horizontalmente entre los elementos o cambia
el valor del elemento.
05 Botón OK
ࣚ Їɇθʒɇ̷ͱϑɇ̟Їϑϩʪϑ͝ЇʪЭͱϑࢋ
06 Botón Guardar y Volver
ࣚ ЇɇθʒɇϑЇϑ͝ЇʪЭͱϑɇ̟ЇϑϩʪϑцЭЇʪ̷Эʪɇ̷Χɇϑͱɇ͝ϩʪθ̈ͱθ
07 Botón Opción
ࣚ Ɗʪ̷ʪʀʀ̈ͱ͝ɇ̷ɇ˙Ї͝ʀ̈ͷ͝ʒʪɇ̟Їϑϩʪʒʪϩɇ̷̷ɇʒͱࢋ
NOTA
࡙ La pantalla de modo de funcionamiento del control remoto
cambia según el idioma seleccionado.
࡙ Es posible que algunas funciones no estén disponibles en función
de las especificaciones del producto.
࡙ Puede ver el estado de funcionamiento en la pantalla LED.
ENCENDIDO Funcionando,
Parpadeando: Se ha producido un error,
OFF: Apaga
A
Aperçu de la télécommande
FR
A
Panoramica del telecomando
IT
A
Przegląd zdalnego sterownika
PL
A
Übersicht über die Fernbedienung
DE
A
Descripción general del control remoto
ES
01 Visor do estado de funcionamento
Exibe as definições e os estados de funcionamento/função.
02 Botão Ligar/Desligar funcionamento (visor LED)
Liga/Desliga a Bomba de calor ar-água.
03 Botão Para cima/Para baixo
Navega verticalmente entre itens ou altera a temperatura definida.
04 Botão Esquerda/Direita
Navega horizontalmente entre itens ou altera o valor de um item.
05 Botão OK
Guarda as suas novas definições.
06 Botão Guardar & Voltar
Guarda as suas novas definições e volta ao passo anterior.
07 Botão Option (Opções)
Seleciona a função de definições detalhadas.
NOTA
࡙ O visor do modo de funcionamento no controlo remoto altera-se em função
do idioma selecionado.
࡙ Algumas funções poderão não estar disponíveis, dependendo das
especificações do produto.
࡙ Pode ver o estado de funcionamento no visor LED.
LIGADO: em funcionamento,
Intermitente: ocorreu um erro,
OFF: desliga-se
A
Descrição geral do controlo remoto
PT
ĮЇϩʒͱͱθ ߢߥࢩߤߪߤߢߣ߫ߣࡑߥߢťđ
Ȑͱ͝ʪߣ
Ȑͱ͝ʪߤ
ߥߢ
²ʪɇϩ
Ɗʪϩ
ߤߪ࢏ߤ
࢏ߢ
ߤߦ
²ʪɇϩ
Ɗʪϩ
࢏ߢ
U²Ǯ
ߦߧ
kʀͱ͝ͱ͔̈ʀ
Ɗʪϩ
࢏ߢ
B
Home Screen
ߢߥࢩߤߪࢩߤߢߣ߫ߣࡑߥߢťđ
²ʪɇϩ
ߥߢ
Ȑͱ͝ʪߣ
Ɗʪϩ AЇθθʪ͝ϩ
ǮɇϩʪθͱЇϩ̷ʪϩ
Ǯɇϩʪθ
ĮЇϩ̷ʪϩ
Ǯɇϩʪθ
ĮЇϩ̷ʪϩ
Ã͝ʒͱͱθ
࢏ߢ
ߤߪ࢏ߤ
ߪ࢏ߥ
C
Zone Screen
ĮΧʪθɇϩ̈ͱ͝
ƊϩɇϩЇϑ
ůЇ̈ʪϩ
ĮĘ
ťθ̈ͱθ̈ϩц
U²Ǯ
ĮΧϩ̈ͱ͝k͝ʪθ˝ц
ĮЇϩ̈͝˝
Į
Ɗʀ˵ʪʒЇ̷ʪ
Ɗʪϩϩ̈͝˝ϑ
E
Settings Screen
Ɗϩɇ͝ʒɇθʒ
Ɗʪϩ
AЇθθʪ͝ϩ
ߪߦ
࢏ߢ
ࣛߤ࢏ߦ
ߢߥࢩߤߪࢩߤߢߣ߫ߣࡑߥߢťđ
U²Ǯ
D
DHW Screen
ߢߣ ߢߤ
ߢߧ
ߢߥ
ߢߦ
ߢߪ
ߢ߫
ߢߤ
ߢߥ
ߢߧ
ߢߩ
ߢߨ
ߢߣ
ߢߦ
ߢߨ
ߢߩ
ߢߤ
ߢߤ
ߢߦ
ߢߥ
ߢߥ
ߢߧ
ߢߦ
ߢߣ
ߢߣ
ߢߧ
Option Button
ߢߨ
ߢߩ
Press the button to enter the Setting screen and then select the desired function or option.
01 Outdoor temperature display
Displays outdoor temperature.
02 Date and time display
Displays current date and time.
03 Zone 1 display
Displays set temperature and operation modes for Zone 1.
04 Zone 2 display
Displays set temperature and operation modes for Zone 2.
05 DHW display
Displays set temperature and operation modes for DHW.
NOTE
࡙ The Home screen may vary depending on whether Zone control is
selected at the initial installation and whether DHW is supported.
B
Home Screen Overview
EN
01 Operation status display
Displays the operation status.
02 Quiet display
Displays the Quiet function.
03 Outing display
Displays the Outing function.
04 Schedule display
Displays any of Daily schedule, Weekly schedule, Yearly
schedule, Holiday.
05 Energy display
Displays any of Energy Usage and Energy Setting.
06 Priority A2A display
Displays any of Priority A2A and Priority DHW.
07 Option display
Displays the Option.
NOTE
࡙ Unavailable functions are marked inactive and they cannot be set.
࡙ In the menu with the > in the Option menu, you can select a menu
with the > button.
࡙ When you do not press any button for 180 seconds with the option
active, the settings are not saved and the Home screen appears.
E
Settings Screen Overview
01 Set temperature display
Displays the set temperature.
02 Current temperature display
Displays current temperature for Water Outlet.
03 Current temperature display
Displays current temperature for Indoor.
04 Operation mode display
Displays any of Auto, Cool, and Heat.
05 Temperature sensor display
Displays any of Water Law, Water Outlet, and Indoor.
06 Schedule indicator
When you are setting a schedule.
When you are setting the operation time limit.
07 Check indicator
08 Lock indicator
09 Central Control indicator
NOTE
࡙ Unavailable functions are marked inactive and they cannot be set.
࡙ The locations of icons may differ depending on the function.
࡙ When you do not press any button for 7 seconds, the function of
the position is automatically selected.
01 Set temperature display
Displays the set temperature.
02 Current temperature display
Displays current temperature for Water Outlet.
03 Operation mode display
Displays any of Economic, Standard, Power, and Forced.
04 Schedule indicator
When you are setting a schedule.
When you are setting the operation time limit.
05 Check indicator
06 Lock indicator
07 Central Control indicator
NOTE
࡙ Unavailable functions are marked inactive and they cannot be set.
࡙ The locations of icons may differ depending on the function.
࡙ When you do not press any button for 7 seconds, the function of
the position is automatically selected.
C
Zone Screen Overview
D
DHW Screen Overview
Pulse el botón para acceder a la pantalla ̟Їϑϩʪ y, a continuación, seleccione la función u opción deseada.
01 Pantalla de temperatura exterior
Muestra la temperatura exterior.
02 Pantalla de fecha y la hora
Muestra la fecha y la hora actuales.
03 Pantalla Zona 1
Muestra la temperatura establecida y los modos de
funcionamiento para Zona 1.
04 Pantalla Zona 2
Muestra la temperatura establecida y los modos de
funcionamiento para Zona 2.
05 Pantalla ACS
Muestra la temperatura establecida y los modos de
funcionamiento para ACS.
NOTA
࡙ La pantalla de inicio puede variar si se ha seleccionado el control de
zona en la instalación inicial y si se admite el ACS.
B
Descripción general de la pantalla de inicio
ES
01 Pantalla Estado función.
Muestra el Estado función.
02 Pantalla Slnc.
Muestra la función Slnc.
03 Pantalla Ausencia
Muestra la función Ausencia.
04 Pantalla Programa
Muestra la opción Programa diario, Programa semanal,
Programa anual o Vacaciones.
05 Pantalla Energía
Muestra la opción Consumo de energía o ̟Їϑϩʪʪ͝ʪθ˝̋ɇ.
06 Pantalla Prioridad A2A
Muestra la opción Prioridad A2A o Prioridad ACS.
07 Pantalla Opción
Muestra la Opción.
NOTA
࡙ Las funciones no disponibles se marcan como inactivas y no se
pueden establecer.
࡙ En el menú con el signo > dentro del menú Opción, podrá seleccionar
un menú con el botón >.
࡙ Si no pulsa ningún botón durante 180 segundos con la opción activa,
̷ͱϑɇ̟Їϑϩʪϑ͝ͱϑʪ˝Їɇθʒɇ͝цɇΧɇθʪʀʪ̷ɇΧɇ͝ϩɇ̷̷ɇʒʪ̈̈͝ʀ̈ͱࢋ
E
Descripción general de la pantalla de ajustes
01 Pantalla temperatura establecida
Muestra la temperatura establecida.
02 Pantalla temperatura actual
Muestra la temperatura actual para Salida agua.
03 Pantalla temperatura actual
Muestra la temperatura actual para Inter.
04 Pantalla modo de funcionamiento
Muestra la opción Auto, Frío o Cal.
05 Pantalla del sensor de temperatura
Muestra la opción RT agua, Salida agua o Inter.
06 Indicador de Programa
Cuando se establece un programa.
Cuanto se establece el límite de tiempo de funcionamiento.
07 Indicador de comprobación
08 Indicador de Bloqueo
09 Indicador de Control central
NOTA
࡙ Las funciones no disponibles se marcan como inactivas y no se
pueden establecer.
࡙ La ubicación de los iconos puede diferir según cada función.
࡙ Si no presiona ningún botón durante siete segundos, la función de la
posición se selecciona automáticamente.
01 Pantalla temperatura establecida
Muestra la temperatura establecida.
02 Pantalla temperatura actual
Muestra la temperatura actual para Salida agua.
03 Pantalla modo de funcionamiento
Muestra la opción Económ., Estándar, Alim. o Forz.
04 Indicador de Programa
Cuando se establece un programa.
Cuanto se establece el límite de tiempo de funcionamiento.
05 Indicador de comprobación
06 Indicador de Bloqueo
07 Indicador de Control central
NOTA
࡙ Las funciones no disponibles se marcan como inactivas y no se
pueden establecer.
࡙ La ubicación de los iconos puede diferir según cada función.
࡙ Si no presiona ningún botón durante siete segundos, la función de la
posición se selecciona automáticamente.
C
Descripción general de la pantalla de zona
D
Descripción general de la pantalla ACS
Appuyez sur le bouton pour accéder à l’écran Réglage puis sélectionnez la fonction ou l’option souhaitée.
01 Affichage de la température extérieure
Affiche la température extérieure.
02 Affichage de la date et de l’heure
Affiche la date et l’heure actuelles.
03 Affichage Zone 1
Affiche la température de réglage et les modes de
fonctionnement pour Zone 1.
04 Affichage Zone 2
Affiche la température de réglage et les modes de fonctionnement pour Zone 2.
05 Affichage ECS
Affiche la température de réglage et les modes de fonctionnement pour ECS.
REMARQUE
࡙ L'écran d'accueil peut varier selon que la commande Zone est
sélectionnée lors de l'installation initiale et que l'eau chaude
sanitaire DHW est prise en charge ou non.
B
Aperçu de l’écran d’accueil
FR
01 Affichage État de fonct.
Affiche État de fonct.
02 Affichage Silence
Affiche la fonction Silence.
03 Affichage Absence
Affiche la fonction Absence.
04 Affichage Prog.
˙˙̈ʀ˵ʪ࣭͔̈͝Χͱθϩʪ̷ɇαЇʪ̷̷ʪʒʪʀʪϑͱΧϩ̈ͱ͝ϑईࡠProgram. Quotidinne,
Prog. hebdo., Prog. annuelle, Vacances.
05 Affichage Énergie
˙˙̈ʀ˵ʪ࣭͔̈͝Χͱθϩʪ̷ɇαЇʪ̷̷ʪʒʪʀʪϑͱΧϩ̈ͱ͝ϑईࡠConsommation
énergie et Réglage énergie.
06 Affichage Priorité Air/Air
˙˙̈ʀ˵ʪ࣭͔̈͝Χͱθϩʪ̷ɇαЇʪ̷̷ʪʒʪʀʪϑͱΧϩ̈ͱ͝ϑईࡠPriorité Air/Air et
Priorité ECS.
07 Affichage Option
Affiche l’Option.
REMARQUE
࡙ Les fonctions indisponibles apparaissent inactives et ne peuvent
être configurées.
࡙ Dans le menu avec > dans le menu Option, vous pouvez sélectionner
un menu au moyen du bouton >.
࡙ Lorsque vous n’appuyez sur aucun bouton pendant 180 secondes
avec l’option active, les réglages ne sont pas enregistrés et l’écran
d’accueil apparaît.
E
Aperçu de l’écran de configuration
01 Affichage de la température configurée
Permet d’afficher la température réglée.
02 Affichage de la température actuelle
Affiche la température actuelle pour Sortie d’eau.
03 Affichage de la température actuelle
Affiche la température actuelle pour Int.
04 Affichage du mode de fonctionnement
˙˙̈ʀ˵ʪ࣭͔̈͝Χͱθϩʪ̷ɇαЇʪ̷̷ʪʒʪʀʪϑͱΧϩ̈ͱ͝ϑईࡠAuto, Froid et CH.
05 Affichage du capteur de température
˙˙̈ʀ˵ʪ࣭͔̈͝Χͱθϩʪ̷ɇαЇʪ̷̷ʪʒʪʀʪϑͱΧϩ̈ͱ͝ϑईࡠloi d’eau, Sortie d’eau et Int.
06 Indicateur de Prog.
Lorsque vous configurez une programmation.
Lorsque vous configurez la durée limite de fonctionnement.
07 Voyant de vérification
08 Voyant de Verrouillage
09 Voyant de Commande centrale
REMARQUE
࡙ Les fonctions indisponibles apparaissent inactives et ne peuvent
être configurées.
࡙ L’emplacement des icônes peut différer selon la fonction.
࡙ Lorsque vous n’appuyez sur aucun bouton pendant 7 secondes, la
fonction de la position est sélectionnée automatiquement.
01 Affichage de la température configurée
Permet d’afficher la température réglée.
02 Affichage de la température actuelle
Affiche la température actuelle pour Sortie d’eau.
03 Affichage du mode de fonctionnement
˙˙̈ʀ˵ʪ࣭͔̈͝Χͱθϩʪ̷ɇαЇʪ̷̷ʪʒʪʀʪϑͱΧϩ̈ͱ͝ϑईࡠÉco, Standard, Alim.
et Forcé.
04 Indicateur de Prog.
Lorsque vous configurez une programmation.
Lorsque vous configurez la durée limite de fonctionnement.
05 Voyant de vérification
06 Voyant de Verrouillage
07 Voyant de Commande centrale
REMARQUE
࡙ Les fonctions indisponibles apparaissent inactives et ne peuvent
être configurées.
࡙ L’emplacement des icônes peut différer selon la fonction.
࡙ Lorsque vous n’appuyez sur aucun bouton pendant 7 secondes, la
fonction de la position est sélectionnée automatiquement.
C
Aperçu de l'écran Zone
D
Aperçu de l'écran ECS
Premere il pulsante per accedere alla schermata Impostazione e selezionare l’opzione o la funzione desiderata.
01 Display temperatura esterna
Visualizza la temperatura esterna.
02 Display data e ora
Visualizza la data e l’ora correnti.
03 Visualizzazione Zona 1
Visualizza la temperatura impostata e le modalità operative
per Zona 1.
04 Visualizzazione Zona 2
Visualizza la temperatura impostata e le modalità operative
per Zona 2.
05 Visualizzazione ACS
Visualizza la temperatura impostata e le modalità operative
per ACS.
NOTA
࡙ La schermata iniziale (Home) cambia a seconda che il controllo di
zona venga selezionato o meno durante l'installazione iniziale e che
ACS sia supportato o meno.
B
Panoramica della schermata Home
IT
01 Display Stato funz.
Visualizza lo Stato di Funz.
02 Visualizzazione Silen
Consente di visualizzare la funzione Silen.
03 Visualizzazione Assenza
Visualizza la funzione Assenza.
04 Visualizzazione Program.
Visualizza Progr. giornaliera, Progr. settimanale, Progr. annuale,
Impostazioni Vacanza.
05 Visualizzazione Energia
Visualizza Consumo energia e Impostazione energia.
06 Visualizzazione Priorità A2A
Visualizza Priorità A2A e Priorità ACS.
07 Visualizzazione Opzione
Consente di visualizzare ciascuna Opzione.
NOTA
࡙ Le funzioni non disponibili sono contrassegnate come inattive e non
possono essere impostate.
࡙ Nel menu contrassegnato da > nel menu Opzione, è possibile
selezionare un menu con il pulsante >.
࡙ Se non si preme alcun pulsante per 180 secondi mentre l’opzione è
attiva, le impostazioni non vengono salvate e viene visualizzata la
schermata Home.
E
Panoramica della schermata delle Impostazioni
01 Visualizzazione temperatura impostata
Consente di visualizzare la temperatura impostata.
02 Visualizzazione temperatura corrente
Visualizza la temperatura corrente per Uscita acqua.
03 Visualizzazione temperatura corrente
Visualizza la temperatura corrente per UtàInt.
04 Visualizzazione modalità di funzionamento
Visualizza Auto, Raff e Risc.
05 Display sensore di temperatura
Visualizza CurvaClim, Uscita acqua e UtàInt.
06 Indicatore Program.
In fase di impostazione di una programmazione.
In fase di impostazione del limite di durata del funzionamento.
07 Indicatore di verifica
08 Indicatore Blocco
09 Indicatore Controllo centralizzato
NOTA
࡙ Le funzioni non disponibili sono contrassegnate come inattive e non
possono essere impostate.
࡙ La posizione delle icone può variare a seconda della funzione.
࡙ Se non si preme alcun pulsante per 7 secondi, viene automaticamente
selezionata la funzione corrispondente alla posizione attuale.
01 Visualizzazione temperatura impostata
Consente di visualizzare la temperatura impostata.
02 Visualizzazione temperatura corrente
Visualizza la temperatura corrente per Uscita acqua.
03 Visualizzazione modalità di funzionamento
Visualizza Economia, Standard, Alim. e Forz.
04 Indicatore Program.
In fase di impostazione di una programmazione.
In fase di impostazione del limite di durata del funzionamento.
05 Indicatore di verifica
06 Indicatore Blocco
07 Indicatore Controllo centralizzato
NOTA
࡙ Le funzioni non disponibili sono contrassegnate come inattive e non
possono essere impostate.
࡙ La posizione delle icone può variare a seconda della funzione.
࡙ Se non si preme alcun pulsante per 7 secondi, viene
automaticamente selezionata la funzione corrispondente alla
posizione attuale.
C
Panoramica della schermata Zone
D
Panoramica della schermata ACS
Prima o botão para aceder ao ecrã de Setting (Definições) e, em seguida, selecione a função ou opção pretendida.
01 Visor da temperatura exterior
Apresenta a temperatura exterior.
02 Visor de data e hora
Apresenta a data e hora atuais.
03 Visor Zone 1 (Zona 1)
Apresenta a temperatura definida e os modos de funcionamento para Zone 1
(Zona 1).
04 Visor Zone 2 (Zona 2)
Apresenta a temperatura definida e os modos de funcionamento para Zone 2 (Zona 2).
05 Visor DHW (AQS)
Apresenta a temperatura definida e os modos de funcionamento para DHW (AQS).
NOTA
࡙ O ecrã inicial poderá variar, consoante se o controlo da zona é selecionado na
instalação inicial e se DHW é suportado.
B
Descrição geral do ecrã inicial
PT
01 Visor Operation Status (Estado Funcionamento)
Exibe a Operation Status (Estado Funcionamento).
02 Visor Quiet (Silêncio)
Exibe a função Quiet (Silêncio).
03 Visor Outing (Ausente)
Exibe a função Outing (Ausente).
04 Visor Schedule (Programação horária)
Exibe Daily Schedule (Programa horário diário), Weekly
Schedule (Programa horário semanal), Yearly Schedule
(Programa horário anual) e Holiday (Férias).
05 Visor Energy (Energia)
Exibe Energy Usage (Utilização de Energia) e Energy Setting
(Programações de Energia).
06 Visor Priority A2A (Priority Ar-Ar)
Exibe Priority A2A (Priority Ar-Ar) e Priority DHW (Prioridade AQS)
.
07 Visor Option (Opções)
Exibe a Option (Opções).
NOTA
࡙ As funções indisponíveis estão marcadas como inativas e não podem
ser definidas.
࡙ No menu com o > no menu Option (Opções), pode selecionar um menu
com o botão >.
࡙ Se não premir qualquer botão durante 180 segundos com a opção ativa,
as definições não são guardadas e aparece o ecrã inicial.
E
Descrição geral do ecrã de definições
01 Visor da temperatura definida
Apresenta a temperatura definida.
02 Visor da temperatura atual
Apresenta a temperatura atual para Water Outlet (Saída de Água).
03 Visor da temperatura atual
Apresenta a temperatura atual para Indoor (Espaço Interior).
04 Visor do modo de funcionamento
Exibe Auto (Automático), Cool (Arrefecimento) e Heat (Aquecimento).
05 Visor do sensor de temperatura
Exibe Water Law (Lei Água), Water Outlet (Saída de Água) e Indoor
(Espaço Interior).
06 Indicador Schedule (Programação horária)
Quando está a definir uma programação.
Quando está a definir o limite de tempo de funcionamento.
07 Indicador de verificação
08 Indicador Lock (Bloqueado)
09 Indicador Controlo centralizado
NOTA
࡙ As funções indisponíveis estão marcadas como inativas e não podem ser definidas.
࡙ A localização dos ícones pode diferir consoante a função.
࡙ Se não premir qualquer botão durante 7 segundos, a função da posição é
selecionada automaticamente.
01 Visor da temperatura definida
Apresenta a temperatura definida.
02 Visor da temperatura atual
Apresenta a temperatura atual para Water Outlet (Saída de Água).
03 Visor do modo de funcionamento
Exibe Economic (Económico), Standard (Normal), Power (Potência) e
Forced (Forçado).
04 Indicador Schedule (Programação horária)
Quando está a definir uma programação.
Quando está a definir o limite de tempo de funcionamento.
05 Indicador de verificação
06 Indicador Lock (Bloqueado)
07 Indicador Controlo centralizado
NOTA
࡙ As funções indisponíveis estão marcadas como inativas e não podem ser
definidas.
࡙ A localização dos ícones pode diferir consoante a função.
࡙ Se não premir qualquer botão durante 7 segundos, a função da posição é
selecionada automaticamente.
C
Descrição geral do ecrã de zona
D
Descrição geral do ecrã de DHW (AQS)
Drücken Sie die Taste , um den Einstellung-Bildschirm aufzurufen, und wählen Sie dann die gewünschte Funktion oder Option aus.
01 Außentemperaturanzeige
Zeigt die Außentemperatur an.
02 Datum- und Zeitanzeige
Zeigt das aktuelle Datum und die Zeit an.
03 Zone 1-Anzeige
Zeigt die Solltemperatur und die Betriebsmodi für Zone 1 an.
04 Zone 2-Anzeige
Zeigt die Solltemperatur und die Betriebsmodi für Zone 2 an.
05 BW-Anzeige
Zeigt die Solltemperatur und die Betriebsmodi für BW an.
HINWEIS
࡙ UʪθƊϩɇθϩɵ̷̈ʒϑʀ˵̈θ͔̧ɇ͝͝̟ʪ͝ɇʀ˵ʒʪ͔ࡡͱɵɵʪ̈ʒʪθkθϑϩ̈͝ϑϩɇ̷̷ɇϩ̈ͱ͝ʒ̈ʪ
Zonensteuerung ausgewählt wurde und ob DHW unterstützt wird,
variieren.
B
Startbildschirm-Übersicht
DE
01 Betriebsstatus-Anzeige
Zeigt den Betriebsstatus an.
02 Leise-Anzeige
Zeigt die Leise-Funktion an.
03 Outing-Anzeige
Zeigt die Outing-Funktion an.
04 Zeitplan-Anzeige
Anzeige der Betriebsmodi Täglicher Zeitplan, Wöchentl Zeitplan,
Jährlicher Zeitplan, Urlaub.
05 Energie-Anzeige
Anzeige der Betriebsmodi Energieverbrauch und Energie-
Einstellung.
06 Priorität A2A-Anzeige
Anzeige der Betriebsmodi Priorität A2A und Priorität BW.
07 Optionsanzeige
Zeigt die Option an.
HINWEIS
࡙ Nicht verfügbare Funktionen werden als inaktiv markiert und
können nicht eingestellt werden.
࡙ Im Menü mit dem Symbol > im Optionsmenü kann das Menü mit der
Taste > ausgewählt werden.
࡙ Ǯʪ͝͝Ɗ̈ʪɵʪ̈ɇ̧ϩ̈ӬʪθϩʪθĮΧϩ̈ͱ͝ߢߩߡईƊʪ̧Ї͝ʒʪ͝̷ɇ͝˝̧ʪ̈͝ʪƟɇϑϩʪ
drücken, werden die Einstellungen nicht gespeichert und der
Startbildschirm wird angezeigt.
E
Einstellungsbildschirm-Übersicht
01 Solltemperaturanzeige
Zeigt die eingestellte Temperatur an.
02 Aktuelle Temperaturanzeige
Zeigt die aktuelle Temperatur für Vorlauf an.
03 Aktuelle Temperaturanzeige
Zeigt die aktuelle Temperatur für Innen an.
04 Betriebsmodusanzeige
Anzeige der Betriebsmodi Auto, Kühl, und Heiz.
05 Temperatursensoranzeige
Anzeige der Betriebsmodi Heizkurve, Vorlauf und Innen.
06 Zeitplan-Anzeige
Beim Einstellen eines Zeitplans.
Beim Einstellen des Betriebszeit-Limits.
07 Einstellungen-Anzeige
08 Verriegeln-Anzeige
09 Zentralsteuerung-Anzeige
HINWEIS
࡙ Nicht verfügbare Funktionen werden als inaktiv markiert und
können nicht eingestellt werden.
࡙ Üʪťͱϑ̈ϩ̈ͱ͝ʒʪθƊц͔ɵͱ̷ʪ̧ɇ͝͝̟ʪ͝ɇʀ˵Ї̧͝ϩ̈ͱ͝Эɇθ̈̈ʪθʪ͝ࢋ
࡙ Ǯʪ͝͝Ɗ̈ʪߨईƊʪ̧Ї͝ʒʪ͝̷ɇ͝˝̧ʪ̈͝ʪƟɇϑϩʪʒθАʀ̧ʪ͝ࡡӥθʒɇЇϩͱ͔ɇϩ̈ϑʀ˵
die Funktion der Position ausgewählt.
01 Solltemperaturanzeige
Zeigt die eingestellte Temperatur an.
02 Aktuelle Temperaturanzeige
Zeigt die aktuelle Temperatur für Vorlauf an.
03 Betriebsmodusanzeige
Anzeige der Betriebsmodi Sparmod., Standard, Spannung und Erzw.
04 Zeitplan-Anzeige
Beim Einstellen eines Zeitplans.
Beim Einstellen des Betriebszeit-Limits.
05 Einstellungen-Anzeige
06 Verriegeln-Anzeige
07 Zentralsteuerung-Anzeige
HINWEIS
࡙ Nicht verfügbare Funktionen werden als inaktiv markiert und
können nicht eingestellt werden.
࡙ Üʪťͱϑ̈ϩ̈ͱ͝ʒʪθƊц͔ɵͱ̷ʪ̧ɇ͝͝̟ʪ͝ɇʀ˵Ї̧͝ϩ̈ͱ͝Эɇθ̈̈ʪθʪ͝ࢋ
࡙ Ǯʪ͝͝Ɗ̈ʪߨईƊʪ̧Ї͝ʒʪ͝̷ɇ͝˝̧ʪ̈͝ʪƟɇϑϩʪʒθАʀ̧ʪ͝ࡡӥθʒɇЇϩͱ͔ɇϩ̈ϑʀ˵
die Funktion der Position ausgewählt.
C
Zonen-Bildschirmübersicht
D
BW-Bildschirmübersicht
Ęɇʀ̈ϑ͝ɦʂΧθіцʀ̈ϑ̧ ࡡɇɵцΧθіʪ̟ϒʂʒͱʪ̧θɇ͝ЇUst.ࢋĘɇϑϩ˄Χ̈͝ʪицɵθɇʂќɦʒɇ͝ɦ˙Ї̧͝ʀ̟˄̷ЇɵͱΧʀ̟˄ࢋ
01 Ǯϑ̧ɇї̧̈͝ϩʪ͔ΧʪθɇϩЇθціʪи͝˄ϩθі͝ʪ̟
Ǯцϒӥʪϩ̷ɇϩʪ͔ΧʪθɇϩЇθ˄іʪи͝˄ϩθі͝ɦࢋ
02 Ǯϑ̧ɇї̧̈͝ʒɇϩц̈ʀіɇϑЇ
Ǯцϒӥʪϩ̷ɇɵ̈ʪќɦʀɦʒɇϩ˄̈ʀіɇϑࢋ
03 Ǯϑ̧ɇї̧̈͝ϩθцɵЇStr. 1
Ǯцϒӥʪϩ̷ɇЇϑϩɇӥͱ͝ɦϩʪ͔ΧʪθɇϩЇθ˄̈ϩθцɵцʒїɇ͐ɇ̈͝ɇиΧθіцΧɇʒ̧Ї
ͱΧʀ̟̈Str. 1.
04 Ǯϑ̧ɇї̧̈͝ϩθцɵЇStr. 2
Ǯцϒӥʪϩ̷ɇЇϑϩɇӥͱ͝ɦϩʪ͔ΧʪθɇϩЇθ˄̈ϩθцɵцʒїɇ͐ɇ̈͝ɇиΧθіцΧɇʒ̧Ї
ͱΧʀ̟̈Str. 2.
05 Ekran CWU
Ǯцϒӥʪϩ̷ɇЇϑϩɇӥͱ͝ɦϩʪ͔ΧʪθɇϩЇθ˄̈ϩθцɵцʒїɇ͐ɇ̈͝ɇCWU.
UWAGA
࡙ ķθɇ͝˝͐ͷи͝ц͔ͱќʪϑ̈˄θͷќ̈͝ʂиіɇ̷ʪќ͝ͱϒʀ̈ͱʒϩʪ˝ͱࡡʀіцΧͱʒʀіɇϑ
Χ̈ʪθиϑіʪ̟̈͝ϑϩɇ̷ɇʀ̟̈ицɵθɇ͝ͱϑϩʪθͱӥ̧͝ϑϩθʪ˙ͱицͱθɇіʀіцϩθцɵAǮƸ
̟ʪϑϩͱɵϑ͐Ї˝̈иɇ͝ц
B
ĮΧ̈ϑʪ̧θɇ͝Ї˝͐ͷи͝ʪ˝ͱ
PL
01 Ǯϑ̧ɇї̧̈͝ϩθцɵЇStan pracy
Ǯцϒӥʪϩ̷ɇStan pracy.
02 Ǯϑ̧ɇї̧̈͝ϩθцɵЇCichy
Ǯцϒӥʪϩ̷ɇ˙Ї̧͝ʀ̟˄Cichy.
03 Ǯϑ̧ɇї̧̈͝ϩθцɵЇOdprowadzenie
Ǯцϒӥʪϩ̷ɇ˙Ї̧͝ʀ̟˄Odprowadzenie.
04 Ǯϑ̧ɇї̧̈͝˙Ї̧͝ʀ̟̈Plan
Ǯцϒӥʪϩ̷ɇͱΧʀ̟˄Codzienny harmon., Tygodniowy harmo., Roczny
harmonogram lub Uїʪ͞иͱ̷͝ц.
05 Ǯϑ̧ɇї̧̈͝˙Ї̧͝ʀ̟̈Energia
Ǯцϒӥʪϩ̷ɇͱΧʀ̟˄Wykorzyst. energii lub Ust. energii.
06 Ǯϑ̧ɇї̧̈͝ϩθцɵЇPriorytet A2A
Ǯцϒӥʪϩ̷ɇͱΧʀ̟˄Priorytet A2A lub Priorytet CWU.
07 Ǯϑ̧ɇї̧̈͝Χͱіцʀ̟̈ĮΧʀ̟ɇ
Ǯцϒӥʪϩ̷ɇΧͱіцʀ̟˄ĮΧʀ̟ɇ.
UWAGA
࡙ Ę̈ʪʒͱϑϩ˄Χ͝ʪ˙Ї̧͝ʀ̟ʪϑɦͱі͝ɇʀіͱ͝ʪ̟ɇ̧ͱ̈͝ʪɇ̧ϩци͝ʪ̈̈͝ʪ͔ͱќ͝ɇ̈ʀ˵
Їϑϩɇӥɇʂࢋ
࡙ W menu z oznaczeniem > w menu ĮΧʀ̟ɇ͔ͱќ͝ɇицɵθɇʂ͔ʪ͝Їіɇ
Χͱ͔ͱʀɦΧθіцʀ̈ϑ̧Їौࢋ
࡙ âʪϔ̷Χθіʪіߢߩߡϑʪ̧Ї͝ʒ̈͝ʪіͱϑϩɇ̈͝ʪ͝ɇʀ̈ϔ͝˄ϩцќɇʒʪ͝Χθіцʀ̈ϑ̧ࡡ˝ʒц
ͱΧʀ̟ɇ̟ʪϑϩɇ̧ϩци͝ɇࡡЇϑϩɇӥʪ̈͝ɇ̈͝ʪіͱϑϩɇ͝ɦіɇΧ̈ϑɇ͝ʪ̈ицϒӥʪϩ̷̈ϑ̈˄
ʪ̧θɇ͝˝͐ͷи͝цࢋ
E
ĮΧ̈ϑʪ̧θɇ͝ЇЇϑϩɇӥʪ͞
01 Ǯϑ̧ɇї̧̈͝іɇʒɇ͝ʪ̟ϩʪ͔ΧʪθɇϩЇθц
Ǯцϒӥʪϩ̷ʪ̈͝ʪіɇʒɇ͝ʪ̟ϩʪ͔ΧʪθɇϩЇθцࢋ
02 Ǯϑ̧ɇї̧̈͝ɵ̈ʪќɦʀʪ̟ϩʪ͔ΧʪθɇϩЇθц
Ǯцϒӥʪϩ̷ɇɵ̈ʪќɦʀɦϩʪ͔ΧʪθɇϩЇθ˄иΧθіцΧɇʒ̧ЇͱΧʀ̟̈Wylot wody.
03 Ǯϑ̧ɇї̧̈͝ɵ̈ʪќɦʀʪ̟ϩʪ͔ΧʪθɇϩЇθц
Ǯцϒӥʪϩ̷ɇɵ̈ʪќɦʀɦϩʪ͔ΧʪθɇϩЇθ˄иΧθіцΧɇʒ̧ЇͱΧʀ̟̈Wewn.
04 Ǯϑ̧ɇї̧̈͝ϩθцɵЇʒїɇ͐ɇ̈͝ɇ
Ǯцϒӥʪϩ̷ɇͱΧʀ̟˄Auto, A˵͐ࢋ lub Ogrz.
05 Ǯцϒӥʪϩ̷ɇʀіʀіЇ̧̟̈͝ɇϩʪ͔ΧʪθɇϩЇθц
Ǯцϒӥʪϩ̷ɇͱΧʀ̟˄Krz. grz., Wylot wody lub Wewn.
06 Ǯϑ̧ɇї̧̈͝˙Ї̧͝ʀ̟̈Plan
Ustawianie planu.
Ƹϑϩɇӥɇ̈͝ʪ̷͔̈̈ϩЇʀіɇϑЇʒїɇ͐ɇ̈͝ɇࢋ
07 Ǯϑ̧ɇї̧̈͝˙Ї̧͝ʀ̟̈ƊΧθɇиʒї
08 Ǯϑ̧ɇї̧̈͝˙Ї̧͝ʀ̟̈Blokada
09 Ǯϑ̧ɇї̧̈͝ʀʪ͝ϩθɇ̷͝ʪ˝ͱϑϩʪθͱиɇ̈͝ɇ
UWAGA
࡙ Ę̈ʪʒͱϑϩ˄Χ͝ʪ˙Ї̧͝ʀ̟ʪϑɦͱі͝ɇʀіͱ͝ʪ̟ɇ̧ͱ̈͝ʪɇ̧ϩци͝ʪ̈̈͝ʪ͔ͱќ͝ɇ̈ʀ˵Їϑϩɇӥɇʂࢋ
࡙ Ƹ͔̈ʪ̟ϑʀͱӥʪ̈͝ʪ̧̈ͱ͝͔ͱќʪϑ̈˄θͷќ̈͝ʂиіɇ̷ʪќ͝ͱϒʀ̈ͱʒ˙Ї̧͝ʀ̟̈ࢋ
࡙ âʪϔ̷иʀ̈ɦ˝Їߨϑʪ̧Ї͝ʒ̈͝ʪіͱϑϩɇ̈͝ʪ͝ɇʀ̈ϔ͝˄ϩцќɇʒʪ͝Χθіцʀ̈ϑ̧ࡡ˙Ї̧͝ʀ̟ɇ
Χͱіцʀ̟̈іͱϑϩɇ̈͝ʪицɵθɇ͝ɇɇЇϩͱ͔ɇϩцʀї͝ʪࢋ
01 Ǯϑ̧ɇї̧̈͝іɇʒɇ͝ʪ̟ϩʪ͔ΧʪθɇϩЇθц
Ǯцϒӥʪϩ̷ʪ̈͝ʪіɇʒɇ͝ʪ̟ϩʪ͔ΧʪθɇϩЇθцࢋ
02 Ǯϑ̧ɇї̧̈͝ɵ̈ʪќɦʀʪ̟ϩʪ͔ΧʪθɇϩЇθц
Ǯцϒӥʪϩ̷ɇɵ̈ʪќɦʀɦϩʪ͔ΧʪθɇϩЇθ˄иΧθіцΧɇʒ̧ЇͱΧʀ̟̈Wylot wody.
03 Ǯϑ̧ɇї̧̈͝ϩθцɵЇʒїɇ͐ɇ̈͝ɇ
Ǯцϒӥʪϩ̷ɇͱΧʀ̟˄Ekonom., Standard, Zas. lub Wymus.
04 Ǯϑ̧ɇї̧̈͝˙Ї̧͝ʀ̟̈Plan
Ustawianie planu.
Ƹϑϩɇӥɇ̈͝ʪ̷͔̈̈ϩЇʀіɇϑЇʒїɇ͐ɇ̈͝ɇࢋ
05 Ǯϑ̧ɇї̧̈͝˙Ї̧͝ʀ̟̈ƊΧθɇиʒї
06 Ǯϑ̧ɇї̧̈͝˙Ї̧͝ʀ̟̈Blokada
07 Ǯϑ̧ɇї̧̈͝ʀʪ͝ϩθɇ̷͝ʪ˝ͱϑϩʪθͱиɇ̈͝ɇ
UWAGA
࡙ Ę̈ʪʒͱϑϩ˄Χ͝ʪ˙Ї̧͝ʀ̟ʪϑɦͱі͝ɇʀіͱ͝ʪ̟ɇ̧ͱ̈͝ʪɇ̧ϩци͝ʪ̈̈͝ʪ͔ͱќ͝ɇ̈ʀ˵
Їϑϩɇӥɇʂࢋ
࡙ Ƹ͔̈ʪ̟ϑʀͱӥʪ̈͝ʪ̧̈ͱ͝͔ͱќʪϑ̈˄θͷќ̈͝ʂиіɇ̷ʪќ͝ͱϒʀ̈ͱʒ˙Ї̧͝ʀ̟̈ࢋ
࡙ âʪϔ̷иʀ̈ɦ˝Їߨϑʪ̧Ї͝ʒ̈͝ʪіͱϑϩɇ̈͝ʪ͝ɇʀ̈ϔ͝˄ϩцќɇʒʪ͝Χθіцʀ̈ϑ̧ࡡ˙Ї̧͝ʀ̟ɇ
Χͱіцʀ̟̈іͱϑϩɇ̈͝ʪицɵθɇ͝ɇɇЇϩͱ͔ɇϩцʀї͝ʪࢋ
C
Opis ekranu strefy
D
Opis ekranu CWU
  • Page 1 1
  • Page 2 2
  • Page 3 3
  • Page 4 4
  • Page 5 5
  • Page 6 6
  • Page 7 7
  • Page 8 8

Samsung MIM-E03CN Manual de usuario

Tipo
Manual de usuario