Hitachi D 10VC2 Manual de usuario
- Categoría
- Herramientas eléctricas
- Tipo
- Manual de usuario
Este manual también es adecuado para

Drill
Taladro
สวานไฟฟา
D 10VC2
Handling instructions
Instrucciones de manejo
คูมือการใชงาน
Read through carefully and understand these instructions before use.
Leer cuidadosamente y comprender estas instrucciones antes del uso.
โปรดอานโดยละเอียดและทําความเขาใจกอนใชงาน

2
12
34
56
78
1
2
3
4
5
6
7
4
!
0
9
8
@
$
#
%
4 3
^
*
&
(

English Español
ไทย
ﺔﻳﺑﺭﻌﻟﺍ
1
Drill chuck Portabrocas
ล็อกสวาน
ﺭﻔﺣﻟﺍ ﺽﺑﻘﻣ
2
Chuck wrench Llave
ประแจล็อก
3
Tighten Apretar
ขันใหแนน
ﻁﺑﺭﻟﺍ ﻡﺎﻛﺣﺇ
4
Loosen Afl ojar
คลาย
ءﺎﺧﺭﺇ
5
Sleeve Manguito
ปลอก
ﺔﺑﻠﺟ
6
Ring Anillo
วงแหวน
ﺔﻘﻠﺣ
7
Open end wrench Llave de boca
ประแจปากตาย
ﻑﺭﻁﻟﺍ ﺡﻭﺗﻔﻣ ﻁﺑﺭ ﺡﺎﺗﻔﻣ
8
Switch trigger Interruptor de gatillo
สวิทซไก
ﻝﻐﺷﻣﻟﺍ ﺡﺎﺗﻔﻣ
9
Push button Botón pulsador
ปุมกด
ﻁﻐﺿﻟﺍ ﺭﺯ
0
R
mark Marca
R
R
เครื่องหมาย
R
R
ﺔﻣﻼﻋ
!
mark
Marca
เครื่องหมาย
ﺔﻣﻼﻋ
@
Speed control dial
Dial de control de
velocidad
หนาปดควบคุมความเร็ว
ﺔﻋﺭﺳﻟﺍ ﻲﻓ ﻡﻛﺣﺗﻟﺍ ﺡﺎﺗﻔﻣ
#
High speed Alta velocidad
ความเร็วสูง
ﺔﻳﻟﺎﻋ ﺔﻋﺭﺳ
$
Low speed Baja velocidad
ความเร็วตํ่า
ﺔﺿﻔﺧﻧﻣ ﺔﻋﺭﺳ
%
Stopper Tope
สต็อปเปอร
ﺩﺍﺩﺳﻟﺍ
^
Side handle Asa lateral
มือจับขาง
ﻲﺑﻧﺎﺟ ﺽﺑﻘﻣ
&
Hook Gancho
ตะขอ
ﻑﺎﻁﺧ
*
M10 Bolt Perno M10
โบลต M10
M10 ﺭﺎﻣﺳﻣ
(
Hook (A) Herramienta (A)
ตะขอ (A)
(A) ﻑﺎﻁﺧ
3

English
4
GENERAL SAFETY RULES
WARNING!
Read all instructions
Failure to follow all instructions listed below may result in
electric shock, fi re and/or serious injury.
The term “power tool” in all of the warnings listed below
refers to your mains-operated (corded) power tool or battery-
operated (cordless) power tool.
SAVE THESE INSTRUCTIONS
1) Work area
a) Keep work area clean and well lit.
Cluttered and dark areas invite accidents.
b) Do not operate power tools in explosive
atmospheres, such as in the presence of
fl ammable liquids, gases or dust.
Power tools create sparks which may ignite the dust
of fumes.
c) Keep children and bystanders away while
operating a power tool.
Distractions can cause you to lose control.
2) Electrical safety
a) Power tool plugs must match the outlet.
Never modify the plug in any way.
Do not use any adapter plugs with earthed
(grounded) power tools.
Unmodifi ed plugs and matching outlets will reduce
risk of electric shock.
b) Avoid body contact with earthed or grounded
surfaces such as pipes, radiators, ranges and
refrigerators.
There is an increased risk of electric shock if your
body is earthed or grounded.
c) Do not expose power tools to rain or wet
conditions.
Water entering a power tool will increase the risk
of electric shock.
d) Do not abuse the cord. Never use the cord for
carrying, pulling or unplugging the power tool.
Keep cord away from heat, oil, sharp edges or
moving parts.
Damaged or entangled cords increase the risk of
electric shock.
e) When operating a power tool outdoors, use an
extension cord suitable for outdoor use.
Use of a cord suitable for outdoor use reduces
the risk of electric shock.
3) Personal safety
a) Stay alert, watch what you are doing and use
common sense when operating a power tool.
Do not use a power tool while you are tired
or under the infl uence of drugs, alcohol or
medication.
A moment of inattention while operating power
tools may result in serious personal injury.
b) Use safety equipment. Always wear eye
protection.
Safety equipment such as dust mask, non-skid
safety shoes, hard hat, or hearing protection used for
appropriate conditions will reduce personal injuries.
c) Avoid accidental starting. Ensure the switch is in
the off position before plugging in.
Carrying power tools with your fi nger on the
switch or plugging in power tools that have the switch
on invites accidents.
d) Remove any adjusting key or wrench before
turning the power tool on.
A wrench or a key left attached to a rotating part
of the power tool may result in personal injury.
e) Do not overreach. Keep proper footing and
balance at all times.
This enables better control of the power tool in
unexpected situations.
f) Dress properly. Do not wear loose clothing or
jewellery. Keep your hair, clothing and gloves
away from moving parts.
Loose clothes, jewellery or long hair can be caught in
moving parts.
g) If devices are provided for the connection of
dust extraction and collection facilities, ensure
these are connected and properly used.
Use of these devices can reduce dust related
hazards.
4) Power tool use and care
a) Do not force the power tool. Use the correct
power tool for your application.
The correct power tool will do the job better and safer
at the rate for which it was designed.
b) Do not use the power tool if the switch does not
turn it on and off .
Any power tool that cannot be controlled with the
switch is dangerous and must be repaired.
c) Disconnect the plug from the power source
before making any adjustments, changing
accessories, or storing power tools.
Such preventive safety measures reduce the risk
of starting the power tool accidentally.
d) Store idle power tools out of the reach of children
and do not allow persons unfamiliar with the
power tool or these instructions to operate the
power tool.
Power tools are dangerous in the hands of
untrained users.
e) Maintain power tools. Check for misalignment or
binding of moving parts, breakage of parts and
any other condition that may aff ect the power
tools’ operation.
If damaged, have the power tool repaired before
use.
Many accidents are caused by poorly maintained
power tools.
f) Keep cutting tools sharp and clean.
Properly maintained cutting tools with sharp cutting
edges are less likely to bind and are easier to
control.
g) Use the power tool, accessories and tool bits
etc., in accordance with these instructions and
in the manner intended for the particular type
of power tool, taking into account the working
conditions and the work to be performed.
Use of the power tool for operations diff erent from
intended could result in a hazardous situation.
5) Service
a) Have your power tool serviced by a qualifi ed
repair person using only identical replacement
parts.
This will ensure that the safety of the power tool
is maintained.
PRECAUTION
Keep children and infi rm persons away.
When not in use, tools should be stored out of reach of
children and infi rm persons.

English
5
PRECAUTIONS ON USING DRILL
1. Hold the drill securely when using.
2. Do not wear gloves made of stuff liable to roll up such as
cotton, wool, cloth or string, etc.
3. Prior to drilling into walls, ceilings or fl oors, ensure there
are no electric cables or conduits inside.
SPECIFICATIONS
Voltage (by areas)* (110 V, 220 V, 230 V, 240 V)
Power input 460 W*
No load speed 0–2300 /min
Drill chuck capacity 10 mm
Capacity
Steel Twist Bit 10 mm
Wood
Flat Spade Bit 25 mm
Auger Bit 16 mm
Weight (without cord)
1.3 kg
* Be sure to check the nameplate on product as it is subject to change by areas.
STANDARD ACCESSORIES
○ Chuck wrench (Spec. only for keyless chuck) ..............1
Standard accessories are subject to change without notice.
OPTIONAL ACCESSORIES (sold separately)
(1) Side handle
(2) Hook
(3) Hook (A)
Optional accessories are subject to change without notice.
APPLICATIONS
○ Boring holes in metal, wood and plastic.
PRIOR TO OPERATION
1. Power source
Ensure that the power source to be utilized conforms
to the power requirements specifi ed on the product
nameplate.
2. Power switch
Ensure that the power switch is in the OFF position. If the
plug is connected to a receptacle while the power switch
is in the ON position, the power tool will start operating
immediately, inviting serious accident.
3. Extension cord
When the work area is removed from the power source.
Use an extension cord of suffi cient thickness and rated
capacity. The extension cord should be kept as short as
practicable.
4. Selecting the appropriate drill bit:
○ When boring metal or plastic
Use ordinary metalworking drill bits.
○ When boring wood
Use ordinary woodworking drill bits.
However, when drilling 6.5 mm or smaller holes, use a
metalworking drill bit.
5. Mounting and dismounting of the bit
For keyed chuck
(Fig. 1)
(1) Open the chuck jaws, and insert the bit into the chuck.
(2) Place the chuck wrench in each of the three holes in the
chuck, and turn it in the clockwise direction (viewed from
the front side). Tighten securely.
(3) To remove the bit, place the chuck wrench into one of
the holes in the chuck and turn it in the counterclockwise
direction.
For keyless chuck (Fig. 2)
(1) Open the chuck jaws, and insert the bit into the chuck.
To open the chuck jaws, hold the ring while turning the
sleeve in the counterclockwise direction (viewed from the
front side).
(2) Firmly grasp the ring and turn the sleeve in the clockwise
direction. Tighten securely.
(3) To remove the bit, fi rmly grasp the ring and turn the
sleeve in the counterclockwise direction.
(4) If it is hard to loosen the sleeve, fi x the spindle using the
open-end wrench, hold the sleeve fi rmly, and turn it in the
loosening direction (counterclockwise when viewed from
the front). (Fig. 3)
6. Check the rotational direction (Fig. 4)
The bit rotates clockwise (viewed from the rear side) by
pushing the R-side of the push button.
The L-side of the push button is pushed to turn the bit
counterclockwise.
(The
and
R
marks are provided on the body.)
7. Installing the side handle (Optional accessory)
A Side handle can be installed on either side of the tool
for right or left handed use.
To install the side handle, thread it into the socket on the
desired side of the gear cover and tighten it securely.
(Fig. 6)
8. Attaching the hook. (Optional accessory)
For hook (side-attaching) (Fig. 7)
Fix the hook fi rmly on the desired side of the gear cover
using M10 bolt which is supplied with hook.
For hook (A) (top-attaching) (Fig. 8)
To attach the hook (A), it is necessary to disassemble the
handle portion which covered the tool’s electrical system.
For your continued safety and electrical shock protection,
installing the hook (A) on this drill should ONLY be
performed by a HITACHI AUTHORIZED SERVICE
CENTER.
CAUTION
When the power tool is used with a hook fi xed to it, pay
attention to the following points:

English
6
○ Before hanging the main unit from the waist belt, make
sure that the drill has come to a complete stop.
While it is suspended from the waist belt, the power plug
must be disconnected from the power source.
○ Do not walk about with the power tool hanging from the
waist belt.
○ In the case of operation in a high place, it is dangerous to
drop the tool accidentally. If the hook is deformed or hung
from the wrong position, there is danger that the hook will
slip off and the tool will fall.
Be careful to avoid danger.
○ In making a through hole, the power tool sometimes
shakes violently when the workpiece is pierced, from
example. Be careful you are not hurt by the hook even if
such situation happens.
HOW TO USE
1. Switch operation
○ When the trigger is depressed, the tool rotates. When the
trigger is released, the tool stops.
○ The rotational speed of the drill can be controlled by
varying the amount that the trigger switch is pulled.
Speed is low when the trigger switch is pulled slightly and
increases as the trigger switch is pulled more.
○ The desired rotation speed can be pre-selected with the
speed control dial.
Turn the speed control dial clockwise for higher speed
and counterclockwise for lower speed. (Fig. 5)
○ Pulling the trigger and pushing the stopper, it keeps
the switched-on condition which is convenient for
continuous running. When switching off , the stopper can
be disconnected by pulling the trigger again.
2. Drilling
○ When drilling, start the drill slowly, and gradually
increasing speed as you drill.
○ Always apply pressure in a straight line with the bit. Use
enough pressure to keep drilling, but do not push hard
enough to stall the motor or defl ect the bit.
○ To minimize stalling or breaking through the material,
reduce pressure on drill and ease the bit through the last
part of the hole.
○ If the drill stalls, release the trigger immediately, remove
the bit from the work and start again. Do not click the
trigger on and off in an attempt to start a stalled drill. This
can damage the drill.
○ The larger the drill bit diameter, the larger the reactive
force on your arm.
Be careful not to lose control of the drill because of this
reactive force.
To maintain fi rm control, establish a good foothold,
use side handle, hold the drill tightly with both hands,
and ensure that the drill is vertical to the material being
drilled.
MAINTENANCE AND INSPECTION
1. Inspecting the drill bits
Since use of an abraded drill bits will cause motor
malfunctioning and degraded effi ciency, replace the drill
bits with a new one or resharpening without delay when
abrasion is noted.
2. Inspecting the mounting screws
Regularly inspect all mounting screws and ensure that
they are properly tightened. Should any of the screws be
loose, retighten them immediately. Failure to do so could
result in serious hazard.
3. Maintenance of the motor
The motor unit winding is the very “heart” of the power
tool. Exercise due care to ensure the winding does not
become damaged and/or wet with oil or water.
4. Inspecting the carbon brushes
For your continued safety and electrical shock protection,
carbon brush inspection and replacement on this tool
should ONLY be performed by a HITACHI AUTHORIZED
SERVICE CENTER.
5. Service parts list
A: Item No.
B: Code No.
C: No. Used
D: Remarks
CAUTION
Repair, modifi cation and inspection of Hitachi Power
Tools must be carried out by a Hitachi Authorized Service
Center.
This Parts List will be helpful if presented with the tool to
the Hitachi Authorized Service Center when requesting
repair or other maintenance.
In the operation and maintenance of power tools, the
safety regulations and standards prescribed in each
country must be observed.
MODIFICATIONS
Hitachi Power Tools are constantly being improved
and modifi ed to incorporate the latest technological
advancements.
Accordingly, some parts (i.e. code numbers and/or
design) may be changed without prior notice.
NOTE
Due to HITACHI’s continuing program of research and
development, the specifi cations herein are subject to change
without prior notice.

Español
7
NORMAS GENERALES DE SEGURIDA
¡ADVERTENCIA!
Lea todas las instrucciones
Si no se siguen las instrucciones de abajo podría
producirse una descarga eléctrica, un incendio y/o daños
graves.
El término “herramienta eléctrica” en todas las advertencias
indicadas a continuación hace referencia a la herramienta
eléctrica que funciona con la red de suministro (con cable) o
a la herramienta eléctrica que funciona con pilas (sin cable).
CONSERVE ESTAS INSTRUCCIONES
1) Área de trabajo
a) Mantenga la zona de trabajo limpia y bien
iluminada.
Las zonas desordenadas y oscuras pueden
provocar accidentes.
b) No utilice las herramientas eléctricas en
entornos explosivos como, por ejemplo, en
presencia de líquidos infl amables, gases o
polvo.
Las herramientas eléctricas crean chispas que
pueden hacer que el polvo desprenda humo.
c) Mantenga a los niños y transeúntes alejados
cuando utilice una herramienta eléctrica.
Las distracciones pueden hacer que pierda el
control.
2) Seguridad eléctrica
a) Los enchufes de las herramientas eléctricas
tienen que ser adecuados a la toma de
corriente.
No modifi que el enchufe.
No utilice enchufes adaptadores con
herramientas eléctricas conectadas a tierra.
Si no se modifi can los enchufes y se utilizan tomas
de corriente adecuadas se reducirá el riesgo de
descarga eléctrica.
b) Evite el contacto corporal con superfi cies
conectadas a tierra como tuberías, radiadores
y frigorífi cos.
Hay mayor riesgo de descarga eléctrica si su cuerpo
está en contacto con el suelo.
c) No exponga las herramientas eléctricas a la
lluvia o a la humedad.
La entrada de agua en una herramienta eléctrica
aumentará el riesgo de descarga eléctrica.
d) No utilice el cable incorrectamente. No utilice el
cable para transportar, tirar de la herramienta
eléctrica o desenchufarla.
Mantenga el cable alejado del calor, del aceite,
de bordes afi lados o piezas móviles.
Los cables dañados o enredados aumentan el
riesgo de descarga eléctrica.
e) Cuando utilice una herramienta eléctrica al aire
libre, utilice un cable prolongador adecuado
para utilizarse al aire libre.
La utilización de un cable adecuado para usarse al
aire libre reduce el riesgo de descarga eléctrica.
3) Seguridad personal
a) Esté atento, preste atención a lo que hace y
utilice el sentido común cuando utilice una
herramienta eléctrica.
No utilice una herramienta eléctrica cuando
esté cansado o esté bajo la infl uencia de
drogas, alcohol o medicación.
La distracción momentánea cuando utiliza
herramientas eléctricas puede dar lugar a
importantes daños personales.
b) Utilice equipo de seguridad. Utilice siempre
una protección ocular.
El equipo de seguridad como máscara para el
polvo, zapatos de seguridad antideslizantes, casco
o protección para oídos utilizado para condiciones
adecuadas reducirá los daños personales.
c) Evite un inicio accidental. Asegúrese de que el
interruptor está en “off ” antes de enchufarlo.
El transporte de herramientas eléctricas con el
dedo en el interruptor o el enchufe de herramientas
eléctricas con el interruptor encendido puede
provocar accidentes.
d) Retire las llaves de ajuste antes de encender la
herramienta eléctrica.
Si se deja una llave en una pieza giratoria de la
herramienta eléctrica podrían producirse daños
personales.
e) No se extralimite. Mantenga un equilibrio
adecuado en todo momento.
Esto permite un mayor control de la herramienta
eléctrica en situaciones inesperadas.
f) Vístase adecuadamente. No lleve prendas
sueltas o joyas. Mantenga el pelo, la ropa y los
guantes alejados de las piezas móviles.
La ropa suelta, las joyas y el pelo largo pueden
pillarse en las piezas móviles.
g) Si se proporcionan dispositivos para la conexión
de extracción de polvo e instalaciones de
recogida, asegúrese de que están conectados
y se utilizan adecuadamente.
La utilización de estos dispositivos puede reducir
los riesgos relacionados con el polvo.
4) Utilización y mantenimiento de las herramientas
eléctricas
a) No fuerce la herramienta eléctrica. Utilice
la herramienta eléctrica correcta para su
aplicación.
La herramienta eléctrica correcta trabajará mejor y
de forma más segura si se utiliza a la velocidad para
la que fue diseñada.
b) N o u t i l i c e l a h e r r a m i e n t a e l é t r i c a s i e l i n t e r r u p t o r
no la enciende y apaga.
Las herramientas elétricas que no pueden
controlarse con el interruptor son peligrosas y
deben repararse.
c) Desconecte el enchufe de la fuente eléctrica
antes de hacer ajustes, cambiar accesorios o
almacenar herramientas eléctricas.
Estas medidas de seguridad preventivas reducen el
riesgo de que la herramienta eléctrica se ponga en
marcha accidentalmente.
d) Guarde las herramientas eléctricas que no
se utilicen para que no las cojan los niños
y no permita que utilicen las herramientas
eléctricas personas no familiarizadas con las
mismas o con estas instrucciones.
Las herramientas eléctricas son peligrosas si son
utilizadas por usuarios sin formación.
e) Mantenimiento de las herramientas eléctricas.
Compruebe si las piezas móviles están mal
alineadas o unidas, si hay alguna pieza
rota u otra condición que pudiera afectar
al funcionamiento de las herramientas
eléctricas.
Si la herramienta eléctrica está dañada, llévela
a reparar antes de utilizarla.
Se producen muchos accidentes por no realizar
un mantenimiento correcto de las herramientas
eléctricas.

Español
8
f) Mantenga las herramientas de corte afi ladas y
limpias.
Las herramientas de corte correctamente
mantenidas con los bordes de corte afi lados son
más fáciles de controlar.
g) Utilice la herramienta eléctrica, los accesorios
y las brocas de la herramienta, etc., de acuerdo
con estas instrucciones y de la manera
adecuada para el tipo de herramienta eléctrica,
teniendo en cuenta las condiciones laborales y
el trabajo que se va a realizar.
La utilización de la herramienta eléctrica para
operaciones diferentes a pretendidas podría dar
lugar a una situación peligrosa.
5) Revisión
a) Lleve su herramienta a que la revise un experto
cualifi cado que utilice sólo piezas de repuesto
idénticas.
Esto garantizará el mantenimiento de la seguridad
de la herramienta eléctrica.
PRECAUCIÓN
Mantenga a los niños y a las personas enfermas
alejadas.
Cuando no se utilicen, las herramientas deben
almacenarse fuera del alcance de los niños y de las
personas enfermas.
PRECAUCIONES AL UTILIZAR EL TALADRO
1. Sujete fi rmemente el taladro durante el uso.
2. No utilice guantes hechos de un material que se pueda
enrollar, como algodón, lana, paño, cordón, etc.
3. Antes de taladrar paredes, techos o pisos, asegúrese
de que no hayan cables o conductos eléctricos en el
interior.
ESPECIFICACIONES
Voltaje (por áreas)* (110 V, 220 V, 230 V, 240 V)
Acometida 460 W*
Velocidad de marcha en vacío 0–2300 /min
Capacidad del portabrocas 10 mm
Capacidad
Acero Broca de torsión 10 mm
Madera
Borca de horquilla
plana
25 mm
Borca de berbiquí 16 mm
Peso (sin cable)
1,3 kg
* Verifi car indefectiblemente los datos de la placa de características de la máquina, pues varían de acuerdo al país de
destino.
ACCESORIOS ESTANDAR
○ Velvedor de mandril (Especifi caciones sólo para
portabrocas sin llave) ...................................................1
Accesorios estándar están sujetos a cambio sin previo
aviso.
ACCESORIOS FACULTATIVOS
(de venta por separado)
(1) Asa lateral
(2) Gancho
(3) Gancho (A)
Accesorios facultativos están sujetos a cambio sin previo
aviso.
APLICACIONES
○ Por acción de orifi cios en metal, madera y plástico.
ANTES DE LA PUESTA EN MARCHA
1. Alimentación
Asegurarse de que la acometida de red que ha de ser
utilizada es conforme a las exigencias de corriente
espacifi cadas en la placa de características del
producto.
2. Conmutador de alimentación
Asegurarse de que el conmutador de acometida está
en posición OFF (desconectado). Si el enchufe está
conectado a la caja del enchufe mientras el conmutador
de acometida está en posición ON (conectado)
la herramienta eléctrica empezará a tradajar
inmediatamente, provocando un serio accidente.
3. Cable de prolongación
Cuando está alejada el área de trabajo de la red de
acometida, usar un cable de prolongación de un grosor
sufi ciente y potencia nominal. El cable de prolongación
debe ser mantenido o más corto posible.
4. Seleccionar la broca de taladro apropiada
○ Perforando metal o plástico
Usar una broca de taladro ordinaria para trabajos en
metal.
○ Perfornado madera
Use ordinary woodworking drill bits.
However, when drilling 6,5 mm or smaller holes, use a
metalworking drill bit.
5. Montaje y desmontaje de la broca
Para portabrocas con llave (Fig. 1)
(1) Abra las mordazas del portabrocas e inserte la broca
en el portabrocas.
(2) Coloque la llave del portabrocas en cada uno de los
tres orifi cios del portabrocas, y gírela en el sentido
de las agujas del reloj (visto desde el lado delantero).
Apriete fi rmemente.

Español
9
(3) Para sacar la broca, coloque la llave del portabrocas
en uno de los orifi cios del portabrocas y gírela en el
sentido contrario a las agujas del reloj.
Para portabrocas sin llave (Fig. 2)
(1) Abra las mordazas del portabrocas e inserte la broca
en el portabrocas.
Para abrir las mordazas del portabrocas, sujete el anillo
mientras gira el manguito en el sentido contrario a las
agujas del reloj (visto desde el lado delantero).
(2) Sujete el anillo fi rmemente y gire el manguito en el
sentido de las agujas del reloj. Apriete fi rmemente.
(3) Para sacar la broca, sujete el anillo fi rmemente y gire el
manguito en el sentido contrario a las agujas del reloj.
(4) Si no consigue afl ojar el manguito, fi je el husillo utilizando
una llave fi ja, sujete el manguito fi rmemente y gírelo en
la dirección de afl ojamiento (en sentido contrario a las
agujas del reloj visto desde adelante). (Fig. 3)
6. Verifi que la dirección de rotación (Fig. 4).
La broca gira en el sentido de las agujas del reloj (visto
desde el lado trasero) empujando el lado R del botón.
Si empuja el lado L del botón, la broca girará en sentido
contrario a las agujas del reloj.
(Las marcas
y
R
están provistas en el cuerpo).
7. Instalación del asa lateral (Accesorio opcional)
Es posible insertar un asa lateral sobre uno u otro lado
de la herramienta, según que el usuario sea diestro o
zurdo.
Para instalar el asa lateral, enrósquelo en el casquillo
del lado deseado de la cubierta de engranajes, y
apriételo fi rmemente. (Fig. 6)
8. Fijación del gancho. (Accesorio opcional)
Para el gancho (fi jación lateral) (Fig. 7)
Fije fi rmemente el gancho sobre el lado deseado de
la cubierta de engranajes utilizando el perno M10
entregado con el gancho.
Para el gancho (A) (fi jación superior)
(Fig. 8)
Para fi jar el gancho (A), es necesario desarmar la
parte del asa que cubre el sistema eléctrico de la
herramienta. Para poder utilizar la herramienta en
condiciones de seguridad y evitar las descargas
eléctricas, la instalación del gancho (A) de este
taladro debe ser realizado SÓLO por un CENTRO DE
SERVICIO AUTORIZADO HITACHI.
PRECAUCIÓN
Cuando utilice la herramienta eléctrica con un gancho
fi jado, preste atención a los puntos siguientes:
○ Antes de colgar la unidad del cinturón, cercióres de que
el taladro esté completamente parado.
Cuando tenga el taladro colgado del cinturón, el
enchufe de alimentación deberá estar desconectado
de la fuente de alimentación.
○ Ne camine con la herramienta eléctrica colgada del
cinturón.
○ Cuando trabaje en un lugar elevado, será peligroso el
dejar caer accidentalmente la herramienta. Si el gancho
está deformado o en posición errónea, existe el peligro
de que se deslice y que se caiga la herramienta.
Tenga cuidado para evitar peligros.
○ Cundo taladre orifi cios, es posible que la herramienta
sufra sacudidas violentas cuando, por ejemplo, se
parta la pieza de trabajo. Tenga cuidado de no herise
con el gancho en caso de ocurrir esta situación.
COMO SE USA
1. Operación del interruptor
○ La herramienta gira al presionar el interruptor de gatillo.
Al soltar el gatillo, la herramienta se detiene.
○ La velocidad de rotación del taladro puede controlarse
variando la fuerza de apriete del interruptor de gatillo.
Apretando ligeramente el interruptor de gatillo la
velocidad es lenta, pero aumenta mientras más se lo
aprieta.
○ Es posible seleccionar previamente la velocidad de
rotación deseada con el dial de control de velocidad.
Gire el dial de control de velocidad en el sentido a
las agujas del reloj para aumentar la velocidad, y en
sentido contrario para disminuirla. (Fig. 5).
○ Tire del gatillo y empuje el tope para mantener activada
la alimentación, lo cual es conveniente para un
funcionamiento continuo. Cuando se lo desconecta, el
tope puede quitarse tirando del gatillo otra vez.
2. Taladrado
○ Para taladrar, inicie el taladro lentamente, y aumente
gradualmente la velocidad.
○ Siempre aplique presión en línea recta a la broca.
Aplique una presión sufi ciente para seguir taladrando,
pero no empuje con una fuerza tal que pueda provocar
el calado del motor o la desviación de la broca.
○ Para reducir al mínimo el calado o la rotura a través
del material, disminuya la presión aplicada al taladro y
mueva la broca a través de la última parte del orifi cio.
○ Si el taladro se atasca, suelte inmediatamente el
gatillo, saque la broca de la pieza de trabajo y empiece
otra vez. No haga clic en el gatillo para conectarlo y
desconectarlo con la intención de poner en marcha el
taladro atascado, pues se podrá dañar el taladro.
○ Cuanto mayor sea el diámetro de la broca de taladro,
mayor será la fuerza de reacción sobre su brazo.
Asegúrese de no perder el control del taladro debido a
esta fuerza de fricción.
Para mantener un control fi rme, haga pie fi rme, utilice
el asa lateral, sujete el taladro fi rmemente con ambas
manos, y asegúrese de mantener el taladro vertical con
respecto al material que se está taladrando.
MANTENIMIENTO E INSPECCION
1. Inspección de las brocas de barrena
Debido a que el uso de brocas de barrena desgastadas
producen fallos de funcionamiento del motor y una
disminución de la efi ciencia, cámbielas inmediatamente
por otras nuevas o reafílelas cuando note abrasión en
las mismas.
2. Inspeccionar la broca de taladro y el macho de
roscar
Como el uso continuado de una broca o macho de
roscar desgastados disminuye la efi ciencia operativa
y causa un posible recalentamiento del motor,
reemplazar o afi lar la broca o el macho sin demora si se
nota un excesivo desgaste.
3. Mantenimiento d motor
La unidad de devanado del motor es el verdadero
“corazón” del herramientas eléctricas. Prestar el mayor
cuidado a asegurarse de que el devando no se dañe y/o
se humedezca con aceite o agua.
4. Inspección de las escobillas
Por motivos de seguridad contra descargas eléctricas,
la inspección y el reemplazo de las escobillas deberán
realizarse SOLAMENTE en un CENTRO DE SERVICIO
AUTORIZADO POR HITACHI.

Español
10
5. Lista de repuestos
A: N°. ítem
B: N°. código
C: N°. usado
D: Observaciones
PRECAUCIÓN
La reparación, modifi cación e inspección de las
herramientas eléctricas Hitachi deben ser realizadas
por un Centro de Servicio Autorizado de Hitachi.
Esta lista de repuestos será de utilidad si es presentada
junto con la herramienta al Centro de Servicio
Autorizado de Hitachi, para solicitar la reparación o
cualquier otro tipo de mantenimiento.
En el manejo y el mantenimiento de las herramientas
eléctricas, se deberán observar las normas y
reglamentos vigentes en cada país.
MODIFICACIONES
Hitachi Power Tools introduce constantemente mejoras
y modifi caciones para incorporar los últimos avances
tecnológicos.
Por consiguiente, algunas partes (por ejemplo, números
de códigos y/o diseño) pueden ser modifi cadas sin
previo aviso.
OBSERVACION
Debido al programa continuo de investigación y desarollo
de HITACHI estas especifi caciones están sujetas a cambio
sin preaviso.

11

12
○
○
○
○

13
R
○
○
○
○
○
○
○
○
○
○
○
○
○

14

ไทย
15
กฎความปลอดภัยโดยทั่วไป
คําเตือน!
โปรดอานคําแนะนําทั้งหมด
ถาไมปฏิบัติตามคําแนะนําทั้งหมด อาจถูกไฟฟาดูด เกิดไฟไหม และ/หรือ
บาดเจ็บสาหัสก็ได
คําวา " เครื่องมือไฟฟา" ในคําเตือนตอไปนี้ทั้งหมดหมายถึงเครื่องมือที่คุณ
ใชงานกับปลั๊กไฟฟา (มีสายไฟ) หรือใชงานกับแบตเตอรี่ (ไรสาย)
โปรดปฏิบัติตามคําแนะนําตอไปนี้
1) พื้นที่ทํางาน
a) รักษาพื้นที่ทํางานใหสะอาดและมีแสงสวางเพียงพอ
สิ่งที
่เกะกะและความมืดทําใหเกิดอุบัติเหตุได
b) อยาใชเครื่องมือไฟฟาในบรรยากาศที่อาจระเบิด เชน มี
ของเหลวไวไฟ แกสหรือฝุน
เครื่องมือไฟฟาอาจเกิดประกายไฟที่อาจทําใหฝุนและไอติดไฟได
c) ใชงานเครื่องมือไฟฟาใหไกลจากเด็กและคนเฝาชม
คนที่วอกแวกทําใหคุณขาดสมาธิในการทํางานได
2) ความปลอดภัยทางไฟฟา
a) ปลั๊กของเครื่องมือไฟฟาตองเหมาะกับเตาเสียบ
อยาดัดแปลงปลั๊ก
อยาใชปลั๊กของตัวปรับแรงดันไฟฟากับเครื
่องมือไฟฟาชนิดที่ตอ
ลงดิน
ปลั๊กกับเตาเสียบที่ไมพอดีกันอาจทําใหคุณถูกไฟฟาดูด
b) อยาใหตัวคุณสัมผัสกับพื้นผิวที่ตอลงดิน เชนทอโลหะ เครื่อง
ทําความรอน เตาอบ ตูเย็น เปนตน
อาจถูกไฟฟาดูดถารางกายของคุณตอวงจรลงดิน
c) อยาใหเครื่องมือไฟฟาถูกกับนํ้าฝนหรือความเปยกชื้น
นํ้าที่เขาไปในเครื่องมือไฟฟาจะเพิ่มความเสี่ยงที่จะถูกไฟฟ
าดูด
d) อยาใชสายไฟฟาในงานอื่น อยาใชสายเพื่อหิ้ว ดึงหรือ เสียบ
เครื่องมือไฟฟา ใหสายไฟอยูหางจากความรอน นํ้ามัน ขอบ
แหลมคมหรือชิ้นสวนที่เคลื่อนไหว
สายที่ชํารุดหรือตึงอาจทําใหคุณถูกไฟฟาดูดไดงาย
e) เมื่อใชงานเครื่องมือไฟฟานอกอาคาร
ใชสายพวงชนิดที่ใชกับนอกอาคารเมื่อใชสายที่เหมาะสมจะลด
ความเสี่ยงที่จะถูกไฟฟาดูด
3) ความปลอดภัยสวนบุคคล
a) ระวังตั
ว ดูสิ่งที่คุณกําลังทํา ใชสามัญสํานึกเมื่อใชเครื่องมือไฟฟา
อยาใชเครื่องมือไฟฟาเมื่อคุณออนเพลียหรือกินยา สุรา หรือยา
เสพติด
การขาดสติชั่วขณะเมื่อใชเครื่องมือไฟฟาอาจทําใหคุณบาดเจ็บ
สาหัส
b) ใชอุปกรณนิรภัย สวมแวนตาปองกันเสมอ
อุปกรณปองกันเชนหนากากกันฝุน รองเทากันลื่น หมวกนิรภัย
หรือจุกอุดหูที่เหมาะสมจะเลี่ยงการบาดเจ็บของรางกายได
c) ระวังเครื่องทํางานโดยไมตั้งใจ ใหสวิทซอยูในตําแหนงปดกอน
เสียบปลั๊ก
เมื่อจับเครื่องมือไฟฟาเมื่อนิ้วอยูที่ตัวสวิทซ หรือเมื่อเสียบปลั๊ก
ขณะเปดสวิทซไวอาจทําใหเกิดอุบัติเหตุ
d) เอาสลักปรับแตงหรือประแจออกกอนเปดสวิทซไฟฟา
สลักหรือประแจที่ติดกับสวนหมุนของเครื่องมือไฟฟาอาจทําให
คุณบาดเจ็
บได
e) อยาเอื้อมตัว ยืนใหมั่นและสมดุลตลอดเวลา
ทําใหควบคุมเครื่องมือไฟฟาไดดีขึ้นเมื่อมีเหตุที่ไมคาดฝน
f) แตงตัวใหรัดกุม อยาสวมเสื้อผาหลวมหรือใชเครื่องประดับ ให
ผม เสื้อผาและถุงมืออยูหางจากชิ้นสวนที่เคลื่อนที่
เสื้อผาหลวม เครื่องประดับหรือผมยาวอาจถูกชิ้นสวนหมุนรั้ง
เขาไป
g) ถาออกแบบเครื่องมือไฟฟาไวใหตอกับชุดดูดฝุนหรือเศษวัสดุ ให
เชื
่อมตอและใชงานอยางถูกตอง
เมื่อใชกับชุดอุปกรณเหลานี้ จะลดอันตรายจากฝุน
4) การใชและบํารุงรักษาเครื่องมือไฟฟา
a) อยาใชเครื่องมือไฟฟาโดยฝนกําลัง ใชเครื่องมือที่ถูกตองกับงาน
ของคุณ
เครื่องมือไฟฟาที่ถูกตองจะทํางานไดดีกวาและปลอดภัยกวา ใน
อัตราตามที่ออกแบบไวแลว
b) อยาใชเครื่องมือไฟฟาถาสวิทซปดเปดไมได
เครื่องมือไฟฟาที่ควบคุมดวยสวิทซ
ไมไดจะมีอันตรายและตอง
ซอม
c) ถอดปลั๊กจากแหลงไฟฟากอนปรับแตง เปลี่ยนอะไหล หรือเก็บ
รักษา
มาตรการปองกันเชนนี้จะลดความเสี่ยงของอุบัติเหตุที่เครื่องมือ
ไฟฟาจะเริ่มทํางานโดยไมไดตั้งใจ
d) เก็บเครื่องมือไฟฟาใหหางจากเด็ก และอยายอมใหผูที่ไมเคยชิน
กับเครื่องมือไฟฟาหรือคําแนะนําเหลานี้ใหใชเครื่องมือไฟฟา
เครื่องมือไฟฟ
าเปนสิ่งที่มีอันตรายมากเมื่ออยูในมือของคนที่ไม
ชํานาญ
e) บํารุงรักษาเครื่องมือไฟฟา ตรวจดูศูนยเคลื่อน สวนบิดงอ ชํารุด
หรือสภาพอื่นๆ ที่มีผลตอการทํางานของเครื่องมือไฟฟา
หากชํารุด ใหซอมแซมกอนใชงาน
อุบัติเหตุจํานวนมากเกิดจากเครื่องมือไฟฟาที่บํารุงรักษาไมดีพอ
f) ใหเครื่องมือตัดมีความคมและสะอาด
เครื่องมือตัดท
ี่บํารุงรักษาอยางถูกตองและมีขอบคมจะไมคอย
บิดงอ และควบคุมไดงายกวา
g) ใชเครื่องมือไฟฟา สวนประกอบและปลายเครื่องมือตัดตามคํา
แนะนําเหลานี้ และตามที่ออกแบบไว โดยพิจารณาสภาพงาน
และสิ่งที่จะใชงาน
ถาใชเครื่องมือไฟฟากับงานที่ไมไดออกแบบไวอาจเกิดความเสีย
หายได
5) การซอมบํารุง
a) ใหชางซอมที่ชํานาญเปนผูซอม และเปลี
่ยนอะไหลที่เปน ของแท
ทําใหเครื่องมือไฟฟามีความปลอดภัย
คําเตือน
เก็บใหพนมือเด็กและผูไมชํานาญ
หากไมไดใช ควรเก็บใหพนมือเด็กและผูไมชํานาญ

ไทย
16
ขอควรระวังในการใชสวานไฟฟา
1. ถือสวานใหมั่นคงในขณะใชงาน
2. อยาสวมถุงมือที่ทําดวยวัสดุที่ลื่นไดงาย เชน ฝาย ขนสัตว ผาหรือ
เชือก เปนตน
3. กอนเจาะผนัง, เพดาน หรือพื้น ตองตรวจสอบจนแนใจวาไมมีสายไฟ
หรือทอนํ้าอยูภายใน
รายละเอียดจําเพาะ
แรงดันไฟฟา (ตามทองที่ใชงาน)*
(110 โวลท, 220 โวลท, 230 โวลท, 240 โวลท)
กําลังไฟฟา
460 วัตต*
ความเร็วอิสระ
0–2300 /นาที
ขนาดตัวล็อกสวาน
10 มม.
ขีดความสามารถ
เหล็กหัวสวานรองเกลียว
10 มม.
ไม
หัวสวานแบบพลั่ว
25 มม.
หัวสวานเกลียว
16 มม.
นํ้าหนัก (ไมรวมสายไฟฟา)
1.3 กก.
* โปรดตรวจดูปายที่ตัวเลื่อยไฟฟา เพราะแตกตางไปตามทองที่ใชงาน
○ เมื่อเจาะไม
ใชดอกสวานเจาะไมทั่วไป
อยางไรก็ตาม ถาเจาะรูขนาดไมเกิน 6.5 มม. ใหใชสวานเจาะโลหะ
แทน
5. การติดและการถอดดอกสวาน
สําหรับล็อกมีสลัก
(รูปที่ 1)
(1) เปดกานล็อก และสอดดอกสวานเขาในล็อก
(2) ใสประแจล็อกเขาในรู 1 ใน 3 รูของล็อก ขันตามเข็มนาฬกา (เมื่อดู
จากดานหนา) ขันใหแนน
(3) ถอดดอกสวาน โดยสอดประแจล็อกเขาในรู 1 ใน 3 รูของล็อก หมุน
ทวนเข็มนาฬกา
สําหรับล็อกสวานแบบไมมีกุญแจขัน
(รูปที่ 2)
(1) เปดปากจับของล็อกสวานออก แลวสอดหัวสวานเขาไปในล็อกสวาน
วิธีเปดปากจับของล็อกสวาน จับแหวนใหแนนแลวหมุนปลอกทวน
เข็มนาฬกา (มองจากดานหนา)
(2) จับแหวนใหแนนแลวหมุนปลอกตามเข็มนาฬกาใหแนนหนา
(3) วิธีถอดหัวสวาน จับแหวนใหแนนแลวหมุนปลอกทวนเข็มนาฬกา
(4) ถาคลายปลอกออกไดยาก ให้ใชประแจปากตายยึดกับสวนเพลาแลว
จับปลอกใหแนน จากนั้นหมุนตามทิศทางการคลายออก (ทวนเข็ม
นาฬกาเมื่อมองจากดานหนา) (รูปที่ 3)
6. ตรวจดูทิ
ศทางหมุน (รูปที่ 4)
ไขควงหมุนตามเข็มนาฬกา (เมื่อมองจากดานทาย) เมื่อกดดาน R
ของปุมกด
กดดาน L ของปุมกดเพื่อใหไขควงสวานหมุนทวนเข็มนาฬกา
(ที่ตัวสวาน จะมีเครื่องหมาย
และเครื่องหมาย
R
)
อุปกรณมาตรฐาน
○ ประแจล็อก ( ใชกับล็อกสวานแบบไมมีกุญแจขัน) ..........................1
อาจเปลี่ยนแปลงอุปกรณมาตรฐานไดโดยไมตองแจงลวงหนา
อุปกรณประกอบ (แยกจําหนายตางหาก)
(1) มือจับขาง
(2) ตะขอ
(3) ตะขอ (A)
อาจเปลี่ยนแปลงอุปกรณประกอบไดโดยไมแจงลวงหนา
การใชงาน
○ เจาะรูในโลหะ, ไม และพลาสติก
คําแนะนํากอนการใชงาน
1. แหลงไฟฟา
ตรวจดูใหแหลงไฟฟาที่จะใชตรงกับรายละเอียดจําเพาะบนแผนปาย
ของเลื่อยไฟฟา
2. สวิทซไฟฟา
ตรวจดูใหสวิทซไฟฟาอยูในตําแหนง OFF ถาเสียบปลั๊กเขากับเตา
เสียบเมื่อสวิทซอยูในตําแหนง ON เครื่องใชไฟฟาจะทํางานทันที และ
ทําใหเกิดอุบัติเหตุที่รายแรงได
3. สายไฟฟาพวง
เมื่อพื้นที่ทํางานอยูหางจากแหลงจายไฟ
ใหใชสายพวงที่โตและมี
ความจุไฟฟามากพอ ควรพยายามใหสายพวงสั้นที่สุดเทาที่จะทําได
4. การเลือกดอกสวานที่เหมาะสม:
○ เมื่อเจาะโลหะหรือพลาสติก
ใชดอกสวานเจาะโลหะทั่วไป

ไทย
17
7. การติดตั้งมือจับดานขาง (อุปกรณเสริม)
สามารถติดตั้งมือจับดานขางเขากับสวานไดทั้งสองขาง เพื่ออํานวย
ความสะดวกแกผูใชงานไมวาจะถนัดมือซายหรือมือขวา
วิธีติดตั้งมือจับดานขาง หมุนมือจับเขาไปในชองที่ครอบเฟองในดาน
ที่ตองการ แลวขันใหแนน (รูปที่ 6)
8. การติดตั้งตะขอ (อุปกรณเสริม)
สําหรับตะขอ (การติดตั้งดานขาง)
(
รูปที่ 7
)
ติดตั้งตะขอที่ครอบเฟองในดานที่ตองการโดยใชโบลต M10 ที่ใหมา
พรอมกับตะขอ
สําหรับตะขอ (A) (การติดตั้งดานบน)
(
รูปที่ 8
)
วิธีติดตะขอ (A) นั้นจําเปนตองแยกชิ้นสวนบริเวณมือจับซึ่งหอหุม
ระบบไฟฟาของเครื่องมือไว เพื่อความปลอดภัยของคุณและเพื่อ
ปองกันไฟฟาดูด การติดตั้งตะขอ (A) เขากับสวานตองดําเนินการ
โดยศูนยบริการฮิตาชิที่ไดรับอนุญาตเทานั้น
ขอควรระวัง
เมื่อใชเครื่องมือไฟฟาที่ติดตั้งตะขอไว ใหใสใจตอขอควรระวังตอไปนี้:
○ กอนแขวนเครื่องมือไวที่เข็มขัด ตรวจสอบใหแนใจวาสวานหยุด
ทํางานแลว
ขณะที่แขวนสวานไวที่เข็มขัด ตองถอดปลั๊กไฟออกจากเตารับให
เรียบรอย
○ หามเดินไปมาโดยมีเครื่องมือไฟฟาแขวนอยูที่เข็มขัด
○ ในกรณีที่ทํางานในที่สูง อาจเกิดอันตรายจากเครื่องมือตกลงมาได ถา
ตะขอบิดเบี้ยวหรือแขวนไวผิดตําแหนง อาจทําใหเครื่องมือลื่นหลุด
และตกลงมาได
ใหใชความระมัดระวังเพื่อหลีกเลี่ยงอันตราย
○ ในขณะเจาะรู เครื่องมือไฟฟาอาจสั่นอยางรุนแรง ใหตรวจสอบวา
ตะขอจะไมทําใหคุณไดรับบาดเจ็บเมื่อเกิดกรณีดังกลาวขึ้น
วิธีการใช
1. การใชสวิทซ
○ เมื่อกดสวิทซไก สวานจะหมุน เมื่อปลอยมือจากสวิทซ สวานจะหยุด
○ อาจควบคุมความเร็วหมุนของไขควงสวานไดอยางตอเนื่อง โดย
เปลี่ยนระยะที่ดึงสวิทซไก ความเร็วตํ่าเมื่อดึงสวิทซไกออกมาเล็ก
นอย และความเร็วเพิ่มขึ้นเมื่อดึงสวิทซออกมามากขึ้น
○ อาจตั้งคาความเร็วหมุนที่ตองการไวลวงหนา โดยใชหนาปดควบคุม
ความเร็ว
หมุนหนาปดควบคุมความเร็วไปตามเข็มนาฬกาเพื่อใชความเร็วสูง
และหมุนทวนเข็มนาฬกาเพื่อใชความเร็วตํ่า (รูปที่ 5)
○ เมื่อดึงสวิทซไกและกดสต็อปเปอร ทําใหสวานอยูในจังหวะเปด
สวิทซ และสะดวกตอการทํางานอยางตอเนื่อง เมื่อปดสวิทซ อาจ
ปลดสต็อปเปอรไดโดยกดสวิทซไกอีกครั้ง
2. การเจาะ
○ เมื่อเจาะ เริ่มดวยความเร็วตํ่า และคอยๆ เพิ่มความเร็วขณะเจาะ
○ ใหแรงกดในแนวเดียวกับดอกสวานเสมอ ใหแรงกดพอเพื่อการเจาะ
แตอยากดแรงเกินไปจนมอเตอรหยุดหรือดอกสวานงอ
○ ปองกันวัสดุแตกหรือสวานติดจนหยุดหมุน โดยลดแรงกดที่สวานและ
ผอนแรงที่ดอกสวานในระยะสุดทายของรู
○ ถาสวานติด ปลอยนิ้วจากสวิทซไกทันที เอาเศษวัสดุออกจากชิ้นงาน
และเจาะอีกครั้ง อยากดสวิทซไกไปมาเพื่อฉุดใหดอกสวานหมุนอีก
เพราะตัวสวานอาจชํารุด
○ เมื่อดอกสวานมีเสนผานศูนยกลางโต แรงผลักแขนของคุณจะมากขึ้น
ระวังอยาใหขาดการควบคุมสวานเนื่องจากแรงผลักเชนนี้
ควบคุมใหมั่นคง โดยยืนใหเขาที่ ใชมือจับขาง ใชมือทั้งสองจับ ตัว
สวานใหแนน และใหสวานตั้งฉากกับวัสดุที่จะเจาะ
การบํารุงรักษาและการตรวจสอบ
1. การตรวจสอบหัวสวาน
เนื่องจากการใชดอกสวานที่สึกหรอจะทําใหมอเตอรทํางานผิดปกติ
และลดประสิทธิภาพงาน ใหเปลี่ยนดอกสวานเสียใหม หรือนําไปลับ
โดยไมชักชา เมื่อเห็นวาสึกไปแลว
2. การตรวจสอบสกรูยึด
ใหตรวจสอบสกรูยึดเสมอ และใหขันไวอยางถูกตอง ถาสกรูหลวม ให
ขันเสียใหมโดยทันที มิฉะนั้นอาจเกิดอันตรายมาก
3. การบํารุงรักษามอเตอร
การขดลวดของมอเตอรเปนหัวใจสําคัญของเครื
่องมือไฟฟา ใหใช
ความระมัดระวังเพื่อไมใหขดลวดของมอเตอรชํารุดและ/หรือเปยกนํ้า
หรือนํ้ามัน
4. การตรวจสอบแปรงถาน
เพื่อความปลอดภัยและปองกันไฟฟาดูดไดอยางตอเนื่อง "เฉพาะ"
ศูนยซอมที่ฮิตาชิรับรองเทานั้นจะตรวจสอบและเปลี่ยนแปรงถานของ
เครื่องมือไฟฟานี้
5. รายการอะไหลซอม
A: หมายเลขอะไหล
B: หมายเลขรหัส
C: จํานวนที่ใช
D: หมายเหต
ค
ําเตือน
ศูนยบริการที่ไดรับอนุญาตของฮิตาชิเทานั้นเปนผูซอม ดัดแปลง และ
ตรวจสอบเครื่องมือไฟฟาของฮิตาชิ
รายการอะไหลซอมนี้จะเปนประโยชนเมื่อสงใหศูนยบริการที่ไดรับ
อนุญาตของฮิตาชิเทานั้นเพื่อแจงซอมหรือบํารุงรักษา
ตองปฏิบัติตามระเบียบและมาตรฐานความปลอดภัยของแตละ
ประเทศในการใชงานและบํารุงรักษาเครื่องมือไฟฟา
การแกไข
ม
ีการปรับปรุงและแกไขเครื่องมือไฟฟาของฮิตาชิเสมอ เพื่อให
สอดคลองกับความกาวหนาลาสุดทางเทคโนโลยี
ดังนั้น จึงอาจเปลี่ยนแปลงชิ้นสวนบางอยาง (คือ หมายเลขรหัสและ/
หรือรุน) ไดโดยไมตองแจงลวงหนา
หมายเหตุ
เนื่องจากฮิตาชิมีแผนงานวิจัยและพัฒนาอยางตอเนื่อง รายละเอียด
จําเพาะนี้จึงอาจเปลี่ยนแปลงไดโดยไมตองแจงลวงหนา

18
ﺔﻳﺑﺭﻌﻟﺍ
۳
(ﻱﻭﻠﻌﻟﺍ ﻁﺑﺭﻟﺍ) (
A
) ﻑﺎﻁﺧﻠﻟ(8 ﻝﻛﺷﻟﺍ)
ﺽﺑﻘﻣﻟﺍ ءﺯﺟ ﻙﻳﻛﻔﺗ
ً
ﻻﻭﺃ ﻙﻳﻠﻋ ﺏﺟﻳ ،(
A
) ﻑﺎﻁﺧﻟﺍ ﺏﻳﻛﺭﺗ ﻡﺗﻳ ﻲﻛﻟ
ﺭﺍﺭﻣﺗﺳﺎﺑ ﻙﺗﻣﻼﺳ ﻥﺎﻣﺿﻟ .ﺓﺩﻌ
ُ
ﻣﻠﻟ ﻲﺑﺭﻬﻛﻟﺍ ﻡﺎﻅﻧﻟﺍ ﻲﻁﻐﻳ ﻱﺫﻟﺍ
ﺍﺫﻫ ﻲﻓ (
A
) ﻑﺎﻁﺧﻟﺍ ﺕﻳﺑﺛﺗ ﺏﺟﻳﻓ ،ﺔﻳﺋﺎﺑﺭﻬﻛﻟﺍ ﺔﻣﺩﺻﻟﺍ ﻥﻣ ﻙﺗﻳﺎﻣﺣﻭ
.ﻁﻘﻓ ﺩﻣﺗﻌﻣﻟﺍ HITACHI ﺔﻣﺩﺧ ﺯﻛﺭﻣ ﺔﻁﺳﺍﻭﺑ ﺭﺎﻔﺣﻟﺍ
ﻪﻳﺑﻧﺗ
ﻩﺎﺑﺗﻧﻻﺍ ﻙﻳﻠﻋ ﺏﺟﻳﻓ ،ﻑﺎﻁﺧ ﺎﻬﺑ ﺕﺑﺛﻣ ﻲﻫﻭ ﺔﻳﺋﺎﺑﺭﻬﻛﻟﺍ ﺓﺩﻌﻣﻟﺍ ﻡﺍﺩﺧﺗﺳﺍ ﺩﻧﻋ
:ﺔﻳﻟﺎﺗﻟﺍ ﻁﺎﻘﻧﻠﻟ
ﻥﺃ ﺩﻛﺄﺗﻟﺍ ﻙﻳﻠﻋ ﺏﺟﻳ ﺭﺻﺧﻟﺍ ﻡﺍﺯﺣ ﻥﻣ ﺔﻳﺳﻳﺋﺭﻟﺍ ﺓﺩﺣﻭﻟﺍ ﻕﻳﻠﻌﺗ ﻝﺑﻗ
○
.ﻡﺎﺗ
ٍ
ﻝﻛﺷﺑ ﻝﻣﻌﻟﺍ ﻥﻋ ﻑﻗﻭﺗ ﺭﺎﻔﺣﻟﺍ
ﺭﻳﻏ ﺔﻗﺎﻁﻟﺍ ﺱﺑﺎﻗ ﻥﻭﻛﻳ ﻥﺃ ﺏﺟﻳ ﺭﺻﺧﻟﺍ ﻡﺍﺯﺣ ﻥﻣ ﺎﻬﻘﻳﻠﻐﺗ ءﺎﻧﺛﺃﻭ
.ﺔﻗﺎﻁﻟﺍ ﺭﺩﺻﻣﺑ ﻝﺻﺗﻣ
.ﺭﺻﺧﻟﺍ ﻡﺍﺯﺣ ﻥﻣ ﺔﻳﺋﺎﺑﺭﻬﻛﻟﺍ ﺓﺩﻌﻣﻟﺍ ﻕﻳﻠﻌﺗ ءﺎﻧﺛﺃ ﻲﺷﻣﻟﺎﺑ ﻡﻘﺗ ﻻ ○
ﻕﻳﺭﻁﺑ ﺓﺩﻌﻣﻟﺍ ﻁﺎﻘﺳﺇ ﺭﻁﺧﻟﺍ ﻥﻣﻓ ﺔﻌﻔﺗﺭﻣﻟﺍ ﻥﻛﺎﻣﻷﺍ ﻲﻓ ﻝﻣﻌﻟﺍ ﺔﻟﺎﺣ ﻲﻓ ○
ﺭﻁﺧ ﺩﺟﻭﻳﻓ ،ﺊﻁﺎﺧ ﻥﺎﻛﻣ ﻥﻣ ﻪﻘﻳﻠﻌﺗ ﻡﺗ ﻭﺃ ﻑﺎﻁﺧﻟﺍ ﻩﻭﺷﺗ ﺍﺫﺇ .ﺄﻁﺧﻟﺍ
.ﺓﺩﻌﻣﻟﺍ ﻁﻭﻘﺳ ﻰﻟﺇ ﻱﺩﺅﻳ ﺎﻣﻣ ﻑﺎﻁﺧﻟﺍ ﻕﻻﺯﻧﺍ ﺔﻳﻟﺎﻣﺗﺣﺍ
.ﺭﻁﺎﺧﻣﻟﺍ ﺏﻧﺟﺗﻟ ﺍ
ً
ﺭﺫﺣ ﻥﻛﻓ
ﺎﻣﺩﻧﻋ ﻑﻳﻧﻋ ﻝﻛﺷﺑ ﺔﻳﺋﺎﺑﺭﻬﻛﻟﺍ ﺓﺩﻌﻣﻟﺍ ﺯﺗﻬﺗ ﺩﻘﻓ ،ﺓﺫﻓﺎﻧ ﺔﺣﺗﻓ ﻊﻧﺻ ﺩﻧﻋ ○
ﻥﻛﻓ .ﻝﺎﺛﻣﻟﺍ ﻝﻳﺑﺳ ﻰﻠﻋ ﺔﺑﻭﻘﺛﻣ ﺎﻬﺑ ﺔﺣﺗﻔﻟﺍ ﻊﻧﺻ ﻡﺗﻳ ﻲﺗﻟﺍ ﺔﻌﻁﻘﻟﺍ ﻥﻭﻛﺗ
ﻑﻗﺍﻭﻣ ﺕﺛﺩﺣ ﻭﻟ ﻰﺗﺣ ،ﻑﺎﻁﺧﻟﺍ ﺔﻁﺳﺍﻭﺑ ﺔﺑﺎﺻﺇ ﻙﻟ ﺙﺩﺣﺗ ﻻﺃ ﺍ
ً
ﺭﺫﺣ
.ﺔﻠﺛﺎﻣﻣ
ﻡﺍﺩﺧﺗﺳﻻﺍ ﺔﻳﻔﻳﻛ
ﺡﺎﺗﻔﻣﻟﺍ ﻝﻳﻐﺷﺗ
1
.ﺓﺍﺩﻷﺍ ﻑﻗﻭﺗﺗ ،ﺡﺍﺩﻘﻣﻟﺍ ﺭﻳﺭﺣﺗ ﺩﻧﻋ .ﺓﺍﺩﻷﺍ ﺭﻭﺩﺗ ،ﺡﺍﺩﻘﻣﻟﺍ ﻁﻐﺿ ﺩﻧﻋ ○
ﺡﺎﺗﻔﻣ ﺏﺣﺳ ﻝﺩﻌﻣ ﺭﻳﻳﻐﺗﺑ ﺏﻘﺛﻣﻟﺍ ﻥﺍﺭﻭﺩ ﺔﻋﺭﺳ ﻲﻓ ﻡﻛﺣﺗﻟﺍ ﻥﻛﻣﻳ ○
.ﺡﺍﺩﻘﻣﻟﺍ
ﺩﻳﺯﺗﻭ ﺡﺍﺩﻘﻣﻟﺍ ﺡﺎﺗﻔﻣ ﻰﻠﻋ ﻕﻓﺭﺑ ﻁﻐﺿﻟﺍ ﺩﻧﻋ ﺔﺿﻔﺧﻧﻣ ﺔﻋﺭﺳﻟﺍ ﻥﻭﻛﺗ
.ﺡﺍﺩﻘﻣﻟﺍ ﺡﺎﺗﻔﻣ ﺏﺣﺳ ﺭﺍﺭﻣﺗﺳﺍ ﻊﻣ
ﻲﻓ ﻡﻛﺣﺗﻟﺍ ﺹﺭﻗ ﻊﻣ ﺔﺑﻭﻏﺭﻣﻟﺍ ﻥﺍﺭﻭﺩﻟﺍ ﺔﻋﺭﺳﻟ ﻕﺑﺳﻣﻟﺍ ﺩﻳﺩﺣﺗﻟﺍ ﻡﺗﻳ ﺩﻗ ○
.ﺔﻋﺭﺳﻟﺍ
ﺔﻋﺎﺳﻟﺍ ﺏﺭﺎﻘﻋ ﻩﺎﺟﺗﺍ ﻲﻓ ﺔﻋﺭﺳﻟﺍ ﻲﻓ ﻡﻛﺣﺗﻟﺍ ﺡﺎﺗﻔﻣ ﻝﻳﻭﺣﺗﺑ ﻡﻗ
ﻝﻭﺻﺣﻠﻟ ﺔﻋﺎﺳﻟﺍ ﺏﺭﺎﻘﻋ ﻩﺎﺟﺗﺍ ﺱﻛﻋ ﻲﻓﻭ ﺭﺑﻛﺃ ﺔﻋﺭﺳ ﻰﻠﻋ ﻝﻭﺻﺣﻠﻟ
(5 ﻝﻛﺷﻟﺍ) .ﻝﻗﺃ ﺔﻋﺭﺳ ﻰﻠﻋ
ﻰﻠﻋ ﻝﻣﻌﻳ ﺍﺫﻬﻓ ،ﻑﺎﻘﻳﻹﺍ ﺡﺎﺗﻔﻣ ﻰﻠﻋ ﻁﻐﺿﻟﺍﻭ ﺡﺍﺩﻘﻣﻟﺍ ﺏﺣﺳ ﺩﻧﻋ ○
.ﺭﻣﺗﺳﻣﻟﺍ ﻝﻳﻐﺷﺗﻟﺍ ﺔﻳﻠﻣﻌﻟ ﺎ
ً
ﺑﺳﺎﻧﻣ ﻙﻟﺫ ﺩﻌﻳﻭ ﻝﻳﻐﺷﺗﻟﺍ ﺔﻟﺎﺣ ﻰﻠﻋ ءﺎﻘﺑﻹﺍ
ﺓﺭﻣ ﺡﺍﺩﻘﻣﻟﺍ ﺏﺣﺳﺑ ﻑﺎﻘﻳﻹﺍ ﺡﺎﺗﻔﻣ ﻝﺻﻓ ﻥﻛﻣﻳ ،ﻝﻳﻐﺷﺗﻟﺍ ﻑﺎﻘﻳﺇ ﺩﻧﻋ
.ﻯﺭﺧﺃ
ﺭﻔﺣﻟﺍ
2
.ﺭﻔﺣﺗ ﺕﻧﺃﻭ ﺔﻋﺭﺳﻟﺍ ﺓﺩﺎﻳﺯﺑ ﻡﻗﻭ ،ءﻁﺑ ﺭﻔﺣﻟﺍ ﺃﺩﺑﺍ ،ﺭﻔﺣﻟﺍ ﺩﻧﻋ ○
ﺎ
ً
ﻁﻐﺿ ﻡﺩﺧﺗﺳﺍ .ﺏﻘﺛﻣﻟﺍ ﻊﻣ ﻡﻳﻘﺗﺳﻣ ﻁﺧ ﻲﻓ ﺎ
ً
ﻣﺋﺍﺩ ﻁﻐﺿﻟﺍ ﻡﺍﺩﺧﺗﺳﺎﺑ ﻡﻗ ○
ﻪﻳﻭﺷﺗ ﻭﺃ ﻙﺭﺣﻣﻟﺍ ﺏﻳﻛﺭﺗﻟ ﺓﻭﻘﺑ ﻊﻓﺩﺗ ﻻ ﻥﻛﻟﻭ ،ﺭﻔﺣﻟﺍ ﻰﻠﻋ ﻅﺎﻔﺣﻠﻟ ﺎ
ً
ﻳﻓﺎﻛ
.ﺏﻘﺛﻣﻟﺍ
ﺏﻘﺛﻣﻟﺍ ﻰﻠﻋ ﻁﻐﺿﻟﺍ ﺽﻔﺧﺑ ﻡﻗ ،ﺓﺩﺎﻣﻟﺍ ﺭﺑﻋ ﺭﺳﻛﻟﺍ ﻭﺃ ﺅﻁﺎﺑﺗﻟﺍ ﻝﻳﻠﻘﺗﻟ ○
.ﺔﺣﺗﻔﻟﺍ ﻥﻣ ﺭﻳﺧﻷﺍ ءﺯﺟﻟﺍ ﺭﺑﻋ ﺏﻘﺛﻣﻟﺍ ﺔﺣﺍﺭﺈﺑ ﻡﻗﻭ
ﻡﻗﻭ ،ﻝﺎﺣﻟﺍ ﻲﻓ ﻝﻳﻐﺷﺗﻟﺍ ﺡﺎﺗﻔﻣ ﺭﻳﺭﺣﺗﺑ ﻡﻗ ،ﺏﻘﺛﻣﻟﺍ ﺅﻁﺎﺑﺗ ﺔﻟﺎﺣ ﻲﻓ ○
ﻝﻳﻐﺷﺗ ﻰﻠﻋ ﻁﻐﺿﺗ ﻻ .ﻯﺭﺧﺃ ﺓﺭﻣ ﺃﺩﺑﺍﻭ ﻝﻣﻌﻟﺍ ﻥﻣ ﺏﻘﺛﻣﻟﺍ ﺔﻟﺍﺯﺈﺑ
ﻱﺩﺅﻳ ﺩﻗ .ءﻲﻁﺑﻟﺍ ﺭﻔﺣﻟﺍ ءﺩﺑﻟ ﺔﻟﻭﺎﺣﻣﻛ ﻪﻠﻳﻐﺷﺗ ﻑﺎﻘﻳﺇ ﻭﺃ ﻝﻳﻐﺷﺗﻟﺍ ﺡﺎﺗﻔﻣ
.ﺏﻘﺛﻣﻟﺍ ﻑﻠﺗ ﻰﻟﺇ ﻙﻟﺫ
ﻰﻠﻋ ﺔﻳﻠﻋﺎﻔﺗﻟﺍ ﺓﻭﻘﻟﺍ ﺩﻳﺍﺯﺗﺗ ،ﺎ
ً
ﺿﻳﺭﻋ ﺭﻔﺣﻟﺍ ﺏﻘﺛﻣ ﺭﻁﻗ ﻥﺎﻛ ﺎﻣﻠﻛ ○
.ﻙﻋﺍﺭﺯ
.ﺔﻳﻠﻋﺎﻔﺗﻟﺍ ﺓﻭﻘﻟﺍ ﺏﺑﺳﺑ ﺏﻘﺛﻣﻟﺍ ﻲﻓ ﻡﻛﺣﺗﻟﺍ ﻥﺍﺩﻘﻓ ﻡﺩﻋ ﻲﻓ ﺭﺫﺣﻟﺍ ﺥﻭﺗ
ﻡﺩﺧﺗﺳﺍﻭ ﺩﻳﺟ ﻡﺩﻗ ﺊﻁﻭﻣ ﻊﺿﻭﺑ ﻡﻗ ،ﺕﺎﺑﺛﺑ ﻡﻛﺣﺗﻟﺍ ﻰﻠﻋ ﻅﺎﻔﺣﻠﻟ
ﻥﺃ ﺩﻛﺄﺗﻭ ،ﻥﻳﺩﻳﻟﺍ ﺎﺗﻠﻛﺑ ﻡﺎﻛﺣﺈﺑ ﺏﺎﻘﺛﻣﻟﺍ ﻙﺳﻣﺍﻭ ،ﻲﺑﻧﺎﺟﻟﺍ ﺽﺑﻘﻣﻟﺍ
.ﺎﻬﺑﻘﺛ ﻡﺗﻳ ﻲﺗﻟﺍ ﺓﺩﺎﻣﻠﻟ ﻲﺳﺃﺭﻟﺍ ﻊﺿﻭﻟﺍ ﻲﻓ ﺏﺎﻘﺛﻣﻟﺍ
ﺹﺣﻔﻟﺍﻭ ﺔﻧﺎﻳﺻﻟﺍ
ﺭﻔﺣﻟﺍ ﺏﻗﺎﺛﻣ ﺹﺣﻓ
1
ﻝﻳﻠﻘﺗﻟﺍﻭ ﻙﺭﺣﻣﻟﺍ ﻑﻠﺗ ﻰﻟﺇ ﻱﺩﺅﺗ ﺔﻠﻛﺂﺗﻣﻟﺍ ﺭﻔﺣﻟﺍ ﺏﻗﺎﺛﻣ ﻥﺃ ﻰﻟﺇ ﺍ
ً
ﺭﻅﻧ
ﻱﻷ ﻙﺗﻅﺣﻼﻣ ﺭﻭﻓ ﺎﻫﺫﺣﺷﺑ ﻡﻗ ﻭﺃ ﺭﻔﺣﻟﺍ ﺏﻗﺎﺛﻣ ﻝﺩﺑﺗﺳﺍ ،ﺓءﺎﻔﻛﻟﺍ ﻥﻣ
.ﻝﻛﺂﺗ
ﺕﻳﺑﺛﺗﻟﺍ ﺭﻳﻣﺎﺳﻣ ﺹﺣﻓ
2
ﺎﻬﻁﺑﺭ ﻡﺎﻛﺣﺇ ﻥﻣ ﺩﻛﺄﺗﻟﺍﻭ ﺕﻳﺑﺛﺗﻟﺍ ﺭﻳﻣﺎﺳﻣ ﺔﻓﺎﻛﻟ ﻱﺭﻭﺩﻟﺍ ﺹﺣﻔﻟﺎﺑ ﻡﻗ
.ﺭﻭﻔﻟﺍ ﻰﻠﻋ ﺎﻬﻁﺑﺭ ﻡﺎﻛﺣﺈﺑ ﻡﻗ ،ﺭﻳﻣﺎﺳﻣ ﺔﻳﺃ ﻙﻓ ﺔﻟﺎﺣ ﻲﻓ .ﺢﻳﺣﺻ ﻝﻛﺷﺑ
.ﺭﻁﺎﺧﻣ ﻰﻟﺇ ﻙﻟﺫﺑ ﻡﺎﻳﻘﻟﺍ ﻲﻓ ﻝﺷﻔﻟﺍ ﺽﺭﻌﻳ ﺩﻘﻓ
ﻙﺭﺣﻣﻟﺍ ﺔﻧﺎﻳﺻ
3
.ﺔﻗﺎﻁﻟﺍ ﺓﺍﺩﺃ ﻥﻣ "ﻁﺳﻭﻷﺍ ءﺯﺟﻟﺍ" ﻭﻫ ﻙﺭﺣﻣﻟﺍ ﺓﺩﺣﻭ ﻑﻠﻣ
.ءﺎﻣﻟﺍ ﻭﺃ ﺕﻳﺯﻟﺍ ﺔﻁﺳﺍﻭﺑ ﻪﻠﻠﺑ ﻭﺃ/ﻭ ﻑﻠﻣﻟﺍ ﻑﻠﺗ ﻡﺩﻋ ﻥﻣ ﺭﺍﺭﻣﺗﺳﺎﺑ ﺩﻛﺎﺗ
ﺔﻳﻧﻭﺑﺭﻛﻟﺍ ﺓﺎﺷﺭﻔﻟﺍ ﺹﺣﻓ
4
ﺓﺎﺷﺭﻔﻟﺍ ﺹﺣﻓ ﺏﺟﻳ ﻻ ،ﺔﻳﺋﺎﺑﺭﻬﻛﻟﺍ ﺕﺎﻣﺩﺻﻟﺍ ﻥﻣ ﺔﻳﺎﻣﺣﻠﻟﻭ ﻙﻧﻣﻷ
Hitachi
ﺔﻣﺩﺧ ﺯﻛﺭﻣ ﻝﺑﻗ ﻥﻣ ﻻﺇ ﺓﺍﺩﻷﺍ ﻩﺫﻬﺑ ﺎﻬﻟﺍﺩﺑﺗﺳﺍﻭ ﺔﻳﻧﻭﺑﺭﻛﻟﺍ
.ﺩﻣﺗﻌﻣﻟﺍ
ﺔﻣﺩﺧﻟﺍ ءﺍﺯﺟﺃ ﺔﻣﺋﺎﻗ
5
ﺭﺻﻧﻌﻟﺍ ﻡﻗﺭ :A
ﺯﻣﺭﻟﺍ ﻡﻗﺭ :
B
ﻡﺩﺧﺗﺳﻣﻟﺍ ﻡﻗﺭﻟﺍ :
C
ﺕﺎﻣﻼﻌﻟﺍ :D
ﻪﻳﺑﻧﺗ
ﻥﻣ
Hitachi
ﺕﺍﻭﺩﻷ ﺹﺣﻔﻟﺍﻭ ،ﻝﻳﺩﻌﺗﻟﺍﻭ ،ﺡﻼﺻﻹﺍ ﻝﺎﻣﻋﺃ ﺫﻳﻔﻧﺗ ﺏﺟﻳ
.ﺩﻣﺗﻌﻣﻟﺍ ﺔﻣﺩﺧﻟﺍ ﺯﻛﺭﻣ ﻝﺑﻗ
Hitachi
ﺔﻣﺩﺧ ﺯﻛﺭﻣﻟ ﺓﺍﺩﻷﺍ ﻊﻣ ﺎﻬﻣﻳﺩﻘﺗ ﺩﻧﻋ ﺓﺩﻳﻔﻣ ﻩﺫﻫ ءﺍﺯﺟﻷﺍ ﺔﻣﺋﺎﻗ
.ﺔﻧﺎﻳﺻﻟﺍ ﻝﺎﻣﻋﺃ ﻥﻣ ﺎﻫﺭﻳﻏ ﻭﺃ ﺡﻼﺻﻹﺍ ﺏﻠﻁ ﺩﻧﻋ ﺩﻣﺗﻌﻣ
ﺕﺎﻣﻳﻠﻌﺗ ﻉﺎﺑﺗﺍ ﺏﺟﻳ ،ﺎﻬﺗﻧﺎﻳﺻ ﻭﺃ ﺔﻳﺋﺎﺑﺭﻬﻛﻟﺍ ﺩﺩﻌﻟﺍ ﻝﻳﻐﺷﺗ ﺔﻟﺎﺣ ﻲﻓ
.ﺔﻟﻭﺩ ﻝﻛﺑ ﺔﺻﺎﺧﻟﺍ ﺭﻳﻳﺎﻌﻣﻟﺍﻭ ﻥﺎﻣﻷﺍ
ﺕﻼﻳﺩﻌﺗﻟﺍ
ﺕﺎﻳﻧﻘﺗﻟﺍ ﺙﺩﺣﻷ ﺎ
ً
ﻌﺑﺗ ﺎﻬﻠﻳﺩﻌﺗﻭ ﺭﺍﺭﻣﺗﺳﺎﺑ
Hitachi
ﺕﺍﻭﺩﺃ ﻥﻳﺳﺣﺗ ﻡﺗﻳ
.ﺔﻣﺩﻘﺗﻣﻟﺍ
(ﻡﻳﻣﺻﺗﻟﺍ ﻭﺃ/ﻭ ﺯﻭﻣﺭﻟﺍ ﻡﺎﻗﺭﺃ ﻝﺛﻣ) ءﺍﺯﺟﻷﺍ ﺽﻌﺑ ﺭﻳﻳﻐﺗ ﻡﺗﻳ ﺩﻗ ،ﻙﻟﺫﻟﻭ
.ﻕﺑﺳﻣ ﻡﻼﻋﺇ ﻥﻭﺩ
ﺔﻅﺣﻼﻣ
ﺕﺎﻔﺻﺍﻭﻣﻟﺍ ﺭﻳﻐﺗﺗ ،ﺭﻣﺗﺳﻣﻟﺍ ﺭﻳﻭﻁﺗﻟﺍﻭ ﺙﺣﺑﻠﻟ
HITACHI
ﺞﻣﺎﻧﺭﺑﻟ ﺎ
ً
ﻌﺑﺗ
.ﻕﺑﺳﻣ ﻡﻼﻋﺇ ﻥﻭﺩ ﺎﻧﻫ ﺓﺭﻭﻛﺫﻣﻟﺍ

19
ﺔﻳﺑﺭﻌﻟﺍ
۲
ﺏﺎﻘﺛﻣﻟﺍ ﻡﺍﺩﺧﺗﺳﺍ ﻝﻭﺣ ﺕﺍﺭﻳﺫﺣﺗ
.ﻡﺍﺩﺧﺗﺳﻻﺍ ﺩﻧﻋ ﻥﺎﻣﺄﺑ ﺏﺎﻘﺛﻣﻟﺍ ﻙﺳﻣﺍ 1
ﻝﻭﺣ ﻑﺗﻠﺗ ﻥﻷ ﺔﺿﺭﻋ ﻡﺎﺧ ﺓﺩﺎﻣ ﻥﻣ ﺔﻋﻭﻧﺻﻣ ﺕﺍﺯﺎﻔﻗ ﻱﺩﺗﺭﺗ ﻻ
2
.ﺎﻫﺭﻳﻏ ﻭﺃ ﻁﻳﺧ ﻭﺃ ﺵﺎﻣﻘﻟﺍ ﻭﺃ ﻑﻭﺻﻟﺍ ﻭﺃ ﻥﻁﻘﻟﺍ ﻝﺛﻣ ﺎﻬﺳﻔﻧ
ﺩﻛﺄﺗ ،ﺕﺎﻳﺿﺭﻷﺍ ﻭﺃ ﻑﻘﺳﻷﺍﻭ ،ﻁﺋﺎﺣﻟﺍ ﻲﻓ ﺭﻔﺣﻟﺍ ﺕﺎﻳﻠﻣﻌﺑ ﻡﻭﻘﺗ ﻥﺃ ﻝﺑﻗ 3
.ﻝﺧﺍﺩﻟﺎﺑ ﺕﻼﺻﻭﻣ ﻭﺃ ﺔﻳﺋﺎﺑﺭﻬﻛ ﺕﻼﺑﺎﻛ ﺩﻭﺟﻭ ﻡﺩﻋ ﻥﻣ
ﺕﺎﻔﺻﺍﻭﻣﻟﺍ
*(ﻕﻁﺎﻧﻣﻟﺍ ﺏﺳﺣ) ﻲﺑﺭﻬﻛﻟﺍ ﺩﻬﺟﻟﺍ (ﺕﻟﻭﻓ
240
،ﺕﻟﻭﻓ
230
،ﺕﻟﻭﻓ
220
،ﺕﻟﻭﻓ
110
)
ﺔﻗﺎﻁﻟﺍ ﻝﺎﺧﺩﺇ*ﺕﺍﻭ
460
ﻝﻣﺣ ﻥﻭﺩﺑ ﺔﻋﺭﺳﻟﺍﺔﻘﻳﻗﺩ/
2300 - 0
ﺏﻘﺛﻣﻟﺍ ﻑﺭﻅ ﺔﻌﺳﻡﻣ 10
ﺔﻌﺳﻟﺍ
ﺏﻠﺻﻟﺍ
ﺔﻳﻧﻭﺯﻠﺣ ﺭﻔﺣ ﺔﻣﻘﻟ
ﻡﻣ
10
ﺏﺷﺧﻟﺍ
ﻱﻭﺗﺳﻣ ﻑﺍﺭﺟﻣ ﺕﺍﺫ ﺭﻔﺣ ﺏﻘﺛﻣ
ﻡﻣ
25
ﺔﻣﻳﺭﺑ ﻭﺫ ﺏﻘﺛﻣ
ﻡﻣ
16
(ﻙﻠﺳﻟﺍ ﻥﻭﺩﺑ) ﻥﺯﻭﻟﺍﻡﺟﻛ
1.3
.ﺔﻘﻁﻧﻣﻟﺍ ﺏﺳﺣ ﺭﻳﻳﻐﺗﻠﻟ ﺔﺿﺭ
ُ
ﻋ ﺎﻬﻧﺃ ﺙﻳﺣ ﺞﺗﻧﻣﻟﺍ ﻰﻠﻋ ﺓﺩﻭﺟﻭﻣﻟﺍ ﻡﺳﻻﺍ ﺔﺣﻭﻟ ﺹﺣﻓ ﻥﻣ ﺩﻛﺄﺗ *
ﺔﻳﺳﺎﻳﻗ ﺕﺎﻘﺣﻠﻣ
1
...............(ﺢﻳﺗﺎﻔﻣ ﻥﻭﺩﺑ ﺽﺑﻘﻣﻠﻟ ﻁﻘﻓ ﺕﺎﻔﺻﺍﻭﻣﻟﺍ) ﻑﺭﻅﻟﺍ ﺡﺎﺗﻔﻣ
○
.ﺭﺎﻁﺧﺇ ﻥﻭﺩ ﺔﻳﺳﺎﻳﻘﻟﺍ ﺕﺎﻘﻠﺣﻣﻟﺍ ﺭﻳﻳﻐﺗ ﻥﻛﻣﻳ
(ﺔﻠﺻﻔﻧﻣ ﻉﺎﺑ
ُ
ﺗ) ﺔﻳﺭﺎﻳﺗﺧﺍ ﺕﺎﻘﺣﻠﻣ
ﻲﺑﻧﺎﺟ ﺽﺑﻘﻣ
(1)
ﻑﺎﻁﺧ
(2)
(A)
ﻑﺎﻁﺧ
(3)
.ﺭﺎﻁﺧﺇ ﻥﻭﺩ ﺔﻳﺭﺎﻳﺗﺧﻻﺍ ﺕﺎﻘﻠﺣﻣﻟﺍ ﺭﻳﻳﻐﺗ ﻥﻛﻣﻳ
ﺕﺎﻘﻳﺑﻁﺗ
.ﻙﻳﺗﺳﻼﺑﻟﺍﻭ ﺏﺷﺧﻟﺍﻭ ﻥﺩﺎﻌﻣﻟﺍ ﻲﻓ ﺕﺎﺣﺗﻓ ﻝﻣﻌﻟ ﺏﻘﺛﻟﺍ ○
ﻝﻳﻐﺷﺗﻟﺍ ﻝﺑﻗ
ﺔﻗﺎﻁﻟﺍ ﺭﺩﺻﻣ
1
ﺕﺎﺑﻠﻁﺗﻣﻟ ﻕﺑﺎﻁﻣ ﻪﻣﺍﺩﺧﺗﺳﺍ ﻡﺗﻳﺳ ﻱﺫﻟﺍ ﺔﻗﺎﻁﻟﺍ ﺭﺩﺻﻣ ﻥﺃ ﻥﻣ ﺩﻛﺄﺗ
.ﺞﺗﻧﻣﻟﺍ ﻰﻠﻋ ﺓﺩﻭﺟﻭﻣﻟﺍ ﻡﺳﻻﺍ ﺔﺣﻭﻟ ﻰﻠﻋ ﺓﺩﺩﺣﻣﻟﺍ ﺔﻗﺎﻁﻟﺍ
ﺔﻗﺎﻁﻟﺍ ﺡﺎﺗﻔﻣ
2
ﺱﺑﺎﻘﻟﺍ ﻝﻳﺻﻭﺗ ﺔﻟﺎﺣ ﻲﻓ .ﻑﺎﻘﻳﺇ ﻊﺿﻭﻟﺍ ﻰﻠﻋ ﺔﻗﺎﻁﻟﺍ ﺡﺎﺗﻔﻣ ﻥﺃ ﻥﻣ ﺩﻛﺄﺗ
ﺓﺍﺩﺃ ﻝﻳﻐﺷﺗ ﻡﺗﻳﺳﻓ ،ﻝﻳﻐﺷﺗ ﻊﺿﻭﻟﺍ ﻰﻠﻋ ﺔﻗﺎﻁﻟﺍ ﺡﺎﺗﻔﻣ ﻥﺎﻛﻭ ﺱﺑﻘﻣﻟﺎﺑ
.ﺭﻳﻁﺧ ﺙﺩﺎﺣ ﻉﻭﻗﻭ ﻰﻟﺇ ﻱﺩﺅﻳ ﺩﻗ ﺎﻣﻣ ،ﺭﻭﻔﻟﺍ ﻰﻠﻋ ﺔﻗﺎﻁﻟﺍ
ﻲﻓﺎﺿﻹﺍ ﻝﻳﺻﻭﺗﻟﺍ ﻙﻠﺳ
3
ﻝﻳﺻﻭﺗ ﻙﻠﺳ ﻡﺩﺧﺗﺳﺍ ،ﺔﻗﺎﻁﻟﺍ ﺭﺩﺻﻣ ﻥﻣ ﻝﻣﻌﻟﺍ ﺔﻘﻁﻧﻣ ﺔﻟﺍﺯﺇ ﺩﻧﻋ
ﻝﻳﺻﻭﺗﻟﺍ ﻙﻠﺳ ﻝﻅﻳ ﻥﺃ ﺏﺟﻳ .ﺔﻧﻧﻘﻣ ﺔﻌﺳﻭ
ٍ
ﻑﺎﻛ ﻙﻣﺳ ﻭﺫ ﻲﻓﺎﺿﺇ
.ﻉﺎﻁﺗﺳﻣﻟﺍ ﺭﺩﻘﺑ ﺍ
ً
ﺭﻳﺻﻗ ﻲﻓﺎﺿﻹﺍ
ﺏﺳﺎﻧﻣﻟﺍ ﺭﻔﺣﻟﺍ ﺏﻘﺛﻣ ﺩﻳﺩﺣﺗ
4
:ﻙﻳﺗﺳﻼﺑﻟﺍ ﻭﺃ ﻥﺩﺎﻌﻣﻟﺍ ﻲﻓ ﺏﻘﺛﻟﺍ ﺩﻧﻋ ○
.ﻱﺩﺎﻋ ﺔﻳﻧﺩﻌﻣ ﻝﺎﻐﺷﺃ ﺭﻔﺣ ﺏﻘﺛﻣ ﻡﺩﺧﺗﺳﺍ
:ﺏﺷﺧﻟﺍ ﻲﻓ ﺏﻘﺛﻟﺍ ﺩﻧﻋ ○
.ﻱﺩﺎﻋ ﺔﻳﺑﺷﺧ ﻝﺎﻐﺷﺃ ﺭﻔﺣ ﺏﻘﺛﻣ ﻡﺩﺧﺗﺳﺍ
ﻝﺎﻐﺷﺃ ﺭﻔﺣ ﺏﻘﺛﻣ ﻡﺩﺧﺗﺳﺍ ،ﺭﻐﺻﺃ ﻭﺃ ﻡﻣ
6.5
ﺕﺎﺣﺗﻓ ﻝﻣﻌﻟ ﺏﻘﺛﻟﺍ ﺩﻧﻋﻭ
.ﺔﻳﻧﺩﻌﻣ
ﻪﻛﻓﻭ ﺏﻘﺛﻣﻟﺍ ﺏﻳﻛﺭﺗ
5
ﺢﻳﺗﺎﻔﻣﻟﺍ ﻭﺫ ﺽﺑﻘﻣﻠﻟ(1 ﻝﻛﺷﻟﺍ)
.ﻑﺭﻅﻟﺍ ﻲﻓ ﺏﻘﺛﻣﻟﺍ ﻝﺧﺩﺃﻭ ﻑﺭﻅﻟﺍ ﻙﻭﻛﻓ ﺢﺗﻓﺍ
(1)
ﺱﻔﻧ ﻲﻓ ﺭﺩﺃﻭ ،ﺽﺑﻘﻣﻟﺍ ﻲﻓ ﺕﺎﺣﺗﻓ ﺙﻼﺛﻟﺍ ﻲﻓ ﺽﺑﻘﻣﻟﺍ ﺡﺎﺗﻔﻣ ﻊﺿ (2)
ﻪﻁﺑﺭﺍ .(ﻲﻣﺎﻣﻷﺍ ﺏﻧﺎﺟﻟﺍ ﻥﻣ ﺔﺿﻭﺭﻌﻣﻟﺍ) ﺔﻋﺎﺳﻟﺍ ﺏﺭﺎﻘﻋ ﻩﺎﺟﺗﺍ
.ﻡﺎﻛﺣﺈﺑ
ﺽﺑﻘﻣﻟﺍ ﻲﻓ ﺕﺎﺣﺗﻔﻟﺍ ﺩﺣﺃ ﻝﺧﺍﺩ ﺽﺑﻘﻣﻟﺍ ﺡﺎﺗﻔﻣ ﻊﺿ ،ﺏﻘﺛﻣﻟﺍ ﺔﻟﺍﺯﻹ (3)
.ﺔﻋﺎﺳﻟﺍ ﺏﺭﺎﻘﻋ ﻩﺎﺟﺗﺍ ﺱﻛﻋ ﻲﻓ ﻩﺭﺩﺃﻭ
ﺡﺎﺗﻔﻣ ﻥﻭﺩﺑ ﻑﺭﻅﻠﻟ(2 ﻝﻛﺷﻟﺍ)
.ﻑﺭﻅﻟﺍ ﻲﻓ ﺏﻘﺛﻣﻟﺍ ﻝﺧﺩﺃﻭ ﻑﺭﻅﻟﺍ ﻙﻭﻛﻓ ﺢﺗﻓﺍ
(1)
ﻩﺎﺟﺗﺍ ﺱﻛﻋ ﻲﻓ ﺔﺑﻠﺟﻟﺍ ﺓﺭﺍﺩﺇ ﺩﻧﻋ ﺔﻘﻠﺣﻟﺍ ﻙﺳﻣﺃ ،ﻑﺭﻅﻟﺍ ﻙﻭﻛﻓ ﺢﺗﻔﻟ
.(ﻲﻣﺎﻣﻷﺍ ﺏﻧﺎﺟﻟﺍ ﻥﻣ) ﺔﻋﺎﺳﻟﺍ ﺏﺭﺎﻘﻋ
ﺏﺭﺎﻘﻋ ﻩﺎﺟﺗﺍ ﻲﻓ ﺔﺑﻠﺟﻟﺍ ﺭﺩﺃﻭ ﺕﺎﺑﺛﺑ ﺔﻘﻠﺣﻟﺍ ﻙﺎﺳﻣﺈﺑ ﻡﻗ ،ﺍ
ً
ﺭﻳﺧﺃﻭ (2)
.ﻡﺎﻛﺣﺈﺑ ﻪﻁﺑﺭﺍ .ﺔﻋﺎﺳﻟﺍ
ﻩﺎﺟﺗﺍ ﺱﻛﻋ ﻲﻓ ﺔﺑﻠﺟﻟﺍ ﺭﺩﺃﻭ ﺕﺎﺑﺛﺑ ﺔﻘﻠﺣﻟﺍ ﻙﺎﺳﻣﺈﺑ ﻡﻗ ،ﺏﻘﺛﻣﻟﺍ ﺔﻟﺍﺯﻹ (3)
.ﺔﻋﺎﺳﻟﺍ ﺏﺭﺎﻘﻋ
ﻡﺍﺩﺧﺗﺳﺎﺑ ﻥﺍﺭﻭﺩﻟﺍ ﺩﻭﻣﻋ ﺕﻳﺑﺛﺗﺑ ﻡﻗ ،ﺔﺑﻠﺟﻟﺍ ﻙﻓ ﺏﻌﺻﻟﺍ ﻥﻣ ﻥﺎﻛ ﺍﺫﺇ (4)
ﻙﻔﻟﺍ ﻩﺎﺟﺗﺍ ﻲﻓ ﺭﺩﺃﻭ ،ﺕﺎﺑﺛﺑ ﺔﺑﻠﺟﻟﺍ ﻙﺳﻣﺍﻭ ،ﻑﺭﻁﻟﺍ ﺡﻭﺗﻔﻣ ﺡﺎﺗﻔﻣ
(3 ﻝﻛﺷﻟﺍ) .(ﻡﺎﻣﻷﺍ ﻥﻣ ﺽﺭﻌﻟﺍ ﺩﻧﻋ ﺔﻋﺎﺳﻟﺍ ﺏﺭﺎﻘﻋ ﻩﺎﺟﺗﺎﺑ)
(
4 ﻝﻛﺷﻟﺍ) ﻥﺍﺭﻭﺩﻟﺍ ﻩﺎﺟﺗﺍ ﻥﻣ ﻕﻘﺣﺗ 6
ﻁﻐﺿﻟﺎﺑ (ﺏﻧﺎﺟ ﺏﺭﻗﺃ ﻥﻣ) ﺔﻋﺎﺳﻟﺍ ﺏﺭﺎﻘﻋ ﻩﺎﺟﺗﺍ ﻲﻓ ﺏﻘﺛﻣﻟﺍ ﺭﻭﺩﻳ
.ﻁﻐﺿﻟﺍ ﺭﺯ ﻥﻣ R ﺏﻧﺎﺟ ﻰﻠﻋ
ﺱﻛﻋ ﻲﻓ ﺏﻘﺛﻣﻟﺍ ﻉﺎﺟﺭﻹ ﻁﻐﺿﻟﺍ ﺭﺯ ﻥﻣ
L ﺏﻧﺎﺟﻟﺍ ﻰﻠﻋ ﻁﻐﺿﻟﺍ ﻡﺗﻳ
.ﺔﻋﺎﺳﻟﺍ ﺏﺭﺎﻘﻋ ﻩﺎﺟﺗﺍ
.(ﻡﺳﺟﻟﺍ ﻰﻠﻋ
R
ﻭ ﻥﻳﺗﻣﻼﻌﻟﺍ ﺭﻳﻓﻭﺗ ﻡﺗﻳ)
(ﻱﺭﺎﻳﺗﺧﺍ ﻕﺣﻠﻣ) ﻲﺑﻧﺎﺟﻟﺍ ﺽﺑﻘﻣﻟﺍ ﺏﻳﻛﺭﺗ
7
ﻥﻣ ﻡﺍﺩﺧﺗﺳﻼﻟ ﺓﺍﺩﻷﺍ ﻲﺑﻧﺎﺟ ﻥﻣ ﻱﺃ ﻰﻠﻋ ﻲﺑﻧﺎﺟﻟﺍ ﺽﺑﻘﻣﻟﺍ ﺏﻳﻛﺭﺗ ﻥﻛﻣﻳ
.ﻯﺭﺳﻳﻟﺍ ﻭﺃ ﻰﻧﻣﻳﻟﺍ ﺩﻳﻟﺍ ﻥﻭﻣﺩﺧﺗﺳﻳ ﻥﻳﺫﻟﺍ ﻝﺑﻗ
ﺏﻧﺎﺟﻟﺍ ﻰﻠﻋ ﺫﺧﺄﻣﻟﺍ ﻝﺧﺍﺩ ﻪﻌﺿﻭﺑ ﻡﻗ ،ﻲﺑﻧﺎﺟﻟﺍ ﺽﺑﻘﻣﻟﺍ ﺏﻳﻛﺭﺗﻟ
(6 ﻝﻛﺷﻟﺍ) .ﻪﻁﺑﺭ ﻡﻛﺣﺃﻭ ﻲﻔﻠﺧﻟﺍ ءﺎﻁﻐﻠﻟ ﺏﻭﻏﺭﻣﻟﺍ
(ﺔﻳﺭﺎﻳﺗﺧﺍ ﺕﺎﻘﺣﻠﻣ) ﻑﺎﻁﺧﻟﺍ ﺏﻳﻛﺭﺗ
8
(ﻲﺑﻧﺎﺟﻟﺍ ﻁﺑﺭﻟﺍ) ﻑﺎﻁﺧﻠﻟ(7 ﻝﻛﺷﻟﺍ)
ﻲﻔﻠﺧﻟﺍ ءﺎﻁﻐﻠﻟ ﺏﻭﻏﺭﻣﻟﺍ ﺏﻧﺎﺟﻟﺍ ﻰﻠﻋ ﻡﺎﻛﺣﺈﺑ ﻑﺎﻁﺧﻟﺍ ﺕﻳﺑﺛﺗﺑ ﻡﻗ
.ﻑﺎﻁﺧﻟﺍ ﻊﻣ ﺭﻓﻭﺗﻣﻟﺍ
M10 ﺭﺎﻣﺳﻣ ﻡﺍﺩﺧﺗﺳﺎﺑ

20
ﺔﻳﺑﺭﻌﻟﺍ
۱
ﺔﻣﺎﻌﻟﺍ ﺔﻣﻼﺳﻟﺍ ﺕﺎﻣﻳﻠﻌﺗ
!!! ﺭﻳﺫﺣﺗ
ﺕﺎﻣﻳﻠﻌﺗﻟﺍ ﻊﻳﻣﺟ ﺓءﺍﺭﻗ ﻰﺟﺭﻳ
ﺔﻣﺩﺻ ﺙﻭﺩﺣ ﻰﻟﺇ ﻩﺎﻧﺩﺃ ﺔﺣﺿﻭﻣﻟﺍ ﺕﺎﻣﻳﻠﻌﺗﻟﺍ ﻩﺫﻬﺑ ﻡﺍﺯﺗﻟﻻﺍ ﻡﺩﻋ ﻱﺩﺅﻳ ﺩﻗ
.ﺓﺭﻳﻁﺧ ﺔﺑﺎﺻﺇ ﻭﺃ ﻕﻳﺭﺣ ﺏﻭﺷﻧ ﻭﺃ ﺔﻳﺑﺭﻬﻛ
ﺔﺣﺿﻭﻣﻟﺍ ﺕﺍﺭﻳﺫﺣﺗﻟﺍ ﻊﻳﻣﺟ ﻲﻓ ﺩﺭﺍﻭﻟﺍ "ﺔﻳﺋﺎﺑﺭﻬﻛﻟﺍ ﺓﺩﻌﻟﺍ" ﺢﻠﻁﺻﻣﻟﺍ
ﺓﺩﻌﻟﺍ ﻭﺃ ﻙﺑ ﺔﺻﺎﺧﻟﺍ (ﺔﻳﻛﻠﺳﻟﺍ) ﺔﻳﺳﻳﺋﺭﻟﺍ ﺔﻳﺋﺎﺑﺭﻬﻛﻟﺍ ﺓﺩﻌﻟﺍ ﻰﻟﺇ ﺭﻳﺷﻳ ﻩﺎﻧﺩﺃ
.ﺔﻳﺭﺎﻁﺑﻠﻟ (ﺔﻳﻛﻠﺳﻼﻟﺍ) ﺔﻳﺋﺎﺑﺭﻬﻛﻟﺍ
:ﺔﻳﻟﺎﺗﻟﺍ ﺕﺎﻣﻳﻠﻌﺗﻟﺍ ﻉﺎﺑﺗﺍ ﻰﺟﺭﻳ
ﻝﻣﻌﻟﺍ ﺔﻘﻁﻧﻣ ﻥﺎﻣﺃ (
1
.ﻙﻠﻐﺷ ﻥﺎﻛﻣ ﺓءﺎﺿﺇ ﻥﺳﺣﻭ ﺔﻓﺎﻅﻧ ﻰﻠﻋ ﻅﻓﺎﺣ (ﺃ
ﺏﺑﺳﺗﺗ ﺓءﺎﺿﻣ ﺭﻳﻐﻟﺍ ﻝﻣﻌﻟﺍ ﺕﻻﺎﺟﻣﻭ ﻝﻣﻌﻟﺍ ﻥﺎﻛﻣ ﻲﻓ ﻰﺿﻭﻔﻟﺎﻓ
.ﺙﺩﺍﻭﺣ ﻉﻭﻗﻭ ﻲﻓ
ﺩﻭﺟﻭ ﻲﻓ ﻱﺃ ﺔﻳﺭﺎﺟﻔﻧﺍ ءﺍﻭﺟﺃ ﻲﻓ ﺔﻳﺋﺎﺑﺭﻬﻛﻟﺍ ﺩﺩﻌﻟﺍ ﻝﻳﻐﺷﺗﺑ ﻡﻘﺗ ﻻ (ﺏ
.ﺭﺎﺑﻏ ﻭﺃ ﻝﺎﻌﺗﺷﻼﻟ ﺔﻠﺑﺎﻗ ﺕﺍﺯﺎﻏ ﻭﺃ ﻝﺋﺍﻭﺳ
.ﺔﻧﺧﺩﻷﺍ ﺭﺎﺑﻏ ﻝﺎﻌﺷﺇ ﻰﻠﻋ ﻝﻣﻌﺗ ﺓﺭﺍﺭﺷ ﺔﻳﺋﺎﺑﺭﻬﻛﻟﺍ ﺩﺩﻌﻟﺍ ﺙﺩﺣﺗ
ﻝﺎﻔﻁﻷﺍ ﻝﻭﺎﻧﺗﻣ ﻥﻋ ﺓﺩﻳﻌﺑ ﺔﻳﺋﺎﺑﺭﻬﻛﻟﺍ ﺩﺩﻌﻟﺍ ﻥﻭﻛﺗ ﻥﺃ ﻰﻠﻋ ﻅﻓﺎﺣ (ﺕ
.ﻙﺑ ﻥﻳﻁﻳﺣﻣﻟﺍ ﻭﺃ
ﻙﺩﻘﻓ ﻰﻟﺇ ﻱﺩﺅﺗ ﻥﺃ ﻥﻛﻣﻣﻟﺍ ﻥﻣ ﺕﻳﺗﺷﺗﻟﺍ ﻝﺎﻛﺷﺃ ﻥﻣ ﻝﻛﺷ ﻱﺃ
.ﺓﺭﻁﻳﺳﻟﺍ
ﺔﻳﺑﺭﻬﻛﻟﺍ ﺕﺎﻣﺩﺻﻟﺍ ﻥﻣ ﺔﻳﺎﻗﻭﻟﺍ (
2
ﻱﺎﺑ ﺱﺑﺎﻘﻟﺍ ﻝﻳﺩﻌﺗ ﺭﻅﺣﻳ ،ءﺎﺑﺭﻬﻛﻟﺍ ﺫﻔﻧﻣﺑ ﺱﺑﺎﻘﻟﺍ ﻝﻳﺻﻭﺗ ﺏﺟﻳ (ﺃ
.ﺔﻘﻳﺭﻁ
.ﺔﻳﺿﺭﻷﺍ ﺔﻳﺋﺎﺑﺭﻬﻛﻟﺍ ﺩﺩﻌﻟﺍ ﻊﻣ ﺊﻳﺎﻬﻣ ﺱﺑﺎﻗ ﻱﺃ ﻡﺩﺧﺗﺳﺗ ﻻ
ﺭﻁﺧ ﻥﻣ ﺔﻣﺋﻼﻣﻟﺍ ﺱﺑﺎﻘﻣﻟﺍﻭ ﺎﻫﺭﻳﻳﻐﺗ ﻡﺗﻳ ﻡﻟ ﻲﺗﻟﺍ ﺱﺑﺍﻭﻘﻟﺍ ﺽﻔﺧﺗ
. ﺔﻳﺋﺎﺑﺭﻬﻛﻟﺍ ﺕﺎﻣﺩﺻﻟﺍ ﺙﻭﺩﺣ
ﺏﻳﺑﺎﻧﻷﺍ ﻝﺛﻣ ﺔﻳﺿﺭﻷﺍ ﺢﻁﺳﻷﺍ ﻊﻣ ﻱﺩﺳﺟﻟﺍ ﺱﻣﻼﺗﻟﺍ ﺏﻧﺟﺗ (ﺏ
.ﺩﻗﺍﻭﻣﻟﺍﻭ ﺕﺎﺟﻼﺛﻟﺍﻭ ﺔﻳﺭﺍﺭﺣﻟﺍ ﺕﻻﺩﺎﺑﻣﻟﺍﻭ
ﻙﺎﻧﻫ ﺔﻳﺿﺭﻷﺍ ﺢﻁﺳﻷﺍ ﻙﻠﺗ ﻥﻣ ﻱﻷ ﻙﻣﺳﺟ ﺔﺳﻣﻼﻣ ﺔﻟﺎﺣ ﻲﻓ
.ﺔﻳﺑﺭﻬﻛ ﺔﻣﺩﺻﻟ ﻙﺿﺭﻌﺗﻟ ﺓﺭﻭﻁﺧ
.ﺔﺑﻭﻁﺭﻟﺍ ﻭﺃ ﺭﻁﻣﻠﻟ ﺔﻳﺋﺎﺑﺭﻬﻛﻟﺍ ﺩﺩﻌﻟﺍ ﺽﺭﻌﺗ ﻻ (ﺕ
ﺓﺩﻌﻟﺍ ﻝﺧﺍﺩ ﻰﻟﺇ ءﺎﻣﻟﺍ ﺏﺭﺳﺗ ﻥﺇ ﺔﻳﺋﺎﺑﺭﻬﻛﻟﺍ ﺕﺎﻣﺩﺻﻟﺍ ﺭﻁﺧ ﺩﺍﺩﺯﻳ
.ﺔﻳﺋﺎﺑﺭﻬﻛﻟﺍ
ﻭﺃ ﻝﻣﺣﻟ
ً
ﺎﻘﻠﻁﻣ ﻪﻠﻣﻌﺗﺳﺗ ﻻ ،(ﻙﻠﺳﻟﺍ) ﻝﺑﺎﻛﻟﺍ ﻝﺎﻣﻌﺗﺳﺍ ءﻲﺳﺗ ﻻ (ﺙ
.ﺱﺑﻘﻣﻟﺍ ﻥﻣ ﺱﺑﺎﻘﻟﺍ ﺏﺣﺳﻟ ﻭﺃ ﺔﻳﺋﺎﺑﺭﻬﻛﻟﺍ ﺓﺩﻌﻟﺍ ﻊﻓﺩ ﻭﺃ ﺩﺷ
ﻑﺍﻭﺣﻟﺍ ﻭﺃ ﺕﻳﺯﻟﺍ ﻭﺃ ﺓﺭﺍﺭﺣﻟﺍ ﺭﺩﺎﺻﻣ ﻥﻋ
ً
ﺍﺩﻳﻌﺑ ﻪﻳﻠﻋ ﻅﻓﺎﺣﻭ
.ﺔﻛﺭﺣﺗﻣﻟﺍ ﺯﺎﻬﺟﻟﺍ ءﺍﺯﺟﺃ ﻭﺃ ﺓﺩﺎﺣﻟﺍ
ﺕﺎﻣﺩﺻﻟﺍ ﺭﻁﺧ ﻥﻣ ﺔﻛﺑﺎﺷﺗﻣﻟﺍ ﻭﺃ ﺔﻔﻟﺎﺗﻟﺍ (ﻙﻼﺳﻷﺍ) ﺕﻼﺑﺎﻛﻟﺍ ﺩﻳﺯﺗ
.ﺔﻳﺑﺭﻬﻛﻟﺍ
ﻙﻠﺳ ﻡﺍﺩﺧﺗﺳﺎﺑ ﺢﺻﻧﻳ ،ﺝﺭﺎﺧﻟﺎﺑ ﺔﻳﺋﺎﺑﺭﻬﻛﻟﺍ ﺓﺩﻌﻟﺍ ﻝﻳﻐﺷﺗ ﺔﻟﺎﺣ ﻲﻓ (ﺝ
.ﻲﺟﺭﺎﺧﻟﺍ ﻝﺎﻣﻌﺗﺳﻻﺍ ﻊﻣ ﺏﺳﺎﻧﺗﻳ (ﻝﺑﺎﻛ)
ﻥﻣ ﻝﻳﻠﻘﺗﻠﻟ ﻲﺟﺭﺎﺧﻟﺍ ﻝﺎﻣﻌﺗﺳﻻﺍ ﻊﻣ ﺏﺳﺎﻧﻣ ﻙﻠﺳ ﻡﺍﺩﺧﺗﺳﺎﺑ ﻡﻗ
.ﺔﻳﺑﺭﻬﻛ ﺔﻣﺩﺻﻟ ﺽﺭﻌﺗﻟﺍ ﺓﺭﻭﻁﺧ
ﺔﻳﺻﺧﺷﻟﺍ ﺔﻣﻼﺳﻟﺍ (
3
ﺓﺩﻌﻟﺍ ﺔﻁﺳﺍﻭﺑ ﻝﻣﻌﻟﺎﺑ ﻡﻗﻭ ﻪﻠﻌﻔﺗ ﺎﻣ ﻰﻟﺇ ﻪﺑﺗﻧﺃﻭ ﺎ
ً
ﻅﻘﻳ ﻥﻛ (ﺃ
ﻙﺭﻭﻌﺷ ﺔﻟﺎﺣ ﻲﻓ ﺔﻳﺋﺎﺑﺭﻬﻛﻟﺍ ﺓﺩﻌﻟﺍ ﻡﺩﺧﺗﺳﺗ ﻻ .ﻝﻘﻌﺗﺑ ﺔﻳﺋﺎﺑﺭﻬﻛﻟﺍ
ﺩﺍﻭﻣ ﻭﺃ ﺔﻳﻭﺩﺃ ﻭﺃ ﺓﺭﺩﺧﻣ ﺩﺍﻭﻣ ﺭﻳﺛﺄﺗ ﺕﺣﺗ ﺕﻧﻛ ﺍﺫﺇ ﻭﺃ ﺏﻌﺗﻟﺎﺑ
.ﺔﻳﻟﻭﺣﻛ
ﻱﺩﺅﻳ ﺩﻗ ﺔﻳﺋﺎﺑﺭﻬﻛﻟﺍ ﺓﺩﻌﻟﺍ ﻡﺍﺩﺧﺗﺳﺇ ﺩﻧﻋ ﺓﺩﺣﺍﻭ ﺔﻅﺣﻠﻟ ﻩﺎﺑﺗﻧﻹﺍ ﻡﺩﻋ
.ﺓﺭﻳﻁﺧ ﺔﺑﺎﺻﺇ ﻰﻟﺇ
.ﻥﻳﻌﻠﻟ ﻲﻗﺍﻭﻟﺍ ﻉﺎﻧﻘﻟﺍ ءﺍﺩﺗﺭﺎﺑ ﺎ
ً
ﻣﺋﺍﺩ ﻡﻗ .ﻥﺎﻣﻷﺍ ﺕﺍﻭﺩﺃ ﻡﺩﺧﺗﺳﺍ (ﺏ
ﺔﻳﺫﺣﺃ ﻭﺃ ﺭﺎﺑﻐﻟﺍ ﻥﻣ ﻲﻗﺍﻭﻟﺍ ﻉﺎﻧﻘﻟﺍ ﻝﺛﻣ ﻥﺎﻣﻷﺍ ﺕﺍﻭﺩﺃ ﻝﻣﻌﺗﺳ
ﻊﻣﺳﻟﺍ ﺔﻳﺎﻣﺣ ﺓﺯﻬﺟﺃ ﻭﺃ ﺔﺑﻠﺻ ﺔﻌﺑﻗ ﻭﺃ ﻕﻻﺯﻧﻼﻟ ﺓﺩﺎﺿﻣﻟﺍ ﻥﺎﻣﻷﺍ
ﺕﻻﺎﻣﺗﺣﺍ ﻝﻳﻠﻘﺗ ﻰﻠﻋ ﺔﻧﻳﻌﻣ ﻑﻭﺭﻅ ﻲﻓ ﺎﻬﻣﺍﺩﺧﺗﺳﺍ ﻡﺗﻳ ﻲﺗﻟﺍﻭ
.ﺔﻳﺻﺧﺷ ﺕﺎﺑﺎﺻﻹ ﺽﺭﻌﺗﻟﺍ
ﻊﺿﻭ ﻲﻓ ﺡﺎﺗﻔﻣﻟﺍ ﻥﺃ ﻥﻣ ﺩﻛﺄﺗ .ﺩﻭﺻﻘﻣﻟﺍ ﺭﻳﻏ ﻝﻳﻐﺷﺗﻟﺍ ﺏﻧﺟﺗ (ﺕ
.ﻝﻳﺻﻭﺗﻟﺍ ﻝﺑﻗ ﻑﺎﻘﻳﻹﺍ
ﻭﺃ ﺡﺎﺗﻔﻣﻟﺍ ﻲﻓ ﻙﻌﺑﺻﺇ ﺩﻭﺟﻭ ﻊﻣ ﺔﻗﺎﻁﻟﺍ ﺕﺍﻭﺩﺃ ﻝﻣﺣ ﻱﺩﺅﻳ
ﻝﻳﻐﺷﺗﻟﺍ ﻊﺿﻭ ﻲﻓ ﺡﺎﺗﻔﻣﻟﺍ ﺎﻬﻳﻓ ﻥﻭﻛﻳ ﻲﺗﻟﺍ ﺔﻗﺎﻁﻟﺍ ﺕﺍﻭﺩﺃ ﻝﻳﺻﻭﺗ
.ﺙﺩﺍﻭﺣ ﻉﻭﻗﻭ ﻝﺎﻣﺗﺣﺍ ﻰﻟﺇ
.ﺔﻳﺋﺎﺑﺭﻬﻛﻟﺍ ﺓﺩﻌﻟﺍ ﻝﻳﻐﺷﺗ ﻝﺑﻗ ﻁﺑﺭﻟﺍ ﺡﺎﺗﻔﻣ ﻭﺃ ﻁﺑﺿﻟﺍ ﺩﺩﻋ ﻉﺯﻧﺍ (ﺙ
ﻥﻣ ﻙﺭﺣﺗﻣﻟﺍ ءﺯﺟﻟﺍ ﺭﺎﺳﻳ ﻰﻠﻋ ﻁﺑﺿ ﺡﺎﺗﻔﻣ ﻭﺃ ﻁﺑﺭ ﺡﺎﺗﻔﻣ ﺩﻭﺟﻭ
.ﺔﻳﺻﺧﺷ ﺔﺑﺎﺻﺇ ﺙﻭﺩﺣ ﻰﻟﺇ ﻱﺩﺅﻳ ﺔﻳﺋﺎﺑﺭﻬﻛﻟﺍ ﺓﺩﻌﻟﺍ
ﻥﻳﺑﻭ ﻙﻧﻳﺑ ﺔﺑﺳﺎﻧﻣ ﺔﻓﺎﺳﻣ ﻙﺭﺗﺍ ،ﺔﻳﺋﺎﺑﺭﻬﻛﻟﺍ ﺓﺩﻌﻟﺍ ﻥﻣ ﺏﺭﺗﻘﺗ ﻻ (ﺝ
.ﺕﺎﻗﻭﻷﺍ ﻊﻳﻣﺟ ﻲﻓ ﻙﻧﺯﺍﻭﺗ ﻰﻠﻋ ﻅﻓﺎﺣﻭ ﺔﻳﺋﺎﺑﺭﻬﻛﻟﺍ ﺓﺩﻌﻟﺍ
ﻲﻓ ﻝﺿﻓﺃ ﻝﻛﺷﺑ ﺯﺎﻬﺟﻟﺍ ﻰﻠﻋ ﺓﺭﻁﻳﺳﻟﺍ ﻥﻣ ﻙﻟﺫ ﻙﻟ ﺢﻣﺳﻳﺳ
.ﺔﻌﻗﻭﺗﻣﻟﺍ ﺭﻳﻏ ﻑﻗﺍﻭﻣﻟﺍ
ﺎﻬﺑ ﻭﺃ ﺔﺿﺎﻔﺿﻓ ﺱﺑﻼﻣ ﻱﺩﺗﺭﺗ ﻻ ،ﺔﺑﺳﺎﻧﻣ ﺱﺑﻼﻣ ءﺍﺩﺗﺭﺎﺑ ﻡﻗ (ﺡ
ﺱﺑﻼﻣﻟﺍﻭ ﻙﺭﻌﺷ ﺩﺎﻌﺑﺇ ﻰﻠﻋ
ً
ﺎﻣﺋﺍﺩ ﻅﻓﺎﺣﻭ ،ﻲﻠﺣ ﻭﺃ ﺔﺑﺋﺎﺳ ﻑﺍﺭﻁﺃ
ﺓﺩﻌﻟﺍ ﻥﻣ ﺔﻛﺭﺣﺗﻣﻟﺍ ءﺍﺯﺟﻷﺍ ﻥﻋ
ً
ﺍﺩﻳﻌﺑ ﺯﺎﻔﻘﻟﺍﻭ ﺎﻬﻳﺩﺗﺭﺗ ﻲﺗﻟﺍ
.ﺔﻳﺋﺎﺑﺭﻬﻛﻟﺍ
ﻲﻠﺣﻟﺍ ﻭﺃ ﻑﺍﺭﻁﺃ ﺎﻬﺑ ﻲﺗﻟﺍ ﻭﺃ ﺔﺿﺎﻔﺿﻔﻟﺍ ﺱﺑﻼﻣﻟﺍ ﻙﺑﺷﺎﺗﺗ ﺩﻗ
.ﺏﺎﻘﺛﻣﻠﻟ ﺔﻛﺭﺣﺗﻣﻟﺍ ءﺍﺯﺟﻷﺎﺑ ﻝﻳﻭﻁﻟﺍ ﺭﻌﺷﻟﺍﻭﺃ
ﺎﻬﻧﺃ ﻥﻣ ﺩﻛﺄﺗﻓ .ﺭﺎﺑﻐﻟﺍ ﻊﻳﻣﺟﺗﻭ ﻁﻔﺷ ﺓﺯﻬﺟﺃ ﺏﻳﻛﺭﺗ ﺯﺎﺟ ﻥﺇ (ﺥ
.ﻡﻳﻠﺳ ﻝﻛﺷﺑ ﺎﻬﻣﺍﺩﺧﺗﺳﺍ ﻡﺗﻳﻭ ﺔﻠﺻﺗﻣ
ﺭﻁﺎﺧﻣﻟﺍ ﻝﻳﻠﻘﺗ ﻰﻟﺇ ﺓﺯﻬﺟﻷﺍ ﻩﺫﻫ ﻡﺍﺩﺧﺗﺳﺍ ﻱﺩﺅﻳ ﻥﺃ ﻥﻛﻣﻣﻟﺍ ﻥﻣ
.ﺭﺎﺑﻐﻟﺎﺑ ﺔﻘﻠﻌﺗﻣﻟﺍ
:ﺎﻬﺑ ﺔﻳﺎﻧﻌﻟﺍﻭ ﺔﻳﺋﺎﺑﺭﻬﻛﻟﺍ ﺓﺩﻌﻟﺍ ﻡﺍﺩﺧﺗﺳﺍ ﺔﻘﻳﺭﻁ (
4
ﺔﻳﺋﺎﺑﺭﻬﻛﻟﺍ ﺓﺩﻌﻟﺍ ﻡﺩﺧﺗﺳﺍﻭ ،ﺔﻳﺋﺎﺑﺭﻬﻛﻟﺍ ﺓﺩﻌﻟﺍ ﻡﺍﺩﺧﺗﺳﺍ ﻲﻓ ﻁﺭﻔﺗ ﻻ (ﺃ
.ﻪﺑ ﻡﻭﻘﺗ ﻱﺫﻟﺍ ﻝﻣﻌﻠﻟ ﺔﺑﺳﺎﻧﻣﻟﺍ
ﻙﺩﻋﺎﺳﻳ ﺍﺫﻫ ﻥﺈﻓ ﻙﻟﺫﻟ ﺔﺻﺻﺧﻣﻟﺍ ﺔﻳﺋﺎﺑﺭﻬﻛﻟﺍ ﺓﺩﻌﻟﺍ ﻙﻣﺍﺩﺧﺗﺳﺍ ﺩﻧﻋ
ﻡﺗ ﻲﺗﻟﺍ ﺔﻣﻬﻣﻠﻟ
ً
ﺎﻌﺑﺗ
ً
ﺎﻧﻣﺃ ﺭﺛﻛﺃﻭ ﻝﺿﻓﺃ ﺔﺟﻳﺗﻧ ﻰﻠﻋ ﻝﻭﺻﺣﻟﺍ ﻰﻠﻋ
.ﺎﻬﻟ ﺏﺎﻘﺛﻣﻟﺍ ﻡﻳﻣﺻﺗ
ﺓﺩﻌﻟﺍ ﻡﺩﺧﺗﺳﺗ ﻻ ﻝﻣﻌﻟﺍ ﻥﻋ ﻝﻳﻐﺷﺗﻟﺍ ﺡﺎﺗﻔﻣ ﻝﻁﻌﺗ ﺔﻟﺎﺣ ﻲﻓ (ﺏ
.ﺔﻳﺋﺎﺑﺭﻬﻛﻟﺍ
ﺎﻬﺑ ﺹﺎﺧﻟﺍ ﻝﻳﻐﺷﺗﻟﺍ ﺡﺎﺗﻔﻣ ﻲﻓ ﻡﻛﺣﺗﻟﺍ ﻥﻛﻣﻳ ﻻ ﺔﻳﺋﺎﺑﺭﻬﻛ ﺓﺩﻋ ﻱﺃ
.ﺡﺎﺗﻔﻣﻟﺍ ﺍﺫﻫ ﺡﻼﺻﺇ ﺏﺟﻳﻭ ﺎﻬﻣﺍﺩﺧﺗﺳﺍ ﺩﻧﻋ
ً
ﺍﺭﻁﺧ ﻝﻛﺷﺗ ﺎﻬﻧﺈﻓ
ﻭﺃ ﺕﻼﻳﺩﻌﺗ ﻱﺃ ءﺍﺭﺟﺇ ﻝﺑﻗ ﺔﻗﺎﻁﻟﺍ ﺭﺩﺻﻣ ﻥﻋ ﺱﺑﺎﻘﻟﺍ ﻝﺻﻔﺑ ﻡﻗ (ﺕ
.ﺔﻗﺎﻁﻟﺍ ﺕﺍﻭﺩﺃ ﻥﻳﺯﺧﺗ ﻭﺃ ﺕﺎﻘﺣﻠﻣﻟﺍ ﺭﻳﻳﻐﺗ
ﺭﻳﻏ ﻝﻛﺷﺑ ﺔﻳﺋﺎﺑﺭﻬﻛﻟﺍ ﺓﺩﻌﻟﺍ ﻝﻳﻐﺷﺗ ﻩﺫﻫ ﻁﺎﻳﺗﺣﻻﺍ ﺕﺍءﺍﺭﺟﺇ ﻊﻧﻣﺗ
.ﺩﻭﺻﻘﻣ
ﻝﻭﺎﻧﺗﻣ ﻥﻋ
ً
ﺃﺩﻳﻌﺑ ﺔﻣﺩﺧﺗﺳﻣ ﺭﻳﻐﻟﺍ ﺔﻳﺋﺎﺑﺭﻬﻛﻟﺍ ﺩﺩﻌﻟﺍ ﻥﻳﺯﺧﺗﺑ ﻡﻗ (ﺙ
ﻝﻳﻐﺷﺗ ﻥﻋ ﺓﺭﻛﻓ ﻪﻳﺩﻟ ﺱﻳﻟ ﺹﺧﺷ ﻱﻷ ﺢﻣﺳﺗ ﻻﻭ ﻝﺎﻔﻁﻷﺍ
.ﺎﻬﻠﻳﻐﺷﺗ ﻭﺃ ﺕﺍﻭﺩﻷﺍ ﻩﺫﻫ ﻥﻣ ﺏﺍﺭﺗﻗﻻﺎﺑ ﺏﺎﻘﺛﻣﻟﺍ
ﻥﻳﺑﺭﺩﻣ ﺭﻳﻐﻟﺍ ﺹﺎﺧﺷﻷﺍ ﻱﺩﻳﺃ ﻲﻓ ﺓﺭﻭﻁﺧ ﻝﺛﻣﺗ ﻝﻳﻐﺷﺗﻟﺍ ﺕﺍﻭﺩﺃ
.ﺎﻬﻳﻠﻋ
ﺔﻳﺣﺎﻧ ﻥﻣ
ً
ﺍﺩﻳﺟ ﺎﻬﺻﺣﻔﺑ ﻡﻗ ،ﺔﻳﺋﺎﺑﺭﻬﻛﻟﺍ ﺩﺩﻌﻟﺍ ﺔﻣﻼﺳ ﻥﻣ ﺩﻛﺄﺗ (ﺝ
ءﺯﺟ ﻱﺃ ﻲﻓ ﺭﺳﻛ ﻱﺃ ﺩﻭﺟﻭ ﻭﺃ ﺔﻛﺭﺣﺗﻣﻟﺍ ءﺍﺯﺟﻷﺍ ﻁﺑﺍﺭﺗ ﻯﺩﻣ
.ﺎﻬﻠﻳﻐﺷﺗ ﻰﻠﻋ ﺭﺛﺅﻳ ﺎﻣﺑ ﺎﻬﺋﺍﺯﺟﺃ ﻥﻣ
ﻝﺑﻗ ﺎﻬﺣﻼﺻﺇ ﺏﺟﻳ ﻝﻳﻐﺷﺗﻟﺍ ﺕﺍﻭﺩﺄﺑ ﻑﻠﺗ ﺙﻭﺩﺣ ﺔﻟﺎﺣ ﻲﻓ
.ﻡﺍﺩﺧﺗﺳﻻﺍ
ﺭﻳﻏ ﻝﻛﺷﺑ ﺔﻧﺎﻳﺻﻟﺍ ﺔﻳﻠﻣﻌﺑ ﻡﺎﻳﻘﻟﺍ ﻭﺃ ﻝﻳﻐﺷﺗﻟﺍ ﺕﺍﻭﺩﺃ ﺔﻧﺎﻳﺻ ﻡﺩﻋ
.ﺙﺩﺍﻭﺣﻟﺍ ﻥﻣ ﺭﻳﺛﻛﻟﺍ ﺙﻭﺩﺣ ﻰﻟﺇ ﻱﺩﺅﻳ ﺢﻳﺣﺻ
ﺔﻔﻳﻅﻧﻭ ﺓﺩﺎﺣ ﻊﻳﻁﻘﺗﻟﺍ ﺕﺍﻭﺩﺃ ﻰﻠﻋ ﻅﺎﻔﺣﻟﺍ ﻰﺟﺭﻳ (ﺡ
ﻝﻬﺳﻳ ﺙﻳﺣﺑ ﻑﺍﻭﺣﻟﺍ ﺓﺩﺎﺣ ﻊﻳﻁﻘﺗﻟﺍ ﺕﺍﻭﺩﺃ ﻰﻠﻋ ﻅﺎﻔﺣﻟﺍ ﻰﺟﺭﻳ
.ﺎﻬﻳﻓ ﻡﻛﺣﺗﻟﺍ
ﻕﻓﺍﻭﺗﻳ ﺎﻣﺑ ،ﺦﻟﺇ ﻊﻁﻘﻟﺍ ﻡﻼﻗﺃﻭ ﺕﺎﻘﺣﻠﻣﻟﺍﻭ ،ﺔﻗﺎﻁﻟﺍ ﺓﺍﺩﺃ ﻡﺩﺧﺗﺳﺍ (ﺥ
ﺔﻗﺎﻁﻟﺍ ﺓﺍﺩﺃ ﻉﻭﻧﻟ ﺔﺻﺻﺧﻣﻟﺍ ﺔﻘﻳﺭﻁﻟﺎﺑﻭ ﺕﺎﻣﻳﻠﻌﺗﻟﺍ ﻩﺫﻫ ﻊﻣ
ﺏﻭﻠﻁﻣﻟﺍ ﻝﻣﻌﻟﺍﻭ ﻝﻣﻌﻟﺍ ﻑﻭﺭﻅ ﺭﺎﺑﺗﻋﻻﺍ ﻲﻓ ﻊﺿﻭﻟﺍ ﻊﻣ ،ﺩﺩﺣﻣﻟﺍ
.ﻪﺑ ﻡﺎﻳﻘﻟﺍ
ﻰﻟﺇ ﺎﻬﻟ ﺔﺻﺻﺧﻣﻟﺍ ﺭﻳﻏ ﺽﺍﺭﻏﻸﻟ ﺔﻗﺎﻁﻟﺍ ﺓﺍﺩﺃ ﻡﺩﺧﺗﺳﺍ ﻱﺩﺅﻳ ﺩﻗ
.ﺭﻳﻁﺧ ﻑﻗﻭﻣ ﺩﻭﺟﻭ
ﺔﻣﺩﺧﻟﺍ (
5
ﻁﻘﻓﻭ ﻥﻳﺻﺻﺧﺗﻣﻟﺍ ﻝﺑﻗ ﻥﻣ ﻁﻘﻓ ﺔﻳﺋﺎﺑﺭﻬﻛﻟﺍ ﻙﺗﺩﻋ ﺢﻳﻠﺻﺗﺑ ﺢﻣﺳﺍ (ﺃ
. ﻁﻘﻓ ﺔﻳﻠﺻﻷﺍ ﺭﺎﻳﻐﻟﺍ ﻊﻁﻗ ﻝﺎﻣﻌﺗﺳﺈﺑ
.ﺯﺎﻬﺟﻟﺍ ﻥﺎﻣﺃ ﻰﻠﻋ ﺔﻅﻓﺎﺣﻣﻟﺍ ﻙﻟﺫ ﻥﻣﺅﻳ
ﺕﺎﻁﺎﻳﺗﺣﻻﺍ
.ﻥﺳﻟﺍ ﺭﺎﺑﻛﻭ ﻝﺎﻔﻁﻷﺍ ﻝﻭﺎﻧﺗﻣ ﻥﻋ
ً
ﺍﺩﻳﻌﺑ ﺔﻳﺋﺎﺑﺭﻬﻛﻟﺍ ﺓﺩﻌﻟﺍ ﻊﺿﻭ ﻰﺟﺭﻳ
ﻥﻋ ﺓﺩﻳﻌﺑ ﺔﻳﺋﺎﺑﺭﻬﻛﻟﺍ ﺓﺩﻌﻟﺍ ﻰﻠﻋ ﻅﺎﻔﺣﻟﺍ ﺏﺟﻳ ﻡﺍﺩﺧﺗﺳﻻﺍ ﻡﺩﻋ ﺔﻟﺎﺣ ﻲﻓ
.ﻥﺳﻟﺍ ﺭﺎﺑﻛﻭ ﻝﺎﻔﻁﻷﺍ ﻝﻭﺎﻧﺗﻣ

21
2
3
4
5
6
7
8
9
10
1
11
12
13
14
15
16
12
17
18
19
20
23
24
25
26
27
30
31
2
501
21
22
28
29
32
33
34
35
36
ABCD
1 980-057 1 10TL2
2 1 950-292 1 10TLRA “1”
2 2 312-516 1 10TLRD-N
3 948-001 1
4 321-626 1
5 305-490 2 D4×30
6 600-2VV 1 6002VVCMPS2L
7 939-544 1
8 301-815 2 D4×45
9 321-625 1
10 321-627 1
11 321-624 1
12 608-VVM 2 608VVC2PS2L
13 1 360-596G 1 220V
13 2 360-596E 1 230V-240V
14 321-623 1
15 950-514 2 D4×40
16 1 340-547G 1 220V
16 2 340-547E 1 230V
16 3 340-547F 1 240V
17 321-622 1
18 ———— 1
19 321-633 1 110V-240V
20 321-630 1
21 321-634 1 110V-240V
22 321-631 1
23 301-653 3 D4×20
24 321-629 1
25 321-632 1
26 321-628 1
27 999-041 2
28 955-203 2
29 ———— 1
30 994-273 1
31 992-635 1
32 984-750 2 D4×16
33 937-631 1
34 981-373 2
35 953-327 1 D8.8
36 ———— 1
501 321-635 1

22

23

Hitachi Koki Co., Ltd.
509
Code No. C99120033 F
Printed in China
Transcripción de documentos
Drill Taladro 手提電鑽 สวานไฟฟา D 10VC2 Handling instructions Instrucciones de manejo 使用說明書 คูมือการใชงาน Read through carefully and understand these instructions before use. Leer cuidadosamente y comprender estas instrucciones antes del uso. 使用前務請詳加閱讀 โปรดอานโดยละเอียดและทําความเขาใจกอนใชงาน 000Book̲D10VC2̲Asia.indb 1 2015/03/25 17:58:00 1 2 1 6 5 4 2 3 3 4 9 ! 8 4 7 0 5 6 % @ 4 # $ 7 8 3 ^ ( * & 2 000Book̲D10VC2̲Asia.indb 2 2015/03/25 17:58:00 English Español 中國語 1 Drill chuck Portabrocas 電鑽卡盤 2 3 Chuck wrench Llave 卡盤扳手 Tighten Apretar 擰緊 4 Loosen Aflojar 鬆開 5 Sleeve Manguito 套管 6 Ring Anillo 套環 7 Open end wrench Llave de boca 開口扳手 8 Switch trigger Interruptor de gatillo 起動器開關 9 Push button Botón pulsador 按鈕 0 R mark Marca R R (右側)標記 ! mark Marca (左側)標記 ไทย ล็อกสวาน ประแจล็อก ขันใหแนน คลาย ปลอก วงแหวน ประแจปากตาย สวิทซ ไก ปุมกด เครื่องหมาย เครื่องหมาย R ﺍﻟﻌﺭﺑﻳﺔ ﻣﻘﺑﺽ ﺍﻟﺣﻔﺭ ﺇﺣﻛﺎﻡ ﺍﻟﺭﺑﻁ ﺇﺭﺧﺎء ﺟﻠﺑﺔ ﺣﻠﻘﺔ ﻣﻔﺗﺎﺡ ﺭﺑﻁ ﻣﻔﺗﻭﺡ ﺍﻟﻁﺭﻑ ﻣﻔﺗﺎﺡ ﺍﻟﻣﺷﻐﻝ ﺯﺭ ﺍﻟﺿﻐﻁ R ﻋﻼﻣﺔ ﻋﻼﻣﺔ @ Speed control dial Dial de control de velocidad # High speed Alta velocidad 高速 ความเร็วสูง ﺳﺭﻋﺔ ﻋﺎﻟﻳﺔ $ Low speed Baja velocidad 低速 ﺳﺭﻋﺔ ﻣﻧﺧﻔﺿﺔ % Stopper Tope 止動器 ^ Side handle Asa lateral 邊柄 & Hook Gancho 掛鉤 * M10 Bolt Perno M10 M10 螺栓 ( Hook (A) Herramienta (A) 掛鉤(A) ความเร็วตํ่า สต็อปเปอร มือจับขาง ตะขอ โบลต M10 ตะขอ (A) 速度控制撥盤 หนาปดควบคุมความเร็ว ﻣﻔﺗﺎﺡ ﺍﻟﺗﺣﻛﻡ ﻓﻲ ﺍﻟﺳﺭﻋﺔ ﺍﻟﺳﺩﺍﺩ ﻣﻘﺑﺽ ﺟﺎﻧﺑﻲ ﺧﻁﺎﻑ M10 ﻣﺳﻣﺎﺭ (A) ﺧﻁﺎﻑ 3 000Book̲D10VC2̲Asia.indb 3 2015/03/25 17:58:00 English GENERAL SAFETY RULES WARNING! Read all instructions Failure to follow all instructions listed below may result in electric shock, fire and/or serious injury. The term “power tool” in all of the warnings listed below refers to your mains-operated (corded) power tool or batteryoperated (cordless) power tool. SAVE THESE INSTRUCTIONS 1) Work area a) Keep work area clean and well lit. Cluttered and dark areas invite accidents. b) Do not operate power tools in explosive atmospheres, such as in the presence of flammable liquids, gases or dust. Power tools create sparks which may ignite the dust of fumes. c) Keep children and bystanders away while operating a power tool. Distractions can cause you to lose control. 2) Electrical safety a) Power tool plugs must match the outlet. Never modify the plug in any way. Do not use any adapter plugs with earthed (grounded) power tools. Unmodified plugs and matching outlets will reduce risk of electric shock. b) Avoid body contact with earthed or grounded surfaces such as pipes, radiators, ranges and refrigerators. There is an increased risk of electric shock if your body is earthed or grounded. c) Do not expose power tools to rain or wet conditions. Water entering a power tool will increase the risk of electric shock. d) Do not abuse the cord. Never use the cord for carrying, pulling or unplugging the power tool. Keep cord away from heat, oil, sharp edges or moving parts. Damaged or entangled cords increase the risk of electric shock. e) When operating a power tool outdoors, use an extension cord suitable for outdoor use. Use of a cord suitable for outdoor use reduces the risk of electric shock. 3) Personal safety a) Stay alert, watch what you are doing and use common sense when operating a power tool. Do not use a power tool while you are tired or under the influence of drugs, alcohol or medication. A moment of inattention while operating power tools may result in serious personal injury. b) Use safety equipment. Always wear eye protection. Safety equipment such as dust mask, non-skid safety shoes, hard hat, or hearing protection used for appropriate conditions will reduce personal injuries. c) Avoid accidental starting. Ensure the switch is in the off position before plugging in. Carrying power tools with your finger on the switch or plugging in power tools that have the switch on invites accidents. d) Remove any adjusting key or wrench before turning the power tool on. A wrench or a key left attached to a rotating part of the power tool may result in personal injury. e) Do not overreach. Keep proper footing and balance at all times. This enables better control of the power tool in unexpected situations. f) Dress properly. Do not wear loose clothing or jewellery. Keep your hair, clothing and gloves away from moving parts. Loose clothes, jewellery or long hair can be caught in moving parts. g) If devices are provided for the connection of dust extraction and collection facilities, ensure these are connected and properly used. Use of these devices can reduce dust related hazards. 4) Power tool use and care a) Do not force the power tool. Use the correct power tool for your application. The correct power tool will do the job better and safer at the rate for which it was designed. b) Do not use the power tool if the switch does not turn it on and off. Any power tool that cannot be controlled with the switch is dangerous and must be repaired. c) Disconnect the plug from the power source before making any adjustments, changing accessories, or storing power tools. Such preventive safety measures reduce the risk of starting the power tool accidentally. d) Store idle power tools out of the reach of children and do not allow persons unfamiliar with the power tool or these instructions to operate the power tool. Power tools are dangerous in the hands of untrained users. e) Maintain power tools. Check for misalignment or binding of moving parts, breakage of parts and any other condition that may affect the power tools’ operation. If damaged, have the power tool repaired before use. Many accidents are caused by poorly maintained power tools. f) Keep cutting tools sharp and clean. Properly maintained cutting tools with sharp cutting edges are less likely to bind and are easier to control. g) Use the power tool, accessories and tool bits etc., in accordance with these instructions and in the manner intended for the particular type of power tool, taking into account the working conditions and the work to be performed. Use of the power tool for operations different from intended could result in a hazardous situation. 5) Service a) Have your power tool serviced by a qualified repair person using only identical replacement parts. This will ensure that the safety of the power tool is maintained. PRECAUTION Keep children and infirm persons away. When not in use, tools should be stored out of reach of children and infirm persons. 4 000Book̲D10VC2̲Asia.indb 4 2015/03/25 17:58:00 English PRECAUTIONS ON USING DRILL 1. Hold the drill securely when using. 2. Do not wear gloves made of stuff liable to roll up such as cotton, wool, cloth or string, etc. 3. Prior to drilling into walls, ceilings or floors, ensure there are no electric cables or conduits inside. SPECIFICATIONS Voltage (by areas)* (110 V, 220 V, 230 V, 240 V) Power input 460 W* No load speed 0–2300 /min Drill chuck capacity 10 mm Steel Capacity Wood Twist Bit 10 mm Flat Spade Bit 25 mm Auger Bit 16 mm Weight (without cord) 1.3 kg * Be sure to check the nameplate on product as it is subject to change by areas. STANDARD ACCESSORIES ○ Chuck wrench (Spec. only for keyless chuck) ..............1 Standard accessories are subject to change without notice. OPTIONAL ACCESSORIES (sold separately) (1) Side handle (2) Hook (3) Hook (A) Optional accessories are subject to change without notice. APPLICATIONS ○ Boring holes in metal, wood and plastic. PRIOR TO OPERATION 1. Power source Ensure that the power source to be utilized conforms to the power requirements specified on the product nameplate. 2. Power switch Ensure that the power switch is in the OFF position. If the plug is connected to a receptacle while the power switch is in the ON position, the power tool will start operating immediately, inviting serious accident. 3. Extension cord When the work area is removed from the power source. Use an extension cord of sufficient thickness and rated capacity. The extension cord should be kept as short as practicable. 4. Selecting the appropriate drill bit: ○ When boring metal or plastic Use ordinary metalworking drill bits. ○ When boring wood Use ordinary woodworking drill bits. However, when drilling 6.5 mm or smaller holes, use a metalworking drill bit. 5. Mounting and dismounting of the bit For keyed chuck (Fig. 1) (1) Open the chuck jaws, and insert the bit into the chuck. (2) Place the chuck wrench in each of the three holes in the chuck, and turn it in the clockwise direction (viewed from the front side). Tighten securely. (3) To remove the bit, place the chuck wrench into one of the holes in the chuck and turn it in the counterclockwise direction. For keyless chuck (Fig. 2) (1) Open the chuck jaws, and insert the bit into the chuck. To open the chuck jaws, hold the ring while turning the sleeve in the counterclockwise direction (viewed from the front side). (2) Firmly grasp the ring and turn the sleeve in the clockwise direction. Tighten securely. (3) To remove the bit, firmly grasp the ring and turn the sleeve in the counterclockwise direction. (4) If it is hard to loosen the sleeve, fix the spindle using the open-end wrench, hold the sleeve firmly, and turn it in the loosening direction (counterclockwise when viewed from the front). (Fig. 3) 6. Check the rotational direction (Fig. 4) The bit rotates clockwise (viewed from the rear side) by pushing the R-side of the push button. The L-side of the push button is pushed to turn the bit counterclockwise. (The and R marks are provided on the body.) 7. Installing the side handle (Optional accessory) A Side handle can be installed on either side of the tool for right or left handed use. To install the side handle, thread it into the socket on the desired side of the gear cover and tighten it securely. (Fig. 6) 8. Attaching the hook. (Optional accessory) For hook (side-attaching) (Fig. 7) Fix the hook firmly on the desired side of the gear cover using M10 bolt which is supplied with hook. For hook (A) (top-attaching) (Fig. 8) To attach the hook (A), it is necessary to disassemble the handle portion which covered the tool’s electrical system. For your continued safety and electrical shock protection, installing the hook (A) on this drill should ONLY be performed by a HITACHI AUTHORIZED SERVICE CENTER. CAUTION When the power tool is used with a hook fixed to it, pay attention to the following points: 5 000Book̲D10VC2̲Asia.indb 5 2015/03/25 17:58:00 English ○ Before hanging the main unit from the waist belt, make sure that the drill has come to a complete stop. While it is suspended from the waist belt, the power plug must be disconnected from the power source. ○ Do not walk about with the power tool hanging from the waist belt. ○ In the case of operation in a high place, it is dangerous to drop the tool accidentally. If the hook is deformed or hung from the wrong position, there is danger that the hook will slip off and the tool will fall. Be careful to avoid danger. ○ In making a through hole, the power tool sometimes shakes violently when the workpiece is pierced, from example. Be careful you are not hurt by the hook even if such situation happens. HOW TO USE 1. Switch operation ○ When the trigger is depressed, the tool rotates. When the trigger is released, the tool stops. ○ The rotational speed of the drill can be controlled by varying the amount that the trigger switch is pulled. Speed is low when the trigger switch is pulled slightly and increases as the trigger switch is pulled more. ○ The desired rotation speed can be pre-selected with the speed control dial. Turn the speed control dial clockwise for higher speed and counterclockwise for lower speed. (Fig. 5) ○ Pulling the trigger and pushing the stopper, it keeps the switched-on condition which is convenient for continuous running. When switching off, the stopper can be disconnected by pulling the trigger again. 2. Drilling ○ When drilling, start the drill slowly, and gradually increasing speed as you drill. ○ Always apply pressure in a straight line with the bit. Use enough pressure to keep drilling, but do not push hard enough to stall the motor or deflect the bit. ○ To minimize stalling or breaking through the material, reduce pressure on drill and ease the bit through the last part of the hole. ○ If the drill stalls, release the trigger immediately, remove the bit from the work and start again. Do not click the trigger on and off in an attempt to start a stalled drill. This can damage the drill. ○ The larger the drill bit diameter, the larger the reactive force on your arm. Be careful not to lose control of the drill because of this reactive force. To maintain firm control, establish a good foothold, use side handle, hold the drill tightly with both hands, and ensure that the drill is vertical to the material being drilled. 3. Maintenance of the motor The motor unit winding is the very “heart” of the power tool. Exercise due care to ensure the winding does not become damaged and/or wet with oil or water. 4. Inspecting the carbon brushes For your continued safety and electrical shock protection, carbon brush inspection and replacement on this tool should ONLY be performed by a HITACHI AUTHORIZED SERVICE CENTER. 5. Service parts list A: Item No. B: Code No. C: No. Used D: Remarks CAUTION Repair, modification and inspection of Hitachi Power Tools must be carried out by a Hitachi Authorized Service Center. This Parts List will be helpful if presented with the tool to the Hitachi Authorized Service Center when requesting repair or other maintenance. In the operation and maintenance of power tools, the safety regulations and standards prescribed in each country must be observed. MODIFICATIONS Hitachi Power Tools are constantly being improved and modified to incorporate the latest technological advancements. Accordingly, some parts (i.e. code numbers and/or design) may be changed without prior notice. NOTE Due to HITACHI’s continuing program of research and development, the specifications herein are subject to change without prior notice. MAINTENANCE AND INSPECTION 1. Inspecting the drill bits Since use of an abraded drill bits will cause motor malfunctioning and degraded efficiency, replace the drill bits with a new one or resharpening without delay when abrasion is noted. 2. Inspecting the mounting screws Regularly inspect all mounting screws and ensure that they are properly tightened. Should any of the screws be loose, retighten them immediately. Failure to do so could result in serious hazard. 6 000Book̲D10VC2̲Asia.indb 6 2015/03/25 17:58:01 Español NORMAS GENERALES DE SEGURIDA ¡ADVERTENCIA! Lea todas las instrucciones Si no se siguen las instrucciones de abajo podría producirse una descarga eléctrica, un incendio y/o daños graves. El término “herramienta eléctrica” en todas las advertencias indicadas a continuación hace referencia a la herramienta eléctrica que funciona con la red de suministro (con cable) o a la herramienta eléctrica que funciona con pilas (sin cable). CONSERVE ESTAS INSTRUCCIONES 1) Área de trabajo a) Mantenga la zona de trabajo limpia y bien iluminada. Las zonas desordenadas y oscuras pueden provocar accidentes. b) No utilice las herramientas eléctricas en entornos explosivos como, por ejemplo, en presencia de líquidos inflamables, gases o polvo. Las herramientas eléctricas crean chispas que pueden hacer que el polvo desprenda humo. c) Mantenga a los niños y transeúntes alejados cuando utilice una herramienta eléctrica. Las distracciones pueden hacer que pierda el control. 2) Seguridad eléctrica a) Los enchufes de las herramientas eléctricas tienen que ser adecuados a la toma de corriente. No modifique el enchufe. No utilice enchufes adaptadores con herramientas eléctricas conectadas a tierra. Si no se modifican los enchufes y se utilizan tomas de corriente adecuadas se reducirá el riesgo de descarga eléctrica. b) Evite el contacto corporal con superficies conectadas a tierra como tuberías, radiadores y frigoríficos. Hay mayor riesgo de descarga eléctrica si su cuerpo está en contacto con el suelo. c) No exponga las herramientas eléctricas a la lluvia o a la humedad. La entrada de agua en una herramienta eléctrica aumentará el riesgo de descarga eléctrica. d) No utilice el cable incorrectamente. No utilice el cable para transportar, tirar de la herramienta eléctrica o desenchufarla. Mantenga el cable alejado del calor, del aceite, de bordes afilados o piezas móviles. Los cables dañados o enredados aumentan el riesgo de descarga eléctrica. e) Cuando utilice una herramienta eléctrica al aire libre, utilice un cable prolongador adecuado para utilizarse al aire libre. La utilización de un cable adecuado para usarse al aire libre reduce el riesgo de descarga eléctrica. 3) Seguridad personal a) Esté atento, preste atención a lo que hace y utilice el sentido común cuando utilice una herramienta eléctrica. No utilice una herramienta eléctrica cuando esté cansado o esté bajo la influencia de drogas, alcohol o medicación. La distracción momentánea cuando utiliza herramientas eléctricas puede dar lugar a importantes daños personales. 000Book̲D10VC2̲Asia.indb 7 b) Utilice equipo de seguridad. Utilice siempre una protección ocular. El equipo de seguridad como máscara para el polvo, zapatos de seguridad antideslizantes, casco o protección para oídos utilizado para condiciones adecuadas reducirá los daños personales. c) Evite un inicio accidental. Asegúrese de que el interruptor está en “off ” antes de enchufarlo. El transporte de herramientas eléctricas con el dedo en el interruptor o el enchufe de herramientas eléctricas con el interruptor encendido puede provocar accidentes. d) Retire las llaves de ajuste antes de encender la herramienta eléctrica. Si se deja una llave en una pieza giratoria de la herramienta eléctrica podrían producirse daños personales. e) No se extralimite. Mantenga un equilibrio adecuado en todo momento. Esto permite un mayor control de la herramienta eléctrica en situaciones inesperadas. f) Vístase adecuadamente. No lleve prendas sueltas o joyas. Mantenga el pelo, la ropa y los guantes alejados de las piezas móviles. La ropa suelta, las joyas y el pelo largo pueden pillarse en las piezas móviles. g) Si se proporcionan dispositivos para la conexión de extracción de polvo e instalaciones de recogida, asegúrese de que están conectados y se utilizan adecuadamente. La utilización de estos dispositivos puede reducir los riesgos relacionados con el polvo. 4) Utilización y mantenimiento de las herramientas eléctricas a) No fuerce la herramienta eléctrica. Utilice la herramienta eléctrica correcta para su aplicación. La herramienta eléctrica correcta trabajará mejor y de forma más segura si se utiliza a la velocidad para la que fue diseñada. b) No utilice la herramienta elétrica si el interruptor no la enciende y apaga. Las herramientas elétricas que no pueden controlarse con el interruptor son peligrosas y deben repararse. c) Desconecte el enchufe de la fuente eléctrica antes de hacer ajustes, cambiar accesorios o almacenar herramientas eléctricas. Estas medidas de seguridad preventivas reducen el riesgo de que la herramienta eléctrica se ponga en marcha accidentalmente. d) Guarde las herramientas eléctricas que no se utilicen para que no las cojan los niños y no permita que utilicen las herramientas eléctricas personas no familiarizadas con las mismas o con estas instrucciones. Las herramientas eléctricas son peligrosas si son utilizadas por usuarios sin formación. e) Mantenimiento de las herramientas eléctricas. Compruebe si las piezas móviles están mal alineadas o unidas, si hay alguna pieza rota u otra condición que pudiera afectar al funcionamiento de las herramientas eléctricas. Si la herramienta eléctrica está dañada, llévela a reparar antes de utilizarla. Se producen muchos accidentes por no realizar un mantenimiento correcto de las herramientas eléctricas. 7 2015/03/25 17:58:01 Español f) Mantenga las herramientas de corte afiladas y limpias. Las herramientas de corte correctamente mantenidas con los bordes de corte afilados son más fáciles de controlar. g) Utilice la herramienta eléctrica, los accesorios y las brocas de la herramienta, etc., de acuerdo con estas instrucciones y de la manera adecuada para el tipo de herramienta eléctrica, teniendo en cuenta las condiciones laborales y el trabajo que se va a realizar. La utilización de la herramienta eléctrica para operaciones diferentes a pretendidas podría dar lugar a una situación peligrosa. 5) Revisión a) Lleve su herramienta a que la revise un experto cualificado que utilice sólo piezas de repuesto idénticas. Esto garantizará el mantenimiento de la seguridad de la herramienta eléctrica. PRECAUCIÓN Mantenga a los niños y a las personas enfermas alejadas. Cuando no se utilicen, las herramientas deben almacenarse fuera del alcance de los niños y de las personas enfermas. PRECAUCIONES AL UTILIZAR EL TALADRO 1. Sujete firmemente el taladro durante el uso. 2. No utilice guantes hechos de un material que se pueda enrollar, como algodón, lana, paño, cordón, etc. 3. Antes de taladrar paredes, techos o pisos, asegúrese de que no hayan cables o conductos eléctricos en el interior. ESPECIFICACIONES Voltaje (por áreas)* (110 V, 220 V, 230 V, 240 V) Acometida 460 W* Velocidad de marcha en vacío Capacidad del portabrocas Capacidad 0–2300 /min 10 mm Acero Broca de torsión 10 mm Madera Borca de horquilla plana 25 mm Borca de berbiquí 16 mm Peso (sin cable) 1,3 kg * Verificar indefectiblemente los datos de la placa de características de la máquina, pues varían de acuerdo al país de destino. ACCESORIOS ESTANDAR ○ Velvedor de mandril (Especificaciones sólo para portabrocas sin llave) ...................................................1 Accesorios estándar están sujetos a cambio sin previo aviso. ACCESORIOS FACULTATIVOS (de venta por separado) (1) Asa lateral (2) Gancho (3) Gancho (A) Accesorios facultativos están sujetos a cambio sin previo aviso. APLICACIONES ○ Por acción de orificios en metal, madera y plástico. ANTES DE LA PUESTA EN MARCHA 1. Alimentación Asegurarse de que la acometida de red que ha de ser utilizada es conforme a las exigencias de corriente espacificadas en la placa de características del producto. 2. Conmutador de alimentación Asegurarse de que el conmutador de acometida está en posición OFF (desconectado). Si el enchufe está conectado a la caja del enchufe mientras el conmutador de acometida está en posición ON (conectado) la herramienta eléctrica empezará a tradajar inmediatamente, provocando un serio accidente. 3. Cable de prolongación Cuando está alejada el área de trabajo de la red de acometida, usar un cable de prolongación de un grosor suficiente y potencia nominal. El cable de prolongación debe ser mantenido o más corto posible. 4. Seleccionar la broca de taladro apropiada ○ Perforando metal o plástico Usar una broca de taladro ordinaria para trabajos en metal. ○ Perfornado madera Use ordinary woodworking drill bits. However, when drilling 6,5 mm or smaller holes, use a metalworking drill bit. 5. Montaje y desmontaje de la broca Para portabrocas con llave (Fig. 1) (1) Abra las mordazas del portabrocas e inserte la broca en el portabrocas. (2) Coloque la llave del portabrocas en cada uno de los tres orificios del portabrocas, y gírela en el sentido de las agujas del reloj (visto desde el lado delantero). Apriete firmemente. 8 000Book̲D10VC2̲Asia.indb 8 2015/03/25 17:58:01 Español (3) Para sacar la broca, coloque la llave del portabrocas en uno de los orificios del portabrocas y gírela en el sentido contrario a las agujas del reloj. Para portabrocas sin llave (Fig. 2) (1) Abra las mordazas del portabrocas e inserte la broca en el portabrocas. Para abrir las mordazas del portabrocas, sujete el anillo mientras gira el manguito en el sentido contrario a las agujas del reloj (visto desde el lado delantero). (2) Sujete el anillo firmemente y gire el manguito en el sentido de las agujas del reloj. Apriete firmemente. (3) Para sacar la broca, sujete el anillo firmemente y gire el manguito en el sentido contrario a las agujas del reloj. (4) Si no consigue aflojar el manguito, fije el husillo utilizando una llave fija, sujete el manguito firmemente y gírelo en la dirección de aflojamiento (en sentido contrario a las agujas del reloj visto desde adelante). (Fig. 3) 6. Verifique la dirección de rotación (Fig. 4). La broca gira en el sentido de las agujas del reloj (visto desde el lado trasero) empujando el lado R del botón. Si empuja el lado L del botón, la broca girará en sentido contrario a las agujas del reloj. (Las marcas y R están provistas en el cuerpo). 7. Instalación del asa lateral (Accesorio opcional) Es posible insertar un asa lateral sobre uno u otro lado de la herramienta, según que el usuario sea diestro o zurdo. Para instalar el asa lateral, enrósquelo en el casquillo del lado deseado de la cubierta de engranajes, y apriételo firmemente. (Fig. 6) 8. Fijación del gancho. (Accesorio opcional) Para el gancho (fijación lateral) (Fig. 7) Fije firmemente el gancho sobre el lado deseado de la cubierta de engranajes utilizando el perno M10 entregado con el gancho. Para el gancho (A) (fijación superior) (Fig. 8) Para fijar el gancho (A), es necesario desarmar la parte del asa que cubre el sistema eléctrico de la herramienta. Para poder utilizar la herramienta en condiciones de seguridad y evitar las descargas eléctricas, la instalación del gancho (A) de este taladro debe ser realizado SÓLO por un CENTRO DE SERVICIO AUTORIZADO HITACHI. PRECAUCIÓN Cuando utilice la herramienta eléctrica con un gancho fijado, preste atención a los puntos siguientes: ○ Antes de colgar la unidad del cinturón, cercióres de que el taladro esté completamente parado. Cuando tenga el taladro colgado del cinturón, el enchufe de alimentación deberá estar desconectado de la fuente de alimentación. ○ Ne camine con la herramienta eléctrica colgada del cinturón. ○ Cuando trabaje en un lugar elevado, será peligroso el dejar caer accidentalmente la herramienta. Si el gancho está deformado o en posición errónea, existe el peligro de que se deslice y que se caiga la herramienta. Tenga cuidado para evitar peligros. ○ Cundo taladre orificios, es posible que la herramienta sufra sacudidas violentas cuando, por ejemplo, se parta la pieza de trabajo. Tenga cuidado de no herise con el gancho en caso de ocurrir esta situación. COMO SE USA 1. Operación del interruptor ○ La herramienta gira al presionar el interruptor de gatillo. Al soltar el gatillo, la herramienta se detiene. ○ La velocidad de rotación del taladro puede controlarse variando la fuerza de apriete del interruptor de gatillo. Apretando ligeramente el interruptor de gatillo la velocidad es lenta, pero aumenta mientras más se lo aprieta. ○ Es posible seleccionar previamente la velocidad de rotación deseada con el dial de control de velocidad. Gire el dial de control de velocidad en el sentido a las agujas del reloj para aumentar la velocidad, y en sentido contrario para disminuirla. (Fig. 5). ○ Tire del gatillo y empuje el tope para mantener activada la alimentación, lo cual es conveniente para un funcionamiento continuo. Cuando se lo desconecta, el tope puede quitarse tirando del gatillo otra vez. 2. Taladrado ○ Para taladrar, inicie el taladro lentamente, y aumente gradualmente la velocidad. ○ Siempre aplique presión en línea recta a la broca. Aplique una presión suficiente para seguir taladrando, pero no empuje con una fuerza tal que pueda provocar el calado del motor o la desviación de la broca. ○ Para reducir al mínimo el calado o la rotura a través del material, disminuya la presión aplicada al taladro y mueva la broca a través de la última parte del orificio. ○ Si el taladro se atasca, suelte inmediatamente el gatillo, saque la broca de la pieza de trabajo y empiece otra vez. No haga clic en el gatillo para conectarlo y desconectarlo con la intención de poner en marcha el taladro atascado, pues se podrá dañar el taladro. ○ Cuanto mayor sea el diámetro de la broca de taladro, mayor será la fuerza de reacción sobre su brazo. Asegúrese de no perder el control del taladro debido a esta fuerza de fricción. Para mantener un control firme, haga pie firme, utilice el asa lateral, sujete el taladro firmemente con ambas manos, y asegúrese de mantener el taladro vertical con respecto al material que se está taladrando. MANTENIMIENTO E INSPECCION 1. Inspección de las brocas de barrena Debido a que el uso de brocas de barrena desgastadas producen fallos de funcionamiento del motor y una disminución de la eficiencia, cámbielas inmediatamente por otras nuevas o reafílelas cuando note abrasión en las mismas. 2. Inspeccionar la broca de taladro y el macho de roscar Como el uso continuado de una broca o macho de roscar desgastados disminuye la eficiencia operativa y causa un posible recalentamiento del motor, reemplazar o afilar la broca o el macho sin demora si se nota un excesivo desgaste. 3. Mantenimiento d motor La unidad de devanado del motor es el verdadero “corazón” del herramientas eléctricas. Prestar el mayor cuidado a asegurarse de que el devando no se dañe y/o se humedezca con aceite o agua. 4. Inspección de las escobillas Por motivos de seguridad contra descargas eléctricas, la inspección y el reemplazo de las escobillas deberán realizarse SOLAMENTE en un CENTRO DE SERVICIO AUTORIZADO POR HITACHI. 9 000Book̲D10VC2̲Asia.indb 9 2015/03/25 17:58:01 Español 5. Lista de repuestos A: N°. ítem B: N°. código C: N°. usado D: Observaciones PRECAUCIÓN La reparación, modificación e inspección de las herramientas eléctricas Hitachi deben ser realizadas por un Centro de Servicio Autorizado de Hitachi. Esta lista de repuestos será de utilidad si es presentada junto con la herramienta al Centro de Servicio Autorizado de Hitachi, para solicitar la reparación o cualquier otro tipo de mantenimiento. En el manejo y el mantenimiento de las herramientas eléctricas, se deberán observar las normas y reglamentos vigentes en cada país. MODIFICACIONES Hitachi Power Tools introduce constantemente mejoras y modificaciones para incorporar los últimos avances tecnológicos. Por consiguiente, algunas partes (por ejemplo, números de códigos y/o diseño) pueden ser modificadas sin previo aviso. OBSERVACION Debido al programa continuo de investigación y desarollo de HITACHI estas especificaciones están sujetas a cambio sin preaviso. 10 000Book̲D10VC2̲Asia.indb 10 2015/03/25 17:58:01 中國語 一般安全規則 警告! 閱讀所有說明 未遵守下列之說明可能導致電擊、火災及/或嚴重傷 害。 「電動工具」一詞在下列警告中,關係到電源操作 (有線)之電動工具或電池操作(無線)之電動工 具。 記住這些說明 1) 工作場所 a) 保持工作場所清潔及明亮。 雜亂及昏暗區域易發生意外。 b) 勿在易產生爆炸之環境中操作,譬如有易燃液 體、瓦斯或粉塵存在之處。 電動工具產生火花會引燃粉塵或煙氣。 c) 當操作電動工具時,保持兒童及過往人員遠 離。 分神會讓你失去控制。 2) 電氣安全 a) 電動工具插頭必須與插座配合,絕不可以任何 方法修改插頭,且不得使用任何轉接插頭於有 接地之電動工具。 不修改插頭及所結合之插座可減少電擊。 b) 避免身體接觸到接地面諸如管子、散熱器、爐 灶及冰箱。 如果你的身體接地或搭地,會增加電擊的危 險。 c) 勿讓電動工具淋雨或曝露在潮濕的環境下。 電動工具進水會增加電繫的危險。 d) 勿濫用電源線。絕勿使用電源線去纏繞、拖拉 電動工具或拔插頭,保持電源線遠離熱氣、油 氣、尖角或可動零件。 損壞或纏繞的電源線會增加電繫之危險。 e) 電動工具在室外操作時要使用一適合室外用的 延長線。 使用合適之室外用延長線會減少電擊的危險。 3) 人員安全 a) 保持機警,注意你正在做什麼,並運用普通常 識操作電動工具。 當你感到疲勞或受藥品、酒精或醫療影響時, 勿操作電動工具。 操作中瞬間的不注意可能造成人員嚴重的傷 害。 b) 使用安全裝備,常時佩戴安全眼鏡。 安全裝備有防塵口罩、防滑安全鞋、硬帽,或 在適當情況下使用聽覺防護,可減少人員傷 害。 c) 避 免 意 外 地 啟 動 。 在 插 電 前 確 認 開 關 是 在 “off”的位置。 以手指放在開關握持電動工具,或在電動工具 的開關於“on”的狀況下插上插頭,都會導致 意外發生。 d) 在將電動工具啟動前,先卸下任何調整用鑰匙 或扳手。 扳手或鑰匙遺留在電動工具的轉動部位時,可 能導致人員傷害。 e) 身體勿過度伸張,任何時間要保持站穩及平 衡。 以便在不預期的狀態下,能對電動工具有較好 的控制。 f) 衣著要合宜,別穿太鬆的衣服或戴首飾。 保持你的頭髮、衣服及手套遠離轉動部位。 寬鬆的衣服、手飾及長髮會被捲入轉動部位。 g) 如果裝置要用於粉塵抽取及集塵設施,要確保 其連接及正當使用。 使用此類裝置能減少與粉塵有關之危害。 4) 電動工具之使用及注意事項 a) 勿強力使用電動工具,使用正確之電動工具為 你所需。 正確使用電動工具會依其設計條件使工作做得 更好更安全。 b) 如果開關不能轉至開及關的位置,勿使用電動 工具。 任何電動工具不能被開關所控制是危險的,必 須要修理。 c) 在做任何調整、更換配件或收存電動工具時, 要將插頭與電源分開,且/或將電池從電動工 具中取出。 此種預防安全措施可減少意外開啟電動機之危 險。 d) 收存停用之電動工具,遠離兒童,且不容許不 熟悉電動工具或未瞭解操作電動工具說明書的 人操作電動工具。 在未受過訓練的人手裡,電動工具極為危險。 e) 保養電動工具,檢核是否有可動零件錯誤的結 合或卡住、零件破裂及可能影響電動工具操作 的任何其他情形。 電動工具如果損壞,在使用前要修好。許多意 外皆肇因於不良的保養。 f) 保持切割工具銳利清潔。 適當的保養切割工具,保持銳利之切削鋒口, 可減少卡住並容易控制。 g) 按照說明書使用電動工具、配件及刀具等,使 用特殊型式之電動工具時要考量工作條件及所 執行之工作。 使用電動工具未如預期用途之操作時,會導致 危害。 11 000Book̲D10VC2̲Asia.indb 11 2015/03/25 17:58:01 中國語 5) 維修 a) 讓你的電動工具由合格修理人員僅使用相同的 維修零件更換。 如此可確保電動工具的安全得以維持。 注意事項 不可讓孩童和體弱人士靠近工作場所。 應將不使用的工具存放在孩童和體弱人士伸手不及的 地方。 規 使用電鑽時應注意事項 1. 使用時,請穩穩地抓住電鑽。 2. 請勿戴用易于卷起的材料(如棉花、羊毛、布或 線等)製成的手套。 3. 在鑽入牆壁、天花板或地板之前,務必確認其中 沒有埋設電纜或管道。 格 電壓(按地區)* (110 V,220 V,230 V,240 V) 輸入功率 460 W* 無負荷速度 0—2300 轉 電鑽卡盤的能力 鋼鐵 能力 木材 分 10 mm 螺旋鑽 10 mm 平鏟鑽頭 25 mm 麻花鑽í 16 mm 重量(不含線纜) 1.3 kg * 當須改變地區時應檢查產品上的銘牌。 標準附件 ○ 卡盤扳手(規格僅適用於帶鍵夾盤) ................ 1 標準附件可能不預先通告而徑予更改。 選購附件(分開銷售) (1) 邊柄 (2) 掛鉤 (3) 掛鉤(A) 選購附件可能不預先通告而徑予更改。 用 途 ○ 在金屬、木材和塑料上鑽孔。 作業之前 1. 電源 確認所使用的電源與工具銘牌上標示的規格是否 相符。 2. 電源開關 確認電源開關是否切斷。若電源開關接通,則插 頭插入電源插座時電動工具將出其不意地立刻轉 動,從而招致嚴重事故。 3. 延伸電纜 若作業場所移到離開電源的地點,應使用容易足 夠、鎧裝合適的延伸線纜,並且要盡可能地短 些。 4. 選擇合適的鑽頭 ○ 在金屬或塑料上鑽孔時 使用普通的金工鑽頭。 ○ 在木材上鑽孔時 使用普通的木工鑽孔。 但是,當鑽小於 6.5 毫米的孔時,請使用金工鑽 頭。 5. 鑽頭的裝配和拆卸 對於帶鍵夾盤 (圖 1) (1) 打開夾盤鉗夾,並將鑽頭插入夾盤。 (2) 將卡盤扳手分別放在夾盤的三個孔之上,並將其 沿順時針方向旋轉(前視),使之固定。 (3) 要拆卸鑽頭時,將卡盤扳手放入夾盤上的一個孔 中,並將其沿逆時針方向轉動。 對於無鍵夾盤 (圖 2) (1) 打開夾盤鉗夾,並將鑽頭插入夾盤。 若要打開夾盤鉗夾,在沿逆時針方向(前視)轉 動套管時握緊扣環。 12 000Book̲D10VC2̲Asia.indb 12 2015/03/25 17:58:01 中國語 (2) 握緊扣環並沿順時針方向轉動套管。擰緊固定 之。 (3) 要拆卸鑽頭時,握緊扣環並沿逆時針方向轉動套 管。 (4) 如果難以擰鬆套管,請用開口扳手固定軸,握緊 套管,並沿擰鬆方向(前視時為逆時針方向)轉 動套管(圖 3)。 6. 確認鑽頭旋轉方向(圖 4) 按下按鍵的 R(右)側可使鑽頭沿順時針方向 (前視)旋轉;按下按鍵的 L(左)側可使鑽頭 沿逆時針方向旋轉。 (機身上有 和 R 標記) 7. 邊柄的裝配(選購件) 可將它裝配在電鑽的左側或右側,以供慣用左手 或右手的人使用。 要裝配邊柄時,將其插入齒輪蓋的所需側面的插 座,並將其擰緊。(圖 6) 8. 掛鉤的裝配。(選購件) 掛鉤(側面裝配) (圖 7) 用掛鉤附帶的 M10 螺栓將掛鉤緊固在齒輪蓋的所 需側面上。 掛鉤(A)(頂面裝配) (圖 8) 要裝配掛鉤(A)時,需要拆下蓋住本機電氣系 統的手柄部分。為了保證長期安全操作和防止觸 電,必須僅由經授權的日立維修中心在本電鑽上 裝配掛鉤(A)。 注意 當使用裝配有掛鉤的電動工具時,請注意以下事 項︰ ○ 將主機懸掛在腰帶上之前,請確認電鑽已經完 全停止轉動。 在它懸掛在腰帶上時,必須從電源插座上拔下 電源插頭。 ○ 請勿將電動工具懸掛在腰帶上行走。 ○ 在高處操作時,不慎使電動工具掉落是非常危 險的。如果掛鉤變形或掛錯位置,則掛鉤可能 會脫落,從而導致電動工具掉落。請避免發生 危險。 ○ 鑽孔時,有時電動工具會猛烈晃動(例如當刺 破工件時)。請小心發生這種情況時不要被掛 鉤扎傷。 使用方法 1. 開關操作 ○ 按下起動器時,電鑽旋轉;鬆開起動器時,電鑽 停止。 ○ 改變拉起動器開關的程度可以控制電鑽的轉速。 輕拉起動器開關轉速較慢,進一步拉起動器開關 則轉速變快。 ○ 可以用速度控制撥盤預選所需的旋轉速度。 順時針轉動速度控制撥盤提高速度,逆時針轉動 降低速度。(圖 5) ○ 拉起動器並推制動器,保持開關合上狀態,便於 連續運轉。當開關斷開時,再次拉起動器便可釋 放制動器。 2. 鑽孔 ○ 鑽孔時,請慢慢起動電鑽,並逐漸提高轉速。 ○ 總是保持對鑽頭施加垂直的壓力。鑽孔時要保持 足夠的壓力,但不要過分用力按壓而導致馬達停 轉或使鑽頭偏斜。 ○ 要盡量減少停轉或損壞材料時,請減少對鑽頭施 加的壓力並在穿孔前降低壓力。 ○ 如果電鑽停轉,則立即釋放起動器,從工件上取 出鑽頭並重新開始鑽孔。請勿按下和鬆開起動器 以試圖起動已停轉的電鑽,否則會損壞電鑽。 ○ 鑽頭口徑越大,手臂受到的反作用力也越大。 必須注意不要因反作用力而失去對電鑽的控制。 為了獲得良好的控制,腳步要站穩,使用邊柄, 用雙手握緊鑽機,確保鑽頭與被鑽面保持垂直。 維護和檢查 1. 檢查鑽頭 繼續使用已磨損或損傷的鑽頭,不僅使工作效率 大為降低,同時又會導致電動機過載。因此,鑽 頭必須時常檢查,並根據情況需要換新件。 2. 檢查安裝螺釘 要經常檢查安裝螺釘是否緊固妥善。若發現螺釘 鬆了,應立即重新扭緊,否則會導致嚴重的事 故。 3. 電動機的維護 電動機繞線是電動工具的心臟部。應仔細檢查有 無損傷,是否被油液或水沾濕。 4. 檢查碳刷 為了保證長期安全操作和防止觸電,必須僅由經 授權的日立維修中心檢查和更換碳刷。 13 000Book̲D10VC2̲Asia.indb 13 2015/03/25 17:58:01 中國語 5. 維修部件目錄 A: 項目號碼 B: 代碼號碼 C: 所使用號碼 D: 備註 注意 日立電動工具的修理、維護和檢查必須由日立所 認可的維修中心進行。 當尋求修理或其他維護時,將本部件目錄與工具 一起提交給日立所認可的維修中心會對您有所幫 助。 在操作和維護電動工具中,必須遵守各國的安全 規則和標准規定。 改進 日立電動工具隨時都在進行改進以適應最新的技術進 步。 因此,有些部件(如,代碼號碼和 或設計)可能未 預先通知而進行改進。 註 為求改進,本手冊所載規格可能不預先通告而徑予 更改。 14 000Book̲D10VC2̲Asia.indb 14 2015/03/25 17:58:01 ไทย กฎความปลอดภัยโดยทั่วไป คําเตือน! โปรดอานคําแนะนําทั้งหมด ถาไมปฏิบัติตามคําแนะนําทั้งหมด อาจถูกไฟฟาดูด เกิดไฟไหม และ/หรือ บาดเจ็บสาหัสก็ได คําวา "เครื่องมือไฟฟา" ในคําเตือนตอไปนี้ทั้งหมดหมายถึงเครื่องมือที่คุณ ใชงานกับปลั๊กไฟฟา (มีสายไฟ) หรือใชงานกับแบตเตอรี่ (ไรสาย) โปรดปฏิบัติตามคําแนะนําตอไปนี้ 1) พื้นที่ทํางาน a) รักษาพื้นที่ทํางานใหสะอาดและมีแสงสวางเพียงพอ สิ่งที่เกะกะและความมืดทําใหเกิดอุบัติเหตุได b) อยาใชเครื่องมือไฟฟาในบรรยากาศที่อาจระเบิด เชน มี ของเหลวไวไฟ แกสหรือฝุน เครื่องมือไฟฟาอาจเกิดประกายไฟที่อาจทําใหฝุนและไอติดไฟได c) ใชงานเครื่องมือไฟฟาใหไกลจากเด็กและคนเฝาชม คนที่วอกแวกทําใหคุณขาดสมาธิในการทํางานได 2) ความปลอดภัยทางไฟฟา a) ปลั๊กของเครื่องมือไฟฟาตองเหมาะกับเตาเสียบ อยาดัดแปลงปลั๊ก อยาใชปลั๊กของตัวปรับแรงดันไฟฟากับเครื่องมือไฟฟาชนิดที่ตอ ลงดิน ปลั๊กกับเตาเสียบที่ไมพอดีกันอาจทําใหคุณถูกไฟฟาดูด b) อยาใหตัวคุณสัมผัสกับพื้นผิวที่ตอลงดิน เชนทอโลหะ เครื่อง ทําความรอน เตาอบ ตูเย็น เปนตน อาจถูกไฟฟาดูดถารางกายของคุณตอวงจรลงดิน c) อยาใหเครื่องมือไฟฟาถูกกับนํ้าฝนหรือความเปยกชื้น นํ้าที่เขาไปในเครื่องมือไฟฟาจะเพิ่มความเสี่ยงที่จะถูกไฟฟาดูด d) อยาใชสายไฟฟาในงานอื่น อยาใชสายเพื่อหิ้ว ดึงหรือ เสียบ เครื่องมือไฟฟา ใหสายไฟอยูหางจากความรอน นํ้ามัน ขอบ แหลมคมหรือชิ้นสวนที่เคลื่อนไหว สายที่ชํารุดหรือตึงอาจทําใหคุณถูกไฟฟาดูดไดงาย e) เมื่อใชงานเครื่องมือไฟฟานอกอาคาร ใชสายพวงชนิดที่ใชกับนอกอาคารเมื่อใชสายที่เหมาะสมจะลด ความเสี่ยงที่จะถูกไฟฟาดูด 3) ความปลอดภัยสวนบุคคล a) ระวังตัว ดูสิ่งที่คุณกําลังทํา ใชสามัญสํานึกเมื่อใชเครื่องมือไฟฟา อยาใชเครื่องมือไฟฟาเมื่อคุณออนเพลียหรือกินยา สุรา หรือยา เสพติด การขาดสติชั่วขณะเมื่อใชเครื่องมือไฟฟาอาจทําใหคุณบาดเจ็บ สาหัส b) ใชอุปกรณนิรภัย สวมแวนตาปองกันเสมอ อุปกรณปองกันเชนหนากากกันฝุน รองเทากันลื่น หมวกนิรภัย หรือจุกอุดหูที่เหมาะสมจะเลี่ยงการบาดเจ็บของรางกายได c) ระวังเครื่องทํางานโดยไมตั้งใจ ใหสวิทซอยูในตําแหนงปดกอน เสียบปลั๊ก เมื่อจับเครื่องมือไฟฟาเมื่อนิ้วอยูที่ตัวสวิทซ หรือเมื่อเสียบปลั๊ก ขณะเปดสวิทซไวอาจทําใหเกิดอุบัติเหตุ 000Book̲D10VC2̲Asia.indb 15 d) เอาสลักปรับแตงหรือประแจออกกอนเปดสวิทซไฟฟา สลักหรือประแจที่ติดกับสวนหมุนของเครื่องมือไฟฟาอาจทําให คุณบาดเจ็บได e) อยาเอื้อมตัว ยืนใหมั่นและสมดุลตลอดเวลา ทําใหควบคุมเครื่องมือไฟฟาไดดีขึ้นเมื่อมีเหตุที่ไมคาดฝน f) แตงตัวใหรัดกุม อยาสวมเสื้อผาหลวมหรือใชเครื่องประดับ ให ผม เสื้อผาและถุงมืออยูหางจากชิ้นสวนที่เคลื่อนที่ เสื้อผาหลวม เครื่องประดับหรือผมยาวอาจถูกชิ้นสวนหมุนรั้ง เขาไป g) ถาออกแบบเครื่องมือไฟฟาไวใหตอกับชุดดูดฝุนหรือเศษวัสดุ ให เชื่อมตอและใชงานอยางถูกตอง เมื่อใชกับชุดอุปกรณเหลานี้ จะลดอันตรายจากฝุน 4) การใชและบํารุงรักษาเครื่องมือไฟฟา a) อยาใชเครื่องมือไฟฟาโดยฝนกําลัง ใชเครื่องมือที่ถูกตองกับงาน ของคุณ เครื่องมือไฟฟาที่ถูกตองจะทํางานไดดีกวาและปลอดภัยกวา ใน อัตราตามที่ออกแบบไวแลว b) อยาใชเครื่องมือไฟฟาถาสวิทซปดเปดไมได เครื่องมือไฟฟาที่ควบคุมดวยสวิทซ ไมไดจะมีอันตรายและตอง ซอม c) ถอดปลั๊กจากแหลงไฟฟากอนปรับแตง เปลี่ยนอะไหล หรือเก็บ รักษา มาตรการปองกันเชนนี้จะลดความเสี่ยงของอุบัติเหตุที่เครื่องมือ ไฟฟาจะเริ่มทํางานโดยไมไดตั้งใจ d) เก็บเครื่องมือไฟฟาใหหางจากเด็ก และอยายอมใหผูที่ไมเคยชิน กับเครื่องมือไฟฟาหรือคําแนะนําเหลานี้ใหใชเครื่องมือไฟฟา เครื่องมือไฟฟาเปนสิ่งที่มีอันตรายมากเมื่ออยูในมือของคนที่ไม ชํานาญ e) บํารุงรักษาเครื่องมือไฟฟา ตรวจดูศูนยเคลื่อน สวนบิดงอ ชํารุด หรือสภาพอื่นๆ ที่มีผลตอการทํางานของเครื่องมือไฟฟา หากชํารุด ใหซอมแซมกอนใชงาน อุบัติเหตุจํานวนมากเกิดจากเครื่องมือไฟฟาที่บํารุงรักษาไมดีพอ f) ใหเครื่องมือตัดมีความคมและสะอาด เครื่องมือตัดที่บํารุงรักษาอยางถูกตองและมีขอบคมจะไมคอย บิดงอ และควบคุมไดงายกวา g) ใชเครื่องมือไฟฟา สวนประกอบและปลายเครื่องมือตัดตามคํา แนะนําเหลานี้ และตามที่ออกแบบไว โดยพิจารณาสภาพงาน และสิ่งที่จะใชงาน ถาใชเครื่องมือไฟฟากับงานที่ไมไดออกแบบไวอาจเกิดความเสีย หายได 5) การซอมบํารุง a) ใหชางซอมที่ชํานาญเปนผูซอม และเปลี่ยนอะไหลที่เปน ของแท ทําใหเครื่องมือไฟฟามีความปลอดภัย คําเตือน เก็บใหพนมือเด็กและผูไมชํานาญ หากไมไดใช ควรเก็บใหพนมือเด็กและผูไมชํานาญ 15 2015/03/25 17:58:01 ไทย ขอควรระวังในการใชสวานไฟฟา 1. ถือสวานใหมั่นคงในขณะใชงาน 2. อยาสวมถุงมือที่ทําดวยวัสดุที่ลื่นไดงาย เชน ฝาย ขนสัตว ผาหรือ เชือก เปนตน 3. กอนเจาะผนัง, เพดาน หรือพื้น ตองตรวจสอบจนแนใจวาไมมีสายไฟ หรือทอนํ้าอยูภายใน รายละเอียดจําเพาะ แรงดันไฟฟา (ตามทองที่ใชงาน)* กําลังไฟฟา ความเร็วอิสระ ขนาดตัวล็อกสวาน เหล็ก หัวสวานรองเกลียว หัวสวานแบบพลั่ว ขีดความสามารถ ไม หัวสวานเกลียว นํ้าหนัก (ไมรวมสายไฟฟา) * โปรดตรวจดูปายที่ตัวเลื่อยไฟฟา เพราะแตกตางไปตามทองที่ใชงาน อุปกรณมาตรฐาน ○ ประแจล็อก (ใชกับล็อกสวานแบบไมมีกุญแจขัน) ..........................1 อาจเปลี่ยนแปลงอุปกรณมาตรฐานไดโดยไมตองแจงลวงหนา อุปกรณประกอบ (แยกจําหนายตางหาก) (1) มือจับขาง (2) ตะขอ (3) ตะขอ (A) อาจเปลี่ยนแปลงอุปกรณประกอบไดโดยไมแจงลวงหนา การใชงาน ○ เจาะรูในโลหะ, ไม และพลาสติก คําแนะนํากอนการใชงาน 1. แหลงไฟฟา ตรวจดูใหแหลงไฟฟาที่จะใชตรงกับรายละเอียดจําเพาะบนแผนปาย ของเลื่อยไฟฟา 2. สวิทซไฟฟา ตรวจดูใหสวิทซ ไฟฟาอยูในตําแหนง OFF ถาเสียบปลั๊กเขากับเตา เสียบเมื่อสวิทซอยูในตําแหนง ON เครื่องใชไฟฟาจะทํางานทันที และ ทําใหเกิดอุบัติเหตุที่รายแรงได 3. สายไฟฟาพวง เมื่อพื้นที่ทํางานอยูหางจากแหลงจายไฟ ใหใชสายพวงที่โตและมี ความจุไฟฟามากพอ ควรพยายามใหสายพวงสั้นที่สุดเทาที่จะทําได 4. การเลือกดอกสวานที่เหมาะสม: ○ เมื่อเจาะโลหะหรือพลาสติก ใชดอกสวานเจาะโลหะทั่วไป (110 โวลท, 220 โวลท, 230 โวลท, 240 โวลท) 460 วัตต* 0–2300 /นาที 10 มม. 10 มม. 25 มม. 16 มม. 1.3 กก. เมื่อเจาะไม ใชดอกสวานเจาะไมทั่วไป อยางไรก็ตาม ถาเจาะรูขนาดไมเกิน 6.5 มม. ใหใชสวานเจาะโลหะ แทน 5. การติดและการถอดดอกสวาน สําหรับล็อกมีสลัก (รูปที่ 1) (1) เปดกานล็อก และสอดดอกสวานเขาในล็อก (2) ใสประแจล็อกเขาในรู 1 ใน 3 รูของล็อก ขันตามเข็มนาฬกา (เมื่อดู จากดานหนา) ขันใหแนน (3) ถอดดอกสวาน โดยสอดประแจล็อกเขาในรู 1 ใน 3 รูของล็อก หมุน ทวนเข็มนาฬกา สําหรับล็อกสวานแบบไมมีกุญแจขัน (รูปที่ 2) (1) เปดปากจับของล็อกสวานออก แลวสอดหัวสวานเขาไปในล็อกสวาน วิธีเปดปากจับของล็อกสวาน จับแหวนใหแนนแลวหมุนปลอกทวน เข็มนาฬกา (มองจากดานหนา) (2) จับแหวนใหแนนแลวหมุนปลอกตามเข็มนาฬกาใหแนนหนา (3) วิธีถอดหัวสวาน จับแหวนใหแนนแลวหมุนปลอกทวนเข็มนาฬกา (4) ถาคลายปลอกออกไดยาก ให้ใชประแจปากตายยึดกับสวนเพลาแลว จับปลอกใหแนน จากนั้นหมุนตามทิศทางการคลายออก (ทวนเข็ม นาฬกาเมื่อมองจากดานหนา) (รูปที่ 3) 6. ตรวจดูทศิ ทางหมุน (รูปที่ 4) ไขควงหมุนตามเข็มนาฬกา (เมื่อมองจากดานทาย) เมื่อกดดาน R ของปุมกด กดดาน L ของปุมกดเพื่อใหไขควงสวานหมุนทวนเข็มนาฬกา (ที่ตัวสวาน จะมีเครื่องหมาย และเครื่องหมาย R ) ○ 16 000Book̲D10VC2̲Asia.indb 16 2015/03/25 17:58:01 ไทย 7. การติดตั้งมือจับดานขาง (อุปกรณเสริม) สามารถติดตั้งมือจับดานขางเขากับสวานไดทั้งสองขาง เพื่ออํานวย ความสะดวกแกผูใชงานไมวาจะถนัดมือซายหรือมือขวา วิธีติดตั้งมือจับดานขาง หมุนมือจับเขาไปในชองที่ครอบเฟองในดาน ที่ตองการ แลวขันใหแนน (รูปที่ 6) 8. การติดตั้งตะขอ (อุปกรณเสริม) สําหรับตะขอ (การติดตั้งดานขาง) (รูปที่ 7) ติดตั้งตะขอที่ครอบเฟองในดานที่ตองการโดยใชโบลต M10 ที่ใหมา พรอมกับตะขอ สําหรับตะขอ (A) (การติดตั้งดานบน) (รูปที่ 8) วิธีติดตะขอ (A) นั้นจําเปนตองแยกชิ้นสวนบริเวณมือจับซึ่งหอหุม ระบบไฟฟาของเครื่องมือไว เพื่อความปลอดภัยของคุณและเพื่อ ปองกันไฟฟาดูด การติดตั้งตะขอ (A) เขากับสวานตองดําเนินการ โดยศูนยบริการฮิตาชิที่ไดรับอนุญาตเทานั้น ขอควรระวัง เมื่อใชเครื่องมือไฟฟาที่ติดตั้งตะขอไว ใหใสใจตอขอควรระวังตอไปนี้: ○ กอนแขวนเครื่องมือไวที่เข็มขัด ตรวจสอบใหแนใจวาสวานหยุด ทํางานแลว ขณะที่แขวนสวานไวที่เข็มขัด ตองถอดปลั๊กไฟออกจากเตารับให เรียบรอย ○ หามเดินไปมาโดยมีเครื่องมือไฟฟาแขวนอยูที่เข็มขัด ○ ในกรณีที่ทํางานในที่สูง อาจเกิดอันตรายจากเครื่องมือตกลงมาได ถา ตะขอบิดเบี้ยวหรือแขวนไวผิดตําแหนง อาจทําใหเครื่องมือลื่นหลุด และตกลงมาได ใหใชความระมัดระวังเพื่อหลีกเลี่ยงอันตราย ○ ในขณะเจาะรู เครื่องมือไฟฟาอาจสั่นอยางรุนแรง ใหตรวจสอบวา ตะขอจะไมทําใหคุณไดรับบาดเจ็บเมื่อเกิดกรณีดังกลาวขึ้น วิธีการใช 1. การใชสวิทซ ○ เมื่อกดสวิทซ ไก สวานจะหมุน เมื่อปลอยมือจากสวิทซ สวานจะหยุด ○ อาจควบคุมความเร็วหมุนของไขควงสวานไดอยางตอเนื่อง โดย เปลี่ยนระยะที่ดึงสวิทซ ไก ความเร็วตํ่าเมื่อดึงสวิทซไกออกมาเล็ก นอย และความเร็วเพิ่มขึ้นเมื่อดึงสวิทซออกมามากขึ้น ○ อาจตั้งคาความเร็วหมุนที่ตองการไวลวงหนา โดยใชหนาปดควบคุม ความเร็ว หมุนหนาปดควบคุมความเร็วไปตามเข็มนาฬกาเพื่อใชความเร็วสูง และหมุนทวนเข็มนาฬกาเพื่อใชความเร็วตํ่า (รูปที่ 5) ○ เมื่อดึงสวิทซ ไกและกดสต็อปเปอร ทําใหสวานอยูในจังหวะเปด สวิทซ และสะดวกตอการทํางานอยางตอเนื่อง เมื่อปดสวิทซ อาจ ปลดสต็อปเปอร ไดโดยกดสวิทซไกอีกครั้ง 2. การเจาะ ○ เมื่อเจาะ เริ่มดวยความเร็วตํ่า และคอยๆ เพิ่มความเร็วขณะเจาะ ○ ใหแรงกดในแนวเดียวกับดอกสวานเสมอ ใหแรงกดพอเพื่อการเจาะ แตอยากดแรงเกินไปจนมอเตอรหยุดหรือดอกสวานงอ ○ ○ ○ ปองกันวัสดุแตกหรือสวานติดจนหยุดหมุน โดยลดแรงกดที่สวานและ ผอนแรงที่ดอกสวานในระยะสุดทายของรู ถาสวานติด ปลอยนิ้วจากสวิทซไกทันที เอาเศษวัสดุออกจากชิ้นงาน และเจาะอีกครั้ง อยากดสวิทซไกไปมาเพื่อฉุดใหดอกสวานหมุนอีก เพราะตัวสวานอาจชํารุด เมือ่ ดอกสวานมีเสนผานศูนยกลางโต แรงผลักแขนของคุณจะมากขึน้ ระวังอยาใหขาดการควบคุมสวานเนื่องจากแรงผลักเชนนี้ ควบคุมใหมั่นคง โดยยืนใหเขาที่ ใชมือจับขาง ใชมือทั้งสองจับ ตัว สวานใหแนน และใหสวานตั้งฉากกับวัสดุที่จะเจาะ การบํารุงรักษาและการตรวจสอบ 1. การตรวจสอบหัวสวาน เนื่องจากการใชดอกสวานที่สึกหรอจะทําใหมอเตอรทํางานผิดปกติ และลดประสิทธิภาพงาน ใหเปลี่ยนดอกสวานเสียใหม หรือนําไปลับ โดยไมชักชา เมื่อเห็นวาสึกไปแลว 2. การตรวจสอบสกรูยึด ใหตรวจสอบสกรูยึดเสมอ และใหขันไวอยางถูกตอง ถาสกรูหลวม ให ขันเสียใหมโดยทันที มิฉะนั้นอาจเกิดอันตรายมาก 3. การบํารุงรักษามอเตอร การขดลวดของมอเตอรเปนหัวใจสําคัญของเครื่องมือไฟฟา ใหใช ความระมัดระวังเพื่อไมใหขดลวดของมอเตอรชํารุดและ/หรือเปยกนํ้า หรือนํ้ามัน 4. การตรวจสอบแปรงถาน เพื่อความปลอดภัยและปองกันไฟฟาดูดไดอยางตอเนื่อง "เฉพาะ" ศูนยซอมที่ฮิตาชิรับรองเทานั้นจะตรวจสอบและเปลี่ยนแปรงถานของ เครื่องมือไฟฟานี้ 5. รายการอะไหลซอม A: หมายเลขอะไหล B: หมายเลขรหัส C: จํานวนที่ใช D: หมายเหต คําเตือน ศูนยบริการที่ไดรับอนุญาตของฮิตาชิเทานั้นเปนผูซอม ดัดแปลง และ ตรวจสอบเครื่องมือไฟฟาของฮิตาชิ รายการอะไหลซอมนี้จะเปนประโยชนเมื่อสงใหศูนยบริการที่ไดรับ อนุญาตของฮิตาชิเทานั้นเพื่อแจงซอมหรือบํารุงรักษา ต อ งปฏิ บั ติ ตามระเบี ย บและมาตรฐานความปลอดภั ย ของแต ล ะ ประเทศในการใชงานและบํารุงรักษาเครื่องมือไฟฟา การแกไข มีการปรับปรุงและแกไขเครื่องมือไฟฟาของฮิตาชิเสมอ เพื่อให สอดคลองกับความกาวหนาลาสุดทางเทคโนโลยี ดังนั้น จึงอาจเปลี่ยนแปลงชิ้นสวนบางอยาง (คือ หมายเลขรหัสและ/ หรือรุน) ไดโดยไมตองแจงลวงหนา หมายเหตุ เนื่องจากฮิตาชิมีแผนงานวิจัยและพัฒนาอยางตอเนื่อง จําเพาะนี้จึงอาจเปลี่ยนแปลงไดโดยไมตองแจงลวงหนา รายละเอียด 17 000Book̲D10VC2̲Asia.indb 17 2015/03/25 17:58:01 ﺍﻟﻌﺭﺑﻳﺔ ﻟﻠﺧﻁﺎﻑ )) (Aﺍﻟﺭﺑﻁ ﺍﻟﻌﻠﻭﻱ( )ﺍﻟﺷﻛﻝ (8 ﺍﻟﺻﻳﺎﻧﺔ ﻭﺍﻟﻔﺣﺹ ﻟﻛﻲ ﻳﺗﻡ ﺗﺭﻛﻳﺏ ﺍﻟﺧﻁﺎﻑ ) ،(Aﻳﺟﺏ ﻋﻠﻳﻙ ﺃﻭﻻً ﺗﻔﻛﻳﻙ ﺟﺯء ﺍﻟﻣﻘﺑﺽ ﺍﻟﺫﻱ ﻳﻐﻁﻲ ﺍﻟﻧﻅﺎﻡ ﺍﻟﻛﻬﺭﺑﻲ ﻟﻠﻣُﻌﺩﺓ .ﻟﺿﻣﺎﻥ ﺳﻼﻣﺗﻙ ﺑﺎﺳﺗﻣﺭﺍﺭ ﻭﺣﻣﺎﻳﺗﻙ ﻣﻥ ﺍﻟﺻﺩﻣﺔ ﺍﻟﻛﻬﺭﺑﺎﺋﻳﺔ ،ﻓﻳﺟﺏ ﺗﺛﺑﻳﺕ ﺍﻟﺧﻁﺎﻑ ) (Aﻓﻲ ﻫﺫﺍ ﺍﻟﺣﻔﺎﺭ ﺑﻭﺍﺳﻁﺔ ﻣﺭﻛﺯ ﺧﺩﻣﺔ HITACHIﺍﻟﻣﻌﺗﻣﺩ ﻓﻘﻁ. ﺗﻧﺑﻳﻪ ﻋﻧﺩ ﺍﺳﺗﺧﺩﺍﻡ ﺍﻟﻣﻌﺩﺓ ﺍﻟﻛﻬﺭﺑﺎﺋﻳﺔ ﻭﻫﻲ ﻣﺛﺑﺕ ﺑﻬﺎ ﺧﻁﺎﻑ ،ﻓﻳﺟﺏ ﻋﻠﻳﻙ ﺍﻻﻧﺗﺑﺎﻩ ﻟﻠﻧﻘﺎﻁ ﺍﻟﺗﺎﻟﻳﺔ: ○ ﻗﺑﻝ ﺗﻌﻠﻳﻕ ﺍﻟﻭﺣﺩﺓ ﺍﻟﺭﺋﻳﺳﻳﺔ ﻣﻥ ﺣﺯﺍﻡ ﺍﻟﺧﺻﺭ ﻳﺟﺏ ﻋﻠﻳﻙ ﺍﻟﺗﺄﻛﺩ ﺃﻥ ﺑﺷﻛﻝ ﺗﺎﻡ. ﺍﻟﺣﻔﺎﺭ ﺗﻭﻗﻑ ﻋﻥ ﺍﻟﻌﻣﻝ ٍ ﻭﺃﺛﻧﺎء ﺗﻐﻠﻳﻘﻬﺎ ﻣﻥ ﺣﺯﺍﻡ ﺍﻟﺧﺻﺭ ﻳﺟﺏ ﺃﻥ ﻳﻛﻭﻥ ﻗﺎﺑﺱ ﺍﻟﻁﺎﻗﺔ ﻏﻳﺭ ﻣﺗﺻﻝ ﺑﻣﺻﺩﺭ ﺍﻟﻁﺎﻗﺔ. ○ ﻻ ﺗﻘﻡ ﺑﺎﻟﻣﺷﻲ ﺃﺛﻧﺎء ﺗﻌﻠﻳﻕ ﺍﻟﻣﻌﺩﺓ ﺍﻟﻛﻬﺭﺑﺎﺋﻳﺔ ﻣﻥ ﺣﺯﺍﻡ ﺍﻟﺧﺻﺭ. ○ ﻓﻲ ﺣﺎﻟﺔ ﺍﻟﻌﻣﻝ ﻓﻲ ﺍﻷﻣﺎﻛﻥ ﺍﻟﻣﺭﺗﻔﻌﺔ ﻓﻣﻥ ﺍﻟﺧﻁﺭ ﺇﺳﻘﺎﻁ ﺍﻟﻣﻌﺩﺓ ﺑﻁﺭﻳﻕ ﺍﻟﺧﻁﺄ .ﺇﺫﺍ ﺗﺷﻭﻩ ﺍﻟﺧﻁﺎﻑ ﺃﻭ ﺗﻡ ﺗﻌﻠﻳﻘﻪ ﻣﻥ ﻣﻛﺎﻥ ﺧﺎﻁﺊ ،ﻓﻳﻭﺟﺩ ﺧﻁﺭ ﺍﺣﺗﻣﺎﻟﻳﺔ ﺍﻧﺯﻻﻕ ﺍﻟﺧﻁﺎﻑ ﻣﻣﺎ ﻳﺅﺩﻱ ﺇﻟﻰ ﺳﻘﻭﻁ ﺍﻟﻣﻌﺩﺓ. ﻓﻛﻥ ﺣﺫﺭً ﺍ ﻟﺗﺟﻧﺏ ﺍﻟﻣﺧﺎﻁﺭ. ○ ﻋﻧﺩ ﺻﻧﻊ ﻓﺗﺣﺔ ﻧﺎﻓﺫﺓ ،ﻓﻘﺩ ﺗﻬﺗﺯ ﺍﻟﻣﻌﺩﺓ ﺍﻟﻛﻬﺭﺑﺎﺋﻳﺔ ﺑﺷﻛﻝ ﻋﻧﻳﻑ ﻋﻧﺩﻣﺎ ﺗﻛﻭﻥ ﺍﻟﻘﻁﻌﺔ ﺍﻟﺗﻲ ﻳﺗﻡ ﺻﻧﻊ ﺍﻟﻔﺗﺣﺔ ﺑﻬﺎ ﻣﺛﻘﻭﺑﺔ ﻋﻠﻰ ﺳﺑﻳﻝ ﺍﻟﻣﺛﺎﻝ .ﻓﻛﻥ ﺣﺫﺭً ﺍ ﺃﻻ ﺗﺣﺩﺙ ﻟﻙ ﺇﺻﺎﺑﺔ ﺑﻭﺍﺳﻁﺔ ﺍﻟﺧﻁﺎﻑ ،ﺣﺗﻰ ﻟﻭ ﺣﺩﺛﺕ ﻣﻭﺍﻗﻑ ﻣﻣﺎﺛﻠﺔ. 1ﻓﺣﺹ ﻣﺛﺎﻗﺏ ﺍﻟﺣﻔﺭ ﻧﻅﺭً ﺍ ﺇﻟﻰ ﺃﻥ ﻣﺛﺎﻗﺏ ﺍﻟﺣﻔﺭ ﺍﻟﻣﺗﺂﻛﻠﺔ ﺗﺅﺩﻱ ﺇﻟﻰ ﺗﻠﻑ ﺍﻟﻣﺣﺭﻙ ﻭﺍﻟﺗﻘﻠﻳﻝ ﻣﻥ ﺍﻟﻛﻔﺎءﺓ ،ﺍﺳﺗﺑﺩﻝ ﻣﺛﺎﻗﺏ ﺍﻟﺣﻔﺭ ﺃﻭ ﻗﻡ ﺑﺷﺣﺫﻫﺎ ﻓﻭﺭ ﻣﻼﺣﻅﺗﻙ ﻷﻱ ﺗﺂﻛﻝ. 2ﻓﺣﺹ ﻣﺳﺎﻣﻳﺭ ﺍﻟﺗﺛﺑﻳﺕ ﻗﻡ ﺑﺎﻟﻔﺣﺹ ﺍﻟﺩﻭﺭﻱ ﻟﻛﺎﻓﺔ ﻣﺳﺎﻣﻳﺭ ﺍﻟﺗﺛﺑﻳﺕ ﻭﺍﻟﺗﺄﻛﺩ ﻣﻥ ﺇﺣﻛﺎﻡ ﺭﺑﻁﻬﺎ ﺑﺷﻛﻝ ﺻﺣﻳﺢ .ﻓﻲ ﺣﺎﻟﺔ ﻓﻙ ﺃﻳﺔ ﻣﺳﺎﻣﻳﺭ ،ﻗﻡ ﺑﺈﺣﻛﺎﻡ ﺭﺑﻁﻬﺎ ﻋﻠﻰ ﺍﻟﻔﻭﺭ. ﻓﻘﺩ ﻳﻌﺭﺽ ﺍﻟﻔﺷﻝ ﻓﻲ ﺍﻟﻘﻳﺎﻡ ﺑﺫﻟﻙ ﺇﻟﻰ ﻣﺧﺎﻁﺭ. 3ﺻﻳﺎﻧﺔ ﺍﻟﻣﺣﺭﻙ ﻣﻠﻑ ﻭﺣﺩﺓ ﺍﻟﻣﺣﺭﻙ ﻫﻭ "ﺍﻟﺟﺯء ﺍﻷﻭﺳﻁ" ﻣﻥ ﺃﺩﺍﺓ ﺍﻟﻁﺎﻗﺔ. ﺗﺎﻛﺩ ﺑﺎﺳﺗﻣﺭﺍﺭ ﻣﻥ ﻋﺩﻡ ﺗﻠﻑ ﺍﻟﻣﻠﻑ ﻭ/ﺃﻭ ﺑﻠﻠﻪ ﺑﻭﺍﺳﻁﺔ ﺍﻟﺯﻳﺕ ﺃﻭ ﺍﻟﻣﺎء. 4ﻓﺣﺹ ﺍﻟﻔﺭﺷﺎﺓ ﺍﻟﻛﺭﺑﻭﻧﻳﺔ ﻷﻣﻧﻙ ﻭﻟﻠﺣﻣﺎﻳﺔ ﻣﻥ ﺍﻟﺻﺩﻣﺎﺕ ﺍﻟﻛﻬﺭﺑﺎﺋﻳﺔ ،ﻻ ﻳﺟﺏ ﻓﺣﺹ ﺍﻟﻔﺭﺷﺎﺓ ﺍﻟﻛﺭﺑﻭﻧﻳﺔ ﻭﺍﺳﺗﺑﺩﺍﻟﻬﺎ ﺑﻬﺫﻩ ﺍﻷﺩﺍﺓ ﺇﻻ ﻣﻥ ﻗﺑﻝ ﻣﺭﻛﺯ ﺧﺩﻣﺔ Hitachi ﺍﻟﻣﻌﺗﻣﺩ. 5ﻗﺎﺋﻣﺔ ﺃﺟﺯﺍء ﺍﻟﺧﺩﻣﺔ :Aﺭﻗﻡ ﺍﻟﻌﻧﺻﺭ :Bﺭﻗﻡ ﺍﻟﺭﻣﺯ :Cﺍﻟﺭﻗﻡ ﺍﻟﻣﺳﺗﺧﺩﻡ :Dﺍﻟﻌﻼﻣﺎﺕ ﺗﻧﺑﻳﻪ ﻳﺟﺏ ﺗﻧﻔﻳﺫ ﺃﻋﻣﺎﻝ ﺍﻹﺻﻼﺡ ،ﻭﺍﻟﺗﻌﺩﻳﻝ ،ﻭﺍﻟﻔﺣﺹ ﻷﺩﻭﺍﺕ Hitachiﻣﻥ ﻗﺑﻝ ﻣﺭﻛﺯ ﺍﻟﺧﺩﻣﺔ ﺍﻟﻣﻌﺗﻣﺩ. ﻗﺎﺋﻣﺔ ﺍﻷﺟﺯﺍء ﻫﺫﻩ ﻣﻔﻳﺩﺓ ﻋﻧﺩ ﺗﻘﺩﻳﻣﻬﺎ ﻣﻊ ﺍﻷﺩﺍﺓ ﻟﻣﺭﻛﺯ ﺧﺩﻣﺔ Hitachi ﻣﻌﺗﻣﺩ ﻋﻧﺩ ﻁﻠﺏ ﺍﻹﺻﻼﺡ ﺃﻭ ﻏﻳﺭﻫﺎ ﻣﻥ ﺃﻋﻣﺎﻝ ﺍﻟﺻﻳﺎﻧﺔ. ﻓﻲ ﺣﺎﻟﺔ ﺗﺷﻐﻳﻝ ﺍﻟﻌﺩﺩ ﺍﻟﻛﻬﺭﺑﺎﺋﻳﺔ ﺃﻭ ﺻﻳﺎﻧﺗﻬﺎ ،ﻳﺟﺏ ﺍﺗﺑﺎﻉ ﺗﻌﻠﻳﻣﺎﺕ ﺍﻷﻣﺎﻥ ﻭﺍﻟﻣﻌﺎﻳﻳﺭ ﺍﻟﺧﺎﺻﺔ ﺑﻛﻝ ﺩﻭﻟﺔ. ﺍﻟﺗﻌﺩﻳﻼﺕ ﻳﺗﻡ ﺗﺣﺳﻳﻥ ﺃﺩﻭﺍﺕ Hitachiﺑﺎﺳﺗﻣﺭﺍﺭ ﻭﺗﻌﺩﻳﻠﻬﺎ ﺗﺑﻌًﺎ ﻷﺣﺩﺙ ﺍﻟﺗﻘﻧﻳﺎﺕ ﺍﻟﻣﺗﻘﺩﻣﺔ. ﻭﻟﺫﻟﻙ ،ﻗﺩ ﻳﺗﻡ ﺗﻐﻳﻳﺭ ﺑﻌﺽ ﺍﻷﺟﺯﺍء )ﻣﺛﻝ ﺃﺭﻗﺎﻡ ﺍﻟﺭﻣﻭﺯ ﻭ/ﺃﻭ ﺍﻟﺗﺻﻣﻳﻡ( ﺩﻭﻥ ﺇﻋﻼﻡ ﻣﺳﺑﻕ. ﻛﻳﻔﻳﺔ ﺍﻻﺳﺗﺧﺩﺍﻡ 1 ○ ○ ○ ○ 2 ○ ○ ○ ○ ○ ﺗﺷﻐﻳﻝ ﺍﻟﻣﻔﺗﺎﺡ ﻋﻧﺩ ﺿﻐﻁ ﺍﻟﻣﻘﺩﺍﺡ ،ﺗﺩﻭﺭ ﺍﻷﺩﺍﺓ .ﻋﻧﺩ ﺗﺣﺭﻳﺭ ﺍﻟﻣﻘﺩﺍﺡ ،ﺗﺗﻭﻗﻑ ﺍﻷﺩﺍﺓ. ﻳﻣﻛﻥ ﺍﻟﺗﺣﻛﻡ ﻓﻲ ﺳﺭﻋﺔ ﺩﻭﺭﺍﻥ ﺍﻟﻣﺛﻘﺏ ﺑﺗﻐﻳﻳﺭ ﻣﻌﺩﻝ ﺳﺣﺏ ﻣﻔﺗﺎﺡ ﺍﻟﻣﻘﺩﺍﺡ. ﺗﻛﻭﻥ ﺍﻟﺳﺭﻋﺔ ﻣﻧﺧﻔﺿﺔ ﻋﻧﺩ ﺍﻟﺿﻐﻁ ﺑﺭﻓﻕ ﻋﻠﻰ ﻣﻔﺗﺎﺡ ﺍﻟﻣﻘﺩﺍﺡ ﻭﺗﺯﻳﺩ ﻣﻊ ﺍﺳﺗﻣﺭﺍﺭ ﺳﺣﺏ ﻣﻔﺗﺎﺡ ﺍﻟﻣﻘﺩﺍﺡ. ﻗﺩ ﻳﺗﻡ ﺍﻟﺗﺣﺩﻳﺩ ﺍﻟﻣﺳﺑﻕ ﻟﺳﺭﻋﺔ ﺍﻟﺩﻭﺭﺍﻥ ﺍﻟﻣﺭﻏﻭﺑﺔ ﻣﻊ ﻗﺭﺹ ﺍﻟﺗﺣﻛﻡ ﻓﻲ ﺍﻟﺳﺭﻋﺔ. ﻗﻡ ﺑﺗﺣﻭﻳﻝ ﻣﻔﺗﺎﺡ ﺍﻟﺗﺣﻛﻡ ﻓﻲ ﺍﻟﺳﺭﻋﺔ ﻓﻲ ﺍﺗﺟﺎﻩ ﻋﻘﺎﺭﺏ ﺍﻟﺳﺎﻋﺔ ﻟﻠﺣﺻﻭﻝ ﻋﻠﻰ ﺳﺭﻋﺔ ﺃﻛﺑﺭ ﻭﻓﻲ ﻋﻛﺱ ﺍﺗﺟﺎﻩ ﻋﻘﺎﺭﺏ ﺍﻟﺳﺎﻋﺔ ﻟﻠﺣﺻﻭﻝ ﻋﻠﻰ ﺳﺭﻋﺔ ﺃﻗﻝ) .ﺍﻟﺷﻛﻝ (5 ﻋﻧﺩ ﺳﺣﺏ ﺍﻟﻣﻘﺩﺍﺡ ﻭﺍﻟﺿﻐﻁ ﻋﻠﻰ ﻣﻔﺗﺎﺡ ﺍﻹﻳﻘﺎﻑ ،ﻓﻬﺫﺍ ﻳﻌﻣﻝ ﻋﻠﻰ ﺍﻹﺑﻘﺎء ﻋﻠﻰ ﺣﺎﻟﺔ ﺍﻟﺗﺷﻐﻳﻝ ﻭﻳﻌﺩ ﺫﻟﻙ ﻣﻧﺎﺳﺑًﺎ ﻟﻌﻣﻠﻳﺔ ﺍﻟﺗﺷﻐﻳﻝ ﺍﻟﻣﺳﺗﻣﺭ. ﻋﻧﺩ ﺇﻳﻘﺎﻑ ﺍﻟﺗﺷﻐﻳﻝ ،ﻳﻣﻛﻥ ﻓﺻﻝ ﻣﻔﺗﺎﺡ ﺍﻹﻳﻘﺎﻑ ﺑﺳﺣﺏ ﺍﻟﻣﻘﺩﺍﺡ ﻣﺭﺓ ﺃﺧﺭﻯ. ﺍﻟﺣﻔﺭ ﻋﻧﺩ ﺍﻟﺣﻔﺭ ،ﺍﺑﺩﺃ ﺍﻟﺣﻔﺭ ﺑﻁء ،ﻭﻗﻡ ﺑﺯﻳﺎﺩﺓ ﺍﻟﺳﺭﻋﺔ ﻭﺃﻧﺕ ﺗﺣﻔﺭ. ﻗﻡ ﺑﺎﺳﺗﺧﺩﺍﻡ ﺍﻟﺿﻐﻁ ﺩﺍﺋﻣًﺎ ﻓﻲ ﺧﻁ ﻣﺳﺗﻘﻳﻡ ﻣﻊ ﺍﻟﻣﺛﻘﺏ .ﺍﺳﺗﺧﺩﻡ ﺿﻐﻁﺎً ﻛﺎﻓﻳًﺎ ﻟﻠﺣﻔﺎﻅ ﻋﻠﻰ ﺍﻟﺣﻔﺭ ،ﻭﻟﻛﻥ ﻻ ﺗﺩﻓﻊ ﺑﻘﻭﺓ ﻟﺗﺭﻛﻳﺏ ﺍﻟﻣﺣﺭﻙ ﺃﻭ ﺗﺷﻭﻳﻪ ﺍﻟﻣﺛﻘﺏ. ﻟﺗﻘﻠﻳﻝ ﺍﻟﺗﺑﺎﻁﺅ ﺃﻭ ﺍﻟﻛﺳﺭ ﻋﺑﺭ ﺍﻟﻣﺎﺩﺓ ،ﻗﻡ ﺑﺧﻔﺽ ﺍﻟﺿﻐﻁ ﻋﻠﻰ ﺍﻟﻣﺛﻘﺏ ﻭﻗﻡ ﺑﺈﺭﺍﺣﺔ ﺍﻟﻣﺛﻘﺏ ﻋﺑﺭ ﺍﻟﺟﺯء ﺍﻷﺧﻳﺭ ﻣﻥ ﺍﻟﻔﺗﺣﺔ. ﻓﻲ ﺣﺎﻟﺔ ﺗﺑﺎﻁﺅ ﺍﻟﻣﺛﻘﺏ ،ﻗﻡ ﺑﺗﺣﺭﻳﺭ ﻣﻔﺗﺎﺡ ﺍﻟﺗﺷﻐﻳﻝ ﻓﻲ ﺍﻟﺣﺎﻝ ،ﻭﻗﻡ ﺑﺈﺯﺍﻟﺔ ﺍﻟﻣﺛﻘﺏ ﻣﻥ ﺍﻟﻌﻣﻝ ﻭﺍﺑﺩﺃ ﻣﺭﺓ ﺃﺧﺭﻯ .ﻻ ﺗﺿﻐﻁ ﻋﻠﻰ ﺗﺷﻐﻳﻝ ﻣﻔﺗﺎﺡ ﺍﻟﺗﺷﻐﻳﻝ ﺃﻭ ﺇﻳﻘﺎﻑ ﺗﺷﻐﻳﻠﻪ ﻛﻣﺣﺎﻭﻟﺔ ﻟﺑﺩء ﺍﻟﺣﻔﺭ ﺍﻟﺑﻁﻲء .ﻗﺩ ﻳﺅﺩﻱ ﺫﻟﻙ ﺇﻟﻰ ﺗﻠﻑ ﺍﻟﻣﺛﻘﺏ. ﻛﻠﻣﺎ ﻛﺎﻥ ﻗﻁﺭ ﻣﺛﻘﺏ ﺍﻟﺣﻔﺭ ﻋﺭﻳﺿًﺎ ،ﺗﺗﺯﺍﻳﺩ ﺍﻟﻘﻭﺓ ﺍﻟﺗﻔﺎﻋﻠﻳﺔ ﻋﻠﻰ ﺯﺭﺍﻋﻙ. ﺗﻭﺥ ﺍﻟﺣﺫﺭ ﻓﻲ ﻋﺩﻡ ﻓﻘﺩﺍﻥ ﺍﻟﺗﺣﻛﻡ ﻓﻲ ﺍﻟﻣﺛﻘﺏ ﺑﺳﺑﺏ ﺍﻟﻘﻭﺓ ﺍﻟﺗﻔﺎﻋﻠﻳﺔ. ﻟﻠﺣﻔﺎﻅ ﻋﻠﻰ ﺍﻟﺗﺣﻛﻡ ﺑﺛﺑﺎﺕ ،ﻗﻡ ﺑﻭﺿﻊ ﻣﻭﻁﺊ ﻗﺩﻡ ﺟﻳﺩ ﻭﺍﺳﺗﺧﺩﻡ ﺍﻟﻣﻘﺑﺽ ﺍﻟﺟﺎﻧﺑﻲ ،ﻭﺍﻣﺳﻙ ﺍﻟﻣﺛﻘﺎﺏ ﺑﺈﺣﻛﺎﻡ ﺑﻛﻠﺗﺎ ﺍﻟﻳﺩﻳﻥ ،ﻭﺗﺄﻛﺩ ﺃﻥ ﺍﻟﻣﺛﻘﺎﺏ ﻓﻲ ﺍﻟﻭﺿﻊ ﺍﻟﺭﺃﺳﻲ ﻟﻠﻣﺎﺩﺓ ﺍﻟﺗﻲ ﻳﺗﻡ ﺛﻘﺑﻬﺎ. ﻣﻼﺣﻅﺔ ﺗﺑﻌًﺎ ﻟﺑﺭﻧﺎﻣﺞ HITACHIﻟﻠﺑﺣﺙ ﻭﺍﻟﺗﻁﻭﻳﺭ ﺍﻟﻣﺳﺗﻣﺭ ،ﺗﺗﻐﻳﺭ ﺍﻟﻣﻭﺍﺻﻔﺎﺕ ﺍﻟﻣﺫﻛﻭﺭﺓ ﻫﻧﺎ ﺩﻭﻥ ﺇﻋﻼﻡ ﻣﺳﺑﻕ. ۳ 2015/03/25 17:58:01 18 000Book̲D10VC2̲Asia.indb 18 ﺍﻟﻌﺭﺑﻳﺔ ﺗﺣﺫﻳﺭﺍﺕ ﺣﻭﻝ ﺍﺳﺗﺧﺩﺍﻡ ﺍﻟﻣﺛﻘﺎﺏ 1ﺍﻣﺳﻙ ﺍﻟﻣﺛﻘﺎﺏ ﺑﺄﻣﺎﻥ ﻋﻧﺩ ﺍﻻﺳﺗﺧﺩﺍﻡ. 2ﻻ ﺗﺭﺗﺩﻱ ﻗﻔﺎﺯﺍﺕ ﻣﺻﻧﻭﻋﺔ ﻣﻥ ﻣﺎﺩﺓ ﺧﺎﻡ ﻋﺭﺿﺔ ﻷﻥ ﺗﻠﺗﻑ ﺣﻭﻝ ﻧﻔﺳﻬﺎ ﻣﺛﻝ ﺍﻟﻘﻁﻥ ﺃﻭ ﺍﻟﺻﻭﻑ ﺃﻭ ﺍﻟﻘﻣﺎﺵ ﺃﻭ ﺧﻳﻁ ﺃﻭ ﻏﻳﺭﻫﺎ. 3ﻗﺑﻝ ﺃﻥ ﺗﻘﻭﻡ ﺑﻌﻣﻠﻳﺎﺕ ﺍﻟﺣﻔﺭ ﻓﻲ ﺍﻟﺣﺎﺋﻁ ،ﻭﺍﻷﺳﻘﻑ ﺃﻭ ﺍﻷﺭﺿﻳﺎﺕ ،ﺗﺄﻛﺩ ﻣﻥ ﻋﺩﻡ ﻭﺟﻭﺩ ﻛﺎﺑﻼﺕ ﻛﻬﺭﺑﺎﺋﻳﺔ ﺃﻭ ﻣﻭﺻﻼﺕ ﺑﺎﻟﺩﺍﺧﻝ. ﺍﻟﻣﻭﺍﺻﻔﺎﺕ ) 110ﻓﻭﻟﺕ 220 ،ﻓﻭﻟﺕ 230 ،ﻓﻭﻟﺕ 240 ،ﻓﻭﻟﺕ( 460ﻭﺍﺕ* / 2300 - 0ﺩﻗﻳﻘﺔ 10ﻣﻡ 10ﻣﻡ 25ﻣﻡ 16ﻣﻡ 1.3ﻛﺟﻡ ﺍﻟﺟﻬﺩ ﺍﻟﻛﻬﺭﺑﻲ )ﺣﺳﺏ ﺍﻟﻣﻧﺎﻁﻕ(* ﺇﺩﺧﺎﻝ ﺍﻟﻁﺎﻗﺔ ﺍﻟﺳﺭﻋﺔ ﺑﺩﻭﻥ ﺣﻣﻝ ﺳﻌﺔ ﻅﺭﻑ ﺍﻟﻣﺛﻘﺏ ﻟﻘﻣﺔ ﺣﻔﺭ ﺣﻠﺯﻭﻧﻳﺔ ﺍﻟﺻﻠﺏ ﻣﺛﻘﺏ ﺣﻔﺭ ﺫﺍﺕ ﻣﺟﺭﺍﻑ ﻣﺳﺗﻭﻱ ﺍﻟﺳﻌﺔ ﺍﻟﺧﺷﺏ ﻣﺛﻘﺏ ﺫﻭ ﺑﺭﻳﻣﺔ ﺍﻟﻭﺯﻥ )ﺑﺩﻭﻥ ﺍﻟﺳﻠﻙ( * ﺗﺄﻛﺩ ﻣﻥ ﻓﺣﺹ ﻟﻭﺣﺔ ﺍﻻﺳﻡ ﺍﻟﻣﻭﺟﻭﺩﺓ ﻋﻠﻰ ﺍﻟﻣﻧﺗﺞ ﺣﻳﺙ ﺃﻧﻬﺎ ﻋُﺭﺿﺔ ﻟﻠﺗﻐﻳﻳﺭ ﺣﺳﺏ ﺍﻟﻣﻧﻁﻘﺔ. 5ﺗﺭﻛﻳﺏ ﺍﻟﻣﺛﻘﺏ ﻭﻓﻛﻪ ﻣﻠﺣﻘﺎﺕ ﻗﻳﺎﺳﻳﺔ ﻟﻠﻣﻘﺑﺽ ﺫﻭ ﺍﻟﻣﻔﺎﺗﻳﺢ ○ ﻣﻔﺗﺎﺡ ﺍﻟﻅﺭﻑ )ﺍﻟﻣﻭﺍﺻﻔﺎﺕ ﻓﻘﻁ ﻟﻠﻣﻘﺑﺽ ﺑﺩﻭﻥ ﻣﻔﺎﺗﻳﺢ(1............... ) (1ﺍﻓﺗﺢ ﻓﻛﻭﻙ ﺍﻟﻅﺭﻑ ﻭﺃﺩﺧﻝ ﺍﻟﻣﺛﻘﺏ ﻓﻲ ﺍﻟﻅﺭﻑ. ) (2ﺿﻊ ﻣﻔﺗﺎﺡ ﺍﻟﻣﻘﺑﺽ ﻓﻲ ﺍﻟﺛﻼﺙ ﻓﺗﺣﺎﺕ ﻓﻲ ﺍﻟﻣﻘﺑﺽ ،ﻭﺃﺩﺭ ﻓﻲ ﻧﻔﺱ ﺍﺗﺟﺎﻩ ﻋﻘﺎﺭﺏ ﺍﻟﺳﺎﻋﺔ )ﺍﻟﻣﻌﺭﻭﺿﺔ ﻣﻥ ﺍﻟﺟﺎﻧﺏ ﺍﻷﻣﺎﻣﻲ( .ﺍﺭﺑﻁﻪ ﺑﺈﺣﻛﺎﻡ. ) (3ﻹﺯﺍﻟﺔ ﺍﻟﻣﺛﻘﺏ ،ﺿﻊ ﻣﻔﺗﺎﺡ ﺍﻟﻣﻘﺑﺽ ﺩﺍﺧﻝ ﺃﺣﺩ ﺍﻟﻔﺗﺣﺎﺕ ﻓﻲ ﺍﻟﻣﻘﺑﺽ ﻭﺃﺩﺭﻩ ﻓﻲ ﻋﻛﺱ ﺍﺗﺟﺎﻩ ﻋﻘﺎﺭﺏ ﺍﻟﺳﺎﻋﺔ. ﻳﻣﻛﻥ ﺗﻐﻳﻳﺭ ﺍﻟﻣﺣﻠﻘﺎﺕ ﺍﻟﻘﻳﺎﺳﻳﺔ ﺩﻭﻥ ﺇﺧﻁﺎﺭ. ﻣﻠﺣﻘﺎﺕ ﺍﺧﺗﻳﺎﺭﻳﺔ ) ُﺗﺑﺎﻉ ﻣﻧﻔﺻﻠﺔ( ) (1ﻣﻘﺑﺽ ﺟﺎﻧﺑﻲ ) (2ﺧﻁﺎﻑ ) (3ﺧﻁﺎﻑ )(A ﻟﻠﻅﺭﻑ ﺑﺩﻭﻥ ﻣﻔﺗﺎﺡ ﻳﻣﻛﻥ ﺗﻐﻳﻳﺭ ﺍﻟﻣﺣﻠﻘﺎﺕ ﺍﻻﺧﺗﻳﺎﺭﻳﺔ ﺩﻭﻥ ﺇﺧﻁﺎﺭ. )(1 ﺗﻁﺑﻳﻘﺎﺕ )(2 ○ ﺍﻟﺛﻘﺏ ﻟﻌﻣﻝ ﻓﺗﺣﺎﺕ ﻓﻲ ﺍﻟﻣﻌﺎﺩﻥ ﻭﺍﻟﺧﺷﺏ ﻭﺍﻟﺑﻼﺳﺗﻳﻙ. )(3 ﻗﺑﻝ ﺍﻟﺗﺷﻐﻳﻝ 1 2 3 4 ○ ○ )(4 ﻣﺻﺩﺭ ﺍﻟﻁﺎﻗﺔ ﺗﺄﻛﺩ ﻣﻥ ﺃﻥ ﻣﺻﺩﺭ ﺍﻟﻁﺎﻗﺔ ﺍﻟﺫﻱ ﺳﻳﺗﻡ ﺍﺳﺗﺧﺩﺍﻣﻪ ﻣﻁﺎﺑﻕ ﻟﻣﺗﻁﻠﺑﺎﺕ ﺍﻟﻁﺎﻗﺔ ﺍﻟﻣﺣﺩﺩﺓ ﻋﻠﻰ ﻟﻭﺣﺔ ﺍﻻﺳﻡ ﺍﻟﻣﻭﺟﻭﺩﺓ ﻋﻠﻰ ﺍﻟﻣﻧﺗﺞ. ﻣﻔﺗﺎﺡ ﺍﻟﻁﺎﻗﺔ ﺗﺄﻛﺩ ﻣﻥ ﺃﻥ ﻣﻔﺗﺎﺡ ﺍﻟﻁﺎﻗﺔ ﻋﻠﻰ ﺍﻟﻭﺿﻊ ﺇﻳﻘﺎﻑ .ﻓﻲ ﺣﺎﻟﺔ ﺗﻭﺻﻳﻝ ﺍﻟﻘﺎﺑﺱ ﺑﺎﻟﻣﻘﺑﺱ ﻭﻛﺎﻥ ﻣﻔﺗﺎﺡ ﺍﻟﻁﺎﻗﺔ ﻋﻠﻰ ﺍﻟﻭﺿﻊ ﺗﺷﻐﻳﻝ ،ﻓﺳﻳﺗﻡ ﺗﺷﻐﻳﻝ ﺃﺩﺍﺓ ﺍﻟﻁﺎﻗﺔ ﻋﻠﻰ ﺍﻟﻔﻭﺭ ،ﻣﻣﺎ ﻗﺩ ﻳﺅﺩﻱ ﺇﻟﻰ ﻭﻗﻭﻉ ﺣﺎﺩﺙ ﺧﻁﻳﺭ. ﺳﻠﻙ ﺍﻟﺗﻭﺻﻳﻝ ﺍﻹﺿﺎﻓﻲ ﻋﻧﺩ ﺇﺯﺍﻟﺔ ﻣﻧﻁﻘﺔ ﺍﻟﻌﻣﻝ ﻣﻥ ﻣﺻﺩﺭ ﺍﻟﻁﺎﻗﺔ ،ﺍﺳﺗﺧﺩﻡ ﺳﻠﻙ ﺗﻭﺻﻳﻝ ﺇﺿﺎﻓﻲ ﺫﻭ ﺳﻣﻙ ﻛﺎ ٍ ﻑ ﻭﺳﻌﺔ ﻣﻘﻧﻧﺔ .ﻳﺟﺏ ﺃﻥ ﻳﻅﻝ ﺳﻠﻙ ﺍﻟﺗﻭﺻﻳﻝ ﺍﻹﺿﺎﻓﻲ ﻗﺻﻳﺭً ﺍ ﺑﻘﺩﺭ ﺍﻟﻣﺳﺗﻁﺎﻉ. ﺗﺣﺩﻳﺩ ﻣﺛﻘﺏ ﺍﻟﺣﻔﺭ ﺍﻟﻣﻧﺎﺳﺏ ﻋﻧﺩ ﺍﻟﺛﻘﺏ ﻓﻲ ﺍﻟﻣﻌﺎﺩﻥ ﺃﻭ ﺍﻟﺑﻼﺳﺗﻳﻙ: ﺍﺳﺗﺧﺩﻡ ﻣﺛﻘﺏ ﺣﻔﺭ ﺃﺷﻐﺎﻝ ﻣﻌﺩﻧﻳﺔ ﻋﺎﺩﻱ. ﻋﻧﺩ ﺍﻟﺛﻘﺏ ﻓﻲ ﺍﻟﺧﺷﺏ: ﺍﺳﺗﺧﺩﻡ ﻣﺛﻘﺏ ﺣﻔﺭ ﺃﺷﻐﺎﻝ ﺧﺷﺑﻳﺔ ﻋﺎﺩﻱ. ﻭﻋﻧﺩ ﺍﻟﺛﻘﺏ ﻟﻌﻣﻝ ﻓﺗﺣﺎﺕ 6.5ﻣﻡ ﺃﻭ ﺃﺻﻐﺭ ،ﺍﺳﺗﺧﺩﻡ ﻣﺛﻘﺏ ﺣﻔﺭ ﺃﺷﻐﺎﻝ ﻣﻌﺩﻧﻳﺔ. 19 2015/03/25 17:58:02 )ﺍﻟﺷﻛﻝ (1 6 7 8 )ﺍﻟﺷﻛﻝ (2 ﺍﻓﺗﺢ ﻓﻛﻭﻙ ﺍﻟﻅﺭﻑ ﻭﺃﺩﺧﻝ ﺍﻟﻣﺛﻘﺏ ﻓﻲ ﺍﻟﻅﺭﻑ. ﻟﻔﺗﺢ ﻓﻛﻭﻙ ﺍﻟﻅﺭﻑ ،ﺃﻣﺳﻙ ﺍﻟﺣﻠﻘﺔ ﻋﻧﺩ ﺇﺩﺍﺭﺓ ﺍﻟﺟﻠﺑﺔ ﻓﻲ ﻋﻛﺱ ﺍﺗﺟﺎﻩ ﻋﻘﺎﺭﺏ ﺍﻟﺳﺎﻋﺔ )ﻣﻥ ﺍﻟﺟﺎﻧﺏ ﺍﻷﻣﺎﻣﻲ(. ﻭﺃﺧﻳﺭً ﺍ ،ﻗﻡ ﺑﺈﻣﺳﺎﻙ ﺍﻟﺣﻠﻘﺔ ﺑﺛﺑﺎﺕ ﻭﺃﺩﺭ ﺍﻟﺟﻠﺑﺔ ﻓﻲ ﺍﺗﺟﺎﻩ ﻋﻘﺎﺭﺏ ﺍﻟﺳﺎﻋﺔ .ﺍﺭﺑﻁﻪ ﺑﺈﺣﻛﺎﻡ. ﻹﺯﺍﻟﺔ ﺍﻟﻣﺛﻘﺏ ،ﻗﻡ ﺑﺈﻣﺳﺎﻙ ﺍﻟﺣﻠﻘﺔ ﺑﺛﺑﺎﺕ ﻭﺃﺩﺭ ﺍﻟﺟﻠﺑﺔ ﻓﻲ ﻋﻛﺱ ﺍﺗﺟﺎﻩ ﻋﻘﺎﺭﺏ ﺍﻟﺳﺎﻋﺔ. ﺇﺫﺍ ﻛﺎﻥ ﻣﻥ ﺍﻟﺻﻌﺏ ﻓﻙ ﺍﻟﺟﻠﺑﺔ ،ﻗﻡ ﺑﺗﺛﺑﻳﺕ ﻋﻣﻭﺩ ﺍﻟﺩﻭﺭﺍﻥ ﺑﺎﺳﺗﺧﺩﺍﻡ ﻣﻔﺗﺎﺡ ﻣﻔﺗﻭﺡ ﺍﻟﻁﺭﻑ ،ﻭﺍﻣﺳﻙ ﺍﻟﺟﻠﺑﺔ ﺑﺛﺑﺎﺕ ،ﻭﺃﺩﺭ ﻓﻲ ﺍﺗﺟﺎﻩ ﺍﻟﻔﻙ )ﺑﺎﺗﺟﺎﻩ ﻋﻘﺎﺭﺏ ﺍﻟﺳﺎﻋﺔ ﻋﻧﺩ ﺍﻟﻌﺭﺽ ﻣﻥ ﺍﻷﻣﺎﻡ() .ﺍﻟﺷﻛﻝ (3 ﺗﺣﻘﻕ ﻣﻥ ﺍﺗﺟﺎﻩ ﺍﻟﺩﻭﺭﺍﻥ )ﺍﻟﺷﻛﻝ (4 ﻳﺩﻭﺭ ﺍﻟﻣﺛﻘﺏ ﻓﻲ ﺍﺗﺟﺎﻩ ﻋﻘﺎﺭﺏ ﺍﻟﺳﺎﻋﺔ )ﻣﻥ ﺃﻗﺭﺏ ﺟﺎﻧﺏ( ﺑﺎﻟﺿﻐﻁ ﻋﻠﻰ ﺟﺎﻧﺏ Rﻣﻥ ﺯﺭ ﺍﻟﺿﻐﻁ. ﻳﺗﻡ ﺍﻟﺿﻐﻁ ﻋﻠﻰ ﺍﻟﺟﺎﻧﺏ Lﻣﻥ ﺯﺭ ﺍﻟﺿﻐﻁ ﻹﺭﺟﺎﻉ ﺍﻟﻣﺛﻘﺏ ﻓﻲ ﻋﻛﺱ ﺍﺗﺟﺎﻩ ﻋﻘﺎﺭﺏ ﺍﻟﺳﺎﻋﺔ. ﻭ Rﻋﻠﻰ ﺍﻟﺟﺳﻡ(. )ﻳﺗﻡ ﺗﻭﻓﻳﺭ ﺍﻟﻌﻼﻣﺗﻳﻥ ﺗﺭﻛﻳﺏ ﺍﻟﻣﻘﺑﺽ ﺍﻟﺟﺎﻧﺑﻲ )ﻣﻠﺣﻕ ﺍﺧﺗﻳﺎﺭﻱ( ﻳﻣﻛﻥ ﺗﺭﻛﻳﺏ ﺍﻟﻣﻘﺑﺽ ﺍﻟﺟﺎﻧﺑﻲ ﻋﻠﻰ ﺃﻱ ﻣﻥ ﺟﺎﻧﺑﻲ ﺍﻷﺩﺍﺓ ﻟﻼﺳﺗﺧﺩﺍﻡ ﻣﻥ ﻗﺑﻝ ﺍﻟﺫﻳﻥ ﻳﺳﺗﺧﺩﻣﻭﻥ ﺍﻟﻳﺩ ﺍﻟﻳﻣﻧﻰ ﺃﻭ ﺍﻟﻳﺳﺭﻯ. ﻟﺗﺭﻛﻳﺏ ﺍﻟﻣﻘﺑﺽ ﺍﻟﺟﺎﻧﺑﻲ ،ﻗﻡ ﺑﻭﺿﻌﻪ ﺩﺍﺧﻝ ﺍﻟﻣﺄﺧﺫ ﻋﻠﻰ ﺍﻟﺟﺎﻧﺏ ﺍﻟﻣﺭﻏﻭﺏ ﻟﻠﻐﻁﺎء ﺍﻟﺧﻠﻔﻲ ﻭﺃﺣﻛﻡ ﺭﺑﻁﻪ) .ﺍﻟﺷﻛﻝ (6 ﺗﺭﻛﻳﺏ ﺍﻟﺧﻁﺎﻑ )ﻣﻠﺣﻘﺎﺕ ﺍﺧﺗﻳﺎﺭﻳﺔ( ﻟﻠﺧﻁﺎﻑ )ﺍﻟﺭﺑﻁ ﺍﻟﺟﺎﻧﺑﻲ( )ﺍﻟﺷﻛﻝ (7 ﻗﻡ ﺑﺗﺛﺑﻳﺕ ﺍﻟﺧﻁﺎﻑ ﺑﺈﺣﻛﺎﻡ ﻋﻠﻰ ﺍﻟﺟﺎﻧﺏ ﺍﻟﻣﺭﻏﻭﺏ ﻟﻠﻐﻁﺎء ﺍﻟﺧﻠﻔﻲ ﺑﺎﺳﺗﺧﺩﺍﻡ ﻣﺳﻣﺎﺭ M10ﺍﻟﻣﺗﻭﻓﺭ ﻣﻊ ﺍﻟﺧﻁﺎﻑ. ۲ 000Book̲D10VC2̲Asia.indb 19 ﺍﻟﻌﺭﺑﻳﺔ ﺙ( ﺍﻧﺯﻉ ﻋﺩﺩ ﺍﻟﺿﺑﻁ ﺃﻭ ﻣﻔﺗﺎﺡ ﺍﻟﺭﺑﻁ ﻗﺑﻝ ﺗﺷﻐﻳﻝ ﺍﻟﻌﺩﺓ ﺍﻟﻛﻬﺭﺑﺎﺋﻳﺔ. ﻭﺟﻭﺩ ﻣﻔﺗﺎﺡ ﺭﺑﻁ ﺃﻭ ﻣﻔﺗﺎﺡ ﺿﺑﻁ ﻋﻠﻰ ﻳﺳﺎﺭ ﺍﻟﺟﺯء ﺍﻟﻣﺗﺣﺭﻙ ﻣﻥ ﺍﻟﻌﺩﺓ ﺍﻟﻛﻬﺭﺑﺎﺋﻳﺔ ﻳﺅﺩﻱ ﺇﻟﻰ ﺣﺩﻭﺙ ﺇﺻﺎﺑﺔ ﺷﺧﺻﻳﺔ. ﺝ( ﻻ ﺗﻘﺗﺭﺏ ﻣﻥ ﺍﻟﻌﺩﺓ ﺍﻟﻛﻬﺭﺑﺎﺋﻳﺔ ،ﺍﺗﺭﻙ ﻣﺳﺎﻓﺔ ﻣﻧﺎﺳﺑﺔ ﺑﻳﻧﻙ ﻭﺑﻳﻥ ﺍﻟﻌﺩﺓ ﺍﻟﻛﻬﺭﺑﺎﺋﻳﺔ ﻭﺣﺎﻓﻅ ﻋﻠﻰ ﺗﻭﺍﺯﻧﻙ ﻓﻲ ﺟﻣﻳﻊ ﺍﻷﻭﻗﺎﺕ. ﺳﻳﺳﻣﺢ ﻟﻙ ﺫﻟﻙ ﻣﻥ ﺍﻟﺳﻳﻁﺭﺓ ﻋﻠﻰ ﺍﻟﺟﻬﺎﺯ ﺑﺷﻛﻝ ﺃﻓﺿﻝ ﻓﻲ ﺍﻟﻣﻭﺍﻗﻑ ﻏﻳﺭ ﺍﻟﻣﺗﻭﻗﻌﺔ. ﺡ( ﻗﻡ ﺑﺎﺭﺗﺩﺍء ﻣﻼﺑﺱ ﻣﻧﺎﺳﺑﺔ ،ﻻ ﺗﺭﺗﺩﻱ ﻣﻼﺑﺱ ﻓﺿﻔﺎﺿﺔ ﺃﻭ ﺑﻬﺎ ﺃﻁﺭﺍﻑ ﺳﺎﺋﺑﺔ ﺃﻭ ﺣﻠﻲ ،ﻭﺣﺎﻓﻅ ﺩﺍﺋﻣﺎ ً ﻋﻠﻰ ﺇﺑﻌﺎﺩ ﺷﻌﺭﻙ ﻭﺍﻟﻣﻼﺑﺱ ﺍﻟﺗﻲ ﺗﺭﺗﺩﻳﻬﺎ ﻭﺍﻟﻘﻔﺎﺯ ﺑﻌﻳﺩﺍً ﻋﻥ ﺍﻷﺟﺯﺍء ﺍﻟﻣﺗﺣﺭﻛﺔ ﻣﻥ ﺍﻟﻌﺩﺓ ﺍﻟﻛﻬﺭﺑﺎﺋﻳﺔ. ﻗﺩ ﺗﺗﺎﺷﺑﻙ ﺍﻟﻣﻼﺑﺱ ﺍﻟﻔﺿﻔﺎﺿﺔ ﺃﻭ ﺍﻟﺗﻲ ﺑﻬﺎ ﺃﻁﺭﺍﻑ ﺃﻭ ﺍﻟﺣﻠﻲ ﺃﻭﺍﻟﺷﻌﺭ ﺍﻟﻁﻭﻳﻝ ﺑﺎﻷﺟﺯﺍء ﺍﻟﻣﺗﺣﺭﻛﺔ ﻟﻠﻣﺛﻘﺎﺏ. ﺥ( ﺇﻥ ﺟﺎﺯ ﺗﺭﻛﻳﺏ ﺃﺟﻬﺯﺓ ﺷﻔﻁ ﻭﺗﺟﻣﻳﻊ ﺍﻟﻐﺑﺎﺭ .ﻓﺗﺄﻛﺩ ﻣﻥ ﺃﻧﻬﺎ ﻣﺗﺻﻠﺔ ﻭﻳﺗﻡ ﺍﺳﺗﺧﺩﺍﻣﻬﺎ ﺑﺷﻛﻝ ﺳﻠﻳﻡ. ﻣﻥ ﺍﻟﻣﻣﻛﻥ ﺃﻥ ﻳﺅﺩﻱ ﺍﺳﺗﺧﺩﺍﻡ ﻫﺫﻩ ﺍﻷﺟﻬﺯﺓ ﺇﻟﻰ ﺗﻘﻠﻳﻝ ﺍﻟﻣﺧﺎﻁﺭ ﺍﻟﻣﺗﻌﻠﻘﺔ ﺑﺎﻟﻐﺑﺎﺭ. (4ﻁﺭﻳﻘﺔ ﺍﺳﺗﺧﺩﺍﻡ ﺍﻟﻌﺩﺓ ﺍﻟﻛﻬﺭﺑﺎﺋﻳﺔ ﻭﺍﻟﻌﻧﺎﻳﺔ ﺑﻬﺎ: ﺃ( ﻻ ﺗﻔﺭﻁ ﻓﻲ ﺍﺳﺗﺧﺩﺍﻡ ﺍﻟﻌﺩﺓ ﺍﻟﻛﻬﺭﺑﺎﺋﻳﺔ ،ﻭﺍﺳﺗﺧﺩﻡ ﺍﻟﻌﺩﺓ ﺍﻟﻛﻬﺭﺑﺎﺋﻳﺔ ﺍﻟﻣﻧﺎﺳﺑﺔ ﻟﻠﻌﻣﻝ ﺍﻟﺫﻱ ﺗﻘﻭﻡ ﺑﻪ. ﻋﻧﺩ ﺍﺳﺗﺧﺩﺍﻣﻙ ﺍﻟﻌﺩﺓ ﺍﻟﻛﻬﺭﺑﺎﺋﻳﺔ ﺍﻟﻣﺧﺻﺻﺔ ﻟﺫﻟﻙ ﻓﺈﻥ ﻫﺫﺍ ﻳﺳﺎﻋﺩﻙ ﻋﻠﻰ ﺍﻟﺣﺻﻭﻝ ﻋﻠﻰ ﻧﺗﻳﺟﺔ ﺃﻓﺿﻝ ﻭﺃﻛﺛﺭ ﺃﻣﻧﺎ ً ﺗﺑﻌﺎ ً ﻟﻠﻣﻬﻣﺔ ﺍﻟﺗﻲ ﺗﻡ ﺗﺻﻣﻳﻡ ﺍﻟﻣﺛﻘﺎﺏ ﻟﻬﺎ. ﺏ( ﻓﻲ ﺣﺎﻟﺔ ﺗﻌﻁﻝ ﻣﻔﺗﺎﺡ ﺍﻟﺗﺷﻐﻳﻝ ﻋﻥ ﺍﻟﻌﻣﻝ ﻻ ﺗﺳﺗﺧﺩﻡ ﺍﻟﻌﺩﺓ ﺍﻟﻛﻬﺭﺑﺎﺋﻳﺔ. ﺃﻱ ﻋﺩﺓ ﻛﻬﺭﺑﺎﺋﻳﺔ ﻻ ﻳﻣﻛﻥ ﺍﻟﺗﺣﻛﻡ ﻓﻲ ﻣﻔﺗﺎﺡ ﺍﻟﺗﺷﻐﻳﻝ ﺍﻟﺧﺎﺹ ﺑﻬﺎ ﻓﺈﻧﻬﺎ ﺗﺷﻛﻝ ﺧﻁﺭﺍً ﻋﻧﺩ ﺍﺳﺗﺧﺩﺍﻣﻬﺎ ﻭﻳﺟﺏ ﺇﺻﻼﺡ ﻫﺫﺍ ﺍﻟﻣﻔﺗﺎﺡ. ﺕ( ﻗﻡ ﺑﻔﺻﻝ ﺍﻟﻘﺎﺑﺱ ﻋﻥ ﻣﺻﺩﺭ ﺍﻟﻁﺎﻗﺔ ﻗﺑﻝ ﺇﺟﺭﺍء ﺃﻱ ﺗﻌﺩﻳﻼﺕ ﺃﻭ ﺗﻐﻳﻳﺭ ﺍﻟﻣﻠﺣﻘﺎﺕ ﺃﻭ ﺗﺧﺯﻳﻥ ﺃﺩﻭﺍﺕ ﺍﻟﻁﺎﻗﺔ. ﺗﻣﻧﻊ ﺇﺟﺭﺍءﺍﺕ ﺍﻻﺣﺗﻳﺎﻁ ﻫﺫﻩ ﺗﺷﻐﻳﻝ ﺍﻟﻌﺩﺓ ﺍﻟﻛﻬﺭﺑﺎﺋﻳﺔ ﺑﺷﻛﻝ ﻏﻳﺭ ﻣﻘﺻﻭﺩ. ﺙ( ﻗﻡ ﺑﺗﺧﺯﻳﻥ ﺍﻟﻌﺩﺩ ﺍﻟﻛﻬﺭﺑﺎﺋﻳﺔ ﺍﻟﻐﻳﺭ ﻣﺳﺗﺧﺩﻣﺔ ﺑﻌﻳﺩﺃً ﻋﻥ ﻣﺗﻧﺎﻭﻝ ﺍﻷﻁﻔﺎﻝ ﻭﻻ ﺗﺳﻣﺢ ﻷﻱ ﺷﺧﺹ ﻟﻳﺱ ﻟﺩﻳﻪ ﻓﻛﺭﺓ ﻋﻥ ﺗﺷﻐﻳﻝ ﺍﻟﻣﺛﻘﺎﺏ ﺑﺎﻻﻗﺗﺭﺍﺏ ﻣﻥ ﻫﺫﻩ ﺍﻷﺩﻭﺍﺕ ﺃﻭ ﺗﺷﻐﻳﻠﻬﺎ. ﺃﺩﻭﺍﺕ ﺍﻟﺗﺷﻐﻳﻝ ﺗﻣﺛﻝ ﺧﻁﻭﺭﺓ ﻓﻲ ﺃﻳﺩﻱ ﺍﻷﺷﺧﺎﺹ ﺍﻟﻐﻳﺭ ﻣﺩﺭﺑﻳﻥ ﻋﻠﻳﻬﺎ. ﺝ( ﺗﺄﻛﺩ ﻣﻥ ﺳﻼﻣﺔ ﺍﻟﻌﺩﺩ ﺍﻟﻛﻬﺭﺑﺎﺋﻳﺔ ،ﻗﻡ ﺑﻔﺣﺻﻬﺎ ﺟﻳﺩﺍً ﻣﻥ ﻧﺎﺣﻳﺔ ﻣﺩﻯ ﺗﺭﺍﺑﻁ ﺍﻷﺟﺯﺍء ﺍﻟﻣﺗﺣﺭﻛﺔ ﺃﻭ ﻭﺟﻭﺩ ﺃﻱ ﻛﺳﺭ ﻓﻲ ﺃﻱ ﺟﺯء ﻣﻥ ﺃﺟﺯﺍﺋﻬﺎ ﺑﻣﺎ ﻳﺅﺛﺭ ﻋﻠﻰ ﺗﺷﻐﻳﻠﻬﺎ. ﻓﻲ ﺣﺎﻟﺔ ﺣﺩﻭﺙ ﺗﻠﻑ ﺑﺄﺩﻭﺍﺕ ﺍﻟﺗﺷﻐﻳﻝ ﻳﺟﺏ ﺇﺻﻼﺣﻬﺎ ﻗﺑﻝ ﺍﻻﺳﺗﺧﺩﺍﻡ. ﻋﺩﻡ ﺻﻳﺎﻧﺔ ﺃﺩﻭﺍﺕ ﺍﻟﺗﺷﻐﻳﻝ ﺃﻭ ﺍﻟﻘﻳﺎﻡ ﺑﻌﻣﻠﻳﺔ ﺍﻟﺻﻳﺎﻧﺔ ﺑﺷﻛﻝ ﻏﻳﺭ ﺻﺣﻳﺢ ﻳﺅﺩﻱ ﺇﻟﻰ ﺣﺩﻭﺙ ﺍﻟﻛﺛﻳﺭ ﻣﻥ ﺍﻟﺣﻭﺍﺩﺙ. ﺡ( ﻳﺭﺟﻰ ﺍﻟﺣﻔﺎﻅ ﻋﻠﻰ ﺃﺩﻭﺍﺕ ﺍﻟﺗﻘﻁﻳﻊ ﺣﺎﺩﺓ ﻭﻧﻅﻳﻔﺔ ﻳﺭﺟﻰ ﺍﻟﺣﻔﺎﻅ ﻋﻠﻰ ﺃﺩﻭﺍﺕ ﺍﻟﺗﻘﻁﻳﻊ ﺣﺎﺩﺓ ﺍﻟﺣﻭﺍﻑ ﺑﺣﻳﺙ ﻳﺳﻬﻝ ﺍﻟﺗﺣﻛﻡ ﻓﻳﻬﺎ. ﺥ( ﺍﺳﺗﺧﺩﻡ ﺃﺩﺍﺓ ﺍﻟﻁﺎﻗﺔ ،ﻭﺍﻟﻣﻠﺣﻘﺎﺕ ﻭﺃﻗﻼﻡ ﺍﻟﻘﻁﻊ ﺇﻟﺦ ،ﺑﻣﺎ ﻳﺗﻭﺍﻓﻕ ﻣﻊ ﻫﺫﻩ ﺍﻟﺗﻌﻠﻳﻣﺎﺕ ﻭﺑﺎﻟﻁﺭﻳﻘﺔ ﺍﻟﻣﺧﺻﺻﺔ ﻟﻧﻭﻉ ﺃﺩﺍﺓ ﺍﻟﻁﺎﻗﺔ ﺍﻟﻣﺣﺩﺩ ،ﻣﻊ ﺍﻟﻭﺿﻊ ﻓﻲ ﺍﻻﻋﺗﺑﺎﺭ ﻅﺭﻭﻑ ﺍﻟﻌﻣﻝ ﻭﺍﻟﻌﻣﻝ ﺍﻟﻣﻁﻠﻭﺏ ﺍﻟﻘﻳﺎﻡ ﺑﻪ. ﻗﺩ ﻳﺅﺩﻱ ﺍﺳﺗﺧﺩﻡ ﺃﺩﺍﺓ ﺍﻟﻁﺎﻗﺔ ﻟﻸﻏﺭﺍﺽ ﻏﻳﺭ ﺍﻟﻣﺧﺻﺻﺔ ﻟﻬﺎ ﺇﻟﻰ ﻭﺟﻭﺩ ﻣﻭﻗﻑ ﺧﻁﻳﺭ. (5ﺍﻟﺧﺩﻣﺔ ﺃ( ﺍﺳﻣﺢ ﺑﺗﺻﻠﻳﺢ ﻋﺩﺗﻙ ﺍﻟﻛﻬﺭﺑﺎﺋﻳﺔ ﻓﻘﻁ ﻣﻥ ﻗﺑﻝ ﺍﻟﻣﺗﺧﺻﺻﻳﻥ ﻭﻓﻘﻁ ﺑﺈﺳﺗﻌﻣﺎﻝ ﻗﻁﻊ ﺍﻟﻐﻳﺎﺭ ﺍﻷﺻﻠﻳﺔ ﻓﻘﻁ . ﻳﺅﻣﻥ ﺫﻟﻙ ﺍﻟﻣﺣﺎﻓﻅﺔ ﻋﻠﻰ ﺃﻣﺎﻥ ﺍﻟﺟﻬﺎﺯ. ﺍﻻﺣﺗﻳﺎﻁﺎﺕ ﻳﺭﺟﻰ ﻭﺿﻊ ﺍﻟﻌﺩﺓ ﺍﻟﻛﻬﺭﺑﺎﺋﻳﺔ ﺑﻌﻳﺩﺍً ﻋﻥ ﻣﺗﻧﺎﻭﻝ ﺍﻷﻁﻔﺎﻝ ﻭﻛﺑﺎﺭ ﺍﻟﺳﻥ. ﻓﻲ ﺣﺎﻟﺔ ﻋﺩﻡ ﺍﻻﺳﺗﺧﺩﺍﻡ ﻳﺟﺏ ﺍﻟﺣﻔﺎﻅ ﻋﻠﻰ ﺍﻟﻌﺩﺓ ﺍﻟﻛﻬﺭﺑﺎﺋﻳﺔ ﺑﻌﻳﺩﺓ ﻋﻥ ﻣﺗﻧﺎﻭﻝ ﺍﻷﻁﻔﺎﻝ ﻭﻛﺑﺎﺭ ﺍﻟﺳﻥ. ﺗﻌﻠﻳﻣﺎﺕ ﺍﻟﺳﻼﻣﺔ ﺍﻟﻌﺎﻣﺔ ﺗﺣﺫﻳﺭ !!! ﻳﺭﺟﻰ ﻗﺭﺍءﺓ ﺟﻣﻳﻊ ﺍﻟﺗﻌﻠﻳﻣﺎﺕ ﻗﺩ ﻳﺅﺩﻱ ﻋﺩﻡ ﺍﻻﻟﺗﺯﺍﻡ ﺑﻬﺫﻩ ﺍﻟﺗﻌﻠﻳﻣﺎﺕ ﺍﻟﻣﻭﺿﺣﺔ ﺃﺩﻧﺎﻩ ﺇﻟﻰ ﺣﺩﻭﺙ ﺻﺩﻣﺔ ﻛﻬﺭﺑﻳﺔ ﺃﻭ ﻧﺷﻭﺏ ﺣﺭﻳﻕ ﺃﻭ ﺇﺻﺎﺑﺔ ﺧﻁﻳﺭﺓ. ﺍﻟﻣﺻﻁﻠﺢ "ﺍﻟﻌﺩﺓ ﺍﻟﻛﻬﺭﺑﺎﺋﻳﺔ" ﺍﻟﻭﺍﺭﺩ ﻓﻲ ﺟﻣﻳﻊ ﺍﻟﺗﺣﺫﻳﺭﺍﺕ ﺍﻟﻣﻭﺿﺣﺔ ﺃﺩﻧﺎﻩ ﻳﺷﻳﺭ ﺇﻟﻰ ﺍﻟﻌﺩﺓ ﺍﻟﻛﻬﺭﺑﺎﺋﻳﺔ ﺍﻟﺭﺋﻳﺳﻳﺔ )ﺍﻟﺳﻠﻛﻳﺔ( ﺍﻟﺧﺎﺻﺔ ﺑﻙ ﺃﻭ ﺍﻟﻌﺩﺓ ﺍﻟﻛﻬﺭﺑﺎﺋﻳﺔ )ﺍﻟﻼﺳﻠﻛﻳﺔ( ﻟﻠﺑﻁﺎﺭﻳﺔ. ﻳﺭﺟﻰ ﺍﺗﺑﺎﻉ ﺍﻟﺗﻌﻠﻳﻣﺎﺕ ﺍﻟﺗﺎﻟﻳﺔ: (1ﺃﻣﺎﻥ ﻣﻧﻁﻘﺔ ﺍﻟﻌﻣﻝ ﺃ( ﺣﺎﻓﻅ ﻋﻠﻰ ﻧﻅﺎﻓﺔ ﻭﺣﺳﻥ ﺇﺿﺎءﺓ ﻣﻛﺎﻥ ﺷﻐﻠﻙ. ﻓﺎﻟﻔﻭﺿﻰ ﻓﻲ ﻣﻛﺎﻥ ﺍﻟﻌﻣﻝ ﻭﻣﺟﺎﻻﺕ ﺍﻟﻌﻣﻝ ﺍﻟﻐﻳﺭ ﻣﺿﺎءﺓ ﺗﺗﺳﺑﺏ ﻓﻲ ﻭﻗﻭﻉ ﺣﻭﺍﺩﺙ. ﺏ( ﻻ ﺗﻘﻡ ﺑﺗﺷﻐﻳﻝ ﺍﻟﻌﺩﺩ ﺍﻟﻛﻬﺭﺑﺎﺋﻳﺔ ﻓﻲ ﺃﺟﻭﺍء ﺍﻧﻔﺟﺎﺭﻳﺔ ﺃﻱ ﻓﻲ ﻭﺟﻭﺩ ﺳﻭﺍﺋﻝ ﺃﻭ ﻏﺎﺯﺍﺕ ﻗﺎﺑﻠﺔ ﻟﻼﺷﺗﻌﺎﻝ ﺃﻭ ﻏﺑﺎﺭ. ﺗﺣﺩﺙ ﺍﻟﻌﺩﺩ ﺍﻟﻛﻬﺭﺑﺎﺋﻳﺔ ﺷﺭﺍﺭﺓ ﺗﻌﻣﻝ ﻋﻠﻰ ﺇﺷﻌﺎﻝ ﻏﺑﺎﺭ ﺍﻷﺩﺧﻧﺔ. ﺕ( ﺣﺎﻓﻅ ﻋﻠﻰ ﺃﻥ ﺗﻛﻭﻥ ﺍﻟﻌﺩﺩ ﺍﻟﻛﻬﺭﺑﺎﺋﻳﺔ ﺑﻌﻳﺩﺓ ﻋﻥ ﻣﺗﻧﺎﻭﻝ ﺍﻷﻁﻔﺎﻝ ﺃﻭ ﺍﻟﻣﺣﻳﻁﻳﻥ ﺑﻙ. ﺃﻱ ﺷﻛﻝ ﻣﻥ ﺃﺷﻛﺎﻝ ﺍﻟﺗﺷﺗﻳﺕ ﻣﻥ ﺍﻟﻣﻣﻛﻥ ﺃﻥ ﺗﺅﺩﻱ ﺇﻟﻰ ﻓﻘﺩﻙ ﺍﻟﺳﻳﻁﺭﺓ. (2ﺍﻟﻭﻗﺎﻳﺔ ﻣﻥ ﺍﻟﺻﺩﻣﺎﺕ ﺍﻟﻛﻬﺭﺑﻳﺔ ﺃ( ﻳﺟﺏ ﺗﻭﺻﻳﻝ ﺍﻟﻘﺎﺑﺱ ﺑﻣﻧﻔﺫ ﺍﻟﻛﻬﺭﺑﺎء ،ﻳﺣﻅﺭ ﺗﻌﺩﻳﻝ ﺍﻟﻘﺎﺑﺱ ﺑﺎﻱ ﻁﺭﻳﻘﺔ. ﻻ ﺗﺳﺗﺧﺩﻡ ﺃﻱ ﻗﺎﺑﺱ ﻣﻬﺎﻳﺊ ﻣﻊ ﺍﻟﻌﺩﺩ ﺍﻟﻛﻬﺭﺑﺎﺋﻳﺔ ﺍﻷﺭﺿﻳﺔ. ﺗﺧﻔﺽ ﺍﻟﻘﻭﺍﺑﺱ ﺍﻟﺗﻲ ﻟﻡ ﻳﺗﻡ ﺗﻐﻳﻳﺭﻫﺎ ﻭﺍﻟﻣﻘﺎﺑﺱ ﺍﻟﻣﻼﺋﻣﺔ ﻣﻥ ﺧﻁﺭ ﺣﺩﻭﺙ ﺍﻟﺻﺩﻣﺎﺕ ﺍﻟﻛﻬﺭﺑﺎﺋﻳﺔ . ﺏ( ﺗﺟﻧﺏ ﺍﻟﺗﻼﻣﺱ ﺍﻟﺟﺳﺩﻱ ﻣﻊ ﺍﻷﺳﻁﺢ ﺍﻷﺭﺿﻳﺔ ﻣﺛﻝ ﺍﻷﻧﺎﺑﻳﺏ ﻭﺍﻟﻣﺑﺎﺩﻻﺕ ﺍﻟﺣﺭﺍﺭﻳﺔ ﻭﺍﻟﺛﻼﺟﺎﺕ ﻭﺍﻟﻣﻭﺍﻗﺩ. ﻓﻲ ﺣﺎﻟﺔ ﻣﻼﻣﺳﺔ ﺟﺳﻣﻙ ﻷﻱ ﻣﻥ ﺗﻠﻙ ﺍﻷﺳﻁﺢ ﺍﻷﺭﺿﻳﺔ ﻫﻧﺎﻙ ﺧﻁﻭﺭﺓ ﻟﺗﻌﺭﺿﻙ ﻟﺻﺩﻣﺔ ﻛﻬﺭﺑﻳﺔ. ﺕ( ﻻ ﺗﻌﺭﺽ ﺍﻟﻌﺩﺩ ﺍﻟﻛﻬﺭﺑﺎﺋﻳﺔ ﻟﻠﻣﻁﺭ ﺃﻭ ﺍﻟﺭﻁﻭﺑﺔ. ﻳﺯﺩﺍﺩ ﺧﻁﺭ ﺍﻟﺻﺩﻣﺎﺕ ﺍﻟﻛﻬﺭﺑﺎﺋﻳﺔ ﺇﻥ ﺗﺳﺭﺏ ﺍﻟﻣﺎء ﺇﻟﻰ ﺩﺍﺧﻝ ﺍﻟﻌﺩﺓ ﺍﻟﻛﻬﺭﺑﺎﺋﻳﺔ. ﺙ( ﻻ ﺗﺳﻲء ﺍﺳﺗﻌﻣﺎﻝ ﺍﻟﻛﺎﺑﻝ )ﺍﻟﺳﻠﻙ( ،ﻻ ﺗﺳﺗﻌﻣﻠﻪ ﻣﻁﻠﻘﺎ ً ﻟﺣﻣﻝ ﺃﻭ ﺷﺩ ﺃﻭ ﺩﻓﻊ ﺍﻟﻌﺩﺓ ﺍﻟﻛﻬﺭﺑﺎﺋﻳﺔ ﺃﻭ ﻟﺳﺣﺏ ﺍﻟﻘﺎﺑﺱ ﻣﻥ ﺍﻟﻣﻘﺑﺱ. ﻭﺣﺎﻓﻅ ﻋﻠﻳﻪ ﺑﻌﻳﺩﺍً ﻋﻥ ﻣﺻﺎﺩﺭ ﺍﻟﺣﺭﺍﺭﺓ ﺃﻭ ﺍﻟﺯﻳﺕ ﺃﻭ ﺍﻟﺣﻭﺍﻑ ﺍﻟﺣﺎﺩﺓ ﺃﻭ ﺃﺟﺯﺍء ﺍﻟﺟﻬﺎﺯ ﺍﻟﻣﺗﺣﺭﻛﺔ. ﺗﺯﻳﺩ ﺍﻟﻛﺎﺑﻼﺕ )ﺍﻷﺳﻼﻙ( ﺍﻟﺗﺎﻟﻔﺔ ﺃﻭ ﺍﻟﻣﺗﺷﺎﺑﻛﺔ ﻣﻥ ﺧﻁﺭ ﺍﻟﺻﺩﻣﺎﺕ ﺍﻟﻛﻬﺭﺑﻳﺔ. ﺝ( ﻓﻲ ﺣﺎﻟﺔ ﺗﺷﻐﻳﻝ ﺍﻟﻌﺩﺓ ﺍﻟﻛﻬﺭﺑﺎﺋﻳﺔ ﺑﺎﻟﺧﺎﺭﺝ ،ﻳﻧﺻﺢ ﺑﺎﺳﺗﺧﺩﺍﻡ ﺳﻠﻙ )ﻛﺎﺑﻝ( ﻳﺗﻧﺎﺳﺏ ﻣﻊ ﺍﻻﺳﺗﻌﻣﺎﻝ ﺍﻟﺧﺎﺭﺟﻲ. ﻗﻡ ﺑﺎﺳﺗﺧﺩﺍﻡ ﺳﻠﻙ ﻣﻧﺎﺳﺏ ﻣﻊ ﺍﻻﺳﺗﻌﻣﺎﻝ ﺍﻟﺧﺎﺭﺟﻲ ﻟﻠﺗﻘﻠﻳﻝ ﻣﻥ ﺧﻁﻭﺭﺓ ﺍﻟﺗﻌﺭﺽ ﻟﺻﺩﻣﺔ ﻛﻬﺭﺑﻳﺔ. (3ﺍﻟﺳﻼﻣﺔ ﺍﻟﺷﺧﺻﻳﺔ ﺃ( ﻛﻥ ﻳﻘ ًﻅﺎ ﻭﺃﻧﺗﺑﻪ ﺇﻟﻰ ﻣﺎ ﺗﻔﻌﻠﻪ ﻭﻗﻡ ﺑﺎﻟﻌﻣﻝ ﺑﻭﺍﺳﻁﺔ ﺍﻟﻌﺩﺓ ﺍﻟﻛﻬﺭﺑﺎﺋﻳﺔ ﺑﺗﻌﻘﻝ .ﻻ ﺗﺳﺗﺧﺩﻡ ﺍﻟﻌﺩﺓ ﺍﻟﻛﻬﺭﺑﺎﺋﻳﺔ ﻓﻲ ﺣﺎﻟﺔ ﺷﻌﻭﺭﻙ ﺑﺎﻟﺗﻌﺏ ﺃﻭ ﺇﺫﺍ ﻛﻧﺕ ﺗﺣﺕ ﺗﺄﺛﻳﺭ ﻣﻭﺍﺩ ﻣﺧﺩﺭﺓ ﺃﻭ ﺃﺩﻭﻳﺔ ﺃﻭ ﻣﻭﺍﺩ ﻛﺣﻭﻟﻳﺔ. ﻋﺩﻡ ﺍﻹﻧﺗﺑﺎﻩ ﻟﻠﺣﻅﺔ ﻭﺍﺣﺩﺓ ﻋﻧﺩ ﺇﺳﺗﺧﺩﺍﻡ ﺍﻟﻌﺩﺓ ﺍﻟﻛﻬﺭﺑﺎﺋﻳﺔ ﻗﺩ ﻳﺅﺩﻱ ﺇﻟﻰ ﺇﺻﺎﺑﺔ ﺧﻁﻳﺭﺓ. ﺏ( ﺍﺳﺗﺧﺩﻡ ﺃﺩﻭﺍﺕ ﺍﻷﻣﺎﻥ .ﻗﻡ ﺩﺍﺋﻣًﺎ ﺑﺎﺭﺗﺩﺍء ﺍﻟﻘﻧﺎﻉ ﺍﻟﻭﺍﻗﻲ ﻟﻠﻌﻳﻥ. ﺳﺗﻌﻣﻝ ﺃﺩﻭﺍﺕ ﺍﻷﻣﺎﻥ ﻣﺛﻝ ﺍﻟﻘﻧﺎﻉ ﺍﻟﻭﺍﻗﻲ ﻣﻥ ﺍﻟﻐﺑﺎﺭ ﺃﻭ ﺃﺣﺫﻳﺔ ﺍﻷﻣﺎﻥ ﺍﻟﻣﺿﺎﺩﺓ ﻟﻼﻧﺯﻻﻕ ﺃﻭ ﻗﺑﻌﺔ ﺻﻠﺑﺔ ﺃﻭ ﺃﺟﻬﺯﺓ ﺣﻣﺎﻳﺔ ﺍﻟﺳﻣﻊ ﻭﺍﻟﺗﻲ ﻳﺗﻡ ﺍﺳﺗﺧﺩﺍﻣﻬﺎ ﻓﻲ ﻅﺭﻭﻑ ﻣﻌﻳﻧﺔ ﻋﻠﻰ ﺗﻘﻠﻳﻝ ﺍﺣﺗﻣﺎﻻﺕ ﺍﻟﺗﻌﺭﺽ ﻹﺻﺎﺑﺎﺕ ﺷﺧﺻﻳﺔ. ﺕ( ﺗﺟﻧﺏ ﺍﻟﺗﺷﻐﻳﻝ ﻏﻳﺭ ﺍﻟﻣﻘﺻﻭﺩ .ﺗﺄﻛﺩ ﻣﻥ ﺃﻥ ﺍﻟﻣﻔﺗﺎﺡ ﻓﻲ ﻭﺿﻊ ﺍﻹﻳﻘﺎﻑ ﻗﺑﻝ ﺍﻟﺗﻭﺻﻳﻝ. ﻳﺅﺩﻱ ﺣﻣﻝ ﺃﺩﻭﺍﺕ ﺍﻟﻁﺎﻗﺔ ﻣﻊ ﻭﺟﻭﺩ ﺇﺻﺑﻌﻙ ﻓﻲ ﺍﻟﻣﻔﺗﺎﺡ ﺃﻭ ﺗﻭﺻﻳﻝ ﺃﺩﻭﺍﺕ ﺍﻟﻁﺎﻗﺔ ﺍﻟﺗﻲ ﻳﻛﻭﻥ ﻓﻳﻬﺎ ﺍﻟﻣﻔﺗﺎﺡ ﻓﻲ ﻭﺿﻊ ﺍﻟﺗﺷﻐﻳﻝ ﺇﻟﻰ ﺍﺣﺗﻣﺎﻝ ﻭﻗﻭﻉ ﺣﻭﺍﺩﺙ. 2015/03/25 17:58:02 ۱ 20 000Book̲D10VC2̲Asia.indb 20 21 000Book̲D10VC2̲Asia.indb 21 2015/03/25 17:58:02 23 12 501 24 11 2 1 25 26 13 27 28 14 29 15 2 16 30 3 31 4 12 32 5 6 33 17 7 8 18 9 19 36 35 34 20 21 10 22 A 1 21 22 3 4 5 6 7 8 9 10 11 12 13 1 13 2 14 15 16 1 16 2 16 3 17 18 19 20 21 22 23 24 25 26 27 28 29 30 31 32 33 34 35 36 501 B 980-057 950-292 312-516 948-001 321-626 305-490 600-2VV 939-544 301-815 321-625 321-627 321-624 608-VVM 360-596G 360-596E 321-623 950-514 340-547G 340-547E 340-547F 321-622 ———— 321-633 321-630 321-634 321-631 301-653 321-629 321-632 321-628 999-041 955-203 ———— 994-273 992-635 984-750 937-631 981-373 953-327 ———— 321-635 C 1 1 1 1 1 2 1 1 2 1 1 1 2 1 1 1 2 1 1 1 1 1 1 1 1 1 3 1 1 1 2 2 1 1 1 2 1 2 1 1 1 D8.8 D4×16 D4×20 110V-240V 110V-240V D4×40 220V 230V 240V 608VVC2PS2L 220V 230V-240V D4×45 D4×30 6002VVCMPS2L D 10TL2 10TLRA “1” 10TLRD-N 22 000Book̲D10VC2̲Asia.indb 22 2015/03/25 17:58:02 23 000Book̲D10VC2̲Asia.indb 23 2015/03/25 17:58:02 Hitachi Koki Co., Ltd. 509 Code No. C99120033 F Printed in China 000Book̲D10VC2̲Asia.indb 24 2015/03/25 17:58:02-
 1
1
-
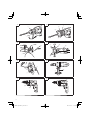 2
2
-
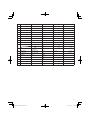 3
3
-
 4
4
-
 5
5
-
 6
6
-
 7
7
-
 8
8
-
 9
9
-
 10
10
-
 11
11
-
 12
12
-
 13
13
-
 14
14
-
 15
15
-
 16
16
-
 17
17
-
 18
18
-
 19
19
-
 20
20
-
 21
21
-
 22
22
-
 23
23
-
 24
24


Hitachi D 10VC2 Manual de usuario
- Categoría
- Herramientas eléctricas
- Tipo
- Manual de usuario
- Este manual también es adecuado para
en otros idiomas
- English: Hitachi D 10VC2 User manual
Artículos relacionados
-
Hitachi D10VG Handling Instructions Manual
-
Hitachi D 10VH Drill Safety Instructions And Instruction Manual
-
Hikoki d10vc2 El manual del propietario
-
-
-
-
Infocus FDV 16VB2 Manual de usuario
-
-
-
Hitachi D13VG Manual de usuario