
HOME ENVIRONMENT
HOME ENVIRONMENT
User Manual
Manual
del usuario
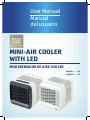
MINI-AIR COOLER
WITH LED
MINI ENFRIADOR DE AIRE CON LED
English........ 02
Español....... 22

2
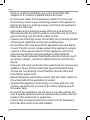
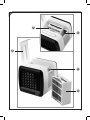
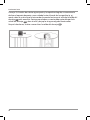
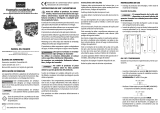
A
5
15
2
7
14
18 9 10 11
B C
13
12
3

3
D
6
4
4
5
5

4
Contents/appliance parts
Contents/appliance parts
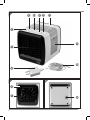
1Base unit
2Air outlet opening
3Air intake opening
4Filter element
5Water tank
6Water tank cover
7Ring LED light (control panel)
8Lighting button (ring LED light + water tank)
9On/off button
10 Button for fan function
11 Fan speed indicator
H = High fan speed
M = Medium fan speed
L = Low fan speed
12 Connector socket for USB cable
13 Drain outlet
14 USB adapter
15 USB cable
16 User manual and warranty card (not shown)

5
Contents
Contents
Overview .....................................................................................................2
Contents/appliance parts ...........................................................................4
General information ....................................................................................6
Reading and storing the user manual ..............................................................6
Explanation of symbols and additional information .....................................6
Safety ........................................................................................................... 7
Proper use .............................................................................................................7
Safety instructions ...............................................................................................8
Dangers to children and persons with impaired abilities .............................9
Risks involved in handling electrical appliances ..........................................10
Dangers when operating the mini-air cooler with LED ................................11
Set-up and assembly ................................................................................. 14
Prior to first use................................................................................................... 14
Operation ................................................................................................... 15
General ................................................................................................................ 15
Using the appliance ........................................................................................... 15
Draining the water tank .................................................................................... 16
Maintenance, cleaning and care ..............................................................18
Cleaning the ventilation slits ............................................................................ 18
Troubleshooting ........................................................................................19
Technical data ...........................................................................................20
Disposal ......................................................................................................20
Disposing of the packaging ..............................................................................20
Disposing of the Product ...................................................................................20

General information
Reading and storing the user manual
This user manual is an integral part of this mini-air cooler with LED.
It contains important information on start-up and use.
Read the user manual, especially the safety instructions, carefully before
using the mini-air cooler with LED. Failure to follow the instructions in this
user manual can result in serious injury or damage to the mini-air cooler with LED.
Please keep the user manual for future reference. If you pass the mini-air cooler with
LED to others, ensure that you also give them this user manual.
Explanation of symbols and additional information
The following symbols and signal words are used in this user manual, on the
appliance, or on the packaging.
Reading and storing the user manual!
Safety items throughout this manual are labelled with a DANGER, WARNING,
or CAUTION based on the risk type.
DANGER!
Indicates a hazardous situation which, if not
avoided, will result in death or serious injury.
WARNING!
Indicates a hazardous situation which, if not
avoided, could result in death or serious injury.
CAUTION!
Indicates a hazardous situation which, if not
avoided, could result in minor or moderate injury.
Indicates installation, operation, or maintenance information which
is important but not hazard-related.
This appliance has met the United States of America electrical
product safety requirements and has earned the ETL Listed Mark.
General information
6

7
Safety
SAFETY
IMPORTANT SAFETY INSTRUCTIONS
READ ALL INSTRUCTIONS BEFORE USING.
READ AND SAVE THESE INSTRUCTIONS
Proper use
The Mini-air cooler with LED is only designed for cooling and
humidification of the air in enclosed spaces. It is intended only for
personal use and is not suitable for commercial purposes.
Only use the appliance as described in this user manual. Using it in any
other way is deemed improper and may result in damage to property
or even personal injury. The mobile air cleaner is not a children’s toy.
The manufacturer or vendor cannot be held liable for damages
incurred through improper or incorrect use.

8
Safety
Safety instructions
When using electrical appliances, basic safety
precautions should always be followed, including
the following:
DANGER!
TO REDUCE THE RISK OF FIRE, ELECTRIC SHOCK OR INJURY -
CAREFULLY FOLLOW THESE INSTRUCTIONS
WARNING!
TO REDUCE THE RISK OF ELECTRIC SHOCK - USE INDOORS ONLY
1. Do not use outdoor or on wet surfaces.
2. Do not allow to be used as a toy. Close attention is necessary
when used by or near children.
3. Use only as described in this manual. Use only
manufacturer's recommended attachments.
4. Do not operate any appliance with a damaged cord or plug
or after the appliance malfunctions, or has been damaged in
any manner. Return the appliance to the nearest authorized
service facility for examination, repair or adjustment.
5. Do not handle the plug or appliance with wet hands.
6. Unplug or disconnect the appliance from the power supply
before servicing.
7. Please note that changes or modifications of this product
not expressly approved by the party responsible for
compliance could void the user's authority to operate the
equipment.
8. WARNING: To Reduce The Risk Of Fire Or Electric Shock, Do Not
Use This Cooler With Any Solid-State Speed Control Device.

9
Safety
NOTE: This equipment has been tested and found to comply
with the limits for a Class B digital device, pursuant to Part 15 of
the FCC Rules. These limits are designed to provide reasonable
protection against harmful interference in a residential
installation. This equipment generates, uses and can radiate
radio frequency energy and, if not installed and used in
accordance with the instructions, may cause harmful
interference to radio communications. However, there is no
guarantee that interference will not occur in a particular
installation.
If this equipment does cause harmful interference to radio or
television reception, which can be determined by turning
the equipment off and on, the user is encouraged to try to
correct the interference by one or more of the following
measures:
– Reorient or relocate the receiving antenna.
– Increase the separation between the equipment and
receiver.
– Connect the equipment into an outlet on a circuit different
from that to which the receiver is connected.
- Consult the dealer or an experienced radio/TV technician
for help.
SAVE THESE INSTRUCTIONS!
Dangers to children and persons with impaired abilities
- This appliance may be used by children aged 8 and older
as well as by individuals with impaired abilities or with
limited experience and/or knowledge, provided they are
supervised or have been instructed in the safe use of the
appliance and are aware of the resulting risks.

10
Safety
- Children must not be allowed to clean or carry out user
maintenance on the appliance unless they are older than
8 and are supervised. The appliance and its power cord
must be kept away from children under the age of 8.
- Children must not be allowed to play with the appliance.
For this reason please use and keep the appliance out of the
reach of children under 8 years of age. To prevent anyone
from pulling the appliance over, do not allow the mains lead
to hang down from the worktop surface.
- Keep packaging materials out of the reach of children –
Risk of suffocation!
Risks involved in handling electrical appliances
- Only connect the USB adapter to a electrical socket installed
correctly with a grid voltage as specified on the identification
plate.
- Dispose of the damaged USB adapter and replace it with a
USB adapter of the same type. Inspect the USB adapter and
the USB cable for damage regularly.
- Repairs must only be carried out by approved specialized
repair service providers. Appliances that have been repaired
incorrectly pose a danger to the user.
- The appliance must only be operated with the supplied USB
adapter or a USB connection (e.g. from a PC, laptop etc.)
using the included cable.
- To avoid accidents, do not leave the appliance unsupervised
during operation.
- Never submerge the USB adapter and appliance in water
and do not use them outdoors, as they must not be exposed
to rain or other moisture! Danger of electric shock!
- If the appliance falls into water, first disconnect the USB
adapter or the USB cable from the USB port then remove

11
Safety
the appliance. Do not turn the appliance on again; have it
checked first at an approved service point. The same applies
if the USB cable or the appliance is damages, or the
appliance falls down.
- Ensure that the USB adapter, USB cable and the appliance
are never left on hot surfaces or near sources of heat. Lay
the USB cable so that it does not touch hot or sharp-edged
objects. Danger of electric shock!
- Never bend the USB cable and do not wind it around the
appliance as this can break the cable.
- Always unplug the USB adapter or disconnect the USB cable
from the USB port in the event of malfunctions, before
cleaning and when the appliance is not in use! Never pull
on the USB cable! Danger of electric shock!
- Never open the appliance and/or the USB adapter yourself
and never attempt to probe inside it with metal objects.
Danger of electric shock!
Dangers when operating the mini-air cooler with LED
- Do not cover the appliance while it is in operation. Ensure
there is sufficient clearance and safe distance to walls,
ceilings and other objects.
- The air intake and air outlet openings must never by
covered or blocked. Always maintain sufficient clearance
and clean dirt from the ventilation slits regularly to prevent
blockage of the openings.
- Do not insert any objects into the air intake or air outlet
openings or the appliance. Ensure that no loose objects
like curtains or drapes, or long hair, ties etc. get into the
ventilation slits. They could be sucked in by the airflow.
- You must not place any items on top of the appliance.
- Always connect the USB cable to the connector socket of
the appliance and the USB adapter first. Once you have

12
Safety
done so, and not until then, you can connect the USB
adapter to a correctly installed electrical socket.
- Do not leave water in the appliance when it is not in use.
- If necessary, remove any remaining water in the appliance
before storing it or putting it away, and clean the appliance
before the next use.
- Fully drain any remaining water after use and allow the
filter element to dry fully in order to avoid the risk of mold or
germs forming. Use the drain outlet for this.
- Please note that high levels of humidity can promote growth
of biological organisms in the surrounding area.
- Do not allow the area around the appliance become damp
or wet. If damp occurs, please reduce the appliance output
volume. If the output volume of the appliance cannot be
reduced any further, use the appliance intermittently.
Make sure that materials that readily absorb moisture, such
as carpets, drapes, curtains or table cloths do not become
damp.
- Only put cold, clear water into the water tank. Do not use any
additives. Never fill the water tank beyond the MAX mark.
- To prevent overflowing, insert the filter element first and
then fill the water tank.
- Before filling the water tank, ensure that the drain outlet on
the underside of the appliance is sealed.
- Operate the appliance exclusively on a level and non-slip
surface. Avoid shocks to prevent the water spilling over in
the water tank.
- Do not tilt the appliance, do not lay it on its side and do not
turn it upside down and avoid repositioning it when there is
water in the water tank or appliance.
- Ensure that no liquids reach the contacts of the appliance,
the USB cable and/or the USB adapter.

13
- Do not add or drain water or clean the appliance unless it
has been disconnected from the power supply.
SAVE THESE INSTRUCTIONS!
Safety

14
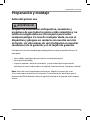
Set-up and assembly
Set-up and assembly
Prior to first use
WARNING!
After unpacking, check the appliance and ensure that
all parts are included; also check for shipping damage
to avoid any hazards. In case of doubt, do not use the
appliance and contact our customer service. The service
addresses are listed in our warranty terms and conditions
as well as on the warranty card.
Your appliance has been packaged to protect it from any shipping damage.
• Carefully remove the appliance from its original packaging.
• Remove all packaging.
• Clean the appliance and all accessories and clean any remaining dust from the
packaging as described in the chapter “Maintenance, cleaning and care”.
Note: Before using the appliance for the first time, run it for roughly 20 minutes as
described in the ‘Operation’ section, to allow the filter element to absorb enough
water so that the appliance is ready for cooling.

15
Operation
Operation
General
There is a filter element inside the appliance with felt-like strips. This filter element
fills up by absorbing some of the water in the water tank. A fan blows air through the
filter element, causing the water to evaporate faster. The airflow from the fan pushes
the resulting evaporation cooling out of the housing as colder air. This colder and
slightly moist airflow has a pleasant cooling effect and less dry air in the appliance’s
wind tunnel. However, due to its size, the appliance is not suitable for cooling entire
rooms.
Using the appliance
• Place the appliance on a suitable, level and non-slip surface.
Note: Make sure that the filter element 4 is inserted into the device before filling
with water.
• Fill the water tank 5 with cold, clear water. Never exceed the MAX capacity
mark on the appliance.
• Now connect the USB cable 15 to the appliance’s connector socket 12 and the
USB adapter 14 .
• Then connect the USB adapter 14 to the mains supply.
Note: You also can also use a USB port (e.g. on a PC, laptop etc.) to power the
appliance. To do so, first connect the USB cable 15 to the appliance and then to a
suitable USB port.
• Now press the on/on/off button 9 to switch the appliance on. The fan starts
running.
• To activate the colored lighting, press the lighting button 8 to switch it on. The
ring LED light 7 and the water tank light illuminate. The lighting 7 changes
color continuously during operation (every 90 seconds).

16
Operation
Note: If you do not want continuous color changes, you can press the lighting button
8 again to chose a fixed color for the ring LED light 7 and the water tank 5
illumination, i.e. set a color that does not change. Push the button until your chosen
color appears. You can choose from seven colors. If you press the lighting button 8
again after the last color that can be selected, the lighting is switched off.
• Push the ventilation function button 10 to adjust the airflow. See the fan speed
indicator 11 for the current setting.
• Press the on/off button 9 again to turn the appliance off.
Check the water level from time to time, and add water if necessary. The cooling
effect is reduced if the water tank 5 is empty.
Disconnect the appliance from the power supply after every use. If there is any water
left in the water tank 5 , drain the water tank 5 as described in the ‘Draining the
water tank’ section. To allow the filter element 4 to dry, we recommend leaving
the water tank cover 6 open or removing the filter element 4 from the
appliance to dry.
To remove the filter element 4, open the water tank cover 6 and lift the filter
element 4 upwards out of the appliance holding the tabs.
Note: Replace the filter element regularly (roughly every 4-6 months depending on
the frequency of use). You can order replacement filter elements from our customer
service department.
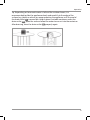
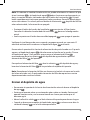
Draining the water tank
• Disconnect the appliance from the power supply before draining the water tank
5.
• Hold the appliance over a suitable container or a washbasin. Always hold the
appliance absolutely straight and do not move it by pulling hardly to avoid the
water spilling over.
• Open the seal of the outlet 13 on the underside of the appliance to drain the
water.
• When the water tank 5 is drained fully, close the drain outlet 13 again
properly with the corresponding seal.

17
Operation
Tip: Depending on how much water is left and the surface chosen, it is
recommended to slide the appliance slowly and carefully to the edge of the
surface (e.g. table) on which you were operating the appliance until the seal of
the drain outlet 13 is accessible. Hold or place a suitable container under the
drain outlet 13 , open the seal and allow the water to run out into the container.
After draining, close the drain outlet 13 properly again.

18
Maintenance, cleaning and care
Maintenance, cleaning and care
WARNING!
Always disconnect the appliance from the power supply
and allow it to cool down completely before cleaning and
storing it! Danger of electric shock!
WARNING!
Ensure that no liquid gets inside the appliance during
cleaning. Never immerse the appliance in water.
Danger of electric shock!
CAUTION!
For cleaning, never use strong or abrasive detergents
or sharp-edged objects. Do not clean the appliance in a
dishwasher.
• To clean the appliance housing, use a dry or if necessary slightly damp, well
wrung-out cloth.
• Then wipe thoroughly dry.
• Remove the filter element 4 from the appliance and clean it carefully under
running water. Let the filter element 4 dry fully before re-inserting it in the
appliance.
Cleaning the ventilation slits
Brush dust and dirt off the ventilation slits regularly using a suitable soft brush.

19
Troubleshooting
Troubleshooting
Malfunction Possible cause Measure
The appliance is
not functioning.
The appliance is not
connected to a power
supply.
Connect the appliance to an
appropriate power supply
(using a USB port or the USB
adapter)
The appliance is not
switched on.
Push the on/off button to turn
the appliance on.
If your device has a defect not stated in the troubleshooting chart above, please
contact our After Sales Support Department. Our After Sales Support staff are happy
to help you. The telephone number is printed on the warranty card. Because our
products are constantly being developed and improved, design and technical
modifications are possible. These operating instructions can also be downloaded as
a pdf file from our homepage, www.gt-support.de.

20
Technical data/disposal
Technical data
USB adapter
Input voltage: 100-240 V~
Frequency: 50-60 Hz
Output voltage: 5 V
Output current: 1A
Basic unit
Input voltage: 5 V
Input current: 1A
Power: 5 W
Disposal
Disposing of the packaging
Sort the packaging before you dispose of it. Dispose of cardboard with
recycled paper and of wrappers with appropriate recycling or garbage.
Disposing of the Product
If the product should no longer work at all, please make sure that it is disposed
of in an environmentally friendly way and according to local regulations.

21

22
A
5
15
2
7
14
18 9 10 11
B C
13
12
3

23
D
6
4
4
5
5

24
Contenido/piezas del dispositivo
Contenido/piezas del dispositivo
1Base de la unidad
2Abertura de salida de aire
3Abertura de entrada de aire
4Elemento del filtro
5Depósito de agua
6Cubierta del depósito de agua
7Luz LED del aro (panel de control)
8Botón de iluminación (aro de luz LED + depósito de agua)
9Botón de encendido/apagado
10 Botón de funcionamiento del ventilador
11 Indicador de velocidad del ventilador
H = Velocidad alta del ventilador
M = Velocidad media del ventilador
L = Velocidad baja del ventilador
12 Conector para cable USB
13 Salida de drenaje
14 Adaptador USB
15 Cable USB
16 Manual de instrucciones y tarjeta de garantía (no ilustrada)

25
Índice
Índice
Vista general ......................................................................................................... 22
Contenido/piezas del dispositivo .........................................................................24
Información general .............................................................................................26
Leer y guardar este manual del usuario ...................................................................... 26
Descripción de símbolos e información adicional ...................................................... 26
Seguridad .............................................................................................................27
Información general ...................................................................................................... 27
Instrucciones de seguridad .......................................................................................... 27
Peligros para niños y personas con discapacidades..................................................29
Riesgos al manipular aparatos eléctricos ...................................................................30
Riesgos durante el uso del mini enfriador de aire con LED ...................................... 31
Preparación y montaje .........................................................................................33
Antes del primer uso ...................................................................................................... 33
Funcionamiento ....................................................................................................34
Generalidades ................................................................................................................34
Uso del aparato ..............................................................................................................34
Drenar el depósito de agua .......................................................................................... 35
Mantenimiento, limpieza y cuidado .....................................................................37
Limpiar las ranuras de ventilación .............................................................................. 37
Solución de problemas ........................................................................................ 38
Datos técnicos .......................................................................................................39
Eliminación ............................................................................................................39
Eliminación del embalaje ..............................................................................................39
Eliminación del producto ...............................................................................................39

26
Información general
Leer y guardar este manual del usuario
El presente manual de instrucciones pertenece a este mini enfriador de
aire con LED. Contiene información importante sobre el funcionamiento y
la manipulación del aparato.
Lea con atención el manual de instrucciones y, en especial, las
indicaciones de seguridad antes de utilizar el mini enfriador de aire con LED. El
incumplimiento de lo establecido en este manual de instrucciones puede ocasionar
lesiones graves o daños en el mini enfriador de aire con LED.
Guarde el manual de usuario para consultarlo en el futuro. Si entrega este
mini enfriador de aire con LED a otras personas, adjunte sin falta este manual de
instrucciones.
Descripción de símbolos e información adicional
Los siguientes símbolos y palabras de advertencia se utilizan en este manual del
usuario, en el aparato o en el embalaje.
¡Lea y siga el manual de instrucciones!
Los puntos relacionados con la seguridad a lo largo de este manual están marcados
con los signos PELIGRO, ADVERTENCIA o PRECAUCIÓN en base al tipo de riesgo.
¡PELIGRO!
Indica una situación peligrosa la cual, si no se evita,
provocará la muerte o lesiones graves.
¡ADVERTENCIA!
Indica una situación peligrosa la cual, si no se evita,
podría provocar la muerte o lesiones graves.
¡PRECAUCIÓN!
Indica una situación peligrosa la cual, si no se evita,
podría provocar lesiones menores o moderadas.
Indica información para la instalación, operación o mantenimiento,
que es importante pero no relacionada con los peligros.
Este aparato cumple los requisitos de seguridad de
los productos eléctricos de los Estados Unidos de América y ha
ganado la marca ETL Listed.
Información general

27
Seguridad
Seguridad
INSTRUCCIONES IMPORTANTES DE SEGURIDAD
LEA TODAS LAS INSTRUCCIONES ANTES
DE USAR.
LEA Y GUARDE ESTAS INSTRUCCIONES.
Uso indicado
El mini enfriador de aire con LED está solo diseñado para enfriar y
humidificar el aire en espacios cerrados. Está concebido solo para uso
personal y no es apto para fines comerciales.
Utilice el aparato solamente como se describe en el manual del
usuario. Usarlo de cualquier otra manera se considera inapropiado y
puede ocasionar daños a la propiedad o incluso lesiones personales.
El enfriador de aire portátil con LED no es un juguete para niños. El
fabricante o el vendedor no se hacen responsables por los daños
ocasionados por el uso indebido o inadecuado.
Instrucciones de seguridad
Al usar aparatos eléctricos, siempre deben seguirse las
precauciones básicas, incluidas las siguientes:
¡PELIGRO!
PARA REDUCIR EL RIESGO DE INCENDIO O DESCARGA
ELÉCTRICA, SIGA ESTAS INSTRUCCIONES CUIDADOSAMENTE
¡ADVERTENCIA!
PARA REDUCIR EL RIESGO DE DESCARGAS ELÉCTRICAS, USAR
ÚNICAMENTE EN INTERIORES

28
1. No lo use al aire libre o en superficies mojadas.
2. No permita que se use como juguete. Es necesaria una
atenta supervisión cuando el producto es usado por niños o
cerca de estos.
3. Utilícelo solamente como se describe en este manual. Utilice
solamente los accesorios recomendados del fabricante.
4. No opere ningún aparato con un cable o enchufe dañado,
después de una avería o si se ha dañado de cualquier
manera. Devuelva el aparato al centro de servicio autorizado
más cercano para su examen, reparación o ajuste.
5. No manipule el enchufe ni el aparato con las manos mojadas.
6. Desenchufe o desconecte el aparato del suministro eléctrico
antes del mantenimiento.
7. Tenga en cuenta que cualquier cambio o modificación no
aprobados expresamente por la parte responsable del
cumplimiento podrían anular la autoridad del usuario para
utilizar este equipo.
8. ADVERTENCIA: Para reducir el riesgo de incendio o descarga
eléctrica, no use este enfriador con dispositivos de control de
velocidad de estado sólido.
AVISO: Este equipo ha sido probado y cumple con los límites
establecidos para los dispositivos digitales de Clase B, de
acuerdo con la Parte 15 de las Normas de la FCC. Estos límites
están diseñados para proporcionar una protección razonable
contra interferencias perjudiciales en una instalación
residencial. Este equipo genera, utiliza y puede irradiar
energía de radiofrecuencia y, si no se instala y utiliza de
acuerdo con las instrucciones, puede causar interferencias
molestas en las comunicaciones de radio. Sin embargo, no
hay garantía de que no se produzcan interferencias en una
instalación particular.
Seguridad

29
Seguridad
Si este equipo causa interferencias molestas en la recepción de
radio o televisión, lo cual puede determinarse apagando
y encendiendo el equipo, se recomienda intentar corregir la in-
terferencia por medio de una o más de las siguientes medidas:
- Reorientar o reubicar la antena receptora.
- Aumentar la separación entre el equipo y el receptor.
- Conectar el equipo a un tomacorriente en un circuito
diferente al que está conectado el receptor.
- Consulte al distribuidor o un técnico experimentado de
radio/televisión para obtener ayuda.
¡GUARDE ESTAS
INSTRUCCIONES!
Peligros para niños y personas con discapacidades
- Este aparato puede ser utilizado por niños mayores de
8 años de edad, así como por personas con capacidades
limitadas o por aquellas personas carentes de experiencia
y/o conocimiento, si son supervisados o han sido instruidos
sobre cómo utilizar de forma segura el aparato y han
comprendido los riesgos asociados con su operación.
- No se debe permitir que los niños limpien o hagan
mantenimiento al aparato, a menos que sean mayores de
8 años de edad y estén supervisados. El aparato y el cable de
alimentación deben mantenerse alejados de niños menores
de 8 años de edad.
- No se debe permitir que los niños jueguen con el aparato.
Por este motivo use y mantenga el aparato alejado de los
niños menores de 8 años de edad. Para evitar que alguien
jale del aparato , no permita que el cable de alimentación
cuelgue de la superficie de la encimera.
- Mantenga los materiales de embalaje fuera del alcance de
los niños. ¡Riesgo de asfixia!

30
Seguridad
Riesgos al manipular aparatos eléctricos
- Conecte el adaptador USB únicamente a una toma de
corriente instalada correctamente con la tensión de red
especificada en la placa de identificación.
- Deshágase del adaptador USB dañado y reemplácelo con un
adaptador USB del mismo tipo. Inspeccione con frecuencia si
el adaptador USB y el cable USB están dañados.
- Las reparaciones solo las deben realizar por proveedores
certificados de servicios de reparación especializados. Los
aparatos que se han reparado incorrectamente representan
un peligro para el usuario.
- El aparato solo se debe operar con el adaptador USB
suministrado o una conexión USB (p. ej., de una
computadora, laptop, etc.) con el cable incluido.
- Para evitar accidentes, no deje el aparato sin supervisión
durante el funcionamiento.
- Nunca sumerja el adaptador USB ni el aparato en agua ni los
utilice en exteriores, ya que no deben quedar expuestos a la
lluvia o cualquier otro tipo de humedad.
¡Peligro de descarga eléctrica!
- Si el aparato cae al agua, primero desconecte el adaptador
USB o el cable USB del puerto USB y luego extraiga el aparato.
No encienda el aparato de nuevo; haga que se revise primero
en un punto de servicio aprobado. Lo mismo se aplica si el
cable USB o el aparato se daña o si el aparato se cae.
- Asegúrese de que el adaptador USB, el cable USB y el apara-
to nunca se coloquen sobre superficies calientes o cerca de
fuentes de calor. Apoye el cable USB de forma tal que no
toque objetos calientes o filosos.
¡Peligro de descarga eléctrica!
- Nunca doble el cable USB y no lo enrolle sobre el aparato ya
que puede romperlo.

31
Seguridad
- Desconecte siempre el adaptador USB o el cable USB del
puerto USB en caso de averías, antes de limpiar el aparato o
cuando no lo use. Nunca tire del cable USB.
¡Peligro de descarga eléctrica!
- Nunca abra el aparato y/o el adaptador USB por su cuenta
ni intente introducirles objetos métalicos.
¡Peligro de descarga eléctrica!
Riesgos durante el uso del mini enfriador de aire con LED
- No cubra el aparato cuando está funcionando. Asegúrese
de que haya suficiente espacio y una distancia segura res-
pecto a paredes, techos y otros objetos.
- Las aberturas de entrada y salida de aire nunca deben quedar
cubiertas o bloqueadas. Mantenga siempre suficiente
distancia y limpie la suciedad de las ranuras de ventilación
con frecuencia para evitar el bloqueo de las aberturas.
- No inserte objetos en las aberturas de entrada y salida de
aire o en el aparato. Asegúrese de que no penetren objetos
sueltos como cortinas, trapos, cabello largo, corbatas, etc., en
las ranuras de ventilación. El flujo de aire puede absorberlos.
- No coloque ningún artículo encima del aparato.
- Conecte siempre el cable USB al conector del aparato y al
adaptador USB primero. Una vez que lo haya hecho, y a una
toma de corriente instalada puede conectar el adaptador
USB a un tomacorriente instalado correctamente.
- No deje agua en el aparato cuando no se esté utilizando.
- Si procede, vacíe el agua restante que quede antes de guar-
dar o almacenar el aparato, y límpielo antes del próximo uso.
- Drene por completo el resto de agua después del uso y
espere a que el elemento del filtro se seque por completo
para evitar el riesgo de formación de moho y gérmenes.
Para esto, use la salida del drenaje.

32
Seguridad
- Tenga en cuenta que una humedad del aire elevada puede
fomentar el crecimiento de organismos biológicos en el en-
torno.
- No permita que el área que rodea el aparato se moje o per-
manezca húmeda. En el supuesto de que se genere hume-
dad, reduzca el caudal de salida del aparato. Si no es posible
seguir reduciendo el caudal de salida del aparato, utilícelo
con interrupciones. Procure que los materiales que absor-
ban la humedad con facilidad, como alfombras, cortinas,
cortinillas o manteles, no se humedezcan.
- Solamente ponga agua limpia y fría en el depósito de agua.
No use aditivos. No llene el depósito de agua sobre la marca
máxima.
- Llene el depósito de agua solo una vez introducido el
elemento filtrante, para evitar así que desborde el agua.
- Antes de llenar el depósito de agua, asegúrese de que la
salida del drenaje del lado inferior del aparato esté sellada.
- Use el aparato solo en una superficie nivelada y
antideslizante. Evite golpes para evitar que el agua se
derrame del depósito de agua.
- No incline el aparato, no lo apoye de lado, no le dé vuelta
y evite moverlo de lugar cuando haya agua en el
depósito de agua o el aparato.
- Asegúrese de que ningún líquido alcance los contactos del
aparato, el cable USB o el adaptador USB.
- Rellene con agua o drene el agua y limpie el aparato úni-
camente después de haberlo desconectado del suministro
eléctrico.
¡GUARDE ESTAS
INSTRUCCIONES!

33
Preparación y montaje
Preparación y montaje
Antes del primer uso
¡ADVERTENCIA!
Después de desembalar al dispositivo, examínelo y
asegúrese de que todas las piezas están completas y no
sufrieron ningún daño en el transporte para evitar
cualquier peligro. En caso de cualquier duda, no use el
dispositivo y póngase en contacto con nuestro servicio
al cliente. Las direcciones de servicio figuran en nuestras
condiciones de la garantía y en la tarjeta de garantía.
El dispositivo ha sido embalado para protegerlo de cualquier posible daño en el
transporte.
• Con cuidado, extraiga al dispositivo de su embalaje original.
• Quite todo el embalaje.
• Limpie el aparato y todos los accesorios, y quite todo el polvo restante del
embalaje, tal como se describe en el capítulo “Mantenimiento, limpieza y cuidado”.
Nota: Antes de usar el aparato por primera vez, hágalo funcionar por unos
20 minutos como se describe en la sección "Funcionamiento" para dejar que el
elemento del filtro absorba suficiente agua de modo que el aparato esté listo para
enfriar.

34
Funcionamiento
Generalidades
Hay un elemento del filtro dentro del aparato con tiras de fieltro. Este elemento
del filtro se llena al absorber parte del agua del depósito de agua. Un ventilador
expulsa el aire a través del elemento del filtro, lo que provoca que el agua se evap-
ore más rápido. El flujo de aire del ventilador empuja la evaporación resultante en
enfriamiento hacia el exterior de la carcasa como aire más frío. Este flujo de aire más
frío y ligeramente más húmedo tiene un efecto de enfriamiento agradable y un aire
menos seco en el túnel de viento del aparato. Sin embargo, debido a su tamaño, el
aparato no es apto para enfriar habitaciones enteras.
Uso del aparato
• Coloque el aparato sobre una superficie plana, adecuada y antideslizante.
Nota: Asegúrese de que el elemento filtrante 4 haya sido introducido en el
aparato antes de llenarlo de agua.
• Llene el depósito de agua 5 con agua fría y limpia. Nunca exceda la
capacidad máxima marcada en el aparato.
• Ahora conecte el cable USB 15 al conector 12 del aparato y el adaptador
USB 14 .
• Luego conecte el adaptador USB 14 a la fuente de alimentación.
Nota: También puede usar un puerto USB (p. ej., de un ordenador, portátil, etc.) para
energizar el aparato. Para hacerlo, conecte primero el cable USB 15 al aparato y
luego a un puerto USB apto.
• Ahora encienda el aparato pulsando el botón de encendido/apagado 9. El
ventilador comienza a funcionar.
• Si desea activar la iluminación de color, enciéndala pulsando el botón de ilumi-
nación 8. El aro luminoso 7 y la luz del depósito de agua comienzan a brillar.
La iluminación 7 cambia de color continuamente durante el funcionamiento (a
intervalos de 90segundos).
Funcionamiento

35
Funcionamiento
Nota: Si no desea un cambio de color continuo, puede seleccionar un color en el que
el aro luminoso 7 y el depósito de agua 5 deban iluminarse continuamente, es
decir, sin cambio de color, volviendo a pulsar el botón de iluminación 8. Pulse el
botón repetidamente hasta que aparezca el color que desee. Para ello, puede elegir
entre siete colores. Si vuelve a pulsar el botón de iluminación 8 después del último
color seleccionable, la iluminación se apagará.
• Presione el botón de función del ventilador 10 para ajustar el flujo de aire.
Consulte el indicador de velocidad del ventilador 11 para ver la configuración
actual.
• Vuelva a presionar el botón de encendido/apagado 9 para apagar el aparato.
Verifique el nivel de agua de vez en cuando y agregue agua de ser necesario. El
efecto de enfriamiento se reduce si el depósito de agua 5 está vacío.
Desconecte el aparato de la fuente de alimentación después de cada uso. Si queda
agua en el depósito de agua 5, drénelo como se describe en la sección "Drenar
el depósito de agua". Para permitir que se seque el elemento del filtro 4,
recomendamos dejar la cubierta 6 del depósito de agua abierta o quitar el
elemento del filtro 4 del aparato.
Para quitar el elemento del filtro 4, abra la cubierta 6 del depósito de agua y
levante el elemento del filtro 4 de las pestañas de soporte del aparato.
Nota: Reemplace el elemento del filtro con frecuencia (cada 4 o 6 meses en función
de la frecuencia de uso). Puede pedir elementos del filtro de repuesto a nuestro
departamento de servicio al cliente.
Drenar el depósito de agua
• Desconecte el aparato de la fuente de alimentación antes de drenar el depósito
de agua 5.
• Sostenga el aparato sobre un contenedor apto o sobre un lavabo. Sostenga el
aparato siempre recto y no lo mueva tirando con fuerza para evitar que se
derrame agua.
• Abra el sello de la salida 13 en el lado inferior del aparato para drenar el agua.
• Cuando se drene por completo el depósito de agua 5, vuelva a cerrar bien la
salida del drenaje 13 con el sello correspondiente.

36
Funcionamiento
Consejo: En función de cuánta agua queda y la superficie elegida, se recomienda
deslizar el aparato despacio y con cuidado hasta el borde de la superficie (p. ej.,
mesa) sobre la cual estuvo funcionando el aparato hasta que el sello de la salida del
drenaje 13 esté accesible. Sostenga o coloque un contenedor apto debajo de la
salida del drenaje 13 , abra el sello y deje que el agua salga del contenedor.
Después de drenar, vuelva a cerrar bien la salida del drenaje 13 .

37
Mantenimiento, limpieza y cuidado
Mantenimiento, limpieza y cuidado
¡ADVERTENCIA!
Desenchufe siempre el aparato de la fuente de
alimentación y deje que se enfríe por completo antes
de limpiarlo y guardarlo. ¡Peligro de descarga eléctrica!
¡ADVERTENCIA!
Asegúrese de que no entren líquidos dentro del
aparato durante la limpieza. Nunca sumerja el aparato
en agua. ¡Peligro de descarga eléctrica!
¡PRECAUCIÓN!
Para la limpieza, nunca use detergentes fuertes o
abrasivos ni objetos con bordes afilados. No coloque el
aparato en el lavavajillas.
• Para limpiar la carcasa del aparato, utilice un paño seco o si es necesario
ligeramente húmedo y bien escurrido.
• A continuación, séquelo bien.
• Quite el elemento del filtro 4 del aparato y límpielo bien bajo un chorro de
agua.
Espere a que el elemento del filtro 4 se seque por completo antes de
volver a insertarlo en el aparato.
Limpiar las ranuras de ventilación
Quite el polvo y la suciedad de las ranuras de ventilación con un cepillo suave y apto.

38
Solución de problemas
Fallo Posible causa Medida
El aparato no
funciona.
El aparato no está
conectado a una fuente
de alimentación.
Conecte el aparato a una
fuente de alimentación
adecuada (con un puerto
USB o el adaptador USB).
El aparato no está
encendido.
Presione el botón de
encendido/apagado para
encender el aparato.
En caso de tener lugar algún problema que no se incluya en este manual de instruc-
ciones, diríjase a nuestro servicio de atención al cliente. Nuestros asesores le ayuda-
rán con mucho gusto. La dirección del servicio de atención al cliente se encuentra en
nuestras condiciones de la garantía, en la tarjeta de garantía adjunta aparte. Puesto
que nuestros productos se desarrollan y mejoran continuamente, es posible que
haya modificaciones técnicas y de diseño. También puede descargar este manual de
instrucciones como archivo PDF desde nuestra página de inicio www.gt-support.de.
Solución de problemas

39
Datos técnicos/Eliminación
Datos técnicos
Adaptador USB
Tensión de entrada: 100-240 V~
Frecuencia: 50-60 Hz
Tensión de salida: 5 V
Corriente de salida: 1A
Unidad base
Tensión de entrada: 5 V
Corriente de entrada: 1A
Potencia: 5 W
Eliminación
Eliminación del embalaje
Clasifique el material de embalaje antes de deshacerse de este.
Deshágase del papel y el cartón con el servicio de reciclado de
papel y los envoltorios con el servicio de recolección adecuado.
Eliminación del producto
Si el producto deja de funcionar, asegúrese de eliminarlo de forma respetuosa
con el medioambiente y de acuerdo con la normativa local.

Rubrik
40
US
Made in China
DIST. & SOLD EXCLUSIVELY BY:
ALDI
BATAVIA, IL 60510
YEAR WARRANTY
AÑOS DE GARANTÍA
3
AFTER SALES SUPPORT
SERVICIO POSVENTA
MODEL / MODELO: PO51031549
GT-SF-LKM-01-US 06/2023
1-866-558-8096
service@801service.net
US
US
822553
-
 1
1
-
 2
2
-
 3
3
-
 4
4
-
 5
5
-
 6
6
-
 7
7
-
 8
8
-
 9
9
-
 10
10
-
 11
11
-
 12
12
-
 13
13
-
 14
14
-
 15
15
-
 16
16
-
 17
17
-
 18
18
-
 19
19
-
 20
20
-
 21
21
-
 22
22
-
 23
23
-
 24
24
-
 25
25
-
 26
26
-
 27
27
-
 28
28
-
 29
29
-
 30
30
-
 31
31
-
 32
32
-
 33
33
-
 34
34
-
 35
35
-
 36
36
-
 37
37
-
 38
38
-
 39
39
-
 40
40


en otros idiomas
- English: Easy Home GT-SF-LKM-01 User manual
Otros documentos
-
Honeywell CL25AE Manual de usuario
-
-
 Quilo QE1SKS Manual de usuario
-
Honeywell CO30XE Guía del usuario
-
Honeywell CS071AE El manual del propietario
-
Honeywell CO25AE Guía del usuario
-
Honeywell CO25MM Guía del usuario
-
Honeywell CO60PM El manual del propietario
-
Bonaire Durango 6280067 Manual de usuario
-
 Casalux GT-WSFP-01 Manual de usuario

