CharGriller 2137 El manual del propietario
- Categoría
- Barbacoas
- Tipo
- El manual del propietario
Este manual también es adecuado para

OM2137 B.3 ™ & © Char-Griller / A&J Mfg.
OWNER’S MANUAL
Charcoal Grill
Model# 2137
Outlaw
Keep your receipt with this manual for Warranty.
CUSTOMER SERVICE 1-912-638-4724
Contents of this manual are Trademarked and Cop-
yrighted by Char-Griller | A&J Manufacturing.
Using the information contained in this manual with-
out consent of Char-Griller and/or A&J Manufactur-
ing is strictly
prohibited

OM2137 B.3 ™ & © Char-Griller / A&J Mfg. 2
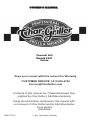
STOP! CALL FIRST! DO NOT RETURN PRODUCT TO STORE.
CALL (912) 638-4724 This product has been built to the highest quality standards.
Call us should you have any questions not addressed in these instructions, or for
service information.
Have your grills serial number (located on the back of the grill body or on the leg)
when calling.
13
22
3
1
2
17
7
19
21
20
6
12
11
8
12
16
9
10
5
No Returns on
Used Grills
14
18
23
15
4

OM2137 B.3 ™ & © Char-Griller / A&J Mfg. 3
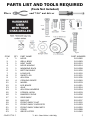
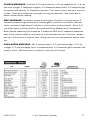
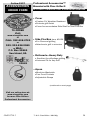
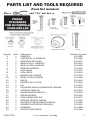
PARTS LIST AND TOOLS REQUIRED
(Tools Not Included)
Pliers and 7/16" nut driver
ITEM QTY PART NAME PART NUMBER
1 1 HOOD 20-0082
2 1 GRILL BODY 20-0083
3 1 HEAT GAGE 55-0010
4 1 HOOD HANDLE 55-0014
5 1 WARMING RACK 30-0058
6 1 BOTTOM SHELF 20-0130
7 2 LONG LEG 10-0120
8 2 SHORT LEG 10-0121
9 1 ASH PAN 20-0135
10 4 COOKING GRATE 10-0049
11 2 WHEEL 55-0003
12 2 LEG BRACE 10-0051
13 1 AXLE 10-0324
14 2 ASH PAN HANGERS 20-0024
15 3 UTENSIL HOOK 50-0003
16 1 DAMPER CIRCLE 10-0036
17 1 SIDE SHELF 30-0016
18 2 HUB CAP 55-0007
19 2 FRONT SHELF SLAT 10-0115
20 2 FRONT SHELF SUPPORTS 10-0053
21 2 FRONT SHELF BRACKETS 10-0052
22 1 STACK 30-0088
23 1 GRATE LIFTER 10-0045
2 ¼”
35 pcs.

OM2137 B.3 ™ & © Char-Griller / A&J Mfg. 4
Page Intentionally Left Blank For Notes

OM2137 B.3 ™ & © Char-Griller / A&J Mfg. 5

OM2137 B.3 ™ & © Char-Griller / A&J Mfg. 6
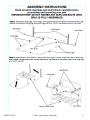
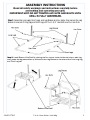
4. Attach LEG BRACE to the outside of the LONG LEG using 2 1/4” Hex Bolts and
Nuts as shown but only finger tight.
5. Attach the other end of the LEG BRACES to the corresponding legs using 2 1/4"
Hex Bolts and Nuts but only finger tight. See below.
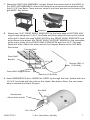
6. Insert the AXLE through the SHORT LEGS and through the BASE. Slide WHEELS
onto AXLE, install washer and cotter pin then hammer HUB CAPS onto each end of
the AXLE to secure WHEELS.

OM2137 B.3 ™ & © Char-Griller / A&J Mfg. 7
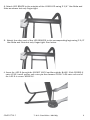
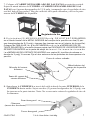
7. Stand the CART/LEG ASSEMBLY upright. Attach the bottom half of the BODY to
the CART/LEG ASSEMBLY (make sure damper is on same side as wheels) with
four 2 1/4" Hex Bolts. There are two holes in the front and two in the back of the
grill BODY. See below.
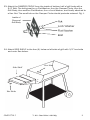
8. Attach two (2) 8" FRONT SHELF BRACKETS to the front edge of BOTTOM HALF
of grill body using two (2) 3/4" Hex Bolts and Nuts (with the nuts on the inside
of the grill). Attach the long WOOD SLATS to the FRONT SHELF BRACKETS and
at the same time attach the FRONT SHELF SUPPORT BRACES to the underside
of the outer Holes of the FRONT SHELF BRACKETS with four (4) 1" Carriage
Bolts and Nuts. Attach the other end of the Support Braces to the Grill Body.
See below.
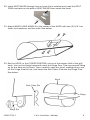
9. Insert SMOKESTACK from INSIDE the HOOD up through the hole. Attach with two
(2) 3/4" hex bolts with the nuts on the inside. See below. Note: It is not neces-
sary to remove the Stack Damper.
Damper
Hex Bolt
Hex Nut
Smokestack
( Insert from inside)
Carriage Bolt
Front Shelf
Bracket
Front Shelf Support Brace
Attach to Grill Body
Bottom Half of
Grill Body
Hex Nut

OM2137 B.3 ™ & © Char-Griller / A&J Mfg. 8
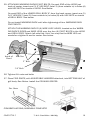
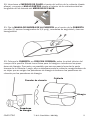
10. Insert HEAT GAUGE through hole in hood (from outside) and push the SPLIT
RING over tabs on the side of HEAT GAUGE from inside the hood.
11. Attach WOOD HOOD HANDLE to the center of the HOOD with two (2) 3/4" hex
bolts, lock washers, and hex nuts. See below.
12. Set the HOOD, in the CLOSED POSITION, on top of the bottom Half of the grill
body. Line up the Hinge holes and insert the Hinge Pins. This may require lifting
up on the back of the Hood. Then, carefully open the hood, making sure to not
let the Hinge Pins fall out, and insert the Hair Cotter Pins into the Hinge Pins.
See below.
Hood
Hinge
Hair Cotter Pin
Hinge Pin

OM2137 B.3 ™ & © Char-Griller / A&J Mfg. 9
13. Attach the DAMPER CIRCLE from the inside of bottom half of grill body with a
3/4" Bolt. The bolt goes thru a Flat Washer, thru the Damper Circle, thru the
Grill Body, thru another Flat Washer, thru a Lock Washer, and finally attached to
a Hex Nut. The small tab on the Damper Circle should protrude outward. Fig. J.
14. Attach SIDE SHELF to the four (4) holes on left side of grill with 1/2" hex bolts
and nuts. See below.
Hex Nuts
Hex Bolts
Side Shelf
Inside of
Charcoal
Grill Body

OM2137 B.3 ™ & © Char-Griller / A&J Mfg. 10
15. ATTACHING WARMING RACKS PIVOT BOLTS: On each END of the HOOD just
back of center, insert one (1) 2" HEX BOLT (total 2) (from outside in) in holes (A)
with HEX NUTS on inside of HOOD. See Below.
On each END of the LOWER GRILL BODY 4" from the back corner, insert one (1)
3/4" HEX BOLT (total 2) (from outside in) in holes (B) with HEX NUTS on inside
of GRILL BODY. See below.
Do not install WARMING RACK until after tightening all four WARMING RACK
PIVOT BOLTS.
ATTACH THE WARMING RACK’S (4) WIRE LOOP HOLES, located on the WARM-
ING RACK’S SIDES and WIRE LEGS, over the four (4) PIVOT BOLTS in the HOOD
and GRILL BODY. Attach left side first. Hint: You may flex the WIRE LEG out-
wards for a tighter fit and to center. See below.
16. Tighten ALL nuts and bolts.
17. Place FIRE GRATE, with ADJUSTABLE HANGERS attached, into BOTTOM HALF of
grill body. See Below. Install the COOKING GRATES.
CONGRATULATIONS, ASSEMBLY COMPLETE!
Fire Grate
2” Bolt
3/4” Bolt
A
B
A
B
Inside of
Hood
Hex Nut

OM2137 B.3 ™ & © Char-Griller / A&J Mfg. 11
Page Intentionally Left Blank For Notes

OM2137 B.3 ™ & © Char-Griller / A&J Mfg. 12
GRILL PREPARATION &OPERATING INSTRUCTIONS
PLEASE NOTE: NO RETURNS ON USED GRILLS
Read all safety warnings and instructions carefully
Before assembling and operating your grill.
1. Cure GRILL prior to your initial use to protect the interior and exterior finish and
to prevent unnatural flavors to your first meals. (A) Lightly coat ALL INTERIOR
SURFACES (including GRILLS, GRATES, AND INSIDE OF BARREL.) with vegetable
oil (spray vegetable oil is easiest but do not use near hot coals or fire). (B) Build
a medium sized fire on the fire grate. (C) After coals ash over, spread out coals,
replace cooking grates, close lid and heat at approximately 250 F for two hours.
Re-coat GRATES and return to grill at approximately 200 F for two hours. You
can lightly coat the exterior of the grill body (while warm) with vegetable oil. This
will extend the life of the finish, much like waxing a car. Your GRILL will then be
ready for use. NOTE: Grill will drip a lot of oil during this process and for several
uses but will slow over time. NEVER EXCEED 400 BECAUSE THIS WILL DAM-
AGE THE FINISH AND CONTRIBUTE TO RUST. PAINT IS NOT WARRANTED AND
WILL REQUIRE TOUCH-UP. THIS UNIT IS NOT WARRANTED AGAINST RUST.
2. To START FIRE – stack 50-60 briquets in pyramid and saturate with lighter fluid
(DON’T USE GASOLINE). Light coals in several places, close lid after briquets
ash over or _ gray, spread them out and start cooking. If one end burns faster,
use tongs to move coals from one end to the other for even heat. ALWAYS FOL-
LOW CHARCOAL AND LIGHTER FLUID MANUFACTURERS’ INSTRUCTIONS AND
WARNINGS. USE OUTDOORS ONLY ON NONCOMBUSTIBLE SURFACE – 15’
AWAY FROM WOOD AND COMBUSTIBLE MATERIAL.
3. Control heat with amount and type of FUEL, DUAL DAMPERS and ADJUSTABLE
FIRE GRATE. Adjust GRATE one end at a time. Wood burns hotter than coals.
More airflow is more heat.
4. For no flare-ups, cook with lid in the down position. Add water soaked hardwood
chips for a smoked flavor.
5. Suggestion: Screw 3/4'" cup hooks (not furnished) on front of the wood shelf to
hang cooking utensils.
6. Burn out may be rust out. Ashes left in bottom too long hold moisture and rust
through any thickness of steel. This grill is made of steel and cast iron, which
WILL RUST, ESPECIALLY IF NOT PROPERLY CARED FOR.
7. Do not use self-starting charcoal as it will give unnatural flavor. Burn lighter flu-
id completely before closing lid.
8. After using, coat vegetable oil on interior grates and bare metal while warm to
reduce rust. On the EXTERIOR, remove dust with wire brush and touch up with a
high heat paint, available at most hardware/auto stores.
9. HINT: If cast iron grates get caked, put them in self cleaning oven. They come
out like new, but need re-seasoning.
10. You may place a coffee can on bottom shelf under the hole in the grill to catch
drippings.
11. HEAT GAUGE may obtain moisture, which will steam out during cooking. Gauge
may be calibrated in oven.
12. You may fill unwanted holes with Nuts & Bolts (Not Provided). NOTE: Smoke will
escape from areas other than the smokestack. This should not affect your cook-
ing.

OM2137 B.3 ™ & © Char-Griller / A&J Mfg. 13
GRILLING RECIPES
DIRECT METHOD
STEAK (& ALL MEATS): Cook food directly above coals/heat. Generally speaking, to
grill meats, raise fire grate to high position (hot) and sear for one minute on each
side with the lid open to seal in flavor and juices. Then lower fire grate to medium
position with lid closed and cook to desire doneness.
Control heat with dual dampers and adjustable fire grate.
BETTER BARBECUE: Place grilled meat back in the marinade for several minutes
before serving – it will become tastier and juicier. CAUTION: Boil extra marinade
first to kill bacteria remaining from the raw meat.
Tip: Cooking with a MEAT THERMOMETER ensures food is fully cooked. Insert into
thickest part not touching bone & allow five minutes to register. Internal tempera-
tures for BIRDS should be 170F to 180F and meat should be 140F for rare, 160F
medium and 170F for well done.
MARINATED FLANK STEAK: Mix marinade ingredients in nonmetal dish. Let steak
stand in marinade for no less than 4 hours in refrigerator. Brown each side for 5
minutes, but center should remain rare. Cut steak diagonally across the grain into thin
slices before serving. Grill with fire grate in high (hot) position with lid open or
closed.
MARINADE: 1/2 cup vegetable or olive oil, 1/3 cup soy sauce, 1/4 cup red wine
vinegar, 2 tbs. Lemon juice, 1 tsp. Dry mustard, 1 minced clove garlic, 1 small
minced onion, 1/4 tsp pepper.
QUAIL OR DOVES: Cover birds in Italian dressing (Good Seasons or Kraft Zesty),
marinate overnight, pour off dressing and cover with Texas Pete Hot Sauce for 6
hours. Wrap birds in thick bacon secured by a toothpick. *Place on grill – keep
turning until bacon is black. Grill for 20 minutes. Sear with lid open and fire grate
in high (hot) position for 1 min each side before lowering grate and closing lid. *OR
SMOKE by placing birds in center of GRID with fire in both ends of FIRE BOX.

OM2137 B.3 ™ & © Char-Griller / A&J Mfg. 14
KABOBS: Alternating on skewers any combination of meat, onions, tomatoes, green
peppers, mushrooms, zucchini, circular slice of corn-on-the-cob, or pineapple. Meat
could consist of chunks of shrimp, scallops, lobster, chicken, sausage, pork, beef,
etc. Marinate the meat in refrigerator for several hours. Grill each side approximately
7 minutes turning occasionally while basting with marinade. Leave a small amount of
room between pieces in order to cook faster. Grill with lid up and the fire grate in the
lowest position. See marinade recipe on last page.
KABOB MARINADE: Mix 1 cup soy sauce, 1/2 cup brown sugar, 1/2 cup vinegar,
1/2 cup pineapple juice, 2 teaspoons salt, 1/2 teaspoon garlic powder and bring to a
boil. Marinate beef in mixture a minimum of 4 hours.
HOT DOGS: Grill with lid up and fire grate in high (hot) position for approximately 6
minutes, turn every few minutes.
HAMBURGERS: Mix in chopped onions, green peppers, salt, sear 3/4 inch patties
on each side with fire grate in high position for a few minutes. Lower fire grate to
medium position and grill with lid down to avoid flare-ups. Cook each side 3 to 7
minutes according to desired doneness. Cook ground meat to 150 internally or until
juice runs clear (free of blood) for prevention of E-coli. Burgers can be basted with
marinade when turning and/or other ingredients can be mixed in with the ground
beef such as chili sauce or powder; or you may marinate by allowing to stand in mari-
nade for 1 or 2 hours at room temperature before cooking; or let stand in covered
dish in refrigerator up to 24 hours. Bring to room temperature before cooking. See
meat marinade on page 9.
SHRIMP (Peeled) & Crayfish: Place on skewers, coat with melted butter and gar-
lic salt. Grill 4 minutes on each side or until pink. Cocktail sauce optional.
BAKED POTATOES: Rub with butter and wrap in foil and cook on grill with lid down
for 50 minutes. Turn after 25 minutes (no need to turn if smoked). Squeeze to
check for doneness.
SWEET CORN IN HUSKS: Trim excess silk from end and soak in cold salted water 1
hour before grilling. Grill 25 minutes – turning several times.

OM2137 B.3 ™ & © Char-Griller / A&J Mfg. 15
SMOKIN’ RECIPES: using the Charcoal Grill side of the Duo with a WATER PAN (also
called INDIRECT METHOD).
Pan not included. Disposable bread pan is recommended. SMOKE BY COOKING
SLOWLY (See chart on page 27 for smoking times). 1) Place water/drip pan on left
side of fire grate. 2) Place hot coals on right side (damper end) of fire grate. The
charcoal basket accessory helps confine coals to one side. 3) Place meat above wa-
ter pan. 4) Place fire grate in low position. 5) Close lid & control heat with dampers &
adjustable grate.
You may want to sear certain foods before smoking by placing meat directly above
coals with LID open and FIRE GRATE in high (hot) position for several minutes. Add
flavor soaked wood chips to the fire and add 1 part marinade, beer or wine to 3 parts
water to the drip pan. OPENING THE SMOKING CHAMBER WILL EXTEND COOKING
TIME. Cooking with meat thermometer ensures food is fully cooked. Insert thermom-
eter into thickest part not touching bone, and allow five minutes to register. Internal
temperature for birds should be 170F to 180F or when leg moves easily in joint.
Meat should be cooked to internal temperature of 140F for rate, 160F for medium
and 170F for well done. Check the water level when cooking more than 4 hours or
when you can’t hear the water simmering. Add water by moving meat over and pour-
ing water through GRILL into WATER PAN. IF THE SMOKE IS WHITE, THE FIRE’S
RIGHT. IF THE SMOKE IS BLACK, ADD SOME DRAFT.
SMOKED TURKEY: Empty cavity rinse and pat dry with paper towel, tuck wing tips
under the back and tie legs together. Place in center of cooking grid directly above
foil drip pan of water. Smoke for 12 minutes per pound. Allow several extra minutes
per pound if stuffed to allow for expansion. Use a meat thermometer for best results
(190F internal).
SMOKED BAKED HAM: Fully cooked canned ham or smoked and cured whole ham or
shank or butt portion. Place fire grate in the lowest position and a drip pan under the
meat. Remove rind and score fat diagonally to give a diamond effect. Insert a whole
clove in to the center of every diamond. Place ham with fat side up in center of cook-
ing grid directly above drip pan. Close lid. About 9 minutes per pound is suggested
for fully cooked hams. Smoked or cured ham which is not fully cooked should be
cooked to an internal temperature of 160∞. Baste with ham glaze 3 or 4 times during
last 30 minutes of cooking time. Garnish with pineapple rings about 15 minutes be-
fore end of cooking time.
HAM GLAZE: 1 cup of light brown sugar, firmly packed, 1/2 cup orange juice, 1/2 cup
honey, combine sugar, juice and honey. Let marinade sit for at least 4 hours.

OM2137 B.3 ™ & © Char-Griller / A&J Mfg. 16
SMOKED HOT DOGS STUFFED: Slit hot dogs lengthwise, within 1/4 inch of each
end. Stuff hot dogs with cheese and relish and wrap in bacon. Place on cooking
grid over drip pan and smoke 15-20 minutes or until bacon is crisp.
SMOKED CHICKEN PARTS AND HALVES: Rinse pieces in cold water and pat dry
with paper towels. Brush each piece with vegetable oil and season to taste with salt
and pepper. Brown pieces directly above coals with lid open and grate in high or
medium position for several minutes. Then place pieces on cooking grate directly
above drip pan. With the grate in the low position, cook with lid down for 55 to 60
minutes or until done. Do not use vegetable oil or salt and pepper if using mari-
nade.
SMOKED VENISON: Place leg of venison in a container or "hefty bag" and marinate
for 2-4 days, turning daily. Marinate bacon overnight in its marinade. Remove roast
from refrigerator at least an hour before cooking. Season generously with seasoned
salt and coarse ground black pepper. Wrap 1 lb. Bacon over the top of the roast,
and smoke 20/25 minutes per pound, or until tender. Do not overcook.
Venison Marinade: 1 cup Balsamic or wine vinegar, 1 cup olive oil, 2 oz. Worcester-
shire, 1/2 oz. Tabasco, 2 tbs. Season All, 1 to 2 chopped jalapenos, 3 oz. Soy sauce.
Bacon Marinade: 2 ox. Wine vinegar, 2 oz. Worcestershire, 4 dashes Tabasco.
SMOKED SHRIMP & CRAYFISH: Mix in a foil pan 1/2 cup butter, two cloves of
crushed garlic, Tabasco, sliced green pepper, 1 tbs. each of minced onions, salt and
juices from one lemon. Add shrimp and/ or crayfish and smoke 45 minutes.
SMOKED VEGETABLES: Turnips, potatoes, carrots, okra, mushrooms, peeled on-
ions, zucchini, squash, etc. Put in pan and cover with water and cook for several
hours while cooking the meat. Or place vegetables on grill and smoke for 50
minutes, either wrapped in foil or not.
SMOKED FISH: Marinate in brine (1/4 cup dissolved in 1 qt of water) or marinate
fish in 1 cup white wine, 1 cup soy sauce mixed with 1 cup lemon juice. Marinate
overnight in covered dish in refrigerator. Let air on rack 20 minutes before placing
on Pam sprayed grill. Smoke 25 minutes.
SMOKED SPARE/BACK RIBS: Peel off tough layer of skin on back side. Rub all
surfaces with seasoning. Place ribs in center of grid above drip pan and smoke ap-
proximately 1 1/2 hours or until meats pulls away from bone. Baste with barbecue
sauce during last 30 minutes.

OM2137 B.3 ™ & © Char-Griller / A&J Mfg. 17
CHICKEN MARINADE: Combine 1/2 cup soy sauce, 1/4 cup vegetable oil, 1/4 cup
red wine vinegar, 1 teaspoon oregano, 1/2 teaspoon sweet basil, 1/2 teaspoon gar-
lic powder with parsley, 1/4 teaspoon pepper. Pour over chicken pieces in nonmet-
al dish. Cover and refrigerate overnight, turning occasionally. Use marinade to
baste chicken while cooking.
MEAT MARINADE: For steaks, chops, and burgers: Combine q cup soy sauce, 2
coarsely chopped large onions and 2 cloves garlic (halved) in an electric blender;
cover, process at high speed 1 minute or until mixture is very smooth. Stir in 1/4
cup bottle gravy coloring (Kitchen Bouquet and Gravy Master) and 2 teaspoons
Beau Monde seasoning (or substitute 1 teaspoon MSG and 1 teaspoon seasoned
salt). Allow meat to stand in marinade at room temperature for 2 hours or refriger-
ate up to 24 hours in a covered dish. Bring meat to room temperature before cook-
ing.
SHISH KABOB MARINADE: Mix 1 cup soy sauce, 1/2 cup brown sugar, 1/2 cup
vinegar, 1/2 cup pineapple juice, 2 teaspoons salt, 1/2 teaspoon garlic powder and
bring to a boil. Marinate beef in mixture a minimum of 4 hours.

OM2137 B.3 ™ & © Char-Griller / A&J Mfg. 18
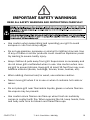
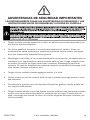
Use caution when assembling and operating your grill to avoid
scrapes or cuts from sharp edges.
Do not use gasoline, kerosene or alcohol for lighting charcoal. Use
of any of these or similar products could cause an explosion possi-
bly leading to severe bodily injury.
Keep children & pets away from grill. Supervision is necessary and
do not leave grill unattended when in use. Use caution when mov-
ing grill to prevent strains. Keep grill at least 15 feet from any com-
bustible material (decks, buildings, fences, trees, bushes, etc).
When adding charcoal and/or wood, use extreme caution.
Never move grill when it is in use or when it contains hot coals or
ashes.
Do not place grill near flammable liquids, gases or where flamma-
ble vapors may be present.
Use caution since flames can flare-up when fresh air suddenly
comes in contact with fire. When opening the lid, keep hands, face
and body safe from hot steam and flame flare-ups.
IMPORTANT SAFETY WARNINGS
READ ALL SAFETY WARNINGS AND INSTRUCTIONS CAREFULLY

OM2137 B.3 ™ & © Char-Griller / A&J Mfg. 19
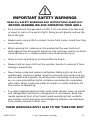
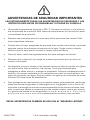
Do not exceed a temperature of 400 F. Do not allow charcoal and/
or wood to rest on the walls of grill. Doing so will greatly reduce the
life of the grill
Always wear oven mitts to protect hands from burns. Avoid touching
hot surfaces.
When opening lid, make sure it is pushed all the way back so it
rests against the lid support brackets. Use extreme caution as hood
could fall back to a closed position and cause bodily injury.
Close lid and all dampers to help suffocate flame.
Always hold an open lid from the wooden handle to prevent it from
closing unexpectedly.
Never leave coals and ashes unattended. Before grill can be left
unattended, coals and ashes must be removed. Use caution to pro-
tect yourself and property. Carefully place remaining coals and ash-
es in a noncombustible metal container and saturate completely
with water. Allow coals and water to remain in metal container 24
hours prior to disposing.
To protect against bacteria that could cause illness, keep all meats
and refrigerated and thaw in refrigerator or microwave; keep raw
meats separate from other foods; wash everything that contacts
raw meats; cook thoroughly; and refrigerate leftovers immediately.
Cook meats medium to well one.
THESE WARNINGS APPLY ALSO TO THE "SIDE FIRE BOX"
IMPORTANT SAFETY WARNINGS
READ ALL SAFETY WARNINGS AND INSTRUCTIONS CAREFULLY
BEFORE ASSEMBLING AND OPERATING YOUR GRILL

OM2137 B.3 ™ & © Char-Griller / A&J Mfg. 20
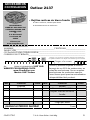
Outlaw 2137
TO ORDER
Visit:
www.chargriller.com
or
CALL: 912-638-4724
or
FAX: 912-638-2580
or MAIL:
P.O. Box 30864
Sea Island, GA
31561
Visit our online store at:
www.chargriller.com
for more Char-Griller®
Professional Accessories™
ACCESSORIES
ORDER FORM
Professional Accessories™
Branded with Char-Griller®
ALL TOOLS: STAINLESS STEEL & HARDWOOD HANDLES
Cover
Custom Fit, Weather Resistant
Protects grill finish
Cover Accommodates Side Shelf or Side Fire Box
Side Fire Box item #2424
For Charcoal grilling
Attaches to grill in minutes
Rotisserie—Heavy Duty
Excellent for effortless grilling
Universal Fit for Any Grill
Apron
Machine Washable
Two Front Pockets
Adjustable Straps
(continued on next page)

OM2137 B.3 ™ & © Char-Griller / A&J Mfg. 21
ACCESSORIES
ORDER FORM
TO ORDER
Visit our online store at:
www.chargriller.com
or
CALL: 912-638-4724
or
FAX: 912-638-2580
or MAIL:
P.O. Box 30864
Sea Island, GA
31561
Outlaw 2137
Warming Rack
Increase Grill Area
Keeps food warm
Charcoal Basket
Confines coals to one side for smoking
Indirect cooking
Raw Cast Iron Grate
Even Heat, Great For Searing
Non Stick, Non Warp
Name_______________________________________ Telephone___________________
Street Address____________________________________________________________
City / State / Zip__________________________________________________________
Email___________________________________________________________________
Please bill my credit
card:
EXPIRATION DATE VISIT OUR WEBSITE FOR
SHIPPING COSTS
Check or Money Order (Sorry—No C.O.D.s)
Check orders will be held 2 weeks before shipment
Qty. Product Price Qty. Prodcut Price
Warming Rack Rotisserie
Adjustable Fit Apron Side Fire Box #5224
Cover For Grill Raw Cast Iron Grate
Charcoal Basket
Shipping Charge
Total
ORDER NOW!
Prices & policies subject to change
15% Restocking Fee on all returns
No Returns on Used Product. Visit
our website for updated Pricing
and Product Availability.
Georgia Customers add a 7% sales tax.
Washington Customers add a 10% sales tax

OM2137 B.3 ™ & © Char-Griller / A&J Mfg. 22
Page Intentionally Left Blank For Notes

OM2137 B.3 ™ & © Char-Griller / A&J Mfg. 23
Warranty Information — Charcoal Grill
Char-Griller® will repair or replace any defective part of its grillers/smokers for a
period of up to one year from the date of purchase. Char-Griller® will also repair
or replace the body (bottom half) of its charcoal grillers/smokers if the metal is
rusted through or burned through for a period up to five years. Char-Griller will
repair or replace any defective part of its side fire boxes for a period up to one
year from the date of purchase.
Proof of purchase, proof of purchase date photo and prepaid return of the item
in question may be required. Misuse, abuse, or commercial use nullifies all war-
ranties. Paint/finish is not warranted. Products are not warranted against rust.
The warranty is for replacement of defective parts only. Manufacture will not be
responsible for damage resulting from accident, alteration, misuse, abuse, hos-
tile environments, improper installation, installation not in accordance with local
codes of service of unit.
This limited warranty does not cover any scratches, dents , corrosion or discolor-
ing by heat, abrasive and chemical cleaners nor any components used in the
installation of the appliance.
Save your receipt for all warranty claims.

OM2137 B.3 ™ & © Char-Griller / A&J Mfg. 24
P.O. Box 30864
Sea Island, GA 31561
912-638-4724
www.CharGriller.com

OM2137B.3 ™ & © Char-Griller / A&J Mfg.
MANUAL DEL USUARIO
Parrilla de Carbón
Model No. 2137
Para efectos de Garantía, guarda tu recibo con este manual.
ATENCIÓN AL CLIENTE
1-912-638-4724
Service@CharGriller.com
Lo contenido en este manual es Marca Registrada y Propiedad con Derechos de Autor de Char-
Griller | A&J Manufacturing. Está terminantemente prohibido utilizar la información suministrada en
este manual sin el consentimiento de Char-Griller y/o A&J Manufacturing.

OM2137B.3 ™ & © Char-Griller / A&J Mfg. 2
13
22
3
1
2
17
7
19
21
20
6
12
11
8
12
16
9
10
5
14
18
23
15
4
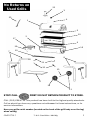
¡ESPERE! ¡LLAME PRIMERO A ! NO DEVUELVA EL
PRODUCTO A LA TIENDA.
LLAME AL (912) 638-4724. Este producto ha sido fabricado según las más altas
normas de calidad. Llámenos si tiene alguna pregunta que no figure en estas in-
strucciones o para obtener información sobre el servicio técnico.
Tener un número de serie de su parrilla (que se encuentra en la parte posterior de
la caja de la parrilla o en la pierna) cuando se llama.
NO SE ACEPTAN
DEVOLUCIONES DE
PARRILLAS USADAS

OM2137B.3 ™ & © Char-Griller / A&J Mfg. 3
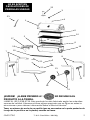
PARTS LIST AND TOOLS REQUIRED
(Tools Not Included)
Pliers and 7/16" nut driver
Perno
hexagonal
de 2 1/4
pulg
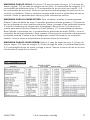
Artículo Cant. Descripción Número de parte
1 1 CUBIERTA 20-0082
2 1 CARCAZA DE LA PARRILLA 20-0083
3 1 INDICADOR DE CALOR 55-0010
4 1 MANIJA DE LA CUBIERTA 55-0014
5 1 REJILLA PARA CALENTAR 30-0058
6 1 ESTANTE INFERIOR 20-0130
7 2 PATA LARGA 10-0120
8 2 PATA CORTA 10-0121
9 1 BANDEJA DE CENIZAS 20-0135
10 4 REJILLA PARA COCINAR 10-0049
11 2 RUEDA 55-0003
12 2 SOPORTE DE LA PATA 10-0051
13 1 EJE 10-0324
14 2 COLGADOR PARA LA BANDEJA DE CENIZAS 20-0024
15 3 UTENSILIO GANCHO 50-0003
16 1 AMORTIGUADOR CIRCULO 10-0036
17 1 REPISA LATERAL 30-0016
18 2 CAPUCHONES DEL EJE 55-0007
19 2 ESTANTE FRONTAL LISTÓN 10-0115
20 2 SOPORTES PARA ESTANTE FRONTAL 10-0053
21 2 SOPORTES DE ESTANTE FRONTAL 10-0052
22 1 CHIMENEA 30-0088
23 1 RALLAR LEVANTADOR 10-0045
35 piezas

OM2137B.3 ™ & © Char-Griller / A&J Mfg. 4
Página en blanco para las notas

OM2137B.3 ™ & © Char-Griller / A&J Mfg. 5

OM2137B.3 ™ & © Char-Griller / A&J Mfg. 6
4. Fije PUNTALES DE LAS PATAS hacia el exterior de la pata larga con 2
1/4"tornillos hexagonales y tuercas como se muestra, pero sólo con los dedos.
5. Coloque el otro extremo de los PUNTALES DE LAS PATAS en las patas corre-
spondientes utilizando pernos hexagonales de 2 1/4 pulg. y tuercas pero ajústelos solo
con los dedos. Ver
6. Inserte el EJE pasándolo a través de las PATAS CORTAS y de la BASE. Deslice las
RUEDAS en el EJE y use un martillo para colocar los CAPUCHONES DE REMATE
DEL EJE en cada extremo para afianzar las RUEDAS.

OM2137B.3 ™ & © Char-Griller / A&J Mfg. 7
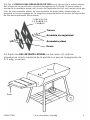
Punta del soporte del
estante delantero
Ménsula del estante
delantero
Perno de cabeza redonda
Mitad inferior del
cuerpo de la parrilla
7. Coloque el CARRITO/ENSAMBLADO DE LAS PATAS en posición vertical.
Sujete la mitad inferior del CUERPO al CARRITO/ENSAMBLADO DE LAS
PATAS con 4 pernos hexagonales de 2 1/4 pulg. (compruebe que el regulador de tiro
esté del lado de las ruedas). Hay dos orificios en la parte delantera y dos en la parte
trasera del CUERPO de la parrilla.
8. S u j e t e d o s ( 2 ) M E N S U L A S D E 8 p u l g . D E L E S T A N T E DELANTERO
en el borde frontal de la MITAD INFERIOR del cuerpo de la parrilla con dos (2) per-
nos hexagonales de 3/4 pulg. y tuercas (las tuercas van en el interior de la parrilla).
Coloque las TABLILLAS l a r g a s DE MADERA s o b r e l a s MÉNSULAS DEL ES-
TANTE DELANTERO y al mismo tiempo sujete los PUNTALES DE LOS SOPORTES DEL
ESTANTE DELANTERO en la parte de abajo de l o s o r i f i c i o s e x t e r i o r e s d e
l a s MÉNSULAS DEL ESTANTE DELANTERO con cuatro (4) tornillos de cabeza re-
donda de 1 pulg. Y tuercas. Fije el otro extremo de los puntales de los soportes a la
parrilla.
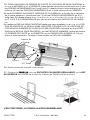
9. IIntroduzca la CHIMENEA a través del orificio desde la parte INTERIOR de la
CUBIERTA hacia arriba. Sujete con dos (2) pernos hexagonales de 3/4 pulg. con
las tuercas en la parte interior. Nota: No es necesario retirar el regulador de tiro de
la chimenea.
Perno hexogonal
Chimenea
(inserte des da adentro)
Tuecra hexagonal
Regulador de tiro

OM2137B.3 ™ & © Char-Griller / A&J Mfg. 8
10. Introduzca el MEDIDOR DE CALOR a través del orificio de la cubierta (desde
afuera) y empuje el ANILLO PARTIDO desde el interior de la cubierta sobre las
lengüetas de los laterals del MEDIDOR DE CALOR.
11. Fije la MANIJA DE MADERA DE LA CUBIERTA en el centro de la CUBIERTA
con dos (2) pernos hexagonales de 3/4 pulg., arandelas de seguridad y tuercas
hexagonales.
12. Coloque la CUBIERTA, en POSICION CERRADA, sobre la mitad inferior del
cuerpo de la parrilla. Alinee los orificios para la bisagra e introduzca los pasa-
dores de bisagra. Para esto, es possible que sea necesario levantar la parte
trasera de la cubierta. Luego, abra cuidadosamente la cubierta, asegurándose de
no dejar que se caigan los pasadores de bisagra introduzca los pasadores de
chaveta por los pasadores de bisagra.
Cubierta
Bisagra
Pasador de chaveta
Pasadores
de bisagra

OM2137B.3 ™ & © Char-Griller / A&J Mfg. 9
13. Fije el CIRCULO DEL REGULADOR DE TIRO en el interior de la mitad inferior
del cuerpo de la parrilla con un perno hexagonal de 3/4pulg. El perno pasa a
través de la arandela plana, del círculo del regulador de tiro, del cuerpo de la par-
rilla, de otra arandela plana, de una arandela de seguridad y finalmente, se
acopla a la tuerca hexagonal. La lengüeta pequeña sobre el círculo del regulador
de tiro debe sobresalir hacia fuera.
14. Sujete las DEL ESTANTE LATERAL en los cuatro (4) orificios
ubicados en el lado izquierdo de la parrilla con pernos hexagonales de
1/2 pulg. y tuercas.
Tuerca
Perno
Tuerca
Arandela de seguirdad
Aranadela plana
Perno
CARCAZA DE
LA PARRILLA,
CARBÓN

OM2137B.3 ™ & © Char-Griller / A&J Mfg. 10
15. COMO COLOCAR LOS PERNOS DE PIVOTE DE LAS REJILLAS PARA CALENTAR: e
n c a d a EXTREMO d e l a CUBIERTA, justo detrás del centro, introduzca uno (1) de
los PERNOS HEXAGONALES de 2 pulg. (son 2) (desde afuera hacia adentro) en los
orificios (A) con las TUERCAS HEXAGONALES en el lado interno de la CUBIERTA.
En cada EXTREMO del CUERPO INFERIOR DE LA PARRILLA, a 4 pulg. de la esquina
de la parte posterior, introduzca uno (1) de los PERNOS HEXAGONALES de 3/4
pulg. (son 2) (desde afuera h a c i a a d e n t r o ) e n l o s o r i f i c i o s ( B ) c o n l
a s T U E R C A S HEXAGONALES que van en el interior del CUERPO DE LA PARRIL-
LA.
No instale la REJILLA PARA CALENTAR hasta que haya ajustado l o s c u a t r o PER-
NOS DE PIVOTE DE LA REJILLA PARA CALENTAR. COLOQUE LOS (4) ORIFICIOS DE
LOS AROS DE ALAMBRE DE LA REJILLA PARA CALENTAR, ubicados en los LATER-
ALES de la REJILLA PARA CALENTAR y en las PATAS DE ALAMBRE, sobre los cuatro
(4) PERNOS DE PIVOTE en la CUBIERTA y en el CUERPO DE LA PARRILLA. Fije pri-
mero el lado izquierdo. Consejo: Puede doblar la PATA DE ALAMBRE.
16. Ajuste todas las tuercas y los pernos.
17. Coloque la PARRILLA, con los SOPORTES COLGANTES REGULABLES, en la MIT-
AD INFERIOR del cuerpo de la parrilla. Instale las PARRILLAS de cocción.
¡FELICITACIONES, LA PARRILLA ESTA ENSAMBLADA!
2” Perno
3/4” Perno
A
B
A
B
Tuerca
Interior de
Parilla

OM2137B.3 ™ & © Char-Griller / A&J Mfg. 11
Página en blanco para las notas

OM2137B.3 ™ & © Char-Griller / A&J Mfg. 12
PREPARACION DE LA PARRILLA
E INSTRUCCIONES DE USO
NOTA: NO SE ACEPTAN DEVOLUCIONES DE PARRILLAS USADAS
Lea todas las instrucciones y advertencias detenidamente
antes de ensamblar y utilizar su parrilla.
1. Cure la PARRILLA antes de utilizarla por primera vez para proteger el acabado exterior e interi-
or y para evitar que sus primeras comidas tengan sabores poco naturales. (A) Aplique sobre
TODAS LAS SUPERFICIES INTERIORES (incluso sobre las PARRILLAS, las REJILLAS y el
INTERIOR del BARRIL) una ligera capa de aceite vegetal (el aceite vegetal en aerosol es más fácil
de aplicar pero no lo utilice cerca de las brasas o el fuego). (B) Encienda un fuego medio sobre la
parrilla. (C) Cuando las brasas se conviertan en cenizas, espárzalas, vuelva a colocar las parrillas de
cocción, cierre la tapa y caliente aproximadamente a 250º F durante dos horas. Aplique otra capa
sobre las PARRILLAS y continúe calentándolas aproximadamente a 200º F durante dos horas.
Puede revestir ligeramente el exterior de la parrilla (mientras esté tibia) con aceite vegetal. Esto
extenderá la vida del acabado, al igual que cuando encera u carro. Entonces su PARRILLA estará
lista para usar. NOTA: Goteará mucho aceite de su parrilla durante este proceso y durante varios
usos pero el goteo irá disminuyendo con el tiempo.NUNCA EXCEDA LOS 400º PORQUE ESTO
DAÑARA EL ACABADO Y HARA QUE SE OXIDE. LA PINTURA NO ESTA CUBIERTA POR LA
GARANTIA Y NECESITARA UN RETOQUE. ESTA UNIDAD NO ESTA CUBIERTA POR LA GAR-
ANTIA CONTRA LA OXIDACION.
2. Para ENCENDER EL FUEGO – apile 50-60 briquetas en forma de pirámide y empape con el
líquido combustible (NO USE GASOLINA). Encienda el carbón en varios lugares, cierre la tapa
cuando las briquetas se convierten en cenizas o la mitad esté gris, extiéndalas y comience a
cocinar. Si un extremo se quema más rápido, utilice las pinzas para mover el carbón de un
extremo a otro para que el calor sea parejo. SIEMPRE SIGA LAS INSTRUCCIONES Y ADVERT-
ENCIAS DE LOS FABRICANTES DEL LIQUIDO COMBUSTIBLE Y DEL CARBON. UTILICE SOLO
AL AIRE LIBRE SOBRE UNA SUPERFICIE NO COMBUSTIBLE A UNA DISTANCIA DE 15 PIES
DE MATERIALES DE MADERA O COMBUSTIBLES.
3.Controle el calor con la cantidad y tipo de COMBUSTIBLE, REGULADOR DE TIRO DOBLE y
PARRILLA REGULABLE. Ajuste un extreme de la PARRILLA a la vez. La madera produce más
calor que el carbón. A mayor circulación de aire, más calor.
4. Para evitar llamaradas, cocine con la tapa en posición baja. Agregue virutas de madera
empapadas con agua para obtener un sabor ahumado.
5. Sugerencia: atornille unos ganchos semicirculares de 3/4 pulg. (no incluidos) en la parte
delantera de la repisa de madera para colgar utensilios de cocina.
6. El consumo del carbón puede oxidar la parrilla. Las cenizas que se dejan sobre el fondo
por mucho tiempo mantienen la humedad y oxidan el acero de cualquier grosor. Esta parrilla
está hecha de acero y hierro fundido y SE OXIDARA SI NO SE LA CUIDA ADECUADAMENTE.
7. No utilice carbón de combustión automática porque dará un sabor poco natural. Queme
todo el líquido combustible antes de cerrar la tapa.
Luego de usar la parrilla, aplique una capa de aceite vegetal sobre las parrillas interiores y las
superficies de metal mientras esté tibia para reducir la oxidación. En la parte EXTERIOR, retire
el óxido con un cepillo de alambre y retoque con una pintura para altas temperaturas, la cual
está disponible en la mayoría de las ferreterías/negocios de venta de accesorios para au-
tomóviles.
9. CONSEJO: Si las parrillas de hierro fundido se endurecen, colóquelas en un horno autolim-
piante. Salen como nuevas, pero es necesario curarlas nuevamente.
10. Puede colocar una lata de café en el estante inferior debajo del orificio de la parrilla para
juntar los líquidos que goteen.
11. El MEDIDOR DE CALOR puede atraer humedad que se evaporará durante la cocción. El
medidor se puede calibrar en el horno.
12. Puede rellenar los orificios no deseados con tuercas y pernos (no incluidos).

OM2137B.3 ™ & © Char-Griller / A&J Mfg. 13
RECETAS PARA ASADOS
FILETES (Y TODAS LAS CARNES): Cocine la comida directamente sobre el calor.
Por lo general, para asar carnes, encienda la llama a la posición HI (caliente) y coci-
ne por un minuto cada lado con la tapa abierta para sellar el sabor y los jugos. Lue-
go baje a fuego mediano/lento con la tapa cerrada y cocine al gusto deseado. Con-
trole el fuego con los reguladores de tiro dobles y las rejillas ajustables.
UNA MEJOR BARBACOA: Coloque la carne asada de nuevo en la marinada por va-
rios minutos antes de servirla – va a adquirir más sabor y jugo. PRECAUCIÓN: Hier-
va la marinada extra para eliminar la bacteria remanente de la carne cruda. Conse-
jo: El cocinar con un TERMÓMETRO PARA CARNE garantiza que el alimento quede
totalmente cocido. Inserte en la parte más gruesa sin tocar el hueso y deje cinco
minutos para que arroje una lectura adecuada. Las temperaturas internas para
AVES deben ser de 170° F (77° C) a 180° F (82° C) y la carne debe estar a 140°
F (60° C) para termino rojo, 160° F(71° C) para termino medio y 170° F (77° C)
para bien cocido.
FILETE DE ARRACHERA MARINADA: Mezcle los ingredientes en un plato no metáli-
co. Deje el filete adobando por no menos 4 horas en el refrigerador. Cocine cada
lado por 5 minutos, pero el centro debe permanecer rojo. Haga el corte del filete en
diagonal a contrapelo para rebanadas delgadas antes de servirlo. Ase en posición
high (caliente) con la tapa abierta o cerrada.
MARINADA: ½ taza de aceite vegetal o de oliva, 1/3 de taza de salsa de soya, ¼
de taza de vinagre de vino tinto, 2 cucharaditas de sumo de limón, 1 cucharadita
de mostaza seca, 1 diente de ajo desmenuzado, 1 cebolla pequeña desmenuzada,
¼ de cucharadita de pimiento.
Codorniz o palomas: Cubra las aves en aliño italiano (Good Seasons o Kraft Zesty),
adobe durante toda la noche, vierta el aliño y cubra con Texas Pete Hot Sauce por 6
horas. Envuelva las aves con tocino grueso y sujételo con un palillo de dien-
tes.*Colóquelo sobre la parrilla – déle vuelta hasta que el tocino quede negro. Ase
por 20 minutos. Queme con la tapa abierta y en posición “high” (caliente) por 1
minuto en cada lado antes de bajar la rejilla y cerrar la tapa.

OM2137B.3 ™ & © Char-Griller / A&J Mfg. 14
PINCHOS: Alterne en los pinchos cualquier combinación de carne, cebolla, tomate, pi-
miento verde, hongos, calabacín, rodajas de mazorca de maíz o piña. La carne podría
ser trozos de camarones, vieiras, langosta, pollo, salchicha, cerdo, res, etc.
Marine la carne en el refrigerador durante varias horas. Ase cada lado aproximada-
mente 7 minutos dando vuelta ocasionalmente mientras humedece con la marinada.
Deje un pequeño espacio entre las piezas para que se cocinen más rápidamente. Ase
con la tapa hacia arriba y la rejilla del fogón en la posición más baja. Vea la receta de la
marinada en la última página.
MARINADA PARA PINCHOS: Mezcle 1 taza de salsa de soya, 1/2 taza de azúcar mos-
cabada, 1/2 taza de vinagre, 1/2 taza de jugo de piña, 2 cucharaditas de sal, 1/2 cu-
charadita de ajo en polvo y haga hervir. Marine la carne de res en la mezcla un mínimo
de 4 horas.
PERROS CALIENTES: Ase con la tapa hacia arriba y la rejilla del fogón en la posición
alta (caliente) durante aproximadamente 6 minutos, dando vuelta cada pocos minutos.
HAMBURGUESAS: Mezcle cebollas picadas. Pimientos verdes, sal, ase las hamburgue-
sas de 3/4 de pulgada (1,9 cm de cada lado con la rejilla del fogón en la posición alta
durante unos minutos. Baje la rejilla del fogón a la posición media y ase con la tapa
hacia abajo para evitar las llamaradas. Cocine cada lado de 3 a 7 minutos de acuerdo
con el grado de cocción que desee. Cocine la carne molida a 150 internamente
(65,6ºC) o hasta que el jugo salga transparente (sin sangre) para prevenir la infección
por E-coli. Has hamburguesas pueden humedecerse con la marinada cuando les dé
vuelta y/o pueden mezclarse otros ingredientes con la carne molida tales como salsa o
polvo de chile o puede marinar permitiendo que permanezca en la marinada durante 1
o 2 horas a la temperatura ambiente antes de cocinar, o deje reposar en el plato tapa-
do en el refrigerador hasta 24 horas. Deje a temperatura ambiente antes de cocinar.
Vea la receta de la marinada para carne en la página 9.
CAMARONES (pelados) y cangrejos: Coloque en los pinchos, barnice con mantequilla
derretida y sal de ajo. Ase 4 minutos de cada lado hasta que estén rosados. Salsa de
cóctel opcional.
PAPAS ASADAS: Frote con mantequilla, envuelva en aluminio y cocine en la parrilla
con la tapa hacia abajo durante 50 minutos. Dé vuelta a los 25 minutos (no necesita
dar vuelta si son ahumadas). Pellizque para comprobar si el grado de cocción es ade-
cuado.
MAÍZ DULCE EN HOJA: Recorte el exceso de pelusa del extremo y remoje en agua fría
salada durante 1 hora antes de asar. Ase 25 minutos – dando vuelta varias veces.
MAÍZ DULCE ENVUELTO EN ALUMINIO: Quite las hojas y lave. Frote con mantequilla y
sazone con sal y pimienta. Envuelva cada mazorca en aluminio y ase durante 30 minu-
tos dando vuelta varias veces (no es necesario dar vuelta si son ahumadas).
VEGETALES ASADOS: Rebane a un espesor de ¼ de pulgada (6,3 mm) y remoje en
aceite de oliva antes de asar para evitar que se quemen. Ase durante 9 minutos de
cada lado.

OM2137B.3 ™ & © Char-Griller / A&J Mfg. 15
RECETAS PARA AHUMAR (BANDEJA PARA EL AGUA)
Método indirecto
La bandeja no está incluida. Se recomienda una panera desechable.
AHUMAR COCINANDO LENTAMENTE (Ver los tiempos de ahumado en el cuadro de la
página 10)
1) Coloque la bandeja para el agua (grasera) en el lado izquierdo de la parrilla. 2)
Coloque el carbón caliente en el lado derecho (en el extremo del regulador de tiro) de
la parrilla. de la cesta para el carbón ayuda a mantener el carbón en un lado. 3) Colo-
que la carne por encima de la bandeja con agua. 4) Coloque la parrilla en posición
baja. 5) Cierre la tapa y controle el calor con los reguladores de tiro y la parrilla regu-
lable. Si desea sellar ciertos alimentos antes de ahumarlos, coloque la carne direc-
tamente sobre el carbón con la TAPA abierta y la PARRILLA en posición alta (caliente)
durante varios minutos. Para obtener más sabor, agréguele al fuego astillas húmedas
y agregue una parte de la marinada, cerveza o vino a 3 partes de agua en la grasera.
SI ABRE LA CAMARA DE AHUMADO, EL TIEMPO DE COCCION SERA MAS PROLONGA-
DO. Cocinar con un termómetro para carnes garantiza que la comida esté bien co-
cida. Inserte el termómetro en la parte más gruesa sin tocar el hueso, deje cinco
minutos para que tome la temperatura. La temperatura interna de las aves debe ser
de 170º a 180º o cuando las patas se mueven fácilmente en las articulaciones. La
carne se debe cocinar a una temperatura interna de 140º para la carne poco cocida,
160º para la carne medianamente cocida y 170º para la carne bien cocida. COMO
AGREGAR MAS AGUA – Verifique el nivel de agua cuando cocine durante más de 4
horas o cuando no pueda oír el agua en ebullición. Agregue agua moviendo la carne y
vertiendo agua en la BANDEJA PARA EL AGUA a través de la PARRILLA.
SI EL HUMO ES BLANCO, EL FUEGO ES EL ADECUADO. SI EL HUMO ES NEGRO,
AGREGUE MAS CORRIENTE DE AIRE.
PAVO AHUMADO – Limpie la cavidad, enjuague y seque dando golpecitos con una
toalla de papel, coloque las puntas de las alas debajo del lomo y ate las patas. Co-
lóquelo en el centro de la parrilla directamente sobre la grasera cubierta con papel
de aluminio y con agua. Ahúme durante 12 minutos por libra.
En caso que el pavo esté relleno, ahúme varios minutos más por libra para que el
relleno se expanda. Utilice un termómetro para carnes para obtener mejores resulta-
dos (temperatura interna de 190º).
JAMON AHUMADO AL HORNO – Jamón enlatado completamente cocido o jamón en-
tero crudo o ahumado o una porción de la pata o nalga. Coloque la parrilla en
posición baja y la grasera debajo de la carne. Retire la corteza y marque la grasa
haciendo cortes en forma de diamantes. Inserte un clavo de olor entero en el centro
de cada diamante. Coloque el jamón con la grasa hacia arriba en el centro de la par-
rilla directamente sobre la grasera. Cierre la tapa. El tiempo sugerido para el jamón
bien cocido es de 9 minutos por libra. El jamón ahumado o crudo que no esté bien
cocido debe cocinarse a una temperatura interna de 160º.
Adobe con glaseado para jamón 3 ó 4 veces durante los últimos 30 minutos de coc-
ción. Decore con aros de piña aproximadamente 15 minutos antes de finalizar el
tiempo de cocción.
GLASEADO PARA EL JAMON – 1 taza bien colmada de azúcar negro liviano, 1/2 taza
de jugo de naranja, 1/2 taza de miel. Combine todos los ingredientes. Deje reposar la
marinada durante al menos 4 horas.

OM2137B.3 ™ & © Char-Griller / A&J Mfg. 16
PERROS CALIENTES RELLENOS AHUMADOS – Haga un corte a lo largo de las sal-
chichas, 1/4 de pulgada de cada extremo. Rellene las salchichas con queso y con-
dimentos y envuélvalas con tocino. Coloque en la parrilla sobre la grasera y ahúme
durante 15 a 20 minutos o hasta que el tocino esté crujiente.
PRESAS Y MITADES DE POLLO AHUMADAS – Enjuague los trozos con agua fría y
seque con toallas de papel dando golpecitos. Unte cada trozo con aceite vegetal y
condimente con sal y pimienta a gusto. Dore las presas durante varios minutos
directamente sobre el carbón con la tapa abierta y la parrilla en posición alta o
media. Luego, coloque las presas en la parrilla directamente sobre la grasera.
Con la parrilla en posición baja, cocine con la tapa baja durante 55 a 60 minutos o
hasta que estén bien cocidas. No utilice aceite de vegetal o sal pimenta si ya está
usando una marinada.
CARNE DE VENADO AHUMADA: Coloque la pata del venado en un recipiente o en
una "bolsa resistente" y deje marinar durante 2 ó 4 días, girándola diariamente.
Marine el tocino en su marinada durante la noche. Retire la carne del refrigerador
al menos una hora antes de cocinarla. Condimente con abundante sal y pimienta
negra molida gruesa. Coloque 1 libra de tocino sobre la parte superior de la carne y
ahúme durante 20/25 minutos por libra o hasta que esté tierna. No cocine demasi-
ado.
MARINADA PARA EL VENADO: 1 taza de vinagre balsámico o de vino, 1 taza de
aceite de oliva, 2 onzas de salsa inglesa, 1/2 onza de Tabasco, 2 cucharaditas de
Season All, 1 ó 2 ajíes jalapeños picados, 3 onzas de salsa de soya. Marinada para
el tocino: 2 onzas de vinagre de vino, 2 onzas de salsa inglesa, 4 gotas de Tabasco.
CANGREJOS DE RIO Y CAMARONES AHUMADOS: Mezcle en una sartén de alumin-
io 1/2 taza de mantequilla, dos dientes de ajos machacados, Tabasco, rodajas de
pimiento verde, 1 cucharadita para cada uno de cebolla picada, sal y jugo de limón.
Agregue los camarones y/o cangrejos de río y ahúme durante 45 minutos.
VEGETALES AHUMADOS: Nabos, papas, zanahorias, okra, hongos, cebollas pela-
das, ca;abacín, zapallo, etc. Colóquelos en una olla, cúbralos con agua y cocine du-
rante varias horas mientras cocina la carne. O coloque los vegetales (ya sea envuel-
tos en papel de aluminio o no) en la parrilla y ahúme durante 50 minutos.
PESCADO AHUMADO: Marine en salmuera (1/4 de taza de sal disuelta en 1 de
agua) o marine el pescado en 1 taza de vino blanco, 1 taza de salsa de soya mez-
clada con 1 taza de jugo de limón. Deje marinar durante la noche en un recipiente
tapado en el refrigerador. Deje que el aire circule sobre la rejilla durante 20 minu-
tos antes de colocar el pescado en la parrilla rociada con aceite en aerosol. Ahúme
durante 25 minutos.
COSTILLAS DE RES AHUMADAS: Retire la capa dura de la piel de la parte trasera.
Unte todas las superficies con condimentos. Coloque las costillas en el centro de la
parrilla sobre la grasera y ahúme durante 1 hora aproximadamente o hasta que la
carne de desprenda del hueso. Rocíe con salsa barbacoa durante los últimos 30
minutos.

OM2137B.3 ™ & © Char-Griller / A&J Mfg. 17
MARINADA PARA EL POLLO: Combine 1/2 taza de salsa de soya, 1/4 de taza de
aceite vegetal, 1/4 de taza de vinagre de vino tinto, 1 cucharadita de orégano, 1/2
cucharadita de albahaca dulce, 1/2 cucharadita de ajo en polvo con perejil, 1/4
de cucharadita de pimienta. Vierta la marinada sobre las presas de pollo en un re-
cipiente no metálico. Cubra y refrigere durante toda la noche, girándolos de vez en
cuando. Utilice la marinada para rociar el pollo mientras se cocina.
MARINADA PARA LA CARNE DE RES: Para chuletas, costillas y hamburguesas:
Mezcle 1 taza de salsa de soya, 2 cebollas grandes picadas gruesas y 2 dientes de
ajo (en mitades) en una licuadora eléctrica; cubra, procese a alta velocidad durante
1 minuto o hasta que la mezcla esté homogénea. Revuelva en 1/4 de taza col-
orante para salsa (Kitchen Bouquet y Gravy Master) y 2 cucharaditas de aderezo
Beau Monde (o sustituya por 1 cucharadita de glutamate de sodio (MSG) y una cu-
charadita de sal para sazonar). Deje reposar la carne en la marinada a temperatura
ambiente durante 2 horas o en el refrigerador hasta 24 horas en un recipiente
tapado. Lleve la carne a temperatura ambiente antes de cocinarla.
MARINADA PARA EL SHISH KEBAB: Mezcle 1 taza de salsa de soya, 1/2 taza de
azúcar negro, 1/2 taza de vinagre, 1/2 taza de jugo de piña, 2 cucharaditas de sal,
1/2 cucharadita de ajo en polvo y ponga a hervir. Marine la carne de res en la mez-
cla durante 4 horas como mínimo.

OM2137B.3 ™ & © Char-Griller / A&J Mfg. 18
Tenga cuidado cuando ensamble y utilice su parrilla para evitar raspones y cor-
tes con los bordes cortantes.
No utilice gasolina, kerosén ni alcohol para encender el carbón. El uso de
cualquiera de estos productos o productos similares podría causar una explo-
sión que ocasionaría lesiones físicas graves.
Mantenga a los niños y a las mascotas alejados de la parrilla. La supervisión es
necesaria y no desatienda la parrilla cuando esté en uso. Tenga cuidado cuan-
do mueva la parrilla de lugar para evitar manchas. Mantenga la parrilla al
menos a 15 pies de distancia de cualquier material combustible (terrazas, edifi-
cios, cercas, árboles, arbustos, etc.).
Tenga mucho cuidado cuando agregue carbón y/o leña.
Nunca mueva la parrilla cuando esté en uso o cuando contenga carbón o ceni-
zas calientes.
No coloque la parrilla cerca de líquidos inflamables, gases o donde pueda ha-
ber vapores inflamables.
Tenga cuidado debido a que las llamas pueden producir una llamarada cuando
el aire puro entra repentinamente en contacto con el fuego. Cuando abra la
tapa, mantenga las manos, la cara y el cuerpo alejados del vapor caliente y de
las llamaradas.
ADVERTENCIAS DE SEGURIDAD IMPORTANTES
LEA DETENIDAMENTE TODAS LAS ADVERTENCIAS DE SEGURIDAD Y LAS
INSTRUCCIONES ANTES DE ENSAMBLAR Y UTILIZAR SU PARRILLA.

OM2137B.3 ™ & © Char-Griller / A&J Mfg. 19
No exceda temperaturas mayores a 400º F. No apoye el carbon y/o la leña so-
bre las paredes de la parrilla. Esto reducirá enormemente la vida útil del metal
y del acabado de su parrilla.
Siempre use manoplas para el horno para evitar quemarse las manos. Evite
tocar superficies calientes.
Cuando abra la tapa, asegúrese de que está bien corrida hacia atrás y que está
apoyada contra las ménsulas de soporte de la tapa. Tenga mucho cuidado
debido a que la tapa puede cerrarse y causar lesiones físicas.
Cierre la tapa y todos los reguladores de tiro para extinguir las llamas.
Siempre abra la tapa con la manija de madera para evitar que se cierre de
manera imprevista.
No descuide nunca el carbón ni las cenizas. Antes de dejar la parrilla sin vigilan-
cia, debe retirar todo el carbón y las cenizas. Tome precauciones para
protegerse a usted mismo y proteger la propiedad. Coloque cuidadosamente el
carbón y las cenizas restantes en un recipiente de metal no combustible y em-
pape por completo con agua. Deje el carbón y el agua en el recipiente de metal
durante 24 horas antes de desecharlos.
Para protegerse de las bacterias que pueden causar enfermedades, mantenga
todas las carnes refrigeradas y descongele en el refrigerador o en el horno mi-
croondas, mantenga las carnes crudas separadas de los otros alimentos, lave
todo lo que haya estado en contacto con las carnes crudas, cocine por comple-
to y guarde las sobras en el refrigerador i n m e d i a t a m e n t e . C o c i n e l a
s c a r n e s h a s t a q u e e s t é n medianamente cocidas o bien cocidas.
ESTAS ADVERTENCIAS TAMBIEN SE APLICAN AL "BRASERO LATERAL"
ADVERTENCIAS DE SEGURIDAD IMPORTANTES
LEA DETENIDAMENTE TODAS LAS ADVERTENCIAS DE SEGURIDAD Y LAS
INSTRUCCIONES ANTES DE ENSAMBLAR Y UTILIZAR SU PARRILLA.

OM2137B.3 ™ & © Char-Griller / A&J Mfg. 20
Outlaw 2137
PARA PEDIDOS
LLAME AL: 912-638-
4724
O ENVIE SU PEDIDO POR
CORREO O FAX
A:
P.O. Box 30864
Sea Island, GA
31561
Visitenos en
www.chargriller.com
para obtener
más informaciόn
sobre Char-Griller®
Professional Accessories™
FORMULARIO
PARA PEDIR
ACCESORIOS
Professional Accessories™
Con el logotipo de Char-Griller® Logo
TODOS LOS UTENSILOS: ACERO INOXABLE Y MAN-
GOS DE MADERA DURA
Cubireta
Cubierta Durable Apta Del Costumbre
Protégé el acabado de la parrilla
La cubierta puded cubir elanaquel
lateral o el brasero lateral
Basero lateral #2424
Reproducciόn para ahumar al
estilo tejano (método indirecto)
Para ahumar al estilo tejano
Asador
Excelente para asar sin esfuerzo
Se adapta perfectamente a
cualquier parilla
Delantal
Dos bolsillos delanteros
Tiras Ajustable
(Los accesorios continuan en el reverso)

OM2137B.3 ™ & © Char-Griller / A&J Mfg. 21
Cant. Producto Preco Cant. Prodcuto Preco
Cubireta Asador
Delantal Basero lateral #2424
Rejillas rusticas de hierro
fundio
Cargo por envio
Total
¡HAGA SU PEDIDO AHORA!
ACCESORIOS
CONTINUACION
PARA PEDIDOS
LLAME AL: 912-638-4724
O ENVIE SU PEDIDO POR
CORREO O FAX
A:
P.O. Box 30864
Sea Island, GA
31561
Visitenos en:
www.chargriller.com
Outlaw 2137
Rejillas rusticas de hierro fundio
Calor uniforme, ideales para dorar
Antiaderente no se deforman
NOMBRE____________________________________TELḖFONO_________________
DIRECCIÓN_____________________________________________________________
CIUDAD/ESTADO/CÓDIGO POSTAL_________________________________________
CORREO ELECTRÓNICO__________________________________________________
Cargue a la cuenta
de: FECHA DE VENCIMIENTO VISIT OUR
WEBSITE FOR SHIPPING COSTS
www.CharGriller.com
Modelo 2137 Outlaw
Precios y politicas sujetas a cambio.
Recargo de un 15% de existencias, en
todas las evoluciones. No se aceptan
devoluciones de productos usados.
Favor llamar para precios actualizados
y disponibilidad del product.
Cheque* o giro postal (no aceptamos entrega contra reembolso)
*los pedidos realzados con cheque seran retenidos por dos semanas

OM2137B.3 ™ & © Char-Griller / A&J Mfg. 22
Página en blanco para las notas

OM2137B.3 ™ & © Char-Griller / A&J Mfg. 23
Información sobre la garantía – Parrilla de carbón
Char-Griller® reparará o reemplazará cualquier pieza defectuosa de sus parrillas/
ahumadores hasta por el período de un año a parr de la fecha de compra. Char-
Griller® también reparará o reemplazará la carcasa (mitad inferior) de sus parrillas/
ahumadores por un período de hasta cinco años si el óxido o las quemaduras han
traspasado el metal. Char-Griller® reparará o reemplazará cualquier pieza defec-
tuosa de las cámaras de combusón laterales hasta por el período de un año a par-
r de la fecha de compra.
Es posible que se le solicite la prueba de compra, prueba de la fecha de compra y la
devolución prepagada del arculo en cuesón. El uso inadecuado, el abuso o el uso
comercial anulan todas las garanas. La pintura/acabado no están garanzados.
Los productos no están garanzados contra el óxido.
La garana ampara el reemplazo de las piezas defectuosas únicamente. La fábrica
no será responsable de los daños que pudiesen ocurrir por accidentes, alteración,
mal uso, abuso, ambientes hosles, instalación inadecuada o instalación que no
esté de acuerdo con la normava local de servicio a la unidad.
Esta garana limitada no ampara los raspones, abolladuras, corrosión o decolora-
ción por el calor, los limpiadores abrasivos o químicos, así como tampoco los com-
ponentes ulizados en la instalación de la unidad.
Guarde su recibo para todos los reclamos en garantía.

OM2137B.3 ™ & © Char-Griller / A&J Mfg. 24
P.O. Box 30864
Sea Island, GA 31561
912-638-4724
www.CharGriller.com
-
 1
1
-
 2
2
-
 3
3
-
 4
4
-
 5
5
-
 6
6
-
 7
7
-
 8
8
-
 9
9
-
 10
10
-
 11
11
-
 12
12
-
 13
13
-
 14
14
-
 15
15
-
 16
16
-
 17
17
-
 18
18
-
 19
19
-
 20
20
-
 21
21
-
 22
22
-
 23
23
-
 24
24
-
 25
25
-
 26
26
-
 27
27
-
 28
28
-
 29
29
-
 30
30
-
 31
31
-
 32
32
-
 33
33
-
 34
34
-
 35
35
-
 36
36
-
 37
37
-
 38
38
-
 39
39
-
 40
40
-
 41
41
-
 42
42
-
 43
43
-
 44
44
-
 45
45
-
 46
46
-
 47
47
-
 48
48


CharGriller 2137 El manual del propietario
- Categoría
- Barbacoas
- Tipo
- El manual del propietario
- Este manual también es adecuado para
en otros idiomas
- English: CharGriller 2137 Owner's manual