Makita XVJ01 Manual de usuario
- Categoría
- Puzzles inalámbricos
- Tipo
- Manual de usuario
Este manual también es adecuado para

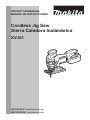
INSTRUCTION MANUAL
MANUAL DE INSTRUCCIONES
Cordless Jig Saw
Sierra Caladora Inalámbrica
XVJ01
IMPORTANT: Read Before Using.
IMPORTANTE: Lea antes de usar.

2 ENGLISH
ENGLISH (Original instructions)
SPECIFICATIONS
Model XVJ01
Length of stroke 26 mm (1")
Max. cutting capacities Wood 135 mm (5-5/16")
Mild steel 10 mm (3/8")
Aluminum 20 mm (25/32")
Strokes per minute 800 - 3,500 /min
Overall length 298 mm (11-3/4")
Net weight 2.3 - 2.6 kg (5.0 - 5.7 lbs)
Rated voltage D.C. 18 V
• Duetoourcontinuingprogramofresearchanddevelopment,thespecicationshereinaresubjecttochange
without notice.
• Specicationsmaydifferfromcountrytocountry.
• Theweightmaydifferdependingontheattachment(s),includingthebatterycartridge.Thelightestandheavi-
estcombination,accordingtoEPTA-Procedure01/2014,areshowninthetable.
Applicable battery cartridge and charger
Batterycartridge
BL1815N / BL1820B / BL1830 / BL1830B / BL1840B / BL1850B / BL1860B
Charger DC18RC / DC18RD / DC18SD / DC18SE / DC18SF
• Someofthebatterycartridgesandchargerslistedabovemaynotbeavailabledependingonyourregionof
residence.
WARNING: Only use the battery cartridges and chargers listed above.Useofanyotherbatterycartridges
andchargersmaycauseinjuryand/orre.
General power tool safety warnings
WARNING:
Read all safety warnings, instruc-
tions, illustrations and specications provided with this
power tool. Failure to follow all instructions listed below
mayresultinelectricshock,reand/orseriousinjury.
Save all warnings and instruc-
tions for future reference.
Theterm"powertool"inthewarningsreferstoyour
mains-operated(corded)powertoolorBATTERY-
operated (cordless) power tool.
Work area safety
1. Keep work area clean and well lit. Cluttered or
dark areas invite accidents.
2. Do not operate power tools in explosive atmo-
spheres, such as in the presence of ammable
liquids, gases or dust. Power tools create sparks
whichmayignitethedustorfumes.
3. Keep children and bystanders away while
operating a power tool. Distractions can cause
youtolosecontrol.
Electrical Safety
1. Power tool plugs must match the outlet. Never
modify the plug in any way. Do not use any
adapter plugs with earthed (grounded) power
tools. Unmodiedplugsandmatchingoutletswill
reduce risk of electric shock.
2. Avoid body contact with earthed or grounded
surfaces, such as pipes, radiators, ranges and
refrigerators.Thereisanincreasedriskofelec-
tricshockifyourbodyisearthedorgrounded.
3.
Do not expose power tools to rain or wet conditions. Water
entering a power tool will increase the risk of electric shock.
4. Do not abuse the cord. Never use the cord for
carrying, pulling or unplugging the power tool.
Keep cord away from heat, oil, sharp edges
or moving parts. Damaged or entangled cords
increase the risk of electric shock.
5.
When operating a power tool outdoors, use an
extension cord suitable for outdoor use. Use of a cord
suitable for outdoor use reduces the risk of electric shock.
6. If operating a power tool in a damp location is
unavoidable, use a ground fault circuit inter-
rupter (GFCI) protected supply. Use of a GFCI
reduces the risk of electric shock.
7.
Power tools can produce electromagnetic elds
(EMF) that are not harmful to the user. However,
users of pacemakers and other similar medical
devices should contact the maker of their device and/
or doctor for advice before operating this power tool.
Personal Safety
1. Stay alert, watch what you are doing and use
common sense when operating a power tool.
Do not use a power tool while you are tired or
under the inuence of drugs, alcohol or med-
ication. A moment of inattention while operating
powertoolsmayresultinseriouspersonalinjury.

3 ENGLISH
2. Use personal protective equipment. Always
wear eye protection. Protective equipment such
asdustmask,non-skidsafetyshoes,hardhat,or
hearing protection used for appropriate conditions
willreducepersonalinjuries.
3. Prevent unintentional starting. Ensure the
switch is in the off-position before connecting
to power source and/or BATTERY pack, pick-
ing up or carrying the tool.Carryingpowertools
withyourngerontheswitchorenergisingpower
tools that have the switch on invites accidents.
4. Remove any adjusting key or wrench before
turning the power tool on.Awrenchorakeyleft
attachedtoarotatingpartofthepowertoolmay
resultinpersonalinjury.
5. Do not overreach. Keep proper footing and
balance at all times.Thisenablesbettercontrol
of the power tool in unexpected situations.
6. Dress properly. Do not wear loose clothing or
jewellery. Keep your hair, clothing and gloves
away from moving parts.Looseclothes,jewel-
leryorlonghaircanbecaughtinmovingparts.
7. If devices are provided for the connection of
dust extraction and collection facilities, ensure
these are connected and properly used. Use of
dust collection can reduce dust-related hazards.
8.
Do not let familiarity gained from frequent use
of tools allow you to become complacent and
ignore tool safety principles. A careless action can
causesevereinjurywithinafractionofasecond.
9.
Always wear protective goggles to protect your
eyes from injury when using power tools.The
goggles must comply with ANSI Z87.1 in the USA.
It is an employer's responsibility to enforce
the use of appropriate safety protective equip-
ments by the tool operators and by other per-
sons in the immediate working area.
Power tool use and care
1. Do not force the power tool. Use the correct
power tool for your application.Thecorrect
powertoolwilldothejobbetterandsaferatthe
rate for which it was designed.
2. Do not use the power tool if the switch does
not turn it on and off.Anypowertoolthatcannot
be controlled with the switch is dangerous and
must be repaired.
3. Disconnect the plug from the power source
and/or remove the BATTERY pack, if detach-
able, from the power tool before making any
adjustments, changing accessories, or stor-
ing power tools.Suchpreventivesafetymea-
sures reduce the risk of starting the power tool
accidentally.
4. Store idle power tools out of the reach of chil-
dren and do not allow persons unfamiliar with
the power tool or these instructions to operate
the power tool. Power tools are dangerous in the
hands of untrained users.
5. Maintain power tools and accessories. Check
for misalignment or binding of moving parts,
breakage of parts and any other condition that
may affect the power tool’s operation. If dam-
aged, have the power tool repaired before use.
Manyaccidentsarecausedbypoorlymaintained
power tools.
6. Keep cutting tools sharp and clean.Properly
maintained cutting tools with sharp cutting edges
arelesslikelytobindandareeasiertocontrol.
7. Use the power tool, accessories and tool bits
etc. in accordance with these instructions, tak-
ing into account the working conditions and
the work to be performed. Use of the power tool
for operations different from those intended could
result in a hazardous situation.
8.
Keep handles and grasping surfaces dry, clean
and free from oil and grease.Slipperyhandles
and grasping surfaces do not allow for safe handling
and control of the tool in unexpected situations.
9. When using the tool, do not wear cloth work
gloves which may be entangled.Theentangle-
mentofclothworkglovesinthemovingpartsmay
resultinpersonalinjury.
BATTERY tool use and care
1. Recharge only with the charger specied by
the manufacturer. A charger that is suitable for
onetypeofBATTERYpackmaycreateariskof
rewhenusedwithanotherBATTERYpack.
2.
Use power tools only with specically des-
ignated BATTERY packs.Useofanyother
BATTERYpacksmaycreateariskofinjuryandre.
3.
When BATTERY pack is not in use, keep it
away from other metal objects, like paper clips,
coins, keys, nails, screws or other small metal
objects, that can make a connection from one
terminal to another.ShortingtheBATTERYtermi
-
nalstogethermaycauseburnsorare.
4. Under abusive conditions, liquid may be
ejected from the BATTERY; avoid contact. If
contact accidentally occurs, ush with water.
If liquid contacts eyes, additionally seek med-
ical help.LiquidejectedfromtheBATTERYmay
cause irritation or burns.
5. Do not use a BATTERY pack or tool that is
damaged or modied.Damagedormodied
batteriesmayexhibitunpredictablebehaviour
resultinginre,EXPLOSIONorriskofinjury.
6. Do not expose a BATTERY pack or tool to re
or excessive temperature.Exposuretoreor
temperatureabove130°Cmaycauseexplosion.
7. Follow all charging instructions and do not
charge the BATTERY pack or tool outside the
temperature range specied in the instruc-
tions.Chargingimproperlyorattemperatures
outsidethespeciedrangemaydamagethe
BATTERYandincreasetheriskofre.
Service
1. Have your power tool serviced by a qualied
repair person using only identical replacement
parts.Thiswillensurethatthesafetyofthepower
tool is maintained.
2. Never service damaged BATTERY packs.
ServiceofBATTERYpacksshouldonlybeper-
formedbythemanufacturerorauthorizedservice
providers.
3. Follow instruction for lubricating and chang-
ing accessories.
4. Do not modify or attempt to repair the appli-
ance or the BATTERY pack except as indicated
in the instructions for use and care.

4 ENGLISH
Cordless jig saw safety warnings
1. Hold the power tool by insulated gripping
surfaces, when performing an operation where
the cutting accessory may contact hidden wir-
ing.Cuttingaccessorycontactinga“live”wiremay
makeexposedmetalpartsofthepowertool“live”
and could give the operator an electric shock.
2.
Use clamps or another practical way to secure
and support the workpiece to a stable platform.
Holdingtheworkpiecebyhandoragainstyourbody
leavesitunstableandmayleadtolossofcontrol.
3.
Always use safety glasses or goggles. Ordinary
eye or sun glasses are NOT safety glasses.
4. Avoid cutting nails. Inspect workpiece for any
nails and remove them before operation.
5. Do not cut oversize workpiece.
6. Check for the proper clearance beyond the
workpiece before cutting so that the blade will
not strike the oor, workbench, etc.
7. Hold the tool rmly.
8. Make sure the blade is not contacting the
workpiece before the switch is turned on.
9. Keep hands away from moving parts.
10. Do not leave the tool running. Operate the tool
only when hand-held.
11. Always switch off and wait for the blade to
come to a complete stop before removing the
blade from the workpiece.
12. Do not touch the blade or the workpiece imme-
diately after operation; they may be extremely
hot and could burn your skin.
13.
Do not operate the tool at no-load unnecessarily.
14. Some material contains chemicals which may
be toxic. Take caution to prevent dust inhala-
tion and skin contact. Follow material supplier
safety data.
15. Always use the correct dust mask/respirator
for the material and application you are work-
ing with.
SAVE THESE INSTRUCTIONS.
WARNING: DO NOT let comfort or familiarity
with product (gained from repeated use) replace
strict adherence to safety rules for the subject
product. MISUSE or failure to follow the safety
rules stated in this instruction manual may cause
serious personal injury.
Symbols
Thefollowingsshowthesymbolsusedfortool.
volts
direct current
no load speed
revolutions or reciprocation per minute
Important safety instructions for
battery cartridge
1. Before using battery cartridge, read all instruc-
tions and cautionary markings on (1) battery
charger, (2) battery, and (3) product using
battery.
2. Do not disassemble battery cartridge.
3. If operating time has become excessively
shorter, stop operating immediately. It may
result in a risk of overheating, possible burns
and even an explosion.
4. If electrolyte gets into your eyes, rinse them
out with clear water and seek medical atten-
tion right away. It may result in loss of your
eyesight.
5. Do not short the battery cartridge:
(1) Do not touch the terminals with any con-
ductive material.
(2) Avoid storing battery cartridge in a con-
tainer with other metal objects such as
nails, coins, etc.
(3) Do not expose battery cartridge to water
or rain.
A battery short can cause a large current
ow, overheating, possible burns and even a
breakdown.
6. Do not store the tool and battery cartridge in
locations where the temperature may reach or
exceed 50 °C (122 °F).
7. Do not incinerate the battery cartridge even if
it is severely damaged or is completely worn
out. The battery cartridge can explode in a re.
8. Be careful not to drop or strike battery.
9. Do not use a damaged battery.
10. The contained lithium-ion batteries are subject
to the Dangerous Goods Legislation require-
ments.
Forcommercialtransportse.g.bythirdparties,
forwarding agents, special requirement on pack-
aging and labeling must be observed.
For preparation of the item being shipped, consult-
ing an expert for hazardous material is required.
Pleasealsoobservepossiblymoredetailed
national regulations.
Tapeormaskoffopencontactsandpackupthe
batteryinsuchamannerthatitcannotmove
around in the packaging.
11. Follow your local regulations relating to dis-
posal of battery.
12. Use the batteries only with the products
specied by Makita. Installing the batteries to
non-compliantproductsmayresultinare,exces-
siveheat,explosion,orleakofelectrolyte.
SAVE THESE INSTRUCTIONS.
CAUTION: Only use genuine Makita batteries.
Use of non-genuine Makita batteries, or batteries that
havebeenaltered,mayresultinthebatterybursting
causingres,personalinjuryanddamage.Itwill
alsovoidtheMakitawarrantyfortheMakitatooland
charger.

5 ENGLISH
Tips for maintaining maximum
battery life
1. Charge the battery cartridge before completely
discharged. Always stop tool operation and
charge the battery cartridge when you notice
less tool power.
2.
Never recharge a fully charged battery cartridge.
Overcharging shortens the battery service life.
3.
Charge the battery cartridge with room tempera-
ture at 10 °C - 40 °C (50 °F - 104 °F). Let a hot
battery cartridge cool down before charging it.
4. Charge the battery cartridge if you do not use
it for a long period (more than six months).
FUNCTIONAL
DESCRIPTION
CAUTION:
• Alwaysbesurethatthetoolisswitchedoffand
thebatterycartridgeisremovedbeforeadjust-
ing or checking function on the tool.
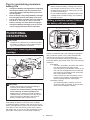
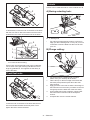
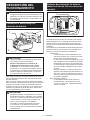
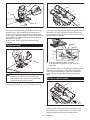
Installing or removing battery
cartridge
1
2
3
►1. Red indicator 2. Button 3.Batterycartridge
CAUTION:
• Alwaysswitchoffthetoolbeforeinstallingor
removingofthebatterycartridge.
• Hold the tool and the battery cartridge rmly
when installing or removing battery car-
tridge.Failuretoholdthetoolandthebattery
cartridgermlymaycausethemtoslipoffyour
hands and result in damage to the tool and
batterycartridgeandapersonalinjury.
Toremovethebatterycartridge,slideitfromthetool
while sliding the button on the front of the cartridge.
Toinstallthebatterycartridge,alignthetongueonthe
batterycartridgewiththegrooveinthehousingandslip
itintoplace.Insertitallthewayuntilitlocksinplace
withalittleclick.Ifyoucanseetheredindicatoronthe
uppersideofthebutton,itisnotlockedcompletely.
CAUTION:
• Alwaysinstallthebatterycartridgefullyuntilthe
redindicatorcannotbeseen.Ifnot,itmayacci-
dentallyfalloutofthetool,causinginjurytoyou
orsomeonearoundyou.
• Donotinstallthebatterycartridgeforcibly.Ifthe
cartridgedoesnotslideineasily,itisnotbeing
insertedcorrectly.
Battery protection system (Lithium-
ion battery with star marking)
1
►1. Star marking
Lithium-ion batteries with a star marking are equipped
withaprotectionsystem.Thissystemautomatically
cutsoffpowertothetooltoextendbatterylife.
Thetoolwillautomaticallystopduringoperationifthe
tooland/orbatteryareplacedunderoneofthefollowing
conditions:
• Overloaded:
Thetoolisoperatedinamannerthatcauses
ittodrawanabnormallyhighcurrent.
In this situation, press ON/OFF switch on the
tool and stop the application that caused the
tooltobecomeoverloaded.ThenpressON/
OFF switch again to restart.
Ifthetooldoesnotstart,thebatteryisover-
heated.Inthissituation,letthebatterycool
before pressing ON/OFF switch again.
• Lowbatteryvoltage:
Theremainingbatterycapacityistoolow
and the tool will not operate. In this situation,
removeandrechargethebattery.

6 ENGLISH
Indicating the remaining battery
capacity
Only for battery cartridges with the indicator
1
2
►1. Indicator lamps 2. Check button
Pressthecheckbuttononthebatterycartridgetoindi-
catetheremainingbatterycapacity.Theindicatorlamps
light up for a few seconds.
Indicator lamps Remaining
capacity
Lighted Off Blinking
75% to 100%
50% to 75%
25% to 50%
0% to 25%
Charge the
battery.
Thebattery
mayhave
malfunctioned.
NOTE: Depending on the conditions of use and the
ambienttemperature,theindicationmaydifferslightly
fromtheactualcapacity.
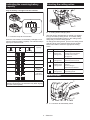
Selecting the cutting action
1
►1. Cutting action changing lever
Thistoolcanbeoperatedwithanorbitalorastraight
line(upanddown)cuttingaction.Theorbitalcutting
action thrusts the blade forward on the cutting stroke
andgreatlyincreasescuttingspeed.
Tochangethecuttingaction,justturnthecuttingaction
changing lever to the desired cutting action position.
Refer to the table to select the appropriate cutting
action.
Position Cutting action Applications
For cutting mild steel,
stainless steel and plastics.
For clean cuts in wood
and plywood.
Small orbit
cutting action
For cutting mild steel,
aluminum and hard wood.
For cutting wood and
plywood.
For fast cutting in
aluminum and mild steel.
Large orbit
cutting action
For fast cutting in
wood and plywood.
0
Straight line
cutting action
Medium orbit
cutting action
Switch action
1
2
►1. Lock switch 2.ON/standbyswitch

7 ENGLISH
Lock-off
Standby
ON
Tostartthetool:
Pressthelockswitchtoturnthetoolintostandbymode.
It turns the lamp on, too.
PresstheON/standbyswitchtostartthetoolinstandby
mode.
Tostopthetool:
PresstheON/standbyswitchtostopandturnthetool
intostandbymode.
Press the lock switch to stop and turn the tool into lock-
off mode.
Instandbymode,pressthelockswitchtoturnthelamp
off and turn the tool into lock-off mode.
NOTE:
• Whenthetoolisinstandbymode,thelamp
keeps lighting.
• Ifthetoolisleft10secondswithoutanyopera-
tionsinstandbymode,thetoolisautomatically
turned into lock-off mode and the lamp goes off.
Lighting up the lamps
CAUTION:
• Donotlookinthelamporseethesourceof
lampdirectly.
Toturnonthelamp,pressthelockswitch.
Another press of the lock switch stops the tool and the
light goes off.
NOTE:
• Useadryclothtowipethedirtoffthelensof
lamp. Be careful not to scratch the lens of lamp,
oritmaylowertheillumination.
• Whenthetoolisoverheated,thelampickers.
Cooldownthetoolfullybeforeoperatingagain.
Speed adjusting dial
1
►1.Speedadjustingdial
Thetoolspeedcanbeinnitelyadjustedbyturningthe
speedadjustingdial.Youcangetthehighestspeedat6
and the lowest speed at 1.
Refer to the table to select the proper speed for the
workpiece to be cut. However, the appropriate speed
maydifferwiththetypeorthicknessoftheworkpiece.In
general,higherspeedswillallowyoutocutworkpieces
faster but the service life of the blade will be reduced.
Number on adjusting dial
4 - 6
Mild steel 3 - 6
Stainless steel 3 - 4
Aluminum 3 - 6
Plastics 1 - 4
Workpiece to be cut
Wood
CAUTION:
• Thespeedadjustingdialcanbeturnedonlyas
far as 6 and back to 1. Do not force it past 6 or
1,orthespeedadjustingfunctionmaynolonger
work.
NOTE:
• Whenthespeedadjustingdialisat3orhigher,
thetoolautomaticallyreducestheno-load
speed to reduce the vibration under no-load.
Once the tool gets load, the tool speed reaches
thepresetspeed.Thenthetoolkeepsthespeed
until the tool is switched off. When temperature
islowandthereislessuidityingrease,thetool
maynothavethisfunctionevenwiththemotor
rotating.
ASSEMBLY
CAUTION:
• Alwaysbesurethatthetoolisswitchedoffand
thebatterycartridgeisremovedbeforecarrying
outanyworkonthetool.

8 ENGLISH
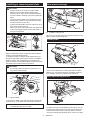
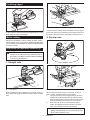
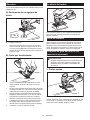
Installing or removing saw blade
CAUTION:
• Alwayscleanoutallchipsorforeignmatter
adhering to the blade and/or blade holder.
Failuretodosomaycauseinsufcienttighten-
ing of the blade, resulting in a serious personal
injury.
• Donottouchthebladeortheworkpieceimme-
diatelyafteroperation;theymaybeextremely
hotandcouldburnyourskin.
• Tightenthesawbladesecurely.Failuretodoso
maycauseaseriousinjury.
• Whenyouremovethesawblade,becarefulnot
tohurtyourngerswiththetopofthebladeor
the tips of workpiece.
1
2
►1. Fixed position 2. Released position
Before installing the blade, make sure that the blade
holder is in the released position.
Toinstalltheblade,inserttheblade(teethfacingfor-
ward)intothebladeholderuntilitlatches.Theblade
holdermovestothexedpositionbyitselfandthe
bladeislocked.Pullthebladelightlytomakesurethat
the blade does not fall off during operation.
CAUTION:
• Donotopenthetoolopenerexcessively,orit
maycausetooldamage.
1
►1. Jig saw blade
Toremovetheblade,pushthetoolopenerforwardas
farasitwillgo.Thisallowsthebladetobereleased.
NOTE:
• Occasionallylubricatetheroller.
Hex wrench storage
1
2
►1. Base 2. Hex wrench
When not in use, store the hex wrench as shown in the
guretokeepitfrombeinglost.
Cover plate
1
2
►1. Cover plate 2. Base
Use the cover plate when cutting decorative veneers,
plastics, etc. It protects sensitive or delicate surfaces
from damage. Fit it on the back of the tool base.
Anti-splintering device
2
1
►1. Anti-splintering device 2. Base
Forsplinter-freecuts,theanti-splinteringdevicecanbeused.To
installtheanti-splinteringdevice,movethetoolbasealltheway
forwardandtitfromthebackoftoolbase.Whenyouusethe
cover plate, install the anti-splintering device onto the cover plate.

9 ENGLISH
CAUTION:
• Theanti-splinteringdevicecannotbeusedwhen
making bevel cuts.
Dust extraction
Thedustnozzle(optionalaccessory)isrecommended
to perform clean cutting operations.
1
2
►1. Dust nozzle 2. Base
Toattachthedustnozzleonthetool,insertthehookof
dust nozzle into the hole in the base.
1
►1. Clamp screw
Tosecurethedustnozzle,tightentheclampscrewat
the front of the dust nozzle.
Thedustnozzlecanbeinstalledoneitherleftorright
side of the base.
1
2
►1. Dust nozzle 2. Hose for vacuum cleaner
ThenconnectaMakitavacuumcleanertothedustnozzle.
OPERATION
CAUTION:
• Alwaysholdthebaseushwiththeworkpiece.
Failuretodosomaycausebladebreakage,
resultinginaseriousinjury.
NOTE:
• Ifthetoolisoperatedcontinuouslyuntilthe
batterycartridgehasdischarged,allowthetool
to rest for 15 minutes before proceeding with a
freshbattery.
1
2
►1. Cutting line 2. Base
Turnthetoolonwithouttheblademakinganycontact
andwaituntilthebladeattainsfullspeed.Thenrest
thebaseatontheworkpieceandgentlymovethetool
forwardalongthepreviouslymarkedcuttingline.
Whencuttingcurves,advancethetoolveryslowly.
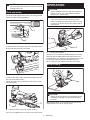
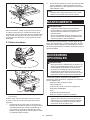
Bevel cutting
CAUTION:
• Alwaysbesurethatthetoolisswitchedoffand
thebatterycartridgeisremovedbeforetilting
the base.
Withthebasetilted,youcanmakebevelcutsatany
angle between 0° and 45° (left or right).

10 ENGLISH
1
2
3
►1. Base 2. Hex wrench 3. Bolt
Totiltthebase,loosentheboltonthebackofthebase
with the hex wrench. Move the base so that the bolt is
positioned in the center of the bevel slot in the base.
1
2
3
4
5
6
►1. Bevel slot 2. Base 3. Bolt 4. Graduations
5. V-notch 6. Gear housing
Tiltthebaseuntilthedesiredbevelangleisobtained.
TheV-notchofthegearhousingindicatesthebevel
anglebygraduations.Thentightentheboltrmlyto
secure the base.
Front ush cuts
1
2
3
►1. Base 2. Hex wrench 3. Bolt
Loosen the bolt on the back of the base with the hex
wrenchandslidethebaseallthewayback.Then
tighten the bolt to secure the base.
Cutouts
Cutouts can be made with either of two methods A or B.
A) Boring a starting hole:
1
►1. Starting hole
• Forinternalcutoutswithoutalead-incutfroman
edge, pre-drill a starting hole 12 mm (1/2") or more
in diameter. Insert the blade into this hole to start
yourcut.
B) Plunge cutting:
• Youneednotboreastartingholeormakea
lead-incutifyoucarefullydoasfollows.
1. Tiltthetooluponthefrontedgeofthebasewith
thebladepointpositionedjustabovethework-
piece surface.
2. Applypressuretothetoolsothatthefrontedgeof
thebasewillnotmovewhenyouswitchonthetool
andgentlylowerthebackendofthetoolslowly.
3. Asthebladepiercestheworkpiece,slowlylower
the base of the tool down onto the workpiece
surface.
4. Complete the cut in the normal manner.

11 ENGLISH
Finishing edges
Totrimedgesormakedimensionaladjustments,runthe
bladelightlyalongthecutedges.
Metal cutting
Alwaysuseasuitablecoolant(cuttingoil)whencutting
metal.Failuretodosowillcausesignicantbladewear.
Theundersideoftheworkpiececanbegreasedinstead
of using a coolant.
Rip fence set (optional accessory)
CAUTION:
• Alwaysbesurethatthetoolisswitchedoffand
thebatterycartridgeisremovedbeforeinstalling
or removing accessories.
1. Straight cuts
1
►1. Rip fence
Whenrepeatedlycuttingwidthsof160mm(6-5/16")or
less, use of the rip fence will assure fast, clean, straight
cuts.
1
2
3
►1. Hex wrench 2. Bolt 3. Fence guide
Toinstall,inserttheripfenceintotherectangularholeonthesideof
the tool base with the fence guide facing down. Slide the rip fence to
the desired cutting width position, then tighten the bolt to secure it.
2. Circular cuts
1
2
3
►
1. Fence guide 2.Threadedknob3. Circular guide pin
When cutting circles or arcs of 170 mm (6-11/16") or
less in radius, install the rip fence as follows.
1.
Insert the rip fence into the rectangular hole on the side of
the base with the fence guide facing up. Insert the circular
guide pin through either of the two holes on the fence guide.
Screw the threaded knob onto the pin to secure the pin.
2. Now slide the rip fence to the desired cutting
radius, and tighten the bolt to secure it in place.
Thenmovethebaseallthewayforward.
NOTE:
• AlwaysusebladesNo.B-17,B-18,B-26orB-27
when cutting circles or arcs.

12 ENGLISH
MAINTENANCE
CAUTION:
• Alwaysbesurethatthetoolisswitchedoffand
thebatterycartridgeisremovedbeforeattempt-
ing to perform inspection or maintenance.
• Neverusegasoline,benzine,thinner,alcohol
or the like. Discoloration, deformation or cracks
mayresult.
TomaintainproductSAFETYandRELIABILITY,
repairs,anyothermaintenanceoradjustmentshould
beperformedbyMakitaAuthorizedorFactoryService
Centers,alwaysusingMakitareplacementparts.
OPTIONAL
ACCESSORIES
CAUTION:
• Theseaccessoriesorattachmentsarerecom-
mendedforusewithyourMakitatoolspecied
inthismanual.Theuseofanyotheraccessories
orattachmentsmightpresentariskofinjuryto
persons.Onlyuseaccessoryorattachmentfor
its stated purpose.
Ifyouneedanyassistanceformoredetailsregard-
ingtheseaccessories,askyourlocalMakitaService
Center.
• Jigsawblades
• Hexwrench4
• Ripfence(guiderule)set
• Anti-splinteringdevice
• Coverplate
• Dustnozzleassy
• Makitagenuinebatteryandcharger
NOTE:
• Someitemsinthelistmaybeincludedinthe
toolpackageasstandardaccessories.They
maydifferfromcountrytocountry.
MAKITA LIMITED WARRANTY
Pleaserefertotheannexedwarrantysheetforthe
mostcurrentwarrantytermsapplicabletothisproduct.
Ifannexedwarrantysheetisnotavailable,refertothe
warrantydetailssetforthatbelowwebsiteforyour
respectivecountry.
United States of America: www.makitatools.com
Canada: www.makita.ca
Other countries: www.makita.com

13 ESPAÑOL
ESPAÑOL (Instrucciones originales)
ESPECIFICACIONES
Modelo XVJ01
Extensión de la carrera 26 mm (1")
Capacidad máxima de corte Madera 135 mm (5-5/16")
Acero templado 10 mm (3/8")
Aluminio 20 mm (25/32")
Carreras por minuto 800 cpm - 3 500 cpm
Longitud total 298 mm (11-3/4")
Peso neto 2,3 - 2,6 kg (5,0 - 5,7 lbs)
Tensiónnominal 18 V c.c.
• Debidoanuestrocontinuoprogramadeinvestigaciónydesarrollo,lasespecicacionesaquíincluidasestán
sujetasacambiosinprevioaviso.
• Lasespecicacionespuedenvariardepaísapaís.
• Elpesopuedevariarenfuncióndelosaccesorios,incluidoelcartuchodebatería.Enlatablasemuestrala
combinacióndepesomásligeroymáspesadoconformealprocedimiento01/2014deEPTA.
Cartucho de batería y cargador aplicables
Cartuchodebatería
BL1815N / BL1820B / BL1830 / BL1830B / BL1840B / BL1850B / BL1860B
Cargador DC18RC / DC18RD / DC18SD / DC18SE / DC18SF
• Algunosdeloscartuchosdebateríaycargadoresenumeradosarribapodríannoestardisponiblesdepen-
diendo de su área de residencia.
ADVERTENCIA: Use únicamente los cartuchos de batería y los cargadores indicados arriba. El uso de
cualquierotrocartuchodebateríaycargadorpodríaocasionarunalesióny/ounincendio.
Advertencias generales de
seguridad para herramientas
eléctricas
ADVERTENCIA: Lea todas las advertencias
de seguridad, instrucciones, ilustraciones y espe-
cicaciones suministradas con esta herramienta
eléctrica. El no seguir todas las instrucciones indi-
cadasacontinuaciónpodríaocasionarunadescarga
eléctrica,incendioy/olesionesgraves.
Conserve todas las advertencias
e instrucciones como referencia
en el futuro.
Enlasadvertencias,eltérmino“herramientaeléctrica”se
reereasuherramientaeléctricadefuncionamientocon
conexión a la red eléctrica (con cableado eléctrico) o herra-
mientaeléctricadefuncionamientoabatería(inalámbrica).
Seguridad en el área de trabajo
1. Mantenga el área de trabajo limpia y bien ilu-
minada. Las áreas oscuras o desordenadas son
propensas a accidentes.
2. No utilice las herramientas eléctricas en
atmósferas explosivas, tal como en la presen-
cia de líquidos, gases o polvo inamables. Las
herramientas eléctricas crean chispas que pueden
prender fuego al polvo o los humos.
3. Mantenga a los niños y curiosos alejados
mientras utiliza una herramienta eléctrica. Las
distracciones le pueden hacer perder el control.
Seguridad eléctrica
1. Las clavijas de conexión de las herramientas
eléctricas deberán encajar perfectamente en la
toma de corriente. No modique nunca la cla-
vija de conexión de ninguna forma. No utilice
ninguna clavija adaptadora con herramientas
eléctricas que tengan conexión a tierra (puesta
a tierra). Lautilizacióndeclavijasnomodica-
dasyqueencajenperfectamenteenlatomade
corriente reducirá el riesgo de que se produzca
una descarga eléctrica.
2. Evite tocar con el cuerpo supercies conec-
tadas a tierra o puestas a tierra tales como
tubos, radiadores, cocinas y refrigeradores. Si
su cuerpo es puesto a tierra o conectado a tierra
existiráunmayorriesgodequesufraunades-
carga eléctrica.
3. No exponga las herramientas eléctricas a la
lluvia ni a condiciones húmedas. La entrada de
agua en una herramienta eléctrica aumentará el
riesgo de que se produzca una descarga eléctrica.
4. No maltrate el cable. Nunca utilice el cable
para transportar, jalar o desconectar la herra-
mienta eléctrica. Mantenga el cable alejado del
calor, aceite, objetos cortantes o piezas móvi-
les. Los cables dañados o enredados aumentan
el riesgo de sufrir una descarga eléctrica.

14 ESPAÑOL
5. Cuando utilice una herramienta eléctrica en
exteriores, utilice un cable de extensión apro-
piado para uso en exteriores. La utilización de
un cable apropiado para uso en exteriores redu-
cirá el riesgo de que se produzca una descarga
eléctrica.
6. Si no es posible evitar usar una herramienta
eléctrica en condiciones húmedas, utilice un
alimentador protegido con interruptor de cir-
cuito de falla a tierra (ICFT).ElusodeunICFT
reduce el riesgo de descarga eléctrica.
7. Las herramientas eléctricas pueden producir
campos electromagnéticos (CEM) que no son
dañinos para el usuario. Sin embargo, si los
usuariostienenmarcapasosyotrosdispositivos
médicos similares, deberán consultar al fabricante
desudispositivoy/oasumédicoantesdeoperar
esta herramienta eléctrica.
Seguridad personal
1. Manténgase alerta, preste atención a lo que
está haciendo y utilice su sentido común
cuando opere una herramienta eléctrica. No
utilice una herramienta eléctrica cuando esté
cansado o bajo la inuencia de drogas, alco-
hol o medicamentos. Un momento de distracción
mientras opera las herramientas eléctricas puede
terminar en una lesión grave.
2. Use equipo de protección personal. Póngase
siempre protección para los ojos. El equipo
protector tal como máscara contra el polvo, zapa-
tosdeseguridadantiderrapantes,cascorígidoy
protecciónparaoídosutilizadoenlascondiciones
apropiadas reducirá el riesgo de lesiones.
3. Impida el encendido accidental. Asegúrese
de que el interruptor esté en la posición de
apagado antes de conectar a la alimentación
eléctrica y/o de colocar el cartucho de batería,
así como al levantar o cargar la herramienta.
Cargar las herramientas eléctricas con su dedo
en el interruptor o enchufarlas con el interrup-
tor encendido hace que los accidentes sean
comunes.
4. Retire cualquier llave de ajuste o llave de
apriete antes de encender la herramienta. Una
llavedeajusteollavedeaprietequehayasido
dejadapuestaenunapartegiratoriadelaherra-
mienta eléctrica puede ocasionar alguna lesión.
5. No utilice la herramienta donde no alcance.
Mantenga los pies sobre suelo rme y el equi-
librio en todo momento.Estopermiteunmejor
control de la herramienta eléctrica en situaciones
inesperadas.
6. Use una vestimenta apropiada. No use ropa
suelta ni alhajas. Mantenga el cabello, la ropa
y los guantes alejados de las piezas móviles.
Lasprendasdevestirholgadas,lasalhajasy
elcabellolargosueltopodríanengancharseen
estas piezas móviles.
7. Si dispone de dispositivos para la conexión
de equipos de extracción y recolección de
polvo, asegúrese de conectarlos y utilizarlos
debidamente. Hacer uso de la recolección de
polvo puede reducir los riesgos relacionados con
el polvo.
8. No permita que la familiaridad adquirida
debido al uso frecuente de las herramientas
haga que se sienta conado e ignore los prin-
cipios de seguridad de las herramientas. Un
descuidopodríaocasionarunalesióngraveen
una fracción de segundo.
9. Utilice siempre gafas protectoras para prote-
ger sus ojos de lesiones al usar herramientas
eléctricas. Las gafas deben cumplir con la
Norma ANSI Z87.1 en EUA.
Es responsabilidad del empleador imponer
el uso de equipos protectores de seguridad
apropiados a los operadores de la herramienta
y demás personas cerca del área de trabajo.
Mantenimiento y uso de la herramienta eléctrica
1. No fuerce la herramienta eléctrica. Utilice la
herramienta eléctrica correcta para su aplica-
ción. La herramienta eléctrica adecuada hará un
mejortrabajoydeformamásseguraalaveloci-
dad para la que ha sido fabricada.
2.
No utilice la herramienta eléctrica si el interrup-
tor no la enciende y apaga. Cualquier herramienta
eléctrica que no pueda ser controlada con el inte-
rruptorespeligrosaydebeserreemplazada.
3. Desconecte la clavija de la fuente de alimen-
tación y/o retire la batería de la herramienta
eléctrica, en caso de ser removible, antes de
realizar ajustes, cambiar accesorios o almace-
nar las herramientas eléctricas.Talesmedidas
de seguridad preventivas reducirán el riesgo
de poner en marcha la herramienta eléctrica de
forma accidental.
4. Guarde la herramienta eléctrica que no use
fuera del alcance de los niños y no permita
que las personas que no están familiarizadas
con ella o con las instrucciones la operen. Las
herramientas eléctricas son peligrosas en manos
de personas que no saben operarlas.
5. Dé mantenimiento a las herramientas eléctri-
cas y los accesorios. Compruebe que no haya
piezas móviles desalineadas o estancadas,
piezas rotas y cualquier otra condición que
pueda afectar al funcionamiento de la herra-
mienta eléctrica. Si la herramienta eléctrica
está dañada, haga que la reparen antes de
utilizarla. Muchos de los accidentes son ocasio-
nados por no dar un mantenimiento adecuado a
las herramientas eléctricas.
6. Mantenga las herramientas de corte limpias
y losas. Si recibe un mantenimiento adecuado
ytienelosbordesalados,esprobablequela
herramientaseatasquemenosyseamásfácil
controlarla.
7.
Utilice la herramienta eléctrica, los accesorios y
las brocas de acuerdo con estas instrucciones,
considerando las condiciones laborales y el tra-
bajo a realizar. Si utiliza la herramienta eléctrica
para realizar operaciones distintas de las indica-
das, podrá presentarse una situación peligrosa.
8. Mantenga los mangos y supercies de asi-
miento secos, limpios y libres de aceite o
grasa.Losmangosysuperciesdeasimiento
resbalosos no permiten una manipulación segura
ni el control de la herramienta en situaciones
inesperadas.

15 ESPAÑOL
9. Cuando vaya a utilizar esta herramienta, evite
usar guantes de trabajo de tela ya que éstos
podrían atorarse.Silosguantesdetrabajode
tela llegaran a atorarse en las piezas móviles,
estopodríaocasionarlesionespersonales.
Uso y cuidado de la herramienta a batería
1. Recargue sólo con el cargador especicado
por el fabricante. Un cargador que es adecuado
paraunsolotipodebateríapuedegenerarriesgo
deincendioalserutilizadoconotrabatería.
2. Utilice las herramientas eléctricas solamente
con las baterías designadas especícamente
para ellas.Lautilizacióndecualquierotrabatería
puede crear un riesgo de lesiones o incendio.
3. Cuando no se esté usando la batería, mantén-
gala alejada de otros objetos metálicos, como
sujetapapeles (clips), monedas, llaves, clavos,
tornillos u otros objetos pequeños de metal
los cuales pueden actuar creando una cone-
xión entre las terminales de la batería. Originar
un cortocircuito en las terminales puede causar
quemaduras o incendios.
4. En condiciones abusivas, podrá escapar
líquido de la batería; evite tocarlo. Si lo toca
accidentalmente, enjuague con agua. Si hay
contacto del líquido con los ojos, busque asis-
tencia médica.Puedequeellíquidoexpulsado
delabateríacauseirritaciónoquemaduras.
5. No utilice una herramienta ni una batería que
estén dañadas o hayan sido modicadas. Las
bateríasdañadasomodicadaspodríanoca-
sionar una situación inesperada provocando un
incendio, explosión o riesgo de lesiones.
6. No exponga la herramienta ni la batería al
fuego ni a una temperatura excesiva. La expo-
sición al fuego o a una temperatura superior a los
130°Cpodríacausarunaexplosión.
7. Siga todas las instrucciones para la carga y
evite cargar la herramienta o la batería fuera
del rango de temperatura especicado en
las instrucciones. Una carga inadecuada o a
unatemperaturafueradelrangoespecicado
podríadañarlabateríaeincrementarelriesgode
incendio.
Servicio
1. Haga que una persona calicada repare la
herramienta eléctrica utilizando sólo piezas de
repuesto idénticas. Esto asegura que se man-
tenga la seguridad de la herramienta eléctrica.
2. Nunca dé servicio a baterías que estén daña-
das.Elservicioalasbateríassolamentedeberá
ser efectuado por el fabricante o un agente de
servicio autorizado.
3. Siga las instrucciones para la lubricación y
cambio de accesorios.
4. No modique ni intente reparar el aparato ni el
paquete de baterías salvo como se indique en
las instrucciones para el uso y cuidado.
Advertencias de seguridad para la
sierra caladora inalámbrica
1. Sujete la herramienta eléctrica por las super-
cies de asimiento aisladas cuando realice
una operación en la que el accesorio de corte
pueda entrar en contacto con cableado oculto.
Si el accesorio de corte entra en contacto con un
cable con corriente, las piezas metálicas expues-
tas de la herramienta eléctrica se cargarán tam-
biéndecorrienteyeloperadorpodrárecibiruna
descarga eléctrica.
2. Utilice abrazaderas o algún otro modo práctico
para asegurar y sujetar la pieza de trabajo a
una plataforma estable. Sostener la pieza de
trabajoconlamanoocontrasucuerpoproduce
inestabilidadyunaposiblepérdidadecontrol.
3. Use siempre gafas de seguridad o protectoras.
Los anteojos comunes o para el sol NO son
gafas de seguridad.
4. Evite cortar clavos. Revise la pieza de trabajo
y quite todos los clavos antes de la operación.
5. No corte piezas de trabajo demasiado grandes.
6. Compruebe que haya espacio suciente más
allá de la pieza de trabajo antes de cortar para
que la cuchilla no golpee el suelo, el banco de
trabajo, etc.
7. Sujete la herramienta rmemente.
8. Asegúrese de que la cuchilla no esté haciendo
contacto con la pieza de trabajo antes de acti-
var el interruptor.
9. Mantenga las manos alejadas de las piezas
móviles.
10. No deje la herramienta funcionando. Tenga en
marcha la herramienta solamente cuando la
esté sosteniendo con la mano.
11. Siempre apague la herramienta y espere a
que la cuchilla se haya detenido por completo
antes de retirarla de la pieza de trabajo.
12. No toque la cuchilla ni la pieza de trabajo
inmediatamente después de la operación;
podrían estar extremadamente calientes y
provocarle quemaduras.
13. No opere la herramienta sin carga
innecesariamente.
14. Algunos materiales contienen sustancias
químicas que pueden ser tóxicas. Tome pre-
cauciones para evitar la inhalación de polvo
y el contacto con la piel. Consulte la hoja de
seguridad de materiales del proveedor.
15. Siempre utilice la máscara contra polvo/respi-
rador indicado para el material y la aplicación
con los que esté trabajando.
GUARDE ESTAS
INSTRUCCIONES.
ADVERTENCIA: NO DEJE que la comodidad
o familiaridad con el producto (a base de utilizarlo
repetidamente) sustituya la estricta observancia
de las normas de seguridad para dicho producto.
El MAL USO o el no seguir las normas de seguri-
dad establecidas en este manual de instrucciones
puede ocasionar lesiones personales graves.

16 ESPAÑOL
Símbolos
Acontinuaciónsemuestranlossímbolosutilizados
para la herramienta.
volts o voltios
corriente directa o continua
velocidad sin carga
revoluciones o alternaciones por minuto,
frecuencia de rotación
Instrucciones importantes de
seguridad para el cartucho de
batería
1. Antes de utilizar el cartucho de batería, lea
todas las instrucciones e indicaciones de
precaución en el (1) el cargador de batería, (2)
la batería, y (3) el producto con el que se utiliza
la batería.
2. No desarme el cartucho de batería.
3. Si el tiempo de operación se ha acortado en
exceso, deje de operar de inmediato. Podría
correrse el riesgo de sobrecalentamiento,
posibles quemaduras e incluso explosión.
4. En caso de que ingresen electrolitos en sus
ojos, enjuáguelos bien con agua limpia y con-
sulte de inmediato a un médico. Esto podría
ocasionar pérdida de visión.
5. Evite cortocircuitar el cartucho de batería:
(1) No toque las terminales con ningún mate-
rial conductor.
(2) Evite guardar el cartucho de batería en un
cajón junto con otros objetos metálicos,
tales como clavos, monedas, etc.
(3) No exponga el cartucho de batería al
agua o la lluvia.
Un cortocircuito en la batería puede causar
un ujo grande de corriente, sobrecalenta-
miento, posibles quemaduras e incluso una
descompostura.
6. No guarde la herramienta ni el cartucho de
batería en lugares donde la temperatura pueda
alcanzar o exceder los 50°C (122°F).
7. Nunca incinere el cartucho de batería incluso
en el caso de que esté dañado seriamente o
ya no sirva en absoluto. El cartucho de batería
puede explotar si se tira al fuego.
8. Tenga cuidado de no dejar caer ni golpear la
batería.
9. No use una batería dañada.
10. Las baterías de ión de litio están sujetas a los
requisitos reglamentarios en materia de bie-
nes peligrosos.
Paraeltrasportecomercial,porej.,mediante
terceros o agentes de transporte, se deben tomar
en cuenta los requisitos especiales relativos al
empaqueyeletiquetado.
Paraefectuarlospreparativosdelartículoquese
va a enviar, se requiere consultar a un experto
en materiales peligrosos. Si es posible, consulte
además otras regulaciones nacionales más deta-
lladas.
Pegue o cubra con cinta adhesiva los contactos
abiertosyempaquelabateríademaneraqueésta
no pueda moverse dentro del paquete.
11. Siga las regulaciones locales relacionadas al
desecho de las baterías.
12. Utilice las baterías únicamente con los pro-
ductos especicados por Makita. Instalar las
bateríasenproductosquenocumplanconlos
requisitospodríaocasionarunincendio,uncalen-
tamiento excesivo, una explosión o una fuga de
electrolito.
GUARDE ESTAS
INSTRUCCIONES.
PRECAUCIÓN: Utilice únicamente baterías
originales de Makita.Elusodebateríasnoorigina-
lesdeMakita,odebateríasalteradas,puedeocasio-
narquelasbateríasexplotencausandounincendio,
lesionespersonalesydaños.Asimismo,estoinva-
lidarálagarantíadeMakitaparalaherramientayel
cargador Makita.
Consejos para alargar al máximo
la vida útil de la batería
1. Cargue el cartucho de batería antes de que
se descargue completamente. Pare siem-
pre la operación y cargue el cartucho de
batería cuando note menos potencia en la
herramienta.
2. No cargue nunca un cartucho de batería que
esté completamente cargado. La sobrecarga
acortará la vida de servicio de la batería.
3. Cargue el cartucho de batería a una tempera-
tura ambiente de 10 °C - 40 °C (50 °F - 104 °F).
Si un cartucho de batería está caliente, déjelo
enfriar antes de cargarlo.
4. Cargue el cartucho de batería si no va a utili-
zarlo durante un período prolongado (más de
seis meses).

17 ESPAÑOL
DESCRIPCIÓN DEL
FUNCIONAMIENTO
PRECAUCIÓN:
• Asegúresesiempredequelaherramientaesté
apagadayelcartuchodebateríaextraídoantes
derealizarcualquierajusteocomprobaciónen
la herramienta.
Instalación o desmontaje del
cartucho de batería
1
2
3
►1.Indicadorrojo2. Botón 3.Cartuchodebatería
PRECAUCIÓN:
• Apaguesiemprelaherramientaantesdecolo-
caroquitarelcartuchodebatería.
• Sujete la herramienta y el cartucho de
la batería con rmeza al colocar o quitar
el cartucho.Sinosesujetaconrmezala
herramientayelcartuchodelabatería,puede
ocasionar que se resbalen de sus manos resul-
tandoendañosalaherramientayalcartucho,
asícomolesionesalapersona.
Paraquitarelcartuchodebatería,deslícelodelaherra-
mienta mientras desliza el botón sobre la parte delan-
tera del cartucho.
Paracolocarelcartuchodebatería,alineelalengüeta
sobreelcartuchodebateríaconlaranuraenlacarcasa
ydesliceensulugar.Inserteporcompletohastaque
sejeensulugarconunpequeñoclic.Sipuedeverel
indicadorrojodelladosuperiordelbotón,estoindica
quenohaquedadojoporcompleto.
PRECAUCIÓN:
• Introduzcasiemprecompletamenteelcartucho
debateríahastaqueelindicadorrojonopueda
verse.Sino,podríaaccidentalmentesalirsede
laherramientaycaeralsuelocausandouna
lesión a usted o alguien a su alrededor.
• Noinstaleelcartuchodebateríaalafuerza:
si el cartucho no se desliza al interior fácil-
mente, se debe a que no está siendo insertado
correctamente.
Sistema de protección de batería
(batería de ión de litio con marca de
estrella)
1
►1. Marca de estrella
Lasbateríasdeióndelitioconunamarcadeestrella
están equipadas con un sistema de protección. Este
sistema corta en forma automática el suministro de
energíaalaherramientaparaprolongarlavidaútilde
labatería.
La herramienta se detendrá automáticamente durante
elfuncionamientosilaherramientay/olabateríase
someten a una de las siguientes condiciones:
• Sobrecarga:
La herramienta se está utilizando de una
manera que causa que consuma una canti-
dad de corriente inusualmente alta.
En este caso, presione interruptor de encen-
dido/apagadoenlaherramientaydetenga
la aplicación que causó que la herramienta
se sobrecargara. Luego presione el interrup-
tor de encendido / apagado de nuevo para
reiniciar.
Si la herramienta no empieza a funcionar,
signicaquelabateríasesobrecalentó.En
estecaso,esperequelabateríaseenfríe
antes de volver a presionar el interruptor de
encendido / apagado.
• Bajovoltajedelabatería:
Lacapacidadrestantedelabateríaes
demasiadobajaylaherramientanofun-
cionará.Enestecaso,extraigalabateríay
vuelva a cargarla.

18 ESPAÑOL
Indicación de la capacidad restante
de la batería
Únicamente para cartuchos de batería con el
indicador
1
2
►1. Luces indicadoras 2.Botóndevericación
Oprimaelbotóndevericaciónenelcartuchodela
bateríaparaqueindiquelacapacidadrestantedela
batería.Laslucesindicadorasseiluminaránporalgu-
nos segundos.
Luces indicadoras Capacidad
restante
Iluminadas Apagadas Parpadeando
75% a 100%
50% a 75%
25% a 50%
0% a 25%
Cargar la
batería.
Labatería
pudo haber
funcionado
mal.
NOTA:Dependiendodelascondicionesdeusoy
la temperatura ambiente, la indicación podrá diferir
ligeramente de la capacidad real.
Selección de corte
1
►1. Palanca de cambio del modo de corte
Esta herramienta puede utilizarse en modo de corte
conórbitaolínearecta(haciaarribayabajo).Elmodo
decorteconórbitaempujalasierrahaciadelanteenla
carreradecorteyaumentanotablementelavelocidad
de corte.
Para cambiar el modo de corte, simplemente gire la
palanca de cambio del modo de corte a la posición del
modo de corte deseado. Consulte la tabla para selec-
cionar el modo de corte apropiado.
Posición Acción de corte Aplicaciones
Para cortar acero bajo en carbono
(dulce), acero inoxidable y plástico.
Para cortes limpios en madera y
madera laminada.
Acción de corte
orbital pequeño
Para cortes rápidos de aluminio,
acero y madera dura.
Para cortes rápidos de madera y
madera laminada.
Para corte rápido en aluminio y
acero dulce.
Acción de corte
orbital grande
Para corte rápido en madera y
contrachapado.
0
Acción de corte
en línea recta
Acción de corte
orbital mediano
Accionamiento del interruptor
1
2
►1. Interruptor de bloqueo 2. Interruptor de encen-
dido / en espera

19 ESPAÑOL
Desbloqueo
En espera
Encendido
("ON")
Para accionar la herramienta:
Presione el interruptor de bloqueo para poner la herra-
mienta en modo de espera. Esto también enciende la
lámpara.
Presione el interruptor de encendido / en espera para
activar la herramienta desde el modo de espera.
Para parar la herramienta:
Presione el interruptor de encendido / en espera para
pararlaherramientayponerlaenmododeespera.
Presione el interruptor de bloqueo para poner la herra-
mienta en modo desbloqueado.
En modo de espera, presione el interruptor de bloqueo
paraapagarlalámparayponerlaherramientaenmodo
desbloqueado.
NOTA:
• Cuandolaherramientaestéenmodode
espera,lalámparacontinúaencendida.
• Silaherramientasedeja10segundossinacti-
vidad en modo de espera, la herramienta auto-
máticamente se pondrá en modo desbloqueado
ylalámparaseapagará.
Encendido de la lámpara
PRECAUCIÓN:
• Nomirelaluzniveadirectamentehaciala
fuente de luz de la lámpara.
Paraencenderlalámpara,jaleelinterruptorde
bloqueo.
Presionar de nuevo el interruptor de bloqueo parará la
herramientayapagarálaluz.
NOTA:
• Utiliceunpañosecoparaquitarlasuciedad
delalentedelalámpara.Tengacuidadodeno
rayarlalentedelalámpara,porquepodrádis-
minuir la iluminación.
• Cuandolaherramientasesobrecalienta,la
luzindicadoraparpadea.Dejeenfriarlaherra-
mienta antes de volver a usarla.
Control de ajuste de velocidad
1
►1.Controldeajustedevelocidad
Lavelocidaddelaherramientapuedeserinnitamente
ajustadaalgirarelcontroldeajustedevelocidad.La
velocidadmáximaseobtieneconelajuste6,ylavelo-
cidadmenorseobtieneconelajuste1.
Consulte la tabla para seleccionar la velocidad ade-
cuada para la pieza que debe cortar. Sin embargo, la
velocidadadecuadapuedevariarsegúnelgrosorotipo
delapieza.Engeneral,emplearunavelocidadmayor
le permitirá cortar la pieza más rápidamente, pero
reducirálavidaútildelahoja.
Número en el control de ajuste
4 - 6
Acero templado 3 - 6
Acero inoxidable 3 - 4
Aluminio 3 - 6
Plásticos 1 - 4
Pieza a cortar
Madera
PRECAUCIÓN:
• Elcontroldeajustedevelocidadsólosepuede
subirhasta6ybajarhasta1.Nolofuercemás
allá de estas marcas o de lo contrario la función
deajustedevelocidadpodríaarruinarse.
NOTA:
• Cuandoelcontroldeajustedevelocidadse
ajustaen3omás,laherramientaautomática-
mente reduce la velocidad en marcha pasiva
para reducir la vibración cuando la herramienta
estásincargadetrabajo.Unavezquela
herramientasesometeacargadetrabajo,la
herramientaretomarálavelocidadpreajustada.
Luego la herramienta se conserva en dicha
velocidad hasta que sea apagada. Cuando la
temperaturaesbajaylagrasatengamenor
uidez,puedequelaherramientanorealice
esta función ni con el motor girando.
ENSAMBLE
PRECAUCIÓN:
• Asegúresesiempredequelaherramientaesté
apagadayelcartuchodebateríaextraídoantes
derealizarcualquiertrabajoenlamisma.

20 ESPAÑOL
Instalación o extracción de la
cuchilla u hoja de sierra
PRECAUCIÓN:
• Limpiesiempretodaslasvirutasomaterias
extrañasadheridasalasierray/oelporta-útil.
Encasocontrariolahojadesierrapodráno
quedarsucientementeapretada,pudiendo
resultar en heridas personales graves.
• Notoquelahojadesierranilapiezadetrabajo
inmediatamentedespuésdelaoperación;esta-
ránmuycalientesypodrányquemarlelapiel.
• Aprietebienlahojadesierra.Encasocontrario,
podríanocasionarseheridaspersonalesgraves.
• Cuandoextraelahojadesierra,tengacuidado
de no lastimarse los dedos con el borde de la
hojaolaspuntasdelapiezadetrabajo.
1
2
►1.Posiciónja2. Posición liberada
Antesdeinstalarlasierra,asegúresedequeelporta-
sierra se encuentre en la posición liberada.
Para instalar la sierra, insértela (con los dientes orienta-
doshaciaadelante)enelportasierrahastaqueencaje.
Elportasierrasemuevealaposiciónjaciónporsí
mismo,quedandojalasierra.Jalelasierraligera-
mente para asegurar que ésta no pueda salirse durante
la operación.
PRECAUCIÓN:
• Noabraelabridordelaherramientademanera
excesivaopodríadañarlaherramienta.
1
►1.Hojadesierracaladora
Paraquitarlasierra,empujeelliberadordelaherra-
mienta hacia adelante hasta el punto que sea posible
hacerlo. Esto permitirá que la sierra pueda liberarse.
NOTA:
• Lubriqueelrodillodevezencuando.
Almacenamiento de la llave de Allen
(hexagonal)
1
2
►1. Base 2. Llave hexagonal
Cuando no la utilice, guarde la llave de Allen como se
muestraenlaguraparaevitarquesepierda.
Tapa
1
2
►1. Placa de cubierta 2. Base
Utilice la tapa cuando corte chapas decorativas, plás-
ticos,etc.Éstaprotegelassuperciessensibleso
delicadas para que no se dañen. Acomódela en la parte
trasera de la base de la herramienta.

21 ESPAÑOL
Dispositivo antiastillado
2
1
►1. Dispositivo antiastillado 2. Base
Para los cortes libres de astillas, se puede utilizar el
dispositivo antiastillado. Para instalar el dispositivo
antiastillado, mueva la base de la herramienta hacia
delanteatopeyacomódeloenlabasedesdelaparte
trasera de la base de la herramienta. Cuando utiliza la
tapa, instale el dispositivo antiastillado sobre la tapa.
PRECAUCIÓN:
• Eldispositivoantiastilladonopuedeutilizarse
para hacer cortes en bisel.
Extracción de polvo
Se recomienda la boquilla de polvo (accesorio opcional)
para realizar operaciones de corte limpias.
1
2
►1. Boquilla para polvo 2. Base
Parajarlaboquilladepolvoenlaherramienta,inserte
losganchosdelaboquilladepolvoenelagujerodela
base.
1
►1.Tornillodejación
Parajarlaboquilladepolvo,aprieteeltornillodela
prensa en la parte frontal de la boquilla de polvo.
Se puede instalar la boquilla de polvo en el lado
izquierdo o derecho de la base.
1
2
►1. Boquilla para polvo 2. Manguera para aspirador
Luego, conecte un aspirador marca Makita a la boquilla
de polvo.
OPERACIÓN
PRECAUCIÓN:
• Sujetesiemprelabasearasconlapiezade
trabajo.Encasocontrariolasierrapodrárom-
perse, pudiendo resultar en heridas personales
graves.
NOTA:
• Siutilizalaherramientacontinuamentehasta
descargarelcartuchodebatería,dejedescan-
sar la herramienta durante 15 minutos antes de
procederconunabateríafresca.

22 ESPAÑOL
1
2
►1.Líneadecorte2. Base
Enciendalaherramientasinquelahojadesierraesté
tocandonadayesperehastaquelahojadesierra
alcance plena velocidad. Después ponga la base hori-
zontalsobrelapiezadetrabajoymuevalaherramienta
haciadelanteconcuidadosiguiendolalíneadecorte
previamente marcada.
Cuandocortecurvas,avancelaherramientamuy
despacio.
Corte en bisel
PRECAUCIÓN:
• Asegúresesiempredequelaherramienta
estéapagadayqueelcartuchodebateríafue
extraídoantesdeinclinarlabase.
Con la base inclinada, puede hacer cortes en bisel a
cualquieránguloentre0°y45°(izquierdaoderecha).
1
2
3
►1. Base 2. Llave hexagonal 3.Tornillo
Parainclinarlabase,aojeeltornilloenlapartetrasera
de la base con la llave hexagonal. Mueva la base de
tal forma que el tornillo quede colocado al centro de la
ranura del bisel en la base.
1
2
3
4
5
6
►1. Ranura biselada 2. Base 3.Tornillo
4. Graduaciones 5. Muesca en V 6.Cajadel
engranaje
Incline la base hasta que se obtenga el ángulo biselado
deseado.LamuescaenVdelacajadeengranaje
indica el ángulo biselado por medio de regulaciones.
Luego,aprieteeltornillormementeparasujetarla
base.
Cortes a ras frontales
1
2
3
►1. Base 2. Llave hexagonal 3.Tornillo
Aojeeltornillodelapartetraseradelabaseconla
llavehexagonalydeslicelabasehaciaatrásatope.
Despuésaprieteeltornilloparasujetarlabase.

23 ESPAÑOL
Recortes
Los recortes pueden hacerse con cualquiera de los dos
métodos A o B.
A) Perforando de un agujero de
inicio:
1
►1.Agujerodeinicio
• Pararecortesinternossinuncortedeentrada
desdeunborde,perforeunagujerodeiniciode
12 mm o más de diámetro previamente. Inserte
lahojadesierraenesteagujeroparacomenzara
hacer su corte.
B) Corte por hundimiento:
• Sihacecuidadosamentelosiguientenonece-
sitaráperforarunagujerodeinicioocortede
entrada.
1. Incline la herramienta hacia arriba sobre el borde
frontal de la base con la punta de la sierra posicio-
nadajustoporencimadelapiezadetrabajo.
2. Aplique presión a la herramienta de forma que
el borde frontal de la base no se mueva cuando
enciendalaherramientaybajeconcuidadoy
despacio el extremo trasero de la herramienta.
3. Amedidaquelasierravayaperforandolapieza
detrabajo,bajedespaciolabasedelaherra-
mientasobrelasuperciedelapiezadetrabajo.
4. Complete el corte de manera normal.
Acabado de bordes
Pararecortarbordesohacerajustesdimensionales,
paselahojadesierraligeramentealolargodelos
bordes cortados.
Corte de metales
Utilice siempre un refrigerante apropiado (lubricante
para cuchillas) cuando corte metales. Si no lo hace
seproduciráunconsiderabledesgastedelahojade
sierra. Se puede poner grasa en la parte inferior de la
piezadetrabajoenlugardeutilizarunrefrigerante.
Conjunto de guía de corte al hilo
(accesorio opcional)
PRECAUCIÓN:
• Siempreasegúresedequelaherramientaestá
apagadayquehayaquitadoelcartuchode
labateríaantesdeinstalarodesinstalarlos
accesorios.
1. Cortes rectos
1
►1.Topelateraldecorte
Al estar haciendo cortes repetidos con amplitud de 160
mm(6-5/16")omenores,elusodelaguíadecortele
asegurarácortesrápidos,limpiosyrectos.

24 ESPAÑOL
1
2
3
►1. Llave hexagonal 2.Tornillo3.Guíalateral
Paralainstalación,insertelaguíadecortealhiloen
eloriciorectangularenelcostadodelabasedela
herramientaconlaguíadecortealhiloorientadahacia
abajo.Deslicelaguíadecortealhiloalaposiciónde
amplituddecortedeseada,yluegoaprieteeltornillo
parajarla.
2. Cortes circulares
1
2
3
►1.Guíalateral2. Perilla roscada 3.Clavijadela
guíacircular
Cuandocortecírculosoarcosde170mmomenos
deradio,instalelaguíadecortealhilodelaforma
siguiente.
1. Insertelaguíadecortealhiloenelagujerorec-
tangulardelcostadodelabaseconlaguíalateral
orientada hacia arriba. Inserte el pasador de la
guíacircularatravésdecualquieradelosdos
agujerosdelaguíalateral.Girelaperillaroscada
enelpasadorparasujetarlo.
2. Ahoradeslicelaguíadecortealhilohastaelradio
decortedeseado,ydespuésaprieteeltornillo
parasujetarlaensusitio.Despuésmuevalabase
hacia delante a tope.
NOTA:
• SiempreutilicehojasdesierraNº.B-17,B-18,
B-26oB-27cuandocortecírculosoarcos.
MANTENIMIENTO
PRECAUCIÓN:
• Asegúresesiempredequelaherramienta
estéapagadayelcartuchodebateríaextraído
antes de intentar realizar una inspección o
mantenimiento.
• Nuncausegasolina,bencina,diluyente(tíner),
alcohol o sustancias similares. Puede que esto
ocasione grietas o descoloramiento.
ParamantenerlaSEGURIDADyFIABILIDADdelpro-
ducto,lasreparaciones,ycualquierotratareademan-
tenimientooajustedeberánserrealizadasenCentros
de Servicio Autorizados por Makita, empleando siempre
repuestos Makita.
ACCESORIOS
OPCIONALES
PRECAUCIÓN:
• Estosaccesoriosoaditamentos(incluidosono)
están recomendados para utilizar con su herra-
mientaMakitaespecicadaenestemanual.
El empleo de cualesquiera otros accesorios o
acoplamientos conllevará un riesgo de sufrir
heridas personales. Utilice los accesorios o aco-
plamientossolamenteparasunestablecido.
Sinecesitacualquierayudaparamásdetallesen
relación con estos accesorios, pregunte a su centro de
servicio Makita local.
• Hojasdesierradesierradecalar
• Llavehexagonal4
• Conjuntodeguíadecortealhilo(reglaguía)
• Dispositivoantiastillado
• Tapa
• Conjuntodeboquilladepolvo
• BateríaycargadororiginalesdeMakita
NOTA:
• Algunosdelosartículosenlalistapuedeque
venganjuntoconelpaquetedelaherramienta
como accesorios incluidos. Puede que estos
accesoriosvaríendepaísapaís.

GARANTÍA LIMITADA DE MAKITA
Ésta Garantía no aplica para México
Consultelahojadelagarantíaanexaparaverlos
términosmásvigentesdelagarantíaaplicableaeste
producto.Encasodenodisponerdeestahojade
garantíaanexa,consultelosdetallessobrelagarantía
descritosenelsitiowebdesupaísrespectivoindicado
a continuación.
Estados Unidos de América: www.makitatools.com
Canadá: www.makita.ca
Otrospaíses:www.makita.com
25 ESPAÑOL

26

27

Some dust created by power sanding, sawing, grinding, drilling, and other
construction activities contains chemicals known to the State of California
to cause cancer, birth defects or other reproductive harm. Some examples
of these chemicals are:
• lead from lead-based paints,
• crystalline silica from bricks and cement and other masonry products, and
• arsenic and chromium from chemically-treated lumber.
Your risk from these exposures varies, depending on how often you do this
type of work. To reduce your exposure to these ch emicals: work in a well
ventilated area, and work with approved safety equipment, such as those
dust masks that are specially designed to filter out microscopic particles.
WARNING
< USA only >
ADVERTENCIA
Algunos polvos creados por el lijado, aserrado, esmerilado, taladrado y
otras actividades de la construcción contienen sustancias químicas
reconocidas por el Estado de California como causantes de cáncer, defectos
de nacimiento y otros peligros de reproducción. Algunos ejemplos de estos
productos químicos son:
• plomo de pinturas a base de plomo,
• sílice cristalino de ladrillos y cemento y otros productos de albañilería, y
• arsénico y cromo de maderas tratadas químicamente.
El riesgo al que se expone varía, dependiendo de la frecuencia con la que
realice este tipo de trabajo. Para reducir la exposición a estos productos
químicos: trabaje en un área bien ventilada y póngase el equipo de seguridad
indicado, tal como las máscaras contra polvo que están especialmente
diseñadas para filtrar partículas microscó
picas.
< Sólo en los Estados Unidos >
Makita Corporation
3-11-8, Sumiyoshi-cho,
Anjo, Aichi 446-8502 Japan
www.makita.com
885219-935
XVJ01-1
EN, ESMX
20180125
-
 1
1
-
 2
2
-
 3
3
-
 4
4
-
 5
5
-
 6
6
-
 7
7
-
 8
8
-
 9
9
-
 10
10
-
 11
11
-
 12
12
-
 13
13
-
 14
14
-
 15
15
-
 16
16
-
 17
17
-
 18
18
-
 19
19
-
 20
20
-
 21
21
-
 22
22
-
 23
23
-
 24
24
-
 25
25
-
 26
26
-
 27
27
-
 28
28


Makita XVJ01 Manual de usuario
- Categoría
- Puzzles inalámbricos
- Tipo
- Manual de usuario
- Este manual también es adecuado para
en otros idiomas
- English: Makita XVJ01 User manual
Artículos relacionados
-
Makita VJ06Z Manual de usuario
-
Makita DJV181 Manual de usuario
-
Makita XVJ02Z Manual de usuario
-
-
Makita JV102D Manual de usuario
-
Makita BJV180 Manual de usuario
-
-
-
-
