Dell E514dw Multifunction Printer Guía de inicio rápido
- Categoría
- Telefonos
- Tipo
- Guía de inicio rápido

Dell™ Multifunction Printer | E515dw
Dell™ Multifunction Printer | E515dn
Dell™ Multifunction Printer | E514dw
Setup Guide
Guide d'installation
Guida di configurazione
Konfigurationshandbuch
Guía de configuración

2
Thank you
for choosing Dell
Merci d'avoir choisi Dell
Grazie per aver scelto Dell
Vielen Dank, dass Sie sich für Dell entschieden haben
Gracias por elegir Dell

3
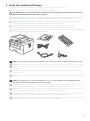
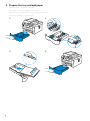
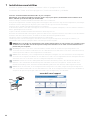
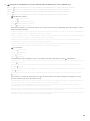
1 Verify the contents of the box
Vérifiez le contenu de l'emballage | Controllare il contenuto della confezione
Überprüfen des Lieferumfangs | Compruebe el contenido de la caja
CAUTION: Before you set up and operate your Dell printer, read and follow the safety instructions in the
Important Information that comes with your printer.
PRÉCAUTION : Avant de configurer et d'utiliser votre imprimante Dell, lisez et respectez les consignes de
sécurité reprises dans le document Informations importantes fourni avec votre imprimante.
ATTENZIONE: Prima di configurare e utilizzare la stampante Dell, leggere e attenersi alle istruzioni di
sicurezza presenti in Informazioni importanti in dotazione con la stampante.
ACHTUNG: Bevor Sie den Dell-Drucker einrichten und bedienen, lesen und befolgen Sie die
Sicherheitshinweise in der Anleitung Wichtige Informationen im Lieferumfang des Druckers.
PRECAUCIÓN: Antes de configurar y utilizar su impresora Dell, lea y siga las instrucciones de seguridad en
la Información importante incluida con la impresora.
NOTE: The contents of the box vary depending on the country or region you purchased the printer from.
REMARQUE : Le contenu de l'emballage varie selon le pays ou la région où votre imprimante a été achetée.
NOTA: Il contenuto della confezione varia in funzione del paese o della regione dove la stampante è stata
acquistata.
HINWEIS: Der Inhalt des Kartons variiert abhängig von dem Land oder der Region, in der Sie den Drucker
gekauft haben.
NOTA: El contenido de la caja puede variar en función del país o de la región en la que compre la impresora.
NOTE: The telephone line cord (A) is bundled for U.K. (The cord is bundled only for Dell Multifunction
Printer | E515dn and Dell Multifunction Printer | E515dw)
REMARQUE : Le cordon de la ligne téléphonique (A) est destiné au Royaume-Uni. (Ce cordon est destiné
uniquement au Dell Multifunction Printer | E515dn et au Dell Multifunction Printer | E515dw)
NOTA: Nella confezione è presente il cavo per linea telefonica (A) per il Regno Unito. (Il cavo è indicato solo
per la Dell Multifunction Printer | E515dn e Dell Multifunction Printer | E515dw)
HINWEIS: Das Telefonleitungskabel (A) im Lieferumfang ist für GB. (Das Kabel ist nur im Lieferumfang des
Dell Multifunction Printer | E515dn und Dell Multifunction Printer | E515dw enthalten.)
NOTA: El cable de línea telefónica (A) se proporciona para el Reino Unido. (El cable solo se proporciona para
Dell Multifunction Printer | E515dn y Dell Multifunction Printer | E515dw)
(A)

4
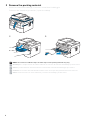
2 Remove the packing material
Retirez le matériau d'emballage | Eliminare il materiale di imballaggio
Entfernen des Verpackungsmaterials | Quite el embalaje
NOTE: The location of adhesive tapes and the shape of the packing material may vary.
REMARQUE : L'emplacement des rubans adhésifs et la forme du matériau d'emballage peuvent varier.
NOTA: Il posizionamento dei nastri adesivi e la forma del materiale di imballaggio può variare.
HINWEIS: Die Position der Klebebänder und die Form des Verpackungsmaterials können variieren.
NOTA: La ubicación de las cintas adhesivas y la forma del embalaje pueden variar.

5
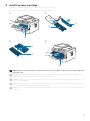
3 Install the toner cartridge
Installez la cartouche de toner | Installare la cartuccia del toner
Einsetzen der Tonerkassette | Instale el cartucho de tóner
NOTE: Dispose of the part (C) that you detach from the toner cartridge in a proper way. It is disposable and
no longer used.
REMARQUE : Mettez au rebut de manière appropriée la pièce (C) que vous détachez de la cartouche de
toner. Celle-ci est à usage unique et n'est donc pas réutilisable.
NOTA: Smaltire il componente (C) staccato dalla cartuccia del toner in modo appropriato. È monouso e non
può essere più utilizzato.
HINWEIS: Entsorgen Sie das Teil (C), das Sie von der Tonerkassette gelöst haben, auf die entsprechende Art.
Es wird nicht mehr verwendet und kann entsorgt werden.
NOTA: Deseche de forma adecuada la pieza (C) que desacople del cartucho de tóner. Es desechable y ya no
se utilizará.
(C)
(B)
(A)
(B)
(A)
(A)

6
4 Prepare the tray and add paper
Préparez le bac et ajoutez du papier
Preparare il vassoio e aggiungere la carta
Vorbereiten des Papierfachs und Einlegen von Papier
Prepare la bandeja y añada papel

7
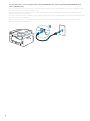
5 Connect the necessary cables
Raccordez les câbles nécessaires | Collegare i cavi necessari
Anschließen der notwendigen Kabel | Conecte los cables necesarios
For USB connection, connect the USB cable
Pour la connexion USB, raccordez le câble USB
Nel caso di connessione USB, connettere il cavo USB
Schließen Sie bei einer USB-Verbindung das USB-Kabel an
Para la conexión USB, conecte el cable USB
For Ethernet connection, connect the ethernet cable
Pour la connexion Ethernet, raccordez le câble Ethernet
Nel caso di connessione ethernet, connettere il cavo ethernet
Schließen Sie bei einer Ethernet-Verbindung das Ethernet-Kabel an
Para la conexión Ethernet, conecte el cable Ethernet

8
For fax connection, connect telephone line cable (Dell Multifunction Printer | E515dn and Dell Multifunction
Printer | E515dw only)
Pour la connexion du fax, raccordez le câble de la ligne téléphonique (Dell Multifunction Printer | E515dn et Dell
Multifunction Printer | E515dw uniquement)
Per la connessione fax, collegare il cavo della linea telefonica (solo Dell Multifunction Printer | E515dn e Dell
Multifunction Printer | E515dw)
Schließen Sie für eine Faxverbindung das Telefonleitungskabel an (nur Dell Multifunction Printer | E515dn und Dell
Multifunction Printer | E515dw)
Para la conexión de fax, conecte el cable de línea telefónica (solo Dell Multifunction Printer | E515dn y Dell
Multifunction Printer | E515dw)

9
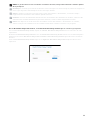
6 Connect the power cable and turn on the printer
Branchez le câble d'alimentation et allumez l'imprimante
Connettere il cavo di alimentazione e accendere la stampante
Anschließen des Netzkabels und Einschalten des Druckers
Conecte el cable de alimentación y encienda la impresora
NOTE: The country setup automatically starts when you turn on the printer for the first time. Follow the
panel message and select your country.
REMARQUE : La configuration du pays démarre automatiquement lors de la première mise sous tension de
l'imprimante. Suivez le message du panneau et sélectionnez votre pays.
NOTA: L'impostazione del Paese si avvia automaticamente quando si accende la stampante per la prima
volta. Attenersi al messaggio visualizzato sul pannello, quindi selezionare il Paese.
HINWEIS: Die Einrichtung des Landes wird automatisch gestartet, wenn Sie den Drucker zum ersten Mal
einschalten. Befolgen Sie die Meldungen im Bedienfeld und wählen Sie das Land aus.
NOTA: La configuración del país se inicia automáticamente al encender la impresora por primera vez. Siga
las indicaciones del mensaje que aparece en el panel y seleccione su país.
Set Country
Press OK Key

10
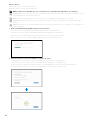
7 Install drivers and utilities
Installez les pilotes et les utilitaires | Installare i driver e i programmi di utilità
Installieren der Treiber und Dienstprogramme | Instale controladores y utilidades
Insert the
Software and Documentation
disc in your computer.
Alternatively, go to dell.com/support, enter the Service Tag of your printer, download the latest software and
driver, and then open the file that you downloaded.
Insérez le disque
Software and Documentation
dans votre ordinateur.
Vous pouvez également consulter la page dell.com/support, saisir le Service Tag de votre imprimante, télécharger
la dernière version du logiciel et du pilote, puis ouvrir le fichier que vous avez téléchargé.
Inserire il disco
Software and Documentation
nel computer.
In alternativa, visitare il sito dell.com/support, inserire il Service Tag della stampante, scaricare l'ultimo software e
driver, quindi aprire il file scaricato.
Legen Sie die CD
Software and Documentation
in den Computer ein.
Besuchen Sie alternativ dell.com/support, geben Sie das Service-Tag Ihres Druckers ein, laden Sie sich die aktuelle
Software und den Treiber herunter, und öffnen Sie dann die heruntergeladene Datei.
Introduzca el disco
Software and Documentation
en el ordenador.
También puede ir a dell.com/support, introducir la Service Tag de la impresora, descargar el software y el
controlador más recientes y después abrir el archivo que ha descargado.
NOTE: Before you begin, for wired printer setup ensure that the printer is connected to your computer using
an Ethernet or USB cable. For wireless printer setup ensure that there is no cable connected between the
printer and your computer.
REMARQUE : Dans le cas d'une connexion filaire, vérifiez avant de commencer que l'imprimante est
correctement raccordée à l'ordinateur avec un câble Ethernet ou USB. Dans le cas d'une connexion sans fil,
vérifiez qu'aucun câble ne relie l'imprimante à l'ordinateur.
NOTA: Prima di iniziare, per la configurazione di stampanti collegate con cavo assicurarsi che la stampante
sia connessa al computer mediante un cavo Ethernet o USB. Per la configurazione di una stampante wireless
assicurarsi che non ci sia alcun cavo che collega la stampante e il computer.
HINWEIS: Stellen Sie bei einer kabelgebundenen Druckereinrichtung sicher, dass der Drucker über ein
Ethernet- oder USB-Kabel mit dem Computer verbunden ist, bevor Sie beginnen. Stellen Sie bei einer
Drahtlosverbindung sicher, dass keine Kabelverbindung zwischen dem Drucker und Computer besteht.
NOTA: Antes de comenzar, en la configuración de la impresora con cable, asegúrese de que la impresora
esté conectada al ordenador con un cable Ethernet o USB. En la configuración de la impresora inalámbrica,
asegúrese de que no hay ningún cable conectado entre la impresora y el ordenador.
www.dell.com/support

11
NOTE: To get the latest version of software or firmware in future, always allow automatic software updates
when prompted.
REMARQUE : À l'avenir, pour obtenir la dernière version de logiciel ou de micrologiciel, autorisez toujours les
mises à jour logicielles automatiques lors des messages d'invite.
NOTA: In futuro per ottenere la versione più recente del software o del firmware, consentire sempre
l'aggiornamento automatico del software quando richiesto.
HINWEIS: Um auch in Zukunft die aktuelle Version der Software oder Firmware zu erhalten, sollten Sie die
automatischen Softwareaktualisierungen immer zulassen, wenn Sie dazu aufgefordert werden.
NOTA: Para disponer en todo momento de la última versión del software o del firmware en el futuro,
autorice siempre las actualizaciones de software automáticas cuando el sistema se lo pregunte.
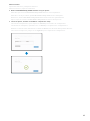
On the Dell Printer Easy Install window, click Next. Dell Printer Easy Install begins to search for your printer.
Sur la fenêtre Dell Printer Easy Install, cliquez sur Suivant. Dell Printer Easy Install lance la recherche de cette
imprimante.
Nella finestra Dell Printer Easy Install fare clic su Avanti. Dell Printer Easy Install avvia la ricerca della stampante.
Klicken Sie im Fenster Dell Printer Easy Install auf Weiter. Dell Printer Easy Install beginnt die Suche nach dem
Drucker.
En la ventana Dell Printer Easy Install, haga clic en Siguiente. Dell Printer Easy Install empieza a buscar esta
impresora.

12
Wireless Printer
Imprimante sans fil | Stampante wireless
Drahtlos-Drucker | Impresora inalámbrica
NOTE: Supported on 802.11b/g/n over 2.4 GHz but not compatible with 802.11n/ac over 5.0 GHz.
REMARQUE : Prise en charge sur les réseaux 802.11b/g/n via la bande 2,4 GHz, mais non compatible avec les
réseaux 802.11n/ac via la bande 5,0 GHz.
NOTA: Supportato 802.11b/g/n su 2,4 GHz ma non compatibile con 802.11n/ac su 5,0 GHz.
HINWEIS: Wird bei 802.11b/g/n über 2,4 GHz unterstützt, ist aber nicht kompatibel mit 802.11n/ac über
5,0 GHz.
NOTA: Compatible con el estándar 802.11b/g/n en la banda 2,4 GHz pero no compatible con 802.11n/ac en
la banda 5,0 GHz.
1 Wait for
Dell Printer Easy Install
wizard to find your printer.
Attendez que l'assistant Dell Printer Easy Install détecte votre imprimante.
Attendere che la procedura guidata Dell Printer Easy Install trovi la stampante.
Warten Sie, bis der Dell Printer Easy Install-Assistent den Drucker gefunden hat.
Espere a que el asistente de Dell Printer Easy Install encuentre la impresora.
2 When the printer is found, click
Install
to complete the setup.
Si l'imprimante a été trouvée, cliquez sur Installer pour terminer la configuration.
Se la stampante viene trovata fare clic su Installa per completare la configurazione.
Wenn der Drucker gefunden wurde, klicken Sie auf Installieren, um die Einrichtung abzuschließen.
Si se encuentra la impresora, haga clic en Instalar para completar la configuración.

13
Ethernet Printer
Imprimante Ethernet | Stampante Ethernet
Ethernet-Drucker | Impresora Ethernet
1 Wait for
Dell Printer Easy Install
wizard to find your printer.
Attendez que l'assistant Dell Printer Easy Install détecte votre imprimante.
Attendere che la procedura guidata Dell Printer Easy Install trovi la stampante.
Warten Sie, bis der Dell Printer Easy Install-Assistent den Drucker gefunden hat.
Espere a que el asistente de Dell Printer Easy Install encuentre la impresora.
2 Select the printer, and then click
Next
to complete the setup.
Sélectionnez l'imprimante, puis cliquez sur Suivant pour terminer la configuration.
Selezionare la stampante, quindi fare clic su Avanti per completare la configurazione.
Wählen Sie den Drucker und klicken Sie dann auf Weiter, um die Einrichtung abzuschließen.
Seleccione la impresora y haga clic en Siguiente para completar la configuración.

14
USB Printer
Imprimante USB | Stampante USB
USB-Drucker | Impresora USB
1 Wait for
Dell Printer Easy Install
wizard to find and install your printer.
Attendez que l'assistant Dell Printer Easy Install détecte et installe votre imprimante.
Attendere che la procedura guidata Dell Printer Easy Install trovi e installi la stampante.
Warten Sie, bis der Dell Printer Easy Install-Assistent den Drucker gefunden und installiert hat.
Espere a que el asistente de Dell Printer Easy Install encuentre e instale la impresora.

15
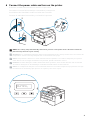
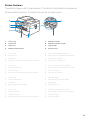
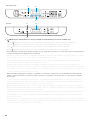
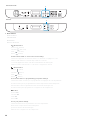
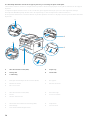
Printer Features
Caractéristiques de l'imprimante | Caratteristiche della stampante
Druckerfunktionen | Características de la impresora
1 Service Tag 5 Manual Feed Slot
2 Front Cover 6 Manual Feed Paper Guide
3 Paper Tray 7 Support Flap
4 Manual Feed Slot Cover 8 Control Panel
1 Service Tag 5 Fente d'alimentation manuelle
2 Capot avant 6 Guide papier de l'alimentation manuelle
3 Bac papier 7 Languette de support
4 Couvercle de la fente d'alimentation manuelle 8 Panneau de configuration
1 Service Tag 5 Fessura di alimentazione manuale
2 Coperchio anteriore 6 Guida carta per alimentazione manuale
3 Cassetto fogli 7 Aletta di supporto
4 Coperchio fessura di alimentazione manuale 8 Pannello di comando
1 Service Tag 5 Manuelle Zufuhr
2 Vordere Abdeckung 6 Papierführung manuelle Zufuhr
3 Papierfach 7 Stützklappe
4 Abdeckung manuelle Zufuhr 8 Bedienerkonsole
1 Service Tag 5 Ranura de alimentación manual
2 Cubierta frontal 6 Guía de papel de alimentación manual
3 Bandeja de papel 7 Solapa de apoyo
4 Cubierta de la ranura de alimentación manual 8 Panel de control
5
4
6
7
8
3
1
2

16
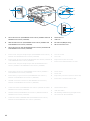
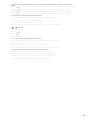
1 Phone Connector (Dell Multifunction Printer | E515dn and Dell
Multifunction Printer | E515dw)
4 Network Port
5 USB Port
2 Wall Jack Connector (Dell Multifunction Printer | E515dn and
Dell Multifunction Printer | E515dw)
6 Back Cover (Output Tray)
7 AC Power Connector
3 Phone Connector CAP (Dell Multifunction Printer | E515dn and
Dell Multifunction Printer | E515dw)
1 Connecteur de ligne téléphonique (Dell Multifunction Printer |
E515dn et Dell Multifunction Printer | E515dw)
4 Port de réseau
5 Port USB
2 Connecteur de prise murale (Dell Multifunction Printer | E515dn
et Dell Multifunction Printer | E515dw)
6 Capot arrière (bac de sortie)
7 Connecteur d'alimentation secteur
3 Connecteur de ligne téléphonique CAP (Dell Multifunction
Printer | E515dn et Dell Multifunction Printer | E515dw)
1 Connettore telefonico (Dell Multifunction Printer | E515dn e
Dell Multifunction Printer | E515dw)
4 Porta di rete
5 Porta USB
2 Connettore per presa a muro (Dell Multifunction Printer |
E515dn e Dell Multifunction Printer | E515dw)
6 Coperchio posteriore (Vassoio di uscita)
7 Connettore di alimentazione CA
3 TAPPO connettore telefonico (Dell Multifunction Printer |
E515dn e Dell Multifunction Printer | E515dw)
1 Telefonanschluss (Dell Multifunction Printer | E515dn und Dell
Multifunction Printer | E515dw)
4 Netzwerkanschluss
5 USB-Anschluss
2 Netzanschluss (Dell Multifunction Printer | E515dn und Dell
Multifunction Printer | E515dw)
6 Rückwärtige Abdeckung (Ausgabefach)
7 Anschluss für das Netzkabel
3 Telefonanschluss-ABDECKUNG (Dell Multifunction Printer |
E515dn und Dell Multifunction Printer | E515dw)
6
4
5
7
1
2
3

17
1 Conector del teléfono (Dell Multifunction Printer | E515dn y
Dell Multifunction Printer | E515dw)
4 Puerto de red
5 Puerto USB
2 Conector de la pared (Dell Multifunction Printer | E515dn y Dell
Multifunction Printer | E515dw)
6 Cubierta posterior (Bandeja de salida)
7 Conector de alimentación CA
3 Tapa del conector del teléfono (Dell Multifunction Printer |
E515dn y Dell Multifunction Printer | E515dw)
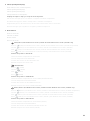
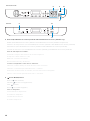
1 ADF Cover 3 Document Glass
2 Document Guides 4 Document Feeder Tray
1 Capot du CAD 3 Vitre d'exposition
2 Guides du papier 4 Plateau d'alimentation en documents
1 Coperchio ADF 3 Vetro documenti
2 Guide dei documenti 4 Vassoio di alimentazione dei documenti
1 ADF-Abdeckung 3 Dokumentenglas
2 Dokumentführungen 4 Dokumenteneinzugsfach
1 Cubierta de ADF 3 Cristal del escáner
2 Guías de documentos 4 Bandeja del alimentador de documentos
12
3
4

18
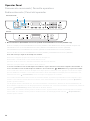
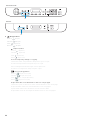
Operator Panel
Panneau de commande | Pannello operatore
Bedienerkonsole | Panel del operador
1 One Touch buttons (Dell Multifunction Printer | E515dn and Dell Multifunction Printer | E515dw only)
Boutons à simple pression (Dell Multifunction Printer | E515dn et Dell Multifunction Printer | E515dw uniquement)
Pulsanti One Touch (solo Dell Multifunction Printer | E515dn e Dell Multifunction Printer | E515dw)
Schnellwahltasten (nur Dell Multifunction Printer | E515dn und Dell Multifunction Printer | E515dw)
Botones de One Touch (solo Dell Multifunction Printer | E515dn y Dell Multifunction Printer | E515dw)
Store and recall up to eight fax and telephone numbers.
Mémorisez et rappelez jusqu'à huit numéros de fax et de téléphone.
Memorizzare e richiamare fino a otto numeri telefonici e fax.
Speichern Sie bis zu acht Fax- und Telefonnummern und rufen Sie diese auf.
Almacene y recupere hasta ocho números de fax y teléfono.
To access stored One Touch fax and telephone numbers 1-4, press the One Touch button assigned to that number. To
access stored One Touch fax and telephone numbers 5-8, hold down the (
Shift
) button as you press the number.
Pour accéder aux numéros de fax et de téléphone à simple pression mémorisés 1 à 4, appuyez sur le bouton à simple
pression attribué à ce numéro. Pour accéder aux numéros de fax et de téléphone à simple pression mémorisés 5 à 8,
maintenez le bouton (
Commutation
) enfoncé lorsque vous appuyez sur le numéro.
Per accedere ai numeri fax e telefonici One Touch memorizzati 1-4, premere il pulsante One Touch assegnato a quel
numero. Per accedere ai numeri telefonici e fax One Touch memorizzati 5-8, tenere premuto il pulsante (
Maiusc
)
quando si preme il numero.
Um die gespeicherten Schnellwahl-Fax- und -Telefonnummern 1-4 aufzurufen, drücken Sie die Schnellwahltaste, die
dieser Nummer zugewiesen ist. Um die gespeicherten Schnellwahl-Fax- und -Telefonnummern 5-8 aufzurufen, halten Sie
die Taste (
Umschalttaste)
gedrückt, während Sie die Ziffer drücken.
Para acceder a los números de fax y teléfono de One Touch 1-4, pulse el botón de One Touch asignado a ese número.
Para acceder a los números de fax y teléfono de One Touch 5-8, mantenga pulsado el botón (
Desplazamiento
)
mientras pulsa el número.
12
E515dn/E515dw
E514dw

19
2 (Fax) buttons (Dell Multifunction Printer | E515dn and Dell Multifunction Printer | E515dw only)
Boutons (Fax) (Dell Multifunction Printer | E515dn et Dell Multifunction Printer | E515dw uniquement)
Pulsanti (Fax) (solo Dell Multifunction Printer | E515dn e Dell Multifunction Printer | E515dw)
Tasten (Fax) (nur Dell Multifunction Printer | E515dn und Dell Multifunction Printer | E515dw)
Botón (Fax) (solo Dell Multifunction Printer | E515dn y Dell Multifunction Printer | E515dw)
(Redial/Pause) button
Bouton (Compo/Pause)
Pulsante (Ricomposizione/Pausa)
Taste (Wahlwiederholung/Pause)
Botón (Rellamada/Pausa)
Dials the last number you called. This button also inserts a pause when programming quick dial numbers or when
dialing a number manually.
Compose le dernier numéro appelé. Ce bouton permet également d'insérer une pause lors de la programmation de
numéros abrégés ou de la composition manuelle d'un numéro.
Compone l'ultimo numero contattato. Questo pulsante inserisce anche una pausa quando si programma numeri di
connessione rapida o quando si seleziona un numero manualmente.
Wählt die zuletzt aufgerufene Nummer. Diese Taste fügt auch eine Pause ein, wenn Sie Schnellwahlnummern
programmieren oder wenn eine Nummer manuell gewählt wird.
Marca el último número al que ha llamado. Este botón también inserta una pausa durante la programación de
números de marcación rápida o cuando se marca un número manualmente.
(Hook) button
Bouton (Raccrocher)
Pulsante (Aggancia)
Taste (Hörer)
Botón (Colgado)
Press this button before dialing to ensure a fax machine answers, and then press the (Start) button.
Appuyez sur ce bouton avant de composer un numéro pour vérifier qu'un télécopieur répond, puis appuyez sur le
bouton (Démarrer).
Premere questo pulsante prima della selezione per garantire la risposta di una macchina fax, quindi premere il
pulsante (Avvia)
Drücken Sie diese Taste vor dem Wählen, um sicherzustellen, dass das Faxgerät antwortet, und drücken Sie dann die
Taste (Start).
Pulse este botón antes de marcar para asegurarse de que responda un aparato de fax y después pulse el botón
(Iniciar).
If the printer is in Fax/Tel (F/T) Mode and you pick up the handset of an external telephone during the F/T ring
(pseudo double-rings), press this button to talk.
Si l'imprimante est en mode Fax/Tél (F/T) et que vous décrochez le combiné d'un téléphone externe pendant une
sonnerie F/T (pseudo sonneries doubles), appuyez sur ce bouton pour parler.
Se la stampante è in modalità Fax/Tel (F/T) e si solleva la cornetta di un telefono esterno durante lo squillo F/T
(pseudo doppio squillo), premere questo pulsante per parlare.
Wenn sich der Drucker im Modus Fax/Tel (F/T) befindet und Sie den Hörer eines externen Telefons während des F/T-
Klingelns (Pseudo-Doppelton) abnehmen, drücken Sie diese Taste, um zu sprechen.
Si la impresora está en Modo Fax/Tel (F/T) y usted descuelga el auricular de un teléfono externo durante el tono de
llamada F/T (dobles pseudotonos), pulse este botón para hablar.

20
3 (
Wi-Fi
) button (Dell Multifunction Printer | E514dw and Dell Multifunction Printer | E515dw only)
Bouton (
Wi-Fi
) (Dell Multifunction Printer | E514dw et Dell Multifunction Printer | E515dw uniquement)
Pulsante (
Wi-Fi
) (solo Dell Multifunction Printer | E514dw e Dell Multifunction Printer | E515dw)
Taste (
Wi-Fi
) (nur Dell Multifunction Printer | E514dw und Dell Multifunction Printer | E515dw)
Botón (
Wi-Fi
) (solo Dell Multifunction Printer | E514dw y Dell Multifunction Printer | E515dw)
Press this button and launch the wireless installer on your computer. Follow the on-screen instructions to set up a wireless
connection between your printer and your network.
Appuyez sur ce bouton et lancez le programme d'installation sans fil sur votre ordinateur. Suivez les instructions à l'écran
pour configurer une connexion sans fil entre votre imprimante et votre réseau.
Premere questo pulsante e avviare l'installazione wireless sul proprio computer. Seguire le istruzioni visualizzate per
impostare una connessione wireless fra la stampante e la rete.
Drücken Sie diese Taste und starten Sie das Wireless-Installationsprogramm auf Ihrem Computer. Befolgen Sie die
Anweisungen auf dem Bildschirm, um eine Wireless-Verbindung zwischen dem Drucker und dem Netzwerk einzurichten.
Pulse este botón e inicie el instalador inalámbrico en el ordenador. Siga las instrucciones en pantalla para configurar una
conexión inalámbrica entre la impresora y la red.
When this button lights green or yellow, your printer is connected to a wireless access point. When this button blinks
amber or yellow, the wireless connection is disconnected, or your printer is in the process of connecting to a wireless
access point.
Lorsque ce bouton est allumé en vert ou en jaune, cela signifie que votre imprimante est connectée à un point d'accès
sans fil. Lorsque ce bouton clignote en orange ou en jaune, cela signifie que la connexion sans fil est désactivée ou que
votre imprimante est en train de se connecter à un point d'accès sans fil.
Quando questo pulsante si accende con la luce verde o gialla, la stampante è collegata a un punto di accesso wireless.
Quando questo pulsante lampeggia con colore ambra o giallo, la connessione wireless non è scollegata o la stampante sta
eseguendo la connessione a un punto di accesso wireless.
Wenn diese Taste grün oder gelb leuchtet, ist der Drucker mit einem Wireless-Access Point verbunden. Wenn diese Taste
bernsteinfarben oder gelb blinkt, ist die Wireless-Verbindung getrennt oder das Gerät verbindet sich gerade mit einem
Wireless-Access Point.
Cuando este botón se enciende de color verde o amarillo, la impresora está conectada a un punto de acceso inalámbrico.
Cuando este botón parpadea de color naranja o amarillo, la conexión inalámbrica está desconectada o bien la impresora
se está conectando a un punto de acceso inalámbrico.
34
5
E515dn/E515dw
5
4
3
E514dw

21
4 LCD (Liquid Crystal Display)
Écran LCD (écran à cristaux liquides)
LCD (Liquid Crystal Display)
LCD (Liquid Crystal Display)
LCD (pantalla de cristal líquido)
Displays messages to help you set up and use the printer.
Affiche des messages pour vous aider à configurer et à utiliser l'imprimante.
Visualizza messaggi che aiutano ad impostare e utilizzare la stampante.
Zeigt Meldungen an, die Ihnen helfen, des Druckers einzurichten und zu verwenden.
Muestra mensajes que le ayudan a configurar y utilizar la impresora.
5Mode buttons
Boutons de mode
Pulsanti modalità
Modus-Tasten
Botones de modo
(FAX) button (Dell Multifunction Printer | E515dn and Dell Multifunction Printer | E515dw only)
Boutons (FAX) (Dell Multifunction Printer | E515dn et Dell Multifunction Printer | E515dw uniquement)
Pulsanti (FAX) (solo Dell Multifunction Printer | E515dn e Dell Multifunction Printer | E515dw)
Taste (FAX) (nur Dell Multifunction Printer | E515dn und Dell Multifunction Printer | E515dw)
Botón (FAX) (solo Dell Multifunction Printer | E515dn y Dell Multifunction Printer | E515dw)
Switches the printer to FAX Mode.
Permet de mettre l'imprimante en mode FAX.
Passa la stampante alla modalità FAX.
Schaltet den Drucker in den FAX-Modus um.
Cambia la impresora al modo FAX.
(SCAN) button
Bouton (SCAN)
Pulsante (SCAN)
Taste (SCAN)
Botón (SCAN)
Switches the printer to SCAN Mode.
Permet de mettre l'imprimante en mode SCAN (NUMÉRISATION).
Passa la stampante alla modalità SCAN.
Schaltet den Drucker in den SCAN-Modus um.
Cambia la impresora al modo SCAN (ESCANEO).
(COPY) button (Dell Multifunction Printer | E515dn and Dell Multifunction Printer | E515dw only)
Boutons (COPY) (Dell Multifunction Printer | E515dn et Dell Multifunction Printer | E515dw uniquement)
Pulsanti (COPY) (solo Dell Multifunction Printer | E515dn e Dell Multifunction Printer | E515dw)
Taste (COPY) (nur Dell Multifunction Printer | E515dn und Dell Multifunction Printer | E515dw)
Botón (COPY) (solo Dell Multifunction Printer | E515dn y Dell Multifunction Printer | E515dw)
Switches the printer to COPY Mode.
Permet de mettre l'imprimante en mode COPY (COPIE).
Passa la stampante alla modalità COPY.
Schaltet den Drucker in den COPY (KOPIER)-Modus um.
Cambia la impresora al modo COPY (COPIA).

22
6 (Copy) buttons
Bouton (Copie)
Pulsante (Copia)
Taste (Kopieren)
Botones (Copiar)
(Options) button
Bouton (Options)
Pulsante (Opzioni)
Taste (Optionen)
Botón (Opciones)
Accesses temporary settings for copying.
Permet d'accéder aux paramètres temporaires pour la copie.
Accede alle impostazioni temporanee per la copia.
Ruft vorübergehende Einstellungen zum Kopieren auf.
Accede a la configuración temporal para copiar.
(2 in 1 (ID) Copy) button
Bouton (Copie 2 en 1 (ID))
Pulsante (Copia 2 in 1 (ID))
Taste (2-in-1-Kopie (Ausweis))
Botón (Copia 2 en 1 (ID))
Copies both sides of an identification card onto a single page.
Permet de copier les deux faces d'une carte d'identité sur une seule page.
Copia entrambi i lati di una carta di identità su una sola pagina.
Kopiert beide Seiten eines Ausweises auf ein einzelnes Blatt.
Copia ambas caras de una tarjeta de identificación en una sola página.
6
E515dn/E515dw
6
E514dw

23
(2-sided) button (Dell Multifunction Printer | E515dn and Dell Multifunction Printer | E515dw only)
Boutons (2 faces) (Dell Multifunction Printer | E515dn et Dell Multifunction Printer | E515dw uniquement)
Pulsanti (Fronte retro) (solo Dell Multifunction Printer | E515dn e Dell Multifunction Printer | E515dw)
Taste (2-seitig) (nur Dell Multifunction Printer | E515dn und Dell Multifunction Printer | E515dw)
Botón (2 caras) (solo Dell Multifunction Printer | E515dn y Dell Multifunction Printer | E515dw)
Copies on both sides of a page.
Permet de copier sur les deux face d'une page.
Copia su entrambi i lati di una pagina.
Kopiert auf beide Seiten eines Blattes.
Copia en ambas caras de una página.

24
7Menu buttons
Boutons Menu
Pulsanti Menu
Menütasten
Botones del menú
(Clear) button
Bouton (Effacer)
Pulsante (Cancella)
Taste (Löschen)
Botón (Borrar)
Deletes entered data or cancels the current setting.
Permet de supprimer les données saisies ou d'annuler le réglage en cours.
Elimina i dati immessi o annulla l'impostazione corrente.
Löscht eingegebene Daten oder bricht die aktuelle Einstellung ab.
Elimina los datos introducidos o cancela la configuración actual.
(Menu) button
Bouton (Menu)
Pulsante (Menu)
Taste (Menü)
Botón (Menú)
Accesses the Menu for programming your printer settings.
Permet d'accéder au menu pour programmer les réglages de votre imprimante.
Accede al menu per la programmazione delle impostazioni della stampante.
Ruft das Menü zum Programmieren der Druckereinstellungen auf.
Accede al menú para programar la configuración de la impresora.
OK
button
Bouton
OK
Pulsante
OK
Taste
OK
Botón
OK
Stores your printer settings.
Permet de mémoriser les paramètres de votre imprimante.
Memorizza le impostazioni della stampante.
Speichert die Druckereinstellungen.
Almacena la configuración de la impresora.
7
E515dn/E515dw
7
E514dw

25
buttons (Dell Multifunction Printer | E515dn and Dell Multifunction Printer | E515dw only)
Boutons (Dell Multifunction Printer | E515dn et Dell Multifunction Printer | E515dw uniquement)
Pulsanti (solo Dell Multifunction Printer | E515dn e Dell Multifunction Printer | E515dw)
Tasten (nur Dell Multifunction Printer | E515dn und Dell Multifunction Printer | E515dw)
Botones (solo Dell Multifunction Printer | E515dn y Dell Multifunction Printer | E515dw)
Scrolls back or forward through menu selections.
Permet de faire défiler vers l'avant ou l'arrière dans les sélections de menu.
Scorre in avanti e indietro tra le selezioni dei menu.
Blättert in der Menüauswahl zurück oder vorwärts.
Permite desplazarse hacia atrás o hacia delante por las selecciones de menús.
buttons
Boutons
Pulsanti
Tasten
Botones
Scrolls up or down through menus and options.
Permet de faire défiler vers le haut ou le bas dans les menus et les options.
Scorre in alto o in basso tra i menu e le opzioni.
Blättert in den Menüs und Optionen nach oben oder unten.
Permite desplazarse hacia arriba o hacia abajo por los menús y las opciones.
Press these buttons to change the resolution in Fax Mode.
Appuyez sur ces boutons pour changer la résolution en mode Fax.
Premere questi pulsanti per modificare la risoluzione in Modalità Fax.
Drücken Sie diese Tasten, um die Auflösung im Fax-Modus zu ändern.
Pulse estos botones para cambiar la resolución en el modo Fax.

26
8 Dial Pad (Dell Multifunction Printer | E515dn and Dell Multifunction Printer | E515dw only)
Cadran (Dell Multifunction Printer | E515dn et Dell Multifunction Printer | E515dw uniquement)
Tastierino di composizione (solo Dell Multifunction Printer | E515dn e Dell Multifunction Printer | E515dw)
Zifferntasten (nur Dell Multifunction Printer | E515dn und Dell Multifunction Printer | E515dw)
Teclado de marcación (solo Dell Multifunction Printer | E515dn y Dell Multifunction Printer | E515dw)
Dials fax and telephone numbers.
Permet de composer des numéros de fax et de téléphone.
Compone i numeri di telefono e fax.
Wählt Fax- und Telefonnummern.
Marca números de fax y de teléfono.
Use this as a keyboard to enter text or characters.
Utilisez-le comme clavier pour saisir du texte ou des caractères.
Utilizzarlo come tastiera per immettere testo o caratteri.
Verwenden Sie diese Tasten als Tastatur, um Text oder Zeichen einzugeben.
Utilícelo como teclado para introducir texto o caracteres.
9 (Power On/Off) button
Bouton (Marche/Arrêt)
Pulsante (Accessione/spegnimento)
Taste (Ein/Aus)
Botón (encendido/apagado)
Turns on the printer.
Permet d'allumer l'imprimante.
Accendere la stampante.
Schaltet den Drucker ein.
Enciende la impresora.
8910
11
E515dn/E515dw
11
109
E514dw

27
Turn off the printer by pressing and holding the (Power On/Off) button. The LCD displays
Shutting Down
for a few
seconds to turn off.
Éteignez l'imprimante en maintenant le bouton (Marche/Arrêt) enfoncé. L'écran LCD affiche
Arrêt en cours
pendant
quelques secondes avant de s'éteindre.
Spegnere la stampante tenendo premuto il pulsante (Accensione/spegnimento). Il display LCD visualizza
Shutting
Down
(Spegnimento) per alcuni secondi.
Schalten Sie den Drucker aus, indem Sie die Taste (Ein/Aus) gedrückt halten. Das LCD zeigt einige Sekunden lang die
Meldung zum
Ausschalten
an und schaltet sich dann aus.
Apague la impresora manteniendo pulsado el botón (encendido/apagado). La pantalla LCD muestra el mensaje
Shutting Down
(Apagando) durante unos segundos antes de apagarse.
10 (Cancel) button
Bouton (Annuler)
Pulsante (Annulla)
Taste (Abbrechen)
Botón
(Cancelar)
Stops an operation.
Permet d'arrêter une opération.
Interrompe un'operazione.
Stoppt einen Vorgang.
Detiene una operación.
Exits from a menu.
Permet de quitter un menu.
Esce da un menu.
Schließt ein Menü.
Sale de un menú.
11 (Start) button
Bouton (Démarrer)
Pulsante (Avvia)
Taste (Start)
Botón
(Inicio)
Starts sending faxes.
Démarre l'envoi de fax.
Avvia l'invio di fax.
Startet das Senden von Faxen.
Inicia el envío de faxes.
Starts copying.
Démarre la copie.
Avvia la copia.
Startet das Kopieren.
Inicia la copia.
Starts scanning documents.
Démarre la numérisation de documents.
Avvia la scansione di documenti.
Startet das Scannen von Dokumenten.
Inicia el escaneo de documentos.

28
Dell Printer Hub
Dell Printer Hub | Dell Printer Hub
Dell Printer Hub | Dell Printer Hub
Manage your printer and imaging needs with ease. The Dell Printer Hub consolidates printer management and
monitoring tools, advanced scan features, cloud connectivity and more, into an easy to use console for a simplified user
experience and improved workflow.
With the Dell Printer Hub, you can easily access the Dell Document Hub for document sharing and storage in supported
cloud services.
For more information about using the Dell Printer Hub, see the FAQ for the Dell Printer Hub or visit Dell.com/printerhub
Gérez facilement vos besoins en impression et numérisation. Dell Printer Hub consolide les outils de surveillance et de
gestion de l'imprimante, les fonctions de numérisation avancées, la connectivité en nuage et bien davantage, dans une
console facile d'emploi qui simplifie l'expérience utilisateur et améliore le flux de travail.
Avec Dell Printer Hub, vous pouvez accéder facilement aux services Dell Document Hub pour partager et stocker vos
documents sur le cloud.
Pour en savoir plus sur l'utilisation de Dell Printer Hub, consultez la FAQ de Dell Printer Hub ou consultez la page
Dell.com/printerhub
Gestione semplificata di stampante e immagini. Il Dell Printer Hub consolida gli strumenti di gestione e monitoraggio
della stampante, le funzioni di scansione avanzate, la connettività cloud e altro ancora, in una console di facile utilizzo
per un'esperienza semplificata da parte dell'utente e un flusso di lavoro migliore.
Grazie a Dell Printer Hub, è possibile accedere facilmente a Dell Document Hub per la condivisione e l'archiviazione dei
documenti nei servizi cloud supportati.
Per ulteriori informazioni sull'uso di Dell Printer Hub, vedere le domande frequenti in Dell Printer Hub o visitare il sito
Dell.com/printerhub
Verwalten Sie ganz einfach Ihren Drucker, und nutzen Sie die benutzerfreundlichen Bildverarbeitungsfunktionen. Das
Dell Printer Hub stellt Druckerverwaltungs- und Überprüfungstools, erweiterte Scanfunktionen, Cloud-Konnektivität
und vieles mehr in einer einfach zu bedienenden Konsole bereit. Dies ermöglicht eine vereinfachte Nutzung und bessere
Arbeitsabläufe.
Dell Printer Hub bietet Ihnen folgende Möglichkeiten rufen Sie ganz einfach Dell Document Hub auf, und teilen und
speichern Sie Dokumente bei unterstützten Cloud-Diensten.
Weitere Informationen zur Verwendung von Dell Printer Hub finden Sie in den FAQs zum Dell Printer Hub oder
besuchen Sie Dell.com/printerhub
Administre su impresora y sus necesidades de imagen de una forma sencilla. Dell Printer Hub combina herramientas de
gestión y de supervisión de la impresora, características avanzadas de escaneado, conectividad a la nube y mucho más,
en una consola fácil de usar que proporciona al usuario una experiencia simplificada y un flujo de trabajo mejorado.
Con la aplicación Dell Printer Hub, se puede acceder fácilmente a Dell Document Hub para compartir y almacenar
documentos en servicios en la nube compatibles.
Para obtener más información acerca del uso de Dell Printer Hub, consulte las preguntas frecuentes en Dell Printer Hub
o bien visite Dell.com/printerhub

29
Dell Document Hub
Dell Document Hub | Dell Document Hub
Dell Document Hub | Dell Document Hub
Easily access and share documents, images and digital content with the Dell Document Hub. This innovative cloud
collaboration solution connects your printer and devices to popular cloud services, providing a flexible and secure way
to collaborate from virtually anywhere.
For more information about using Dell Document Hub, see the FAQ in Dell Document Hub or visit
Dell.com/documenthub
Accédez aux documents, images et contenus numériques et partagez-les facilement avec Dell Document Hub. Cette
solution innovante de collaboration en nuage connecte votre imprimante et vos périphériques à des services en nuage
populaires, fournissant ainsi un moyen flexible et sécurisé de collaborer de pratiquement n'importe où.
Pour en savoir plus sur l'utilisation de Dell Document Hub, consultez la FAQ de Dell Document Hub ou consultez la page
Dell.com/documenthub
Accedere e condividere i documenti con facilità, le immagini e il contenuto digitale con Dell Document Hub. Questa
innovativa soluzione di collaborazione cloud connette la stampante e i dispositivi ai noti servizi cloud, offrendo un modo
flessibile e sicuro per collaborare virtualmente da qualsiasi luogo.
Per ulteriori informazioni sull'uso di Dell Document Hub, vedere le domande frequenti in Dell Document Hub o visitare il
sito Dell.com/documenthub
Greifen Sie mit Dell Document Hub einfach auf Dokumente, Bilder und digitale Inhalte zu und teilen Sie diese. Diese
innovative Cloud-Zusammenarbeitslösung verbindet Ihren Drucker und Ihre Geräte mit beliebten Cloud-Diensten und
bietet eine flexible und sichere Möglichkeit zur Zusammenarbeit und das von fast überall.
Weitere Informationen zur Verwendung von Dell Document Hub finden Sie in den FAQs zum Dell Document Hub oder
besuchen Sie Dell.com/documenthub
Acceda a documentos, imágenes y contenido digital, y compártalos con facilidad, con Dell Document Hub. Este servicio
innovador de colaboración en la nube conecta su impresora y sus dispositivos a servicios en la nube populares, lo que
proporciona una forma segura y flexible de colaborar desde prácticamente cualquier lugar.
Para obtener más información acerca del uso de Dell Document Hub, consulte las preguntas frecuentes en
Dell Document Hub o bien visite Dell.com/documenthub

30
Tips and Tricks
Trucs et astuces | Suggerimenti
Tipps und Tricks | Consejos y sugerencias
Setting up a wireless connection (Dell Multifunction Printer | E514dw and Dell Multifunction
Printer | E515dw only)
Établissement d'une connexion sans fil (Dell Multifunction Printer | E514dw et Dell Multifunction
Printer | E515dw uniquement)
Impostazione di una connessione wireless (solo Dell Multifunction Printer | E514dw e Dell
Multifunction Printer | E515dw)
Einrichten einer Wireless-Verbindung (nur Dell Multifunction Printer | E514dw und Dell
Multifunction Printer | E515dw)
Configuración de una conexión inalámbrica (solo Dell Multifunction Printer | E514dw y Dell
Multifunction Printer | E515dw)
1 Insert the
Software and Documentation
disc that is provided with the printer into your computer.
The Dell Printer Easy Install program launches automatically.
2Click
Main Menu
.
3Click
Setup
.
4Click
Wireless
.
5 Follow the instructions on the screen, and configure the wireless setting of the printer.
1 Insérez dans l'ordinateur le disque
Software and Documentation
fourni avec l'imprimante.
Le programme Dell Printer Easy Install démarre automatiquement.
2Cliquez sur
Menu principal
.
3Cliquez sur
Configuration
.
4Cliquez sur
Sans fil
.
5 Suivez les instructions à l'écran, puis configurez le réglage sans fil de l'imprimante.
1 Inserire nel computer il disco
Software and Documentation
fornito con la stampante.
Il programma Dell Printer Easy Install viene avviato automaticamente.
2Fare clic su
Menu principale
.
3Fare clic su
Impostazione
.
4Fare clic su
Wireless
.
5 Seguire le istruzioni visualizzate a schermo e configurare le impostazioni wireless della stampante.
1 Legen Sie die mit dem Drucker gelieferte Disc
Software and Documentation
in Ihren Computer ein.
Das Programm Dell Printer Easy Install wird automatisch gestartet.
2 Klicken Sie auf
Hauptmenü
.
3 Klicken Sie auf
Einrichtung
.
4 Klicken Sie auf
Drahtlos
.
5 Befolgen Sie die Anweisungen auf dem Bildschirm und konfigurieren Sie die Wireless-Einstellungen des Druckers.

31
1 Introduzca el disco
Software and Documentarion
suministrado con la impresora en su ordenador.
El programa Dell Printer Easy Install se inicia automáticamente.
2 Haga clic en
Menú principal
.
3 Haga clic en
Configurar
.
4 Haga clic en
Conexión inalámbrica
.
5 Siga las instrucciones en pantalla y configure los ajustes inalámbricos de la impresora.

32
Wireless Setup Issues (Dell Multifunction Printer | E514dw and Dell Multifunction Printer |
E515dw only)
Problèmes de configuration sans fil (Dell Multifunction Printer | E514dw et Dell Multifunction
Printer | E515dw uniquement)
Problemi con l'impostazione wireless (solo Dell Multifunction Printer | E514dw e Dell
Multifunction Printer | E515dw)
Probleme bei der Wireless-Einrichtung (nur Dell Multifunction Printer | E514dw und Dell
Multifunction Printer | E515dw)
Problemas con la configuración inalámbrica (solo Dell Multifunction Printer | E514dw y Dell
Multifunction Printer | E515dw)
Problem Action
Cannot setup wireless connection. Ensure that the Ethernet cable is disconnected from the printer.
Ensure that Wi-Fi is set to On. For more information, see User's Guide.
The firewall on your computer may be blocking communication with your
printer. Try disabling the firewall on your computer.
Cannot setup wireless connection
with WPS (Wi-Fi Protected Setup).
Ensure that the security setting of the wireless LAN access point or router is WPA
or WPA2. (WEP is not supported on WPS.)
Cannot setup wireless connection
with the WPS-PBC (Wi-Fi Protected
Setup-Push Button Configuration).
Press the WPS button on the wireless LAN access point or router within two
minutes after starting the WPS operation on the printer. For details about the
wireless LAN access point or router, see the manual supplied with the wireless
LAN access point or router.
Cannot setup wireless connection
with WPS-PIN (Wi-Fi Protected Setup-
Personal Identification Number).
Check if the PIN you have entered on the computer is correct.
Problème Action
Impossible d'établir une connexion
sans fil.
Assurez-vous que le câble Ethernet est débranché de l'imprimante.
Vérifiez que le Wi-Fi est réglé sur Activé. Pour plus d'informations, reportez-vous
au Guide de l'utilisateur.
Il est possible que le pare-feu de votre ordinateur bloque la communication avec
votre imprimante. Essayez de désactiver le pare-feu de votre ordinateur.
Impossible d'établir la connexion sans
fil avec le WPS (Wi-Fi Protected Setup).
Vérifiez que le paramètre de sécurité du routeur ou point d'accès au réseau local
sans fil est le WPA ou le WPA2. (Le WEP n'est pas pris en charge sur le WPS.)
Impossible d'établir la connexion sans
fil avec le WPS-PBC (Wi-Fi Protected
Setup-Push Button Configuration).
Appuyez sur le bouton WPS du routeur ou point d'accès au réseau local sans fil
dans les deux minutes suivant le début de l'utilisation du WPS sur l'imprimante.
Pour plus de détails sur le routeur ou point d'accès au réseau local sans fil,
reportez-vous au manuel fourni avec celui-ci.
Impossible d'établir la connexion sans
fil avec le WPS-PIN (Wi-Fi Protected
Setup-Personal Identification
Number).
Vérifiez si le code PIN que vous avez saisi sur l'ordinateur est correct.

33
Problema Operazioni da effettuare
Impossibile impostare la connessione
wireless.
Assicurarsi che il cavo Ethernet sia scollegato dalla stampante.
Assicurarsi che Wi-Fi sia attivato. Per maggiori informazioni, vedere la Guida per
l'utente.
Il firewall del computer potrebbe bloccare la comunicazione con la stampante.
Provare a disabilitare il firewall del computer.
Impossibile impostare la connessione
wireless utilizzando WPS (Wi-Fi
Protected Setup).
Verificare che l'impostazione di protezione del punto di accesso LAN o del router
sia WPA o WPA2 (WEP non è supportato da WPS).
Impossibile impostare la connessione
wireless utilizzando WPS-PBC (Wi-Fi
Protected Setup-Push Button
Configuration).
Premere il pulsante WPS sul punto di accesso LAN wireless o sul router entro due
minuti dall'avvio dell'operazione WPS sulla stampante. Per ulteriori informazioni
sul punto di accesso LAN wireless o sul router, consultare la documentazione
fornita con il punto di accesso LAN wireless o con il router.
Impossibile impostare la connessione
wireless utilizzando WPS-PIN (Wi-Fi
Protected Setup-Personal
Identification Number).
Verificare che il PIN inserito nel computer sia corretto.
Problem Maßnahme
Die Wireless-Verbindung kann nicht
eingerichtet werden.
Stellen Sie sicher, dass das Ethernet-Kabel vom Drucker getrennt ist.
Stellen Sie sicher, dass Wi-Fi auf Ein gesetzt ist. Weitere Informationen finden Sie
in der Benutzerhandbuch.
Die Firewall des Computers blockiert möglicherweise die Kommunikation mit
dem Drucker. Deaktivieren Sie testweise die Firewall des Computers.
Die Wireless-Verbindung kann nicht
mit WPS (Wi-Fi Protected Setup)
eingerichtet werden.
Stellen Sie sicher, dass die Sicherheitseinstellung des WLAN-Access Points oder
Routers auf WPA oder WPA2 eingestellt ist. (WEP wird bei WPS nicht unterstützt.)
Die Wireless-Verbindung kann nicht
mit WPS-PBC (Wi-Fi Protected Setup-
Push Button Configuration)
eingerichtet werden.
Drücken Sie die WPS-Taste am WLAN-Access Point oder Router innerhalb von
zwei Minuten, nachdem Sie den WPS-Vorgang beim Drucker gestartet haben.
Ausführliche Informationen zum WLAN-Access Point oder Router finden Sie in
der Bedienungsanleitung im Lieferumfang des WLAN-Access Points oder
Routers.
Die Wireless-Verbindung kann nicht
mit WPS-PIN (Wi-Fi Protected Setup-
Personal Identification Number)
eingerichtet werden.
Überprüfen Sie, ob die beim Computer eingegebene PIN korrekt ist.

34
Problema Acción
No se puede configurar la conexión
inalámbrica.
Asegúrese de que el cable Ethernet esté desconectado de la impresora.
Asegúrese de que Wi-Fi está ajustado en Activado. Si desea más información,
consulte la Guía del usuario.
El cortafuegos del ordenador puede estar bloqueando la comunicación con la
impresora. Intente deshabilitar el cortafuegos de la impresora.
No se puede configurar la conexión
inalámbrica con WPS (Wi-Fi Protected
Setup).
Asegúrese de que la configuración de seguridad del punto de acceso inalámbrico
de la LAN sea WPA o WPA2. (WEP no se admite en WPS.)
No se puede configurar la conexión
inalámbrica con WPS-PBC (Wi-Fi
Protected Setup-Push Button
Configuration).
Pulse el botón WPS en el punto de acceso inalámbrico de la LAN o el router
antes de que transcurran dos minutos desde el inicio de la operación WPS en la
impresora. Si desea más información sobre el punto de acceso inalámbrico de la
LAN o el router, consulte el manual que se proporciona con el punto de acceso
inalámbrico de la LAN o el router.
No se puede configurar la conexión
inalámbrica con WPS-PIN (Wi-Fi
Protected Setup-Personal
Identification Number).
Compruebe si el PIN que ha introducido en el ordenador es correcto.

35
Identifying the location of paper jams
Localisation de l'emplacement des bourrages papier
Individuazione della posizione degli inceppamenti
Identifizieren der Position eines Papierstaus
Identificación de la ubicación de atascos de papel
CAUTION: Do not attempt to clear any jams using tools or instruments. This may permanently damage the printer.
PRÉCAUTION : N'essayez pas d'éliminer les bourrages à l'aide d'outils ou d'instruments. L'imprimante pourrait être
définitivement endommagée.
ATTENZIONE: Non tentare di rimuovere l'inceppamento con attrezzi o strumenti. Ciò potrebbe causare danni
permanenti alla stampante.
ACHTUNG: Verwenden Sie keine Werkzeuge oder andere Gegenstände, um Papierstaus zu beseitigen. Dadurch
könnte der Drucker irreparabel beschädigt werden.
PRECAUCIÓN: No intente eliminar atascos con herramientas o instrumentos. Esto podría dañar la impresora para
siempre.

36
The following illustration shows where paper jams may occur along the print media path.
L'illustration suivante montre les emplacements possibles des bourrages papier le long du cheminement du support
imprimé.
La seguente figura mostra le aree in cui si verificano gli inceppamenti lungo il percorso dei supporti di stampa.
Die folgende Abbildung zeigt die Bereiche des Papierwegs, in denen Papierstaus auftreten können.
En la siguiente ilustración se muestra dónde se pueden producir los atascos de papel en la trayectoria del material de
impresión.
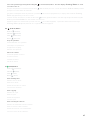
1 Auto Document Feeder (ADF) 4 Paper Tray
2 Fusing Unit 5 Inside Path
3 2-sided Tray
1 Chargeur automatique de documents (CAD) 4 Bac papier
2 Module de fusion 5 Chemin intérieur
3 Bac recto-verso
1 Auto Document Feeder (ADF) 4 Cassetto fogli
2 Fusore 5 Percorso interno
3 Vassoio fronte/retro
1 Automatischer Dokumenteneinzug (ADF) 4 Papierfach
2 Fixieranlage 5 Innerer Pfad
3 Fach für den beidseitigen Druck
4
2
3
5
1

37
Replacing the toner cartridge
Remplacement de la cartouche de toner | Sostituzione della cartuccia del toner
Ersetzen der Tonerkassette | Sustitución del cartucho de tóner
To replace the toner cartridge, see the
User's Guide
Pour remplacer la cartouche de toner, reportez-vous au
Guide de l'utilisateur
Per sostituire la cartuccia del toner, consultare la
Guida per l'utente
Um die Tonerkassette zu ersetzen, schlagen Sie in der
Benutzerhandbuch
Para sustituir el cartucho de tóner, consulte la
Guía del usuario
Cleaning the printer
Nettoyage de l'imprimante | Pulizia della stampante
Reinigen des Druckers | Limpieza de la impresora
To clean the printer, see the
User's Guide
Pour nettoyer l'imprimante, reportez-vous au
Guide de l'utilisateur
Per pulire la stampante, consultare la
Guida per l'utente
Um den Drucker zu reinigen, schlagen Sie in der
Benutzerhandbuch
Para limpiar la impresora, consulte la
Guía del usuario
Ordering Supplies
Commandes de fournitures | Ordinare i materiali di consumo
Bestellen von Verbrauchsmaterial | Pedido de suministros
You can order consumables such as toner cartridge and drum cartridge from Dell online when using a networked
printer. Enter the IP address of your printer in your web browser, launch the Dell Printer Configuration Web Tool, and
click the Order Supplies at: to order toner for your printer.
You can also order toner cartridges by the following method:
1 Launch
Dell Printer Hub
.
•
Windows 8 or 8.1: After pointing to the bottom right corner of the screen to display the menu bar (charms bar), click
Search
Apps
to enter "Dell Printer Hub" in the search box
Dell Printer Hub
.
•
Windows 7: Click
Start
All Programs
Dell Printers
Dell Printer Hub
.
The Dell Printer Hub window appears.
2 Select your printer from the
My Printers
list.
3Click
Supplies
, and then follow the instructions on the screen to order from the web.
NOTE: When you cannot get information from the printer automatically by two-way communication, a
window that prompts you to type the Service Tag appears. Type your Dell printer Service Tag in the field
provided. See the Printer Features section of this document to locate the Service Tag of your printer.
If you are ordering by phone, call the number that appears in the Order by Phone section.
1 Alimentador automático de documentos (ADF) 4 Bandeja de papel
2 Unidad del fusor 5 Ruta de entrada
3 Bandeja de 2 caras

38
Vous pouvez commander des fournitures telles qu'une cartouche de toner et une cartouche à tambour, sur le site
Internet Dell si vous utilisez une imprimante connectée en réseau. Saisissez l'adresse IP de votre imprimante dans votre
navigateur Internet, lancez le Dell Printer Configuration Web Tool, puis cliquez sur Commander des fournitures à : pour
commander le toner pour votre imprimante.
Vous pouvez également commander des cartouches de toner de la manière suivante :
1Lancez
Dell Printer Hub
.
•
Windows 8 ou 8.1 : Pointez dans l'angle inférieur droit de l'écran pour afficher la barre de menus (barre talismans), puis
cliquez sur
Rechercher
Applications
pour saisir "Dell Printer Hub" dans la zone de recherche
Dell Printer Hub
.
•
Windows 7 : Cliquez sur
Démarrer
Tous les programmes
Imprimantes Dell
Dell Printer Hub
.
La fenêtre Dell Printer Hub apparaît.
2 Sélectionnez votre imprimante dans la liste
Mes imprimantes
.
3Cliquez sur
Fournitures
, puis suivez les instructions à l'écran pour commander sur le Web.
REMARQUE : Si vous ne parvenez pas à obtenir automatiquement les informations depuis l'imprimante à l'aide
de la communication directe, une fenêtre s'ouvrira, vous invitant à saisir le Service Tag. Saisissez le Service Tag
de votre imprimante Dell dans le champ prévu à cet effet. Reportez-vous à la section Caractéristiques de
l'imprimante de ce document pour savoir où trouver le Service Tag de votre imprimante.
Si vous commandez par téléphone, composez le numéro qui s'affiche sous le titre Commander par téléphone.
Utilizzando una stampante collegata in rete, è possibile ordinare materiali di consumo, come una cartuccia del toner e
una cartuccia a tamburo, direttamente da Dell online. Immettere l'indirizzo IP della stampante nel browser Web, avviare
Dell Printer Configuration Web Tool e fare clic su Ordinare i materiali consumabili a: per ordinare toner per la
stampante.
È inoltre possibile ordinare cartucce di toner nel modo seguente:
1 Avviare
Dell Printer Hub
.
•
Windows 8 o 8.1: Puntare sull'angolo inferiore destro della schermata per visualizzare la barra dei menu (barra icone
promemoria), selezionare
Cerca
App
per accedere al "Dell Printer Hub" nella finestra di ricerca
Dell Printer Hub
.
•
Windows 7: Fare clic su
Start
Tutti i programmi
Stampanti Dell
Dell Printer Hub
.
Viene visualizzata la finestra Dell Printer Hub.
2 Selezionare la stampante dall'elenco
My Printers
.
3Fare clic su
Supplies
, quindi attenersi alle istruzioni visualizzate per eseguire l'ordine tramite Web.
NOTA: Quando non è possibile ottenere informazioni dalla stampante automaticamente tramite
comunicazione a due vie, viene visualizzata una finestra che chiede di digitare il Service Tag assistenza.
Immettere il Service Tag assistenza Dell nel campo apposito. Esaminare la sezione delle Caratteristiche della
stampante di questo documento per individuare il Service Tag della stampante.
Se si ordina al telefono, chiamare il numero visualizzato nella sezione Ordine telefonico.
Sie können Verbrauchsmaterialien, wie Tonerkassetten und Trommeleinheiten, von Dell online bestellen, wenn Sie einen
vernetzten Drucker verwenden. Geben Sie die IP-Adresse Ihres Druckers im Web-Browser ein, starten Sie das Dell
Printer Configuration Web Tool, und klicken Sie auf Verbrauchsmaterial bestellen bei:, um Toner für Ihren Drucker zu
bestellen.
Sie können auch auf die folgende Weise Tonerkassetten bestellen:
1 Starten Sie das
Dell Printer Hub
.
•
Windows 8 oder 8.1: Zeigen Sie auf die untere rechte Ecke des Bildschirms, um die Menüleiste (Charms-Leiste)
anzuzeigen, klicken Sie auf
Suche
Apps
geben Sie "Dell Printer Hub" im Suchfeld ein
Dell Printer Hub
.
•
Windows 7: Klicken Sie auf
Start
Alle Programme
Dell-Drucker
Dell Printer Hub
.
Das Fenster Dell Printer Hub wird angezeigt.
2 Wählen Sie Ihren Drucker in der Liste
Meine Drucker
aus.
3 Klicken Sie auf
Verbrauchsmaterial
, und befolgen Sie dann die Anweisungen auf dem Bildschirm, um über das Internet
zu bestellen.
HINWEIS: Wenn Sie nicht automatisch über die bidirektionale Kommunikation Informationen vom Drucker
abrufen können, wird ein Fenster angezeigt, in dem Sie aufgefordert werden, das Service Tag einzugeben.
Geben Sie das Service Tag Ihres Dell-Druckers in das dafür vorgesehene Feld ein. Informationen zur Position
des Service Tag des Druckers finden Sie im Abschnitt Druckerfunktionen dieses Dokuments.
Wenn Sie telefonisch bestellen möchten, rufen Sie die Nummer an, die im Abschnitt Telefonisch bestellen angezeigt
wird.

39
Si la impresora está conectada a la red, podrá solicitar consumibles, tales como cartuchos de tóner y cartuchos de
tambor a Dell en línea. Introduzca la dirección IP de la impresora en el navegador web, inicie la herramienta Dell Printer
Configuration Web Tool y haga clic en Realice el pedido de suministros en: para solicitar tóner para su impresora.
También puede solicitar cartuchos de tóner de la siguiente forma:
1Inicie
Dell Printer Hub
.
•
Windows 8 o 8.1: Apunte a la esquina inferior derecha de la pantalla para mostrar la barra de menús (barra de acceso),
haga clic en
Buscar
Aplicaciones
en el cuadro de búsqueda "Dell Printer Hub"
Dell Printer Hub
.
•
Windows 7: Haga clic en
Inicio
Todos los programas
Impresoras Dell
Dell Printer Hub
.
Aparece la ventana Dell Printer Hub.
2 Seleccione su impresora en la lista
Mis impresoras
.
3 Haga clic en
Suministros
y siga las instrucciones en pantalla para realizar el pedido desde la web.
NOTA: Cuando no se pueda obtener información de la impresora de forma automática mediante
comunicación bidireccional, aparecerá una ventana en la que se solicita que escriba el número de la Service
Tag. Escriba el número de la Service Tag de su impresora Dell en el campo correspondiente. Consulte la
sección Características de la impresora de este documento para localizar la Service Tag de la impresora.
Si lo solicita por teléfono, llame al número que aparece en la sección Solicitar por teléfono.
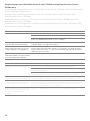
Finding Information
Où trouver les informations | Individuazione delle informazioni
Wo finde ich was | Búsqueda de Información
For additional information about printer components, consumable replacement, available software, and
troubleshooting, see the
User's Guide
at dell.com/support/manuals.
Pour en savoir plus sur les composants de l'imprimante, le remplacement des fournitures, les logiciels disponibles et le
dépannage, reportez-vous au
Guide de l'utilisateur
disponible sur dell.com/support/manuals.
Per ulteriori informazioni su componenti della stampante, rifornimento dei materiali di consumo, software disponibile e
risoluzione dei problemi, consultare la
Guida per l'utente
, disponibile all'indirizzo dell.com/support/manuals.
Weitere Informationen zu den Druckerkomponenten, zum Austausch von Verbrauchsmaterialien, zur verfügbaren
Software und zur Problemlösung finden Sie in der
Benutzerhandbuch
unter dell.com/support/manuals.
Si desea información adicional sobre componentes de la impresora, sustitución de suministros, software disponible y
solución de problemas, consulte la
Guía del usuario
en dell.com/support/manuals.

Product support and manuals
Assistance produit et manuels dell.com/support
Assistenza al prodotto e manuali dell.com/support/manuals
Produktsupport und -handbücher dell.com/printer
Asistencia del producto y manuales
Contact Dell
Prenez contact avec Dell | Contattare Dell dell.com/contactdell
Wenden Sie sich an Dell | Póngase en contacto con Dell
Regulatory and safety
Réglementation et sécurité | Regolamenti e sicurezza dell.com/regulatory_compliance
Richtlinien und Sicherheit | Regulaciones y seguridad
Regulatory model and type
Modèle et type réglementaire E514dw
Modello e tipo regolamentari E515dn
Regulatives Modell und Typ E515dw
Modelo regulador y tipo
Printer model
Modèle d'imprimante | Modello di stampante E514dw
Druckermodell | Modelo de impresora E515dn
E515dw
Copyright © 2015 Dell Inc. All rights reserved. This product is protected by U.S. and international copyright and
intellectual property laws. Dell
™
and the Dell logo are trademarks of Dell Inc. in the United States and/or other
jurisdictions. All other marks and names mentioned herein may be trademarks of their respective companies.
Printed in Vietnam
LEV376001-01/0TFGTFA01 2015-05
604E 80141/KB3288X5-2
-
 1
1
-
 2
2
-
 3
3
-
 4
4
-
 5
5
-
 6
6
-
 7
7
-
 8
8
-
 9
9
-
 10
10
-
 11
11
-
 12
12
-
 13
13
-
 14
14
-
 15
15
-
 16
16
-
 17
17
-
 18
18
-
 19
19
-
 20
20
-
 21
21
-
 22
22
-
 23
23
-
 24
24
-
 25
25
-
 26
26
-
 27
27
-
 28
28
-
 29
29
-
 30
30
-
 31
31
-
 32
32
-
 33
33
-
 34
34
-
 35
35
-
 36
36
-
 37
37
-
 38
38
-
 39
39
-
 40
40


Dell E514dw Multifunction Printer Guía de inicio rápido
- Categoría
- Telefonos
- Tipo
- Guía de inicio rápido
En otros idiomas
Documentos relacionados
-
Dell E310dw Printer Guía de inicio rápido
-
Dell E525w Color Multifunction Printer El manual del propietario
-
-
-
-
-