Celestron 22016 Instrucciones de operación

Categoría
Telescopios
Tipo
Instrucciones de operación

El Celestron 22016 es un telescopio versátil que permite explorar el firmamento y observar objetos terrestres. Incluye dos oculares: 20 mm (15 aumentos) y 4 mm (75 aumentos). Se puede utilizar sobre una mesa o cualquier superficie plana y estable. Apúntalo a tu objetivo aflojando la tuerca de bloqueo y moviendo el extremo del tubo. Utiliza el enfoque girando el botón hasta que la imagen esté nítida. Para observar objetos terrestres, mira desde la parte frontal del tubo.

El Celestron 22016 es un telescopio versátil que permite explorar el firmamento y observar objetos terrestres. Incluye dos oculares: 20 mm (15 aumentos) y 4 mm (75 aumentos). Se puede utilizar sobre una mesa o cualquier superficie plana y estable. Apúntalo a tu objetivo aflojando la tuerca de bloqueo y moviendo el extremo del tubo. Utiliza el enfoque girando el botón hasta que la imagen esté nítida. Para observar objetos terrestres, mira desde la parte frontal del tubo.

ORIENTATION DE L’IMAGE Lorsque vous regardez
dans l’oculaire depuis l’arrière ou le côté du tube
optique (en position naturelle), votre image sera
inversée (verticalement et horizontalement), ou
visible selon un angle différent. Si vous regardez
depuis l’avant (en vous décalant légèrement d’un
côté ou de l’autre) du tube optique, l’image sera
correcte. Utilisez cette technique pour observer
des objets terrestres.
MISE AU POINT Tournez la molette de mise au point
jusqu’à l’obtention d’une image nette. Le fait de
faire tourner la molette dans le sens horaire vous
permet de faire la mise au point sur un objet qui est
plus loin que celui que vous observez actuellement,
et vice-versa. Vous aurez besoin de refaire la mise
au point après changement des oculaires.
LITTÉRATURE EN BONUS Votre FirstScope est
livré avec un téléchargement gratuit du livre
électronique de Robert Reeves, Paysages lunaires.
Visitez www.celestron.com/robertreeves pour
acder au fichier PDF.
La boîte contenant votre FirstScope comporte une
carte imprimée de la Lune sur l’arrière. Découpez-la
et rangez-la avec votre télescope de manière à ce
que vous puissiez vous y référer lors d’observations
futures.
AVERTISSEMENT SUR LE SOLEIL
Ne regardez jamais directement le soleil à l’œil nu ou avec un télescope
(à moins d’utiliser un filtre adapté.) Des dommages oculaires permanents
et irréversibles peuvent être encourus.
DEUTSCH
SIGNATURE SERIES FIRSTSCOPE
ROBERT REEVES MOND
BEDIENUNGSANLEITUNG • MODELL-NR. 22016
Diese Betriebsanleitung enthält grundlegende Hinweise.
Für weitere ins Detail gehende Informationen besuchen Sie
bitte celestron.com.
Das Teleskop ist gebrauchsfertig vormontiert
verpackt. Im Lieferumfang sind zwei Okulare
enthalten: 20 mm (15x) und 4 mm (75x). Entfernen
Sie vor dem Beobachten von Objekten den
Objektivdeckel vorne am optischen Tubus.
OKULARE AUFSETZEN Das Okular ist ein optisches
Element, das das vom Teleskop fokussierte Bild
vergrößert. Es passt direkt in den Fokussierer (nach
dem Entfernen der Kappe). Achten Sie darauf, dass
die Rändelschrauben nicht in den Fokussiertubus
ragen. Stecken Sie dann die Chrom-Steckhülse
des Okulars in den Fokussiertubus und ziehen
Sie die Rändelschrauben fest, nicht zu fest ziehen.
Lokalisieren Sie Objekte zuerst mit dem Okular
von geringer Vergrößerungsleistung (15x). Sobald
Sie Ihr Objekt zentriert haben, können Sie zum
Okular mit höherer Vergrößerungsleistung (75x)
wechseln. Die Okulare können durch Umkehren
des oben beschriebenen Vorgangs gewechselt
werden.
Your telescope is ready to use right out of the
carton. Two eyepieces are included – 20 mm
(15 power), and 4 mm (75 power). Remove the
lens cap from the front of the optical tube before
searching for objects.
INSTALLING THE EYEPIECES An eyepiece is
an optical element that magnifies the image
focused by the telescope. It fits directly into the
focuser (after removing the cap). Make sure the
thumbscrews are not protruding into the focuser
tube. Then, insert the chrome barrel of the eyepiece
into the focuser and tighten the thumbscrews,
being careful not to overtighten. Locate objects
with the low power eyepiece (15x). Once you’ve
centered your object, you can change to the higher
power eyepiece (75x) for more magnification.
The eyepieces can be changed by reversing the
procedure described above.
POINTING THE TELESCOPE The telescope is
designed to be used on a table or other flat, sturdy
surface. The FirstScope is easy to move wherever
you want to point it. Turn counterclockwise to
loosen the lock nut and hold the tube end. Sight
along the optical tube towards the object you want
to find. Move the tube end until you find the object
you are searching for and then tighten the lock nut.
IMAGE ORIENTATION When looking through the
eyepiece from the rear or side of the optical tube
(natural position), your image will be inverted
(upside down and backwards) or angled. If you
view from the front (slightly to either side) of the
optical tube, the image will be correct. Use this
technique for looking at terrestrial subjects.
FOCUSING Simply turn the focus knob until the
object comes in sharp. Turning the knob clockwise
allows you to focus on an object that is farther than
the one you are currently observing and vice versa.
You will have to refocus after changing eyepieces.
BONUS MATERIALS Your FirstScope includes
a free download of Robert Reeves’ ebook,
Lunar Landscapes. Visit www.celestron.com/
robertreeves to access the PDF.
The box that your FirstScope came in has a map of
the lunar surface on the back. Cut it out and store
it with your telescope so you can refer to it during
future lunar observations.
SOLAR WARNING Never look directly at the sun with the
naked eye or with a telescope (unless you have the proper solar filter). Permanent
and irreversible eye damage may result!
FRANÇAIS
GAMME SIGNATURE FIRSTSCOPE
ROBERT REEVES LA LUNE
GUIDE DE LUTILISATEUR • MOLES N°. 22016
Ce mode d’emploi couvre les instructions de base. Pour
obtenir des instructions plus détaillées et des informations
supplémentaires, visitez celestron.com.
Votre télescope est pt à l’utilisation dès la sortie
du carton. Deux oculaires sont inclus: 20mm
(puissance de 15), et 4mm (puissance de 75).
Enlevez le protège-objectif de l’avant du tube
optique avant de commencer à observer.
INSTALLATION DES OCULAIRES Loculaire est un
élément optique qui grossit l’image focalie par le
télescope. Il s’installe directement sur le dispositif
de mise au point (après retrait du cache). Vériez
que les vis moletées ne dépassent pas dans le tube
du dispositif de mise au point. Insérez ensuite le
barillet chromé de l’oculaire dans le tube de mise
au point, puis serrez les vis moletées, en veillant à
ne pas serrer excessivement. Localiser des objets
avec l’oculaire de plus basse puissance (15x).
Une fois l’objet centré, vous pouvez basculer sur
un oculaire de plus grande puissance (75x) pour
agrandir encore plus l’image. Il est possible de
changer les oculaires en inversant la procédure
décrite ci-dessus.
POINTAGE DU TÉLESCOPE Le télescope est conçu
pour être utilisé sur une table ou une autre surface
plane et solide. Il est facile de déplacer le FirstScope
sur le lieu depuis lequel vous souhaitez observer.
Faites tourner la molette dans le sens inverse des
aiguilles d’une montre et tenez l’extrémité du tube.
Regardez dans la longueur du tube vers l’objet que
vous souhaitez trouver. Déplacez l’extrémité du
tube jusqu’à ce que vous trouviez l’objet que vous
recherchez et serrez la molette.
2
3
5
1
4
6
INSTRUCTION MANUAL - MODEL #22016
1. Thumbscrew
2. Eyepiece
3. Focuser
1. Vis
2. Oculaire
3. Bouton de mise au point
1. Flügelschraube
2. Okular
3. Fokussierer
4. Focus Knob
5. Tube End
6. Optical Tube
4. Dispositif de mise au point
5. Extrémité du tube
6. Tube optique
4. Fokussierknopf
5. Tubusende
6. Optischer Tubus
This manual covers basic instructions. For more detailed
instructions, information, please visit celestron.com.
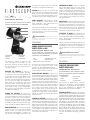
INSTALACIÓN DE LOS OCULARES Un ocular es un
elemento óptico que aumenta la imagen enfocada
por el telescopio. Se encaja directamente en el
enfoque (tras retirar la tapa). Asegúrese de que
los tornillos no sobresalgan en el interior del tubo
del enfoque. A continuación, introduzca el cañón
de cromo del ocular en el enfoque y apriete los
tornillos manuales, con cuidado de no apretarlos
en exceso. Localice objetos con el ocular de baja
potencia (15x). Cuando haya centrado su objeto,
puede cambiar al ocular de alta potencia (75x)
para obtener más aumento. Los oculares pueden
cambiarse invirtiendo el procedimiento descrito
anteriormente.
APUNTAR EL TELESCOPIO El telescopio está
disado para usarse en una mesa u otra
superficie plana y resistente. El FirstScope es fácil
de mover a cualquier lugar al que quiera orientarlo.
Gire en sentido contrario a las agujas del reloj para
aflojar la rosca de bloqueo y aguante el extremo del
tubo. Mire a lo largo del tubo hacia el objeto que
desee localizar. Mueva el extreme del tubo hasta
encontrar el objeto que esté buscando y apriete la
rosca de bloqueo.
ORIENTACIÓN DE IMAGEN Cuando mire por el
ocular desde la parte posterior del tubo óptico
(posición natural), la imagen estará invertida
(vertical y horizontalmente) o en ángulo. Si mira
desde la parte anterior (ligeramente en ambos
lados) la imagen será correcta. Use esta técnica
para observar sujetos terrestres.
ENFOQUE Gire el mando de enfoque hasta que el
objeto quede definido. Girar el mando en sentido de
las agujas del reloj permite enfocar un objeto más
lejano que el que esté observando actualmente y
viceversa. Tendrá que volver a enfocar tras cambiar
oculares.
MATERIALES ADICIONALES Su FirstScope incluye
una descarga gratuita del libro electrónico de
Robert Reeves, Lunar Landscapes (Paisajes
lunares). Visite www.celestron.com/robertreeves
para acceder al PDF.
La caja en la que se entrega su FirstScope tiene
un mapa de la superficie lunar en la parte posterior.
Recórtelo y guárdelo con su telescopio como
referencia durante futuras observaciones lunares.
AVISO SOLAR
No mire nunca directamente al sol con los ojos descubiertos o un
telescopio (a menos que tenga un filtro solar adecuado). Puede producir
daños oculares permanentes e irreversible
DAS TELESKOP SCHWENKEN Das Teleskop ist für
den Einsatz auf einem Tisch oder einer anderen
flachen, stabilen Oberfläche ausgelegt. Das
FirstScope lässt sich einfach überallhin bewegen,
was auch immer Sie anvisieren möchten. Lösen Sie
die Sicherungsmutter gegen den Uhrzeigersinn
drehen und halten das Tubusende fest. Visieren
Sie entlang des optischen Tubus das gewünschte
Objekt an. Bewegen Sie das Tubusende, bis Sie
das gewünschte Objekt gefunden haben.und
ziehen die Sicherungsmutter fest.
BILDORIENTIERUNG Wenn Sie durch das Okular
von der Rückseite oder von der Seite des optischen
Tubus schauen (natürliche Position), wird Ihr Bild
invertiert (auf den Kopf gestellt und seitenverkehrt)
oder schräg. Wenn Sie von der Vorderseite (leicht
seitlich) des optischen Tubus sehen, wird das Bild
korrekt sein. Verwenden Sie diese Technik für
terrestrische Beobachtungen.
FOKUSSIEREN Einfach den Fokusssierknopf
drehen, bis das Objekt scharf eingestellt ist.
Wenn der Knopf im Uhrzeigersinn gedreht wird,
können Sie ein Objekt scharf einstellen, das weiter
entfernt ist als das, das Sie gerade beobachten,
und umgekehrt. Nach dem Wechseln der Okulare
müssen Sie neu fokussieren.
BONUSMATERIALIEN Ihr FirstScope enthält einen
kostenlosen Download von Robert Reeves Ebook
Lunar Landscapes. Besuchen Sie www.celestron.
com/robertreeves um auf das PDF zuzugreifen.
Die Box, in der Ihr FirstScope verpackt war, hat
auf der Rückseite eine Karte der Mondoberfläche.
Schneiden Sie es aus und bewahren es mit
Ihrem Teleskop auf, damit Sie bei künftigen
Mondbeobachtungen darin nachsehen können.
WARNHINWEIS BEI SONNENBEOBACHTUNG
Niemals mit bloßem Auge oder mit einem Teleskop direkt in die
Sonne schauen (außer bei der Verwendung eines vorschriftsmäßigen
Sonnenfilters). Es kann zu permanenten und irreversiblen Augenschäden
führen.
ITALIANO
SIGNATURE SERIES ROBERT REEVES MOON
MANUALE DI ISTRUZIONI • MODELLI 22016
Questo manuale fornisce le istruzioni base. Per istruzioni,
informazioni più dettagliate visitare celestron.com.
Il telescopio è già pronto all’uso appena rimosso
dal cartone. Sono inclusi due oculari: 20 mm (15
potenza), e 4 mm (75 potenza). Rimuovere il tappo
della lente dalla parte frontale del tubo ottico prima
di cercare gli oggetti.
INSTALLAZIONE DEGLI OCULARI Un oculare è un
elemento ottico che ingrandisce l’immagine messa
a fuoco dal telescopio. Si adatta direttamente al
dispositivo di messa a fuoco (dopo aver rimosso il
tappo). Assicurarsi che le viti a testa zigrinata non
sporgano nel tubo del dispositivo di messa a fuoco.
Quindi, inserire la canna cromata dell’oculare nel
dispositivo di messa a fuoco e serrare le viti a
testa zigrinata, facendo attenzione a non serrare
eccessivamente. Individuare gli oggetti con
l’oculare a bassa potenza (15x). Una volta centrato
il proprio oggetto, è possibile passare all’oculare
più potente (75x) per maggiore ingrandimento.
Gli oculari possono essere sostituiti invertendo la
procedura descritta sopra.
PUNTAMENTO DEL TELESCOPIO Il telescopio è
stato progettato per essere utilizzato su un tavolo
o altra superficie piana e robusta. Il FirstScope è
semplice da spostare in qualsiasi luogo si desideri
puntarlo. Girare in senso antiorario per allentare
il controdado e tenere l’estremità del tubo. Vista
lungo il tubo ottico verso l’oggetto che si desidera
trovare. Spostare l’estremità del tubo fino a trovare
l’oggetto che si sta cercando e quindi serrare il
controdado.
ORIENTAMENTO IMMAGINE
Quando si guarda attraverso l’oculare dalla parte
posteriore o laterale del tubo ottico (posizione
naturale), l’immagine verrà invertita (capovolta e
all’indietro) o inclinata. Se si guarda dal davanti
(leggermente su entrambi i lati) del tubo ottico,
l’immagine sarà corretta. Usare questa tecnica per
guardare i soggetti terrestri.
MESSA A FUOCO
Basta ruotare la manopola di messa a fuoco
finché l’oggetto non diventa nitido. Ruotando la
manopola in senso orario è possibile mettere a
fuoco un oggetto più distante rispetto a quello che
si sta osservando al momento e viceversa. Si dovrà
rimettere a fuoco dopo aver sostituito gli oculari.
MATERIALI BONUS
FirstScope include un download gratuito
dell’ebook di Robert Reeves, Lunar Landscapes.
Visitare www.celestron.com/robertreeves per
accedere al PDF.
La confezione in cui viene fornito il FirstScope
ha una mappa della supercie lunare sul retro.
Tagliarla e conservarla con il proprio telescopio per
riferimento durante le future osservazioni lunari.
AVVERTENZA SOLARE
Non guardare mai direttamente il Sole a occhio nudo o con un telescopio
(a meno che non si abbia un filtro solare idoneo). Possono verificarsi
danni permanenti e irreversibili alla vista.
ESPOL
GAMA SIGNATURE FIRSTSCOPE
ROBERT REEVES MOON
MANUAL DE INSTRUCCIONES
Este manual cubre instrucciones básicas. Para instrucciones
más detalladas e información, visite celestron.com.
Su telescopio está listo para el uso inmediatamente
al sacarlo de la caja. Incluye dos oculares: 20 mm
(potencia 15) y 4 mm (potencia 75). Saque la tapa
de la lente de la parte delantera del tubo óptico
antes de buscar objetos.
© 2018 Celestron • All rights reserved • celestron.com
2835 Columbia Street • Torrance, CA 90503 U.S.A.
Telephone: 800.421.9649
1.Vite
2. Oculare
3. Focalizzatore
Made in China | Fabriqué en Chine | Hecho en China |
Hergestellt in China | Fabbricato in Cina
1. Tornillo manual
2. Ocular
3. Mecanismo de enfoque
4. Manopola di messa a fuoco
5. Estremità del tubo
6. Tubo óptico
4. Botón de enfoque
5. Extremo del tubo
6. Tubo óptico
  • Page 1 1
  • Page 2 2

Celestron 22016 Instrucciones de operación

Categoría
Telescopios
Tipo
Instrucciones de operación

El Celestron 22016 es un telescopio versátil que permite explorar el firmamento y observar objetos terrestres. Incluye dos oculares: 20 mm (15 aumentos) y 4 mm (75 aumentos). Se puede utilizar sobre una mesa o cualquier superficie plana y estable. Apúntalo a tu objetivo aflojando la tuerca de bloqueo y moviendo el extremo del tubo. Utiliza el enfoque girando el botón hasta que la imagen esté nítida. Para observar objetos terrestres, mira desde la parte frontal del tubo.