
OWNER'S MANUAL
Central Water
Whole Home
Filtration System
MODEL NO. 625.382080
Caution:
Read and follow all safety rules and operating
instructions before first use of this product.
Questions ?
Visit www.KenmoreWater.com
or call toll free 1-800-426-9345 (M - F, 7 AM - 6 PM CST)
Repair or Parts ? Call toll free 1-800-469-4663
See back cover for other Sears service numbers.
SAVE THIS MANUAL
• Warranty
• Installation
• How It Works
• Care Of
• Specifications
• Repair Parts
System tested and certified by NSF International
against NSF/ANSI Standard 42
for the reduction of chlorine taste and odor,
and certified to NSF/ANSI Standard 372.
Sears Brands Management Corporation, Hoffman
PRINTED IN U.S.A. www.KenmoreWater.com
Estates, IL 60179 U.S.A.
Part No. 7333705 (Rev. D 2/26/13)

WARRANTY ON THE KENMORE CENTRAL WATER
WHOLE HOME FILTRATION SYSTEM
ONE YEAR LIMITED WARRANTY ON CENTRAL WATER WHOLE HOME FILTRATION SYSTEM
When installed, operated and maintained according to all instructions supplied with the product, if this Central
Water Whole Home Filtration System fails due to a defect in material or workmanship within one year from
the date of purchase, call 1-800-4-MY-HOME ® to arrange for free repair.
TEN YEAR LIMITED WARRANTY AGAINST LEAKS
When installed, operated and maintained according to all instructions supplied with the product, if the Central
Water Whole Home Filtration System filter bed tank develops a leak within ten years from the date of pur-
chase, call 1-800-4-MY-HOME ® to arrange for free tank replacement. After the first year you must pay an ini-
tial trip charge.
All warranty coverage does not include the filter bed, which is an expendable item.
If this Central Water Whole Home Filtration System is ever used for other than private family purposes, all
warranty coverage applies for only 90 days from the date of purchase.
This warranty covers only defects in material and workmanship. Sears will NOT pay for:
1. A service technician to instruct the user in correct product installation, operation or maintenance.
2. A service technician to clean or maintain this product.
3. Damage to or failure of this product if it is not installed, operated or maintained according to the all
instructions supplied with the product.
4. Damage to or failure of this product resulting from accident, abuse, misuse or use for other than its intended
purpose.
5. Damage to or failure of this product caused by the use of detergents, cleaners, chemicals or utensils other
than those recommended in all instructions supplied with the product.
6. Damage to or failure of parts or systems resulting from unauthorized modifications made to this product.
Disclaimer of implied warranties; limitation of remedies
Customer's sole and exclusive remedy under this limited warranty shall be product repair as provided herein.
Implied warranties, including warranties of merchantability or fitness for a particular purpose, are limited to
one year or the shortest period allowed by law. Sears shall not be liable for incidental or consequential dam-
ages. Some states and provinces do not allow the exclusion or limitation of incidental or consequential dam-
ages, or limitation on the duration of implied warranties of merchantability or fitness, so these exclusions or
limitations may not apply to you.
This warranty applies only while this appliance is used in the United States or Canada.
This warranty gives you specific legal rights, and you may also have other rights which vary from state to
state.
Sears Brands Management Corporation, Hoffman Estates, IL 60179
Questions? Call The Kenmore Water Line 1-800-426-9345 or visit KenmoreWater.com

Unpack and Check Shipment ...................................................................... 4
Installation Requirements ........................................................................ 5-6
Installation .................................................................................. 7-11
How a Central Water Filtration System Works ........................................................ 11
Programming the Central Water System ............................................................ 12
Start Up Procedure ............................................................................. 13
Customizing Features / Options ................................................................. 14-16
Care of Your Central Water Filtration System ...................................................... 17-18
Troubleshooting .............................................................................. 19-21
Specifications & Performance Claims ............................................................... 22
Dimensions ................................................................................... 23
Wiring Schematic .............................................................................. 23
Exploded View & Parts List .................................................................... 24-27
• Read all steps and guides carefully before installing •
and using your Central Water Whole Home Filtration
System. Follow all steps exactly to correctly install.
Reading this manual will also help you to get all the
benefits from the Central Water Whole Home
Filtration System.
• Do not attempt to use this product to make safe drink- •
ing water from non-potable water sources. Do not use
the system on microbiologically unsafe water, or water
of unknown quality without adequate disinfection
before or after the system.
• Use only lead-free solder and flux for all sweat-solder
connections, as required by federal codes.
• Use care when handling the Central Water Whole
Home Filtration System. Do not turn upside down or •
drop.
• Avoid installing in direct sunlight. Excessive sun heat
may cause distortion or other damage to non-metallic
parts.
• Check with your local public works department for •
plumbing and sanitation codes. You must follow their
guides as you install the system. Follow your local
codes if they differ with guides in this manual. In
Massachusetts, plumbing code 248-CMR 3.00 and
10.00 shall be adhered to. Consult with a licensed
plumber.
The Central Water Whole Home Filtration System
works on water pressures of 30 psi (minimum) to 125
psi (maximum). If your house water pressure is over
the maximum, install a pressure reducing valve in the
water supply pipe to the Central Water Home
Filtration System.
The Central Water Whole Home Filtration System
works on 24 volt, 60 Hz electrical power only, supplied
by a direct plug-in transformer (included). Be sure to
use the included transformer and plug it into a nominal
120V, 60 cycle household outlet that is properly pro-
tected by an overcurrent device such as a circuit
breaker or fuse. If transformer is replaced, use only
the authorized service, Class II, 24V 1OVA transformer.
Do not install the Central Water Whole Home
Filtration System outside, or in extreme hot or cold
temperatures. Temperature of the water supply to the
Central Water Whole Home Filtration System must be
between 40°F and 120°F. Do not install on hot water.
This Central Water Whole Home Filter has a non-
metallic valve system. Installing it on metal plumbing
will break electrical continuity, which may interrupt
grounding for the home. You must restore electrical
continuity in your metal plumbing system (See Page 10).
European Directive 2002/96/EC requires all electrical and electronic
equipment to be disposed of according to Waste Electrical and Electronic
Equipment (WEEE) requirements. This directive or similar laws are in
place nationally and can vary from region to region. Please refer to your
state and local laws for proper disposal of this equipment.
Questions? Call The Kenmore Water Line 1-800-426-9345 or visit KenmoreWater.com
3

INSPECT SHIPMENT
Your Central Water Whole Home Filtration System is
shipped complete in one carton. Remove all items from
your shipping carton.
Check all items against the packing list below. Note
any items lost or damaged in shipment. Note any dam-
age to the shipping carton. If problems exist, contact
the store where you purchased your Central Water
Whole Home Filtration System.
Keep the small parts in the parts bag until you are
ready to install them.
NOTE: Codes in the state of Massachusetts require
installation by a licensed plumber.
If you live in the state of Massachusetts, review plumb-
ing code 248-CMR of the Commonwealth of
Massachusetts before proceeding with the installation.
Bypass Valve O-rings
0
Drain Hose
Installation
Adaptors
Clips
Hose Clamps Adaptor Elbow
Figure 1
TOOLS NEEDED
Assemble the required tools before starting installation.
Read and follow instructions provided with any tools
listed here.
• Screwdriver
• Tape measure
• Pliers
If using Soldered Copper Pipe
• Tubing cutter
• Lead-free solder and flux
• Propane torch
• Emery cloth, sandpaper or steel wool
• Misc. copper pipe fittings
If using Threaded Pipe
• Pipe cutter or hacksaw
• Pipe joint compound
• Threading tool
• Misc. threaded pipe fittings
If using CPVC Plastic
• Pipe cutter
• Solvent cement
• Hacksaw
• Primer
• Adjustable wrench
If using Other
• Other pipe and fittings suitable for potable water as
required by piping system manufacturer and local
codes and/or ordinances.
Questions? Call The Kenmore Water Line 1-800-426-9345 or visit KenmoreWater.com
4

LOCATION REQUIREMENTS
Consider the following when selecting an installation
location for the Central Water Whole Home Filtration
System.
• Do not operate the Central Water Whole Home
Filtration System where freezing temperatures occur.
Do not attempt to treat water over 120°F. Freezing
temperatures or hot water damage voids the war-
ranty.
• To condition all water in the home, install the Central
Water Whole Home Filtration System close to the
water supply inlet, and before all other plumbing
connections, except outside water pipes.
• For a home with municipal water supply, install the
Central Water Whole Home Filtration System
between the home's incoming water supply and the
water softener, if one is being used (See Figure 2A).
If the home has well water, reverse the order of the
Central Water Filtration System and the water
softener (See Figure 2B).
• A nearby drain is needed to carry away Clean Rinse
discharge water. Use a floor drain, laundry tub,
sump, standpipe, or other options (check your local
codes). See "Air Gap Requirements" and "Valve
Drain Requirements" sections. If a drain is not avail-
able, it is still passible to operate the Central Water
Whole Home Filtration System in a manual Clean
Rinse mode. See "Operating in Manual Clean Rinse
Mode." The automatic Clean Rinse must be disabled
if the Central Water Whole Home Filtration System
will not be connected to a drain (See Page 16).
• The Central Water Whole Home Filtration System
works on 24 volt, 60 Hz electrical power only, sup-
plied by a direct plug-in transformer (included).
Provide an electrical outlet in accordance with NEC
and local codes.
• Do not install the Central Water Whole Home
Filtration System on a hot water line (See Figures 2A
& 2B below).
THE PROPER ORDER TO INSTALL WATER TREATMENT EQUIPMENT
Untreated Water to
Cold Water
to House
Hot Water _,_
to House
Outside Faucets
t
Optional
J Sediment
Filter
City Water Supply
Water Water Central
Heater Softener Water
Filtration
System
Cold Water
to House
Hot Water _.,,_
to House
Untreated Water to
Outside Faucets
_Oplional
Filth--_ Sediment
!
Pressure
Tank
Figure 2A
Water Central Water -- I Well Water Supply
Heater Water Softener _L_
Filtration Well
System Pump I Figure 2B
Questions? Call The Kenmore Water Line 1-800-426-9345 or visit KenmoreWater.com
5

PLUMBING CODES
All plumbing must be completed in accordance with
national, state and local plumbing codes.
In the state of Massachusetts: The Commonwealth
of Massachusetts plumbing code 248-CMR shall be
adhered to. A licensed plumber shall be used for
this installation.
AIR GAP REQUIREMENTS
A drain is needed for Clean Rinse discharge water. A
floor drain, close to the Central Water Filtration System,
is preferred. A laundry tub, standpipe, etc. are other
drain options. Secure valve drain hose in place. Leave
an air gap of 1-1/2" between the end of the hose and
the drain. This gap is needed to prevent backflow of
sewer water into the Central Water Whole Home
Filtration System. Do not put the end of the drain hose
into the drain.
VALVE DRAIN REQUIREMENTS
Using the flexible drain hose (included), measure and
cut to the length needed. Flexible drain hose is not
allowed in all localities (check your plumbing codes). If
local codes do not allow use of a flexible drain hose, a
rigid valve drain run must be used. Purchase a com-
pression fitting (1/4 NPT x 1/2 in. minimum tube) and
1/2" tubing from your local hardware store. Plumb a
rigid drain as needed (see Figure 3, below).
NOTE: Avoid drain hose runs longer than 30 feet. Make
the valve drain line as short and direct as possible.
It is recommended that the Central Water Whole
Home Filtration System be installed near a drain.
However, if a drain is not available, it is still possible to
operate the Central Water Whole Home Filtration
System in a manual Clean Rinse mode. See "Operating
in Manual Clean Rinse Mode" section. The automatic
Clean Rinse function must be disabled if the Central
Water Filtration System will not be connected to a drain.
CONNECTING VALVE TO DRAIN
_,.,,, Drain [
Fitting _
Clamp " -'__ ]_
Valve
Drain
Hose
Tie or wire
tubing in
place
Drain grate with 1"
dia. hole in center
Grounding wire must
connect metal pipes
To drain point other
than floor drain.
Support tubing in
place as needed.
Install adaptor
elbow using hose
clamp. Aim nozzle
down toward
center of drain
1-1/2"
air gap
FLOOR DRAIN
SUBSTITUTING RIGID DRAIN LINE
1/4 NPTThreads
Cti ....
Cut barbs from
drain fitting {pull
clip to remove fit-
ting from valve) Camp Fitting.
NPT x 1/2" O.D.
Tube (nat included)
1/2" Outside Dia.
Copper Tube (not
included)
air gap_
LAUNDRY TUB STANDPIPE
Figure 3
Questions? Call The Kenmore Water Line 1-800-426-9345 or visit KenmoreWater.com
6

TURN OFF WATER SUPPLY
1. Close the main water supply valve, near the well
pump or water meter.
2. Open all faucets to drain water from the house
pipes.
NOTE: Be sure not to drain water from the water
heater, as damage to the water heater elements
could result.
MOVE THE CENTRAL WATER FILTRATION
SYSTEM INTO PLACE
1. Move the Central Water Whole Home Filtration
System into installation position. Set it on a level sur-
face. If needed, place the unit on a section of ply-
wood, a minimum of 5/8" thick. Then place shims
under the plywood to level the Central Water
Filtration System (see Figure 4).
Shim(s)
LEVEL IF NECESSARY
Plywood
/
Figure 4
CROSS OVER
In what direction does the water flow?
Be sure to plan piping so water flow is to the Central
Water Whole Home Filtration System valve INLET.
Plan a crossover if flow is from left to right.
Treated
Water from
Valve
OUTLET
t
Untreated
Water to
Valve
INLET
To Central Water
Filtration System
Figure 5
Questions? Call The Kenmore Water Line 1-800-426-9345 or visit KenmoreWater.com
7

INLET- OUTLETPLUMBINGOPTIONS
Install a single bypass valve (provided) to the plumbing,
as shown in Fig. 8 OR if desired, a 3 valve bypass sys-
tem (parts not included) can be installed, as shown in
Figure 7. Bypass valves allow you to turn off water to
the Central Water Whole Home Filtration System for
maintenance if needed, but still supply water to the
house.
Use either:
• Copper pipe
• Threaded pipe
• PEX (Crosslinked Polyethylene) pipe
• CPVC plastic pipe
• Other pipe approved for use with potable water
IMPORTANT: Do not solder with plumbing attached to
installation adapters and single valve
bypass. Soldering heat will damage the
adapters and valve.
NOTE: Before installing the bypass valve or copper
tube into the valve's INLET, remove the foam
piece that was placed in that port for shipping.
Before installing the bypass valve or copper tube into
the valve's OUTLET, make sure that the turbine and sup-
port are firmly in place, as shown in Figure 6.
Turbine Valve
.Support Outlet
Turbine
/
Figure 6
3 VALVE BYPASS
Central Water Filtration
SystemOUTLET
Central Water Filtration
SystemINLET
Figure 7
CONNECTING PLUMBING TO VALVE
OUT
Use Teflon@ tape,
pipe joint com-
pound or both
IN
1" NPT Sweat
Adapter (2)
_._ (not included)
8__ 1" NPT
_ Adapter (2)l
Clip (4))
\
Valve Bypass
Inlet Valve
Included
Use Teflon@ tape,
pipe joint com-
pound or both
Valve
Inlet
OUT IN
1" NPT Sweat
Adapter (2)
(not included)
1" NPT Clip (r_
Adapter (2)_ Included
Figure 8
Questions? Call The Kenmore Water Line 1-800-426-9345 or visit KenmoreWater.com

ASSEMBLE INLET AND OUTLET PLUMBING
Measure, cut, and loosely assemble pipe and fittings
from the main water pipe to the inlet and outlet ports
of the Central Water Whole Home Filtration System
valve. Be sure to keep fittings fully together, and pipes
squared and straight.
Be sure the incoming water supply pipe goes to the
valve inlet side.
CONNECT INLET AND OUTLET PLUMBING
IMPORTANT:
• Be sure to fit, align and support all plumbing to pre-
vent putting stress on the Central Water Whole
Home Filtration System valve inlet and outlet. Undue
stress from misaligned or unsupported plumbing may
cause damage and leaks at the valve.
• Be sure to keep fittings fully together, and pipes
squared and straight.
• Be sure incoming water supply pipe goes to the
Central Water Whole Home Filtration System valve
INLET side. Inlet and outlet are marked on the
valve. Trace the water flow direction to be sure.
Complete the inlet and outlet plumbing for the type of
pipe, as described below and at right.
Sears Flexible Connectors
Flexible connector hoses are available in pairs to
make a convenient connection between 3/4" (Sears
42-34405) or 1" (Sears 42-34407) house plumbing
(copper, CPVC or PEX) and the Central Water Whole
Home Filtration System.
1. Follow the instructions included with the Sears flexible
connectors.
Soldered Copper Pipe
1. Thoroughly clean and apply solder flux to all joints.
2. Make all solder connections.
IMPORTANT: Do not solder with plumbing attached to
installation Adapters and single valve
bypass. Soldering heat will damage the
adaptors and valve.
Threaded Pipe
1. Apply pipe joint compound or Teflon® tape to all
male pipe threads.
2. Tighten all threaded joints and make all solder con-
nections.
CPVC Plastic Pipe
1. Clean, prime and cement all joints, following the
manufacturer's instructions supplied with the plastic
pipe and fittings.
Other, including PEX (Crosslinked Polyethylene)
1. Follow the piping system manufacturer's instructions
when using other pipe approved for potable water.
® Teflon is a registered trademark of E.I. Du Pont de Nemours
and Company.
Questions? Call The Kenmore Water Line 1-800-426-9345 or visit KenmoreWater.com
9

METALWATERPIPEGROUNDING
IMPORTANT: This Central Water Whole Home Filter
has a non-metallic valve system.
Installing it on metal plumbing will break
electrical continuity, which may interrupt
grounding for the home. You must restore
electrical continuity in your metal plumb-
ing system.
If you installed a 3-valve bypass system (Fig. 7), electri-
cal continuity will be maintained. If you installed the
non-metallic bypass valve (Fig. 8), restore the ground as
follows:
Install a #4 copper wire (parts not included) across the
removed section of metal water pipe, securely clamping
it at both ends (See Fig. 9). Be sure the pipes are clean
under the clamps, to assure good contact.
NOTE: If you are installing a water softener or other
item(s) into the plumbing system, along with the
Central Water Whoel Home Filter, be sure to
restore electrical continuity across all removed
metal pipe sections.
INSTALL VALVE DRAIN HOSE
1. Measure, cut to needed length and connect the 3/8"
drain line (provided) to the Central Water Whole
Home Filtration System valve drain fitting (See Figure
10). Use a hose clamp to hold the hose in place.
NOTE: If codes require a rigid drain line see "Valve
Drain requirements" section.
2. Run the drain hose or copper tubing to the floor
drain. Secure drain hose. This will prevent the drain
line from "whipping" during Clean Rinse cycles. See
"Air Gap Requirements" section.
METAL PIPE GROUNDING
(parts not included)
Ground Wire
/
Figure 9
Drain Line
Connection
SINGLE BYPASS VALVE
Pull handle
OUT for normal
I Push handle IN
I for BYPASS
Figure 10
Questions? Call The Kenmore Water Line 1-800-426-9345 or visit KenmoreWater.com
10

TEST FOR LEAKS
1. Make sure the single bypass valve (or 3 valve bypass,
if installed) is in the bypass position, with the handle
pushed in (See Figure 10).
2. Fully open the main water supply valve.
3. Briefly open a faucet in the house to refill the plumb-
ing with water.
4. Slowly move the bypass valve(s) to the normal oper-
ation position, pausing several times to allow the unit
to pressurize slowly (See Figure 10).
5. Check for leaks at all the plumbing connections you
made.
IMPORTANT: Start up procedure must be run prior to
using any filtered water. Follow the
instructions below and on Page 13.
TURN ON THE CENTRAL WATER WHOLE
HOME FILTRATION SYSTEM
During installation, the Central Water Whole Home
Filtration System wiring may be moved or jostled from
place. Check to be sure all leadwire connectors are
secure on the back of the electronic board (see Figure
25 on Page 23) and be sure all wiring is away from the
valve gear and motor area, which rotates during Clean
Rinse cycles.
1. Plug the Central Water Whole Home Filtration
System's transformer into an electrical outlet that is
not controlled by a switch.
2. In the display, the words "SET TIME" appear and
12:00 PM begins to flash. Set the clock according to
the "Set Time of Day" section on Page 12.
3. Run the start up procedure, as detailed on Page 13.
NORMAL OPERATION
During normal operation water enters the Central
Water Whole Home Filtration System and flows
through several filtration processes where tastes, odors
and sediment are reduced.
CLEAN RINSE CYCLE
A Clean Rinse cycle will automatically be initiated
based on how many gallons of water have been fil-
tered through the system (or after 14 days if no water
has passed through the system in that time). The Clean
Rinse cycle lifts and expands the media bed to rejuve-
nate the media and then repacks the bed for continued
use. During the Clean Rinse cycle, dirt, sediment, etc.
are flushed from the Central Water Whole Home
Filtration System down the drain.
APPLICATIONS FOR A CENTRAL WATER
FILTRATION SYSTEM
Do not use the Central Water Whole Home
Filtration System with water that is microbiologically
unsafe or of unknown quality without adequate dis-
infection before or after the system.
The Central Water Whole Home Filtration System
may not be an effective treatment method for water
sources with a hydrogen sulfide problem (rotten egg
odor or taste). If your water has hydrogen sulfide,
contact your local Sears store associate for Kenmore
solutions.
The Central Water Filtration System will not remove
iron and is not intended to replace iron treatment
equipment.
Although the Central Water Filtration System has
sediment filter capabilities, additional sediment fil-
tration may be needed in problem water applica-
tions.
Questions? Call The Kenmore Water Line 1-800-426-9345 or visit KenmoreWater.com
11

Display
Central Water
Whole Home Filtration System
UP
button
CLEAN
DOWN
button
CLEAN
button
ENTER
button
Figure 11
When the transformer is initially plugged into the electri-
cal outlet, the model code (dF 1) and a test number
(example: J2.0), are briefly shown in the faceplate dis-
play. Then the words "SET TIME" appear and 12:00 PM
begins to flash.
NOTE: If "- - - -" shows in the display, press the f UP or
V DOWN button until "dF 1" shows in the dis-
play. Then, press the ENTER button to set, and
change to the "SET TIME" display.
CODE
dF
Figure 12
SET CURRENT TIME
If the words "SET TIME" do not show in the display, press
the ENTER button a few times until they do.
1. Press the /X UP or V DOWN buttons to set the pres-
ent time. Up moves the display ahead; down sets the
time back. Be sure AM or PM is correct.
NOTE: Press buttons and quickly release to slowly
advance the display. Hold the buttons down for
fast advance.
2. When the correct time is displayed, press the ENTER
button a few times, until the time appears in the dis-
play, but is not flashing.
I
TIME
i-I,__-II__I'IZ.3 AM
SET
TIME
I •
C IC
Figure 13
Questions? Call The Kenmore Water Line 1-800-426-9345 or visit KenmoreWater.com
12

IMPORTANT:
Run the start up cycle immediately after com-
pleting installation, before using any water in
the home.
The filtration media in this Central Water Whole Home
Filtration System contains a small number of harmless
activated carbon particles generated during shipping
that are small enough to exit the system with water
flow. It is normal for these particles to cause a tempo-
rary discoloration of the water coming out of the sys-
tem. To avoid discolored water at your home's faucets
the system's start up cycle should be initiated to rinse
the particles and any discolored water down the drain.
If the Central Water Whole Home Filtration System is
used without first running the start up cycle, you will
notice that the water will temporarily have a gray color
until the particles have exited the system.
To Initiate the start up cycle:
1. Make sure the drain hose is attached to the Central
Water Whole Home Filtration System and the other
end is secured over a drain (see "Install Valve Drain
Hose" on Page 10).
2. Make sure bypass valve is in the "service" (open or
filtered water) position and the home's water supply
is turned on.
3. Press and hold the CLEAN button to initiate the start
up cycle. The button can be released when you hear
the valve changing position and "RECHARGE NOW"
flashes in the display.
During the start up cycle:
Throughout the start up cycle you will hear the valve
changing position and notice the flow of water to drain
starting and stopping. The start up cycle will take
approximately 20 minutes. Avoid using water during
this time. Do not set the time of day or press other but-
tons during the start up cycle, as this will interrupt the
start up cycle. Do not unplug the transformer during
the start up cycle. If the start up cycle is interrupted, it
should be initiated again and allowed to run to comple-
tion.
After the start up cycle:
Once the start up procedure completes successfully, it
cannot be initiated a second time. The Central Water
Whole Home Filtration System will automatically return
to the normal operation position. Once the start up
cycle has run, a faucet in the home should be opened
and water allowed to run for 10 minutes at the system's
rated flow. If, after running the start up cycle, the
water still appears discolored, manually run Clean Rinse
cycles (See Page 14) until the water is clear.
If the time of day was not set before the start up cycle,
set it now (See Page 12).
Check the new plumbing connections and joints once
more for leaks.
Questions? Call The Kenmore Water Line 1-800-426-9345 or visit KenmoreWater.com
13

STARTA CLEANRINSECYCLE
To manually start a Clean Rinse cycle, press and hold the CLEAN button
for a few seconds, until "RECHARGE NOW" flashes in the display. This
Clean Rinse cycle takes 3 minutes (unless the factory settings for backwash
and fast rinse times have been changed, as shown below).
SET CLEAN RINSE START TIME
By default the Central Water Whole Home Filtration System will Clean
Rinse at 1:00 a.m. The system will not filter water during the Clean Rinse
cycle. It is recommended that the Clean Rinse start time be set for when
water is not likely to be used in the household.
NOTE: If you also have a water softener, set the Central Water System's
Clean Rinse time for either one hour before or two hours after the
water softener's scheduled regeneration time.
To change the Clean Rinse start time:
1. Press the ENTER button a few times until "SET RECHARGE TIME" is
shown in the display.
2. Press the f UP or V DOWN buttons to set the Clean Rinse time in 1
hour increments. Be sure AM or PM is correct.
3. When the desired Clean Rinse time is displayed, press the ENTER button
a few times, until the time appears in the display, but is not flashing.
RECHARGE
NOW
Figure 14
RECHARGE
TIME
I.FtI-I
I'UU AM
Figure 15
SET LENGTH OF CLEAN RINSE
By default the Central Water Whole Home Filtration System's Clean Rinse
cycle will consist of a 2 minute backwash followed by a 1 minute fast rinse.
This should be sufficient for most applications.
Increasing the length of Clean Rinse time will increase the amount of water
flushed to drain during each Clean Rinse cycle. Increasing the length of
Clean Rinse should only be done in cases of very high amounts of sedi-
ment, or other water issues.
To change the length of the backwash or fast rinse parts of the Clean
Rinse cycle:
1. Press and hold the ENTER button for a few seconds, until the "000--"
screen appears, as shown at right.
2. Press the ENTER button once, so "SET TIME bA" appears in the display.
3. Press the f UP or V DOWN buttons to set the length of backwash in
minutes.
4. Press the
TIME Fr"
5. Press the
minutes.
.
ENTER button when the desired backwash time is shown. "SET
appears in the display.
f UP or V DOWN buttons to set the length of fast rinse in
Press the ENTER button when the desired fast rinse time is shown. The
display will change to the time of day.
FIFI Fi ____
UUU
TIME
LO
I II!
m
SET
TIME
Fr'- I
Figure 16
Questions? Call The I<enmore Water Line 1-800-426-9345 or visit KenmoreWater.com
14

SETTING THE FREQUENCY OF AUTOMATIC CLEAN RINSE CYCLES
The Central Water Whole Home Filtration System will automatically initiate
Clean Rinse cycles based on how much water has been filtered through the sys-
tem. The default is to run a Clean Rinse cycle after 3,000 gallons have been
filtered. The Clean Rinse cycle takes place at the preset time of day (1:00 a.m.
is the default). The system also will initiate an automatic Clean Rinse cycle if
no water has been run through the system in 14 days, to keep the filter bed
fresh.
The Central Water Whole Home Filtration System allows the frequency of
automatic Clean Rinse cycles to be increased for systems where the water sup-
ply may have more sediment than in a typical municipal water supply. The
table below shows the three settings available. The unit is shipped with "CLn 1"
as the default.
Clean Rinse Clean Rinses
Water supply type
mode every
CLn 1 City water supply 3,000 gallons
Well water with a
CLn 2 2,000 gallons
light amount of sediment
Well water with a
CLn 3 1,000 gallons
high amount of sediment
To change the frequency of Clean Rinse cycles:
1. Press the ENTER button a few times until "SET CLn" is shown in the display,
along with a flashing number (1 - 3). The flashing number indicates the cur-
rent setting.
2. Press the /_ UP or V DOWN buttons to change the number to the desired
Clean Rinse mode (see table, above).
3. Press the ENTER button when the desired Clean Rinse mode is displayed.
The display will change to the time of day.
SET
V!
LLn !
SET
I!-!
If..I.. 2
-SET
I-!
LLI-I
Figure 17
Questions? Call The I<enmore Water Line 1-800-426-9345 or visit I<enmoreWater.com
15

OPERATING IN MANUAL CLEAN RINSE MODE
Clean Rinse cycles will run automatically, unless the automatic Clean Rinse
function has been disabled. If this function has been disabled, it will be nec-
essary to manually initiate any Clean Rinse cycles. It is recommended that a
Clean Rinse cycle should be run at least once each month, or more frequently
if necessary.
A manual Clean Rinse mode may be used when a drain (required for auto-
matic Clean Rinse) is not available. However, it is recommended that auto-
matic Clean Rinse be used if the drain requirements can be met.
IMPORTANT: During the Clean Rinse cycle, whether manually or automati-
cally initiated, water will flow from the valve drain port at 3.4 gallons per
min. for 3 minutes. If a permanent drain line has not been installed, provi-
sions must be made for the drain flow prior to initiating a Clean Rinse cycle
You must have empty containers ready that will hold at least 15 gallons of
water.
DISABLING AUTOMATIC CLEAN RINSE
To disable the automatic Clean Rinse function:
1. Press and immediately release the CLEAN button (pressing and holding the
button a few seconds would initiate a Clean Rinse cycle).
2. "RECHARGE OFF" will flash in the display, as shown in Figure 18, indicat-
ing that the Central Water Whole Home Filtration System is in the manual
Clean Rinse mode (the automatic Clean Rinse function has been disabled).
MANUALLY STARTING A CLEAN RINSE CYCLE
To manually start a Clean Rinse cycle:
1. If the drain line is not set up to discharge into a drain, you must have
empty containers ready that will hold at least 15 gallons of water.
2. Press and hold the CLEAN button for a few seconds, until "RECHARGE
NOW" flashes in the display, as shown in Figure 19.
3. When the Clean Rinse cycle is complete, the Central Water Whole Home
Filtration System will remain in the manual Clean Rinse mode.
RE-ENABLING AUTOMATIC CLEAN RINSE
To return the Central Water Whole Home Filtration System to its automatic
Clean Rinse function:
1. Press and immediately release the CLEAN button.
2. The flashing "RECHARGE OFF" on the display should be replaced by the
normal time of day screen, as shown in Figure 20.
RECHARGE
Figure 18
RECHARGE
NOW
Figure 19
.
C.UC I
IZ.I" IZ.I pM
Figure 20
Questions? Call The I<enmore Water Line 1-800-426-9345 or visit KenmoreWater.com
16

POWER OUTAGE MEMORY
If electrical power to the Central Water Whole Home
Filtration System is lost, "memory" built into the con-
troller circuitry will keep all settings for several hours.
While the power is out, the display is blank and the
Central Water Whole Home Filtration System will not
Clean Rinse.
When electrical power is restored, you have to reset the
time of day only if the display is flashing. The Clean
Rinse TIME never requires resetting unless a change is
desired. Even if the clock is incorrect after a long
power outage, the Central Water Whole Home
Filtration System works as it should to keep your water
treated. However, Clean Rinse cycles may occur at the
wrong time of day until you reset the clock to the cor-
rect time of day.
NOTE: If the Central Water Whole Home Filtration
System was in a Clean Rinse cycle when power
was lost, it will now finish the cycle.
VACATIONS AND EXTENDED PERIODS OF
NO WATER USE
If your Central Water Whole Home Filtration System
will not be used for an extended period of time (several
months), please follow one of these recommendations:
• If the water supply to the unit is not turned off, and
the automatic Clean Rinse function has not been dis-
abled, then no further actions are required. The
Central Water Filtration System will clean itself
every 14 days if no water has run through it.
If you do not want Clean Rinse cycle to be running
automatically while you are gone, it is recommended
that you unplug the Central Water Whole Home
Filtration System and either shut off the water supply
or place the bypass valve(s) into the bypass position.
If the Clean Rinse cycle cannot be automatically run,
due to the water supply being shut off, the trans-
former being unplugged or the automatic Clean
Rinse function being disabled, then it is recommend-
ed that a minimum of 2 manually initiated Clean
Rinse cycles be performed when the system is
placed back into operation (see Start a Clean Rinse
Cycle section on Page 14).
In any installation where there is a possibility of
freezing, the Central Water Filtration System should
be disconnected and the water drained (see Protect
the Central Water Whole Home Filtration System
from Freezing section on Page 18).
Questions? Call The Kenmore Water Line 1-800-426-9345 or visit KenmoreWater.com
17

PROTECT THE CENTRAL WATER FILTRATION
SYSTEM FROM FREEZING
If the Central Water Whole Home Filtration System is
installed where it could freeze (summer cabin, lake
home, etc.), you must drain all water from it to stop
possible freeze damage. If the system freezes, cracks
may develop in plastic parts, which will leak causing
damage.
To drain the unit:
1. Close the shut-off valve on the house main water
pipe, near the water meter or pressure tank.
2. Open a faucet in the filtered water pipes to vent
pressure in the unit.
3. Move the stem in the single bypass valve to bypass.
Close the inlet and outlet valve in a 3 valve bypass
system, and open the bypass valve. If you want
water in the house pipes again, reopen the shut-off
valve on the main water pipe.
4. Unplug the transformer at the wall outlet. Take off
the drain hose if it will interfere with moving the
Central Water Whole Home Filtration System into
position over the drain.
5. Remove the large holding clips at the Central Water
Whole Home Filtration System inlet and outlet (See
Figure 8 on Page 8). Separate the unit from the
plastic installation adaptors, or from the bypass
valve.
6. Lay a piece of 2 inch thick board near the floor
drain (See Figure 21).
7. Move the Central Water Whole Home Filtration
System close to the drain. Slowly and gently, tip it
over until the rim rests on the wood block with the
inlet and outlet over the drain (See Figure 21). Do
not allow the unit's weight to rest on the inlet and
outlet fittings or they may break.
8. Tip the bottom of the Central Water Whole Home
Filtration System up a few inches and rest it on
something like a wood block that will allow water to
drain. Rest the bottom on two stacked wood blocks.
Leave the unit laying like this until you are ready to
use it. Plug the inlet and outlet with clean rags to
keep dirt, bugs, etc. out.
DRAIN ALL WATER FROM CENTRAL WATER
FILTRATION SYSTEM
Wood Block
Floor Drain
Figure 21
Questions? Call The Kenmore Water Line 1-800-426-9345 or visit KenmoreWater.com
18

PROBLEM CAUSE CORRECTION
Water has black or gray (NEW SYSTEM) Start up procedure Run start up procedure (See Page 13) or run
color has not been completed consecutive Clean Rinse cycles (See Page 14)
until water color returns to normal.
(NOT A NEW SYSTEM) Normal abra-
sion of filtration media
Sediment filter screen is cloggedLow water pressure at
house faucets
Filtration media pores are blocked
Water has objectionable System is in bypass
taste and/or odor
Filtration media pores are blocked
Manually initiate a Clean Rinse cycle (See
Page 14).
Manually initiate a Clean Rinse cycle (See
Page 14).
If the filter screen is frequently plugging, it
may be necessary to adjust the frequency of
Clean Rinse cycles or add a sediment filter
upstream (See Figure 2 on Page 5).
Manually initiate a Clean Rinse cycle (See
Page 14).
If the filtration media pores are frequently
blocking, it may be necessary to increase the
frequency of Clean Rinse cycles or add a
sediment filter upstream (See Figure 2 on
Page 5).
Move bypass valve(s) to normal operating
(non-bypass) position.
Manually initiate a Clean Rinse cycle (See
Page 14).
If the filtration media pores are frequently
blocking, it may be necessary to increase the
frequency of Clean Rinse cycles or add a
sediment filter upstream (See Figure 2 on
Page 5).
Move bypass valve(s) to normal operating
(non-bypass) position.
Clean drain flow control (See Page 21).
No water flow to drain System is in bypass
during Clean Rinse cycle
Drain flow control is plugged
Drain hose is plugged or kinked Straighten drain hose.
Transformer is unplugged from wall Check for loss of power and correct.
electrical outlet (display will be blank)
Clean Rinse cycle does If display reads "RECHARGE OFF", Press and release the CLEAN button until
not run automatically then Clean Rinse function has been display no longer reads "RECHARGE OFF"
disabled (See Page 16).
Check for loss of power.
Reset the clock to the correct time of day (See
Page 12).
If display is blank, transformer may be
unplugged from wall electrical outlet
If time display is flashing, then a long
power loss caused the clock to lose its
time setting
Motor is defective or inner valve
defect is causing high torque on the
motor
Clean Rinse cycle does
not run at the
programmed time of day
Valve motor stalled or
clicking
Replace rotor/seal kit (instructions included
with kit).
Replace motor and switch (See parts list at
end of this manual).
Questions? Call The Kenmore Water Line 1-800-426-9345 or visit KenmoreWater.com
19

PROBLEM CAUSE CORRECTION
"RECHARGE OFF" is The automatic Clean Rinse function If you want the Clean Rinse function to run
flashing in the display has been disabled (See Page 16) automatically, press and release the CLEAN
button until display no longer reads
"RECHARGE OFF" (See Page 16).
Error Code El, E3 or E4 Wiring harness or connections to Replace wiring harness or connection to
appears position switch position switch (See parts list at end of this
manual).
Switch Replace switch (See parts list at end of this
manual).
Valve defect causing high torque Replace rotor/seal kit (instructions included
with kit).
Motor inoperative Replace motor (instructions included with
motor)
Error Code E5 appears Electronic control Replace electronic control board (PWA)
(instructions included with PWA).
Procedure for removing error code from display:
1. Unplug transformer from electrical outlet.
2. Correct problem.
3. Plug in transformer.
4. Wait 8 minutes. The error code will return if the problem was not corrected.
Assistance from customer service may be needed with the following:
PROBLEM CAUSE CORRECTION
Water running to the drain Inner valve defect causing leak Replace seals and rotor
(while unit is not in the
Clean Rinse cycle)
Filter media in household Crack in distributor or riser tube Replace distributor or riser tube.
plumbing
Questions? Call The Kenmore Water Line 1-800-426-9345 or visit KenmoreWater.com
2O

RESETTING TO FACTORY DEFAULTS
To reset the electronic controller to its factory default
for all settings (time, frequency of automatic Clean
Rinse cycles, etc.):
1. Press the SELECT button and hold it until the display
changes twice to show "SET CODE" and the flashing
model code.
2. Press the /X UP button twice to display a flashing
"SOS".
3. Press the SELECT button, and the electronic controller
will restart.
4. Set the present time, as described on page 12.
SET CODE
dF
SET CODE
Figure 22
CLEANING THE DRAIN FLOW CONTROL
This procedure is not required if the Central Water
Whole Home Filtration System is operating normally. It
should be performed only if a problem with lack of
water flow to drain is encountered, as detailed in the
troubleshooting table on Page 19.
1. Remove the clip holding the drain fitting into the
valve (See Figure 23).
2. Remove the drain fitting from the valve
3. Clear any obstruction.
4. Reinstall the drain fitting into the valve.
5. Reinstall the clip to secure the drain fitting in the
valve.
Drain
Hose
REMOVING DRAIN FITTING TO CLEAN
FLOW CONTROL
Flow
Clip Control
Clamp
f
Drain
Fitting
j_
Figure 23
Questions? Call The Kenmore Water Line 1-800-426-9345 or visit KenmoreWater.com
21

This system has been tested according to NSF/ANSI 42 for the reduction of chlorine taste and odor. The concentra-
tion of the indicated substance in water entering the system was reduced to a concentration less than or equal to the
permissible limit for water leaving the system, as specified in NSF/ANSI 42.
While testing was performed under standard laboratory conditions, actual performance of the system may vary based
on local water conditions.
SPECIFICATIONS
Model Code
Rated Service Flow Rate
Pressure Drop at Rated Service Flow
Pressure Drop at 9.6 gpm
Supply Water Pressure Limits (minimum / maximum)
Supply Water Temperature Limits (minimum / maximum)
Maximum Drain Flow Rate
0.50 ppm
0.75 ppm
Rated Capacity at Chlorine Concentration** of: 1.0 ppm
1.5 ppm
2.0 ppm
25-30 micron particle size
Sediment Removal with: 30-40 micron particle size
40 micron particle size or larger
Model No. 625.382080
dF1
6.0 gpm
10 psig (68.9 kPa)
15 psig (103.4 kPa)*
30 - 125 psi
(206.8 - 861.8 kPa)
40 - 120 OF (5 - 49 °C)
3.4 gpm
2,280,000 gal.*
1,520,000 gal.*
1,140,000 gal.*
760,000 gal.*
570,000 gal.
89.9% or greater
96.4% or greater
99.4% or greater
* From independent laboratory test data.
** Typical residential chlorine concentration is 0.5 to 1.0 ppm.
This system conforms to NSF/ANSI Standard 42 for the specific performance claims as veri-
fied and substantiated by test data.
Installations In The Commonwealth Of Massachusetts: The Commonwealth of Massachusetts
requires installation be performed by a licensed plumber. Plumbing code 248-CMR of the
Commonwealth of Massachusetts must be followed in these cases.
PERFORMANCE CLAIMS
Re_uctl_n u! _em A':er_ge _ercent Re_
Chlorine 2.0 4-10% mg/L 50% 82.8%
Model No.
Serial No.
For future reference, enter the following information.
Installation Date
Model No. and Serial No. are on the shipping carton and on the registration decal on the Central Water
Whole Home Filtration System.
22
Questions? Call The Kenmore Water Line 1-800-426-9345 or visit KenmoreWater.com

_11-7/8"_
3_3/4,,-/_:/_,)_
T
13-1/2"
!
TOP VIEW
IN - OUT
27-7/8"
_F J _J
_J L _
7
SIDE VIEW
35-3
FRONT VIEW
/8"
Figure 24
TRANSFORMER --_
!
120VAC _ I
60Hz 24VAC
TURBINE
SENSOR
BACK OF
ELECTRONIC
CONTROLLER
24VDC
MOTOR
_._ NC
? NO
POSITION
SWITCH Figure 25
Questions? Call The Kenmore Water Line 1-800-426-9345 or visit KenmoreWater.com
23

Valve Assembly
See Pages 26 & 27
for parts
\
19
71
18
I
73
6
7
8
9
10
11
12
13
14
\
16 _ 17
Questions? Call The Kenmore Water Line 1-800-426-9345 or visit KenmoreWater.com
24

Key No. Part No. Description
Assembly, Replacement Mineral Tank, with
• 7302623 media, associated components & outer
shroud tank (includes Key Nos. 1 through 13)
- 7112963 Distributor O-Ring Kit (includes Key Nos. 1-3)
1 _ O-Ring, 2-7/8" x 3-1/4"
2 _h O-Ring, 13/16" x 1-1/16"
3 _h O-Ring, 2-3/4" x 3"
4 7077870 Top Distributor
5 7265025 Filter Screen
6 7105047 Repl. Bottom Distributor
Tank Neck Clamp Kit
- 7331177
(includes 2 ea. of Key Nos. 7 & 8)
7 _ Retainer Clip (2 req.)
8 _ Clamp Section (2 req.)
9 _ Mineral Tank, 8" x 25"
10 _ Activated Carbon, 10 Ibs.
11 _ Filter Sand, 5 Ibs.
12 "/€ Gravel, 6 Ibs.
13 _ Outer Shroud Tank
Cover Assembly
14 7326766
(includes Kenmore badge & faceplate decal)
15 7302592 Repl. Electronic Control Board (PWA)
16 7297373 Light Pipe
17 7275907 Transformer
18 7139999 Drain Hose, 20 ft.
19 1103200 Adaptor Elbow
20 7214383 Bypass Valve Assembly, 1", including 2 ea.
Clips & O-Rings (See Key Nos. 71 & 73)
• 7333705 Owner's Manual
• Not illustrated.
Mineral Tank, media, outer shroud tank and rim can only be
purchased as part of the Replacement Mineral Tank Assembly
(See top of list).
Questions? Call The Kenmore Water Line 1-800-426-9345 or visit KenmoreWater.com
25

78
57
60 59 58
71
_3
74
75
72
Questions? Call The Kenmore Water Line 1-800-426-9345 or visit KenmoreWater.com
26

Key No. Part No. Description
50 7224087 Screw, #8-32 x 1" (2 req.)
51 7286039 Motor (incl. 2 ea. of Key No. 50)
52 7231393 Motor Plate
53 0900857 Screw, #6-20 x 3/8" (3 req.)
54 7171250 Bearing
55 7283489 Cam & Gear
- 7331282 Drain Hose Adaptor Kit (incl. Key Nos. 56-60)
56 _h Clip, Drain
57 _h Hose Clamp
58 _h Adaptor, Drain Hose
59 _h O-Ring, 15/16" x 1-3/16"
60 _h Flow Plug, 3.4 gpm
- 7185487 Seal Kit (includes Key Nos. 61-66)
61 _h O-Ring, 5/8" x 13/16"
62 _h O-Ring, 1-1/8" x 1-1/2"
63 _h O-Ring, 4-1/2" x 4-7/8"
64 _h Rotor Seal
65 _h Seal
66 _ Seal, Nozzle & Venturi
67 7174313 Bearing, Wave Washer
68 7185500 Rotor & Disc
69 7171187 Plug, Drain Seal
70 7129889 Spring
71 7337589 Clip, 1", pack of 4
72 7271204 Installation Adaptor, 1" (2 req.)
73 7337597 O-Ring, 1-1/16" x 1-5/16", pack of 4
Turbine & Support Assembly, including 2 O-Rings
- 7290931
(See Key No. 73) & 1 ea. of Key Nos. 74 & 75
74 _h Turbine Support & Shaft
75 _h Turbine
76 7309811 Wire Harness (Sensor)
77 7081201 Retainer, Nozzle & Venturi
78 7171145 Valve Body
79 7170319 O-Ring, 1/4" x 3/8" (2 req.)
80 7100940 Plug, Aspirator Port
81 7175199 Wave Washer
82 7171161 Valve Cover
83 7172997 Screw, #10-14 x 2-5/8" (8 req.)
84 7305150 Switch
85 7140738 Screw, #4-24 x 3/4", Flat Head (2 req.)
Questions? Call The I<enmore Water Line 1-800-426-9345 or visit I<enmoreWater.com
27

Your Home
For expert troubleshooting and home solutions advice:
managemylife
Our Home
For repair of carry-in items like vacuums, lawn equipment,
and electronics, call anytime for the location of your nearest
Sears Parts & Repair Service Center
1-800-488-1222 (U.S.A.) 1-800-469-4663 (Canada)
www.sears.com www.sears.ca
To purchase a protection agreement on a product serviced by Sears:
1-800-827-6655 (U.S.A.) 1-800-361-6665 (Canada)
Para pedir servicio de reparaci6n
a domicilio, y para ordenar piezas:
1-888-SU-HOGAR ®
(1-888-784-6427)
www.sears.com
Au Canada pour service en frangais:
1-800-LE-FOYER Mc
(1-800-533-6937)
www.sears.ca
® Registered Trademark / TNTrademark of KCD IP, LLC in the United States, or Sears Brands, LLC in other countries
® Marca Registrada / TNMarca de Fabrica de KCD IP, LLC en Estados Unidos, o Sears Brands, LLC en otros parses
NCMarque de commerce / NDMarque depos6e de Sears Brands, LLC

MANUAL DEL PROPIETARIO
Sistema central
de filtrado de agua
para toda la casa
MODELO No. 625.382080
Precauci6n:
Antes de usar este producto por primera
vez, lea y siga toclas las reglas de seguri-
dad y las instrucciones de operaci6n.
_Tiene preguntas?
Visite el sitio web www.KenmoreWater.com
o Ilame gratis al 1-800-426-9345
(lun. a vie., de 7 a.m. a 6 p.m., hora del Centro)
i.Necesita reparaci6n o repuestos? Llame gratis al 1-800-469-4663
Vea otros n0meros de servicio de Sears en la cubierta posterior.
CONSERVE ESTE MANUAL
Este sistema ha sido probado y certificado
por NSF International seg0n la norma
NSF/ANSI 42 para la
reducci6n del sabor y el olor a cloro,
y certificado segOn la norma NSF/ANSI 372.
• Garantfa
• Instalaci6n
• C6mo funciona
• C6mo cuidar el producto
• Especificaciones
• Piezas de repuesto
Sears Brands Management Corporation, Hoffman
IMPRESO EN LOS EE.UU. www.KenmoreWater.com
Estates, IL 60179 U.S.A.
Pieza No. 7333705 (Rev. D 2/26/13)

GARANTJA PARA EL SISTEMA CENTRAL I(ENMORE
DE FILTRADO DE AGUA PARA TODA LA CASA
GARANTJA LIMITADA DE UN AI_iO PARA EL SISTEMA CENTRAL KENMORE DE FILTRADO DE AGUA PARA
TODA LA CASA
Cuando se haya instalado, operado y mantenido conforme a todas las instrucciones suministradas con el pro-
ducto, si este sistema central de filtrado de agua para toda la casa fallara debido a defectos en materiales o
mano de obra dentro de un a_o a partir de la fecha de compra, Ilame al 1-800-4-MY-HOME ® para solicitar
la reparaci6n gratuita.
GARANTJA LIMITADA DE DIEZ AI_IOS CONTRA FUGAS
Cuando se haya instalado, operado y mantenido conforme a todas las instrucciones suministradas con el pro-
ducto, si el tanque con base filtrante del sistema central de filtrado de agua para toda la casa tuviera una
fuga dentro de los diez a_os de la fecha de compra, Ilame al 1-800-4-MY-HOME ® para solicitar el reemplazo
gratuito del tanque. Despu_s del primer a_o, usted deber6 pagar un cargo inicial por viaje.
La cobertura de la garantia total no incluye la base filtrante, la cual es un articulo consumible.
Si este sistema central de filtrado de agua para toda la casa Ilegara a usarse alguna vez con un prop6sito
ajeno al de una familia privada, toda la cobertura de la garantia se aplicar6 por s61o 90 dias a partir de la
fecha de compra.
La presente garantia s61o cubre defectos en materiales y mano de obra. Sears NO pagar_:
1. A un t6cnico de servicio para instruir al usuario sobre la forma correcta de instalar, operar o mantener
el producto.
2. A un t6cnico de servicio para limpiar o dar mantenimiento a este producto.
3. El da_o o la falla de este producto si no se instala, opera ni mantiene conforme a todas las instrucciones
suministradas con el producto.
4. El da_o o la falla de este producto originado por accidentes, maltratos, uso incorrecto o uso ajeno al
prop6sito de diseffo.
5. El da_o o la falla de este producto causado por el uso de detergentes, productos de limpieza, productos
quimicos o utensilios que no sean los recomendados en todas las instrucciones suministradas con
el producto.
6. El da_o o la falla de piezas o sistemas originado por modificaciones no autorizadas hechas a este producto.
Exenci6n de responsabilidad por garantias implicitas; limitaci6n de recursos
Conforme a la presente garantia limitada, el recurso 0nico y exclusivo para el cliente ser6 la reparaci6n del
producto seg0n Io aqui estipulado. Las garantias implicitas, incluyendo las garantias de comerciabilidad o
aptitud para un prop6sito en particular, se limitan a un afio o al periodo m6s breve que permite la ley. Sears
no se responsabilizar6 de dafios imprevistos o emergentes. En ciertas jurisdicciones no se permite la exclusi6n
o limitaci6n de dafios imprevistos o emergentes, o no se permite la limitaci6n de la duraci6n de las garantias
implicitas de comerciabilidad o aptitud, de modo que las presentes exclusiones o limitaciones podrian no apli-
carse a usted.
Esta garantia se aplicar6 solamente mientras este artefacto se use en los Estados Unidos o Canad6.
Esta garantia le otorga derechos legales especificos, yes posible que usted tambi6n tenga otros derechos, los
cuales varian de una jurisdicci6n a otra.
Sears Brands Management Corporation, Hoffman Estates, IL 60179
_.Tiene preguntas? Llame a la linea de ayuda de Kenmore Water al 1-800-426-9345
o visite el sitio web KenmoreWater.com.

Desempaque y revise el env[o ..................................................................... 4
Requisitos de instalaci6n ........................................................................ 5-6
Instalaci6n .................................................................................. 7-11
C6mo funciona un sistema central de filtrado de agua ................................................. 11
Programaci6n del sistema central de filtrado de agua .................................................. 12
Procedimiento de arranque ....................................................................... 13
Caracteristicas/opciones de personalizaci6n ....................................................... 14-16
Cuidado del sistema central de filtrado de agua ................................................... 17-18
Soluci6n de problemas ........................................................................ 19-21
Especificaciones y reclamos de funcionamiento ....................................................... 22
Dimensiones .................................................................................. 23
Diagrama de cableado ......................................................................... 23
Vista detallada y lista de piezas ............................................................... 24-27
• Antes de instalar y usar el sistema central de filtrado
de agua para toda la casa, lea atentamente todos los
pasos y las pautas. Siga exactamente todos los pasos
para Iograr la instalaci6n correcta. Leer este manual
tambi6n Io ayudar6 a obtener todos los beneficios del
sistema central de filtrado de agua para toda la casa.
• No intente utilizar este producto a fin de patabilizar
agua proveniente de fuentes no potables. Si el agua es
microbiol6gicamente impura o si se desconoce su cali-
dad, no use el sistema sin una adecuada desinfecci6n
antes o despu6s del sistema.
• Use s61o soldadura y fundente sin plomo para todas
las conexiones de soldadura con estafio, segOn Io exi-
jan los c6digos federales.
• Maneje con cuidado el sistema central de filtrado de
agua para toda la casa. No Io voltee ni deje caer.
• Evite instalarlo bajo la luz directa del sol. El exceso de
calor solar puede distorsionar o causar algOn otro
dafio alas piezas no met61icas.
• Consulte los c6digos de plameria y sanidad a su
departamento local de obras pOblicas. AI instalar el
sistema deber6 seguir las pautas que le indiquen. Siga
sus c6digas locales si difieren con las pautas del pre-
sente manual. En el Estado de Massachusetts, se debe
cumplir con los c6digos de plomeria 248-CMR 3.00 y
10.00. Consulte a un plomero con licencia.
• El sistema central de filtrado de agua para toda la
casa funciona con presiones de agua de 30 PSI (mini-
ma) a 125 PSI (m6xima). Si la presi6n del agua de su
casa supera la m6xima, instale una v61vula reductora
de presi6n en la linea de suministro de agua al sistema
central de filtrado de agua para toda la casa.
• El sistema central de filtrado de agua para toda la
casa funciona solamente con corriente de 24 voltios y
60 hercios, suministrada por un transformador directo
enchufable (que se incluye). AsegOrese de usar el
transformador incluido y de enchufarlo en un tomacor-
riente dom6stico con r6gimen nominal de
120 voltios y 60 ciclos, que est6 debidamente protegi-
do por un dispositivo para sobrecorriente, como un
disyuntor o un fusible. Si se reemplaza el transfor-
mador, use solamente el transformador de servicio
autorizado de Clase II, 24 voltios, 10 VA.
• No instale el sistema central de filtrado de agua para
toda la casa en exteriores ni bajo temperaturas
extremadamente calientes o frias. La temperatura del
suministro de agua al sistema central de filtrado de
agua para toda la casa debe estar entre 40 °F y
120 °F (4 °C y 49 °C). No Io instale en tuberias de
agua caliente.
• Este sistema central de filtrado de agua para toda la
casa tiene un sistema de v61vulas no met61icas. Su insta-
laci6n en una tuberia met61ica cortar6 la continuidad
el6ctrica, la cual puede interrumpir la conexi6n a tierra
de la vivienda. Debe restaurar la continuidad el6ctrica
en el sistema de la tuberia met61ica (vea la p6gina 10).
La Directiva Europea 2002/96/EC requiere que todo equipo el6ctrico y electr6nico se deseche
conforme a los requisitos sobre "Residuos de aparatos el6ctricos y electr6nicos" (RAEE). Dicha
directiva u otras leyes similares se han implementado a nivel nacional y pueden variar de una
regi6n a otra. Para desechar correctamente este equipo, consulte sus leyes estatales y locales.
_Tiene preguntas? Llame a la linea de ayuda de Kenmore Water al 1-800-426-9345
o visite el sitio web KenmoreWater.com.
3

INSPECCIONE EL ENVJO
El sistema central de filtrado de agua para toda la
casa se envia completo en una caja de cart6n. Retire
todos los articulos de la caja de cart6n del envio.
Revise todos los articulos contra la lista de empaque
que figura a continuaci6n. Tome nota de todo articulo
faltante o dafiado durante el envio. Tome nota de
cualquier dafio en la caja del envio. Si hubiera
problemas, contacte la tienda donde usted compr6 su
sistema central de filtrado de agua para toda la casa.
Conserve las piezas peque_as dentro de la bolsa de piezas
hasta que est6 listo para instalarlas.
NOTA: Los c6digos del Estado de Massachusetts requieren
que un plomero con licencia realice la instalaci6n.
Si vive en Massachusetts, examine el c6digo de plomeria
248-CMR del Estado de Massachusetts antes de instalar el
producto.
V_lvula de derivaci6n Juntas t6ricas
Manguera
de desagLie
Abrazaderas
para manguera
Adaptadores
para instalaci6n
Codo adaptador
Clips
Figura 1
HERRAMIENTAS NECESARIAS
ReOna las herramientas necesarias antes de comenzar la
instalaci6n. Lea y siga las instrucciones incluidas con
todas las herramientas mencionadas aquL
• Destornillador
• Cinta de medir
• Pinzas
Si usa tubo de cobre soldado
• Cortatubos
• Soldadura y fundente sin plomo
• Soplete de propano
• Tela de esmeril, papel de lija o lana de acero
• Uniones varias para tuberia de cobre
Si usa tuberia roscada
• Cortatubos o sierra para metal
• Compuesto para juntas de tuberia
• Roscador
• Uniones varias para tuberia roscada
Si usa tuberia de pl_stico CPVC
• Cortatubos
• Cemento solvente
• Sierra para metal
• Tapaporos
• Llave ajustable
Si
se usa otto tipo
Otras tuberias y uniones adecuadas para agua
potable, segOn Io requieran el fabricante del sistema
de tuberias y los c6digos y las ordenanzas locales.
4
_Tiene preguntas? Llame a la linea de ayuda de Kenmore Water al 1-800-426-9345
o visite el sitio web KenmoreWater.com.

REQUISITOS DE UBICACION
Considere Io siguiente al seleccionar una ubicaci6n para
instalar el sistema central de filtrado de agua para toda
la casa.
• No opere el sistema central de filtrado de agua para
toda la casa donde se registren temperaturas de
congelamiento. No intente tratar agua con una
temperatura superior a los 120 °F (49 °C). El uso de
agua a temperatura de congelamiento o de agua
caliente anula la garanfia.
• Para acondicionar toda el agua de la vivienda, instale
el sistema central de filtrado de agua para toda la
casa cerca de la entrada del suministro de agua, y
antes de todas las dem6s conexiones de plomeria,
excepto los tubos de agua externos.
• Para una casa con suministro municipal de agua,
instale el sistema central de filtrado de agua para
toda la casa entre el suministro entrante de agua de la
vivienda y el suavizante de agua, si se utiliza. (Vea la
Figura 2A). Si la casa tiene un suministro de agua de
cisterna, invertir el orden del sistema central de filtrado
de agua y el suavizante de agua (Vea la Figura 2B).
• Se necesita tener un desagLie cerca para descargar el
agua del ciclo de limpieza. Use un desagLie de piso,
una pileta de lavadero, un sumidero, un tubo vertical u
otras opciones. (Consulte sus c6digos locales.) Vea las
secciones "Requisitos de separaci6n de aire" y
"Requisitos para el desagLie de la v61vula". Si no hay
un desagLie disponible, es posible operar el sistema
central de filtrado de agua para toda la casa en
modo de limpieza manual. Vea la secci6n titulada
"C6mo operar en modo de limpieza manual". Si el
sistema central de filtrado de agua para toda la casa
no se conectar_ a un desagLie, hay que desactivar el
ciclo autom6tico de limpieza. (Vea la p6gina 16.)
• El sistema central de filtrado de agua para toda la
casa funciona solamente con corriente de 24 voltios y
60 hercios, suministrada por un transformador directo
enchufable (que se incluye). Proporcione un tomacor-
riente el6ctrico conforme a los c6digos NEC y locales.
• No instale el sistema central de filtrado de agua para
toda la casa en una tuberla de agua caliente. (Vea las
Figuras 2A y 2B m6s aba]o.)
ORDEN CORRECTO PARA INSTALAR EL EQUIPO DE TRATAMIENTO DE AGUA
Agua fria a
la casa
Agua caliente _
a la casa
Agua sin tratar a
los grifos externos
_'_ _ Suministro municipal
de agua
Filtro
opcional de
sedimentos
Calentador Ablandador Sistema
de agua de agua central de
filtrado
de agua
Agua fria a
la casa
Agua caliente _
a la casa
OtEN
Agua sin tratar a i
los grifos externos
-|
opcional de
sedimentos
Tanque
de presi6n
Figura 2A
_d Suministro
Calentador Sistema Ablandador e agua de cisterna
de agua central de de agua _x
filtrado Bomba de
de agua cisterna _ t Figura 2B
_.Tiene preguntas? Llame a la linea de ayuda de I<enmore Water al 1-800-426-9345
o visite el sitio web KenmoreWater.com.
5

CODIGOS DE PLOMERJA
Toda la plomeria debe instalarse en cumplimiento
de los c6digos de plomeria nacional, estatal y local.
En el estado de Massachusetts: Se debe cumplir
con el c6digo de plomeria 248-CMR del Estada de
Massachusetts. Un plomero con licencia realizar6
esta instalaci6n.
REQUISITOS DE SEPARACION DE AIRE
Se necesita tener un desagLie para descargar el agua
del ciclo de limpieza. Es preferible usar un desagLie de
piso, cerca del sistema central de filtrado de agua.
Otras opciones pueden ser una pileta de lavadero, un
tubo vertical, etc. Fije la manguera de desagLie de la
v61vula en su sitio. Deje una separaci6n de aire de
1-1/2 pulg. (3.8 cm) entre el extremo de la manguera y
el desagLie. Se necesita esta separaci6n para impedir el
refluja de agua residual al sistema central de filtrado
de agua para toda la casa. No coloque el extremo de
la manguera de desagLie dentro del desagLie.
REQUISITOS PARA EL DESAGOE DE LA VALVULA
Use la manguera flexible de desagLie (incluida), mldala y
c6rtela a la Iongitud necesaria. No en todas las Iocalidades
se permite usar mangueras flexibles de desagLie. (Consulte
sus c6digos de plomeria.) Si los c6digos locales no permiten
usar una manguera flexible de desagLie, deber_ instalar
un desagLie con v_lvula rigida. Adquiera una uni6n de
compresi6n (NPT de 1/4 x tubo de 1/2 pulg. como mfnimo)
y tubo de 1/2 pulg. en su ferreterla local. Instale un
desagLie rlgido segOn se necesite. (Vea la Fig. 3 m6s aba]o.)
NOTA: Evite que la Iongitud de la manguera de desagLie
supere los 30 pies (9.14 m). Haga la tuberla de
desagLie de la v_lvula tan corta y directa como
sea posible.
Se recomienda instalar el sistema central de filtrado de
agua para toda la casa cerca de un desagLie. Sin embargo,
si no hay un desagLie disponible, es posible operar el
sistema central de filtrado de agua para toda la casa en
modo de limpieza manual. Vea la secci6n titulada "C6mo
operar en modo de limpieza manual". Si el sistema central
de filtrado de agua no se conectar_ a un desagLie, hay
que desactivar la funci6n autom6tica de limpieza.
CONEXION DE LA VALVULA AL DESAGOE
Uni6n
_Ipara
desagiJe
Abrazadera
para manguera
Manguera de
desagLie para
la v61vula
FUe el tubo en su
sitio con alambre
o amarres.
Rejilla de desagLie con orificio
de 1 pulg. (2.5 cm) en el centro
El alambre de con-
exi6n a tierra debe
hacer contacto con
los tubos met61icos
A un punto de
desagLie que no sea
un desagLie de piso.
Fije el tubo en su sitio
segOn se necesite.
\
Instale un codo adapta-
dor con abrazadera
para manguera. Apunte
la boquilla hacia abajo
y al centro del desagLie
Separaci6n
de aire de
1-1/2 pulg.
(3.8 cm)
DESAGOE DE PISO
SUBSTITUCION CON TUBERiA RiGIDA
DE DESAGOE
_/_,_,_ Roscas NPT de 1/4 pulg.
Corte las reba
bas de la unidn
para desagiJe
[tire det clip para Uni6n de compresi6n NPT
separar la uni6nde 1/4 x tubo de 1/2 pulg.
de la v6tvula) de D.E.(no se inctuye)
Tubo de cobre de
1/2 pulg. de D.E.
(no incluido)
raci6nde_ _iL_
airede_.._'
l
PILETA DE LAVADERO
raci6n de _ @
airede-- -
I-1/2pulg.'Z_[_
(3.8 cm)
TUBO VERTICAL
Figura 3
6
_.Tiene preguntas? Llame a la linea de ayuda de Kenmore Water al 1-800-426-9345
o visite el sitio web KenmoreWater.com.

CIERRE EL SUMINISTRO DE AGUA
1. Cierre la v_lvula principal del suministro de agua,
cerca de la bomba de la cisterna o el medidor
de agua.
2. Abra todos los grifos para desaguar la tuberia de
la casa.
NOTA: Cerci6rese de no desaguar el calentador de
agua, ya que podrian da_arse los elementos del
calentador.
TRASLADE EL SISTEMA CENTRAL
DE FILTRADO DE AGUA A SU SITIO
1. Ponga el sistema central de filtrado de agua para
toda la casa en la posici6n de instalaci6n. Ap6yelo
sobre una superficie nivelada. Si es necesario,
coloque la unidad sobre una chapa de madera de
5/8 pulg. (16 mm) de espesor como minimo. Luego
coloque cu_as debajo de la chapa para nivelar el
sistema central de filtrado de agua. (Vea la Fig. 4.)
NIVELE SI ES NECESARIO
Cu_a(s)
Chapa
de madera
/
L_-
Figura 4
CRUCE
_,En qu_ sentido fluye el agua?
No olvide planear las tuberias de modo que el agua
fluya hacia la ENTRADA de la v_lvula del sistema
central de filtrado de agua para toda la casa. Si el
flujo va de izquierda a derecha, planee un truce.
T_berio
_ Principal de Og_o
Agua trata-
da desde la
v61vula -
SALIDA
t
Agua sin
tratar a la
v61vula -
ENTRADA
AI sistema central
de filtrado de agua
Figura 5
_Tiene preguntas? Llame a la linea de ayuda de Kenmore Water al 1-800-426-9345
o visite el sitio web KenmoreWater.com.
7

OPCIONESDEPLOMERIAPARAENTRADA/
SALIDA
Instale una v61vula de derivaci6n (que se incluye) a la
plomeria, como se ilustra en la Fig. 8, O BIEN, si Io
desea, puede instalar un sistema de derivaci6n de
3 v61vulas (no se incluyen las piezas), como se ilustra en
la Fig. 7. Las v61vulas de derivaci6n le permiten cerrar
la entrada de agua al sistema central de filtrado de
agua para toda la casa para su mantenimiento, si es
necesario, y aOn asi suministrar agua a la casa.
Use uno de estos:
• Tuberia de cobre
• Tuberia roscada
• Tubo de PEX (polietileno reticulado)
• Tubo de pl6stico CPVC
• Otto tubo aprobado para usar con agua potable
IMPORTANTE: No suelde con la plomeria conectada a
adaptadores de instalaci6n y una
derivaci6n de una sola v61vula.
El calor de la soldadura da_ar6 los
adaptadores y la v61vula.
NOTA: Antes de instalar la v61vula de derivaci6n o el
tubo de cobre en la ENTRADA de la v61vula,
retire la pieza de espuma que se coloc6 dentro
de dicho puerto para su despacho.
Antes de instalar la v61vula de derivaci6n o el tubo de
cobre en la SALIDA de la v61vula, compruebe que la
turbina y el soporte est6n colocados firmemente, como
se ilustra en la Figura 6.
Soporte para Salida de
la turbina la v61vula
Turbina
/
Figura 6
_ DERIVACION DE 3 VALVULAS
Sistema central de filtra-
do de agua - SALIDA
Sistema central de filtrado
de agua - ENTRADA
Ficjura 7
CONEXION DE LA PLOMERIA A LA VALVULA
SAL.
Use cinta de
Teflon®, compuesto
para juntas de
tuberia o ambos
ENT.
Adaptador per
fusi6n NPT de
1pulg. (2)
(no se incluye)
_ Adaptador
, _. NPTde
Se
incluyen
_ Vdlvula de
Entrada de derivaci6n
la v61vula
Use cinta de _
Teflon®, compuesto
SAL. _ ENT.
tuPa;aajuntamSbd_ _ _
_'_" Ada.ptador per
_'_ "Clip (2)(no se ,ncluye)
NdTPdead°r_Se incluyen
Entrada de 1 pulg. (2)
la v61vula
Ficjura 8
_Tiene preguntas? Llame a la linea de ayuda de Kenmore Water al 1-800-426-9345
o visite el sitio web KenmoreWater.com.

ARME LA PLOMERIA DE ENTRADA Y SALIDA
Mida, torte y arme sin apretar los tubos y las uniones
del tubo de agua principal a los puertos de entrada y
salida de la v61vula del sistema central de filtrado de
agua para toda la casa. Aseg0rese de mantener las
uniones bien colocadas entre si, con los tubos derechos
y bien alineados unos con otros.
Aseg0rese de que el tubo de suministro de agua
entrante vaya al lado de entrada de la v61vula.
CONECTE LA PLOMERIA DE ENTRADA Y SALIDA
IMPORTANTE:
• No olvide armar, alinear y dar soporte a toda la plom-
eria para evitar el esfuerzo excesivo de la entrada y
la salida de la v61vula del sistema central de filtra-
do de agua para toda la casa. El esfuerzo indebido
a causa de piezas desalineadas o con soporte deft-
ciente podria dafiar la v61vula y producir fugas.
• Aseg0rese de mantener las uniones bien colocadas
entre si, con los tubos derechos y bien alineados
unos con otros.
• Cerci6rese de que la linea entrante de suministro de
agua de la casa vaya al lado de la ENTRADA
de la v61vula del sistema central de filtrado de agua
para toda la casa. La entrada y la salida est6n
marcadas en la v61vula. Siga el sentido del flujo del
agua para cerciorarse.
Finalice la plomeria de entrada y salida para el tipo de
tuberia descrito m6s abajo a la derecha.
Conectores flexibles Sears
Las mangueras con conector flexible se ofrecen en
pares para realizar una conexi6n conveniente entre la
plomeria de 3/4 pulg. (Sears 42-34405) o la de
1 pulg. (Sears 42-34407) para uso dom_stico (cobre,
CPVC o PEX) _/el sistema central de filtrado de agua
para toda la casa.
1. Siga las instrucciones que se incluyen con los
conectores flexibles Sears.
Tuberia de cobre soldado
1. Limpie bien y aplique fundente de soldadura a todas
las juntas.
2. Haga todas
IMPORTANTE:
las conexiones de soldadura.
No suelde con la plomeria conectada a
adaptadores de instalaci6n y una
derivaci6n de una sola v61vula. El calor
de la soldadura dafiar6 los adapta-
dores y la v61vula.
Tuberia roscada
1. Aplique compuesto para junta de tuberias o cinta
de TeflonQ a todas las roscas macho de los tubos.
2. Apriete todas las juntas roscadas y haga las conex-
iones de soldadura.
Tubo de pl_stico CPVC
1. Limpie, aplique tapaporos y cemento a todas las
juntas, siguiendo las instrucciones del fabricante
proporcionadas con el tubo y las uniones de pl6stico.
Otros tubos, incluv'endo de PEX (polietileno
reticulado)
1. Siga las instrucciones del fabricante del sistema
de tuberias al usar otros tubos aprobados para agua
potable.
® Teflon es una marca registrada de E.I. Du Pont de Nemours
and Company.
_.Tiene preguntas? Llame a la linea de ayuda de Kenmore Water al 1-800-426-9345
o visite el sitio web KenmoreWater.com.
9

CONEXIONA TIERRAPORTUBERJA
METALICADEAGUA
IMPORTANTE:
Este sistema central de filtrado de agua
para toda la casa tiene un sistema de
v61vulas no met61icas. Su instalaci6n en
una tuberia met61ica cortar6 la continu-
idad el6ctrica, Io cual puede interrumpir
la conexi6n a tierra de la vivienda. Debe
restaurar la continuidad el6ctrica en el sis-
tema de la tuberia met61ica.
Si instal6 un sistema de derivaci6n de 3 v61vulas (Fig. 7),
se mantendr6 la continuidad el6ctrica. Si instal6 la v61vu-
la de derivaci6n no met61ica (Fig. 8), restaure la conexi6n
a tierra de esta manera:
Instale un alambre de cobre calibre 4 (no se incluye la
pieza) a trav6s de la secci6n de la tuberia met61ica de
agua que se retir6, fij6ndolo firmemente con abrazaderas
a ambos extremos (vea la Fig. 9). Compruebe que los
tubos est6n limpios debajo de las abrazaderas para que
haya un buen contacto.
NOTA: Si instala un ablandador de agua u otros elemen-
tos en el sistema de plomeria, juntamente con el
sistema central de filtrado de agua para toda la
casa, no olvide restaurar la continuidad el6ctrica
a trav6s de todas las secciones de tuberia met61i-
ca que retire.
INSTALE LA MANGUERA DE DESAGOE PARA
LA VALVULA
1. Mida, corte seg0n la Iongitud necesaria y conecte el
tubo de desagLie de 3/8 pulg. (se incluye) a la uni6n
para desagLie de la v61vula del sistema central de fil-
trado de agua para toda la casa. (Vea la Figura 10.)
Mantenga la manguera en su sitio con una abrazadera.
NOTA: Si los c6digos exigen una tuberia rigida de
desagLie, vea la secci6n titulada "Requisitos para
el desagLie de la v61vula".
2. Tienda la manguera o la tuberia de cobre de desagLie
hasta el desagLie de piso. Fije la manguera de
desagLie. Eso impedir6 que la tuberia de desagLie
"d_ latigazos" durante los ciclos de limpieza. Vea la
secci6n "Requisitos de separaci6n de aire".
CONEXION A TIERRA POR TUBERJA METALICA
(no se incluyen las piezas)
Alambre de
conexi6n a tierra
/
Abram--
Figura 9
VALVULA DE UNA DERIVACION
Conexi6n para
tuberia de desagLie
Tire de la manija
hacia AFUERA
para la I
la manija
ADENTRO
ara lao
VACION
Figura 10
10
_.Tiene preguntas? Llame a la linea de ayuda de Kenmore Water al 1-800-426-9345
o visite el sitio web KenmoreWater.com.

PRUEBE PARA DETECTAR FUGAS
1. Compruebe que la v61vula de una derivaci6n (o la
v61vula de 3 derivaciones, si se instala) est6 en la
posici6n de derivaci6n, con la manija empujada
hacia adentro. (Vea la Figura 10.)
2. Abra totalmente la v61vula principal del suministro
de agua.
3. Abra brevemente un grifo de la casa para recargar
la plomeria con agua.
4. Mueva lentamente la v61vula o v61vulas de
derivaci6n
a la posici6n de operaci6n normal, con varias
pausas para permitir que la unidad presurice lenta-
mente.
(Vea la Figura 10.)
5. Revise todas las conexiones de plomeria que haya
hecho para detectar fucjas.
IMPORTANTE: El procedimiento de arranque debe
realizarse antes de usar cualquier agua
filtrada. Siga las instrucciones m6s
abajo y las de la p6gina 13.
ENCIENDA EL SISTEMA CENTRAL DE FILTRA-
DO DE AGUA PARA TODA LA CASA
Durante la instalaci6n, es posible que el cableado del
sistema central de filtrado de agua para toda la casa
se haya desplazado de su sitio. Compruebe que todos
los conectores de los cables est6n fijos en la parte pos-
terior del tablero electr6nico (vea la Fig. 25 en la p6gi-
na 23) y cerci6rese de que todos los cables est6n aleja-
dos del 6rea del engranaje y el motor de la v61vula, el
cual gira durante los ciclos de limpieza.
1. Enchufe el transformador del sistema central de fil-
trado de agua para toda la casa a un tomacorriente
el6ctrico que no est6 controlado por un interruptor.
2. En la pantalla, aparecer6n las palabras "SET TIME"
(Configurar la hora) y comenzar6 a destellar "12:00
PM". Programe el reloj seggn la secci6n titulada "Fije
la hora del dia" de la p6gina 12.
3. Ejecute el procedimiento de arranque, como se
detalla en la p6gina 13.
OPERACION NORMAL
Durante la operaci6n normal, el agua ingresa en el sis-
tema central de filtrado de agua para toda la casa y
pasa por diversos procesos de filtrado mediante los
cuales se reducen los sabores, los olores y el sedimento.
CICLO DE LIMPIEZA
Se iniciar6 autom6ticamente un ciclo de limpieza en
base a cu6ntos galones de agua ha filtrado el sistema
(o despu6s de 14 dias si no ha pasado agua por el sis-
tema durante ese tiempo). El ciclo de limpieza levanta
y expande la capa de medios filtrantes para renovarlos
y luego vuelve a compactar la capa para su uso per-
manente. Durante dicho ciclo de limpieza, la suciedad,
el sedimento, etc., se eliminan por el desagLie del sis-
tema central de filtrado de agua para toda la casa.
APLICACIONES PARA aN SISTEMA CENTRAL
DE FILTRADO DE AGUA
Si el agua es microbiol6gicamente cuestionable o si
se desconoce su calidad, no use el sistema central
de filtrado de agua para toda la casa sin una ade-
cuada desinfecci6n antes o despu_s del sistema.
Es posible que el sistema central de filtrado de agua
para toda la casa no sea un m6todo de tratamiento
eficaz para fuentes de agua con problemas de sul-
furo de hidr6geno (olor o sabor a huevo podrido). Si
el agua contiene sulfuro de hidr6geno, comuniquese
con un empleado de su tienda Sears para consultar
sobre las soluciones de Kenmore.
El sistema central de filtrado de agua no eliminar6
el hierro ni tiene el prop6sito de reemplazar equipos
para tratamiento de hierro.
En caso de aplicaciones de agua con problemas, a
pesar de que el sistema central de filtrado de agua
tiene capacidad de filtrado de sedimento, es posible
que se necesite un filtrado adicional de sedimento.
_Tiene preguntas? Llame a la linea de ayuda de Kenmore Water al 1-800-426-9345
o visite el sitio web KenmoreWater.com.
11

Pantalla
Central Water
Whole Home Filtration System
Bot6n
SUBIR
CLEAN
Bot6n
BAJAR
Bot6n CLEAN
(Limpiar)
Bot6n ENTER
(Aceptar)
Figura 11
Cuando se enchufe inicialmente el transformador a un
tomacorriente el6ctrico, aparecer6 brevemente un c6digo
de modelo y un nOmero de prueba (ejemplo: J2.0) en la
pantalla de la placa frontal. Luego aparecer6n las
palabras "SET TIME" (Configurar la hora) y comenzar6
a destellar "12:00 PM'.
NOTA: Si en la pantalla se ve .... , oprima el bot6n
/_ SUBIR o V BAJAR hasta que se vea "dE I" en
la pantalla. Luego, optima el bot6n ENTER (Aceptar)
para fijar y cambiar al mensaje "SET TIME".
CONFIGURAR LA HORA ACTUAL
Si no seven las palabras "SET TIME" (Configurar la hora)
en la pantalla, optima el bot6n ENTER (Aceptar) unas
cuantas veces hasta que aparezcan.
1. Oprima los botones /X SUBIR o V BAJAR para fijar la
hora actual. "Subir" hace avanzar los nOmeros en
pantalla; "Bajar" los hace retroceder. AsegOrese de
que la funci6n AM o PM est6 correcta.
NOTA: Oprima y suelte enseguida los botones para
hacer avanzar lentamente los nOmeros en la
pantalla. Mantenga oprimidos los botones para
avanzar r6pidamente.
2. Cuando aparece la hora correcta, oprima unas
cuantas veces el bot6n ENTER (Aceptar) hasta que
aparezca en pantalla la hora del dia que no destella.
CODE
TIME
SET
TiME
Figura 12
Figura 13
12
_.Tiene preguntas? Llame a la linea de ayuda de Kenmore Water al 1-800-426-9345
o visite el sitio web KenmoreWater.com.

IMPORTANTE:
Ponga en marcha el ciclo de arranque tan
pronto como termine la instalaci6n, antes de
usar el agua de la casa.
Los medios filtrantes de este sistema central de filtrado
de agua para toda la casa contienen una pequefia
cantidad de particulas inofensivas de carbono activa-
do, generadas durante la fabricaci6n y el envio, las
cuales son suficientemente pequefias para salir del sis-
tema con el flujo del agua. Es normal que dichas
particulas causen una decoloraci6n temporal en el
agua que sale del sistema. Para evitar que salga agua
descolorida por los grifos de la casa, hay que iniciar el
ciclo de arranque del sistema para eliminar las particu-
las y toda el agua descolorida por el desagLie.
Si se usa el sistema central de filtrado de agua para
toda la casa sin ejecutar primero el ciclo de arranque,
notar6 que el agua saldr6 temporalmente de color gris
hasta que las particulas hayan salido del sistema.
Para iniciar el ciclo de arranque:
1. Cerci6rese de que la manguera de desagLie est6
conectada al sistema central de filtrado de agua
para toda la casa y que el otro extremo se haya fija-
do sobre un desagLie. (Vea la secci6n titulada
"lnstale la manguera de desagLie para la v61vula"
en la p6gina 10.)
2. Cerci6rese de que la v61vula de derivaci6n est6 en la
posici6n de "Service" (Servicio: abierta o agua filtra-
da) y que est6 abierto el suministro de agua de la
casa.
3. Mantenga oprimido el bot6n CLEAN (Limpiar) para
iniciar el ciclo de arranque. Puede soltar el bot6n
cuando oiga que la v61vula cambia de posici6n y
queen la pantalla destelle la frase "RECHARGE
NOW" (Recargar ahora).
Durante el ciclo de arranque:
Durante el ciclo de arranque oir6 que la v61vula cam-
bia de posici6n y notar6 que comienza y se detiene el
flujo de agua hacia el desagLie. El ciclo de arranque
durar6 aproximadamente 20 minutos. Evite usar agua
durante ese tiempo. No programe la hora del dia ni
oprima otros botones durante el ciclo de arranque, pues
interrumpir6 dicho ciclo. No desenchufe el transfor-
mador durante el ciclo de arranque. Si se interrumpe el
ciclo de arranque, habr6 que iniciarlo nuevamente y
dejar que se ejecute completamente.
Despu_s del ciclo de arranque:
Una vez que el ciclo de arranque haya finalizado satis-
factoriamente, no podr6 iniciarse una segunda vez. El
sistema central de filtrado de acjua para toda
la casa volver6 autom6ticamente a la posici6n de
operaci6n normal. Una vez que se haya cumplido el
ciclo de arranque, hay que abrir un grifo en la casa y
dejar correr el agua durante 10 minutos al caudal nom-
inal del sistema. Despu_s del ciclo de arranque,
si el agua se ve descolorida, haga correr ciclos de
limpieza manuales (vea la p6gina 14) hasta que el
agua salga clara.
Si no se program6 la hora del dia antes del ciclo de
arranque, fijela ahora. (Vea la p6gina 12.)
Revise nuevamente las conexiones y juntas de la plom-
eria para detectar fugas.
_Tiene preguntas? Llame a la linea de ayuda de Kenmore Water al 1-800-426-9345
o visite el sitio web KenmoreWater.com.
13

INICIE UN CICLO DE LIMPIEZA
Para iniciar manualmente un ciclo de limpieza, mantenga oprimido el
bot6n CLEAN (Limpiar) durante unos segundos, hasta que destelle la frase
"RECHARGE NOW" (Recargar ahora) en la pantalla. Este ciclo de
limpieza Ileva 3 minutos (a menos que se haya cambiado la configuraci6n
de f6brica para retrolavado y enjuague r6pido, como se ilustra m6s abajo).
FIJE LA HORA DE INICIO DE LA LIMPIEZA
El sistema central de filtrado de agua para toda la casa viene programado
para iniciar la limpieza a la 1:00 a.m. El sistema no filtrar6 agua durante
el ciclo de limpieza. Se recomienda fijar la hora de inicio del ciclo de
limpieza para cuando no sea probable que se use agua en la casa.
NOTA: Si tiene un ablandador de agua, configura la hora del ciclo de
limpieza del sistema central de filtrado de agua para toda la casa
una hora antes o dos horas despu6s de la hora de regeneraci6n
programada del ablandador de agua.
Para cambiar la hora de inicio de la limpieza:
1. Oprima el bot6n ENTER (Aceptar) unas cuantas veces hasta que
aparezca "SET RECHARGE TIME" (Fijar hora de recarga) en
la pantalla.
2. Oprima los botones /X SUBIR o V BAJAR para fijar la hora de
limpieza en incrementos de 1 hora. Aseg0rese de que la funci6n AM
o PM est6 correcta.
,
Cuando aparece la hora deseada para la limpieza, oprima unas
cuantas veces el bot6n ENTER (Aceptar) hasta que aparezca en
pantalla la hora del dia que no destella.
FIJE LA DURACION DEL CICLO DE LIMPIEZA
El sistema central de filtrado de agua para toda la casa viene programa-
do para un ciclo de limpieza de 2 minutos de retrolavado, seguido por
1 minuto de enjuague r6pido. Eso ser6 suficiente para casi todas las
aplicaciones.
AI aumentar la duraci6n del tiempo de limpieza se aumentar6 la cantidad
de agua descargada hacia el desagLie durante cada ciclo de limpieza.
$61o se deber6 aumentar la duraci6n del ciclo de limpieza cuando haya
altas cantidades de sedimento u otros problemas con el agua.
Para cambiar la duraci6n de la parte de retrolavado o enjuague r_pido
del ciclo de limpieza:
1. Mantenga oprimido el bot6n ENTER (Aceptar) durante unos segundos,
hasta que aparezca en pantalla "000--", como se ilustra a la derecha.
2. Oprima el bot6n ENTER (Aceptar) hasta que aparezca "SET TIME bA"
(Configurar la hora de retrolavado) en la pantalla.
3. Oprima los botones /X SUBIR o V BAJAR para fijar la duraci6n del
retrolavado en minutos.
4.
5°
6.
Oprima el bot6n ENTER (Aceptar) cuando aparezca en pantalla la hora
deseada para el retrolavado. Aparecer6 "SET TIME Fr" (Configurar la
hora de enjuague r6pido) en la pantalla.
Oprima los botones /X SUBIR o V BAJAR para fijar la duraci6n del
enjuague r6pido en minutos.
Oprima el bot6n ENTER (Aceptar) cuando aparezca en pantalla la hora
deseada para el enjuague r6pido. La pantalla cambiar6 a la hora del dia.
Figura 14
j
RECHARGE
TIME _
I.| !|!
I.UU
Figuro 15
FIFIFI____
UUU
TIME
!_O
I II!
m
SET
TIME
Fr-
Figura 16
14
_.Tiene preguntas? Llame a la linea de ayuda de I<enmore Water al 1-800-426-9345
o visite el sitio web I<enmoreWater.com.

COMO FIJAR LA FRECUENCIA DE LOS CICLOS DE LIMPIEZA
AUTOMATICA
El sistema central de filtrado de agua para toda la casa iniciar6 autom6tica-
mente los ciclos de limpieza en base a cu6nta agua se haya filtrado en el
sistema. El valor predeterminado es ejecutar un ciclo de limpieza despu_s de
filtrar 3,000 galones. El ciclo de limpieza se realiza a una hora predetermina-
da del dfa. (La 1:00 a.m. es el valor predeterminado). El sistema iniciar6 tam-
bi6n un ciclo de limpieza autom6tica si no se ha filtrado agua en el sistema
durante 14 dfas, a fin de mantener en buenas condiciones la base filtrante.
El sistema central de filtrado de agua para toda la casa permite aumentar la
frecuencia de los ciclos de limpieza autom6tica en los sistemas donde el sumin-
istro de agua pueda tener mayor cantidad de sedimento que un suministro
municipal de agua tipico. La siguiente tabla indica los tres valores disponibles.
La unidad se despacha con el valor "CLn 1" como predeterminado.
Modo de Tipo de suministro Limpieza
limpieza de agua cada
Suministro municipal
CLn 1 3,000 galones
de agua
CLn 2 Agua de cisterna con baja 2,000 galones
cantidad de sedimento
CLn 3 Agua de cisterna con alta 1,000 galones
cantidad de sedimento
Para cambiar la frecuencia de los ciclos de limpieza:
1. Oprima unas cuantas veces el bot6n ENTER (Aceptar) hasta que aparezca
en pantalla "SET CLn" (Fijar modo de limpieza), junto con un nOmero que
destella (1 - 3). El nOmero que destella indica el valor actual.
2. Oprima los botones /_ SUBIR o V BAJAR para cambiar el nOmero al ciclo
de limpieza deseado. (Ver la tabla, m6s arriba.)
3. Oprima el bot6n ENTER (Aceptar) cuando aparezca en pantalla el modo de
limpieza deseado. La pantalla cambiar6 a la hora del dfa.
SET
LLn !
JSET
l!-!
IL I_ I"I 2
-SET
F!
LLN
Ficjura 17
_Tiene preguntas? Llame a la Ifnea de ayuda de I<enmore Water al 1-800-426-9345
o visite el sitio web KenmoreWater.com.
15

COMO OPERAR EN MODO DE LIMPIEZA MANUAL
Los ciclos de limpieza se ejecutar6n autom6ticamente, a menos que se haya
desactivado la funci6n de limpieza. Si se ha desactivado dicha funci6n, ser6
necesario iniciar manualmente los ciclos de limpieza. Se recomienda ejecutar
un ciclo de limpieza por Io menos una vez al mes, o m6s ffecuentemente si
fuera necesario.
Cuando no hay un desagUe disponible (requerido para la limpieza autom6tica),
se puede aplicar el modo de limpieza manual. Sin embargo, se recomienda
la limpieza automatica si pueden cumplirse los requisitos de desagUe.
IMPORTANTE: Durante el ciclo de limpieza, ya sea que se inicie manual o
autom6ticamente, fluir6 el agua del puerto de desagUe de la v61vula a raz6n
de 3.4 galones por minuto durante 3 minutos. Si no se ha instalado una
tuberia de desagUe permanente, habr6 que preyer el flujo del desagUe antes
de iniciar el ciclo de limpieza. Necesitar6 disponer de recipientes vacios en
cantidad suficiente para contener por Io menos 15 galones de agua.
COMO DESACTIVAR LA LIMPIEZA AUTOMATICA
Para desactivar la funci6n de limpieza autom6tica:
1. Oprima y suelte inmediatamente el bot6n CLEAN (Limpiar). (Mantener
oprimido el bot6n durante unos segundos iniciaria un ciclo de limpieza.)
2. En la pantalla destellar6 la frase "RECHARGE OFF" (Recarga desactivada),
como se ilustra en la Fig. 18, para indicar que el sistema central de filtrado
de agua para toda la casa est6 ahora en el modo de limpieza manual.
(Se ha desactivado la funci6n de limpieza autom6tica.)
COMO INICIAR UN CICLO DE LIMPIEZA MANUAL
Para iniciar manualmente un ciclo de limpieza:
1,
,
,
Si la tuberia de desag_ie no est6 preparada para descargar en un
desag_ie, necesitar6 disponer de recipientes vacios en cantidad suficiente
para contener por Io menos 15 galones de agua.
Mantenga oprimido el bot6n CLEAN (Limpiar) durante unos segundos,
hasta que destelle la frase "RECHARGE NOW" (Recargar ahora) en
la pantalla, como se ilustra en la Fig. 19.
Cuando finalice el ciclo de limpieza, el sistema central de filtrado de agua
para toda la casa permanecer6 en el modo de limpieza manual.
COMO REACTIVAR LA LIMPIEZA AUTOMATICA
Para que el sistema central de filtrado de agua para toda la casa regrese a
la funci6n de limpieza autom6tica:
1. Oprima y suelte inmediatamente el bot6n CLEAN (Limpiar).
2. Desaparecer6 de la pantalla la frase "RECHARGE OFF" (Recarga des-
activada) yen su lugar aparecer6 la hora normal del dia, como se ilustra
en la Fig. 20.
RECHARGE
Figura 18
RECHARGE
NOW
Figura 19
C.UC 1
IZ.I" IZ.IpM
Figura 20
16
_Tiene preguntas? Llame a la linea de ayuda de I<enmore Water al 1-800-426-9345
o visite el sitio web KenmoreWater.com.

MEMORIA PARA CORTES DE ELECTRICIDAD
Si se interrumpe la electricidad del sistema central de
filtrado de agua para toda la casa, la "memoria"
integrada a los circuitos del controlador conservar6
todos los par6metros durante varias horas. Mientras no
haya electricidad, la pantalla se mantendr6 en blanco y
el sistema central de filtrado de agua para toda la
casa no realizar6 limpiezas.
Cuando se restaure la electricidad, tendr6 que repro-
gramar la hora del dia solamente si la pantalla est6
destellando. Nunca ser6 necesario reprogramar la fun-
ci6n TIME (Hora) de la limpieza hasta que se necesite
un cambio. Aun cuando la hora del reloj sea incorrecta
despu_s de una interrupci6n prolongada de la electrici-
dad, el sistema central de filtrado de agua para toda
la casa seguir6 procesando el agua. No obstante, es
posible que los ciclos de limpieza se realicen a una
hora equivocada hasta que se reprograme el reloj con
la hora correcta del dia.
NOTA: Si el sistema central de filtrado de agua para
toda la casa estaba realizando una limpieza
cuando se interrumpi6 la electricidad, finalizar6
el ciclo cuando se restaure.
VACACIONES Y PERIODOS PROLONGADOS
SIN USO DE AGUA
Si su sistema central de filtrado de agua para toda la
casa no se usar6 durante un periodo prolongado (var-
ios meses), siga una de estas recomendaciones:
Si no se cierra el suministro de agua a la unidad, y
no se ha desactivado la funci6n de limpieza
autom6tica, no es necesario tomar otras medidas. El
sistema central de filtrado de agua para toda la
casa se limpiar6 autom6ticamente cada 14 dias
cuando no haya pasado agua por el mismo.
Si no desea que el ciclo de limpieza funcione
autom6ticamente cuando usted no est6 en la casa,
se recomienda desenchufar el sistema central de fil-
trado de agua para toda la casa, y cerrar el sumin-
istro de agua o bien colocar la(s) v61vula(s) de
derivaci6n en la posici6n de derivaci6n.
Si no se puede ejecutar el ciclo de limpieza
autom6tica, debido a que est6 cerrado el suministro
de agua, est6 desenchufado el transformador o la
funci6n de limpieza autom6tica se ha desactivado,
se recomienda realizar 2 ciclos de limpieza manual
como minimo cuando vuelva a ponerse el sistema en
funcionamiento. (Vea la secci6n titulada "lnicie un
ciclo de limpieza" en la p6gina 14.)
En toda instalaci6n hay una posibilidad de conge-
lamiento; en ese caso, hay que desconectar el sis-
tema central de filtrado de agua para toda la casa
y desaguarlo. (Vea la secci6n titulada "Proteja el sis-
tema central de filtrado de agua contra el conge-
lamiento" en la p6gina 18.)
_.Tiene preguntas? Llame a la linea de ayuda de Kenmore Water al 1-800-426-9345
o visite el sitio web KenmoreWater.com.
17

PROTEJA EL SISTEMA CENTRAL DE FILTRADO
DE AGUA CONTRA EL CONGELAMIENTO
Si se instala el sistema central de filtrado de agua para
toda la casa en un lugar donde podria congelarse
(cabafia de verano, vivienda junto a un lago, etc.),
deber6 desaguarlo totalmente para evitar un posible
dafio por congelamiento. Si se congela el sistema,
podrian agrietarse las piezas pl6sticas, Io cual producir6
p6rdidas que causen dafio.
Para desaguar la unidad-
1. Cierre la v61vula de paso del agua en la tuberia
principal de agua de la casa, cerca del medidor de
agua o el tanque de presi6n.
2. Abra un grifo en las tuberias de agua filtrada para
compensar la presi6n de la unidad.
3. Mueva el v6stago de la v61vula de derivaci6n a la
posici6n de derivaci6n. En un sistema de derivaci6n
con 3 v61vulas, cierre la v61vula de entrada y salida,
y abra la v61vula de derivaci6n. Si desea que circule
nuevamente agua por las tuberias de la casa, vuelva
a abrir la v61vula de paso del agua en la tuberia
maestra.
4. Desenchufe el transformador del tomacorriente de la
pared. Separe la manguera de desagLie si interferir6
con el desplazamiento del sistema central de filtrado
de agua para toda la casa sobre el desagLie.
5. Retire los clips sujetadores grandes de los puertos de
entrada y salida del sistema central de filtrado
de agua para toda la casa. (Vea la Figura 8 de la
p6gina 8.) Separe la unidad de los adaptadores
pl6sticos de instalaci6n o de la v61vula de derivaci6n.
6. Apoye un bloque de madera de 2 pulg. (5 cm) de
espesor cerca del desagLie de piso. (Vea la Figura 21.)
Z Acerque el sistema central de filtrado de agua para
toda la casa al desagLie. Inclinelo en forma lenta y
suave, hasta que el reborde se apoye sobre el bloque
de madera, con los puertos de entrada y salida
sobre el desagLie. (Vea la Figura 21.) No deje que el
peso de la unidad descanse sobre las uniones de
entrada y salida, porque podrian romperse.
8. Levante el fondo del sistema central de filtrado de
agua para toda la casa algunas pulgadas y ap6yelo
sobre algo como un bloque de madera que permita
descargar el agua. Apoye el fondo sobre dos blo-
ques de madera apilados. Deje la unidad en esa
posici6n hasta que est6 listo para volver a usarla.
Tape los puertos de entrada y salida con trapos
limpios para impedir la contaminaci6n con suciedad,
insectos, etc.
DESAGOE TODO EL SISTEMA CENTRAL DE
FILTRADO DE AGUA
Bloque de madera
DesagLie de piso
Figura 21
18
_.Tiene preguntas? Llame a la linea de ayuda de Kenmore Water al 1-800-426-9345
o visite el sitio web KenmoreWater.com.

PROBLEMA CAUSA CORRECCION
El color del agua es (SISTEMA NUEVO) No ha finalizado el Ejecute el procedimiento de arranque (vea la
negro o gris procedimiento de arranque p6gina 13) o ejecute ciclos de limpieza consec-
utivos (vea la p6gina 14) hasta que el color del
agua vuelva a ser normal.
(NO ES UN SISTEMA NUEVO) Abrasi6n Inicie manualmente un ciclo de limpieza.
normal de los medios filtrantes (Vea la p6gina 14.)
Se ha tapado el filtro de sedimentosHay baja presi6n de
agua en los grifos de
la casa
Est6n bloqueados los poros de los
medios filtrantes
Inicie manualmente un ciclo de limpieza.
(Vea la p6gina 14.)
Si el filtro se tapa con frecuencia, tal vez sea
necesario ajustar la frecuencia de los ciclos de
limpieza o acjrecjar un filtro de sedimento cor-
riente arriba. (Vea la Figura 2 en la p6gina 5.)
Inicie manualmente un ciclo de limpieza. (Vea
la p6gina 14.)
Si los poros del medio filtrante se tapan con
frecuencia, tal vez sea necesario ajustar la
frecuencia de los ciclos de limpieza o agregar
un filtro de sedimento corriente arriba. (Vea la
Figura 2 en la p6gina 5.)
El sabor y/o el olor del El sistema est6 en derivaci6n Mueva la v61vula o v61vulas a la posici6n de
agua es desagradable operaci6n normal (no de "derivaci6n").
Est6n bloqueados los poros de los
medios filtrantes
El ciclo de limpieza no
se ejecuta a la hora
programada
El motor de la vdllvula
se ha detenido o
hate ¢1i¢
Inicie manualmente un ciclo de limpieza.
(Vea la p6gina 14.)
El motor tiene un defecto, o hay un
defecto interno en la v61vula, el cual
eleva el torque del motor
Si los poros del medio filtrante se tapan con
frecuencia, tal vez sea necesario ajustar la fie-
cuencia de los ciclos de limpieza o agregar un
filtro de sedimento corriente arriba. (Vea la
Figura 2 en la p6gina 5.)
No fluye agua al El sistema est6 en derivaci6n Mueva la v61vula o v61vulas a la posici6n de
desagLie durante el operaci6n normal (no de "derivaci6n").
¢i¢1o de limpieza Se ha bloqueado el control de flujo Limpie el control de flujo del desag_Je.
del desag_Je (Vea la p6gina 21.)
La manguera de desag_Je est6 tapada o Enderece la manguera de desag_Je.
torcida
El transformador est6 desenchufado del Revise si se interrumpi6 la electricidad y corrija
tomacorriente de la pared (la pantalla el problema.
quedar6 en blanco)
El ¢iclo de limpieza Si la pantalla indica "RECHARGE OFF" Oprima y suelte el bot6n CLEAN (Limpiar)
no funciona automdlti- (Recarga desactivada), se ha desactivado hasta que desaparezca la frase "RECHARGE
¢amente el ciclo de limpieza OFF" (Recarcja desactivada) de la pantalla.
(Vea la p6gina 16.)
Si la pantalla est6 en blanco, el trans- Compruebe si se interrumpi6 la electricidad.
formador podria estar desenchufado
del tomacorriente de la pared
Si destella la hora en la pantalla se debe Reprograme el reloj a la hora correcta del dia.
a que se desprogram6 el reloj por una (Vea la p6gina 12.)
interrupci6n prolongada de electricidad
Reemplace el juego de rotor/sello.
(Se incluyen instrucciones con el juego.)
Reemplace el motor y el interruptor. (Vea la
lista de piezas al final de este manual.)
_Tiene preguntas? Llame a la linea de ayuda de Kenmore Water al 1-800-426-9345
o visite el sitio web KenmoreWater.com.
19

PROBLEMA
Destella "RECHARGE
OFF" (Recarga des-
activada) en la pantalla
CAUSA
Se ha desactivado la funci6n de
limpieza autom6tica. (Vea la p6gina 16.)
Aparecen los c6digos de Arn6s de cables o conexiones al inter-
error El, E3 o E4 ruptor de posiciones
Interru ptor
Un defecto de la v61vula eleva el torque
No funciona el motor
Aparece el c6digo de Control electr6nico
error E5
CORRECCION
Si desea que la funci6n de limpieza se active
autom6ticamente, optima y suelte el bot6n
CLEAN (Limpiar) hasta que desaparezca
la frase "RECHARGE OFF" (Recarga des-
activada) de la pantalla. (Vea la p6gina 16.)
Reemplace el arn6s de cables o la conexi6n
al interruptor de posiciones. (Vea la lista de
piezas al final de este manual.)
Reemplace el interruptor. (Vea la lista de
piezas al final de este manual.)
Reemplace el juego de rotor/sello.
(Se incluyen instrucciones con el juego.)
Reemplace el motor. (Se incluyen instrucciones
con el motor.)
Reemplace el tablero de control electr6nico
(PWA). (Se incluyen instrucciones con el PWA.)
Procedimiento para borrar un c6digo de error de la pantalla:
1. Desenchufe el transformador del tomacorriente el6ctrico.
2. Corrija el problema.
3. Enchufe el transformador.
4. Aguarde 8 minutos. El c6digo de error volver6 a aparecer si no se ha corregido el problema.
Es posible que se necesite la asistencia del servicio al cliente con respecto a Io siguiente:
PROBLEMA CAUSA CORRECCION
Fluye agua al desagUe Un defecto en la v61vula interna Reemplace los sellos y el rotor
(mientras la unidad no causa la fuga
e]ecuta un ciclo de limpieza)
Hay medios filtrantes en Hay una grieta en el distribuidor o el Reemplace el distribuidor o el tubo elevador
la plomeria de la casa tubo elevador
2O
_.Tiene preguntas? Llame a la linea de ayuda de Kenmore Water al 1-800-426-9345
o visite el sitio web KenmoreWater.com.

REAJUSTE A LOS VALORES DE FABRICA
Para reajustar el controlador electr6nico a todos los
valores predeterminados en la f6brica (hora, la
frecuencia de los ciclos de limpieza autom6tica, etc.):
1. Mantenga oprimido el bot6n SELECT (Seleccionar)
hasta que cambie dos veces la pantalla para
mostrar la frase "SET CODE" (Fijar el c6digo) y el
c6digo destellante del modelo.
2. Presione dos veces el bot6n /_ SUBIR para mostrar
un simbolo de "SOS" que destella.
3. Presione el bot6n SELECT (Seleccionar) y se reiniciar6
el controlador electr6nico.
4. Fije la hora actual, como se describe en la p6gina 12.
SET CODE
dF
SET CODE
Ficjura 22
LIMPIEZA DEL CONTROL DE FLUJO
DE DESAGOE
Si el sistema central de filtrado de agua para toda la
casa funciona normalmente, no se necesita realizar este
procedimiento. $61o debe realizarse si se detecta un
problema de falta de flujo de agua al desagLie, come
se detalla en la tabla de soluci6n de problemas de la
p6gina 19.
1. Retire el clip que sujeta el accesorio para desagLie a
la v61vula. (Vea la Fig. 23.)
2. Retire la uni6n para desagLie de la v61vula.
3. Limpie toda obstrucci6n.
4. Vuelva a instalar la uni6n para desagLie de la v61vula.
5. Reinstale el clip para fijar la uni6n para desagLie a
la v61vula.
COMO RETIRAR LA UNION PARA DESAGOE
Y LIMPIAR EL CONTROL DE FLUJO
Control
Abrazadera
Clip de flujo
para manguera
Manguera
de desagLie
t
Uni6n para
desagLie
Figura 23
_Tiene preguntas? Llame a la linea de ayuda de Kenmore Water al 1-800-426-9345
o visite el sitio web KenmoreWater.com.
21

Este sistema se ha sometido alas pruebas NSF/ANSI 42 a fin de reducir el sabor y el olor a cloro. Se redujo la con-
centraci6n de la sustancia indicada en el agua que ingresan en el sistema a una concentraci6n menor o igual al limite
permitido para el agua que sale del sistema, como se especifica en NSF/ANSI 42.
El desempefio real puede variar de acuerdo a las condiciones locales del agua.
ESPECIFICACIONES
C6digo del modelo
Caudal para servicio nominal
Caida de presi6n con un caudal para servicio nominal
Caida de presi6n a 9.6 gpm (35.5 Ipm)
Limites de presi6n del agua de suministro (minima / m6xima)
Limites de temperatura del agua de suministro (minima / m6xima)
Caudal de desagLie m6ximo
Capacidad nominal con la concentraci6n de la clorina _: de:
0.50 PPM
0.75 PPM
1.0 PPM
1.5 PPM
2.0 PPM
25-30 micras
Eliminaci6n de los sedimentoscon particulas de tamafio: 30-40 micras
40 micras o m6s grande
Modelo No. 625.382080
dF1
6.0 gpm (22.7 Ipm)
10 PSIG (68.9 kPa)
15 PSIG (103.4 kPa)_:
30 - 125 PSI
(206.8 - 861.8 kPa)
40 - 120 °F (5 - 49 °C)
3.4 gpm (12.9 Ipm)
2,280,000 gal. _:
1,520,000 gal. _:
1,140,000 gal. _:
760,000 gal. _:
570,000 gal.
89.9% o m6s
96.4% o m6s
99.4% o m6s
_:Basado en datos de pruebas de un laboratorio independiente.
_:_:La concentraci6n residencial tipica de la clorina es 0.5 a 1.0 PPM.
Este sistema cumple la norma NSF/ANSI 42 con respecto a las afirmaciones de rendimiento especificas,
las cuales se han verificado y respaldado mediante datos de pruebas.
Instalaci6n en el Estado de Massachusetts: El Estado de Massachusetts requiere que un plomero con
licencia realice la instalaci6n. En tales casos, se debe cumplir con el c6digo de plomeria 248-CMR del
Estado de Massachusetts.
RECLAMOS DE FUNCIONAMIENTO
Cloro 2.0 +10% mg/L 50% 82.8%
Escriba la siguiente informaci6n para su referencia en el futuro.
No. de modelo Fecha de instalaci6n
No. de serie
Los n0meros de modelo y de serie se encuentran tanto en la caja de cart6n del envio como en la calcomania
de registro del sistema central de filtrado de agua para toda la casa.
22
_Tiene preguntas? Llame a la linea de ayuda de Kenmore Water al 1-800-426-9345
o visite el sitio web KenmoreWater.com.

! ENT.
3-3/4 pulg.
t SAL.
11-7/8
pulg.
t
13-1/2
pulg.
VISTA SUPERIOR
ENT. - SAL.
27-7/8
pulg.
_J L
,,L •
7
VISTA LATERAL
J
VISTA FRONTAL
35-3/8
pulg.
Figura 24
TRANSFORMADOR --0-
I
120 VCA _ I
60 Hz 24 VCA
PARTE POSTERIOR
DEL CONTROLADOR
ELECTRONICO
SENSOR
DE TURBINA
MOTOR
DE 24 VCC
N.C.
N.A.
INTERRUPTOR
DE POSICIONES Ficjura 25
_.Tiene preguntas? Llame a la linea de ayuda de Kenmore Water al 1-800-426-9345
o visite el sitio web KenmoreWater.com.
23

Conjunto de la v,_lvula
Vea las piezas en las
p6ginas 26 y 27
\
19
71
18
I
73
15
6
7
8
9
10
11
12
13
14
\
16 _ 17
24
_.Tiene preguntas? Llame a la linea de ayuda de Kenmore Water al 1-800-426-9345
o visite el sitio web KenmoreWater.com.

Clave No. Pieza No. Descripci6n
Conjunto, tanque de minerales de reemplazo
• 7302623 c/medios filtrantes, componentes asociados
y recubrimiento externo del tanque (incluye
claves No. 1 a 13.)
- 7112963 Juego de juntas t6ricas para el distribuidor
(se incluye claves No. 1 a 3)
1 _ Junta t6rica, 2-7/8 x 3-1/4 pulg.
2 _ Junta t6rica, 13/16 x 1-1/16 pulg.
3 _ Junta t6rica, 2-3/4 x 3 pulg.
4 7077870 Distribuidor superior
5 7265025 Malla del filtro
6 7105047 Distribuidor inferior de reemplazo
- 7331177 Juego de abrazadera para cuello de tanque
(se incl. 2 c/u de las claves No. 7 y 8)
7 _ Clip retenedor (se necesitan 2)
8 _ Secciones de abrazadera (se necesitan 2)
9 _ Tanque de minerales, 8 x 25 pulg.
10 _ Carbono activado, 10 Ib (4.5 kg)
11 "/€ Arena filtrante, 5 Ib (2.27 kg)
12 "/€ Grava, 6 Ib (2.7 kg)
13 _ Recubrimiento externo del tanque
14 7326766 Conjunto de cubierta (incluye la placa de
Kenmore y la calcomania de la placa frontal)
Tablero de control electr6nico (PWA) de re-
15 7302592
emplazo
16 7297373 Tubo liviano
17 7275907 Transformador
18 7139999 Manguera de desagLie, 20 pies (6.1 m)
19 1103200 Codo adaptador
Conjunto de v61vula de derivaci6n, 1 pulg.,
20 7214383 incluyendo 2 c/u de los clips y las juntas
t6ricas (vea las claves No. 71 y 73)
• 7333705 Manual del propietario
• No se ilustra.
•/€ El tanque de minerales, los medios filtrantes, el recubrimiento
externo del tanque y el reborde s61o pueden comprarse como
parte del conjunto del tanque de minerales de reemplazo.
(Vea al principio de la lista.)
_Tiene preguntas? Llame a la linea de ayuda de Kenmore Water al 1-800-426-9345
o visite el sitio web KenmoreWater.com.
25

78
57
60 59 58
71
_3
74
75
72
26
_.Tiene preguntas? Llame a la Ifnea de ayuda de Kenmore Water al 1-800-426-9345
o visite el sitio web KenmoreWater.com.

Clave No.
50
51
52
53
54
55
Pieza No.
7224087
7286039
7231393
0900857
7171250
7283489
- 7331282
56
57 '1_
58 '1_
59 '1_
60 '1_
- 7185487
61
62
63
64
65 '1_
66
67 7174313
68 7185500
69 7171187
70 7129889
71 7337589
72 7271204
73 7337597
- 7290931
74 '1_
75 '1_
76 7309811
77 7081201
78 7171145
79 7170319
80 7100940
81 7175199
82 7171161
83 7172997
84 7305150
85 7140738
Descrlpci6n
Tornillo 8-32 x 1 pulg. (se necesitan 2)
Motor (se incl. 2 c/u de la clave No. 50)
Placa del motor
Tornillo 6-20 x 3/8 pulg. (se necesitan 3)
Cojinete
Leva y engranaje
Juego de adaptador para manguera de desagLie
(se incluye claves No. 56 a 60)
Clip para desagLie
Abrazadera para manguera
Adaptador para manguera de desagLie
Junta t6rica, 15/16 x 1-3/16 pulg.
Tap6n de flujo, 3.4 gpm
Juego de sellos (se incluye claves No. 61 a 66)
Junta t6rica, 5/8 x 13/16 pulg.
Junta t6rica, 1-1/8 x 1-1/2 pulg.
Junta t6rica, 4-1/2 x 4-7/8 pulg.
Sello de rotor
Sello
Sello, boquilla y tubo Venturi
Cojinete de lavadora en oleadas
Rotor y disco
Tap6n para sello de desagLie
Resorte
Clip, 1 pulg., paquete de 4
Adaptador de instalaci6n, 1 pulg. (se necesitan 2)
Junta t6rica, 1-1/16 x 1-5/16 pulg., paquete de 4
Conjunto de turbina y soporte, incluyendo 2 juntas t6ricas
(vea la clave No. 73) y 1 c/u de las claves No. 74 y 75
Soporte y eje de la turbina
Turbina
Mazo de cables (sensor)
Ret6n, boquilla y tubo Venturi
Cuerpo de la v61vula
Junta t6rica, 1/4 x 3/8 pulg. (se necesitan 2)
Tap6n para puerto de aspiraci6n
Arandela ondulada
Cubierta de v61vula
Tornillo 10-14 x 2-5/8 pulg. (se necesitan 8)
Interruptor
Tornillo 4-24 x 3/4 pulg., de cabeza plana (se necesitan 2)
_Tiene preguntas? Llame a la linea de ayuda de Kenmore Water al 1-800-426-9345
o visite el sitio web KenmoreWater.com.
27

Your Home
For expert troubleshooting and home solutions advice:
managemylife
Our Home
For repair of carry-in items like vacuums, lawn equipment,
and electronics, call anytime for the location of your nearest
Sears Parts & Repair Service Center
1-800-488-1222 (U.S.A.) 1-800-469-4663 (Canada)
www.sears.com www.sears.ca
To purchase a protection agreement on a product serviced by Sears:
1-800-827-6655 (U.S.A.) 1-800-361-6665 (Canada)
Para pedir servicio de reparaci6n
a domicilio, y para ordenar piezas:
1-888-SU-HOGAR ®
(1-888-784-6427)
www.sears.com
Au Canada pour service en frangais:
1-800-LE-FOYER Mc
(1-800-533-6937)
www.sears.ca
® Registered Trademark / TNTrademark of KCD IP, LLC in the United States, or Sears Brands, LLC in other countries
® Marca Registrada / TNMarca de Fabrica de KCD IP, LLC en Estados Unidos, o Sears Brands, LLC en otros parses
NCMarque de commerce / NDMarque depos6e de Sears Brands, LLC
-
 1
1
-
 2
2
-
 3
3
-
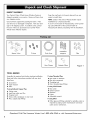 4
4
-
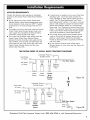 5
5
-
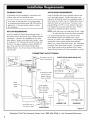 6
6
-
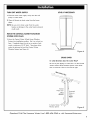 7
7
-
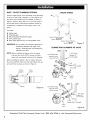 8
8
-
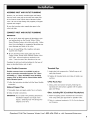 9
9
-
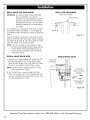 10
10
-
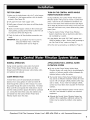 11
11
-
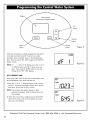 12
12
-
 13
13
-
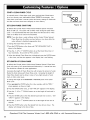 14
14
-
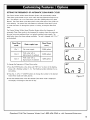 15
15
-
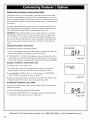 16
16
-
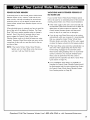 17
17
-
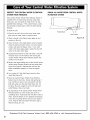 18
18
-
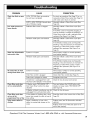 19
19
-
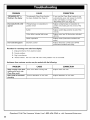 20
20
-
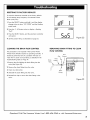 21
21
-
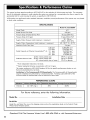 22
22
-
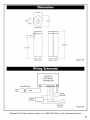 23
23
-
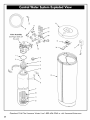 24
24
-
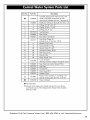 25
25
-
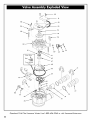 26
26
-
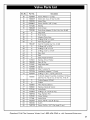 27
27
-
 28
28
-
 29
29
-
 30
30
-
 31
31
-
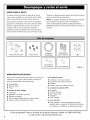 32
32
-
 33
33
-
 34
34
-
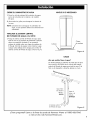 35
35
-
 36
36
-
 37
37
-
 38
38
-
 39
39
-
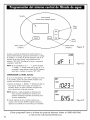 40
40
-
 41
41
-
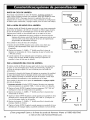 42
42
-
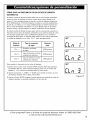 43
43
-
 44
44
-
 45
45
-
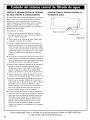 46
46
-
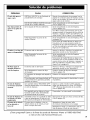 47
47
-
 48
48
-
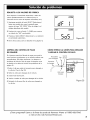 49
49
-
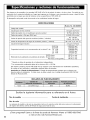 50
50
-
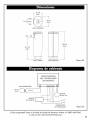 51
51
-
 52
52
-
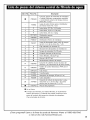 53
53
-
 54
54
-
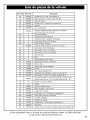 55
55
-
 56
56


Kenmore Elite ELITE 625.382080 El manual del propietario
- Tipo
- El manual del propietario
- Este manual también es adecuado para
en otros idiomas
Artículos relacionados


Otros documentos
-
Kenmore 625384480 El manual del propietario
-
-
-
-
-
Whirlpool WHELJ1 Installation Instructions Manual
-
Westbrass 7931817-AF-50 Guía de instalación
-
Westbrass R93-2-62 Guía de instalación
-
-
GE GXMH31H El manual del propietario