Avanti DWE1812W Manual de usuario
- Categoría
- Lavaplatos
- Tipo
- Manual de usuario
Este manual también es adecuado para

DISHWASHER / LAVAPLATOS
INSTRUCTION MANUAL / MANUAL DE INSTRUCCIONES
Model Numbers / Números de Modelos: DWE1812W / DWE1813B
BEFORE USE, PLEASE READ AND FOLLOW ALL SAFETY RULES AND OPERATING
INSTRUCTIONS.
La sección en español empieza en la página 18.
Avanti has a policy of continuous improvement on its products and reserves the right to change materials and
specifications without notice.
Avanti Products, A Division of The Mackle Co., Inc.
P.O. Box 520604 - Miami, Florida 33152
www.avantiproducts.com

2

3
TABLE OF CONTENTS
Help Us Help You 5
Parts and Features 6
Important Safety Instructions 7
Electrical Connection 7
Water Heater Safety 8
Before Using Your Dishwasher 8
Control Panel 9
Wash Cycle Descriptions 9
Overflow Protection 10
Usin
g
the Deter
g
ent Dispenser 10
Using the Rinse Aid Dispenser 10 – 11
How to Efficiently Load Your Dishwasher 11 – 12
Starting, Modifying and Canceling the Wash Cycle 12
Filtering System 12
Caring and Maintenance 13
Cleaning the Spray Arms 13
Cleaning the Filters 13
Cleaning the Door 13
How to Keep your Dishwasher in Shape 14
Problems with your Dishwasher? 14
Troubleshooting Guide 14 – 15
Service for your Dishwasher 16
Wiring Diagram 16
Your Avanti Products Warranty 17
Instrucciones en Español 18 - 26
Registration Information / Registration Card Back Cover

4

5
HELP US HELP YOU...
Read this guide carefully.
It is intended to help you operate and maintain
your new dishwasher properly.
Keep it handy to answer your questions.
If you don't understand something or you need
more assistance, please call:
Avanti Customer Service
800-220-5570
Keep proof of original purchase date (such as
your sales slip) with this guide to establish the
warranty period.
Write down the model and serial numbers.
You'll find them on a plate located on the rear
wall of the dishwasher.
Please write these numbers here:
____________________________________
Date of Purchase
____________________________________
Model Number
____________________________________
Serial Number
Use these numbers in any correspondence or
service calls concerning your dishwasher.
If you received a damaged dishwasher,
immediately contact the dealer (or builder) that
sold you the dishwasher.
Save time and money. Before you call for
service, check the Troubleshooting Guide. It
lists causes of minor operating problems that
you can correct yourself.
IF YOU NEED SERVICE
We're proud of our service and want you to be
pleased. If for some reason you are not happy
with the service you receive, here are some
steps to follow for further help.
FIRST, contact the people who serviced your
dishwasher. Explain why you are not pleased.
In most cases, this will solve the problem.
NEXT, if you are still not pleased, write all the
details, including your telephone number, and
send it to:
Customer Service
Avanti Products
10880 NW 30
th
Street
Miami, FL 33172

6
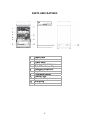
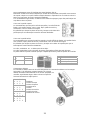
PARTS AND FEATURES
1 Upper Rack
2 Spray Arms
3 Lower Rack
4 Stainless Steel Interior
5 Main Filter Assembly
6 Detergent Dispenser
7 Cup Shelf
8 Silverware Basket
9 Coarse Filter
10 Rinse Aid Dispenser
11 Inlet Valve
12 Junction Box

7
Important Safety Instructions
WARNING
To reduce the risk of fire, electrical shock,
or injury when using your dishwasher,
follow these basic precautions:
Read all instructions before using the dishwasher.
DANGER or WARNING: Risk of child entrapment.
Child entrapment and suffocation are not problems of the past. Junked or abandoned
dishwashers are still dangerous. . . even if they will “just sit in the garage a few days.”
Before you throw away your old appliance: Take off the doors. Leave the shelves
in place so that children may not easily climb inside.
Never allow children to operate, play with, or crawl inside the dishwasher.
Never clean dishwasher parts with flammable fluids. The fumes can create a fire
hazard or explosion.
Do not store or use gasoline or any other flammable vapors and liquids in the vicinity of
this or any other dishwasher. The fumes can create a fire hazard or explosion.
Plug the dishwasher into an exclusive properly installed-grounded wall outlet. Do not
under any circumstances cut or remove the third (ground) prong from the power cord.
Any questions concerning power and or grounding should be directed toward a
certified electrician or an authorized Avanti Products service center
-Save these instructions-
Electrical Connection
This dishwasher should be properly grounded for your safety. The power cord of this dishwasher is
equipped with a three-prong plug which mates with standard three prong wall outlets to minimize
the possibility of electrical shock.
Do not under any circumstances cut or remove the third ground prong from the power cord
supplied.
Never use an extension cord to connect power to the unit.
Never use a two-prong grounding adapter.
Where a two-prong wall receptacle is encountered, contact a qualified electrician to have it replaced
with a 3-prong receptacle in accordance with applicable electrical codes.
This dishwasher requires a standard 110/120 volts A.C.~/60hz electrical outlet with three-prong
ground.
The cord should be secured behind the dishwasher and not left exposed or dangling to prevent
accidental injury.
Connect to a grounded metal, permanent wiring system: or run an equipment grounding terminal or
lead of the appliance.
Improper connection of the equipment grounding conductor can result in a risk of electric shock.
Check with a qualified electrician or service representative if you are in doubt whether the appliance
is properly grounded.
Do not attempt to repair or replace any part of your dishwasher unless it is specifically
recommended in this manual. All other servicing should be referred to a qualified technician.
To minimize the possibility of electric shock, disconnect this appliance form the power supply before
attempting any maintenance. Note: Turning the dishwasher off does not disconnect the appliance
Warning
Improper use of the grounded plug can result in the risk of electrical shock. If the power cord is
damaged, have it replaced by an authorized Avanti Products service center.

8
from the power supply. We recommend having a qualified technician service your appliance.
Water Heater Safety
Under certain conditions hydrogen may be produced in a water heater that has not been used for two
weeks or more. Hydrogen gas is explosive.
If the hot water has not been use for two weeks or more, prevent the possibility of damage or injury by
turning on all hot water faucets and allow them to run for several minutes. Do this before using any
electrical appliance which is connected to the hot water system. This simple procedure will allow any
built-up hydrogen gas to escape. Since the gas is flammable, do not smoke or use an open flame or
appliance during this process.
Use this appliance only for its intended purpose as described in this Owner’s Manual.
WARNING READ FOR PROPER USE
Do not abuse, sit on, or stand on the door or dish rack of the dishwasher.
Do not touch the heating element during or immediately after use.
Do not wash plastic items unless they are marked dishwasher safe or the equivalent. For plastic
items not so marked, check the manufacturer recommendations.
Use only detergent and rinse additives designed for an automatic dishwasher. Using detergent that
is not specifically designed for dishwashers will cause the dishwasher to fill with suds.
Keep children away from detergent and rinse aid, keep children away from the open door of the
dishwasher, there could still be some detergent left inside.
The door should not be left in the open position since this could present a tripping hazard.
During installation, the power supply must not be excessively bent or flattened.
To reduce the risk of injury, do not allow children to play in or on a dishwasher.
Do not operate your dishwasher unless all enclosure panels are properly in place. Open the door
very carefully if the dishwasher is operating, there is a risk of water squirting out.
Do not place any heavy objects or stand on the door when it is open. The appliance could tip
forward.
When loading items to be washed:
1) Locate sharp items so that they are not likely to damage the door seal;
2) Load sharp knives with the handles up to reduce the risk of cut-type injuries.
When using your dishwasher, you should prevent plastic items form contacting with heating
element.
If the supply cord is damaged, it must be replaced by the manufacturer or its service agent or
similarly qualified person in order to avoid a hazard.
Please dispose of packing materials properly.
Use the dishwasher only for its intended function.
Remove the door when removing an old dishwasher from service or discarding it.
Do not tamper with controls.
Do not touch the heating element during or immediately after use.
Before Using Your Dishwasher
Remove the exterior and interior packing.
Check to be sure you have all of the following parts:
2 Wash Racks (1 Upper / 1 Lower)
1 Silverware Basket
1 Measuring Spoon
1 Instruction Manual
1 Measuring Cup
1 Installation Manual
Clean the interior surface with lukewarm water using a soft cloth.

9
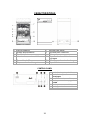
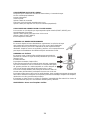
CONTROL PANEL
POWER ON / OFF BUTTON: Turns the unit ON / OFF but does not remove the unit from
electrical supply.
START / RESET BUTTON:
Press the button to start or pause the selected wash program.
PRE-PROGRAMMED WASH CYCLE SELECTOR:
Press the button to select the appropriate wash cycle to accommodate your needs.
See the detailed description of each option / cycle below:
Once the program is selected relevant indicator light on the right will flash intermittently
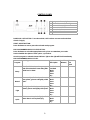
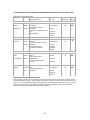
PRE-PROGRAMMED WASH CYCLES:
Program
Load Type Cycle
Description
Run Time
(Minutes)
Rinse
Aid
Used
Heavy
For all soiled loads, such as pots, pans
and dishes that have been sitting with
dried food on them.
Pre-Wash
Pre-Wash
Wash
Rinse
Rinse
Dry
125 NO
Normal
For normally soiled loads, such as
pots, plates, glasses and lightly soiled
pans.
Pre-Wash
Wash
Rinse
Rinse
Dry
95 YES
Light
For lightly soiled loads, such as pots,
plates, glasses and lightly soiled pans.
Pre-Wash
Wash
Rinse
Rinse
Dry
85 NO
Quick
A shorter wash cycle for lightly soiled
items that do not require drying
Pre-Wash
Wash
Rinse
Dry
65 NO
1 Program Indicator Lights
2 Rinse Aid Low Indicator Light
3 Power Indicator Light
4 Power ON / OFF Button
5 Start / Reset Button
6 Program Selector Button
7 Air Vent

10
OVERFLOW PROTECTIONS
Our Avanti dishwasher has an overfill protection device which could automatically shut off the inlet valve
and start the drain pump if the water overflow. If this occurs, turn off the main water supply before calling
a servicer. If there is water in the base pan because of an overfill or small leak, the water should be
removed before restarting the dishwasher.
DETERGENT DISPENSER
The dispenser must be refilled before the start of each wash
cycle according to the instructions provided in the “Wash Cycle
Table”. Our dishwashers use less detergent rinse aid than
conventional dishwashers. Generally, only one tablespoon of
detergent is needed for a normal wash load. Also, more heavily
soiled items need more detergent. Always add the detergent
just before starting dishwasher, otherwise it could get damp
and will not dissolve properly.
1. Main Wash Detergent
2. Prewash Detergent Compartment
3. Rinse-Aid Compartment
4. Rinse Aid Level Indicator
Amount of Detergent to Use
If the water isn’t too hard, you may also prevent the formation of deposits by adding detergent. The
amount of detergent needed can vary due to differences in water hardness. To determine the water
hardness in your area, contact your local water utility or area water softening company. The harder the
water, the more detergent you may need. Remember, you should adjust the amount of detergent you
use little by little until you find the correct amount.
Removing Hard Water Spots From Dishes
To remove hard water spots, try the following:
Run dishes through a normal wash program.
Remove all metal dishware, such as cutlery, pans, etc., from the dishwasher.
Do not add detergent.
Pour two cups of vinegar into a bowl and set the bowl face up on the lower rack of the dishwasher.
Run the dishes through a normal wash program.
If this doesn’t work, try the same process with ¼ cup of citric acid crystals instead of vinegar.
Proper Use Of Detergent
Use only detergent specifically made for use in dishwasher. Keep your detergent fresh and dry. Don’t
put powder detergent into the dispenser until you’re ready to wash dishes.
Rinse Aid Dispenser
The rinse aid is released during the final rinse to prevent water from
forming droplets on your dishes that can leave spots and streaks. It also
improves drying by allowing water to “sheet” off the dishes.
Our dishwashers are designed to use liquid rinse aids. The rinse aid
dispenser is located inside the door next to the detergent dispenser. To fill
the dispenser, open the cap and pour the rinse aid into the dispenser until
the level indicator turns completely black. The dispenser holds about 100
ml of liquid rinse aid.

11
Be careful not to overfill the dispenser, because this could cause over sudsing. Wipe away any spills
with a damp cloth. Don’t forget to replace the cap before you close the dishwasher door. If you have soft
water, you may not need rinse aid for it may cause a white film to develop on your dishes.
Adjusting Rinse Aid Dispenser
A measured amount of rinse aid is released during the final rinse. As with detergent,
the amount of rinse aid needed for your dishes depends on the hardness of the water
in your area. Too much rinse aid can result in lather of foaming and cause cloudiness
or streaks on your dishes. If the water in you area is very soft, you may not need rinse
aid. If you do, you can dilute the rinse aid with an equal amount of water.
The rinse aid dispenser has 4 settings. Always start with the dispenser set on “1”. If spots and poor
drying are problems, increase the amount of rinse aid dispensed by removing the dispenser lid and
rotating the dial to “2”. IF the dishes still are not drying properly or are spotted, adjust the dial to the next
higher number until your dishes are spot-free. We suggest you to set on”3”.
When To Refill The Rinse Aid Dispenser
If there is no rinse aid warning light on the control panel, you can
judge the amount of rinse aid by the following means: The black dot
on the rinse aid dispenser indicates the amount of rinse aid in the
dispenser. As the rinse aid diminishes, the size of the black dot
decreases. You should never let the rinse aid get below ¼ full.
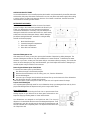
How to Use the Upper Rack
The upper rack is designed to hold more delicate and lighter dishware such as glasses, coffee and tea
cup and saucers, as well as plates, small bowls and shallow pans ( as long as they are not too dirty).
Position the dishes and cookware so that they do not get moved by the spray of waters.
The upper rack can be adjusted for height by putting wheels of different height into the rails.
1. Cups
2. Small Serving Bowl
3. Large Serving Bowl
4. Glasses
5. Saucers
6. Dish
How To Use The Lower Rack
We recommend that you place large items which are most difficult to clean into the lower rack: pots,
pans, lids, serving dishes and bowls, as shown in the figure.
It is preferable to place serving dishes and lids on the side of the racks in order to avoid blocking the
rotation of the top spray arm.
Pots, serving bowls, etc, must always be placed top down.
Deep pots should be slanted to allow water to flow out.
The bottom rack feature folds down tine rows so that larger or more pots and pans can be loaded.
1. Oval Platter
2. Dinner Plates
3. Soup Plates
4. Dessert Dishes
5. Silverware Basket

12
Silverware Basket
Silverware should be placed in the silverware basket with handles at the bottom: if the
rack has side baskets, the spoon should be loaded individually into the appropriate slots,
especially long utensils should be placed in the horizontal position at the front of the upper
rack.
Starting A Wash Cycle
Make sure that the plug for the appliance is inserted into the wall socket.
Make sure the water supply is turned on to full pressure.
Load the dishwasher.
Pour in the detergent.
Close the door completely.
Press the ON/OFF button.
Select the appropriate wash cycle suitable for your needs the dishwasher will begin the selected
wash cycle
During the wash cycle the START/RESET indicator light will flash intermittently.
Canceling Or Modifying A Wash Cycle Setting
Premise: A cycle that is underway can only be modified if it has only been running for a short time.
Otherwise, the detergent may have already been released, and the appliance may have already
drained the wash water. If this is the case, the detergent dispenser must be refilled.
press the START/RESET button to hold for more than 3 seconds to cancel the running program. Then
you can select appropriate programs.
At The End Of The Wash Cycle
When the cycle has finished; turn off the appliance using the ON/OFF button, shut off the water supply
and open the door of the dishwasher. Wait a few minutes before unloading the dishwasher to avoid
handling the dishes and utensils while they are still hot and more susceptible to breakage. They will also
dry better.
Forgot To Add A Dish?
A forgotten dish can be added any time before the detergent cup opens.
Press the START/RESET button
Pull the door handle.
Do not open the door until the water spray action stops. Steam may rise out of the dishwasher.
Add forgotten dishes.
Push the door to close it. When the door is closed right a click will be heard.
Press the START/RESET button again to continue accordingly.
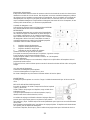
Filtering System
For your convenience, we have placed the drain pump and filtering system within easy reach inside the
tub. There are three components of the filtering system: the main
filter, the coarse filter and the fine filter.
1. Main Filter
Food and soil particles trapped by this filter are pulverized by a
special jet on the lower spray arm and washed down the drain.
2. Coarse Filter
Larger items, such as pieces of bone or glass, that could clog the
drain are trapped in the coarse filter. To remove an item caught in
this filer, gently squeeze the tabs on top of this filter and lift out.
3. Fine Filter
This filter holds soil and food residue in the sump area and
prevents it from being re-deposited on the dishes during a cycle.

13
Caring And Maintenance
To clean the control panel use a lightly dampened cloth then dry thoroughly. To clean the exterior use a
good appliance polish wax.
Never use sharp objects, scouring pads or harsh cleaners on any part of the dishwasher.
Protect against freezing
If you dishwasher is left in an unheated place during the winter, ask a service technician to:
1. Cut off electrical power to the dishwasher. Remove fuses or tip circuit breaker.
2. Turn off the water supply and disconnect the water inlet pipe from the water valve.
3. Drain water from the inlet pipe and water valve. (Use a pan to catch the water.)
4. Reconnect the water inlet pipe to the water valve.
5. Remove the plastic sump cover in the tub the bottom and use a sponge to soak up water in rubber
boot.
Cleaning The Spray Arms
It is necessary to clean the spray arms regularly or hard water chemicals will clog the
spray arm jets and bearings. To remove the spray arm, screw off the nut to take out
the washer on top of the spray arm and remove the arm. Wash the arms in soapy and
warm water and use a soft brush to clean the jets. Replace them after rinsing them
thoroughly.
Cleaning The Filters
Filter assembly
For best performance and results, the filter assembly must be cleaned.
The filter efficiently removes food particles form the wash water,
allowing it to be re-circulated during the cycle. For this reason, it is a
good idea to remove the larger food particles trapped in the filter after
each wash cycle by rinsing the semicircular filter and cup under running
water. To remove the filter assembly, pull on the cup handle in the
upward direction. The entire filter assembly should be cleaned at least
once a month.
To clean the coarse filter and the fine filter, use a cleaning brush. Then, reassemble the filter parts as
shown in the figures and reinsert the entire assembly in the dishwasher, positioning in its seat and
pressing downward.
The dishwasher must never be used without the filters. Improper replacement of the filter may reduce
the performance level of the appliance and damage dishes and utensils.
WARNIING – Never run the dishwasher without the filters in place.
Cleaning The Door
To clean the edge around the door, you should use only a soft warm, damp
rag. To prevent penetration of water into the door lock and electrical
components, do not use a spray cleaner of any kind.
Also, never use abrasive cleaners or scouring pads on the outer surfaces
because they will scratch the finish. Some papers towels can also scratch
or leave marks on the surface.
WARNING - Never use a spray cleaner to clean the door panel for it could damage the door lock
and electrical components. It is not allowed to use the abrasive agent or some paper towel
because of the risk of scratching or leaving spots on the stainless steel surface.

14
How To Keep You Dishwasher In Shape
After every wash
After every wash, turn off the water supply to the appliance and leave the door slightly ajar so that
moisture and odors are not trapped inside.
No solvents or abrasive cleaning products
To clean the exterior and rubber parts of the dishwasher, do not use solvents or abrasive cleaning
products. Rather, use only a cloth and warm soapy water. To remove spots or stains from the surface of
the interior, use a cloth dampened with water and a little white vinegar, or a cleaning product made
specifically for dishwashers.
When you go on Holiday
When you go on holiday, it is recommended that you run a wash cycle with the dishwasher empty and
them remove the plug from the AC socket, turn off the water supply and leave the door of the appliance
slightly ajar. This will help the seals last longer and prevent odors from forming within the appliance.
Seals
One of the factors that cause odors to form in the dishwasher is food that remains trapped in the seals.
Periodic cleaning with a damp sponge will prevent this from occurring.
PROBLEMS WITH YOUR DISHWASHER?
You can solve many common dishwasher problems easily, saving you the cost of a possible service
call. Try the suggestions below to see if you can solve the problem before calling the servicer.
TROUBLESHOOTING GUIDE
PROBLEM POSSIBLE CAUSE WHAT TO DO
Dishwasher does not
operate.
The circuit breaker tripped
or blown fuse.
Power supply is not turned
on.
Water pressure is low.
Replace fuse or reset circuit breaker. Remove any
other appliances sharing the same circuit with the
dishwasher
Make sure the dishwasher is turned on and the
door is closed securely.
Make sure the power cord is properly connected.
Check that the water supply is connected properly
and the water is turned on.
Drain pump doesn’t stop Overflow The system is designed to detect an overflow.
When it doesn’t it shuts off the circulation pump
and turns on the drain pump.
Noise Some audible sounds are
normal.
Utensils are not secured in
the baskets or something
small has dropped into the
basket.
Motor hums.
Sound from soft food shredding action and
detergent cup opening.
Ensure everything is secured in the dishwasher.
Dishwasher has not been used regularly. If you do
not use it often, remember to set it to fill and pump
out every week, which will help keep the seal
moist.
Suds in the tub Improper detergent.
Spilled rinse agent.
Use only the special dishwasher detergent to avoid
suds.
If this occurs, open the dishwasher and let suds
evaporate.
Add 1 gallon of cold water to the tub. Close and
latch the dishwasher, then drain out the water by
slowly turning the dial until a drain period is
reached. Repeat if necessary.
Always wipe-up rinse agent spills immediately.

15
Stained tub interior Detergent with colorant was
used.
Make sure that the detergent is the one without
colorant.
Dishes are not dried Rinse agent dispenser is
empty.
Make sure the rinse agent dispenser is filled.
Dishes and flatware not
clean.
Improper program.
Improper rack loading.
Select a stronger program.
Make sure that the action for the detergent
dispenser and spray arms are not blocked by large
dishware.
Cloudiness on glassware. Combination of soft water
and too much detergent.
Use less detergent if you have soft water and
select a shorter cycle to wash the glassware to get
them clean.
Yellow or brown film on
inside surfaces.
Tea or coffee stains.
Iron deposits in water can
cause an overall film.
Using a solution of ½ cup bleach and 3 cups warm
water to remove the stains by hand.
Warning
You have to wait for 20 minutes after a cycle to let
the heating elements cool down before cleaning
interior: otherwise, burns will happen.
You have to call a water softener company for a
special filter.
White film on inside surface. Hard water minerals
To clean the interior, use a damp sponge with
dishwasher detergent and wear rubber gloves.
Never use any other cleaner than dishwasher
detergent for the risk of foaming or suds.
Detergent left in dispenser
cups.
Dishes block detergent
cups.
Re-load the dishes properly.
Steam Normal phenomenon
There is some steam coming through the vent by
the door latch during drying and water draining.
Black or gray marks on
dishes.
Aluminum utensils have
rubbed against dishes.
Use a mild abrasive cleaner to eliminate those
marks.
Water standing in the bottom
of the tub.
This is normal.
A small amount of clean water around the outlet on
the tub bottom at the back of the tub keeps the
water seal lubricated.
Water doesn’t pump out of
the tub.
Drain is clogged.
Make sure the kitchen sink is draining well. If the
dishwasher drains into a disposer, run it clear.
Dishwasher leaks. Overfill dispenser or rinse
aid spills.
Dishwasher isn’t level.
Be careful not to overfill the rinse aid dispenser.
Spilled rinse aid could cause oversudsing and lead
to overflowing. Wipe away any spills with a damp
cloth.
Make sure the dishwasher is level.
LIGHT and QUICK program
lights flicker intermittently
Water has not reached the
required temperature (HOT)
Malfunction of the temperature sensor and or the
heating element
NORMAL and LIGHT
program lights flicker
intermittently
Failure of the temperature
sensor
Temperature sensor has failed.
Contact an authorized service center
NORMAL and QUICK
program lights flicker
intermittently
Failure of the temperature
sensor
Temperature sensor has failed.
Contact an authorized service center

16
SERVICE FOR YOUR DISHWASHER
We are proud of our customer service organization and the network of professional service technicians
that provide service on your Avanti dishwashers. With the purchase of your Avanti dishwasher, you can
have the confidence that if you ever need additional information or assistance, the Avanti Products
Customer Service team will be here for you. Just call us toll-free.
AVANTI PRODUCTS CUSTOMER SERVICES
Product Information
800-323-5029
Whatever your questions are about our products,
help is available.
Part Orders
800-220-5570
You may order parts and accessories that will be
delivered directly to your home, by personal
check, money order, Master Card, or Visa.
In-Home Repair Service
800-220-5570
An Avanti Products authorized service center will
provide expert repair service, scheduled at a time
that is convenient for you. Our trained servicers
know your dishwasher inside and out.
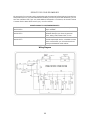
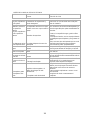
Wiring Diagram

17
YOUR AVANTI PRODUCTS
WARRANTY
Staple your sales receipt here. Proof of original
purchase date is needed to obtain service under
warranty.
WHAT IS COVERED – LIMITED ONE-YEAR WARRANTY
Avanti Products warrants that the product is free from defects in materials and/or workmanship for a period of
twelve (12) months from the date of purchase by the original owner. The foregoing timeline begins to run upon the
date of purchase, and shall not be stalled, tolled, extended, or suspended for any reason whatsoever unless
described in detail in the warranty document. For one year from the date of purchase by the original owner, Avanti
products will, at its option, repair or replace any part of the product which proves to be defective in material or
workmanship under normal use. Avanti Products will provide you with a reasonably similar product that is either
new or factory refurbished. During this period Avanti Products will provide all parts and labor necessary to correct
such defects free of charge, so long as the product has been installed and operated in accordance with the written
instructions in this manual. In rental or commercial use, the warranty period is 90 days. All Avanti appliances of 3.5
cubic feet capacity or less must be brought/sent to the appliance service center for repair.
LIMITED FIVE YEAR WARRANTY ON PLASTIC TUB
After one year and until five years from the date of purchase, Avanti Products will furnish a replacement plastic tub,
for one which is defective in material or workmanship. All labor and transportation charges are the responsibility of
the consumer.
LIMITED SEVEN YEAR WARRANTY ON STAINLESS STEEL TUB
After one year and until seven years from the date of purchase, Avanti Products will furnish a replacement plastic
tub, for one which is defective in material or workmanship. All labor and transportation charges are the
responsibility of the consumer.
WARRANTY EXCLUSIONS / WHAT IS NOT COVERED:
The warranty coverage described herein excludes all defects or damage that are not the direct fault of Avanti
Products, including without limitation, one or more of the following:
A failure to comply with any applicable state, local, city, or county electrical, plumbing and/or building codes,
regulations, or laws, including failure to install the product in strict conformity with local fire and building codes
and regulations.
Any external, elemental and/or environmental forces and factors, including without limitation, rain, wind, sand,
floods, fires, mud slides, freezing temperatures, excessive moisture or extended exposure to humidity, lightning,
power surges, structural failures surrounding the appliance, and acts of God.
Content losses of food or other content due to
spoilage.
Incidental or consequential damages
Parts and labor costs for the following will not be
considered as warranty:
Evaporator doors, door springs, and/or frames.
Inner door panels, door shelves, door rails, and/or
door supports.
Chest freezer lid liners.
Vegetable crispers.
Light bulbs and/or plastic housing.
Plastic cabinet liners.
Punctured evaporator that voids the warranty on
the complete sealed system.
Shipping and handling costs associated with the
replacement of the unit.
Repairs performed by unauthorized servicers.
Service calls that are related to external problems,
such as abuse, misuse, inadequate electrical power,
accidents, fire, floods, or any other acts of God.
Failure of the product if it is used for other than it
intended purpose.
The warranty does not apply outside the Continental
USA.
Surcharges including but not limited to, any after
hour, weekend, or holiday service calls, tolls, ferry
trip charges, or mileage expense for service calls to
remote areas.
In no event shall Avanti Products have any liability or responsibility whatsoever for damage to surrounding property,
including cabinetry, floors, ceilings, and other structures and/or objects around the product. Also excluded from this
warranty are scratches, nicks, minor dents, and other cosmetic damages on external surfaces and exposed parts;
Products on which the serial numbers have been altered, defaced or removed; service visits for customer
education, or visits where there is nothing wrong with the product; correction of installation problems (you are solely
responsible for any structure and setting for the product, including all electrical, plumbing and/or other connecting
facilities, for proper foundation/flooring, and for any alterations including without limitation cabinetry, walls, floors,
shelving etc., as well as the resetting of breakers or fuses.
OUT OF WARRANTY PRODUCT
Avanti Products is under no obligation, at law or otherwise, to provide you with any concessions, including repairs,
pro-rates, or product replacement, once this warranty has expired.
Warranty – Washing Machines

18
INSTRUCCIONES EN ESPAÑOL
PRECAUCION
Para reducir el riesgo de incendio, descarga
eléctrica, o daño cuando use su
electrodoméstico, siga las siguientes
precauciones.
Lea todas las instrucciones antes de usar su electrodoméstico.
Peligro o Precaución: Existe el riesgo que los niños queden atrapados.
Niños atrapados o sofocamiento no son un problema del pasado. Los electrodomésticos son
peligrosos aún si solo los deja en el garaje por un par de días.
Antes de desechar su equipo usado: quítele la puerta. Deje las canastas en su lugar para
evitar que los niños se queden atrapados.
No permita que los niños manejen, jueguen o entren dentro del electrodoméstico.
No limpie su electrodoméstico con líquidos inflamables. Los gases pueden ocasionar fuego o
una explosión.
No guarde ni use gasolina u otros líquidos inflamables cerca de este o de cualquier otro
electrodoméstico. Los vapores pueden ocasionar fuego o explosión.
- Guarde estas instrucciones.-
INFORMACIONES IMPORTANTES DE SEGURIDAD
LEA TODAS LAS INSTRUCCIONES ANTES DE USAR EL EQUIPO
ADVERTENCIA
Cuando use el lavaplatos siga las instrucciones básicas indicadas a continuación
ADVERTENCIA. EL HIDROGENO ES UN GAS EXPLOSIVO
Bajo ciertas condiciones, el gas de hidrógeno se puede producir en un sistema de agua caliente que no
ha sido usado por más de dos semanas. EL HIDROGENO ES UN GAS EXPLOSIVO.
Si el sistema de agua caliente no va a ser usado por un período de tiempo, cierre todas las llaves de
agua caliente y deje correr el agua fría por varios minutos antes de usar el lavaplatos. Esto liberará
cualquier residuo de gas hidrógeno acumulado. Debido a lo inflamable de este gas, no fume o haga
fuego alrededor.
INSTRUCCIONES DE ALAMBRADO
Tipos de Cable Alambrado
Este equipo debe estar alambrado a tierra. En el evento en que ocurra alguna rotura o mal
funcionamiento, el alambrado a tierra reducirá el riesgo de descarga eléctrica proveyendo un camino
de menor resistencia para la corriente eléctrica. Este equipo viene con un cable con enchufe a tierra. El
cable debe estar conectado a un enchufe apropiado, el cual deberá cumplir todas las ordenanzas y
códigos locales.
ADVERTENCIA
La conexión inapropiada del cable a tierra incrementará el riesgo de descargas eléctricas. Verifique
con un electricista o personal de servicio calificados la conexión apropiada del equipo. Si necesita
realizar alguna modificación en el enchufe a tierra, le recomendamos contratar los servicios de un
electricista.

19
USO APROPIADO
No maltrate, se siente o se pare en la puerta o la bandeja del lavaplatos.
No toque el calentador durante o justamente después de usar el lavaplatos.
No lave artículos de plástico, a menos que estos indiquen que son aptos para lavaplatos, para los
artículos que no lleven indicación, lea las recomendaciones del fabricante.
Use sólo detergentes y aditivos de enjuague diseñados para lavaplatos automáticos. No use jabón,
detergente para ropa o detergente de lavado a mano en su equipo.
Mantenga el detergente y los aditivos de enjuague fuera del alcance de los niños. Mantenga a los
niños lejos del lavaplatos cuando la puerta esté abierta, ya que podrían quedar residuos de
detergente en el interior.
La puerta no debe quedar abierta, ya que podría causar tropiezos y caídas.
Durante la instalación, el sistema de suministro eléctrico no debe estar doblado o aplanado.
Para reducir el riesgo de accidentes, no permita a los niños jugar en o con el lavaplatos.
No utilice su lavaplatos a menos que todos los paneles interiores estén en su lugar. Abra
cuidadosamente el lavaplatos si este esta operando, existe el riesgo de una fuga de agua.
No coloque objetos pesados sobre la puerta abierta. El equipo podría inclinarse hacia adelante.
Cuando esté cargando los artículos a limpiar:
Coloque los artículos afilados de manera que no dañen el sello de la puerta.
Coloque los filos de los cuchillos hacia abajo para reducir el riesgo de cortes.
Si el cordón del enchufe está dañado, deberá ser reemplazado por el fabricante, su agente de
servicios o una persona calificada.
Deshágase de los materiales de empaque apropiadamente.
Use el lavaplatos sólo para las funciones para las que fue diseñado.
Quite la puerta del compartimiento de lavado cuando cambie o deseche un lavaplatos.
No juegue con los controles.
LEA Y SIGA CUIDADOSAMENTE ESTA INFORMACION DE SEGURIDAD
GUARDE ESTAS INSTRUCCIONES

20
CARACTERISTICAS
1 Parrilla superior 7 Parrilla para tazas
2 Brazos distribuidores 8 Canasta para cubiertos
3 Parrilla inferior 9 Filtro grueso
4 Interior de acero inoxidable 10
Dispensador de aditivo de
en
j
ua
g
ue
5 Ensamble de filtro 11
Válvula para la entrada de agua
6 Dispensador de deter
g
ente
12
Ca
j
a eléctrica
CONTROL PANEL
1 Luz indicadora para cada ciclo
2 Luz indicadora para llenar el aditivo
de enjuague
3 Luz indicadora de encendido
4 Botón para encender o apagar la
unidad
5 Botón para comenzar el ciclo
6 Botón para seleccionar un ciclo
7 Ventilación

21
La luz indicadora de ciclo parpadeará intermitentemente para indicar el ciclo seleccionado.
TABLA DE CICLO DE LAVADO
Programa Ciclo Información de Descripción Tiempo de Aditiv
Selección de Ciclo de ciclo Operación Enjuag
(Minutos)
Heavy Lavado
Para cargas de mucha
suciedad, Pre-enjuague 125
NO
(Intensivo) Normal
Como ollas, sartenes,
cacerolas Lavado
y platos con comida seca, por
un Enjuague
Mayor tiempo Enjuague
Secado
Normal Lavado
Para cargas de suciedad
normal Pre-enjuague 95
SI
Normal
Como ollas, platos, vasos y
sartenes Lavado
ligeramente sucios. Enjuague
Ciclo diario estándar Enjuague
Secado
Light Lavado
Para cargas de suciedad
ligera Lavado 85
NO
(Economico) Ligero
como platos, vasos,
ensaladeras Enjuague
y sartenes ligeramente
sucios. Enjuague
Rápido Cristales
Pequeño lavado para cargas
de Pre-enjuague 65
NO
Vidrio
suciedad ligera que no
necesitan Lavado
Enjuague
Secado
Protección contra el sobre flujo de agua
Este lavaplatos cuenta con un sistema de protección contra el sobre flujo de agua, el mismo cierra la
válvula de entrada de agua y activa la bomba de drenaje cuando el nivel del agua sube demasiado. Si
esto ocurre, cierre la llave principal de entrada de agua antes de llamar al personal de servicio. Si hay
agua en la bandeja de la base debido al sobre flujo o existe algún tipo de goteo, el agua deberá
retirarse antes de reiniciar el funcionamiento del lavaplatos.

22
Dispensador de Detergente
El dispensador debe rellenarse antes de comenzar cada ciclo de lavado de acuerdo a las instrucciones
detalladas en la tabla de ciclo de lavado. Este lavaplatos usa menor cantidad de detergente y aditivos
de enjuague que los lavaplatos convencionales. Generalmente, sólo se necesitará una cucharada de
detergente para una carga en el programa de lavado normal. Los artículos más sucios necesitaran
mayor cantidad de detergente. Siempre añada el detergente justo antes de iniciar el lavaplatos, de otra
manera podría humedecerse y no disolverse apropiadamente.
Cantidad de detergente a usar
SI EL AGUA NO ES MUY DURA, USTED PODRA PREVENIR
LA FORMACION DE DEPOSITOS AÑADIENDO
DETERGENTE.
La cantidad de detergente que necesite variará dependiendo
de la dureza del agua. Para determinar la dureza del agua en
su localidad, comuníquese con la compañía proveedora de
agua. Mientras más dura sea el agua, mayor será la cantidad
de detergente a utilizar. Recuerde, usted debe encontrar la
cantidad de detergente que debe usar añadiendo pequeñas
cantidades hasta encontrar la medida exacta.
1: Depósito principal de detergente
2: Depósito de detergente de pre-lavado
3: Depósito de aditivos de enjuague
4: Indicador de nivel de aditivos de enjuague
Quitando manchas de agua dura de los platos
Para quitar las manchas producidas por el agua dura, siga estos consejos:
Ponga los platos en el programa de lavado normal.
Quite todo objeto metálico, como cubiertos, sartenes, etc.) del lavaplatos.
No añada detergente.
Eche dos tazas de vinagre en una ensaladera, colóquela en la rejilla inferior del lavaplatos. Inicie el
programa de lavado normal.
Si esto no funciona, realice el mismo proceso usando ¼ de taza de cristales de ácido cítrico en lugar del
vinagre.
Uso adecuado del detergente
Solamente use detergente para lavaplatos.
Conserve el detergente en un lugar fresco y seco.
No vierta el detergente en polvo hasta el momento mismo de lavar los platos.
ADVERTENCIA!
El detergente para lavaplatos es corrosivo. Tenga el cuidado de mantenerlo lejos del alcance de los
niños.
DEPOSITO DE ADITIVOS DE ENJUAGUE
Para abrir el depósito, de vuelta a la tapa hacia la flecha izquierda
(“open”) y tire de ella.
Vierta el aditivo de enjuague en el depósito, tenga cuidado de no
sobrepasar el tope.
Coloque la tapa alineándola con la flecha izquierda (“open”) y
dándole vuelta hacia la flecha derecha (“close”).
Los aditivos de enjuague se liberarán durante el enjuague final para
prevenir que el agua forme gotas en sus platos las que podrían
dejar manchas y rayas. También mejoran el secado permitiendo que el agua se escurra más fácilmente
de los platos.
Este lavaplatos esta diseñado para usar aditivos de enjuague líquidos. El depósito está situado dentro
de la puerta, junto al depósito de detergente
Para llenar el depósito, abra la tapa y eche el aditivo de enjuague hasta que el indicador de nivel se

23
torne completamente negro. El depósito tiene capacidad para 100 ml.
Debe tener cuidado de no llenar el depósito por encima del nivel permitido, esto podría causar excesos
de espuma. Limpie con un paño húmedo cualquier derrame o salpicadura. No se olvide de colocar la
tapa en su lugar antes de cerrar la puerta del lavaplatos.
Si su localidad tiene agua blanda, no deberá usar el aditivo de enjuague ya que éste podría dejar una
capa blanca sobre sus platos.
Como usar la parrilla superior
Le recomendamos que coloque los artículos pequeños y los más fáciles de
limpiar, en la parrilla superior: vasos, copas, tapas, platos de servicio y
ensaladeras, como se muestra en la figura.
Es preferible que coloque los platos de servicio y las tapas en los lados de la
parrilla para que no interrumpan la rotación del brazo distribuidor.
Como usar la parrilla inferior
Le recomendamos que coloque los artículos grandes y los más difíciles de limpiar, en la parrilla inferior:
ollas, sartenes, tapas, platos de servicio y ensaladeras, como se muestra en la figura.
Es preferible que coloque los platos de servicio y las tapas en los lados de la parrilla para que no
interrumpan la rotación del brazo distribuidor.
Las ollas, ensaladeras, etc., se deben poner boca abajo.
Las ollas hondas deben estar colocadas de manera que permitan el flujo adecuado del agua.
La parrilla inferior se puede acomodar para que cualquier tipo de ollas y sartenes puedan ser incluídas.
2
2
1 5
3 4
Canasta para cubiertos
Los cubiertos se deben colocar en las áreas designadas en la canasta de cubiertos con los mangos
hacia abajo: Si la rejilla tiene canastas laterales, las cucharas
deberán insertarse individualmente en las ranuras apropiadas, los
utensilios especialmente largos, deben colocarse en posición
horizontal al frente de la rejilla superior.
Tenedores
Cucharas de sopa
Cucharas de postre
Cucharitas de te
Cuchillos
Cucharas de servicio
Cucharón de salsa
Tenedores de servicio
1 Bandejas Ovales
2 Platos de comida
3 Platos de sopa
4 Platos de postre
5 Canasta para cubiertos
1 4 5 2
1 4 5
1 4 5 2
1 4 5 2
1 4 5
4 4 5 2
7 4 5 2
8 3 5
1 3 3 2
1 3 3 2
1 3 3
6 3 6 2

24
COMO EMPEZAR UN CICLO DE LAVADO:
Asegurase que la unidad está conectada al tomacorriente y a la entrada de agua.
Llena la unidad apropriadamente.
Agrega el detergente
Cierra la puerta
Oprima el botón de encendido
Selecciona el ciclo de lavado apropiado para su uso
Oprima el botón para empezar el ciclo (la luz indicadora parpardeará).
COMO CANCELAR O MODIFICAR UN CICLO DE LAVADO:
Para cancelar un ciclo después que haya empezado oprima el botón (START / RESET) para
aproximadamente 3 segundos.
Oprima el botón (PROG) para seleccionar el ciclo nuevo
Oprima el botón (START / RESET)
El ciclo empezará a funcionar.
LIMPIANDO LOS BRAZOS DISTRIBUIDORES
Es necesario limpiar los brazos distribuidores regularmente, los químicos del agua
dura pueden tupir el brazo distribuidor y el eje. Para sacar el brazo distribuidor,
desenrosque la tuerca para sacar el limpiador de la parte superior del brazo
distribuidor. Limpie los brazos con agua tibia y jabonosa, use una pequeña brocha
para limpiar los distribuidores. Reinstálelos después de haberlos secado.
LIMPIANDO LOS FILTROS
Es necesario sacar y limpiar el filtro periódicamente removiendo las
particulas de comida en el agua de lavado permitiendo que recircule
durante el ciclo.
Ensamble del filtro.
Para mejores resultados, limpie el filtro.
El filtro remueve partículas de comida del agua de lavado, permitiendo
que recircule durante el ciclo. Por esta razón, es una buena idea quitar
las grandes partículas de comida atrapadas en el filtro después de
cada ciclo de lavado enjuagando el filtro semicircular y la taza.
Para sacar el sistema del filtro, hale la manija de la taza hacia arriba. El
sistema entero del filtro deberá ser limpiado al menos una vez al mes.
Para limpiar el filtro grueso y el fino use un cepillo limpiador, luego ensamble nuevamente las partes del
filtro como se muestra en las figuras de la izquierda y reinserte el ensamblaje completo en el lavaplatos,
ubicándolo en su sitio y presionando hacia abajo.
El lavaplatos no debe usarse sin el filtro. El reemplazo inapropiado del filtro reducirá los niveles de
funcionamiento del equipo así como también dañando platos y utensilios.
ADVERTENCIA: Nunca use el lavaplatos sin filtro.

25
LIMPIANDO LA PUERTA
Para limpiar el borde alrededor de la puerta use un trapo húmedo, suave y tibio. Para prevenir el
ingreso de agua al seguro de la puerta y a componentes eléctricos, no use limpiadores en aerosol de
ninguna clase. Tampoco use limpiadores con abrasivos o paños desgrasadores ya que podrían arañar
la superficie. Algunos papeles toalla podrían también arañar o dejar marcas en la superficie.
ADVERTENCIA
Tampoco use agentes abrasivos o papel toalla áspero debido al riesgo de arañar el equipo o dejar
manchas en las superficies de acero inoxidable.
Limpiando la Bomba de Drenaje
Ocasionalmente algo caerá dentro del filtro y la bomba de drenaje. Si esto ocurre, la bomba de drenaje
empleada en este equipo, está diseñada para revertir el sistema de drenaje automáticamente, de
manera que devolverá el artículo en el desagüe. Si por algún motivo usted tuviera que retirar
manualmente un artículo de la bomba de drenaje, antes de quitar los filtros, usted deberá apagar y
desconectar el equipo de la corriente luego quitar el pequeño inserto negro del sumidero. En caso de
haber residuos de agua, estos deberán ser secados antes de proseguir. Saque el artículo que causa la
obstrucción, este debe encontrarse en el sumidero. Recuerde colocar el inserto negro antes de
re-instalar los filtros.
MANTENIMIENTO
Después de cada lavado
Cierre la llave del ingreso de agua y deje la puerta ligeramente entreabierta, de esta manera la
humedad y los malos olores no quedarán atrapados en el interior.
No use productos de limpieza solventes o abrasivos
Para limpiar las superficies exteriores y las partes de goma no use productos de limpieza solventes o
abrasivos. En lugar de estos productos use un paño limpio y agua tibia jabonosa. Para quitar manchas
u óxido de la superficie interior del equipo use un paño humedecido con agua y un poco de vinagre o un
producto de limpieza diseñado específicamente para lavaplatos.
Cuando se vaya de vacaciones
Se recomienda que realice un ciclo de lavado con el lavaplatos vacío, desenchufe el equipo, cierre la
llave de entrada de agua y deje la puerta del lavaplatos ligeramente entreabierta. Esto alargará la vida
de los sellos del equipo y prevendrá la formación de malos olores en el interior del mismo.
Sellos
Uno de los factores que causa el mal olor en el lavaplatos es la comida que queda atrapada en los
sellos. Periódicamente límpielos con una esponja húmeda, lo cual prevendrá la formación de los
mismos.

26
ANTES DE LLAMAR AL SERVICIO TECNICO
Problema Posibles Que hacer?
Causas Selección de Ciclo
Hay una capa blanca
en los platos
Combinación de agua blanda y
mucho detergente
Use menos detergente si tiene agua blanda y
seleccione un ciclo de lavado más corto para
lavar la cristalería.
Hay una capa
amarilla o marrón en
las superficies
internas
Manchas de te o café
Los depósitos de hierro en el agua
pueden causar una capa en todo el
equipo
Use una mezcla de 1/2 taza de blanqueador y 3
tazas de agua tibia para quitar manualmente las
manchas.
Hay una capa blanca
en las superficies
internas Minerales de agua dura
Llamar a la compañía de agua y pedir un filtro
especial.
Hay detergente en las
tazas dispensadoras
Los platos bloquean las tazas de
detergente
Para limpiar el interior, use una esponja húmeda
con detergente para lavaplatos y use guantes de
goma.
Nunca use otra clase de limpiador que no sea el
diseñado específicamente para lavaplatos.
Reacomode los platos apropiadamente.
Vapor Normal
Siempre habrá algo de vapor que se escape por
entre la puerta durante el desagüe y el secado.
Manchas negras y
grises en los platos
Artículos de aluminio junto a los
platos
Use un limpiador abrasivo suave para eliminar
esas marcas.
Hay agua en el fondo
de la tina Normal
Un poco de agua limpia cerca del ingreso de
agua en el fondo de la tina mantendrá el sello de
agua lubricado.
El agua en la tina no
drena El desagüe está tupido
Asegúrese que el lavadero de la cocina esté
drenando bien. Si su equipo drena en un
regulador, debe limpiarlo o destupirlo.
El lavaplatos
g
otea
Depósitos sobrecargados o el
aditivo de enjuague se está
derramando
Asegúrese de no sobrecargar el depósito de
aditivos para el enjuague. El derrame de este
fluido puede causar exceso de espuma y
derrames.
Limpie cualquier salpicadura o exceso con un
paño húmedo.
El lavaplatos hace
ruido El lavaplatos está desnivelado
Asegúrese de nivelar correctamente el
lavaplatos.

27
Registration Information
Thank you for purchasing this fine Avanti product. Please fill out this card and return it within 100 days
of purchase and receive these
important benefits:
Protect your product:
We will keep the model number and date of purchase of your new Avanti product on file to help
you refer to this information in the event of an insurance claim such as fire or theft.
Promote better products:
We value your input. Your responses will help us develop products designed to best meet your
future needs.
-----------------------------------------------------(detach here)----------------------------------------------------------
Avanti Registration Card
__________________________________ _____________________________________
Name Model # Serial #
__________________________________ _____________________________________
Address Date Purchased Store/Dealer Name
__________________________________ ______________________________________
City State Zip Occupation
__________________________________ As Your Primary Residence, Do You:
Area Code Phone Number Own Rent
Did You Purchase An Additional Warranty:
Your Age:
Extended None under 18 18-25 26-30
Reason For Choosing This Avanti Product:
31-35 36-50 over 50
Please indicate the most important factors Marital Status:
that influenced your decision to purchase Married Single
this product. Is This Product Used In The:
Price Home Business
Product Features How Did You Learn About This Product:
Avanti Reputation Advertising
Product Quality In Store Demo Personal Demo
Salesperson Recommendation
Other______________________________
Friend/Relative Recommendation Comments____________________________
Warranty _____________________________________
Other_______________________ _____________________________________

28
VER: DWE1812W-1.0 – 05242011 PRINTED IN CHINA
-
 1
1
-
 2
2
-
 3
3
-
 4
4
-
 5
5
-
 6
6
-
 7
7
-
 8
8
-
 9
9
-
 10
10
-
 11
11
-
 12
12
-
 13
13
-
 14
14
-
 15
15
-
 16
16
-
 17
17
-
 18
18
-
 19
19
-
 20
20
-
 21
21
-
 22
22
-
 23
23
-
 24
24
-
 25
25
-
 26
26
-
 27
27
-
 28
28


Avanti DWE1812W Manual de usuario
- Categoría
- Lavaplatos
- Tipo
- Manual de usuario
- Este manual también es adecuado para
en otros idiomas
- English: Avanti DWE1812W User manual