HoMedics AG-2001TL El manual del propietario
- Categoría
- Masajeadores
- Tipo
- El manual del propietario
Este manual también es adecuado para
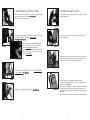
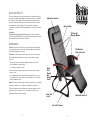
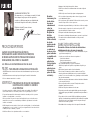
El HoMedics AG-2001TL es un sillón reclinable de masaje que proporciona un masaje lujoso y relajante con sus 10 potentes motores de masaje. Tiene 3 zonas de masaje para el cuello, la espalda y las piernas, y 5 programas de masaje preprogramados para personalizar tu experiencia de masaje. También cuenta con función de calor relajante para aliviar la tensión muscular. El sillón es fácil de montar y usar, y es perfecto para relajarse después de un largo día.
El HoMedics AG-2001TL es un sillón reclinable de masaje que proporciona un masaje lujoso y relajante con sus 10 potentes motores de masaje. Tiene 3 zonas de masaje para el cuello, la espalda y las piernas, y 5 programas de masaje preprogramados para personalizar tu experiencia de masaje. También cuenta con función de calor relajante para aliviar la tensión muscular. El sillón es fácil de montar y usar, y es perfecto para relajarse después de un largo día.


-
 1
1
-
 2
2
-
 3
3
-
 4
4
-
 5
5
-
 6
6
-
 7
7
-
 8
8
-
 9
9
-
 10
10
-
 11
11
-
 12
12
-
 13
13
-
 14
14


HoMedics AG-2001TL El manual del propietario
- Categoría
- Masajeadores
- Tipo
- El manual del propietario
- Este manual también es adecuado para
El HoMedics AG-2001TL es un sillón reclinable de masaje que proporciona un masaje lujoso y relajante con sus 10 potentes motores de masaje. Tiene 3 zonas de masaje para el cuello, la espalda y las piernas, y 5 programas de masaje preprogramados para personalizar tu experiencia de masaje. También cuenta con función de calor relajante para aliviar la tensión muscular. El sillón es fácil de montar y usar, y es perfecto para relajarse después de un largo día.
en otros idiomas
- English: HoMedics AG-2001TL Owner's manual
Artículos relacionados
-
HoMedics AG-4000TL Destress Spa Recliner El manual del propietario
-
HoMedics DeStress Spa Recliner El manual del propietario
-
-
-
HoMedics AG-2101 AntiGravity Recliner El manual del propietario
-
-
-
-
HoMedics Shiatsu AntiGravity Recliner El manual del propietario
-