Seiko 8X22 Instrucciones de operación
- Categoría
- Relojes
- Tipo
- Instrucciones de operación

GPS Solar
Cal. 8X22
World-Time
INSTRUCTIONS
INSTRUCCIONES
Copyright © 2016 by SEIKO WATCH CORPORATION
JSE8X22 2016-06

Cal. 8X22
INSTRUCTIONS
INSTRUCCIONES
( P. 2)
( P. 32)

32
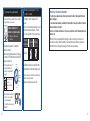
English
Please carefully read the instructions in this Complete User
Guide before using the watch.
Length adjustment service for metallic bands is available at the retailer from whom the watch
was purchased. If you cannot have your watch repaired by the retailer from whom the watch
was purchased because you received the watch as a gift, or you moved to a distant place,
please contact SEIKO WORLDWIDE SERVICE NETWORK. The service may also be available on
a chargeable basis at other retailers, however, some retailers may not perform the service.
If your watch has a protective film for preventing scratches, make sure to peel it off before
using the watch. If the watch is used with the film on it, dirt, sweat, dust, or moisture may be
attached under the film and may cause corrosion.
1 Features ............................................................................................ 4
2 Names of the parts ......................................................................... 7
3 Check the charging status .............................................................. 8
4 Time zone ...................................................................................... 10
5 Time zone display and list of time zones around the world ..... 11
6 Time Zone Adjustment ................................................................. 13
7 Manual time zone selection ......................................................... 16
8 DST setting .................................................................................... 18
9 How to manually adjust the time ................................................ 20
10 When boarding (in-flight mode (
)) ............................................ 23
11 Leap second (Automatic leap second reception function) ........ 25
12 Reception result display ............................................................... 27
13 How to check when the time zone information was
configured for your watch ............................................................ 29
CONTENTS

54
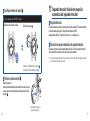
1
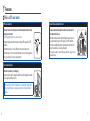
Features
This is a GPS solar watch.
GPS signal reception
This watch can be set to the precise local time anywhere in the world by
pushing just one button.
DST (Daylight Saving Time) can be set manually.
This watch quickly adjusts the time by receiving GPS signals from GPS
satellites.
This watch responds to a total of 40 time zones around the world.
When the region or time zone where the watch is used is changed, please
carry out operation of “time zone adjustment.”
Solar charging function
This watch operates by solar charging.
Expose the dial to light to charge the watch. Once fully charged, the watch
runs for approximately 6 months.
When the energy stored in the watch runs out completely, it takes time
to fully charge the watch, so please keep in mind to charge the watch
regularly.
Automatic time adjustment function
This watch automatically adjusts the time in accordance with
action patterns during use.
When the watch has sensed sufficient brightness under an open
sky, it automatically receives GPS signals from GPS satellites.
This function enables the watch to automatically adjust the time
precisely even while you are using the watch.
This watch is unable to receive GPS signals when the energy stored in
the watch is low.

76
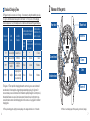
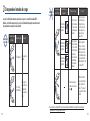
Standard Charging Time
GPS signal reception consumes a lot of energy. It is necessary to charge the watch by exposing
it to light so that the indicator hand points to the “middle” or “full” position. (If the charging
status is displayed as “low,” the reception will not start even with manual GPS signal reception.)
Illumination
lx (LUX)
Light
source
Condition
(Example)
From the state where the watch
is stopped (not charged)
In the state where
the hand moves (the
watch is charged)
To fully
charged
To one-second
interval movement
is secured
To move for one day
700 Fluorescent light General offices
- -
3.5 hours
3,000 Fluorescent light 30W 20cm 420 hours 12 hours 1 hours
10,000
Fluorescent light
Sunlight
Cloudy day
30W 5cm
115 hours 4 hours 15 minutes
100,000 Sunlight
Sunny day (Under
the direct sunlight
on a summer day)
50 hours 1.5 hours 10 minutes
The figures of “Time required for charging the watch to start moving at one- second intervals”
are estimations of time required to charge the stopped watch by exposing it to light until it
moves at steady one-second intervals. Even if the watch is partially charged for a shorter period,
the watch will resume one-second- interval movement. However, it may shortly return to two-
second-interval movement. Use the charging time in this column as a rough guide for sufficient
charging time.
The required charging time slightly varies depending on the design and the dial color of the watch.
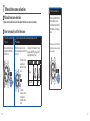
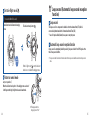
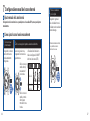
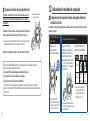
2
Names of the parts
Crown
Minute hand
Date
Button B
Hour hand
Button A
Second hand
Indicator hand
Position of each display may differ depending on the model (design).

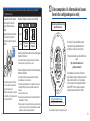
98
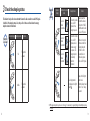
3
Check the charging status
The indicator hand position shows whether this watch is able or unable to receive GPS signals.
In addition, if the charging status is low, the position of the second hand shows the energy
depletion status in further detail.
Reception
is allowed
Indicator display Charging status Solution
full
Reception is
allowed.
middle
Reception is
allowed.
Reception
is not
allowed
Indicator
display
Movement of second
hand
Charging status Solution
1-second
interval
movement
low
The watch is unable
to receive GPS
signals, but has
energy to operate.
Charge the watch at
least until the indicator
hand points to “middle”
so that the watch is able
to receive GPS signals.
2-second
interval
movement
The watch is unable
to receive GPS
signals, and does
not have energy
to operate. (The
energy depletion
forewarning
function is
activated.)
Continue to charge the
watch at least until the
indicator hand points
to “middle” so that
the watch is able to
continuously operate
and receive GPS signals.
5-second
interval
movement
The charging status is
not displayed for in-flight
mode (
).
Change from in-flight to
normal mode.
When the indicator hand
points to “low,” charge
the watch.
GPS signal reception requires a lot of energy. It is necessary to regularly charge the watch by exposing
it to light.

1110
4
Time zone
Time zone
Based on Coordinated Universal Time (UTC), the standard time commonly used is adopted by
countries and regions around the world. The standard time is determined by each country or
region, and the region where the same standard time is adopted is referred to as the time zone,
and presently, the time zone is divided into 40 zones as of March 2015.
DST (Daylight Saving Time)
Depending on the area, DST (Daylight Saving Time) is individually set.
Daylight Saving Time, or summer time, is a system to lengthen daylight time by advancing 1
hour when daylight time is longer during summer. Daylight saving time has been adopted in
about 80 countries, mainly in Europe and North America. The adoption and duration of daylight
saving time varies depending on the country.
Daylight Saving Time is subject to change due to circumstances of the country or region.
Coordinated Universal Time (UTC)
UTC is the universal standard time coordinated through an international agreement. UTC is the
primary time standard for recording time around the world. The time obtained by adding a leap
second to the “International Atomic Time (TAI)” is determined based on the atomic clock around
the world. It is coordinated in order to compensate for deviations from universal time (UT)
which is astronomically determined by the UTC.
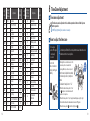
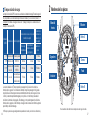
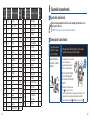
5
Time zone display and list of time zones around
the world
The following list shows the relationship between displays of the bezel and dial ring and time
difference from the UTC.
Please refer to the second hand positions below to set the time zone or to check the time zone
setting.
DST (Daylight Saving Time) is used in time zones with a mark.
In the Lord Howe Island time zone in Australia with a
mark, the time is advanced by 30
minutes while Daylight Saving Time (Summer Time) is in effect.
This watch corresponds to DST in the Lord Howe Island time zone.
The time zone of each region and DST (Daylight Saving Time) are as of March 2015.
The displays of city code and the time difference from UTC are subject to
change depending on model.
“·” between figures of the display of time difference shows that there is a
time zone in that place.
Display of time zone
Display of time difference
Representative city names…28 cities among the total of 40 time zones
around the world
Time difference…+14 hours ~ –12 hours

1312
City
code
Display
of time
difference
City name
UTC
± hours
LON UTC
London
0
PAR 1
Paris/Berlin
+1
CAI 2
Cairo
+2
JED 3 Jeddah +3
— •
Tehran
+3.5
DXB 4 Dubai +4
— • Kabul +4.5
KHI 5 Karachi +5
DEL • Delhi +5.5
— • Kathmandu +5.75
DAC 6 Dhaka +6
— • Yangon +6.5
BKK 7 Bangkok +7
BJS 8 Beijing +8
— • Eucla +8.75
TYO 9 Tokyo +9
ADL •
Adelaide
+9.5
SYD 10
Sydney
+10
— •
Lord Howe Island
+10.5
NOU 11 Nouméa +11
— • Norfolk Island +11.5
City
code
Display
of time
difference
City name
UTC
± hours
WLG 12
Wellington
+12
— •
Chatham Islands
+12.75
TBU 13 Nuku’alofa +13
CXI 14 Kiritimati +14
— –12 Baker Island –12
MDY –11 Midway islands –11
HNL –10 Honolulu –10
— • Marquesas Islands –9.5
ANC –9
Anchorage
–9
LAX –8
Los Angeles
–8
DEN –7
Denver
–7
CHI –6
Chicago
–6
NYC –5
New York
–5
— • Caracas –4.5
SDQ –4 Santo Domingo –4
— •
St. John’s
–3.5
RIO –3
Rio de Janeiro
–3
FEN –2
Fernando de
Noronha
–2
PDL –1
Azores
–1
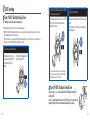
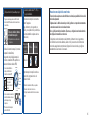
6
Time Zone Adjustment
Time zone adjustment
The time zone can be adjusted to the local time anywhere in the world with just one
button operation.
DST (Daylight Saving Time) can be set manually.
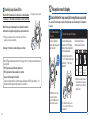
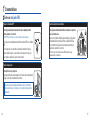
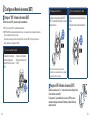
How to adjust the time zone
1
Go to a place
where GPS signals
can be easily
received
2
Continue to press Button A (6 seconds), and then release it when the second
hand moves to the 30-second position.
Move to the
outdoors under an
open sky with good
visibility.
Although the second hand moves to the
0-second position 3 seconds after
pressing Button A, continue to press it.
When the second hand has reached
the 30-second position, reception is
started.
The indicator hand points to “4+.”
While the indicator hand points to “low”
or , reception is not started even with
operation for reception.
When the hand points to “low,” charge the watch by exposing it to light.
Check whether the watch is able/unable to receive GPS signals
When the hand points to
, reset the in-flight mode ( ).
Press for
6 seconds

1514
3
Direct the watch face upward and wait
4
When the second hand points to “Y” or “N,”
reception is completed.
Please note that it may be difficult to receive GPS
signals while you are in motion.
It takes a maximum of 2
minutes to complete reception.
It depends on the receiving
conditions.
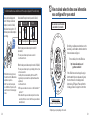
< Display during reception (= satellites
acquisition status) >
The second hand indicates ease of receiving
(= number of GPS satellites from which GPS
signals are received).
The larger the number of
acquired satellites, the
easier it is to receive GPS
signals.
Second hand position
25-second
Number of satellites
5 units
Even when the hand points to
4 units or more, reception
may not be allowed.
To cancel the reception, press
Button B.
The reception result is displayed for 5
seconds.
Then, the hour and minute hands move, and
the time and date are adjusted. (The time
zone is also adjusted to the local time zone.)
Reception
result display
Y: Successful N: Failed
Display
Check that the reception is successful after
the watch returns to the time display mode.
During movement of the hands and the date, the
buttons cannot be operated.
Manually set Daylight Saving Time (DST).
B
P
C
J
J
Y
May receive
C
a
n
n
o
t
r
e
c
e
i
v
e
3 units
4 units
5 units
6 units
・
・
・
・
・
・
2 units
0 units
E
a
s
y
t
o
r
e
c
e
i
v
e
Press
Precautions on time zone adjustment
If the time zone is adjusted near a time zone boundary, the time of the adjacent time zone
may be displayed.
In some areas the boundaries observed by the watch may not exactly correlate to the actual
time zone markers on the land.
This does not indicate a malfunction. In this case, set the time zone in the manual time zone
setting mode.
When the time zone is adjusted while traveling on land, avoid doing so near time zone
boundaries. In addition, when the watch is used near time zone boundaries, make sure to
check the time zone setting, and manually set the time zone as necessary.

1716
7
Manual time zone selection
Manual time zone selection
In places where the time zone cannot be adjusted, the time zone can be set manually.
How to manually set the time zone
1
Pull out the crown to the
first click
2
Turn the crown and set the second hand to the time zone of the
destination
The second hand moves
to display the currently
set time zone.
Pull out
to the
1st click
0 1 2
When the crown is turned,
the second hand moves to the
next zone.
Turn the crown
clockwise to
advance 1 time
zone.
Turn the
crown counter
clockwise to
set back 1 time
zone.
< Display of the indicator hand >
Displays ON/OFF setting of DST
(Daylight Saving Time).
DST OFF ON
Display
Hand position • DST
3
Push the crown back in
The second hand returns to
the time display mode.
The indicator hand returns
to the display of charging
status.
During movement of the date,
the buttons and crown cannot
be operated.
Push
back in
0 1 2

1918
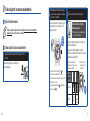
8
DST setting
Turn ON DST (Daylight Saving Time)
DST (Daylight Saving Time) can be manually set.
DST (Daylight Saving Time) is not automatically changed.
ON/OFF of the DST (Daylight Saving Time) is not automatically changed with operation of time zone
adjustment/manual time zone selection.
When traveling to a region where DST (Daylight Saving Time) is not adopted from a region where it is
adopted, turn off the DST (Daylight Saving Time) setting.
1
Pull out the crown to the first click
The indicator hand moves
to indicate the current DST
(Daylight Saving Time)
setting.
< When DST (Daylight Saving
Time) setting is OFF >
Pull out
to the first
click
0 1 2
2
Continue to press Button A (3 seconds) within 5
seconds after operation of ①
3
Push the crown back in
The indicator hand moves to point to “DST
(ON),” and the hour and minute hands
advance by one hour.
Press for
3 seconds
0 1 2
In the Lord Howe Island time zone in Australia,
the time is advanced by 30 minutes while DST
(Daylight Saving Time) is in effect.
The second hand returns to the time display
mode.
The indicator hand returns to the display of
charging status.
Push
back in
0 1 2
Turn OFF DST (Daylight Saving Time)
Carry out steps ① to ③ in the state where DST (Daylight Saving Time)
setting is ON.
In step ②, adjust the indicator hand to the “OFF” position as shown in the
figure at the right. The hour and minute hands return by one hour.

2120
9
How to manually adjust the time
Manual time adjustment
The watch can be set to the precise current time of the currently set time zone.
(The time zone is not changed.)
How to manually adjust the time
1
Go to a place where GPS signals can be easily received
Move to the outdoors under an open sky
with good visibility.
2
Continue to press Button A (3 seconds),
and then release it when the second
hand moves to the 0-second position.
3
Direct the watch face upward and wait
When the second hand has reached
the 0-second position, reception is
started. The indicator hand points
to “1.”
Press for
3 seconds
While the indicator hand points to “low”
or , reception is not started even with
operation for reception.
When the hand points to “low,” charge
the watch by exposing it to light.
When the hand points to
, reset in-
flight mode ( ).
It takes up to one minute to complete
reception.
The reception time depends on the
reception conditions.
< Display during reception (= satellites acquisition
status) >
The second hand indicates ease of receiving (=
number of GPS satellites from which GPS signals are
received).
To acquire only time information,
the number of satellites necessary
for reception is one.
Number of
acquired
satellites
1 0
Display
State
Easy to
receive
Cannot
receive
To cancel the
reception, press
Button B.
Press

2322
4
When the second hand points to “Y” or “N,” reception is completed.
The reception result is displayed for 5 seconds.
Then, the hour and minute hands move, and the time and
date are adjusted.
Reception
result
display
Y: Successful N: Failed
Display
Check that the reception is successful after the watch returns
to the time display mode.
When the time is not correct even if “Y” is displayed, the time
zone may not correspond to the region where you are. Check
the time zone or DST (Daylight Saving Time) selection.
During movement of the hands and the date, the buttons cannot be
operated.
Manually set DST (Daylight Saving Time).
10
When boarding (in-flight mode ( ))
In-flight mode ( )
Set to in-flight mode ( ) where the reception may influence operation of other electronics
devices in an airplane, etc.
In in-flight mode (
), the GPS signal reception (time zone adjustment, manual time adjustment,
and automatic time adjustment) does not function.
< In-flight mode (
) >
The indicator hand points to
.
When in-flight mode has been
deactivated the indicator hand
indicates the charging status.

2524
Set to in-flight mode ( ).
1
Press and hold Button B (3 seconds)
The indicator hand indicates the charging
status.
Press for
3 seconds
The indicator hand points to .
When in-flight mode ( ) is set, the indicator
hand does not indicate the charging status.
Return to normal mode
Carry out operation ①.
When the indicator hand points to “the charging status as shown”
in the figure at the right, in-flight mode can be deactivated.
The display when the
charging status is “full”
11
Leap second (Automatic leap second reception
function)
Leap second
The leap second is to compensate for deviations from the universal time (UT) which is
astronomically determined and the “International Atomic Time (TAI).
“1 second” may be added (deleted) once a year or every few years.
Automatic leap second reception function
A leap second is automatically added by receiving “leap second data” from GPS signals at the
time of leap second addition.
“Leap second data” includes information about future leap second addition and current leap second
data.

2726
Receiving Leap Second Data
When the GPS signal reception is performed on or after December
1st and June 1st, the indicator hand displays as shown at the right.
When the leap second data reception is completed, the indicator
hand returns to display the charging status. Use the watch as it is.
The leap second data reception is performed every half a year
regardless of leap second addition.
It takes up to 18 minutes to receive the leap second data.
Receiving the leap second data
When GPS signals are received under the following conditions, the leap second data reception
is also started.
• GPS signals are received after the system reset
• GPS signals have not been received for a long time
• Leap second data reception has failed
(Leap second data reception is performed again during the next GPS signal reception. It is
repeated until the leap second data reception is successful.)
12
Reception result display
Check whether the leap second data reception was successful
The successful / failed reception result of the regular leap second data reception is displayed for
5 seconds.
1
Press Button A and then
release it
2
The result of the reception is displayed
The second hand and
indicator hand display the
reception result.
Press and
release
When Button A is kept
pressed, the watch
enters the Manual time
adjustment operation.
The second hand displays
the result of the GPS signal
reception (time adjustment or
time zone adjustment).
The indicator hand points to
“1” or “4+” which shows “time
adjustment” or “time zone
adjustment”.
The indicator hand points to
“4+” as a result of time zone
adjustment.
Second hand: Reception
result (successful / failed)
Result Successful Failed
Display
Position
Y 8-Second
Position
N
22-Second
Position
After 5 seconds have elapsed
or when Button B is pressed,
the watch returns to the time
display mode.

2928
3
Press Button A and then release it while the result of the reception is displayed (for 5 seconds) in step 2
The second hand displays the
result of the leap second data
reception (successful / failed).
The indicator hand points to “0”
when leap second data reception
is occurring.
Press and
release
When Button A is kept pressed,
the watch enters the Manual time
adjustment operation.
After 5 seconds have elapsed,
or when Button B is pressed, the
watch returns to the time display
mode.
Second hand: Reception result (successful / failed)
Result Successful Failed
Display
Position Y 8-second position N 22-second position
When the leap second data reception result is Y
(successful)
• The leap second data reception was successful.
Use the watch as it is.
When the leap second data reception result is N (failed)
• The leap second data reception, periodically performed, has
not been successful.
It will be performed automatically with the next GPS
signal reception (automatic time adjustment/manual time
adjustment).
Use the watch as it is.
The leap second data is received on or after December 1
st
and June 1
st
.
Even when the leap second data reception has not been
successful, the time is correct until the leap second data is
added (deleted).
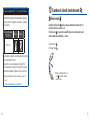
13
How to check when the time zone information
was configured for your watch
The case back shows the caliber-
case number of your watch.
8
X
2
2
-
0
A
A
0
-
2
8
X
2
2
-
0
A
A
0
-
2
Caliber-case number
The number to identify the watch type
Display may vary depending on the model.
By referring to caliber-case number shown on the
case back, you will be able to determine when the
time zone data was configured.
For more details, refer to the URL below.
http://www.seikowatches.com/
gpstimezonedatainfo/
If the official time zone has changed in a region
after the watch’s time zone data was configured,
the correct time will not be displayed even
after receiving GPS signals. Please perform the
following operations to display the correct time:

3130
< To set the time of this watch in a region where the official time zone has changed >
1. Select the time zone appropriate for the current time in the target region by manual time zone
setting.
→ For details, please refer to “7. Manual time zone selection” P. 16
2. Next, adjust the time by manual time adjustment.
→ For details, please refer to “9. How to manually adjust the time” P. 20
3. When using the watch within the same time zone, the correct time will be displayed after
automatic (GPS) or manual time adjustments.
4. When moving from a region where the official time zone has changed to a different time
zone, then back to the region where the official time zone has changed, carry out the same
operations from 1. - 3. as indicated above to display the correct time in the region where the
official time zone has changed.
SPECIFICATIONS
1. Basic function ...
Main-dial; three hands (hour/minute/second hands), date, indicator hand, world time function
(40 Time zones)
2. Frequency of crystal oscillator ... 32,768 Hz (Hz = Hertz ... Cycles per second)
3. Loss/gain (monthly rate) ...
Loss / gain ±15 seconds on a monthly rate (When the watch is used without automatic time
setting by receiving GPS signal and when it is worn on the wrist within a normal temperature
range between 5°C and 35°C (41°F and 95°F)).
4. Operational temperature range ... Between −10°C and +60°C (14°F and 140°F)
5. Driving system ... Step motor (hour/minute/second hands of main-dial), date, indicator hand.
6. Power source ... Secondary battery, 1 piece
7. Duration of operation ...
Approximately 6 months (Fully charged, and the Power Save is not activated).
If the Power Save is activated after it is fully charged, the watch continues to run for approximately
2 years at maximum.
8. GPS signal reception function ...
Time zone adjustment, manual time adjustment, automatic time adjustment
9. IC (Integrated Circuit) ... Oscillator, frequency divider and driving circuit C-MOS-IC, 4 pieces
The specifications, as noted above, are subject to change without prior notice for product improvement
purposes.


3332
Español
Por favor lea detenidamente las instrucciones de la presente
guía completa para el uso correcto y seguro de su reloj SEIKO
antes de usarlo.
El servicio de ajuste de longitud de los brazaletes se encuentra disponible en el
establecimiento donde adquirió su reloj. En caso usted no pueda solicitar la reparación de
su reloj en el establecimiento de venta porque lo recibió como obsequio, o porque se mudó
a un lugar lejano, póngase en contacto con la RED MUNDIAL DE SERVICIO DE SEIKO. Dicho
servicio también está disponible en otros establecimientos mediante pago, aunque algunos
establecimientos no están en condiciones de prestar dicho servicio.
Si su reloj cuenta con una película de protección para evitar rasguños, asegúrese de retirarla
antes de usar el reloj. Si el reloj se usa sin retirar dicha película, se podría adherir polvo, sudor
o humedad debajo de la misma y causar oxidación.
1 Características ............................................................................... 34
2 Nombres de las piezas .................................................................. 37
3 Compruebe el estado de carga .................................................... 38
4 Zona horaria ................................................................................... 40
5 Indicación de zona horaria y lista de zonas horarias
alrededor del mundo..................................................................... 41
6 Ajuste de la zona horaria .............................................................. 43
7 Configuración manual de la zona horaria ................................... 46
8 Configure el Horario de verano (DST) .......................................... 48
9 Cómo ajustar la zona manualmente ........................................... 50
10 Cuando está a bordo (modo de vuelo (
)) ................................. 53
11 Segundo intercalar (función de recepción automática del
segundo intercalar) ....................................................................... 55
12 Indicación del resultado de recepción ......................................... 57
13 Cómo comprobar si la información de la zona horaria fue
configurada para su reloj .............................................................. 59
CONTENIDO

3534
1
Características
Este es un reloj solar GPS.
Recepción de señales GPS
Este reloj puede ajustarse a la exacta hora local en cualquier parte del
mundo, pulsando solo un botón.
El DST (Horario de Verano) se puede configurar de manera manual.
El reloj ajusta la hora rápidamente al recibir las señales GPS de los satélites
GPS.
El reloj responde a un total de 40 zonas horarias alrededor del mundo.
Cuando cambie la región o zona horaria donde esté usando el reloj, por
favor realice la operación de “ajuste de zona horaria”.
Función de carga solar
Este reloj funciona por carga solar.
Exponga la esfera a la luz para cargar el reloj. Cuando está completamente
cargado, el reloj funciona alrededor de 6 meses.
Cuando se agota toda la energía almacenada en el reloj, toma tiempo
volver a cargar el reloj por completo, por lo que debe recordar cargarlo
regularmente.
Función de ajuste horario automático
Este reloj ajusta automáticamente la hora de acuerdo con patrones
de acción durante el uso.
Cuando el reloj detecta suficiente luminosidad bajo el cielo abierto,
automáticamente recibe señales GPS de los satélites GPS. Esta
función permite al reloj ajustar la hora de manera automática y
exacta incluso durante el uso del reloj.
Este reloj no puede recibir las señales GPS cuando la energía
almacenada no es suficiente.

3736
Tiempo estándar de carga
La recepción de señales GPS consume una cantidad considerable de energía. Recuerde cargar el
reloj exponiéndolo a la luz de manera que el indicador señale la “posición de nivel (media)” o “F
(completa)”. (Si el estado de carga se indica como “E (baja)”, la recepción no iniciará incluso con
la recepción de señales GPS).
Iluminación
lx (LUX)
Fuente de luz Condición (ejemplo)
Desde el estado en el cual el reloj se ha
detenido (descargado)
En el estado en el
cual la manecilla
se mueve (el reloj
está cargado)
Para cargar
completamente
Para garantizar el
movimiento a intervalos
de un segundo
Para moverse
un día
700 Luz fluorescente Oficinas en general
- -
3,5 horas
3,000 Luz fluorescente 30W 20cm 420 horas 12 horas 1 hora
10,000
Luz fluorescente
Luz solar
Día nublado
30W 5cm
115 horas 4 horas 15 minutos
100,000 Luz solar
Día soleado (bajo la
luz solar directa en
un día de verano)
50 horas 1,5 horas 10 minutos
Los valores indicados en “Tiempo requerido para cargar el reloj e iniciar el movimiento a
intervalos de un segundo” son estimaciones del tiempo requerido para cargar el reloj parado
exponiéndolo a la luz hasta que se mueva constantemente a intervalos de un segundo. Incluso
si el reloj se encuentra parcialmente cargado por un periodo corto de tiempo, reanudará el
movimiento a intervalos de un segundo. Sin embargo, pronto puede regresar al movimiento a
intervalos de dos segundos. Utilice el tiempo de carga en esta columna como referencia general
para el tiempo suficiente de carga.
El tiempo requerido de carga varía ligeramente dependiendo del modelo y del color de la esfera del reloj.
2
Nombres de las piezas
Manecilla
horaria
Segundero
Indicador
Minutero
Fecha
Botón A
Corona
Botón B
La visualización del nombre de la ciudad puede variar según el modelo.

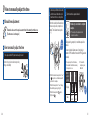
3938
3
Compruebe el estado de carga
La posición del indicador muestra si este reloj es capaz o no de recibir las señales GPS.
Además, si el nivel de carga es bajo, la posición de la manecilla de segundo muestra el estado
de agotamiento de energía con mayor detalle.
La recepción
es posible
Visualización del
indicador
Estado de carga Solución
F (completa)
La recepción es
posible.
Posición de
nivel (media)
La recepción
es posible, pero
recuerde que
debe cargar el
reloj.
La recepción
no es posible
Visualización
del indicador
Movimiento del
segundero
Estado de carga Solución
Movimiento a
intervalos de
1 segundo
E
(Baja)
El reloj no puede
recibir las señales
GPS, pero cuenta
con energía para
funcionar.
Cargue el reloj por lo
menos hasta que el
indicador señale la
posición de nivel de
manera que el reloj
pueda recibir las
señales GPS.
Movimiento a
intervalos de
2 segundos
El reloj no puede
recibir las señales
GPS, y no cuenta
con energía para
funcionar. (La
función de alerta
de agotamiento
de energía está
activada.)
Continúe cargando
el reloj por lo menos
hasta que el indicador
señale la posición de
nivel de manera que el
reloj pueda funcionar
continuamente y recibir
las señales GPS.
Movimiento a
intervalos de
5 segundos
El estado de carga no
se indica en el modo de
vuelo ( ).
Cambie del modo de
vuelo al modo normal.
Cuando el indicador
señale, “E”, cargue el
reloj siguiendo lo antes
indicado.
La recepción de señales GPS requiere una cantidad considerable de energía. Recuerde recargar
regularmente el reloj exponiéndolo a la luz.

4140
4
Zona horaria
Zona horaria
En base a la Hora Universal Coordinada (UTC), los países y regiones alrededor del mundo
adoptan la hora estándar comúnmente usada. Cada país o región determina la hora estándar, y
la región donde se adopta la misma hora estándar se conoce como zona horaria. Actualmente, a
partir de marzo de 2015, existen 40 zonas horarias.
Horario de Verano (DST)
Dependiendo del área, el Horario de Verano (DST) se determina individualmente.
El Horario de Verano se refiere a un sistema para alargar la hora diaria al adelantar 1 hora
cuando el día es más largo en verano. El horario de verano se ha adoptado en unos 80 países,
principalmente en Europa y América del Norte. La adopción y duración del Horario de Verano
depende de cada país.
El Horario de Verano está sujeto a cambios debido a las circunstancias del país o región.
Hora Universal Coordinada (UTC)
La UTC es la hora universal estándar coordinada a través de un acuerdo internacional. Se utiliza
como la hora oficial para registrar la hora alrededor del mundo. La UTC es la hora que se obtiene
al agregar un segundo intercalar a la “Hora Atómica Internacional (TAI)” determinada en base
al reloj atómico alrededor del mundo y coordinada para compensar desviaciones de la hora
universal (UT), la cual se determina astronómicamente.
5
Indicación de zona horaria y lista de zonas
horarias alrededor del mundo
La siguiente lista muestra la relación entre las indicaciones del bisel y el aro de la esfera y la
diferencia horaria en relación a la UTC.
Por favor consulte las posiciones del segundero que se muestran líneas abajo para configurar la
zona horaria o comprobar la configuración de la zona horaria.
El DST (Horario de verano) se usa en zonas horarias con la marca .
En la zona horaria de la Isla Lord Howe en Australia con la marca
, la hora se adelanta 30
minutos durante la vigencia del horario de verano.
Este reloj corresponde al DST en la zona horaria de la Isla Lord Howe.
La zona horaria de cada región se basa en datos desde marzo de 2015.
Las indicaciones del código de ciudad y la diferencia horaria en relación a la
UTC están sujetas a cambios según el modelo.
“·” entre valores de la indicación de diferencia horaria muestra que existe
una zona horaria en dicho lugar.
Indicación de la zona horaria
Indicación de diferencia horaria
Nombres de ciudades representativas…28 ciudades entre el total de 40
zonas horarias alrededor del mundo
Diferencia horaria...+14 horas ~ –12 horas

4342
Código
de
ciudad
Indicación
de diferencia
horaria
Nombre de la ciudad
UTC ±
horas
LON UTC
Londres
0
PAR 1
París/Berlín
+1
CAI 2
Cairo
+2
JED 3 Jeddah +3
— •
Teherán
+3.5
DXB 4 Dubai +4
— • Kabul +4.5
KHI 5 Karachi +5
DEL • Delhi +5.5
— • Katmandú +5.75
DAC 6 Dhaka +6
— • Yangon +6.5
BKK 7 Bangkok +7
BJS 8 Beijing +8
— • Eucla +8.75
TYO 9 Tokio +9
ADL •
Adelaide
+9.5
SYD 10
Sídney
+10
— •
Isla Lord Howe
+10.5
NOU 11 Noumea +11
— • Isla de Norfolk +11.5
Código
de
ciudad
Indicación
de diferencia
horaria
Nombre de la ciudad
UTC ±
horas
WLG 12
Wellington
+12
— •
Islas Chatham
+12.75
TBU 13 Nuku’alofa +13
CXI 14 Kiritimati +14
— –12 Isla Baker –12
MDY –11 Islas Midway –11
HNL –10 Honolulu –10
— • Islas Marquesas –9.5
ANC –9
Anchorage
–9
LAX –8
Los Angeles
–8
DEN –7
Denver
–7
CHI –6
Chicago
–6
NYC –5
Nueva York
–5
— • Caracas –4.5
SDQ –4 Santo Domingo –4
— •
St. John’s
–3.5
RIO –3
Río de Janeiro
–3
FEN –2
Fernando de
Noronha
–2
PDL –1
Azores
–1
6
Ajuste de la zona horaria
Ajuste de la zona horaria
La zona horaria puede ajustarse a la hora local en cualquier parte del mundo con solo
una operación del botón.
El DST (Horario de verano) se puede configurar manualmente.
Cómo ajustar la zona horaria
1
Vaya a un lugar donde las
señales GPS se puedan
recibir con facilidad
2
Mantenga pulsado el Botón A (6 segundos), y suéltelo cuando el
segundero se mueva a la posición de 30 segundos
Salga al aire libre bajo
cielo abierto con buena
visibilidad.
Aunque el segundero se mueva a la
posición del segundo 0, 3
segundos después de pulsar el
Botón A, continúe pulsándolo.
Cuando el segundero alcanza
la posición del segundo 30,
inicia la recepción. El indicador
señala “4+.”
Mientras que el indicador señale
“E” o , la recepción no inicia.
Cuando el indicador señale “E”, cargue el reloj exponiéndolo a la luz.
Compruebe si el reloj puede/no puede recibir las señales GPS
Cuando el indicador señale ( ), restablezca el modo de vuelo ( ).
Pulse
durante 6
segundos

4544
3
Dirija la esfera del reloj hacia arriba y espere
4
Cuando el segundero señale “Y” o “N”, la
recepción ha finalizado
Tenga en cuenta que puede ser difícil recibir
las señales GPS cuando usted se encuentra en
movimiento.
Tarda como máximo 2 minutos
en finalizar la recepción.
Depende de las condiciones de
recepción.
< Indicación durante la recepción (= estado
de captación de satélites) >
El segundero indica facilidad recepción
(= número de satélites GPS a partir de los
cuales se reciben las señales GPS).
Cuanto más satélites se
captan, más fácil será
recibir las señales GPS.
Posición del segundero
en 25 segundos
Número de satélites 5
unidades
Incluso cuando la manecilla
señale 4 unidades o más, es
posible que no haya
recepción.
Para cancelar la recepción
pulse el Botón B.
El resultado de la recepción se muestra
durante 5 segundos.
Luego, el minutero y el segundero se
mueven, y se ajustan la hora y la fecha.(La
zona horaria también se ajusta a la zona
horaria local).
Indicación del
resultado de
recepción
Y: Exitosa N: Fallida
Indicación
Compruebe que la recepción es exitosa
cuando el reloj regresa al modo de
indicación horaria.
Durante el cambio de la fecha, no pueden
funcionar los botones ni la corona.
Configure manualmente el Horario de verano
(DST).
B
P
C
J
J
Y
Puede recibir
3 unidades
4 unidades
5 unidades
6 unidades
・
・
・
・
・
・
2 unidades
0 unidades
F
a
c
i
l
i
d
a
d
d
e
r
e
c
e
p
c
i
ó
n
N
o
s
e
p
u
e
d
e
r
e
c
i
b
i
r
Pulse el
Botón B
Precauciones en el ajuste de la zona horaria
Si la zona horaria se ajusta cerca de un límite de zona horaria, se puede indicar la hora de la
zona horaria adyacente.
En algunas áreas los límites observados por el reloj podrían no corresponder exactamente a
los marcadores reales de la zona horaria en la tierra.
Esto no significa un mal funcionamiento. En este caso, configure la zona horaria en el modo
de configuración manual de la zona horaria.
En el ajuste la zona horaria durante un viaje terrestre, evite hacerlo en un lugar cercano
a los límites de la zona horaria. Además, cuando el reloj se usa cerca de los límites de la
zona horaria, asegúrese de comprobar la configuración de la zona horaria, y configurar
manualmente la zona horaria si es necesario.

4746
7
Configuración manual de la zona horaria
Ajuste manual de la zona horaria
En lugares donde la zona horaria no se puede ajustar con las señales GPS, esta se puede ajustar
manualmente.
Cómo ajustar la zona horaria manualmente
1
Tire de la corona al
primer chasquido
2
Gire la corona y ajuste el segundero a la zona horaria del destino
El segundero se mueve
para mostrar la zona
horaria actualmente
configurada.
0 1 2
Retire al
primer
chasquido
Cuando se gira la corona,
el segundero se mueve a la
siguiente zona.
Gire la corona en
sentido del reloj
para avanzar 1
zona horaria.
Gire la corona en
sentido contrario
del reloj para
retroceder 1 zona
horaria.
< Visualización del indicador >
Indica la configuración ON/OFF
del Horario de verano (DST).
DST OFF ON
Indicación
Posición de la
manecilla
• DST
3
Pulse la corona hasta su
posición original
El segundero regresa al
modo de indicador horario.
El indicador vuelve a señalar
el estado de carga.
Durante el cambio de la fecha,
no pueden funcionar los
botones ni la corona.
0 1 2
Vuelva a
colocarla en
su lugar

4948
8
Configure el Horario de verano (DST)
Ponga en “ON” el horario de verano (DST)
El Horario de verano (DST) se puede configurar manualmente.
El Horario de verano (DST) no cambia automáticamente.
ON/OFF del DST no cambia automáticamente incluso con la operación de la configuración manual de
la zona horaria/ajuste de la zona horaria.
Cuando viaje de una región donde se adopta el Horario de verano (DST) a otra región donde no se
adopta, desactive la configuración del DST.
1
Tire de la corona al primer chasquido
El indicador se mueve para
señalar la configuración
actual del Horario de verano
(DST).
< Cuando la configuración
del Horario de verano está
en OFF >
0 1 2
Retire al
primer
chasquido
2
Mantenga pulsado el Botón A
3
Pulse la corona hasta su posición original
El indicador se mueve para señalar “DST
(ON)” y las manecilla del minutero y horaria
avanzan una hora.
0 1 2
Pulse
durante 3
segundos
En la zona horaria de la Isla Lord Howe en
Australia, la hora se adelanta 30 minutos durante
la vigencia del Horario de Verano.
El segundero vuelve al modo de indicación
horaria.
El indicador vuelve a mostrar el estado de
carga.
0 1 2
Vuelva a
colocarla en
su lugar
Ponga en OFF el Horario de verano (DST)
Realice las operaciones de ① a ③ en el estado donde la configuración del
Horario de verano está en ON.
En la operación ②, ajuste el indicador a la posición OFF tal como se
muestra en la imagen a la derecha. El minutero y la manecilla horaria
regresan una hora

5150
9
Cómo ajustar la zona manualmente
Ajuste horario manual
El reloj se puede configurar a la hora exacta de la zona horaria actualmente
establecida. (La zona horaria no se cambia).
Cómo ajustar la zona manualmente
1
Vaya a un lugar donde las señales GPS se puedan recibir con
facilidad
Salga al aire libre bajo cielo abierto con
buena visibilidad.
2
Mantenga pulsado el Botón A (3 segundos),
y suéltelo cuando el segundero se mueva a
la posición de 0 segundos
3
Dirija la esfera del reloj hacia arriba y espere
Cuando el segundero alcanza la posición
de 0 segundos, inicia la recepción. El
indicador señala “1”.
Pulse
durante 3
segundos
Cuando el indicador señala “E” o , la
recepción de las señales GPS no inicia.
Cuando el indicador señala “E”, cargue el reloj
exponiéndolo a la luz.
Cuando el indicador señala
, restablezca el
modo de vuelo ( ).
Tarda alrededor de un minuto
finalizar la recepción.
El tiempo de recepción depende de las
condiciones de recepción.
< Indicación durante la recepción (= estado de
captación de satélites) >
El segundero indica facilidad de recepción
(= número de satélites GPS a partir de los cuales
se reciben las señales GPS).
Para captar únicamente
información horaria, sólo se
requiere un satélite.
Número de
satélites de
captación
1 0
Indicación
Estado
Fácil de
recibir
No se
puede
recibir
Para cancelar la
recepción pulse
el Botón B.
Pulse el
Botón B

5352
4
Cuando el segundero señala “Y” o “N”, la recepción ha finalizado
El resultado de la recepción se muestra durante 5 segundos.
Luego, el minutero y el segundero se mueven, y se ajusta la
hora y la fecha.
Indicación del resultado
de recepción
Y: Exitosa N: Fallida
Indicación
Compruebe que la recepción es exitosa cuando el reloj vuelve
al modo de indicación horaria.
Cuando la hora no es correcta aunque se indique “Y”, la
zona horaria puede no corresponder a la región en la que se
encuentra. Compruebe la configuración de la zona horaria.
Durante el cambio de fecha, no están operativos los botones ni la
corona.
Configure manualmente el Horario de verano (DST).
10
Cuando está a bordo (modo de vuelo ( ))
Modo de vuelo ( )
Configure el modo de vuelo ( ) cuando la recepción pueda afectar la operación de otros
dispositivos electrónicos en un avión, etc.
En el modo vuelo (
), la recepción de la señal GPS (ajuste de zona horaria, ajuste horario
manual y ajuste horario automático) no se activa.
< Modo de vuelo (
) >
El indicador señala
.
Cuando se restablece el modo de
vuelo (
), el indicador señala el
estado de carga.

5554
Configure el modo de vuelo ( ).
1
Pulse y mantenga pulsado el Botón B (3 segundos)
El indicador indica el estado de carga.
Pulse
durante 3
segundos
El indicador apunta a .
Cuando se configura el modo de vuelo ( ),
el indicador no señala el estado de carga.
Retorno al modo normal ( ).
Realice la operación ①.
Cuando la manecilla indicadora esté apuntando “el estado de carga”
como se muestra en la figura derecha, puede desactivarse el modo
de vuelo (
).
La visualización cuando la
carga está “completa”.
11
Segundo intercalar (función de recepción
automática del segundo intercalar)
Segundo intercalar
El segundo intercalar compensa las desviaciones del horario universal (UT) el cual se determina
astronómicamente al igual que el “Tiempo Atómico Internacional (TAI).”
Se puede añadir (eliminar) “1 segundo” una vez por año o cada algunos años.
Función de recepción automática del segundo intercalar
Un segundo intercalar se añade automáticamente al recibir los “datos del segundo intercalar”
de las señales GPS en el momento de la adición del segundo intercalar.
“Los datos del segundo intercalar” incluyen información sobre la futura adición del segundo intercalar
y los datos actuales del segundo intercalar.

5756
Recepción de datos del segundo intercalar
El indicador se muestra tal como se indica a la derecha cuando la
recepción de las señales GPS se realiza alrededor del 1 de junio o 1
de diciembre.
Al finalizar la recepción de datos del segundo intercalar, el indicador
vuelve a señalar el estado de carga. Use el reloj tal como está.
La recepción de datos del segundo intercalar se realiza cada medio año
independientemente de la adición del segundo intercalar.
Tarda hasta 18 minutos en recibir los datos del segundo intercalar.
Recepción de datos del
segundo intercalar
Cuando las señales GPS se reciben en las siguientes condiciones, también se inicia la
recepción de datos del segundo intercalar.
• Las señales GPS se reciben después de restablecer el sistema
• Las señales GPS no se han recibido por largo tiempo
• La recepción de datos del segundo intercalar falló
(La recepción de datos del segundo intercalar se realiza de nuevo durante la siguiente
recepción de señales GPS. Se repite hasta que la recepción de datos del segundo intercalar
sea exitosa).
12
Indicación del resultado de recepción
Compruebe que la recepción de datos del segundo intercalar
se realizó con éxito
El resultado de la recepción regular (exitosa o fallida) de datos del segundo intercalar se muestra
durante 5 segundos.
1
Pulse el Botón A una vez y
luego suéltelo
2
Se visualiza el resultado de la recepción
El segundero y el
indicador indican el
resultado de la recepción.
Pulse y
luego
suelte
Cuando se mantiene
pulsado el Botón A, el reloj
comienza la operación de
ajuste horario manual.
El segundero indica el
resultado de la recepción de
señales GPS (ajuste horario o
ajuste de la zona horaria).
La manecilla indicadora señala
“1” o “4+“, es decir, muestra el
“ajuste horario” o el “ajuste de
la zona horaria”.
La manecilla indicadora señala
“4+.” Como resultado del ajuste
de la zona horaria.
Segundero: Resultado de
recepción (exitosa/fallida)
Resultado Exitosa Fallida
Indicación
Posición
Y Posición
de 8
segundos
N Posición
de 22
segundos
Después de 5 segundos
o al pulsar el Botón B, el
reloj regresa al modo de
indicación horaria.

5958
3
Pulse el Botón A una vez y luego suéltelo mientras se visualiza el resultado de la recepción (durante 5
segundos) en el paso 2
El segundero indica el resultado
de la recepción de datos del
segundo intercalar (exitosa/
fallida).
La manecilla indicadora muestra
“0” cuando se encuentra en
recepción de datos de segundo
bisiesto.
Pulse y
luego
suelte
Al mantener pulsado el Botón A,
el reloj comienza la operación de
ajuste horario manual.
Después de 5 segundos o al pulsar
el Botón B, el reloj regresa al modo
de indicación horaria.
Segundero: Resultado de recepción (exitosa/fallida)
Resultado Exitosa Fallida
Indicación
Posición
Y Posición de
8 segundos
N Posición de
22 segundos
Cuando el resultado de la recepción de datos del segundo
intercalar es Y (exitosa)
• La recepción de datos del segundo intercalar se realizó de
manera exitosa. Use el reloj tal como está.
Cuando el resultado de la recepción de datos del segundo
intercalar es N (fallida)
• La recepción de datos del segundo intercalar, realizada
periódicamente, no ha sido exitosa.
Se realizará automáticamente con la siguiente recepción de
señales de GPS (ajuste horario automático/ajuste horario
manual).
Use el reloj tal como está.
Los datos del segundo intercalar se reciben alrededor del 1
de diciembre y 1 de junio.
Incluso cuando la recepción de datos del segundo intercalar
no ha sido exitosa, la hora es correcta hasta que se añadan
(eliminen) los datos del segundo intercalar.
13
Cómo comprobar si la información de la zona
horaria fue configurada para su reloj
La tapa de la caja muestra el código
del calibre de su reloj.
8
X
2
2
-
0
A
A
0
-
2
8
X
2
2
-
0
A
A
0
-
2
Código del calibre en la caja
Es el código para identificar el tipo de reloj
La visualización puede variar según el modelo.
Al consultar el código del calibre mostrado
en la tapa de la caja, podrá determinar si se
configuraron los datos de la zona horaria.
Para mayores detalles, consulte la URL de más
abajo.
http://www.seikowatches.com/
gpstimezonedatainfo/
Si ha cambiado la zona horaria oficial en una
región, después de que se configuraran los datos
de la zona horaria del reloj, no se visualizará
la hora correcta, incluso después de recibir las
señales GPS. Por favor, realice las siguientes
operaciones para mostrar la hora correcta:

6160
< Para ajustar la hora de este reloj en una región donde la zona horaria oficial ha cambiado >
1. Seleccione la zona horaria apropiada para la hora actual en la región elegida, configurando
manualmente la zona horaria.
→ Para más información, consultar “7. Configuración manual de la zona horaria” P. 46.
2. A continuación, modifique la hora manualmente.
→ Para más información, consultar “9. Cómo ajustar la zona manualmente” P. 50.
3. Cuando se utiliza el reloj dentro de la misma zona horaria, se mostrará la hora correcta
después del ajuste horario manual o automático (GPS).
4. Si se traslada a una región donde la zona horaria oficial ha cambiado a una zona horaria
diferente, y regresa luego a la región para la que cambió la zona horaria, lleve a cabo las
mismas operaciones de 1 a 3 como se indica más arriba para visualizar la hora correcta en la
región para la que cambió la zona horaria oficial.
ESPECIFICACIONES
1. Función básica ...
Esfera principal; tres manecillas (hora/minuto/segundo), fecha, indicador, función de hora
mundial (40 Zonas Horarias)
2. Frecuencia del oscilador de cristal ... 32,768 Hz (Hz = Hertz ... Ciclos por segundo)
3. Precisión (ratio mensual) ...
Precisión de ±15 segundos en un ratio mensual (Cuando el reloj se usa sin la configuración
horaria automática de recepción de señales GPS y cuando se lleva puesto en la muñeca
dentro de un rango de temperatura normal entre 5°C y 35°C).
4. Rango de temperatura operativa ... Entre -10°C y +60°C
5. Sistema de impulso ...
Motor de pasos (manecillas de hora/minutero/segundero de la esfera principal), fecha,
indicador.
6. Fuente de alimentación ... Batería secundaria, 1 pieza
7. Duración de la operación ...
Aproximadamente 6 meses (Cargado completamente y sin activar el ahorro de energía).
Si el ahorro de energía se activa después de estar completamente cargado, el reloj continúa
funcionando por aproximadamente 2 años como máximo.
8. Función de recepción de señales GPS. ...
Ajuste de zona horaria, ajuste horario manual, ajuste horario automático
9. CI (Circuito Integrado) ...
Oscilador, divisor de frecuencia y circuito de impulso C-MOSIC, 4 piezas
Las especificaciones están sujetas a cambio sin previo aviso para la mejora del producto.
-
 1
1
-
 2
2
-
 3
3
-
 4
4
-
 5
5
-
 6
6
-
 7
7
-
 8
8
-
 9
9
-
 10
10
-
 11
11
-
 12
12
-
 13
13
-
 14
14
-
 15
15
-
 16
16
-
 17
17
-
 18
18
-
 19
19
-
 20
20
-
 21
21
-
 22
22
-
 23
23
-
 24
24
-
 25
25
-
 26
26
-
 27
27
-
 28
28
-
 29
29
-
 30
30
-
 31
31
-
 32
32
-
 33
33


Seiko 8X22 Instrucciones de operación
- Categoría
- Relojes
- Tipo
- Instrucciones de operación
En otros idiomas
- English: Seiko 8X22 Operating instructions
Documentos relacionados
Otros documentos
-
Timex Intelligent Quartz Manual de usuario
-
Timex Intelligent Quartz FlyBack Chrono-Compass Manual de usuario
-
-
-
JVC KW-NT530HD El manual del propietario
-
ORIENT FDW03001B0 Manual de usuario
-
JVC GPS Receiver LVT2141-001B Manual de usuario
-
ORIENT EM75002D Manual de usuario
-
 King Technology FROG Leap Anti-Bac Mineral Pac Instrucciones de operación
