Sharp DR-S460 El manual del propietario
- Categoría
- Radios
- Tipo
- El manual del propietario
Este manual también es adecuado para

DR-S460
User manual
Stereo Digital Radio
Product images are for illustration purposes only. Actual product may vary. | Das Bild auf der Verpackung kann vom Inhalt abweichend sein. | Las imágenes del
producto son para fi nes ilustrativos solamente. | Le immagini dei prodotti sono solo ai fi ni illustrativi. | Les images du produit sont présentées à titre d’illustration
uniquement. | Zdjęcie produktu jest tylko w celach ilustracyjnych. Produkt może się różnić.
EN ESDE IT FR PL


EN
Important safety instructions
Please, read these safety instructions and respect
the following warnings before the appliance is
operated:
The exclamation point within an equilateral triangle is
intended to alert the user to the presence of important
operating and maintenance (servicing) instructions in the
literature accompanying the appliance.
Use only power supply listed in the user manual.
This symbol means that the product should be disposed of
in an environmentally friendly manner and not with general
household waste.
AC voltage
DC voltage
Class II equipment
For indoor use only
Energy e ciency marking with level VI
Polarity of d.c. power connector
In order to prevent re always
keep candles and other open
ames away from this product.
Warning:
• Always follow basic safety precautions when using this applience,
especially when children are present.
• Children should be supervised to ensure that they do not play with the
appliance.
• Do not damage the power cord, place heavy objects on it, stretch or
bend it. Do not attach extension cables. Damage to the power cord may
cause re or electric shock.
• If the supply cord is damaged, it must be replaced by the manufacturer,
a service agent or similarly qualied persons in order to avoid a hazard.
• Ensure that the unit is plugged into an AC 100-240V 50/60Hz power
outlet. Using higher voltage may cause the unit to malfunction or catch
re.
• If the power plug does not t into the socket, do not force it.
• Turn o the unit before unplugging it from power source to completely
switch it o .
• Do not disconnect or connect the power cord with wet hands. This may
cause an electric shock.
• If the unit is not going to be used for a long period time, disconnect the
power supply.
• Ensure that the mains plug is always easily accessible.
• This product does not contain any parts that are serviceable by the
user. In case of a fault, contact the manufacturer or authorised service
department. Exposing the internal parts inside the device may endanger
your life. The manufacturers guarantee does not extend to faults caused
by repairs carried out by unauthorised third parties.
• Do not use this product immediately after unpacking. Wait until it warms
up to room temperature before using it.
• Ensure this product is used in moderate climates only (not in tropical/
subtropical climates).
• Place product on a at, stable surface that is not subject to vibrations.
• Ensure the product and its parts is not overhanging the edge of the
supporting furniture.
• To reduce the risk of fire, electric shock or damage to this product, do
not expose it to direct sunlight, dust, rain and moisture. Never expose it
to dripping or splashing and do not place objects filled with liquids on
or near the product.
• Do not place objects lled with liquids, such as vases, on the apparatus.
• Do not install near any heat sources such as radiators, heat registers,
stoves, or other apparatus (including ampli ers) that produce heat.
• Do not place the product where the humidity is high and ventilation is
poor.
• Ensure a minimum distance of 5 cm around the apparatus for su cient
ventilation. Do not block any ventilation openings of this product.
Always ensure that the ventilation openings are not covered with items
such as newspapers, table-cloths, curtains, etc.
• NEVER let anyone, especially children, push anything into holes, slots
or any other openings in the unit’s casing as this could result in a fatal
electric shock.
• Storms are dangerous for all electric appliances. If the mains or aerial
wiring is struck by lightning, the appliance might get damaged, even if it
is turned o . You should disconnect all the cables and connectors of the
appliance before a storm.
Maintenance
• Unplug the power cable from the power source before cleaning the
appliance.
• Use a soft and clean rag to clean the outside of the unit. Never clean it
with chemicals or detergent.
Power Adapter
• To disconnect the unit from the mains supply, unplug the lead from the
mains socket.
• Only use the supplied mains adaptor as failure to do this may result in a
safety risk and/or damage to the unit.

2
Disposal of this equipment
• Do not dispose of this product as unsorted municipal
waste. Return it to a designated collection point for the
recycling of WEEE in accordance with local law. By doing
so, you will help to conserve resources and protect the
environment.
• The shown above appears on electrical and electronical equipment (or
the packaging) to remind users of this.
• Users are requested to use existing return facilities for used equipment
and batteries.
CE Statement:
• Hereby, UMC Poland sp. z o.o. declares that this audio device is
in compliance with the essential requirements and other relevant
provisions of RED Directive 2014/53/EU. The full text of the EU
declaration of conformity is available by following the link http://www.
sharpconsumer.eu/documents-of-con rmity
Trademarks:
The Bluetooth® word mark and logos are registered trademarks owned by
Bluetooth SIG,. Inc.
The terms HDMI and HDMI High-De nition Multimedia Interface, and the
HDMI Logo are trademarks or registered trademarks of HDMI Licensing,
LLC in the United States and other countries.
Manufactured under license from Dolby Laboratories. Dolby, Dolby
Audio and the double-D symbol are trademarks of Dolby Laboratories.

EN
What is included in the box:
• 1 x Main unit
• 1 x User Manual
• 1 x Quick start guide
• 1 x Power adaptor
• 1x UK AC plug for power adapter
• 1x EU AC plug for power adapter
Panels & Controls
Front Panel
3
1
4
6
9
2
7
8
5
1. MODE – Press to change the modes: DAB/DAB+, FM, Bluetooth, AUX
IN.
2. STANDBY – Press this button to turn on the unit or enter standby
mode.
3. INFO/MENU – Press to view the station information, or enter main
menu setting screen.
4. ENTER – Press to con rm your selections.
5. PREVIOUS ◄ – Press to go back to the previous selections, or to
decrease the frequency, or seek the previous strongest station.
6. NEXT ► – Press to go forward to the next selection, or to increase the
frequency, or seek the next strongest station.
7. SCAN – Use to scan the radio stations, or to adjust the backlight level.
8. PRESET – Press to recall the preset stations.
9. DISPLAY SCREEN – To show the information.
Rear Panel
12
10
13
11
10. Volume Knob – Rotate the volume knob to adjust the volume level.
11. FM Antenna – To receive the FM signal.
12. DC Power input – DC 12V
13. AUX IN jack – Connect the 3.5mm audio cable to this jack to enjoy the
external audio music.
General Operating Instructions
Mains Adaptor (supplied with the package)
Connect the mains adaptor to the DC power socket on the rear panel of
the radio.
Get the Best Reception
Extend the telescopic aerial as far as it can go.
Turn On the Radio
Press the STANDBY button to turn on the radio.
Switch to Standby Mode
When in use, long press the STANDBY button to enter Standby mode.
Press it again to wake up the radio. The radio will turn into standby mode
automatically if no any operations after 15 minutes.
Adjust the Volume
Rotate the Volume Knob to adjust the volume to a comfortable level.
Listening to the radio at a high volume levels may damage your hearing.
Avoid listening at high volume levels for long periods of time.
The rst time the radio is used
The rst time you turn the radio on it will automatically scan for stations.
During scanning, the screen will display a slide bar that indicates the
progress of the scan and the amount of radio stations that have been
found so far. Once the scan has nished, the radio will play the rst station
it nds.
Snooze function
When the alarm is sounding in Standby mode, rotate the Volume Knob to
activate the SNOOZE function.
The alarm will sound again after 5 minutes.
Sleep Time
To set the sleep time, repeatedly press the SLEEP button to select from: o ,
15, 30, 45, 60, 90 minutes.
When the set time has passed, the unit will enter sleep mode.
Select Modes
When in use, press the MODE button repeatedly to switch to your desired
mode: DAB/DAB+, FM, Bluetooth AUX IN.
Station Information
Press the INFO/MENU button to check the station information.
Time Auto Update
The time and date can be updated automatically if the system detects the
RDS signal. If the RDS signal is weak or cannot be detected, the time will
not automatically update.
Main Menu Setting
Long press the INFO/MENU button to enter the main menu setup screen.
Find and enter the <System> screen by pressing the ENTER button.
Then use the ◄/► button to cycle through the menu options: <Time
setup>, <Alarms>, <Sleep>, <Language>, <Prune>, <Station Order>,
<Backlight>, <Factory reset>, <SW version>.
NOTE: The <Prune> and < Station Order> are only available in DAB mode.
Select one of the options and then press the ENTER button to access that
menu.
Time setup
1. Set clock: 00:00(Hour:Minutes), use the ◄/► and ENTER buttons to
set.
2. Set date: 01-01-2018(Day-Month-Year), same as the “set clock” setting.
3. Auto update: <No update> or <From radio>, press ENTER button to
con rm.
4. Set 12/24 hour: choose your favorite format.

4
After you nish the steps above, the time is set up manually.
Alarms
When the <Alarms> appears,
1. Press ENTER button to enter the alarm setting screen.
2. Choose <Alarm 1: o > or <Alarm 2: o >, press the ENTER button to
set the alarm On.
3. Using the ◄/► button to select the alarm time, press ENTER to
con rm.
4. Select the alarm days: Daily, Once, Weekdays, Weekends.
5. Set the alarm mode: DAB, FM, Buzzer.
6. Set the alarm volume: there is a slide bar adjusting the alarm volume,
press ◄/► button to increase or decrease the volume level, press
ENTER button to con rm.
7. After all the above settings, enter the Save screen, press ENTER button
to save the alarm.
8. To cancel the alarms, enter the alarm setting screen, press ENTER
button to select O and then enter save screen to save the alarm o
setting.
Sleep (Set sleep time)-brie y press SLEEP button
Enter the Sleep time setting screen to select the sleep time:
o /15/30/45/60/90 minutes.
Language (Set the system language)
Enter Language setting screen, use the ◄/► and ENTER buttons to set
the system language.
Backlight
Enter Backlight setting screen, using the ◄/► button to select your
desired display backlight level: 3, 2, 1, o . Then press the ENTER button to
con rm your selection.
Factory reset
To set the radio to the original settings, enter the Factory reset screen,
follow the tips <Factory reset?>, choose <YES> to reset, and the radio will
be restarted.
NOTE: You also can press SCAN button to adjust the backlight level.
SW version
To check the software version of the system.
Prune the stations (only available in DAB/DAB+
mode)
To remove stations that listed but are unavailable.
Enter the Prune screen, use the ◄/► button to select <Yes> or <No>, then
press the ENTER button to con rm your selection. The unavailable stations
now be deleted if you chose <Yes>.
Station order (only available in DAB/DAB+ mode)
Enter the Station order screen, use the ◄/► button to select one of the
station orders, then press the ENTER button to con rm.
DAB/DAB+ Operations
After turn on the radio, press the MODE button repeatedly to select and
enter DAB/DAB+ mode.
Scan Stations
When turning on to DAB/DAB+ mode, the radio will automatically scan the
stations it found in this area.
Press the ◄/► button to select the previous or next stations, then press
the ENTER button to activate to play the station.
Station Tuning
Long press the INFO/MENU button, when the <Station scan> appears,
press the ENTER button, then use the ◄/► button to cycle through the
scanning options: <Full scan>, <Manual tune>.
1. Select the <Full scan>, and then press ENTER button to enable full
scanning.
2. Select the <Manual tune> and press ENTER button, use ◄/► button
to select stations from 5A:174.928MHz to 13F:239.200MHz. Then
press ENTER button to activate the selected station.
Store Stations
It is possible to store up to 10 of your favourite DAB stations. This will
enable you to access your favourite stations quickly & easily.
1. To store a preset, you must rst be listening to the station you would
like to save.
2. Press the PRESET button.
3. Use the ◄/► button to select desired preset number 1-10.
4. Press and hold the ENTER button to con rm.
Recall A Stored Station
Once you have saved the stations to the preset stations. You can recall by
pressing the PRESET button.
Press the ◄/► button to select the stored stations, and press ENTER
button to con rm.
Display Mode
Every time you press the INFO/MENU button, the display will cycle
through the following display modes:
The information is displayed on the lower segment of the LCD display.
Dynamic Label Segment (DLS)
Displays scrolling text information supplied by the broadcaster.
PTY (Programme Type)
Shows the type and description of the programme provided by the DAB/
DAB+ station.
Bit Rate
The data rate which the signal is being transmitted.
Frequency
Displays the station's transmission channel number and frequency.
Time and Date
Displays the time and date information provided by the broadcaster.
NOTES: DAB-unlike normal radio, groups together several
radio stations and transmits them on one frequency.
FM Operations
Switch to FM mode by pressing the MODE button.
Select Stations
To search for an FM station from 87.5 to 108.00MHz.
1. Press the ◄ or ► button to skip to go back or go forward the
frequency by the step of 0.05MHz.
2. Long press the ◄ or ► button to skip to the previous or next station
of the strongest reception. Once a station has been found, it stops
scanning automatically. If no station is found, it will stop after it has
cycled through the entire frequency.

EN
Tuning Stations
1. Long press the SCAN button to scan the stations. During scanning, the
screen will display a slide bar that indicate the progress of the scan and
the amount of radio stations that have been found so far. Once the scan
has nished, the radio will play the rst station it found.
2. Long press the INFO/MENU button to enter <Audio setting> screen,
use the ◄/► button and press ENTER button to choose: <Forced
mono> or <Stereo allowed>.
Store Stations
It is possible to store up to 10 of your favourite FM stations. This will enable
you to access your favourite FM stations quickly & easily.
1. To store a preset, you must rst be listening to the station you would
like to save.
2. Press the PRESET button.
3. Use the ◄/► button to select desired preset number 1-10.
4. Press and hold the ENTER button to con rm.
Recall a Stored Station
Once you have saved the stations to the preset stations. You can recall by
pressing the PRESET button.
Press the ◄/► button to select the stored stations, and press ENTER
button to con rm.
Display mode
Press the INFO/MENU button to cycle through the FM information
provided by the stations:
Blutooth Operations
Press the MODE button repeatedly to select and enter Bluetooth mode.
1. Once in Bluetooth mode, “Connecting” appears and keeps ashing as
the unit tries to connect to previously paired devices. If no devices are
found “Connecting” continues to ash to indicate it is ready for pairing
to a new device.
2. Activate your Bluetooth device and search for a device labelled “SHARP
DR-S460” in the list.
3. Select and enable pairing for the “SHARP DR-S460” device. If
prompted for a password, enter “0000”.
4. If pairing is successful, the unit will sound, and the ashing
“Connecting” will change to "Connected".
5. If connected device goes out of range, the radio will attempt to
reconnect for 2 minutes. When the device comes into range, the radio
will reconnect again automatically.
6. You should now be able to stream audio wirelessly from your Bluetooth
device.
7. To disconnect, press the MODE button on the radio to switch to
another mode. Or turn o the bluetooth function in your device.
NOTES:
• The operation range of Bluetooth is approximately 7metres. Obstacles in-
between devices may reduce this range.
• Only one Bluetooth device can be paired at a time.
• Not all Bluetooth devices are compatible.
Troubleshooting
This product does not contain any parts that are serviceable by the
user. In case of a fault, contact the manufacturer or authorised service
department. Exposing the internal parts inside the device may endanger
your life. The manufacturers guarantee does not extend to faults caused
by repairs carried out by unauthorised third parties.
No Sound
Cause
• Volume not turned up.
Solution
• Adjust the main volume knob.
Static Sound
Cause
• Signal reception too low.
Solution
• Adjust the antenna or move the unit to a stronger signal location.
Sound is distorted
Cause
• Volume is too high
Solution
• Reduce the volume
Desired station not found
Cause
• Weak signal
Solution
• Use the Manual Tune function.
NO DAB functions
Cause
• No DAB coverage in your area.
• Poor reception
Solution
• Adjust the position of the aerial.
The display is blank.
Cause
• This may occur if the broadcaster changes the label of a service or
removes a label while tuned.
Solution
• The radio will try to retune.
• Perform a scan.
NO Power
Cause
• The adaptor is not connected to the wall outlet.
Solution
• Make sure the adaptor is plugged.

6
Technical speci cation
Model DR-S460
Output Power 2x7W (RMS)
Power Consumption (max.) 26W
Power Consumption Standby <1W
FM Frequency 87.5-108MHz
DAB+ Frequency 174.928-239.200MHz
Bluetooth
Version V 4.2
Frequency bands 2402 MHz ~ 2480 MHz
Maximum power transmitted 4dBm
Power Adapter
Model name: FJ-SW1202000N
Input: AC 100-240V ~ 50/60Hz, 0.6A Max
Output:
DC 12V
⎓2000mA
Manufacturer:
SHENZHEN FU JIA APPLIANCE CO., LTD
B1,Xujing chang Industrial Park, Haoye Road, Fuyong 518103 Shenzhen, China
354 mm
145 mm
185 mm
2,95kg
KG

DE
Wichtige Sicherheitsanweisungen
Bitte lesen Sie sich diese Sicherheitsanweisungen
durch und beachten Sie, bevor Sie das Gerät in
Betrieb nehmen, auf die folgenden Warnhinweise:
Das Dreieckszeichen mit Ausrufungszeichen verweist auf
wichtige Funktions - und Wartungshinweise (Reparatur) in der
dem Gerät beigelegten Bedienungsanleitung.
Benutzen Sie nur die Energieversorgung, die in der
Bedienungsanleitung angegeben ist.
Dieses Symbol bedeutet, dass das Produkt auf
umweltfreundliche Weise und nicht mit dem gewöhnlichen
Haushaltsmüll entsorgt werden sollte.
Wechselspannung
Gleichspannung
Gerät der KlasseII
Nur für den Innenbereich
Energiee zienzkennzeichnung mit Stufe VI
Polarität des Gleichstromsteckers
Halten Sie Kerzen und o enes
Feuer von diesem Produkt fern,
um einen Brand zu vermeiden.
Warnung:
• Halten Sie sich während der Nutzung dieses Geräts immer an die
allgemeinen Sicherheitshinweise, insbesondere, wenn Kinder in der
Nähe sind.
• Kinder sollten beaufsichtigt werden, um sicherzustellen, dass sie nicht
mit dem Gerät spielen.
• Das Stromkabel darf weder beschädigt, noch dürfen schwere Objekte
darauf abgelegt werden, außerdem dürfen Sie es nicht dehnen oder
verbiegen. Schließen Sie keine Verlängerungskabel an. Schäden am
Stromkabel können zu einem Feuer oder Stromschlag führen.
• Das Stromkabel darf weder beschädigt, noch dürfen schwere Objekte
darauf abgelegt werden, außerdem dürfen Sie es nicht dehnen oder
verbiegen. Schließen Sie auch keine Verlängerungskabel an. Schäden am
Stromkabel können zu einem Feuer oder Stromschlag führen.
• Wenn das Stromversorgungskabel beschädigt ist, muss es vom Her-
steller, einem Servicetechniker oder einer ähnlich quali zierten Person
ausgetauscht werden, um Gefährdungen zu vermeiden.
• Stellen Sie sicher, dass die Einheit an eine AC 110-240V 50/60Hz Steck-
dose angeschlossen wird. Eine höhere Spannung kann zu Fehlfunktio-
nen oder sogar zu einem Brand führen.
• Wenn der Netzstecker nicht in die Steckdose passt, dürfen Sie ihn nicht
mit Gewalt einstecken.
• Wenn der Stecker nicht in die Steckdose passt, dürfen Sie keine Gewalt
anwenden, um einen nicht passenden Stecker in die Steckdose zu
drücken.
• Schalten Sie die Einheit aus, bevor Sie sie von der Stromversorgung
trennen, um sie so vollständig abzuschalten.
• Wenn das Gerät längere Zeit nicht benutzt wird, trennen Sie es von der
Stromversorgung.
• Vermeiden Sie es, das Stromkabel mit nassen Händen anzuschließen
oder zu trennen. Dies könnte andernfalls zu einem Stromschlag führen.
• Trennen Sie das Stromkabel, wenn es längere Zeit nicht verwendet wird.
• Stellen Sie sicher, dass der Hauptstecker immer leicht zugänglich ist.
• Dieses Produkt enthält keine Teile, die vom Benutzer gewartet werden
können. Setzen Sie sich im Fall eines Defekts mit dem Hersteller oder
der autorisierten Kundenabteilung in Verbindung. Teile aus dem Inneren
des Geräts freizulegen kann lebensgefährlich sein. Die Garantie der
Hersteller gilt nicht für Defekte, die durch von nicht autorisierte Dritten
durchgeführte Reparaturen entstehen.
• Benutzen Sie dieses Produkt nicht direkt nach dem Auspacken. Warten
Sie, bis es sich auf Zimmertemperatur erwärmt hat, ehe sie es einschal-
ten.
• Stellen Sie sicher, dass dieses Produkt ausschließlich in Umgebungen
mit mildem Klima verwendet wird (kein tropisches oder subtropisches
Klima).
• Stellen Sie das Produkt auf eine ache, stabile Ober äche, die keinen
Erschütterungen ausgesetzt ist.
• Das Produkt und dessen Teile dürfen nicht über die Kante delelte tragen-
den Möbelstücks hinausragen.
• Um das Risiko eines Feuers, Stromschlags oder Schäden an diesem
Produkt zu reduzieren, sollten Sie es nicht direktem Sonnenlicht, Staub,
Regen oder Feuchtigkeit aussetzen. Setzen Sie es niemals tropfendem
oder spritzendem Wasser aus und positionieren Sie keine mit Flüssigkei-
ten gefüllten Objekte auf oder neben dem Produkt.
• Setzen Sie keine mit Flüssigkeit gefüllten Objekte wie Vasen auf das
Gerät.
• Installieren Sie das Produkt nicht in der Nähe von Heizquellen, wie etwa
Heizungen, Heizregister, Öfen oder anderen Apparaten (einschließlich
Verstärker), die Hitze produzieren.
• Platzieren Sie das Gerät nicht an Orten mit hoher Feuchtigkeit und
mangelhafter Belüftung.
• Sorgen Sie für einen Mindestabstand von 5 cm rund um das Gerät,
um eine ausreichende Belüftung sicherzustellen. Vermeiden Sie es,
Belüftungsö nungen an diesem Produkt zu blockieren. Sorgen Sie
immer dafür, dass die Belüftungsö nungen nicht durch Gegenstände, z.
B. Zeitungen, Tischdecken, Gardinen usw. verdeckt sind.
• Lassen Sie NIEMALS jemanden, ganz besonders nicht Kinder, etwas in
die Löcher, Spalten oder anderen Ö nungen des Gerätegehäuses stop-
fen, da dies zu einem folgenschweren Stromschlag führen kann.
• Gewitter sind für alle elektrischen Geräte gefährlich. Wenn das Strom-
oder Antennenkabel vom Blitz getro en wird, kann das Gerät, auch
wenn es ausgeschaltet ist, beschädigt werden. Bei einem herannahen-
den Gewitter sollten Sie alle Kabel und Stecker des Gerätes ausstecken.
• Ein exzessiver Schalldruck von Kopfhörern kann zu einem Hörverlust
führen.
Wartung
• Trennen Sie vor dem Reinigen des Geräts das Stromkabel von der
Stromquelle.
• Verwenden Sie einen weichen und sauberen Lappen, um die Außen-
ächen der Einheit zu reinigen. Verwenden Sie beim Reinigen niemals
Chemikalien oder Reinigungsmittel.
Netzadapter
• Um die Einheit von der Stromversorgung zu trennen, trennen Sie das
Netzkabel von der Steckdose.
• Benutzen Sie nur den mitgelieferten Netzadapter, andernfalls kann es zu
einem Sicherheitsrisiko/einer Beschädigung des Gerätes kommen.

8
Entsorgung dieses Geräts
• Entsorgen Sie dieses Gerät niemals über den normalen
Hausmüll. Geben Sie es entsprechend den gesetzlichen
Regelungen vor Ort bei dem für das Recycling von WEEE
vorgesehenen Sammelpunkt ab. Damit helfen Sie, Res-
sourcen einzusparen und die Umwelt zu schützen.
•
Die oben aufgeführten Hinweise sind auf elektrischen und
elektronischen Geräten und Batterien (oder der Verpackung) zu nden,
um Nutzer entsprechend zu erinnern. Nutzer werden darum gebeten, für
gebrauchte Geräte und Batterien bestehende Rückgabeeinrichtungen
zu nutzen.
CE-Konformitätserklärung:
• Die Universal Media Corporation s.r.o erklärt hiermit, dass dieses Audi-
ogerät die wesentlichen Anforderungen und weitere entsprechende
Vorschriften der RED-Verordnung 2014/53/EU einhält. Der vollständige
Text der EU-Konformitätserklärung ist unter folgender Internetadresse
erhältlich: http://www.sharpconsumer.eu/documents-of-con rmity
Markenzeichen:
Die Bluetooth® Wortmarke und Logos sind geschützte Marken der
Bluetooth SIG Inc.
Die Begri e HDMI und HDMI High-De nition Multimedia Interface sowie
das HDMI Logo sind Warenzeichen oder in den Vereinigten Staaten und
weiteren Ländern eingetragene Warenzeichen der HDMI Licensing, LLC.
In Lizenz von Dolby Laboratories gefertigt. Dolby, Dolby Audio und das
Doppel-D-Symbol sind Warenzeichen von Dolby Laboratories.

DE
Was be ndet sich im Karton:
• 1 x Hauptgerät • 1 x Benutzerhandbuch
• 1 x Schnellstart-Handbuch • 1 x Netzadapter
• 1x Wechselstromstecker für Netz-
adapter (Vereinigtes Königreich)
• 1x Wechselstromstecker für Netz-
adapter (Europäische Union)
Panels und Bedienelemente
Vorderseite
3
1
4
6
9
2
7
8
5
1. MODE – Drücken Sie, um die Modi zu ändern: DAB / DAB +, FM,
Bluetooth, AUX IN.
2. STANDBY – Drücken Sie diese Taste, um das Gerät einzuschalten oder
in den Standby-Modus zu wechseln.
3. INFO/MENU – Drücken Sie, um die Senderinformationen anzuzeigen,
oder rufen Sie das Hauptmenü auf.
4. ENTER – Drücken Sie, um Ihre Auswahl zu bestätigen.
5. PREVIOUS ◄ – Drücken Sie, um zur vorherigen Auswahl zurückzu-
kehren oder die Frequenz zu verringern oder suchen Sie nach dem
vorherigen stärksten Sender.
6. NEXT ► – Drücken Sie, um zur nächsten Auswahl zu gelangen, oder
um die Frequenz zu erhöhen, oder suchen Sie den nächsten Sender.
7. SCAN – Verwenden Sie diese Option, um die Radiosender zu scannen
oder die Hintergrundbeleuchtung einzustellen.
8. PRESET – Drücken Sie, um die gespeicherten Sender abzurufen.
9. DISPLAY SCREEN – Um die Informationen anzuzeigen.
Rückseite
12
10
13
11
10. Volume – Drehen Sie den Lautstärkeregler, um die Lautstärke
einzustellen.
11. FM Antenna – Um das FM-Signal zu empfangen.
12. DC Power input – Gleichstrom 12V
13. AUX IN jack – Schließen Sie das 3,5-mm-Audiokabel an diese Buchse
an, um die externe Audiomusik zu genießen.
Allgemeine Betriebsanleitung
Netzadapter (beiliegend)
Schließen Sie den Netzadapter an die Gleichstrom-
Stromversorgungsbuchse (DC) auf der Rückseite des Radios an.
Den besten Empfang erhalten
Teleskopantenne maximal ausfahren.
Das Radio einschalten
Drücken Sie zum Einschalten des Radios die Taste STANDBY (STAND-BY).
In den Stand-by-Modus schalten
Wenn das Radio läuft, drücken Sie lange die Taste STANDBY (STAND-
BY), um den Stand-by-Modus zu aktivieren. Erneut drücken, um das
Radio aufzuwecken. Das Radio schaltet ohne Betrieb automatisch nach
15Minuten in den Stand-by-Modus.
Lautstärkeregelung
Drehen Sie den Lautstärkeregler, um die Lautstärke auf ein angenehmes
Niveau einzustellen. Wenn Sie bei hoher Lautstärke Radio hören, kann Ihr
Gehör geschädigt werden. Vermeiden Sie es, über einen längeren Zeitraum
bei hoher Lautstärke Radio zu hören.
Die erste Benutzung des Radios
Wenn Sie das Radio zum ersten Mal einschalten, startet es automatisch
den Sendersuchlauf. Während des Suchlaufs wird auf dem Bildschirm ein
Schiebebalken angezeigt, der den Fortschritt des Suchlaufs und die Anzahl
der bisher gefundenen Sender anzeigt. Sobald der Suchlauf abgeschlossen
ist, spielt das Radio den zuerst gefundenen Sender ab.
Snooze-Funktion (Schlummer)
Wenn der Alarm im Stand-by-Modus ertönt, drehen Sie am
Lautstärkeregler, um die Funktion SNOOZE (SCHLUMMER) zu aktivieren.
Der Alarm ertönt nach 5Minuten erneut.
Schlafzeit
Um die Schlafzeit einzustellen, drücken Sie wiederholt die Taste SLEEP
(SCHLAF), um eine der folgenden Optionen auszuwählen: aus, 15, 30, 45,
60, 90Minuten.
Wenn die Zeit vorbei ist, wird der Schlafmodus des Geräts aktiviert.
Modi wählen
Wenn das Radio läuft, drücken Sie wiederholt die Taste MODE/STANDBY
(MODUS/STAND-BY), um zu ihrem gewünschten Modus umzuschalten:
DAB/DAB+, FM, Bluetooth, AUX IN.
Senderinformationen
Drücken Sie die Taste INFO/MENU (INFO/MENÜ), um die
Senderinformationen aufzurufen.
Automatische Aktualisierung der Zeit
Die Uhrzeit und das Datum können automatisch aktualisiert werden, wenn
das System das RDS-Signal erkennt. Wenn das RDS-Signal schwach ist oder
nicht erkannt werden kann, wird die Zeit nicht automatisch aktualisiert.
Hauptmenü-Einstellung
Drücken Sie lange die Taste INFO/MENU (INFO/MENÜ), um den
Einstellungsbildschirm des Hauptmenüs aufzurufen. Suchen Sie den
Bildschirm <System> und rufen Sie ihn auf, indem Sie die Taste SCAN (SCAN)
drücken. Benutzen Sie dann die Taste ◄/►, um durch die Menüoptionen
zu blättern: <Time setup> (Zeiteinstellung), <Alarms> (Alarme), <Sleep>
(Schlaf), <Language> (Sprache), <Prune> (Bereinigen), <Station Order>
(Senderreihenfolge), <Backlight> (Hintergrundbeleuchtung), <Factory
reset> (Werkseinstellung), <SW version> (Software-Version).
HINWEIS: Die Optionen <Prune> (Bereinigen) und < Station Order>
(Senderreihenfolge) sind nur im DAB-Modus verfügbar.
Wählen Sie eine der Optionen und drücken Sie anschließend die Taste
ENTER (EINGABE), um dieses Menü aufzurufen.

10
Zeiteinstellung
1. Einstellen der Uhr: 00:00 (Stunden:Minuten), benutzen Sie zur
Einstellung die Tasten ◄/► und ENTER (EINGABE).
2. Datum einstellen: 01-01-2018 (Tag-Monat-Jahr), ebenso wie die
Einstellung unter „Einstellen der Uhr“.
3. Automatisches Update: <No update> (Kein Update) oder <From
radio> (Von Radio); drücken Sie zur Bestätigung die Taste ENTER
(EINGABE).
4. 12/24Stunden einstellen: Wählen Sie Ihr bevorzugtes Format aus.
Nachdem Sie die oberen Schritte durchgeführt haben, wurde die Zeit
manuell eingestellt.
Alarme
Wenn <Alarms> (Alarme) erscheint,
1. drücken Sie die Taste ENTER (EINGABE), um den Alarm-
Einstellungsbildschirm aufzurufen.
2. Wählen Sie <Alarm1: o > (Alarm1: aus) oder <Alarm2: o >
(Alarm2: aus), drücken Sie die Taste ENTER (EINGABE), um den Alarm
auf On (Ein) zu schalten.
3. Mit der Taste ◄/► wählen Sie die Alarmzeit; drücken Sie zur
Bestätigung ENTER (EINGABE).
4. Wählen Sie die Alarmtage: Daily (Täglich), Once (Einmal), Weekdays
(Wochentage), Weekends (Wochenende).
5. Stellen Sie den Alarmmodus ein: DAB, FM, Buzzer (Summer).
6. Stellen Sie die Alarmlautstärke ein: Es gibt einen Schiebebalken zur
Anpassung der Alarmlautstärke; drücken Sie die Taste ◄/►, um die
Lautstärke zu erhöhen oder zu senken; drücken Sie zur Bestätigung die
Taste ENTER (EINGABE).
7. Rufen Sie nach all diesen oberen Einstellungen den Bildschirm Save
(Speichern) auf; drücken Sie die Taste ENTER (EINGABE), um den
Alarm abzuspeichern.
8. Um die Alarme abzubrechen, rufen Sie den Bildschirm der
Alarmeinstellungen auf, drücken die Taste ENTER (EINGABE), um O
(Aus) auszuwählen, und rufen dann den Speicherbildschirm auf, um die
Alarm-Aus-Einstellung abzuspeichern.
Sleep (Set sleep time) [Schlaf (Schlafzeit einstellen)]–
Drücken Sie kurz die Taste SLEEP (SCHLAF)
Rufen Sie den Einstellungsbildschirm der Schlafzeit auf, um die Schlafzeit
auszuwählen: aus/15/30/45/60/90Minuten.
Sprache (Einstellen der Systemsprache)
Rufen Sie den Bildschirm der Spracheinstellung auf; benutzen Sie die Tasten
◄/► und ENTER (EINGABE), um die Systemsprache einzustellen.
Hintergrundbeleuchtung
Rufen Sie den Bildschirm der Hintergrundbeleuchtung auf; benutzen Sie
die Taste ◄/►, um Ihre bevorzugte Helligkeit der Hintergrundbeleuchtung
auszuwählen: 3, 2, 1, aus. Drücken Sie anschließend die Taste ENTER
(EINGABE) , um Ihre Auswahl zu bestätigen.
Werkseinstellungen
Um das Radio auf die ursprünglichen Einstellungen zurückzusetzen, rufen
Sie den Bildschirm der Werkseinstellungen auf, und befolgen sie die Tipps
<Factory reset?> (Werkseinstellungen?), wählen zum Zurücksetzen
<YES> (JA), und das Radio wird neu gestartet.
HINWEISE: Sie können auch die SCAN-Taste drücken,
um die Hintergrundbeleuchtung einzustellen.
Software-Version
Zum Überprüfen der Software-Version des Systems.
Sender bereinigen (nur im Modus DAB/DAB+ verfügbar)
Um Sender zu entfernen, die aufgelistet, aber nicht verfügbar sind.
Rufen Sie den Bildschirm „Prune“ (Bereinigen) auf; benutzen Sie die
Taste ◄/►, um <Yes> (Ja) oder <No> (Nein) auszuwählen; drücken Sie
anschließend die Taste ENTER (EINGABE), um Ihre Auswahl zu bestätigen.
Wenn Sie jetzt <Yes> (Ja) auswählen, werden die nicht verfügbaren Sender
gelöscht.
Senderreihenfolge (nur im Modus DAB/DAB+ verfügbar)
Rufen Sie den Bildschirm der Senderreihenfolge auf; benutzen Sie die Taste
◄/► zur Auswahl der Senderreihenfolge; drücken Sie anschließend zur
Bestätigung die Taste ENTER (EINGABE).
Betrieb DAB/DAB+
Drücken Sie nach dem Einschalten des Radios wiederholt die Taste MODE
(MODUS), um den Modus DAB/DAB+ auszuwählen und aufzurufen.
Sendersuchlauf
Wenn Sie den Modus DAB/DAB+ einschalten, sucht das Radio automatisch
die Sender, die in diesem Gebiet gefunden werden können.
Drücken Sie die Taste ◄/►, um die vorherigen oder nächsten Sender
auszuwählen; drücken Sie anschließend die Taste ENTER (EINGABE), um
den Sender zu aktivieren und wiederzugeben.
Sender einstellen
Drücken Sie lange auf die Taste INFO/MENU (INFO/MENÜ), wenn
<Station scan> (Sendersuchlauf) erscheint; drücken Sie auf die Taste
ENTER (EINGABE); benutzen Sie anschließend die Taste ◄/►, um durch
die Suchlaufoptionen zu blättern: <Full scan> (Vollständiger Suchlauf),
<Manual tune> (Manuelle Einstellung).
1. Wählen Sie <Full scan> (Vollständiger Suchlauf) aus und drücken
Sie die Taste ENTER (EINGABE), um den vollständigen Suchlauf zu
aktivieren.
2. Wählen Sie <Manual tune> (Manuelle Einstellung) aus und drücken
Sie die Taste ENTER (EINGABE); benutzen Sie die Taste ◄/►, um die
Sender von 5A:174,928MHz bis 13F:239,200MHz auszuwählen.
Drücken Sie anschließend die Taste ENTER (EINGABE), um den
ausgewählten Sender zu aktivieren.
Sender speichern
1. Sie können bis zu 10 Ihrer Lieblings-DAB-Sender abspeichern. So
können Sie Ihre Lieblingssender schnell und einfach aufrufen.
2. Um eine Voreinstellung zu speichern, müssen Sie zunächst den Sender
anhören, den Sie speichern möchten.
3. Drücken Sie die Taste PRESET (VOREINSTELLUNG).
4. Benutzen Sie die Taste ◄/►, um die gewünschte
Voreinstellungsnummer 1-10 auszuwählen.
5. Drücken Sie die Taste ENTER (EINGABE) und halten Sie diese Taste
gedrückt, um Ihre Auswahl zu bestätigen.
Aufrufen eines gespeicherten Senders
Nachdem Sie die Sender als Voreinstellungssender abgespeichert
haben. Sie können die abgespeicherten Sender mit der Taste PRESET
(VOREINSTELLUNG) aufrufen.
Drücken Sie die Taste ◄/►, um die gespeicherten Sender auszuwählen,
und drücken Sie zur Bestätigung die Taste ENTER (EINGABE).
Anzeigemodus
Bei jedem Drücken der Taste INFO/MENU (INFO/MENÜ) schaltet die
Anzeige durch folgende Anzeigemodi:
Die Informationen werden im unteren Bereich des LCD-Displays angezeigt.
Dynamic Label Segment – DLS (Digitaler Begleittext)
Zeigt Lauftext-Daten an, die vom Sender bereitgestellt werden.
PTY (Programmart)
Zeigt die Art und die Beschreibung des Programms an, die vom Sender
DAB/DAB+ bereitgestellt werden.

DE
Bitrate
Die Datenrate, mit der das Signal übertragen wird.
Frequenz
Zeigt die Nummer des Übertragungskanals und die Frequenz an.
Zeit und Datum
Zeigt die Zeit- und Datumsinformationen an, die vom Sender bereitgestellt
werden.
HINWEISE: DAB– Gruppiert im Gegensatz zum normalen Radio
einige Radiosender und überträgt sie auf einer Frequenz.
FM-Betrieb
Schalten Sie in den FM-Modus, indem Sie die Taste MODE (MODUS)
drücken.
Senderauswahl
Um nach einem FM-Sender zwischen 87,5 und 108,00MHz zu suchen.
1. Drücken Sie die Taste ◄ oder ►, um die Frequenz in Schritten von
0,05MHz zu erhöhen oder zu verringern.
2. Drücken Sie lange auf die Taste ◄ oder ►, um zum vorherigen oder
nächsten Sender mit dem stärksten Empfang zu wechseln. Sobald ein
Sender gefunden wurde, wird der Suchlauf automatisch angehalten.
Wenn kein Sender gefunden wird, wird der Suchlauf angehalten, sobald
er alle Frequenzen durchsucht hat.
Sender einstellen
1. Drücken Sie lange die Taste SCAN (SCAN), um den Sendersuchlauf
zu starten. Während des Suchlaufs wird auf dem Bildschirm ein
Schiebebalken angezeigt, der den Fortschritt des Suchlaufs und die
Anzahl der bisher gefundenen Sender anzeigt. Sobald der Suchlauf
abgeschlossen ist, spielt das Radio den zuerst gefundenen Sender ab.
2. Drücken Sie lange die Taste INFO/MENU, um den Bildschirm <Audio
setting> aufzurufen. Verwenden Sie die Taste ◄/►, und drücken Sie
die Taste ENTER, um Folgendes auszuwählen: <Forced mono> oder
<Stereo allowed>.
Sender speichern
Sie können bis zu 10Lieblingssender speichern. So können Sie Ihre
Lieblingssender schnell und einfach aufrufen.
1. Um eine Voreinstellung zu speichern, müssen Sie zunächst den Sender
anhören, den Sie speichern möchten.
2. Drücken Sie die Taste PRESET (VOREINSTELLUNG).
3. Benutzen Sie die Taste ◄/►, um die gewünschte
Voreinstellungsnummer 1-10 auszuwählen.
4. Drücken Sie die Taste ENTER (EINGABE) und halten Sie diese Taste
gedrückt, um Ihre Auswahl zu bestätigen.
Aufrufen eines gespeicherten Senders
Nachdem Sie die Sender als Voreinstellungssender abgespeichert
haben. Sie können die abgespeicherten Sender mit der Taste PRESET
(VOREINSTELLUNG) aufrufen.
Drücken Sie die Taste ◄/►, um die gespeicherten Sender auszuwählen,
und drücken Sie zur Bestätigung die Taste ENTER (EINGABE).
Anzeigemodus
Drücken Sie die Taste INFO/MENU (INFO/MENÜ), um durch die von den
Sendern bereitgestellten Informationen zu blättern:
Bluetooth-Betrieb
Drücken Sie wiederholt die Taste MODE (MODUS), um den Bluetooth-
Modus auszuwählen und aufzurufen.
1. Sobald der Bluetooth-Modus aufgerufen wurde, erscheint
„Connecting“ (Verbindung läuft) und blinkt weiter, da das Gerät
versucht, sich mit zuvor verbundenen Geräten zu verbinden. Wenn
keine Geräte gefunden werden, blinkt „Connecting“ (Verbindung
läuft) weiter, um anzuzeigen, dass es für die Verbindung mit einem
neuen Gerät bereit ist.
2. Aktivieren Sie Ihr Bluetooth-Gerät und suchen Sie in der Liste nach
einem Gerät mit der Bezeichnung „SHARP DR-S460“.
3. Wählen Sie das Gerät „SHARP DR-S460“ aus und aktivieren Sie die
Verbindung (Pairing). Wenn Sie nach einem Passwort gefragt werden,
geben Sie „0000“ ein.
4. Wenn die Verbindung (Pairing) erfolgreich ist, spielt das Gerät den
Audiostream ab und das blinkende „Connecting“ (Verbindung läuft)
ändert sich zu „Connected“ (Verbunden).
5. Wenn sich das verbundene Gerät aus der Reichweite des Radios
entfernt, versucht das Radio 2Minuten lang, sich erneut zu verbinden.
Wenn das Gerät wieder in Reichweite kommt, verbindet sich das Radio
automatisch wieder damit.
6. Sie sollten nun Audiostreams drahtlos von Ihrem Bluetooth-Gerät
übertragen können.
7. Drücken Sie zum Trennen die Taste MODE auf Ihrem Radio, um zu
einem anderen Modus zu schalten. Oder schalten Sie die Bluetooth-
Funktion auf Ihrem anderen Gerät aus.
HINWEISE:
• Die Bluetooth-Reichweite beträgt ungefähr 7Meter.
Hindernisse zwischen den Geräten können diese Reichweite verringern.
• Es kann nur ein Bluetooth-Gerät gleichzeitig verbunden werden.
• Nicht alle Bluetooth-Geräte sind kompatibel.
Problembehandlung
Dieses Produkt enthält keine Teile, die vom Benutzer gewartet werden
können. Setzen Sie sich im Fall eines Defekts mit dem Hersteller oder
der autorisierten Kundenabteilung in Verbindung. Teile aus dem Inneren
des Geräts freizulegen kann lebensgefährlich sein. Die Garantie der
Hersteller gilt nicht für Defekte, die durch von nicht autorisierte Dritten
durchgeführte Reparaturen entstehen.
Kein Ton
Ursache
• Lautstärke nicht aufgedreht
Lösung
• Stellen Sie den Lautstärke-
regler hoch
Statisches Geräusch
Ursache
• Signalempfang zu niedrig.
Lösung
• Richten Sie die Antenne anders aus
oder stellen Sie das Gerät an einen
Ort mit einem stärkeren Signal
Ton verzerrt
Ursache
• Lautstärke zu hoch
Lösung
• Verringern Sie die Lautstärke
Gewünschter Sender nicht
gefunden
Ursache
• Schwaches Signal
Lösung
• Verwenden Sie die manuelle
Suchfunktion
Keine DAB-Funktionen
Ursache
• Kein DAB-Empfang in Ihrer
Gegend
• Schlechter Empfang
Lösung
• Ausrichtung der Antenne
ändern
Das Display ist leer
Ursache
• Dies kann passieren, wenn der
Sender die Benennung eines Ser-
vices ändert oder eine Benennung
während der Einstellung löscht
Lösung
• Das Radio wird versuchen, sich neu
einzustellen
• Führen Sie einen Suchlauf durch.
Kein Strom
Ursache
• Der Adapter ist nicht mit
einer Wandsteckdose
verbunden
Lösung
• Vergewissern Sie sich, dass
der Adapter eingesteckt ist

12
Technische Angaben
Modell DR-S460
Ausgangsstrom 2x7W (RMS)
Stromverbrauch (max.) 26W
Stromverbrauch im Stand-by <1W
FM-Frequenz 87.5-108MHz
Frequenz DAB+ 174.928-239.200MHz
Bluetooth
Version V 4.2
Frequenzbänder 2402 MHz ~ 2480 MHz
Maximaler übertragener Strom 4dBm
Netzadapter
Modellname: FJ-SW1202000N
Eingang: AC 100-240V ~ 50/60Hz, 0.6A Max
Ausgang:
DC 12V
⎓2000mA
Hersteller:
SHENZHEN FU JIA APPLIANCE CO., LTD
B1,Xujing chang Industrial Park, Haoye Road, Fuyong 518103 Shenzhen, China
354 mm
145 mm
185 mm
2,95kg
KG

ES
Instrucciones de seguridad importantes
Lea estas instrucciones de seguridad y respete las
siguientes advertencias antes de utilizar el aparato:
La nalidad de la marca de admiración dentro de un triángulo
equilátero es avisar al usuario de la presencia de instrucciones
importantes de uso y mantenimiento (servicio) en el manual
que acompaña al aparato.
Utilice la fuente de alimentación enumerada en el manual
de usuario.
Este símbolo signi ca que el producto debe eliminarse de
manera respetuosa con el medio ambiente y no con los
residuos domésticos generales.
Tensión de CA
Tensión de CC
Equipo de clase II
Solo para uso en interiores
Etiquetado de e ciencia energética de nivel VI
Polaridad del conector de corriente continua
Para evitar incendios mantenga
siempre las velas u otras llamas al
descubierto lejos del producto.
Advertencia:
• Respete siempre las precauciones básicas de seguridad cuando utilice
este electrodoméstico, especialmente cuando si hay niños presentes.
• Los niños deben ser supervisados para asegurarse de que no juegan con
el aparato.
• No dañe el cable de alimentación, no coloque objetos pesados encima,
no lo estire ni lo doble. No conecte alargadores. Los daños en el cable de
alimentación pueden ocasionar incendios o descargas eléctricas.
• Si el cable de alimentación presenta algún daño, deberá ser sustituido
por el fabricante, el servicio técnico o personas con una cuali cación
similar para evitar que se produzcan situaciones de peligro.
• Asegúrese de que la unidad está conectada a una toma de corriente
de CA de 100-240 V y 50/60 Hz. El uso de una tensión superior puede
causar el mal funcionamiento de la unidad o incluso presentar riesgo
de incendio.
• Si el enchufe de corriente no entra en la toma, no lo fuerce.
• Apague la unidad antes de desenchufarla de la corriente para desconec-
tarla por completo.
• No conecte ni desconecte el cable de alimentación con las manos moja-
das, ya que podría producirse una descarga eléctrica.
• Desconecte el cable de alimentación si la unidad no se va a utilizar
durante un periodo prolongado de tiempo.
• Si la unidad no se va a usar durante un largo periodo de tiempo, descon-
éctela de la alimentación.
• Asegúrese de que el enchufe de alimentación resulta fácilmente
accesible.
• Este producto no contiene ninguna pieza que pueda ser reparada por
el usuario. En caso de avería, póngase en contacto con el fabricante o el
servicio técnico autorizado. La exposición de ciertas partes internas del
dispositivo puede poner en peligro su vida. La garantía del fabricante
no cubre las averías resultantes de reparaciones llevadas a cabo por
terceros.
• No utilice este producto inmediatamente tras desembalar. Espere a que
se caliente a la temperatura ambiente antes de utilizarlo.
• Asegúrese de utilizar el producto en climas moderados únicamente (no
en climas tropicales o subtropicales).
• Coloque el producto en una super cie plana estable y no expuesta a
vibraciones.
• Asegúrese de que el producto y sus partes no sobresalen de los bordes
del mueble sobre el que se coloca.
• Para reducir el riesgo de incendio, descarga eléctrica o daño en el
producto, no lo exponga directamente a la luz del sol, polvo, lluvia o
humedad. No exponga nunca este producto a gotas o derramamientos y
no coloque objetos llenos de líquido sobre o cerca de este.
• No coloque objetos con líquidos, como jarrones, sobre el aparato.
• No instale el aparato cerca de ninguna fuente de calor, como radiadores,
salidas de aire caliente, estufas u otros aparatos (incluidos ampli cado-
res) que produzcan calor.
• No coloque el producto en espacios húmedos o con ventilación de cien-
te.
• Asegúrese de dejar una distancia mínima de 5 cm en torno al aparato
para garantizar una ventilación adecuada. No obstruya las aberturas de
ventilación de este producto. Evite siempre la obstrucción de las ranuras
de ventilación con objetos como periódicos, manteles, cortinas, etc.
• No permita que nadie, especialmente los niños, introduzca elementos en
los ori cios, ranuras ni en ninguna apertura de la carcasa de la unidad, ya
que podrían dar lugar a descargas eléctricas mortales.
• Las tormentas son peligrosas para todos los aparatos eléctricos. Si el
cable de alimentación o el cableado de la antena es alcanzado por un
rayo, el aparato puede resultar dañado, incluso si no está encendido.
Debe desconectar todos los cables y conectores del aparato antes de
una tormenta.
• La presión acústica excesiva de los auriculares y los cascos puede causar
la pérdida del sentido auditivo.
Mantenimiento
• Desenchufe el cable de alimentación de la toma de corriente antes de
limpiar la unidad.
• Utilice un paño suave y limpio para limpiar la parte exterior de la unidad.
No utilice nunca productos químicos ni detergentes.
Adaptador de corriente
• Para desconectar la unidad del suministro eléctrico, desenchufe el cable
de la toma de corriente.
• Utilice únicamente el adaptador de red suministrado, de lo contrario
podrían producirse riesgos para la seguridad o daños en la unidad.

14
Eliminación de este equipo y las pilas
• No elimine este producto como residuo urbano no selec-
cionado. Entréguelos en un punto de recogida designado
para el reciclado de aparatos electrónicos y eléctricos de
acuerdo con la ley local. De esta forma, ayudará a conser-
var los recursos y a proteger el medio ambiente.
• El símbolo anterior mostrado en equipos eléctricos y electrónicos (o en
el embalaje) tiene por objeto recordar a los usuarios esta circunstancia.
• Se solicita a los usuarios que utilicen las instalaciones de devolución
existentes para equipos usados.
Declaración CE:
• Por la presente, UMC Poland sp. z o.o. declara que este dispositivo
sonoro cumple los requisitos esenciales y otras disposiciones pertinentes
de la Directiva RED 2014/53/UE. El texto completo de la declaración de
conformidad de la UE está disponible en el siguiente enlace http://www.
sharpconsumer.eu/documents-of-con rmity
Marcas comerciales:
La marca denominativa Bluetooth® y sus logotipos son marcas comerciales
propiedad de Bluetooth SIG, Inc.
Los términos “HDMI” e “Interfaz multimedia de alta de nición HDMI”, así
como el logotipo HDMI, son marcas comerciales o marcas comerciales
registradas de HDMI Licensing, LLC en Estados Unidos y otros países.
Fabricado con la licencia de Dolby Laboratories. Dolby, Dolby Audio y el
símbolo de la doble D son marcas comerciales de Dolby Laboratories.

ES
Contenido de la caja
• 1 unidad
• 1 manual de instrucciones
• 1 guía de inicio rápido
• 1 adaptador de corriente
• 1 adaptador de enchufe de CA para el Reino Unido
• 1 adaptador de enchufe de CA para la UE
Paneles y controles
Panel frontal
3
1
4
6
9
2
7
8
5
1. MODE – Presione para cambiar los modos: DAB / DAB +, FM, Blue-
tooth, ENTRADA AUX.
2.
STANDBY – Presione este botón para encender la unidad o entrar al
modo de espera.
3.
INFO/MENU – Presione para ver la información de la estación o ingre-
se a la pantalla de con guración del menú principal.
4.
ENTER – Presione para con rmar sus selecciones.
5.
PREVIOUS ◄ – Presione para volver a las selecciones anteriores, o
para disminuir la frecuencia, o buscar la estación más fuerte anterior.
6.
NEXT ► – Presione para avanzar a la siguiente selección, o para
aumentar la frecuencia, o buscar la siguiente estación más fuerte.
7.
SCAN – Utilícelo para escanear las estaciones de radio o para ajustar el
nivel de luz de fondo.
8.
PRESET – Presione para recuperar las estaciones preestablecidas.
9.
DISPLAY SCREEN – Para mostrar la información.
10.
Volume – Gire la perilla de volumen para ajustar el nivel de volumen.
Panel posterior
12
10
13
11
11. FM Antenna – Para recibir la señal de FM.
12.
DC Power input – DC 12V
13.
AUX IN jack – Conecte el cable de audio de 3.5 mm a esta toma para
disfrutar de la música de audio externa.
Instrucciones generales de uso
Adaptador de corriente (suministrado con el paquete)
Conecte el adaptador a la toma de corriente continua en la parte
posterior de la radio.
Obtención de la mejor señal
Extienda la antena telescópica todo lo posible.
Encendido de la radio
Pulse el botón STANDBY para encender la unidad.
Cambio al modo en espera
Con la radio encendida, pulse el botón STANDBY para activar el modo en
espera. Vuelva a pulsar para activar la radio. La radio volverá al modo en
espera automáticamente si no se realiza ninguna operación en 15 minutos
Ajuste del volumen
Gire el control de volumen para ajustar el volumen a un nivel cómodo.
Escuchar la radio a altos volúmenes puede dañar la capacidad de audición.
Evite escuchar a altos volúmenes durante periodos largos de tiempo.
Primer uso de la radio
La radio realizará una exploración automática de emisoras al encenderse
por primera vez. Durante la exploración, la pantalla mostrará una barra
de avance para indicar el progreso de la operación de exploración y
la cantidad de emisoras encontradas hasta el momento. Cuando la
exploración termine, la radio mostrará la primera emisora encontrada.
Función de repetición
Cuando la alarma suena en modo en espera, gire el control de volumen
para activar la función de REPETICIÓN.
La alarma volverá a sonar transcurridos 5 minutos.
Hora de apagado
Para establecer la hora de apagado, pulse repetidamente el botón SLEEP
para seleccionar: desactivado, 15, 30, 45, 60, 90 minutos.
La unidad entrará en el modo de apagado seleccionado tras el tiempo
establecido.
Selección de modos
Con la radio encendida, pulse el botón MODE repetidamente para
seleccionar el modo deseado: DAB/DAB+, FM o Bluetooth, AUX IN
Información de emisora
Pulse el botón INFO/MENU para consultar la información de la emisora.
Actualización automática de la hora
La hora se puede actualizar automáticamente si el sistema detecta la
señal RDS. Si la señal RDS es débil o no puede detectarse, la hora no se
actualizará automáticamente.
Ajustes del menú principal
Mantenga pulsado el botón INFO/MENU para acceder a la pantalla de
con guración del menú principal. Busque y acceda a la pantalla <System>
pulsando el botón ENTER. A continuación, utilice el botón◄/► para
desplazarse por las opciones del menú: <Time setup>, <Alarms>,
<Sleep>, <Language>, <Prune>, <Station Order>, <Backlight>,
<Factory reset>, <SW version>.
NOTA: Las funciones <Prune> y < Station Order>
solo están disponibles en el modo DAB.
Seleccione una de las opciones y pulse el botón ENTER para acceder al
menú.
Con guración de la hora
1. Ajuste del reloj: 00:00 (Horas:Minutos), use los botones ◄/► y ENTER
para establecer la hora.
2. Ajuste de la fecha: 01-01-2018 (Día-Mes-Año), mismo proceso que
para ajustar el reloj.
3. Actualización automática: <No update> o <From radio>, pulse el
botón ENTER para con rmar.
4. Establecimiento de los modos 12/24 horas: seleccione su formato
favorito.

16
Tras completar los pasos anteriores, la hora se ajusta manualmente.
Alarmas
Cuando aparezca <Alarms>,
1. Pulse el botón ENTER para acceder a la pantalla de ajuste de la alarma.
2. Seleccione <Alarm 1: o > o <Alarm 2: o > y pulse el botón ENTER
para activar la alarma.
3. Con ayuda del botón ◄/► para seleccionar la hora de la alarma, pulse
ENTER para con rmar.
4. Seleccione los días de la alarma: diariamente, una vez, días de la
semana y nes de semana.
5. Establezca el modo de la alarma: DAB, FM o zumbador.
6. Establezca el volumen de la alarma: aparece una barra de
desplazamiento que permite ajustar el volumen de la alarma. Pulse el
botón ◄/► para aumentar o reducir el nivel de volumen y pulse el
botón ENTER para con rmar.
7. Tras establecer todos los ajustes anteriores, acceda a la pantalla Save y
pulse ENTER para guardar la alarma.
8. Para cancelar las alarmas, acceda a la pantalla de ajustes de alarma,
pulse el botón ENTER para seleccionar O y entre en la pantalla Save
para escoger el ajuste para desactivar la alarma.
Apagado (establecer el tiempo de apagado): pulse
brevemente el botón SLEEP
Entre en la pantalla de ajuste del tiempo de apagado para seleccionar el
tiempo de apagado: desactivado/15/30/45/60/90 minutos.
Idioma (establecer el idioma del sistema).
Acceda a la pantalla de ajuste de idioma y utilice los botones ◄/►
yENTER para establecer el idioma del sistema.
Retroiluminación
Acceda a la pantalla de ajustes de retroiluminación y con ayuda del botón
◄/► seleccione el nivel de retroiluminación de la pantalla deseado: 3, 2,
1, desactivado. A continuación, pulse el botón ENTER para con rmar la
selección.
Restablecimiento de los valores de fábrica
Para establecer la radio en los ajustes de fábrica, acceda a la pantalla de
restablecimiento de ajustes de fábrica, siga los consejos de <Factory
reset?> y seleccione <YES>. La radio se restablecerá a los ajustes de
fábrica.
NOTES: You also can press SCAN button to adjust the backlight level.
Versión de software
Permite consultar la versión de software del sistema.
Eliminación de emisoras (solo disponible en el modo
DAB/DAB+)
Para eliminar emisoras enumeradas que no están disponibles.
Acceda a la pantalla Prune y utilice el botón◄/► para seleccionar <Yes> o
<No>. A continuación, pulse el botón ENTER para con rmar la selección.
Las emisoras no disponibles se eliminarán si se selecciona <Yes>.
Orde de las emisoras (solo disponible en el modo
DAB/DAB+)
Entre en la pantalla Station order y con ayuda del botón ◄/► seleccione
una de las formas de ordenar las emisoras. A continuación, pulse el botón
ENTER para con rmar.
Operaciones con DAB/DAB+
Tras activar la radio, pulse el botón MODE repetidamente para seleccionar
y acceder al modo DAB/DAB+.
Exploración de emisoras
Cuando se activa el modo DAB/DAB+, la radio explora automáticamente
las emisoras que encuentra en la zona.
Pulse el botón ◄/► para seleccionar las emisoras previas o siguientes.
Acontinuación, pulse el botón ENTER para activar la reproducción de la
emisora.
Ajuste de emisoras
Mantenga pulsado el botón INFO/MENU. Cuando aparezca <Station
scan>, pulse el botón ENTER y utilice el botón ◄/► para desplazarse por
las opciones de exploración: <Full scan>, <Manual tune>.
1. Seleccione <Full scan> y pulse el botón ENTER para habilitar la
búsqueda completa.
2. Seleccione <Manual tune> y pulse el botón ENTER . Utilice el
botón ◄/► para seleccionar una emisora entre 5A:174.928MHz
y13F:239.200MHz. A continuación, pulse el botón ENTER para activar
la emisora seleccionada.
Almacenamiento de emisoras
Puede guardar hasta 10 de sus emisoras DAB favoritas, para acceder a ellas
de forma rápida y sencilla.
1. Para guardar una emisora preestablecida, primero debe escucharla y
2. después pulsar el botón PRESET.
3. Utilice el botón ◄/► para seleccionar el número preestablecido
deseado 1-10.
4. Mantenga pulsado el botón ENTER para con rmar.
Recuperación de una emisora almacenada
Una vez guardadas las emisoras como preestablecidas, puede recuperarlas
con el botón PRESET.
Pulse el botón ◄/► para seleccionar las emisoras guardadas y,
acontinuación, el botón ENTER para con rmar.
Modo de pantalla
Cada vez que pulsa el botón INFO/MENU, la pantalla se desplaza a través
de los siguientes modos:
La información se muestra en el segmento inferior de la pantalla LCD.
DLS (Segmento de etiqueta dinámica)
Muestra información de texto en desplazamiento suministrada por la emisora.
PTY (Tipo de programa)
Muestra el tipo y la descripción del programa proporcionados por la
emisora DAB/DAB+.
Velocidad de bits
La velocidad de datos a la que se transmite la señal.
Frecuencia
Muestra el número de canal y la frecuencia de transmisión de la emisora.
Hora y fecha
Muestra la información de hora y fecha proporcionada por la emisora.
NOTAS: DAB, a diferencia de las radios normales, agrupa varias
emisoras de radio y las transmite en una frecuencia.
Funcionamiento de la función FM
Seleccione el modo FM pulsando el botón MODE.
Selección de emisoras
Para buscar una emisora entre 87.5 y 108.00MHz.
1. Pulse el botón ◄ o ► para avanzar o retroceder en saltos de 0.05MHz.

ES
2. Mantenga pulsados el botón ◄ o ► para saltar a la emisora previa osiguiente
con la mejor señal. Una vez encontrada una emisora, la exploración se
detendrá automáticamente. Si no se encuentra ninguna emisora, la
exploración se interrumpirá cuando haya completado la frecuencia.
Sintonización de emisoras
1. Mantenga pulsado el botón SCAN para explorar emisoras. Durante
la exploración, la pantalla mostrará una barra de avance que indica el
progreso de la operación de exploración y la cantidad de emisoras que
se han encontrado hasta el momento. Cuando haya terminado, la radio
reproducirá la primera emisora que encuentre.
2. Presione prolongadamente el botón INFO / MENU para ingresar a
la pantalla <Audio setting>, use el botón ◄/► y presione el botón
ENTER para elegir: <Forced mono> o <Stereo allowed>.
Almacenamiento de emisoras
Podrá guardar hasta diez emisoras favoritas, para acceder a ellas de forma
rápida y sencilla.
1. Para guardar una emisora preestablecida, primero debe escucharla y
2. después pulsar el botón PRESET.
3. Utilice el botón ◄/► para seleccionar el número preestablecido
deseado 1-10.
4. Mantenga pulsado el botón ENTER para con rmar.
Recuperación de una emisora almacenada
Una vez guardadas las emisoras como preestablecidas, puede recuperarlas
con el botón PRESET.
Pulse el botón ◄/► para seleccionar las emisoras guardadas y,
acontinuación, el botón ENTER para con rmar.
Modo de pantalla
Pulse el botón INFO/MENU para desplazarse por la información de FM
proporcionada por las emisoras:
Funciones Bluetooth
Pulse el botón MODE repetidamente para seleccionar y acceder al modo
Bluetooth.
1. Una vez en el modo Bluetooth, aparecerá el texto Connecting, que
parpadeará mientras la unidad intenta conectarse con dispositivos
previamente emparejados. Si no se encuentra ningún dispositivo, el
texto Connecting seguirá parpadeando para indicar que la unidad está
lista para emparejarse con un nuevo dispositivo.
2. Active su dispositivo Bluetooth y busque un dispositivo con el nombre
de SHARP DR-S460 en la lista.
3. Seleccione y habilite el emparejamiento del dispositivo SHARP DR-
S460. Si se le solicita una contraseña, introduzca 0000.
4. Si el emparejamiento se completa correctamente, la unidad emitirá un
sonido y el texto parpadeante Connecting cambiará a Connected.
5. Si el dispositivo conectado se encuentra fuera de la zona de alcance,
la radio intentará volver a conectarse durante dos minutos. Cuando
el dispositivo esté de nuevo en el rango de alcance, la radio volverá a
conectarse automáticamente
6. y podrá transmitir audio de manera inalámbrica desde el dispositivo
Bluetooth.
7. Para desconectar, pulse el botón MODE de la radio y seleccionar otro
modo. O bien desactive la función Bluetooth del dispositivo.
NOTAS:
• El rango de funcionamiento de Bluetooth es de aproximadamente 7 metros.
Los obstáculos entre los dispositivos pueden reducir el rango.
• Solo se puede emparejar un dispositivo Bluetooth a la vez.
• No todos los dispositivos Bluetooth son compatibles.
Resolución de problemas
Este producto no contiene ninguna pieza que pueda ser reparada por
el usuario. En caso de avería, póngase en contacto con el fabricante o el
servicio técnico autorizado. La exposición a ciertas partes internas del
dispositivo puede poner en peligro su vida. La garantía del fabricante
no cubre las averías resultantes de reparaciones llevadas a cabo por
terceros.
Sin sonido
Causa
• El volumen no está activado.
Solución
• Ajuste el control de volumen principal.
Sonido estático.
Causa
• Recepción de la señal baja
Solución
• Ajuste la antena o mueva la unidad hacia una ubicación con señal más
intensa.
El sonido se oye distorsionado.
Causa
• El volumen está demasiado alto.
Solución
• Reduzca el volumen.
No se encuentra la emisora deseada.
Causa
• Señal débil.
Solución
• Utilice la función de sintonización manual.
Sin funciones DAB
Causa
• No hay cobertura DAB en la zona.
• Mala recepción.
Solución
• Ajuste el brillo de la pantalla.
La pantalla se muestra en blanco.
Causa
• Esto puede ocurrir si la emisora cambia la etiqueta de un servicio o
elimina una etiqueta al sintonizar.
Solución
• La radio intentará volver a sintonizar.
• Realice una exploración.
El dispositivo no se enciende.
Causa
• El adaptador no está conectado a la toma de la pared.
Solución
• Asegúrese de que el enchufe esté conectado.

18
Especi cación técnica
Modelo DR-S460
Potencia de salida 2x7W (RMS)
Consumo de electricidad (máx.) 26W
Consumo de electricidad en modo en espera <1W
Frecuencia FM 87.5-108MHz
Frecuencia DAB+ 174.928-239.200MHz
Bluetooth
Versión V 4.2
Bandas de frecuencia 2402 MHz ~ 2480 MHz
Potencia máxima transmitida 4dBm
Adaptador de corriente
Nombre del modelo: FJ-SW1202000N
Entrada: AC 100-240V ~ 50/60Hz, 0.6A Max
Salida:
DC 12V
⎓2000mA
Fabricante:
SHENZHEN FU JIA APPLIANCE CO., LTD
B1,Xujing chang Industrial Park, Haoye Road, Fuyong 518103 Shenzhen, China
354 mm
145 mm
185 mm
2,95kg
KG

IT
Importanti istruzioni di sicurezza
Vi preghiamo di leggere queste istruzioni di
sicurezza e di rispettare le seguenti avvertenze
prima di mettere in funzione l'apparecchio:
Il punto esclamativo in un triangolo equilatero serve ad
avvertire la presenza di importanti istruzioni operative e
di manutenzione nella documentazione che accompagna
l’apparecchio.
Usare esclusivamente gli alimentatori elencati nel manuale
utente
Questo simbolo signi ca che il prodotto deve essere smaltito
in modo rispettoso dell'ambiente, non insieme ai ri uti
domestici.
Tensione AC
Tensione DC
Apparecchiatura di Classe II
Solo per uso interno
Classi cazione di e cienza energetica livello VI
Polarità del connettore di corrente d.c.
Per evitare incendi, tenete
sempre lontane dall’apparecchio
candele e qualunque
altro tipo di amma.
Avvertenza:
• Seguire sempre le precauzioni di sicurezza basilari quando si utilizza
questo apparecchio, specialmente in presenza di bambini.
• I bambini dovrebbero essere supervisionati per assicurarsi che non
giochino con l’apparecchio.
• Non danneggiare il cavo di alimentazione, né riporvi sopra oggetti
pesanti, tirarlo o piegarlo. Inoltre, non utilizzare prolunghe. Danni al cavo
di alimentazione potrebbero causare incendi o shock elettrici
• Non danneggiare il cavo di alimentazione, né riporvi sopra oggetti
pesanti, tirarlo o piegarlo. Inoltre, non utilizzare prolunghe. Danni al cavo
di alimentazione potrebbero causare incendi o shock elettrici.
• Se il cavo di alimentazione è danneggiato, deve essere sostituito dal
produttore, da un agente di servizio o da persone altrettanto quali cate,
in modo da evitare pericoli.
• Assicurarsi che l’unità sia connessa a una presa di corrente CA 110-240V
50/60Hz. Usare un voltaggio superiore può provocare un malfunziona-
mento dell’unità e persino la formazione di amme.
• Se la spina di alimentazione non entra nello zoccolo, non forzarla.
• Spegnere completamente l’unità prima di disconnetterla
dall’alimentazione.
• Non disconnettere o connettere il cavo di alimentazione con le mani
bagnate. Può provocare uno shock elettrico.
• Se l'unità non verrà usata per un periodo di tempo prolungato, discon-
nettere l'alimentazione di corrente.
• Scollegare il cavo di alimentazione se non viene usato per molto tempo.
• Assicurarsi che la presa di corrente sia sempre facilmente accessibile.
• Questo prodotto non ha componenti che possano essere riparate
dall'utente. In caso di guasto, contattate il produttore o l'agente di ser-
vizio autorizzato. Esporre le parti interne al dispositivo può comportare
un pericolo di vita. La garanzia non copre danni causati da riparazioni
e ettuate da terze parti non autorizzate.
• Non utilizzare questo prodotto immediatamente dopo averlo rimosso
dall’imballaggio. Attendere che si riscaldi no a temperatura ambiente
prima di usarlo.
• Assicurarsi di usare questo prodotto soltanto in un clima temperato (non
in ambienti tropicali o subtropicali).
• Collocare il prodotto su una super cie piana e stabile in modo che non
sia sottoposto a vibrazioni.
• Assicurarsi che il prodotto e le sue parti non pendino dal bordo del
mobilio di supporto.
• Per ridurre il rischio di incendi, shock elettrici o danni al prodotto, non
esporlo direttamente a luce del sole, polvere, pioggia o umidità. Non
esporlo mai a gocciolamenti e schizzi d’acqua e non collocare oggetti
contenenti liquidi sopra o vicino a esso.
• Non collocare oggetti pieni di liquidi, come vasi, sull’apparecchio.
• Non installarlo vicino a fonti di calore come termosifoni, griglie di
ventilazione, stufe o altri apparecchi (inclusi ampli catori) che generano
calore.
• Non collocare il prodotto in punti con elevata umidità e scarsa ventilazio-
ne.
• Assicurare una distanza minima di 5 cm attorno all’apparecchio per una
ventilazione su ciente. Non ostruire le aperture per la ventilazione del
prodotto. Assicurarsi che le aperture per la ventilazione siano sgombere
da oggetti come giornali, tovaglie, tendaggi ecc.
• MAI lasciare che qualcuno, specialmente un bambino, inserisca qualcosa
nei fori e nelle aperture dell’involucro dell’unità, in quanto ciò potrebbe
risultare in uno shock elettrico fatale.
• I temporali sono pericolosi per gli apparecchi elettronici. Se i cavi della
rete elettrica o l'antenna vengono colpiti da un fulmine, l'apparecchio
potrebbe risultarne danneggiato, anche se spento. E' opportuno scolle-
gare tutti i cavi e i connettori dell'apparecchio prima di un temporale.
• Un’eccessiva pressione sonora da cu e o auricolari può causare danni
all’udito.
Manutenzione
• Disconnetti il cavo di alimentazione dalla presa elettrica prima di pulire
l’apparecchio.
• Usare un panno morbido e pulito per pulire l’esterno dell’unità. Non
pulire con agenti chimici e detergenti.
Adattatore di corrente
• Per disconnettere l'unità dall'alimentatore, disconnettere il cavo dalla
presa di corrente.
• Usare solo l'adattatore fornitore perché non fare ciò potrebbe mettere a
rischio la sicurezza e/o danneggiare l'unità.

20
Smaltimento di questa apparecchiatura
• Non smaltire questo televisore insieme ai ri uti comunali
non di erenziati. Riconsegnarlo in un punto di raccolta
apposito per il RAEE (Riciclaggio di Apparecchiature
Elettriche ed Elettroniche). Così facendo, contribuirete
alla conservazione delle risorse e alla protezione
dell'ambiente.
•
I simboli mostrati in alto appaiono su apparecchi elettrici ed elettronici e
batterie (o sulla relativa confezione) come promemoria per gli utenti.
• Gli utenti sono tenuti a utilizzare le strutture adeguate per lo smalti-
mento di apparecchi e batterie.
Dichiarazione CE:
• Con la presente, UMC Poland sp. z o.o. dichiara che questo dispositivo
audio soddisfa i requisiti essenziali e le altre disposizioni rilevanti della
direttiva RED 2014/53/UE. Il testo completo della Dichiarazione di
conformità UE è disponibile al link seguente http://www.sharpconsumer.
eu/documents-of-con rmity
Imarchi:
La parola e i loghi Bluetooth® simbolo sono marchi registrati di proprietà di
Bluetooth SIG,. Inc.
I termini HDMI, il logo HDMI e High-De nition Multimedia Interface sono
marchi commerciali o marchi registrati di HDMI Licensing LLC negli USA e
in altri paesi.
Prodotto su licenza di Dolby Laboratories. Dolby, Dolby Audio e il simbolo
della doppia D sono marchi di Dolby Laboratories.

IT
Cosa è compreso nella confezione
• 1 unità principale
• 1 Manuale utente
• 1 Guida di avvio rapido
• 1 alimentatore
• 1x spina CA britannica per l’adattatore di corrente.
• 1x spina CA europea per l’adattatore di corrente.
Pannelli e controlli
Pannello anteriore
3
1
4
6
9
2
7
8
5
1. MODE – Premere per cambiare le modalità: DAB / DAB +, FM, Blue-
tooth, AUX IN.
2. STANDBY – Premere questo pulsante per accendere l'unità o accedere
alla modalità standby.
3. INFO/MENU – Premere per visualizzare le informazioni sulla stazione,
o accedere alla schermata delle impostazioni del menu principale.
4. ENTER – Premere per confermare le selezioni.
5. PREVIOUS ◄ – Premere per tornare alle selezioni precedenti o per
diminuire la frequenza o cercare la stazione più forte precedente.
6. NEXT ► – Premere per andare avanti alla selezione successiva, o per
aumentare la frequenza, o cercare la successiva stazione più forte.
7. SCAN – Utilizzare per scansionare le stazioni radio o per regolare il
livello di retroilluminazione.
8. PRESET – Premere per richiamare le stazioni preselezionate.
9. DISPLAY SCREEN – Per mostrare le informazioni.
Pannello posteriore
12
10
13
11
10. Volume – Ruotare la manopola del volume per regolare il livello del
volume.
11. FM Antenna –Per ricevere il segnale FM.
12. DC Power input – DC 12V
13. AUX IN jack – Collegare il cavo audio da 3,5 mm a questo jack per
ascoltare la musica audio esterna.
Istruzioni operative generali
Adattatore di presa di corrente (fornito con la confezione)
Connettere l'adattatore della presa di corrente all'alimentatore DC sul
pannello posteriore della radio.
Ottieni la migliore ricezione
Estendere l'antenna telescopica no a dove arriva.
Accendi la radio
Premere il tasto STANDBY per accendere la radio.
Passa alla modalità Standby
Quando è in uso, premi per qualche istante il tasto STANDBY per passare
alla modalità Standby. Premere nuovamente per accendere la radio. La
radio passa alla modalità standby automaticamente se non ci sono attività
dopo 15 minuti.
Regolare il volume
Ruotare la manopola del volume per regolare il volume a un livello
confortevole. Ascoltare la radio ad alto volume può danneggiare l'udito.
Evitare di ascoltare ad alto volume per lunghi periodi di tempo.
La prima volta che la radio è usata
La prima volta che la radio viene accesa, scansionerà automaticamente
cercando le stazioni. Durante la scansione, lo schermo mostra una barra
di scorrimento che indica l'avanzamento della scansione e il numero di
stazioni trovate sino a ora. Una volta che la scansione è terminata, la radio
riproduce la prima stazione che trova.
Funzione snooze
Quando l'allarme suona in modalità Standby, ruotare la manopola del
volume per attivare la funzione SNOOZE.
L'allarme suonerà ancora dopo 5 minuti.
Ora di sonno
Per impostare l'ora di sonno, premere ripetutamente il pulsante SLEEP per
selezionare: spento, 15, 30, 45, 60, 90 minuti.
Quando l'ora impostata è trascorsa, l'unità passa alla modalità sleep.
Selezionare le modalità
Quando è in uso, premi ripetutamente il tasto MODE per passare alla
modalità desiderata: DAB/DAB+, FM, Bluetooth, AUX IN.
Informazioni sulla stazione
Premere il tasto INFO/MENU per controllare le informazioni della stazione.
Aggiornamento automatico dell'ora
L'ora e la data possono essere aggiornate automaticamente se il sistema
rileva il segnale RDS. Se il segnale RDS è debole o non può essere rilevato,
l'ora non si aggiorna automaticamente.
Con gurazione menu principale
Premere per qualche istante il tasto INFO/MENU per passare alla
schermata di con gurazione del menu principale. Trovare ed entrare
nella schermata <Sistema> premendo il pulsante ENTER. Quindi usare
il pulsante◄/► per scorrere nelle opzioni del menu: <Time setup>,
<Alarms>, <Sleep>, <Language>, <Prune>, <Station Order>,
<Backlight>, <Factory reset>, <SW version>.
NOTA: <Prune> e < Station Order> sono disponibili solo in modalità DAB
Selezionare una delle opzioni quindi premere il pulsante ENTER per
accedere a quel menu.
Impostazione dell'ora
1. Impostare orologio: 00:00 (Ora:Minuti), usare i pulsanti ◄/► ed
ENTER per impostare.
2. Impostare data: 01-01-2018 (Giorno-Mese-Anno), uguale alla
con gurazione di “set clock”.

22
3. Aggiornamento automatico: <No update> o <From radio>, premere il
pulsante ENTER per confermare.
4. Impostare ora 12/24: scegli il tuo formato preferito.
Dopo aver terminato i passaggi indicati, l'ora sarà impostata
automaticamente.
Allarmi
Quando appare <Alarms>,
1. Premere il pulsante ENTER per passare alla schermata di con gurazione
dell'allarme.
2. Selezionare <Alarm 1: o > o <Alarm 2: o >, premere il pulsante
ENTER per impostare l'allarme su On.
3. Utilizzando il pulsante ◄/► per selezionare alarm time, premere
ENTER per confermare.
4. Selezionare alarm days: giornaliero, una volta, giorni della settimana,
ne settimana.
5. Impostare alarm mode: DAB, FM, Buzzer.
6. Impostare alarm volume: è presente una barra scorrevole per regolare il
volume dell'allarme, premere il pulsante ◄/► per aumentare o ridurre il
livello del volume, premere il pulsante ENTER per confermare.
7. Dopo tutte le impostazioni precedenti, passare alla schermata Save,
premere il pulsante ENTER per salvare l'allarme.
8. Per annullare gli allarmi, passare alla schermata delle impostazioni,
premere il pulsante ENTER per selezionare O quindi passare alla
schermata di salvataggio per salvare le impostazioni di spegnimento
dell'allarme.
Sleep (imposta ora di sleep) - premere brevemente il
pulsante SLEEP
Passare alla schermata di impostazione dell'ora di Sleep per selezionare
l'ora di sleep: spento/15/30/45/60/90 minuti.
Lingua (con gurare la lingua del sistema)
Passare alla schermata delle impostazioni della lingua, usare i pulsanti
◄/► e ENTER per impostare la lingua del sistema.
Retroilluminazione
Passare alla schermata delle impostazioni della retroilluminazione, usando
il pulsante ◄/► per selezionare il livello desiderato di retroilluminazione
dello schermo: 3, 2, 1, spento. Quindi premere il pulsante ENTER per
confermare la selezione.
Ripristino di fabbrica
Per impostare la radio alle impostazioni originali, passare alla schermata
di ripristino di fabbrica, seguire le indicazioni <Factory reset?>, scegliere
<YES> per ripristinare, e la radio sarà riavviata.
NOTE: è anche possibile premere il tasto SCAN per
regolare il livello di retroilluminazione.
Versione SW
Per controllare la versione software del sistema.
Sfrondare le stazioni (disponibile solo in modalità
DAB/DAB+)
Per rimuovere le stazioni elencate ma non disponibili.
Passare alla schermata Prune, usare il pulsante ◄/► per selezionare <Yes> o
<No>, quindi premere il pulsante ENTER per confermare la tua selezione. Le
stazioni non disponibili ora saranno cancellate se scegli <Yes>.
Ordine stazione (disponibile solo in modalità DAB/DAB+)
Passare alla schermata di ordine della stazione, usare il pulsante ◄/► per
selezionare uno degli ordini della stazione, quindi premere per confermare
ENTER.
Operazioni DAB/DAB+
Dopo avere acceso la radio, premere ripetutamente il pulsante MODE per
selezionare e passare alla modalità DAB/DAB+.
Scansionare le stazioni
Quando si accende la modalità DAB/DAB+, la radio scansiona
automaticamente le stazioni trovare in questa area.
Premere il pulsante ◄/► per selezionare le stazioni precedenti
osuccessiva, quindi premere il pulsante ENTER per attivare la riproduzione
della stazione.
Sintonizzazione stazione
Premere per qualche istante il pulsante INFO/MENU, quando <Station
scan> appare, premere il pulsante ENTER, quindi usare il pulsante ◄/►
per scorrere lungo le opzioni di scansionamento: <Full scan>, <Manual
tune>.
1. Selezionare <Scansione completa> quindi premere il pulsante ENTER
per consentire una scansione completa.
2. Selezionare <Manual tune> e premere il pulsante ENTER, usare
il pulsante ◄/► per selezionare stazioni da 5A:174.928 MHz a
13F:239.200 MHz. Quindi premere il pulsante ENTER per attivare la
stazione selezionata.
Memorizzare le stazioni
È possibile memorizzare no a 10 delle proprie stazioni DAB preferite. Ciò
consente di accedere alle proprie stazioni preferite con rapidità e facilità.
1. Per memorizzare una preimpostazione, prima è necessario ascoltare la
stazione che si vuole salvare.
2. Premere il pulsante PRESET..
3. Usare il pulsante◄/► per selezionare il numero preimpostato desiderato 1-10.
4. Tenere premuto il pulsante ENTER per confermare.
Richiamare una stazione memorizzata
Una volta salvate le stazioni sulle stazioni preimpostate. Puoi richiamarla
premendo il pulsante PRESET.
Premere il pulsante ◄/► per selezionare le stazioni memorizzate,
epremere il pulsante ENTER per confermare.
Modalità display
Ogni volta che si preme il pulsante INFO/MENU, il display scorre tra le
seguenti modalità di visualizzazione.
Le informazioni sono visualizzate nel segmento inferiore del display LCD.
Dynamic Label Segment (DLS)
Mostra informazioni testuali a scorrimento fornite dall'emittente.
PTY (tipo programma)
Mostra il tipo e la descrizione del programma fornito dalla stazione DAB/DAB+.
Bit Rate
Il tasso dei dati al quale il segnale viene trasmesso.
Frequenza
Mostra il numero e la frequenza del canale della trasmissione della stazione.
Ora e data
Mostra informazioni su ora e data fornite dall'emittente.
NOTE: DAB – a di erenza delle normali radio, raggruppa assieme
molte stazioni radio e le trasmette su una frequenza.

IT
Funzionamento FM
Passare alla modalità FM premendo il pulsante MODE.
Selezionare le stazioni
Per cercare una stazione FM da 87.5 a 108.00 MHz.
1. Premere il pulsante ◄ o ► per scorrere avanti o indietro nella
frequenza per passaggi di 0.05 MHz.
2. Premere per qualche istante il pulsante ◄ o ► per passare alla stazione
precedente o succesiva con la ricezione migliore. Una volta trovata una
stazione, la scansione automatica si arresta. Se non vengono trovate
stazioni, si arresta dopo essere passato lungo l'intera frequenza.
Sintonizzare le stazioni
1. Premere per qualche istante il pulsante SCAN per scansione le stazioni.
Durante la scansione, lo schermo mostra una barra di scorrimento che
indica l'avanzamento della scansione e il numero di stazioni trovate
sino a ora. Una volta che la scansione è terminata, la radio riproduce la
prima stazione che trova.
2. Premere a lungo il pulsante INFO / MENU per accedere alla schermata
<Impostazioni audio>, utilizzare il pulsante ◄/► e premere il pulsante
ENTER per scegliere: <Forced mono> o <Stereo allowed>.
Memorizzare le stazioni
È possibile memorizzare no a 10 delle proprie stazioni FM preferite. Ciò
consente di accedere alle proprie stazioni FM preferite con rapidità e facilità.
1. Per memorizzare una preimpostazione, prima è necessario ascoltare la
stazione che si vuole salvare.
2. Premere il pulsante PRESET..
3. Usare il pulsante◄/► per selezionare il numero preimpostato
desiderato 1-10.
4. Tenere premuto il pulsante ENTER per confermare.
Richiamare una stazione memorizzata
Una volta salvate le stazioni sulle stazioni preimpostate. Puoi richiamarla
premendo il pulsante PRESET.
Premere il pulsante ◄/► per selezionare le stazioni memorizzate,
epremere il pulsante ENTER per confermare.
Modalità display
Premere il pulsante INFO/MENU per scorrere tra le informazioni FM fornite
dalle stazioni:
Funzionamento Bluetooth
Premere ripetutamente il pulsante MODE per selezionare epassare alla
modalità Bluetooth.
1. Una volta in modalità Bluetooth, “Connecting” appare e lampeggia
no a che l'unità cerca di connettersi ai dispositivi accoppiati in
precedenza. Se non vengono trovati dispositivi, “Connecting” continua
a lampeggiare per indicare che è pronto per accoppiarsi a un nuovo
dispositivo.
2. Attivare il proprio dispositivo Bluetooth e cercare un dispositivo
etichettato “SHARP DR-S460” nella lista.
3. Selezionare e attivare l'accoppiamento per il dispositivo “SHARP DR-
S460”. Se viene chiesta una password, inserire “0000”.
4. Se l'accoppiamento ha successo, l'unità emette un suono
e“Connecting” lampeggiante passa a "Connected".
5. Se il dispositivo connesso è fuori portata, la radio cercherà di
riconnettersi per due minuti. Quando il dispositivo è nella portata, la
radio cercherà di riconnettersi automaticamente.
6. Dovresti ora essere in grado di riprodurre audio in streaming senza cavo
dal tuo dispositivo Bluetooth.
7. Per disconnettersi, premi il tasto MODE per passare a un'altra modalità.
Oppure spegni la funzione bluetooth del tuo dispositivo.
NOTE:
• La distanza di funzionamento del Bluetooth è di circa 7 metri.
Gli ostacoli tra i dispositivi possono ridurre questa distanza.
• È possibile accoppiare un solo dispositivo Bluetooth per volta.
• Non tutti i dispositivi Bluetooth sono compatibili.
Risoluzione dei problemi
Questo prodotto non ha componenti che possano essere riparate
dall'utente. In caso di guasto, contattate il produttore o l'agente di servizio
autorizzato. Esporre le parti interne al dispositivo può comportare
un pericolo di vita. La garanzia non copre danni causati da riparazioni
e ettuate da terze parti non autorizzate.
Audio assente
Causa
• Volume non acceso.
Soluzione
• Regolare la manopola del volume principale.
Suono statico
Causa
• Ricezione del segnale troppo bassa.
Soluzione
• Regolare l'antenna o spostare l'unità in un punto dove il segnale è più
forte.
Il suono è distorto
Causa
• Il volume è troppo alto
Soluzione
• Abbassare il volume
Stazione desiderata non trovata
Causa
• Segnale debole
Soluzione
• Usare la funzione di sintonizzazione manuale
Funzioni DAB assenti
Causa
• DAB non coperto nella tua area.
• Scarsa ricezione
Soluzione
• Regola la posizione dell'antenna.
Il display è vuoto.
Causa
• Ciò può veri carsi se l'emittente modi ca l'etichetta di un servizio o
rimuove un'etichetta mentre è sintonizzata.
Soluzione
• La radio cercherà di risintonizzarsi.
• Eseguire una scansione.
Alimentazione assente
Causa
• L'adattatore non è connesso alla presa su parete.
Soluzione
• Accertarsi che l'adattatore sia connesso.

24
Speci che tecniche
Modello DR-S460
Corrente in uscita 2x7W (RMS)
Consumo energetico (max.) 26W
Standby Consumo energetico <1W
Frequenza FM 87.5-108MHz
Frequenza DAB+ 174.928-239.200MHz
Bluetooth
Versione V 4.2
Bande di frequenza 2402 MHz ~ 2480 MHz
Potenza massima trasmessa 4dBm
Adattatore di corrente
Nome modello: FJ-SW1202000N
Input: AC 100-240V ~ 50/60Hz, 0.6A Max
Output:
DC 12V
⎓2000mA
Produttore:
SHENZHEN FU JIA APPLIANCE CO., LTD
B1,Xujing chang Industrial Park, Haoye Road, Fuyong 518103 Shenzhen, China
354 mm
145 mm
185 mm
2,95kg
KG

FR
Importantes consignes de sécurité
Svp, lire ces consignes de sécurité et respecter les
avertissements suivants avant que l'appareil ne soit
actionné :
Le point d'exclamation contenu dans un triangle équilatéral
a pour objet d'appeler l'attention de l'utilisateur sur la
présence dans la documentation accompagnant le produit
d'instructions importantes d'utilisation et d'entretien (de
réparation).
Utilisez uniquement l'alimentation électrique indiquée dans
le mode d'emploi.
Ce symbole signi e que le produit doit être éliminé de
manière écologique et non avec les ordures ménagères.
Tension alternative
Tension continue
Équipement de classe II
Pour une utilisation en intérieur uniquement
Notation d'e cacité énergétique de niveau VI
Polarité de câble d'alimentation de C.C.
A n d’éviter un incendie,
maintenir toujours les bougies
et autres ammes nues
éloignées de ce produit.
Avertissement :
• Suivez toujours les précautions basiques de sécurité durant l'utilisation
de cet appareil, particulièrement lorsque des enfants sont présents.
• Les enfants doivent être supervisés a n de s'assurer qu'ils ne jouent pas
avec l'appareil.
• N'endommagez pas le cordon d'alimentation, n'y placez pas d'objets
lourds, ne l'étirez pas et ne le pliez pas. N'utilisez pas de rallonge
électrique. Tout dommage au cordon d'alimentation peut provoquer un
incendie ou un choc électrique.
• Si le cordon d'alimentation est endommagé, il doit être remplacé par le
fabricant, un agent du service après-vente ou des personnes similaire-
ment quali ées a n d'éviter tout risque.
• Assurez-vous que l'appareil est bien branché dans une prise électrique
CA 110-240V 50/60Hz. L'utilisation d'une tension plus élevée peut entraî-
ner un dysfonctionnement de l'appareil ou un incendie.
• Si la che d'alimentation ne rentre pas dans la prise, ne la forcez pas.
• Si votre che électrique ne rentre pas dans votre prise murale, ne forcez
pas pour la faire rentrer.
• Éteignez l'appareil avant de le débrancher de sa source électrique a n de
complètement le désactiver.
• Ne connectez ou ne déconnectez pas le cordon d'alimentation avec des
mains mouillées. Ceci peut causer une électrocution.
• Si l'appareil ne doit pas être utilisé pendant une longue période, débran-
chez l'alimentation.
• Déconnectez le cordon d'alimentation si l'appareil n'est pas utilisé
pendant une période prolongée.
• Assurez-vous que la prise principale est toujours facilement accessible.
• Ce produit ne contient aucune pièce réparable par l'utilisateur. En cas de
défaut, contactez le fabricant ou le département de service après-vente
autorisé. L'exposition aux pièces internes situées à l'intérieur de l'appareil
peuvent mettre votre vie en danger. La garantie du fabricant ne couvre
pas les défauts provoqués par des réparations e ectuées par des tiers
non autorisés.
• N'utilisez pas ce produit directement après déballage. Attendez qu'il se
réchau e à la température ambiante avant de l'utiliser.
• Assurez-vous que ce produit est utilisé dans des climats modérés uni-
quement (et non tropicaux ou sous-tropicaux).
• Placez le produit sur une surface plane et stable sans vibrations.
• Assurez-vous que le produit ou ses pièces ne dépassent pas du bord du
meuble le supportant.
• Pour réduire les risques d'incendie, d'électrocution ou de dommages
à ce produit, veuillez ne pas l'exposer à la lumière directe du soleil, à la
poussière, à la pluie et à l'humidité. Ne l'exposez jamais aux éclaboussu-
res ou égouttements et ne placez pas d'objets remplis d'eau sur ou près
du produit.
• Ne placez pas d’objets remplis de liquide, comme des vases sur l'appareil.
• N’installez pas l’appareil à proximité de sources de chaleurs telles que
des radiateurs, des chau ages, des cuisinières ou d’autres appareils (y
compris des ampli cateurs) produisant de la chaleur.
• Ne placez pas de produit dans un emplacement à l'humidité élevée et
présentant une mauvaise ventilation.
• Assurez une distance minimum de 5 cm autour de l'appareil a n
d'assurer une ventilation su sante. Ne bloquez pas les entrées de
ventilation de ce produit. Assurez-vous toujours que les ouvertures de
ventilation ne sont pas recouvertes d'articles tels que journaux, nappes
de table, rideaux, etc.
• Ne laissez JAMAIS une personne, et particulièrement un enfant, faire
rentrer un objet dans les trous, fentes ou toute autre ouverture du boitier
de l'appareil, ceci pouvant causer une électrocution fatale.
• Les orages sont dangereux pour tous les appareils électriques. Si le
secteur ou le câblage aérien est frappé par la foudre, l'appareil peut être
endommagé, même s'il était éteint. Vous devez débrancher tous les
câbles et connecteurs de l'appareil avant un orage.
• Un niveau de pression acoustique excessif du casques ou des écouteurs
peut causer une perte auditive.
Entretien
• Débranchez le câble d'alimentation de la source de courant avant de
nettoyer l'appareil.
• Utilisez un chi on doux et propre pour nettoyer l'extérieur de l'appareil.
Ne nettoyez jamais l'appareil avec des produits chimiques ou détergent.
Adaptateur électrique
• Pour déconnecter l'appareil du réseau d'alimentation, débrancher le l
de la prise de courant.
• N'utilisez que l'adaptateur secteur fourni, faute de quoi cela pourrait
entraîner un risque pour la sécurité et / ou endommager l'appareil.

26
Mise au rebut de ce matériel
• Ne jetez pas ce produit avec les déchets municipaux non
triés. Renvoyez-la à un point de ramassage et de recyclage
WEEE (déchets d'équipements électriques et électron-
iques) selon la législation en vigueur. Agir ainsi, aide à con-
server les ressources et à protéger l'environnement.
• La gure ci-dessus apparaît sur les équipements électriques et électron-
iques (ou sur l'emballage) pour rappeler ce fait aux utilisateurs.
• Les utilisateur doivent utiliser les centres de ramassage d'équipements
et de piles existants.
Déclaration CE :
• Par la présente, Universal Media Corporation déclare que cet appareil au-
dio est conforme aux principales exigences et autres clauses pertinentes
de la Directive RED 2014/53/EU. Le texte intégral de la déclaration de
conformité de l'UE est disponible en cliquant sur le lien suivant: http://
www.sharpconsumer.eu/documents-of-con rmity
Marques déposées :
La marque et les logos Bluetooth® sont des marques déposées de
Bluetooth SIG., Inc.
Les termes HDMI et HDMI High-De nition Multimedia Interface et logo
HDMI sont protégés par le droit d'auteur et sont la propriété de HDMI
Licensing, LLC aux États-Unis et dans d'autres pays.
Fabriqué sous licence de Dolby Laboratories. Dolby, Dolby Audio et le
symbole double-D sont des marques déposées de Dolby Laboratories.

FR
Ce qui est inclus dans la boîte :
• 1 x 1 unité principale
• 1 x Manuel d'utilisation
• 1 x Guide de démarrage rapide
• 1 x Adaptateur secteur
• 1x Fiche AC (Royaume-Uni) pour adaptateur d'alimentation
• 1x Fiche AC (Union européenne) pour adaptateur d'alimentation
Panels & Controls
Partie avant
3
1
4
6
9
2
7
8
5
1. MODE – Appuyez sur pour changer les modes: DAB / DAB +, FM,
Bluetooth, AUX IN.
2. STANDBY – Appuyez sur cette touche pour allumer l'appareil ou
passer en mode veille.
3. INFO/MENU – Appuyez sur pour a cher les informations sur la station
ou pour accéder à l'écran de réglage du menu principal.
4. ENTER – Appuyez sur pour con rmer vos sélections.
5. PREVIOUS ◄ – Appuyez sur pour revenir aux sélections précédentes,
ou pour diminuer la fréquence, ou recherchez la station la plus forte
précédente.
6. NEXT ► – Appuyez sur pour avancer à la sélection suivante, ou pour
augmenter la fréquence, ou recherchez la station la plus forte suivante.
7. SCAN – Utilisez pour scanner les stations de radio ou pour ajuster le
niveau de rétroéclairage.
8. PRESET – Appuyez sur pour rappeler les stations préréglées.
9. DISPLAY SCREEN – Pour a cher les informations.
Panneau arrière
12
10
13
11
10. Volume – Tournez le bouton de volume pour régler le volume.
11. FM Antenna – Pour recevoir le signal FM.
12. DC Power input – DC 12V
13. AUX IN jack – Connectez le câble audio 3,5 mm à cette prise pour
pro ter de la musique audio externe.
Instructions générales d'utilisation
Adaptateur secteur (fourni avec le package)
Branchez l'adaptateur secteur sur la prise d'alimentation CC située sur le
panneau arrière de la radio.
Obtenez la meilleure réception
Déployez l'antenne télescopique aussi loin que possible.
Allumez la radio
Appuyez sur le bouton STANDBY pour allumer la radio.
Passer en mode veille
Pendant l'utilisation, appuyer longuement sur le bouton STANDBY pour
entrer en mode veille. Appuyez à nouveau pour réveiller la radio. La
radio se met automatiquement en mode veille si aucune opération n'est
e ectuée après 15 minutes.
Réglage du volume
Tournez le bouton Volume pour régler le volume à un niveau confortable.
Écouter la radio à un volume élevé peut endommager votre audition.
Évitez de l'écouter à haut volume pendant de longues périodes.
La première utilisation de la radio
La première fois que vous allumerez la radio, celle-ci recherchera
automatiquement les stations. Durant le balayage, l'écran a chera une
barre de dé lement indiquant la progression du balayage et le nombre de
stations de radio trouvées jusque là. Une fois le balayage terminé, la radio
émettra la première station trouvée.
Fonction répétition
Lorsque l’alarme sonne en mode veille, tournez le bouton Volume pour
activer la fonction RÉPÉTITION.
L'alarme se fera entendre à nouveau après 5 minutes.
Temps de veille
Pour régler la durée de veille, appuyez plusieurs fois sur le bouton SLEEP
pour sélectionner: o , 15, 30, 45, 60, 90 minutes.
Lorsque le temps imparti est écoulé, l'appareil passe en mode veille.
Sélection de modes
En cours d'utilisation, appuyez plusieurs fois sur le bouton MODE pour
passer au mode souhaité: DAB/DAB+, FM, Bluetooth, AUX IN.
Informations sur la station
Appuyez sur le bouton INFO/MENU pour véri er les informations de la
station.
Mise à jour automatique de l'heure
L'heure et la date peuvent être mises à jour automatiquement si le système
détecte le signal RDS. Si le signal RDS est faible ou ne peut pas être détecté,
l'heure ne sera pas automatiquement mise à jour.
Réglage du menu principal
Appuyez longuement sur le bouton INFO/MENU pour accéder à l'écran
de con guration du menu principal. Cherchez et entrez dans l'écran
<Système> en appuyant sur le bouton ENTER. Utilisez le bouton ◄/►
pour faire dé ler les options de menu: <Time setup>, <Alarms>,
<Sleep>, <Language>, <Prune>, <Station Order>, <Backlight>,
<Factory reset>, <SW version>.
REMARQUE: <Prune> et < Station Order> ne
sont disponibles qu'en mode DAB.
Sélectionnez l'une des options, puis appuyez sur le bouton ENTER pour
accéder à ce menu.
Réglage de l'heure
1. Régler l'horloge : 00:00 (Heure:Minutes), utilisez les boutons ◄/► et
ENTER pour le réglage.
2. Régler la date: 01-01-2018 (Jour-Mois-Année), semblable au
paramétrage «Régler l'horloge».
3. Mise à jour automatique: <No update> ou <From radio>, appuyez
sur le bouton ENTER pour con rmer.
4. Régler 12/24 heure: choisissez votre format préféré.

28
Une fois que vous avez terminé les étapes ci-dessus, l'heure est con gurée
manuellement.
Sonneries
Lorsque <Alarms> apparaît,
1. Appuyez sur le bouton ENTER pour accéder à l'écran de réglage de la
sonnerie.
2. Choisissez <Alarm 1: o > ou <Alarm 2: o >, Appuyez sur le bouton
ENTER pour régler la sonnerie sur On.
3. Utiliser le bouton ◄/► pour sélectionner l' heure de la sonnerie,
appuyer sur ENTER pour con rmer.
4. Sélectionner les jours de la sonnerie: Tous les jours, Une fois, Les jours
de la semaine, Les week-ends.
5. Régler le mode sonnerie: DAB, FM, Buzzer.
6. Régler le volume de la sonnerie: il y a une barre de réglage du volume
de sonnerie, appuyez sur le bouton◄/► pour augmenter ou diminuer
le volume, appuyez sur le bouton ENTER pour con rmer.
7. Après tous les réglages ci-dessus, accédez à l'écran Enregistrer,
appuyez sur le bouton ENTER pour enregistrer la sonnerie.
8. Pour annuler les sonneries, accédez à l’écran de réglage de la sonnerie,
appuyez sur le bouton ENTER pour sélectionner O puis accédez à
l’écran de sauvegarde pour enregistrer le paramètre de la sonnerie.
Veille (Régler l'heure de mise en veille) - appuyez
brièvement sur le bouton SLEEP
Accédez à l'écran de réglage de l’heure de veille pour sélectionner l’heure
de veille : o /15/30/45/60/90 minutes.
Langue (Dé nir la langue du système)
Accédez à l'écran de réglage de la langue, utilisez les boutons◄/► et
ENTER pour dé nir la langue du système.
Rétro-éclairage
Accédez à l'écran de réglage du rétro-éclairage, utilisez les boutons
◄/►pour sélectionner le niveau de rétro-éclairage souhaité: 3, 2, 1, o .
Puis, appuyez sur le bouton ENTER pour con rmer votre sélection.
Réinitialisation des paramètres d'usine
Pour régler la radio sur les paramètres d'origine, accédez à l'écran de
réinitialisation d'usine, suivez les conseils <Réinitialisation des paramètres
d'usine?>, Choisissez <OUI> pour réinitialiser, et la radio aura redémarré.
REMARQUES: Vous pouvez également appuyer sur le
bouton SCAN pour régler le niveau de rétroéclairage.
Version SW:
Pour véri er la version du logiciel du système.
Éliminer les stations (disponible uniquement en
mode DAB / DAB +)
Pour supprimer des stations répertoriées, mais non disponibles.
Accédez à l'écran Éliminer, utilisez le bouton ◄/► pour sélectionner<Oui> ou
<Non>, puis, appuyez sur le bouton ENTER pour con rmer votre sélection. Les
stations indisponibles sont maintenant supprimées si vous avez choisi <Oui>.
Ordre des stations (disponible uniquement en mode DAB / DAB +)
Accédez à l'écran Ordre des stations, utilisez le bouton ◄/► pour
sélectionner l'un des ordres de la station, puis appuyez sur le bouton
ENTER pour con rmer.
Fonctionnement DAB/DAB+
Après avoir allumé la radio, appuyez sur le bouton MODE àplusieurs
reprises pour sélectionner et accéder au mode DAB/DAB+ .
Balayage des stations
En mode DAB / DAB +, la radio balaye automatiquement les stations
trouvées dans cette zone.
Appuyez sur le bouton ◄/► pour sélectionner les stations précédentes
ou suivantes, puis appuyez sur le bouton ENTER pour activer la lecture de
la station.
Réglage des stations
Appuyez longuement sur le bouton INFO/MENU, lorsque <Balayage
station > apparaît, appuyez sur le bouton ENTER, puis, utilisez le bouton
◄/► pour faire dé ler les options de balayage: <Balayage complet>,
<Réglage manuel>.
1. Sélectionnez <Réglage manuel>, puis appuyez sur la touche ENTER
pour activer la recherche complète.
2. Sélectionnez le <Réglage manuel> et appuyez sur le bouton ENTER,
utilisez le bouton ◄/► pour sélectionner les stations de 5A:174.928
MHz à 13F:239.200 MHz. Appuyez ensuite sur le bouton ENTER pour
activer la station sélectionnée.
Mémoriser des stations
Il est possible de mémoriser jusqu'à 10 de vos stations DAB préférées. Ceci
vous permettra d’accéder à vos stations favorites rapidement et facilement.
1. Pour mémoriser un préréglage, vous devez d'abord écouter la station
que vous souhaitez enregistrer.
2. Appuyez sur la touche PRESET.
3. Utilisez le bouton ◄/► pour sélectionner le nombre de préréglage
souhaité 1-10.
4. Appuyez et maintenez le bouton ENTER pour con rmer.
Rappel d'une station mémorisée
Une fois que vous avez enregistré les stations sur les stations préréglées.
Vous pouvez les rappeler en appuyant sur le bouton PRESET.
Appuyez sur le bouton ◄/► pour sélectionner les stations mémorisées et
appuyez sur le bouton ENTER pour con rmer.
Mode d'a chage
Chaque fois que vous appuyez sur le bouton INFO/MENU, l'écran a chera
les modes d'a chage suivants:
Les informations sont a chées sur le segment inférieur de l'écran LCD.
Dynamic Label Segment (DLS)
A che les informations textuelles dé lantes fournies par le di useur.
PTY (Type de programme)
Indique le type et la description du programme fourni par la station DAB / DAB +.
Débit binaire
Le débit de données auquel le signal est transmis.
Fréquence
A che le numéro et la fréquence du canal de transmission de la station.
Heure et date
A che l'heure et la date fournies par le di useur.
REMARQUES: DAB – contrairement aux stations radio normales, regroupe
plusieurs stations de radio et les transmet sur une seule fréquence.
Fonctions FM
Passez en mode FM en appuyant sur le bouton MODE.
Sélectionner les stations
Pour rechercher une station FM de 87.5 à 108.00 MHz.
1. Appuyez sur le bouton◄ ou ► pour passer à revenir en arrière ou
avancer la fréquence par pallier de 0.05 MHz.
2. Appuyez longuement sur le bouton ◄ ou ► pour passer à la station
précédente ou suivante à la réception la plus puissante. Une fois qu'une
station a été trouvée, le balayage s'arrête automatiquement. Si aucune station
n'est trouvée, le balayage s'arrêtera après avoir parcouru toute la fréquence.

FR
Réglage des stations
1. Appuyez longuement sur le bouton SCAN pour procéder au balayage
des stations. Durant le balayage, l'écran a chera une barre de
dé lement indiquant la progression du balayage et le nombre de
stations de radio trouvées jusque là. Une fois le balayage terminé, la
radio émettra la première station trouvée.
2.
Appuyez longuement sur le bouton INFO / MENU pour accéder à
l'écran <Réglage audio>, utilisez le bouton◄/► et appuyez sur le
bouton ENTER pour choisir: <Mono forcé> ou <Stéréo autorisé>.
Mémoriser des stations
Il est possible de mémoriser jusqu'à 10de vos stations FM préférées. Ceci vous
permettra d’accéder à vos stations FM favorites rapidement et facilement.
1. Pour mémoriser un préréglage, vous devez d'abord écouter la station
que vous souhaitez enregistrer.
2. Appuyez sur la touche PRESET.
3. Utilisez le bouton ◄/► pour sélectionner le numéro de préréglage
souhaité 1-10.
4. Appuyez et maintenez le bouton ENTER pour con rmer.
Rappel d'une station mémorisée
Une fois que vous avez enregistré les stations sur les stations préréglées.
Vous pouvez les rappeler en appuyant sur le bouton PRESET.
Appuyez sur le bouton ◄/► pour sélectionner les stations mémorisées et
appuyez sur le bouton ENTER pour con rmer.
Mode d'a chage
Appuyez sur la touche INFO/MENU pour parcourir les informations FM
fournies par les stations:
Fonctions Bluetooth
Appuyez plusieurs fois sur la touche MODE pour sélectionner et accéder
au mode Bluetooth.
1. Une fois en mode Bluetooth, “Connecter” apparaît et continue de
clignoter pendant que l'unité essaie de se connecter aux appareils
précédemment associés. Si aucun périphérique n'est trouvé
“Connecter” continue à clignoter pour indiquer qu'il est prêt à être
associé à un nouvel appareil.
2. Activez votre périphérique Bluetooth et recherchez un périphérique
nommé “SHARP DR-S460” dans la liste.
3. Sélectionnez et activez appariement pour le périphérique “SHARP DR-
S460”. Si vous êtes invité à entrer un mot de passe, entrez “0000”.
4. Si l’appariement réussit, l’appareil émettra un son et le “Connecter”
clignotant changera pour "Connecté".
5. Si l'appareil connecté est hors de portée, la radio tentera de se
reconnecter pendant 2 minutes. Lorsque l'appareil est à portée, la radio
se reconnecte automatiquement.
6. Vous devriez maintenant pouvoir di user de l'audio sans l depuis
votre périphérique Bluetooth.
7. Pour vous déconnecter, appuyez sur le bouton MODE sur la radio pour
passer à un autre mode. Ou désactivez la fonction Bluetooth sur votre
appareil.
REMARQUES:
• Le rayonnement opérationnel de Bluetooth est d'environ 7 mètres
Les obstacles entre les appareils peuvent réduire cette plage.
• Un seul périphérique Bluetooth peut être associé à la fois.
• Tous les appareils Bluetooth ne sont pas compatibles.
Dépannage
Ce produit ne contient aucune pièce réparable par l'utilisateur. En cas de
défaut, contactez le fabricant ou le département de service après-vente
autorisé. L'exposition aux pièces internes situées à l'intérieur de l'appareil
peuvent mettre votre vie en danger. La garantie du fabricant ne couvre
pas les défauts provoqués par des réparations e ectuées par des tiers non
autorisés.
Absence de son
Cause
• Le volume n'est pas activé.
Solution
• Ajustez le bouton de volume principal.
Son statique
Cause
• La réception du signal est trop faible.
Solution
• Ajustez l'antenne ou déplacez l'appareil vers un emplacement de signal
plus fort.
Le son est déformé
Cause
• Le volume est trop élevé
Solution
• Réduisez le volume
Station souhaitée introuvable
Cause
• Signal faible
Solution
• Utilisez la fonction de réglage manuel
Pas de fonctions DAB
Cause
• Aucune couverture DAB dans votre secteur.
• Mauvaise réception
Solution
• Ajustez la position de l'antenne.
L'écran est blanc
Cause
• Cela peut se produire si le di useur change l'appellation d'un service ou
supprime une appellation lors de la mise au point.
Solution
• La radio essayera un nouveau réglage.
• Procéder à un balayage
Pas d'alimentation
Cause
• L'adaptateur n'est pas connecté à la prise murale.
Solution
• Assurez-vous que l'adaptateur est branché.

30
Spéci cation technique
Modèle DR-S460
Puissance de sortie 2x7W (RMS)
Consommation électrique (max.) 26W
Consommation électrique en veille <1W
Fréquence FM 87.5-108MHz
Fréquence DAB+ 174.928-239.200MHz
Bluetooth
Version V 4.2
Bande de fréquences 2402 MHz ~ 2480 MHz
Puissance maximale transmise 4dBm
Power Adapter
Nom du modèle: FJ-SW1202000N
Entrée: AC 100-240V ~ 50/60Hz, 0.6A Max
Sortie:
DC 12V
⎓2000mA
Fabricant:
SHENZHEN FU JIA APPLIANCE CO., LTD
B1,Xujing chang Industrial Park, Haoye Road, Fuyong 518103 Shenzhen, China
354 mm
145 mm
185 mm
2,95kg
KG

PL
Ważne środki ostrożności
Proszę zapoznać się zniniejszymi instrukcjami
bezpieczeństwa iwziąć pod uwagę poniższe
ostrzeżenia zanim urządzenie zostanie
uruchomione:
Wykrzyknik wewnątrz trójkąta równobocznego powiadamia
użytkownika o ważnych wskazaniach dotyczących obsługi
i konserwacji (serwisowania) zawartych w instrukcji obsługi
urządzenia.
Należy korzystać wyłącznie z zasilacza opisanego w instrukcji
obsługi.
Ten symbol oznacza, że produkt należy usuwać w sposób
przyjazny dla środowiska, a nie z innymi odpadkami
gospodarczymi.
napięcie zmienne
napięcie stałe
urządzenie klasy II
Tylko do użytku w pomieszczeniach
Efektywność energetyczna na poziomie VI
Biegunowość zasilacza prądu stałego
Żeby zapobiec pożarowi,
zawsze trzymaj świece i inne
źródła otwartego ognia z
daleka od urządzenia.
Ostrzeżenie:
• Zawsze zachowuj podstawowe środki ostrożności podczas korzystania z
urządzenia, zwłaszcza w obecności dzieci.
• Nadzoruj dzieci, by nie bawiły się urządzeniem.
• Należy chronić przewód zasilający przed uszkodzeniem, nie umieszczać
na nim ciężkich przedmiotów, rozciągać go ani zginać. Nie podłączać
urządzenia do przedłużaczy. Uszkodzenie przewodu zasilającego może
spowodować pożar lub porażenie prądem.
• Uważaj, by nie uszkodzić kabla zasilającego: nie stawiaj na nim ciężkich
przedmiotów, nie rozciągaj go ani nie wyginaj. Nie podłączaj urządzenia
do przedłużaczy. Uszkodzenie kabla zasilającego może spowodować
pożar lub porażenie prądem.
• Jeśli przewód zasilający zostanie uszkodzony, należy go wymienić u pro-
ducenta, w serwisie lub u innej wykwali kowanej osoby, żeby ochronić
się przed zagrożeniem.
• Dopilnuj, by urządzenie zostało podłączone do gniazda zasilania 110-
240V ~ 50/60Hz. Używanie wyższego napięcia może powodować awarie,
a nawet zapalenie się urządzenia.
• Jeśli wtyczka nie mieści się w gnieździe, nie wolno wciskać jej na siłę.
• Wyłącz urządzenie przed odłączeniem go od prądu, by całkowicie je
wyłączyć.
• Nie odłączaj ani nie podłączaj kabla zasilającego mokrymi rękami. Może
to spowodować porażenie prądem.
• Jeśli urządzenie nie jest używane przez dłuższy czas, należy odłączyć je
od źródła zasilania.
• Dopilnuj, by wtyczka była zawsze łatwo dostępna.
• Niniejszy produkt nie posiada żadnych części, które może naprawiać
użytkownik. W przypadku wystąpienia usterki skontaktuj się z producen-
tem lub autoryzowanym serwisem. Odsłanianie wewnętrznych części
urządzenia może stanowić zagrożenie dla życia. Gwarancja nie obejmuje
usterek wywołanych naprawami wykonywanymi przez nieupoważnione
strony trzecie.
• Nie używaj produktu tuż po rozpakowaniu. Przed użyciem należy
odczekać, aż urządzenie nagrzeje się do temperatury pokojowej.
• Urządzenia można używać tylko w umiarkowanym klimacie (nie w
klimacie zwrotnikowym i podzwrotnikowym).
• Umieść urządzenie na płaskiej, stabilnej powierzchni, która nie jest
narażona na wibracje.
• Dopilnuj, by urządzenie nie wystawało za krawędź mebla, na którym stoi.
• Aby zmniejszyć ryzyko pożaru, porażenia prądem i uszkodzenia pro-
duktu, nie wystawiaj go na bezpośrednie działanie światła słonecznego,
kurzu, deszczu czy wilgoci. Nigdy nie narażaj urządzenia na zamoczenie
lub zachlapanie i nie stawiaj na nim ani w jego pobliżu zbiorników
wypełnionych cieczą.
• Nie stawiaj żadnych przedmiotów ani zbiorników z płynami, takich jak
wazony itp., na urządzeniu.
• Nie umieszczaj urządzenia w pobliżu źródeł ciepła, takich jak grzejniki,
nawiewy, piece czy inne urządzenia (w tym wzmacniacze) emitujące
ciepło.
• Nie umieszczaj produktu tam, gdzie wilgotność jest wysoka, a wentylacja
słaba.
• Dopilnuj, by zostawić 5 cm wolnego miejsca wokół urządzenia dla
zapewnienia odpowiedniej wentylacji. Nie zakrywaj otworów wentyla-
cyjnych urządzenia. Upewnij się, że otwory wentylacyjne nie są zakryte
przedmiotami, takimi jak gazety, ścierki, zasłony itp.
• NIGDY nie pozwalaj nikomu, zwłaszcza dzieciom, wpychać czegokolwiek
w otwory, gniazda i inne szczeliny w obudowie urządzenia: może to
skutkować śmiertelnym porażeniem prądem.
• Burze stanowią niebezpieczeństwo dla wszystkich urządzeń elekt-
rycznych. Jeśli przewód zasilający lub przewody antenowe zostaną
tra one piorunem, urządzenie może zostać uszkodzone, nawet gdy
jest wyłączone. Przed nadejściem burzy należy odłączyć od urządzenia
wszystkie przewody i złącza.
• Słuchanie zbyt głośnych dźwięków przez słuchawki douszne i nauszne
może powodować utratę słuchu.
Konserwacja
• Przed czyszczeniem urządzenia odłącz przewód zasilający od prądu.
• Do czyszczenia zewnętrznej części obudowy użyj miękkiej, czystej
ściereczki. Nigdy nie czyść obudowy chemikaliami ani detergentami.
Zasilacz
• Żeby odłączyć urządzenie od zasilania sieciowego, odłącz przewód
zasilający od gniazdka elektrycznego.
• Korzystaj wyłącznie z zasilacza dostarczonego w zestawie. Użycie innego
zasilacza może spowodować zagrożenie dla bezpieczeństwa i/lub
uszkodzenie urządzenia.

32
Utylizacja sprzętu
• Nie wyrzucać niniejszego produktu razem z niesortow-
anymi odpadami z gospodarstwa domowego. Oddaj je
do wyznaczonego punktu odbioru w celu przetworzenia
zgodnie z przepisami WEEE. W ten sposób oszczędzasz
zasoby naturalne i chronisz środowisko.
• Powyższy symbol umieszczany jest na urządzeniach elektrycznych i elek-
tronicznych (lub na ich opakowaniach), by przypomnieć użytkownikowi
o tej zasadzie.
• Użytkownicy powinni zgłaszać się do wyznaczonych punktów odbioru
zużytych urządzeń i baterii.
Deklaracja zgodności:
• UMC Poland sp. z o.o. niniejszym oświadcza, że to urządzenie spełnia
zasadnicze wymagania oraz inne odnośne normy określone w dyrekty-
wie RED 2014/53/UE. Pełen tekst deklaracji zgodności WE jest dostępny
pod następującym linkiem: http://www.sharpconsumer.eu/documents-
of-con rmity
Znaki handlowe:
Nazwa i logo Bluetooth®są zarejestrowanymi znakami handlowymi rmy
Bluetooth SIG,. Inc.
Nazwy HDMI i HDMI High-De nition Multimedia Interface oraz logo HDMI
są znakami towarowymi lub zarejestrowanymi znakami towarowymi HDMI
Licensing, LLC w Stanach Zjednoczonych i innych krajach.
Wyprodukowano na licencji Dolby Laboratories. Dolby, Dolby Audio i
symbol z podwójnym D są znakami towarowymi rmy Dolby Laboratories.

PL
Zawartość opakowania
• 1 x Urządzenie główne
• 1 x Instrukcja obsługi
• 1 x Skrócona instrukcja instalacji
• 1 x Zasilacz
• 1x wtyczka sieciowa do zasilacza w wersji dla Wielkiej Brytanii
• 1x wtyczka sieciowa do zasilacza w wersji dla krajów UE
Panele i przyciski
Przedni panel
3
1
4
6
9
2
7
8
5
1. MODE – Naciśnij, aby zmienić tryby: DAB / DAB +, FM, Bluetooth,
AUX IN.
2. STANDBY – Naciśnij ten przycisk, aby włączyć urządzenie lub przejść
do trybu gotowości.
3. INFO/MENU – Naciśnij, aby wyświetlić informacje o stacji lub przejdź
do ekranu ustawień głównego menu.
4. ENTER – Naciśnij, aby potwierdzić wybór.
5. PREVIOUS ◄ – Naciśnij, aby wrócić do poprzednich wyborów, lub,
aby zmniejszyć częstotliwość, lub wyszukaj poprzednią najsilniejszą
stację.
6. NEXT ► – Naciśnij, aby przejść do następnego wyboru, lub, aby
zwiększyć częstotliwość lub wyszukać kolejną najsilniejszą stację.
7. SCAN – Służy do skanowania stacji radiowych lub do regulacji pozio-
mu podświetlenia.
8. PRESET – Naciśnij, aby przywołać zaprogramowane stacje.
9. DISPLAY SCREEN – Aby wyświetlić informacje.
Tylny panel
12
10
13
11
10. Volume – Obróć pokrętło głośności, aby wyregulować poziom
głośności.
11. FM Antenna – Aby odebrać sygnał FM.
12. DC Power input – DC 12V
13. AUX IN jack – Podłącz kabel audio 3,5 mm do tego gniazda, aby
cieszyć się zewnętrzną muzyką audio
Ogólne instrukcje użytkowania
Zasilacz sieciowy (dostarczony w zestawie)
Podłączyć przewód zasilający do gniazda prądu stałego znajdującego
sięna tylnym panelu odbiornika.
Optymalna jakośćodbioru
Maksymalnie wysunąć antenę teleskopową.
Włączyć odbiornik
Nacisnąć przycisk STANDBY, aby włączyć odbiornik.
Przejść do trybu czuwania
Aby przejść w tryb czuwania podczas korzystania z odbiornika, nacisnąć
iprzytrzymać przycisk STANDBY. Nacisnąć ponownie, aby włączyć
odbiornik. Jeśli w ciągu 15 minut nie zostanie wykonana żadna operacja,
odbiornik automatycznie przejdzie w tryb czuwania.
Regulacja głośności
Obrócić pokrętło regulacji głośności, aby ustawić pożądany poziom
dźwięku. Słuchanie radia przy wysokim poziomie głośności grozi
uszkodzeniem słuch. Długotrwałe narażenie na wysoki poziom głośności
grozi uszkodzeniem słuchu.
Pierwsze użycie odbiornika
Po pierwszym włączeniu, odbiornik automatycznie zacznie wyszukiwać
stacje. Podczas wyszukiwania, na ekranie pojawi się pasek wskazujący
postępy i ilość znalezionych stacji radiowych. Po zakończeniu
wyszukiwania, odbiornik przełączyćsięna pierwszą znalezioną stację.
Funkcja drzemki
Gdy alarm włączy się w trybie czuwania, obrócić pokrętło głośności , aby
aktywować funkcję drzemki (SNOOZE).
Alarm włączy się ponownie po 5 minutach.
Wyłącznik czasowy (SLEEP)
Aby ustawić wyłącznik czasowy, kilkakrotnie nacisnąć przycisk SLEEP
iwybraćjedną z następujących opcji: o (wyłączony), 15, 30, 45, 60, 90 minut.
Po upływie ustawionego czasu, urządzenie przejdzie w tryb uśpienia.
Wybór trybu
Kiedy odbiornik jest w użyciu, nacisnąć kilkakrotnie przycisk MODE, aby
przełączyć go na wybrany przez siebie tryb: DAB/DAB+, FM, Bluetooth,
AUX IN.
Informacje o stacji
Nacisnąćprzycisk INFO/MENU, aby uzyskać dostęp do informacji o stacjach.
Automatyczne ustawienie godziny
Godzinę i datęmożna ustawiać automatycznie, jeśli system rozpozna
sygnał RDS. Jeżeli sygnał RDS jest słaby lub nie można go wykryć, godzina
nie zostanie automatycznie zaktualizowana.
Ustawienie menu głównego
Przytrzymać przycisk INFO/MENU, aby przejść do ekranu kon guracji
menu głównego. Znaleźć i otworzyć ekran <System>, naciskając przycisk
SCAN. Następnie na pomocąprzycisków ◄/► przejrzeć opcje menu:
<Time setup/Ustawienie czasu>, <Alarms/Budzik>, <Sleep/Uśpienie>,
<Language/Język>, <Prune/Eliminacja>, <Station Order/Kolejność
stacji>, <Backlight/Podświetlenie>, <Factory reset/Ustawienia
fabryczne>, <SW version/Wersja SW>.
UWAGA: Opcje < Prune> i < Station Order> są dostępne tylko w trybie DAB.
Wybrać jedną z opcji, a następnie przejść do menu, naciskającprzycisk
ENTER.
Ustawienie godziny
1. Ustawić zegar: 00:00 (godzina:minuty) za pomocąprzycisków ◄/►
oraz ENTER.
2. Ustawić datę: 01-01-2018 (dzień-miesiąc-rok), podobnie jak
wprzypadku „ustawienia zegara”.

34
3. Automatyczna aktualizacja: < No update/Brak aktualizacji> lub <
From radio/Z radia>, nacisnąć przycisk ENTER, by potwierdzić.
4. Ustawić czas w preferowanym przez siebie formacie 12/24.
Po wykonaniu powyższych czynności, godzinę należy ustawić ręcznie.
Budzik
Kiedy wyświetla się <Alarms>,
1. Nacisnąć przycisk ENTER, by wprowadzić ustawienia budzika.
2. Wybrać <Alarm 1: o > lub <Alarm 2: o >, nacisnąć przycisk ENTER,
aby włączyć budzik On.
3. Przyciskiem ◄/► ustawić godzinę budzenia, a następnie potwierdzić,
naciskając ENTER.
4. Wybrać dni budzenia: Codziennie, jednorazowo, dni robocze,
weekendy.
5. Ustawić tryb budzika: DAB, FM, Buzzer (dzwonek).
6. Ustawić głośność budzika: służy do tego suwak regulacji głośności
alarmu. Naciskającprzyciski ◄/►, zwiększyć lub zmniejszyćpoziom
głośności, a następnie potwierdzić przyciskiem ENTER.
7. Po potwierdzeniu powyższych ustawień, przejśćdo ekranu Save
inacisnąć przycisk ENTER, aby zapisać ustawienia budzika.
8. Aby wyłączyć budzik, przejść do ekranu ustawień budzika, nacisnąć
przycisk ENTER i wybrać O , a następnie przejść do ekranu zapisu, aby
zapisać nowe ustawienie.
Wyłączenie (Ustawienie wyłącznika czasowego) -
krótko nacisnąćprzycisk SLEEP
Przejśćdo ekranu ustawień wyłącznika czasowego, aby wybrać czas
wyłączenia: o /15/30/45/60/90 minut.
Język (Ustaw język systemu)
Przejść do ekranu ustawień języka i ustawićjęzyk za pomocą przycisków
◄/► oraz ENTER.
Podświetlenie
Przejść do ekranu ustawień Backlight (podświetlenie) za pomocą przycisku
◄/► i wybrać pożądany poziom podświetlenia ekranu: 3, 2, 1, o .
Następnie nacisnąćprzycisk ENTER , aby potwierdzić swój wybór.
Przywracanie ustawień fabrycznych
Aby przywrócić oryginalne ustawienia odbiornika, przejść do ekranu
ustawień fabrycznych, postępować zgodnie ze wskazówkami <Factory
reset?>, wybrać <YES>, aby zresetować; odbiornik włączy sięponownie.
UWAGI: Możesz także nacisnąć przycisk SCAN, aby
wyregulować poziom podświetlenia.
Wersja oprogramowania
Informacja o wersji oprogramowania systemu.
Eliminacja stacji (opcja dostępna tylko w trybie DAB/DAB+)
Służy usuwaniu stacji znajdujących sięna liście, ale niedostępnych.
Przejść do ekranu Usuwania, za pomocą przycisku◄/► i wybrać <Yes> lub
<No>, a następnie potwierdzić dokonany wybór naciskając przycisk ENTER
. Niedostępne stacje zostaną usunięte po wybraniu <Yes>.
Kolejnośćstacji (opcja dostępna tylko w trybie DAB/DAB+)
Przejść do ekranu kolejności stacji, przyciskiem ◄/► wybrać kolejność
stacji, a następnie nacisnąć przyciskENTER, aby potwierdzić.
Działanie DAB/DAB+
Po włączeniu odbiornika, kilkakrotnie nacisnąć przycisk STANDBY, aby
wybrać tryb DAB/DAB+.
Skanowanie stacji
Po przełączeniu na tryb DAB/DAB+, odbiornik automatycznie skanuje
zidenty kowane na danym obszarze stacje.
Przyciskami ◄/► wybrać poprzednią lub następną stację, a następnie
nacisnąć przycisk ENTER, aby włączyć odtwarzanie.
Dostrajanie stacji
Przytrzymać przez chwilę przycisk INFO/MENU, kiedy wyświetli się
<Station scan>, nacisnąćprzycisk ENTER, a następnie przejrzeć opcje
skanowania przyciskiem ◄/► : <Full scan>, <Manual tune>.
1. Wybrać opcję pełnego skanowania <Full scan> i nacisnąć przycisk
ENTER , by uruchomić skanowanie.
2. Wybrać opcję ręcznego dostrajania <Manual tune> i przycisk ENTER,
użyć przycisków ◄/►, żeby wybrać stacje od 5A:174.928 MHz do
13F:239.200 MHz. Następnie nacisnąć przycisk ENTER, by rozpocząć
odtwarzanie wybranej stacji.
Store Stations
Można zapisać maksymalnie 10ulubionych stacji. This will enable you to
access your favourite stations quickly & easily.
1. Można zapisać tylko odtwarzane stacje.
2. Nacisnąć przycisk PRESET.
3. Przyciskami◄/► wybrać numer 1-10.
4. Nacisnąć i przytrzymać przycisk ENTER, aby potwierdzić.
Przywoływanie stacji z pamięci
Wyłącznie po zapisaniu wybranych stacji. Można przywołać
stacjęzpamięci za pomocą przycisku PRESET.
Nacisnąć przycisk ◄/► , aby wybrać zapisane stacje, a następnie
potwierdzić przyciskiem ENTER.
Tryb wyświetlania
Każde naciśnięcie przycisku INFO/MENU spowoduje wyświetlenie
poniższych trybów wyświetlania.
Informacje są wyświetlane w dolnej części wyświetlacza LCD.
Dynamic Label Segment (DLS)
Wyświetla przewijane informacje tekstowe od nadawcy.
PTY (Typ programu)
Wyświetla typ i opis programu dostarczanego przez stację DAB/DAB+.
Przepływowość
Prędkość przesyłanego sygnału.
Częstotliwość
Wyświetla numer kanału i częstotliwość stacji.
Godzina i data
Wyświetla informacje o godzinie i dacie przekazane przez nadawcę.
UWAGA: System DAB – w przeciwieństwie do systemu analogowego, grupuje
kilka stacji radiowych i transmituje ich audycje na jednej częstotliwości.
Tryb FM
Przejść do trybu FM , naciskając przycisk MODE.
Wybór stacji
Wybór stacji FM od 87.5 do 108.00 MHz.
1. Nacisnąćprzycisk ◄ lub ►, aby zmienić częstotliwość, przechodząc
wstecz lub do przodu o 0.05 MHz.

PL
2. Nacisnąć dłużej przycisk ◄ lub ►, aby przejść do kolejnej lub
poprzedniej stacji o najsilniejszym sygnale. Po znalezieniu stacji,
skanowanie zatrzymuje się automatyczne. Jeśli żadna stacja nie
zostanie znaleziona, skanowanie zatrzyma się po przejściu przez całą
częstotliwość.
Strojenie stacji
1. Trzymać naciśnięty przycisk SCAN, aby przeskanować stacje. Podczas
skanowania na ekranie pojawi się suwaka wskazujący postęp
skanowania i liczbę znalezionych stacji radiowych. Po zakończeniu
skanowania odbiornik odtworzy pierwszą znalezioną stację.
2.
Naciśnij i przytrzymaj przycisk INFO / MENU, aby przejść do ekranu
<Ustawienia audio>, użyj przycisku ◄/► i naciśnij przycisk ENTER, aby
wybrać: <Forced mono> lub <Stereo allowed>.
Zapisywanie stacji
Można zapisać maksymalnie 10 ulubionych stacji. Dzięki temu łatwo
iszybko można uzyskać dostęp do ulubionych stacji FM.
1. Można zapisać tylko odtwarzaną stację.
2. Nacisnąć przycisk PRESET.
3. Przyciskiem ◄/► wybrać numer 1-10.
4. Nacisnąć i przytrzymać przycisk ENTER, aby potwierdzić.
Przywołanie zapisanej stacji
Wyłącznie po zapisaniu danej stacji na liście zaprogramowanych stacji.
Stację można przywołać za pomocąprzycisku PRESET.
Nacisnąćprzycisk ◄/►, aby wybrać zapisane stacje, a następnie przycisk
ENTER, aby potwierdzić.
Tryb wyświetlania
Nacisnąć przycisk INFO/MENU, aby przejrzeć informacje udostępnione
przez stacje radiowe:
Działanie Bluetooth
Nacisnąć kilkakrotnie przycisk MODE i wybrać tryb Bluetooth.
1. W trybie Bluetooth wyświetla się sygnał „Connecting”; miga, gdy
odbiornik próbuje połączyć się z urządzeniami, które wcześniej
z nim połączono. Jeżeli nie odnajdzie żadnych urządzeń, sygnał
„Connecting” miga, by wskazać, że jest gotowy na połączenie
znowymi urządzeniami.
2. Aktywowaćswoje urządzenie Bluetooth i wyszukaćna liście urządzenie
oznaczone jako „SHARP DR-S460”.
3. Wybrać i potwierdzić połączenie z urządzeniem „SHARP DR-S460”.
Jeśli konieczne będzie podanie hasła, wprowadzić „0000”.
4. Charakterystyczny dźwięk sygnalizuje, że łączenie urządzeń się
powiodło; migający sygnał „Connecting” zmienia sięwówczas na
„Connected”.
5. Jeśli podłączone urządzenie znajdzie się poza zasięgiem, odbiornik będzie
przez 2 minuty próbował ponownie siępołączyć. Odbiornik automatycznie
połączy się ponownie, gdy urządzenie znajdzie się w zasięgu.
6. Bezprzewodowe przesyłanie dźwięku z urządzenia Bluetooth powinno
byćteraz możliwe.
7. Aby rozłączyć, nacisnąć przycisk MODE na odbiorniku, co spowoduje
przejście urządzenia w inny tryb. Można też wyłączyć funkcję Bluetooth
w swoim urządzeniu.
UWAGA:
• Zasięg transmisji Bluetooth wynosi około 7metrów.
Przeszkody pomiędzy urządzeniami mogą zmniejszać zasięg.
• Jednocześnie można połączyćza pomocą Bluetooth tylko jedno urządzenie.
• Nie wszystkie urządzenia Bluetooth są kompatybilne.
Rozwiązywanie problemów
Niniejszy produkt nie posiada żadnych części, które może naprawiać
użytkownik. W przypadku wystąpienia usterki skontaktuj się z
producentem lub autoryzowanym serwisem. Odsłanianie wewnętrznych
części urządzenia może stanowić zagrożenie dla życia. Gwarancja
nie obejmuje usterek wywołanych naprawami wykonywanymi przez
nieupoważnione strony trzecie.
Brak dźwięku
Przyczyna
• Dźwięk nie jest włączony.
Rozwiązanie
• Ustawić w odpowiedniej pozycji pokrętło dźwięku.
Szum
Przyczyna
• Słaby odbiór sygnału.
Rozwiązanie
• Wyregulowaćantenę lub przenieść urządzenie w miejsce, w którym
odbiór sygnału jest lepszy.
Dźwięk jest zniekształcony.
Przyczyna
• Zbyt wysoki poziom głośności.
Rozwiązanie
• Zmniejszyć głośność.
Nie odnaleziono żądanej stacji.
Przyczyna
• Słaby sygnał
Rozwiązanie
• Użyćfunkcji ręcznego dostrajania.
Nie działa DAB
Przyczyna
• Brak obsługi DAB na danym terenie.
• Słaby sygnał
Rozwiązanie
• Wyregulować ustawienie anteny.
Brak danych na wyświetlaczu.
Przyczyna
• Sytuacja ta może wystąpić, kiedy nadawca zmieni oznaczenie usługi lub
usunie oznaczenie w trakcie dostrajania.
Rozwiązanie
• Odbiornik będzie próbował się dostroić.
• Przeprowadzić skanowanie stacji.
Brak zasilania
Przyczyna
• Zasilacz nie jest podłączony do gniazda w ścianie.
Rozwiązanie
• Sprawdzić, czy zasilacz jest podłączony do gniazda.

36
Dane techniczne
Model DR-S460
Moc wyjściowa 2x7W (RMS)
Pobór energii (maks.) 26W
Pobór energii w trybie czuwania <1W
Częstotliwość FM 87.5-108MHz
DAB+ Częstotliwość 174.928-239.200MHz
Bluetooth
Wersja V 4.2
Pasma częstotliwości 2402 MHz ~ 2480 MHz
Maksymalny poziom przekazywanej mocy 4dBm
Power Adapter
Nazwa modelu: FJ-SW1202000N
Wejście: AC 100-240V ~ 50/60Hz, 0.6A Max
Wyjście:
DC 12V
⎓2000mA
Producent:
SHENZHEN FU JIA APPLIANCE CO., LTD
B1,Xujing chang Industrial Park, Haoye Road, Fuyong 518103 Shenzhen, China
354 mm
145 mm
185 mm
2,95kg
KG


www.sharpconsumer.eu
SAU/MAN/0055
UMC Poland sp. z o.o.
Ostaszewo 57B, 87-148 Łysomice,
Poland
Made in China
Transcripción de documentos
User manual DR-S460 Stereo Digital Radio EN DE ES IT FR PL Product images are for illustration purposes only. Actual product may vary. | Das Bild auf der Verpackung kann vom Inhalt abweichend sein. | Las imágenes del producto son para fi nes ilustrativos solamente. | Le immagini dei prodotti sono solo ai fi ni illustrativi. | Les images du produit sont présentées à titre d’illustration uniquement. | Zdjęcie produktu jest tylko w celach ilustracyjnych. Produkt może się różnić. EN Important safety instructions Please, read these safety instructions and respect the following warnings before the appliance is operated: The exclamation point within an equilateral triangle is intended to alert the user to the presence of important operating and maintenance (servicing) instructions in the literature accompanying the appliance. Use only power supply listed in the user manual. This symbol means that the product should be disposed of in an environmentally friendly manner and not with general household waste. AC voltage DC voltage Class II equipment For indoor use only Energy efficiency marking with level VI Polarity of d.c. power connector In order to prevent fire always keep candles and other open flames away from this product. Warning: • Always follow basic safety precautions when using this applience, especially when children are present. • Children should be supervised to ensure that they do not play with the appliance. • Do not damage the power cord, place heavy objects on it, stretch or bend it. Do not attach extension cables. Damage to the power cord may cause fire or electric shock. • If the supply cord is damaged, it must be replaced by the manufacturer, a service agent or similarly qualied persons in order to avoid a hazard. • Ensure that the unit is plugged into an AC 100-240V 50/60Hz power outlet. Using higher voltage may cause the unit to malfunction or catch fire. • If the power plug does not fit into the socket, do not force it. • Turn off the unit before unplugging it from power source to completely switch it off. • Do not disconnect or connect the power cord with wet hands. This may cause an electric shock. • If the unit is not going to be used for a long period time, disconnect the power supply. • Ensure that the mains plug is always easily accessible. • This product does not contain any parts that are serviceable by the user. In case of a fault, contact the manufacturer or authorised service department. Exposing the internal parts inside the device may endanger your life. The manufacturers guarantee does not extend to faults caused by repairs carried out by unauthorised third parties. • Do not use this product immediately after unpacking. Wait until it warms up to room temperature before using it. • Ensure this product is used in moderate climates only (not in tropical/ subtropical climates). • Place product on a flat, stable surface that is not subject to vibrations. • Ensure the product and its parts is not overhanging the edge of the supporting furniture. • To reduce the risk of fire, electric shock or damage to this product, do not expose it to direct sunlight, dust, rain and moisture. Never expose it to dripping or splashing and do not place objects filled with liquids on or near the product. • Do not place objects filled with liquids, such as vases, on the apparatus. • Do not install near any heat sources such as radiators, heat registers, stoves, or other apparatus (including amplifiers) that produce heat. • Do not place the product where the humidity is high and ventilation is poor. • Ensure a minimum distance of 5 cm around the apparatus for sufficient ventilation. Do not block any ventilation openings of this product. Always ensure that the ventilation openings are not covered with items such as newspapers, table-cloths, curtains, etc. • NEVER let anyone, especially children, push anything into holes, slots or any other openings in the unit’s casing as this could result in a fatal electric shock. • Storms are dangerous for all electric appliances. If the mains or aerial wiring is struck by lightning, the appliance might get damaged, even if it is turned off. You should disconnect all the cables and connectors of the appliance before a storm. Maintenance • Unplug the power cable from the power source before cleaning the appliance. • Use a soft and clean rag to clean the outside of the unit. Never clean it with chemicals or detergent. Power Adapter • To disconnect the unit from the mains supply, unplug the lead from the mains socket. • Only use the supplied mains adaptor as failure to do this may result in a safety risk and/or damage to the unit. 2 Disposal of this equipment • Do not dispose of this product as unsorted municipal waste. Return it to a designated collection point for the recycling of WEEE in accordance with local law. By doing so, you will help to conserve resources and protect the environment. • The shown above appears on electrical and electronical equipment (or the packaging) to remind users of this. • Users are requested to use existing return facilities for used equipment and batteries. CE Statement: • Hereby, UMC Poland sp. z o.o. declares that this audio device is in compliance with the essential requirements and other relevant provisions of RED Directive 2014/53/EU. The full text of the EU declaration of conformity is available by following the link http://www. sharpconsumer.eu/documents-of-confirmity Trademarks: The Bluetooth® word mark and logos are registered trademarks owned by Bluetooth SIG,. Inc. The terms HDMI and HDMI High-Definition Multimedia Interface, and the HDMI Logo are trademarks or registered trademarks of HDMI Licensing, LLC in the United States and other countries. Manufactured under license from Dolby Laboratories. Dolby, Dolby Audio and the double-D symbol are trademarks of Dolby Laboratories. EN What is included in the box: • • • • • • General Operating Instructions 1 x Main unit 1 x User Manual 1 x Quick start guide 1 x Power adaptor 1x UK AC plug for power adapter 1x EU AC plug for power adapter Mains Adaptor (supplied with the package) Connect the mains adaptor to the DC power socket on the rear panel of the radio. Get the Best Reception Extend the telescopic aerial as far as it can go. Turn On the Radio Press the STANDBY button to turn on the radio. Panels & Controls Switch to Standby Mode When in use, long press the STANDBY button to enter Standby mode. Press it again to wake up the radio. The radio will turn into standby mode automatically if no any operations after 15 minutes. Front Panel Adjust the Volume Rotate the Volume Knob to adjust the volume to a comfortable level. Listening to the radio at a high volume levels may damage your hearing. Avoid listening at high volume levels for long periods of time. 9 1 2 3 4 5 6 7 8 The first time the radio is used The first time you turn the radio on it will automatically scan for stations. During scanning, the screen will display a slide bar that indicates the progress of the scan and the amount of radio stations that have been found so far. Once the scan has finished, the radio will play the first station it finds. 1. MODE – Press to change the modes: DAB/DAB+, FM, Bluetooth, AUX IN. 2. STANDBY – Press this button to turn on the unit or enter standby mode. 3. INFO/MENU – Press to view the station information, or enter main menu setting screen. Snooze function When the alarm is sounding in Standby mode, rotate the Volume Knob to activate the SNOOZE function. The alarm will sound again after 5 minutes. Sleep Time To set the sleep time, repeatedly press the SLEEP button to select from: off, 15, 30, 45, 60, 90 minutes. When the set time has passed, the unit will enter sleep mode. 4. ENTER – Press to confirm your selections. 5. PREVIOUS ◄ – Press to go back to the previous selections, or to decrease the frequency, or seek the previous strongest station. Select Modes When in use, press the MODE button repeatedly to switch to your desired mode: DAB/DAB+, FM, Bluetooth AUX IN. 6. NEXT ► – Press to go forward to the next selection, or to increase the frequency, or seek the next strongest station. Station Information Press the INFO/MENU button to check the station information. 7. SCAN – Use to scan the radio stations, or to adjust the backlight level. 8. PRESET – Press to recall the preset stations. 9. DISPLAY SCREEN – To show the information. Time Auto Update The time and date can be updated automatically if the system detects the RDS signal. If the RDS signal is weak or cannot be detected, the time will not automatically update. Rear Panel 10 11 12 13 Main Menu Setting Long press the INFO/MENU button to enter the main menu setup screen. Find and enter the <System> screen by pressing the ENTER button. Then use the ◄/► button to cycle through the menu options: <Time setup>, <Alarms>, <Sleep>, <Language>, <Prune>, <Station Order>, <Backlight>, <Factory reset>, <SW version>. NOTE: The <Prune> and < Station Order> are only available in DAB mode. 10. Volume Knob – Rotate the volume knob to adjust the volume level. 11. FM Antenna – To receive the FM signal. 12. DC Power input – DC 12V 13. AUX IN jack – Connect the 3.5mm audio cable to this jack to enjoy the external audio music. Select one of the options and then press the ENTER button to access that menu. Time setup 1. Set clock: 00:00(Hour:Minutes), use the ◄/► and ENTER buttons to set. 2. Set date: 01-01-2018(Day-Month-Year), same as the “set clock” setting. 3. Auto update: <No update> or <From radio>, press ENTER button to confirm. 4. Set 12/24 hour: choose your favorite format. 4 After you finish the steps above, the time is set up manually. Alarms When the <Alarms> appears, 1. Press ENTER button to enter the alarm setting screen. 2. Choose <Alarm 1: off> or <Alarm 2: off>, press the ENTER button to set the alarm On. 3. Using the ◄/► button to select the alarm time, press ENTER to confirm. 4. Select the alarm days: Daily, Once, Weekdays, Weekends. 5. Set the alarm mode: DAB, FM, Buzzer. 6. Set the alarm volume: there is a slide bar adjusting the alarm volume, press ◄/► button to increase or decrease the volume level, press ENTER button to confirm. 7. After all the above settings, enter the Save screen, press ENTER button to save the alarm. 8. To cancel the alarms, enter the alarm setting screen, press ENTER button to select Off and then enter save screen to save the alarm off setting. Sleep (Set sleep time)-briefly press SLEEP button Enter the Sleep time setting screen to select the sleep time: off/15/30/45/60/90 minutes. Language (Set the system language) Enter Language setting screen, use the ◄/► and ENTER buttons to set the system language. scanning options: <Full scan>, <Manual tune>. 1. Select the <Full scan>, and then press ENTER button to enable full scanning. 2. Select the <Manual tune> and press ENTER button, use ◄/► button to select stations from 5A:174.928MHz to 13F:239.200MHz. Then press ENTER button to activate the selected station. Store Stations It is possible to store up to 10 of your favourite DAB stations. This will enable you to access your favourite stations quickly & easily. 1. To store a preset, you must first be listening to the station you would like to save. 2. Press the PRESET button. 3. Use the ◄/► button to select desired preset number 1-10. 4. Press and hold the ENTER button to confirm. Recall A Stored Station Once you have saved the stations to the preset stations. You can recall by pressing the PRESET button. Press the ◄/► button to select the stored stations, and press ENTER button to confirm. Display Mode Every time you press the INFO/MENU button, the display will cycle through the following display modes: The information is displayed on the lower segment of the LCD display. Backlight Enter Backlight setting screen, using the ◄/► button to select your desired display backlight level: 3, 2, 1, off. Then press the ENTER button to confirm your selection. Factory reset To set the radio to the original settings, enter the Factory reset screen, follow the tips <Factory reset?>, choose <YES> to reset, and the radio will be restarted. NOTE: You also can press SCAN button to adjust the backlight level. SW version To check the software version of the system. Prune the stations (only available in DAB/DAB+ mode) Dynamic Label Segment (DLS) Displays scrolling text information supplied by the broadcaster. PTY (Programme Type) Shows the type and description of the programme provided by the DAB/ DAB+ station. To remove stations that listed but are unavailable. Enter the Prune screen, use the ◄/► button to select <Yes> or <No>, then press the ENTER button to confirm your selection. The unavailable stations now be deleted if you chose <Yes>. Bit Rate The data rate which the signal is being transmitted. Station order (only available in DAB/DAB+ mode) Time and Date Displays the time and date information provided by the broadcaster. NOTES: DAB-unlike normal radio, groups together several radio stations and transmits them on one frequency. Enter the Station order screen, use the ◄/► button to select one of the station orders, then press the ENTER button to confirm. DAB/DAB+ Operations Frequency Displays the station's transmission channel number and frequency. FM Operations After turn on the radio, press the MODE button repeatedly to select and enter DAB/DAB+ mode. Switch to FM mode by pressing the MODE button. Scan Stations Select Stations When turning on to DAB/DAB+ mode, the radio will automatically scan the stations it found in this area. Press the ◄/► button to select the previous or next stations, then press the ENTER button to activate to play the station. To search for an FM station from 87.5 to 108.00MHz. 1. Press the ◄ or ► button to skip to go back or go forward the frequency by the step of 0.05MHz. Station Tuning Long press the INFO/MENU button, when the <Station scan> appears, press the ENTER button, then use the ◄/► button to cycle through the 2. Long press the ◄ or ► button to skip to the previous or next station of the strongest reception. Once a station has been found, it stops scanning automatically. If no station is found, it will stop after it has cycled through the entire frequency. EN Tuning Stations 1. Long press the SCAN button to scan the stations. During scanning, the screen will display a slide bar that indicate the progress of the scan and the amount of radio stations that have been found so far. Once the scan has finished, the radio will play the first station it found. 2. Long press the INFO/MENU button to enter <Audio setting> screen, use the ◄/► button and press ENTER button to choose: <Forced mono> or <Stereo allowed>. Store Stations It is possible to store up to 10 of your favourite FM stations. This will enable you to access your favourite FM stations quickly & easily. 1. To store a preset, you must first be listening to the station you would like to save. 2. Press the PRESET button. 3. Use the ◄/► button to select desired preset number 1-10. 4. Press and hold the ENTER button to confirm. Recall a Stored Station Once you have saved the stations to the preset stations. You can recall by pressing the PRESET button. Press the ◄/► button to select the stored stations, and press ENTER button to confirm. Troubleshooting This product does not contain any parts that are serviceable by the user. In case of a fault, contact the manufacturer or authorised service department. Exposing the internal parts inside the device may endanger your life. The manufacturers guarantee does not extend to faults caused by repairs carried out by unauthorised third parties. No Sound Cause • Volume not turned up. Solution • Adjust the main volume knob. Static Sound Cause • Signal reception too low. Solution • Adjust the antenna or move the unit to a stronger signal location. Sound is distorted Cause • Volume is too high Solution • Reduce the volume Display mode Desired station not found Press the INFO/MENU button to cycle through the FM information provided by the stations: Cause • Weak signal Solution • Use the Manual Tune function. NO DAB functions Blutooth Operations Cause • No DAB coverage in your area. • Poor reception Solution • Adjust the position of the aerial. Press the MODE button repeatedly to select and enter Bluetooth mode. The display is blank. 1. Once in Bluetooth mode, “Connecting” appears and keeps flashing as the unit tries to connect to previously paired devices. If no devices are found “Connecting” continues to flash to indicate it is ready for pairing to a new device. Cause • This may occur if the broadcaster changes the label of a service or removes a label while tuned. Solution • The radio will try to retune. • Perform a scan. 2. Activate your Bluetooth device and search for a device labelled “SHARP DR-S460” in the list. 3. Select and enable pairing for the “SHARP DR-S460” device. If prompted for a password, enter “0000”. 4. If pairing is successful, the unit will sound, and the flashing “Connecting” will change to "Connected". 5. If connected device goes out of range, the radio will attempt to reconnect for 2 minutes. When the device comes into range, the radio will reconnect again automatically. 6. You should now be able to stream audio wirelessly from your Bluetooth device. 7. To disconnect, press the MODE button on the radio to switch to another mode. Or turn off the bluetooth function in your device. NOTES: • The operation range of Bluetooth is approximately 7metres. Obstacles inbetween devices may reduce this range. • Only one Bluetooth device can be paired at a time. • Not all Bluetooth devices are compatible. NO Power Cause • The adaptor is not connected to the wall outlet. Solution • Make sure the adaptor is plugged. 6 Technical specification Model DR-S460 Output Power 2x7W (RMS) Power Consumption (max.) 26W Power Consumption Standby <1W FM Frequency 87.5-108MHz DAB+ Frequency 174.928-239.200MHz Bluetooth Version V 4.2 Frequency bands 2402 MHz ~ 2480 MHz Maximum power transmitted 4dBm Power Adapter Model name: FJ-SW1202000N Input: AC 100-240V ~ 50/60Hz, 0.6A Max DC 12V ⎓2000mA Output: SHENZHEN FU JIA APPLIANCE CO., LTD B1,Xujing chang Industrial Park, Haoye Road, Fuyong 518103 Shenzhen, China Manufacturer: 145 mm 354 mm 185 mm KG 2,95kg DE Wichtige Sicherheitsanweisungen Bitte lesen Sie sich diese Sicherheitsanweisungen durch und beachten Sie, bevor Sie das Gerät in Betrieb nehmen, auf die folgenden Warnhinweise: Das Dreieckszeichen mit Ausrufungszeichen verweist auf wichtige Funktions - und Wartungshinweise (Reparatur) in der dem Gerät beigelegten Bedienungsanleitung. Benutzen Sie nur die Energieversorgung, die in der Bedienungsanleitung angegeben ist. Dieses Symbol bedeutet, dass das Produkt auf umweltfreundliche Weise und nicht mit dem gewöhnlichen Haushaltsmüll entsorgt werden sollte. Wechselspannung Gleichspannung Gerät der Klasse II Nur für den Innenbereich Energieeffizienzkennzeichnung mit Stufe VI Polarität des Gleichstromsteckers Halten Sie Kerzen und offenes Feuer von diesem Produkt fern, um einen Brand zu vermeiden. Warnung: • Halten Sie sich während der Nutzung dieses Geräts immer an die allgemeinen Sicherheitshinweise, insbesondere, wenn Kinder in der Nähe sind. • Kinder sollten beaufsichtigt werden, um sicherzustellen, dass sie nicht mit dem Gerät spielen. • Das Stromkabel darf weder beschädigt, noch dürfen schwere Objekte darauf abgelegt werden, außerdem dürfen Sie es nicht dehnen oder verbiegen. Schließen Sie keine Verlängerungskabel an. Schäden am Stromkabel können zu einem Feuer oder Stromschlag führen. • Das Stromkabel darf weder beschädigt, noch dürfen schwere Objekte darauf abgelegt werden, außerdem dürfen Sie es nicht dehnen oder verbiegen. Schließen Sie auch keine Verlängerungskabel an. Schäden am Stromkabel können zu einem Feuer oder Stromschlag führen. • Wenn das Stromversorgungskabel beschädigt ist, muss es vom Hersteller, einem Servicetechniker oder einer ähnlich qualifizierten Person ausgetauscht werden, um Gefährdungen zu vermeiden. • Stellen Sie sicher, dass die Einheit an eine AC 110-240V 50/60Hz Steckdose angeschlossen wird. Eine höhere Spannung kann zu Fehlfunktionen oder sogar zu einem Brand führen. • Wenn der Netzstecker nicht in die Steckdose passt, dürfen Sie ihn nicht mit Gewalt einstecken. • Wenn der Stecker nicht in die Steckdose passt, dürfen Sie keine Gewalt anwenden, um einen nicht passenden Stecker in die Steckdose zu drücken. • Schalten Sie die Einheit aus, bevor Sie sie von der Stromversorgung trennen, um sie so vollständig abzuschalten. • Wenn das Gerät längere Zeit nicht benutzt wird, trennen Sie es von der Stromversorgung. • Vermeiden Sie es, das Stromkabel mit nassen Händen anzuschließen oder zu trennen. Dies könnte andernfalls zu einem Stromschlag führen. • Trennen Sie das Stromkabel, wenn es längere Zeit nicht verwendet wird. • Stellen Sie sicher, dass der Hauptstecker immer leicht zugänglich ist. • Dieses Produkt enthält keine Teile, die vom Benutzer gewartet werden können. Setzen Sie sich im Fall eines Defekts mit dem Hersteller oder der autorisierten Kundenabteilung in Verbindung. Teile aus dem Inneren des Geräts freizulegen kann lebensgefährlich sein. Die Garantie der Hersteller gilt nicht für Defekte, die durch von nicht autorisierte Dritten durchgeführte Reparaturen entstehen. • Benutzen Sie dieses Produkt nicht direkt nach dem Auspacken. Warten Sie, bis es sich auf Zimmertemperatur erwärmt hat, ehe sie es einschalten. • Stellen Sie sicher, dass dieses Produkt ausschließlich in Umgebungen mit mildem Klima verwendet wird (kein tropisches oder subtropisches Klima). • Stellen Sie das Produkt auf eine flache, stabile Oberfläche, die keinen Erschütterungen ausgesetzt ist. • Das Produkt und dessen Teile dürfen nicht über die Kante delelte tragenden Möbelstücks hinausragen. • Um das Risiko eines Feuers, Stromschlags oder Schäden an diesem Produkt zu reduzieren, sollten Sie es nicht direktem Sonnenlicht, Staub, Regen oder Feuchtigkeit aussetzen. Setzen Sie es niemals tropfendem oder spritzendem Wasser aus und positionieren Sie keine mit Flüssigkeiten gefüllten Objekte auf oder neben dem Produkt. • Setzen Sie keine mit Flüssigkeit gefüllten Objekte wie Vasen auf das Gerät. • Installieren Sie das Produkt nicht in der Nähe von Heizquellen, wie etwa Heizungen, Heizregister, Öfen oder anderen Apparaten (einschließlich Verstärker), die Hitze produzieren. • Platzieren Sie das Gerät nicht an Orten mit hoher Feuchtigkeit und mangelhafter Belüftung. • Sorgen Sie für einen Mindestabstand von 5 cm rund um das Gerät, um eine ausreichende Belüftung sicherzustellen. Vermeiden Sie es, Belüftungsöffnungen an diesem Produkt zu blockieren. Sorgen Sie immer dafür, dass die Belüftungsöffnungen nicht durch Gegenstände, z. B. Zeitungen, Tischdecken, Gardinen usw. verdeckt sind. • Lassen Sie NIEMALS jemanden, ganz besonders nicht Kinder, etwas in die Löcher, Spalten oder anderen Öffnungen des Gerätegehäuses stopfen, da dies zu einem folgenschweren Stromschlag führen kann. • Gewitter sind für alle elektrischen Geräte gefährlich. Wenn das Stromoder Antennenkabel vom Blitz getroffen wird, kann das Gerät, auch wenn es ausgeschaltet ist, beschädigt werden. Bei einem herannahenden Gewitter sollten Sie alle Kabel und Stecker des Gerätes ausstecken. • Ein exzessiver Schalldruck von Kopfhörern kann zu einem Hörverlust führen. Wartung • Trennen Sie vor dem Reinigen des Geräts das Stromkabel von der Stromquelle. • Verwenden Sie einen weichen und sauberen Lappen, um die Außenflächen der Einheit zu reinigen. Verwenden Sie beim Reinigen niemals Chemikalien oder Reinigungsmittel. Netzadapter • Um die Einheit von der Stromversorgung zu trennen, trennen Sie das Netzkabel von der Steckdose. • Benutzen Sie nur den mitgelieferten Netzadapter, andernfalls kann es zu einem Sicherheitsrisiko/einer Beschädigung des Gerätes kommen. 8 Entsorgung dieses Geräts • Entsorgen Sie dieses Gerät niemals über den normalen Hausmüll. Geben Sie es entsprechend den gesetzlichen Regelungen vor Ort bei dem für das Recycling von WEEE vorgesehenen Sammelpunkt ab. Damit helfen Sie, Ressourcen einzusparen und die Umwelt zu schützen. • Die oben aufgeführten Hinweise sind auf elektrischen und elektronischen Geräten und Batterien (oder der Verpackung) zu finden, um Nutzer entsprechend zu erinnern. Nutzer werden darum gebeten, für gebrauchte Geräte und Batterien bestehende Rückgabeeinrichtungen zu nutzen. CE-Konformitätserklärung: • Die Universal Media Corporation s.r.o erklärt hiermit, dass dieses Audiogerät die wesentlichen Anforderungen und weitere entsprechende Vorschriften der RED-Verordnung 2014/53/EU einhält. Der vollständige Text der EU-Konformitätserklärung ist unter folgender Internetadresse erhältlich: http://www.sharpconsumer.eu/documents-of-confirmity Markenzeichen: Die Bluetooth® Wortmarke und Logos sind geschützte Marken der Bluetooth SIG Inc. Die Begriffe HDMI und HDMI High-Definition Multimedia Interface sowie das HDMI Logo sind Warenzeichen oder in den Vereinigten Staaten und weiteren Ländern eingetragene Warenzeichen der HDMI Licensing, LLC. In Lizenz von Dolby Laboratories gefertigt. Dolby, Dolby Audio und das Doppel-D-Symbol sind Warenzeichen von Dolby Laboratories. DE Was befindet sich im Karton: • 1 x Hauptgerät • 1 x Benutzerhandbuch • 1 x Schnellstart-Handbuch • 1 x Netzadapter Allgemeine Betriebsanleitung Netzadapter (beiliegend) Schließen Sie den Netzadapter an die GleichstromStromversorgungsbuchse (DC) auf der Rückseite des Radios an. • 1x Wechselstromstecker für Netz- • 1x Wechselstromstecker für Netzadapter (Vereinigtes Königreich) adapter (Europäische Union) Den besten Empfang erhalten Teleskopantenne maximal ausfahren. Das Radio einschalten Drücken Sie zum Einschalten des Radios die Taste STANDBY (STAND-BY). Panels und Bedienelemente In den Stand-by-Modus schalten Wenn das Radio läuft, drücken Sie lange die Taste STANDBY (STANDBY), um den Stand-by-Modus zu aktivieren. Erneut drücken, um das Radio aufzuwecken. Das Radio schaltet ohne Betrieb automatisch nach 15 Minuten in den Stand-by-Modus. Vorderseite 9 1 2 3 4 5 6 7 8 Lautstärkeregelung Drehen Sie den Lautstärkeregler, um die Lautstärke auf ein angenehmes Niveau einzustellen. Wenn Sie bei hoher Lautstärke Radio hören, kann Ihr Gehör geschädigt werden. Vermeiden Sie es, über einen längeren Zeitraum bei hoher Lautstärke Radio zu hören. Die erste Benutzung des Radios Wenn Sie das Radio zum ersten Mal einschalten, startet es automatisch den Sendersuchlauf. Während des Suchlaufs wird auf dem Bildschirm ein Schiebebalken angezeigt, der den Fortschritt des Suchlaufs und die Anzahl der bisher gefundenen Sender anzeigt. Sobald der Suchlauf abgeschlossen ist, spielt das Radio den zuerst gefundenen Sender ab. 1. MODE – Drücken Sie, um die Modi zu ändern: DAB / DAB +, FM, Bluetooth, AUX IN. 2. STANDBY – Drücken Sie diese Taste, um das Gerät einzuschalten oder in den Standby-Modus zu wechseln. 3. INFO/MENU – Drücken Sie, um die Senderinformationen anzuzeigen, oder rufen Sie das Hauptmenü auf. 4. ENTER – Drücken Sie, um Ihre Auswahl zu bestätigen. 5. PREVIOUS ◄ – Drücken Sie, um zur vorherigen Auswahl zurückzukehren oder die Frequenz zu verringern oder suchen Sie nach dem vorherigen stärksten Sender. 6. NEXT ► – Drücken Sie, um zur nächsten Auswahl zu gelangen, oder um die Frequenz zu erhöhen, oder suchen Sie den nächsten Sender. 7. SCAN – Verwenden Sie diese Option, um die Radiosender zu scannen oder die Hintergrundbeleuchtung einzustellen. 8. PRESET – Drücken Sie, um die gespeicherten Sender abzurufen. 9. DISPLAY SCREEN – Um die Informationen anzuzeigen. Snooze-Funktion (Schlummer) Wenn der Alarm im Stand-by-Modus ertönt, drehen Sie am Lautstärkeregler, um die Funktion SNOOZE (SCHLUMMER) zu aktivieren. Der Alarm ertönt nach 5 Minuten erneut. Schlafzeit Um die Schlafzeit einzustellen, drücken Sie wiederholt die Taste SLEEP (SCHLAF), um eine der folgenden Optionen auszuwählen: aus, 15, 30, 45, 60, 90 Minuten. Wenn die Zeit vorbei ist, wird der Schlafmodus des Geräts aktiviert. Modi wählen Wenn das Radio läuft, drücken Sie wiederholt die Taste MODE/STANDBY (MODUS/STAND-BY), um zu ihrem gewünschten Modus umzuschalten: DAB/DAB+, FM, Bluetooth, AUX IN. Senderinformationen Drücken Sie die Taste INFO/MENU (INFO/MENÜ), um die Senderinformationen aufzurufen. Rückseite 10 11 Automatische Aktualisierung der Zeit Die Uhrzeit und das Datum können automatisch aktualisiert werden, wenn das System das RDS-Signal erkennt. Wenn das RDS-Signal schwach ist oder nicht erkannt werden kann, wird die Zeit nicht automatisch aktualisiert. Hauptmenü-Einstellung 12 13 10. Volume – Drehen Sie den Lautstärkeregler, um die Lautstärke einzustellen. 11. FM Antenna – Um das FM-Signal zu empfangen. 12. DC Power input – Gleichstrom 12V 13. AUX IN jack – Schließen Sie das 3,5-mm-Audiokabel an diese Buchse an, um die externe Audiomusik zu genießen. Drücken Sie lange die Taste INFO/MENU (INFO/MENÜ), um den Einstellungsbildschirm des Hauptmenüs aufzurufen. Suchen Sie den Bildschirm <System> und rufen Sie ihn auf, indem Sie die Taste SCAN (SCAN) drücken. Benutzen Sie dann die Taste ◄/►, um durch die Menüoptionen zu blättern: <Time setup> (Zeiteinstellung), <Alarms> (Alarme), <Sleep> (Schlaf), <Language> (Sprache), <Prune> (Bereinigen), <Station Order> (Senderreihenfolge), <Backlight> (Hintergrundbeleuchtung), <Factory reset> (Werkseinstellung), <SW version> (Software-Version). HINWEIS: Die Optionen <Prune> (Bereinigen) und < Station Order> (Senderreihenfolge) sind nur im DAB-Modus verfügbar. Wählen Sie eine der Optionen und drücken Sie anschließend die Taste ENTER (EINGABE), um dieses Menü aufzurufen. 10 Zeiteinstellung Senderreihenfolge (nur im Modus DAB/DAB+ verfügbar) 1. Einstellen der Uhr: 00:00 (Stunden:Minuten), benutzen Sie zur Einstellung die Tasten ◄/► und ENTER (EINGABE). Rufen Sie den Bildschirm der Senderreihenfolge auf; benutzen Sie die Taste ◄/► zur Auswahl der Senderreihenfolge; drücken Sie anschließend zur Bestätigung die Taste ENTER (EINGABE). 2. Datum einstellen: 01-01-2018 (Tag-Monat-Jahr), ebenso wie die Einstellung unter „Einstellen der Uhr“. 3. Automatisches Update: <No update> (Kein Update) oder <From radio> (Von Radio); drücken Sie zur Bestätigung die Taste ENTER (EINGABE). 4. 12/24 Stunden einstellen: Wählen Sie Ihr bevorzugtes Format aus. Nachdem Sie die oberen Schritte durchgeführt haben, wurde die Zeit manuell eingestellt. Alarme Wenn <Alarms> (Alarme) erscheint, 1. drücken Sie die Taste ENTER (EINGABE), um den AlarmEinstellungsbildschirm aufzurufen. 2. Wählen Sie <Alarm 1: off> (Alarm 1: aus) oder <Alarm 2: off> (Alarm 2: aus), drücken Sie die Taste ENTER (EINGABE), um den Alarm auf On (Ein) zu schalten. 3. Mit der Taste ◄/► wählen Sie die Alarmzeit; drücken Sie zur Bestätigung ENTER (EINGABE). 4. Wählen Sie die Alarmtage: Daily (Täglich), Once (Einmal), Weekdays (Wochentage), Weekends (Wochenende). 5. Stellen Sie den Alarmmodus ein: DAB, FM, Buzzer (Summer). 6. Stellen Sie die Alarmlautstärke ein: Es gibt einen Schiebebalken zur Anpassung der Alarmlautstärke; drücken Sie die Taste ◄/►, um die Lautstärke zu erhöhen oder zu senken; drücken Sie zur Bestätigung die Taste ENTER (EINGABE). 7. Rufen Sie nach all diesen oberen Einstellungen den Bildschirm Save (Speichern) auf; drücken Sie die Taste ENTER (EINGABE), um den Alarm abzuspeichern. 8. Um die Alarme abzubrechen, rufen Sie den Bildschirm der Alarmeinstellungen auf, drücken die Taste ENTER (EINGABE), um Off (Aus) auszuwählen, und rufen dann den Speicherbildschirm auf, um die Alarm-Aus-Einstellung abzuspeichern. Sleep (Set sleep time) [Schlaf (Schlafzeit einstellen)] – Drücken Sie kurz die Taste SLEEP (SCHLAF) Rufen Sie den Einstellungsbildschirm der Schlafzeit auf, um die Schlafzeit auszuwählen: aus/15/30/45/60/90 Minuten. Sprache (Einstellen der Systemsprache) Rufen Sie den Bildschirm der Spracheinstellung auf; benutzen Sie die Tasten ◄/► und ENTER (EINGABE), um die Systemsprache einzustellen. Hintergrundbeleuchtung Rufen Sie den Bildschirm der Hintergrundbeleuchtung auf; benutzen Sie die Taste ◄/►, um Ihre bevorzugte Helligkeit der Hintergrundbeleuchtung auszuwählen: 3, 2, 1, aus. Drücken Sie anschließend die Taste ENTER (EINGABE) , um Ihre Auswahl zu bestätigen. Werkseinstellungen Um das Radio auf die ursprünglichen Einstellungen zurückzusetzen, rufen Sie den Bildschirm der Werkseinstellungen auf, und befolgen sie die Tipps <Factory reset?> (Werkseinstellungen?), wählen zum Zurücksetzen <YES> (JA), und das Radio wird neu gestartet. HINWEISE: Sie können auch die SCAN-Taste drücken, um die Hintergrundbeleuchtung einzustellen. Betrieb DAB/DAB+ Drücken Sie nach dem Einschalten des Radios wiederholt die Taste MODE (MODUS), um den Modus DAB/DAB+ auszuwählen und aufzurufen. Sendersuchlauf Wenn Sie den Modus DAB/DAB+ einschalten, sucht das Radio automatisch die Sender, die in diesem Gebiet gefunden werden können. Drücken Sie die Taste ◄/►, um die vorherigen oder nächsten Sender auszuwählen; drücken Sie anschließend die Taste ENTER (EINGABE), um den Sender zu aktivieren und wiederzugeben. Sender einstellen Drücken Sie lange auf die Taste INFO/MENU (INFO/MENÜ), wenn <Station scan> (Sendersuchlauf) erscheint; drücken Sie auf die Taste ENTER (EINGABE); benutzen Sie anschließend die Taste ◄/►, um durch die Suchlaufoptionen zu blättern: <Full scan> (Vollständiger Suchlauf), <Manual tune> (Manuelle Einstellung). 1. Wählen Sie <Full scan> (Vollständiger Suchlauf) aus und drücken Sie die Taste ENTER (EINGABE), um den vollständigen Suchlauf zu aktivieren. 2. Wählen Sie <Manual tune> (Manuelle Einstellung) aus und drücken Sie die Taste ENTER (EINGABE); benutzen Sie die Taste ◄/►, um die Sender von 5A:174,928 MHz bis 13F:239,200 MHz auszuwählen. Drücken Sie anschließend die Taste ENTER (EINGABE), um den ausgewählten Sender zu aktivieren. Sender speichern 1. Sie können bis zu 10 Ihrer Lieblings-DAB-Sender abspeichern. So können Sie Ihre Lieblingssender schnell und einfach aufrufen. 2. Um eine Voreinstellung zu speichern, müssen Sie zunächst den Sender anhören, den Sie speichern möchten. 3. Drücken Sie die Taste PRESET (VOREINSTELLUNG). 4. Benutzen Sie die Taste ◄/►, um die gewünschte Voreinstellungsnummer 1-10 auszuwählen. 5. Drücken Sie die Taste ENTER (EINGABE) und halten Sie diese Taste gedrückt, um Ihre Auswahl zu bestätigen. Aufrufen eines gespeicherten Senders Nachdem Sie die Sender als Voreinstellungssender abgespeichert haben. Sie können die abgespeicherten Sender mit der Taste PRESET (VOREINSTELLUNG) aufrufen. Drücken Sie die Taste ◄/►, um die gespeicherten Sender auszuwählen, und drücken Sie zur Bestätigung die Taste ENTER (EINGABE). Anzeigemodus Bei jedem Drücken der Taste INFO/MENU (INFO/MENÜ) schaltet die Anzeige durch folgende Anzeigemodi: Die Informationen werden im unteren Bereich des LCD-Displays angezeigt. Software-Version Zum Überprüfen der Software-Version des Systems. Sender bereinigen (nur im Modus DAB/DAB+ verfügbar) Um Sender zu entfernen, die aufgelistet, aber nicht verfügbar sind. Rufen Sie den Bildschirm „Prune“ (Bereinigen) auf; benutzen Sie die Taste ◄/►, um <Yes> (Ja) oder <No> (Nein) auszuwählen; drücken Sie anschließend die Taste ENTER (EINGABE), um Ihre Auswahl zu bestätigen. Wenn Sie jetzt <Yes> (Ja) auswählen, werden die nicht verfügbaren Sender gelöscht. Dynamic Label Segment – DLS (Digitaler Begleittext) Zeigt Lauftext-Daten an, die vom Sender bereitgestellt werden. PTY (Programmart) Zeigt die Art und die Beschreibung des Programms an, die vom Sender DAB/DAB+ bereitgestellt werden. DE Bitrate Die Datenrate, mit der das Signal übertragen wird. Frequenz Zeigt die Nummer des Übertragungskanals und die Frequenz an. Zeit und Datum Zeigt die Zeit- und Datumsinformationen an, die vom Sender bereitgestellt werden. HINWEISE: DAB – Gruppiert im Gegensatz zum normalen Radio einige Radiosender und überträgt sie auf einer Frequenz. FM-Betrieb Schalten Sie in den FM-Modus, indem Sie die Taste MODE (MODUS) drücken. Senderauswahl Um nach einem FM-Sender zwischen 87,5 und 108,00 MHz zu suchen. 1. Drücken Sie die Taste ◄ oder ►, um die Frequenz in Schritten von 0,05 MHz zu erhöhen oder zu verringern. 1. Sobald der Bluetooth-Modus aufgerufen wurde, erscheint „Connecting“ (Verbindung läuft) und blinkt weiter, da das Gerät versucht, sich mit zuvor verbundenen Geräten zu verbinden. Wenn keine Geräte gefunden werden, blinkt „Connecting“ (Verbindung läuft) weiter, um anzuzeigen, dass es für die Verbindung mit einem neuen Gerät bereit ist. 2. Aktivieren Sie Ihr Bluetooth-Gerät und suchen Sie in der Liste nach einem Gerät mit der Bezeichnung „SHARP DR-S460“. 3. Wählen Sie das Gerät „SHARP DR-S460“ aus und aktivieren Sie die Verbindung (Pairing). Wenn Sie nach einem Passwort gefragt werden, geben Sie „0000“ ein. 4. Wenn die Verbindung (Pairing) erfolgreich ist, spielt das Gerät den Audiostream ab und das blinkende „Connecting“ (Verbindung läuft) ändert sich zu „Connected“ (Verbunden). 5. Wenn sich das verbundene Gerät aus der Reichweite des Radios entfernt, versucht das Radio 2 Minuten lang, sich erneut zu verbinden. Wenn das Gerät wieder in Reichweite kommt, verbindet sich das Radio automatisch wieder damit. 2. Drücken Sie lange auf die Taste ◄ oder ►, um zum vorherigen oder nächsten Sender mit dem stärksten Empfang zu wechseln. Sobald ein Sender gefunden wurde, wird der Suchlauf automatisch angehalten. Wenn kein Sender gefunden wird, wird der Suchlauf angehalten, sobald er alle Frequenzen durchsucht hat. 6. Sie sollten nun Audiostreams drahtlos von Ihrem Bluetooth-Gerät übertragen können. Sender einstellen HINWEISE: • Die Bluetooth-Reichweite beträgt ungefähr 7 Meter. Hindernisse zwischen den Geräten können diese Reichweite verringern. • Es kann nur ein Bluetooth-Gerät gleichzeitig verbunden werden. • Nicht alle Bluetooth-Geräte sind kompatibel. 1. Drücken Sie lange die Taste SCAN (SCAN), um den Sendersuchlauf zu starten. Während des Suchlaufs wird auf dem Bildschirm ein Schiebebalken angezeigt, der den Fortschritt des Suchlaufs und die Anzahl der bisher gefundenen Sender anzeigt. Sobald der Suchlauf abgeschlossen ist, spielt das Radio den zuerst gefundenen Sender ab. 2. Drücken Sie lange die Taste INFO/MENU, um den Bildschirm <Audio setting> aufzurufen. Verwenden Sie die Taste ◄/►, und drücken Sie die Taste ENTER, um Folgendes auszuwählen: <Forced mono> oder <Stereo allowed>. Sender speichern Sie können bis zu 10 Lieblingssender speichern. So können Sie Ihre Lieblingssender schnell und einfach aufrufen. 1. Um eine Voreinstellung zu speichern, müssen Sie zunächst den Sender anhören, den Sie speichern möchten. 2. Drücken Sie die Taste PRESET (VOREINSTELLUNG). 3. Benutzen Sie die Taste ◄/►, um die gewünschte Voreinstellungsnummer 1-10 auszuwählen. 4. Drücken Sie die Taste ENTER (EINGABE) und halten Sie diese Taste gedrückt, um Ihre Auswahl zu bestätigen. Aufrufen eines gespeicherten Senders Nachdem Sie die Sender als Voreinstellungssender abgespeichert haben. Sie können die abgespeicherten Sender mit der Taste PRESET (VOREINSTELLUNG) aufrufen. Drücken Sie die Taste ◄/►, um die gespeicherten Sender auszuwählen, und drücken Sie zur Bestätigung die Taste ENTER (EINGABE). Anzeigemodus Drücken Sie die Taste INFO/MENU (INFO/MENÜ), um durch die von den Sendern bereitgestellten Informationen zu blättern: Bluetooth-Betrieb Drücken Sie wiederholt die Taste MODE (MODUS), um den BluetoothModus auszuwählen und aufzurufen. 7. Drücken Sie zum Trennen die Taste MODE auf Ihrem Radio, um zu einem anderen Modus zu schalten. Oder schalten Sie die BluetoothFunktion auf Ihrem anderen Gerät aus. Problembehandlung Dieses Produkt enthält keine Teile, die vom Benutzer gewartet werden können. Setzen Sie sich im Fall eines Defekts mit dem Hersteller oder der autorisierten Kundenabteilung in Verbindung. Teile aus dem Inneren des Geräts freizulegen kann lebensgefährlich sein. Die Garantie der Hersteller gilt nicht für Defekte, die durch von nicht autorisierte Dritten durchgeführte Reparaturen entstehen. Kein Ton Ursache • Lautstärke nicht aufgedreht Lösung • Stellen Sie den Lautstärkeregler hoch Ton verzerrt Ursache • Lautstärke zu hoch Lösung • Verringern Sie die Lautstärke Keine DAB-Funktionen Ursache • Kein DAB-Empfang in Ihrer Gegend • Schlechter Empfang Lösung • Ausrichtung der Antenne ändern Kein Strom Ursache • Der Adapter ist nicht mit einer Wandsteckdose verbunden Lösung • Vergewissern Sie sich, dass der Adapter eingesteckt ist Statisches Geräusch Ursache • Signalempfang zu niedrig. Lösung • Richten Sie die Antenne anders aus oder stellen Sie das Gerät an einen Ort mit einem stärkeren Signal Gewünschter Sender nicht gefunden Ursache • Schwaches Signal Lösung • Verwenden Sie die manuelle Suchfunktion Das Display ist leer Ursache • Dies kann passieren, wenn der Sender die Benennung eines Services ändert oder eine Benennung während der Einstellung löscht Lösung • Das Radio wird versuchen, sich neu einzustellen • Führen Sie einen Suchlauf durch. 12 Technische Angaben Modell DR-S460 Ausgangsstrom 2x7W (RMS) Stromverbrauch (max.) 26W Stromverbrauch im Stand-by <1W FM-Frequenz 87.5-108MHz Frequenz DAB+ 174.928-239.200MHz Bluetooth Version V 4.2 Frequenzbänder 2402 MHz ~ 2480 MHz Maximaler übertragener Strom 4dBm Netzadapter Modellname: FJ-SW1202000N Eingang: AC 100-240V ~ 50/60Hz, 0.6A Max Ausgang: DC 12V ⎓2000mA Hersteller: SHENZHEN FU JIA APPLIANCE CO., LTD B1,Xujing chang Industrial Park, Haoye Road, Fuyong 518103 Shenzhen, China 145 mm 354 mm 185 mm KG 2,95kg ES Instrucciones de seguridad importantes Lea estas instrucciones de seguridad y respete las siguientes advertencias antes de utilizar el aparato: La finalidad de la marca de admiración dentro de un triángulo equilátero es avisar al usuario de la presencia de instrucciones importantes de uso y mantenimiento (servicio) en el manual que acompaña al aparato. Utilice la fuente de alimentación enumerada en el manual de usuario. Este símbolo significa que el producto debe eliminarse de manera respetuosa con el medio ambiente y no con los residuos domésticos generales. Tensión de CA Tensión de CC Equipo de clase II Solo para uso en interiores Etiquetado de eficiencia energética de nivel VI Polaridad del conector de corriente continua Para evitar incendios mantenga siempre las velas u otras llamas al descubierto lejos del producto. • No utilice este producto inmediatamente tras desembalar. Espere a que se caliente a la temperatura ambiente antes de utilizarlo. • Asegúrese de utilizar el producto en climas moderados únicamente (no en climas tropicales o subtropicales). • Coloque el producto en una superficie plana estable y no expuesta a vibraciones. • Asegúrese de que el producto y sus partes no sobresalen de los bordes del mueble sobre el que se coloca. • Para reducir el riesgo de incendio, descarga eléctrica o daño en el producto, no lo exponga directamente a la luz del sol, polvo, lluvia o humedad. No exponga nunca este producto a gotas o derramamientos y no coloque objetos llenos de líquido sobre o cerca de este. • No coloque objetos con líquidos, como jarrones, sobre el aparato. • No instale el aparato cerca de ninguna fuente de calor, como radiadores, salidas de aire caliente, estufas u otros aparatos (incluidos amplificadores) que produzcan calor. • No coloque el producto en espacios húmedos o con ventilación deficiente. • Asegúrese de dejar una distancia mínima de 5 cm en torno al aparato para garantizar una ventilación adecuada. No obstruya las aberturas de ventilación de este producto. Evite siempre la obstrucción de las ranuras de ventilación con objetos como periódicos, manteles, cortinas, etc. • No permita que nadie, especialmente los niños, introduzca elementos en los orificios, ranuras ni en ninguna apertura de la carcasa de la unidad, ya que podrían dar lugar a descargas eléctricas mortales. • Las tormentas son peligrosas para todos los aparatos eléctricos. Si el cable de alimentación o el cableado de la antena es alcanzado por un rayo, el aparato puede resultar dañado, incluso si no está encendido. Debe desconectar todos los cables y conectores del aparato antes de una tormenta. • La presión acústica excesiva de los auriculares y los cascos puede causar la pérdida del sentido auditivo. Mantenimiento Advertencia: • Respete siempre las precauciones básicas de seguridad cuando utilice este electrodoméstico, especialmente cuando si hay niños presentes. • Los niños deben ser supervisados para asegurarse de que no juegan con el aparato. • No dañe el cable de alimentación, no coloque objetos pesados encima, no lo estire ni lo doble. No conecte alargadores. Los daños en el cable de alimentación pueden ocasionar incendios o descargas eléctricas. • Si el cable de alimentación presenta algún daño, deberá ser sustituido por el fabricante, el servicio técnico o personas con una cualificación similar para evitar que se produzcan situaciones de peligro. • Asegúrese de que la unidad está conectada a una toma de corriente de CA de 100-240 V y 50/60 Hz. El uso de una tensión superior puede causar el mal funcionamiento de la unidad o incluso presentar riesgo de incendio. • Si el enchufe de corriente no entra en la toma, no lo fuerce. • Apague la unidad antes de desenchufarla de la corriente para desconectarla por completo. • No conecte ni desconecte el cable de alimentación con las manos mojadas, ya que podría producirse una descarga eléctrica. • Desconecte el cable de alimentación si la unidad no se va a utilizar durante un periodo prolongado de tiempo. • Si la unidad no se va a usar durante un largo periodo de tiempo, desconéctela de la alimentación. • Asegúrese de que el enchufe de alimentación resulta fácilmente accesible. • Este producto no contiene ninguna pieza que pueda ser reparada por el usuario. En caso de avería, póngase en contacto con el fabricante o el servicio técnico autorizado. La exposición de ciertas partes internas del dispositivo puede poner en peligro su vida. La garantía del fabricante no cubre las averías resultantes de reparaciones llevadas a cabo por terceros. • Desenchufe el cable de alimentación de la toma de corriente antes de limpiar la unidad. • Utilice un paño suave y limpio para limpiar la parte exterior de la unidad. No utilice nunca productos químicos ni detergentes. Adaptador de corriente • Para desconectar la unidad del suministro eléctrico, desenchufe el cable de la toma de corriente. • Utilice únicamente el adaptador de red suministrado, de lo contrario podrían producirse riesgos para la seguridad o daños en la unidad. 14 Eliminación de este equipo y las pilas • No elimine este producto como residuo urbano no seleccionado. Entréguelos en un punto de recogida designado para el reciclado de aparatos electrónicos y eléctricos de acuerdo con la ley local. De esta forma, ayudará a conservar los recursos y a proteger el medio ambiente. • El símbolo anterior mostrado en equipos eléctricos y electrónicos (o en el embalaje) tiene por objeto recordar a los usuarios esta circunstancia. • Se solicita a los usuarios que utilicen las instalaciones de devolución existentes para equipos usados. Declaración CE: • Por la presente, UMC Poland sp. z o.o. declara que este dispositivo sonoro cumple los requisitos esenciales y otras disposiciones pertinentes de la Directiva RED 2014/53/UE. El texto completo de la declaración de conformidad de la UE está disponible en el siguiente enlace http://www. sharpconsumer.eu/documents-of-confirmity Marcas comerciales: La marca denominativa Bluetooth® y sus logotipos son marcas comerciales propiedad de Bluetooth SIG, Inc. Los términos “HDMI” e “Interfaz multimedia de alta definición HDMI”, así como el logotipo HDMI, son marcas comerciales o marcas comerciales registradas de HDMI Licensing, LLC en Estados Unidos y otros países. Fabricado con la licencia de Dolby Laboratories. Dolby, Dolby Audio y el símbolo de la doble D son marcas comerciales de Dolby Laboratories. ES Contenido de la caja • • • • • • Instrucciones generales de uso 1 unidad 1 manual de instrucciones 1 guía de inicio rápido 1 adaptador de corriente 1 adaptador de enchufe de CA para el Reino Unido 1 adaptador de enchufe de CA para la UE Adaptador de corriente (suministrado con el paquete) Conecte el adaptador a la toma de corriente continua en la parte posterior de la radio. Obtención de la mejor señal Extienda la antena telescópica todo lo posible. Encendido de la radio Pulse el botón STANDBY para encender la unidad. Paneles y controles Cambio al modo en espera Con la radio encendida, pulse el botón STANDBY para activar el modo en espera. Vuelva a pulsar para activar la radio. La radio volverá al modo en espera automáticamente si no se realiza ninguna operación en 15 minutos Panel frontal Ajuste del volumen Gire el control de volumen para ajustar el volumen a un nivel cómodo. Escuchar la radio a altos volúmenes puede dañar la capacidad de audición. Evite escuchar a altos volúmenes durante periodos largos de tiempo. 9 1 2 3 4 5 6 7 8 Primer uso de la radio La radio realizará una exploración automática de emisoras al encenderse por primera vez. Durante la exploración, la pantalla mostrará una barra de avance para indicar el progreso de la operación de exploración y la cantidad de emisoras encontradas hasta el momento. Cuando la exploración termine, la radio mostrará la primera emisora encontrada. Función de repetición Cuando la alarma suena en modo en espera, gire el control de volumen para activar la función de REPETICIÓN. La alarma volverá a sonar transcurridos 5 minutos. 1. MODE – Presione para cambiar los modos: DAB / DAB +, FM, Bluetooth, ENTRADA AUX. 2. STANDBY – Presione este botón para encender la unidad o entrar al modo de espera. 3. INFO/MENU – Presione para ver la información de la estación o ingrese a la pantalla de configuración del menú principal. 4. ENTER – Presione para confirmar sus selecciones. 5. PREVIOUS ◄ – Presione para volver a las selecciones anteriores, o para disminuir la frecuencia, o buscar la estación más fuerte anterior. 6. NEXT ► – Presione para avanzar a la siguiente selección, o para aumentar la frecuencia, o buscar la siguiente estación más fuerte. 7. SCAN – Utilícelo para escanear las estaciones de radio o para ajustar el nivel de luz de fondo. 8. PRESET – Presione para recuperar las estaciones preestablecidas. 9. DISPLAY SCREEN – Para mostrar la información. Selección de modos Con la radio encendida, pulse el botón MODE repetidamente para seleccionar el modo deseado: DAB/DAB+, FM o Bluetooth, AUX IN Información de emisora Pulse el botón INFO/MENU para consultar la información de la emisora. Actualización automática de la hora La hora se puede actualizar automáticamente si el sistema detecta la señal RDS. Si la señal RDS es débil o no puede detectarse, la hora no se actualizará automáticamente. Ajustes del menú principal 10. Volume – Gire la perilla de volumen para ajustar el nivel de volumen. Panel posterior 10 11 12 Hora de apagado Para establecer la hora de apagado, pulse repetidamente el botón SLEEP para seleccionar: desactivado, 15, 30, 45, 60, 90 minutos. La unidad entrará en el modo de apagado seleccionado tras el tiempo establecido. Mantenga pulsado el botón INFO/MENU para acceder a la pantalla de configuración del menú principal. Busque y acceda a la pantalla <System> pulsando el botón ENTER. A continuación, utilice el botón◄/► para desplazarse por las opciones del menú: <Time setup>, <Alarms>, <Sleep>, <Language>, <Prune>, <Station Order>, <Backlight>, <Factory reset>, <SW version>. NOTA: Las funciones <Prune> y < Station Order> solo están disponibles en el modo DAB. 13 Seleccione una de las opciones y pulse el botón ENTER para acceder al menú. Configuración de la hora 11. FM Antenna – Para recibir la señal de FM. 12. DC Power input – DC 12V 13. AUX IN jack – Conecte el cable de audio de 3.5 mm a esta toma para disfrutar de la música de audio externa. 1. Ajuste del reloj: 00:00 (Horas:Minutos), use los botones ◄/► y ENTER para establecer la hora. 2. Ajuste de la fecha: 01-01-2018 (Día-Mes-Año), mismo proceso que para ajustar el reloj. 3. Actualización automática: <No update> o <From radio>, pulse el botón ENTER para confirmar. 4. Establecimiento de los modos 12/24 horas: seleccione su formato favorito. 16 Tras completar los pasos anteriores, la hora se ajusta manualmente. Alarmas Cuando aparezca <Alarms>, 1. Pulse el botón ENTER para acceder a la pantalla de ajuste de la alarma. 2. Seleccione <Alarm 1: off> o <Alarm 2: off> y pulse el botón ENTER para activar la alarma. 3. Con ayuda del botón ◄/► para seleccionar la hora de la alarma, pulse ENTER para confirmar. 4. Seleccione los días de la alarma: diariamente, una vez, días de la semana y fines de semana. 5. Establezca el modo de la alarma: DAB, FM o zumbador. 6. Establezca el volumen de la alarma: aparece una barra de desplazamiento que permite ajustar el volumen de la alarma. Pulse el botón ◄/► para aumentar o reducir el nivel de volumen y pulse el botón ENTER para confirmar. 7. Tras establecer todos los ajustes anteriores, acceda a la pantalla Save y pulse ENTER para guardar la alarma. 8. Para cancelar las alarmas, acceda a la pantalla de ajustes de alarma, pulse el botón ENTER para seleccionar Off y entre en la pantalla Save para escoger el ajuste para desactivar la alarma. Apagado (establecer el tiempo de apagado): pulse brevemente el botón SLEEP Exploración de emisoras Cuando se activa el modo DAB/DAB+, la radio explora automáticamente las emisoras que encuentra en la zona. Pulse el botón ◄/► para seleccionar las emisoras previas o siguientes. A continuación, pulse el botón ENTER para activar la reproducción de la emisora. Ajuste de emisoras Mantenga pulsado el botón INFO/MENU. Cuando aparezca <Station scan>, pulse el botón ENTER y utilice el botón ◄/► para desplazarse por las opciones de exploración: <Full scan>, <Manual tune>. 1. Seleccione <Full scan> y pulse el botón ENTER para habilitar la búsqueda completa. 2. Seleccione <Manual tune> y pulse el botón ENTER . Utilice el botón ◄/► para seleccionar una emisora entre 5A:174.928 MHz y 13F:239.200 MHz. A continuación, pulse el botón ENTER para activar la emisora seleccionada. Almacenamiento de emisoras Puede guardar hasta 10 de sus emisoras DAB favoritas, para acceder a ellas de forma rápida y sencilla. 1. Para guardar una emisora preestablecida, primero debe escucharla y 2. después pulsar el botón PRESET. 3. Utilice el botón ◄/► para seleccionar el número preestablecido deseado 1-10. 4. Mantenga pulsado el botón ENTER para confirmar. Recuperación de una emisora almacenada Entre en la pantalla de ajuste del tiempo de apagado para seleccionar el tiempo de apagado: desactivado/15/30/45/60/90 minutos. Una vez guardadas las emisoras como preestablecidas, puede recuperarlas con el botón PRESET. Pulse el botón ◄/► para seleccionar las emisoras guardadas y, a continuación, el botón ENTER para confirmar. Idioma (establecer el idioma del sistema). Modo de pantalla Acceda a la pantalla de ajuste de idioma y utilice los botones ◄/► y ENTER para establecer el idioma del sistema. Retroiluminación Cada vez que pulsa el botón INFO/MENU, la pantalla se desplaza a través de los siguientes modos: La información se muestra en el segmento inferior de la pantalla LCD. Acceda a la pantalla de ajustes de retroiluminación y con ayuda del botón ◄/► seleccione el nivel de retroiluminación de la pantalla deseado: 3, 2, 1, desactivado. A continuación, pulse el botón ENTER para confirmar la selección. Restablecimiento de los valores de fábrica Para establecer la radio en los ajustes de fábrica, acceda a la pantalla de restablecimiento de ajustes de fábrica, siga los consejos de <Factory reset?> y seleccione <YES>. La radio se restablecerá a los ajustes de fábrica. NOTES: You also can press SCAN button to adjust the backlight level. Versión de software Permite consultar la versión de software del sistema. Eliminación de emisoras (solo disponible en el modo DAB/DAB+) Para eliminar emisoras enumeradas que no están disponibles. Acceda a la pantalla Prune y utilice el botón◄/► para seleccionar <Yes> o <No>. A continuación, pulse el botón ENTER para confirmar la selección. Las emisoras no disponibles se eliminarán si se selecciona <Yes>. Orde de las emisoras (solo disponible en el modo DAB/DAB+) Entre en la pantalla Station order y con ayuda del botón ◄/► seleccione una de las formas de ordenar las emisoras. A continuación, pulse el botón ENTER para confirmar. Operaciones con DAB/DAB+ DLS (Segmento de etiqueta dinámica) Muestra información de texto en desplazamiento suministrada por la emisora. PTY (Tipo de programa) Muestra el tipo y la descripción del programa proporcionados por la emisora DAB/DAB+. Velocidad de bits La velocidad de datos a la que se transmite la señal. Frecuencia Muestra el número de canal y la frecuencia de transmisión de la emisora. Hora y fecha Muestra la información de hora y fecha proporcionada por la emisora. NOTAS: DAB, a diferencia de las radios normales, agrupa varias emisoras de radio y las transmite en una frecuencia. Funcionamiento de la función FM Seleccione el modo FM pulsando el botón MODE. Tras activar la radio, pulse el botón MODE repetidamente para seleccionar y acceder al modo DAB/DAB+. Selección de emisoras Para buscar una emisora entre 87.5 y 108.00 MHz. 1. Pulse el botón ◄ o ► para avanzar o retroceder en saltos de 0.05 MHz. ES 2. Mantenga pulsados el botón ◄ o ► para saltar a la emisora previa o siguiente con la mejor señal. Una vez encontrada una emisora, la exploración se detendrá automáticamente. Si no se encuentra ninguna emisora, la exploración se interrumpirá cuando haya completado la frecuencia. Sintonización de emisoras 1. Mantenga pulsado el botón SCAN para explorar emisoras. Durante la exploración, la pantalla mostrará una barra de avance que indica el progreso de la operación de exploración y la cantidad de emisoras que se han encontrado hasta el momento. Cuando haya terminado, la radio reproducirá la primera emisora que encuentre. 2. Presione prolongadamente el botón INFO / MENU para ingresar a la pantalla <Audio setting>, use el botón ◄/► y presione el botón ENTER para elegir: <Forced mono> o <Stereo allowed>. Almacenamiento de emisoras Podrá guardar hasta diez emisoras favoritas, para acceder a ellas de forma rápida y sencilla. 1. Para guardar una emisora preestablecida, primero debe escucharla y 2. después pulsar el botón PRESET. 3. Utilice el botón ◄/► para seleccionar el número preestablecido deseado 1-10. 4. Mantenga pulsado el botón ENTER para confirmar. Recuperación de una emisora almacenada Resolución de problemas Este producto no contiene ninguna pieza que pueda ser reparada por el usuario. En caso de avería, póngase en contacto con el fabricante o el servicio técnico autorizado. La exposición a ciertas partes internas del dispositivo puede poner en peligro su vida. La garantía del fabricante no cubre las averías resultantes de reparaciones llevadas a cabo por terceros. Sin sonido Causa • El volumen no está activado. Solución • Ajuste el control de volumen principal. Sonido estático. Causa • Recepción de la señal baja Solución • Ajuste la antena o mueva la unidad hacia una ubicación con señal más intensa. El sonido se oye distorsionado. Una vez guardadas las emisoras como preestablecidas, puede recuperarlas con el botón PRESET. Pulse el botón ◄/► para seleccionar las emisoras guardadas y, a continuación, el botón ENTER para confirmar. Causa • El volumen está demasiado alto. Solución • Reduzca el volumen. Modo de pantalla No se encuentra la emisora deseada. Pulse el botón INFO/MENU para desplazarse por la información de FM proporcionada por las emisoras: Causa • Señal débil. Solución • Utilice la función de sintonización manual. Sin funciones DAB Funciones Bluetooth Pulse el botón MODE repetidamente para seleccionar y acceder al modo Bluetooth. 1. Una vez en el modo Bluetooth, aparecerá el texto Connecting, que parpadeará mientras la unidad intenta conectarse con dispositivos previamente emparejados. Si no se encuentra ningún dispositivo, el texto Connecting seguirá parpadeando para indicar que la unidad está lista para emparejarse con un nuevo dispositivo. 2. Active su dispositivo Bluetooth y busque un dispositivo con el nombre de SHARP DR-S460 en la lista. 3. Seleccione y habilite el emparejamiento del dispositivo SHARP DRS460. Si se le solicita una contraseña, introduzca 0000. 4. Si el emparejamiento se completa correctamente, la unidad emitirá un sonido y el texto parpadeante Connecting cambiará a Connected. 5. Si el dispositivo conectado se encuentra fuera de la zona de alcance, la radio intentará volver a conectarse durante dos minutos. Cuando el dispositivo esté de nuevo en el rango de alcance, la radio volverá a conectarse automáticamente 6. y podrá transmitir audio de manera inalámbrica desde el dispositivo Bluetooth. 7. Para desconectar, pulse el botón MODE de la radio y seleccionar otro modo. O bien desactive la función Bluetooth del dispositivo. NOTAS: • El rango de funcionamiento de Bluetooth es de aproximadamente 7 metros. Los obstáculos entre los dispositivos pueden reducir el rango. • Solo se puede emparejar un dispositivo Bluetooth a la vez. • No todos los dispositivos Bluetooth son compatibles. Causa • No hay cobertura DAB en la zona. • Mala recepción. Solución • Ajuste el brillo de la pantalla. La pantalla se muestra en blanco. Causa • Esto puede ocurrir si la emisora cambia la etiqueta de un servicio o elimina una etiqueta al sintonizar. Solución • La radio intentará volver a sintonizar. • Realice una exploración. El dispositivo no se enciende. Causa • El adaptador no está conectado a la toma de la pared. Solución • Asegúrese de que el enchufe esté conectado. 18 Especificación técnica Modelo DR-S460 Potencia de salida 2x7W (RMS) Consumo de electricidad (máx.) 26W Consumo de electricidad en modo en espera <1W Frecuencia FM 87.5-108MHz Frecuencia DAB+ 174.928-239.200MHz Bluetooth Versión V 4.2 Bandas de frecuencia 2402 MHz ~ 2480 MHz Potencia máxima transmitida 4dBm Adaptador de corriente Nombre del modelo: FJ-SW1202000N Entrada: AC 100-240V ~ 50/60Hz, 0.6A Max DC 12V ⎓2000mA Salida: SHENZHEN FU JIA APPLIANCE CO., LTD B1,Xujing chang Industrial Park, Haoye Road, Fuyong 518103 Shenzhen, China Fabricante: 145 mm 354 mm 185 mm KG 2,95kg IT Importanti istruzioni di sicurezza • Vi preghiamo di leggere queste istruzioni di sicurezza e di rispettare le seguenti avvertenze prima di mettere in funzione l'apparecchio: • • Il punto esclamativo in un triangolo equilatero serve ad avvertire la presenza di importanti istruzioni operative e di manutenzione nella documentazione che accompagna l’apparecchio. • • Usare esclusivamente gli alimentatori elencati nel manuale utente Questo simbolo significa che il prodotto deve essere smaltito in modo rispettoso dell'ambiente, non insieme ai rifiuti domestici. • • Tensione AC Tensione DC Apparecchiatura di Classe II • • Solo per uso interno Classificazione di efficienza energetica livello VI • Polarità del connettore di corrente d.c. Per evitare incendi, tenete sempre lontane dall’apparecchio candele e qualunque altro tipo di fiamma. • • un pericolo di vita. La garanzia non copre danni causati da riparazioni effettuate da terze parti non autorizzate. Non utilizzare questo prodotto immediatamente dopo averlo rimosso dall’imballaggio. Attendere che si riscaldi fino a temperatura ambiente prima di usarlo. Assicurarsi di usare questo prodotto soltanto in un clima temperato (non in ambienti tropicali o subtropicali). Collocare il prodotto su una superficie piana e stabile in modo che non sia sottoposto a vibrazioni. Assicurarsi che il prodotto e le sue parti non pendino dal bordo del mobilio di supporto. Per ridurre il rischio di incendi, shock elettrici o danni al prodotto, non esporlo direttamente a luce del sole, polvere, pioggia o umidità. Non esporlo mai a gocciolamenti e schizzi d’acqua e non collocare oggetti contenenti liquidi sopra o vicino a esso. Non collocare oggetti pieni di liquidi, come vasi, sull’apparecchio. Non installarlo vicino a fonti di calore come termosifoni, griglie di ventilazione, stufe o altri apparecchi (inclusi amplificatori) che generano calore. Non collocare il prodotto in punti con elevata umidità e scarsa ventilazione. Assicurare una distanza minima di 5 cm attorno all’apparecchio per una ventilazione sufficiente. Non ostruire le aperture per la ventilazione del prodotto. Assicurarsi che le aperture per la ventilazione siano sgombere da oggetti come giornali, tovaglie, tendaggi ecc. MAI lasciare che qualcuno, specialmente un bambino, inserisca qualcosa nei fori e nelle aperture dell’involucro dell’unità, in quanto ciò potrebbe risultare in uno shock elettrico fatale. I temporali sono pericolosi per gli apparecchi elettronici. Se i cavi della rete elettrica o l'antenna vengono colpiti da un fulmine, l'apparecchio potrebbe risultarne danneggiato, anche se spento. E' opportuno scollegare tutti i cavi e i connettori dell'apparecchio prima di un temporale. Un’eccessiva pressione sonora da cuffie o auricolari può causare danni all’udito. Manutenzione Avvertenza: • Seguire sempre le precauzioni di sicurezza basilari quando si utilizza questo apparecchio, specialmente in presenza di bambini. • I bambini dovrebbero essere supervisionati per assicurarsi che non giochino con l’apparecchio. • Non danneggiare il cavo di alimentazione, né riporvi sopra oggetti pesanti, tirarlo o piegarlo. Inoltre, non utilizzare prolunghe. Danni al cavo di alimentazione potrebbero causare incendi o shock elettrici • Non danneggiare il cavo di alimentazione, né riporvi sopra oggetti pesanti, tirarlo o piegarlo. Inoltre, non utilizzare prolunghe. Danni al cavo di alimentazione potrebbero causare incendi o shock elettrici. • Se il cavo di alimentazione è danneggiato, deve essere sostituito dal produttore, da un agente di servizio o da persone altrettanto qualificate, in modo da evitare pericoli. • Assicurarsi che l’unità sia connessa a una presa di corrente CA 110-240V 50/60Hz. Usare un voltaggio superiore può provocare un malfunzionamento dell’unità e persino la formazione di fiamme. • Se la spina di alimentazione non entra nello zoccolo, non forzarla. • Spegnere completamente l’unità prima di disconnetterla dall’alimentazione. • Non disconnettere o connettere il cavo di alimentazione con le mani bagnate. Può provocare uno shock elettrico. • Se l'unità non verrà usata per un periodo di tempo prolungato, disconnettere l'alimentazione di corrente. • Scollegare il cavo di alimentazione se non viene usato per molto tempo. • Assicurarsi che la presa di corrente sia sempre facilmente accessibile. • Questo prodotto non ha componenti che possano essere riparate dall'utente. In caso di guasto, contattate il produttore o l'agente di servizio autorizzato. Esporre le parti interne al dispositivo può comportare • Disconnetti il cavo di alimentazione dalla presa elettrica prima di pulire l’apparecchio. • Usare un panno morbido e pulito per pulire l’esterno dell’unità. Non pulire con agenti chimici e detergenti. Adattatore di corrente • Per disconnettere l'unità dall'alimentatore, disconnettere il cavo dalla presa di corrente. • Usare solo l'adattatore fornitore perché non fare ciò potrebbe mettere a rischio la sicurezza e/o danneggiare l'unità. 20 Smaltimento di questa apparecchiatura • Non smaltire questo televisore insieme ai rifiuti comunali non differenziati. Riconsegnarlo in un punto di raccolta apposito per il RAEE (Riciclaggio di Apparecchiature Elettriche ed Elettroniche). Così facendo, contribuirete alla conservazione delle risorse e alla protezione dell'ambiente. • I simboli mostrati in alto appaiono su apparecchi elettrici ed elettronici e batterie (o sulla relativa confezione) come promemoria per gli utenti. • Gli utenti sono tenuti a utilizzare le strutture adeguate per lo smaltimento di apparecchi e batterie. Dichiarazione CE: • Con la presente, UMC Poland sp. z o.o. dichiara che questo dispositivo audio soddisfa i requisiti essenziali e le altre disposizioni rilevanti della direttiva RED 2014/53/UE. Il testo completo della Dichiarazione di conformità UE è disponibile al link seguente http://www.sharpconsumer. eu/documents-of-confirmity I marchi: La parola e i loghi Bluetooth® simbolo sono marchi registrati di proprietà di Bluetooth SIG,. Inc. I termini HDMI, il logo HDMI e High-Definition Multimedia Interface sono marchi commerciali o marchi registrati di HDMI Licensing LLC negli USA e in altri paesi. Prodotto su licenza di Dolby Laboratories. Dolby, Dolby Audio e il simbolo della doppia D sono marchi di Dolby Laboratories. IT Cosa è compreso nella confezione • • • • • • Istruzioni operative generali 1 unità principale 1 Manuale utente 1 Guida di avvio rapido 1 alimentatore 1x spina CA britannica per l’adattatore di corrente. 1x spina CA europea per l’adattatore di corrente. Adattatore di presa di corrente (fornito con la confezione) Connettere l'adattatore della presa di corrente all'alimentatore DC sul pannello posteriore della radio. Ottieni la migliore ricezione Estendere l'antenna telescopica fino a dove arriva. Accendi la radio Premere il tasto STANDBY per accendere la radio. Pannelli e controlli Passa alla modalità Standby Quando è in uso, premi per qualche istante il tasto STANDBY per passare alla modalità Standby. Premere nuovamente per accendere la radio. La radio passa alla modalità standby automaticamente se non ci sono attività dopo 15 minuti. Pannello anteriore 9 1 2 3 4 5 6 7 8 Regolare il volume Ruotare la manopola del volume per regolare il volume a un livello confortevole. Ascoltare la radio ad alto volume può danneggiare l'udito. Evitare di ascoltare ad alto volume per lunghi periodi di tempo. La prima volta che la radio è usata La prima volta che la radio viene accesa, scansionerà automaticamente cercando le stazioni. Durante la scansione, lo schermo mostra una barra di scorrimento che indica l'avanzamento della scansione e il numero di stazioni trovate sino a ora. Una volta che la scansione è terminata, la radio riproduce la prima stazione che trova. 1. MODE – Premere per cambiare le modalità: DAB / DAB +, FM, Bluetooth, AUX IN. 2. STANDBY – Premere questo pulsante per accendere l'unità o accedere alla modalità standby. 3. INFO/MENU – Premere per visualizzare le informazioni sulla stazione, o accedere alla schermata delle impostazioni del menu principale. 4. ENTER – Premere per confermare le selezioni. 5. PREVIOUS ◄ – Premere per tornare alle selezioni precedenti o per diminuire la frequenza o cercare la stazione più forte precedente. 6. NEXT ► – Premere per andare avanti alla selezione successiva, o per aumentare la frequenza, o cercare la successiva stazione più forte. 7. SCAN – Utilizzare per scansionare le stazioni radio o per regolare il livello di retroilluminazione. 8. PRESET – Premere per richiamare le stazioni preselezionate. 9. DISPLAY SCREEN – Per mostrare le informazioni. Funzione snooze Quando l'allarme suona in modalità Standby, ruotare la manopola del volume per attivare la funzione SNOOZE. L'allarme suonerà ancora dopo 5 minuti. Ora di sonno Per impostare l'ora di sonno, premere ripetutamente il pulsante SLEEP per selezionare: spento, 15, 30, 45, 60, 90 minuti. Quando l'ora impostata è trascorsa, l'unità passa alla modalità sleep. Selezionare le modalità Quando è in uso, premi ripetutamente il tasto MODE per passare alla modalità desiderata: DAB/DAB+, FM, Bluetooth, AUX IN. Informazioni sulla stazione Premere il tasto INFO/MENU per controllare le informazioni della stazione. Aggiornamento automatico dell'ora L'ora e la data possono essere aggiornate automaticamente se il sistema rileva il segnale RDS. Se il segnale RDS è debole o non può essere rilevato, l'ora non si aggiorna automaticamente. Pannello posteriore 10 11 12 13 10. Volume – Ruotare la manopola del volume per regolare il livello del volume. 11. FM Antenna –Per ricevere il segnale FM. 12. DC Power input – DC 12V 13. AUX IN jack – Collegare il cavo audio da 3,5 mm a questo jack per ascoltare la musica audio esterna. Configurazione menu principale Premere per qualche istante il tasto INFO/MENU per passare alla schermata di configurazione del menu principale. Trovare ed entrare nella schermata <Sistema> premendo il pulsante ENTER. Quindi usare il pulsante◄/► per scorrere nelle opzioni del menu: <Time setup>, <Alarms>, <Sleep>, <Language>, <Prune>, <Station Order>, <Backlight>, <Factory reset>, <SW version>. NOTA: <Prune> e < Station Order> sono disponibili solo in modalità DAB Selezionare una delle opzioni quindi premere il pulsante ENTER per accedere a quel menu. Impostazione dell'ora 1. Impostare orologio: 00:00 (Ora:Minuti), usare i pulsanti ◄/► ed ENTER per impostare. 2. Impostare data: 01-01-2018 (Giorno-Mese-Anno), uguale alla configurazione di “set clock”. 22 3. Aggiornamento automatico: <No update> o <From radio>, premere il pulsante ENTER per confermare. 4. Impostare ora 12/24: scegli il tuo formato preferito. Dopo aver terminato i passaggi indicati, l'ora sarà impostata automaticamente. Allarmi Quando appare <Alarms>, 1. Premere il pulsante ENTER per passare alla schermata di configurazione dell'allarme. 2. Selezionare <Alarm 1: off> o <Alarm 2: off>, premere il pulsante ENTER per impostare l'allarme su On. 3. Utilizzando il pulsante ◄/► per selezionare alarm time, premere ENTER per confermare. 4. Selezionare alarm days: giornaliero, una volta, giorni della settimana, fine settimana. 5. Impostare alarm mode: DAB, FM, Buzzer. 6. Impostare alarm volume: è presente una barra scorrevole per regolare il volume dell'allarme, premere il pulsante ◄/► per aumentare o ridurre il livello del volume, premere il pulsante ENTER per confermare. 7. Dopo tutte le impostazioni precedenti, passare alla schermata Save, premere il pulsante ENTER per salvare l'allarme. 8. Per annullare gli allarmi, passare alla schermata delle impostazioni, premere il pulsante ENTER per selezionare Off quindi passare alla schermata di salvataggio per salvare le impostazioni di spegnimento dell'allarme. Sleep (imposta ora di sleep) - premere brevemente il pulsante SLEEP Passare alla schermata di impostazione dell'ora di Sleep per selezionare l'ora di sleep: spento/15/30/45/60/90 minuti. Lingua (configurare la lingua del sistema) Passare alla schermata delle impostazioni della lingua, usare i pulsanti ◄/► e ENTER per impostare la lingua del sistema. Retroilluminazione Passare alla schermata delle impostazioni della retroilluminazione, usando il pulsante ◄/► per selezionare il livello desiderato di retroilluminazione dello schermo: 3, 2, 1, spento. Quindi premere il pulsante ENTER per confermare la selezione. Ripristino di fabbrica Operazioni DAB/DAB+ Dopo avere acceso la radio, premere ripetutamente il pulsante MODE per selezionare e passare alla modalità DAB/DAB+. Scansionare le stazioni Quando si accende la modalità DAB/DAB+, la radio scansiona automaticamente le stazioni trovare in questa area. Premere il pulsante ◄/► per selezionare le stazioni precedenti o successiva, quindi premere il pulsante ENTER per attivare la riproduzione della stazione. Sintonizzazione stazione Premere per qualche istante il pulsante INFO/MENU, quando <Station scan> appare, premere il pulsante ENTER, quindi usare il pulsante ◄/► per scorrere lungo le opzioni di scansionamento: <Full scan>, <Manual tune>. 1. Selezionare <Scansione completa> quindi premere il pulsante ENTER per consentire una scansione completa. 2. Selezionare <Manual tune> e premere il pulsante ENTER, usare il pulsante ◄/► per selezionare stazioni da 5A:174.928 MHz a 13F:239.200 MHz. Quindi premere il pulsante ENTER per attivare la stazione selezionata. Memorizzare le stazioni È possibile memorizzare fino a 10 delle proprie stazioni DAB preferite. Ciò consente di accedere alle proprie stazioni preferite con rapidità e facilità. 1. Per memorizzare una preimpostazione, prima è necessario ascoltare la stazione che si vuole salvare. 2. Premere il pulsante PRESET.. 3. Usare il pulsante◄/► per selezionare il numero preimpostato desiderato 1-10. 4. Tenere premuto il pulsante ENTER per confermare. Richiamare una stazione memorizzata Una volta salvate le stazioni sulle stazioni preimpostate. Puoi richiamarla premendo il pulsante PRESET. Premere il pulsante ◄/► per selezionare le stazioni memorizzate, e premere il pulsante ENTER per confermare. Modalità display Ogni volta che si preme il pulsante INFO/MENU, il display scorre tra le seguenti modalità di visualizzazione. Le informazioni sono visualizzate nel segmento inferiore del display LCD. Per impostare la radio alle impostazioni originali, passare alla schermata di ripristino di fabbrica, seguire le indicazioni <Factory reset?>, scegliere <YES> per ripristinare, e la radio sarà riavviata. NOTE: è anche possibile premere il tasto SCAN per regolare il livello di retroilluminazione. Versione SW Per controllare la versione software del sistema. Sfrondare le stazioni (disponibile solo in modalità DAB/DAB+) Per rimuovere le stazioni elencate ma non disponibili. Passare alla schermata Prune, usare il pulsante ◄/► per selezionare <Yes> o <No>, quindi premere il pulsante ENTER per confermare la tua selezione. Le stazioni non disponibili ora saranno cancellate se scegli <Yes>. Ordine stazione (disponibile solo in modalità DAB/DAB+) Passare alla schermata di ordine della stazione, usare il pulsante ◄/► per selezionare uno degli ordini della stazione, quindi premere per confermare ENTER. Dynamic Label Segment (DLS) Mostra informazioni testuali a scorrimento fornite dall'emittente. PTY (tipo programma) Mostra il tipo e la descrizione del programma fornito dalla stazione DAB/DAB+. Bit Rate Il tasso dei dati al quale il segnale viene trasmesso. Frequenza Mostra il numero e la frequenza del canale della trasmissione della stazione. Ora e data Mostra informazioni su ora e data fornite dall'emittente. NOTE: DAB – a differenza delle normali radio, raggruppa assieme molte stazioni radio e le trasmette su una frequenza. IT Funzionamento FM Passare alla modalità FM premendo il pulsante MODE. Selezionare le stazioni Per cercare una stazione FM da 87.5 a 108.00 MHz. 1. Premere il pulsante ◄ o ► per scorrere avanti o indietro nella frequenza per passaggi di 0.05 MHz. 2. Premere per qualche istante il pulsante ◄ o ► per passare alla stazione precedente o succesiva con la ricezione migliore. Una volta trovata una stazione, la scansione automatica si arresta. Se non vengono trovate stazioni, si arresta dopo essere passato lungo l'intera frequenza. Sintonizzare le stazioni 1. Premere per qualche istante il pulsante SCAN per scansione le stazioni. Durante la scansione, lo schermo mostra una barra di scorrimento che indica l'avanzamento della scansione e il numero di stazioni trovate sino a ora. Una volta che la scansione è terminata, la radio riproduce la prima stazione che trova. 2. Premere a lungo il pulsante INFO / MENU per accedere alla schermata <Impostazioni audio>, utilizzare il pulsante ◄/► e premere il pulsante ENTER per scegliere: <Forced mono> o <Stereo allowed>. Memorizzare le stazioni È possibile memorizzare fino a 10 delle proprie stazioni FM preferite. Ciò consente di accedere alle proprie stazioni FM preferite con rapidità e facilità. 1. Per memorizzare una preimpostazione, prima è necessario ascoltare la stazione che si vuole salvare. 2. Premere il pulsante PRESET.. 3. Usare il pulsante◄/► per selezionare il numero preimpostato desiderato 1-10. 4. Tenere premuto il pulsante ENTER per confermare. Richiamare una stazione memorizzata Una volta salvate le stazioni sulle stazioni preimpostate. Puoi richiamarla premendo il pulsante PRESET. Premere il pulsante ◄/► per selezionare le stazioni memorizzate, e premere il pulsante ENTER per confermare. Modalità display Premere il pulsante INFO/MENU per scorrere tra le informazioni FM fornite dalle stazioni: 6. Dovresti ora essere in grado di riprodurre audio in streaming senza cavo dal tuo dispositivo Bluetooth. 7. Per disconnettersi, premi il tasto MODE per passare a un'altra modalità. Oppure spegni la funzione bluetooth del tuo dispositivo. NOTE: • La distanza di funzionamento del Bluetooth è di circa 7 metri. Gli ostacoli tra i dispositivi possono ridurre questa distanza. • È possibile accoppiare un solo dispositivo Bluetooth per volta. • Non tutti i dispositivi Bluetooth sono compatibili. Risoluzione dei problemi Questo prodotto non ha componenti che possano essere riparate dall'utente. In caso di guasto, contattate il produttore o l'agente di servizio autorizzato. Esporre le parti interne al dispositivo può comportare un pericolo di vita. La garanzia non copre danni causati da riparazioni eff ettuate da terze parti non autorizzate. Audio assente Causa • Volume non acceso. Soluzione • Regolare la manopola del volume principale. Suono statico Causa • Ricezione del segnale troppo bassa. Soluzione • Regolare l'antenna o spostare l'unità in un punto dove il segnale è più forte. Il suono è distorto Causa • Il volume è troppo alto Soluzione • Abbassare il volume Stazione desiderata non trovata Causa • Segnale debole Soluzione • Usare la funzione di sintonizzazione manuale Funzioni DAB assenti Causa • DAB non coperto nella tua area. • Scarsa ricezione Soluzione • Regola la posizione dell'antenna. Il display è vuoto. Funzionamento Bluetooth Premere ripetutamente il pulsante MODE per selezionare e passare alla modalità Bluetooth. 1. Una volta in modalità Bluetooth, “Connecting” appare e lampeggia fino a che l'unità cerca di connettersi ai dispositivi accoppiati in precedenza. Se non vengono trovati dispositivi, “Connecting” continua a lampeggiare per indicare che è pronto per accoppiarsi a un nuovo dispositivo. 2. Attivare il proprio dispositivo Bluetooth e cercare un dispositivo etichettato “SHARP DR-S460” nella lista. 3. Selezionare e attivare l'accoppiamento per il dispositivo “SHARP DRS460”. Se viene chiesta una password, inserire “0000”. 4. Se l'accoppiamento ha successo, l'unità emette un suono e “Connecting” lampeggiante passa a "Connected". 5. Se il dispositivo connesso è fuori portata, la radio cercherà di riconnettersi per due minuti. Quando il dispositivo è nella portata, la radio cercherà di riconnettersi automaticamente. Causa • Ciò può verificarsi se l'emittente modifica l'etichetta di un servizio o rimuove un'etichetta mentre è sintonizzata. Soluzione • La radio cercherà di risintonizzarsi. • Eseguire una scansione. Alimentazione assente Causa • L'adattatore non è connesso alla presa su parete. Soluzione • Accertarsi che l'adattatore sia connesso. 24 Specifiche tecniche Modello DR-S460 Corrente in uscita 2x7W (RMS) Consumo energetico (max.) 26W Standby Consumo energetico <1W Frequenza FM 87.5-108MHz Frequenza DAB+ 174.928-239.200MHz Bluetooth Versione V 4.2 Bande di frequenza 2402 MHz ~ 2480 MHz Potenza massima trasmessa 4dBm Adattatore di corrente Nome modello: FJ-SW1202000N Input: AC 100-240V ~ 50/60Hz, 0.6A Max DC 12V ⎓2000mA Output: SHENZHEN FU JIA APPLIANCE CO., LTD B1,Xujing chang Industrial Park, Haoye Road, Fuyong 518103 Shenzhen, China Produttore: 145 mm 354 mm 185 mm KG 2,95kg FR Importantes consignes de sécurité • Svp, lire ces consignes de sécurité et respecter les avertissements suivants avant que l'appareil ne soit actionné : Le point d'exclamation contenu dans un triangle équilatéral a pour objet d'appeler l'attention de l'utilisateur sur la présence dans la documentation accompagnant le produit d'instructions importantes d'utilisation et d'entretien (de réparation). Utilisez uniquement l'alimentation électrique indiquée dans le mode d'emploi. Ce symbole signifie que le produit doit être éliminé de manière écologique et non avec les ordures ménagères. • • • • • • Tension alternative • Tension continue Équipement de classe II • Pour une utilisation en intérieur uniquement Notation d'efficacité énergétique de niveau VI Polarité de câble d'alimentation de C.C. Afin d’éviter un incendie, maintenir toujours les bougies et autres flammes nues éloignées de ce produit. • • • pas les défauts provoqués par des réparations effectuées par des tiers non autorisés. N'utilisez pas ce produit directement après déballage. Attendez qu'il se réchauffe à la température ambiante avant de l'utiliser. Assurez-vous que ce produit est utilisé dans des climats modérés uniquement (et non tropicaux ou sous-tropicaux). Placez le produit sur une surface plane et stable sans vibrations. Assurez-vous que le produit ou ses pièces ne dépassent pas du bord du meuble le supportant. Pour réduire les risques d'incendie, d'électrocution ou de dommages à ce produit, veuillez ne pas l'exposer à la lumière directe du soleil, à la poussière, à la pluie et à l'humidité. Ne l'exposez jamais aux éclaboussures ou égouttements et ne placez pas d'objets remplis d'eau sur ou près du produit. Ne placez pas d’objets remplis de liquide, comme des vases sur l'appareil. N’installez pas l’appareil à proximité de sources de chaleurs telles que des radiateurs, des chauffages, des cuisinières ou d’autres appareils (y compris des amplificateurs) produisant de la chaleur. Ne placez pas de produit dans un emplacement à l'humidité élevée et présentant une mauvaise ventilation. Assurez une distance minimum de 5 cm autour de l'appareil afin d'assurer une ventilation suffisante. Ne bloquez pas les entrées de ventilation de ce produit. Assurez-vous toujours que les ouvertures de ventilation ne sont pas recouvertes d'articles tels que journaux, nappes de table, rideaux, etc. Ne laissez JAMAIS une personne, et particulièrement un enfant, faire rentrer un objet dans les trous, fentes ou toute autre ouverture du boitier de l'appareil, ceci pouvant causer une électrocution fatale. Les orages sont dangereux pour tous les appareils électriques. Si le secteur ou le câblage aérien est frappé par la foudre, l'appareil peut être endommagé, même s'il était éteint. Vous devez débrancher tous les câbles et connecteurs de l'appareil avant un orage. Un niveau de pression acoustique excessif du casques ou des écouteurs peut causer une perte auditive. Avertissement : Entretien • Suivez toujours les précautions basiques de sécurité durant l'utilisation de cet appareil, particulièrement lorsque des enfants sont présents. • Les enfants doivent être supervisés afin de s'assurer qu'ils ne jouent pas avec l'appareil. • N'endommagez pas le cordon d'alimentation, n'y placez pas d'objets lourds, ne l'étirez pas et ne le pliez pas. N'utilisez pas de rallonge électrique. Tout dommage au cordon d'alimentation peut provoquer un incendie ou un choc électrique. • Si le cordon d'alimentation est endommagé, il doit être remplacé par le fabricant, un agent du service après-vente ou des personnes similairement qualifiées afin d'éviter tout risque. • Assurez-vous que l'appareil est bien branché dans une prise électrique CA 110-240V 50/60Hz. L'utilisation d'une tension plus élevée peut entraîner un dysfonctionnement de l'appareil ou un incendie. • Si la fiche d'alimentation ne rentre pas dans la prise, ne la forcez pas. • Si votre fiche électrique ne rentre pas dans votre prise murale, ne forcez pas pour la faire rentrer. • Éteignez l'appareil avant de le débrancher de sa source électrique afin de complètement le désactiver. • Ne connectez ou ne déconnectez pas le cordon d'alimentation avec des mains mouillées. Ceci peut causer une électrocution. • Si l'appareil ne doit pas être utilisé pendant une longue période, débranchez l'alimentation. • Déconnectez le cordon d'alimentation si l'appareil n'est pas utilisé pendant une période prolongée. • Assurez-vous que la prise principale est toujours facilement accessible. • Ce produit ne contient aucune pièce réparable par l'utilisateur. En cas de défaut, contactez le fabricant ou le département de service après-vente autorisé. L'exposition aux pièces internes situées à l'intérieur de l'appareil peuvent mettre votre vie en danger. La garantie du fabricant ne couvre • Débranchez le câble d'alimentation de la source de courant avant de nettoyer l'appareil. • Utilisez un chiffon doux et propre pour nettoyer l'extérieur de l'appareil. Ne nettoyez jamais l'appareil avec des produits chimiques ou détergent. Adaptateur électrique • Pour déconnecter l'appareil du réseau d'alimentation, débrancher le fil de la prise de courant. • N'utilisez que l'adaptateur secteur fourni, faute de quoi cela pourrait entraîner un risque pour la sécurité et / ou endommager l'appareil. 26 Mise au rebut de ce matériel • Ne jetez pas ce produit avec les déchets municipaux non triés. Renvoyez-la à un point de ramassage et de recyclage WEEE (déchets d'équipements électriques et électroniques) selon la législation en vigueur. Agir ainsi, aide à conserver les ressources et à protéger l'environnement. • La figure ci-dessus apparaît sur les équipements électriques et électroniques (ou sur l'emballage) pour rappeler ce fait aux utilisateurs. • Les utilisateur doivent utiliser les centres de ramassage d'équipements et de piles existants. Déclaration CE : • Par la présente, Universal Media Corporation déclare que cet appareil audio est conforme aux principales exigences et autres clauses pertinentes de la Directive RED 2014/53/EU. Le texte intégral de la déclaration de conformité de l'UE est disponible en cliquant sur le lien suivant : http:// www.sharpconsumer.eu/documents-of-confirmity Marques déposées : La marque et les logos Bluetooth® sont des marques déposées de Bluetooth SIG., Inc. Les termes HDMI et HDMI High-Definition Multimedia Interface et logo HDMI sont protégés par le droit d'auteur et sont la propriété de HDMI Licensing, LLC aux États-Unis et dans d'autres pays. Fabriqué sous licence de Dolby Laboratories. Dolby, Dolby Audio et le symbole double-D sont des marques déposées de Dolby Laboratories. FR Ce qui est inclus dans la boîte : • • • • • • Instructions générales d'utilisation 1 x 1 unité principale 1 x Manuel d'utilisation 1 x Guide de démarrage rapide 1 x Adaptateur secteur 1x Fiche AC (Royaume-Uni) pour adaptateur d'alimentation 1x Fiche AC (Union européenne) pour adaptateur d'alimentation Adaptateur secteur (fourni avec le package) Branchez l'adaptateur secteur sur la prise d'alimentation CC située sur le panneau arrière de la radio. Obtenez la meilleure réception Déployez l'antenne télescopique aussi loin que possible. Allumez la radio Appuyez sur le bouton STANDBY pour allumer la radio. Panels & Controls Passer en mode veille Pendant l'utilisation, appuyer longuement sur le bouton STANDBY pour entrer en mode veille. Appuyez à nouveau pour réveiller la radio. La radio se met automatiquement en mode veille si aucune opération n'est effectuée après 15 minutes. Partie avant Réglage du volume Tournez le bouton Volume pour régler le volume à un niveau confortable. Écouter la radio à un volume élevé peut endommager votre audition. Évitez de l'écouter à haut volume pendant de longues périodes. 9 1 2 3 4 5 6 7 8 La première utilisation de la radio La première fois que vous allumerez la radio, celle-ci recherchera automatiquement les stations. Durant le balayage, l'écran affichera une barre de défilement indiquant la progression du balayage et le nombre de stations de radio trouvées jusque là. Une fois le balayage terminé, la radio émettra la première station trouvée. Fonction répétition Lorsque l’alarme sonne en mode veille, tournez le bouton Volume pour activer la fonction RÉPÉTITION. L'alarme se fera entendre à nouveau après 5 minutes. 1. MODE – Appuyez sur pour changer les modes: DAB / DAB +, FM, Bluetooth, AUX IN. 2. STANDBY – Appuyez sur cette touche pour allumer l'appareil ou passer en mode veille. 3. INFO/MENU – Appuyez sur pour afficher les informations sur la station ou pour accéder à l'écran de réglage du menu principal. 4. ENTER – Appuyez sur pour confirmer vos sélections. 5. PREVIOUS ◄ – Appuyez sur pour revenir aux sélections précédentes, ou pour diminuer la fréquence, ou recherchez la station la plus forte précédente. Informations sur la station Appuyez sur le bouton INFO/MENU pour vérifier les informations de la station. 6. NEXT ► – Appuyez sur pour avancer à la sélection suivante, ou pour augmenter la fréquence, ou recherchez la station la plus forte suivante. 7. SCAN – Utilisez pour scanner les stations de radio ou pour ajuster le niveau de rétroéclairage. Mise à jour automatique de l'heure L'heure et la date peuvent être mises à jour automatiquement si le système détecte le signal RDS. Si le signal RDS est faible ou ne peut pas être détecté, l'heure ne sera pas automatiquement mise à jour. 8. PRESET – Appuyez sur pour rappeler les stations préréglées. 9. DISPLAY SCREEN – Pour afficher les informations. Temps de veille Pour régler la durée de veille, appuyez plusieurs fois sur le bouton SLEEP pour sélectionner: off, 15, 30, 45, 60, 90 minutes. Lorsque le temps imparti est écoulé, l'appareil passe en mode veille. Réglage du menu principal Panneau arrière 10 11 12 Sélection de modes En cours d'utilisation, appuyez plusieurs fois sur le bouton MODE pour passer au mode souhaité : DAB/DAB+, FM, Bluetooth, AUX IN. 13 Appuyez longuement sur le bouton INFO/MENU pour accéder à l'écran de configuration du menu principal. Cherchez et entrez dans l'écran <Système> en appuyant sur le bouton ENTER. Utilisez le bouton ◄/► pour faire défiler les options de menu : <Time setup>, <Alarms>, <Sleep>, <Language>, <Prune>, <Station Order>, <Backlight>, <Factory reset>, <SW version>. REMARQUE : <Prune> et < Station Order> ne sont disponibles qu'en mode DAB. Sélectionnez l'une des options, puis appuyez sur le bouton ENTER pour accéder à ce menu. 10. Volume – Tournez le bouton de volume pour régler le volume. Réglage de l'heure 11. FM Antenna – Pour recevoir le signal FM. 1. Régler l'horloge : 00:00 (Heure:Minutes), utilisez les boutons ◄/► et ENTER pour le réglage. 12. DC Power input – DC 12V 13. AUX IN jack – Connectez le câble audio 3,5 mm à cette prise pour profiter de la musique audio externe. 2. Régler la date : 01-01-2018 (Jour-Mois-Année), semblable au paramétrage « Régler l'horloge ». 3. Mise à jour automatique : <No update> ou <From radio>, appuyez sur le bouton ENTER pour confirmer. 4. Régler 12/24 heure : choisissez votre format préféré. 28 Une fois que vous avez terminé les étapes ci-dessus, l'heure est configurée manuellement. Sonneries Lorsque <Alarms> apparaît, 1. Appuyez sur le bouton ENTER pour accéder à l'écran de réglage de la sonnerie. 2. Choisissez <Alarm 1: off> ou <Alarm 2: off>, Appuyez sur le bouton ENTER pour régler la sonnerie sur On. 3. Utiliser le bouton ◄/► pour sélectionner l' heure de la sonnerie, appuyer sur ENTER pour confirmer. 4. Sélectionner les jours de la sonnerie: Tous les jours, Une fois, Les jours de la semaine, Les week-ends. 5. Régler le mode sonnerie: DAB, FM, Buzzer. 6. Régler le volume de la sonnerie : il y a une barre de réglage du volume de sonnerie, appuyez sur le bouton◄/► pour augmenter ou diminuer le volume, appuyez sur le bouton ENTER pour confirmer. 7. Après tous les réglages ci-dessus, accédez à l'écran Enregistrer, appuyez sur le bouton ENTER pour enregistrer la sonnerie. 8. Pour annuler les sonneries, accédez à l’écran de réglage de la sonnerie, appuyez sur le bouton ENTER pour sélectionner Off puis accédez à l’écran de sauvegarde pour enregistrer le paramètre de la sonnerie. Veille (Régler l'heure de mise en veille) - appuyez brièvement sur le bouton SLEEP Accédez à l'écran de réglage de l’heure de veille pour sélectionner l’heure de veille : off/15/30/45/60/90 minutes. Langue (Définir la langue du système) Accédez à l'écran de réglage de la langue, utilisez les boutons◄/► et ENTER pour définir la langue du système. Réglage des stations Appuyez longuement sur le bouton INFO/MENU, lorsque <Balayage station > apparaît, appuyez sur le bouton ENTER, puis, utilisez le bouton ◄/► pour faire défiler les options de balayage : <Balayage complet>, <Réglage manuel>. 1. Sélectionnez <Réglage manuel>, puis appuyez sur la touche ENTER pour activer la recherche complète. 2. Sélectionnez le <Réglage manuel> et appuyez sur le bouton ENTER, utilisez le bouton ◄/► pour sélectionner les stations de 5A:174.928 MHz à 13F:239.200 MHz. Appuyez ensuite sur le bouton ENTER pour activer la station sélectionnée. Mémoriser des stations Il est possible de mémoriser jusqu'à 10 de vos stations DAB préférées. Ceci vous permettra d’accéder à vos stations favorites rapidement et facilement. 1. Pour mémoriser un préréglage, vous devez d'abord écouter la station que vous souhaitez enregistrer. 2. Appuyez sur la touche PRESET. 3. Utilisez le bouton ◄/► pour sélectionner le nombre de préréglage souhaité 1-10. 4. Appuyez et maintenez le bouton ENTER pour confirmer. Rappel d'une station mémorisée Une fois que vous avez enregistré les stations sur les stations préréglées. Vous pouvez les rappeler en appuyant sur le bouton PRESET. Appuyez sur le bouton ◄/► pour sélectionner les stations mémorisées et appuyez sur le bouton ENTER pour confirmer. Mode d'affichage Chaque fois que vous appuyez sur le bouton INFO/MENU, l'écran affichera les modes d'affichage suivants : Les informations sont affichées sur le segment inférieur de l'écran LCD. Rétro-éclairage Accédez à l'écran de réglage du rétro-éclairage, utilisez les boutons ◄/►pour sélectionner le niveau de rétro-éclairage souhaité : 3, 2, 1, off. Puis, appuyez sur le bouton ENTER pour confirmer votre sélection. Réinitialisation des paramètres d'usine Pour régler la radio sur les paramètres d'origine, accédez à l'écran de réinitialisation d'usine, suivez les conseils <Réinitialisation des paramètres d'usine ?>, Choisissez <OUI> pour réinitialiser, et la radio aura redémarré. REMARQUES: Vous pouvez également appuyer sur le bouton SCAN pour régler le niveau de rétroéclairage. Version SW : Pour vérifier la version du logiciel du système. Dynamic Label Segment (DLS) Affiche les informations textuelles défilantes fournies par le diffuseur. Éliminer les stations (disponible uniquement en mode DAB / DAB +) PTY (Type de programme) Indique le type et la description du programme fourni par la station DAB / DAB +. Pour supprimer des stations répertoriées, mais non disponibles. Accédez à l'écran Éliminer, utilisez le bouton ◄/► pour sélectionner<Oui> ou <Non>, puis, appuyez sur le bouton ENTER pour confirmer votre sélection. Les stations indisponibles sont maintenant supprimées si vous avez choisi <Oui>. Ordre des stations (disponible uniquement en mode DAB / DAB +) Accédez à l'écran Ordre des stations, utilisez le bouton ◄/► pour sélectionner l'un des ordres de la station, puis appuyez sur le bouton ENTER pour confirmer. Fonctionnement DAB/DAB+ Débit binaire Le débit de données auquel le signal est transmis. Fréquence Affiche le numéro et la fréquence du canal de transmission de la station. Heure et date Affiche l'heure et la date fournies par le diffuseur. REMARQUES : DAB – contrairement aux stations radio normales, regroupe plusieurs stations de radio et les transmet sur une seule fréquence. Fonctions FM Après avoir allumé la radio, appuyez sur le bouton MODE à plusieurs reprises pour sélectionner et accéder au mode DAB/DAB+ . Passez en mode FM en appuyant sur le bouton MODE. Balayage des stations Sélectionner les stations En mode DAB / DAB +, la radio balaye automatiquement les stations trouvées dans cette zone. Appuyez sur le bouton ◄/► pour sélectionner les stations précédentes ou suivantes, puis appuyez sur le bouton ENTER pour activer la lecture de la station. Pour rechercher une station FM de 87.5 à 108.00 MHz. 1. Appuyez sur le bouton◄ ou ► pour passer à revenir en arrière ou avancer la fréquence par pallier de 0.05 MHz. 2. Appuyez longuement sur le bouton ◄ ou ► pour passer à la station précédente ou suivante à la réception la plus puissante. Une fois qu'une station a été trouvée, le balayage s'arrête automatiquement. Si aucune station n'est trouvée, le balayage s'arrêtera après avoir parcouru toute la fréquence. FR Réglage des stations 1. Appuyez longuement sur le bouton SCAN pour procéder au balayage des stations. Durant le balayage, l'écran affichera une barre de défilement indiquant la progression du balayage et le nombre de stations de radio trouvées jusque là. Une fois le balayage terminé, la radio émettra la première station trouvée. 2. Appuyez longuement sur le bouton INFO / MENU pour accéder à l'écran <Réglage audio>, utilisez le bouton◄/► et appuyez sur le bouton ENTER pour choisir: <Mono forcé> ou <Stéréo autorisé>. Mémoriser des stations Il est possible de mémoriser jusqu'à 10de vos stations FM préférées. Ceci vous permettra d’accéder à vos stations FM favorites rapidement et facilement. 1. Pour mémoriser un préréglage, vous devez d'abord écouter la station que vous souhaitez enregistrer. 2. Appuyez sur la touche PRESET. 3. Utilisez le bouton ◄/► pour sélectionner le numéro de préréglage souhaité 1-10. 4. Appuyez et maintenez le bouton ENTER pour confirmer. Rappel d'une station mémorisée Une fois que vous avez enregistré les stations sur les stations préréglées. Vous pouvez les rappeler en appuyant sur le bouton PRESET. Appuyez sur le bouton ◄/► pour sélectionner les stations mémorisées et appuyez sur le bouton ENTER pour confirmer. Dépannage Ce produit ne contient aucune pièce réparable par l'utilisateur. En cas de défaut, contactez le fabricant ou le département de service après-vente autorisé. L'exposition aux pièces internes situées à l'intérieur de l'appareil peuvent mettre votre vie en danger. La garantie du fabricant ne couvre pas les défauts provoqués par des réparations eff ectuées par des tiers non autorisés. Absence de son Cause • Le volume n'est pas activé. Solution • Ajustez le bouton de volume principal. Son statique Cause • La réception du signal est trop faible. Solution • Ajustez l'antenne ou déplacez l'appareil vers un emplacement de signal plus fort. Le son est déformé Cause • Le volume est trop élevé Solution • Réduisez le volume Mode d'affichage Station souhaitée introuvable Appuyez sur la touche INFO/MENU pour parcourir les informations FM fournies par les stations : Cause • Signal faible Solution • Utilisez la fonction de réglage manuel Pas de fonctions DAB Fonctions Bluetooth Cause • Aucune couverture DAB dans votre secteur. • Mauvaise réception Solution • Ajustez la position de l'antenne. Appuyez plusieurs fois sur la touche MODE pour sélectionner et accéder au mode Bluetooth. 1. Une fois en mode Bluetooth, “Connecter” apparaît et continue de clignoter pendant que l'unité essaie de se connecter aux appareils précédemment associés. Si aucun périphérique n'est trouvé “Connecter” continue à clignoter pour indiquer qu'il est prêt à être associé à un nouvel appareil. L'écran est blanc 2. Activez votre périphérique Bluetooth et recherchez un périphérique nommé “SHARP DR-S460” dans la liste. Pas d'alimentation 3. Sélectionnez et activez appariement pour le périphérique “SHARP DRS460”. Si vous êtes invité à entrer un mot de passe, entrez “0000”. 4. Si l’appariement réussit, l’appareil émettra un son et le “Connecter” clignotant changera pour "Connecté". 5. Si l'appareil connecté est hors de portée, la radio tentera de se reconnecter pendant 2 minutes. Lorsque l'appareil est à portée, la radio se reconnecte automatiquement. 6. Vous devriez maintenant pouvoir diffuser de l'audio sans fil depuis votre périphérique Bluetooth. 7. Pour vous déconnecter, appuyez sur le bouton MODE sur la radio pour passer à un autre mode. Ou désactivez la fonction Bluetooth sur votre appareil. REMARQUES : • Le rayonnement opérationnel de Bluetooth est d'environ 7 mètres Les obstacles entre les appareils peuvent réduire cette plage. • Un seul périphérique Bluetooth peut être associé à la fois. • Tous les appareils Bluetooth ne sont pas compatibles. Cause • Cela peut se produire si le diffuseur change l'appellation d'un service ou supprime une appellation lors de la mise au point. Solution • La radio essayera un nouveau réglage. • Procéder à un balayage Cause • L'adaptateur n'est pas connecté à la prise murale. Solution • Assurez-vous que l'adaptateur est branché. 30 Spécification technique Modèle DR-S460 Puissance de sortie 2x7W (RMS) Consommation électrique (max.) 26W Consommation électrique en veille <1W Fréquence FM 87.5-108MHz Fréquence DAB+ 174.928-239.200MHz Bluetooth Version V 4.2 Bande de fréquences 2402 MHz ~ 2480 MHz Puissance maximale transmise 4dBm Power Adapter Nom du modèle : FJ-SW1202000N Entrée : AC 100-240V ~ 50/60Hz, 0.6A Max DC 12V ⎓2000mA Sortie : SHENZHEN FU JIA APPLIANCE CO., LTD B1,Xujing chang Industrial Park, Haoye Road, Fuyong 518103 Shenzhen, China Fabricant : 145 mm 354 mm 185 mm KG 2,95kg PL Ważne środki ostrożności Proszę zapoznać się z niniejszymi instrukcjami bezpieczeństwa i wziąć pod uwagę poniższe ostrzeżenia zanim urządzenie zostanie uruchomione: Wykrzyknik wewnątrz trójkąta równobocznego powiadamia użytkownika o ważnych wskazaniach dotyczących obsługi i konserwacji (serwisowania) zawartych w instrukcji obsługi urządzenia. Należy korzystać wyłącznie z zasilacza opisanego w instrukcji obsługi. Ten symbol oznacza, że produkt należy usuwać w sposób przyjazny dla środowiska, a nie z innymi odpadkami gospodarczymi. • • • • • • • napięcie zmienne • napięcie stałe urządzenie klasy II • Tylko do użytku w pomieszczeniach Efektywność energetyczna na poziomie VI • Biegunowość zasilacza prądu stałego Żeby zapobiec pożarowi, zawsze trzymaj świece i inne źródła otwartego ognia z daleka od urządzenia. • • urządzenia może stanowić zagrożenie dla życia. Gwarancja nie obejmuje usterek wywołanych naprawami wykonywanymi przez nieupoważnione strony trzecie. Nie używaj produktu tuż po rozpakowaniu. Przed użyciem należy odczekać, aż urządzenie nagrzeje się do temperatury pokojowej. Urządzenia można używać tylko w umiarkowanym klimacie (nie w klimacie zwrotnikowym i podzwrotnikowym). Umieść urządzenie na płaskiej, stabilnej powierzchni, która nie jest narażona na wibracje. Dopilnuj, by urządzenie nie wystawało za krawędź mebla, na którym stoi. Aby zmniejszyć ryzyko pożaru, porażenia prądem i uszkodzenia produktu, nie wystawiaj go na bezpośrednie działanie światła słonecznego, kurzu, deszczu czy wilgoci. Nigdy nie narażaj urządzenia na zamoczenie lub zachlapanie i nie stawiaj na nim ani w jego pobliżu zbiorników wypełnionych cieczą. Nie stawiaj żadnych przedmiotów ani zbiorników z płynami, takich jak wazony itp., na urządzeniu. Nie umieszczaj urządzenia w pobliżu źródeł ciepła, takich jak grzejniki, nawiewy, piece czy inne urządzenia (w tym wzmacniacze) emitujące ciepło. Nie umieszczaj produktu tam, gdzie wilgotność jest wysoka, a wentylacja słaba. Dopilnuj, by zostawić 5 cm wolnego miejsca wokół urządzenia dla zapewnienia odpowiedniej wentylacji. Nie zakrywaj otworów wentylacyjnych urządzenia. Upewnij się, że otwory wentylacyjne nie są zakryte przedmiotami, takimi jak gazety, ścierki, zasłony itp. NIGDY nie pozwalaj nikomu, zwłaszcza dzieciom, wpychać czegokolwiek w otwory, gniazda i inne szczeliny w obudowie urządzenia: może to skutkować śmiertelnym porażeniem prądem. Burze stanowią niebezpieczeństwo dla wszystkich urządzeń elektrycznych. Jeśli przewód zasilający lub przewody antenowe zostaną trafione piorunem, urządzenie może zostać uszkodzone, nawet gdy jest wyłączone. Przed nadejściem burzy należy odłączyć od urządzenia wszystkie przewody i złącza. Słuchanie zbyt głośnych dźwięków przez słuchawki douszne i nauszne może powodować utratę słuchu. Ostrzeżenie: Konserwacja • Zawsze zachowuj podstawowe środki ostrożności podczas korzystania z urządzenia, zwłaszcza w obecności dzieci. • Nadzoruj dzieci, by nie bawiły się urządzeniem. • Należy chronić przewód zasilający przed uszkodzeniem, nie umieszczać na nim ciężkich przedmiotów, rozciągać go ani zginać. Nie podłączać urządzenia do przedłużaczy. Uszkodzenie przewodu zasilającego może spowodować pożar lub porażenie prądem. • Uważaj, by nie uszkodzić kabla zasilającego: nie stawiaj na nim ciężkich przedmiotów, nie rozciągaj go ani nie wyginaj. Nie podłączaj urządzenia do przedłużaczy. Uszkodzenie kabla zasilającego może spowodować pożar lub porażenie prądem. • Jeśli przewód zasilający zostanie uszkodzony, należy go wymienić u producenta, w serwisie lub u innej wykwalifikowanej osoby, żeby ochronić się przed zagrożeniem. • Dopilnuj, by urządzenie zostało podłączone do gniazda zasilania 110240V ~ 50/60Hz. Używanie wyższego napięcia może powodować awarie, a nawet zapalenie się urządzenia. • Jeśli wtyczka nie mieści się w gnieździe, nie wolno wciskać jej na siłę. • Wyłącz urządzenie przed odłączeniem go od prądu, by całkowicie je wyłączyć. • Nie odłączaj ani nie podłączaj kabla zasilającego mokrymi rękami. Może to spowodować porażenie prądem. • Jeśli urządzenie nie jest używane przez dłuższy czas, należy odłączyć je od źródła zasilania. • Dopilnuj, by wtyczka była zawsze łatwo dostępna. • Niniejszy produkt nie posiada żadnych części, które może naprawiać użytkownik. W przypadku wystąpienia usterki skontaktuj się z producentem lub autoryzowanym serwisem. Odsłanianie wewnętrznych części • Przed czyszczeniem urządzenia odłącz przewód zasilający od prądu. • Do czyszczenia zewnętrznej części obudowy użyj miękkiej, czystej ściereczki. Nigdy nie czyść obudowy chemikaliami ani detergentami. Zasilacz • Żeby odłączyć urządzenie od zasilania sieciowego, odłącz przewód zasilający od gniazdka elektrycznego. • Korzystaj wyłącznie z zasilacza dostarczonego w zestawie. Użycie innego zasilacza może spowodować zagrożenie dla bezpieczeństwa i/lub uszkodzenie urządzenia. 32 Utylizacja sprzętu • Nie wyrzucać niniejszego produktu razem z niesortowanymi odpadami z gospodarstwa domowego. Oddaj je do wyznaczonego punktu odbioru w celu przetworzenia zgodnie z przepisami WEEE. W ten sposób oszczędzasz zasoby naturalne i chronisz środowisko. • Powyższy symbol umieszczany jest na urządzeniach elektrycznych i elektronicznych (lub na ich opakowaniach), by przypomnieć użytkownikowi o tej zasadzie. • Użytkownicy powinni zgłaszać się do wyznaczonych punktów odbioru zużytych urządzeń i baterii. Deklaracja zgodności: • UMC Poland sp. z o.o. niniejszym oświadcza, że to urządzenie spełnia zasadnicze wymagania oraz inne odnośne normy określone w dyrektywie RED 2014/53/UE. Pełen tekst deklaracji zgodności WE jest dostępny pod następującym linkiem: http://www.sharpconsumer.eu/documentsof-confirmity Znaki handlowe: Nazwa i logo Bluetooth®są zarejestrowanymi znakami handlowymi firmy Bluetooth SIG,. Inc. Nazwy HDMI i HDMI High-Definition Multimedia Interface oraz logo HDMI są znakami towarowymi lub zarejestrowanymi znakami towarowymi HDMI Licensing, LLC w Stanach Zjednoczonych i innych krajach. Wyprodukowano na licencji Dolby Laboratories. Dolby, Dolby Audio i symbol z podwójnym D są znakami towarowymi fi rmy Dolby Laboratories. PL Zawartość opakowania • • • • • • Ogólne instrukcje użytkowania 1 x Urządzenie główne 1 x Instrukcja obsługi 1 x Skrócona instrukcja instalacji 1 x Zasilacz 1x wtyczka sieciowa do zasilacza w wersji dla Wielkiej Brytanii 1x wtyczka sieciowa do zasilacza w wersji dla krajów UE Zasilacz sieciowy (dostarczony w zestawie) Podłączyć przewód zasilający do gniazda prądu stałego znajdującego się na tylnym panelu odbiornika. Optymalna jakość odbioru Maksymalnie wysunąć antenę teleskopową. Włączyć odbiornik Nacisnąć przycisk STANDBY, aby włączyć odbiornik. Panele i przyciski Przejść do trybu czuwania Aby przejść w tryb czuwania podczas korzystania z odbiornika, nacisnąć i przytrzymać przycisk STANDBY. Nacisnąć ponownie, aby włączyć odbiornik. Jeśli w ciągu 15 minut nie zostanie wykonana żadna operacja, odbiornik automatycznie przejdzie w tryb czuwania. Przedni panel 9 1 2 3 4 5 6 7 8 Regulacja głośności Obrócić pokrętło regulacji głośności, aby ustawić pożądany poziom dźwięku. Słuchanie radia przy wysokim poziomie głośności grozi uszkodzeniem słuch. Długotrwałe narażenie na wysoki poziom głośności grozi uszkodzeniem słuchu. Pierwsze użycie odbiornika Po pierwszym włączeniu, odbiornik automatycznie zacznie wyszukiwać stacje. Podczas wyszukiwania, na ekranie pojawi się pasek wskazujący postępy i ilość znalezionych stacji radiowych. Po zakończeniu wyszukiwania, odbiornik przełączyć się na pierwszą znalezioną stację. Funkcja drzemki Gdy alarm włączy się w trybie czuwania, obrócić pokrętło głośności , aby aktywować funkcję drzemki (SNOOZE). Alarm włączy się ponownie po 5 minutach. 1. MODE – Naciśnij, aby zmienić tryby: DAB / DAB +, FM, Bluetooth, AUX IN. 2. STANDBY – Naciśnij ten przycisk, aby włączyć urządzenie lub przejść do trybu gotowości. 3. INFO/MENU – Naciśnij, aby wyświetlić informacje o stacji lub przejdź do ekranu ustawień głównego menu. 4. ENTER – Naciśnij, aby potwierdzić wybór. 5. PREVIOUS ◄ – Naciśnij, aby wrócić do poprzednich wyborów, lub, aby zmniejszyć częstotliwość, lub wyszukaj poprzednią najsilniejszą stację. 6. NEXT ► – Naciśnij, aby przejść do następnego wyboru, lub, aby zwiększyć częstotliwość lub wyszukać kolejną najsilniejszą stację. 7. SCAN – Służy do skanowania stacji radiowych lub do regulacji poziomu podświetlenia. 8. PRESET – Naciśnij, aby przywołać zaprogramowane stacje. 9. DISPLAY SCREEN – Aby wyświetlić informacje. Wybór trybu Kiedy odbiornik jest w użyciu, nacisnąć kilkakrotnie przycisk MODE, aby przełączyć go na wybrany przez siebie tryb: DAB/DAB+, FM, Bluetooth, AUX IN. Informacje o stacji Nacisnąć przycisk INFO/MENU, aby uzyskać dostęp do informacji o stacjach. Automatyczne ustawienie godziny Godzinę i datę można ustawiać automatycznie, jeśli system rozpozna sygnał RDS. Jeżeli sygnał RDS jest słaby lub nie można go wykryć, godzina nie zostanie automatycznie zaktualizowana. Ustawienie menu głównego Tylny panel 10 11 12 Wyłącznik czasowy (SLEEP) Aby ustawić wyłącznik czasowy, kilkakrotnie nacisnąć przycisk SLEEP i wybrać jedną z następujących opcji: off (wyłączony), 15, 30, 45, 60, 90 minut. Po upływie ustawionego czasu, urządzenie przejdzie w tryb uśpienia. 13 Przytrzymać przycisk INFO/MENU, aby przejść do ekranu konfiguracji menu głównego. Znaleźć i otworzyć ekran <System>, naciskając przycisk SCAN. Następnie na pomocą przycisków ◄/► przejrzeć opcje menu: <Time setup/Ustawienie czasu>, <Alarms/Budzik>, <Sleep/Uśpienie>, <Language/Język>, <Prune/Eliminacja>, <Station Order/Kolejność stacji>, <Backlight/Podświetlenie>, <Factory reset/Ustawienia fabryczne>, <SW version/Wersja SW>. UWAGA: Opcje < Prune> i < Station Order> są dostępne tylko w trybie DAB. 10. Volume – Obróć pokrętło głośności, aby wyregulować poziom głośności. 11. FM Antenna – Aby odebrać sygnał FM. Wybrać jedną z opcji, a następnie przejść do menu, naciskając przycisk ENTER. Ustawienie godziny 12. DC Power input – DC 12V 1. Ustawić zegar: 00:00 (godzina:minuty) za pomocą przycisków ◄/► oraz ENTER. 13. AUX IN jack – Podłącz kabel audio 3,5 mm do tego gniazda, aby cieszyć się zewnętrzną muzyką audio 2. Ustawić datę: 01-01-2018 (dzień-miesiąc-rok), podobnie jak w przypadku „ustawienia zegara”. 34 3. Automatyczna aktualizacja: < No update/Brak aktualizacji> lub < From radio/Z radia>, nacisnąć przycisk ENTER, by potwierdzić. Przyciskami ◄/► wybrać poprzednią lub następną stację, a następnie nacisnąć przycisk ENTER, aby włączyć odtwarzanie. 4. Ustawić czas w preferowanym przez siebie formacie 12/24. Dostrajanie stacji Po wykonaniu powyższych czynności, godzinę należy ustawić ręcznie. Budzik Kiedy wyświetla się <Alarms>, 1. Nacisnąć przycisk ENTER, by wprowadzić ustawienia budzika. 2. Wybrać <Alarm 1: off> lub <Alarm 2: off>, nacisnąć przycisk ENTER, aby włączyć budzik On. 3. Przyciskiem ◄/► ustawić godzinę budzenia, a następnie potwierdzić, naciskając ENTER. 4. Wybrać dni budzenia: Codziennie, jednorazowo, dni robocze, weekendy. 5. Ustawić tryb budzika: DAB, FM, Buzzer (dzwonek). 6. Ustawić głośność budzika: służy do tego suwak regulacji głośności alarmu. Naciskając przyciski ◄/►, zwiększyć lub zmniejszyć poziom głośności, a następnie potwierdzić przyciskiem ENTER. 7. Po potwierdzeniu powyższych ustawień, przejść do ekranu Save i nacisnąć przycisk ENTER, aby zapisać ustawienia budzika. 8. Aby wyłączyć budzik, przejść do ekranu ustawień budzika, nacisnąć przycisk ENTER i wybrać Off, a następnie przejść do ekranu zapisu, aby zapisać nowe ustawienie. Wyłączenie (Ustawienie wyłącznika czasowego) krótko nacisnąć przycisk SLEEP Przejść do ekranu ustawień wyłącznika czasowego, aby wybrać czas wyłączenia: off/15/30/45/60/90 minut. Język (Ustaw język systemu) Przejść do ekranu ustawień języka i ustawić język za pomocą przycisków ◄/► oraz ENTER. Przytrzymać przez chwilę przycisk INFO/MENU, kiedy wyświetli się <Station scan>, nacisnąć przycisk ENTER, a następnie przejrzeć opcje skanowania przyciskiem ◄/► : <Full scan>, <Manual tune>. 1. Wybrać opcję pełnego skanowania <Full scan> i nacisnąć przycisk ENTER , by uruchomić skanowanie. 2. Wybrać opcję ręcznego dostrajania <Manual tune> i przycisk ENTER, użyć przycisków ◄/►, żeby wybrać stacje od 5A:174.928 MHz do 13F:239.200 MHz. Następnie nacisnąć przycisk ENTER, by rozpocząć odtwarzanie wybranej stacji. Store Stations Można zapisać maksymalnie 10ulubionych stacji. This will enable you to access your favourite stations quickly & easily. 1. Można zapisać tylko odtwarzane stacje. 2. Nacisnąć przycisk PRESET. 3. Przyciskami◄/► wybrać numer 1-10. 4. Nacisnąć i przytrzymać przycisk ENTER, aby potwierdzić. Przywoływanie stacji z pamięci Wyłącznie po zapisaniu wybranych stacji. Można przywołać stację z pamięci za pomocą przycisku PRESET. Nacisnąć przycisk ◄/► , aby wybrać zapisane stacje, a następnie potwierdzić przyciskiem ENTER. Tryb wyświetlania Każde naciśnięcie przycisku INFO/MENU spowoduje wyświetlenie poniższych trybów wyświetlania. Informacje są wyświetlane w dolnej części wyświetlacza LCD. Podświetlenie Przejść do ekranu ustawień Backlight (podświetlenie) za pomocą przycisku ◄/► i wybrać pożądany poziom podświetlenia ekranu: 3, 2, 1, off. Następnie nacisnąć przycisk ENTER , aby potwierdzić swój wybór. Przywracanie ustawień fabrycznych Aby przywrócić oryginalne ustawienia odbiornika, przejść do ekranu ustawień fabrycznych, postępować zgodnie ze wskazówkami <Factory reset?>, wybrać <YES>, aby zresetować; odbiornik włączy się ponownie. UWAGI: Możesz także nacisnąć przycisk SCAN, aby wyregulować poziom podświetlenia. Wersja oprogramowania Informacja o wersji oprogramowania systemu. Eliminacja stacji (opcja dostępna tylko w trybie DAB/DAB+) Służy usuwaniu stacji znajdujących się na liście, ale niedostępnych. Przejść do ekranu Usuwania, za pomocą przycisku◄/► i wybrać <Yes> lub <No>, a następnie potwierdzić dokonany wybór naciskając przycisk ENTER . Niedostępne stacje zostaną usunięte po wybraniu <Yes>. Kolejność stacji (opcja dostępna tylko w trybie DAB/DAB+) Przejść do ekranu kolejności stacji, przyciskiem ◄/► wybrać kolejność stacji, a następnie nacisnąć przyciskENTER, aby potwierdzić. Działanie DAB/DAB+ Po włączeniu odbiornika, kilkakrotnie nacisnąć przycisk STANDBY, aby wybrać tryb DAB/DAB+. Skanowanie stacji Po przełączeniu na tryb DAB/DAB+, odbiornik automatycznie skanuje zidentyfikowane na danym obszarze stacje. Dynamic Label Segment (DLS) Wyświetla przewijane informacje tekstowe od nadawcy. PTY (Typ programu) Wyświetla typ i opis programu dostarczanego przez stację DAB/DAB+. Przepływowość Prędkość przesyłanego sygnału. Częstotliwość Wyświetla numer kanału i częstotliwość stacji. Godzina i data Wyświetla informacje o godzinie i dacie przekazane przez nadawcę. UWAGA: System DAB – w przeciwieństwie do systemu analogowego, grupuje kilka stacji radiowych i transmituje ich audycje na jednej częstotliwości. Tryb FM Przejść do trybu FM , naciskając przycisk MODE. Wybór stacji Wybór stacji FM od 87.5 do 108.00 MHz. 1. Nacisnąć przycisk ◄ lub ►, aby zmienić częstotliwość, przechodząc wstecz lub do przodu o 0.05 MHz. PL 2. Nacisnąć dłużej przycisk ◄ lub ►, aby przejść do kolejnej lub poprzedniej stacji o najsilniejszym sygnale. Po znalezieniu stacji, skanowanie zatrzymuje się automatyczne. Jeśli żadna stacja nie zostanie znaleziona, skanowanie zatrzyma się po przejściu przez całą częstotliwość. Strojenie stacji 1. Trzymać naciśnięty przycisk SCAN, aby przeskanować stacje. Podczas skanowania na ekranie pojawi się suwaka wskazujący postęp skanowania i liczbę znalezionych stacji radiowych. Po zakończeniu skanowania odbiornik odtworzy pierwszą znalezioną stację. 2. Naciśnij i przytrzymaj przycisk INFO / MENU, aby przejść do ekranu <Ustawienia audio>, użyj przycisku ◄/► i naciśnij przycisk ENTER, aby wybrać: <Forced mono> lub <Stereo allowed>. Zapisywanie stacji Można zapisać maksymalnie 10 ulubionych stacji. Dzięki temu łatwo i szybko można uzyskać dostęp do ulubionych stacji FM. 1. Można zapisać tylko odtwarzaną stację. 2. Nacisnąć przycisk PRESET. 3. Przyciskiem ◄/► wybrać numer 1-10. 4. Nacisnąć i przytrzymać przycisk ENTER, aby potwierdzić. Przywołanie zapisanej stacji Wyłącznie po zapisaniu danej stacji na liście zaprogramowanych stacji. Stację można przywołać za pomocą przycisku PRESET. Nacisnąć przycisk ◄/►, aby wybrać zapisane stacje, a następnie przycisk ENTER, aby potwierdzić. Tryb wyświetlania Nacisnąć przycisk INFO/MENU, aby przejrzeć informacje udostępnione przez stacje radiowe: • Jednocześnie można połączyć za pomocą Bluetooth tylko jedno urządzenie. • Nie wszystkie urządzenia Bluetooth są kompatybilne. Rozwiązywanie problemów Niniejszy produkt nie posiada żadnych części, które może naprawiać użytkownik. W przypadku wystąpienia usterki skontaktuj się z producentem lub autoryzowanym serwisem. Odsłanianie wewnętrznych części urządzenia może stanowić zagrożenie dla życia. Gwarancja nie obejmuje usterek wywołanych naprawami wykonywanymi przez nieupoważnione strony trzecie. Brak dźwięku Przyczyna • Dźwięk nie jest włączony. Rozwiązanie • Ustawić w odpowiedniej pozycji pokrętło dźwięku. Szum Przyczyna • Słaby odbiór sygnału. Rozwiązanie • Wyregulować antenę lub przenieść urządzenie w miejsce, w którym odbiór sygnału jest lepszy. Dźwięk jest zniekształcony. Przyczyna • Zbyt wysoki poziom głośności. Rozwiązanie • Zmniejszyć głośność. Nie odnaleziono żądanej stacji. Przyczyna • Słaby sygnał Rozwiązanie • Użyć funkcji ręcznego dostrajania. Nie działa DAB Działanie Bluetooth Nacisnąć kilkakrotnie przycisk MODE i wybrać tryb Bluetooth. 1. W trybie Bluetooth wyświetla się sygnał „Connecting”; miga, gdy odbiornik próbuje połączyć się z urządzeniami, które wcześniej z nim połączono. Jeżeli nie odnajdzie żadnych urządzeń, sygnał „Connecting” miga, by wskazać, że jest gotowy na połączenie z nowymi urządzeniami. 2. Aktywować swoje urządzenie Bluetooth i wyszukać na liście urządzenie oznaczone jako „SHARP DR-S460”. 3. Wybrać i potwierdzić połączenie z urządzeniem „SHARP DR-S460”. Jeśli konieczne będzie podanie hasła, wprowadzić „0000”. 4. Charakterystyczny dźwięk sygnalizuje, że łączenie urządzeń się powiodło; migający sygnał „Connecting” zmienia się wówczas na „Connected”. 5. Jeśli podłączone urządzenie znajdzie się poza zasięgiem, odbiornik będzie przez 2 minuty próbował ponownie się połączyć. Odbiornik automatycznie połączy się ponownie, gdy urządzenie znajdzie się w zasięgu. 6. Bezprzewodowe przesyłanie dźwięku z urządzenia Bluetooth powinno być teraz możliwe. 7. Aby rozłączyć, nacisnąć przycisk MODE na odbiorniku, co spowoduje przejście urządzenia w inny tryb. Można też wyłączyć funkcję Bluetooth w swoim urządzeniu. UWAGA: • Zasięg transmisji Bluetooth wynosi około 7 metrów. Przeszkody pomiędzy urządzeniami mogą zmniejszać zasięg. Przyczyna • Brak obsługi DAB na danym terenie. • Słaby sygnał Rozwiązanie • Wyregulować ustawienie anteny. Brak danych na wyświetlaczu. Przyczyna • Sytuacja ta może wystąpić, kiedy nadawca zmieni oznaczenie usługi lub usunie oznaczenie w trakcie dostrajania. Rozwiązanie • Odbiornik będzie próbował się dostroić. • Przeprowadzić skanowanie stacji. Brak zasilania Przyczyna • Zasilacz nie jest podłączony do gniazda w ścianie. Rozwiązanie • Sprawdzić, czy zasilacz jest podłączony do gniazda. 36 Dane techniczne Model DR-S460 Moc wyjściowa 2x7W (RMS) Pobór energii (maks.) 26W Pobór energii w trybie czuwania <1W Częstotliwość FM 87.5-108MHz DAB+ Częstotliwość 174.928-239.200MHz Bluetooth Wersja V 4.2 Pasma częstotliwości 2402 MHz ~ 2480 MHz Maksymalny poziom przekazywanej mocy 4dBm Power Adapter Nazwa modelu: FJ-SW1202000N Wejście: AC 100-240V ~ 50/60Hz, 0.6A Max DC 12V ⎓2000mA Wyjście: SHENZHEN FU JIA APPLIANCE CO., LTD B1,Xujing chang Industrial Park, Haoye Road, Fuyong 518103 Shenzhen, China Producent: 145 mm 354 mm 185 mm KG 2,95kg UMC Poland sp. z o.o. Ostaszewo 57B, 87-148 Łysomice, Poland Made in China SAU/MAN/0055 www.sharpconsumer.eu-
 1
1
-
 2
2
-
 3
3
-
 4
4
-
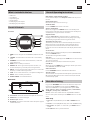 5
5
-
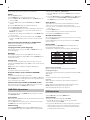 6
6
-
 7
7
-
 8
8
-
 9
9
-
 10
10
-
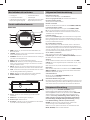 11
11
-
 12
12
-
 13
13
-
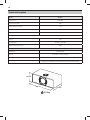 14
14
-
 15
15
-
 16
16
-
 17
17
-
 18
18
-
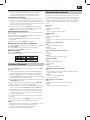 19
19
-
 20
20
-
 21
21
-
 22
22
-
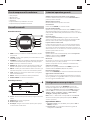 23
23
-
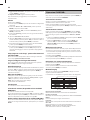 24
24
-
 25
25
-
 26
26
-
 27
27
-
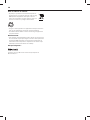 28
28
-
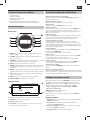 29
29
-
 30
30
-
 31
31
-
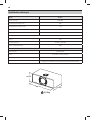 32
32
-
 33
33
-
 34
34
-
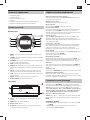 35
35
-
 36
36
-
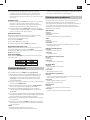 37
37
-
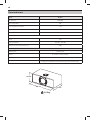 38
38
-
 39
39
-
 40
40
-
 41
41
-
 42
42


Sharp DR-S460 El manual del propietario
- Categoría
- Radios
- Tipo
- El manual del propietario
- Este manual también es adecuado para
en otros idiomas
- français: Sharp DR-S460 Le manuel du propriétaire
- italiano: Sharp DR-S460 Manuale del proprietario
- English: Sharp DR-S460 Owner's manual
- Deutsch: Sharp DR-S460 Bedienungsanleitung
- polski: Sharp DR-S460 Instrukcja obsługi
Artículos relacionados
Otros documentos
-
Lenco DIR-260BK El manual del propietario
-
-
-
-
-
-
-
PEAQ PDR350BT B El manual del propietario
-
Tangent DAB2go Bluetooth White High Gloss El manual del propietario
-
Schwaiger DAB 400 Operating And Safety Instructions Manual