
HITACHI
Designedforoperatingin USA&Canadaonly.
WhenthisproductisusedinareasotherthantheUSA&Canada,
wecannotguaranteetheproductqualityandperformance.
Model
Modele
Modelo
WH 18DSDL
WR 18DSDL
CordlessImpact Driver
Marteau a choc sans fil
Atornillador de impacto a bateria
CordlessImpact Wrench
Clea chocsansfil
Llavede impacto a bateria
WH18DSDL WR18DSDL
SAFETYINSTRUCTIONSAND INSTRUCTIONMANUAL
,4',, WARNING
IMPROPER OR UNSAFE use of this power tool can result in death or serious bodily
injury!
This manual contains important information about product safety. Please read and
understand this manual BEFORE operating the power tool. Please keep this manual
available for other users and owners before they use the power tool. This manual should
be stored in safe place.
INSTRUCTIONSDESECURITEETMODE D'EMPL01
/_ AVERTISSEMENT
Une utilisation INCORRECTE OU DANGEREUSE de cet outil motoris6 peut entrafner la
mort ou de s@ieuses blessures corporelles!
Ce mode d'emploi contient d'importantes informations apropos de la s6curit6 de ce
produit. Priere de lire et de comprendre ce mode d'emploi AVANT d'utiliser I'outil
motoris& Garder ce mode d'emploi a la disponibilite des autres utilisateurs et proprietaires
avant qu'ils utilisent I'outil motoris& Ce mode d'emploi doit _tre conserve dans un
endroit sQr.
INSTRUCCIONESDESEGURIDADYMANUALDEINSTRUCCIONES
/_, ADVERTENCIA
iLa utilizaci6n INAPROPIADA O PELIGROSA de esta herramienta electrica puede
resultar en lesiones de gravedad o la muerte!
Este manual contiene informaci6n importante sobre la seguridad del producto. Lea y
comprenda este manual ANTES de utilizar la herramienta electrica. Guarde este manual
para que puedan leerlo otras personas antes de utilizar la herramienta electrica. Este
manual debe ser guardado en un lugar seguro.
Hitachi Koki
01Eng WH18DSDL US.p65 1 10/2/12, 3:18 PM

English I CONTENTS
Page Page
IMPORTANT SAFETY INSTRUCTIONS ............. 3 NAME OF PARTS ................................................ 9
MEANINGS OF SIGNAL WORDS ...................... 3 SPECIFICATIONS .............................................. 10
SAFETY .................................................................... 3
GENERAL POWER TOOL SAFETY
WARNINGS .................................................. 3
SPECIFIC SAFETY RULES AND SYMBOLS ....... 5
IMPORTANT SAFETY INSTRUCTIONS FOR USE OF
THE CORDLESS IMPACT DRIVER/WRENCH ........ 6
IMPORTANT SAFETY INSTRUCTIONS
FOR BATTERY CHARGER ........................... 6
IMPORTANT SAFETY INSTRUCTIONS
FOR USE OF THE BATTERY AND
BATTERY CHARGER .................................... 7
CAUTION ON LITHIUM-ION BATTERY ............. 7
FUNCTIONAL DESCRIPTION .................................. 9
ASSEMBLY AND OPERATION ............................. 11
APPLICATIONS ................................................. 11
REMOVAL AND INSTALLATION METHOD
OF BATTERY ........................................... 11
CHARGING METHOD ....................................... 11
BEFORE USE ..................................................... 13
OPERATION ....................................................... 13
OPERATIONAL CAUTIONS .............................. 15
MAINTENANCE AND INSPECTION ..................... 17
ACCESSORIES ....................................................... 19
STANDARD ACCESSORIES ............................... 19
OPTIONAL ACCESSORIES ................................ 19
PARTS LIST ............................................................ 65
FranqaisI TABLE DES MATIERES
Page Page
CONSIGNES DE St_CURITE IMPORTANTES .......... 23 NOM DES PARTIES ............................................ 30
SIGNIFICATION DES MOTS D'AVERTISSEMENT .... 23 SPECIFICATIONS ................................................ 31
SECURITE ................................................................ 23
AVERTISSEMENTS DE St_CURITE Gt_NERAUX
CONCERNANT LES OUTILS ELECTRIQUES... 23
REGLESDE SECURITESPECIFIQUESET SYMBOLES..., 25
CONSlGNES DE SI_CURITI_ IMPORTANTES
POUR L'UTILISATION DU MARTEAU/CL¢ A
CHOCS SANS FIL ......................................... 26
CONSIGNES DE SI_CURITI_ IMPORTANTES
POUR LE CHARGEUR DE BATTERIE .......... 26
CONSIGNES DE SI_CURITI_ IMPORTANTES
POUR L'UTILISATION DE LA BATTERIE
ET DU CHARGEUR DE BATTERIE .............. 27
PRI_CAUTIONS RELATIVES A LA BATTERIE
AU LITHIUM ION ......................................... 28
DESCRIPTION FONCTIONNELLE ........................... 30
ASSEMBLAGE ET FONCTIONNEMENT ................ 32
UTILISATIONS .................................................... 32
METHODE DE RETRAIT ET D'INSTALLATION
DE LA BATTERIE .......................................... 32
MC:THODE DE RECHARGE ................................. 32
AVANT L'UTILISATION ...................................... 34
UTILISATION ....................................................... 34
PRO:CAUTIONS D'UTILISATION ........................ 37
ENTRETIEN ET INSPECTION .................................. 38
ACCESSOIRES ......................................................... 40
ACCESSOIRES STANDARD ............................... 40
ACCESSOIRES EN OPTION ................................ 40
LISTE DES PIECES ................................................. 65
Espar_ol I INDICE
Pagina Pagina
INSTRUCCIONESIMPORTANTESSOBRESEGURIDAD.. 44 NOMENCLATURA ............................................... 51
SIGNIFICADODE LASPALABRAS DESENALIZACION ,,.44 ESPECIFICACIONES ............................................ 52
SEGURIDAD ............................................................. 44
ADVERTENCIAS DE SEGURIDAD GENERAL DE
LA HERRAMIENTA EL¢CTRICA .................. 44
NORMAS Y SIMBOLOS ESPECIFICOS DE
SEGURIDAD ................................................. 46
INSTRUCCIONES IMPORTANTES DE
SEGURIDAD PARA USAR EL TALADRO/
LLAVE DE IMPACTO DE BATERIA .............. 47
INSTRUCCIONES IMPORTANTES DE SEGURIDAD
PARA EL CARGADOR DE BATERIAS ............ 48
INSTRUCCIONES IMPORTANTES DE SEGURIDAD PARA
LA BATERiA Y EL CARGADOR DEBATERiAS ......48
ADVERTENCIA DE LA BATERiA DE LITIO...................... 49
DESCRIPCION FUNClONAL .................................... 51
MONTAJE Y OPERACION ...................................... 53
APLICACIONES .............. , ............................ ,........ 53
MCTODO DE EXTRACCION E INSTALACION
DE LA BATERIA ............................................ 53
MC:TODO DE CARGA ...... _................................... 53
ANTES DE LA UTILIZACION .............................. 55
OPERACION ........................................................ 55
PRECAUCIONES OPERACIONALES .................. 58
MANTENIMIENTO E INSPECCION ........................ 59
ACCESORIOS ........................................................... 61
ACCESORIOS ESTANDAR ................................. 61
ACCESORIOS OPCIONALES .............................. 61
LISTA DE PIEZAS .................................................. 65
01Eng WH18DSDL US.p65 2 10/2/12, 2:38 PM

English
IMPORTANT SAFETY INSTRUCTIONS
Readand understandall ofthe safetyprecautions,warnings andoperatinginstructionsin the InstructionManual
beforeoperatingor maintainingthis powertool.
Mostaccidentsthat resultfrom powertool operation andmaintenancearecausedbythefailureto observebasic
safetyrulesor precautions.An accidentcanoften be avoided byrecognizinga potentially hazardoussituation
beforeit occurs,and by observingappropriatesafetyprocedures.
Basicsafetyprecautionsareoutlined inthe "SAFETY"sectionofthisInstructionManualand inthe sectionswhich
containthe operationand maintenanceinstructions.
Hazardsthat must beavoidedto preventbodily injury or machinedamageareidentified byWARNINGSonthe
powertool and inthis Instruction Manual.
NEVERusethispower tool in amannerthat hasnot beenspecificallyrecommendedbyHITACHI.
MEANINGS OF SIGNAL WORDS
WARNINGindicatesa potentially hazardoussituationswhich, if ignored,could resultindeathor seriousinjury.
CAUTIONindicatesapotentially hazardoussituationswhich, if not avoided, may result in minor or moderate
injury,or maycausemachinedamage.
NOTEemphasizesessentialinformation.
m_
I
I
GENERAL POWER TOOL SAFETY WARNINGS
/k
1)
2)
WARNING:
Readallsafetywarnings andallinstructions.
Failuretofollow the warnings and instructionsmay resultin electric shock,fire and/orseriousinjury.
Saveallwarnings andinstructionsfor futurereference.
Theterm "power tool" inthe warningsreferstoyour mains-operated(corded)powertoolor battery-operated
(cordless)powertool.
Work areasafety
a} Keepworkareacleanandwell lit.
Clutteredor darkareasinviteaccidents.
b) Do not operate power tools in explosive
atmospheres,suchas in the presenceof
flammable liquids,gasesordust.
Powertools createsparkswhich may ignite
the dust or fumes.
c} Keepchildrenand bystandersaway while
operatingapowertool.
Distractionscancauseyou to losecontrol.
Electricalsafety
a} Powertoolplugsmustmatchtheoutlet.
Nevermodifytheplugin anyway.
Donot useanyadapterplugswith earthed
(grounded)powertools.
Unmodifiedplugs and matchingoutlets will
reduceriskofelectric shock.
b) Avoidbodycontactwithearthedorgrounded
surfacessuchaspipes,radiators,rangesand
refrigerators.
Thereis an increasedrisk of electric shockif
your body isearthedor grounded.
3)
c} Do notexposepowertoolsto rain or wet
conditions.
Waterenteringapowertool will increasethe
riskof electricshock.
d) Donotabusethecord.Neverusethecordfor
carrying,pullingorunpluggingthepowertool.
Keepcordawayfrom heat,oil,sharpedges
ormovingparts.
Damagedorentangledcordsincreasethe risk
of electricshock.
e} Whenoperatinga powertooloutdoors,use
an extensioncordsuitablefor outdooruse.
Useof acordsuitablefor outdoorusereduces
the risk of electricshock.
f} Ifoperatinga powertoolinadamplocation
isunavoidable,usea residualcurrentdevice
(RCD)protectedsupply.
UseofanRCDreducestheriskofelectricshock.
Personalsafety
a} Stayalert,watchwhatyouaredoinganduse
commonsensewhenoperatingapowertool.
Donot useapowertoolwhileyou aretired
or underthe influenceof drugs,alcoholor
medication.
3
01Eng WH18DSDL US.p65 3 10/2/12, 2:38 PM

tirol
I
I
English
4)
A moment of inattention while operating
power tools may result in serious personal
injury.
b) Usepersonalprotectiveequipment.Always
wear eyeprotection.
Protectiveequipmentsuchasdustmask,non-
skid safety shoes, hard hat, or hearing
protection usedfor appropriate conditions
will reducepersonalinjuries.
c} Preventunintentionalstarting.Ensurethe
switchisintheoff-positionbeforeconnecting
topowersourceand/orbatterypack,picking
uporcarryingthetool.
Carryingpowertoolswith yourfinger on the
switch or energising powertools that have
the switch on invites accidents.
d) Removeanyadjustingkeyorwrenchbefore
turningthe powertoolon.
A wrenchor akeyleft attachedto a rotating
partofthe powertool mayresultin personal
injury.
e} Donotoverreach.Keepproperfootingand
balanceat alltimes.
This enablesbetter control ofthe powertool
in unexpectedsituations.
f} Dressproperly.Donot wear looseclothing
or jewellery.Keepyour hair, clothingand
glovesawayfrommovingparts.
Looseclothes,jewellery or long hair can be
caught inmoving parts.
g) Ifdevicesareprovidedfortheconnectionof
dust extraction and collection facilities,
ensurethese are connectedand properly
used.
Useofdustcollectioncanreducedust-related
hazards.
Powertooluseandcare
a) Donot forcethepowertool.Usethe correct
powertoolforyourapplication.
Thecorrectpowertool will do the job better
andsaferatthe rateforwhich it wasdesigned.
b) Donotusethepowertooliftheswitchdoes
notturnitonandoff.
Anypowertoolthatcannotbecontrolledwith
the switchisdangerousandmust berepaired.
c} Disconnectthe plugfromthe powersource
and/orthebatterypackfromthe powertool
beforemakinganyadjustments,changing
accessories,orstoringpowertools.
Suchpreventivesafetymeasuresreducethe
riskofstarting the powertool accidentally.
d) Storeidle powertoolsout of the reachof
childrenanddonot allowpersonsunfamiliar
with thepowertoolortheseinstructionsto
operatethepowertool.
Powertools aredangerous in the handsof
untrainedusers.
e) Maintain power tools. Check for
misalignmentor bindingof moving parts,
breakageof partsand any othercondition
thatmayaffectthepowertool'soperation.
If damaged,have the powertool repaired
beforeuse.
Many accidents are caused by poorly
maintained powertools.
f} Keepcuttingtoolssharpandclean.
Properlymaintainedcuttingtoolswith sharp
cutting edgesareless likelyto bind and are
easierto control.
g) Usethe powertool,accessoriesandtoolbits
etc. in accordancewith theseinstructions,
takingintoaccounttheworkingconditions
andtheworkto beperformed.
Useofthepowertool for operationsdifferent
from those intended could result in a
hazardoussituation.
5} Batterytooluseandcare
a) Rechargeonlywiththe chargerspecifiedby
themanufacturer.
A charger that is suitable for one type of
battery pack may create a risk of fire when
usedwith another batterypack.
b) Use power tools only with specifically
designatedbatterypacks.
Useof any otherbatterypacksmaycreatea
riskof injury andfire.
c} Whenbatterypackisnotinuse,keepitaway
from other metal objectslike paperclips,
coins,keys, nails,screws,or other small
metal objects,that canmake aconnection
fromoneterminalto another.
Shortingthe batteryterminals together may
causeburnsor afire.
d) Under abusiveconditions,liquidmay be
ejectedfrom the battery;avoidcontact.If
contactaccidentallyoccurs,flushwithwater.
If liquid contactseyes, additionallyseek
medicalhelp.Liquid ejectedfrom thebattery
may causeirritation or burns.
6} Service
a) Haveyourpowertoolservicedbya qualified
repair person using only identical
replacementparts.
This will ensurethat the safetyof the power
tool ismaintained.
-WARNING-
To reduce the risk of injury, user must read
instructionmanual,
01Eng WH18DSDL US.p65 4 10/2/12, 2:38 PM

WARNING:
Some dust created by power sanding, sawing,
grinding, drilling, and other constructionactivities
containschemicalsknowntothe StateofCalifornia
to causecancer,birth defectsor otherreproductive
harm.Someexamplesofthesechemicalsare:
• Leadfrom lead-basedpaints,
• Crystallinesilicafrom bricksandcementandother
masonryproducts,and
• Arsenic and chromium from chemically-treated
lumber.
Your risk from theseexposuresvaries,depending
on how often you do this type of work. Toreduce
your exposureto thesechemicals:work in a well
ventilated area, and work with approved safety
equipment, such as those dust masks that are
speciallydesignedtofilter out microscopicparticles.
SPECIFIC SAFETY RULES AND SYMBOLS
1. Holdpowertoolsby insulatedgrippingsurfaces,
whenperforminganoperationwherethefastener
maycontacthiddenwiring.
Fastenerscontacting a "live" wire may make
exposedmetalpartsof the powertool "live" and
couldgive theoperator anelectric shock.
2. ALWAYSwearearprotectorswhenusingthetool
for extendedperiods.
Q Prolongedexposure to high intensity
noisecan causehearing loss.
3. NEVERplace handsor other body parts nearthe
drillbitorchuckduring operation.Holdthe impact
driver/wrenchby itshandleonly.
4. Because the cordless impact driver/wrench
operatesbybatterypower,beawareofthefactthat
it canbeginto operateatany time.
5. WhenworkingatelevatedIocations,clearthe area
of all other people and be aware of conditions
belowyou.
6. NEVERtouch moving parts.
NEVERplace your hands,fingers or other body
partsnearthe tool's moving parts.
7. NEVERoperatewithout all guardsin place.
NEVERoperate this tool without all guards or
safetyfeatures in place and in proper working
order. If maintenance or servicing requires the
removalof a guard or safetyfeature, be sureto
replacetheguardor safetyfeaturebeforeresuming
operationof the tool.
English
8. Use righttool.
Don'tforce smalltool or attachmentto do thejob
of aheavy-dutytool.
Don't use tool for purpose not intended -for
example- don't usecircular sawfor cutting tree
limbs or logs.
9. NEVERuse a power tool for applications other
thanthose specified.
NEVERuseapowertool forapplicationsotherthan
thosespecifiedin the InstructionManual.
10. Handletool correctly.
Operate the tool according to the instructions
provided herein.Do not drop or throw the tool.
NEVERallow thetool to beoperatedbychildren,
individuals unfamiliar with its operation or
unauthorizedpersonnel.
11. Keepall screws,bolts andcoverstightly in place.
Keepallscrews,bolts,andplatestightly mounted.
Checktheir condition periodically.
12. Do not use power tools if the plastichousing or
handleis cracked.
Cracksin thetool's housingor handlecan leadto
electricshock.Suchtools shouldnotbe useduntil
repaired.
13. Bladesandaccessoriesmust besecurelymounted
to the tool.
Prevent potential injuries to yourself or others.
Blades,cutting implementsandaccessorieswhich
havebeenmounted to the tool should besecure
andtight.
14. NEVERusea tool which isdefectiveor operating
abnormally.
If the tool appears to be operating unusually,
making strange noises, or otherwise appears
defective,stop using it immediately andarrange
for repairsbyaHitachiauthorized servicecenter.
15. Carefullyhandlepower tools.
Should apowertool bedroppedor struckagainst
hard materialsinadvertently,it maybedeformed,
cracked,or damaged.
16. Do notwipe plastic partswith solvent.
Solventssuchasgasoline,thinnerbenzine,carbon
tetrachloride,and alcohol may damageandcrack
plasticparts.Donotwipethemwith suchsolvents.
Wipe plastic parts with a soft cloth lightly
dampenedwith soapywateranddrythoroughly.
17. ALWAYS wear eye protection that meets the
requirement of the latest revision of
ANSIStandardZ87.1.
18.
Definitionsfor symbols usedonthis tool
V...............volts
-. ..............directcurrent
no ............no load speed
---/rain......revolutionsor reciprocationperminute
iml-i
I
I
01Eng WH18DSDL US.p65 5 10/2/12, 2:38 PM

r-I--I
/
I
English
IMPORTANT SAFETY INSTRUCTIONS FOR USE
OFTHE CORDLESSIMPACT DRIVER/WRENCH
/_ WARNING:
Deathor seriousbodilyinjurycouldresultfrom
improperor unsafeuseof the cordlessimpact
driver/wrench,Toavoidtheserisks,follow these
basicsafetyinstructions:
IMPORTANT SAFETY INSTRUCTIONS FOR
BATTERY CHARGER
/_ WARNING:
Deathor seriousbodilyinjurycouldresultfrom
improperor unsafeuseof batterychargers,To
avoid these risks, follow these basic safety
instructions:
1. Neverusethisimpactdriver/wrenchhandlefor any
applicationother thanthoseinthis manual.
2. Never place handsor other body parts near the 1.
drill bitor chuckduring operation.
Holdthe impactdriver/wrench byits handleonly.
3. When working in high places,alwaysmakesure 2.
thatther isno one below beforestarting to work.
4. Always wear eye and ear protection when you
work. 3.
5. Always installthe driverbitsecurely.Aloosebit is
dangerousbecauseit can comeloose while you
areworking. (WH18DSDL)
6. Always usethe driver bit that matchesthe screw 4.
size.(WH18DSDL) 5.
7. Always havethe screwyou are screwingin and
this impact driver in astraight line.Workingwith
this impact driver at an angle to the screw can 6.
damage the screw head and will not give the
prescribedtightening torque. (WH18DSDL) 7.
8. Confirm whether the socket has any crack in it.
(WR18DSDL)
9. Attach the hex. socketsecurelyonto the anvil. If 8.
the hex.socketisinsufficientlysecured,itmaydrop
out and cause an accident. For hex. socket
attachmentrefer to "OPERATION".(WR18DSDL)
10. Confirmthetightening torquebyatorquewrench
before use in order to ascertain the correct
tightening torque to beused.(WR18DSDL)
11. Ifa universaljoint is used,be surenotto operate
the unit in a no-load condition. Operating inthis
condition is dangerous.Whenthe socketsection
spins around it may cause injury to hands or
bodies, or the resulting intense vibration may
causethe userto dropthe tool. (WR18DSDL)
12. Becareful that foreign mattersdo not blockthe
holeslocatedon bothsidesof the handle.Alsodo
not closethe holeswith atape.The holesactan
important role.(WR18DSDL)
Table1
READALL INSTRUCTIONS
This manual contains important safety and
operating instructionsfor batterycharger Model
UC18YRSL.
Beforeusingbattery charger,readall instructions
and cautionary markingson (1) batterycharger,
(2)battery,and (3)productusing battery.
To reduce risk of injury, charge HITACHI
rechargeablebatterytype BSL18series.Othertype
of batteriesmayburstcausingpersonalinjury and
damage.
Do not exposebatterychargerto rain or snow.
Use of an attachment not recommendedor sold
bythe batterychargermanufacturermay resultin
ariskof fire,electricshock,or injury to persons.
Toreduceriskof damageto electricplugandcord,
pull by plugwhen disconnectingbatterycharger.
Make sure cord is located so that it will not be
steppedon, tripped over,or otherwise subjected
to damageor stress.
An extension cord should not be used unless
absolutely necessary.Useof improperextension
cordcouldresultinariskoffire andelectricshock.
If extensioncordmustbe usedmakesure:
a. That bladesof extension cord arethe same
number,size,andshapeasthoseof plug on
batterycharger:
b. Thatextension cordisproperly wired and in
good electricalcondition; and
c. Thatwiresizeislargeenoughfor ACampere
rating of battery charger as specified in
Table1.
RECOMMENDEDMINIMUMAWGSIZEFOR
EXTENSIONCORDSFORBATTERYCHARGERS
AC InputRatingAmperes* AWG Sizeof Cord
Equalto or but less Lengthof Cord,Feet(Meter)
greaterthan than 25(7.5) 50(15) 100(30) 150(45)
0 2 18 18 18 16
2 3 18 18 16 14
3 4 18 18 16 14
01Eng WH18DSDL US.p65 6 10/2/12, 2:38 PM

Ifthe input ratingof abatterychargerisgiven in
watts ratherthan in amperes,the corresponding
ampereratingisto bedetermined bydividing the
wattage rating bythevoltage rating-for example:
1,250watts = 10amperes
125volts
9. Donotoperatebatterychargerwith damagedcord
or plug-replacethem immediately.
10. Donot operatebattery chargerif it hasreceiveda
sharpblow,beendropped,or otherwisedamaged
in anyway;take itto a qualifiedserviceman.
11. Do not disassemble batterycharger;take it to a
qualified serviceman when service or repair is
required.Incorrectreassemblymayresultina risk
ofelectric shockor fire.
12. To reduce riskof electric shock,unplug charger
from receptacle before attempting any
maintenanceor cleaning. Removing the battery
will not reducethis risk.
IMPORTANT SAFETY INSTRUCTIONS FOR
USE OF THE BATTERY AND BATTERY
CHARGER
You must charge the battery before you can use the
power tool. Before using the model
UC18YRSL battery charger, be sure to read all
instructions and cautionary statements on it, the battery
and in this manual.
/k CAUTION:
USEONLYHITACHIBATTERYTYPEBSL18
SERIES.OTHERTYPESOFBATTERIESMAY
BURSTANDCAUSEINJURY!
Followtheseinstructionsto avoidthe riskof injury:
Ak WARNING:
Improperuseofthebatteryorbatterychargercan
leadtoseriousinjury.Toavoidtheseinjuries:
1. NEVERdisassemblethe battery.
2. NEVERincinerate the battery, even if it is
damagedor is completely worn out.The battery
canexplode inafire.
3. NEVERshort-circuitthe battery.
4. NEVERinsert any objects into the battery
charger'sair vents.Electric shockor damageto
the batterycharger may result.
5. NEVERcharge outdoors.Keepthe battery away
from directsunlight and useonly where there is
low humidity andgood ventilation.
6. NEVERcharge when the temperature is below
32°F(0°C)or above104°F(40°C).
Chargingthe battery attemperatures outsidethe
rangeof 32°F- 104°F(0°C- 40°C)may prevent
properchargingand reducebattery life.
English
7. NEVERconnecttwo batterychargerstogether.
8. NEVERinsertforeign objectsintothe holefor the
batteryor the batterycharger.
9. NEVERuseaboostertransformerwhencharging.
10. NEVERusean enginegenerator or DCpowerto
charge.
11. NEVERstore the battery or battery charger in
placeswherethetemperaturemayreachor exceed
104°F(40°C).
12. ALWAYSoperate charger on standard household
electricalpower (120volts).Using thecharger on
any othervoltage may overheatand damagethe
charger.
13. ALWAYSwaitatleast15minutesbetweencharges
to avoid overheatingthe charger.
14. ALWAYSdisconnectthe power cord from its
receptaclewhen thecharger isnot in use.
CAUTION ON LITHIUM-ION BATTERY
To extendthe lifetime, the lithium-ion battery equips
with the protectionfunction to stop theoutput.
Inthe casesof 1to 3describedbelow,when usingthis
product, evenif you arepulling the switch,the motor
may stop. This is not the trouble but the result of
protection function.
1. Whenthe batterypower remaining runsout,the
motor stops.
In suchcase,chargeit upimmediately.
2. If the tool is overloaded,the motor may stop. In
this case,releasethe switchof tool andeliminate
causesof overloading. After that, you canuse it
again.
3. Ifthe batteryis overheatedunderoverloadwork,
the battery power maystop.
In this case,stop using the battery and let the
batterycool.After that,you can useit again.
Furthermore, pleaseheedthe following warning and
caution.
Ak WARNING
Inorderto preventanybatteryleakage,heatgeneration,
smoke emission, explosion and ignition beforehand,
pleasebe sureto heedthe following precautions.
1. Makesurethat swarf anddust do not collect on
the battery.
© Duringwork makesurethat swarfand dustdo not
fall onthe battery.
© Makesurethat any swarfanddust falling on the
power tool during work do not collect on the
battery.
0 Do not store an unused battery in a location
exposedto swarf and dust.
0 Before storing a battery, remove any swarf and
dust that may adhere to it and do not store it
togetherwith metalparts(screws,nails,etc.).
iml-i
/
I
01Eng WH18DSDL US.p65 7 10/2/12, 2:38 PM

r-I--I
I
I
English
2. Donot piercebatterywith asharpobjectsuchasa
nail, strike with a hammer, step on, throw or
subjectthe batteryto severephysicalshock.
3. Do not use an apparently damagedor deformed
battery.
4. Do not usethe battery in reversepolarity.
5. Do not connectdirectlyto anelectricaloutlets or
carcigarettelighter sockets.
6. Do not usethe batteryfor a purpose otherthan
thosespecified.
7. Ifthe batterychargingfailsto completeevenwhen
a specified recharging time has elapsed,
immediatelystop furtherrecharging.
8. Do not put or subject the battery to high
temperatures or high pressure such as into a
microwaveoven,dryer,orhighpressurecontainer.
9. Keepawayfrom fire immediately when leakage
orfoul odor aredetected.
10. Do not use in a location where strong static
electricitygenerates.
11. If there is battery leakage, foul odor, heat
generated,discoloredor deformed,or in anyway
appears abnormal during use, recharging or
storage, immediately remove it from the
equipmentor batterycharger,andstopuse.
,4k CAUTION
1. If liquid leakingfrom the battery gets into your
eyes, do not rub your eyesand wash them well
with fresh clean water such as tap water and
contactadoctorimmediately.
If left untreated, the liquid may cause eye-
problems.
2. If liquid leaksonto yourskinor clothes,washwell
with cleanwatersuchas tapwater immediately.
There is a possibility that this can causeskin
irritation.
3. If you find rust,foul odor, overheating,discolor,
deformation,and/orotherirregularitieswhenusing
the batteryfor the firsttime, do not useandreturn
it to your supplier or vendor.
/k WARNING
If an electrically conductive foreign object enters the
terminalsofthe lithium ion battery,ashort-circuitmay
occur resulting in the riskof fire. Pleaseobservethe
following matterswhen storing the battery.
O Donot placeelectricallyconductivecuttings,nails,
steelwire, copperwire or otherwire inthe storage
case.
O Eitherinstallthe battery inthe powertool orstore
by securelypressing into the battery coveruntil
the ventilation holes are concealedto prevent
short-circuits(SeeFig.1).
SAVETHESEINSTRUCTIONS
AND
MAKETHEMAVAILABLETOOTHERUSERS
AND
OWNERSOFTHISTOOL!
01Eng WH18DSDL US.p65 8 10/2/12, 2:38 PM

iml-i
/
English I
NOTE:
The information contained in this Instruction Manual is designedto assist you in the safe operation and
maintenanceof the powertool.
NEVERoperate,or attemptany maintenanceonthe tool unlessyou havefirst readand understoodall safety
instructionscontainedin this manual.
Someillustrations in this Instruction Manualmay showdetailsor attachmentsthat differ from thoseon your
own powertool.
NAME OFPARTS
1. CordlessImpactDriver (WH18DSDL)/Wrench(WR18DSDL)
0 WH18DSDL 0 WR18DSDL
Housing
Guide sleeve Anvil
Housing
Push button
Light Light
Switch trigger Rotation Switch trigger
change lever
Handle Handle
Switch _<_
Switchpanel Hook panel _
Battery
Push button
Rotation
change lever
Hook
Battery
© Battery(BSL1830)
Ventilation holes
Terminals
Battery cover
Latc
Battery
Fig.1
01Eng WH18DSDL US.p65 9 10/4/12, 8:28 AM

rl--I
I
I
English
2. BatteryCharger(UC18YRSL)
Pilot lamp
Cord
rail
SPECIFICATIONS
1. CordlessImpactDriver/Wrench
Fig.2
Nameplate
Model
No-loadspeed
Capacity
Tighteningtorque
(Maximum)
Powermode
Savemode
Smallscrew
Ordinarybolt
Hightension bolt
WH18DSDL
0- 2,600/min
0- 2,000/min
5/32"- 3/8"(M4- M10)
1/4"- 9/16"(M6- M14)
1/4"- 15/32"(M6- M12)
Powermode1,510in-lbs.
{170N.m}
Savemode840in-lbs.
{95N.m}
Tightening is9/16"(M14)high
tension bolt, when fully charged
at68°F(20°C)temp.
Tighteningtime: 3sec.
WR18DSDL
3/8"- 23/32"(M10- M18)
5/16"- 9/16"(M8- M14)
Powermode 188ft.lbs.
{255N.m}
Savemode 103ft.lbs.
{140N.m}
Tighteningis 5/8"(M16)F10T,
when fully chargedat 68°F
(20°C)temp.
Tighteningtime:5sec.
Bitshanksize 1/4"(6.35mm) Hex. 1/2"(12.7mm) square
Rechargeablebattery BSL1830:Li-ion18V (3.0Ah)
Weight 3.7Ibs.(1.7kg)
2. BatteryCharger(UC18YRSL)
Inputpower source Single phase:AC 120V60 Hz
Chargingtime Approx.45 min.
Chargingvoltage DC14.4V- 18V
Charger DC14.4V:DC3.5A
Chargingcurrent DC18V:DC3.5A
Weight 1.3Ibs.(0.6kg)
NOTE:Thechargingtime mayvary accordingto temperature and powersourcevoltage.
lO
01Eng WH18DSDL US.p65 10 11/19/12, 1:19 PM

English
m_
I
I
APPLICATIONS
<WH18DSDL>
Driving and removing of machine screws, wood
screws,tapping screws,etc.
<WR18DSDL>
Tighteningand loosening of all typesof bolts and
nuts,usedfor securingstructural items
REMOVAL AND INSTALLATION METHOD
OF BATTERY
1. Battery removal
Hold the handle tightly and push the battery latch to
remove the battery (see Fig. 3).
/_ CAUTION
Nevershort-circuitthebattery.
2. Batteryinstallation
Insertthe batterywhile observingits polarities(see
Fig.3).
Pull out
l_ Handle
Insert ))-_-'-q'N_
,'" _ Latch
"" Push
Battery
Fig.3
CHARGING METHOD
NOTE:
Beforeplugging into the receptacle,makesurethe
following points.
O The power source voltage is stated on the
nameplate.
© The cord is not damaged.
/k
WARNING:
Donotchargeatvoltagehigherthanindicatedon
the nameplate.
Ifchargedatvoltagehigherthanindicatedonthe
nameplate,thechargerwill burnout.
1. Connectthe charger's power cordto a receptacle.
When the power cord is connected,the charger's
pilot lamp will blink in red.(At 1-secondintervals)
Do not use the electrical cord if
damaged. Have it repaired
immediately.
2. Insertthe batteryintothe charger.
Firmly insertthe battery into the charger until the
lineisvisible, asshown in Fig.4,5.
Battery
Pilot ,amp ___
Charger
Fig.4
Line
Fig.5
3. Charging
Whenthe batteryisconnectedtothebatterycharger,
chargingwill commenceandthepilot lampwill light
in red.(SeeTable2)
NOTE:
Ifthe pilot lampflikersin red,pull outthe plugfrom
the receptacleand checkif the battery is properly
mounted.
Whenthe batteryisfully charged,thepilot lampwill
blinkin redslowly.(At 1-secondintervals)(SeeTable
2)
11
O1Eng WH18DSDL US.p65 11 10/2/12, 2:38 PM

rm
I
I
English
(1)Pilot lampindication
Theindicationsofthe pilot lampwill beasshown in
Table2,accordingtothe conditionof thechargeror
the rechargeablebattery.
Table2
Before
charging
The While
pilot charging
lamp
lights or Charging
blinks in complete
red.
Charging
impossible
The
pilot lamp Overheat
lights in standby
green.
Blinks
Lights
Blinks
Flickers
Lights
Indications of the pilot lamp
Lights for 0.5 seconds. Does not light for 0.5
seconds. (off for 0.5 seconds)
Lights continuously
Lights for 0.5 seconds. Does not light for 0.5
seconds. (off for 0.5 seconds)
Lights for 0.1 seconds. Does not light for 0.1
seconds. (off for 0.1 seconds)
mmmmmmmmmmmmm
Lights continuously
Malfunction in the
battery or the charger
Battery overheated.
Unable to charge
(Charging will commence
when battery cools).
(2)Regarding the temperature of the rechargeable
battery.
Thetemperaturesfor rechargeablebatteriesareas
shownintheTable3,and batteriesthat havebecome
hot should be cooled for a while before being
recharged.
Table3 Rechargingrangesof batteries
Rechargeable
batteries
BSL1830
Temperaturesatwhichthe
batterycanberecharged
32OF-122OF
(OoC- 50oc)
(3)Regardingrechargingtime
Table4 Chargingtime (At 68°F(20°C))
Charger
UC18YRSL
Battery _--_._
BSL1830 Approx. 45min.
NOTE:
The charging time may vary according to
temperatureandpowersourcevoltage.
4. Disconnectbatterychargerfrom the receptacle.
/k CAUTION
Donotpulltheplugoutofthereceptaclebypulling
onthecord.
Makesuretograsptheplugwhenremovingfrom
receptacleto avoiddamagingcord.
5. Remove the battery from the battery charger.
Supporting the battery charger with hand, pull out
the battery from the battery charger.
I Howtomakethebatteriesperformlonger I
(1) Recharge the batteries before they become
completely exhausted.
When you feelthat the power of the tool becomes
weaker,stop usingthetool and rechargeits battery.
If you continue to use the tool and exhaust the
electric current, the battery may be damaged and
its lifewill becomeshorter.
(2)Avoid rechargingat high temperatures.
A rechargeablebatterywill behot immediatelyafter
use.Ifsucha batteryisrechargedimmediatelyafter
use,its internalchemicalsubstancewilldeteriorate,
andthe battery life will be shortened. Leavethe
batteryandrechargeit afterit hascooledfor awhile.
/k CAUTION
• When the batterychargerhas beencontinuosly
used,the batterychargerwill be heated,thus
constitutingthe causeofthe failures.Oncethe
charginghasbeencompleted,give15minutesrest
untilthe nextcharging.
• If the batteryisrechragedwhenitiswarmdueto
batteryuseorexposuretosunlight,thepilotlamp
maylightingreen.
Thebatterywill notberecharged.Insucha case,
let thebatterycoolbeforecharging.
12
01Eng WH18DSDL US.p65 12 10/2/12, 2:38 PM

Whenthepilotlampflickersrapidlyin red(at0.2-
secondintervals),checkfor and take out any
foreignobjectsinthecharger'sbatteryinstallation
hole.Iftherearenoforeign objects,it isprobable
thatthebattery orchargerismalfunctioning.Take
itto yourauthorizedServiceCenter.
BEFORE USE
Checktheworkareatomakesurethat it isclearofdebris
andclutter.
Clearthe area of unnecessarypersonnel.Ensurethat
lighting andventilation isadequate.
OPERATION
1. Installingthe bit (WH18DSDL)
Always follow the following procedure to install
driver bit. (Fig.6)
Guide sleeve Movement
Driver bit Hexagonal hole "_(
in the anvil "_"_,_J,,/
Fig.6
(1)Pullthe guidesleeveforward.
(2)Insertthe bit into the hexagonalholein the anvil.
(3)Releasethe guidesleeveandit returnsto itsorigianl
position.
Ak CAUTION
Ifthe guidesleevedoesnotreturnto its original
position,thenthebit isnotinstalledproperly.
2. Removingthe bit (WH18DSDL)
Pleasedo the opposite point on the method of
installing bit.
3. Selecting the socket matched to the bolt
(WR18DSDL)
Besureto useasocketwhichis matchedtothe bolt
to betightened. Usingan improper socketwill not
only result in insufficient tightening but also in
damageto the socketor nut.
Aworn or deformedhex.or square-holedsocketwill
not give anadequatetightnessfor fitting to the nut
or anvil,consequentlyresultingin lossoftightening
torque.
Payattention to wear of socket hole,and replace
beforefurther wearhasdeveloped.
4. Installinga socket(WR18DSDL)
Selectthe socketto be used.
• Plungertype (Fig.7)
Align the plunger locatedin the squarepart of the
anvilwiththe holein thehex.socket.Thenpushthe
English
plunger, and mount the hex. socket on the anvil.
Check that the plunger is fully engaged in the hole.
When removing the socket, reverse the sequence.
Ak CAUTION
• Pleaseusethedesignatedattachmentswhich are
listed in the operationsmanual and Hitachi's
catalog. Accidentsor injuriescouldresultfrom
notdoingso.
• Makesuretofirmlyinstallthe socketintheanvil.
Ifthe socketisnotfirmly installedit mightcome
outandcauseinjuries.
Hexagonal socket Groove Anvil
5,
6.
Fig. 7
Confirm that the battery is mounted correctly.
Check the rotational direction
The bit rotates clockwise (viewed from the rear side)
by pushing the R-side of the push button.
The L-side of the push button is pushed to turn the
bit counterclockwise. (See Fig. 8).
(The ,o and _ marks are engraved on the body.)
Push Push
Trigger switch Push button
Fig.8
/k
CAUTION
The pushbuttoncannotbe switchedwhile the
impact driver is turning. To switch the push
button,stopthe impactdriver,thensetthe push
button.
7. Switchoperation
© When the trigger switch is depressed, the tool
rotates.Whenthe trigger isreleased,thetool stops.
© The rotational speedcan be controlled by varying
the amount thatthe trigger switch is pulled.Speed
13
m_
I
I
01Eng WH18DSDL US.p65 13 10/2/12, 2:38 PM

rm
I
I
English
is lowwhen thetriggerswitch is pulledslightly and
increasesasthe trigger switch is pulled more.
© Whenreleasingthe trigger of the switch,the brake
will be appliedfor immediate stopping.
NOTE:
Abuzzingnoiseisproducedwhenthemotorisabout
to rotate;this isonly anoise,not a machinefailure.
If the nut is only loosely fitted to the bolt, the bolt
may turn with the nut, therefore mistaking proper
tightening. In this case, stop impact on the nut and
hold the bolt head with a wrench before restarting
impact, or manually tighten the bolt and nut to
prevent them slipping.
11.Using the hook
The hook is used to hang up the power tool to your
waist belt while working.
Changerotation speed
Asshown in Fig.9,whenthe rotationchangelever ,4k
is slid to the lower side,the powermode (P)is set. •
And when slid to upper side,the savemode (S)is
set.
Pleaseuse the save mode (S)when you want to •
lower Maximum tighteningtorque.
I I _i_ Rotation
Save mode ( change lever
Power mode
Fig.9
CAUTION
In the work of the save mode (S), avoid the
continuous screw-tightening as temperature of
electronic components of the converter switch
increases.
Tighteningandlooseningscrews
Installthe bitthat matchesthe screw,line upthe bit
inthe groovesoftheheadofthe screw,thentighten
it.
Pushthe impactdriver/wrenchjust enoughto keep
the bit fitting the headof the screw.
/k
/k CAUTION
Applyingthe impact driver/wrench fortoo long
tightensthescrewtoo muchandcanbreakit.
Tighteningascrewwiththeimpactdriver/wrench
atanangletothatscrewcandamagethe headof
the screw and the proper force will not be
transmittedto thescrew.
Tightenwith this impactdriver/wrenchlinedup
straightwith thescrew.
10.
Tighteningandloosening bolts
Ahex.socketmatchingthe boltor nut mustfirst be
selected.Then mount the socketon the anvil, and
grip the nut to be tightened with the hex. socket.
Holding the wrench in linewith the bolt, pressthe
powerswitch to impactthe nutfor severalseconds.
14
(1)
CAUTION
Whenusingthe hook,hang upthe power tool
firmlynotto dropaccidentally.
Ifthepowertoolisdropped,itmayleadtoanaccident.
Whencarryingthepowertoolwithhookedtoyour
waist belt,do notfit anybit to the tip of power
tool.If the sharpbit suchasdrillisfitted to the
powertoolwhencarryingitwith hookedto your
waistbelt,youwillbe injured.
Installsecurelythehook.Unlessthehookissecurely
installed,itmaycauseaninjurywhileusing.
Removingthe hook.
Removethe screws fixing the hook with Philips
screwdriver. (Fig.10)
Hook Screw
Fig.10
(2) Replacingthe hookandtightening the screws.
Installsecurelythe hookin thegrooveofpowertool
and tighten the screws to fix the hook firmly.
(Fig.11)
Groove
Hook
Screw
Fig.11
01Eng WH18DSDL US.p65 14 10/2/12, 3:21 PM

12.About RemainingBatteryIndicator
When pressing the remaining battery indicator
switch,the remaining batteryindicatorlamplights
andthe battery remaining power can bechecked.
(Fig.12) When releasing your finger from the
remaining battery indicator switch, the remaining
battery indicator lamp goes off. Thetable 5 shows
the stateof remaining battery indicator lamp and
the battery remaining power.
Switch panel
Remaining
battery Remaining
indicator battery
switch indicator
lamp
State of lamp
Fig.12
Table 5
Battery Remaining Power
The battery remaining power
is enough.
The battery remaining power
is a half.
The battery remaining power
s nearly empty.
:{e-chargethe battery soonest
_ossible.
Asthe remainingbatteryindicatorshowssomewhat
differently dependingon ambienttemperatureand
batterycharacteristics,readit asa reference.
NOTE:
O Do not give a strong shockto the switch panelor
breakit.It may leadto atrouble.
O To save the battery power consumption, the
remaining battery indicator lamp lights while
pressingthe remaining batteryindicator switch.
13.
Howto usethe LEDlight
Everytime you pressthe light switch on the switch
panel,the LEDlight lightsor goesoff. (Fig.13)
Topreventthe batterypowerconsumption,turn off
the LEDlightfrequently.
m_
I
English I
Light switch
Fig.13
/k CAUTION
Do not exposedirectlyyour eye to the light by
lookingintothe light.
If youreye iscontinuouslyexposedto the light,
youreyewillbe hurt.
NOTE:
To preventthe batterypowerconsumptioncaused
byforgetting toturn off the LEDlight,the lightgoes
off automaticallyinabout 15minutes.
OPERATIONAL CAUTIONS
1. Restingthe unit after continuouswork
After usefor continuous bolt-tightening work, rest
the unit for 15 minutes or so when replacingthe
battery. Thetemperatureofthe motor,switch,etc.,
will riseifthework isstartedagainimmediatelyafter
batteryreplacement,eventuallyresultinginburnout.
Ak CAUTION
Donot touchthe metalparts,asit getsvery hot
duringcontinuouswork.
2. Cautionson useof the speedcontrol switch
This switch has a built-in, electronic circuit which
steplesslyvariesthe rotationspeed.Consequently,
when the switchtrigger is pulledonly slightly (low
speed rotation) and the motor is stopped while
continuously driving in screws,the componentsof
the electronic circuit parts may overheat and be
damaged.
3. Usea tighteningtime suitablefor the screw
Theappropriatetorquefor a screwdiffersaccording
tothe materialandsizeofthescrew,andthematerial
beingscrewedetc.,so pleaseuseatightening time
suitable for the screw. In particular, if a long
tighteningtime isusedinthecaseofscrewssmaller
than 5/16"(8 mm), there is a dangerof the screw
breaking,sopleaseconfirm thetightening time and
the tightening torque beforehand.
15
01Eng WH18DSDL US.p65 15 10/2/12, 2:38 PM

rm
I
I
English
4. Work at a tighteningtorque suitable for the bolt
underimpact
The optimum tightening torque for nuts or bolts
differswith materialand sizeof the nutsor bolts.
An excessivelylargetightening torque for a small
bolt may stretchor breakthe bolt. The tightening
torqueincreasesin proportiontotheoperationtime.
Usethe correctoperatingtime for the bolt.
5. Confirmthe tightening torque
Thefollowing factors contribute to a reduction of
the tightening torque. So confirm the actual
tighteningtorqueneededbyscrewingupsomebolts
beforethe job with ahandtorque wrench. Factors
affectingthe tightening torque areas follows.
(1)Voltage
When the discharge margin is reached, voltage
decreasesandtightening torque is lowered.
(2)Operatingtime
Thetighteningtorqueincreaseswhentheoperating
time increases.Butthe tightening torque does not
increaseabove a certain value even if the tool is
drivenfor a longtime.
(3)Diameterof bolt
Thetightening torque differs with the diameter of
the bolt. Generally a largerdiameter bolt requires
largertighteningtorque.
(4)Tightening conditions
Thetighteningtorquediffersaccordingtothe torque
ratio,class,andlengthof boltsevenwhenboltswith
the same size threads are used. The tightening
torquealsodiffersaccordingto the conditionof the
surfaceof workpiecethrough whichthe bolts areto
betightened. Whenthe bolt andnut turn together,
torque isgreatly reduced.
(5)Usingoptional parts(WR18DSDL)
Thetightening torque is reduceda little when an
extensionbar,universaljoint ora longsocketisused.
(6)Clearanceofthe socket(WR18DSDL)
Aworn or deformedhex. orasquare-holedsocket
will not give an adequatetightness to the fitting
betweenthe nut or anvil,consequentlyresulting in
lossof tightening torque.
Usinganimproper socketwhich doesnot matchto
the bolt will result in an insufficient tightening
torque.
(7)Tighteningtorquevaries,dependingon thebattery's
chargelevel.
16
01Eng WH18DSDL US.p65 16 10/2/12, 2:38 PM

English
m_
I
I
Ak CAUTION:
Pullout batterybeforedoingany inspectionor
maintenance.
/k
Checkingthecondition ofthe bit. (WH18DSDL)
The bits should be checkedregularly. If worn or
brokenbitscanslipor decreasetheefficiencyofthe
motor andburn it out.
Replaceworn bits with newones.
CAUTION:
Ifyou usea driverbit ofwhich point isworn or
broken, it will be dangerous since it slips.So
replaceit with anewone.
2. Checkingthe condition ofthe socket(WR18DSDL)
Aworn or deformedhex. orasquare-holedsocket
will not give an adequatetightness to the fitting
betweenthe nut or anvil,consequentlyresulting in
lossof tighteningtorque. Payattentionto wearof a
socket holes periodically, and replace with a new
oneif needed.
3. Checkthe Screws
Loosescrewsaredangerous.Regularlyinspectthem
andmakesurethey aretight.
Ak CAUTION:
Usingthis powertool with loosened screws is
extremelydangerous.
Maintenanceof the motor
The motor unit winding is the very "heart" of the
powertool.
Exercisedue careto ensure the winding doesnot
becomedamagedand/orwet with oil or water.
Inspectingthe carbonbrushes(Fig.14)
The motor employs carbon brushes which are
consumable parts. Since and excessively worn
carbon brush can result in motor trouble, replace
the carbon brush with newones when it becomes
worntoor nearthe"wear limit". Inaddition,always
keepcarbonbrushescleanandensurethattheyslide
freelywithin the brush holders.
NOTE:
When replacingthe carbonbrushwith a newone,
be sureto usethe HitachiCarbon BrushCodeNo.
999054.
Wear limit
I.... iO.l_,l(3mm)I
, = 0.45" I
(11.5mm)
Fig.14
Nail of carbon brush
--_ \ Protrusion
\ , of carbon
brush
Fig.15
Replacingcarbon brushes
Take out the carbon brush byfirst removing the
brush cap and then hooking the protrusion of the
carbon brushwith aflat headscrewdriver, etc.,as
shown in Fig.16.
When installing the carbon brush, choose the
directionso thatthe nailofthecarbonbrushagrees
with thecontactportionoutsidethebrushtube.Then
pushit inwith afinger asillustratedin Fig.17.Lastly,
installthe brushcap.
Ak CAUTION
• Beabsolutelysureto insertthe nailofthe carbon
brushintothecontactportionoutsidethe brush
tube. (Youcaninsertwhicheveroneof the two
nailsprovided.)
• Cautionmustbeexercisedsinceanyerrorinthis
operationcanresultin the deformednailofthe
carbonbrushandmaycausemotortroubleat an
earlystage.
@
Fig.16
17
01Eng WH18DSDL US.p65 17 10/2/12, 2:38 PM

rm
I
I
English
Contact portion
outside brush tube
Fig.17
7. Checkfor Dust
Dust may be removed with a soft cloth or a cloth
dampenedwith soapywater.
Do not usebleach,chlorine, gasolineor thinner,for
they may damagethe plastics.
8. Disposalof the exhaustedbattery
/k WARNING:
Do not disposeof the exhaustedbattery. The
battery must explodeif it is incinerated.The
productthat you have purchasedcontains a
rechargeablebattery.Thebatteryisrecyclable.At
the endofit's usefullife,undervariousstateand
locallaws, it may be illegalto disposeof this
batteryintothe municipalwaste stream.Check
with yourlocalsolidwasteofficialsfor detailsin
yourareaforrecyclingoptionsorproperdisposal.
9. Storage
Storingin aplacebelow 104°F(40°C)andout of the
reachof children.
NOTE:
Makesure that the battery is fully charged when
stored for a long period (3 months or more). The
batterywith smallercapacitymaynot beable to be
chargedwhen used,if storedfor a long period.
10.Serviceand repairs
All quality power tools will eventually require
servicingor replacementof parts becauseof wear
from normal use. To assure that only authorized
replacement parts will be used, all service and
repairs must be performed by a HITACHI
AUTHORIZEDSERVICECENTER,ONLY.
11.Serviceparts list
A: ItemNo.
B: CodeNo.
C: No.Used
D: Remarks
ik CAUTION:
Repair,modificationand inspectionof Hitachi
Power Toolsmust becarriedout by an Hitachi
AuthorizedServiceCenter.
ThisPartsListwillbehelpfulifpresentedwiththe
tooltotheHitachiAuthorizedServiceCenterwhen
requestingrepairor othermaintenance.In the
operationand maintenanceofpowertools,the
safety regulationsand standardsprescribedin
eachcountrymustbe observed.
MODIFICATIONS:
HitachiPowerToolsareconstantlybeingimprovedand
modified to incorporate the latest technological
advancements.
Accordingly, some parts (i.e. code numbers and/or
design) may bechangedwithout prior notice.
Importantnoticeonthebatteriesforthe Hitachi
cordlesspowertools
Pleasealwaysuseoneof ourdesignatedgenuine
batteries. We cannot guarantee the safety and
performance of our cordless power tool when
usedwith batteriesother thanthese designated
by us, or when the battery is disassembledand
modified (suchasdisassemblyandreplacement
of cellsor other internal parts).
18
01Eng WH18DSDL US.p65 18 10/2/12, 2:38 PM

English
m_
I
I
A_ WARNING
ALWAYSuseOnlyauthorizedHITACHIreplacementpartsandaccessories.NEVERusereplacementpartsor
accessorieswhicharenot intendedforusewiththistool.ContactHITACHIifyou arenot surewhetherit is
safeto usea particularreplacementpartor accessorywith yourtool.
The useof anyotherattachmentor accessorycan be dangerousand couldcauseinjuryor mechanical
damage.
NOTE:
Accessoriesaresubjectto changewithout anyobligation onthe part ofthe HITACHI.
STANDARD ACCESSORIES
_1_BatteryCharger(UC18YRSL).......................................................................................................1
WH18DSDL _2_Battery BSL1830).........................................................................................................................2
WR18DSDL _3_Batterycover(CodeNo.329897).................................................................................................1
(2LSRK) @ PlasticCase(CodeNo.323230)...................................................................................................1
WH18DSDL
WR18DSDL Battery,battery charger,plasticcaseandbatterycoverarenot contained.
(NN)
OPTIONAL ACCESSORIES
<WH18DSDL>
1. Battery
BSL1830(CodeNo. 330067)
Phillipsbit
Bit No.
No. 2
No. 3
Code No.
992671
992672
19
01Eng WH18DSDL US.p65 19 10/2/12, 2:38 PM

Fm
I
I
English
3. Hexagonalsocket
Part Name
Engraved
characters L B Code No.
7 65 7 992689
8 65 8 996177
10 65 10 985329
12 65 12 996178
13 65 13 996179
14 65 14 996180
16 65 16 996181
17 65 17 996182
21 166 21 996197
4 mm Hexagonal socket
5 mm Hexagonal socket
6 mm Hexagonal socket
5/16" Hexagonal socket
8 mm Hexagonal socket
10 mm Hexagonal socket (small type)
10 mm Hexagonal socket
10 mm Hexagonal socket
1/2" Hexagonal long socket
Engravedcharacters
4. Drillchuckadapterset:CodeNo. 321823
Usethe drill availableon the market.
<WR18DSDL>
1. Battery
BSL1830(CodeNo. 330067)
2. Sockets
Form B
Form C Form D
20
01Eng WH18DSDL US.p65 20 10/2/12, 2:38 PM

English
Square Suitable Bolt Diameter Hexagonal Main Socket
headdrive Part Name Code No High ISO ISO Inch width across Form Dimensions
dimensionsS tension (ordinary) (small) bolts flats H L L1 _F
25/64" 1-9/16" 5/16" 11/16"
10mm 944291 M6 (10mm) B (40mm) (Smm) (18mm)
15/32" 1-9/16" 5/16" 25/32"
12mm 873632 M8 W5/16" (12mm) B (40mm) (Smm) (20mm)
33/64" 1-9/16" 11/32" 1"
13mm 873539 M8 (13mm) B (40mm) (9mm) (25mm)
9/16" 1-9/16" 11/32" 1"
14mm 873540 M1O (14mm) B (40mm) (9mm) (25mm)
1/2" Hexagonal 11/16" 1-1/4" 5/16" 1-3/32"
(12.7mrn) Socket 17mm 873536 M10 M12 W3/8" (17mm) C (32mm) (Smm) (28mm)
3/4" 1-11/32" 11/32" 1-3/32"
19mm 873624 M12 M14 W7/16" (19mm) C (34mm) (9mm) (28mm)
13/16" 1-13/32" 3/8" 1-1/4"
21 mm 873626 W1/2" (21mm) D (36mm) (10mm) (32mm)
7/8" 1-9/16" 9/16" 1-3/8"
22mm 873627 M12 M14 M16 (22mm) D (40mm) (14mm) (35mm)
15/16" 1-9/16" 9/16" 1-1/2"
24mm 873629 M16 M18 (24mm) D (4Omm) (15mm) (38mm)
m_
I
I
Form C
Form D
Square Code Suitable Bolt Diameter Main Socket
headdrive Part Name High ISO ISO Inch Dimensions
dirnensi0nsS No. tension ordinary) (small) bolts flats H L L1 L2 eF
15/32" 2-3/64" 25/32" 1-11/32" 25/32"
12mm 955138 M8 W5/16" (12mm) B (52mm) (20ram) (34ram) (20ram)
33/64" 2-3/64" 25/32" 1-11/32" 53/64"
13mm 955139 M8 (13mm) B (52mm) (20ram) (34ram) (21.Srnm)
9/16" 2-3/64" 25/32" 1-11/32" 7/8"
14mm 955140 M10 (14mm) B (52mm) (20ram) (34ram) (22mm)
11/16" 2-3/64" 15/16" 1-11/32" 1"
17mm 955141 M10 M12 W3/8" (17mm) B (52mm) (24ram) (34ram) (25ram)
11/16" 2-15/16" 15/16" 2-1/4" 1"
17mm 955149 M10 M12 W3/8" (17mm) B (75ram) (24ram) (57ram) (25ram)
3/4" 2-3/64" 15/16" 1-11/32" 1-3/32"
1/2" Long 19mm 955142 M12 M14 W7/16" (19mm) B (52mm) (24ram) (34ram) (28ram)
(12.7 mrn) Socket 3/4" 2-15/16" 15/16" 2-1/4" 1-3/32"
19mm 955150 M12 M14 W7/16" (19mm) B (75ram) (24ram) (57ram) (28ram)
13/16" 2-3/64" 15/16" 1-11/32" 1-7/32"
21mm 955143 W1/2" (21mm) D (52mm) (24ram) (34ram) (31ram)
13/16" 2-15/16" 15/16" 2-1/4" 1-7/32"
21mm 955151 W1/2" (21mm) D (75ram) (24ram) (57ram) (31ram)
13/16" 4-15/16" 15/16" 4-7/32" 1-7/32"
21mm 991480 W1/2" (21mm) D [125mm) (24ram) (107rnrn) (31ram)
7/8" 2-3/64" 15/16" 1-11/32" 1-9/32"
22mm 955144 M12 M14 M16 (22mm) D (52mm) (24ram) (34ram) (32.Srnm)
15/16" 2-3/64" 63/64" 1-11/32" 1-11/32"
24mm 955146 M16 M18 (24mm) D (52mm) (25mm) (34mm) (34mm)
Hexagonal
width across Form
21
01Eng WH18DSDL US.p65 21 10/2/12, 2:38 PM

rm
I
I
English
A_
Extensionbar:
Theextension barisconvenientfor working in very
restrictedspacesor whenthesocketprovidedcannot
reachthe bolt to betightened.
CAUTION
Whenthe extensionbar is used,the tightening
torque is reducedslightly comparedwith the
ordinarysocket.
CodeNo. Dimention B,S
873633 1/2"(12.7mm)
t
Universaljoint:
Theuniversaljoint isconvenientfor impactingnuts
when there is an angle between the socket and
wrench,or whenworking in avery narrowspace.
7 Bit adaptor:
This is usedfortightening small screws(M6).
NOTE:
This adaptor is set only on the anvil (drive angle) of
the main unit.
I CodeNo. Dimention S
991476 1/2"(12.7mm)
NOTE:
Specificationsare subject to change without any
obligaiton onthe partof the HITACHI.
CodeNo. Dimention B,S
992610 1/2"(12.7mm) t
Duct socket:
This is used for tightening bolts and nuts on flange
sections of air conditioners, type ducts, etc.
Ls
CodeNo.
993658
992613
992615
Hexagonalwidth
acrossflats
15/32"(12mm)
1/2"(13mm)
9/16"(14mm)
Dimention S
1/2"
(12.7mm)
22
O1Eng WH18DSDL US.p65 22 10/2/12, 2:38 PM

Fran_ais
CONSIGNES DE SI_CURITI_ IMPORTANTES
Lireetcomprendretoutes lesprecautionsdes6curite, lesavertissementset les instructionsdefonctionnement
danscemoded'emploi avantd'utiliser ou d'entretenir cetoutil motorise.
Laplupart des accidentscausesIorsde I'utilisation ou de I'entretien de I'outil motorise proviennentd'un non
respectdes r6glesou precautionsde basede s6curite.Unaccidentpeut la plupartdu temps 6treevit6 si I'on
reconnaitunesituationdedangerpotentielavantqu'elleneseproduise,etenobservantlesproceduresdes6curite
appropriees.
Lesprecautionsdebasedes6curitesont misesenevidencedansla section"SECURITE"dece moded'emploi et
dansles sectionsquicontiennent les instructionsde fonctionnementetd'entretien.
Lesdangersquidoivent6treevit6spourprevenirdesblessurescorporellesouunendommagementdela machine
sont identifiesparAVERTISSEMENTSsur I'outil motoriseetdansce moded'emploi.
NEJAMAIS utiliser cet outil motorise d'une mani@e qui n'est pas specifiquement recommandee aar HITACHI.
SIGNIFICATION DES MOTS D'AVERTISSEMENT
AVERTISSEMENT indique des situations potentiellement dangereuses qui, si elles sont ignorees, pourraient
entrainer la mort ou de serieuses blessures.
PRECAUTION indique des situations dangereuses potentilles qui, si elles ne sont pas evit6es, peuvent entrainer
de mineures et 16g@esblessures ou endommager la machine.
REMARQUE met en relief des informations essentielles.
AVERTISSEMENTS DE SI_CURITI_ GI_NI_RAUX CONCERNANT LES OUTILS I_LECTRIQUES
m_
I
I
/k AVERTISSEMENT:
Liretouslesavertissementsde securiteet touteslesinstructions
Tout manquement_ observercesavertissementset instructions peutengendrerdeschocselectriques,des
incendieset/oudesblessuresgraves.
Conserveztouslesavertissementset touteslesinstructionspourvousy refererult_rieurement.
Leterme "outil electrique", utilise dans les avertissements,ser6f6reaux outils electriques(c_bl6) ou aux
outils& piles (sansfil).
1) SecuritedeI'aire detravail
a) Maintenir I'aire de travail propre et bien
eclairee.
Lesendroits encombres ou sombres sont
propicesauxaccidents.
b) Nepasutiliserd'outilselectriquesenpresence
de liquides,gaz ou poussiereinflammables,
au risquede provoqueruneexplosion.
Lesoutils electriquescreent des etincelles
susceptiblesd'enflammerla poussi@e.
c) Ne pas laisser les enfants et les visiteurs
s'approcherdevous Iorsquevous utiliser un
outil electrique.
Lesdistractionspeuventfaireperdrelecontr61e.
2) Securite electrique
a) Les prises de I'outil electrique doivent
correspondrea la prise secteur.
Nejamais modifier laprise.
Nepas utiliser d'adaptateursavecles outils
electriquesmis a la masse.
b)
c)
d)
Lesprisesnonmodifieesetlesprisessecteurs
correspondantes reduisent les risques de
chocelectrique.
Evitertoutcontactaveclessurfacesmises
la massetelles que lestuyaux,radiateurs,
bandeset r_frigerateurs.
Lerisquedechocelectriqueestaccruencas
de mise_la massedu corps.
Nepasexposerlesoutilselectriquesa lapluie
ouadesconditionshumides.
Si I'eau p6n_tredans I'outil, celaaugmente
les risquesdechocelectrique.
Ne pasutiliserle cordona tort. Ne jamais
utiliser le cordon pour transporter ou
debrancherI'outilelectrique.
Maintenirle cordonloin de la chaleur,de
I'huile, des bords pointus ou des pi_ces
mobiles.
Les cordons endommages ou uses
augmentent lesrisquesdechocelectrique.
23
02Fre WH18DSDL US.p65 23 10/2/12, 2:37 PM

rm
I
I
Fran_ais
3)
e) Encas d'utilisationd'un outil electrique
I'exterieur,utiliser un cordonde rallonge
adapt_a unusageexterieur.
L'utilisation d'un cordon adapte_ I'usage
exterieurreduitlesrisquesdechocelectrique.
f) Sivous devezutiliserun outilelectriquedans
unendroithumide,utilisezunealimentation
protegeecontrelescourantsr_siduels.
L'utilisation d'un dispositif de protection
contre lescourantsresiduelsreduit le risque
dechocelectrique.
Securitepersonnelle
a) Restezalerte,regardercequevousfaites et
usezde votrebonsensenutilisantunoutil
electrique.
Nepasutiliserd'outil electriquesivous_tes
sousI'influencede drogues,d'alcooloude
medicaments.
PendantI'utilisation d'outils electrique, un
instant d'inattention peut entrainer des
blessuresgraves.
b) Utiliser un equipement de protection
individuelle. Toujours porter des verres de
protection.
L'utilisationd'equipementsdeprotectiontels
quelesmasquesanti-poussi@e,leschaussures
des6curiteanti-derapantes,lescasquesou les
protections auditives dans des conditions
approprieesreduisentlesrisquesdeblessures.
c) Emp_cherles demarrages intempestifs.
VeilleracequeI'interrupteursoitenposition
d'arr_t avant de brancher a une source
d'alimentation et/ou une batterie, de
ramasserI'outilau soloudeletransporter.
Transporterlesoutilselectriquesavecledoigt
sur I'interrupteur ou brancher les outils
electriquesavecI'interrupteurenpositionde
marchepeutentrainerdesaccidents.
d) Retirertouteclede s_curiteoucleavantde
mettreI'outilelectriqueenmarche.
Laisserunecleou unecledes6curitesurune
partie mobile de I'outil electrique peut
engendrerdesblessures.
e) Nepastropsepencher.Toujoursgarderune
bonneassiseet unbonequilibrependantle
travail.
Celapermet un meilleur contr61ede I'outil
electriquedansdessituations imprevisibles.
f} Porter des v6tements adequats. Ne pas
porterde v6tementsamplesni de bijoux.
Maintenirlescheveux,lesv6tementset les
gantsloindespiecesmobiles.
Lesv6tementsamplesou lescheveuxlongs
peuventse prendredanslespi6cesmobiles.
g) En cas de dispositifs destines au
raccordementd'installationsd'extractionet
de recueilde la poussi_re,veillerace qu'ils
soientcorrectementraccordeset utilis6s.
24
L'utilisation d'un dispositif de collectede la
poussi6repeutreduire lesdangersassocies
la poussi@e.
4) Utilisationetentretiend'un outilelectrique
a) Ne pasforcer sur I'outil electrique.Utiliser
I'outilelectriqueadapteavostravaux.
Lebonoutilelectriqueferaletravailmieuxeten
toutes6curiteauregimepourlequelila6teconcu.
b) NepasutiliserI'outilelectriquesiI'interrupteur
nelemetpasenpositiondemarcheetd'arr6t.
Tout outil ne pouvant _tre contr616 par
I'interrupteurestdangereuxetdolt6trerepar6.
c} Debrancherlapriseouretirerlabatterieavant
deprocedera desr6glages,auremplacement
desaccessoiresou au stockagedesoutils
electriques.
Ces mesures preventives de securit6
reduisentlesrisquesdedemarrageaccidentel
de I'outil electrique.
d) Stockezlesoutilselectriquesinutilises hors
delaporteedesenfantsetnepaslaisserdes
personnesnonfamiliarisees avecI'outil ou
cesinstructionsutiliserI'outilelectrique.
Lesoutils electriquessont dangereuxentre
les mains d'utilisateurs non habilites.
e} Entretenir les outils electriques.Verifier
I'absencedemauvaisalignementoud'arr6t,
d'endommagementdepiecesoutouteautre
conditionsusceptibled'affecterI'operationde
I'outil.
Si I'outilest endommage,le faire reparer
avantutilisation.
Denombreuxaccidentssontdus_desoutils
mal entretenus.
f) Maintenirlesoutilscoupantsaiguisesetpropres.
Desoutils coupantsbienentretenusavecdes
bordsaiguisessontmoinssusceptiblesdese
coinceretplus simples_contr61er.
g) UtiliserI'outil electrique,les accessoireset
les mechesde I'outil,etc. conformement
ces instructions en tenant compte des
conditionsd'utilisationetdutravail_r_aliser.
L'utilisation de I'outil electrique pour des
operations differentes de celles pour
lesquellesil a6teconcuestdangereuse.
5} Utilisation etentretien dela batterie
a} Rechargerla batterie uniquementavecle
chargeurrecommandeparlefabricant.
Un chargeur inadequat pour le type de
batterie peut entrainerun risqued'incendie
en casd'utilisation avecuneautre batterie.
b} Utiliser les outils electriquesuniquement
aveclesbatteries specifiees.
L'utilisation d'autresbatteriespeutentrainer
un risquede blessuresetd'incendie.
c} Lorsquela batterieestinutilisee, la garder
I'ecart d'objets metalliques comme des
trombones,despi_cesdemonnaie,descles,
02Fre WH18DSDL US.p65 24 10/2/12, 2:37 PM

des clous,desvis ou autres petits objets
metalliquespouvantraccorderlesbornes.
Laconnexion desbornespeutentrainerdes
blessuresou un incendie.
d) En cas d'utilisation darts des conditions
extr6mes, du liquide peut 6tre emis de la
batterie.Evitertout contact,encasdecontact
accidentel,rinceraI'eau.Si leliquideentreen
contactaveclesyeux,consulterun medecin.
Leliquideemis parlabatteriepeutentrainer
desirritations et desbrQlures.
6) Service
a) Faire entretenir I'outil 61ectrique par un
technicien habilit6 a I'aide de pieces de
rechangeidentiquesexclusivement.
Celagarantira le maintien de las6curitede
I'outil electrique.
-AVERTISSEMENT-
Pourreduiretout risquedeblessure,I'utilisateurdolt
lire le moded'emploi.
AVERTISSEMENT:
Lapoussi6reresultant d'un poncage,d'un sciage,
d'un meulage,d'unpercageoudetouteautreactivite
deconstructionrenfermedesproduitschimiquesqui
sont connusparI'EtatdeCaliforniepourcauserdes
cancers, des defauts de naissance et autres
anomalies de reproduction. Nous enum6rons ci-
dessuscertainsdecesproduits chimiques:
• Plombdespeintres_ basede plomb,
• Silicecristallinedesbriquesetducimentetautres
materiauxde maconnerie,et
• Arsenic et chrome du bois d'oeuvre traite
chimiquement.
Le risque d'exposition _ ces substancesvarie en
fonction delafrequenced'executiondece genrede
travail. Pour reduire I'exposition _ ces produits
chimiques, travailler dans un lieu bien ventile, et
porter un equipement de protection agre6, par
exemple un masqueanti-poussi6respecialement
con£upourfilter lesparticulesmicroscopiques.
REGLES DE SECURITE SPECIFIQUES ET
SYMBOLES
1. Tenir I'outil electrique par les surfacesisolees
permettant de I'agripper pour effectuer une
operationoucoupel'attachepeutentrerencontact
avecdesills electriquesmasques.
LecontactdeI'attacheavecunfil soustensionpeut
transmettreducourantdanslespi_cesmetalliques
exposeesdeI'outil etcommuniquerunedecharge
electrique_ I'operateur.
Franqais
TOUJOURSporterdesprotecteursd'oreilleIors
de I'utilisationde I'outil pendantde
Q Iongues periodes,
Uneexposition prolongee_ un sonde
forte intensitepeutendommagerI'ou'_'e
deI'utilisateur.
3. NEJAMAISplacerlesmainsou touteautre partie
du corpsprosdu foret ou du mandrin pendant le
fonctionnement. Tenir le marteau/cle _ chocs
uniquement parsonmanche.
4. Etant donne que le marteau/cle_ chocssans fil
fonctionne sur batterie,ilfaut savoir qu'il peutse
mettre _fonctionner _tout moment.
5. Lorsd'un travail en position elev6e,evacuertout
le mondedeI'airedetravailetnepasoublierqu'on
travailleen hauteur.
6. NEJAMAIStoucher lesparties mobiles.
NEJAMAISplacersesmains,sesdoigtsou toute
autre partiedesoncorpsprosdespartiesmobiles
de I'outil.
7. NE JAMAIS utiliser I'outil sans que tousles
dispositifs de securitenesoient enplace.
NE JAMAIS faire fonctionner cet outil sansque
tousles dispositifs etcaracteristiquesde s6curite
ne soienten placeet enetat defonctionnement.
Si un entretien ou une reparation necessite le
retrait d'un dispositif ou d'une caracteristiquede
securit6, s'assurer de bien remettre en place le
dispositif ou la caracteristiquede s6curite avant
de recommencer_utiliser I'outil.
8. Utiliser I'outilcorrect
Ne pasforcer sur unpetit outil ouaccessoirepour
faire letravail d'un outil de grandepuissance.Ne
pas utiliser un outil pour un usagepour lequelil
n'apaset6prevu:parexemple,nepasutiliser une
scie circulaire pour couper des branchesd'arbre
ou desb_ches.
9. NE JAMAIS utiliser un outil motoris_ pour des
applications autresquecellessp_cifiees.
NE JAMAIS utiliser un outil motorise pour des
applications autres que cellesspecifi6esdans le
mode d'emploi.
10. ManipulerI'outilcorrectement
Utiliser I'outil de la faconindiqueedanscemode
d'emploi. Nepas laissertomber ou lancerI'outil.
NE JAMAIS permettre que I'outil soit utilise par
desenfants,despersonnesnonfamiliaris6esavec
sonfonctionnementouunpersonnelnonautoris&
11. Maintenirtoutes les vis, tous les boulons et les
couverclesfermementenplace.
Maintenir toutes les vis, tousles boulons et les
couvercles fermement montes. Verifier leurs
conditions periodiquement.
12. Nepasutiliser lesoutils motorisessi lerevStement
de plastiqueou lapoigneeestfendu.
Des fentes dans le rev6tement ou la poignee
peuvententraineruneelectrocution.Detels outils
ne doiventpas_tre utilisesavantd'etre r6par&
25
m_
I
I
02Fre WH18DSDL US.p65 25 10/2/12, 2:37 PM

rm
I
I
Fran_ais
13. Leslamesetlesaccessoiresdoivent 6tre
fermementmontessurI'outil.
Eviter les blessures potentielles personnelleset
aux autres.Leslames,les instruments de coupe
et les accessoiresqui ont et6 montes sur I'outil
doivent6trefixeset serresfermement.
14. NE JAMAISutiliser unoutil defectueuxou qui
fonctionneanormalement.
SiI'outil n'apasI'airdefonctionnernormalement,
fait des bruits etranges ou sans cela parait
defectueux,arr6terdeI'utiliser immediatementet
le faire reparer par un centrede service Hitachi
autorise.
15. Manipuler I'outil motorise avecprecaution.
Siun outil motorisetombe ou frappeun materiau
dur accidentellement, il risque d'6tre deform6,
fendu ou endommage.
16. Ne pasessuyerlespartiesen plastiqueavecdu
solvant.
Les solvants comme I'essence, les diluants, la
benzine, le tetrachlorure de carbone et I'alcool
peuvent endommager et fissurer les parties en
plastique.Nepaslesessuyeravecdetels solvants.
Essuyerles parties en plastique avec un chiffon
doux 16g_rementimbibe d'une solution d'eau
savonneuseet secherminutieusement.
17. TOUJOURSporter des lunettes des protections
conformes aux exigences des
derni@esrevisionsdustandardANSI
Z87.1.
18. Ddinitions pour lessymbolesutilisessur cetoutil
V .....................volts
-. ....................courant continu
no ..................vitessesanscharge
---/min ............rotationsoumouvementsdeva-et-
vient parminute
CONSIGNES DE SI_CURITI_ IMPORTANTES
POUR L'UTILISATION DU MARTEAU/CLI_
A CHOCS SANS FIL
/k AVERTISSEMENT:
Une utilisation incorrecteou dangereuse du
marteau/cleachocssansfil risqued'entrainerdes
blessures gravesou mortelles. Pour eviterces
risques, observer les consignesde s6curit_
elementairessuivantes:
1. Nejamaisutiliser lemanchedecetoutil pour une
t_cheautre quecelles d@ritesdans le manuel.
2. Nejamaismettre lesmainsni aucuneautrepartie
du corpsprosdu foret ni du mandrin pendantle
fonctionnement.
Tenir le marteau/cle_chocsuniquementpar son
manche.
3. Lors d'un travail en hauteur, toujours s'assurer
qu'il n'yapersonnedessousavantdecommencer.
26
4. Toujoursporter des protections pour les yeux et
les oreilles pendantletravail.
5. Toujoursins@erleforet_fond.Unforet I_cheserait
dangereuxcar il pourrait sedetacherpendant le
travail.(WH18DSDL)
6. Toujours utiliserunforet correspondant_la taille
du tournevis.(WH18DSDL)
7. Toujoursdisposerla visqueI'onveutenfonceretle
marteau_chocen lignedroite.Avecce marteau
choc,lefait detravailler_angleparrapport_ lavis
risqued'endommagerlat6tedelavisetnepermettra
pas d'obtenir le couple de serrage sp6cifie.
(WH18DSDL)
8. Verifier qu'il n'y a pas de fissure sur la douille.
(WR18DSDL)
9. Fixerla douillehexagonalesolidementsurlepiton.
Si la douille hexagonale n'est pas fixee assez
solidement,elle risquedetomberetdeprovoquer
un accident. Pour I'accessoire de douille
hexagonale,voir "Utilisation". (WR18DSDL)
10. Wrifier le couple de serrage _ I'aide d'une cle
dynamometrique avant I'utilisation, de facon
s'assurer que le couple de serragesera correct.
(WR18DSDL)
11. Si I'on utilise un joint universel, ne pas faire
fonctionner I'outil _ vide. Celaseraitdangereux.
Si la section de la douille tourne autour du joint,
celarisquedeprovoquerdesblessuresauxmains
et sur le corps, ou sous I'effet des vibrations
intensesquienresulteraient,I'utilisateurrisquede
laissertomber I'outil. (WR18DSDL)
12. Veiller_cequ'aucun corpsetrangernebloqueles
orifices situesdes deuxc6tes de la poignee. Par
ailleurs,nepasboucherlesorifices avecdu ruban
adhesif. Cesorifices remplissent une fonction
importante. (WR18DSDL)
CONSIGNES DE SI_CURITI_ IMPORTANTES
POUR LE CHARGEUR DE BATTERIE
Ak AVERTISSEMENT:
Une utilisation incorrecteou dangereuse des
chargeursde batterie peutentrainerla mort ou
desblessuresgraves.
LIRE
1.
TOUTCEMODED'EMPLOI
Ce manuelrenfermedesconsignesde s@uriteet
d'utilisation importantes pour le chargeur de
batteriemod61eUC18YRSL.
Avantd'utiliser lechargeurde batterie,lire toutes
les etiquettes d'instruction et de pr@aution
apposeessur (1) le chargeur de batterie, (2) la
batterie,et (3)le produitutilisant labatterie.
Pourreduiretout risquedeblessure,NErecharger
QUEles batteriesrechargeablesHITACHIutilisees
dansle mod61eserie BSL18.Lesautrestypes de
batterie pourraient exploser et provoquer des
blessuresou desdommages.
02Fre WH18DSDL US.p65 26 10/2/12, 2:37 PM

Fran_ais
4. Nepasexposerlechargeur_ la pluieni _ la neige.
5. L'utilisation d'un accessoirenonrecommandeou
nonvenduparlefabricantdu chargeurde batterie
risque de provoquer un feu, une decharge
electriqueou des blessures.
6. Pourreduiretout risquededommagedelaficheet
du cordon electrique, debrancherle cordon du
chargeurentirant sur lafiche.
7. Verifier que le cordon est place de facon que
personnenepuissemarcherdessus,seprendreles
piedsdedans,ni I'endommagerou lesoumettre
descontraintes.
Tableau1
Ne pasutiliser de cordonde rallongesi celan'est
pas absolument necessaire. L'utilisation d'un
cordonde rallongeincorrectpourraitentrainerun
feu ouune dechargeelectrique.Si I'ondolt utiliser
un cordonderallonge,s'assurerque:
a. Les broches de la rallonge ont les m6mes
numero,taille etforme que cellesdela fiche
du chargeur;
b. Le cordon de rallonge est correctement
raccordeeten bonetatelectrique;
c. Le calibredu fil dolt _treau moinssuffisant
pour I'intensite nominale CA (amp6res)du
chargeurdebatteriesp6cifieesdansletableau
ci-dessous.
CALIBREMINIMUMRECOMMANDI_POURLESCORDONS
DERALLONGEDESCHARGEURSDEBATTERIE
Intensite nominaled'entreeCA (amp6res)* Calibredu cordon
Egalou maisnon Longueurdecordonen pieds(m6tres)
sup@bur_ inferieur _ 25(7.5) 50(15) 100(30) 150(45)
0 2 18 18 18 16
2 3 18 18 16 14
3 4 18 18 16 14
Si I'intensite nominale d'entree du chargeurde .,'K. PRECAUTION
batterieestdonneeen watts et nonen amp6res, UTILIS.EREXCLUSIVEMENTLEBATTERIEHITACHI
calculerlacapaciteenamp6rescorrespondanteen DE SERIE BSL18. LES AUTRES TYPES DE
divisant lacapaciteenamp6resparlacapacitede BATTERIE POURRAIENT EXPLOSER OU
tension, parexemple: PROVOQUERDESBLESSURES.
1,250watts= 10amp6res
125 volts
9. Nepasutiliserlechargeursisoncordonousafiche
sontendommages-Leremplacerimmediatement.
10. Nepasutiliser le chargeurs'il arecuuncoup,s'il
esttombeou endommagedetouteautremani6re.
L'apporter_un reparateurqualifie.
11. Nepasdemonterlechargeurnile produitquirecoit
labatterie;si unentretienoudesreparationssont
necessaires,les apporter_un reparateurqualifie.
Un remontage incorrect pourrait provoquer une
dechargeelectriqueou unfeu.
12. Pour reduiretout risque de dechargeelectrique,
debrancherle chargeurde la prise secteuravant
toutentretienounettoyage.IInesuffitpasdesortir
la batterie.
CONSIGNES DE SI_CURITI_ IMPORTANTES
POUR L'UTILISATION DE LA BATTERIE ET
DU CHARGEUR DE BATTERIE
Pourpouvoirutiliser lasciecirculaire_batterie,ilfaudra
recharger la batterie. Avant d'utiliser le chargeurde
batterie mod61eUC18YRSL.,bien lire attentivement
toutes lesconsigneset lesavertissementssignalessur
lechargeur,sur la batterieou dansce manuel.
Pour eviter tout risque de blessure, observer les
consignessuivantes:
Ak AVERTISSEMENT:
Une utilisationincorrectede la batterie ou du
chargeurde batterie risquede provoquerdes
blessures.Pourevitertout risquedeblessure:
1. NEJAMAISdemonter la batterie.
2. NEJAMAISjeter la batterieau feu, m6me sielle
est endommagee ou compl6tement usee. La
batterierisque d'exploseraufeu.
3. NEJAMAIScourt-circuiterla batterie.
4. NE JAMAIS inserer d'objets clans les ou'ies
d'aeration du chargeur.II pourrait en resulter un
chocelectriqueou desdommagesdu chargeur.
5. NE JAMAIS effectuer la recharge _ I'exterieur.
Eloignerla batteriedesrayonsdirectsdu soleil et
utiliser exclusivementdans desendroits _faible
humidite etbien aer6s.
6. NEJAMAIS effectuer la recharge si la
temperatureestinferieure_32°F(0°C)ousuperieure
104°F(40°C).
Lefait de charger labatterie _des temperatures
inferieures _ 32°F(0°C)ou superieures _ 104°F
(40°C)peut nuire _ la qualit6 du chargement et
reduire ladureedevie dela batterie.
27
m_
I
I
02Fre WH18DSDL US.p65 27 10/2/12, 2:37 PM

rm
I
I
Fran_ais
7. NEJAMAISraccorderdeux chargeursdebatterie
ensemble.
8. NE JAMAIS inserer de corps etrangers dans
I'orifice dela batterieou du chargeurde batterie.
9. NE JAMAIS utiliser de transformateur-el6vateur
pour larecharge.
10. NEJAMAIS utiliser de g6nerateurde moteur ni
d'alimentation CCpour larecharge.
11. NEJAMAIS ranger la batterie nile chargeurde
batterie dans un lieu ou la temperature peut
atteindreou depasser104°F(40°C).
12. TOUJOURSalimenter le chargeur sur une prise
secteur domestique standard (120 volts).
L'utilisationdu chargeur_uneautretension peut
entra_ner une surchauffe et endommager le
chargeur.
13. TOUJOURSattendreau moins 15minutes entre
deux rechargespour eviter toute surchauffe du
chargeur.
14. TOUJOURSdebrancherlecordon d'alimentation
de la prise secteur Iorsqu'on ne se sert pas du
chargeur.
PRECAUTIONS RELATIVES A LA
BATTERIE AU LITHIUM ION
Pourprolonger sa dureede vie,la batterielithium-ion
est equipee d'une fonction de protection qui coupe
automatiquementI'alimentation.
Danslescas1_ 3decritsci-dessous,ilestpossibleque
le moteur s'arr6te Iorsque vous utilisez ce produit,
m6me si vous actionnezle commutateur. II ne s'agit
pasd'un dysfonctionnement,maisdu fonctionnement
normalde laprotection.
1. Lorsquelachargerestantede labatteriediminue,
le moteurs'arr6te.
Danscecasdefigure, chargezimmediatementla
batterie.
2. EncasdesurchargedeI'outil,actionnezlecommutateur
deI'outileteliminezlescausesde lasurcharge.Vous
pouvezensuiterecommencer_ utiliserI'outil.
3. Encasdesurchauffedue_ untravailtrop intensif,
I'alimentation dela batteriepeutsecouper.
Danscecas,arr6teztoute utilisation dela batterie
et laissez-la refroidir. Vous pouvez ensuite
recommencer_I'utiliser.
Enoutre,respectezlaprecautionetI'avertissementsuivants.
Ak AVERTISSEMENT
Afin d'eviter toute fuite de la batterie, gen6rationde
chaleur,emissiondefumee,explosionetinflammation,
respectezscrupuleusementles precautionssuivantes:
1. Assurez-vousque les copeauxet la poussi@ene
s'accumulentpassur labatterie.
O Lorsquevoustravaillez,assurez-vousquelescopeaux
etlapoussi6renetombentpassurlabatterie.
O Assurez-vousque lescopeauxet la poussi@equi
tombent sur I'outil Iorsque vous travaillez ne
s'accumulentpassur labatterie.
O Ne conservezpas une batterieinutilisee dansun
endroitquiestexposeauxcopeauxet_lapoussi6re.
O Avantdestockerunebatterie,retireztouslescopeaux
etlapoussi@equiont puyadhereretnelaconservez
pasavecdespi6cesmetalliques(vis,clous,etc.).
2. Ne percezpas labatterie_ I'aided'unobjet pointu
telqu'unclou.Nelafrappezpas_I'aidedun marteau.
Ne marchezpasdessus,ne la lancezpaset ne la
soumettezpasun_chocphysiqueimportant.
3. N'utilisez pas une batterie dont I'exterieur est
deform6ou laissepenserqu'elleestdefectueuse.
4. N'inserezpasla batterie_I'envers(p61esinverses).
5. Ne raccordezpas directement la batterie _ une
priseelectriqueou_ unallume-cigare.
6. N'utilisez pas la batterie_ d'autresfins que celle
specifi6e.
7. En cas d'echec du chargement d'une batterie,
m6me apr6s un certain delai, arr6tez
immediatement lerechargement.
8. N'exposezpasla batterie_destemperaturesou
unepressionelev6es(four_ micro-ondes,sechoir,
conteneursoushautepression).
9. Maintenez_labatterie_I'ecartdetouteflammeen
casdedetectiondunefuiteoudunemauvaiseodeur.
10. Nepasutiliser _proximite d'unesourcepuissante
d'electricit6statique.
11. Encasdefuite de labatterie,de mauvaiseodeur,
de gen6ration de chaleur, de decoloration, de
deformation ou d'anomalieen coursd'utilisation,
de rechargementou d'entreposage,6tez
immediatementla batteriedeI'equipementou du
chargeurdebatterieet neI'utilisez plus.
,4k PRECAUTION
1. Encasdeprojectiondanslesyeuxdeliquideayant
fuit de la batterie, ne vous frottez pas les yeux,
rincez-les_I'eauclaireetcontactezimmediatement
un medecin.
En I'absence de traitement, le liquide peut
det6riorer I'oeil.
2. Encasdeprojectiondeliquideayantfuitdelabatterie
sur votre peau ou vos v6tements, rincez
immediatementcesderniers_I'eauclaire(aurobinet).
Leliquidepeutprovoqueruneirritationdelapeau.
3. Encasdedetectionderouille, demauvaiseodeur,
desurchauffe,dedecoloration,dedeformationet/
ouautresanomaliesIorsdela premi6reutilisation
de la batterie, n'utilisez pas cette derni@e et
renvoyez-laau fournisseurouaufabricant.
28
02Fre WH18DSDL US.p65 28 10/2/12, 2:37 PM

/N AVERTISSEMENT
Uncourt-circuitrisquedeseproduireetcauserunincendie,
si uncorpsetrangerconducteurd'electricitepassedans
lesbornesde lapileau lithium-ion.Veuillezrespecterles
consignessuivantespourle rangementde lapile.
© Nepasmettred'objetconducteurd'electricite,tels
queclous,fil d'acier,decuivreouautrefil dansla
mallettederangement.
© Soit rangerle blocde pileavecI'outil_lectrique
oude manieresecuritaireen I'enfon_;antdansle
couverclejusqu'acequelesorificesdeventilation
soientdissimulesafind'_viterlescourts-circuits.
(VoirlaFig.1)
m_
I
Fran_ais I
CONSERVERCESINSTRUCTIONS
ET
LESMETTREALADISPOSITIONDESAUTRESUTILISATEURS
ET
PROPRIETAIRESDECETOUTIL!
29
02Fre WH18DSDL US.p65 29 10/2/12, 2:37 PM

I
I
Fran_ais
REMARQUE:
Lesinformationscontenuesdanscemoded'emploi sontconcuespour assisterI'utilisateurdansuneutilisation
sansdangeret un entretiende I'outil motorise.
NEJAMAISutiliser nientreprendreune revisiondeI'outilsansavoir d'abordlu etcompristouteslesinstructions
des6curitecontenuesdans cemanuel.
Certainesillustrations dansce moded'emploi peuventmontrerdes detailsou desaccessoiresdifferents de
ceuxde I'outil motoriseutilise.
NOM DES PARTIES
1,
© WH18DSDL
Carter
Manchon_
/ _X_::<-r<_ Bouton-
Lumiere _ _! poussoir
Declencheur [ _':_
...... \ :./_ Levier de
. ----------------_ ";)L modification du
rolgnee _/\ •
...... sens de rotation
y_
k
commande
Crochet
Marteau_choc sansfil (WH18DSDL)/ Cle(WR18DSDL)
0 WR18DSDL
Chabotte ,,
Declencheur l ::i_{
Poignee
"%__.//b %k:-j_
Tableau de __
commande _,_
Batterie
Carter
_ Bouton-
poussoir
Levier de
modification du
de rotation
Crochet
X
Batterie
© Batterie(BSL1830)
30
Orifices de ventilation
i_i;/ Bornes
t__,_..,x_ Couvercle de batterie
Loque
Batterie
Fig.1
02Fre WH18DSDL US.p65 30 10/4/12, 8:29 AM

2. Chargeurdebatterie(UC18YRSL)
Lam )e
t6mom
Cordon
m_
I
Fran_:ais I
Rail guide
Fig.2
Plaque signaletique
SPECIFICATIONS
1. Marteau/cle_ chocssansfil
Mod61e WH18DSDL WR18DSDL
0 - 2,600/rain
Vitesse sans
charge 0 - 2,000/rain
5/32"- 3/8" (M4 - M10)
Capacite 1/4" - 9/16" (M6 - M14) 3/8" - 23/32" (M10 - M18)
1/4" - 15/32" (M6 - M12) 5/16" - 9/16" (M8 - M14)
Couple de serrage
(Maximum)
Mode alimentation
Mode economie
d'energie
Petite vis
Boulon ordinaire
Boulon hautement
extensible
Mode electrique1,510in-lbs.
{170N.m}
Mode sauvegarder840 in-lbs.
{95N.m}
Leserrageestun boulon
hautementextensible9/16"
(M14),compl6tementcharge
unetemperaturede68°F
(20°C).
Tempsde serrage:3sec.
Hexagonale,1/4" (6.35 ram)
Mode electrique188ft.lbs.
{255N.m}
Mode sauvegarder103fl.lbs.
{140N.m}
Serragede 5/8"(M16)F10T,
avecrechargecompl6te_ une
temperaturede68°F(20°C).
Tempsde serrage:5sec.
Taille de queue de foret Carre, 1/2" (12.7 mm)
Batterie rechargeable BSL1830:Li-ion 18 V (3.0Ah)
Poids 3.7 Ibs. (1.7 kg)
2. Chargeurdebatterie(UC18YRSL)
Sourced'alimentation d'entree Monophasee:CA120V60Hz
Dureede recharge Environ45rain.
Tensiondecharge CC14.4V - 18V
Chargeur CC14.4V:CC3.5A
Courantdecharge CC18V:CC3.5A
Poids 1.3Ibs.(0.6kg)
REMARQUE:La dureede rechargepeut varier en fonction de la temperature et de la tension de la source
d'alimentation.
31
02Fre WH18DSDL US.p65 31 11/19/12, 1:29 PM

rm
I
I
Fran_ais
UTILISATIONS
<WH18DSDL>
Enfoncementet extraction de vis mecaniques,vis
de bois,visdetaraudage,etc.
<WR18DSDL>
Pour le serrageet le desserragedetous types de
boulaonset d'ecrousutilises pour laconsolidation
destuctures.
MI_THODE DE RETRAIT ET
D'INSTALLATION DE LA BATTERIE
1. Retrait de la batterie
Maintenir fermement la poignee et pousser letaquet
de la batterie pour I'enlever (voir Fig.3).
/iX PRECAUTION
Ne jamais court-circuiter la batterie.
Miseen placede labatterie
Insererla batterietout enrespectantlapolarite(voir
Fig.3).
)ign6e
Inserer
Batterie
Loquet
Pousser
Fig.3
MI_THODE DE RECHARGE
REMARQUE:
Avantdebrancherlechargeurdansla prise,verifier
les points suivants.
© La tension de la source d'alimentation est indiquee
sur la plaque signaletique.
O Le cordon n'est pas endommage.
/k
AVERTISSEMENT:
Ne pas effectuer de recharge a une tension
superieurea la tension indiqueesur la plaque
signaletique.
32
Si la recharge est effectuee a une tension
superieure a la tension indiqueesur la plaque
signaletique,lechargeurserabr_l&
Brancherle cordond'alimentation du chargeursur
uneprisesecteur.
Quandvous raccordezla fiche du chargeur_ un,e
prisemurale,lalampetemoin clignoteenrouge.(A
intervallesd'une seconde)
A', AVERTISSEMENT:
Nepasutiliserlecordonelectriques'il
est endommag& Le faire r6parer
imm6diatement.
Insererlabatteriedans lechargeur.
Inserezfermement la batterie dans le chargeur,
jusqu'_ ceque la lignesoit visible,commecelaest
indiquedansla Fig.4,5.
Batterie
Lampe__4i,_,
temoin
Chargeur
Fig.4
Ligne
Fig.5
Recharge
Quand la batterie est raccordeeau chargeur de
batterie,la rechargecommenceet la lampetemoin
s'allumeen rouge.(Voirle Tableau2)
02Fre WH18DSDL US.p65 32 10/2/12, 2:37 PM

Franoais
REMARQUE:
Si lalampetemoin clignoteenrouge,debrancherla
fiche de lapriseet verifier si la batterieestins6ree
correctement.
(1) Indicationde la lampetemoin
Lesindicationsde lalampetemoin sont expliquees
dansle Tableau2, selon la condition du chargeur
ou de labatterierechargeable.
Quand la batterie est rechargee_ fond, la lampe
temoin clignote lentementen rouge.(A intervalles
d'uneseconde)(Voir leTableau2)
Tableau2
La lampe
temoin s'allume
ou clignote en
rouge.
La lampe t6moin
s'allume en vert.
Avant la
recharge
Pendant la
recharge
Recharge
terminee
Recharge
impossible
Veille en
su rchauffe
Indications de la lampe temoin
S'allume pendant 0.5 seconde. Ne s'allume
pas pendant 0.5 seconde. (Eteint pendant
Clignote 0.5 seconde)
S'allume sans interruption
S'allume
Clignote
S'allume pendant 0.5 seconde. Ne s'allume
pas pendant 0.5 seconde. (Eteint pendant
0.5 seconde)
Clignote
S'allume pendant 0.1 seconde. Ne s'allume
pas pendant 0.1 seconde. (Eteint pendant
0.1 seconde)
mmmmmmmmmmmmm
S'allume sans interruption
S'allume
Anomalie de la batterie
ou du chargeur
Batterie en surchauffe.
Chargement impossible
(le chargement
commencera une fois que
la batterie sera froide).
(2)Temperature admissible d'une batterie
rechargeable.
La temperature admissible des batteries
rechargeablesestindiqueedansleTableau3,etles
batteries qui ont chauffe devront _tre laissees
refroidir pendant quelquetemps avant de pouvoir
6trerechargees.
Tableau3 Plagede rechargedes batteries
Batteries Temperature_ laquellela
rechargeables batteriepeut6tre rechargee
32OF- 122OF
BSL1830 (0oc_ 50oc)
(3) Dureede recharge
Tableau4 Tempsde recharge(A 68°F(20°C))
Batterie _ UC18YRSL
BSL1830 Env.45rain.
REMARQUE:
Laduree de rechargepeutvarier en fonction de la
temperature et de la tension de la source
d'alimentation.
4. Debrancherle chargeurdebatteriede la prise.
/k PRECAUTION
Nepasdebrancherlafiche delapriseentirant sur
le cordon.
Pour eviter tout dommage Iorsqu'on debranche
la fiche dela prise,bientenir la fiche proprement
dite.
5. Retirerla batteriedu chargeurdebatterie.
Sortir la batteriedu chargeurtout en la soutenant
dela main.
iCommentprolongerladur6edeviedesbatteries I
I I
(1) Rechargerles batteries avant qu'elles ne soient
compl6tement 6puisees.
QuandlapuissancedeI'outil utilisefaiblit, I'eteindre
et recharger la batterie. Si I'outil continue d'6tre
utilisejusqu'_ epuisementdu courantelectrique,la
batterierisque d'6tre endommageeet sadureede
vie seraccourcira.
(2) Eviterd'effectuerlarechargesousdestemperatures
6levees.
Une batterie esttoujours chaude immediatement
apr6s son utilisation. Si la batterie est rechargee
33
m_
I
I
02Fre WH18DSDL US.p65 33 10/2/12, 2:37 PM

rm
I
I
Fran_ais
immidiatement apris utilisation, les substances
chimiques internes risquentde seditiriorer et la
durie devie dela batterieseraccourcira.Laisserla
batterierefroidir un momentavantde I'utiliser.
/K PRECAUTION
• Si lechargeurafonctionnipendantIongtempsde
suite,il serachaud,ce qui risquedeprovoquer
des pannes.Lorsquela rechargeestterminie,
laisserle chargeurrefroidirpendantenviron15
minutesavantdepassera larechargesuivante.
• Si I'onrechargelabatterieIorsqu'elleestchaude,
soitparcequ'ellevientdefonctionner,soitparce
qu'elleesten pleinsoleil,ilsepeutque lalampe
timoin s'allumeenvert.
La batterie nese rechargerapas.Dansce cas,
laisserla batterierefroidiravantde larecharger.
• Si lalampetimoin clignoterapidementenrouge
(aintervallesde 0.2seconde},virifiers'il y a des
corpsitrangers dansI'orificed'installationdela
batterieduchargeur,etlesenleverlecasichiant.
S'il n'y a pas de corps itrangers, il s'agit
probablementd'uneanomaliedelabatterieoudu
chargeur.Lesporterauserviceapres-venteagri&
AVANT L'UTILISATION
VerifierI'airedetravail pours'assurerqu'il n'yanidebris
ni desordre.
Evacuertouteslespersonnesnon nicessairesautravail.
S'assurerque I'eclairageet la ventilation sont
satisfaisants.
UTILISATION
1. Miseen placede lamiche (WH18DSDL)
Pour installer la miche, toujours se reporter aux
dimarches suivantes.(Fig.6)
Manchon-guide Mouvement
M_che Orifice" -'_--Q_:<f'_
hexagonal de L__.i_ /
la chabotte F-,._J_
Fig.6
(1)Pousserlemanchon-guideversI'avant.
(2)Insererla miche dans I'orifice hexagoneldela
chabotte.
(3)Rel_cher le manchon-guide et le replacer _ sa
position originale.
Ak PRECAUTION
Silemanchon-guiden'estpasreplacia saposition
originale, la meche n'est pas installie
correctement.
34
Douille hexagonal
2. Retraitde la miche (WH18DSDL)
Procider clanslesensinversede I'installationde la
miche.
3. Choisirune doulille pouvants'accjouplerauboulon
(WR18DSDL)
Bein choisir une douille pouvant s'accoupler au
boulon qui dolt itre serri. Unedouille trop grande
non seulement empihera un bon serrage mais
risqueaussid'endommager ladouille ou I'icrou.
Unedouille sixpansoucarrie usie ou diformie ne
permettrapas unbonserragepour fixer I'icrou ou
lachabotte,et,enconsiquence,cecisetraduira pas
unepertedecouple.
Veiler_I'usuredestrousdedouilesetlesremplacer
avantque toute usureexcessivesoitconstatie.
4. Misein placed'une douille (WR18DSDL)
Choisirla douille_utiliser.
• Pistondetype (Fig.7)
Aligner le piston, situi dans la partie carrie de
I'enclume, avec I'orifice de la fiche hexagonale.
Ensuite,enfoncer le piston et la fiche hexagonale
dans I'enclume. S'assurer que le piston est
complitement engagi dans I'orifice. Lorsqu' on
enlive lafiche hexagonale,inverserlesdimarches.
Ak PRECAUTION
• Utiliserlesaccessoiresspecifiisquisontinumiris
dans le mode d'emploi et le catalogueHitachi.
Sinonily a risqued'accidentsoudeblessures.
• Bieninstallerladouillea fond dansI'enclume.Si
ladouillen'estpassolidementinstallie,ellerisque
desedegageret deprovoquerdesblessures.
Rainure Chabotte
Fig.7
5. Virifiez si la batteriea iti correctementinstallie.
6. Virifiez le sensde rotation
Lamiche tournedanslesenshoraire(vudeI'arriire)
quand on appuiesur le c6ti Rdu bouton-poussoir.
Enappuyant sur le c6ti Ldu bouton-poussoir, la
miche tournedansle sensanti-horaire.(VoirFig.8)
(Lesrepires ,_et _ sont marquis surle corps.)
02Fre WH18DSDL US.p65 34 10/2/12, 2:37 PM

\
_L)
Pousser _l_Pousser
Declencheu r Bouton-poussoir
Fig.8
ik PRECAUTION
II n'est pas possiblede commuterle bouton-
poussoirpendantque letournevisa percussion
fonctionne.Pourcommuterle bouton-poussoir,
arr6terle tournevisa percussion,puis reglerle
bouton-poussoir.
7. FonctionnementdeI'interrupteur
© Quandontire surlag_chettedeI'interrupteur,I'outil
tourne.Quandon rel_chelag_chette,I'outil s'arrCte.
O Lavitessede rotationpeut6trecontrClCeenfaisant
varier la force avec laquelle on appuie sur la
g_chette. Quand on appuie 16gCrementsur la
g_chette,lavitesseestlente,etelleaugmentequand
on appuieplusfort.
© Lorsque le d@lencheur est liberC,le frein arrCte
immediatementI'outil.
REMARQUE:
Un bruit de vibration seproduit quand le moteur
estsur lepoint detourner;il nes'agitque d'unbruit,
et non d'une anomalie.
Changementdela vitessederotation
Comme indique sur la Fig.9, Iorsquele levier de
modificationdusensderotationestabaisse,lemode
d'alimentation (P)estenclench&Lorsque le levier
est releve, le mode economic d'energie (S) est
enclench&
Utilisezlemode@onomied'energie(S)Iorsquevous
souhaitezreduirele coupledeserragemaximum.
_A_:_Y_¢ Levierde
Mode j_C_ .._'_ _ j modification
sauvegarder (S) _//.1_?>_\/ du seas de
j \ y_ c',.._l!I ro_auon
Mode 61ectr__ _,i_.
Fig.9
Fran£ais
Ax ATTENTION :
Enmodeeconomied'energie(S},evitezd'utiliser
le tournevis en continu. Cette operation fait
augmenter la temperature des composants
electroniquesduconvertisseur.
9. Serrageet desserragedesvis
Installer une re@hecorrespondant _ la vis, faire
coincider lam@heaveclesrainuressur latCtedela
vis, puiscommencer_ serrer.
Appuyersur le marteau/cle_chocsjuste assezpour
que lamCchetienne clanslesrainuressur latCtede
lavis.
AX PRECAUTION
• SiI'onserretropIongtempsunevis,celle-cipeut
sebriser.
• SiI'onserreunevisaunangleinadequat,lat6te
de vis peut 6tre endommageeet de plus,il est
impossibledetransmettrealavislaforce requise.
DesIors,toujoursalignerle marteau/clea chocs
perpendiculairementauxvis.
10.Serrageet desserragedes boulon
Commencerparselectionnerunedouillehexagonale
qui convientpourle boulonou I'@rou.Puis,monter
la douille surle piton,et saisirI'@rou _serreravec
la douille hexagonale.Tout en tenant la cle clans
I'alignement du boulon,appuyer surI'interrupteur
pour percuterI'@rou pendantplusieurssecondes.
Si I'@rou n'est passerre _fond sur le boulon, le
boulon risque de tourner en mCmetemps que
I'@rou,empCchantd'obtenir le couple de serrage
voulu.Danscecas,cesserdepercuterI'@rouettenir
latCteduboulonavecunecleavantderecommencer
la percussion,ouserrermanuellement le boulonet
I'@roupour lesempCcherde glisser.
11.Utilisationdu crochet
Lecrochetsert_suspendreI'outil electrique_votre
ceinturependantle travail.
AX PRECAUTION
• Lorsquevousemployezle crochet,accrochez
fermement I'outil pour en eviter toute chute
accidentelle.
Encasdechutede I'outilelectrique,unaccident
pourraitsurvenir.
• Lorsquevous portez I'outil accrochea votre
ceinture,n'installezaucunemeche au bout de
I'outil. Si une m6che tranchante,comme une
fraise, est installeesur I'outil accrochea votre
ceinture,vouspourriezvousblesser.
• Installezfermement le crochet.Une mauvaise
installation pourrait provoquerdes blessures
pendantI'utilisation.
(1)
Deposedu crochet.
Enlevezlesvis qui maintiennentle crochet,_ I'aide
d'untournevis Philips. (Fig.10)
m_
I
I
35
02Fre WH18DSDL US.pC5 35 10/2/12, 2:37 PM

rm
I
I
Fran_:ais
Crochet Vis
Fig.10
(2)Remplacerlecrochetet serrerlesvis.
Installezle crochet _ fond dans la gorge de I'outil
electrique et serrez les vis pour le maintenir
fermement.(Fig.11)
Gorge
12.
Crochet
Vis
Fig.11
Apropos deI'indicateurde puissanceresiduellede
la batterie
/orsque vous appuyez sur le commutateur de
puissance residuelle de la batterie, le temoin
lumineux de puissance batterie s'allume et vous
pouvezverifier lapuissanceresiduelle.(Fig.12)
Lorsquevous rel_chezlecommutateurd'indication
de puissance batterie, le temoin de puissance
batterieresiduelles'eteint.Letableau5presenteles
conditions d'illumination du temoin et I'etat de
puissancede labatterie.
Tableau de commande
Tableau5
Etatdela lampe Lapuissanceresiduelledelabatterie
La puissance residuelle
de la batterie est
suffisante
La puissance residuelle de
la batterie est _ la moitie
La puissance residuelle de
la batterie est presque
nulle. Rechargezla batterie
le plus vite possible.
Letemoinlumineux depuissancebatterieresiduelle
peuts'allumer differemment selon latemperature
ambiante et les caracteristiques de la batterie.
Utilisezdonccetableau comme ref6rence.
REMARQUE:
O Ne donnez pas de choc violent au panneau de
commutation et nele cassezpas.
Celapeut provoquerdesdefaillances.
O Pour limiter la consommation de puissancede la
batterie, le temoin de puissance residuelle de la
batterie ne s'allume que pendant I'activation du
commutateur d'indication depuissanceresiduelle.
13.
Commentutiliser la DELd'eclairage
Chaquefois que vousappuyezsur lecommutateur
d'eclairagedu panneaude commutation, la diode
(DEL)s'allume ou s'eteint.(Fig.13)
Pourlimiter laconsommationdepuissancebatterie,
eteignezla DELfrequemment.
CommutateurTemoin
depuissance lumineux
batterie de
residuelle puissance
batterie
residuelle
Fig.12
Commutateur
d'eclairage
/k
Fig.13
PRECAUTION
N'exposez pasvosyeux directementa la lampe
en laregardant.
Uneexpositioncontinuede vosyeuxa lalampe
pourraitlesblesser.
36
02Fre WH18DSDL US.p65 36 10/2/12, 2:38 PM

REMARQUE:
Poureviterdeconsommerde la puissancebatterie
Iorsque vous oubliez de couper la DEL,la lampe
s'eteintautomatiquementapr6senviron 15minutes.
PRECAUTIONS D'UTILISATION
1. Reposde I'appareilapr_suntravail continu
Apr6sun travail de serragede boulonseffectuede
fa£on continue, laisser I'outil reposer pendant
environ 15 minutes Iors du remplacement de la
batterie.Latemperaturedu moteur,de lag_chette,
etc.augmenterasi le travail estrepristout de suite
apr6sle remplacementde la batterie,ce qui risque
de provoquerun grillage.
,IN PRECAUTION
Ne pas toucher les pi_cesmetalliques, car elles
deviennenttreschaudesIorsd'untravail continu.
2. Precautionsd'utilisation duselecteurdereglagede
vitesse
Ce selecteur comprend un circuit electronique
integr6quifait varier_ I'infini la vitessederotation.
Parconsequent,silag_chettedeselectionn'esttiree
que 16g6rement(faible vitesse de rotation) et le
moteurestarr6t6tout envissantdesvisencontinu,
les composantsdu circuit electroniquerisquentde
chaufferetd'6tre endommages.
3. Utiliser le couplede serrageadapt6&chaquetype
devis
Lecoupledeserageapproprievarie enfonction du
materiauetdelatailledelavis,ainsique lemateriau
danslequelelleestvissee.Parconsequent,utiliser
un temps de serrage approprie. Plus
particuli6rement, si I'on utilise un long temps de
serragedanslecasdevisdetaiffeinferieure_5/16"
(8mm),celles-ci peuventse briser parce que trop
Iongtemps serrees.D6s Iors,verifier, avant toute
chose,le coupleet letemps deserrage.
4. Travailler_ un couplede serrageconvenablepour
le boulon percute
Lecoupledeserrageoptimalpourecrousetboulons
diff@een fonction de la mati6re et de lataille des
ecrouset desboulons. Un couple de serragefrop
important pour un petitboulon risquededeformer
ou de fendre lee boulon. Le couple augment
proportionnellement autempsde fonctionnement.
Utiliser le reglage d'echelle et le temps de
fonctionnementappropriespour le boulon.
5. Verifierle coupledeserrage
Lesfacteurs suivants contributent _une reduction
du couple de serrage.Ainsi, verifier le couplede
serrage reel d6sire en serragequelques boulons
avec une cle dynamometrique _ main avant
d'effecteur letravail. Facteursinfluencantle couple
deserrage.
Fran_ais
(1)Tension
Si la marge de decharge est atteine, la tension
d6croitet lecoupleeserragediminue.
(2)Tempsdefonctionnement
/e couplede serrageaugmentequand letempsde
fonctionnement augmente.Toutefois, le couplede
serragen'augmente pasau-dessusd'une certaine
valeur, cecim_mesi I'appareilfonctionne pendant
Iongtemps.
(3) Diam_trede boulon
Lecouple de serrage diff6re selon le diam6tre du
boulon. En r_glegen6rale,un boulon de diam_tre
plus large necessite un couple de serrage plus
_mportant.
(4) Conditionsdeserrage
Le couple de serrage diff@e selon le rapport de
couple, la classificationet la Iongueurdesboulons
et ceci m6mesi desboulonsayantdesfiletagesde
dimensionsidentiquessontutilises.Lecouplediff_re
aussien fonction de I'etat du metal _ la surface
traverslequellesboulonsdoivent6treserres.Quand
le boulon et I'ecroutournent ensemble,le couple
est reduit defaconimportante.
(5) Utilisationde pi6cesoptionnelles (WR18DSDL)
Le couple de serrage est 16g@ementreduit en
utilisantunebarrede rallonge,unjoint universelou
unedouille Iongue.
(6)Jeu de ladouille (WR18DSDL)
Unedouille sixpansoucarr6eus6eou d6form6ene
permettrapas unbonserragepour fixer I'ecrouou
la chabotte, ce qui se traduira par une perte de
couple. L'utilisation d'une douille inapproprieequi
nes'appariepasauboulonsetraduiraparuncouple
deserrageinsuffisant.
(7) Lecoupledeserragevarieselon I'etatdechargede
la batterie.
m_
I
I
37
02Fre WH18DSDL US.p65 37 10/2/12, 2:38 PM

rm
I
I
Fran_ais
Z_ PRECAUTION
Sortir la batterie avant toute operation
d'inspectionoud'entretien.
Verifier I'etat de la m6che. (WH18DSDL)
Les m6ches doivent 6tre verifi6es r6guli6rement. Si
elles sont usees ou cassees, elles risquent de glisser
ou de reduire le rendement du moteur et de le brt]ler.
Remplacer les m6ches usees par des neuves.
,,k PRECAUTION
Si I'on utiliseunemechedontlapointeestusee
oucass_e,elleseradangereusecarellerisquede
glisser.Laremplacerparuneneuve.
2. VerifierI'etat dela douille (WR18DSDL)
Unedouillesixpansoucarreeuseeoudeform6ene
permettra pasun bonserragepourfixer I'ecrouou
lachabotte,cequisetraduira parunepertedecouple
deserrage.Contr61erperiodiquementI'etatd'usure
destrous dedouille et lesremplacerpardesneufs
encas debesoin.
3. Verifierlesvis
Desvisreal serreessontdangereuses.Lesinspecter
r6guli6rementetverifierqu'ellessontserrees_fond.
Z_ PRECAUTION
L'utilisationde I'outil electriqueavec des vis
desserreesseraitextr_mementdangereuse.
Entretiendu moteur
Le bobinage de I'ensemblemoteur est le "cceur"
m6me de I'outil electro-portatif. Veiller
soigneusement_ ce que cebobinage ne soit pas
endommageet/oumouillepardeI'huileou deI'eau.
Contr61edesbalaisen carbone(Fig.14)
/e moteurutilise desbalaisencarbonequi sontdes
pi_cesqui s'usent.Commeunbalaiencarbonetrop
usepeutdet6riorer le moteur,remplacerles balais
encarbonepardesneufsIorsqu'ilssontusesoupr6s
de la"limite d'usure". Enoutre,toujours maintenir
les balaisen carbonepropres et veiller _ cequ'ils
coulissentlibrementdans lessupports.
REMARQUE:
Lors du remplacementdes balais en carbone par
desneufs,bienutiliserdesbalaisencarboneHitachi,
No.decode 999054.
Limite d'usure
' l v v Av:
I.... iO.l_,l(3mm)I
, = 0.45" I
(11.5mm)
Fig.14
Clou de balai en carbone
-_ \ Sailliede
\ ,balai en
carbone
Fig.15
Remplacementd'un balaien carbone
Pour sortir le balai en carbone, commencer par
retirerlecapuchondu balai,puisdecrocherlasaillie
du balaien carboneavecun tournevis _t6te plate,
etc.,comme indiquesur la Fig.16.
Pourinstallerle balaien carbone,choisir le sensde
faconque leclou du balaien carbones'adapte_ la
sectiondecontact_ I'exterieurdutubedebalai.Puis
I'enfoncerdudoigt commeindique_ laFig.17.Enfin,
remettrele capuchondu balaien place.
Ax ATTENTION:
• Bienveillerimp_rativementa insurerlecloudu
balai en carbonedansla sectionde contact
I'exterieurdu tube de balai. (On pourrainserer
n'importelequeldesdeuxclousfournis.}
• Procederavecprecaution,car une erreur dans
cetteoperationrisquededeformerlecloudubalai
en carboneet d'endommagerprecocementle
moterur.
@
38
Fig.16
02Fre WH18DSDL US.p65 38 10/2/12, 2:38 PM

Section de contact
I'exterieur du tube
de balai
Fig.17
7. Verifiers'il y ade lapoussi@e
Enlever la poussi@eavec un chiffon doux ou un
chiffon humected'eausavonneuse.Ne pasutiliser
dedecolorant,chlorure,essenceou diluant,car ces
produits pourraientendommagerle plastique.
8. Mise aurebut d'une batterieusee
ik AVERTISSEMENT:
Ne pas jeter la batterie us6e aux ordures
menag6res.La batterierisqued'explosersi elle
estincineree.L'appareilque vousavez achete
renfermeunebatterierechargeable.Labatterieest
recyclable. Lorsqu'elle a atteint sa limite de
service,selonlesloisdesetatset lesloislocales,
il peut 6tre illegal de jeter cette batterie aux
orduresmenageres.Verifieraupresdesonservice
deramassaged'ordureslesoptionsderecyclage
etlaprocedurecorrectede raiseaurebut.
Rangement
Ranger dans un lieu dont la temperature est
inferieure _ 104°F(40°C), et hors de portee des
enfants.
REMARQUE:
Sivouspenseznepasavoir_utiliser lapilependant
une Iongue periode (3 mois ou plus),veillez _ ce
qu'elle soitenti@ementchargeeavantdela ranger.
Unepilemoinschargeepourraitneplusserecharger
correctementapr6suneIongueperiodedestockage.
10.Entretienet reparation
Tousles outils motorises de qualite auront
eventuellement besoin d'une reparation ou du
remplacement d'une pi6ce _ cause de I'usure
normale de I'outil. Pour assurer que seules des
pi6cesderechangeautoriseesseront utilisees,tous
lesentretiensetlesreparationsdoivent6treeffectues
uniquementpar UNCENTREDESERVICEHITACHI
AUTORISE.
11.Listedespi6cesderechange
A: No.el6ment
B: No.code
C: No.utilise
D: Remarques
Fran_:ais
/k PRECAUTION
Lesreparations,modificationsetinspectionsdes
outilselectriquesHitachidoivent 6treconfiees
unserviceapres-venteHitachiagre&IIserautile
depresentercettelistedepiecesauserviceapres-
vente Hitachiagree Iorsqu'onapporte un outil
necessitant des r6parations ou tout autre
entretien.
Lorsde I'utilisationet de I'entretiend'un outil
electrique,respecterlesr_glementsetlesnormes
des6curiteenvigueurdanslepaysenquestion.
MODIFICATIONS:
Les outils electriques Hitachi sont constamment
amelior6setmodifiesafind'incorporerlestous derniers
progr6stechnologiques.
Enconsequence,ilestpossiblequecertainespi6ces(c.-
bd. no.decodeet/oudessin)soientmodifieessansavis
)realable.
Avis important sur les batteries pour outils
electriquessansfil Hitachi
Toujours utiliser une de nos batteriesoriginales
specifi6es.Nousne saurions garantir la s6curite
et la performancede notreoutil electrique sans
fil s'il estutilise avecune batterieautrequecelle
quenousavonssp6cifie,ou encoresi la batterie
est demont6e et modifiee (par exemple, le
demontage et remplacement des cellules ou
autres composants internes).
m_
I
I
39
02Fre WH18DSDL US.p65 39 10/2/12, 2:38 PM

pm
I
I
Fran_ais
A_ AVERTISSEMENT:
TOUJOURSutiliseruniquementdespi_cesderechangeet desaccessoiresHITACHI.NEJAMAISutiliserde
piecederechangeoud'accessoiresquinesontpasprevuspour_tre utiliseaveccetoutil.Encasde doute,
contacterHITACHIpoursavoirsiunepiecede rechangeouunaccessoireparticulierpeuvent_treutilisesen
toutesecuriteavecvotreoutil.
L'utilisationdetout autreattachementouaccessoirepeut_tredangereuxet peutcauserdesblessuresou
desdommagesmecaniques.
REMARQUE:
Lesaccessoiressont sujets_changementsansobligation de lapart de HITACHI.
ACCESSOIRES STANDARD
_1_Chargeurdebatterie(UC18YRSL)...............................................................................................1
WH18DSDL _2_Batterie(BSL1830)........................................................................................................................2
WR18DSDL C3_Couverclede batterie(Node code329897).................................................................................1
(2LSRK) _4_Coffreten plastique(Nodecode323230)...................................................................................1
WH18DSDL Labatterie,le chargeurde batterie,le coffret en plastiqueet le couverclede la batterie nesont
WR18DSDL
(NN) pasfournis.
ACCESSOIRES EN OPTION
<WH18DSDL>
1. Batterie
40
BSL1830(No.decode 330067)
M6chePhillips
NOde m6che NOde code
NO2 992671
NO3 992672
02Fre WH18DSDL US.p65 40 10/2/12, 2:38 PM

3. Douillehexagonale
Designation
4 mmDouillehexagonale
5 mmDouillehexagonale
6 mmDouillehexagonale
5/16"Douillehexagonale
8 mmDouillehexagonale
10mm Douille hexagonale(Petitsformat)
10mm Douille hexagonale
10mm Douille hexagonale
1/2"Douille hexagonaleIongue
Fran_:ais
Carad6res
graves L B N° decode
7 65 7 992689
8 65 8 996177
10 65 10 985329
12 65 12 996178
13 65 13 996179
14 65 14 996180
16 65 16 996181
17 65 17 996182
21 166 21 996197
Caract6resgraves Jeud'adaptateurdemandrindeforeuse:NOdeCode
321823
Utiliserlaforeuseenvente.
m_
I
I
<WR18DSDL>
1. Batterie
BSL1830(No.decode 330067)
2. Douilles
Forme C Forme D
41
02Fre WH18DSDL US.p65 41 10/2/12, 2:38 PM

rm
I
I
Fran_:ais
Dimensions N°de Diametre de boulon adequat Largeur Douille principale
hexag.onale
del'entra;ne- Nora du produit Code Haute ISO ISO Boulons mesuree aux Forme Dimensions
mentcarreS tension (ordinaire) (reduit) enpouces bordsH L L1 eF
25/64" 1-9/16" 5/16" 11/16"
10mm 944291 M6 (10mm) B (40mm) (8mm) (18mm)
15/32" 1-9/16" 5/16" 25/32"
12mm 873632 M8 W5/16" (12mm) B (40mm) (8mm) (20mm)
33/64" 1-9/16" 11/32" 1"
13mm 873539 M8 (13mm) B (40mm) (9mm) (25mm)
9/16" 1-9/16" 11/32" 1"
14mm 873540 MIO (14mm) B (40mm) (9mm) (25mm)
1/2" Douille 11/16" 1-1/4" 5/16" 1-3/32"
17 mm 873536 MlO M12 W3/8" C
(12.7mm) lexagonale (17mm) (32mm) (8mm) (28mm)
3/4" 1-11/32" 11/32" 1-3/32"
19mm 873624 M12 M14 W7/16" (19mm) C (34mm) (9mm) (28mm)
13/16" 1-13/32" 3/8" 1-1/4"
21 mm 873626 Wl/2" (21mm) D (36mm) (10mm) (32mm)
7/8" 1-9/16" 9/16" 1-3/8"
22mm 873627 M12 M14 M16 (22mm) D (40mm) (14mm) (35mm)
15/16" 1-9/16" 9/16" 1-1/2"
24mm 873629 M16 M18 (24mm) D (4Omm) (15mm) (38mm)
3. DouilleIongue
Forme B
Forme C Forme D
Dimensions Largeur Douille principale
del'entra;ne- Nom du produit N° de hexag.onale Forme Dimensions
Code mesuree aux
mentcarreS tension ordinaire (reduit) en pouces bords H L L1 L2 eF
15/32" 2-3/64" 25/32" 1-11/32" 25/32"
12mm 955138 M8 W5/16" (12mm) B (52mm) (20ram) (34ram) (20ram)
33/64" 2-3/64" 25/32" 1-11/32" 53/64"
13 mm 955139 M8 (13 mm) B (52 mm) (20 ram) (34 ram) (21,5 ram)
9/16" 2-3/64" 25/32" 1-11/32" 7/8"
14mm 955140 M10 (14ram) B (52mm) (20ram) (34ram) (22mm)
11/16" 2-3/64" 15/16" 1-11/32" 1"
17mm 955141 M10 M12 W3/8" (17ram) B (52mm) (24ram) (34ram) (25ram)
11/16" 2-15/16" 15/16" 2-1/4" 1"
17mm 955149 M10 M12 W3/8" (17ram) B (75ram) (24ram) (57ram) (25ram)
3/4" 2-3/64" 15/16" 1-11/32" 1-3/32"
1/2" Douille 19mm 955142 M12 M14 W7/16" (19ram) B (52mm) (24ram) (34ram) (28ram)
(12.7 ram) Iongue 3/4" 2-15/16" 15/16" 2-1/4" 1-3/32"
19mm 955150 M12 M14 W7/16" (19ram) B (75ram) (24ram) (57ram) (28ram)
13/16" 2-3/64" 15/16" 1-11/32" 1-7/32"
21mm 955143 W1/2" (21ram) D (52mm) (24ram) (34ram) (31ram)
13/16" 2-15/16" 15/16" 2-1/4" 1-7/32"
21mm 955151 W1/2" (21ram) D (75ram) (24ram) (57ram) (31ram)
13/16" 4-15/16" 15/16" 4-7/32" 1-7/32"
21mm 991480 W1/2" (21ram) D (125mm) (24ram) (107mm) (31ram)
7/8" 2-3/64" 15/16" 1-11/32" 1-9/32"
22mm 955144 M12 M14 M16 (22mm) D (52mm) (24ram) (34ram) (32,5mm)
15/16" 2-3/64" 63/64" 1-11/32" 1-11/32"
24mm 955146 M16 M18 (24ram) D (52mm) (25ram) (34ram) (34ram)
Diametre de boulon adequat
Haute ISO ISO Boulons
42
02Fre WH18DSDL US.p65 42 10/2/12, 2:38 PM

Barrede rallonge:
Labarrederallongeestpratiquepour letravail dans
des espacestr6s resserres ou Iorsque la douille
utiliseenepermetpasd'atteindrele boulon_serrer.
/k PRECAUTION
Quandlarallongeestutilisee,lecoupledeserrage
estlegerementreduitcompar6aceluideladouille
ordinaire.
Fran_:ais
7. Adaptateurde m6che:
Cetadaptateurestutilisepour serrerdespetitesvis
(M6).
REMARQUE:
Utiliser cet adaptateur uniquement dans le
prolongementde I'anglede lavisseuse.
m_
I
I
NOdecode dimensionB,S
873633 1/2"(12.7mm) t
5. Joint universel:
Cejoint universel s'av6retr6s pratique pour serrer
des ecrous Iorsquela douille et la cle forment un
angleou Iorsqu'on travailledansun lieuetroit.
I
No.decode dimension S
991476 1/2"(12.7mm)
REMARQUE:
Lesspecificationssont sujettes_modification sans
aucuneobligation de lapart deHITACHI.
NOdecode dimensionB,S
992610 1/2"(12.7mm) t
Douille_tubulure:
Cette douille est utilisee pour serrer boulons et
ecrousdans les bridesdesconduits d'appareilsde
conditionnementd'air, etc.
LS
N°decode
993658
992613
992615
Largeurhexagonale
mesureeaux bords
15/32"(12mm)
1/2"(13mm)
9/16"(14mm)
dimensionS
1/2"
(12.7mm)
43
02Fre WH18DSDL US.p65 43 11/19/12, 1:31 PM

rm
I
I
Espafiol
INSTRUCCIONES IMPORTANTES SOBRE SEGURIDAD
Antesdeutilizarode realizarcualquiertrabajode mantenimientodeestaherramientaelectrica,leay comprenda
todas las precauciones de seguridad, advertenciase instrucciones de funcionamiento de este Manual de
instrucciones.
La mayoria de los accidentesproducidos en laoperacion y el mantenimiento de una herramientaelectricase
debena lafalta deobservaci6ndelasnormasoprecaucionesdeseguridad.Losaccidentesnormalmentepodran
evitarse reconociendo una situacion potencialmente peligrosa a tiempo y siguiendo los procedimientos de
seguridadapropiados.
Lasprecaucionesbasicasdeseguridadsedescribenenlasecci6n"SEGURIDAD"deesteManualdeinstrucciones
yen lasseccionesque contienenlasinstruccionesdeoperaciony mantenimiento.
Paraevitar lesionesoel dafio dela herramientaelectrica,los riesgosestanidentificadosconADVERTENCIASen
dicha herramientayen este Manualde instrucciones.
No utilice NUNCAesta herramientaelectricade ningunaforma que no este especificamenterecomendadapor
HITACHI.
SIGNIFICADO DE LAS PALABRAS DE SEI_IALIZACION
ADVERTENCIA indica situaciones potencialmente peligrosas que, si se ignoran, pueden resultar en la muerte o
en lesiones de gravedad.
PRECAUClON indica situaciones potencialmente peligrosas que, de no evitarse, pueden resultar en lesiones
menores o moderadas, o causar dafios en la herramienta electrica.
NOTA acentt_a informacion esencial.
ADVERTENCIAS DE SEGURIDAD GENERAL DE LA HERRAMIENTA ELleCTRICA
/N ADVERTENCIA:
Leatodaslasinstruccionesy todaslasadvertenciasdeseguridad.
Si no sesiguenlas advertenciase instrucciones,podria producirseuna descargaelectrica,un incendioy/o
dafiosgraves.
Guardetodaslasadvertenciaseinstruccionesparafuturareferencia.
Eltermino "herramientaelectrica"en lasadvertenciashacereferenciaalaherramientaelectricaquefunciona
con lareddesuministro (concable)oala herramientaelectricaque funciona conpilas (sincable).
1) Seguridaden elareadetrabajo
a) Mantengala zonade trabajolimpiay bien
iluminada.
Laszonas desordenadaso oscuras pueden
provocaraccidentes.
b) No utilice las herramientaselectricasen
entornosexplosivoscomo,porejemplo,en
presenciade liquidosinflamables,gaseso
polvo.
Lasherramientaselectricascreanchispasque
puedenhacerqueel polvodesprendahumo.
c} Mantengaa losnifiosytranseuntesalejados
cuandoutiliceunaherramientaelectrica.
Lasdistraccionespuedenhacerque pierdael
control.
2) Seguridadelectrica
a) Losenchufesde lasherramientaselectricas
tienenqueseradecuadosalatomadecorriente.
No modifique elenchufe.
No utilice enchufes adaptadores con
herramientaselectricasconectadasa tierra.
Si no semodifican los enchufesy seutilizan
tomas decorrienteadecuadassereducirael
riesgo dedescargaelectrica.
b} Evite el contactocorporalcon superficies
conectadasatierracomotuberias,radiadores
yfrigorificos.
Hay mayorriesgodedescargaelectricasi su
cuerpoestaencontacto conel suelo.
c) No expongalasherramientaselectricasa la
Iluviaoa lahumedad.
Laentradadeaguaenunaherramientaelectrica
aumentaraelriesgode descargaelectrica.
d} No utiliceelcableincorrectamente.Noutilice
el cable para transportar, tirar de la
herramientaelectricaodesenchufarla.
44
03Spa WH18DSDL US.p65 44 10/2/12, 3:13 PM

Mantenga el cablealejado del calor, del
aceite,debordes afiladosopiezasm6viles.
Loscablesdahadoso enredadosaumentan
el riesgodedescargaelectrica.
e) Cuando utiliceuna herramientaelectricaal
aire libre, utilice un cable prolongador
adecuadoparautilizarsealairelibre.
Lautilizaci6ndeuncableadecuadoparausarse
alairelibrereduceelriesgodedescargaelectrica.
f) Si no se puede evitar el uso de una
herramientaelectricaen un lugarhumedo,
utiliceunsuministroprotegidomedianteun
dispositivodecorrienteresidual(RCD).
ElusodeunRCDreduceel riesgodedescarga
electrica.
Seguridadpersonal
a) Esteatento, preste atencionaIo que hacey
utilice el sentidocomun cuando utilice una
herramientaelectrica.
No utilice una herramientaelectricacuando
est6 cansado o este bajo la influencia de
drogas,alcohol omedicacion.
La distracci6n momentanea cuando utiliza
herramientas electricas puede dar lugar a
importantesdaSospersonales.
b) Utilice un equipo de proteccion. Utilice
siempreunaproteccionocular.
Elequipo de proteccioncomo mascarapara
el polvo,zapatosdeseguridadantideslizantes,
cascoo proteccionparaoidos utilizadopara
condiciones adecuadasreducira los daSos
personales.
c) Eviteuninicioinvoluntario.Aseguresedeque
el interruptor estaen"off" antesdeconectar
laherramientaaunafuente dealimentacion
y/o bateria,cogerlaotransportarla.
Eltransportede herramientaselectricascon
el dedo en el interruptor o el encendidode
herramientas electricas con el interruptor
encendidopuede provocaraccidentes.
d) RetirelasIlavesdeajusteantesdeencender
la herramientaelectrica.
Sisedejauna Ilaveen unapiezagiratoriade
la herramientaelectricapodrian producirse
da5ospersonales.
e) No seextralimite. Mantenga un equilibrio
adecuadoentodo momento.
Estopermiteunmayorcontroldelaherramienta
electricaensituacionesinesperadas.
f) Vistase adecuadamente.No Ileve prendas
sueltasojoyas. Mantengael pelo, la ropa y
los guantesalejadosde laspiezasmoviles.
La ropa suelta, las joyas y el pelo largo
puedenpillarse en laspiezasm6viles.
g) Si se proporcionan dispositivos para la
conexiondeextracciondepolvoeinstalaciones
de recogida, asegurese de que estan
conectadosy seutilizanadecuadamente.
3)
Espafiol
La utilizacion de un sistemade recogidade
polvo puedereducirlos riesgosrelacionados
conel polvo.
4} Utilizacion y mantenimientodelasherramientas
electricas
a) No fuerce la herramientaelectrica.Utilicela
herramientaelectricacorrectaparasuaplicaci6n.
La herramienta electrica correctatrabajara
mejor y deforma massegurasiseutilizaala
velocidadpara laquefue diseSada.
b) No utilice la herramienta electrica si el
interruptor no la enciendey apaga.
Las herramientaselectricasque no pueden
controlarseconel interruptorsonpeligrosas
y debenrepararse.
c) Antesde hacerajustes,cambiaraccesorios
o almacenar las herramientas electricas,
desconecteelenchufede lafuente electrica
y/o lasbateriasdelaherramienta.
Estas medidas de seguridad preventivas
reducen el riesgo de que la herramienta
electricasepongaenmarchaaccidentalmente.
d) Guardelasherramientaselectricasquenose
utilicenparaquenolascojanlosni5osy no
permita que utilicen las herramientas
electricaspersonasnofamiliarizadasconlas
mismasoconestasinstrucciones.
Lasherramientaselectricassonpeligrosassi
son utilizadaspor usuariossin formaci6n.
e} Mantenimientodelasherramientaselectricas.
Compruebesi laspiezasm6vilesestanreal
alineadasounidas,sihayalgunapiezarotau
otra condici6n que pudiera afectar al
funcionamientodelasherramientaselectricas.
Si la herramienta electrica esta dafiada,
Ilevelaarepararantesdeutilizarla.
Se producen muchos accidentes por no
realizar un mantenimiento correcto de las
herramientaselectricas.
f) Mantengalas herramientasdecorteafiladas
y limpias.
Las herramientas de corte correctamente
mantenidascon los hordesdecorte afilados
son masfacilesdecontrolar.
g) Utilicelaherramientaelectrica,losaccesorios
y las brocas de la herramienta, etc. de
acuerdoconestasinstrucciones,teniendoen
cuentalascondicioneslaboralesyeltrabajo
queseva arealizar.
Lautilizaciondela herramientaelectricapara
operacionesdiferentesapretendidaspodria
dar lugara una situacionpeligrosa.
5} Utilizaci6ny cuidadodelas herramientasapilas
a) Recargues61oconel cargadorespecificado
porelfabricante.
Uncargadorqueesaptoparauntipodepaquete
de pilas podria crear un riesgode incendio
cuandoseutilizaconotro paquetedepilas.
45
I
I
03Spa WH18DSDL US.p65 45 10/2/12, 3:13 PM

rm
I
I
Espafiol
b) Utilice herramientas electricas s61ocon
paquetesdepilasespecificamentedise_ados.
La utilizacion de otros paquetes de pilas
podriacrear riesgodeda5oseincendio.
c} Cuandono se utilice el paquetede pilas,
mantengalo alejado de otros objetos
metalicos como clips, monedas, Ilaves,
clavos,tornillosu otrosobjetosmetalicos
peque_osquepuedanhacerunaconexi6nde
unterminala otro.
Si se acortan los terminales de las pilas
podrianproducirsequemaduraso incendios.
d} Bajos condiciones abusivas, podria
expulsarseliquido de la pila; evite todo
contacto. En caso de que se produzca
contacto accidentalmente,enjuague con
agua.Si entraliquidoen los ojos,busque
ayudamedica.
Elliquido expulsado dela pila podriacausar
irritacion oquemaduras.
6} Revisi6n
a} Lleve su herramienta a que la revise un
expertocualificadoqueutilices61opiezasde
repuestoidenticas.
Esto garantizara el mantenimiento de la
seguridaddela herramientaelectrica.
-ADVERTENCIA-
Paradisminuirelriesgodelesiones,elusuariodebe
leerelmanualde instrucciones.
ADVERTENCIA:
Algunos polvos creadospot el lijado mecanico,el
aserrado, el esmerilado, el taladrado y otras
actividades de construccion contienen sustancias
quimicasconocidasporleEstadodeCaliforniacomo
agentescancerigenos,defectoscongenitosy otros
darios reproductores.Algunos ejemplos de estas
sustanciasquimicasson:
• Elplomo de laspinturasabasede plomo,
• Elsilicecristalinodelosladrillosycementoyotros
productosde mamposteria,y
• El arsenico y el cromo de la madera tratada
quimicamente.
El riesgoresultantede laexposicionvaria segt_nla
frecuenciacon que se realizaeste tipo de trabajo.
Para reducir la exposicion a esta sustancias
quimicas:trabajeenun lugarbienventiladoy realice
el trabajoutilizandoel equipamientoapropiado,tal
como las mascaraspara el polvo especialmente
diseriadosparaeliminar lasparticulasmint_sculas.
46
NORMAS Y SIMBOLOS ESPECIFICOS DE
SEGURIDAD
1. Sostenga la herramienta electrica por las
superficiesdeagarreaisladascuandorealiceuna
operaci6nen laqueelsujetadorpuedaentraren
contactoconelcableadooculto.
Si elsujetadorentra encontactoconuncablecon
corriente, las partes metalicas expuestas de la
herramienta electrica pueden transmitir esa
corriente y producir una descarga electrica al
operador.
2. EMPLEEsiempreprotectoresauditivoscuando
tenga que utilizar la herramienta
Q durantemuchotiempo.
La exposici6n prolongada a ruido de
granintensidadpuedecausarlaperdida
delsentidodel oido.
3. No coloque las manos niotras partesdel cuerpo
cerca de la broca ni del portabrocas durante la
operacion. Sostengael taladro/llave de impacto
t_nicamentepor el mango.
4. Ya que el taladro/llave de impacto de bateriaes
accionadopot una bateria,tenga en mente que
puedeempezara operarencualquiermomento.
5. Cuandotrabaje en lugares elevados, despejeel
area de otras personas y tenga en cuenta las
condicionesque hayadebajode usted.
6. No toquenuncalaspiezasm6viles.
NOcoloqueNUNCAsus manos,dedos,ni demas
partesdelcuerpocercadelaspiezasm6vilesdela
herramienta.
7. NO utilice NUNCA la herramienta sin los
protectorescolocadosensu lugar.
NO utilice NUNCA esta herramienta sin los
protectores de seguridad correctamente
instalados. Si el trabajo de mantenimiento o de
reparacionrequiereeldesmontajedeun protector
de seguridad, cerci6rese de volver a instalarlo
antesdeutilizar laherramienta.
8. Utilicelaherramientacorrecta.
No fuerce herramientasni accesoriospeque_os
para realizarun trabajopesado.
No utilice las herramientas para fines no
proyectados, pot ejemplo, no utilice esta
amoladoraangularparacortarmadera.
9. NOutiliceNUNCAunaherramientaelectricapara
aplicacionesquenoseanlasespecificadas.
NOutiliceNUNCAunaherramientaelectricapara
aplicacionesno especificadasen esteManual de
instrucciones.
10. Manejecorrectamentela herramienta.
Maneje la herramienta de acuerdo con las
instruccionesofrecidasaqui.No deje caer ni tire
la herramienta.NOpermitaNUNCAquelos nirios
ni otras personasnoautorizadasnifamiliarizadas
con laoperacion dela herramientautilicenesta.
03Spa WH18DSDL US.p65 46 10/2/12, 3:13 PM

11. Mantengatodoslostornillos,pernos,y cubiertas
firmemente fijadosen sulugar.
Mantengatodos los tornillos, pernos,y cubiertas
firmementemontados.Compruebeperi6dicamente
sucondicion.
12. No utilice herramientaselectricassi la carcasao
laempu_adurade plasticoestarajada.
Las rajasen la carcasao en la empu_adura de
plastico puedenconducira descargaselectricas.
Talesherramientasnodeberanutilizarsemientras
nose hayanreparado.
13. Lascuchillasy los accesoriosdeberanmontarse
conseguridaden laherramienta.
Evitelesionespersonalesy deotraspersonas.Las
cuchillas, los accesorios de corte, y demas
accesoriosmontadosen la herramientadeberan
fijarsecon seguridad.
14. NOutiliceNUNCAunaherramientadefectuosao
quefuncioneanormalmente.
Si la herramienta parece que funciona
anormalmente,produciendoruidosextra6os,etc.,
deje inmediatamente de utilizarla y solicite su
arregloauncentrodereparacionesautorizadopor
Hitachi.
15. Manejeconcuidadolasherramientaselectricas.
Si una herramienta electrica se ha caido o ha
chocado inadvertidamente contra materiales
duros,es posibleque se hayadeformado, rajado,
odariado.
16. No limpie laspartesdeplasticocondisolvente.
Los disolventes, como gasolina, diluidor de
pintura,bencina,tetraclorurodecarbono,y alcohol
puedendaharo rajarlaspartesdeplastico.Nolas
limpie contalesdisolventes.
Limpielaspartesde plastico con un paho suave
ligeramente humedecido en agua jabonosa y
despuessequelasbien.
17. SIEMPREutilice protecci6n para los ojos que
satisfaga los requisitos de la ultima
versionde la normaZ87.1deANSI.
18.
Definicionespara los simbolos utilizadosen esta
herramienta
V ..................voltios
-. .................corrientecontinua
n................. velocidadsin carga
---/min .........revolucionesoreciprocaci6nporminuto
Espafiol
INSTRUCCIONES IMPORTANTES DE
SEGURIDAD PARA USAR EL TALADRO/
LLAVE DE IMPACTO DE BATERIA
,IN ADVERTENCIA:
Elusoinadecuadooinsegurodeltaladro/llavede
impactode bateriapuedeprovocarla muerteo
da_oscorporalesserios.Paraevitarestosriesgos,
siga las siguientes instruccionesbasicas de
seguridad:
1. No utilice este taladro/llave de impacto para
cualquierotra aplicacionqueno seespecifiqueen
estemanual.
2. No coloque nuncalas manos ni otras partes del
cuerpocercadelabrocani delportabrocasdurante
la operacion.Sostengaeltaladro/llavedeimpacto
unicamentepor el mango.
3. Cuandotrabaje en lugares elevados,cerci6rese
siemprede que no haya nadiedebajo antesde
iniciar eltrabajo.
4. Cuandotrabaje,utilicesiempreproteccionparasus
ojosy oidos.
5. Instale siempre con seguridad la broca del
atornillador. Una broca floja podria resultar
peligrosaporque podriadesprenderseduranteel
trabajo.(WH18DSDL)
6. Utilice siemprela broca adecuadaaltama_o clel
tornillo. (WH18DSDL)
7. Insertesiemprelostornillos conel atornilladorde
impacto en linea recta. Sitrabajase con el
atornillador deimpacto inclinado,podria dariar la
cabezade los tornillos y no conseguirel par de
aprieteprescrito.(WH18DSDL)
8. Confirme que el casquillo no este rajado.
(WR18DSDL)
9. Fije el casquillo hexagonal en la boca. Si no
asegurasesuficientemente el casquillo, podria
caersey provocarunaccidente.Conrespectoala
fijacion del casquillo hexagonal, consulte
"OPERACION".(WR18DSDL)
10. Confirme el par de apriete con una Ilave
dinanometrica antes de utilizarlo a fin de
asegurarsedeque estautilizandoel parcorrecto.
(WR18DSDL)
11. Si utilizaunajunta universal,cercioresedenousar
la unidaden condici6nsincarga.Si lautilizaseen
estacondicion,podria resultarpeligrosa. Cuando
la secci6ndelcasquillogire,puedecausarlesiones
enlas manosoenelcuerpo,olavibraci6n intensa
puede hacer que se caiga la herramienta.
(WR18DSDL)
12. Tenga cuidado de que materias extra6as no
bloqueen losorificios situadosaambos ladosde
la empuriadura. Ademas,notapedichosorificios
con cinta. Estos orificios juegan un papel muy
importante. (WR18DSDL)
47
m_
I
I
03Spa WH18DSDL US.p65 47 10/2/12, 3:13 PM

rm
I
I
Espafiol
INSTRUCCIONES IMPORTANTES DE
SEGURIDAD PARA EL CARGADOR DE
BATERiAS
/k ADVERTENCIA:
La utilizacibninadecuadadel cargadorde
bateriaspuederesultarenlesionesseriaso
enlamuerte.Paraevitarestosriesgos,siga
lasinstruccionesde seguridadofrecidasa
continuacibn.
LEATODASLASINSTRUCCIONES
1. Estemanual contiene instruccionesimportantes
deseguridadparael cargadordebateriasmodelo
UC18YRSL.
2. Antesdeutilizarel cargadorde baterias,leatodas
lasinstruccionesy tengaen cuentalasmarcasde
precaucionde (1)el cargador de baterias,(2)la
bateria,y (3)el producto queutilizalabateria.
3. Parareducirelriesgode lesiones,carguela bateria
HITACHIde tipo de laserieBSL18.Otrostipos de
bateriaspodrianexplotarcausandolesionesydaSos.
4. No expongael cargadordebateriasa la Iluviania
la nieve.
5. Lautilizaci6n de unaccesoriono recomendadoo
vendido porelfabricantedelcargadorde baterias
puede resultar en el riesgo de incendios, en
descargaselectricas,oen lesiones.
6. Parareducirelriesgodedafiarelcabley elenchufe,
paradesconectarelcabledelcargadordebaterias,
tire del enchufe.
7. Cerci6resede que el cablequede situado donde
nopuedapisarse,dondenadiepuedatropezarcon
el,y donde no puedarecibirdaSos.
8. A menos que sea absolutamente necesario,no
debera utilizarse un cable prolongador. La
utilizacion de un cable prolongador inadecuado
podria resultar en el riesgo de incendios y
descargaselectricas.
Cuandotenga queutilizar un cableprolongador,
cerci6resedeque:
a. El enchufe del cable prolongador sea igual
en tamafio y forma que el del cargadorde
baterias;
b. El cable prolongador este adecuadamente
conectadoyen buenascondicioneselectricas;y
c. Queelcalibredelcableseasuficienteparael
amperaje de CA del cargador de baterias,
comoseespecificaen la Tabla1.
Tabla 1
CALIBRE(AWG)MiNIMORECOMENDADOPARACABLES
PROLONGADORESPARAELCARGADORDEBATERiAS
Amperajenominal de entradadeCA* Calibre(AWG)delcable
Igualo pero Longituddelcable,Pies(metros)
superiora inferior a 25(7.5) 50(15) 100(30) 150(45)
0 2 18 18 18 16
2 3 18 18 16 14
3 4 18 18 16 14
Si laentrada nominal delcargadordebateriasse
indicaen vatiosen vezde amperios,el amperaje
nominal correspondiente se determinara
dividiendoel vataje por latension, porejemplo:
1,250vatios _ 10amperios
125voltios
9. No utilice el cargadorde bateriascon un cable o
un enchufe da6ado. Si estan dafiados,
reemplacelosinmediatamente.
10. Noutiliceelcargadordebateriassiharecibidoun
golpe,sihacaido,osiesta da6adodealgunaotra
forma. Lleveloa untecnico cualificado.
11. No desarme el cargador de baterias. Cuando
necesite reparaci6n, Ilevelo a un tecnico
cualificado. El reensamblaje incorrecto podria
resultar en el riesgo de incendios o descargas
electricas.
48
12.
Para reducir el riesgo de descargaselectricas,
desenchufeel cargador del tomacorriente antes
de intentar realizar cualquier operacion de
mantenimientoodelimpiarlo. Laextracciondela
bateriano reduciraesteriesgo.
INSTRUCCIONES IMPORTANTES DE
SEGURIDAD PARA LA BATERiA Y EL
CARGADOR DE BATERiAS
Usted debera cargar la bateria antes de utilizar el
atornilladores de percusion inalambrico. Antes de
utilizar el cargador de baterias modelo UC18YRSL,
cercioresedeleertodaslasinstruccionesy precauciones
del mismo,de la bateria,y de estemanual.
03Spa WH18DSDL US.p65 48 10/2/12, 3:13 PM

/k PRECAUCION
iUTILICESOLAMENTEBATERJAHITACHIDEL
TIPODELASERIEBSL18.LOSDEMASTIPOSDE
BATERIASPODRIAN EXPLOTAR Y CAUSAR
LESIONES!
Paraevitarelriesgodelesiones,sigalasinstrucciones
ofrecidasacontinuacion:
/k ADVERTENCIA:
La utilizaci6n inadecuadade la bateria o del
cargadordebaterias puedeconducira lesiones
serias.Paraevitarestaslesiones:
1. NUNCAdesarmela bateria.
2. NUNCAincinereunabateria,aunqueesteda5ada
ocompletamen-teagotada.
3. NUNCAcortocircuite labateria.
4. NUNCAinserteningt_nobjeto en las ranurasde
ventilaciondelcargador.SiIohiciesepodriarecibir
descargas electricas o da_ar el cargador de
baterias.
5. NUNCAcargueenexteriores. Mantengalabateria
alejadade laluzsolardirecta,y utilicelasolamente
donde haya poca humedad y una buena
ventilacion.
6. NUNCAcarguecuandolatemperaturaseainferior
a32°F(0°C)o superior a104°F(40°C).
Si secarga la bateria a temperaturas fuera del
rangode32°F- 104°F(0°C- 40°C)tal vezla carga
no se realicecorrectamentey se reduzcaaia^ida
dela bateria.
7. NUNCAconecte dos cargadores de baterias
juntos.
8. NUNCAinserteobjetosextra5osenelorificio para
la bateriani enel cargadordebaterias.
9. NUNCAutilice un transformador elevador para
cargar.
10. NUNCAutiliceunmotogeneradornitensiondeCC
paracargar.
11. NUNCAguarde la bateria ni el cargador de
baterias en lugares en los que la temperatura
puedaalcanzarosobrepasar104°F(40°C).
12. SlEMPREutilice el cargadorcon un tomacorriente
(120voltios). La utilizaci6n de un cargadorcon
cualquierotra tensi6n podria hacerque este se
recalentasey daSase.
13. SlEMPREespere15minutos porIomenosentrelas
cargasparaevitarqueelcargadorserecaliente.
14. SlEMPREdesconecteel cablede alimentaci6n del
tomacorriente cuando no vaya a utilizar el
cargador.
Espafiol
ADVERTENCIA DE LA BATERIA DE LITIO
Para ampliar su duracion, la bateria de litio esta
equipadacon lafuncion de protecci6nparadetener la
salida.
Enlos casos1a3 descritosmas abajo,cuando utilice
este producto, incluso si tira del interruptor, el motor
puededetenerse.Noesunproblema,sinoel resultado
de lafunci6n de proteccion.
1. Cuandola bateriarestanteseagota, el motor se
detiene.
Enestecaso,carguelainmediatamente.
2. Si la herramientasesobrecarga,el motor puede
detenerse.Enestecaso,suelteel interruptor de la
herramientayelimine lascausasdelasobrecarga.
Acontinuaci6n, puedevolverla a utilizar.
3. Si la bateriase calientaexcesivamenteal realizar
untrabajo desobrecarga,lapotenciadela bateria
podria pararse.
Enestecaso,dejede utilizar la bateriay deje que
seenfrie.Posteriormentepuedeutilizarladenuevo.
Asimismo,presteatencionalassiguientesadvertencias
y precauclones.
Ak ADVERTENCIA
Paraevitar fugas de la bateria, generacionde calor,
emision de humo, explosiones e igniciones, preste
atencionalas siguientesprecauciones.
1. Asegt_rese de que no entran virutas o polvo en la
bateria.
O Durante el trabajo, asegt_rese de que no caen
virutas o polvo en la bateria.
O Asegt_rese de que las virutas o el polvo que caen
sobre la herramienta electrica durante el trabajo
no entran en la bateria.
O No almacene una bateria sin utilizar en un lugar
expuesto avirutas y polvo.
O Antes de almacenar una bateria, retire las virutas
y el polvo que se haya adherido y no la almacene
junto a piezas metalicas (tornillos, clavos, etc.).
2. No agujeree la bateria con un objeto afilado como
un clavo, no la golpee con un martillo, la pise, la
tire o la exponga a fuertes impactos fisicos.
3. No utilice una bateria que pudiera estar daSada o
deformada.
4. No utilice la bateria con las polaridades cambiadas.
5. No conecte la bateria directamente a salidas
electricas o a los encendedores de cigarros de los
coches.
6. No utilice la bateria para un fin diferente a los
especificados.
7. Si la carga de la bateria no finaliza incluso cuando
ha transcurrido un determinado tiempo de recarga,
detenga inmediatamente la recarga.
8. No coloque o exponga la bateria a temperaturas
elevadas o alta presi6n como en un microondas,
una secadora o un contenedor de gran presi6n.
49
m_
I
I
03Spa WH18DSDL US.p65 49 10/2/12, 3:13 PM

rm
I
I
Espafiol
9. Alejela del fuego inmediatamente cuando se
detecteunafugao un olor raro.
10. No la utilice en un lugar donde se generegran
electricidadestatica.
11. Si hayunafuga de la bateria,mal olor, segenera
color,estadescoloridao deformada,o de algt_n
modo funciona de forma anormal durante su
utilizacion, recarga o almacenamiento, retirela
inmediatamentedel equipo o del cargadorde la
bateriay detengasuutilizacion.
/K PRECAUCION
1. Siel liquidodefugadelabateriaentraencontacto
conlos ojos,nose losfrote y lavelosbienconagua
limpiacomo,porejemplo,aguadelgrifoy p6ngase
encontactocon un medicoinmediatamente.
Si nose trata,el liquido podriacausarproblemas
devisi6n.
2. Siel liquido defugaentraencontactoconla pielo
la ropa, lavela bien con agua limpia como, por
ejemplo,aguadelgrifo inmediatamente.
Podriaproducir irritaci6ndela piel.
Si observa 6xido, mal olor, recalentamiento,
decoloracion, deformaci6n y/u otras
irregularidadesalutilizarlabateriaporprimeravez,
no la utilice y devuelvasela a su proveedor o
distribuidor.
/k ADVERTENClA
Si un objeto extrario conductor de electricidad entra en
los terminales de la bateria de litio, podria producirse
un cortacircuito, resultando en un riesgo de incendio.
Por favor, respete los siguientes consejos cuando
almacene la bateria.
© No coloque cortes conductivos, clavos, cables de
acero, cables de cobre u otros cables en la caja de
almacenamiento.
Q Instale el paquete de baterias en la herramienta
electrica o almacenelo presionando la tapa de
baterias hasta que se oculten los orificios de
ventilacion para evitar cortacircuitos. (Ver Fig. 1}
iGUARDEESTASINSTRUCCIONES
Y
PONGALASADISPOSICIONDEOTROSUSUARIOS
Y
PROPIETARIOSDEESTAHERRAMIENTA?
5O
03Spa WH18DSDL US.p65 50 10/2/12, 3:13 PM

Espafiol
m_
I
I
NOTA:
La informacion contenida en este Manualde instrucciones ha sido diseEadapare ayudarlea utilizer con
seguridady mantenerestaherramientaekctrica.
NUNCAhagafuncionar niefectt_eel mantenimientode la herramientaantesde leery comprendertodaslas
instruccionesde seguridadcontenidaseneste manual.
Algunasilustraciones deesteManual deInstruccionespuedenmostrar detalleso accesoriosdiferentesa los
de lapropia herramientaekctrica.
NOMENCLATURA
1. Atornillador de impactoa bateria(WH18DSDL)/Llave(WR18DSDL)
0 WH18DSDL 0 WR18DSDL
Alojamiento
Mangu_
Luz / "_u"_%q::_:7_ Boton
^ , .---"1.J X_, pulsador
Conmutador -_F-//s_
degatillo \ _!\'_!\/ ---" Palanca de
Asidero ----------_:"::_)_ cambio de
9_ rotaclon
Paneld_ _ "'
,nterru tores
Gancho
Bateria
Alojamiento
Yun_
. / "_(::_ Botdn
LUZ . , /._ _! -- pulsador
Conmutador "-_"9_ ....
de gatillo _J._l _ cra_iCoac_e
Asldero --__,_i_ rotacion
interruptores_ _"_ _- _
Gancho
Bateria
© Bateria(BSL1830)
Orificios de ventilacion
_._, Terminales
Taps de bateria
Enganc
Bateria
Fig.1
51
03Spa WH18DSDL US.p65 51 10/4/12, 8:31 AM

rm
I
I
Espafiol
Cargadordebaterias(UC18YRSL)
Cable
Lampara
piloto
de guia
Placa de
caracteristicas
Fig.2
ESPEClFICAClONES
1. Atornillador de impactoa bateria/Llave
Modelo WH18DSDL WR18DSDL
0 - 2,600/min
Velocidad sin carga 0 - 2,000/min
5/32" - 3/8" (M4 - M10)
Capacidad 1/4" - 9/16" (M6 - M14) 3/8" - 23/32" (M10 - M18)
1/4" - 15/32" (M6 - M12) 5/16" - 9/16" (M8 - M14)
Torsion de apriete
(Maxima)
Modo de encendido
Modo de ahorro
Tornillo pequeSo
Perno ordinario
Pernos de gran
resistenciaa la tracci6n
Modo Energia1,510in-lbs.
{170N.m}
Modo Guardar840in-lbs.
{95N.m}
Latorsion esdepernos
9/16"(M14)degran
resistenciaa latraccion
con labateria
completamentecargadaa
68°F(20°C)de
temperatura.
Tiempodetorsion: 3seg.
1/4" (6.35 mm) Hex
Modo Energia188ft.lbs.
{255N.m}
Modo Guardar
Maxima 103ft.lbs.
{140N.m}
Aprietedel pernodegran
resistenciaala traccionde
5/8"(M16)F10T,estando
completamentecargadaa
unatemp. de68°F(20°C).
Tiempo detorsion: 5seg.
TamaSo de la espiga de broca Cuadradode 1/2"(12.7ram)
Bateria recargable BSL1830:Li-ion 18 V (3.0Ah)
Peso 3.7 Ibs. (1.7 kg)
2. Cargadordebaterias(UC18YRSL)
Fuentedealimentacionde entrada Monof_sica:120V CA,60 Hz
Tiempodecarga Aprox. 45 min.
Tensiondecarga CC14.4V - 18V
Cargador CC14.4V:CC3.5A
Corrientedecarga CC18V:CC3.5A
Peso 1.3Ibs.(0.6kg)
NOTA:Eltiempo decargapuedavariarde acuerdocon latemperaturay latension delafuente de alimentacion.
52
03Spa WH18DSDL US.p65 52 11/19/12, 1:25 PM

Espafiol
m_
I
I
APLICAClONES
<WH18DSDL>
Atornillamiento y desatornillamiento de tornillos
para metales,tornillos para madera,tornillos que
no necesitanabrir antessuagujero,etc.
<WR18DSDL>
Apretadoy aflojado de cualquiertipo de pernosy
tuercaspasaaseguerarestructuras.
MI_TODO DE EXTRACCION E
INSTALACION DE LA BATERIA
1. Desmontajede labateria
Sujetarfirmemente el asideroy presionarel cierre
de labatariaparadesmontarla(Verla Fig.3).
Ak PRECAUCION
Nocortocircuitarnuncalabateria.
Instalaciondela bateria
Insertarla bateriaobservandosuspolaridades(ver
la Fig.3).
Mango
Enganche
-, ..... Presionar
Bateria
Fig.3
METODO DE CARGA
NOTA:
Antesdeenchufarelcargadoren untomacorriente,
tengaencuenta lospuntos siguientes.
© Latensiondelafuentedealimentacionestaindicada
en laplacade caracteristicas.
© Elcable nodeberaestardaSado.
/k ADVERTENCIA:
Nocargueconunatensionsuperiora laindicada
enlaplacadecaracteristicas.
Sicargaseconunatensionsuperiora laindicada
en la placa de caracteristicas,el cargador se
quemaria.
1. Enchufeel cabledealimentaciondelcargadoraun
tomacorriente deCA.
Cuandohayaconectadoel enchufe del cargadora
unatoma de lared, la lamparapiloto seencendra
en rojo. (A intervalosde 1segundo)
No utiliceel cargadorsi sucableesta
daSado. Haga que se Io reparen
inmediatamente.
Insertela bateriaen la cargador
Introduzca la bateria firmemente en el cargador
hastaque la lineaestevisible, tal y comoseindica
en laFig4, 5.
Bateria
Lampara
piloto
Cargador
Fig.4
Linea
Fig.5
Carga
Cuandoinsertela bateriaenel cargadordebaterias,
seiniciaralacarga,y la lamparapiloto seencendera
en rojo. (ConsultelaTabla2)
NOTA:
Sila lamparapiloto parpadeaen rojo,desconecteel
enchufedeltomacorrienteycompruebesilabateria
estacorrectamenteinsertada.
53
03Spa WH18DSDL US.p65 53 10/2/12, 3:13 PM

rm
I
I
Espafiol
Cuandola bateriasehayacargadocompletamente,
la lampara parpadeara lentamente en rojo. (A
intervalos de1segundo) (ConsukelaTabla2)
(1) Incticacionesde lalamparapiloto
Lasindicacionesde lalamparapiloto mostradasen
laTabla2,seproducirandeacuerdoconlacondicion
delcargadoro de labateria.
Tabla2
El indicador
luminoso
piloto se
ilumina o
parpadea en
rojo.
El indicador
luminoso pilot(
se ilumina en
verde.
Antes de la
carga
Durante la
carga
Carga
completa
Carga
tmposible
Espera por
recalenta-
miento
Parpadeo
Indicaciones de la lampara piloto
Se encendera durante 0.5 segundos. No se
encendera durante 0.6 segundos. (Apagada
durante 0.6 segundos)
Iluminacion permanente
Iluminaci6n
Parpadeo
Se encendera durante 0.5 segundos. No se
encendera durante 0.5 segundos. (Apagada
durante 0.5 segundos)
Destello
Se encendera durante 0.1 segundos. No se
encendera durante 0.1 segundos. (Apagada
durante 0.1 segundos)
mmmmmmmmmmmmm
Illuminacion permanente
Iluminaci6n
Mal funcionamento de la
bateria o del cargador
Bateria recalentada.
No puede cargarse (la
carga comenzar_ cuando
la bateria se enfrie).
(2) Temperatura de la bateria
La temperatura de la bateria recargable se muestra
en la Tabla 3 y, si la bateria se ha calentado, habra
que dejar que se enfrie durante cierto tiempo antes
de recargarla.
Tabla3 Margenesdecargade lasbaterias
Bateriarecargable
recharg
BSL1830
Temperaturaa la que
podrarecargarsela bateria
32OF-122OF
(0oc- 50oc)
(3) Tiempo de carga
Tabla4 Tiempo decarga(A68°F(20°C))
Cargador
Bateria _-_. UC18YRSL
BSL1830 Aprox. 45min.
NOTA:
Eltiempo decarga puedavariar deacuerdocon la
temperatura y la tension de la fuente de
alimentacion.
4. Desconecte el cargador de baterias del
tomacorriente.
/k PRECAUCION
No desconecteelcabledeltomacorrientetirando
delmismo.
Cercioresedetirardelenchufeparadesconectarlo
deltomacorrientea fin de evitardaSarelcable.
5. Extraiga la bateria del cargador de baterias.
Sujetando el cargador de baterias con una mano,
extraiga la bateria del mismo.
I Forma de hacer que las baterias duren mas I
(1) Recarque las baterias antes deque se hayan agotado
completamente.
Si siente que la potencia de la herramienta electrica
se debilita, deje de utilizarla y recargue su bateria.
Si continuase utilizando la herramienta hasta agotar
la capacidad de la bateria, esta podria dafiarse y su
duraci6n util podria acortarse.
(2) Evite realizar la recarga a altas temperaturas.
Una bateria se calentara inmediatamente despues
de haberla utilizado. Si recargase tal bateria
inmediatamente despues de haberla utilizado, su
substancia quimica interna se deterioraria, y la
duracion util de la bateria se acortaria. Deje la bateria
y recarguela despues de que se haya enfriado
durante cierto tiempo.
54
03Spa WH18DSDL US.p65 54 10/2/12, 3:13 PM

iK PRECAUCION
• Si utilizacontinuamenteelcargadordebaterias,
estese calentar&Io que puedecausaraverias.
Despuesde haberfinalizado lacarga,espere15
minutosantesderealizarlacargasiguiente.
• Si recargaunabateria calienteoexpuestaalsol,
lalamparapilotopuedeencenderseenverde.
Labaterianosecargar& Ental caso,dejequela
bateriaseenfrieantesde cargarla.
• Cuandolalamparapilotoparpadeerapidamente
enrojo(aintervalosde0.2segundos),compruebe
yeliminelosobjetosextra_osquehayaenelorificio
deinstalaciondelcargadorde baterias.Sinohay
objetosextra_os,esprobablequelabateriaoque
el cargadorde baterias est_funcionando real.
Llevelosauncentrodereparacionesautorizado.
ANTES DE LA UTILIZACION
Compruebe el area de trabajo para cerciorarse de que
este libre de escombros y bien ordenada.
Despeje el area de personal innecesario. Cerci6rese de
que la iluminacion y la ventilaci6n sean adecuadas.
OPERACION
1. Instalaciondelapuntadelatornillador(WH18DSDL)
Para instalar la punta de destornillador, realice
siempreelprocedimientosiguiente. (Fig.6)
Manguito guia Movimiento
Punta del Orificio _ )_ (
atornillador hexagonal _<_/
en el _ '_J_
yunque
Fig.6
(1)Tiredel manguitoguia haciadelante.
(2)Inserte la punta de destornillador en el orificio
hexagonalen el yunque.
(3)Suelteel manguitoguia y devuelvaloa suposicion
original.
z_ PRECAUCION
Si el manguito guia no vuelve a su posicion
original,significaraquelapuntadedestornillador
noestacorrectamenteinstalada.
2. Extracci6ndela broca(WH18DSDL)
Realicela operaci6ncontrariaa la deinstalaci6nde
la broca.
Espahol
3. Seleccion del recepraculoque concuerde con el
perno(WR18DSDL)
Cerciorarsedeutilizarunreceptaculoqueconcuerde
con el perno a ser apretado. Si se utilizase un
receptaculo inadecuado, el apriete no sera
satisfactorio y la cabezael perno o la tuerca se
da_aran.
Un receptaculo,hexagonalo cuadrado,deformado
noquedarabienapretadoenlatuercaoenelyunque
porIoquelatensiondeaprietenoserala adecuade.
Poner atencion al desgaste de los agujeros del
receptaculoycambiarloantesdequeel destastesea
excesivo.
4. Instalac6nde un receptaculo(WR18DSDL)
Seleccioneel receptaculoque deseeemplear.
• Tipo embolo (Fig.7)
Alinee el embolo sitado en laparte cuadradade la
bocacon el orificio del cuo hexagonal. Despues
empuje el embolo y monteel cubo hexagonalen la
boca. Compruebe que el embolo este
completamente enganchada en el orificio. Para
extraer elcubo inviertalasecuencia.
,4', PRECAUCION
• Porfavor utilicelos accesoriosespecificadosen
las instruccionesde manejo yen el catalogode
Hitachi. De Io contrario, se podrian producir
lesioneso accidentes.
• Aseguresede instalarfirmemente el casquillo
adaptador en el yunke. Si no esta instalado
firmemente, elcasquilloadaptadorsepodrasalir
yprovocaraccidentes.
5.
6.
Recaptaculo
hexanogal Ranura Yunque
Fig.7
Confirmarquelabateriaestapuestacorrectamente.
Examinarla direccionde rotaci6n
El manguito girara hacia la derecha (mirandola
desdearras)al oprimir el lado R (der.) del boron
pulsador.
Ellado L(izq.)del bot6npulsadorseusaparahacer
girar elmanguito haciala izquierda.(Veala Fig.8).
(Las marcas _oy _, estan en el cuerpo de la
herramienta.)
m_
I
I
55
03Spa WH18DSDL US.p65 55 10/2/12, 3:13 PM

rm
I
I
Espafiol
CL)
Presionar _ Presionar
Conmutador de Boton pulsador
gatillo
Fig.8
ik
PRECAUCION
El bot6n pulsador no podra utilizare mientras el
motor de la herramienta est6 girando. Pars
accionarlo, pare en primer lugar el motor de Is
herramienta.
7. 0peracion de conmutacion
© Cuandotire delgatillo delinterruptor,laherramienta
girar&
Cuandosuelteel gatillo, laherramientasedetendr&
© Lavelocidadderotacionpodracontrolarsevariando
la presi6n conla que tire del interruptordel gatillo.
Lavelocidad ser_baja cuando setire ligeramente
del gatillo, y aumentara amedida que setire mas
deel.
© Cuandopresioneeldisparado,el freno seaplicara
inmediatamente.
NOTA:
Se produce un ruido de zumbido antesde que el
motor empiecea girar, Io cualno indicaproblema
alguno dela maquina.
Cambiela velocidadderotaci6n
Taly comosemuestraenla Fig.9,cuandolapalanca
de cambio de rotacion se desliza hacia el lado
inferior, se activa el modo de encendido (P). Y,
cuandosedeslizahaciaelladosuperior,seactivael
modo deahorro (S).
Utiliceel modode ahorro (S)cuandodeseereducir
el parde aprietemaximo.
_s-'__ Palanca de
Modo Guardar (S) "_P"_ i\/ csmbio derotacion
Modo Energia (P) "_
Fig.9
56
/k
/k
PRECAUCION:
Cuandotrabajeenelmododeahorro(S},noajuste
continuamentelostornillos,yaquelatemperatura
deloscomponenteselectronicosdelconmutador
delconvertidoraumenta.
Apretadoy aflojado depernos
Instale la punts de destornillador adecuada al
tornillo, alineelacon las ranuras de la cabezadel
mismo,y despuesaprietelo.
Presioneeltaladro/llavedeimpactosoloIosuficiente
para mantener la punta fija sobre la cabezadel
tornillo.
PRECAUCION
Elmantenereltaladro/llave de impacto sobreel
tornillodemasiadotiempoIoapretarademasiado
ypodriaromperlo.
Atornillar un tornillo con el taladro/llave de
impactoa unangulo,puededa_ar lacabezadel
tornilloy no transmitirala fuerza adecuadaal
tornillo.
Atornille con este taladro/llave de impacto
alineadoen linearectaconeltornillo.
10.Apretado y aflojado depernos
Enprimerlugartendraque seleccionarun manguito
hexagonalque coincidacon el perno o la tuerca.
Despuestendraquemontarelmanguitoenlabocay
sujetarlatuercaque deseeapretarconel manguito
hexadecimal.SujetandolaIlaveenlineaconelperno,
presioneel interruptorde alimentaci6nparaapretar
con impactoalatuercadurantevariossegundos.
Silatuercaquedasepocofijadaal perno,estepodria
girar con ella e impediriael aprieteadecuado. En
estecaso,dejede apretarconimpactoa latuercay
sujetela cabezadel perno con unaIlave antesde
reanudar el apriete con impacto, o apriete
manualmenteel pernoy latuercaparaevitarque se
deslicen.
11.Usodel gancho
Elgancho seusa paracolgarsela herramientacon
alimentacion electrica del cintur6n mientras se
trabaja.
,4k PRECAUCION
• Cuandoseutilizael gancho,se debe sujetarla
herramientaconfirmezaparaquenosecaigapor
accidente.
AIcaer,puedeprovocarunaccidente.
• No ajuste ningunabroca en el extremo de la
herramienta de alimentacionelectricasila Ileva
enganchadadelcinturon.Si laherramientatiene
ajustada una broca afilada, por ejemplo una
perforadora,y se Ilevaenganchadaal cinturon,
puederesultarlesionado.
• Instaleel ganchode forma segura. Si no esta
correctamentecolocado,puedeprovocarlesiones
durante suuso.
03Spa WH18DSDL US.p65 56 10/2/12, 3:13 PM

(1)Retiradadelgancho.
Extraigalos tornillos que sujetanel gancho conun
destornillador Philips.(Fig.10)
Gancho Tornillo
Fig.10
(2)Colocaciondelganchoy ajustedelos tornillos.
Instaleel gancho enla ranuradela herramientade
alimentacionelectricadeforma seguray aprietelos
tornillosdemaneraqueelganchoquedefirmemente
sujeto.(Fig.11)
Ranura
Gancho
Tornillo
Fig.11
12.Acercadel indicadordebateria restante
AI pulsar el interruptor del indicador de bateria
restante,seiluminael indicadorluminosodebateria
restantey puedecomprobarsela potenciarestante.
(Fig.12)
AI retirarel dedode dicho interruptor, el indicador
luminoso de bateria restantese apaga.Latabla 5
muestrael estadodelindicadorluminosode bateria
restantey la potenciadebateriarestante.
Panelde
interruptores
Interruptor " ,
de indicador Indicador
de bateria luminoso
de bateria
restante
restante
Fig.12
m_
I
Espafiol I
Tabla 5
Estadodel Potencia de bateria restante
indicador
La potencia restante de la
bateria es suficiente.
La potencia restante de la bateria
se encuentra a la mitad.
La jootencia restante de la bateria
esta practicamente agotada.
Recarguela bateria cuanto antes.
Dadoqueel indicador de bateriarestantemuestra
resultados ligeramente diferentes segun la
temperatura ambiental y las caracteristicasde la
bateria,utilice sulecturacomoreferencia.
NOTA:
© No golpee con fuerza ni rompa el panel de
interruptores.
Puedenproducirse problemas.
© Parareducirel consumedela potenciade bateria,
el indicadorluminosodebateriarestanteseilumina
mientrassemantienepresionadoel interruptordel
indicadordebateriarestante.
13.Usode la luzLED
Cadavezque sepresionaelinterruptor delucesdel
panel de interruptores, la luz LEDse enciendeo
apaga.(Fig.13)
Parareducirel consumo de potenciade la bateria,
apaguela luz LEDde manerafrecuente.
Interruptor
de luces
/k
Fig. 13
PRECAUCION
No exponga los ojos directamente a la luz; evite
mirar hacia ella directamente.
Si los ojos estan expuestos de manera continua a
la luz, pueden resultar lesionados.
NOTA:
Paraevitar queseconsumala potenciade bateria
pornoacordarsedeapagarlaluzLED,laluzseapaga
automaticamente tras un periodo de
aproximadamente15minutos.
57
03Spa WH18DSDL US.p65 57 10/2/12, 3:13 PM

rm
I
I
Espafiol
PRECAUClONES OPERAClONALES
1. Reposo de la herramienta despues de un
funcionamiento prolongado
Tras una tarea de apdete de pernos de larga
duraci6n,dejela unidadenreposoduranteunos 15
minutos alreemplazarlabateria.Sireinicia latarea
inmediatamentedespuesde reemplazarla bateria,
aumentarialatemperaturadelmotor,delinterruptor,
etc.,con losconsiguientesriesgosde quemadura.
z_ PRECAUClON
No toque las partes metalicas, debido a que
pueden alcanzar altas temperaturas durante el
trabajo continuo.
2. Precaucionessobre el empleo del interruptor de
control develocidad
Este interruptor posee un circuito electronico
incorporadoque varia lavelocidadde rotacion.Por
consiguiente, cuando apriete el gatillo s61o
ligeramente(bajavelocidadderotacion)y elmotor
se pare mientras este insertando continuamente
tornillos, los componentes de dicho circuito
electr6nicopuedenrecalentary da5arse.
3. Empleeeltiempo deapriete adecuadoaltornillo
Elparadecuadoaun tornillo difieredeacuerdocon
el materialy eltama5odel mismo,elmaterialenel
queseesteatornillando,etc.PorIotanto,empleeel
tiempo deaprieteadecuadoaltornillo. Enespecial,
encasodetornillos menoresa5/16"(8ram)siutiliza
untiempodeaprietelargo,existeelpeligroderotura
de los tornillos, motivo por el quese le aconseja
confirmar con antelacion el tiempo y el par de
apriete.
4. Tensionde apriete apropiada para los pernos y
tuercas
Latensionde apriete6ptima para pernosy tuercas
difiere segt_nsu materialy tama6o.
Una tension de apriete excesiva para un perno
peque_opodria deformarlo o romperlo.Latension
deaprieteaumentaproporcionalmentealteimpo de
operacion. Utilice la indicacion de la escalay el
tiempo deoperacion adecuadosacadaperno.
5. Confirmacionde latension deapriete
Los factores que se mencionen a continuacion
contribuyenareducirlatensi6n de apriete.
Comprobarpor ellolatensionde aprietenecesaria
atornillandopreviamentealgunostornillos conuna
Ilave detuercas manual. Factoresqueafectana la
tensi6nde apriete.
(1)Tension
Cuandosealcanceelmargendedescarga,latension
sereduciray latorsion deapriete disminuir&
(2)Tiempodeoperacion
Latensiondeaprieteaumentaalaumentareltiempo
deoperaci6n.Latensi6n deaprietesin embargono
superacierto valor a pesarde que la herramienta
funcione duranteun largo periododetiempo.
58
(3) Diametrodel perno
Latension deaprietediffiere segt_nel diametro del
perno.Generalmente,cuantomayorseaeldiametro
delperno,mayorseralatension deapriete.
(4) Condicionesdeapriete
El parde aprietedifieresegt_nla relaci6nde par,la
claseyel largodelospernos,a pesardequeseutilicen
pernosconroscasdelmismotama[io.Elpardeapriete
difieretambiensegt]nlascondicionesdelasuperficie
delapiezadetrabajosobrelacualsevanaapretarlos
pernos. Cuando el perno y la tuerca giran
conjuntamente,el parsereduceconsiderablemente.
(5) Utilizacionde piezasopcionales(WR18DSDL)
Latensi6n deaprietesereduceun pococuandose
utilizaunabarradeextensi6n,unajuntauniversalo
un receptaculode grantama6o.
(6) Holguradelreceptaculo(WR18DSDL)
Un receptaculo con sus agujeros hexagonal o
cuadradodeformados no quedarabien sujeto a la
tuerca o al yunque por Ioque la tensi6nde apriete
noseraapropiada.
Un receptaculoinapropiado,queno concuerdecon
el perno,tembienevitaraque latension deapriere
seaadecuada.
(7) Latorsi6n deaprietevariaradeacuerdoconel nivel
decaugadela bateria.
03Spa WH18DSDL US.p65 58 10/2/12, 3:13 PM

Espafiol
m_
I
I
Z_ PRECAUCION
Extraigala bateria antes de realizarcualquier
trabajode inspeccionode mantenimiento.
1. Comprobacion de las condiciones de la broca.
(WH18DSDL)
Las brocas deberan comprobarse regularmente. Si
una broca esta desgastada o rota, puede patinar o
reducir la eficacia del motor, o hacer que se queme.
Reemplace las brocas gastadas por otras nuevas.
iK PRECAUCION
Si utiliza una broca dedestornillador con su punta
desgastada o rota, puede resultar peligroso,
porque patinar& Por Iotanto reemplacela por otra
nueva.
2. Comprobacion de las condiciones del casquillo
(WR18DSDL)
Un receptaculo con sus agujeros hexagonal o
cuadrado deformados no quedara bien sujeto a
tuercao al yunquepor Ioque la tensi6n deapriete
no seraapropida. Periodicamente,poner atencion
al desgaste de los agujeros del receptaculo y
cambiarloporotro nuevocuandoseanecesario.
3. Comprobaci6nde lostornillos
Lostornillos son peligrosos. Inspeccionelos
regularmente y cerciorese de que esten bien
apretados.
/K PRECAUCION
La utilizaci6n de esta herramienta electricacon
tornillos flojosesextremadamentepeligroso.
Mantenimientode motor
La unidad de bobinado del motor esel verdadero
"coraz6n" de lasharramientaselectrias.Prestarel
mayor cuidadoaasegurarsedequeel bobinadono
sedaSey/o sehumedezcacon aceiteo agua.
Inspeccionde lasescobillasdecarb6n(Fig.14)
Elmotorempleaescobillasdecarb6nquesonpiezas
consumibles. Como una escobilla excesivamente
desgastada podria dar problemas al motor,
reemplacelaspor otras nuevascuando se hayan
desgastadoo estencercadel "limite de desgaste".
Ademas,mantengasiemprelimpias lasescobillas
de carbon y compruebesi se mueven libremente
dentro desusportaescobillas.
NOTA:
Cuandoreemplacelasescobillasdecarbonporotras
nuevas, utilice escobillas Hitachi con numero de
codigo999054.
Limite de uso
I.... iO.l_,l(3mm)I
, = 0.45" I
(11.5mm)
Fig.14
U_a de escobilla de carb6n
-_ \ Salientede
\ , esco,billa de
carbon
Fig.15
Reemplazarel carbonde contacto
Extraigalaescobillade carb6nquitando primero la
tapa y despues enganchando el saliente de la
escobilla decarb6nconun destornilladorde punta
plana,etc.,como semuestraen laFig.16.
Cuandoinstalelaescobilladecarbon,elijael sentido
en el que la usa de la misma coincida conel tubo
exterior de la parte de contactode dicha escoibilla
decarb6n. Despuesempuje laescobillade carbon
con un dedo, como se muestraen la Fig. 17. Por
t_ltimo,instalela tapade laescobilladecarb6n.
/k PRECAUCION:
• Cercioresede insertar la usa de la escobilla de
carbonen eltubo exterior dela partedecontacto
de lamisma.(Ustedpodrainsertarcualquierade
las dosuSassuministradas.}
• Tendacuidado,porqueunerror enestaoperacion
podria deformar la usa de la escobilla y daSar
prematuramenteel motor.
@
Fig.16
59
03Spa WH18DSDL US.p65 59 10/2/12, 3:13 PM

rm
I
I
Espafiol
............Cubo exterior de la parte de
contacto de la escobilla de
carbon
Fig.17
7,
8,
Ax
9,
Comprobaciondelpolvo
El polvo podra eliminarse con un pahosuave y
secooligeramentehumedecidoenaguajabonosa.
No utilice lejia, cloro, gasolina, ni diluidor de
pintura, porquepodrianda5ar el plastico.
Eliminaci6nde lasbateriasagotadas
ADVERTENCIA:
Notire lasbateriasagotadas.Lasbateriaspueden
explotar si se incineran. El producto que ha
adquiridocontieneuna bateria. La bateria es
reciclable.Cuandose agotesu duraciont_til,de
acuerdoconlas leyesestatalesy locales,puede
ser ilegaltirarestabateriaalabasura.Solicitea
las autoridades localeslos detalles sobrelas
opcionesderecicladoodelaforma dedeshacerse
apropiadamentede labateria.
AImacenamiento
Guardela herramientaenun lugarcon menosde
104°F(40°C)y fueradel alcancede nihos.
NOTA:
Aseguresede que la bateriaestacompletamente
cargada si lava a almacenar durante un
prolongado periodo de tiempo (3meseso mas).
Esposibleque la bateriacon unacapacidadmas
pequehano se puedacargarcuando seutilice si
sehaalmacenadoduranteunprolongadoperiodo
detiempo.
10. Mantenimientoy reparacion
Todas las herramientas electricas de calidad
requieren de vez en cuando el servicio de
mantenimiento o el reemplazode piezasdebido
al desgaste producido durante la utilizaci6n
normal. Para asegurarsede que solamente se
utilicenpiezasdereemplazoautorizadas,todoslos
serviciosdemantenimientoy reparaciondeberan
realizarse SOLAMENTE EN UN CENTRO DE
REPARACIONESAUTORIZADOPORHITACHI.
11. Listade repuestos
A: N°. item
B: N°. c6digo
C: N°. usado
D: Observaciones
60
Ak PRECAUCION
La reparacion,modificacione inspeccion de las
herramientas electricas Hitachi deben ser
realizadasporunCentrode Servicio Autorizado
deHitachi.
Esta lista de repuestossera de utilidad si es
presentadajuntoconlaheramienta alCentrode
Servicio Autorizadode Hitachiparasolicitarla
reparacion o cualquier otro tipo de
mantenimiento.
En el manejo y el mantenimiento de las
herramientaselectricas,se deberanobservarlas
normasy reglamentosvigentesencadapals.
MODIFICACIONES:
HitachiPowerToolsintroduceconstantementemejoras
y modificacionespara incorporarlos ultimos avances
tecnol6gicos.
Porconsiguiente,algunaspartes(porejemplo,numeros
de c6digos y/o dise_o) pueden ser modificadas sin
previoaviso.
Aviso importante sobre las pilas de las
herramientasinalambricasde Hitachi
Utilice siempre una de nuestraspilas genuinas.
No podemos garantizar la seguridad y el
funcionamiento de nuestraherramientaelectrica
inal_mbricacuando seutilizaconpilasdiferentes
alas indicadaspor nosotroso cuando la pila se
desmonta y modifica (como cuando se
desmontan y sustituyen celdas u otras piezas
internas).
03Spa WH18DSDL USp60.p65 60 10/4/12, 9:00

Espafiol
m_
I
I
ADVERTENCIA:
SIEMPREutiliceunicamenterepuestosy accesoriosautorizadosporHITACHI.NOutilicenuncarepuestoso
accesoriosnoprevistosparausarconestaherramienta.Sitienedudasen cuantoa laseguridadde usar
determinadorepuestooaccesoriojuntoconsuherramienta,p6ngaseen contactoconHITACHI.
Lautilizaci6ndeotrosaccesoriospuederesultarpeligrosay causarlesionesoda_osmecanicos.
NOTA:
Lasespecificacionesestansujetasa cambiosin ningunaobligacion por partede HITACHI.
ACCESORIOS ESTANDAR
C1_Cargadorde baterias(UC18YRSL)..............................................................................................1
WH18DSDL _2_Bateda(BSL1830)..........................................................................................................................2
WR18DSDL
(2LSRK) _3_Tapade bateria(NOdec6digo 329897).......................................................................................1
_4_Cajade plastico(NOdecodigo323230).......................................................................................1
WH18DSDL
WR18DSDL Labateria,el cargadorde baterias,el cajadeplasticoy latapade baterianoestanincluidos.
(NN)
ACCESORIOS OPCIONALES
<WH18DSDL>
1. Bateria
BSL1830(CodeNo. 330067)
2. BrocaPhillips
No. de destornillador
No. 2
No. 3
No. de c6digo
992671
992672
61
03Spa WH18DSDL US.p65 61 10/2/12, 3:14 PM

rm
I
I
Espafiol
3. Receptaculohexagonalparatuercasy pernos
Nombrede lapieza Caracteres L B No.de c6digo
grabactos
4 mmReceptaculohexagonal 7 65 7 992689
5 mmReceptaculohexagonal 8 65 8 996177
6 mmReceptaculohexagonal 10 65 10 985329
5/16"Receptaculohexagonal 12 65 12 996178
8 mmReceptaculohexagonal 13 65 13 996179
10mm Receptaculohexagonal 14 65 14 996180
(Tama6opeque6o)
10mm Receptaculohexagonal 16 65 16 996181
10mm Receptaculohexagonal 17 65 17 996182
1/2"Receptaculohexagonallargo 21 166 21 996197
Caracteresgrabados
Juego adaptador de portabrocas: No. de c6digo
321823
Montelasbrocasque sevendenenel mercadopara
perforarorificios.
<WR18DSDL>
1. Bateria
BSL1830(CodeNo. 330067)
2. Cubos
62
Forma C Forma D
03Spa WH18DSDL US.p65 62 10/2/12, 3:14 PM

Espafiol
Dimensi6nS Diamero id6neo del perno Dimensi6nHentr_ Dimensiones del
de laboca Nombre del N ° de
impulsora producto codigo Gran ISO ISO Pernos en carasopuestaSdelaboca Forma cubo principal
cuadrada tension (ordinario) (pequedo) pulgadas hexagonal L L1 eF
25/64" 1-9/16" 5/16" 11/16"
10 mm 944291 M6 (10 ram) B (40 ram) (8 ram) (18 ram)
15/32" 1-9/16" 5/16" 25/32"
12 mm 873632 M8 W5/16" (12 mm) B (40 ram) (8 ram) (20 ram)
33/64" 1-9/16" 11/32" 1"
13 mm 873539 M8 (13 mm) B (40 ram) (9 ram) (25 ram)
9/16" 1-9/16" 11/32" 1"
14ram 873540 M10 (14ram) B (40ram) (gram) (25ram)
1/2" Cubo 11/16" 1-1/4" 5/16" 1-3/32"
(12.7mm) hexagonal 17ram 873536 M10 M12 W3/8" (17ram) C (32mm) (8ram) (28ram)
3/4" 1-11/32" 11/32" 1-3/32"
19ram 873624 M12 M14 W7/16" (19ram) C (34ram) (gram) (28ram)
13/16" 1-13/32" 3/8" 1-1/4"
21 mm 873626 Wl/2" (21 ram) D (36 ram) (10 ram) (32 mm)
7/8" 1-9/16" 9/16" 1-3/8"
22ram 873627 M12 M14 M16 (22mm) D (40ram) (14ram) (35ram)
15/16" 1-9/16" 9/16" 1-1/2"
24ram 873629 M16 M18 (24ram) D (40ram) (15ram) (38ram)
m_
I
I
3. Cubolargo
I_ma _LI_, _ Forma C
Forma D
Dimensi6nS Di_mero idoneo del perno Dimensiones del
dela boca Nombre del N ° de cubo principal
impulsora producto codJgo Gran ISO ISO _ernos en dela boca
cuadrada tensi6n (ordinario)(peque6o) pulgadas hexagonal L L1 L2 cF
16/32" 2-3/64" 25/32" 1-11/32" 25/32"
12ram 955138 M8 W5/16" (12mm) B (52mm) (20mm) (34mm) (20mm)
33/64" 2-3/64" 25/32" 1-11/32" 53/64"
13ram 955139 M8 (13mm) B (52mm) (20mm) (34mm) (21,5mm
9/16" 2-3/64" 25/32" 1-11/32" 7/8"
14ram 955140 M10 (14mm) B (52mm) (20mm) (34mm) (22mm)
11/16" 2-3/64" 15/16" 1-11/32" 1"
17ram 955141 M10 M12 W3/8" (17mm) B (52mm) (24mm) (34mm) (25mm)
11/16" 2-15/16" 15/16" 2-1/4" 1"
17ram 955149 M10 M12 W3/8" (17mm) B (75mm) (24mm) (57mm) (25mm)
3/4" 2-3/64" 15/16" 1-11/32" 1-3/32"
1/2" Cubo 19ram 955142 M12 M14 W7/16" (19mm) B (52mm) (24mm) (34mm) (28mm)
(12.7 rnm) largo 3/4" 2-15/16" 15/16" 2-1/4" 1-3/32"
19ram 955150 M12 M14 W7/16" (19mm) B (75mm) (24mm) (57mm) (28mm)
13/16" 2-3/64" 15/16" 1-11/32" 1-7/32"
21 mm 955143 Wl/2" (21mm) D (52mm) (24mm) (34mm) (31mm)
13/16" 2-15/16" 15/16" 2-1/4" 1-7/32"
21 mm 955151 Wl/2" (21mm) D (75mm) (24mm) (57mm) (31mm)
13/16" 4-15/16" 15/16" 4-7/32" 1-7/32"
21 mm 991480 Wl/2" (21mm) D (125mm) (24mm) (107ram) (31mm)
7/8" 2-3/64" 15/16" 1-11/32" 1-9/32"
22ram 955144 M12 M14 M16 (22mm) D (52mm) (24mm) (34mm) (32,5mm
15/16" 2-3/64" 63/64" 1-11/32" 1-11/32"
24ram 955146 M16 M18 (24mm) D (52mm) (25mm) (34mm) (34ram)
Dimensi6n H entr_
caras opuestas Forms
63
03Spa WH18DSDL US.p65 63 10/2/12, 3:14 PM

rm
I
I
Espafiol
Barra de extension:
La barra de extension es muy apropiada para
trabajar en espacios muy reducidos o cuando el
receptaculo provisto no pueda Ilegar al perno a ser
apretado.
PRECAUCION
Cuandoseutilicelabarradeextensi6n,latensi6n
deaprietesereduceligeramenteencomparci6n,
latensi6nIogradaconelreceptaculoordinario.
Nodec6digo dimensi6n B,S
873633 1/2"(12.7mm)
Junta cardanica:
Junta cardanica sera muy t_til para apretar tuercas
con cierto angulo entre el cubo y el cubo y el
aprietatuercal, o cuando haya que trabajar en un
espacio muy angosto.
Node c6digo dimensi6nB,S J
992610 1/2"(12.7mm)
I
Cubo para conductos:
Este cubo se utiliza para apretar pernos y tuercas de
secciones con rebordes de conductos de
accondicionadonadores de aire, etc.
7. Adaptador debrocas:
Este adaptador se utiliza para apretar tornillos
pequeSos(M6).
NOTA:
Este adaptedoe de brocas sirve solamente para
utilizaren angulo rectola unidadprincipal.
J I Nodec6digo dimensionS
991476 1/2"(12.7mm)
NOTA:
Las especificationes estan sujetas a cambio sin
ningunaobligacion pot partede HITACHI.
LS
Dimensi6nHentrecaras
NOdecodigo opuestasdelabocahexagonal
993658 15/32"(12mm) 1/2"
992613 1/2"(13mm) (12.7mm)
992615 9/16"(14mm)
64
03Spa WH18DSDL US.p65 64 10/2/12, 3:14 PM

o
co
co
I
@
WH18DSDL
A B C D
1 330619 1
2 330856 1
3 331284 1
4 322717 1
5 332198 1
6 333745 1
7 319535 2 D3.5
8 333744 1
9 959154 2 D5.556
10 324218 1
11 959148 28 D3.175
12 315978 1
13 324224 1
14 316172 1
15 324222 1
16 332186 1
17 326295 2
18 319914 2
19 333747 1
20 983852 1 S-42
21 319911 1
22 6901VV 1 6901VVCMPS2L
23 324230 2
24 332185 1
25 360947 1
26 324607 1
27 334901 1 "26"
28 324228 1
29 334955 1
30 999054 2 5×6×11.5
31 319918 2
32 1
33 301653 9 D4×20
34 334953 1
35 329519 1
36 327001 1 M4
37 332824 1
38 329520 1
39 329454 1
40 334956 1
41 327002 2 M4
A B C D
42 328644 2
45 334958 1
46 330067 2 BSL1830
501 1 UC18YRSL
502 323230 1
503 329897 1

co
co
I
WR18DSDL
A B C D
1 332198 1
2 332200 1
3 332196 1 "4-6"
4 324257 1
5 332197 1
6 324256 1
7 959154 2 D5.556
8 333749 1
9 959148 28 D3.175
10 315978 2
11 324224 1
12 316172 1
13 324222 1
14 332186 1
15 326295 2
16 319914 2
17 326787 1
18 983852 1 S-42
19 319911 1
20 6901VV 1 6901VVCMPS2L
21 324230 2
22 332185 1
23 360947 1
24 324607 1
25 334901 1 "24"
26 324228 1
27 334955 1
28 999054 2 5×6×11.5
29 319918 2
30 1
31 301653 9 D4×20
32 334953 1
33 329519 1
34 327001 1
35 332824 1
36 329520 1
37 329454 1
38 334956 1
39 327002 2 M4
40 328644 2
A B C D
43 334958 1
44 330067 2 BSL1830
501 1 UC18YRSL
502 323230 1
503 329897 1

67
03Spa WH18DSDL US.p65 67 10/2/12, 3:14 PM

Please contact HITACHI KOKI U.S.A. LTD.
at 1-800-59-TOOLS (toll free), or HITACHI
AUTHORIZED POWER TOOL SERVICE
CENTER regarding COLLECTION.
Pour le RAMASSAGE, contacter HITACHI
KOKI U.S.A. LTD. au 1-800-59-TOOLS (appet
gratuit), ou UN SERVICE APR#S-VENTE
D'OUTILS I_LECTRIQUE AGRI_I _ PAR
HITACHI.
Con respecto a la RECOLECCION de baterias,
p6ngase en contacto con HITACHI KOKI
U.S.A. LTD. nQmero 1-800-59-TOOLS
(llamada gratis), o con HITACHI AUTHORIZED
POWER TOOL SERVICE CENTER.
Issued by
_Hitachi Koki Co., Ltd.
Sinagawa IntercityTower A, 15-1, Konan 2-chome,
Minato-ku,Tokyo 108-6020, Japan
Distributed by
_)Hitachi Koki U.S.A., Ltd.
3950 Steve Reynolds Blvd.
Norcross, GA 30093
_)Hitachi Koki Canada Corp.
450 Export Blvd. Unit B,
Mississauga ON L5S 2A4 208
Code No. C99203261
Printed in China
03Spa WH18DSDL US.p65 68 10/2/12, 3:14 PM
Transcripción de documentos
HITACHI Designed for operatingin USA& Canada only. WhenthisproductisusedinareasotherthantheUSA&Canada, wecannotguarantee theproductqualityandperformance. WH 18DSDL WR 18DSDL Model Modele Modelo CordlessImpact Driver Marteau a choc sans fil Atornillador de impacto a bateria CordlessImpact Wrench Cle a choc sans fil Llave de impacto a bateria WH18DSDL WR18DSDL SAFETYINSTRUCTIONSAND INSTRUCTIONMANUAL ,4',, WARNING IMPROPER OR UNSAFE use of this power tool can result in death or serious bodily injury! This manual contains important information about product safety. Please read and understand this manual BEFORE operating the power tool. Please keep this manual available for other users and owners before they use the power tool. This manual should be stored in safe place. INSTRUCTIONSDE SECURITEET MODE D'EMPL01 /_ AVERTISSEMENT Une utilisation INCORRECTE OU DANGEREUSE de cet outil motoris6 peut entrafner la mort ou de s@ieuses blessures corporelles! Ce mode d'emploi contient d'importantes informations apropos de la s6curit6 de ce produit. Priere de lire et de comprendre ce mode d'emploi AVANT d'utiliser I'outil motoris& Garder ce mode d'emploi a la disponibilite des autres utilisateurs et proprietaires avant qu'ils utilisent I'outil motoris& Ce mode d'emploi doit _tre conserve dans un endroit sQr. INSTRUCCIONES DESEGURIDAD Y MANUALDEINSTRUCCIONES /_, ADVERTENCIA iLa utilizaci6n INAPROPIADA O PELIGROSA de esta resultar en lesiones de gravedad o la muerte! Este manual contiene informaci6n importante sobre la comprenda este manual ANTES de utilizar la herramienta para que puedan leerlo otras personas antes de utilizar manual debe ser guardado en un lugar seguro. herramienta electrica seguridad del producto. Lea y electrica. Guarde este manual la herramienta electrica. Este Hitachi 01Eng WH18DSDL US.p65 1 puede 10/2/12, 3:18 PM Koki English I CONTENTS Page IMPORTANT SAFETY INSTRUCTIONS ............. 3 MEANINGS OF SIGNAL WORDS ...................... 3 SAFETY .................................................................... GENERAL POWER TOOL SAFETY WARNINGS .................................................. SPECIFIC SAFETY RULES AND SYMBOLS ....... IMPORTANT SAFETY INSTRUCTIONS FOR USE OF THE CORDLESS IMPACT DRIVER/WRENCH ........ IMPORTANT SAFETY INSTRUCTIONS FOR BATTERY CHARGER ........................... IMPORTANT SAFETY INSTRUCTIONS FOR USE OF THE BATTERY AND BATTERY CHARGER .................................... CAUTION ON LITHIUM-ION BATTERY ............. 3 FUNCTIONAL 9 DESCRIPTION .................................. FranqaisI 3 5 6 6 7 7 ASSEMBLY AND OPERATION ............................. APPLICATIONS ................................................. REMOVAL AND INSTALLATION METHOD OF BATTERY ........................................... CHARGING METHOD ....................................... BEFORE USE ..................................................... OPERATION ....................................................... OPERATIONAL CAUTIONS .............................. 11 11 MAINTENANCE 17 FONCTIONNELLE ........................... 19 19 19 PARTS LIST ............................................................ 65 ASSEMBLAGE ET FONCTIONNEMENT ................ UTILISATIONS .................................................... METHODE DE RETRAIT ET D'INSTALLATION DE LA BATTERIE .......................................... MC:THODE DE RECHARGE ................................. AVANT L'UTILISATION ...................................... UTILISATION ....................................................... PRO:CAUTIONS D'UTILISATION ........................ 32 32 ENTRETIEN ET INSPECTION 32 32 34 34 37 .................................. 38 ACCESSOIRES ......................................................... ACCESSOIRES STANDARD ............................... ACCESSOIRES EN OPTION ................................ 40 40 40 LISTE DES PIECES ................................................. 65 30 Pagina INSTRUCCIONESIMPORTANTESSOBRESEGURIDAD .. 44 SIGNIFICADODE LAS PALABRAS DE SENALIZACION ,,. 44 SEGURIDAD ............................................................. 44 ADVERTENCIAS DE SEGURIDAD GENERAL DE LA HERRAMIENTA EL¢CTRICA .................. 44 NORMAS Y SIMBOLOS ESPECIFICOS DE SEGURIDAD ................................................. 46 INSTRUCCIONES IMPORTANTES DE SEGURIDAD PARA USAR EL TALADRO/ LLAVE DE IMPACTO DE BATERIA .............. 47 INSTRUCCIONES IMPORTANTES DE SEGURIDAD PARA EL CARGADOR DE BATERIAS ............ 48 INSTRUCCIONES IMPORTANTES DE SEGURIDAD PARA LA BATERiA Y EL CARGADOR DE BATERiAS ...... 48 ADVERTENCIA DE LA BATERiA DE LITIO ...................... 49 WH18DSDL Page 30 31 NOM DES PARTIES ............................................ SPECIFICATIONS ................................................ INDICE Espar_ol I 01Eng ..................... TABLE DES MATIERES SECURITE ................................................................ 23 AVERTISSEMENTS DE St_CURITE Gt_NERAUX CONCERNANT LES OUTILS ELECTRIQUES... 23 REGLESDE SECURITESPECIFIQUESET SYMBOLES ..., 25 CONSlGNES DE SI_CURITI_ IMPORTANTES POUR L'UTILISATION DU MARTEAU/CL¢ A CHOCS SANS FIL ......................................... 26 CONSIGNES DE SI_CURITI_ IMPORTANTES POUR LE CHARGEUR DE BATTERIE .......... 26 CONSIGNES DE SI_CURITI_ IMPORTANTES POUR L'UTILISATION DE LA BATTERIE ET DU CHARGEUR DE BATTERIE .............. 27 PRI_CAUTIONS RELATIVES A LA BATTERIE AU LITHIUM ION ......................................... 28 DESCRIPCION AND INSPECTION 11 11 13 13 15 ACCESSORIES ....................................................... STANDARD ACCESSORIES ............................... OPTIONAL ACCESSORIES ................................ Page CONSIGNES DE St_CURITE IMPORTANTES .......... 23 SIGNIFICATION DES MOTS D'AVERTISSEMENT .... 23 DESCRIPTION Page 9 10 NAME OF PARTS ................................................ SPECIFICATIONS .............................................. FUNClONAL US.p65 .................................... 2 51 NOMENCLATURA ............................................... ESPECIFICACIONES ............................................ Pagina 51 52 MONTAJE Y OPERACION ...................................... APLICACIONES .............. , ............................ ,........ MCTODO DE EXTRACCION E INSTALACION DE LA BATERIA ............................................ MC:TODO DE CARGA ...... _................................... ANTES DE LA UTILIZACION .............................. OPERACION ........................................................ PRECAUCIONES OPERACIONALES .................. 53 53 MANTENIMIENTO 59 E INSPECCION ........................ 53 53 55 55 58 ACCESORIOS ........................................................... ACCESORIOS ESTANDAR ................................. ACCESORIOS OPCIONALES .............................. 61 61 61 LISTA DE PIEZAS 65 .................................................. 10/2/12, 2:38 PM m_ I I English IMPORTANT SAFETY INSTRUCTIONS Readand understand all of the safetyprecautions,warnings and operatinginstructions in the Instruction Manual before operatingor maintaining this power tool. Mostaccidentsthat resultfrom power tool operation andmaintenancearecausedby the failure to observebasic safety rules or precautions.An accident can often be avoided by recognizing a potentially hazardoussituation before it occurs,and by observing appropriatesafety procedures. Basicsafetyprecautionsareoutlined inthe "SAFETY"sectionof this Instruction Manualand inthe sectionswhich containthe operationand maintenanceinstructions. Hazardsthat must be avoided to prevent bodily injury or machinedamage are identified by WARNINGSon the power tool and inthis Instruction Manual. NEVERuse this power tool in a manner that has not beenspecifically recommended by HITACHI. MEANINGS OF SIGNAL WORDS WARNINGindicatesa potentially hazardoussituations which, if ignored, could result in death or serious injury. CAUTION indicates a potentially hazardoussituations which, if not avoided, may result in minor or moderate injury, or may causemachinedamage. NOTEemphasizesessentialinformation. GENERAL POWER TOOL SAFETY WARNINGS /k WARNING: Readall safetywarnings andall instructions. Failureto follow the warnings and instructions may result in electric shock,fire and/or serious injury. Saveall warnings andinstructionsfor futurereference. Theterm "power tool" inthe warnings refersto your mains-operated(corded)power tool or battery-operated (cordless)power tool. 1) Work areasafety c} a} 2) Keepwork areacleanandwell lit. Clutteredor dark areas invite accidents. b) Do not operate power tools in explosive atmospheres,such as in the presenceof flammable liquids,gasesor dust. Powertools createsparkswhich may ignite the dust or fumes. c} Keepchildrenand bystandersaway while operatinga powertool. Distractionscan causeyou to lose control. Electricalsafety a} Powertool plugsmust matchthe outlet. Nevermodifythe plugin anyway. Do not useany adapterplugswith earthed (grounded)powertools. Unmodified plugs and matchingoutlets will reducerisk of electric shock. b) Avoidbodycontactwithearthedorgrounded 3) surfacessuchaspipes,radiators,rangesand refrigerators. There is an increasedrisk of electric shock if your body is earthed or grounded. Do not exposepower tools to rain or wet conditions. Waterentering a power tool will increasethe risk of electricshock. d) Donotabusethecord.Neverusethecordfor carrying,pullingorunplugging thepowertool. Keepcordawayfrom heat,oil,sharpedges or movingparts. Damagedor entangledcordsincreasethe risk of electricshock. e} Whenoperatinga powertool outdoors,use an extensioncordsuitablefor outdooruse. Useof acordsuitablefor outdoor usereduces the risk of electricshock. f} If operatinga powertool in a damplocation is unavoidable,usea residualcurrentdevice (RCD)protectedsupply. Useof anRCDreducesthe riskofelectricshock. Personalsafety a} Stay alert,watchwhatyouaredoinganduse commonsensewhenoperatingapowertool. Do not usea powertoolwhile you are tired or underthe influenceof drugs,alcoholor medication. 3 01Eng WH18DSDL US.p65 3 10/2/12, 2:38 PM tirol I I English 4) 01Eng A moment of inattention while operating e) Maintain power tools. Check for power tools may result in serious personal misalignmentor bindingof moving parts, injury. breakageof partsand any other condition b) Usepersonalprotectiveequipment.Always that may affectthe powertool's operation. wear eyeprotection. If damaged,have the power tool repaired beforeuse. Protectiveequipmentsuchasdust mask,nonskid safety shoes, hard hat, or hearing Many accidents are caused by poorly protection used for appropriate conditions maintained power tools. will reducepersonal injuries. f} Keepcuttingtools sharpandclean. c} Preventunintentionalstarting. Ensurethe Properly maintained cutting tools with sharp switchisinthe off-positionbeforeconnecting cutting edges are less likely to bind and are easierto control. to powersourceand/orbatterypack,picking upor carryingthe tool. g) Usethe powertool,accessories andtool bits Carryingpower tools with your finger on the etc. in accordancewith these instructions, switch or energising power tools that have takinginto accountthe workingconditions the switch on invites accidents. andthe workto beperformed. d) Removeany adjustingkeyor wrenchbefore Useof the power tool for operationsdifferent from those intended could result in a turningthe powertool on. hazardoussituation. A wrench or a key left attachedto a rotating part of the power tool may result in personal 5} Batterytool useandcare injury. a) Rechargeonlywith the chargerspecifiedby the manufacturer. e} Do not overreach.Keepproperfooting and balanceat alltimes. A charger that is suitable for one type of This enablesbetter control of the power tool battery pack may create a risk of fire when in unexpectedsituations. usedwith another battery pack. f} Dressproperly.Do not wear looseclothing b) Use power tools only with specifically or jewellery. Keepyour hair, clothing and designatedbatterypacks. glovesawayfrom movingparts. Useof any other battery packs may createa Looseclothes, jewellery or long hair can be risk of injury andfire. caught in moving parts. c} Whenbatterypackisnotin use,keepit away g) If devicesare providedfor the connectionof from other metal objects like paper clips, dust extraction and collection facilities, coins, keys, nails, screws,or other small ensurethese are connected and properly metal objects,that can make a connection used. from oneterminalto another. Useof dust collectioncan reducedust-related Shorting the batteryterminals together may hazards. causeburns or afire. Powertool useandcare d) Under abusive conditions, liquid may be a) Donot forcethe powertool. Usethe correct ejectedfrom the battery;avoid contact.If powertool foryourapplication. contactaccidentally occurs,flushwithwater. The correct power tool will do the job better If liquid contacts eyes, additionally seek andsaferatthe rateforwhich it wasdesigned. medicalhelp.Liquid ejectedfrom the battery b) Donotusethe powertool if the switchdoes may causeirritation or burns. notturn it on andoff. 6} Service Any power tool that cannot becontrolledwith a) Haveyourpowertool servicedbya qualified the switchisdangerousandmust berepaired. repair person using only identical c} Disconnect the plugfrom the powersource replacementparts. and/orthe batterypackfromthe powertool This will ensurethat the safety of the power tool is maintained. beforemaking any adjustments,changing accessories, or storingpowertools. -WARNINGSuchpreventivesafety measuresreducethe To reduce the risk of injury, user must read risk of starting the power tool accidentally. instructionmanual, d) Store idle power tools out of the reachof childrenanddo not allowpersonsunfamiliar with the powertool or theseinstructionsto operatethe powertool. Power tools are dangerous in the hands of untrainedusers. WH18DSDL US.p65 4 10/2/12, 2:38 PM iml-i I English WARNING: Some dust created by power sanding, sawing, grinding, drilling, and other construction activities contains chemicalsknown to the Stateof California to causecancer,birth defectsor other reproductive harm.Some examplesof these chemicalsare: • Leadfrom lead-basedpaints, • Crystallinesilicafrom bricksandcementandother masonry products, and • Arsenic and chromium from chemically-treated lumber. Your risk from these exposures varies, depending on how often you do this type of work. To reduce your exposure to these chemicals: work in a well ventilated area, and work with approved safety equipment, such as those dust masks that are speciallydesignedto filter out microscopicparticles. 8. 9. 10. 11. 12. SPECIFIC SAFETY RULES AND SYMBOLS 1. Holdpowertoolsby insulatedgrippingsurfaces, whenperforminganoperationwherethe fastener 13. maycontacthiddenwiring. Fasteners contacting a "live" wire may make exposedmetal parts of the power tool "live" and could give the operator an electric shock. 2. ALWAYSwearearprotectorswhenusingthe tool for extendedperiods. 14. noisecan causehearing loss. Q Prolongedexposure to high intensity 3. 4. 5. 6. 7. 01Eng NEVERplace hands or other body parts near the drill bit or chuckduring operation.Holdthe impact driver/wrench by its handle only. Because the cordless impact driver/wrench operatesbybatterypower, beawareofthe factthat it can begin to operate at any time. When working at elevatedIocations,clearthe area of all other people and be aware of conditions below you. NEVERtouch moving parts. NEVERplace your hands, fingers or other body parts near the tool's moving parts. NEVERoperate without all guardsin place. NEVERoperate this tool without all guards or safety features in place and in proper working order. If maintenance or servicing requires the removal of a guard or safety feature, be sure to replacethe guardor safetyfeature beforeresuming operationof the tool. WH18DSDL US.p65 5 15. 16. 17. Use righttool. Don't force small tool or attachmentto do the job of a heavy-duty tool. Don't use tool for purpose not intended -for example- don't use circular sawfor cutting tree limbs or logs. NEVERuse a power tool for applications other than those specified. NEVERuseapowertool for applicationsotherthan those specified in the Instruction Manual. Handletool correctly. Operate the tool according to the instructions provided herein. Do not drop or throw the tool. NEVERallow the tool to be operated by children, individuals unfamiliar with its operation or unauthorizedpersonnel. Keepall screws, bolts andcoverstightly in place. Keepall screws, bolts, andplatestightly mounted. Checktheir condition periodically. Do not use power tools if the plastic housing or handle is cracked. Cracksin the tool's housing or handlecan leadto electricshock. Suchtools should not be useduntil repaired. Bladesandaccessoriesmust be securelymounted to the tool. Prevent potential injuries to yourself or others. Blades,cutting implementsandaccessorieswhich have been mounted to the tool should be secure and tight. NEVERusea tool which is defective or operating abnormally. If the tool appears to be operating unusually, making strange noises, or otherwise appears defective,stop using it immediately and arrange for repairs by a Hitachiauthorized servicecenter. Carefully handle power tools. Should apower tool be droppedor struckagainst hard materialsinadvertently, it may be deformed, cracked,or damaged. Do not wipe plastic parts with solvent. Solventssuchasgasoline,thinner benzine,carbon tetrachloride,and alcohol may damageand crack plastic parts.Donot wipe them with suchsolvents. Wipe plastic parts with a soft cloth lightly dampenedwith soapy water and dry thoroughly. ALWAYS wear eye protection that meets the requirement of the latest revision of ANSI StandardZ87.1. 18. Definitions for symbols usedon this tool V ...............volts -. ..............direct current no ............no load speed ---/rain ...... revolutionsor reciprocationperminute 10/2/12, 2:38 PM I r-I--I / I English IMPORTANT SAFETY INSTRUCTIONS FOR USE OF THE CORDLESS IMPACT DRIVER/WRENCH IMPORTANT SAFETY INSTRUCTIONS BATTERY CHARGER /_ /_ WARNING: Deathor seriousbodilyinjurycouldresultfrom improperor unsafe useof the cordlessimpact driver/wrench,To avoidtheserisks,follow these basicsafetyinstructions: FOR WARNING: Deathor seriousbodilyinjurycouldresultfrom improperor unsafeuse of battery chargers,To avoid these risks, follow these basic safety instructions: 1. Neverusethis impactdriver/wrenchhandlefor any READALL INSTRUCTIONS applicationother than those in this manual. 2. Never place hands or other body parts near the 1. This manual contains important safety and drill bit or chuckduring operation. operating instructions for battery charger Model Holdthe impactdriver/wrench by its handle only. UC18YRSL. 3. When working in high places,always make sure 2. Before using battery charger,read all instructions that ther is no one below beforestarting to work. and cautionary markings on (1) battery charger, 4. Always wear eye and ear protection when you (2) battery, and (3) product using battery. work. 3. To reduce risk of injury, charge HITACHI 5. Always install the driver bit securely.A loose bit is rechargeablebatterytype BSL18series.Other type dangerous becauseit can come loose while you of batteriesmay burst causingpersonalinjury and areworking. (WH18DSDL) damage. 6. Always use the driver bit that matchesthe screw 4. Do not expose batterycharger to rain or snow. size.(WH18DSDL) 5. Use of an attachment not recommended or sold 7. Always havethe screw you are screwing in and by the batterycharger manufacturer may resultin this impact driver in a straight line. Working with a risk of fire, electric shock,or injury to persons. this impact driver at an angle to the screw can 6. To reduceriskof damageto electricplug andcord, damage the screw head and will not give the pull by plug when disconnectingbattery charger. prescribedtightening torque. (WH18DSDL) 7. Make sure cord is located so that it will not be 8. Confirm whether the socket has any crack in it. stepped on, tripped over, or otherwise subjected (WR18DSDL) to damage or stress. 9. Attach the hex. socket securely onto the anvil. If 8. An extension cord should not be used unless the hex.socketis insufficientlysecured,it may drop absolutely necessary.Useof improper extension out and cause an accident. For hex. socket cord could result in arisk of fire andelectricshock. attachmentrefer to "OPERATION".(WR18DSDL) If extensioncord must be usedmakesure: 10. Confirm the tightening torque by atorque wrench a. That blades of extension cord arethe same before use in order to ascertain the correct number, size,and shapeasthose of plug on tightening torque to be used. (WR18DSDL) battery charger: 11. If a universaljoint is used,be sure not to operate b. That extension cord is properly wired and in the unit in a no-load condition. Operating in this good electricalcondition; and condition is dangerous. When the socket section c. That wire sizeis large enoughfor AC ampere spins around it may cause injury to hands or rating of battery charger as specified in bodies, or the resulting intense vibration may Table 1. causethe userto drop the tool. (WR18DSDL) 12. Be careful that foreign matters do not block the holes locatedon both sidesof the handle.Also do not close the holes with a tape. The holes act an important role. (WR18DSDL) Table 1 RECOMMENDED MINIMUM AWG SIZEFOR EXTENSIONCORDSFORBATTERYCHARGERS AC Input Rating Amperes* 01Eng AWG Sizeof Cord Equalto or greaterthan but less than 0 2 3 2 3 4 WH18DSDL US.p65 Lengthof Cord, Feet(Meter) 25 (7.5) 50 (15) 100(30) 18 18 18 6 18 18 18 18 16 16 10/2/12, 2:38 PM 150(45) 16 14 14 iml-i / English If the input rating of a battery charger is given in watts rather than in amperes,the corresponding ampere rating is to bedetermined by dividing the wattage rating by the voltage rating-for example: 1,250watts = 10amperes 125volts 9. Donot operatebatterychargerwith damagedcord or plug-replacethem immediately. 10. Donot operate battery charger if it has receiveda sharp blow, beendropped,or otherwisedamaged in any way; take it to a qualified serviceman. 11. Do not disassemble battery charger; take it to a qualified serviceman when service or repair is required.Incorrect reassemblymay result ina risk of electric shockor fire. 12. To reduce risk of electric shock, unplug charger from receptacle before attempting any maintenance or cleaning. Removing the battery will not reducethis risk. 7. NEVERconnect two battery chargers together. 8. NEVER insertforeign objectsinto the hole for the battery or the battery charger. 9. NEVER useaboostertransformer when charging. 10. NEVER use an engine generator or DCpower to charge. 11. NEVERstore the battery or battery charger in placeswhere the temperaturemay reachor exceed 104°F(40°C). 12. ALWAYS operate charger on standard household electrical power (120volts). Using the charger on any other voltage may overheat and damagethe charger. 13. ALWAYSwaitat least 15 minutes betweencharges to avoid overheatingthe charger. 14. ALWAYSdisconnect the power cord from its receptaclewhen the charger is not in use. CAUTION ON LITHIUM-ION BATTERY To extend the lifetime, the lithium-ion battery equips with the protection function to stop the output. In the casesof 1to 3 describedbelow, when using this product, even if you are pulling the switch, the motor may stop. This is not the trouble but the result of protection function. You must charge the battery before you can use the 1. When the battery power remaining runs out, the power tool. Before using the model motor stops. UC18YRSL battery charger, be sure to read all In such case,chargeit up immediately. instructions and cautionary statements on it, the battery 2. If the tool is overloaded,the motor may stop. In and in this manual. this case,releasethe switch of tool and eliminate causesof overloading. After that, you can use it /k CAUTION: again. USEONLY HITACHIBATTERYTYPEBSL18 SERIES.OTHERTYPESOF BATTERIES MAY 3. If the battery is overheatedunder overload work, the battery power may stop. BURST ANDCAUSEINJURY! In this case, stop using the battery and let the battery cool. After that, you can use it again. Follow these instructionsto avoid the risk of injury: Furthermore, please heed the following warning and Ak WARNING: caution. Improperuseofthe battery or batterychargercan Ak WARNING leadto seriousinjury.To avoidtheseinjuries: In orderto preventanybattery leakage,heatgeneration, smoke emission, explosion and ignition beforehand, 1. NEVERdisassemblethe battery. 2. NEVERincinerate the battery, even if it is pleasebe sureto heed the following precautions. 1. Make sure that swarf and dust do not collect on damagedor is completely worn out. The battery the battery. canexplode in a fire. © During work makesurethat swarf and dust do not 3. NEVERshort-circuitthe battery. fall on the battery. 4. NEVERinsert any objects into the battery charger's air vents. Electric shock or damage to © Make sure that any swarf and dust falling on the power tool during work do not collect on the the batterycharger may result. battery. 5. NEVERcharge outdoors. Keep the battery away Do not store an unused battery in a location from direct sunlight and use only where there is 0 exposedto swarf and dust. low humidity and good ventilation. Before storing a battery, remove any swarf and 6. NEVERcharge when the temperature is below 0 dust that may adhere to it and do not store it 32°F(0°C)or above 104°F(40°C). together with metal parts (screws,nails, etc.). Chargingthe battery at temperatures outside the range of 32°F- 104°F(0°C- 40°C)may prevent proper charging and reducebattery life. IMPORTANT SAFETY INSTRUCTIONS FOR USE OF THE BATTERY AND BATTERY CHARGER 01Eng WH18DSDL US.p65 7 10/2/12, 2:38 PM I r-I--I I I English 2. Donot piercebatterywith asharp objectsuch asa nail, strike with a hammer, step on, throw or subjectthe battery to severephysical shock. 3. Do not use an apparently damagedor deformed battery. 4. Do not usethe battery in reversepolarity. 5. Do not connect directly to an electrical outlets or car cigarette lighter sockets. 6. Do not use the battery for a purpose other than those specified. 7. Ifthe batterychargingfailsto completeevenwhen a specified recharging time has elapsed, immediately stop further recharging. 8. Do not put or subject the battery to high temperatures or high pressure such as into a microwaveoven,dryer,or high pressurecontainer. 9. Keep away from fire immediately when leakage or foul odor are detected. 10. Do not use in a location where strong static electricitygenerates. 11. If there is battery leakage, foul odor, heat generated,discoloredor deformed, or in any way appears abnormal during use, recharging or storage, immediately remove it from the equipmentor batterycharger, and stop use. ,4k CAUTION 1. If liquid leaking from the battery gets into your eyes, do not rub your eyes and wash them well with fresh clean water such as tap water and contact a doctor immediately. If left untreated, the liquid may cause eyeproblems. 2. If liquid leaksonto your skinor clothes,washwell with clean water such as tap water immediately. There is a possibility that this can cause skin irritation. 3. If you find rust, foul odor, overheating, discolor, deformation,and/orotherirregularitieswhen using the batteryfor the first time, do not useand return it to your supplier or vendor. /k WARNING If an electrically conductive foreign object enters the terminals of the lithium ion battery,a short-circuit may occur resulting in the risk of fire. Pleaseobservethe following matters when storing the battery. O Donot placeelectricallyconductivecuttings,nails, steelwire, copperwire or otherwire inthe storage case. O Either install the battery inthe power tool or store by securely pressing into the battery coveruntil the ventilation holes are concealedto prevent short-circuits (See Fig.1). SAVETHESE INSTRUCTIONS AND MAKE THEM AVAILABLE TOOTHER USERS AND OWNERS OFTHISTOOL! 01Eng WH18DSDL US.p65 8 10/2/12, 2:38 PM iml-i / English NOTE: The information contained in this Instruction Manual is designed to assist you in the safe operation and maintenanceof the power tool. NEVERoperate,or attempt any maintenanceon the tool unless you havefirst read and understood all safety instructions contained in this manual. Some illustrations in this Instruction Manualmay show details or attachmentsthat differ from those on your own power tool. NAME OF PARTS 1. CordlessImpact Driver (WH18DSDL)/Wrench(WR18DSDL) 0 WH18DSDL 0 WR18DSDL Housing Guide sleeve Housing Anvil Push button Push button Light Switch trigger Rotation change lever Light Rotation change lever Switch trigger Handle Handle Switchpanel Hook Switch _<_ panel _ Hook Battery Battery © Battery(BSL1830) Ventilation holes Terminals Battery cover Latc Battery Fig. 1 01Eng WH18DSDL US.p65 9 10/4/12, 8:28 AM I rl--I I I English 2. BatteryCharger (UC18YRSL) Cord Pilot lamp rail Nameplate Fig.2 SPECIFICATIONS 1. CordlessImpact Driver/Wrench Model WH18DSDL WR18DSDL Power mode No-load speed 0 - 2,600/min Savemode 0 - 2,000/min 5/32"- 3/8" (M4- M10) Small screw Ordinary bolt Hightension bolt Capacity Tightening torque (Maximum) Bit shanksize 1/4"- 9/16"(M6 - M14) 3/8"- 23/32"(M10- M18) 1/4"- 15/32"(M6 - M12) Power mode 1,510in-lbs. {170 N.m} Savemode 840in-lbs. {95 N.m} Tightening is 9/16"(M14) high tension bolt, when fully charged at 68°F(20°C)temp. Tightening time: 3 sec. 5/16"- 9/16"(M8 - M14) Power mode 188ft.lbs. {255 N.m} Savemode 103ft.lbs. {140 N.m} Tightening is 5/8" (M16)F10T, when fully chargedat 68°F (20°C)temp. Tightening time: 5 sec. 1/4" (6.35mm) Hex. Rechargeablebattery 1/2"(12.7mm) square BSL1830:Li-ion 18 V (3.0Ah) Weight 3.7 Ibs. (1.7kg) 2. BatteryCharger (UC18YRSL) Input power source Single phase:AC 120V 60 Hz Chargingtime Approx. 45 min. Chargingvoltage DC14.4V- 18 V Chargingcurrent DC14.4V: DC3.5 A DC 18V: DC3.5 A Charger Weight 1.3 Ibs. (0.6 kg) NOTE:The charging time may vary accordingto temperature and power source voltage. lO 01Eng WH18DSDL US.p65 10 11/19/12, 1:19 PM m_ I English APPLICATIONS <WH18DSDL> Driving and removing of machine screws, wood screws,tapping screws,etc. <WR18DSDL> Tightening and loosening of all types of bolts and nuts, usedfor securingstructural items REMOVAL AND INSTALLATION OF BATTERY METHOD 1. Connect the charger's power cord to a receptacle. When the power cord is connected, the charger's pilot lamp will blink in red. (At 1-secondintervals) Do not use the electrical cord if damaged. Have it repaired immediately. 2. Insertthe battery into the charger. Firmly insert the battery into the charger until the line is visible, as shown in Fig.4, 5. 1. Battery removal Hold the handle tightly and push the battery latch to remove the battery (see Fig. 3). /_ Battery CAUTION Nevershort-circuit thebattery. 2. Battery installation Insert the batterywhile observing its polarities (see Fig.3). l_ Pilot ,amp ___ Handle Charger Pull out Insert ))-_-'-q'N_ ,'" _ "" Fig.4 Latch Line Push Battery Fig.3 CHARGING METHOD NOTE: Before plugging into the receptacle,makesure the following points. O The power source voltage nameplate. © The cord is not damaged. /k is stated on the WARNING: Donotchargeat voltagehigherthanindicatedon the nameplate. If chargedat voltagehigherthan indicatedonthe nameplate,the chargerwill burnout. Fig.5 3. Charging Whenthe batteryisconnectedto the batterycharger, chargingwill commenceandthe pilot lampwill light in red. (SeeTable 2) NOTE: Ifthe pilot lamp flikers in red, pull out the plug from the receptacle and check if the battery is properly mounted. When the batteryisfully charged,the pilot lampwill blinkin redslowly. (At 1-secondintervals)(SeeTable 2) 11 O1Eng WH18DSDL US.p65 11 10/2/12, 2:38 PM I rm I I English (1) Pilot lamp indication The indicationsof the pilot lampwill be asshown in Table2, accordingto the condition of the charger or the rechargeablebattery. Table 2 Indications of the pilot lamp Lights for 0.5 seconds. Does not light for 0.5 seconds. (off for 0.5 seconds) Before charging Blinks The pilot While charging Lights lamp lights or blinks in red. Charging complete Blinks Lights for 0.5 seconds. Does not light for 0.5 seconds. (off for 0.5 seconds) Charging impossible Flickers Lights for 0.1 seconds. Does not light for 0.1 seconds. (off for 0.1 seconds) Overheat standby Lights The pilot lamp lights in green. Lights continuously mmmmmmmmmmmmm Table 3 Rechargingrangesof batteries Rechargeable batteries BSL1830 Temperaturesat which the battery can be recharged 32OF-122OF (OoC- 50oc) (3) Regardingrecharging time Table 4 Chargingtime (At 68°F(20°C)) Battery BSL1830 Charger _--_._ UC18YRSL Approx. 45 min. NOTE: The charging time may vary according to temperature and power source voltage. 4. Disconnectbattery chargerfrom the receptacle. /k Battery overheated. Unable to charge (Charging will commence when battery cools). Lights continuously (2) Regarding the temperature of the rechargeable battery. Thetemperatures for rechargeablebatteriesare as shown inthe Table3,and batteriesthat havebecome hot should be cooled for a while before being recharged. CAUTION Donotpulltheplugoutofthe receptacle by pulling onthe cord. Makesureto graspthe plugwhenremovingfrom receptacleto avoiddamagingcord. Malfunction in the battery or the charger 5. Remove the battery from the battery charger. Supporting the battery charger with hand, pull out the battery from the battery charger. I How to makethe batteriesperformlonger (1) Recharge the batteries before they become completely exhausted. When you feel that the power of the tool becomes weaker,stop using the tool and rechargeits battery. If you continue to use the tool and exhaust the electric current, the battery may be damaged and its life will becomeshorter. (2) Avoid rechargingat high temperatures. A rechargeablebatterywill be hot immediatelyafter use.If such a batteryis rechargedimmediately after use,its internalchemicalsubstancewill deteriorate, and the battery life will be shortened. Leave the batteryandrechargeit after it hascooledfor awhile. /k • • CAUTION When the batterychargerhas beencontinuosly used, the battery chargerwill be heated, thus constitutingthe causeof the failures.Oncethe charginghasbeencompleted,give15minutesrest untilthe nextcharging. If the batteryisrechragedwhenit iswarm dueto batteryuseorexposureto sunlight,the pilotlamp may light in green. Thebatterywill not berecharged.In sucha case, let the batterycoolbeforecharging. 12 01Eng WH18DSDL US.p65 12 I 10/2/12, 2:38 PM m_ I English Whenthe pilotlampflickers rapidlyin red(at0.2plunger, and mount the hex. socket on the anvil. secondintervals), checkfor and take out any Check that the plunger is fully engaged in the hole. foreign objectsinthe charger'sbatteryinstallation When removing the socket, reverse the sequence. hole.If thereare noforeign objects,it is probable thatthe battery or chargerismalfunctioning. Take Ak CAUTION it to yourauthorizedServiceCenter. • Pleaseusethe designatedattachmentswhich are listed in the operations manual and Hitachi's BEFORE USE catalog. Accidentsor injuriescouldresultfrom Checkthe work areato makesurethat it isclearof debris not doingso. andclutter. • Make sureto firmlyinstallthe socketin the anvil. Clearthe area of unnecessarypersonnel.Ensurethat If the socketisnotfirmly installedit mightcome lighting andventilation is adequate. out andcauseinjuries. Hexagonal socket Groove OPERATION Anvil 1. Installing the bit (WH18DSDL) Always follow the following procedure to install driver bit. (Fig.6) Guide sleeve Movement Fig. 7 Confirm that the battery is mounted correctly. 6. Check the rotational direction The bit rotates clockwise (viewed from the rear side) by pushing the R-side of the push button. The L-side of the push button is pushed to turn the bit counterclockwise. (See Fig. 8). (The ,o and _ marks are engraved on the body.) 5, Driver bit Hexagonal hole "_( in the anvil "_"_,_J,,/ Fig.6 (1) Pullthe guide sleeveforward. (2) Insert the bit into the hexagonal hole in the anvil. (3) Releasethe guide sleeveandit returnsto its origianl position. Ak CAUTION If the guidesleevedoesnotreturn to its original position,then the bit isnot installedproperly. 2. Removing the bit (WH18DSDL) Please do the opposite point on the method of installing bit. 3. Selecting the socket matched to the bolt (WR18DSDL) Be sureto usea socketwhich is matchedto the bolt to be tightened. Using an improper socketwill not only result in insufficient tightening but also in damageto the socket or nut. Aworn or deformed hex.or square-holedsocketwill not give an adequatetightness for fitting to the nut or anvil,consequently resultingin lossof tightening torque. Pay attention to wear of socket hole, and replace before further wear has developed. 4. Installing a socket (WR18DSDL) Selectthe socketto be used. • Plungertype (Fig. 7) Align the plunger located in the square part of the anvil with the hole in the hex. socket.Thenpushthe Push Push Trigger switch Push button Fig.8 /k CAUTION The pushbutton can not be switchedwhile the impact driver is turning. To switch the push button,stopthe impactdriver,then setthe push button. 7. Switch operation © When the trigger switch is depressed, the tool rotates.Whenthe trigger is released,the tool stops. © The rotational speed can be controlled by varying the amount that the trigger switch is pulled. Speed 13 01Eng WH18DSDL US.p65 13 10/2/12, 2:38 PM I rm I I English is low when the trigger switch is pulledslightly and increasesasthe trigger switch is pulled more. © When releasingthe trigger of the switch, the brake will be appliedfor immediate stopping. NOTE: A buzzingnoiseis producedwhen the motor is about to rotate;this is only a noise,not a machinefailure. Changerotation speed As shown in Fig. 9, when the rotation changelever is slid to the lower side, the power mode (P)is set. And when slid to upper side, the save mode (S) is set. Pleaseuse the save mode (S) when you want to lower Maximum tightening torque. I I _i_ Rotation change lever Save mode ( If the nut is only loosely fitted to the bolt, the bolt may turn with the nut, therefore mistaking proper tightening. In this case, stop impact on the nut and hold the bolt head with a wrench before restarting impact, or manually tighten the bolt and nut to prevent them slipping. 11. Using the hook The hook is used to hang up the power tool to your waist belt while working. ,4k CAUTION • When usingthe hook,hang up the power tool firmlynotto dropaccidentally. Ifthepowertoolisdropped, itmayleadtoanaccident. • Whencarryingthe powertoolwith hookedto your waist belt,do notfit any bit to the tip of power tool. If the sharpbit suchas drill is fitted to the powertool whencarryingit with hookedto your waist belt,youwill be injured. Installsecurely thehook.Unlessthehookissecurely installed,it maycauseaninjurywhileusing. (1) Removingthe hook. Remove the screws fixing the hook with Philips screw driver. (Fig. 10) Power mode Fig.9 /k CAUTION In the work of the save mode (S), avoid the continuous screw-tightening as temperature of electronic components of the converter switch increases. Tightening and looseningscrews Install the bit that matchesthe screw, line up the bit inthe groovesof the headof the screw,then tighten it. Pushthe impact driver/wrenchjust enough to keep the bit fitting the headof the screw. /k CAUTION Applyingthe impact driver/wrench for too long tightensthe screwtoo muchandcanbreakit. Tighteningascrewwith the impactdriver/wrench at anangleto that screwcandamagethe headof the screw and the proper force will not be transmittedto the screw. Tightenwith this impactdriver/wrenchlinedup straightwith the screw. 10.Tightening and loosening bolts A hex. socket matchingthe bolt or nut mustfirst be selected.Then mount the socket on the anvil, and grip the nut to be tightened with the hex. socket. Holding the wrench in line with the bolt, press the power switch to impactthe nut for severalseconds. Hook Fig. 10 (2) Replacingthe hook andtightening the screws. Installsecurelythe hookin the groove of power tool and tighten the screws to fix the hook firmly. (Fig. 11) Groove Hook Fig.11 14 01Eng WH18DSDL US.p65 14 Screw 10/2/12, 3:21 PM Screw m_ I English I 12.About RemainingBatteryIndicator When pressing the remaining battery indicator switch, the remaining battery indicator lamp lights and the battery remaining power can be checked. (Fig.12) When releasing your finger from the remaining battery indicator switch, the remaining battery indicator lamp goes off. The table 5 shows the state of remaining battery indicator lamp and the battery remaining power. Switch panel Light switch Fig. 13 /k Remaining battery Remaining indicator battery switch indicator lamp CAUTION Do not expose directlyyour eye to the light by lookingintothe light. If youreye is continuouslyexposedto the light, youreyewill be hurt. NOTE: To preventthe battery power consumption caused byforgetting to turn off the LEDlight, the light goes off automatically in about 15 minutes. Fig.12 Table 5 State of lamp Battery Remaining Power OPERATIONAL The battery remaining power is enough. The battery remaining power is a half. The battery remaining power s nearly empty. :{e-chargethe battery soonest _ossible. Asthe remainingbattery indicatorshowssomewhat differently dependingon ambient temperature and battery characteristics,read it asa reference. NOTE: O Do not give a strong shock to the switch panel or break it.It may lead to atrouble. O To save the battery power consumption, the remaining battery indicator lamp lights while pressingthe remaining battery indicator switch. 13.How to use the LEDlight Everytime you pressthe light switch on the switch panel,the LEDlight lights or goes off. (Fig. 13) To preventthe batterypower consumption, turn off the LEDlight frequently. CAUTIONS 1. Restingthe unit after continuouswork After use for continuous bolt-tightening work, rest the unit for 15 minutes or so when replacing the battery. Thetemperature of the motor, switch, etc., will rise if the work isstartedagainimmediatelyafter batteryreplacement,eventually resultingin burnout. Ak CAUTION Do not touchthe metal parts,as it getsvery hot duringcontinuouswork. 2. Cautionson useof the speedcontrol switch This switch has a built-in, electronic circuit which steplesslyvariesthe rotation speed. Consequently, when the switch trigger is pulled only slightly (low speed rotation) and the motor is stopped while continuously driving in screws,the components of the electronic circuit parts may overheat and be damaged. 3. Usea tightening time suitablefor the screw The appropriatetorque for a screwdiffers according to the materialandsizeof the screw,andthe material being screwedetc., so pleaseuse atightening time suitable for the screw. In particular, if a long tightening time is usedinthe caseof screwssmaller than 5/16" (8 mm), there is a danger of the screw breaking,so pleaseconfirm the tightening time and the tightening torque beforehand. 15 01Eng WH18DSDL US.p65 15 10/2/12, 2:38 PM rm I I English 4. Work at a tighteningtorque suitable for the bolt under impact The optimum tightening torque for nuts or bolts differs with materialand sizeof the nuts or bolts. An excessively large tightening torque for a small bolt may stretch or break the bolt. The tightening torque increasesin proportion to the operationtime. Usethe correct operatingtime for the bolt. 5. Confirm the tightening torque The following factors contribute to a reduction of the tightening torque. So confirm the actual tighteningtorque neededby screwingup somebolts before the job with a hand torque wrench. Factors affectingthe tightening torque areas follows. (1) Voltage When the discharge margin is reached, voltage decreasesandtightening torque is lowered. (2) Operating time Thetightening torque increaseswhen the operating time increases.But the tightening torque does not increaseabove a certain value even if the tool is driven for a long time. (3) Diameterof bolt The tightening torque differs with the diameter of the bolt. Generally a larger diameter bolt requires larger tightening torque. (4) Tightening conditions Thetighteningtorque differs accordingto the torque ratio, class,andlength of boltsevenwhen bolts with the same size threads are used. The tightening torque also differs accordingto the condition of the surfaceof workpiecethrough which the bolts areto be tightened. When the bolt and nut turn together, torque is greatly reduced. (5) Using optional parts (WR18DSDL) The tightening torque is reduced a little when an extensionbar,universaljoint or a long socketis used. (6) Clearanceof the socket (WR18DSDL) A worn or deformed hex. or a square-holedsocket will not give an adequate tightness to the fitting betweenthe nut or anvil, consequently resulting in lossof tightening torque. Using an improper socketwhich doesnot match to the bolt will result in an insufficient tightening torque. (7) Tighteningtorque varies,dependingon the battery's chargelevel. 16 01Eng WH18DSDL US.p65 16 10/2/12, 2:38 PM m_ I English Ak CAUTION: Pull out battery beforedoingany inspectionor maintenance. Checkingthe condition of the bit. (WH18DSDL) The bits should be checked regularly. If worn or brokenbits can slip or decreasethe efficiencyof the motor and burn it out. Replaceworn bits with new ones. Wear limit I.... ,= iO.l_,l(3mm) I 0.45" (11.5mm) I Fig. 14 /k CAUTION: If you use a driverbit of which point is worn or broken, it will be dangerous since it slips.So replaceit with a new one. 2. Checkingthe condition of the socket(WR18DSDL) A worn or deformed hex. or a square-holedsocket will not give an adequate tightness to the fitting betweenthe nut or anvil, consequently resulting in lossof tightening torque. Payattention to wearof a socket holes periodically, and replace with a new one if needed. 3. Checkthe Screws Loosescrewsaredangerous.Regularlyinspectthem and makesure they aretight. Ak CAUTION: Usingthis power tool with loosened screws is extremelydangerous. Maintenanceof the motor The motor unit winding is the very "heart" of the power tool. Exercisedue care to ensure the winding does not becomedamagedand/or wet with oil or water. Inspectingthe carbon brushes(Fig. 14) The motor employs carbon brushes which are consumable parts. Since and excessively worn carbon brush can result in motor trouble, replace the carbon brush with new ones when it becomes worn to or nearthe "wear limit". In addition,always keepcarbonbrushescleanandensurethatthey slide freely within the brush holders. NOTE: When replacingthe carbon brush with a new one, be sure to use the Hitachi Carbon Brush Code No. 999054. Nail of carbon brush --_ \ \ Protrusion , of carbon brush Fig. 15 Replacingcarbon brushes Take out the carbon brush by first removing the brush cap and then hooking the protrusion of the carbon brush with a flat headscrew driver, etc., as shown in Fig. 16. When installing the carbon brush, choose the directionso thatthe nailof the carbon brush agrees with the contactportion outsidethe brushtube.Then pushit inwith afinger asillustratedin Fig.17.Lastly, install the brush cap. Ak CAUTION • Beabsolutelysureto insertthe nailofthe carbon brushinto the contactportionoutsidethe brush tube. (Youcan insertwhicheveroneof the two nailsprovided.) • Cautionmust be exercisedsinceanyerrorin this operationcan resultin the deformednail of the carbonbrush andmay causemotortroubleat an earlystage. @ Fig. 16 17 01Eng WH18DSDL US.p65 17 10/2/12, 2:38 PM I rm I I English ik CAUTION: Contact portion outside brush tube Fig.17 7. Checkfor Dust Dust may be removed with a soft cloth or a cloth dampenedwith soapywater. Do not usebleach,chlorine, gasolineor thinner, for they may damagethe plastics. 8. Disposalof the exhaustedbattery /k WARNING: Do not disposeof the exhaustedbattery. The battery must explode if it is incinerated.The product that you have purchasedcontains a rechargeable battery.Thebatteryisrecyclable.At the endofit's usefullife,undervariousstateand locallaws, it may be illegal to disposeof this batteryinto the municipalwaste stream.Check with yourlocalsolidwasteofficialsfor detailsin yourareafor recyclingoptionsor properdisposal. Repair, modificationand inspectionof Hitachi Power Toolsmust be carriedout by an Hitachi AuthorizedServiceCenter. ThisPartsList will behelpfulif presentedwith the toolto the HitachiAuthorizedServiceCenterwhen requestingrepairor other maintenance.In the operationand maintenanceof power tools,the safety regulationsand standardsprescribedin eachcountrymustbe observed. MODIFICATIONS: HitachiPowerToolsare constantlybeing improved and modified to incorporate the latest technological advancements. Accordingly, some parts (i.e. code numbers and/or design) may be changedwithout prior notice. Importantnoticeon the batteriesfor the Hitachi cordlesspowertools Pleasealwaysuse oneof our designated genuine batteries. We cannot guarantee the safety and performance of our cordless power tool when used with batteries other than these designated by us, or when the battery is disassembled and modified (such as disassembly and replacement of cells or other internal parts). 9. Storage Storing in a place below 104°F(40°C)andout of the reach of children. NOTE: Make sure that the battery is fully charged when stored for a long period (3 months or more). The battery with smaller capacitymay not beable to be chargedwhen used, if storedfor a long period. 10.Serviceand repairs All quality power tools will eventually require servicing or replacement of parts becauseof wear from normal use. To assure that only authorized replacement parts will be used, all service and repairs must be performed by a HITACHI AUTHORIZEDSERVICECENTER,ONLY. 11.Serviceparts list A: Item No. B: Code No. C: No. Used D: Remarks 18 01Eng WH18DSDL US.p65 18 10/2/12, 2:38 PM m_ I English A_ WARNING ALWAYSuseOnlyauthorizedHITACHIreplacementpartsandaccessories. NEVERusereplacementpartsor accessories whichare not intendedfor usewith thistool.ContactHITACHIif you arenot surewhetherit is safeto usea particularreplacementpart or accessory with yourtool. The use of any other attachmentor accessorycan be dangerousand couldcauseinjury or mechanical damage. NOTE: Accessoriesare subjectto changewithout any obligation on the part of the HITACHI. STANDARD ACCESSORIES _1_BatteryCharger (UC18YRSL)....................................................................................................... 1 WH18DSDL _2_Battery BSL1830)......................................................................................................................... 2 WR18DSDL _3_Batterycover (Code No.329897)................................................................................................. 1 (2LSRK) @ PlasticCase(CodeNo.323230)................................................................................................... 1 WH18DSDL WR18DSDL Battery,battery charger,plastic caseand battery cover are not contained. (NN) OPTIONAL ACCESSORIES <WH18DSDL> 1. Battery BSL1830(CodeNo. 330067) Phillips bit Bit No. No. 2 No. 3 Code No. 992671 992672 19 01Eng WH18DSDL US.p65 19 10/2/12, 2:38 PM I Fm I I English 3. Hexagonalsocket Part Name 4 mm Hexagonal socket 5 mm Hexagonal socket 6 mm Hexagonal socket 5/16" Hexagonal socket 8 mm Hexagonal socket 10 mm Hexagonal socket (small type) 10 mm Hexagonal socket 10 mm Hexagonal socket 1/2" Hexagonal long socket Engraved characters L B Code No. 7 8 65 65 7 8 992689 996177 10 12 13 65 65 65 10 12 13 985329 996178 996179 14 16 17 21 65 65 65 166 14 16 17 21 996180 996181 996182 996197 4. Drill chuck adapter set: Code No. 321823 Usethe drill availableon the market. Engravedcharacters <WR18DSDL> 1. Battery BSL1830(CodeNo. 330067) 2. Sockets Form C Form D Form B 20 01Eng WH18DSDL US.p65 20 10/2/12, 2:38 PM m_ I English Square headdrive dimensionsS 1/2" (12.7mrn) Suitable Part Name Hexagonal Socket Code No 10mm 944291 12mm 873632 13mm 873539 14mm 873540 High tension Main width across flats H Form L Socket Dimensions L1 _F 25/64" (10mm) B 1-9/16" (40mm) 5/16" (Smm) 11/16" (18mm) 15/32" (12mm) B 1-9/16" (40mm) 5/16" (Smm) 25/32" (20mm) 33/64" (13mm) B 1-9/16" (40mm) 11/32" (9mm) 1" (25mm) M1O 9/16" (14mm) B 1-9/16" (40mm) 11/32" (9mm) 1" (25mm) C 1-1/4" (32mm) 5/16" (Smm) 1-3/32" (28mm) M8 W5/16" M8 17mm 873536 M10 M12 W3/8" 19mm 873624 M12 M14 W7/16" 3/4" (19mm) C 1-11/32" (34mm) 11/32" (9mm) 1-3/32" (28mm) W1/2" 13/16" (21mm) D 1-13/32" (36mm) 3/8" (10mm) 1-1/4" (32mm) M16 7/8" (22mm) D 1-9/16" (40mm) 9/16" (14mm) 1-3/8" (35mm) M18 15/16" (24mm) D 1-9/16" (4Omm) 9/16" (15mm) 1-1/2" (38mm) 21 mm 873626 22mm 873627 M12 M14 873629 Code Part Name No. Long Socket Hexagonal Inch bolts M6 M16 Form 1/2" (12.7 mrn) ISO (small) 11/16" (17mm) 24mm Square headdrive dirnensi0nsS Bolt Diameter ISO (ordinary) 12mm 955138 13mm 955139 14mm 955140 Form C Suitable Bolt Diameter High ISO ISO Inch tension ordinary) (small) bolts Hexagonal width across flats H D Main Socket Dimensions L1 L2 Form L eF 15/32" (12mm) B 2-3/64" (52mm) 25/32" (20ram) 1-11/32" (34ram) 25/32" (20ram) 33/64" (13mm) B 2-3/64" (52mm) 25/32" (20ram) 1-11/32" (34ram) 53/64" (21.Srnm) M10 9/16" (14mm) B 2-3/64" (52mm) 25/32" (20ram) 1-11/32" (34ram) 7/8" (22mm) B 2-3/64" (52mm) 15/16" (24ram) 1-11/32" (34ram) 1" (25ram) B 2-15/16" (75ram) 15/16" (24ram) 2-1/4" (57ram) 1" (25ram) B 2-3/64" (52mm) 2-15/16" (75ram) 15/16" (24ram) 15/16" (24ram) 1-11/32" (34ram) 2-1/4" (57ram) 1-3/32" (28ram) 1-3/32" (28ram) M8 W5/16" M8 17mm 955141 M10 M12 W3/8" 11/16" (17mm) 17mm 955149 M10 M12 W3/8" 11/16" (17mm) 19mm 955142 M12 M14 W7/16" 19mm 955150 M12 M14 W7/16" 3/4" (19mm) 3/4" (19mm) 21mm 955143 W1/2" 13/16" (21mm) D 2-3/64" (52mm) 15/16" (24ram) 1-11/32" (34ram) 1-7/32" (31ram) D 2-15/16" (75ram) 15/16" (24ram) 2-1/4" (57ram) 1-7/32" (31ram) 21mm 955151 W1/2" 13/16" (21mm) 21mm 991480 W1/2" 13/16" (21mm) 22mm 955144 24mm 955146 M12 M14 M16 7/8" (22mm) M16 M18 15/16" (24mm) B D 4-15/16" [125mm) 15/16" (24ram) 4-7/32" (107rnrn) 1-7/32" (31ram) D 2-3/64" (52mm) 15/16" (24ram) 1-11/32" (34ram) 1-9/32" (32.Srnm) D 2-3/64" (52mm) 63/64" (25mm) 1-11/32" (34mm) 1-11/32" (34mm) 21 01Eng WH18DSDL US.p65 21 10/2/12, 2:38 PM I rm I I English Extension bar: Theextension bar is convenientfor working in very restrictedspacesor when the socketprovidedcannot reachthe bolt to be tightened. A_ CAUTION 7 Bit adaptor: This is usedfor tightening small screws(M6). NOTE: This adaptor is set only on the anvil (drive angle) of the main unit. When the extensionbar is used,the tightening torque is reducedslightly comparedwith the ordinarysocket. Code No. 873633 Dimention B, S 1/2" (12.7mm) t Universaljoint: The universaljoint is convenientfor impactingnuts when there is an angle between the socket and wrench, or when working in a very narrow space. Code No. 992610 Dimention B,S 1/2" (12.7mm) I Code No. 991476 Dimention S 1/2"(12.7mm) NOTE: Specifications are subject to change without any obligaiton on the part of the HITACHI. t Duct socket: This is used for tightening bolts and nuts on flange sections of air conditioners, type ducts, etc. Ls Code No. Hexagonalwidth acrossflats Dimention S 993658 992613 992615 15/32"(12 mm) 1/2" (13 mm) 9/16"(14 mm) 1/2" (12.7mm) 22 O1Eng WH18DSDL US.p65 22 10/2/12, 2:38 PM m_ I Fran_ais CONSIGNES DE SI_CURITI_ IMPORTANTES Lire et comprendre toutes lesprecautions de s6curite, lesavertissementset les instructions de fonctionnement dansce mode d'emploi avant d'utiliser ou d'entretenir cet outil motorise. La plupart des accidentscauses Iors de I'utilisation ou de I'entretien de I'outil motorise proviennent d'un non respectdes r6gles ou precautionsde base de s6curite. Un accident peut la plupart du temps 6tre evit6 si I'on reconnaitunesituation dedanger potentielavantqu'elle ne seproduise,et en observantlesproceduresde s6curite appropriees. Lesprecautionsde basede s6curite sont misesen evidence dansla section"SECURITE"de ce mode d'emploi et dansles sectionsqui contiennent les instructionsde fonctionnement et d'entretien. Lesdangersqui doivent 6treevit6s pour prevenir des blessurescorporelles ou un endommagementde la machine sont identifies parAVERTISSEMENTS sur I'outil motorise et dansce mode d'emploi. NE JAMAIS utiliser cet outil motorise d'une mani@e qui n'est pas specifiquement recommandee SIGNIFICATION aar HITACHI. DES MOTS D'AVERTISSEMENT AVERTISSEMENT indique des situations potentiellement entrainer la mort ou de serieuses blessures. dangereuses qui, si elles sont ignorees, pourraient PRECAUTION indique des situations dangereuses potentilles qui, si elles ne sont pas evit6es, peuvent entrainer de mineures et 16g@esblessures ou endommager la machine. REMARQUE met en relief des informations AVERTISSEMENTS essentielles. DE SI_CURITI_ GI_NI_RAUX CONCERNANT LES OUTILS I_LECTRIQUES /k AVERTISSEMENT: 1) 2) Liretous lesavertissements de securiteet toutesles instructions Tout manquement _ observer cesavertissementset instructions peut engendrerdes chocselectriques, des incendieset/ou des blessuresgraves. Conserveztous lesavertissements et toutesles instructionspourvousy refererult_rieurement. Le terme "outil electrique", utilise dans les avertissements,se r6f6re aux outils electriques(c_bl6) ou aux outils & piles (sansfil). Securite de I'aire de travail Lesprisesnonmodifieeset lesprisessecteurs a) Maintenir I'aire de travail propre et bien correspondantes reduisent les risques de eclairee. choc electrique. Les endroits encombres ou sombres sont b) Eviter tout contactaveclessurfacesmises propicesaux accidents. la massetelles que les tuyaux, radiateurs, b) Nepasutiliser d'outilselectriquesenpresence bandeset r_frigerateurs. de liquides, gaz ou poussiereinflammables, Le risque de choc electrique est accruen cas au risquede provoquer uneexplosion. de mise _ la massedu corps. c) Nepasexposerlesoutils electriquesa lapluie Les outils electriques creent des etincelles ou a desconditionshumides. susceptiblesd'enflammer la poussi@e. c) Ne pas laisser les enfants et les visiteurs Si I'eau p6n_tre dans I'outil, cela augmente s'approcherde vous Iorsquevous utiliser un les risques de choc electrique. d) Ne pas utiliserle cordona tort. Ne jamais outil electrique. Lesdistractionspeuventfaireperdrelecontr61e. utiliser le cordon pour transporter ou Securite electrique debrancherI'outilelectrique. Maintenir le cordon loin de la chaleur,de a) Les prises de I'outil electrique doivent correspondrea la prise secteur. I'huile, des bords pointus ou des pi_ces mobiles. Nejamais modifier laprise. Nepas utiliser d'adaptateurs avec les outils Les cordons endommages ou uses electriques mis a la masse. augmentent lesrisques de choc electrique. 23 02Fre WH18DSDL US.p65 23 10/2/12, 2:37 PM I rm I I Fran_ais e) 3) Encas d'utilisationd'un outil electrique I'exterieur, utiliser un cordon de rallonge adapt_a un usageexterieur. L'utilisation d'un cordon adapte _ I'usage 4) exterieur reduit lesrisquesde chocelectrique. f) Sivous devezutiliser un outil electriquedans unendroithumide,utilisezunealimentation protegeecontreles courantsr_siduels. L'utilisation d'un dispositif de protection contre lescourants residuels reduit le risque de choc electrique. Securite personnelle a) Restezalerte,regarderce quevousfaites et usezde votre bonsensen utilisantun outil electrique. Nepasutiliserd'outil electriquesivous_tes sousI'influencede drogues,d'alcoolou de medicaments. Pendant I'utilisation d'outils electrique, un instant d'inattention peut entrainer des blessuresgraves. b) Utiliser un equipement de protection individuelle. Toujours porter des verres de protection. L'utilisationd'equipementsde protection tels quelesmasquesanti-poussi@e, leschaussures des6curiteanti-derapantes,lescasquesou les protections auditives dans des conditions approprieesreduisentlesrisquesde blessures. c) Emp_cher les demarrages intempestifs. VeilleracequeI'interrupteursoitenposition d'arr_t avant de brancher a une source d'alimentation et/ou une batterie, de ramasserI'outilau solou de le transporter. Transporterlesoutils electriquesavecledoigt sur I'interrupteur ou brancher les outils electriquesavec I'interrupteur en position de marchepeut entrainer des accidents. d) Retirertoutecle de s_curiteou cle avantde mettreI'outilelectriqueenmarche. Laisserunecleou uneclede s6curite sur une partie mobile de I'outil electrique peut engendrer des blessures. e) Nepastropse pencher.Toujoursgarderune bonneassiseet un bonequilibrependantle travail. 5} Cela permet un meilleur contr61ede I'outil electrique dansdes situations imprevisibles. f} Porter des v6tements adequats. Ne pas porter de v6tementsamples ni de bijoux. Maintenirles cheveux,les v6tementset les gantsloindes piecesmobiles. Lesv6tements amples ou lescheveux longs peuventse prendredans lespi6ces mobiles. g) En cas de dispositifs destines au raccordementd'installationsd'extractionet de recueilde la poussi_re,veillerace qu'ils soientcorrectementraccordeset utilis6s. L'utilisation d'un dispositif de collecte de la poussi6re peut reduire les dangers associes la poussi@e. Utilisationet entretiend'un outilelectrique a) Ne pasforcer sur I'outil electrique.Utiliser I'outilelectriqueadaptea vostravaux. Le bonoutil electriqueferaletravailmieuxeten toutes6curiteau regimepourlequelila6teconcu. b) NepasutiliserI'outilelectriquesiI'interrupteur nelemetpasenpositiondemarcheet d'arr6t. Tout outil ne pouvant _tre contr616 par I'interrupteurestdangereuxetdolt 6tre repar6. c} Debrancher lapriseouretirerlabatterieavant deprocedera desr6glages,auremplacement des accessoiresou au stockagedes outils electriques. Ces mesures preventives de securit6 reduisentlesrisquesde demarrageaccidentel de I'outil electrique. d) Stockez lesoutilselectriquesinutilises hors dela porteedesenfantset nepaslaisserdes personnesnonfamiliarisees avecI'outil ou cesinstructionsutiliserI'outilelectrique. Les outils electriques sont dangereux entre les mains d'utilisateurs non habilites. e} Entretenir les outils electriques.Verifier I'absencedemauvais alignementou d'arr6t, d'endommagement depiecesoutouteautre conditionsusceptible d'affecterI'operationde I'outil. Si I'outil est endommage,le faire reparer avantutilisation. Denombreux accidentssont dus _ desoutils mal entretenus. f) Maintenirlesoutilscoupants aiguises etpropres. Desoutils coupantsbienentretenusavecdes bords aiguisessont moinssusceptiblesde se coincer et plus simples _ contr61er. g) Utiliser I'outil electrique,les accessoireset les mechesde I'outil,etc. conformement ces instructions en tenant compte des conditionsd'utilisationet dutravail_ r_aliser. L'utilisation de I'outil electrique pour des operations differentes de celles pour lesquellesil a 6te concu est dangereuse. Utilisation et entretien de la batterie a} Rechargerla batterie uniquementavec le chargeurrecommandeparle fabricant. Un chargeur inadequat pour le type de batterie peut entrainer un risque d'incendie en casd'utilisation avecune autre batterie. b} Utiliser les outils electriquesuniquement aveclesbatteries specifiees. L'utilisation d'autresbatteries peutentrainer un risque de blessureset d'incendie. c} Lorsque la batterie est inutilisee, la garder I'ecart d'objets metalliques comme des trombones,despi_cesdemonnaie, descles, 24 02Fre WH18DSDL US.p65 24 10/2/12, 2:37 PM m_ I Franqais des clous, des vis ou autres petits objets TOUJOURSporter des protecteursd'oreilleIors metalliquespouvantraccorderles bornes. de I'utilisationde I'outil pendant de La connexion des bornes peut entrainer des blessuresou un incendie. Une exposition prolongee _ un son de Q Iongues periodes, d) En cas d'utilisation darts des conditions forte intensite peutendommager I'ou'_'e de I'utilisateur. extr6mes, du liquide peut 6tre emis de la batterie.Evitertout contact,en casde contact accidentel,rincer aI'eau.Si leliquide entreen 3. NE JAMAIS placer lesmainsou toute autre partie contactavec lesyeux, consulterun medecin. du corps pros du foret ou du mandrin pendant le fonctionnement. Tenir le marteau/cle _ chocs Le liquide emis par la batterie peut entrainer des irritations et des brQlures. uniquement par son manche. 6) Service 4. Etant donne que le marteau/cle _ chocs sans fil a) Faire entretenir I'outil 61ectrique par un fonctionne sur batterie, il faut savoir qu'il peut se mettre _fonctionner _tout moment. technicien habilit6 a I'aide de pieces de rechangeidentiques exclusivement. 5. Lors d'un travail en position elev6e,evacuertout Celagarantira le maintien de la s6curite de le mondede I'airede travailet ne pasoublier qu'on travaille en hauteur. I'outil electrique. 6. NE JAMAIS toucher lesparties mobiles. -AVERTISSEMENTNE JAMAIS placer sesmains, sesdoigts ou toute Pourreduiretout risquede blessure,I'utilisateur dolt autre partie de son corpspros des parties mobiles lire le mode d'emploi. de I'outil. 7. NE JAMAIS utiliser I'outil sans que tousles dispositifs de securite ne soient en place. AVERTISSEMENT: NE JAMAIS faire fonctionner cet outil sans que La poussi6re resultant d'un poncage, d'un sciage, tousles dispositifs et caracteristiquesde s6curite d'un meulage,d'un percageou detoute autreactivite ne soient en place et en etat de fonctionnement. de constructionrenfermedesproduitschimiquesqui Si un entretien ou une reparation necessite le sont connuspar I'Etat de Californie pour causerdes retrait d'un dispositif ou d'une caracteristiquede cancers, des defauts de naissance et autres securit6, s'assurer de bien remettre en place le anomalies de reproduction. Nous enum6rons cidispositif ou la caracteristique de s6curite avant dessuscertains de cesproduits chimiques: de recommencer_ utiliser I'outil. • Plomb des peintres_ basede plomb, 8. Utiliser I'outilcorrect • Silicecristallinedes briqueset du cimentet autres Ne pasforcer sur un petit outil ou accessoirepour materiaux de maconnerie,et faire letravail d'un outil de grande puissance.Ne • Arsenic et chrome du bois d'oeuvre traite pas utiliser un outil pour un usage pour lequel il chimiquement. n'a pas et6 prevu:par exemple,ne pasutiliser une Le risque d'exposition _ ces substances varie en scie circulaire pour couper des branchesd'arbre fonction de lafrequenced'executionde ce genrede ou des b_ches. travail. Pour reduire I'exposition _ ces produits 9. NE JAMAIS utiliser un outil motoris_ pour des chimiques, travailler dans un lieu bien ventile, et applications autresque cellessp_cifiees. porter un equipement de protection agre6, par NE JAMAIS utiliser un outil motorise pour des exemple un masque anti-poussi6re specialement applications autres que celles specifi6esdans le con£u pour filter lesparticulesmicroscopiques. mode d'emploi. 10. ManipulerI'outilcorrectement Utiliser I'outil de la facon indiquee dansce mode REGLES DE SECURITE SPECIFIQUES ET d'emploi. Nepas laisser tomber ou lancer I'outil. SYMBOLES NE JAMAIS permettre que I'outil soit utilise par 1. Tenir I'outil electrique par les surfacesisolees des enfants,des personnesnonfamiliaris6esavec permettant de I'agripper pour effectuer une son fonctionnementou un personnelnonautoris& operationou coupel'attache peutentrer en contact 11. Maintenirtoutes les vis, tous les boulons et les avecdes ills electriques masques. couverclesfermementen place. Lecontactde I'attacheavecun fil soustension peut Maintenir toutes les vis, tousles boulons et les transmettredu courantdanslespi_cesmetalliques couvercles fermement montes. Verifier leurs exposeesde I'outil et communiquerunedecharge conditions periodiquement. electrique_ I'operateur. 12. Nepasutiliser lesoutils motorisessi lerevStement de plastique ou la poignee est fendu. Des fentes dans le rev6tement ou la poignee peuvententrainer uneelectrocution.Detels outils ne doivent pas _tre utilises avantd'etre r6par& 25 02Fre WH18DSDL US.p65 25 10/2/12, 2:37 PM I rm I I Fran_ais 13. Leslameset les accessoires doivent 6tre fermementmontessur I'outil. Eviter les blessures potentielles personnelleset aux autres. Les lames, les instruments de coupe et les accessoiresqui ont et6 montes sur I'outil doivent 6tre fixes et serresfermement. 14. NE JAMAISutiliser un outil defectueuxou qui fonctionneanormalement. Si I'outil n'a pasI'air de fonctionner normalement, fait des bruits etranges ou sans cela parait defectueux,arr6ter de I'utiliser immediatementet le faire reparer par un centre de service Hitachi autorise. 15. Manipuler I'outil motorise avec precaution. Si un outil motorisetombe ou frappe un materiau dur accidentellement, il risque d'6tre deform6, fendu ou endommage. 16. Ne pasessuyerles partiesen plastiqueavecdu solvant. Les solvants comme I'essence, les diluants, la benzine, le tetrachlorure de carbone et I'alcool peuvent endommager et fissurer les parties en plastique.Nepas lesessuyeravecdetels solvants. Essuyer les parties en plastique avec un chiffon doux 16g_rement imbibe d'une solution d'eau savonneuseet secherminutieusement. 17. TOUJOURSporter des lunettes des protections conformes aux exigences des derni@esrevisions du standard ANSI Z87.1. 18. Ddinitions pour lessymboles utilisessur cet outil V .....................volts -. ....................courant continu no ..................vitesse sans charge ---/min ............rotationsou mouvementsde va-etvient par minute CONSIGNES DE SI_CURITI_ IMPORTANTES POUR L'UTILISATION DU MARTEAU/CLI_ A CHOCS SANS FIL /k AVERTISSEMENT: Une utilisation incorrecte ou dangereuse du marteau/cle achocssansfil risqued'entrainerdes blessures gravesou mortelles. Pour eviter ces risques, observer les consignes de s6curit_ elementairessuivantes: 1. 2. 3. 26 02Fre Nejamais utiliser lemanchede cet outil pour une t_che autre quecelles d@ritesdans le manuel. Nejamais mettre lesmainsni aucuneautrepartie du corps pros du foret ni du mandrin pendant le fonctionnement. Tenir le marteau/cle_ chocs uniquement par son manche. Lors d'un travail en hauteur, toujours s'assurer qu'il n'y a personnedessousavantde commencer. WH18DSDL US.p65 26 4. Toujoursporter des protections pour les yeux et les oreilles pendant letravail. 5. Toujoursins@erleforet _fond. Unforet I_cheserait dangereux car il pourrait se detacher pendant le travail. (WH18DSDL) 6. Toujours utiliser un foret correspondant_ la taille du tournevis. (WH18DSDL) 7. Toujoursdisposerla vis que I'onveut enfonceret le marteau_ choc en ligne droite.Avecce marteau choc, lefait detravailler_ anglepar rapport_ lavis risqued'endommagerlat6tede laviset nepermettra pas d'obtenir le couple de serrage sp6cifie. (WH18DSDL) 8. Verifier qu'il n'y a pas de fissure sur la douille. (WR18DSDL) 9. Fixerla douille hexagonalesolidementsur lepiton. Si la douille hexagonale n'est pas fixee assez solidement, elle risquede tomber et de provoquer un accident. Pour I'accessoire de douille hexagonale,voir "Utilisation". (WR18DSDL) 10. Wrifier le couple de serrage _ I'aide d'une cle dynamometrique avant I'utilisation, de facon s'assurer que le couple de serrage sera correct. (WR18DSDL) 11. Si I'on utilise un joint universel, ne pas faire fonctionner I'outil _ vide. Cela serait dangereux. Si la section de la douille tourne autour du joint, cela risquede provoquer des blessuresaux mains et sur le corps, ou sous I'effet des vibrations intensesqui en resulteraient,I'utilisateur risquede laisser tomber I'outil. (WR18DSDL) 12. Veiller_ cequ'aucun corpsetranger ne bloque les orifices situes des deux c6tes de la poignee. Par ailleurs, ne pas boucherlesorifices avecdu ruban adhesif. Cesorifices remplissent une fonction importante. (WR18DSDL) CONSIGNES DE SI_CURITI_ IMPORTANTES POUR LE CHARGEUR DE BATTERIE Ak AVERTISSEMENT: Une utilisation incorrecte ou dangereuse des chargeursde batterie peut entrainerla mort ou desblessuresgraves. LIRETOUTCE MODED'EMPLOI 1. Ce manuelrenferme des consignesde s@uriteet d'utilisation importantes pour le chargeur de batterie mod61eUC18YRSL. Avant d'utiliser lechargeur de batterie,lire toutes les etiquettes d'instruction et de pr@aution apposees sur (1) le chargeur de batterie, (2) la batterie,et (3) le produit utilisant la batterie. Pour reduiretout risque de blessure,NE recharger QUEles batteriesrechargeablesHITACHIutilisees dans le mod61eserie BSL18.Les autrestypes de batterie pourraient exploser et provoquer des blessuresou des dommages. 10/2/12, 2:37 PM m_ I Fran_ais 4. 5. 6. 7. Nepas exposerlechargeur_ la pluie ni _ la neige. L'utilisation d'un accessoirenon recommandeou nonvendu par le fabricantdu chargeurde batterie risque de provoquer un feu, une decharge electriqueou des blessures. Pourreduiretout risquede dommagede lafiche et du cordon electrique, debrancher le cordon du chargeuren tirant sur la fiche. Verifier que le cordon est place de facon que personnenepuissemarcherdessus,seprendreles pieds dedans,ni I'endommagerou le soumettre des contraintes. Ne pas utiliser de cordon de rallongesi cela n'est pas absolument necessaire. L'utilisation d'un cordon de rallongeincorrect pourrait entrainer un feu ou une dechargeelectrique.Si I'on dolt utiliser un cordon de rallonge,s'assurerque: a. Les broches de la rallonge ont les m6mes numero,taille et forme que cellesde la fiche du chargeur; b. Le cordon de rallonge est correctement raccordeet en bon etatelectrique; c. Le calibre du fil dolt _tre au moins suffisant pour I'intensite nominale CA (amp6res) du chargeurde batteriesp6cifieesdansletableau ci-dessous. Tableau 1 CALIBREMINIMUM RECOMMANDI_ POURLESCORDONS DE RALLONGEDESCHARGEURS DE BATTERIE Intensite nominaled'entree CA (amp6res)* Egal ou sup@bur _ 0 2 3 mais non inferieur _ 2 3 4 Si I'intensite nominale d'entree du chargeur de batterie est donnee en watts et non en amp6res, calculerlacapaciteen amp6rescorrespondanteen divisant lacapaciteen amp6res par lacapacitede tension, par exemple: 1,250watts = 10amp6res 125 volts 9. Nepasutiliser lechargeursi son cordonou safiche sont endommages-Le remplacerimmediatement. 10. Nepas utiliser le chargeurs'il a recu un coup, s'il esttombeou endommagede toute autremani6re. L'apporter _ un reparateurqualifie. 11. Nepasdemonterlechargeurnile produitqui recoit labatterie ;si un entretien ou des reparationssont necessaires,les apporter _ un reparateurqualifie. Un remontage incorrect pourrait provoquer une dechargeelectrique ou un feu. 12. Pour reduire tout risque de dechargeelectrique, debrancherle chargeur de la prise secteuravant tout entretien ou nettoyage.IIne suffit pasde sortir la batterie. CONSIGNES DE SI_CURITI_ IMPORTANTES POUR L'UTILISATION DE LA BATTERIE ET DU CHARGEUR DE BATTERIE Pourpouvoirutiliser lasciecirculaire_ batterie,il faudra recharger la batterie. Avant d'utiliser le chargeur de batterie mod61eUC18YRSL.,bien lire attentivement toutes lesconsigneset lesavertissementssignalessur lechargeur, sur la batterie ou dansce manuel. Calibredu cordon Longueur de cordon en pieds (m6tres) 25 (7.5) 50 (15) 100(30) 150(45) 18 18 18 16 18 18 16 14 18 18 16 14 .,'K. PRECAUTION UTILIS.ER EXCLUSIVEMENT LEBATTERIE HITACHI DE SERIE BSL18. LES AUTRES TYPES DE BATTERIE POURRAIENT EXPLOSER OU PROVOQUER DESBLESSURES. Pour eviter tout risque de blessure, observer les consignes suivantes: Ak AVERTISSEMENT: Une utilisationincorrectede la batterie ou du chargeurde batterie risque de provoquerdes blessures.Pour eviter tout risquede blessure: 1. 2. 3. 4. 5. 6. NE JAMAIS demonter la batterie. NE JAMAISjeter la batterie au feu, m6me si elle est endommagee ou compl6tement usee. La batterie risque d'exploserau feu. NE JAMAIS court-circuiter la batterie. NE JAMAIS inserer d'objets clans les ou'ies d'aeration du chargeur. II pourrait en resulter un choc electrique ou des dommagesdu chargeur. NE JAMAIS effectuer la recharge _ I'exterieur. Eloigner la batterie des rayons directsdu soleil et utiliser exclusivement dans des endroits _ faible humidite et bien aer6s. NEJAMAIS effectuer la recharge si la temperatureestinferieure_32°F(0°C)ou superieure 104°F(40°C). Le fait de charger la batterie _ des temperatures inferieures _ 32°F (0°C)ou superieures _ 104°F (40°C)peut nuire _ la qualit6 du chargement et reduire la dureede vie de la batterie. 27 02Fre WH18DSDL US.p65 27 10/2/12, 2:37 PM I rm I I Fran_ais 7. NEJAMAISraccorderdeux chargeursde batterie ensemble. NE JAMAIS inserer de corps etrangers dans I'orifice de la batterie ou du chargeurde batterie. NE JAMAIS utiliser de transformateur-el6vateur pour la recharge. NE JAMAIS utiliser de g6nerateur de moteur ni d'alimentation CCpour la recharge. NE JAMAIS ranger la batterie nile chargeur de batterie dans un lieu ou la temperature peut atteindre ou depasser104°F(40°C). TOUJOURSalimenter le chargeur sur une prise secteur domestique standard (120 volts). L'utilisation du chargeur_ une autretension peut entra_ner une surchauffe et endommager le chargeur. TOUJOURSattendreau moins 15 minutes entre deux recharges pour eviter toute surchauffe du chargeur. TOUJOURSdebrancher lecordon d'alimentation de la prise secteur Iorsqu'on ne se sert pas du chargeur. O Assurez-vousque lescopeauxet la poussi@equi tombent sur I'outil Iorsque vous travaillez ne 8. s'accumulent passur labatterie. O Ne conservezpas une batterie inutilisee dans un 9. endroitquiestexposeauxcopeauxet _lapoussi6re. O Avantdestockerunebatterie,retireztous lescopeaux 10. et lapoussi@equiont puy adhereretne laconservez pas avecdespi6cesmetalliques(vis, clous,etc.). 11. 2. Ne percezpas la batterie_ I'aide d'un objet pointu telqu'unclou.Nelafrappezpas_I'aidedun marteau. Ne marchezpas dessus,ne la lancezpas et ne la 12. soumettezpas un _choc physiqueimportant. 3. N'utilisez pas une batterie dont I'exterieur est deform6 ou laissepenserqu'elle est defectueuse. 4. N'inserezpasla batterie_ I'envers(p61esinverses). 5. Ne raccordez pas directement la batterie _ une 13. prise electrique ou _ un allume-cigare. 6. N'utilisez pas la batterie _ d'autresfins que celle specifi6e. 14. 7. En cas d'echec du chargement d'une batterie, m6me apr6s un certain delai, arr6tez immediatement lerechargement. 8. N'exposezpas la batterie_ destemperatures ou une pressionelev6es(four_ micro-ondes,sechoir, PRECAUTIONS RELATIVES A LA conteneur sous haute pression). BATTERIE AU LITHIUM ION 9. Maintenez_ la batterie_ I'ecartdetoute flammeen casdedetectiondunefuite ou dune mauvaiseodeur. Pour prolonger sa dureede vie, la batterie lithium-ion 10. Nepas utiliser _proximite d'unesource puissante est equipee d'une fonction de protection qui coupe d'electricit6 statique. automatiquement I'alimentation. 11. En casde fuite de labatterie, de mauvaiseodeur, Danslescas1_ 3 decritsci-dessous,il est possibleque de gen6ration de chaleur, de decoloration, de le moteur s'arr6te Iorsque vous utilisez ce produit, deformation ou d'anomalieen coursd'utilisation, m6me si vous actionnez le commutateur. II ne s'agit de rechargementou d'entreposage,6tez pas d'un dysfonctionnement,mais du fonctionnement immediatement la batterie de I'equipementou du normal de la protection. chargeur de batterie et ne I'utilisez plus. 1. Lorsquelachargerestantede labatteriediminue, ,4k PRECAUTION le moteur s'arr6te. Danscecas de figure, chargezimmediatement la 1. Encasde projectiondanslesyeux de liquide ayant fuit de la batterie, ne vous frottez pas les yeux, batterie. rincez-les_I'eauclaire etcontactezimmediatement 2. Encasdesurcharge deI'outil,actionnezlecommutateur un medecin. de I'outilet eliminezlescausesde lasurcharge.Vous En I'absence de traitement, le liquide peut pouvezensuiterecommencer_ utiliserI'outil. det6riorer I'oeil. 3. Encasde surchauffedue_ un travail trop intensif, 2. Encasdeprojectionde liquideayantfuit delabatterie I'alimentation de la batterie peut secouper. sur votre peau ou vos v6tements, rincez Danscecas,arr6teztoute utilisation de la batterie immediatementcesderniers_I'eauclaire(aurobinet). et laissez-la refroidir. Vous pouvez ensuite Le liquide peut provoquerune irritation de lapeau. recommencer_ I'utiliser. Enoutre,respectez laprecautionet I'avertissement suivants. 3. Encasdedetectionderouille, demauvaiseodeur, de surchauffe,dedecoloration, de deformationet/ Ak AVERTISSEMENT ou autresanomaliesIorsde la premi6reutilisation Afin d'eviter toute fuite de la batterie, gen6ration de de la batterie, n'utilisez pas cette derni@e et chaleur,emissiondefumee, explosionet inflammation, renvoyez-laau fournisseur ou au fabricant. respectezscrupuleusementles precautionssuivantes: 1. Assurez-vousque les copeauxet la poussi@ene s'accumulentpas sur la batterie. O Lorsquevoustravaillez,assurez-vous quelescopeaux et lapoussi6renetombent passur labatterie. 28 02Fre WH18DSDL US.p65 28 10/2/12, 2:37 PM m_ I Fran_ais I /N AVERTISSEMENT Uncourt-circuitrisquedeseproduireetcauserunincendie, si un corps etrangerconducteurd'electricitepassedans lesbornesde lapile au lithium-ion.Veuillezrespecterles consignessuivantespour le rangementde lapile. © Nepasmettred'objetconducteur d'electricite, tels queclous,fil d'acier,decuivreou autrefil dansla mallettederangement. © Soit rangerle blocde pileavec I'outil _lectrique ou de maniere securitaireen I'enfon_;ant dansle couverclejusqu'acequelesorificesdeventilation soientdissimulesafind'_viterles courts-circuits. (VoirlaFig.1) CONSERVER CES INSTRUCTIONS ET LES METTRE ALADISPOSITION DES AUTRES UTILISATEURS ET PROPRIETAIRES DECET OUTIL! 29 02Fre WH18DSDL US.p65 29 10/2/12, 2:37 PM I I Fran_ais REMARQUE: Lesinformations contenuesdanscemode d'emploi sont concuespour assisterI'utilisateur dansuneutilisation sans dangeret un entretien de I'outil motorise. NEJAMAISutiliser nientreprendreune revisiondeI'outil sansavoir d'abordlu etcompris toutes lesinstructions de s6curite contenuesdans ce manuel. Certainesillustrations dansce mode d'emploi peuvent montrer des details ou des accessoiresdifferents de ceux de I'outil motorise utilise. NOM DES PARTIES Marteau _choc sansfil (WH18DSDL)/ Cle (WR18DSDL) 1, © WH18DSDL 0 WR18DSDL Carter Carter Chabotte ,, Manchon_ _ / _X_::<-r<_ Lumiere _ _! Declencheur [ _':_ ...... \ :./_ . ----------------_ ";)L rolgnee _/\ ...... y_ commande Bouton- Boutonpoussoir poussoir Declencheur Levier de modification du • sens de rotation k l ::i_{ Levier de modification du Poignee "%__.//b Tableau de __ %k:-j_ commande _,_ Crochet Crochet X Batterie Batterie © Batterie (BSL1830) Orifices de ventilation i_i;/ t__,_..,x_ Bornes Couvercle de batterie Loque Batterie Fig. 1 30 02Fre WH18DSDL US.p65 30 de rotation 10/4/12, 8:29 AM m_ I Fran_:ais 2. Chargeurde batterie (UC18YRSL) Cordon Lam )e t6mom Rail guide Plaque signaletique Fig. 2 SPECIFICATIONS 1. Marteau/cle_ chocs sansfil Mod61e WH18DSDL Mode alimentation Mode economie d'energie Petite vis Boulon ordinaire Boulon hautement extensible Vitesse sans charge Capacite WR18DSDL 0 - 2,600/rain 0 - 2,000/rain 5/32" - 3/8" (M4 - M10) 1/4" - 9/16" (M6 - M14) 3/8" - 23/32" (M10 - M18) 1/4" - 15/32" (M6 - M12) 5/16" - 9/16" (M8 - M14) Mode electrique 1,510in-lbs. {170 N.m} Mode sauvegarder840 in-lbs. {95 N.m} Le serrage est un boulon hautement extensible 9/16" (M14), compl6tementcharge une temperature de 68°F (20°C). Tempsde serrage :3 sec. Hexagonale, 1/4" (6.35 ram) BSL1830: Li-ion Couple de serrage (Maximum) Taille de queue de foret Batterie rechargeable Poids Mode electrique 188ft.lbs. {255 N.m} Mode sauvegarder103fl.lbs. {140 N.m} Serragede 5/8"(M16) F10T, avec rechargecompl6te_ une temperature de 68°F(20°C). Tempsde serrage :5 sec. Carre, 1/2" (12.7 mm) 18 V (3.0 Ah) 3.7 Ibs. (1.7 kg) 2. Chargeurde batterie (UC18YRSL) Sourced'alimentation d'entree Monophasee: CA 120V 60 Hz Dureede recharge Environ 45 rain. Tension de charge CC14.4V - 18 V Courant de charge CC14.4V: CC3.5A CC18V: CC3.5A Chargeur Poids 1.3 Ibs. (0.6 kg) REMARQUE:La duree de recharge peut varier en fonction de la temperature et de la tension de la source d'alimentation. 31 02Fre WH18DSDL US.p65 31 11/19/12, 1:29 PM I rm I I Fran_ais UTILISATIONS <WH18DSDL> Enfoncement et extraction de vis mecaniques,vis de bois, vis de taraudage,etc. <WR18DSDL> Pour le serrage et le desserrage de tous types de boulaons et d'ecrous utilises pour la consolidation de stuctures. MI_THODE DE RETRAIT ET D'INSTALLATION DE LA BATTERIE 1. Retrait de la batterie Maintenir fermement la poignee et pousser letaquet de la batterie pour I'enlever (voir Fig. 3). /iX PRECAUTION Ne jamais court-circuiter la batterie. Si la recharge est effectuee a une tension superieure a la tension indiqueesur la plaque signaletique,le chargeurserabr_l& Brancherle cordon d'alimentation du chargeur sur une prisesecteur. Quand vous raccordezla fiche du chargeur _ un,e prisemurale, la lampetemoin clignote en rouge. (A intervalles d'une seconde) A', AVERTISSEMENT: Nepasutiliserlecordonelectrique s'il est endommag& Le faire r6parer imm6diatement. Inserer labatterie dans lechargeur. Inserezfermement la batterie dans le chargeur, jusqu'_ ceque la ligne soit visible, comme celaest indique dans la Fig.4, 5. Mise en place de labatterie Insererla batterietout en respectantla polarite(voir Fig.3). )ign6e Batterie Inserer Loquet Lampe__4i,_, temoin Chargeur Pousser Fig. 4 Batterie Ligne Fig.3 MI_THODE DE RECHARGE REMARQUE: Avant de brancherlechargeurdansla prise,verifier les points suivants. © La tension de la source d'alimentation sur la plaque signaletique. O Le cordon n'est pas endommage. /k est indiquee AVERTISSEMENT: Ne pas effectuer de recharge a une tension superieurea la tension indiquee sur la plaque signaletique. Fig. 5 Recharge Quand la batterie est raccordee au chargeur de batterie, la rechargecommence et la lampetemoin s'allume en rouge. (Voir le Tableau2) 32 02Fre WH18DSDL US.p65 32 10/2/12, 2:37 PM m_ I I Franoais REMARQUE: Si lalampetemoin clignote en rouge, debrancherla fiche de la priseet verifier si la batterie est ins6ree correctement. (1) Indicationde la lampetemoin Lesindications de lalampe temoin sont expliquees dans le Tableau 2, selon la condition du chargeur ou de la batterie rechargeable. Quand la batterie est rechargee _ fond, la lampe temoin clignote lentement en rouge. (A intervalles d'une seconde)(Voir leTableau 2) Tableau2 Indications Avant la recharge Clignote Pendant la recharge S'allume Recharge terminee Clignote Recharge impossible Clignote La lampe temoin s'allume ou clignote en rouge. de la lampe temoin S'allume pendant 0.5 seconde. Ne s'allume pas pendant 0.5 seconde. (Eteint pendant 0.5 seconde) S'allume sans interruption S'allume pendant 0.5 seconde. Ne s'allume pas pendant 0.5 seconde. (Eteint pendant 0.5 seconde) S'allume pendant 0.1 seconde. Ne s'allume pas pendant 0.1 seconde. (Eteint pendant 0.1 seconde) Anomalie de la batterie ou du chargeur mmmmmmmmmmmmm La lampe t6moin s'allume en vert. Veille en su rchauffe S'allume S'allume (2) Temperature admissible d'une batterie rechargeable. La temperature admissible des batteries rechargeablesest indiqueedansleTableau3, et les batteries qui ont chauffe devront _tre laissees refroidir pendant quelquetemps avant de pouvoir 6tre rechargees. 4. Debrancherle chargeur de batterie de la prise. /k PRECAUTION Nepas debrancherlafiche de lapriseen tirant sur le cordon. Pour eviter tout dommage Iorsqu'on debranche la fiche de la prise, bien tenir la fiche proprement dite. Tableau 3 Plagede rechargedes batteries Batteries rechargeables BSL1830 Batterie en surchauffe. Chargement impossible (le chargement commencera une fois que la batterie sera froide). sans interruption Temperature_ laquelle la batterie peut 6tre rechargee 32OF- 122OF (0oc_ 50oc) 5. Retirer la batteriedu chargeur de batterie. Sortir la batterie du chargeur tout en la soutenant de la main. i Comment prolongerladur6edevie desbatteries I (3) Dureede recharge Tableau 4 Tempsde recharge(A 68°F(20°C)) Batterie BSL1830 _ UC18YRSL Env. 45 rain. REMARQUE: La duree de recharge peut varier en fonction de la temperature et de la tension de la source d'alimentation. 02Fre WH18DSDL US.p65 33 II (1) Recharger les batteries avant qu'elles ne soient compl6tement 6puisees. Quandlapuissancede I'outil utilisefaiblit, I'eteindre et recharger la batterie. Si I'outil continue d'6tre utilisejusqu'_ epuisementdu courant electrique, la batterie risque d'6tre endommageeet sa duree de vie seraccourcira. (2) Eviterd'effectuerla rechargesousdestemperatures 6levees. Une batterie est toujours chaude immediatement apr6s son utilisation. Si la batterie est rechargee 33 10/2/12, 2:37 PM rm I I Fran_ais immidiatement apris utilisation, les substances chimiques internes risquent de se ditiriorer et la durie de vie de la batterie seraccourcira.Laisserla batterie refroidir un moment avant de I'utiliser. 2. Retraitde la miche (WH18DSDL) Procider clanslesens inversede I'installation de la miche. 3. Choisirune doulille pouvants'accjoupler au boulon (WR18DSDL) /K PRECAUTION Bein choisir une douille pouvant s'accoupler au • Si lechargeurafonctionnipendantIongtempsde boulon qui dolt itre serri. Une douille trop grande suite,il sera chaud,ce qui risquede provoquer non seulement empihera un bon serrage mais des pannes.Lorsquela rechargeest terminie, risque aussid'endommager la douille ou I'icrou. laisserle chargeurrefroidirpendant environ15 Unedouille six pansou carrie usie ou diformie ne minutesavantde passera la rechargesuivante. permettrapas un bon serrage pour fixer I'icrou ou • Si I'on rechargelabatterieIorsqu'elleestchaude, lachabotte,et, en consiquence, cecisetraduira pas soitparcequ'ellevientde fonctionner,soitparce une pertede couple. qu'elleesten pleinsoleil,il se peutque la lampe Veiler _I'usure destrous de douileset lesremplacer timoin s'allumeenvert. avantque toute usure excessivesoit constatie. La batterie ne se rechargerapas. Dansce cas, 4. Mise in placed'une douille (WR18DSDL) laisserla batterierefroidiravantde la recharger. Choisir la douille _ utiliser. • Si la lampetimoin clignoterapidementenrouge • Pistonde type (Fig. 7) (a intervallesde 0.2 seconde},virifier s'il y a des Aligner le piston, situi dans la partie carrie de corpsitrangers dansI'orificed'installationde la I'enclume, avec I'orifice de la fiche hexagonale. batterie duchargeur,et lesenleverlecasichiant. Ensuite, enfoncer le piston et la fiche hexagonale S'il n'y a pas de corps itrangers, il s'agit dans I'enclume. S'assurer que le piston est probablementd'uneanomaliedela batterieoudu complitement engagi dans I'orifice. Lorsqu' on chargeur.Lesporterauserviceapres-venteagri& enlive lafiche hexagonale,inverserlesdimarches. Ak PRECAUTION AVANT L'UTILISATION • Utiliserlesaccessoires specifiisquisontinumiris VerifierI'aire detravail pours'assurerqu'il n'y a nidebris dans le mode d'emploi et le catalogueHitachi. ni desordre. Sinon il y a risqued'accidentsou deblessures. Evacuertoutes lespersonnesnon nicessairesautravail. • Bieninstallerla douillea fond dansI'enclume.Si S'assurerque I'eclairageet la ventilation sont ladouillen'estpassolidementinstallie,ellerisque satisfaisants. de se degageret de provoquerdes blessures. Douille hexagonal Rainure UTILISATION Chabotte 1. Mise en place de lamiche (WH18DSDL) Pour installer la miche, toujours se reporter aux dimarches suivantes.(Fig. 6) Manchon-guide M_che Mouvement Orifice" -'_--Q_:<f'_ hexagonal de L__.i_ / la chabotte F-,._J_ Fig.6 (1) Pousserlemanchon-guide vers I'avant. (2) Inserer la miche dans I'orifice hexagonel de la chabotte. (3) Rel_cher le manchon-guide et le replacer _ sa position originale. Ak PRECAUTION Si lemanchon-guiden'estpasreplacia saposition originale, la meche n'est pas installie correctement. Fig.7 5. Virifiez si la batteriea iti correctementinstallie. 6. Virifiez le sensde rotation Lamiche tourne danslesenshoraire(vu de I'arriire) quand on appuie sur le c6ti Rdu bouton-poussoir. En appuyant sur le c6ti L du bouton-poussoir, la miche tourne dansle sensanti-horaire.(Voir Fig.8) (Lesrepires ,_ et _ sont marquis sur le corps.) 34 02Fre WH18DSDL US.p65 34 10/2/12, 2:37 PM m_ I Fran£ais _L) \ Pousser _l_Pousser Declencheu r Bouton-poussoir Fig.8 ik Ax ATTENTION : En mode economied'energie (S},evitezd'utiliser le tournevis en continu. Cette operation fait augmenter la temperature des composants electroniquesdu convertisseur. 9. Serrageet desserragedes vis Installer une re@he correspondant _ la vis, faire coincider lam@heavec lesrainuressur latCtede la vis, puis commencer _ serrer. Appuyer sur le marteau/cle_chocsjuste assezpour que lamCchetienne clanslesrainures sur latCtede lavis. AX • PRECAUTION II n'est pas possiblede commuter le boutonpoussoirpendantque le tournevisa percussion • fonctionne.Pour commuterle bouton-poussoir, arr6terle tournevisa percussion,puis reglerle bouton-poussoir. 7. Fonctionnementde I'interrupteur © Quandon tire sur lag_chettede I'interrupteur,I'outil tourne.Quandon rel_chelag_chette,I'outil s'arrCte. O La vitessede rotation peut 6tre contrClCeen faisant varier la force avec laquelle on appuie sur la g_chette. Quand on appuie 16gCrementsur la g_chette,lavitesseest lente,et elleaugmentequand on appuie plus fort. © Lorsque le d@lencheur est liberC, le frein arrCte immediatement I'outil. REMARQUE: Un bruit de vibration se produit quand le moteur estsur lepoint detourner ;il ne s'agitque d'un bruit, et non d'une anomalie. Changementde la vitesse de rotation Comme indique sur la Fig. 9, Iorsque le levier de modificationdu sensde rotationestabaisse,lemode d'alimentation (P) est enclench& Lorsque le levier est releve, le mode economic d'energie (S) est enclench& Utilisezlemode@onomied'energie(S)Iorsquevous souhaitezreduire le couple de serrage maximum. _A_:_Y_¢ Levier de Mode j_C_ .._'_ _ j sauvegarder (S) _//.1_?>_\/ j \ y_ c',.._l!I Mode 61ectr__ modification du seas de ro_auon _,i_. PRECAUTION Si I'on serretropIongtempsunevis,celle-cipeut se briser. Si I'on serreunevis a un angleinadequat,la t6te de vis peut 6tre endommageeet de plus,il est impossibledetransmettrea lavislaforce requise. DesIors,toujoursalignerle marteau/clea chocs perpendiculairement aux vis. 10.Serrageet desserragedes boulon Commencerparselectionnerunedouille hexagonale qui convient pour le boulon ou I'@rou.Puis,monter la douille sur le piton, et saisir I'@rou _ serrer avec la douille hexagonale.Tout en tenant la cle clans I'alignement du boulon, appuyer sur I'interrupteur pour percuterI'@rou pendant plusieurs secondes. Si I'@rou n'est pas serre _ fond sur le boulon, le boulon risque de tourner en mCme temps que I'@rou, empCchantd'obtenir le couple de serrage voulu. Danscecas,cesserde percuterI'@rouet tenir latCtedu boulon avecunecleavantde recommencer la percussion,ou serrer manuellement le boulon et I'@rou pour lesempCcherde glisser. 11.Utilisation du crochet Lecrochetsert _suspendreI'outil electrique_ votre ceinture pendant le travail. AX PRECAUTION • Lorsquevous employez le crochet, accrochez fermement I'outil pour en eviter toute chute accidentelle. Encasde chutede I'outilelectrique,un accident pourraitsurvenir. • Lorsque vous portez I'outil accroche a votre ceinture,n'installezaucunemeche au bout de I'outil. Si une m6che tranchante, comme une fraise, est installee sur I'outil accrochea votre ceinture,vouspourriezvousblesser. • Installez fermement le crochet. Une mauvaise installation pourrait provoquer des blessures pendantI'utilisation. (1) Deposedu crochet. Enlevezlesvis qui maintiennent le crochet,_ I'aide d'un tournevis Philips. (Fig.10) Fig.9 35 02Fre WH18DSDL US.pC5 35 10/2/12, 2:37 PM I rm I I Fran_:ais Tableau 5 Etatde la lampe Lapuissance residuelle de labatterie La puissance residuelle de la batterie est suffisante La puissance residuelle de la batterie est _ la moitie Crochet Vis La puissance residuelle de Fig.10 (2) Remplacerlecrochetet serrer lesvis. Installez le crochet _ fond dans la gorge de I'outil electrique et serrez les vis pour le maintenir fermement. (Fig. 11) Gorge Crochet Fig.11 Vis 12.Apropos de I'indicateur de puissanceresiduellede la batterie /orsque vous appuyez sur le commutateur de puissance residuelle de la batterie, le temoin lumineux de puissance batterie s'allume et vous pouvezverifier la puissanceresiduelle.(Fig. 12) Lorsquevous rel_chezlecommutateur d'indication de puissance batterie, le temoin de puissance batterie residuelles'eteint. Letableau5presente les conditions d'illumination du temoin et I'etat de puissancede la batterie. la batterie est presque nulle. Rechargezla batterie le plus vite possible. Letemoin lumineux depuissancebatterieresiduelle peut s'allumer differemment selon la temperature ambiante et les caracteristiques de la batterie. Utilisez donccetableau comme ref6rence. REMARQUE: O Ne donnez pas de choc violent au panneau de commutation et ne le cassezpas. Celapeut provoquer des defaillances. O Pour limiter la consommation de puissance de la batterie, le temoin de puissance residuelle de la batterie ne s'allume que pendant I'activation du commutateur d'indication de puissanceresiduelle. 13.Commentutiliser la DELd'eclairage Chaquefois que vous appuyezsur lecommutateur d'eclairagedu panneau de commutation, la diode (DEL)s'allume ou s'eteint. (Fig. 13) Pourlimiter laconsommation de puissancebatterie, eteignezla DELfrequemment. Tableau de commande Commutateur d'eclairage Commutateur Temoin de puissance lumineux batterie de residuelle puissance batterie residuelle Fig. 13 /k PRECAUTION N'exposez pasvosyeux directementa la lampe en la regardant. Une expositioncontinuede vosyeuxa la lampe pourraitlesblesser. Fig.12 36 02Fre WH18DSDL US.p65 36 10/2/12, 2:38 PM m_ I Fran_ais REMARQUE: Pour eviter de consommer de la puissancebatterie Iorsque vous oubliez de couper la DEL, la lampe s'eteint automatiquementapr6senviron 15minutes. PRECAUTIONS D'UTILISATION 1. Reposde I'appareilapr_s un travail continu Apr6s un travail de serrage de boulons effectuede fa£on continue, laisser I'outil reposer pendant environ 15 minutes Iors du remplacement de la batterie. La temperature du moteur, de la g_chette, etc. augmenterasi le travail est repris tout de suite apr6s le remplacementde la batterie, ce qui risque de provoquer un grillage. ,IN PRECAUTION Ne pas toucher les pi_ces metalliques, car elles deviennenttres chaudesIorsd'un travail continu. 2. Precautionsd'utilisation du selecteurde reglagede vitesse Ce selecteur comprend un circuit electronique integr6 qui fait varier _ I'infini la vitessede rotation. Parconsequent,si lag_chettede selectionn'esttiree que 16g6rement(faible vitesse de rotation) et le moteur est arr6t6tout en vissantdes vis en continu, les composants du circuit electronique risquentde chauffer et d'6tre endommages. 3. Utiliser le couple de serrage adapt6 &chaquetype devis Le couple de serageapproprie varie en fonction du materiauet de lataille de lavis, ainsique lemateriau dans lequelelle est vissee. Parconsequent,utiliser un temps de serrage approprie. Plus particuli6rement, si I'on utilise un long temps de serragedans lecasde vis de taiffe inferieure _5/16" (8mm), celles-ci peuvent se briser parce que trop Iongtemps serrees. D6s Iors, verifier, avant toute chose,le couple et letemps de serrage. 4. Travailler _ un couple de serrageconvenable pour le boulon percute Lecouplede serrageoptimal pour ecrouset boulons diff@een fonction de la mati6re et de la taille des ecrous et des boulons. Un couple de serrage frop important pour un petit boulon risque de deformer ou de fendre lee boulon. Le couple augment proportionnellement au temps de fonctionnement. Utiliser le reglage d'echelle et le temps de fonctionnement appropries pour le boulon. 5. Verifier le couple de serrage Les facteurs suivants contributent _ une reduction du couple de serrage. Ainsi, verifier le couple de serrage reel d6sire en serrage quelques boulons avec une cle dynamometrique _ main avant d'effecteur letravail. Facteursinfluencantle couple de serrage. (1) Tension Si la marge de decharge est atteine, la tension d6croit et lecouple e serrage diminue. (2) Temps de fonctionnement /e couple de serrage augmentequand le temps de fonctionnement augmente.Toutefois, le couple de serrage n'augmente pas au-dessusd'une certaine valeur, ceci m_mesi I'appareilfonctionne pendant Iongtemps. (3) Diam_trede boulon Le couple de serrage diff6re selon le diam6tre du boulon. En r_gle gen6rale,un boulon de diam_tre plus large necessite un couple de serrage plus _mportant. (4) Conditions de serrage Le couple de serrage diff@e selon le rapport de couple, la classificationet la Iongueur des boulons et ceci m6mesi des boulons ayant des filetages de dimensionsidentiquessont utilises.Lecouplediff_re aussi en fonction de I'etat du metal _ la surface traverslequellesboulonsdoivent 6treserres.Quand le boulon et I'ecrou tournent ensemble, le couple est reduit de facon importante. (5) Utilisation de pi6cesoptionnelles (WR18DSDL) Le couple de serrage est 16g@ement reduit en utilisant une barrede rallonge,un joint universel ou une douille Iongue. (6) Jeu de la douille (WR18DSDL) Unedouille six pansou carr6eus6eou d6form6ene permettrapas un bon serrage pour fixer I'ecrou ou la chabotte, ce qui se traduira par une perte de couple. L'utilisation d'une douille inappropriee qui nes'appariepasau boulon setraduira par un couple de serrage insuffisant. (7) Lecouple de serragevarie selon I'etat de chargede la batterie. 37 02Fre WH18DSDL US.p65 37 10/2/12, 2:38 PM I rm I I Fran_ais Z_ PRECAUTION Sortir la batterie avant toute operation d'inspectionoud'entretien. Verifier I'etat de la m6che. (WH18DSDL) Les m6ches doivent 6tre verifi6es r6guli6rement. Si elles sont usees ou cassees, elles risquent de glisser ou de reduire le rendement du moteur et de le brt]ler. Limite d'usure ' l v v Av: I.... ,= iO.l_,l(3mm) I 0.45" (11.5mm) Remplacer les m6ches usees par des neuves. Fig. 14 ,,k PRECAUTION Si I'on utiliseunemechedont la pointeest usee oucass_e,elleseradangereusecarellerisquede glisser.Laremplacerparuneneuve. 2. Verifier I'etat de la douille (WR18DSDL) Une douille six pansou carree useeou deform6e ne permettra pas un bon serrage pour fixer I'ecrou ou lachabotte,cequi setraduira parunepertede couple de serrage.Contr61erperiodiquement I'etat d'usure des trous de douille et lesremplacer par des neufs en cas de besoin. 3. Verifier lesvis Desvis real serreessont dangereuses.Lesinspecter r6guli6rementetverifier qu'elles sontserrees_fond. Z_ PRECAUTION L'utilisation de I'outil electrique avec des vis desserrees seraitextr_mementdangereuse. Entretien du moteur Le bobinage de I'ensemble moteur est le "cceur" m6me de I'outil electro-portatif. Veiller soigneusement_ ce que ce bobinage ne soit pas endommageet/ou mouille par de I'huileou de I'eau. Contr61edes balais en carbone(Fig. 14) /e moteur utilise des balaisen carbonequi sont des pi_cesqui s'usent.Comme un balai en carbonetrop use peut det6riorer le moteur, remplacerles balais en carbonepar desneufsIorsqu'ilssont usesou pr6s de la "limite d'usure". En outre,toujours maintenir les balais en carbone propres et veiller _ ce qu'ils coulissent librement dans lessupports. I Clou de balai en carbone -_ \ \ carbone Fig. 15 Remplacementd'un balai en carbone Pour sortir le balai en carbone, commencer par retirer lecapuchondu balai,puis decrocherlasaillie du balai en carboneavec un tournevis _t6te plate, etc., comme indique sur la Fig.16. Pour installer le balaien carbone,choisir le sensde facon que leclou du balai en carbones'adapte _ la sectionde contact_ I'exterieurdu tube de balai. Puis I'enfoncerdu doigt commeindique_ laFig.17.Enfin, remettre le capuchondu balai en place. Ax ATTENTION: • Bienveiller imp_rativementa insurerle clou du balai en carbone dans la section de contact I'exterieurdu tube de balai. (On pourrainserer n'importelequeldes deuxclousfournis.} • Proceder avec precaution,car une erreur dans cetteoperationrisquededeformerlecloudubalai en carbone et d'endommager precocementle moterur. @ REMARQUE: Lors du remplacement des balais en carbone par desneufs,bien utiliser des balaisen carboneHitachi, No. de code 999054. Fig. 16 38 02Fre WH18DSDL US.p65 38 Sailliede ,balai en 10/2/12, 2:38 PM m_ I Fran_:ais /k Section de contact I'exterieur du tube de balai Fig.17 7. Verifier s'il y a de la poussi@e Enlever la poussi@eavec un chiffon doux ou un chiffon humecte d'eau savonneuse.Ne pas utiliser de decolorant,chlorure, essenceou diluant, car ces produits pourraient endommager le plastique. 8. Mise au rebut d'une batterie usee ik AVERTISSEMENT: Ne pas jeter la batterie us6e aux ordures menag6res.La batterie risqued'explosersi elle est incineree.L'appareilque vous avez achete renfermeunebatterierechargeable. Labatterieest recyclable. Lorsqu'elle a atteint sa limite de service,selon les loisdes etatset lesloislocales, il peut 6tre illegal de jeter cette batterie aux orduresmenageres.Verifieraupresdesonservice deramassaged'orduresles optionsderecyclage et la procedurecorrectede raiseaurebut. PRECAUTION Lesreparations,modificationset inspections des outilselectriquesHitachidoivent 6tre confiees un serviceapres-venteHitachiagre& II serautile de presentercettelistede piecesauserviceapresvente Hitachiagree Iorsqu'onapporte un outil necessitant des r6parations ou tout autre entretien. Lorsde I'utilisationet de I'entretien d'un outil electrique,respecterlesr_glementset les normes de s6curiteenvigueurdans le paysenquestion. MODIFICATIONS: Les outils electriques Hitachi sont constamment amelior6set modifiesafin d'incorporer lestous derniers progr6s technologiques. Enconsequence,il estpossiblequecertainespi6ces(c.bd. no.de codeet/oudessin)soientmodifieessansavis )realable. Avis important sur les batteries pour outils electriquessansfil Hitachi Toujours utiliser une de nos batteries originales specifi6es. Nous ne saurions garantir la s6curite et la performance de notre outil electrique sans fil s'il est utilise avec une batterie autre que celle que nous avons sp6cifie, ou encoresi la batterie est demont6e et modifiee (par exemple, le demontage et remplacement des cellules ou autres composants internes). Rangement Ranger dans un lieu dont la temperature est inferieure _ 104°F(40°C), et hors de portee des enfants. REMARQUE: Si vous penseznepas avoir_ utiliser lapile pendant une Iongue periode (3 mois ou plus), veillez _ ce qu'elle soitenti@ementchargeeavant de la ranger. Unepile moinschargeepourrait ne plusserecharger correctementapr6suneIongueperiodedestockage. 10.Entretien et reparation Tousles outils motorises de qualite auront eventuellement besoin d'une reparation ou du remplacement d'une pi6ce _ cause de I'usure normale de I'outil. Pour assurer que seules des pi6cesde rechangeautoriseesseront utilisees,tous lesentretienset lesreparationsdoivent6treeffectues uniquement par UN CENTREDESERVICEHITACHI AUTORISE. 11.Liste des pi6ces de rechange A: No.el6ment B: No.code C: No.utilise D: Remarques 39 02Fre WH18DSDL US.p65 39 10/2/12, 2:38 PM I pm I I Fran_ais A_ AVERTISSEMENT: TOUJOURSutiliseruniquementdespi_cesde rechangeet desaccessoires HITACHI.NEJAMAISutiliserde piecederechangeoud'accessoires qui nesontpasprevuspour_tre utiliseaveccetoutil. Encasde doute, contacterHITACHIpoursavoirsi unepiecede rechangeouun accessoire particulierpeuvent_tre utilisesen toutesecuriteavecvotreoutil. L'utilisationde tout autreattachementouaccessoirepeut _tre dangereux et peutcauserdes blessuresou des dommagesmecaniques. REMARQUE: Les accessoiressont sujets _changement sans obligation de lapart de HITACHI. ACCESSOIRES STANDARD _1_Chargeurde batterie (UC18YRSL)............................................................................................... 1 WH18DSDL _2_Batterie(BSL1830)........................................................................................................................ 2 WR18DSDL C3_Couverclede batterie (Node code329897)................................................................................. 1 (2LSRK) _4_Coffret en plastique (Node code323230)................................................................................... 1 WH18DSDL La batterie, le chargeur de batterie, le coffret en plastique et le couverclede la batterie ne sont WR18DSDL (NN) pasfournis. ACCESSOIRES EN OPTION <WH18DSDL> 1. Batterie BSL1830(No. de code 330067) M6che Phillips NOde m6che NO2 NO3 NOde code 992671 992672 40 02Fre WH18DSDL US.p65 40 10/2/12, 2:38 PM m_ I Fran_:ais 3. Douille hexagonale Designation 4 mm Douille hexagonale 5 mm Douille hexagonale 6 mm Douille hexagonale 5/16"Douille hexagonale 8 mm Douille hexagonale Carad6res graves 7 L 65 B 7 N° de code 992689 8 10 12 65 65 65 8 10 12 996177 985329 996178 13 65 13 996179 10 mm Douille hexagonale(Petitsformat) 10 mm Douille hexagonale 14 16 65 65 14 16 996180 996181 10 mm Douille hexagonale 1/2"Douille hexagonaleIongue 17 21 65 166 17 21 996182 996197 Caract6res graves Jeu d'adaptateurde mandrin deforeuse: NOde Code 321823 Utiliser la foreuse en vente. <WR18DSDL> 1. Batterie BSL1830(No. de code 330067) 2. Douilles Forme C Forme D 41 02Fre WH18DSDL US.p65 41 10/2/12, 2:38 PM I rm I I Fran_:ais Dimensions del'entra;nementcarreS Nora du produit 1/2" (12.7mm) Douille N°de Code 10mm 944291 12mm 873632 13mm 873539 14mm 873540 17 mm Diametre de boulon adequat Haute ISO ISO Boulons tension (ordinaire) (reduit) enpouces Largeur hexag.onale mesuree aux bordsH M6 M8 W5/16" M8 MIO 873536 MlO M12 19mm 873624 21 mm 873626 22mm 873627 24mm M12 M12 873629 M16 Douille principale Dimensions L1 eF B 1-9/16" (40mm) 5/16" (8mm) 11/16" (18mm) 15/32" (12mm) B 1-9/16" (40mm) 5/16" (8mm) 25/32" (20mm) 33/64" (13mm) B 1-9/16" (40mm) 11/32" (9mm) 1" (25mm) 9/16" (14mm) B 1-9/16" (40mm) 11/32" (9mm) 1" (25mm) 1-1/4" 5/16" 1-3/32" (8mm) 11/32" (9mm) (28mm) 1-3/32" (28mm) 11/16" C W7/16" (17mm) 3/4" (19mm) C (32mm) 1-11/32" (34mm) Wl/2" 13/16" (21mm) D 1-13/32" (36mm) 3/8" (10mm) 1-1/4" (32mm) M16 7/8" (22mm) D 1-9/16" (40mm) 9/16" (14mm) 1-3/8" (35mm) M18 15/16" (24mm) D 1-9/16" (4Omm) 9/16" (15mm) 1-1/2" (38mm) M14 M14 L 25/64" (10mm) W3/8" lexagonale Forme 3. Douille Iongue Forme Forme B Dimensions del'entra;ne- Nom Diametre du produit N° de Code 12mm 955138 13 mm 955139 14mm 955140 mentcarreS 17mm 1/2" Douille (12.7 ram) Iongue Haute tension C Forme de boulon ISO ordinaire adequat ISO (reduit) Largeur hexag.onale Forme Boulons mesuree aux en pouces bords H L L1 25/32" (20ram) 1-11/32" (34ram) 25/32" (20ram) 33/64" (13 mm) B 2-3/64" (52 mm) 25/32" (20 ram) 1-11/32" (34 ram) 53/64" (21,5 ram) M10 9/16" (14ram) B 2-3/64" (52mm) 25/32" (20ram) 1-11/32" (34ram) 7/8" (22mm) M12 W3/8" 11/16" (17ram) B 2-3/64" (52mm) 15/16" (24ram) 1-11/32" (34ram) 1" (25ram) B 2-15/16" (75ram) 15/16" (24ram) 2-1/4" (57ram) 1" (25ram) 17mm 955149 M10 M12 W3/8" 19mm 955142 M12 M14 W7/16" 3/4" (19ram) B 2-3/64" (52mm) 15/16" (24ram) 1-11/32" (34ram) 1-3/32" (28ram) W7/16" 3/4" (19ram) B 2-15/16" (75ram) 15/16" (24ram) 2-1/4" (57ram) 1-3/32" (28ram) W1/2" 13/16" (21ram) D 2-3/64" (52mm) 15/16" (24ram) 1-11/32" (34ram) 1-7/32" (31ram) D 2-15/16" (75ram) 15/16" (24ram) 2-1/4" (57ram) 1-7/32" (31ram) D 4-15/16" (125mm) 15/16" (24ram) 4-7/32" (107mm) 1-7/32" (31ram) D 2-3/64" (52mm) 15/16" (24ram) 1-11/32" (34ram) 1-9/32" (32,5mm) D 2-3/64" (52mm) 63/64" (25ram) 1-11/32" (34ram) 1-11/32" (34ram) 19mm 955150 21mm 955143 M12 M14 21mm 955151 W1/2" 13/16" (21ram) 21mm 991480 W1/2" 13/16" (21ram) 24mm 955144 M12 955146 M14 M16 M16 7/8" (22mm) M18 15/16" (24ram) 42 WH18DSDL eF 2-3/64" (52mm) 11/16" (17ram) 22mm 02Fre L2 B W5/16" M8 M10 Douille principale Dimensions 15/32" (12mm) M8 955141 D US.p65 42 10/2/12, 2:38 PM m_ I Fran_:ais Barrede rallonge: Labarre de rallongeestpratique pour letravail dans des espaces tr6s resserres ou Iorsque la douille utilisee ne permetpas d'atteindre le boulon _serrer. /k PRECAUTION Quandlarallongeestutilisee,lecoupledeserrage estlegerementreduitcompar6aceluideladouille ordinaire. NOde code 873633 dimension B, S 1/2" (12.7mm) dimension B, S 1/2" (12.7mm) REMARQUE: Utiliser cet adaptateur uniquement dans le prolongement de I'anglede lavisseuse. tI 5. Joint universel: Cejoint universel s'av6retr6s pratique pour serrer des ecrous Iorsque la douille et la cle forment un angle ou Iorsqu' on travaille dans un lieu etroit. NOde code 992610 7. Adaptateur de m6che: Cetadaptateurest utilise pour serrerdes petites vis (M6). No. de code dimension S 991476 1/2"(12.7mm) REMARQUE: Les specificationssont sujettes_ modification sans aucuneobligation de lapart de HITACHI. t Douille _tubulure: Cette douille est utilisee pour serrer boulons et ecrous dans les brides des conduits d'appareilsde conditionnement d'air, etc. LS N°decode Largeur hexagonale mesureeaux bords dimension S 993658 992613 992615 15/32"(12mm) 1/2"(13 mm) 9/16"(14 mm) 1/2" (12.7mm) 43 02Fre WH18DSDL US.p65 43 11/19/12, 1:31 PM I rm I I Espafiol INSTRUCCIONES IMPORTANTES SOBRE SEGURIDAD Antes de utilizar o de realizarcualquiertrabajo de mantenimientode esta herramienta electrica,leay comprenda todas las precauciones de seguridad, advertencias e instrucciones de funcionamiento de este Manual de instrucciones. La mayoria de los accidentesproducidos en la operacion y el mantenimiento de una herramientaelectrica se debena lafalta de observaci6n de lasnormas o precaucionesde seguridad.Losaccidentesnormalmente podran evitarse reconociendo una situacion potencialmente peligrosa a tiempo y siguiendo los procedimientos de seguridad apropiados. Lasprecaucionesbasicasdeseguridad sedescribenen lasecci6n "SEGURIDAD"deeste Manualde instrucciones yen lasseccionesque contienen las instruccionesde operacion y mantenimiento. Paraevitar lesioneso el dafio de la herramientaelectrica, los riesgosestan identificadoscon ADVERTENCIAS en dicha herramientayen este Manualde instrucciones. No utilice NUNCAesta herramienta electricade ninguna forma que no este especificamenterecomendadapor HITACHI. SIGNIFICADO DE LAS PALABRAS DE SEI_IALIZACION ADVERTENCIA indica situaciones potencialmente en lesiones de gravedad. peligrosas que, si se ignoran, pueden resultar en la muerte o PRECAUClON indica situaciones potencialmente peligrosas que, de no evitarse, pueden resultar en lesiones menores o moderadas, o causar dafios en la herramienta electrica. NOTA acentt_a informacion esencial. ADVERTENCIAS DE SEGURIDAD GENERAL DE LA HERRAMIENTA ELleCTRICA /N ADVERTENCIA: Leatodaslas instrucciones y todaslasadvertenciasdeseguridad. Si no se siguen las advertenciase instrucciones,podria producirseuna descargaelectrica, un incendioy/o dafios graves. Guardetodaslasadvertenciase instrucciones parafuturareferencia. Eltermino "herramienta electrica"en lasadvertenciashacereferenciaa laherramientaelectricaquefunciona con la red de suministro (concable) o a la herramientaelectricaque funciona con pilas (sin cable). 1) 2) Seguridaden el areadetrabajo a) Mantengala zonade trabajo limpiay bien iluminada. Las zonas desordenadaso oscuras pueden provocar accidentes. b) No utilice las herramientaselectricas en entornosexplosivoscomo,por ejemplo,en presenciade liquidosinflamables,gaseso polvo. Lasherramientas electricascreanchispasque pueden hacerqueel polvo desprendahumo. c} Mantengaa losnifiosytranseuntesalejados cuandoutiliceunaherramientaelectrica. Lasdistraccionespuedenhacerque pierdael control. Seguridadelectrica a) Losenchufesde las herramientaselectricas tienenqueseradecuados alatomadecorriente. b} c) d} No modifique el enchufe. No utilice enchufes adaptadores con herramientaselectricasconectadasa tierra. Si no se modifican los enchufesy seutilizan tomas de corriente adecuadasse reducirael riesgo de descargaelectrica. Evite el contactocorporal con superficies conectadas a tierracomotuberias,radiadores y frigorificos. Hay mayorriesgo de descargaelectricasi su cuerpo esta en contacto con el suelo. No expongalas herramientaselectricasa la Iluviao a la humedad. Laentradadeaguaen unaherramientaelectrica aumentarael riesgode descargaelectrica. No utiliceel cableincorrectamente.Noutilice el cable para transportar, tirar de la herramientaelectricao desenchufarla. 44 03Spa WH18DSDL US.p65 44 10/2/12, 3:13 PM I Espafiol 3) Mantenga el cable alejado del calor, del aceite,debordes afiladoso piezasm6viles. Los cables dahados o enredados aumentan el riesgo de descargaelectrica. 4} e) Cuando utiliceuna herramientaelectricaal aire libre, utilice un cable prolongador adecuadoparautilizarseal airelibre. Lautilizaci6nde uncableadecuadoparausarse alairelibrereduceelriesgodedescargaelectrica. f) Si no se puede evitar el uso de una herramientaelectricaen un lugarhumedo, utiliceun suministroprotegidomedianteun dispositivodecorrienteresidual(RCD). Eluso de un RCDreduceel riesgode descarga electrica. Seguridad personal a) Esteatento, preste atenciona Io que hacey utilice el sentido comun cuando utilice una herramienta electrica. No utilice una herramienta electricacuando est6 cansado o este bajo la influencia de drogas, alcohol o medicacion. La distracci6n momentanea cuando utiliza herramientas electricas puede dar lugar a importantes daSospersonales. b) Utilice un equipo de proteccion. Utilice siempre una proteccion ocular. El equipo de proteccioncomo mascarapara el polvo,zapatosde seguridadantideslizantes, casco o proteccion para oidos utilizado para condiciones adecuadas reducira los daSos personales. c) Eviteun inicioinvoluntario.Aseguresedeque el interruptor esta en "off" antesde conectar laherramienta a unafuente de alimentacion y/o bateria, cogerlao transportarla. El transporte de herramientaselectricascon el dedo en el interruptor o el encendido de herramientas electricas con el interruptor encendido puede provocar accidentes. d) RetirelasIlaves de ajusteantes de encender la herramientaelectrica. Si se deja una Ilaveen una piezagiratoria de la herramienta electrica podrian producirse da5ospersonales. e) No se extralimite. Mantenga un equilibrio adecuado en todo momento. Estopermiteun mayorcontroldelaherramienta electricaen situacionesinesperadas. f) Vistase adecuadamente. No Ileve prendas sueltas o joyas. Mantenga el pelo, la ropa y los guantesalejadosde las piezasmoviles. La ropa suelta, las joyas y el pelo largo 5} puedenpillarse en laspiezasm6viles. g) Si se proporcionan dispositivos para la conexiondeextracciondepolvo einstalaciones de recogida, asegurese de que estan conectadosy seutilizan adecuadamente. La utilizacion de un sistema de recogida de polvo puedereducirlos riesgosrelacionados con el polvo. Utilizacion y mantenimientodelas herramientas electricas a) No fuerce la herramientaelectrica.Utilicela herramienta electrica correcta parasuaplicaci6n. La herramienta electrica correcta trabajara mejor y deforma mas segurasi seutiliza a la velocidad para laque fue diseSada. b) No utilice la herramienta electrica si el interruptor no la enciendey apaga. Las herramientas electricasque no pueden controlarsecon el interruptor son peligrosas y deben repararse. c) Antesde hacer ajustes,cambiaraccesorios o almacenar las herramientas electricas, desconecteel enchufede la fuente electrica y/o lasbaterias de la herramienta. Estas medidas de seguridad preventivas reducen el riesgo de que la herramienta electricasepongaen marchaaccidentalmente. d) Guardelasherramientas electricasquenose utilicenparaqueno lascojanlosni5osy no permita que utilicen las herramientas electricaspersonasnofamiliarizadasconlas mismaso conestasinstrucciones. Las herramientaselectricasson peligrosassi son utilizadaspor usuariossin formaci6n. e} Mantenimientodelasherramientaselectricas. Compruebesi las piezasm6vilesestan real alineadaso unidas,si hayalgunapiezarotau otra condici6n que pudiera afectar al funcionamientodelasherramientas electricas. Si la herramienta electrica esta dafiada, Ilevelaa repararantesde utilizarla. Se producen muchos accidentes por no realizar un mantenimiento correcto de las herramientaselectricas. f) Mantengalas herramientasde corte afiladas y limpias. Las herramientas de corte correctamente mantenidascon los hordesde corte afilados son mas faciles de controlar. g) Utilicelaherramientaelectrica,losaccesorios y las brocas de la herramienta, etc. de acuerdoconestasinstrucciones, teniendoen cuentalascondicioneslaboralesy el trabajo queseva a realizar. La utilizacionde la herramientaelectricapara operacionesdiferentes a pretendidas podria dar lugar a una situacion peligrosa. Utilizaci6n y cuidadode las herramientasa pilas a) Recargues61oconel cargadorespecificado por elfabricante. Uncargadorqueesaptoparauntipode paquete de pilas podria crear un riesgo de incendio cuandoseutilizaconotro paquetede pilas. 45 03Spa WH18DSDL US.p65 45 10/2/12, 3:13 PM I rm I I Espafiol b) 6} Utilice herramientas electricas s61ocon paquetesdepilasespecificamente dise_ados. La utilizacion de otros paquetes de pilas podriacrear riesgo de da5os e incendio. c} Cuando no se utilice el paquete de pilas, mantengalo alejado de otros objetos metalicos como clips, monedas, Ilaves, clavos,tornillos u otros objetosmetalicos peque_osquepuedanhacerunaconexi6nde unterminala otro. Si se acortan los terminales de las pilas podrianproducirsequemaduraso incendios. d} Bajos condiciones abusivas, podria expulsarse liquido de la pila; evite todo contacto. En caso de que se produzca contacto accidentalmente, enjuague con agua. Si entra liquidoen los ojos, busque ayudamedica. El liquido expulsado de la pila podriacausar irritacion o quemaduras. Revisi6n a} Lleve su herramienta a que la revise un expertocualificadoqueutilices61opiezasde repuestoidenticas. Esto garantizara el mantenimiento de la seguridad de la herramienta electrica. -ADVERTENCIAParadisminuirel riesgodelesiones,elusuariodebe leerel manualde instrucciones. ADVERTENCIA: Algunos polvos creados pot el lijado mecanico,el aserrado, el esmerilado, el taladrado y otras actividades de construccion contienen sustancias quimicasconocidaspor leEstadode Californiacomo agentescancerigenos,defectoscongenitos y otros darios reproductores.Algunos ejemplos de estas sustanciasquimicas son: • El plomo de laspinturas a basede plomo, • Elsilicecristalinode losladrillos y cementoy otros productos de mamposteria,y • El arsenico y el cromo de la madera tratada quimicamente. El riesgo resultante de laexposicion varia segt_nla frecuencia con que se realizaeste tipo de trabajo. Para reducir la exposicion a esta sustancias quimicas:trabaje enun lugarbien ventiladoy realice el trabajo utilizando el equipamiento apropiado,tal como las mascaras para el polvo especialmente diseriadospara eliminar lasparticulasmint_sculas. NORMAS Y SIMBOLOS SEGURIDAD 1. ESPECIFICOS DE Sostenga la herramienta electrica por las superficiesdeagarreaisladascuandorealiceuna operaci6nen la queel sujetadorpuedaentraren contactoconel cableadooculto. Si elsujetador entra en contactocon un cable con corriente, las partes metalicas expuestas de la herramienta electrica pueden transmitir esa corriente y producir una descarga electrica al operador. EMPLEEsiempreprotectoresauditivos cuando tenga que utilizar la herramienta 2. Q La exposici6n prolongada a ruido de durantemuchotiempo. gran intensidadpuedecausarlaperdida del sentido del oido. 3. No coloque las manos ni otras partesdel cuerpo cerca de la broca ni del portabrocas durante la operacion. Sostengael taladro/llave de impacto t_nicamentepor el mango. 4. Ya que el taladro/llave de impacto de bateria es accionado pot una bateria,tenga en mente que puedeempezar a operar en cualquier momento. 5. Cuando trabaje en lugares elevados, despeje el area de otras personas y tenga en cuenta las condicionesque hayadebajo de usted. 6. No toquenuncalas piezasm6viles. NO coloque NUNCAsus manos,dedos, ni demas partesdel cuerpocercade laspiezasm6viles de la herramienta. 7. NO utilice NUNCA la herramienta sin los protectorescolocadosensu lugar. NO utilice NUNCA esta herramienta sin los protectores de seguridad correctamente instalados. Si el trabajo de mantenimiento o de reparacionrequiereeldesmontajede un protector de seguridad, cerci6rese de volver a instalarlo antes de utilizar la herramienta. 8. Utilicela herramientacorrecta. No fuerce herramientas ni accesoriospeque_os para realizarun trabajo pesado. No utilice las herramientas para fines no proyectados, pot ejemplo, no utilice esta amoladora angular para cortar madera. 9. NO utiliceNUNCAunaherramientaelectricapara aplicaciones queno seanlasespecificadas. NO utilice NUNCAuna herramientaelectricapara aplicaciones no especificadasen este Manual de instrucciones. 10. Manejecorrectamentela herramienta. Maneje la herramienta de acuerdo con las instrucciones ofrecidas aqui. No deje caer ni tire la herramienta.NO permita NUNCAque los nirios ni otras personasno autorizadasni familiarizadas con laoperacion de la herramienta utilicen esta. 46 03Spa WH18DSDL US.p65 46 10/2/12, 3:13 PM m_ I Espafiol 11. Mantengatodoslostornillos,pernos,y cubiertas firmemente fijados en sulugar. Mantengatodos los tornillos, pernos,y cubiertas firmementemontados.Compruebeperi6dicamente sucondicion. 12. No utilice herramientas electricas si la carcasao laempu_adurade plasticoesta rajada. Las rajas en la carcasao en la empu_adura de plastico pueden conducir a descargaselectricas. Talesherramientasno deberanutilizarsemientras no se hayan reparado. 13. Lascuchillasy los accesoriosdeberanmontarse conseguridad en laherramienta. Evitelesionespersonalesy de otras personas.Las cuchillas, los accesorios de corte, y demas accesoriosmontados en la herramienta deberan fijarse con seguridad. 14. NO utiliceNUNCAunaherramientadefectuosao quefuncioneanormalmente. Si la herramienta parece que funciona anormalmente,produciendoruidos extra6os,etc., deje inmediatamente de utilizarla y solicite su arregloa un centrode reparacionesautorizadopor Hitachi. 15. Manejeconcuidadolasherramientas electricas. Si una herramienta electrica se ha caido o ha chocado inadvertidamente contra materiales duros,es posibleque se hayadeformado, rajado, o dariado. 16. No limpie laspartesdeplasticocondisolvente. Los disolventes, como gasolina, diluidor de pintura,bencina,tetraclorurodecarbono,y alcohol puedendaharo rajar laspartesde plastico.Nolas limpie con tales disolventes. Limpie las partes de plastico con un paho suave ligeramente humedecido en agua jabonosa y despuessequelasbien. 17. SIEMPRE utilice protecci6n para los ojos que satisfaga los requisitos de la ultima version de la norma Z87.1de ANSI. 18. Definicionespara los simbolos utilizadosen esta herramienta V ..................voltios -. .................corriente continua n................. velocidad sin carga ---/min .........revolucionesoreciprocaci6n porminuto INSTRUCCIONES IMPORTANTES DE SEGURIDAD PARA USAR EL TALADRO/ LLAVE DE IMPACTO DE BATERIA ,IN ADVERTENCIA: Elusoinadecuadoo insegurodeltaladro/llavede impactode bateriapuede provocarla muerteo da_oscorporalesserios.Paraevitarestosriesgos, siga las siguientes instrucciones basicas de seguridad: 1. No utilice este taladro/llave de impacto para cualquierotra aplicacionqueno seespecifiqueen este manual. 2. No coloque nunca las manos ni otras partes del cuerpocercade labrocani delportabrocasdurante la operacion.Sostengaeltaladro/llave de impacto unicamentepor el mango. 3. Cuando trabaje en lugares elevados,cerci6rese siemprede que no haya nadie debajo antes de iniciar el trabajo. 4. Cuandotrabaje,utilicesiempreproteccionparasus ojos y oidos. 5. Instale siempre con seguridad la broca del atornillador. Una broca floja podria resultar peligrosa porque podria desprendersedurante el trabajo. (WH18DSDL) 6. Utilice siemprela broca adecuadaal tama_o clel tornillo. (WH18DSDL) 7. Insertesiemprelostornillos con el atornillador de impacto en linea recta. Sitrabajase con el atornillador de impacto inclinado,podria dariar la cabezade los tornillos y no conseguir el par de apriete prescrito. (WH18DSDL) 8. Confirme que el casquillo no este rajado. (WR18DSDL) 9. Fije el casquillo hexagonal en la boca. Si no asegurase suficientemente el casquillo, podria caersey provocar un accidente. Conrespectoa la fijacion del casquillo hexagonal, consulte "OPERACION".(WR18DSDL) 10. Confirme el par de apriete con una Ilave dinanometrica antes de utilizarlo a fin de asegurarsede que esta utilizando el par correcto. (WR18DSDL) 11. Si utilizaunajunta universal,cercioresede no usar la unidad en condici6n sincarga.Si la utilizaseen esta condicion, podria resultarpeligrosa. Cuando la secci6ndel casquillogire, puedecausarlesiones en las manoso en elcuerpo,o lavibraci6n intensa puede hacer que se caiga la herramienta. (WR18DSDL) 12. Tenga cuidado de que materias extra6as no bloqueen losorificios situados a ambos lados de la empuriadura. Ademas,no tape dichos orificios con cinta. Estos orificios juegan un papel muy importante. (WR18DSDL) 47 03Spa WH18DSDL US.p65 47 10/2/12, 3:13 PM I rm I I Espafiol INSTRUCCIONES IMPORTANTES DE SEGURIDAD PARA EL CARGADOR DE BATERiAS 4. 5. /k ADVERTENCIA: La utilizacibninadecuadadel cargadorde 6. bateriaspuederesultaren lesionesseriaso en la muerte.Paraevitarestosriesgos,siga las instruccionesde seguridadofrecidasa 7. continuacibn. LEATODASLAS INSTRUCCIONES 1. 2. 3. Este manual contiene instrucciones importantes de seguridadpara el cargadorde bateriasmodelo UC18YRSL. Antes de utilizar el cargadorde baterias,leatodas lasinstruccionesy tenga en cuenta lasmarcasde precaucion de (1) el cargador de baterias, (2)la bateria,y (3) el producto que utiliza la bateria. Parareducirel riesgode lesiones,carguela bateria HITACHIde tipo de la serie BSL18.Otrostipos de bateriaspodrianexplotarcausandolesionesy daSos. 8. No expongael cargadorde bateriasa la Iluvia ni a la nieve. La utilizaci6n de un accesoriono recomendadoo vendido por elfabricante del cargadorde baterias puede resultar en el riesgo de incendios, en descargaselectricas,o en lesiones. Parareducirel riesgode dafiarelcabley elenchufe, para desconectarelcable delcargadorde baterias, tire del enchufe. Cerci6resede que el cable quede situado donde no puedapisarse,dondenadiepuedatropezarcon el, y donde no puedarecibir daSos. A menos que sea absolutamente necesario, no debera utilizarse un cable prolongador. La utilizacion de un cable prolongador inadecuado podria resultar en el riesgo de incendios y descargaselectricas. Cuando tenga que utilizar un cable prolongador, cerci6resede que: a. El enchufe del cable prolongador sea igual en tamafio y forma que el del cargador de baterias; b. El cable prolongador este adecuadamente conectadoyen buenascondicioneselectricas; y c. Que elcalibre del cable seasuficiente parael amperaje de CA del cargador de baterias, como se especificaen la Tabla 1. Tabla 1 CALIBRE(AWG)MiNIMORECOMENDADO PARACABLES PROLONGADORES PARAELCARGADORDEBATERiAS Amperajenominal de entrada de CA* Igualo superior a pero inferior a 0 2 3 2 3 4 Calibre(AWG)del cable Longitud del cable,Pies (metros) 25 (7.5) 50 (15) 100(30) 150(45) 18 18 18 Si laentrada nominal del cargador de bateriasse indica en vatios en vez de amperios, el amperaje nominal correspondiente se determinara dividiendo el vataje por latension, por ejemplo: 1,250vatios _ 10 amperios 125 voltios 9. No utilice el cargador de bateriascon un cable o un enchufe da6ado. Si estan dafiados, reemplacelosinmediatamente. 10. Noutilice el cargadorde bateriassi ha recibido un golpe, si ha caido,o siesta da6adode alguna otra forma. Lleveloa un tecnico cualificado. 11. No desarme el cargador de baterias. Cuando necesite reparaci6n, Ilevelo a un tecnico cualificado. El reensamblaje incorrecto podria resultar en el riesgo de incendios o descargas electricas. 18 18 18 18 16 16 12. Para reducir el riesgo de descargas electricas, desenchufeel cargador del tomacorriente antes de intentar realizar cualquier operacion de mantenimiento o de limpiarlo. Laextraccionde la bateria no reducira este riesgo. INSTRUCCIONES IMPORTANTES SEGURIDAD PARA LA BATERiA CARGADOR DE BATERiAS WH18DSDL US.p65 48 DE Y EL Usted debera cargar la bateria antes de utilizar el atornilladores de percusion inalambrico. Antes de utilizar el cargador de baterias modelo UC18YRSL, cercioresedeleertodaslasinstruccionesy precauciones del mismo, de la bateria,y de este manual. 48 03Spa 16 14 14 10/2/12, 3:13 PM m_ I Espafiol /k PRECAUCION iUTILICE SOLAMENTEBATERJAHITACHIDEL TIPODE LA SERIEBSL18.LOSDEMASTIPOSDE BATERIAS PODRIAN EXPLOTAR Y CAUSAR LESIONES! ADVERTENCIA DE LA BATERIA DE LITIO Para ampliar su duracion, la bateria de litio esta equipada con lafuncion de protecci6n para detener la salida. En los casos 1 a 3 descritos mas abajo,cuando utilice Paraevitar el riesgo de lesiones,siga las instrucciones este producto, incluso si tira del interruptor, el motor ofrecidasa continuacion: puededetenerse.Noes un problema, sino el resultado de lafunci6n de proteccion. /k ADVERTENCIA: 1. Cuando la bateria restante se agota, el motor se La utilizaci6n inadecuadade la bateria o del detiene. cargadorde baterias puedeconducira lesiones En este caso,carguela inmediatamente. serias.Paraevitarestaslesiones: 2. Si la herramienta se sobrecarga,el motor puede detenerse.Eneste caso,suelteel interruptor de la 1. NUNCAdesarme la bateria. herramientay elimine lascausasde lasobrecarga. A continuaci6n, puedevolverla a utilizar. 2. NUNCA incinereuna bateria,aunqueeste da5ada 3. Si la bateriase calienta excesivamenteal realizar o completamen-teagotada. 3. NUNCAcortocircuite la bateria. un trabajo de sobrecarga,la potenciade la bateria podria pararse. 4. NUNCA inserte ningt_nobjeto en las ranuras de En este caso, deje de utilizar la bateriay deje que ventilaciondel cargador.Si Io hiciesepodriarecibir seenfrie.Posteriormentepuedeutilizarlade nuevo. descargas electricas o da_ar el cargador de baterias. Asimismo, presteatencionalas siguientesadvertencias 5. NUNCAcargueenexteriores. Mantengalabateria y precauclones. alejadade laluzsolardirecta,y utilicela solamente Ak ADVERTENCIA donde haya poca humedad y una buena Para evitar fugas de la bateria, generacion de calor, ventilacion. emision de humo, explosiones e igniciones, preste 6. NUNCAcarguecuandolatemperaturaseainferior atencionalas siguientes precauciones. a 32°F(0°C)o superior a 104°F(40°C). Si se carga la bateria a temperaturas fuera del 1. Asegt_rese de que no entran virutas o polvo en la rango de 32°F- 104°F(0°C- 40°C)tal vezla carga bateria. no se realicecorrectamente y se reduzcaaia^ida O Durante el trabajo, asegt_rese de que no caen de la bateria. virutas o polvo en la bateria. 7. NUNCAconecte dos cargadores de baterias O Asegt_rese de que las virutas o el polvo que caen juntos. sobre la herramienta electrica durante el trabajo 8. NUNCA inserteobjetosextra5osen elorificio para no entran en la bateria. la bateriani en el cargadorde baterias. O No almacene una bateria sin utilizar en un lugar 9. NUNCA utilice un transformador elevador para expuesto a virutas y polvo. cargar. O Antes de almacenar una bateria, retire las virutas 10. NUNCA utiliceun motogeneradornitension deCC y el polvo que se haya adherido y no la almacene para cargar. junto a piezas metalicas (tornillos, clavos, etc.). 11. NUNCAguarde la bateria ni el cargador de 2. No agujeree la bateria con un objeto afilado como baterias en lugares en los que la temperatura un clavo, no la golpee con un martillo, la pise, la puedaalcanzaro sobrepasar 104°F(40°C). tire o la exponga a fuertes impactos fisicos. 12. SlEMPRE utilice el cargador con un tomacorriente 3. No utilice una bateria que pudiera estar daSada o (120 voltios). La utilizaci6n de un cargador con deformada. cualquier otra tensi6n podria hacer que este se 4. No utilice la bateria con las polaridades cambiadas. recalentasey daSase. 5. No conecte la bateria directamente a salidas 13. SlEMPRE espere15minutos por Io menosentrelas electricas o a los encendedores de cigarros de los cargaspara evitar que el cargador serecaliente. coches. 14. SlEMPREdesconecte el cable de alimentaci6n del 6. No utilice la bateria para un fin diferente a los tomacorriente cuando no vaya a utilizar el especificados. cargador. 7. Si la carga de la bateria no finaliza incluso cuando 8. ha transcurrido un determinado tiempo de recarga, detenga inmediatamente la recarga. No coloque o exponga la bateria a temperaturas elevadas o alta presi6n como en un microondas, una secadora o un contenedor de gran presi6n. 49 03Spa WH18DSDL US.p65 49 10/2/12, 3:13 PM I rm I I Espafiol 9. Alejela del fuego inmediatamente cuando se detecteunafuga o un olor raro. 10. No la utilice en un lugar donde se genere gran electricidadestatica. 11. Si hay unafuga de la bateria,mal olor, segenera color, esta descolorida o deformada,o de algt_n modo funciona de forma anormal durante su utilizacion, recarga o almacenamiento, retirela inmediatamente del equipo o del cargador de la bateriay detenga su utilizacion. /K PRECAUCION 1. Si el liquido de fuga de labateriaentraen contacto conlos ojos, nose losfrote y lavelosbiencon agua limpia como,porejemplo,aguadelgrifo y p6ngase en contactocon un medico inmediatamente. Si no se trata,el liquido podria causar problemas de visi6n. 2. Si el liquido defuga entraen contactocon la piel o la ropa, lavela bien con agua limpia como, por ejemplo,agua del grifo inmediatamente. Podria producir irritaci6n de la piel. Si observa 6xido, mal olor, recalentamiento, decoloracion, deformaci6n y/u otras irregularidadesalutilizar labateriapor primeravez, no la utilice y devuelvasela a su proveedor o distribuidor. /k ADVERTENClA Si un objeto extrario conductor de electricidad entra en los terminales de la bateria de litio, podria producirse un cortacircuito, resultando en un riesgo de incendio. Por favor, respete los siguientes consejos cuando almacene la bateria. © No coloque cortes conductivos, clavos, cables de acero, cables de cobre u otros cables en la caja de almacenamiento. Q Instale el paquete de baterias en la herramienta electrica o almacenelo presionando la tapa de baterias hasta que se oculten los orificios de ventilacion para evitar cortacircuitos. (Ver Fig. 1} iGUARDE ESTAS INSTRUCCIONES Y PONGALAS ADISPOSICION DEOTROS USUARIOS Y PROPIETARIOS DEESTA HERRAMIENTA? 5O 03Spa WH18DSDL US.p65 50 10/2/12, 3:13 PM m_ I Espafiol NOTA: La informacion contenida en este Manual de instrucciones ha sido diseEadapare ayudarle a utilizer con seguridad y mantener esta herramienta ekctrica. NUNCAhaga funcionar ni efectt_eel mantenimiento de la herramienta antesde leery comprender todas las instruccionesde seguridad contenidasen este manual. Algunas ilustraciones de este Manual de Instruccionespueden mostrar detalleso accesoriosdiferentes a los de la propia herramientaekctrica. NOMENCLATURA 1. Atornillador de impacto a bateria (WH18DSDL)/ Llave (WR18DSDL) 0 WH18DSDL 0 WR18DSDL Alojamiento Alojamiento Yun_ Mangu_ Luz / "_u"_%q::_:7_ ^ , .---"1. J X_, Conmutador -_F-//s_ de gatillo \ _!\'_!\/ Asidero ----------_:"::_)_ 9_ . Boton pulsador ---" LUZ / "_(::_ . , /._ Conmutador "-_" 9_ de gatillo _J._l Palanca de cambio de rotaclon _ Botdn pulsador -- .... _ Asldero --__,_i_ ,nterru tores Paneld_ _! cra_iCoa c_ e rotacion "' interruptores_ _"_ _- _ Gancho Gancho Bateria Bateria © Bateria(BSL1830) Orificios de ventilacion _._, Terminales Taps de bateria Enganc Bateria Fig. 1 51 03Spa WH18DSDL US.p65 51 10/4/12, 8:31 AM I rm I I Espafiol Cargadorde baterias(UC18YRSL) Cable Lampara piloto de guia Placa de caracteristicas Fig.2 ESPEClFICAClONES 1. Atornillador de impacto a bateria/Llave Modelo WH18DSDL WR18DSDL Velocidad sin carga Modo de encendido Modo de ahorro Capacidad Tornillo pequeSo Perno ordinario 1/4" - 9/16" (M6 - M14) 3/8" - 23/32" (M10 - M18) Pernos de gran resistenciaa la tracci6n 1/4" - 15/32" (M6 - M12) 5/16" - 9/16" (M8 - M14) 0 - 2,600/min 0 - 2,000/min 5/32" - 3/8" (M4 - M10) Modo Energia1,510in-lbs. {170 N.m} Modo Guardar840in-lbs. {95 N.m} La torsion es de pernos 9/16"(M14) de gran resistenciaa latraccion con la bateria completamentecargada a 68°F(20°C)de temperatura. Tiempo de torsion: 3 seg. Torsion de apriete (Maxima) TamaSo de la espiga de broca Bateria recargable Peso Modo Energia188ft.lbs. {255 N.m} Modo Guardar Maxima 103ft.lbs. {140 N.m} Apriete del perno de gran resistenciaa la traccion de 5/8" (M16)F10T, estando completamente cargadaa unatemp. de 68°F(20°C). Tiempo de torsion: 5 seg. 1/4" (6.35 mm) Hex Cuadradode 1/2" (12.7ram) BSL1830: Li-ion 18 V (3.0 Ah) 3.7 Ibs. (1.7 kg) 2. Cargadorde baterias(UC18YRSL) Fuentede alimentacion de entrada Tiempo de carga Monof_sica: 120V CA,60 Hz Aprox. 45 min. Tensionde carga CC14.4V - 18 V Cargador CC14.4V: CC3.5 A CC18V: CC3.5A Corriente de carga Peso 1.3 Ibs. (0.6kg) NOTA:El tiempo de carga puedavariar de acuerdocon latemperatura y la tension de lafuente de alimentacion. 52 03Spa WH18DSDL US.p65 52 11/19/12, 1:25 PM m_ I Espafiol APLICAClONES <WH18DSDL> Atornillamiento y desatornillamiento de tornillos para metales,tornillos para madera,tornillos que no necesitanabrir antes su agujero,etc. <WR18DSDL> Apretado y aflojado de cualquier tipo de pernos y tuercaspasaaseguerarestructuras. MI_TODO DE EXTRACCION E INSTALACION DE LA BATERIA 1. Desmontajede labateria Sujetarfirmemente el asideroy presionarel cierre de la batariapara desmontarla (Ver la Fig.3). 1. Enchufeel cable de alimentacion del cargador a un tomacorriente de CA. Cuando hayaconectado el enchufe del cargador a una toma de la red, la lampara piloto se encendra en rojo. (A intervalosde 1segundo) No utiliceel cargadorsi su cableesta daSado. Haga que se Io reparen inmediatamente. Insertela bateriaen la cargador Introduzca la bateria firmemente en el cargador hastaque la linea este visible, tal y como se indica en la Fig 4, 5. Bateria Ak PRECAUCION Nocortocircuitar nunca la bateria. Instalacionde la bateria Insertar la bateriaobservando sus polaridades(ver la Fig.3). Mango Lampara piloto Cargador Enganche Fig.4 Linea -, ..... Presionar Bateria Fig.3 METODO DE CARGA NOTA: Antesde enchufar elcargadoren un tomacorriente, tenga en cuenta lospuntos siguientes. © Latension delafuentede alimentacionesta indicada en la placade caracteristicas. © El cable no debera estar daSado. /k ADVERTENCIA: Nocargueconunatensionsuperior a la indicada enla placadecaracteristicas. Si cargaseconunatensionsuperiora la indicada en la placa de caracteristicas,el cargador se quemaria. Fig. 5 Carga Cuandoinsertela bateriaen el cargadorde baterias, seiniciaralacarga,y la lamparapiloto seencendera en rojo. (Consultela Tabla 2) NOTA: Si la lamparapiloto parpadeaen rojo, desconecteel enchufedeltomacorriente y compruebe si labateria esta correctamente insertada. 53 03Spa WH18DSDL US.p65 53 10/2/12, 3:13 PM I rm I I Espafiol Cuandola bateriase hayacargado completamente, la lampara parpadeara lentamente en rojo. (A intervalos de 1 segundo) (ConsukelaTabla 2) (1) Incticacionesde la lampara piloto Lasindicacionesde lalampara piloto mostradasen laTabla2,seproducirande acuerdocon lacondicion del cargadoro de labateria. Tabla 2 Indicaciones Antes de la carga Durante carga El indicador luminoso piloto se ilumina o parpadea en rojo. la de la lampara piloto Parpadeo Se encendera durante 0.5 segundos. No se encendera durante 0.6 segundos. (Apagada durante 0.6 segundos) Iluminaci6n Iluminacion Carga completa Parpadeo Carga tmposible Destello permanente Se encendera durante 0.5 segundos. No se encendera durante 0.5 segundos. (Apagada durante 0.5 segundos) Se encendera durante 0.1 segundos. No se encendera durante 0.1 segundos. (Apagada durante 0.1 segundos) Mal funcionamento de la bateria o del cargador mmmmmmmmmmmmm El indicador luminoso pilot( se ilumina en verde. Espera por recalentamiento Iluminaci6n Illuminacion (2) Temperatura de la bateria La temperatura de la bateria recargable se muestra en la Tabla 3 y, si la bateria se ha calentado, habra que dejar que se enfrie durante cierto tiempo antes de recargarla. Tabla 3 Margenesde carga de lasbaterias Bateriarecargable recharg BSL1830 Temperaturaa la que podra recargarsela bateria 32OF-122OF (0oc- 50oc) (3) Tiempo de carga Tabla 4 Tiempo de carga (A 68°F(20°C)) Bateria BSL1830 Cargador _-_. UC18YRSL Aprox. 45 min. NOTA: El tiempo de carga puedavariar de acuerdo con la temperatura y la tension de la fuente de alimentacion. 4. Desconecte el cargador tomacorriente. de baterias permanente /k Bateria recalentada. No puede cargarse (la carga comenzar_ cuando la bateria se enfrie). PRECAUCION No desconecte el cabledeltomacorrientetirando delmismo. Cerciorese detirardelenchufeparadesconectarlo deltomacorrientea fin de evitardaSarel cable. 5. Extraiga la bateria del cargador de baterias. Sujetando el cargador de baterias con una mano, extraiga la bateria del mismo. I Forma de hacer que las baterias duren mas (1) Recarque las baterias antes de que se hayan agotado completamente. Si siente que la potencia de la herramienta electrica se debilita, deje de utilizarla y recargue su bateria. Si continuase utilizando la herramienta hasta agotar la capacidad de la bateria, esta podria dafiarse y su duraci6n util podria acortarse. (2) Evite realizar la recarga a altas temperaturas. Una bateria se calentara inmediatamente despues de haberla utilizado. Si recargase tal bateria inmediatamente despues de haberla utilizado, su substancia quimica interna se deterioraria, y la duracion util de la bateria se acortaria. Deje la bateria y recarguela despues de que se haya enfriado durante cierto tiempo. del 54 03Spa WH18DSDL US.p65 54 I 10/2/12, 3:13 PM m_ I Espahol iK • PRECAUCION 3. Seleccion del recepraculo que concuerde con el perno (WR18DSDL) Si utilizacontinuamenteel cargadordebaterias, Cerciorarsede utilizar un receptaculoqueconcuerde este se calentar&Io que puedecausaraverias. con el perno a ser apretado. Si se utilizase un Despuesde haberfinalizado la carga,espere15 receptaculo inadecuado, el apriete no sera minutosantesderealizarlacargasiguiente. satisfactorio y la cabezael perno o la tuerca se • Si recargaunabateria calienteo expuestaal sol, da_aran. la lamparapilotopuedeencenderseenverde. Un receptaculo,hexagonal o cuadrado,deformado Labateria no secargar& Ental caso,deje quela noquedarabienapretadoenlatuercaoen elyunque bateriase enfrieantesde cargarla. por Io quelatension de aprieteno serala adecuade. • Cuandola lamparapiloto parpadeerapidamente Poner atencion al desgaste de los agujeros del enrojo(a intervalosde 0.2 segundos), compruebe receptaculoy cambiarlo antesde queel destastesea y eliminelosobjetosextra_osquehayaenel orificio excesivo. deinstalaciondelcargadorde baterias.Si no hay objetosextra_os,esprobablequela bateriao que 4. Instalac6nde un receptaculo(WR18DSDL) Seleccioneel receptaculoque deseeemplear. el cargadorde baterias est_ funcionando real. Llevelosa uncentrode reparaciones autorizado. • Tipo embolo (Fig.7) Alinee el embolo sitado en la parte cuadradade la boca con el orificio del cuo hexagonal. Despues ANTES DE LA UTILIZACION empuje el embolo y monteel cubo hexagonalen la Compruebe el area de trabajo para cerciorarse de que boca. Compruebe que el embolo este este libre de escombros y bien ordenada. completamente enganchada en el orificio. Para extraer elcubo invierta la secuencia. Despeje el area de personal innecesario. Cerci6rese de que la iluminacion y la ventilaci6n sean adecuadas. ,4', PRECAUCION • Por favor utilice los accesoriosespecificadosen OPERACION las instrucciones de manejo yen el catalogode Hitachi. De Io contrario, se podrian producir 1. Instalacionde lapunta del atornillador (WH18DSDL) lesioneso accidentes. Para instalar la punta de destornillador, realice • Aseguresede instalar firmemente el casquillo siempre el procedimientosiguiente. (Fig.6) adaptador en el yunke. Si no esta instalado firmemente, el casquilloadaptadorsepodrasalir Manguito guia Movimiento y provocaraccidentes. Recaptaculo hexanogal Punta del atornillador Orificio hexagonal en el yunque Ranura Yunque _ )_ ( _<_/ _ '_J_ Fig.6 (1) Tire del manguito guia hacia delante. (2) Inserte la punta de destornillador en el orificio hexagonalen el yunque. (3) Suelte el manguito guia y devuelvaloa su posicion original. z_ PRECAUCION Si el manguito guia no vuelve a su posicion original,significaraquela puntade destornillador noesta correctamenteinstalada. 2. Extracci6nde la broca (WH18DSDL) Realicela operaci6n contraria a la de instalaci6nde la broca. Fig.7 Confirmarque labateriaesta puestacorrectamente. 6. Examinarla direccion de rotaci6n El manguito girara hacia la derecha (mirandola desde arras) al oprimir el lado R (der.) del boron pulsador. El lado L(izq.)del bot6n pulsador seusa para hacer girar el manguito hacia la izquierda.(Vea la Fig.8). (Las marcas _o y _, estan en el cuerpo de la herramienta.) 5. 55 03Spa WH18DSDL US.p65 55 10/2/12, 3:13 PM I rm I I Espafiol /k CL) Presionar _ Conmutador de gatillo ik Boton pulsador /k PRECAUCION El bot6n pulsador no podra utilizare mientras el motor de la herramienta est6 girando. Pars accionarlo, pare en primer lugar el motor de Is herramienta. 7. 0peracion de conmutacion © Cuandotire delgatillo delinterruptor, laherramienta girar& Cuandosuelteel gatillo, laherramientasedetendr& © Lavelocidadde rotacion podracontrolarsevariando la presi6n con la que tire del interruptor del gatillo. La velocidad ser_ baja cuando se tire ligeramente del gatillo, y aumentara a medida que se tire mas deel. © Cuando presione el disparado,el freno se aplicara inmediatamente. NOTA: Se produce un ruido de zumbido antes de que el motor empiecea girar, Io cual no indica problema alguno de la maquina. Cambiela velocidad de rotaci6n Taly comose muestraen la Fig.9,cuandolapalanca de cambio de rotacion se desliza hacia el lado inferior, se activa el modo de encendido (P). Y, cuandosedeslizahaciael lado superior, seactiva el modo de ahorro (S). Utilice el modo de ahorro (S)cuandodeseereducir el par de aprietemaximo. Modo Guardar (S) Apretado y aflojado de pernos Instale la punts de destornillador adecuada al tornillo, alineela con las ranuras de la cabezadel mismo, y despuesaprietelo. Presioneeltaladro/llavede impactosolo Io suficiente para mantener la punta fija sobre la cabeza del tornillo. Presionar Fig.8 _s-'__ Palanca de "_P"_ i\/ csmbio de rotacion Modo Energia (P) "_ PRECAUCION: Cuandotrabajeenel mododeahorro(S},noajuste continuamentelostornillos,ya quelatemperatura de loscomponentes electronicos delconmutador del convertidoraumenta. PRECAUCION El mantenerel taladro/llave de impacto sobreel tornillodemasiadotiempoIo apretarademasiado y podriaromperlo. Atornillar un tornillo con el taladro/llave de impactoa un angulo,puededa_ar la cabezadel tornillo y no transmitirala fuerza adecuadaal tornillo. Atornille con este taladro/llave de impacto alineadoen linearectaconeltornillo. 10.Apretado y aflojado de pernos Enprimer lugar tendraque seleccionarun manguito hexagonal que coincida con el perno o la tuerca. Despuestendra quemontar elmanguito en labocay sujetar latuercaque deseeapretarcon el manguito hexadecimal.SujetandolaIlaveen lineacon elperno, presioneel interruptorde alimentaci6npara apretar con impacto a latuercadurante variossegundos. Si latuercaquedasepocofijada al perno,este podria girar con ella e impediria el apriete adecuado. En este caso, deje de apretarcon impacto a latuercay sujete la cabezadel perno con una Ilave antes de reanudar el apriete con impacto, o apriete manualmenteel pernoy latuercapara evitarque se deslicen. 11.Usodel gancho El gancho seusa para colgarsela herramientacon alimentacion electrica del cintur6n mientras se trabaja. ,4k PRECAUCION • Cuandose utiliza el gancho,se debe sujetarla herramienta confirmezaparaquenosecaigapor accidente. AI caer,puedeprovocarunaccidente. • No ajuste ninguna broca en el extremo de la herramienta de alimentacionelectricasi la Ileva enganchadadel cinturon.Si la herramienta tiene ajustada una broca afilada, por ejemplo una perforadora,y se Ilevaenganchadaal cinturon, puederesultarlesionado. • Instale el ganchode forma segura. Si no esta correctamente colocado,puedeprovocarlesiones durante suuso. Fig.9 56 03Spa WH18DSDL US.p65 56 10/2/12, 3:13 PM m_ I Espafiol I Tabla 5 (1) Retiradadel gancho. Extraigalos tornillos que sujetan el gancho con un destornillador Philips. (Fig. 10) Estadodel Potencia de bateria restante indicador La potencia restante de la bateria es suficiente. La potencia restante de la bateria se encuentra a la mitad. La jootencia restante de la bateria esta practicamente agotada. Recargue la bateria cuanto antes. Gancho Tornillo Dado que el indicador de bateria restante muestra resultados ligeramente diferentes segun la temperatura ambiental y las caracteristicas de la bateria,utilice su lectura como referencia. Fig.10 (2) Colocaciondel ganchoy ajuste de los tornillos. Instaleel gancho en la ranura de la herramientade alimentacionelectrica deforma seguray aprietelos tornillos demaneraqueelganchoquedefirmemente sujeto. (Fig. 11) Ranura Gancho Tornillo Fig.11 12.Acercadel indicador de bateria restante AI pulsar el interruptor del indicador de bateria restante,seiluminael indicadorluminoso de bateria restantey puedecomprobarsela potenciarestante. (Fig. 12) AI retirar el dedo de dicho interruptor, el indicador luminoso de bateria restante se apaga. La tabla 5 muestrael estadodel indicadorluminoso de bateria restantey la potenciade bateria restante. Panel de interruptores NOTA: © No golpee con fuerza ni rompa el panel de interruptores. Puedenproducirse problemas. © Parareducir el consume de la potenciade bateria, el indicador luminoso de bateriarestanteseilumina mientras semantiene presionadoel interruptor del indicador de bateria restante. 13.Usode la luzLED Cadavezque sepresiona elinterruptor de lucesdel panel de interruptores, la luz LED se enciende o apaga.(Fig. 13) Parareducir el consumo de potenciade la bateria, apaguela luz LEDde manerafrecuente. Interruptor de luces Fig. 13 /k Interruptor de indicador Indicador de bateria luminoso de bateria restante restante " , PRECAUCION No exponga los ojos directamente a la luz; evite mirar hacia ella directamente. Si los ojos estan expuestos de manera continua a la luz, pueden resultar lesionados. NOTA: Paraevitar que se consuma la potencia de bateria por noacordarsedeapagarlaluzLED,laluzseapaga automaticamente tras un periodo de aproximadamente15 minutos. Fig.12 57 03Spa WH18DSDL US.p65 57 10/2/12, 3:13 PM rm I I Espafiol (3) Diametrodel perno OPERAClONALES Latension de apriete diffiere segt_nel diametro del 1. Reposo de la herramienta despues de un perno.Generalmente,cuanto mayorseaeldiametro funcionamiento prolongado del perno, mayor sera latension de apriete. Tras una tarea de apdete de pernos de larga (4) Condicionesde apriete duraci6n, deje la unidad en reposodurante unos 15 El par de aprietedifiere segt_nla relaci6n de par, la minutos al reemplazarlabateria. Si reinicia latarea clasey el largode lospernos,a pesarde queseutilicen inmediatamente despuesde reemplazarla bateria, pernoscon roscasdelmismotama[io.Elpardeapriete aumentarialatemperaturadelmotor, delinterruptor, difieretambiensegt]nlascondicionesde lasuperficie etc., con losconsiguientes riesgosde quemadura. delapiezadetrabajosobrelacualsevan aapretarlos pernos. Cuando el perno y la tuerca giran z_ PRECAUClON conjuntamente,el par sereduceconsiderablemente. No toque las partes metalicas, debido a que pueden alcanzar altas temperaturas durante el (5) Utilizacionde piezasopcionales(WR18DSDL) Latensi6n de apriete se reduceun poco cuandose trabajo continuo. utilizauna barrade extensi6n,unajunta universal o un receptaculode gran tama6o. 2. Precaucionessobre el empleo del interruptor de (6) Holgura del receptaculo(WR18DSDL) control de velocidad Un receptaculo con sus agujeros hexagonal o Este interruptor posee un circuito electronico cuadrado deformados no quedara bien sujeto a la incorporadoque varia lavelocidad de rotacion. Por tuerca o al yunque por Io que la tensi6n de apriete consiguiente, cuando apriete el gatillo s61o no sera apropiada. ligeramente (bajavelocidad de rotacion) y el motor Un receptaculoinapropiado, queno concuerdecon se pare mientras este insertando continuamente el perno, tembien evitara que latension de apriere tornillos, los componentes de dicho circuito seaadecuada. electr6nico puedenrecalentary da5arse. (7) Latorsi6n de aprietevariarade acuerdocon el nivel 3. Empleeel tiempo de apriete adecuadoaltornillo de cauga de la bateria. El par adecuadoaun tornillo difiere de acuerdocon el materialy el tama5o del mismo, el material en el quese esteatornillando, etc. PorIo tanto, empleeel tiempo de aprieteadecuado altornillo. Enespecial, en casode tornillos menoresa 5/16"(8ram)si utiliza un tiempo de aprietelargo, existeelpeligro de rotura de los tornillos, motivo por el que se le aconseja confirmar con antelacion el tiempo y el par de apriete. 4. Tensionde apriete apropiada para los pernos y tuercas La tension de apriete6ptima para pernosy tuercas difiere segt_nsu materialy tama6o. Una tension de apriete excesiva para un perno peque_o podria deformarlo o romperlo. Latension de aprieteaumentaproporcionalmentealteimpo de operacion. Utilice la indicacion de la escala y el tiempo de operacion adecuadosa cadaperno. 5. Confirmacion de latension de apriete Los factores que se mencionen a continuacion contribuyen a reducir latensi6n de apriete. Comprobar por ello la tension de apriete necesaria atornillando previamentealgunos tornillos con una Ilave de tuercas manual. Factoresque afectana la tensi6n de apriete. (1) Tension Cuandosealcanceelmargende descarga,latension se reduciray latorsion de apriete disminuir& (2) Tiempo de operacion Latension deaprieteaumentaalaumentareltiempo de operaci6n.Latensi6n de aprietesin embargono supera cierto valor a pesar de que la herramienta funcione durante un largo periodo de tiempo. PRECAUClONES 58 03Spa WH18DSDL US.p65 58 10/2/12, 3:13 PM m_ I Espafiol Z_ PRECAUCION Extraigala bateria antes de realizar cualquier trabajode inspecciono de mantenimiento. Limite de uso 1. Comprobacion de las condiciones de la broca. (WH18DSDL) Las brocas deberan comprobarse regularmente. Si una broca esta desgastada o rota, puede patinar o reducir la eficacia del motor, o hacer que se queme. Reemplace las brocas gastadas por otras nuevas. iK I.... ,= I Fig. 14 PRECAUCION U_a de escobilla de carb6n Si utiliza una broca de destornillador con su punta desgastada o rota, puede resultar peligroso, porque patinar& Por Io tanto reemplacela por otra nueva. -_ 2. Comprobacion de las condiciones del casquillo (WR18DSDL) Un receptaculo con sus agujeros hexagonal o cuadrado deformados no quedara bien sujeto a tuercao al yunque por Io que la tensi6n de apriete no sera apropida. Periodicamente,poner atencion al desgaste de los agujeros del receptaculo y cambiarlo por otro nuevo cuandosea necesario. 3. Comprobaci6nde lostornillos Lostornillos son peligrosos. Inspeccionelos regularmente y cerciorese de que esten bien apretados. /K iO.l_,l(3mm) I 0.45" (11.5mm) Salientede , esco,billa de carbon Fig. 15 Reemplazarel carbonde contacto Extraigalaescobilla de carb6nquitando primero la tapa y despues enganchando el saliente de la escobilla de carb6n con un destornillador de punta plana,etc., como semuestra en la Fig.16. Cuandoinstale laescobillade carbon,elijael sentido en el que la usa de la misma coincida con el tubo exterior de la parte de contactode dicha escoibilla de carb6n. Despuesempuje la escobilla de carbon con un dedo, como se muestra en la Fig. 17. Por t_ltimo,instale la tapa de laescobilla de carb6n. PRECAUCION La utilizaci6n de esta herramienta electrica con tornillos flojosesextremadamente peligroso. Mantenimiento de motor La unidad de bobinado del motor es el verdadero "coraz6n" de las harramientas electrias. Prestarel mayor cuidado aasegurarsede queel bobinado no se daSey/o se humedezcacon aceiteo agua. Inspeccionde lasescobillas de carb6n (Fig. 14) El motor empleaescobillasde carb6nque sonpiezas consumibles. Como una escobilla excesivamente desgastada podria dar problemas al motor, reemplacelas por otras nuevas cuando se hayan desgastadoo estencercadel "limite de desgaste". Ademas, mantenga siempre limpias las escobillas de carbon y compruebe si se mueven libremente dentro de sus portaescobillas. \ \ /k • • PRECAUCION: Cercioresede insertar la usa de la escobilla de carbonen eltubo exterior de la partede contacto de la misma. (Usted podra insertar cualquierade las dos uSassuministradas.} Tendacuidado,porque un error en esta operacion podria deformar la usa de la escobilla y daSar prematuramente el motor. @ NOTA: Cuandoreemplacelasescobillasde carbonpor otras nuevas, utilice escobillas Hitachi con numero de codigo 999054. Fig. 16 59 03Spa WH18DSDL US.p65 59 10/2/12, 3:13 PM I rm I I Espafiol Ak ............Cubo exterior de la parte de contacto de la escobilla de carbon Fig. 17 Comprobacion del polvo El polvo podra eliminarse con un paho suave y secoo ligeramentehumedecidoen aguajabonosa. No utilice lejia, cloro, gasolina, ni diluidor de pintura, porque podrian da5ar el plastico. 8, Eliminaci6n de lasbateriasagotadas Ax ADVERTENCIA: Notire lasbateriasagotadas. Lasbateriaspueden explotar si se incineran. El producto que ha adquiridocontiene una bateria. La bateria es reciclable.Cuandose agotesu duraciont_til,de acuerdoconlas leyesestatalesy locales,puede ser ilegaltiraresta bateriaa la basura.Solicitea las autoridades locales los detalles sobre las opcionesderecicladoo delaforma dedeshacerse apropiadamentede la bateria. 7, 9, AImacenamiento Guarde la herramientaen un lugar con menos de 104°F(40°C)y fuera del alcancede nihos. PRECAUCION La reparacion,modificacione inspeccion de las herramientas electricas Hitachi deben ser realizadaspor un Centrode Servicio Autorizado deHitachi. Esta lista de repuestossera de utilidad si es presentadajuntoconla heramienta al Centrode Servicio Autorizadode Hitachi para solicitarla reparacion o cualquier otro tipo de mantenimiento. En el manejo y el mantenimiento de las herramientaselectricas,se deberanobservarlas normasy reglamentosvigentesencadapals. MODIFICACIONES: HitachiPowerTools introduceconstantementemejoras y modificacionespara incorporarlos ultimos avances tecnol6gicos. Porconsiguiente,algunaspartes(porejemplo,numeros de c6digos y/o dise_o) pueden ser modificadas sin previo aviso. Aviso importante sobre las pilas de las herramientasinalambricasde Hitachi Utilice siempre una de nuestras pilas genuinas. No podemos garantizar la seguridad y el funcionamiento de nuestra herramientaelectrica inal_mbrica cuando seutiliza con pilas diferentes alas indicadas por nosotros o cuando la pila se desmonta y modifica (como cuando se desmontan y sustituyen celdas u otras piezas internas). NOTA: Aseguresede que la bateriaesta completamente cargada si lava a almacenar durante un prolongado periodo de tiempo (3 meses o mas). Es posibleque la bateriacon una capacidadmas pequeha no se puedacargar cuando se utilice si seha almacenadodurante un prolongado periodo de tiempo. 10. Mantenimientoy reparacion Todas las herramientas electricas de calidad requieren de vez en cuando el servicio de mantenimiento o el reemplazode piezas debido al desgaste producido durante la utilizaci6n normal. Para asegurarse de que solamente se utilicen piezasdereemplazoautorizadas,todos los servicios de mantenimientoy reparaciondeberan realizarse SOLAMENTE EN UN CENTRO DE REPARACIONES AUTORIZADOPORHITACHI. 11. Lista de repuestos A: N°. item B: N°. c6digo C: N°. usado D: Observaciones 60 03Spa WH18DSDL USp60.p65 60 10/4/12, 9:00 m_ I Espafiol ADVERTENCIA: SIEMPREutiliceunicamenterepuestosy accesorios autorizadosporHITACHI.NOutilicenuncarepuestoso accesoriosno previstosparausarconesta herramienta.Si tiene dudasen cuantoa la seguridadde usar determinadorepuestoo accesoriojuntoconsu herramienta,p6ngaseen contactoconHITACHI. Lautilizaci6ndeotrosaccesoriospuederesultarpeligrosay causarlesioneso da_osmecanicos. NOTA: Lasespecificacionesestansujetasa cambio sin ningunaobligacion por partede HITACHI. ACCESORIOS ESTANDAR C1_Cargadorde baterias(UC18YRSL).............................................................................................. 1 WH18DSDL _2_Bateda(BSL1830).......................................................................................................................... 2 WR18DSDL (2LSRK) _3_Tapade bateria (NOde c6digo 329897)....................................................................................... 1 _4_Cajade plastico (NOde codigo 323230)....................................................................................... 1 WH18DSDL WR18DSDL La bateria,el cargadorde baterias,el caja de plastico y latapa de bateria no estan incluidos. (NN) ACCESORIOS OPCIONALES <WH18DSDL> 1. Bateria BSL1830(CodeNo. 330067) 2. BrocaPhillips No. de destornillador No. 2 No. 3 No. de c6digo 992671 992672 61 03Spa WH18DSDL US.p65 61 10/2/12, 3:14 PM I rm I I Espafiol 3. Receptaculohexagonalpara tuercasy pernos Nombrede la pieza Caracteres grabactos L B No. de c6digo 4 mm Receptaculohexagonal 5 mm Receptaculohexagonal 7 8 65 65 7 8 992689 996177 6 mm Receptaculohexagonal 5/16"Receptaculohexagonal 10 12 65 65 10 12 985329 996178 8 mm Receptaculohexagonal 13 65 13 996179 10 mm Receptaculohexagonal (Tama6o peque6o) 14 65 14 996180 10 mm Receptaculohexagonal 10 mm Receptaculohexagonal 16 17 65 65 16 17 996181 996182 1/2"Receptaculohexagonal largo 21 166 21 996197 Juego adaptador de portabrocas: No. de c6digo 321823 Montelasbrocasque sevendenen el mercado para perforar orificios. Caracteresgrabados <WR18DSDL> 1. Bateria BSL1830(CodeNo. 330067) 2. Cubos Forma C Forma D 62 03Spa WH18DSDL US.p65 62 10/2/12, 3:14 PM m_ I Espafiol Dimensi6nS de laboca impulsora cuadrada 1/2" (12.7mm) Diamero Nombre del producto Cubo hexagonal N ° de codigo 10 mm 944291 12 mm 873632 13 mm 873539 14ram 873540 Gran tension id6neo ISO (ordinario) del perno ISO (pequedo) Dimensi6nHentr_ Pernos en pulgadas M6 5/16" (8 ram) 11/16" (18 ram) 15/32" (12 mm) B 1-9/16" (40 ram) 5/16" (8 ram) 25/32" (20 ram) 33/64" (13 mm) B 1-9/16" (40 ram) 11/32" (9 ram) 1" (25 ram) M10 9/16" (14ram) B 1-9/16" (40ram) 11/32" (gram) 1" (25ram) C 1-1/4" (32mm) 5/16" (8ram) 1-3/32" (28ram) M8 W5/16" M8 M10 M12 W3/8" 19ram 873624 M12 M14 W7/16" 3/4" (19ram) 873627 24ram C 1-11/32" (34ram) 11/32" (gram) 1-3/32" (28ram) 13/16" (21 ram) D 1-13/32" (36 ram) 3/8" (10 ram) 1-1/4" (32 mm) M16 7/8" (22mm) D 1-9/16" (40ram) 9/16" (14ram) 1-3/8" (35ram) M18 15/16" (24ram) D 1-9/16" (40ram) 9/16" (15ram) 1-1/2" (38ram) Wl/2" M12 M14 873629 M16 eF 1-9/16" (40 ram) 873536 22ram del B 17ram 873626 L cubo principal L1 25/64" (10 ram) 11/16" (17ram) 21 mm Dimensiones carasopuestaSdela boca Forma hexagonal 3. Cubo largo Forma I_ma _LI_, Dimensi6nS dela boca impulsora cuadrada _ Di_mero Nombre del producto Cubo largo N ° de codJgo 12ram 955138 13ram 955139 14ram 1/2" (12.7 rnm) Forma Gran tensi6n C idoneo del perno ISO ISO (ordinario)(peque6o) M8 _ernos en pulgadas W5/16" M8 955140 D Dimensiones del cubo principal Dimensi6n H entr_ caras opuestas Forms dela boca hexagonal L L1 L2 cF 16/32" (12mm) B 2-3/64" (52mm) 25/32" (20mm) 1-11/32" (34mm) 25/32" (20mm) 33/64" (13mm) B 2-3/64" (52mm) 25/32" (20mm) 1-11/32" (34mm) 53/64" (21,5mm 25/32" (20mm) 1-11/32" (34mm) 7/8" (22mm) M10 9/16" (14mm) B 2-3/64" (52mm) B 2-3/64" (52mm) 15/16" (24mm) 1-11/32" (34mm) 1" (25mm) B 2-15/16" (75mm) 15/16" (24mm) 2-1/4" (57mm) 1" (25mm) 15/16" (24mm) 15/16" (24mm) 1-11/32" (34mm) 2-1/4" (57mm) 1-3/32" (28mm) 1-3/32" (28mm) 17ram 955141 M10 M12 W3/8" 11/16" (17mm) 17ram 955149 M10 M12 W3/8" 11/16" (17mm) 19ram 955150 W7/16" 3/4" (19mm) 3/4" (19mm) B 2-3/64" (52mm) 2-15/16" (75mm) 21 mm 955143 Wl/2" 13/16" (21mm) D 2-3/64" (52mm) 15/16" (24mm) 1-11/32" (34mm) 1-7/32" (31mm) 21 mm 955151 Wl/2" 13/16" (21mm) D 2-15/16" (75mm) 15/16" (24mm) 2-1/4" (57mm) 1-7/32" (31mm) Wl/2" 13/16" (21mm) 15/16" (24mm) 4-7/32" (107ram) 1-7/32" (31mm) 19ram 955142 M12 M14 W7/16" M12 M14 21 mm 991480 22ram 955144 24ram 955146 M12 M14 M16 7/8" (22mm) M16 M18 15/16" (24mm) B D 4-15/16" (125mm) D 2-3/64" (52mm) 15/16" (24mm) 1-11/32" (34mm) 1-9/32" (32,5mm D 2-3/64" (52mm) 63/64" (25mm) 1-11/32" (34mm) 1-11/32" (34ram) 63 03Spa WH18DSDL US.p65 63 10/2/12, 3:14 PM I rm I I Espafiol Barra de extension: La barra de extension es muy apropiada para trabajar en espacios muy reducidos o cuando el receptaculo provisto no pueda Ilegar al perno a ser apretado. PRECAUCION Cuando seutilicela barradeextensi6n,latensi6n de aprietese reduceligeramenteencomparci6n, latensi6nIogradaconel receptaculoordinario. Node c6digo 873633 dimensi6n B,S 1/2"(12.7mm) J 7. Adaptador de brocas: Este adaptador se utiliza para apretar tornillos pequeSos(M6). NOTA: Este adaptedoe de brocas sirve solamente para utilizar en angulo recto la unidad principal. 991476 I Nodec6digo 1/2" (12.7mm) dimensionS NOTA: Las especificationes estan sujetas a cambio sin ningunaobligacion pot partede HITACHI. Junta cardanica: Junta cardanica sera muy t_til para apretar tuercas con cierto angulo entre el cubo y el cubo y el aprietatuercal, o cuando haya que trabajar en un espacio muy angosto. Node c6digo 992610 dimensi6n B, S 1/2" (12.7mm) J I Cubo para conductos: Este cubo se utiliza para apretar pernos y tuercas de secciones con rebordes de conductos de accondicionadonadores de aire, etc. LS Dimensi6n H entrecaras NOdecodigo opuestasdelabocahexagonal 993658 992613 992615 15/32"(12mm) 1/2"(13mm) 9/16"(14mm) 1/2" (12.7mm) 64 03Spa WH18DSDL US.p65 64 10/2/12, 3:14 PM o WH18DSDL co co I @ A B C 1 2 3 4 5 6 7 8 9 10 11 12 13 14 15 16 17 18 19 20 21 22 23 24 25 26 27 28 29 30 31 32 33 34 35 36 37 38 39 40 41 330619 330856 331284 322717 332198 333745 319535 333744 959154 324218 959148 315978 324224 316172 324222 332186 326295 319914 333747 983852 319911 6901VV 324230 332185 360947 324607 334901 324228 334955 999054 319918 1 1 1 1 1 1 2 1 2 1 28 1 1 1 1 1 2 2 1 1 1 1 2 1 1 1 1 1 1 2 2 1 9 1 1 1 1 1 1 1 2 301653 334953 329519 327001 332824 329520 329454 334956 327002 D A 42 45 46 501 502 503 D3.5 D5.556 D3.175 S-42 6901VVCMPS2L "26" 5×6×11.5 D4×20 M4 M4 B 328644 334958 330067 323230 329897 C 2 1 2 1 1 1 D BSL1830 UC18YRSL co co I WR18DSDL A B C 1 2 3 4 5 6 7 8 9 10 11 12 13 14 15 16 17 18 19 20 21 22 23 24 25 26 27 28 29 30 31 32 33 34 35 36 37 38 39 40 332198 332200 332196 324257 332197 324256 959154 333749 959148 315978 324224 316172 324222 332186 326295 319914 326787 983852 319911 6901VV 324230 332185 360947 324607 334901 324228 334955 999054 319918 1 1 1 1 1 1 2 1 28 2 1 1 1 1 2 2 1 1 1 1 2 1 1 1 1 1 1 2 2 1 9 1 1 1 1 1 1 1 2 2 301653 334953 329519 327001 332824 329520 329454 334956 327002 328644 D "4-6" D5.556 D3.175 S-42 6901VVCMPS2L "24" 5×6×11.5 D4×20 M4 A 43 44 501 502 503 B 334958 330067 323230 329897 C 1 2 1 1 1 D BSL1830 UC18YRSL 67 03Spa WH18DSDL US.p65 67 10/2/12, 3:14 PM Please contact HITACHI KOKI U.S.A. LTD. at 1-800-59-TOOLS (toll free), or HITACHI AUTHORIZED POWER TOOL SERVICE CENTER regarding COLLECTION. Pour le RAMASSAGE, contacter HITACHI KOKI U.S.A. LTD. au 1-800-59-TOOLS (appet gratuit), ou UN SERVICE APR#S-VENTE D'OUTILS I_LECTRIQUE AGRI_I _ PAR HITACHI. Con respecto a la RECOLECCION de baterias, p6ngase en contacto con HITACHI KOKI U.S.A. LTD. nQmero 1-800-59-TOOLS (llamada gratis), o con HITACHI AUTHORIZED POWER TOOL SERVICE CENTER. Issued by _Hitachi Sinagawa Koki Co., Ltd. IntercityTower Minato-ku,Tokyo Distributed A, 15-1, Konan 2-chome, 108-6020, Japan by _)Hitachi Koki U.S.A., Ltd. 3950 Steve Reynolds Norcross, _)Hitachi Blvd. GA 30093 Koki Canada Corp. 450 Export Blvd. Unit B, Mississauga ON L5S 2A4 208 Code No. C99203261 Printed 03Spa WH18DSDL US.p65 68 10/2/12, 3:14 PM in China-
 1
1
-
 2
2
-
 3
3
-
 4
4
-
 5
5
-
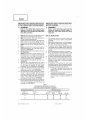 6
6
-
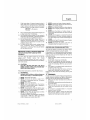 7
7
-
 8
8
-
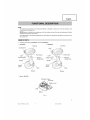 9
9
-
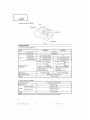 10
10
-
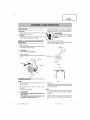 11
11
-
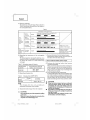 12
12
-
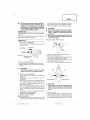 13
13
-
 14
14
-
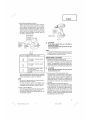 15
15
-
 16
16
-
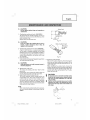 17
17
-
 18
18
-
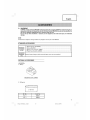 19
19
-
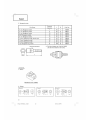 20
20
-
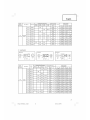 21
21
-
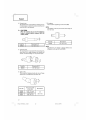 22
22
-
 23
23
-
 24
24
-
 25
25
-
 26
26
-
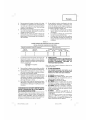 27
27
-
 28
28
-
 29
29
-
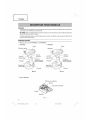 30
30
-
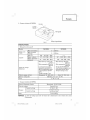 31
31
-
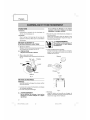 32
32
-
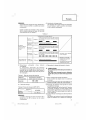 33
33
-
 34
34
-
 35
35
-
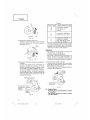 36
36
-
 37
37
-
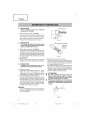 38
38
-
 39
39
-
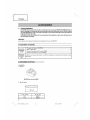 40
40
-
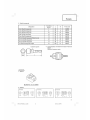 41
41
-
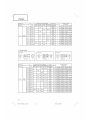 42
42
-
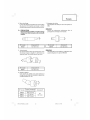 43
43
-
 44
44
-
 45
45
-
 46
46
-
 47
47
-
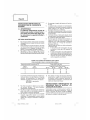 48
48
-
 49
49
-
 50
50
-
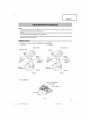 51
51
-
 52
52
-
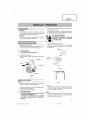 53
53
-
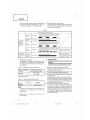 54
54
-
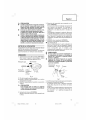 55
55
-
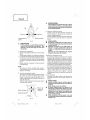 56
56
-
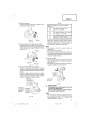 57
57
-
 58
58
-
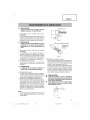 59
59
-
 60
60
-
 61
61
-
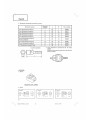 62
62
-
 63
63
-
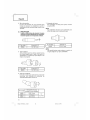 64
64
-
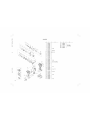 65
65
-
 66
66
-
 67
67
-
 68
68


Hitachi WR 18DSDL Safety Instructions And Instruction Manual
- Tipo
- Safety Instructions And Instruction Manual
- Este manual también es adecuado para
en otros idiomas
- français: Hitachi WR 18DSDL
- English: Hitachi WR 18DSDL
Artículos relacionados
-
Hitachi wh 18 dsl Manual de usuario
-
-
Hitachi WH 18DL El manual del propietario
-
-
Hitachi DV18DSDL Manual de usuario
-
Hitachi DS18DSAL El manual del propietario
-
-
Hikoki WR18DBDL Manual de usuario
-
-
Hikoki WH14DBL Manual de usuario
