Prime TNO24111 Manual de usuario
- Categoría
- Temporizadores eléctricos
- Tipo
- Manual de usuario

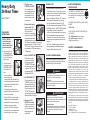
2. Plug timer into an
ELECTRICAL OUTLET
Use an outdoor-rated
three-pronged grounded
electrical outlet. Do not
use extension cords to
connect the timer to the
power source.
3. Set a period of time for
the timer to be “ON”
Make sure all pins are in the
UP position before
beginning. Locate the gray
pins and push them DOWN
at the marked times when
the attached device is to be
“ON”. Each pin represents a 30 minute time
interval. Example: “ON” time is 7:00pm,
“OFF” time is 11:00pm. Push down all of the
pins between the 7:00pm arrow and the
11:00pm arrow.
4. Set the “CURRENT TIME”
Rotate the entire gray
push-pin dial clockwise
until the arrow marked
“CURRENT TIME” aligns
with the current time of day
on the dial. “AM” hours are
highlighted in WHITE. “PM” hours are
highlighted in BLACK.
5. Set “BYPASS SWITCH”
When the switch is in the
“TIMER ON” position, timer
will automatically turn the
attached device on and off.
When the switch is in the
“OUTLET ON” position,
timer will bypass the programming and the
attached device will remain on.
6. Attach up to TWO
DEVICES to the timer
Plug the devices into the
outlets on the bottom of
the timer. Make sure the
attached devices are
switched ON.
Heavy Duty
24-Hour Timer
Model: TNO24111
STEP-BY-STEP
INSTRUCTIONS
HELPFUL TIPS
• This timer repeats the same settings daily.
• To push down or pull up the gray pins, use your
finger or the tip of a small non-metalic insulated
tool, such as a pencil or toothpick.
• Set up to 48 different “ON” and “OFF” times in a
24 hour period by the positioning of the gray
pins. Pins pressed down represent the ‘ON’
time.
Pins in the up position represent ‘OFF’ time.
• Switching the timer to “OUTLET ON” will bypass
programming, however, the timer dial will
continue to rotate and maintain the current time.
• This timer is weather-resistant and rated for
Outdoor Use. The timer will function outdoors
when installed and operated as outlined in this
manual.
• The “Power” indicator will glow red when the
timer programming is activated and power is
being provided to attached devices.
IN CASE OF POWER FAILURE
Timer will stop operating if the power goes out.
Once power is restored, reset the time of day as
explained in Step 4 of the instructions.
SAFETY INFORMATION &
SPECIFICATIONS
THIS TIMER IS A “GROUNDED” DEVICE
The male plug contains a ground pin and is
only intended for use with a three-pronged
grounded outlet.
THIS TIMER IS FOR USE WITH A 125VAC POWER
SOURCE.
125VAC / 60Hz
DO NOT ATTACH A DEVICE THAT EXCEEDS THE
UNIT RATINGS:
15A / 1875W Resistive (General Purpose)
10A / 1250W Tungsten (Incandescent)
1/2 HP (Horsepower Motor)
LIMITED 1 YEAR WARRANTY
Prime warrants this product to be free from manufacturing
defects for a period of one year from the original date of
purchase (“warranty period”). This warranty is limited to the
repair or replacement of this product only and Prime is not
liable for any consequential or incidental damage to other
products that may be used with this unit. This warranty is
effective only if such unit is returned to Prime not later than
thirty (30) days after the expiration of the warranty period.
Warranty is void if damage is due to neglect, misuse,
alteration, modification, improper installation, or repair by
other than Prime. This warranty is in lieu of all other
warranties express or implied. Some states do not allow
limitations on how long an implied warranty lasts or permit the
exclusion or limitation of incidental or consequential
damages, so the above limitations may not apply to you.
It is our experience that a product that fails prematurely due to
a manufacturing defect in materials or workmanship, will
generally do so very early in the product’s life cycle, often the
first or second time the product is used. Products that are
returned for warranty inspection after months or years of
continuous reliable service are usually the result of normal
wear and tear, which is not considered a defect in materials or
workmanship and therefore is not covered by the warranty.
This warranty gives you specific rights, and you may also
have other rights which vary from state to state. If unit should
prove defective within the warranty period, return within the
time period set forth above prepaid with the original purchase
receipt to:
Prime Wire & Cable, Inc.
ATTN: Timer Warranty
280 Machlin Court
City of Industry, CA 91789
Service - (888) 445-9955 • www.primewirecable.com
1. INSTALL TIMER to a
vertical flat surface
close to a properly
installed outdoor-rated
grounded receptacle
a. Using a screw or hook
(not included), secure
the MOUNTING TAB at
the top of the timer to
a wall or post.
b. For a more secure
mounting, use the two
MOUNTING HOLES
on the back of the
timer.
• Create a mounting
template by placing
a sheet of paper over the back of the
timer and punching holes through the
paper where the mounting holes are
located on the timer.
• Temporarily secure the mounting
template to the flat surface where the
timer is to be mounted.
• Drill two 3/32 inch pilot holes where
indicated on the mounting template.
• Insert two #6 sheet metal screws (not
included), leaving screw heads
protruding 1/8 inch from the surface.
• Place the timer over the screw heads
and push down to lock into place.
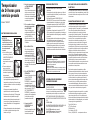
WARNING
Risk of Electric Shock
Keep children away. Unplug timer before cleaning. Fully
insert plug. Do not use near standing water.
Risk of Fire
Do not use to control appliances that contain heating
elements (cooking appliances, heaters, irons, etc.). Do not
exceed electrical ratings.
a
AVERTISSEMENT
Risque de choc électrique
Garder hors de portée des enfants. Débrancher la
minuterie avant de nettoyer. Insérer complètement la fiche.
Ne pas utiliser près de l’eau stagnante.
Risque d’incendie
Ne pas utiliser pour contrôler les appareils contenant des
éléments chauffants (équipements de cuisine, radiateurs,
fers à repasser, etc.). Ne pas excéder la capacité
électrique.
Outlet
ON
Timer
ON
b

2. Enchufe el temporizador en
un TOMACORRIENTE
ELÉCTRICO
Use un tomacorriente para tres
clavijas con conexión a tierra
apto para uso a la intemperie.
No use cables de extensión para
conectar el temporizador al
suministro eléctrico.
3. Fije un período de tiempo
para que el temporizador
esté ENCENDIDO
Ubique las clavijas grises y
empújelas hacia ABAJO en los
tiempos marcados cuando se
vaya a ENCENDER el
dispositivo conectado. Cada
clavija representa un intervalo de
30 minutos.
4. Fije la HORA ACTUAL
Gire el dial con clavijas de
empuje completamente en
sentido horario hasta que la
flecha marcada “CURRENT
TIME” (HORA ACTUAL) quede
alineada con la hora actual del
día en el dial. Las horas “AM”
están resaltadas de BLANCO.
Las horas “PM” están resaltadas
de NEGRO.
5. Fije el INTERRUPTOR DE
DERIVACIÓN
Cuando el interruptor esté en la
posición “TIMER ON”
(TEMPORIZADOR
ENCENDIDO), el temporizador
encenderá y apagará
automáticamente el dispositivo
conectado. Cuando el interruptor
esté en la posición “OUTLET
ON” (TOMACORRIENTE
ENCENDIDO), el temporizador
pasará por alto la programación
y el dispositivo conectado
permanecerá encendido.
6. Conecte hasta DOS
DISPOSITIVOS en el
temporizador
Enchufe los dispositivos en las
tomas situadas de la parte
inferior del temporizador.
CONSEJOS PRÁCTICOS
• Este temporizador repite los mismos ajustes
diariamente.
• Para empujar o jalar las clavijas grises, use el dedo o la
punta de un pequeño útil aislado y no metálico tal como
un lápiz o mondadientes.
• Fije hasta 48 tiempos de ENCENDIDO (ON) Y
APAGADO (OFF) en un período de 24 horas mediante
el posicionamiento de las clavijas grises. Las clavijas
presionadas representan el tiempo de ENCENDIDO.
Las clavijas en posición arriba representan el tiempo de
APAGADO.
• Al cambiarse el temporizador a la posición “OUTLET
ON” se pasará por alto la programación, sin embargo, el
dial del temporizador continuará girando y mantendrá la
hora actual.
• Este temporizador resiste las inclemencias climáticas y
está clasificado para usarse a la intemperie. El
temporizador funcionará a la intemperie cuando se
instale y opere tal como se indica en este manual.
• El indicador de potencia brilla de color rojo cuando la
programación del temporizador está activada y los
dispositivos conectados están recibiendo el suministro.
EN CASO DE FALLA DEL SUMINISTRO
ELÉCTRICO
El temporizador deja de funcionar si se interrumpe el
suministro. Una vez que se reestablezca, vuelva a fijar
la hora del día tal como se explicó en el Paso 4 de las
instrucciones.
GARANTÍA LIMITADA DE 1 AÑO
Prime garantiza al comprador consumidor original, y
exclusivamente para beneficio de dicho comprador
consumidor original (el "consumidor"), que el temporizador
Power Zone no presentará defectos de fabricación
durante un período de un año a partir de la fecha de
compra original (“período de garantía”). Esta garantía está
limitada exclusivamente a la reparación o reemplazo del
producto y Prime no se responsabiliza por los daños
consecuentes o incidentales que puedan sufrir otros
productos que se usen con esta unidad. Esta garantía
tendrá vigencia sólo si la unidad se devuelve a Prime a
más tardar treinta (30) días tras el vencimiento del período
de garantía. La garantía se anula si los daños se deben a
negligencia, uso indebido, alteración, modificación,
instalación incorrecta, o reparaciones hechas por terceros
ajenos a Prime. Esta garantía reemplaza a todas las
demás garantías expresas o implícitas. Algunos estados
no permiten limitaciones en cuanto a la duración de una
garantía implícita, y otros no permiten la exclusión o
limitación de daños incidentales o consecuentes, de modo
que es posible que las limitaciones antedichas no sean
pertinentes en su caso particular.
Según nuestra experiencia los productos que fallan
prematuramente debido a defectos de material o mano de
obra, en general lo hacen en las primeras etapas de su
ciclo de vida útil, a menudo la primera o segunda vez que
se utiliza el producto. Los productos que se devuelven
para ser inspeccionados bajo garantía tras meses o años
de servicio continuo y confiable, presentan problemas
como resultado del desgaste y deterioro normales, los
cuales no se consideran defectos de material ni mano de
obra y por lo tanto no están cubiertos por la garantía.
Esta garantía le otorga derechos específicos, y es posible
que usted también tenga otros derechos que pueden
variar de una jurisdicción a otra. Si la unidad presenta
defectos dentro del período de garantía, devuélvalo dentro
del plazo antedicho con flete prepagado y con el recibo de
compra original a la siguiente dirección:
Prime Wire & Cable, Inc.
ATTN: Timer Warranty
280 Machlin Court
City of Industry, CA 91789
Service - (888) 445-9955 • www.primewirecable.com
1. INSTALE EL
TEMPORIZADOR en una
superficie plana y vertical
cerca de un tomacorriente
de intemperie con puesta a
tierra correctamente
instalado
a. Use un tornillo o gancho
(no se incluye) y afiance la
LENGÜETA DE MONTAJE
situada encima del
temporizador a una pared o
poste.
b. Para un montaje más
seguro, use los dos
ORIFICIOS DE MONTAJE
situados en la parte trasera
de temporizador.
• Cree una plantilla de montaje colocando una
hoja de papel sobre la parte posterior del
temporizador y perforando orificios en el papel
donde se encuentran los orificios de montaje en
el temporizador.
• Afiance provisoriamente la plantilla a la
superficie donde va montar el temporizador.
• Perfore dos orificios piloto de 3/32 de pulgada
donde se indica en la plantilla de montaje.
• Introduzca dos tornillos autorroscantes núm. 6
(no se incluyen), dejando las cabezas de los
mismos sobresaliendo a 1/8 de pulgada de la
superficie.
• Coloque el temporizador sobre las cabezas de
los tornillos y empújelo hacia abajo a fin de
trabarlo en su lugar.
b
ADVERTENCIA
Peligro de descarga eléctrica
Mantenga a los niños alejados. Desenchufe el temporizador
antes de limpiarlo. Introduzca plenamente el enchufe. No lo
use cerca de agua estancada.
Peligro de incendio
No lo use para controlar artefactos que contengan elementos
calefactores (artefactos de cocción, calentadores, planchas,
etc.). No exceda las capacidades nominales.
Temporizador
de 24 horas para
servicio pesado
Modelo: TNO24111
INSTRUCCIONES PASO A PASO
INFORMACIÓN DE SEGURIDAD
Y ESPECIFICACIONES
ESTE TEMPORIZADOR ES UN DISPOSITIVO
“PUESTO A TIERRA”
El enchufe macho contiene una clavija de puesta
a tierra y sólo está diseñado para usarse con un
tomacorriente para tres clavijas con conexión a tierra.
ESTE TEMPORIZADOR ESTÁ DISEÑADO PARA
USARSE CON UN SUMINISTRO ELÉCTRICO DE 125
VCA.
125 VCA / 60Hz
NO CONECTE UN DISPOSITIVO QUE EXCEDA LAS
CAPACIDADES NOMINALES DE LA UNIDAD:
15A / 1875 W resistivo (uso general)
10A / 1250 W tungsteno (incandescente)
1/2 HP (motor de caballos de fuerza)
Outlet
ON
Timer
ON
a
-
 1
1
-
 2
2


Prime TNO24111 Manual de usuario
- Categoría
- Temporizadores eléctricos
- Tipo
- Manual de usuario
en otros idiomas
- English: Prime TNO24111 User manual
Artículos relacionados
-
Prime TNI24111 Manual de usuario
-
-
-
-
-
-
-
-
-
 Utilitech UTTNOCD2 Guía de instalación
