Kenmore 116.22412 El manual del propietario
- Categoría
- Aspiradoras
- Tipo
- El manual del propietario
Este manual también es adecuado para

Owner's Manual
Manual Dei Propietario
Vacuum Cleaner
Aspiradora
Model, Modelo
?
116.22412
116.22413
CAUTION:
Read andfollow all
safety and operating
instructions beforefirst
use of this product,
CUIDADO:
Leay sigatodaslas
instruccionesde operaci6n
y seguridadantesdel usode
este producto.
Sears, Roebuck and Co., Hoffman Estates, IL 60179 U.S.A.
www.sears.com
Part No. CO1ZBRFOOUOO-8192346
Printed in U.S.A.
ImpresoenEUA

Before UsingYour NewVacuum ....... 2
KenmoreVacuum Cleaner Warranty . .. 2
Important Safety Instructions ......... 3
Parts and Features ................. 4-5
Assembly Instructions ............. 6-7
Use ............................ .... 8
How to Start ........................ 8
Vacuuming Tips ..................... 9
Suggested Pile Height Settings ......... 9
Attachments ....................... 10
Attachment Use Chart ............... 10
Performance Features ............... 11
How'(our Vacuum Works ............. 12
Canister Care ....................... t2
Cieaning Exterior and Attachments ..... t2
Dust Bin Cleaning .................. 13
Filter Changing/Cleaning ........... 14-16
Power-Mate ® Care .................. 16
Light Bulb Changing ................. 17
Belt Changing and Brush Cleaning ... 17-18
Brush Servicing .................... 19
Brush Assembly .................... 19
Troubleshooting .................... 20
Requesting Assistance
Or Service .................. Back Cover
Please read this guide. It will help you assemble and operate your new Kenmore vacuum in
the safest and most effective way.
For more information about vacuum cleaner care and operation, call your nearest Sears store.
You will need the complete model and serial numbers when requesting information. Your vacu-
um's model and serial numbers are located on the Model and Serial Number Plate.
Use the space below to record the model number and serial number of your new Kenmore
vacuum.
Model No.
Serial No.
Date of Purchase
Keep this book and your sales check (receipt) in a safe place for future reference.
LIMITED ONEYEAR WARRANTY ON KENMOREVACUUM CLEANER
This warranty isfor one yearfrom the date of purchase, and includes only private household
vacuum cleaner use. During the warranty year,when this vacuum cleaner isoperated and
maintained according to theowner's manual instructions,Sears will repair any defectsin
material or workmanship free of charge.
This warranty excludes vacuum bags,belts, light bulbs,and filters,which are expendable parts
and becomeworn during normal use.
For warranty service, return this vacuum cleaner to the nearest Sears Service Center in
the United States.
This warranty applies only while this product is in use in the United States. This warranty gives
you specific legal rights, and you may also have other rights which vary from state to state.
Sears, Roebuck and Co., D/817 WA, Hoffman Estates, tL 60179

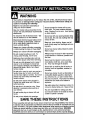
WARNING
Your safety is important to us.To reduce the risk of fire, electrical shock,injury
to persons or damage when using your vacuum cleaner, follow basic safety pre-
cautions including the following:
Readthismanualbeforeassemblingor
usingyourvacuumcleaner.
Useyourcleaneronlyasdescribedin this
manual.UseontywithSearsrecommended
attachments.
Toreducethe riskof electricalshock- Do
not useoutdoorsor onwetsurfaces.
Disconnectelectricalsupply beforeservic-
ingor cleaningoutbrush area. Failureto
dosocouldresult inelectricalshockor
brushsuddenlystarting.
Alwaysturn cleaneroffbeforeconnecting
ordisconnectingthehoseorPower-Mate®.
Alwaysturn cleaneroff beforeunplugging.
Do not unplugby pullingoncord.To
unplug,graspthe plug,notthecord.
Holdplugwhenrewindingontocordreel.
Donot allowplugtowhipwhenrewinding.
Do not usewithdamagedcordorplug.tf
cleanerisnot workingasit should,has
beendropped,damaged,left outdoors,or
droppedintowater,return ittoa Sears
ServiceCenter.
Donot pulIorcarrybycord,usecordasa
handle,closedooron cord,or pul!cord
aroundsharp edgesorcorners.Donot run
cleanerovercord.Keepcordawayfrom
heatedsurfaces.
Do not leavecleaner whenpluggedin,
Unplugfromoutletwhen notin useand
beforeservicing.
Donot allowto be usedas a toy, Close
attentionisnecessarywhen usedbyor
nearchildren.
Do not handleplug or cleanerwith wet
hands.
Do not put anyobjectsinto openings.
SAVETHESE
Do notoperatethe cleanerwitha punc-
turedhose. Thehosecontainselectrical
wires. Replaceif cut or worn. Avoidpicking
up sharpobjects.
Do not usewith any openingblocked;keep
freeof dust, lint,hair andanythingthat may
reduceairflow.
Keephair,looseclothing,fingers,andall
partsofbodyawayfrom openingsandmov-
ing parts.
Do not usecleanerwithoutdust bin andlor
filters in place.
Alwaysemptythe dust bin aftervacuuming
carpetcleanersorfreshener,powdersand
fine dust.
Donot usethecleanerto pick upsharp
hardobjects,smalltoys,pins,paperclips,
etc. They maydamage thecleaner,
Donot pick upanythingthat isburningor
smoking,suchas cigarettes,matches,or
hotashes.
Donot usecleanerto pickupflammableor
combustibleliquids(gasoline,cleaningflu-
ids,perfumes,etc.),or use in areaswhere
they maybe present, The fumesfromthese
substancescan createafire hazardor
explosion.
Useextra carewhen cleaningonstairs.Do
notputonchairs,tables,etc. Keeponfloor.
You are responsiblefor makingsurethat
yourvacuumcleanerisnot usedbyanyone
unableto operateit properly.
NSTRUCTIONS
Properassemblyandsafe useofyourvacuumcleanerareyour responsibilities.Yourcleaner
isintendedonlyforhouseholduse,Readthis Owner'sManualcarefullyforimportantuse and
safetyinformation.This guidecontainssafety statementsunderwarning andcautionsymbols.
Pleasepayspecialattentiontothese boxesandfollowanyinstructionsgiven.WARNING
statementsalertyouto suchdangersasfire, eEectricalshock,burnsand personalinjury.
CAUTIONstatementsalert youto such dangersas personalinjuryandlorpropertydamage.
ill i i HUl,i i J i i Hll. :
3

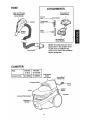
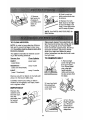
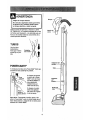
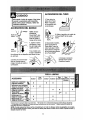
it is important to know your vacuumcleaner's parts andfeatures to assure its properand safe
use. Reviewthese before using your cleaner.
Item Part NO,
In U.S.
Headlight Bulb 20-5240
Belt 20-5285
Part No.
In Canada
596181
40110
Cord and
Plug Holder
Power-Ma_ _
PowerCord
--Wand
GordHolde_
Light
(Some Models)
I In U, So#20-5240
In Canada #596181
Pile Height
Adjuster
Overload Protector
(Reset Button)
Edge Cleaner
(Not Shown)
_-- Cord and
Plug Holder
-- Handle Quick
Release
(Some Models)
-- Upper
Wand
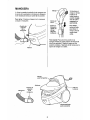
POWER-MATE ®

HOSE
2-Way On/Off Switch
Bare Floor/Carpet
(Some Models)
Handle
ATTACHMENTS
Power-Mate Jr,e
(Some Models)
Crevice
Tool
Combination
Brush
Floor __
Brush _tJ
Handi.Mato Jr._
(Some Models)
NOTE:All models haveone set of
attachments inthe canister.Some
models havean additional set,
whichcan be kept in the accessory
bagfor garage use.
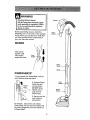
CANISTER
item Part NO.
In U.S.
Exhaust Filter 20-86889
Part No.
In Canada
20-86889C
Cord Rewind
Button
(not shown)
l
PowePMato ®
Cord
Exhaust Filter
Attachment
Storage
Switch
Bin

I IWARNING
Electrical Shock Hazard
DO NOT plug into electrical supply
until assembly is complete. Failure
to do so could result in electrical
shock or injury,
Before assembling vacuum, check the
PACKING LIST on the cover ofthe separate
Repair Parts List. Use this list to verify that
you have receivedall the components of
your new Kenmore vacuum.
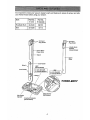
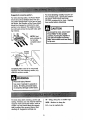
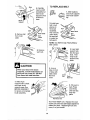
WANDS
Slide wands
together until
wand button Cord
snaps into place. Holder
POWER-MATE ®
1. Insertwandsinto Power-Mate_untilthe
wand buttons snaps intoplace.
Raised
2. Connect Power-
Mate®plug and
cord as shown.
DO NOT force.
Raised area of
plug must be
toward hand,
3. Secure cord into
cord holderon
wandswivel.
To remove: Disconnect cord, steady
Power-Mates with foot andturnwands until
the button disappears, then pull wands out
of Power-Mate®.
Handle
Lock
Button
Wand-_-_
Cord
Holder --
Wand
BUttOn

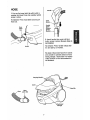
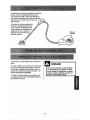
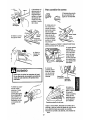
HOSE
1. Line upthe hose latchtab withnotch in
canister andinserthose intocanisteruntil it
snaps in place.
To remove: Press hose latch tab and pull
hose out.
Hose
Latch
Tab
\,
Notch
2. Insert handle into wand until lock
button snaps in place. Be sure hose is
not twisted.
To remove: Press handle release but-
ton and pull up on handle.
To store: Disconnect hose from wands
and canister to preventstress on hose
during storage. Store hose in a loosely
coiled positionso the hose material is
not stressed.
Cover
Hose
Latch Tab
Attachment
Storage

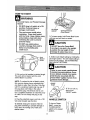
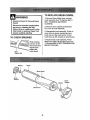
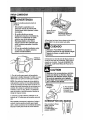
HOW TO START
• WARNING '
Personal Injury and Product Damage
Hazard
- DO NOT plug in if switch is in ON
position. Personal injuryor
damage could result.
• The cord moves rapidly when
rewinding. Press cord rewind
with foot only. Keep children away
and provide a clear pathwhen
rewinding the cord to prevent
personal injury.
, DO NOT use outlets above
counters. Damage from cord to
items in surrounding area
could occur.
_ Cord
Rewind
Button
1. Pull cord out of canister to desired length.
The cord wit] not rewind until the cord
rewind button is pushed.
NOTE:To reduce the risk of electricshock,
this vacuum cleaner has a polarized plug;
one blade is wider than the other.This plug
will fit in a polarized outlet only oneway.If
the plug does not fit futty inthe outlet,
reverse the plug. If it still does not fit, con-
tacta qualified electrician to install the prop-
er outlet. Do not change the plug inany
way,
2. Plug the polarized power cord into a 120
Volt outlet located near the floor.
To rewind: Unplug the cleaner, Hold the
plug while rewinding to prevent damage or
injury from the moving cord. Push cord
rewind button,
Pile Height
Adjuster
Overload Protector
(Reset Button)
3.To lower wands, hold Power-Mate_down
with foot and pull back on wands.
15C,OT,O.
DO NOT leavethe Power-Mate®
running in one spot inthe upright
position for any lengthof time.
Damage to carpet may occur.
,i ill
4. Select a pile heightsetting byrotating the
pile height control. The pile heightsetting is
shown on thecontrol. See SUGGESTED
PILE HEIGHT SETTINGS.
• CAUTION
Referto your carpet manufacturers
cleaning recommendations. Some
more delicate carpets may require
that they be vacuumedwith the
Power-Mate®agitator turned off, to
prevent carpet damage.
i
ON/OFF /
Switch
5.To turn unit on,
step on the
ON/OFF switch.
HANDLE SWITCH
omoower
Mate®, movethe
FLOOR!CARPET
switch to the carpet
position.

Suggested sweeping pattern.
Forbestcleaningaction,the Power-Mate®
shouldbe pushedstraightaway from you
and pulledstraightback.At the end ofeach
pullstroke, thedirectionof the Power-Mate_
shouldbe changedto pointintothe next
sectionto be cleaned.Thispatternshould
be continuedacrossthe rug withslow,glid-
ing motions.
NOTE: Fast,
jerky strokes do
not provide
complete clean-
ing.
Suction
Control
Carpeted stairs need to be vacuumed
regularly.For best cleaning results,fully
closethe suction control.
! WARNING
Personal Injury Hazard
Use care if canister is placed on
stairs. If it falls, personal injury
or propertydamage could result.
I ii
For best deep down cleaning, usethe LO
setting. However,you may need to raise the
height to make some jobs easier, such as
scatter rugs and some deep pile carpets,
and to prevent the vacuum cleaner from
shutting off.Suggested settings are:
For best cleaning results, keep the air-
flow passage open. Check eachassem-
bly area in HOWYOUR VACUUM
WORKS occasionally for clogs. Unplug
from outlet before checking.
CAUTION
HI- Shag,deep pile,or scatter rugs.
MED- Mediumto deep pile.
LO- Lowto medium pi!e.

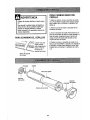
CAUTION
DO NOT attach or remove handle or
wands while cleaner is ON. This
could cause sparking and damage
the electrical contacts,
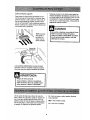
ATTACHMENTS ON HANDLE
NOTE: If the
Power-Mates is
Lock attached, turn
cleaner off
before removing
handle from
wands.
1, Press lock
=== ==. button,then pull
to remove han-
Upper dle from wand.
I
Ifyour modet has the optional feature of a
handle release, press it
in similarly. __
2, Slide attachments firm-
ly on handle as needed.
See chart below.
ATTACHMENTS ON WANDS
1.To remove
wands from Power-
Mate®, lock wands
in straight-up posi-
tion.
2. Remove Power-Mate®plug
andcord from holders.
3, Disconnect cord
and steady Power-
Mate®with foot and
turn wands until lock
button disappears,
then pull wands out
of Power-Mate _.
4, Put attachment on
wands as needed. See
chart.
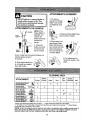
CLEANING AREA
Between Bare Carpeted
ATTACHMENT Furniture*Cushions* Drapes* Stairs Floors :loors/Rugs Walls
Combination Brush &(Some Models) X X X X
CreviceTool
X X
(Some Models) -""-_----,_"
Floor Brush
!_Some Models) X X X
Power-Mate®
(Some Models) X*** X
Handi-Mate Jr.®
X
X
(Some Models)**
Power-Mate Jr.®
ISomoModel,l" , x x i
*Alwaysclean attachments before usingon fabrics, ** 2-way On/Off switchshould bein ON position,
*** Handi-Mate Jr.= and Power-MateJr.®attachment instructionsare inctuded withthe products, *_ (Some Models)
Power-Mate switchshould bein OFF position.
NOTE: Whenseparatingwands,depress lockbutton completelybefore pullingwandsapart. If
wand lock buttonis difficulttoaepress:push thetwowandsmore tightly togernerto lineup
the lockbutton withthe hole.uepress Iock bu_on and thenpullwanasapart,
10

EDGE CLEANER
1_ ctive brush edge
cleaners are onboth
sides ofthe Power-
Mate®.Guide either
side ofthe Power-
Mate®along base-
boardsor next to
furniture to help
remove dirt trapped at
carpet edges.
OVERLOAD PROTECTOR
The Power-Mate®has
built-in protection against
motor and belt damage
Shouldthe brushjam. If
the brush slowsdown or
stops, the overload
protector buttonpops up
and shuts off the Power-
Mate®.The canister motor
will continueto run.
To correct problem: See
TROUBLESHOOTING.
To reset: Push in the overload protector
button.
SUCTION CONTROL
The suction
control allows
you tochange
the vacuum
Suction Suction suctionfor
differentfabric
and carpetweights.Openingthe control
decreases suction for draperiesand
lightweightrugs,while closingthecontrol
increasessuction forupholsteriesand
carpets.
WARNING
Personal injury Hazard
Always unplug the vacuum cleaner
before cleaning the brush area as
brush may suddenly restart. Failure
to do so can result in personal
injury.
i Hjlll ii i lllllllll
1t
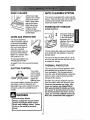
AUTO-CLEANING SYSTEM
This vacuumisequippedwith a auto-cleaning
system. Eachtimethepowercordisextended
a cleaningcam locatedinsidethe dustbin
rotatesand cleansthefilter.
POWER-MATE ®STORAGE
SOME MODELS
The lowerwand has
a"U" shapedflange
in the area where
the power cord
attaches.The canis-
ter hasa "U"
shaped slot near the
rear ofthe canister,
The slotallowsthe wandsand Power-Mate®
to be stored with the canister to conserve
storage space.
The wand will slip out of the slot as itis lift-
ed up for use and will slide into the slot asit
is lowered forstorage.
THERMAL PROTECTOR
This vacuumhas a thermalprotector which
automatically tripstoprotectthe vacuum
from overheating. The thermal protector
turns the motor off automatically to allow the
motor tocool in orderto preventpossible
damage to the vacuum.
To reset: Turn off and unplug the vacuum
from the outlet to allow the vacuum to coo[.
Check for and remove any clogs. Also
check and replace any clogged filters.
Wait approximately 30 minutes and plug
the vacuum in and turn back on to see if
the thermal protector has reset. In some
cases, the unit may suddenly restart. DO
NOT leave unattended while plugged in.

The vacuum cteaner creates suction that
picks up dirt. Rapidly moving air carries
the dirt to the dust bin through the [ ._--_'______
airflow passages.The dust bin lets /._,ij_
the air pass throughl while it traps z_,_,f"
the dirt. ,/_/
For best cleaning results, keep ._/z
the airflow passage open. ._7"
Check the starred areas _z_/_,/
occasionally for clogs. ,4_"
Unplugfrom outlet /_'t.7"
before check_
Dust
Bin
1. Unpiug cord from wall outlet;
2. Clean exterior using a clean, soft cloth
that has been dipped in a solution of mild
{iquid detergent and water, then wrung dry.
Wipe dry after cleaning. DO NOT drip
water on cleaner.
3. To reduce static electricity and dust build-
up, wipe outer surface of cleaner and
attachments.
• CAUTION "
Do not use attachments if they
are wet, Attachments used in
dirty areas, such as under a
refrigerator, should not be used
on other surfaces until they are
washed.They could leave marks.
Ill I II I I
12

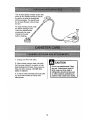
Always empty the dust binwhen dirt
level reaches the "MAX FILU'line.
TO REMOVE DUST BIN:
WARNING
I lectrical Shock And PersonalInjury
Hazard
Always unplug power cord from elec-
trical outlet before performing any
service on vacuum. .....
Press down on
the dust bin
release tab locat-
ed above the
handleof the dust
bin.
___ Pull thehandle
and lift dust bin
outofthe vacu-
um cleaner.
Every time the dust
bin is removed, rotate Cleaning
cleaning knobon top Knob
o,°o,t oo,oo,t
two complete revolu-
and maintain clean-
ing performance.
Secondary _.,.'_--_._
Filter ( _ I 11 |
Dust Bi__
Remove any
clogs that
might be
located in
the dust bin
port or the
secondary
filter.
TO EMPTY DUST BIN:
While ho[dingdust bin
over atrash can,
remove lid from dust
bin bylifting off.
Pourdust bin
contents into a
trash container.
TO CLEAN FILTER
See 'ToClean Filter"underFILTER
CHANGING/CLEANING,
Cover
TO REPLACE DUST BIN
Replacedust bin
lid assembly by
placing back on
dust binwith the
alignment rib on
the lid aligned
with the edge on
the dust bin
rib
Placedust bin
back intovacuum
cleaner by insert-
ing until the
dust bin release
button locks
dust bin secure-
ly in place,
13

WARNING
Electrical Shock Hazard
Unplug powercord from electrical
outlet. Do not operate the cleaner
without the primary or exhaust fil-
ters. Be sure the filters are properly
installed to prevent motor failure
and/or electrical shock.
PRIMARY FILTER
Check primary filter frequently and clean
when dirty.
Note: Under normal use and care, your filter
can be expectedto last upto 5 years
TO REMOVE PRIMARY FILTER
Remove the dust bin and dust bin lid assem-
bly as outlinedinthe DUST BIN CLEANING
section.
While holding the dust bin lid assembly over
a trash container, grasp filter, rotate clock-
wise and lift off.
Primary
Cover
TO CLEAN FILTER
The filter may be cleaned by tapping iton a
trash container or by rinsing it under a
faucet.
Rinse with water only, do not use any
detergent or soap. Allow the filter to dry for
24 hours before putting it back into the
vacuum.
When cleaning the filter no longer restores
vacuum suction to full power you need to
replace the filter.
TO REPLACE PRIMARY FILTER
Slide filter overcleaning cam and rotate filter
counterclockwise until slots tockonto tabs in
Primary
Slot
Cover
cover.
Replacethe dust bin and dust bin lid assem-
bly as outlined inthe DUST BIN CLEANING
section.
• • 14

SECONDARY FILTER
FOAM
WARNING
Electrical Shock Hazard
Do not operate the cleaner without
the motor safety filter.Be sure the
filter is properly installed to prevent
motor failure and/or electrical
shock.
Always unplug power cord from
electrical outlet before performing
any service on vacuum.
ill
Check secondary filter frequently and clean
when dirty.
Remove thedust bin as outlinedinthe
DUST BIN CLEANING section.
Remove secondary filter from vacuum
cleaner.
Secondary
Filter
Wash the secondary filter inwarm soapy
water,rinse and dry thoroughly by squeez-
ing the filter inyour hand and letting it air
dry.
DO NOT wash in the dishwasher.
DO NOT install damp.
Replacedry secondaryfilter.Ensure filter is
properlyinstalledoverfilter opening.
Replacethe dust binas outlined in the
DUST B]N CLEANING section,
t5

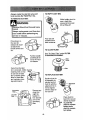
EXHAUST FILTER
ELECTROSTATIC
The exhaust filter must be replaced when
dirty. It should be replaced regularly depend-
ing on use conditions,
The filter CANNOT be washed as it will
lose its dust trapping ability,
NOTE: See PARTS AND FEATURES
for the exhaust filter number,
TO REMOVEFILTER
Press release
tab on filter car-
tridge and pull
out of canister,
(Cover not
shown for clari-
ty).
Remove filter
from cartridge by
pressing out
through the slot in
the cartridge.
Alwaysfollow altsafety precautions when
cleaning and servicing the Power-Mate®.
TO REPLACE FILTER
Slide newfilter
into cartridge so
that the white side
will Paceawayfrom
the canister,as
shown.
_._:_ ReplacetheRelease
exhaust filter
---__ cartridge by
placing intoslot
and pushing in
unti! the release
tab snaps into
place.
ElectricalShock Or Personal injury
Hazard
Disconnect electrical supply before
servicing or cleaning the unit,
Failureto do so could result in elec-
trical shock or personal injuryfrom
....cleaner suddenly starting _
16

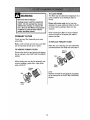
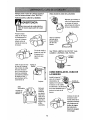
TO CLEAN AGITATOR:
1. Remove
lightcoverby
pressing in
and lifting both
sides as
shown.
NOTE: Inorderto keep cleaning efficiency
high and to preventdamageto your vacu-
um, the agitator must be cleaned every_time
the belt is changed.
The agitator must also be cleaned accord-
ing to thefol]owingschedule:
Vacuum Use Clean Agitator
HEAVY - everyweek
(used daily)
MODERATE -
(used 2-3 timeslweek)
LIGHT -
(used 1 time!week)
every month
every 2 months
Remove any dirt or debris in the belt path
area or in the brush roller area.
Carefully remove any string or debris
located on the agitator, end caps, wash-
ers or agitator shaft.
IMPORTANT
Replace the
washers and
the end caps.
See the
exploded view
for correct
assembly.
2. Push inand turn
bulb counterclockwise
to remove.
3. Replace the bulb.
Bulb must not be high-
er than 15Watts (130
volts). Close light cover
until it snaps in place.
NOTE: See PARTSAND FEATURESfor
Bulb Number,
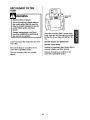
Disconnect cleaner from electrical out-
let. Checkand remove hair,string and lint
build-up frequently inthe PowePMate®
brush andbrush support areas, if build-up
becomes excessive, disconnect Power-
Mate®from wand and follow the steps
below. Instructions can also be found under
the light cover.
TO REMOVE BELT
_m
1. Remove light
coverand light bulb,
ifonyour model.
Turn Power-Mate®
over, raise pile
heightadjuster
rollersand remove
the two screwsfrom
the base.
2. Insert andtwist
fiat screwdriver
underbothback
covertabs.
3. TurnPower-
Mate®rightside
up. Tilt cover
forward from
back untilfront
snapsfree.
17

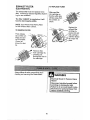
Brush
Support
Base
4. Carefully
insert andlift
screwdriver at
each brush
support tofree
brush from
base.
5,Remove belt
from motor
shaft,
6, Remove
worn belt.
!
• CAUTION .......
When you remove the brush
supports, a small metal washer on
each end may come off. DO NOT
lose these two metal washers,
, ,i i i
7. Slide brush "/" " >-_r'-F
supports off to check
and clean brush
support areas. See
BRUSH ASSEMBLY
for picture of cornptete
brush assembly.
TO REPLACE BELT
1. Slide washers
and brush supports
onto brush assem-
bly,
2. Install new
belt in belt
grooveon
the brush
assembly,
thenover the
motor shaft.
Be sure belt
is under the
belt guard.
NOTE: See PARTS AND FEATURES for
Belt number.
3. Insert both
support tabs
intothe base
slots. Then
snap brush
supports into
place.
4, Line up
tabs on front
of base with
slots inside
the front
cover.
Cover
Slot Front
Base Tab
5. Tiitcoverto
back. Press
coverfirmly
untitreartabs
snapinto
place.
Rear Base Tab
TurnPower-Mate_over. Replace the cover
screws and lower the pile heightadjustment
rollers intoplace. Replace light bulb and
cover, if on your model,
18

WARNING
Electrical Shock Or Personal Injury
Hazard
Disconnect electrical supply before
servicing or cleaning the unit,
Failure to do so could result in elec-
trical shock or personal injury from
cleaner suddenly starting,
illll i,ll ii
TO CHECK BRUSHES
Base
Support Bar
When brushes
are wornto the
levelof the base
support bars,
replace the
brush dowel.
TO REPLACE BRUSH DOWEL
1. Remove Power-Mate ®cover, belt and
brush assembly, See "To Remove Belt" in
BELT CHANGING AND BRUSH
CLEANING.
2. Removebrush supports and washers
from ends of brush assembly.
3. Reassemble brush assembly.To lineup
screwholes in dowel, sprocket andend
brush, be sure the brush portion of end
brush lines up with brushes on brush dowel,
4. Replace belt, brush assembly, Power-
Mate®cover,light bulb andlight cover.See
"ToReplace Belt"in BELTCHANGING AND
BRUSH CLEANING.
Washer Brush
Brush
Suppo_
19

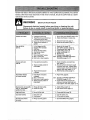
Review this table to find do-it-yourself solutions for minor performance problems. Any service
needed, other than those described in this owner's manual, should be performed by a autho-
rized Sears Service Center.
Cleanerwon't start. 1. Unpluggedat wailouttat.
Poorjob of dirt
pick-up.
Cleanerstarts but
cuts off.
PowePMate®Wi!!not
run when attached.
2.
3.
4,
't.
2.
3.
4.
5,
6,
7.
8.
9.
Trippedcircuitbreakerib_ownfuse
at householdservice panel.
Loosehoseelectrical connections. 3,
Tripped thermat protector in 4.
canister.
Fullor cloggeddust bin, i.
Cloggedairflow passages. 2.
Dirty _ters. 3.
Wrong pile heightsetting. 4.
Open suctioncontrol, 5.
Hole in hose. 6,
Worn Power-Mate®brushes. 7.
Worn or brokenbelt. 8 & 9.
Dirty brushor brushsupports.
11 Hoseelectricalconnections,
2. Tripped overloadprotectorin
Power-Mate_.
3. Trippedthermalprotector
in canister,
1, Power-Mate®coene_ons
unplugged_
2. Worn or broken be}t.
3. Dirty brush or brush supports.
4. Trippedovedoad protector in
Power-Mate_,
1. Plugin firmly,push ON/OFF switch toON.
2. Reset circuitbreakeror replace fuse.
Reconnect hoseends, (page 7).
Resetthermal protector,(page 11).
Empty dustdin, (page 13).
Clear airflow passages,(page 12).
CleaNohange filters, (page 14, 15).
Adjust setting, (page 8, 9),
Adjust COntrol,(page 1t).
Repla_ hose.
Change brushes,(page 18).
See BELTCHANGINGAND BRUSH
CLEANING,(pages 16, 17).
1, Checkconnections,reconnecthose
ends, (page 7),
2. Removeany itemsthat may becaught
orjammed, then reset. If cleaner starts
andstopsagain, cleanbrushand brush
supports,then reset,(pages 16, 17).
3. Resetthermalprotector,(page11).
2&3,
4.
Rug in firmly, (page 6).
See BELTCHANGINGAND BRUSH
CLEANING, (pages 16, !7),
Check brusharea for excessivelint
buitd-upor jamming, Clean brushand
brush supports,then reset,(pages "_6,17),
Cleanerpicks up moveable 1. Wrong pile height setting. I. Adjust setting,(page 8, 9).
rugs-or- Power-Mate® 2. Suctiontoo strong. 2, Open suction control,(page 11}.
pushestoo hard.
Light won't work. 1. Burned outlight bulb. 1. Change tigh[bulb, (page 16).
Cordwon't rewind, I, Dirty power cord. t. CIeanthe power COrd,
2. Cardjammed. 2. Purl outcordand rewind.
C]eanerleaves marks 1. Wrong vacuuming-pattern. '["i See VACUUMINGTIPS, (page-9).
on carpet,

Antes de usar su aspiradora nueva ..... I
Garantia de la aspiradora de Kenmore ... 1
Instrucciones importantes de
seguridad ............................ 2
Piezas y caracteristicas .............. 3-4
Instrucciones de ensemblado ......... 5-6
Use .................................. 7
Paracomenzar ....................... 7
Sugsrenciasparaaspirar ............... 8
Sugerenciassobre el ajustede nivel de
pelode la alfombra .................... 8
Accesorios ........................... 9
Usede {osaccesorios .................. 9
Caracteristicas derendimiento ........... 10
Funcionamientodesu aspiradora ......... 11
Cuidado del recept_culo ............... 11
Limpiezadel exteriory de los accesorios . .. ti
Limpiandoel cube de labasura ........... 12
Cambio/Limpezade]filtro ............. 13-15
Cuidado de la Power-Mate ® ............ 15
Cambiode la bombilla ................. 16
Cambiodela correay timpieza
delcepillo ........................ 16-17
CuidadodeIeepit]o.................... 18
Ensambledel cepilIo .................. 18
Reconocimiento de problemas ......... 19
Informaci6n de assistancia
o servicio ................ PosteriorCubierta
Perfavor lea estaguia quale ayudara a assemblary operarsu aspiradoranuevade Kenmoreenuna manera
m_s seguray effectiva.
Paramas informaci0nacerea del cuidadoy operaci6nde esta aspirador,IJamea su tienda Searsmas cercana.
Cuando prequnteperinformaciSnusted necisitar_el n_merocompletedeseriey modelode la aspiradomqua
est_ locadoen la placade los n0memsde modeloy sede.
Use el espacio deabajo pararegistrarel nOmerode modeIoy serie parasu nuevaaspiradorade Kenmore.
N_merode Modelo
NSmerodeSerie
Fechade Compra
Matengaestelibro ysu reciboen u Iugarseguropatareferanciasfuturas.
GARANTiAUMITADA DEUN AI:,IODELA ASPtRADORAKENMORE
Estagarantia es perunaSodesdala fechade compra,e incluyesolamenteel usedeIaaspiradoraen
hogaresprivados.Duranteel aSode garantfa,cuandola aspiradoraesoperaday mantenida deacuerdoal
manualdeinstruccionesdel dueSo,Seats repararacua]quierdefectoenmateriales ofabricaci0ntibrede
cargo.
Estagarantiaexcluyelas bolsasde colecci6n,correas,lamparilIas,y filtros,lascualessen partes gastablesqua
se deteriorancon e/usa normal.
Para el servicio de garantia, retorne esta aspiradora a! Centre de Servicio Sears m_s cercano en los
Estados Unidos.
Estagarantiase aplicasolamentemientraseste productoest,_enuse anlosEstadosUnidos.Esta garantiale
daa ustedderechoslegalesespecificos, y usted puedetartertambi6nolrosdetacheslos cualesvariande
estadoaestado.
Sears,Roebuckand Co,, D/817WA, HoffmanEstates,IL 60179
1

ADVERTENCIA
Su seguridad es muy importante para nosotros. Para reducir el riesgo de incendio, cheque
elOctrico, lesion corporal o da_os a! utilizar su aspiradora, actbe de acuerdo con precauciones
b._sicas de seguridad, entre elias:
Leaeste manualantesdearmaro utilizarsuaspira-
dora.
Use su aspiradora0nicamenteenIafarina descrita
eneste manuel.Use,3nicamenteconaccesorios
recomendadosperSears.
Parareducirel riesgodechequee]Octrico,no use
su aspiradoraalaire librenisabresupe_cies moja-
das.
Desconecteel cordon elOctdcoantesdecomponar
o limpiarel _readel cepilIo.DeIocentrario,elcepilIo
podriaarrancardeform imprevistao podda
producirseunchequeelOctrico.
Siempredebe apagarla aspiradoraantesde
conectaro desconectarIamangueradela Power-
Mate®.
Siempre debeapagarsu aspiradoraantesdedes-
conectarla.
Nodesconectelaaspiradoratirandodelcordon
eI6ctrieo.Paradesconectarla,haleelenchufe,noel
cordon.
Sujeteel enchufaconla maneal enrollarelcordon-_
elOctrieo.Paradesconectarla,hale enenchufe,noel
cordon.
No usetaaspiradorasiel cordonoel enchufeest_
daOado.Si taaspiradoranoest,,funcionandoade-
cuadamenteosi se hadejadocaer,est_daBade,se
hade,iadoe×puestaala intemperieose hadejado
caeren agua,devuOlvalaa unCentrede serviciode
Sears.
Nohale ni transportela aspiradaraperel cordon;no
useel cerd0ncome mango;nocierre puertassabre
e]cordon;nohale elcordonsabrerebordesagudos
niesquinas.Nopasotaaspiradorasabreelcordon.
Mantengaetcordonalejadodesuperficiescalientes.
Noabandonela aspiredoracuandoest6conectada.
DesconOctelacuendono laest6usandoy antesde
darleservicio.
No permitaque sea utilizadacomejuguete.$e
requieretenormayorcuidadocuandosea utilizada
enla pro×imidadde niOoso perniOos.
No toquela espiradorani eIenchufeconJasmanes
mojadas.
GUARDE ESTAS
No usetaaspiradorasi la mangueraest_rata.La
mangueracontienealambrese{6ctricos.C_mbielasi
est_rataodesgastada.Eviteaspirarobjetos
agudos.
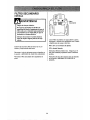
Noco[oqueobjetosenIasaberturas,
NoutiliceIaaspiradorasialgunaabetturaest_510-
queada;mantOngalaUbredepolvo,pelasa,eabellos
y cualquieracosaquapodriadisminuirel flujode
aire.
MantengaelcabelIo,ropasuelfa,dodosy todaslas
pertesdeIcuerpoafajadosdelasaberlurasy plazas
mec&nicas.
Nouse Iaaspiradorasintenorel cubedela basura
y/o {asfiltros.
Cambiesiampreel cubedela basuradespuOsde
aspirerlimpiadoresdealfombraso desodorantes,
talcosy pelvesfines.
No usela aspiradoraparatevantarebjetosagudos,
juguetespequot,as,alfileres,sujetapapeles,etc.
PodriandaOarla aspiradora.
No Ievanteningunacosaquase est6quemandoo
emitiendehumo,comecigardlIos,cerilIosocent.as
calientes.
Nouse laaspiradoraparaaspit'arliquidosinflama-
bIeso combustibles(gasolina,liquidosparatim-
pieza,perfumes,etc.)ni la useenIugaresdonde
6stospodrienestarpresentes,Losvaporesdeestas
sustanciaspuedencroatunpeligrodeincendioo
explosion.
Tongacuidadoespecialal utilizarla aspiredoraen
esealones.Nola eolequesabresillas,mesas,etc.
Mantengalaenel piso.
Usted es responsabledeasegurarquasu aspira-
dora noseautiIizadaperningunapersonaquano
puedemanejar]acorrectamente.
INSTRUCCIONES
E{armada y use segurodesu aspiradarason suresponsabilidad.Es!aaspiradorahaside dise_ada
exclusivamentepara use domOstico.LaaspiradoradeberAalmacenareeen unlugarsecoyen el interior.
Lea este ManualdeIpropiefariodetenidamente,puescontieneinformaci0nimportantesabre seguridady
use. Estaquia conliene informaciOnsabreseguridaddebajodesimbolos deadvarlieneiacuidado, Per
favorpenga atenciOnespecialaestasinstruccionesdadas. Advertencia: EsteinformaciOnIealerfar&con
el poligrodefuego, cheques electricos,quemadasy lesiones, Cuidado: Este informaci6n]ealertaraa
peligros come lesionesy daOosde prepiedad.
===H=,

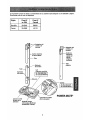
Es importanteconocerlas piezasy caractedsticasde su aspiradorapara asegurarsu uso adecuadoy seguro.
Examinelasantes deusarsu aspiradora.
Objeto PiezaN° Pieza No
en EUA Canad_
Bombilla 20-5240 596181
Correa 20-5285 40110
Tubo
Sujetador
del ¢ord6n ,\
2
Ajuste de hive! /
de pelo de la
/
alfombra
Sujetadordel
cord6nye!
enchufe
*-- Cord6n el_ctrico
de Power-Mate ®
-- Tubo
SuJetador
de} cord6n
_.-Sujetadordel
cord6nyel
enchufe
Bot6n de
liberaclSn
r_plda del
mango
(Algunos
modalos)
-- Tubo
superior
Luz
(Algunos modelos)
fen EUA #20-5240 ]
En Canadd #5961811
--Reborde /
LimpiaOorOeori/las POWER'MATE®
(No se muestra)
Protector contra
sobrecargas (Bot6n de
restauract6n "Reset")
3

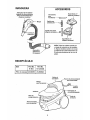
MANGUERA
Interruptor de encendido/
apagado de dos posiciones
(Piso expuesto/A/fombra)
(Alguno$ modelos)
Mango
ACCESORIOS
Power-Mate Jr._
Herramienta (Algunos modelos)
para I
hendiduras _ _
cepmop=,_ _
combinaciOn _ _
Cepitlo para pisos _
(Algun°s rn°delos)-_'-_ll _
Handi-Mate Jr."
(Algut]os modelos)
Dispositivo
giratorio de
la manguera
NOTA:Todoslosmodelos cuentancon
unjuego de accesoriosen el recept_cu-
!o.Algunosmodelos cuentancon unjue-
go adiciona]que puedealmacenarseen
la botsapareaccesorios deuso e ene]
garaje.
RECEPTACULO
Item Part No. Part No.
InU.S. In Canada
Ffftrode escape 20-86889 20-86889C
Mango
pare
Bot(_n do
enorollar/o
Ranura de almecenamient_
pare Power-Mate ®
e/_ctrico
Filtro de _ _
encendido/apagado
la basura

Peligrode chequeeI_ctrico
No conecte laaspiradorahastaque termine
de armarla.De Io contrariopodriacausar
un cheque el_ctricoo lesi6ncorporal.
Antesde armar laaspiradora,chequeela LISTA
DE EMBALAJE en la cubiertaseparadade la Lista
de Partespara Reparacibn. Use esta listapareveri-
ficar queha recibidotodaslas componentesde su
nuevaaspiradoraKenmore.
TUBOS
Unalos tubos
desliz_ndolos
hasta queel bot6n
quede fijo en posi-
ci6n.
Sujetador
del cord__ t
POWER-MATE ®
I, lntroduzca los tubesen la Power-Mate®hasteque
e[ bet6ndeItubequede fijoen posici6n.
e/evada
2. Conecteel enchufe
y cord6nde Is Power-
Mate®comesemues-
tra,NO LOfuerce. El
_lreaelevadadel
enchufetieneque
estarhacialamane,
3.Assgure el cordbn
dentrodel sujetador
de]cord6nen elgirato-
riode ]amango.
Pare retirar: Desconectee]cordon, epoyeelpie
sobre la Power-Mate®y gire los tuboshasteque el
bot6n desa-parezca y Iuego tire de los tubes pare
retiralos de IaPower-Mate_.
Bo_n del
c_r_
Sujetador del
cord6n
Tubo --
Su]etador
del
cord6n--
Bot6n del
tube

MANGUERA
1.Alinee Ia pestafia desuieci6n de Iamanguem Con
la ranura deIaaspiradorae introduzca Iamanguera
en el recept_culohastaque quede fijaen posici6n.
Pararetirar: Presione el seguro de Ia manguera
y saque la manguera,
Pest'aria de-:-
sujeci6n
dela
manguera
Ranura
Bot6n del
cierre
...... Bot6n de .........
/iberaci6n
r6pida del
mango
(A/gunos
2. Jntmduzcael
mango eneftubo
hasta queel
bot6n quede en
posici6n.Aseg_-
rese de que la
manguera no
est_ torcida.
...........Pararetirar:..........
oprima e]bot6n
para liberarel
mangoy tiredeI
mango hacia
ardba.
ParaGuardar:Paraprevenirla preci6ndeIa
manguamientrasse guarda,desuna]amanguadei
tubade la aspiradora.Guarde ]amaguaen una
posicibnenrollada y flojamentede tafmaneraquela
tapade Iamanguanose estire.
Mango
PestaSa de
sujeci6n
MangUera de la
%
para accesorios
Cubo de
/a basura

PARA COMENZAR
ADVERTENCIA
Peligrode lesi6n personaly daSoal
producto
, NO enchufela aspiradora siel
interrupterest,. en la posici6n ON.
Podriacausar lesi6n personalo da6o
alproducto.
• El cord6n el6ctricose mueve
r_pidamentedurante el enrollamiento.
Presione el rebobinado del cable
eI_ctrico con el pie solamente.
Msntengaslejadosa losni6os y
asegureespaciolibre suficientepara
evitar Iesionespersonalesalenrollar
el cord6n.
• NO use losenchufesIocalizadossabre
losmuebles. Los objetoscercanos
podrianresultar dafiados.
I. Tiredel cord6n paresacarlodel recept&cuIo
hastalener {a Iongituddeseada,El cord6nnose en-
rollar_ hssta que optima la bot6n paraenrollarlo.
NOTA: Parereducirel riesgodechequeel_ctrico,
esta sspiradors cuentaconunaclavijapsladzads;
unode loscontactos es m_,ssnchoquael afro.La
clavija s61opuedeintroducirsedeuna maneraenel
enchufe.Si la clavija nocabe bienenelenchufe,
invi6rtala.SiaSn nocabe, ltamea unelectricista
paraque instsle unenchufecorrecto.Noaltereia
ctavijadeningunamanera.
2. Conecte el cord6n eI6ctricopo]adzadoen un
enchufede 120voItiosque se encuentrecerca del
pfso
Paraenrollar:desconectela aspiradora.Sujeteel
enchufemientrasenrollael cord6npareimpedir
daSoo Iesi6ncorporalpar elmovimientode1cord6n.
EmpujeIs bot6npsrs enrolIsr el cord6neI_ctrico.
Ajuste de nivel
de pelo de la Protector centre
alfombra sebrecargas(bot6n de
restauraci6n"Reset'*)
4. Parebajar lostubas,tubas coloque elpie sabre la
Power-Mste_y tire de lostubashaciaatr,_s.
CUIDADO
5. Seteccioneun nivelde pelode Iatturagirandoel
controldenivel pelo de la alfombra.Estenive]se
muestra enel control. Consulte SUGERENCIAS
SOBRE ELAJUSTE DENIVEL DEPELODE LA
ALFOMBRA.
CAUTION
Refi_rase a las recomendscionesde!fabri-
cante para limpiar sualfombra. Algunas
alfombrasm_s delicadaspuedenrequerir
el usa de Isaspiradors con elagitador
Power-Mste° desconectsdopareprevenir
que laalfombra sea dafiada.
, ,,u,, ,,,,,,,,,,
Interrupter /
de encendido/ /
apagado / / 6. Parsencender
la unidad,piseIa
interrupterde
cendidolapagsdo.
INTERRUPTER DEL MANGO
Matee,muevael
interrupterde
FLOOR/CARPETa Ia
posici6nCARPET.

Estilodelimplezasugerido.
Paraabtenerla majoracci6n de limpiezase reco-
miendaempujar laPower-Mate®en direcci6ndirec-
tamente opuesta a ustedyjalarla enlinea recta. AI
final de cada pasadade regreso,cambietadJrec-
ci6n de IaPower-Mate®haciala siguientesecci6na
Iimpiar.Contineeasia trav6s de todataalfombrade
una maneralentay deslizante.
NOTA:las pasa-
das r_pidasy
jalonadas no
Iogranuna Ilm-
pieza completa.
Control de
aspiraci6n
Los escaJonesalfombradosrequierenlimpieza
peri6dica. Cierreparcompletoel controlde aspira-
ci6n paraIograrlos mejoresresultadosde limpieza.
ADVERTENCIA
Peligrode lesi6n personal
Tengacuidadosi colocael recept_cuto
sabre escalones,Si se cae,podriacausar
lesi6npersonalo dafioa lapropiedad.
Mantenga el paso de afre abierto para lograr los
mejores resultados de limpieza, Examine de vaz.
en cuando cada una de las _reas de uni6n en FUN-
CIONAMIENTO DE SU ASPtRADORA para asegu-
rarse de qua no esten bloqueadas. Desconecte la
aspiradora antes de revisar.
CUIDADo
Paraevitar volcaduras,nuncadeje laPower-
Mate®en pos[ci6nvertical.Girandoel
mangoaun lado, laPower-Mate®se hallar&
enuna posici6n m_sestabley ser_,m&s
dificilqua sevuelque.
Use el ajuste LO (bajo)para obtenerla mejorJim-
pieza a fondo.Parotra parte,quiz_s serequieraele-
var el nivel parafacilitar algunastareas, coma par
ejemplocuandose tratade tapetesyalgunasalfom-
brasde pelo largo,y para impedirquala aspiradora
se apague.Se sugierenlossiguientes ajustes:
HI- Pelomuy largoy suelto,tapetes,alfombras
muy acojinadas.
MED - Pelomedianoa largo.
LO - Pelocorto a mediano.

CUIDADO
| NO instate n_retire el mango n[ los tubas
I cuando laaspiradora est_ encendida.
| Esto podria causar chispas y daSar los
contactos ei_ctricos.
ACCESORIOS DEL MANGO
Bot6n
cierre
tics adicionaIdeun dispositivo
go,opflmalo,
NOTA:Si tiene
instalada la
Power-Mate®,apa-
gue Iaaspiradora
antes dequitar el
mango de lostubas,
1, Opdmael bot6n
de bloqueoy luego
tire detmangopars
quitado del tuba.
Si su modelocuen-
ta con Iacaracteris-
pars liberar el man-
2. Desliceel accesoriodese-
ado con firmezasabreet
mango.Consulte el cuadro a
continuaci6n.
ACCESORIOS DEL TUBa
1.PararetirarIos I I1 _[ M /j'
tubas dela Power-
Mate®,col6quelos
enla posici6nverti-
cal debIoqueo,
2.ReUreel enchufeyel cord6nde
la Power-Mate®de lossujeta-
dares.
3. DesconecteeIcord6n, _ /Ranura
apoyeel pie sabrela
Power-Mate®y girelos
tubas hastaqueel bot6n
desa-parezcay luegotire
delostubas pararetiralos
deIa Power-Mate®.
4. Coloqueel accesofio
deseadosabre eltuba.
Consults elcuadro.
............... AREAA LIMPIAR []
............ ' ' w|
Entre P_sos Pisos
ACCESORIO Meubles* cojines* Cortinas* Escaloneslescublertosalfombrsdos?Parades
Alfombras _
Cepillo pars cbmbinacibn _ ........... P-_
(Algunosmodelos) _ X X X X
Herramientapara"_end[duras
(Algunosmode]as) _._ X i
Cep'illSparapisos
X X X
(Algunos modelos)
Powe'r_Mate"
(Algunos modeIos)
X*** X
Handi-mateJr,® _ .......
(Algunos modelos)** _ X X
Power-mateJP _ "
X X
(Algunosmodelos)** _ ..........
* Siemprelimple los ac_=sotios antesde usarsabretells, ** El intertuptotde 2 pos_ones dabs astor en la posicibn ON (p_sodescubierto).
_" La Handi-Mate Jr,"y la Pce_r-Ma_eJr2 {ncluyen sus p_opiasins{Tu_ionespars USOde S_t_S. _ (A._gunoSi"nodelos)El interrup_orde
Power-Mate_debe estar en _aposici6nOFF,
NOTA:Cuandoseparelostubasoptimacomp!etamenteel boto,'nde b]oqueoantesdesepararlosparcompla-
to,Si sele oincultaopr,imirel baton,juntemas_ostubasparaalineare[bot6nconel ori_tcio,uprima el bot6ny
oespu6s separe lOStuaos.

LIMPIADOR DE ORILLAS
Active los cepilIosiim-
piadoresde orillas a
cadalade de la Power-
Mate®.Pasela Power-
Mate®junto a [as pare-
des o junto a los mue-
blesparaayudar a eli-
miner Iatierraacumu-
ladeen las orillasde la
alfombra.
PROTECTOR CONTRA
SOBRECARGAS
La Power-Mate®cuenta con lil
protecci6nincorporada contfa
da5odetmotor y Iacorreaen
case deatascamientodei cepi-
Iio.Si el cepilIo pierdeveloci-
dado se detiene, et bot6n deI
protectorcontra sebrecargas
se active y apaga la Power-
Matee,Etmotor deIreceptaculo
continuarafuncionando.
Pare ¢orregir el problema:ConsutteeI
RECONOCIMtENTODEPROBLEMAS.
Para restablecer: Oprima el bot6ndeI protector
centre sobrecarga.
CONTROL DE ASPIPo_CI6N
El control de
aspiraci6n Ie
permite cam-
bier la poten-
cia de aspira-
aspiraciSn aspiraci(>n ci6n de Ia es-
piradora de_
pendiendo del
grosor de la tela o aifombra. La aspiraci6n se dismi-
nuye, pare limpiar cortinas y tapetes ligeros, abrien-
do el control; pare aspirer muebles y alfombras, el
control debe cerrarse pare aumentar Ia aspiraci6n.
ADVERTENCIA
Peligrode lesiones personales
Desconectesiempre la aspiradoraantes de
limpiar Ias _reas de los cepillos pues_stos
podrianarrancar de maneraimprevista. El
he hacerlo,podria resultaren lestonesper-
sonales.
SlSTEMA DE AUTO-LIMPIEZA.
Est_aspiradora estaequipadacon un sistemade
auto-limpieza.Cedavez quase extiendeel cable
el_ctricouna [evade limpiezasituadadentrodeI
cube de[a basuragira y limpia elfiltro.
TAPAY ALMACENAMIENTO
PARA POWER-MATE _
ALGUNOS MODELOS
Eltube inferiortieneun
rebordeen formade"U_
enla zonede fijaci6ndel
cord6neI_ctrico.La
aspiredoratiene unatenu-
re enformade"U"cerca
Iaposteriordela
aspiradora.
La ranura permite almacenar Ios tubes y la Power-
Mate®con el tube pare economizar eI espacio re-
querido pare su almacenamiento.
El tube se sale de la ranura al set levantado para
usarlo y se desliza dentro de _'sta aI bajarlo para el-
macenarlo.
PROTECTORTERMAL
Estaaspiradoratiene un protectortermalquase
ajustaautom_ticamentepareprotegerala
aspiradoradetsobrecalentamiento.El protector
termaiapege el motorautom&ticamentepara
permitirquaelmotor se enfrieafin deeviter
posiblesdaSosala aspiradora.
Pararestablecer: Apague Iaaspiradoray des-
enchufeel cord6ndeI tomacorrienteparepermitir
quala aspiradorase enfrie. Busque y saque las
obstrucciones,si es necesario.Examinetambi_n
y reemplacecualquierfiltro obstruido. Espere -
aproximadamente30 minutes y enchufe[aaspi-
radorayvolt_elapare ver si e] protectordel
motorse hareajustado.En algunoscases, la
unidadpuedevolvera arrancer sSbitamente,NO
LA DEJEdesatendidamientras qua est_enchu-
fade.
10

Laaspiradoracreasucc{6no aspiraci6nquelevanta
latierra. Latierra esirnpulsadaa trav_s delas
v[as deflujo aire hastael cubede la baseuraper
unar&pidacorriente deaire, Elcube de la baseura ...__
bolsaparapo[vopermiteel flujo deaire, pete ("7/"'_
atrapata_e,_a. / _"-_----_,,
Para[ograrlos mejoresresultados de _ "_
limpieza,mantengaabiertas lasvias ._
de aire.Examineperi6dicamenteIas ./.,f/
_ireasindicadascon asteriscospara /_,_"
asegorarsede que noest_n hie- _.,_,_"
queadas.DesconectedeIrecep-_o,;/
t_culode rev_
1. Desconecte el cord6n ei6ctdco de laciavija de la
Gubo de
la basura
pared.
2, Limpie el exteriorconun traposuavey limp]o,que
ha sideexprimidodespu6sde remejarenuna so]u-
cibn deagua y detergente liquido Iigero.Sequeel
exterior con untraposeco despu_sde limpiar. NO
choreeagua sobre laasptradora.
3, Limpie la superficieexteriordeI recept_culoy de
losaccesoriospara reducirIa e]ectricidadest_ticay
]aacumulaci6nde polvo.
CUIDADO
No use los accesorios s| est_n mojados.
Los accesorios qua se utilicen en &teas
sucias, debajo del refrigerador, no deben
usarse en otras superficies sin antes ser
lavados. Podr{an dejar marcas.
11

Siemprevacieelcubodelabasuracuandoel
niveldebasuraalcanzala]inea"MAX FILL."
PAPASACAR ELCUBO DELA BASURA:
ADVERTENCIA
redesconecteel cord6n _lectrico
de repararalguna partede la aspi-
a.
Presione hacia
aba_oen el seguro
de desbIoquear el
cubo de Ia basura
situado sobre la
manija del cubo de
la basura.
Tire de la manija y
levanteel cubo de
_t_ la basura de Ia
caja de ]aaspi-
radora.
Cada vezque se saca
el cubo de la basura,
roteel botbn de arribe
del cubo debasura
per Iomenos dos rev-
olucionescompletas
para activarel sistema
de limpierel fil_ro,y
pare mantenerel fun-
cionamientode
Perilla de
limpi__j
Iimpieza,
Filtro
Secondario _',,
.o.,,,o.o,
cubo de la _ "1%ti" Jl
basura _____
Remueva
cuaIquier
obstaculo
quepueda
esterlocal-
izadoen Ia
entradadel
cubode la
basura o en
el filtro
secundado.
PARA VACIAR EL CUBO DE LA BASURA:
Vacie el contenido
del cube dela
basuraadentro
del tarrode
basura.
Mientrasque sostiene el
cubode la basura sobre
uri envasede basura,
quite la tapa deIcubo de
ta basura levantandola.
Vea "PARA LIMPIAR EL FILTRO" bajo
CAMBtO / LIMPIEZA DEL F1LTRO.
delflltro
COMO INSTALAR EL CUBO DE
LA BASURA
lnstal_ Ia tape del __\
ou o l=
colocandola de _/..,._--- Cosllllade
_(,_,_ laa/ineaci6nregrese en el cubodE,' _---.,,_- --
la basura con la costilla
de alirieaci6n y la alineaci6rt
de la tape alineadas pot el
borde en el cubo de Ia
basura
Coloque elcube de
la basisra riueva-
mente dentro de ta
aspiradora insertan-
dolo haste que el
bot6n de seguro
del cubo de la
basura 1oasegure
en su lugar.
i2

ADVERTENCIA
Peligrode choqueel_ctrico
Desenchufeel cablede poderdel tomacor-
riente.No opere la limpiadorasin eifiltro
prlmarioo el filtm de escape.Est_seguro
que elflltros est_ Znstaladopropiamente
paraprevenirfalla del motoryfosacudida
el_ctrica.
IHH
FILTRO PRIMARIO
Examineel filtro primariode vez encuandoy Iimpie
cuando est_ sucio.
NOTA: Bajo usoy cuidadonormal, sufiltro puedeIIe-
gara durar hasta5 aSos.
PARA SACAR EL FILTRO PRIMARIO
Remuevael cubode Iabasura y el ensembledela
tapadeIcubede la basura comosedescribe enIa
secci6n LIMPIANDO EL CUBO DE LA BASURA,
Mientrasque sostieneel ensamble de la tapa
sobre un envase de basura agarre el fillro, gire a
ta derecha y levbntelo.
Filtro
Ranura \
Cubierta
Del Filtro
UMPARELFILTRO
El filtro puede ser limpiado golpeandolo
ligeramente en el Iado de un envase de la
basura o Enjuaguelo bajo un grifo de agua.
Enjuague con agua solamente; no utilice
ningOn detergente ojabbn. Permita que el filtro
se seque pot 24 horas antes de ponerlo
nuevamente dentro de Ia aspiradora.
Sial limpiar el filtro no se restaur6 m&sla succi6n
de Ia aspiradora a su maximo poder, usted necesi-
ta substituir el filtro.
PAPA REEMPLAZAREL FtLTROPRIMARIO
Desliseel filtro sobre]alevade limpiezay r6telo a la
izquierda hastaque lastabulacionesbloqueanen
ranuras.
Filtro
Cubie_a
D_Filtm
Cambieelcubode la basuray e]ensemble dela
tapa del cubodeIa basuracomose describe enla
secci6n LIMPIANDOEL CUBODE LABASURA.
13

FILTRO SECUNDARIO
ESPUNJA
Peligro de choque el_ctrico
No opere la aspiradora sin el filtro de
seguridad del motor. Asag_urese de que el
fiJtro est# seco e instalado adecuadamente
pare impedir que ei motor falle y/o que se
produzca un choque el_ctrico,
Siempredesconecteel cord6n_Jectrico
antes de reparara]gunaparte de ta aspi-
radora.
Examine el secondary filter del motor de vez en
cuando y timpie cuando est_ sucio.
Remueva er cube de Ia basura come se describe en
la secci6n LIMPIANDO EL CUBO DE LA BASURA.
RemuevaeIfiltro secundariode la aspiradorade
polvo.
Laveel tiltro secundariocon aguacalienteyjab6n,
enju&gueloys_quelo bienapret_ndolocon lamano
y dejandoquase seque aIaire libra.
NO Io lave en la lavadora de platos,
NO Io instale ht_medo.
Reemplace_trosecundarioseco. Asegureque el
f_ltroest_ instaladopropiamentesobre la abertura
del filtro,
Reemplaceel cubo dela basura oomose describe
en tasecci6n L]MPIANDOEL CUBO DE LA
BASURA,
14

FILTRO DE ESCAPE
ELECTROSTATICO
Este cartuchodel filtroescapese tienequecambiar
est_ sucio.DebecambiarseperibdicamentesegOn
las condicionesde use.
Elfiltro no se puede lavarpues perderi_su
capacidadparaatraparaltrapar polvo.
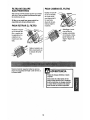
PAPA RETIRAR EL FILTRO
Presioneel seguro
en el cartuchodeI
filtro y saq_elo de
le espiradora. (La
cubierta no se
muestra porclad-
dad),
Quite el cartucho de
filtro presionando en
la ranura del cartu-
cho.
PARA CAMBIAR EL FILTRO
Desliseel nuevo fll-
tro en el cartucho
de modoque la
cara blanca del ill-
tro yea hacia
afuera de la aspi-
radora, segen Io
mostrado.
Substituya el cartu-
cho de filtrode
escapecolocandolo
en la ranura y empu-
jandohasta que el
seguro Ilegu6 a su
]ugar.
Siempre deberan seguirse todas ]as precau-
ciones de seguridad al limpiar y dar servicio a
ta Power-Mate®.
ADVERTENClA
J Pel{grode choque et_ctrlcoo lesi6n
corporal
Desconectela unidadantes de lim-
piarlao darleservicio. De io contrario
podria producirseun choqueei_ctdco
o causar lesibn corporal sila aspira-
doraarranca de maneraImprevista,
Illlll ill
15

i___ 1. Retire la cubier-
! . ta de la bombilla
ejerciendo presibn
_ _ haciaadentroy
levantandoambos
_ _%_'lr_=_ costados comose
muestra.
2. EmpujeIabombillahacia
adentroy girelaen direc-
ci6nopuestaal sentide de
las manecillasdel reloj
para retirarla.
3. Cambiela bombilla.Esta
nodebeexceder15va-
tios(130velt_os),Cierre Ia
cubiertade la bombillahas-
ta que quedebien cerrada,
NOTA:Censulte la PIEZASY CARACTERISTICAS
paradeterm]narel N°.de {abombilla.
CUIDADO .....I
Puede que al retirar los soportes del I
cepillo se desprenda una pequefia I
arandela de metal de cada extremo. I
NO pierda estas arandelas. ,,,,
NOTA: Para mantener una alta eficiencia de
limpieza y evitar el da_io a la aspiradora,
clue limDiar el aqitador _da vez aue se cambia
la_correa.
Tambien hay que limpiar el agitador seg_n el
siguiente horatio:
El uso de la
aspiradora agitador
Frecuente - cada sernana
(usada dirariamente)
Moderado - carla rues
(usada 2 o 3 veces
por semana)
Ligero - cada 2 meses
(usada 1 vez por semana)
Retire todo indiciode basura o suciedad de la
zona de Ia correa y deI rodillo del cepillo.
Con cuidado quite las tapas y quite ef hilo o los
restos ubicados en el agitador, en los soportes
del cepillo, en las arandelas o en el eje del agi-
tator,
IMPORTANTE
Cambie las arandelas y
luego las soportes,
Vea la perspect]va des-
piezada para seguir el
orden correcto de colo-
caci6n de tas piezas.
16
Desconectela aspiradora.Examinefrecuente-
mente el cepillo y las_reasdesoporte del misme
de taPower-Mate®yelimine todocabelio,hiloy
pelusaacumulada.Si la acumu/aci6nes excesiva,
separe laPower-Mate®del tuboy realicelos pasos
a continuacibn.Las instruccionestambi6naparecen
bajo Iacubierta dela bombilla.
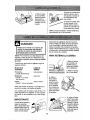
PARA RETIRAR LA CORREA
1.Retire[acubierta
de la bombilIay la
bombillacomose
indica bajo CAMSIO
DE LA BOMBILLA.
2. Retire lostornillos
de IaPower-Mate®,
3.Velteela
Power-Mate_,
Paraquitarla
cubierta,inserte
el destomillador
enlas pestafias
deIacubierta de
amboscostadosy
girelo para {iberar
laspestafias.
4. Volteela Power-
Mateehaciaarriba.
Oprimata gutade
tiberaci6ny baje el
dispositivogiratorie,
Incline lacubierta
de atr._shaciaade-
]antehastaque se
desprend&

del cepilte
4. Introduzcacui-
dadosamenteel
destornilladory
emp_jelo hacia
arribaen el lugar
delsoperte'dei
cepilloparedes-
prenderelcepillo
deIabase.
5. Retire la correa
del eje deImotor.
el
a
6.Retire Ia
banda des-
gastada.
CUIDADO
Puede que al retirar los soportesdelcepi-
Iio se desprenda unapeque_a arandelade
metalde cada extrerao.NO pierdaestas
arandelas.
7. Retire los sopor-
tes de!cepil[o;
examine y limpie
las_reas de
soporte del cepilIo.
EnIaENSAMBLE
DELCEPILLOse
proporcionauna
ilustraci6nde todo
el ensambledeI
cepillo.
Para cambiar la correa
1.Reinstaielasarande-
lasy lossoportesdel
cepilloen el ensemble.
2.]nstaleuna cor-
tea nuevaen la
ranura correspon-
dientedel ensara-
hie del cepi!Io.
pas_ndoladespu_s
sobre el eje del
motor.Asegfirese
de queia correa
quede potdebajo
dei protector,
NOTA: Consulte la PIEZASY CARACTERJSTICAS
paradetermineret N°,decoffee.
3.[nserte ambas
pesta_esde
soportedelante-
rasen las ranu-
rasde tabase.
I Luegoinserte
losdossoportes
tara
\ _3_ delantera _ delcepiflohaste
\_________....-._delsoporte quequeden bien
esentados.
\
4. Lineelas \
pestaSasdelan-
\
terasde Ia base
con lasranuras
del frentede la
cubierta.
Ranura de
la cubierta Pesta_a
delantera
de la base
17
5, Incline la
cubiertahacia
atras.Presione
firmemente
sobre la cubierta
hasteque las
pestaSasposte-
riores asienten
porcompleto.
Peste_a posterior de la base
VolteeIaPower-Mate®,ReinstatelostorniI!osde]a
cubierla y baje los rodillosde ajustedenive]de pelo
de la alfombrahaste quequeden en posici6n.
Reinsta[ela bombillay la cubierta,sisuraedelo Ias
tiene.

ADVERTENCIA
Peiigrode choque eldctricoo lesi6ncorpo-
ral
Desconectela unidadantes de limpiar!ao
darle ser_icio. De Io contrariopodria pro-
ducirse un choque el_ctricoo causar
lesi6ncorporal si ta aspiradoraarranca de
maneraimprevista,
,,,,,,,,,,,
PARA EXAMINAR EL CEPILLOS
__ ambie mazo del
cepillo cuando
est_.n desgastados
haste el nivel de
las barras de
soporte de [a base.
Barra de soporte
de la base
PARA CAMBIAR MAZO DEL
CEPILLO
1.Retire la cubierta,correay ensembledeicepiilo
de lePower-Mate®Consulte"Pareretirar Iacorrea"
bajo CAMBIODELACORREAY LiMPIEZADEL
CEPILLO.
2.Retire Iasopor_ede]cepilloy arande]asdelas
ensambledeIcepillo.
3.Armeet ensambledelcepilIo.Paraalinearlos ori-
ficiosde lostomillosdel mazo,]aruedadentaday el
topedel cepil[o,asegSresedeque Iepartede [a
cepillodeltope delcepilloest6 alineadacon Ias
cepillosdel mazodeIcepillo.
4.Cambie lacorrea,el ensambledeIcepil[o,la cu-
bierta de la Power-Mate®,la bombilIay Iacubiertade
ia bombilla.Consulte"Parecambiarla correa"bajo
CAMBIODELACORREAY LIMPIEZADELCEPi-
LLO.
Arandela Cepillo
;IL t ,o o,e
18

Consulteestetabia pareencontrarsoEucionesqueustedmismo puedereatizarcuandotengaproblemasmeno-
resde rendimiento, Cuatquierservicioque necesiteapartede otros descritos eneste manualtienen queser
hechosper unrepresetante deservicio autorizadoSeam.
ADVERTENCIA Pe,grodochoqueel ctrico
Desconectela aspiradoraantes de darleservicio o limpiarla. De Io contrariopodria
producirse uncheque el_ctricoo causerlesiSn corporal.
No asp|re
satisfactoriamente÷
La aspinldora arranca.
pete seapaga,
La PowePMate_ no
fimciona cuando est_
tostaJada.
1, Es_ desconectade.
2. Cortecircuitosbetide o fL_ibIe quemado
en el tablerodo servicie de laresklencia.
3. ConexioneseF_ctd_sde le mangue_
s_e]tas.
4. Protectortermelen e!recept_culo,
1, Cubede |e besuraIleneo alascada,
2, Vies defluis _'e aim atascadas.
3. FilLiessucies,
4. Ajus_eincortecto de hive!de pelode
Iaalfombra.
5, Cohire]de aspirac_nabietto,
6. Men3uere r_!a,
7, Cepilios de leF_wer*Mate=desgastados,
8, Corma desgostadao rote.
9. Cepilb o soperiesde _ste suclos.
1, Conexioneset_cldcasde Ie menguera
2, Protectorcanlt_,sob_car3as de Ia
Power-Mate®botado_
3, Ptotectertsrmalenelrecept_culo.
l. Conex_onesde la Power.Mate*
desconectadas.
2, Co_ea desgestada o ro_a.
9. Cepilloosoportesde _ste su_ios,
4, Prol_ctorcantrasobrecergasde Ia
Power-Mate_ boccie.
,',,, ii:"_i_...............
1. Conecte bien,opdmaselectorde er,c,endido/
apa_ado e Ia p,_-s_clSnON.
2, Restablezca el cottacireuitoso cambteet
fusible.
3, Vuelvaa €onectarZosexltemos de la manguera
(p§gina 6).
4, Restablezca elprotector terrr_t,(p&ginal0).
1. Cube de ]a basura_imp_o(p_gina12),
2, Umple Ies vies de flujo de aite, (p_glna 12),
3. Limpie/ cemb_ losliltros, (p=igLna13, 14).
4_ Ajusteel =_lvel,(p_gina 8).
5, Ajusteel control,(p_g_na"i1},
6, Cambiela manguera.
7. Cambie los r.epilIos,(p_ginat7).
8.&9. ConsulteCAMSIO DE LACORRF.AY UMPIEZ,
DEL CEPILLO,(pdginas 15,16).
i,
t, Examine ta$tone, ones el_cldcas,vue_vaa co_
ector_osextremesde _ ma_ueta, (p_gina6).
2. Retirecualquierobjeto atoradoo elascado,
{ue9o testab{e_a. S{la aspiradotaarranca pe_c
se vuek'ea apagar,{impie elcepI{10y {0s
soportesde _te, {ueg_ restablezca,
(p_glnas 15, 1_).
3. RestobIezceetprotecto_ttermal,(p_gina 10),
f. Conecte bien,(l_gina 5).
2.&3.
4.
C_nsu[teCAMBIODE L/_CORREAY LIMPIF..Z,
DEL CEPILLO, (p,:_l_nas15, t6),
Exemine elbma delcepilIoparedetetroinar
sihey ecumufadSn excesivaobloqueode
pelusa,
Umpie e!cepiltoy sussopodes,luego
restab]ezca,(p_.g_nas15,16},
La aspimdora levante tapetes 1, Ajustein_x_rrsct_de nivel de pe_ode 1, Ajusteel P:lVe;,(p_gine 8),
-,.o-es dilicilempujar Iaatfombra,
e Power-Mate% 2, Aspiracl6ndemaciado potente. 2, Abrael controlde aspitacl_e, (p_gina tl).
La Izzznofuncione. 1, 8ombille fundide, 1, Camblelabombille, (p_glne15).
2. Cot6_n etescado. 2, Tiredel cm'd6ny despots enr_lelo.
Laaspimdoradejamames t. Estiledelimpfezain_rrecto, t. ConsulIeSUGERENCIASPARAASPIRAR,
en la alfombra, (p_g_na8,
19

Your Home
For repair- in your home - ofall major brand appliances,
lawn and garden equipment, or heating and cooling systems,
no matter who made it, no matter who sold it!
For the replacementparts,accessoriesand
owner's manuals that you need to do-it-yourself.
For Sears professional installation of home appliances
and items like garage door openers and water heaters.
1-800-4-MY-HOME ® Anytime, day or night
(1-800-469-4663) (U.S,A. and Canada)
www,sears.com www.sears.ca
Our Home
For repair of carry-inproductslike vacuums,lawnequipment,
and electronics, call or go on-linefor the nearest
Sears Parts and Repair Center.
1-800-488-1222 Anytime, day or night (U.S.A. only)
www, sears,com
_ To purchasea protectionagreement on a productservicedby Sears:
_ 1-800-827-6655 (U.S.A.) 1-800-361-6665 (Canada)
Parapedirserviciode reparaci6n
a domicilio,yparaordenarpiezas:
1-8884_U-HOGARs_
(14_88-784,.6427)
Au Canada pour service en frangais:
1-800-LE-FOYER Mc
(_.aoo433-6937)
www.sears.ca
© Sea_, Roebuckand Co.
® Registered Trademark t TMTrademark / SMService Mark of Sears, Roebuck and Co.
® Marca Registrada / TMMarca de F_brica I sMMarca de Servicio de Sears, Roebuck and Co.
_c Marque de commerce t eo Marque d_posee de Sears, Roebuck and Co.
-
 1
1
-
 2
2
-
 3
3
-
 4
4
-
 5
5
-
 6
6
-
 7
7
-
 8
8
-
 9
9
-
 10
10
-
 11
11
-
 12
12
-
 13
13
-
 14
14
-
 15
15
-
 16
16
-
 17
17
-
 18
18
-
 19
19
-
 20
20
-
 21
21
-
 22
22
-
 23
23
-
 24
24
-
 25
25
-
 26
26
-
 27
27
-
 28
28
-
 29
29
-
 30
30
-
 31
31
-
 32
32
-
 33
33
-
 34
34
-
 35
35
-
 36
36
-
 37
37
-
 38
38
-
 39
39
-
 40
40


Kenmore 116.22412 El manual del propietario
- Categoría
- Aspiradoras
- Tipo
- El manual del propietario
- Este manual también es adecuado para
en otros idiomas
- English: Kenmore 116.22412 Owner's manual
Artículos relacionados
-
Kenmore 11623613300 Manual de usuario
-
-
 Sears Kenmore 116.29713 El manual del propietario
-
-
-
-
Kenmore 11623913300 El manual del propietario
-
-
