Bionaire BUL9100-UM El manual del propietario
- Categoría
- Humidificadores
- Tipo
- El manual del propietario

INFORMACION DE LA GARANTIAPREGUNTAS FRECUENTES
GARANTÍA LIMITADA DE 3 AÑOS
Sunbeam Products, Inc. operando bajo el nombre de Jarden Consumer Solutions, o en Canadá, Sunbeam Corporation
(Canada) Limited operando bajo el nombre de Jarden Consumer Solutions, (en forma conjunta, “JCS”), garantiza que
por un período de tres años a partir de la fecha de compra, este producto estará libre de defectos de materiales y
mano de obra. JCS, a su elección, reparará o reemplazará este producto o cualquier componente del mismo que
presente defectos durante el período de garantía. El reemplazo se realizará por un producto o componente nuevo o
reparado. Si el producto ya no estuviera disponible, se lo reemplazará por un producto similar de valor igual o
superior. Ésta es su garantía exclusiva. No intente reparar o ajustar ninguna función eléctrica o mecánica de este
producto. Al hacerlo elimínará ésta garantía.
La garantía es válida para el comprador minorista original a partir de la fecha de compra inicial y la misma no es
transferible. Conserve el recibo de compra original. Para solicitar servicio en garantía se requiere presentar un recibo
de compra. Los agentes y centros de servicio de JCS o las tiendas minoristas que venden productos de JCS no tienen
derecho a alterar, modificar ni cambiar de ningún otro modo los términos y las condiciones de esta garantía.
Esta garantía no cubre el desgaste normal de las piezas ni los daños que se produzcan como resultado de uso negligente o
mal uso del producto, uso de voltaje incorrecto o corriente inapropiada, uso contrario a las instrucciones operativas, y
desarme, reparación o alteración por parte de un tercero ajeno a JCS o a un Centro de Servicio autorizado por JCS.
Asimismo, la garantía no cubre actos fortuitos tales como incendios, inundaciones, huracanes y tornados.
¿Cuál es el límite de responsabilidad de JCS?
JCS no será responsable de daños incidentales o emergentes causados por el incumplimiento de alguna garantía o
condición expresa, implícita o legal.
Excepto en la medida en que lo prohíba la ley aplicable, cualquier garantía o condición implícita de comerciabilidad o
aptitud para un fin determinado se limita, en cuanto a su duración, al plazo de la garantía antes mencionada.
JCS queda exenta de toda otra garantías, condiciones o manifestaciones, expresa, implícita, legal o de cualquier otra
naturaleza.
JCS no será responsable de ningún tipo de daño que resulte de la compra, uso o mal uso del producto, o por la
imposibilidad de usar el producto, incluidos los daños incidentales, especiales, emergentes o similares, o la pérdida de
ganancias, ni de ningún incumplimiento contractual, sea de una obligación esencial o de otra naturaleza, ni de ningún
reclamo iniciado contra el comprador por un tercero.
Algunas provincias, estados o jurisdicciones no permiten la exclusión o limitación de los daños incidentales o
emergentes ni las limitaciones a la duración de las garantías implícitas, de modo que es posible que la exclusión o las
limitaciones antes mencionadas no se apliquen en su caso.
Esta garantía le otorga derechos legales específicos y es posible que usted tenga otros derechos que varían de un
estado, provincia o jurisdicción a otro.
Cómo solicitar el servicio en garantía
En los Estados Unidos
Si tiene alguna pregunta sobre esta garantía o desea recibir servicio de garantía, llame al 1-800-253-2764 y podrá
obtener la dirección del centro de servicio que le resulte más conveniente.
En Canadá
Si tiene alguna pregunta sobre esta garantía o desea recibir servicio de garantía, llame al 1-800-253-2764 y podrá
obtener la dirección del centro de servicio que le resulte más conveniente.
En los Estados Unidos, esta garantía es ofrecida por Sunbeam Products, Inc. operando bajo el nombre de Jarden
Consumer Solutions, Boca Ratón, Florida 33431. En Canadá, esta garantía es ofrecida por Sunbeam Corporation
(Canada) Limited operando bajo el nombre de Jarden Consumer Solutions, 20 B Hereford Street, Brampton, Ontario
L6Y 0M1. Si usted tiene otro problema o reclamo en conexión con este producto, por favor escriba al Departamento
de Servicio al Consumidor. POR FAVOR NO DEVUELVA ESTE PRODUCTO A NINGUNA DE ESTAS
DIRECCIONES NI AL LUGAR DE COMPRA.
WARRANTY INFORMATION
3 YEAR LIMITED WARRANTY
Sunbeam Products, Inc. doing business as Jarden Consumer Solutions or if in Canada, Sunbeam Corporation (Canada)
Limited doing business as Jarden Consumer Solutions (collectively “JCS”) warrants that for a period of three years
from the date of purchase, this product will be free from defects in material and workmanship. JCS, at its option, will
repair or replace this product or any component of the product found to be defective during the warranty period.
Replacement will be made with a new or remanufactured product or component. If the product is no longer available,
replacement may be made with a similar product of equal or greater value. This is your exclusive warranty. Do NOT
attempt to repair or adjust any electrical or mechanical functions on this product. Doing so will void this warranty.
This warranty is valid for the original retail purchaser from the date of initial retail purchase and is not transferable.
Keep the original sales receipt. Proof of purchase is required to obtain warranty performance. JCS dealers, service
centers, or retail stores selling JCS products do not have the right to alter, modify or any way change the terms and
conditions of this warranty.
This warranty does not cover normal wear of parts or damage resulting from any of the following: negligent use or
misuse of the product, use on improper voltage or current, use contrary to the operating instructions, disassembly,
repair or alteration by anyone other than JCS or an authorized JCS service center. Further, the warranty does not
cover: Acts of God, such as fire, flood, hurricanes and tornadoes.
What are the limits on JCS’s Liability?
JCS shall not be liable for any incidental or consequential damages caused by the breach of any express, implied or
statutory warranty or condition.
Except to the extent prohibited by applicable law, any implied warranty or condition of merchantability or fitness for
a particular purpose is limited in duration to the duration of the above warranty.
JCS disclaims all other warranties, conditions or representations, express, implied, statutory or otherwise.
JCS shall not be liable for any damages of any kind resulting from the purchase, use or misuse of, or inability to use
the product including incidental, special, consequential or similar damages or loss of profits, or for any breach of
contract, fundamental or otherwise, or for any claim brought against purchaser by any other party.
Some provinces, states or jurisdictions do not allow the exclusion or limitation of incidental or consequential damages
or limitations on how long an implied warranty lasts, so the above limitations or exclusion may not apply to you.
This warranty gives you specific legal rights, and you may also have other rights that vary from province to province,
state to state or jurisdiction to jurisdiction.
How to Obtain Warranty Service
In the U.S.A.
If you have any question regarding this warranty or would like to obtain warranty service, please call
1-800-253-2764 and a convenient service center address will be provided to you.
In Canada
If you have any question regarding this warranty or would like to obtain warranty service, please call
1-800-253-2764 and a convenient service center address will be provided to you.
In the U.S.A., this warranty is offered by Sunbeam Products, Inc. doing business as Jarden Consumer Solutions located
in Boca Raton, Florida 33431. In Canada, this warranty is offered by Sunbeam Corporation (Canada) Limited doing
business as Jarden Consumer Solutions, located at 20 B Hereford Street, Brampton, Ontario L6Y 0M1. If you have any
other problem or claim in connection with this product, please write our Consumer Service Department. PLEASE DO
NOT RETURN THIS PRODUCT TO ANY OF THESE ADDRESSES OR TO THE PLACE OF PURCHASE.
INSTRUCCIONES PARA GUARDAR
ACCESORIOS DE REPUESTO
STORAGE INSTRUCTIONS
REPLACEMENT ACCESSORIES
Printed In China
© 2015 Sunbeam Products, Inc. doing business as Jarden Consumer Solutions. All Rights Reserved. Distributed by Sunbeam
Products, Inc. doing business as Jarden Consumer Solutions, Boca Raton, Florida 33431.
STORAGE INSTRUCTIONS
If your humidifier will not be in use for two days or more, follow these instructions.
1. Clean, rinse and thoroughly dry the humidifier as directed in the weekly maintenance section. DO NOT leave any
water inside the base.
2. Remove the tank cap. Do not store with the tank cap in place.
3. Place the humidifier in the original carton and store in a cool, dry place.
4. Always clean the humidifier before the next season begins.
REPLACEMENT ACCESSORIES
To order the replacement accessories you can do any of the following:
• Visityourlocalretailer
• Goto
www.bionaire.com
• CallConsumerServiceat1-800-253-2764
DIAGNÓSTICO DE PROBLEMAS
156864 Rev A BUL9100_15ESM1 Impreso en China
GCDS-BIO39661-SL
FREQUENTLY ASKED QUESTIONS
TROUBLESHOOTING
TROUBLESHOOTING
Trouble Probable Cause Solution
• Water Leaks from
Tank.
☛ Tank rubber ring is missing.
☛ Tank cap not tight enough.
☛ Tank water is Hot.
✔ Remove tank cap and replace or reposition
ring.
✔ Tighten the tank cap.
✔ Fill with cool water only.
• Crack in Tank.
☛ Hot water will cause tank to pressurize.
☛ Tanks will crack if hit or dropped.
✔ Fill with cool water only.
✔ Handle tank with care.
• Film on Tank.
☛ Mineral deposits. ✔
Clean/disinfect tank as instructed in weekly
cleaning instructions.
• Warmmist
minimal to none.
☛ Heating element can take up to 20
minutes to warm.
✔ Allow up to 20 minutes of run time after
selecting the warm mist option.
• Reduced or no
mist.
☛ Scale build up on transducer.
✔ Clean transducer (refer to the Cleaning and
Maintenance Instructions).
• Appearance of
minerals or "white
dust"
☛ Tap water contains minerals that collect
inside your humidifier. When the
minerals are released into the air they
often appear as white dust on your
furniture.
✔ Use distilled water in your humidifier. This will
help reduce the precipitation of minerals or
`white dust'.
✔ In addition, use a demineralization cartridge.
ADC14-UM, Arm & Hammer Demineralization
Cartridge available for purchase on
www.bionaire.com.
FREQUENTLY ASKED QUESTIONS
Question Answer
• What are the variables that affect
run time?
The estimated run time for this humidifier is based on average room
conditions. The actual run time of your humidifier is dependent on numerous
variables such as:
✔ Air exchange in the room where the humidifier is placed.
✔ Room construction of the room where the humidifier is placed.
✔ Temperature of the room where the humidifier is placed.
✔ Humidity levels in the room where the humidifier is placed.
✔ Movement of occupants and the opening and closing of doors in the room
where the humidifier is placed.
✔ Home furnishings in the room where the humidifier is placed.
• How do I remove film on water
tank?
✔ See Daily Maintenance instructions. Regular cleaning is recommended.
• How can I extend the run time?
✔ Run your unit on the lowest setting.
✔ If your unit has electronics, set it to your desired humidity level. The unit
will turn on and off, which will extend the run time.
✔ Fill the tank all the way full, place it on the base, let the water empty into
the base until it stops bubbling, then refill the tank full again. This ensures
maximum water capacity and will extend run time.
PREGUNTAS FRECUENTES
PREGUNTAS RESPUESTAS
• Cuáles son las variables que
afectan el tiempo de
funcionamiento?
El tiempo de funcionamiento estimado de este humidificador está basado en las
condiciones ambientales promedio. El tiempo de funcionamiento actual de su
humidificador depende de varios factores tales como:
✔ El intercambio de aire en el cuarto donde se encuentra el humidificador.
✔ La estructura del cuarto donde se encuentra el humidificador.
✔ La temperatura del cuarto donde se encuentra el humidificador.
✔ Los niveles de humedad en el cuarto donde se encuentra el humidificador.
✔ La actividad de los ocupantes y la secuencia en que se abren y cierran las puertas
del cuarto donde se encuentra el humidificador.
✔ El número de muebles presentes en el cuarto donde se encuentra el humidificador.
• Cómo quito la película del
tanque de agua?
✔ Consulte las instrucciones diarias de mantenimiento. Se recomienda una limpieza
regular.
• Cómo puedo extender el
tiempo de funcionamiento?
✔ Haga funcionar la unidad en el modo más bajo.
✔ Si su unidad tiene electrónicos, ajústela al nivel de humedad deseado. La unidad
se encenderá y apagará, extendiendo el tiempo de funcionamiento.
✔ Llene el tanque al máximo, colóquelo en la base, deje que el agua se vacíe en la base
hasta que deje de burbujear, luego llene nuevamente el tanque al máximo. Esto
asegura una capacidad máxima de agua que extenderá el tiempo de funcionamiento.
© 2015 Sunbeam Products, Inc. operando bajo el nombre de Jarden Consumer Solutions. Todos los derechos reservados.
Distribuido por Sunbeam Products, Inc. operando bajo el nombre de Jarden Consumer Solutions, Boca Raton, Florida 33431.
DIAGNÓSTICO DE PROBLEMAS
Problema Posible Causa Solución
•
Fugas de agua
del tanque.
☛ Falta el anillo de caucho del tanque.
☛ La tapa no está suficientemente
ajustada.
☛ El tanque de agua está caliente.
✔ Quite la tapa del tanque y reemplace o
coloque correctamente el anillo.
✔ Ajustar bien la tapa.
✔
Llene sólo con agua fría
.
• El tanque está
agrietado.
☛
El agua caliente causará presión en el tanque.
☛
El tanque se agrietará si es golpeado o
está goteando
.
✔
Llene con agua fría solamente
.
✔ Manipule el tanque con cuidado. Si el tanque
tiene una rajadura, reemplácelo por uno nuevo.
• Hay residuos en
el tanque.
☛ Hay depósitos minerales. ✔ Limpie/desinfecte el tanque como se indica
en las instrucciones de limpieza semanal.
cleaning instructions.
• Vaporcaliente
de mínimo a
nulo.
☛ El elemento calefactor puede tardar hasta
20 minutos para calentarse.
✔ Permita que el aparato funcione por 20
minutos después de seleccionar la función de
vapor caliente..
• Vaporreducidoo
nulo.
☛ Acumulación de sarro en el transductor.
✔ Limpie el transductor (consulte las
instrucciones de Limpieza y mantenimiento).
• Apariencia de
minerales o
"polvo blanco "
☛ El agua del grifo contiene minerales que
se acumulan en el interior de su
humidificador. Cuando los minerales se
liberan en el aire a menudo aparecen en
forma de polvo blanco en sus muebles .
✔ Utilice agua destilada en el humidificador .
Esto ayudará a reducir la precipitación de
minerales o ' polvo blanco ' .
✔ Además , utilice un cartucho de
desmineralización. ADC14-UM, Arm &
Hammer cartucho de desmineralización .
disponible para su compra en
www.bionaire.com.
pure indoor living
Instruction Leaflet
Questions? Comments? Call 1-800-253-2764 in North America.
Folleto de Instrucciones
Lea las instrucciones antes de usarlo. Consérvelas para futuras consultas.
¿Preguntas? ¿Comentarios? Llame al 1-800-253-2764 en Norteamérica.
Read instructions before operating. Retain for future reference.
vida en interiores puros
ULTRASONIC
HUMIDIFIER WITH
DIGITAL HUMIDISTAT
If you have any questions regarding your product or would like to learn more about other Bionaire
®
products, please
contact our Consumer Service Department at 1-800-253-2764 or visit our website at www.bionaire.com.
Si tiene preguntas relacionadas con este producto o si está interesado en conocer otros productos Bionaire
®
, póngase en
contacto con nuestro Departamento de Servicio al Cliente: llame al 1-800-253-2764 o visite nuestro sitio web
www.bionaire.com.
ULTRASONIC
HUMIDIFICADORE CON
MEDIDOR DE HUMEDAD DIGITAL
MODEL: BUL9100
MODELO: BUL9100
INSTRUCCIONES PARA GUARDAR
Si planea no usar su humidificador por dos o más días, siga estas instrucciones.
1. Limpie, enjuague y seque el humidificador como se indica en las instrucciones de mantenimiento semanal. NO deje
agua dentro de la base ni en la bandeja.
2. Retire la tapa del tanque. No guarde el tanque con la tapa puesta.
3. Coloque el humidificador en su empaque original y guárdelo en un lugar fresco y seco.
4. Siempre limpie el humidificador antes de que comience la próxima estación.
ACCESORIOS DE REPUESTO
Puede ordenar accesorios de repuesto de una de las siguientes formas:
• Visitesudistribuidorlocal
• Vallaa
www.bionaire.com
• Llameaservicioalconsumidoral1-800-253-2764
BUL9100_15ESM1.indd 1 4/1/15 9:27 AM

PLEASE READ AND SAVE THESE
IMPORTANT SAFETY INSTRUCTIONS
FEATURES - OPERATIONS
• ALLERGY
• COLD/FLU
• COMFORT
• DRY SKIN
• NOSE & THROAT
Digital Humidistat Control
Your humidifier is equipped with a digital humidistat that
allows you to set your humidifier to your desired comfort
level. To preset a precise comfort level, turn the Dial Knob
( ) to adjust the humidity level ranging from 35% to
60% or “Stay On ” setting for constant humidity. The LCD
Display will show the selected humidity level for 5 seconds
and then change back to show the room humidity. When the
room humidity level rises above the set humidity, the
humidifier will stop. When the room humidity level drops
below the set humidity, the humidifier will turn on
automatically to maintain the preset humidity level.
NOTE: To shut the humidifier off at any setting, press the
Power Button ( ). The humidistat has memory. This
means that when you turn the unit back on, it will be at the
last humidity setting before the humidifier is turned off.
However, if the humidifier is unplugged, the digital
humidistat will no longer remember the previous humidity
setting. You will need to reset the digital humidistat if the
humidifier is unplugged.
CAUTION: DO NOT move the humidifier with water in the
tank or the humidifier base. The moving action of the water
may activate the water tank’s release nozzle and overfill the
humidifier base. This may cause the humidifier to function
intermittently, or stop emitting mist. Should this occurs,
simply remove the excess water from the humidifier base.
NOTES:
• High setting will produce the maximum moisture level
and Low setting will produce the longest run time and
quieter performance.
• Whenthehumidifierrunsoutofwater,thetransducer
and fan will automatically shut off.
Tank Empty
Once the tank is empty, TANK EMPTY will illuminate in the
LCD display, and the humidifier will shut off automatically.
Unplug the humidifier from the electrical outlet. Before
refilling, empty any residual water from the base and the
tank (follow the daily maintenance instructions).
Timer
Your humidifier is equipped with 24-Hour Auto Shut-off Timer
feature. This allows you to program your humidifier to shut
off automatically after running for a defined time interval.
1. Press the Timer Button ( ) once. The " " next to
icon will begin to blink.
2. Press the Timer Button ( ) to select your desired
time interval for the humidifier to shut off automatically
after 8, 12, 16 or 24 hours.
3. The Timer icon ( ) will appear on the LCD Display to
indicate that the Timer is active.
4. To cancel the Timer feature, press the Timer
Button ( ) to select " " .
21. Never place housing under water flow or immerse in
liquids.
22. Do not plug in the cord with wet hands: electric shock
could result.
23. Do not pour water in any openings other than the
water tank.
24. To prevent damage to surfaces, do not place humidifier
under overhanging surfaces.
25.NEVERoperateunitwithoutwaterinthetank.
26. Do not move unit after it has been used until unit cools
completely.
27. Use both hands when carrying full tank of water.
PLEASE READ AND SAVE
THESE IMPORTANT SAFETY
INSTRUCTIONS
CONSUMER SAFETY INFORMATION
NOTE: This is an electrical appliance and requires
attention when in use.
NOTE: If moisture forms on the walls or windows of the
room, turn off the humidifier. The room already has plenty
of humidity and additional moisture may cause damage.
NOTE: DO NOT block air inlet or outlet.
Cord and Plug Installation Safety Instructions:
The length of cord used on this appliance was selected to
reduce the hazards of becoming tangled in, or tripping
over a longer cord. If a longer cord is necessary an
approved extension cord may be used. The electrical
rating of the extension cord must be equal to or greater
than the rating of the humidifier (refer to the rating
information placed on the humidifier). Care must be
taken to arrange the extension cord so that it will not
drape over the countertop or tabletop where it can be
pulled on by children or accidentally tripped over.
FCC STATEMENT
Potential for Radio/Television interference
This device complies with Part 18 of the FCC Rules.
Operation is subject to the following two conditions: (1)
This device may not cause harmful interference, and (2)
this device must accept any interference received,
including interference that may cause undesired operation.
This product has been tested and found to comply with the limits
for a Class B digital device, pursuant to Part 18 of the FCC rules.
These limits are designed to provide reasonable protection
against harmful interference in a residential installation. The
product generates, uses, and can radiate radio frequency
energy and, if not installed and used in accordance with
the instructions, may cause harmful interference to radio
communications. However, there is no guarantee that the
interference will not occur in a particular installation. If
the product does cause harmful interference to radio or
television reception, which can be determined by turning
the product on or off, the user is encouraged to try to correct
the interference by one or more of the following measures:
• Reorientorrelocatethereceivingantenna.
• Increasetheseparationbetweentheproductandthe
receiver.
• Connecttheproductintoanoutletonacircuit
different from that to which the receiver is connected.
• Consultthedealeroranexperiencedradio/TV
technician for help.
• Changesormodificationsnotexpresslyapprovedby
the party responsible for compliance could void the
user’s authority to operate the equipment.
HOW ULTRASONIC WORKS:
An ultrasonic transducer atomizes water, producing
refreshing visible cool or warm mist.
NOTE: A humidity level below 20% can be unhealthy
and uncomfortable. The recommended humidity level is
between 40%-50%.
NOTE: To avoid white dust use only distilled water
especially if A) you suffer from respiratory problems or
B) you live in an area where the water has a high
mineral content.
When using electrical appliances, basic safety precautions
should always be followed to reduce the risk of fire, electric
shock, and injury to persons, including the following:
1. Read all instructions before using the appliance.
2. To avoid fire or shock hazard, plug the appliance
directlyintoa120VACelectricaloutlet.
3. Keep the cord out of heavy traffic areas. To avoid
firehazard,NEVERputthecordunderrugsornear
heat registers.
4. DO NOT place humidifier near heat sources such as
stoves, radiators, and heaters. DO locate your
humidifier on an inside wall near an electrical outlet.
The humidifier should be at least 4 inches (10 cm)
away from the wall for best results.
5. NEVERplacehumidifierinanareawhereitis
accessibletochildren.NEVERusehumidifierina
closed room, particularly where a child may be
sleeping, resting, or playing (a closed room may
result in excessive humidity).
6.
WARNING:
Do not attempt to refill humidifier without
first unplugging the unit from its electrical outlet. Failure
to heed this warning may cause personal injury. Be sure
to unplug the unit by pulling on the plug and not the
cord.
7. Never place anything over moisture outlet when the
unit is running.
8. NEVERdroporinsertanyobjectintoanyopenings.
9. DO NOT operate any appliance with a damaged cord
or plug, after the appliance malfunctions, or if it has
been dropped or damaged in any manner. Return
appliance to manufacturer for examination, electrical
or mechanical adjustment, or repair.
10.
Use appliance only for intended household use as
described in this manual. Any other use not
recommended by the manufacturer may cause fire,
electric shock, or injury to persons. The use of
attachments not recommended or sold by the
manufacturer may cause hazards.
11. DO NOT use outdoors.
12. Always place humidifier on a firm, flat, level surface.
A waterproof mat or pad is recommended for use
underthehumidifier.NEVERplaceitonarugor
carpet, or on a finished floor that may be damaged
by exposure to water or moisture.
13. DO NOT allow the Moisture Outlet to directly face the
wall. Moisture could cause damage, particularly to wall
paper.
14. Humidifier should be unplugged when not in use.
15.
NEVERtilt,move,orattempttoemptyunitwhileitis
operating. Shut off and unplug before removing the
water tank and moving the unit.
16.
This humidifier requires daily and weekly
maintenance to operate appropriately. Refer to daily
and weekly cleaning procedures. Use only cleaners
and additives recommended by the manufacturer.
17.
NEVERusedetergents,gasoline,glasscleaner,
furniture polish, paint thinner, or other household
solvents to clean any part of the humidifier.
18.
Excessive humidity in a room can cause water
condensation on windows and some furniture. If this
happens, turn the humidifier OFF.
19.
Do not use humidifier in an area where humidity
level is in excess of 50%. Use a hygrometer,
available at your local retailer or through the
manufacturer, to measure the humidity.
20.
DO NOT attempt to repair or adjust any electrical or
mechanical functions on this unit. Doing so will void
your warranty. The inside of the unit contains no
user serviceable parts. All servicing should be
performed by qualified personnel only.
FEATURES - OPERATIONS
FEATURES - OPERATIONS
THIS APPLIANCE HAS A POLARIZED PLUG (one blade is wider than the
other). To reduce the risk of electric shock, this plug is intended to fit in a
polarized outlet only one way. If the plug does not fit fully in the outlet,
reverse the plug. If it still does not fit, contact a qualified electrician to
install the proper outlet.
DO NOT ATTEMPT TO MODIFY THIS PLUG OR DEFEAT THIS
SAFETY FEATURE IN ANY WAY.
FILLING INSTRUCTIONS
1. Be sure the humidifier is switched off.
2. Select a location for your humidifier on a flat level
surface about 4 inches (10 cm) away from the wall.
DO NOT place the humidifier on a finished floor or
near furniture which can be damaged by too much
moisture or water. Place on a moisture resistant
surface.
3. Remove the tank from the main housing.
4. Bring the tank to the sink, twist off the tank cap by
turning counterclockwise. Fill tank with cool, fresh tap
water. DO NOT fill with warm water as this may cause
leaking. Replace the cap on tank FIRMLY.
5. Place tank back onto the base. The tank will
immediately begin to empty into the base.
6. Plugthehumidifierintoa120Velectricaloutlet.
OPERATING INSTRUCTIONS
Power Button
1. Press the Power Button to turn the humidifier on; the
LCD Display shows the room humidity level.
NOTE: The display range is 30% - 90%. If your room
humidity level falls below 30%, the unit will still display
30. If your room humidity level rises above 90%, the
unit will continue to display 90.
2. Once the unit is turned on, it begins to run at the Cool
Mist and High Speed settings. The Cool Mist icon ( )
and High speed setting ( ) will illuminate on LCD
display.
3. To switch to Low (1) setting, press the Speed Button.
Warm/Cool Mist Button
Press the Warm/Cool Mist Button to switch between Cool
Mist and Warm Mist mode. The corresponding icon( for
Warm/ for Cool Mist) will illuminate on LCD display to
indicate which mode is activated. Cool Mist and Warm Mist
can operate at all speed settings. Press the Speed Button to
switch between High (2) and Low (1) settings.
NOTE: For optimal warm mist output allow up to 20
minutes of run time after selecting the warm mist function.
Comfort Select Button (5 Comfort Modes)
The humidifier is designed with 5 comfort modes; you may
select the one which suits your need. Press the Comfort
Select Button to activate the function, and then turn the
Dial Knob ( ) to cycle through the 5 comfort levels
and select your preferred mode; the selected mode will
illuminate on LCD display:
CARACTERISTICA - FUNCIONAMIENTO
CARACTERISTICA - FUNCIONAMIENTO
CARACTERISTICA - FUNCIONAMIENTO
LEA Y CONSERVE ESTAS IMPORTANTES
INSTRUCCIONES DE SEGURIDAD
ESTE PRODUCTO TIENE UN ENCHUFE POLARIZADO (una hoja es más
ancha que la otra). A fin de disminuir el riesgo de descarga eléctrica, este
enchufe está diseñado para insertarse en un tomacorriente polarizado en
un solo sentido. Si el enchufe no entra completamente en el tomacorriente,
inviértalo. Si aun así no entra, llame a un electricista calificado para instalar
un tomacorriente apropiado.
NO MODIFIQUE EL ENCHUFE NI ANULE ESTA FUNCION DE SEGURIDAD
DE NINGUNA MANERA.
iluminará en la pantalla LCD para indicar qué modo está
activado. Los modos de vapor frío y vapor caliente pueden
operar en todas las configuraciones de velocidad. Oprima el
botón Speed (velocidad) para cambiar entre las
configuraciones Alta (2) y Baja (1).
NOTA: Para una salida óptima de vapor caliente, permita
que el aparato funcione por 20 minutos después de
seleccionar la función de vapor caliente.
Botón Comfort Select (Selección de confort) con
5 modos de confort
TEl humidificador está diseñado con 5 modos de confort;
usted puede seleccionar el que se ajuste a sus necesidades.
Oprima el botón Comfort Select para activar la función y
luego gire la perilla ( ) para cambiar entre los 5 niveles
de confort y seleccione su modo preferido; el modo
seleccionado se iluminará en la pantalla LCD:
• ALLERGY (ALERGIA)
• COLD/FLU (RESFRIADO/GRIPE)
• COMFORT (CONFORT)
• DRY SKIN (PIEL SECA)
• NOSE & THROAT (NARIZ Y GARGANTA)
Control digital del humidistato
Su humidificador está equipado con un humidistato digital
que le permite seleccionar el nivel de confort deseado. Para
preestablecer un nivel de confort preciso, gire la perilla
( ) para ajustar el nivel de humedad entre 35% y 60%
o "Stay On" (fijar) para una humedad constante. La pantalla
LCD le mostrará durante 5 segundos el nivel de humedad
seleccionado y luego volverá a mostrar el nivel de humedad
de la habitación. Cuando el nivel de humedad de la
habitación aumente más de la humedad establecida, el
humidificador se detendrá. Cuando el nivel de humedad de la
habitación esté por debajo del nivel establecido, el
humidificador se encenderá automáticamente para mantener
el nivel de humedad preestablecido.
NOTA: Para apagar el humidificador en cualquier
configuración, presione el botón de encendido( ). El
humidistato tiene memoria. Esto significa que cuando
encienda de nuevo la unidad, lo hará con la configuración
que tendía el humidificador antes de apagarlo. Sin embargo,
si el humidificador se desconecta, el humidistato digital no
guardará en la memoria la configuración de humedad
previa. Necesitará restablecer el humidistato digital si el
humidificador se desconecta.
PRECAUCIÓN: NO mueva el humidificador con agua en el
tanque o su base. El movimiento del agua puede activar la
boquilla de vaciado del agua del tanque y llenar de más la
cavidad del transductor. Esto puede provocar que el
humidificador funcione de forma intermitente o ya no
produzca vapor. Si esto ocurre, sólo elimine el exceso de
agua de la base del humidificador.
NOTAS:
• Unaconfiguraciónaltaproduciráelmáximonivelde
humedad y una configuración baja producirá el mayor
lapso de funcionamiento y un desempeño más silencioso.
• Cuandoelhumidificadorsequedasinagua,el
transductor y el ventilador se apagarán de forma
automática.
Tanque vacío
Cuando el tanque esté vacío, se iluminará TANK EMPTY
(tanque vacío) en la pantalla LCD, y el humidificador se
apagará de manera automática. Desconecte el humidificador
del tomacorriente. Antes de volver a llenar, vacíe toda el
agua residual de la base y del tanque (siga las instrucciones
de mantenimiento diario).
Cronómetro
Su humidificador está equipado con una función de
cronómetro de apagado automático de 24 horas. Esto le
permite programar su humidificador para apagarse de forma
automática después de funcionar por un periodo definido.
1. Presione el botón Timer (cronómetro) ( ) una vez.
El " " al lado del icono empezará a parpadear.
2. Oprima el botón Timer ( ) para seleccionar el tiempo
que tardará el humidificador en apagarse de forma
automática después de 8, 12, 16 o 24 horas.
3. El icono de Timer ( ) se mostrará en la pantalla LCD
para indicar que el cronómetro está activo.
4. Para cancelar la función de cronómetro, presione el
botón Timer ( ) para seleccionar " " .
reparables por el usuario. Toda reparación debe ser
realizada únicamente por personal calificado.
21. Nunca coloque el gabinete debajo de la canilla o lo
sumerja en líquidos.
22. No enchufe el cable con las manos húmedas. Puede
ocasionarle una descarga eléctrica.
23. No coloque agua en ninguna abertura que no sea el
tanque de agua.
24. Para prevenir el daño a las superficies, no coloque el
humidificador debajo de ninguna superficie que
sobresalga por encima del mismo.
25.
NUNCA haga funcionar la unidad sin agua en el tanque.
26. Una vez utilizada la unidad, no la mueva hasta que
se haya enfriado completamente.
27. Use las dos manos cuando cargue el tanque de agua.
LEA Y CONSERVE ESTAS
IMPORTANTES
INSTRUCCIONES DE
SEGURIDAD
INFORMACIÓN DE SEGURIDAD PARA EL
CONSUMIDOR
NOTA: Este es un artefacto eléctrico y requiere ser usado
con cuidado.
NOTA: Si se acumula humedad en las paredes o
ventanas del cuarto, apague el humidificador. El cuarto
ya tiene demasiada humedad y la humedad adicional
puede causar daños.
NOTA: NO bloquee la entrada o salida de aire.
Instrucciones de Seguridad en la Instalación del
Cable y el Enchufe :
La longitud del cable de este artefacto fue seleccionada
para reducir el riesgo de enredarse o tropezarse con un
cable más largo. Si necesita usar un cable más largo,
puede utilizar un cable de extensión aprobado. La
capacidad eléctrica del cable de extensión debe ser igual o
mayor que la capacidad del humidificador (consulte la
información sobre clasificación que se encuentra en el
humidificador). No debe permitir que el cable de extensión
cuelgue de la mesada o mesa de tal forma que pueda ser
jalado por niños o causar que alguien se tropiece.
DECLARACIÓN DE LA COMISIÓN
FEDERAL DE COMUNICACIONES (FCC
POR SUS SIGLAS EN INGLÉS)
Posibilidad de interferencias con Radio/ Televisión
Este equipo cumple con la Parte 15 de las Normas de la
FCC. Su funcionamiento está sujeto a las siguientes dos
condiciones: (1) Este equipo no puede causar
interferencia perjudicial y (2) este equipo debe aceptar
toda interferencia recibida, inclusive interferencia que
pueda causar un funcionamiento no deseado.
Este producto ha sido probado y se determinó que cumple
con los límites para un dispositivo digital Clase B, según
la parte 15 del reglamento de la FCC.
Estos límites están diseñados para brindar protección
razonable contra interferencias nocivas en una instalación
residencial. El producto genera, usa y puede irradiar
energía de radiofrecuencia, y si no se lo instala y se lo usa
según las instrucciones, puede causar interferencias
adversas en las comunicaciones radiales. Sin embargo, no
hay garantía de que la interferencia no ocurra en una
instalación en particular. Si el producto causa interferencias
nocivas en la recepción de radio o televisión, lo cual se
puede determinar apagando y encendiendo el producto, se
recomienda al usuario que intente corregir la interferencia
por medio de una de los siguientes métodos:
• Reorientaroreubicarlaantenareceptora.
• Aumentarlaseparaciónentreelproductoyelreceptor.
•
Conectar el producto a una salida en un circuito
diferente de aquella a la cual está conectado el receptor.
•
Pedir ayuda al distribuidor o a un técnico de radio/
TVidóneo.
•
Todo cambio o modificación que no haya sido
expresamente autorizado por la parte responsable de
exigir el cumplimiento podría anular la autoridad del
usuario para usar el equipo.
CÓMO FUNCIONA ULTRASONIC:
Un transductor ultrasónico atomiza el agua y produce un
refrescante vapor frío y visible.
Debe tomar precauciones básicas de seguridad siempre que
utilice artefactos eléctricos para reducir el riesgo de incendio,
descarga eléctrica y daños personales, incluyendo lo siguiente:
1. Lea completamente las instrucciones antes de utilizar
el artefacto.
2. Para evitar incendio o descarga eléctrica, enchufe el
artefactodirectamenteenuntomacorrientede120VCA.
3.
Mantenga el cable fuera de las zonas de mucho
tráfico. Para evitar incendios, NUNCA coloque el cable
debajo de alfombrillas o cerca de salidas de calefacción.
4.
NO coloque el humidificador cerca de fuentes de calor
como estufas, radiadores y calefactores. NO coloque el
humidificador contra una pared interna cerca de un
tomacorriente. El humidificador debe estar a por lo
menos 4" de la pared para obtener el mejor resultado.
5.
NUNCA coloque el humidificador en una zona
accesible para los niños. NUNCA use el humidificador
en un cuarto cerrado, especialmente donde pueda
haber un niño durmiendo, descansando, o jugando
(un cuarto cerrado puede resultar en excesiva humedad).
6.
ADVERTENCIA: No intente llenar nuevamente el
humidificador sin antes desenchufarlo del tomacorriente.
El no tener en cuenta esta advertencia puede causar
daños personales. Asegúrese de desenchufar la unidad
tirando del enchufe y no del cable.
7. Nunca coloque algo sobre la salida de humedad
cuando la unidad esté funcionando.
8. NUNCA inserte ningún objeto en una de las ranuras.
9. NO utilice ningún artefacto si el cable o el enchufe
están dañados, luego de una falla, o si se ha caído o
ha sufrido cualquier tipo de daño. Devuelva el
artefacto al fabricante para su inspección, ajuste
eléctrico o mecánico, o reparación.
10.
Utilice el artefacto únicamente para el propósito
hogareño indicado en este manual. Cualquier uso
distinto al recomendado por el fabricante puede
causar incendio, descarga eléctrica, o daños
personales. El uso
de accesorios no recomendados o que
no sean vendidos por el fabricante puede ser peligroso.
11.
NO utilizar en el exterior.
12.
Siempre coloque el humidificador en una superficie
firme, plana y nivelada. Se recomienda el colocar
una alfombrilla o bandeja resistente al agua debajo
del humidificador. NUNCA lo coloque sobre un tapete
o una alfombra, o en un piso que pueda dañarse con
el agua o la humedad.
13.
NO haga que la salida de humedad apunte
directamente a la pared. La humedad puede causar
daños, especialmente al empapelado.
14. Se debe desenchufar el humidificador cuando no se usa.
15.
NUNCA incline, mueva o intente vaciar la unidad
mientras esté funcionando. Apague y desenchufe la
unidad antes de quitar el tanque de agua y moverla.
16.
Este humidificador requiere mantenimiento diario y
semanal para funcionar correctamente. Refiérase a
los procedimientos de limpieza diarios y semanales.
Use únicamente limpiadores y aditivos recomendados
por el fabricante.
17.
NUNCA use detergentes, gasolina, limpiavidrios,
limpiador de muebles, diluyente de pintura u otro
solvente hogareño para limpiar ninguna parte del
humidificador.
18. La humedad excesiva en un cuarto puede causar
condensación de agua en las ventanas y en algunos
muebles. Si sucede esto, apague el humidificador.
19. No use el humidificador en un área donde el nivel de
humedad es mayor al 50%. Use un Higrómetro,
disponible en su tienda local o a través del
fabricante, para medir la humedad.
20. NO intente reparar o ajustar ninguna función
eléctrica o mecánica de esta unidad. El hacerlo
invalidará la garantía. La unidad no contiene partes
NOTA: Un nivel de humedad menor al 20% puede ser
nocivo e incómodo. El nivel de humedad recomendado es
entre el 40% y el 50%
.
NOTA: Para evitar el uso de polvo blanco sólo use agua
destilada especialmente si A) usted sufre de problemas
respiratorios o B ) que vive en una zona donde el agua
tiene un alto contenido de minerales.
INSTRUCCIONES DE LLENADO
1. Asegúrese de que el humidificador esté apagado.
2. Escoja una ubicación para su humidificador, sobre
una superficie plana y nivelada, separada unas 4" de
la pared. NO coloque el humidificador sobre un piso
o cerca de muebles que puedan ser dañados por la
humedad o el agua. Colóquelo sobre una superficie
resistente a la humedad.
3. Retire el tanque de la caja principal.
4. Acerque el tanque hasta la pileta, gire la tapa del
tanque en sentido contrario a las manecillas del reloj.
Llene el tanque con agua fría del grifo. NO llene con
agua caliente ya que esto puede producir una
pérdida.VuelvaacolocarlatapadeltanqueCON
FIRMEZA.
5. Coloque el tanque nuevamente sobre la base. El
tanque comenzará a vaciarse inmediatamente en la
base.
6. Enchufe el humidificador en un tomacorriente de
120V.
INSTRUCCIONES DE USO
Botón de encendido
1. Presione el botón de encendido para encender el
humidificador; la pantalla LCD muestra el nivel de
humedad de la habitación.
NOTA: El rango de la pantalla es de 30% a 90%. Si el
nivel de humedad de su habitación disminuye a menos
de 30%, la unidad seguirá mostrando 30. Si el nivel de
humedad de su habitación aumenta a más de 90%, la
unidad seguirá mostrando 90.
2. Cuando la unidad se enciende, empieza a funcionar en
lasconfiguracionesCoolMist(Vaporfrío)yHighSpeed
(Velocidadalta).Eliconodevaporfrío( ) y la
configuración de alta velocidad ( ) se iluminarán en
la pantalla LCD.
3. Para cambiar a la configuración baja, Low (1), presione
elbotónSpeed(Velocidad).
Botón Warm/Cool Mist (vapor caliente/frío)
Presione el botón Warm/Cool Mist para cambiar entre los
modos de vapor frío y vapor caliente. El icono
correspondiente ( para vapor frío o para caliente) se
CLEANING AND MAINTENANCE
INSTRUCTIONS
The following maintenance procedures must be
routinely followed in order to ensure proper,
efficient operation of your humidifier. The unit
will not work properly if not cleaned regularly.
When the unit is in use, daily and weekly maintenance is
recommended. Regular weekly cleaning prevents scale
buildup on the heating element and tray. It also prevents
micro-organisms from growing on the tray and tank. This
ensures that maximum efficiency will be achieved.
We cannot over-emphasize how essential proper
cleaning is to the maintenance and continued use
of your unit and to the avoidance of algae or
bacteria build-up.
Daily Maintenance:
1. Before cleaning, switch off the humidifier and unplug
the unit from the electrical outlet. Allow the unit to
cool down before cleaning.
2. Remove the water tank from the humidifier and
place in sink or tub.
3. Drain any remaining water and rinse thoroughly to
remove any sediment or dirt. Wipe clean and dry
with a clean cloth or paper towel.
4. Refill with cool tap water. Do not overfill.
Weekly Maintenance
Remove Scale:
1. Repeat steps 1-3 in the Daily Maintenance section.
2. Clean all surfaces with a soft brush (provided - see
Figure 3). Lift door on left buttom side of humidifier
to access transducer. Use brush provided to gently
clean transducer (See Figure 3). Remove the scale by
wiping the entire base with a cloth dampened with
undiluted white vinegar.
3. Rinse with clean warm water to remove scale and the
white vinegar solution before beginning to disinfect
the tank.
Disinfect tank:
1. Fill humidifier tank 1/2 full with water and 1/2
tablespoon of chlorine bleach.
2. Let the solution stand for 20 minutes, swishing every
few minutes. Wet all surfaces.
3. Empty the tank after 20 minutes, and rinse well with
water until the bleach smell is gone. Dry with a clean
cloth or paper towel.
4. Refill the water tank with cool water; replace the
housing and the water tank. Repeat ALL Operating
Instructions.
FEATURES - OPERATIONS
CLEANING / MAINTENANCE
CARACTERISTICA - FUNCIONAMIENTO
LIMPIEZA Y MANTENIMIENTO
INSTRUCCIONES DE LIMPIEZA Y
MANTENIMIENTO
Los siguientes procedimientos de mantenimiento
se deben seguir rutinariamente para poder
asegurar un funcionamiento correcto y eficiente de
su humidificador. La unidad NO FUNCIONARÁ
CORRECTAMENTE si no se la limpia de manera
adecuada.
Cuando la unidad está en uso, se recomienda realizar
mantenimientos diarios y semanales. Las limpiezas
semanales regulares evitan la acumulación de sarro en el
calentador y la base. Además impide el crecimiento de
microorganismos en la base. Esto garantiza que se pueda
lograr una máxima eficiencia.
No exageramos cuando hacemos hincapié en la
importancia de una limpieza adecuada para lograr
un mantenimiento y uso continuo de su unidad y
para evitar la acumulación de algas o bacterias.
Mantenimiento diario :
1. Antes de limpiar el humidificador, apáguelo y
desconéctelo del tomacorriente. Permita que la
unidad se enfríe antes de limpiarla.
2. Quite el tanque de agua del humidificador y
colóquelo en el lavabo o la tina.
3. Drene toda el agua restante y enjuague por completo
para eliminar todos los sedimentos o la suciedad.
Limpie y seque con un paño limpio o una toalla de
papel.
4. Vuelvaallenarconaguafrescadelgrifo.Nolo
sobrellene.
Mantenimiento semanal
Extraer el sarro:
1. Repita los pasos 1 al 3 de la sección Mantenimiento
Diario.
2. Limpie todas las superficies con un cepillo suave (que
se entrega con la unidad - ver Figura 3). Levante la
puerta del lado inferior izquierdo del humidificador
para alcanzar el transductor. Use el cepillo que se
entrega con el equipo para limpiar con cuidado el
transductor(VerFigura3).Quiteelsarrolimpiando
por completo la base con un paño humedecido con
vinagre blanco sin diluir.
3. Enjuague con agua tibia para quitar la escama y la
solución de vinagre blanca antes de comenzar a
desinfectar el tanque.
Desinfectar el Depósito:
1. Llene el tanque del humidificador a la mitad y agregue
1/2 cucharada de cloro blanqueador.
2. Deje reposar las partes en la solución durante 20
minutos, removiéndolas de vez en cuando. Humedezca
todas las superficies.
3. Vacíeeltanquedespuésde20minutos,yenjuaguebien
con agua hasta que el olor del blanqueador haya
desaparecido. Seque con un paño limpio o toallita de
papel.
4. Llene nuevamente el tanque de agua con agua fría;
reemplace la cubierta y el tanque de agua. Repita TODAS
las instrucciones de uso.
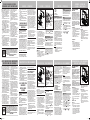
Figure 2
Control Panel (close-up)
F. Comfort Select Button
G. Warm/Cool Mist Button
H. LCD Display
I. Speed Button
J. Dial Knob
K. Power Button
L. Timer Button
F
J
L
K
G
H
I
Figure 1
A. Nozzle
B. Control Panel (see
Figure 2 for close-up)
C. Water Tank
D. Tank Cap
E. Humidifier Housing
A
C
E
B
D
Figura 2
Panel de control
(primer plano)
F. Botón de selección de
confort
G. Botón Warm/Cool Mist
(vapor caliente/frío)
H. Pantalla LCD
I. Botón de velocidad
J. Perilla
K. Power Button
L. Botón del cronómetro
F
J
L
K
G
H
I
Figura 1
A. Boquilla
B. Panel de control (consulte
la Figura 2 ver más de
cerca)
C. Tanque de agua
D. Tapón del tanque
E. Cubierta del humidificador
A
C
E
B
D
Figure 3
Brush
Transducer
Figura 3
Cepillo
Transductor
BUL9100_15ESM1.indd 2 4/1/15 9:27 AM
-
 1
1
-
 2
2


Bionaire BUL9100-UM El manual del propietario
- Categoría
- Humidificadores
- Tipo
- El manual del propietario
En otros idiomas
- English: Bionaire BUL9100-UM Owner's manual
Documentos relacionados
Otros documentos
-
Holmes HUL2622W-UM El manual del propietario
-
-
-
Sunbeam SUL2322 El manual del propietario
-
Holmes HM2320 El manual del propietario
-
UFESA HF3000 El manual del propietario
-