Truper ROEL-50N2 El manual del propietario
- Categoría
- Herramientas eléctricas
- Tipo
- El manual del propietario

ENGLISH
ESPAÑOL
Manual
Rotary Hammer
ROEL-50N2 ModelCode
ROEL-50N2
Applies for:
19320
Impact Energy Motor
5 Joules 11 A
CAUTION Read this manual thoroughly
before using the tool.

2ENGLISH
CAUTION
Contents
Keep this manual for future references.
The illustrations in this manual are for reference
only. They might be different from the real tool.
To gain the best performance of
the tool, prolong the duty life,
make the Warranty valid if
necessary, and to avoid hazards
of fatal injuries please read and
understand this Manual before
using the tool.
FULFILL THE WORKING CYCLES.
50 min of work and 20 min of rest. Daily maximum 6 hours.
DO NOT CHANGE THE SELECTOR WHILE THE MACHINE
IS WORKING.
CLEAN AFTER EACH USE TO REMOVE EXCESS OF DUST.
Perform periodic MAINTENANCE to your machine (page 9).
Use and care recomendations
Technical Data
Power Requirements
General Power Tools Safety Warnings
Safety warnings for Drills
and Hammer Drills
Parts
Preparation
Start Up
Maintenance
Authorized Service Centers
Warranty Policy
3
3
4
5
6
6
7
10
11
12

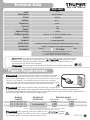
ROEL-50N2
19320
SDS Plus
60 Hz
Rotary Hammer
11 A
2 Hp
Code
Description
Chuck
Voltage
Frequency
Current
Power
5 Joules
Impact Energy
Concrete: 1-1/4” Steel: 1/2” Wood: 1-9/16”
Drilling Capacity
0 - 800 RPM
Speed
127 V~
Technical Data
IP Grade IP20
Class II
16 AWG x 2C with 221 °F insulation temperature
50 minutes’ work per 20 minutes idle. Maximum 6 hours per day.
Work Cycle
Conductors
Insulation
3
Power cord grips used in this product: Type “Y”.
Build quality: Reinforced Insulation
Thermal insulation on motor winding: Class H
Power Requirements
WARNING
WARNING Avoid the risk of electric shock or severe injury. When the power cable gets damaged
it should only be replaced by the manufacturer or at a Authorized Service Center.
The build quality of the electric insulation is altered if spills or liquid gets into the tool while in use.
Do not expose to rain, liquids and/or dampness.
Before gaining access to the terminals all power sources should be disconnected.
Tools with double insulation and reinforced insulation are equipped
with a polarized plug (one prong is wider than the other). This plug will only fit in the
right way into a polarized outlet. If the plug cannot be introduced into the outlet, reverse
the plug. If it still doesn’t fit, call a qualified electrician to install for you a polarized
outlet. Do not alter the plug in any way. Both insulation types eliminate the need of both
a grounded third power cord with three prongs or a grounded power connection.
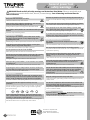
When using an extension cable, verify the gauge is enough for the
power that your product needs. A lower gauge cable will cause voltage drop in the line, resulting in power loss and
overheating. The following table shows the right size to use depending on cable’s length and the ampere capability shown in
the tool’s nameplate. When in doubt use the next higher gauge.
WARNING
WARNING
WARNING
from 0 A and up to 10 A
from 10 A and up to 13 A
from 13 A and up to 15 A
from 15 A and up to 20 A
18 AWG(*)
16 AWG
14 AWG
8 AWG
16 AWG
14 AWG
12 AWG
6 AWG
3 (one grounded)
from 6’ to 49’ | higher than 49’
Ampere
Capacity Number of
Conductors Extension gauge
* It is safe to use only if the extensions have a built-in artifact for over current protection.
AWG = American Wire Gauge. Reference: NMX-J-195-ANCE
When operating power tools outdoors, use a grounded
extension cable labeled “For Outdoors Use”. These extensions are especially designed
for operating outdoors and reduce the risk of electric shock. ENGLISH
0 - 4500 impact/min
Impacts

4
Work area
Keep your work area clean, and well lit.
Cluttered and dark areas may cause accidents.
Never use the tool in explosive atmospheres, such as in the
presence of flammable liquids, gases or dust.
Sparks generated by power tools may ignite the flammable material.
Keep children and bystanders at a safe distance while operating
the tool.
Distractions may cause loosing control.
Electrical Safety
The tool plug must match the power outlet. Never modify
the plug in any way. Do not use any adapter plugs with
grounded power tools.
Modified plugs and different power outlets increase the risk of electric shock.
Avoid body contact with grounded surfaces, such as pipes,
radiators, electric ranges and refrigerators.
The risk of electric shock increases if your body is grounded.
Do not expose the tool to rain or wet conditions.
Water entering into the tool increases the risk of electric shock.
Do not force the cord. Never use the cord to carry, lift or unplug
the tool. Keep the cord away from heat, oil, sharp edges or
moving parts.
Damaged or entangled cords increase the risk of electric shock.
When operating a tool outdoors, use an extension cord suitable
for outdoor use.
Using an adequate outdoor extension cord reduces the risk of electric shock.
If operating the tool in a damp location cannot be avoided, use
a ground fault circuit interrupter (GFCI) protected supply.
Using a GFCI reduces the risk of electric shock.
Personal safety
Stay alert, watch what you are doing and use common sense
when operating a tool. Do not use a power tool while you are
tired or under the influence of drugs, alcohol or medication.
A moment of distraction while operating the tool may result in personal injury.
Use personal protective equipment. Always wear eye
protection.
Protective equipment such as safety glasses, anti-dust mask, non-skid shoes,
hard hats and hearing protection used in the right conditions significantly
reduce personal injury.
Prevent unintentional starting up. Ensure the switch is in the
“OFF” position before connecting into the power source and /
or battery as well as when carrying the tool.
Transporting power tools with the finger on the switch or connecting power
tools with the switch in the “ON” position may cause accidents.
Remove any wrench or vice before turning the power tool on.
Wrenches or vices left attached to rotating parts of the tool may result in personal
injury.
Do not overreach. Keep proper footing and balance at all times.
This enables a better control on the tool during unexpected situations.
Dress properly. Do not wear loose clothing or jewelry. Keep
hair, clothes and gloves away from the moving parts.
Loose clothes or long hair may get caught in moving parts.
If you have dust extraction and recollection devices connected
onto the tool, inspect their connections and use them correctly.
Using these devices reduce dust-related risks.
Power Tools Use and Care
Do not force the tool. Use the adequate tool for your
application.
The correct tool delivers a better and safer job at the rate for which it was designed.
Do not use the tool if the switch is not working properly.
Any power tool that cannot be turned ON or OFF is dangerous and should be
repaired before operating.
Disconnect the tool from the power source and / or battery
before making any adjustments, changing accessories or
storing.
These measures reduce the risk of accidentally starting the tool.
Store tools out of the reach of children. Do not allow persons
that are not familiar with the tool or its instructions to
operate the tool.
Power tools are dangerous in the hands of untrained users.
Service the tool. Check the mobile parts are not misaligned or
stuck. There should not be broken parts or other conditions
that may affect its operation. Repair any damage before
using the tool.
Most accidents are caused due to poor maintenance to the tools.
Keep the cutting accessories sharp and clean.
Cutting accessories in good working conditions are less likely to bind and are
easier to control.
Use the tool, components and accessories in accordance with
these instructions and the projected way to use it for the type of
tool when in adequate working conditions.
Using the tool for applications different from those it was designed for, could
result in a hazardous situation.
Service
Repair the tool in a Authorized Service Center
using only identical spare parts.
This will ensure that the safety of the power tool is maintained.
General power tool
safety warnings
WARNING! Read carefully all safety warnings and instructions listed below. Failure to comply with any of
these warnings may result in electric shock, fire and / or severe damage. Save all warnings and instructions for
future references.
This tool is in compliance with
the Official Mexican Standard
(NOM - Norma Oficial Mexicana).
ENGLISH

5
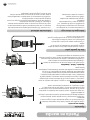
Safety warnings for
Drills and Hammer Drills
• The tool is designed to work with
SDS-PLUS drill bits or shank accessories. Choose the
appropriate one for the material to work, this reduces the
risk of serious injuries and speeds up the work.
• In case of drilling concrete or stone, use specific bits for
concrete.
• For metal, wood or plastic use the 3-jaw chuck with SDS
adapter (Not included); the measurements cover a
minimum of 1/16” up to the maximum capacity of the
chuck (1/2”)
• Do not attempt to use bits that exceed the capacity of the
chuck.
• Use bits / accessories that are sharp and in good
condition to optimize the work.
Choose the right bit
• Before starting to work with the hammer drill, take a few
minutes to assess the job to be done and double-check all
the safety caution rules.
• Fit the bit into the chuck. Remove the
chuck wrench before drilling. Failure to follow this
instruction shoots out the chuck wrench with great speed
and cause severe injury.
• Before drilling walls, floors or ceiling,
look for any built-in objects, like power cables and
conductors or pipes.
• Verify the switch is in the OFF position
before connecting the hammer drill. Otherwise, it can
unexpectedly start operating and could cause sever
injuries.
• Turn off and disconnect the tool before
reversing the chuck’s direction as well as fitting or replacing
bits.
Before using the hammer drill
CAUTION
CAUTION
WARNING
DANGER
DANGER
• Use the auxiliary handles, if supplied with the tool.
Loss of control may result in personal injury.
• Hold the tool by the isolated parts. The cutting part of
bit could come into contact with hidden wiring or
with its own power cord. Making contact with a
power cord causes the tool metal parts get electrified and
may result in electric shock to the user.
• Do not force the tool to excessive workloads.
• Turn off the hammer drill immediately
if the bit gets stuck into de work piece. Then, remove the
bit off the work piece. Do not try removing stuck bits
turning on and off the tool.
• Do not apply too much force on the tool in order to
accelerate the drilling procedure. The bit could get
damaged and the tool would loose efficiency and useful
life.
• A large diameter bit causes a higher
reactive force leading to losing control over the tool. To
avoid this possibility, firmly hold the tool with both hands
and keep balanced footing. Drill at 90°
• Be prepared to relax the drilling force when the bit goes
through the material. Sudden movements could break the
bit or damage the hammer drill.
• Do not touch the bit or the orifices
immediately after drilling. Wait until they cool down to
handle them. Do not try to cool them down using water
or oil.
• Immediately after using do not set the tool where there
are particles and / or dust. They can be absorbed into
the tool mechanism and cause damage.
• Use earplugs when the noise is higher than 85 dB
Exposure to noise can cause hearing loss.
• Use dust mask and dust extractor if necessary.
Remember that materials such as asbestos, paint with
lead, additives, some types of wood, metals or minerals
are highly toxic.
• Use safety glasses.
While operating the hammer drill
CAUTION
CAUTION
WARNING
ENGLISH

Preparation
4
5
3
Steps 1 & 2
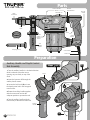
Parts
Non-Slip
Handle
Vibration
Shock Absorber
360°
Auxiliary
Handle
Function
Selector
Blocking
Button
Switch
Speed
Selector
Function Double
Selector
Depth
Control Rod
SDS
Chuck
6
A
Auxiliary
Handle
Mount
Depth
Control Rod
Cord Protector
Power Cord
Dust Guard
Two prong wrench
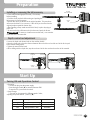
Auxiliary Handle and Depth Control
Rod Assembly
1. Turn the auxiliary handle in a clockwise direction
while is released so that the mount
opening can pass freely on top of the
chuck.
2. Insert the hammer drill through the
auxiliary handle mount.
3. Loosen the lock knob (A) to insert
the depth control rod in the hexagonal
mount orifice.
4. Rotate the auxiliary handle together
with the mount until set into the
adequate position to operate the tool.
5. Turn the auxiliary handle to fix the
mount firmly to the hammer drill head.
Crankshaft Cap
ENGLISH

A
B
1
2
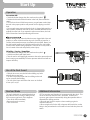
Chuck
Jaw
Bit with
SDS-PLUS Shank
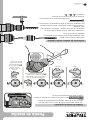
Installing or removing the bit/accessory
• Clean and lubricate lightly the bit and / or accessory
before installing.
• Push the chuck jaw back while turning and pushing the
bit/accessory in until it engages.
• Release the chuck jaw to set it in the original position. This procedure
will secure the bit and / or accessory. If the chuck jaw is not back to the
original position repeat the former step.
• After installing, always make sure the bit is firmly in place by trying to
pull it out.
• To remove the bit, pull down on the bit sleeve and push the bit out.
Do not try to install or remove bits and / or accessories
unless the tool is disconnected.
7
Turning ON and Operation Control
• Operation:
Connect the plug into the power supply.
Press the trigger switch (A) to start the hammer Drill.
To stop the use, just release the switch.
• Speed change:
• The tool can be operated in different speeds. Select,
adjusting the speed selector (+ and -) (B).
WARNING
ENGLISH
Preparation
Start Up
Operation
lock button
Auxiliary
handle
Depth
control rod
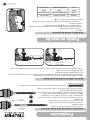
Depth control rod adjustment
• Loosen the depth rod release knob on the auxiliary handle.
• Move the depth rod so that the distance between the end of the rod and the end of the bit is equal
to the desired drilling depth.
• Tighten the wand release knob.
• When drilling with the depth bar, stop when the end of the bar reaches the surface of the material.
Speed
High
Medium
Low
Concrete and Stone
Metal
Start holes
Rotary Hammer / Chiseling
Drill
Rotary Hammer / Drill
Operation mode Material or Use

8
Start Up
Wood, metal or plastic drilling
WARNING
ENGLISH
Metal, wood or plastic can be drilled with
the tool using drill / accessory bit three
jaws chuck with an SDS adapter (NOT INCLUDED).
• To install the three jaws chuck, go as with any other SDS accessory
(page 7, Installing or removing the bit / accessory).
• Set the bit into the three jaws chuck until is stops and secure with
the chuck key tightening each one of the orifices alternatively.
Never use the three jaws chuck with the selector
in the operation mode in the IMPACT positions ( , , ).
C
Changing the Operation Mode
• Turn both function selectors (C) into one of the 2
positions to determine one of the four configurations,
depending what is the job to carry out.
Never change the position in the
function selectors when the hammer drill motor is
running.
Hammer Drill
Chiseling
(The chisel does not have a
100% fixed )position.
WARNING
Drill
Adjust the working angle of the chisel, you
can rotate the chisel in any position.
Note: The hammer drill does not generate
rotation or impact output for user safety.
Note: Only adjust the chisel
in angle adjustment mode,
adjusting it in chisel mode
may result in a risky situation.

9
Start Up
ENGLISH
•SDS accessories need freedom of movement inside the chuck. This
causes eccentricity when the tool is unloaded. However, the
accessory gets centered automatically during the operation with no
affectation the drilling precision.
• When the tool is new it requires 5 hours working to gain its
maximum efficiency.
• When using the tool in the drill or hammer drill mode first, set the
bit tip in the point where the orifice will be bored and then press the
switch.
The tool is built with an overload breaker that
stops the axis force (causing a rattling sound)
if the accessory gets stuck. If this happens:
• Turn off the tool immediately.
• Remove the stuck accessory.
• Turn On the tool.
Additional Information
Overload Brake
Percussion drill.
• Set the knob that changes the drive mode to the symbol .
• Position the bit at the desired location in the hole, then actuate the
switch.
• Do not force the tool. With less pressure, you get better results. Keep
the tool in the proper position and prevent it from slipping out of the
hole.
• Do not apply more pressure when the hole is clogged with particles or
chips. Instead, actuate the tool with no load, and then withdraw the bit
partially from the hole. If you repeat this action several times, the hole
will be cleaned and normal preforming will resume.
• When drilling a hole, when the hole becomes clogged with chips and
particles, or when it hits the reinforcing rods of reinforced concrete, a
sudden and tremendous torque is exerted on the tool/drill. Always use
the side handle (auxiliary) and hold the tool firmly by the side handle
and the switch handle during operations. Failure to do so may result in
loss of control of the tool and possibly serious injury.
Chiselling / Carving / Demolition
• Set the knob that changes the drive mode to the symbol .
• Hold the tool firmly with both hands.
• Turn the tool on and apply light pressure to the tool to prevent the tool
from bouncing uncontrollably. Excessive pressure with the tool will not
improve efficiency.
Operation
ADVERTENCIA
Use of the Dust Guard
• Slide the dust cover over the bit before drilling any holes
vertically above your head.
• The dust cover will prevent dust from falling on the tool
and on yourself when drilling.
• The size of the bits to which the dust cover can be fixed
is from 5/16” to 3/8”

ENGLISH
Maintenance
10
A
• Carbon brushes shall be checked periodically and
replaced always in a Authorized
Service Center .
• When replaced, ask the technician to inspect if the new
carbon brushes move freely in the carbon brush housing.
Ask to turn on the tool during five minutes to make the
contact in the carbon brushes and the commuter even.
• Use only original spare carbon
brushes, designed specifically with the right strength and
electric resistance for each type of motor. Carbon brushes
with different specifications may damage the motor.
• When replacing carbon brushes, always change bot.
• To guarantee adequate motor cooling, always keep slots
clean and free of obstructions.
• Regularly inspect all the assembly screws. Double-check
they are properly tighten. If any screw is loose screw it
immediately.
• Service should only be made in a
Authorized Service Center. Service and maintenance
performed by non-qualified people may be dangerous and
can lead to personal injuries. It also makes the product
Warranty void.
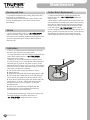
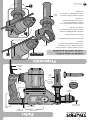
Lubrication
Cleaning and Care Carbon Brush Replacement
Service
• There is no requirement to lubricate daily or each hour
because it has a lubrication greasing system.
• It is required that the tool transmission be lubricated each
carbon brush replacement in a
Authorized Service Center
• However, the user shall add Lithium Complex Grease,
ISO 220 Viscosity, N.L.G.I Grade #2 (for more information
about the type of grease to use, please contact a Truper
Authorized Service Center) every 2 to 3 days, and everyday
if the load is heavy or when the impact seems to be weak.
Only in this case proceed as follows:
1. Turn ON the tool a couple of minutes to warm it.
2. Unplug the tool.
3. Remove the crankshaft with the two-prong wrench (A).
4. Set the tool onto a table with the chuck side facing up.
This makes the old grease accumulate inside the cover.
5. Clean the old grease from inside and replace with fresh
grease (0.05 lb - 0.06 lb). If filling with more than the
specified amount it can cause defects. Fill only the
specified amount.
6. Set back the crankshaft cap and tighten with the
two-prong wrench. (Do not tighten excessively the
crankshaft cap because it may break).
To assure safety and Warranty of the product, repairs and
any other maintenance shall be carried out in a
Authorized Service Center.

ENGLISH
Authorized Service Centers
11
In the event of any problem contacting a Truper Authorized Service Center, please see our webpage www.truper.com
to get an updated list, or call our toll-free numbers 800 690-6990 or 800 018-7873 to get information about the
nearest Service Center.
AGUASCALIENTES
BAJA
CALIFORNIA
BAJA
CALIFORNIA SUR
CAMPECHE
CHIAPAS
CHIHUAHUA
MEXICO
CITY
COAHUILA
COLIMA
DURANGO
ESTADO DE
MÉXICO
GUANAJUATO
GUERRERO
HIDALGO
JALISCO
MICHOACÁN
MORELOS
NAYARIT
NUEVO LEÓN
OAXACA
PUEBLA
QUERÉTARO
QUINTANA ROO
SAN LUIS
POTOSÍ
SINALOA
SONORA
TABASCO
TAMAULIPAS
TLAXCALA
VERACRUZ
YUCATÁN
DE TODO PARA LA CONSTRUCCIÓN
GRAL. BARRAGÁN #1201, COL. GREMIAL, C.P. 20030,
AGUASCALIENTES, AGS. TEL.: 449 994 0537
SUCURSAL TIJUANA
AV. LA ENCANTADA, LOTE #5, PARQUE INDUSTRIAL EL
FLORIDO II, C.P 22244, TIJUANA, B.C.
TEL.: 664 969 5100
FIX FERRETERÍAS
FELIPE ÁNGELES ESQ. RUIZ CORTÍNEZ S/N, COL. PUEBLO
NUEVO, C.P. 23670, CD. CONSTITUCIÓN, B.C.S.
TEL.: 613 132 1115
TORNILLERÍA Y FERRETERÍA AAA
AV. ÁLVARO OBREGÓN #324, COL. ESPERANZA
C.P. 24080 CAMPECHE, CAMP. TEL.: 981 815 2808
FIX FERRETERÍAS
AV. CENTRAL SUR #27, COL. CENTRO, C.P. 30700,
TAPACHULA, CHIS. TEL.: 962 118 4083
SUCURSAL CHIHUAHUA
AV. SILVESTRE TERRAZAS #128-11, PARQUE INDUSTRIAL
BAFAR, CARRETERA MÉXICO CUAUHTÉMOC, C.P. 31415,
CHIHUAHUA, CHIH. TEL. 614 434 0052
FIX FERRETERÍAS
EL MONSTRUO DE CORREGIDORA, CORREGIDORA # 35,
COL. CENTRO, C.P. 06060, CUAUHTÉMOC, CDMX.
TEL: 55 5522 5031 / 5522 4861
SUCURSAL TORREÓN
CALLE METAL MECÁNICA #280, PARQUE INDUSTRIAL
ORIENTE, C.P. 27278, TORREÓN, COAH.
TEL.: 871 209 68 23
BOMBAS Y MOTORES BYMTESA DE MANZANILLO
BLVD. MIGUEL DE LA MADRID #190, COL. 16 DE
SEPTIEMBRE, C.P. 28239, MANZANILLO, COL.
TEL.: 314 332 1986 / 332 8013
TORNILLOS ÁGUILA, S.A. DE C.V.
MAZURIO #200, COL. LUIS ECHEVERRÍA, DURANGO,
DGO.TEL.: 618 817 1946 / 618 818 2844
SUCURSAL CENTRO JILOTEPEC
PARQUE INDUSTRIAL # 1, COL. PARQUE INDUSTRIAL
JILOTEPEC, JILOTEPEC, EDO. DE MÉX. C.P. 54257
TEL: 761 782 9101 EXT. 5728 Y 5102
CÍA. FERRETERA NUEVO MUNDO S.A. DE C.V.
AV. MÉXICO - JAPÓN #225, CD. INDUSTRIAL, C.P. 38010,
CELAYA, GTO. TEL.: 461 617 7578 / 79 / 80 / 88
CENTRO DE SERVICIO ECLIPSE
CALLE PRINCIPAL MZ.1 LT. 1, COL. SANTA FE, C.P. 39010,
CHILPANCINGO, GRO. TEL.: 747 478 5793
FERREPRECIOS S.A. DE C.V.
LIBERTAD ORIENTE #304 LOCAL 30, INTERIOR DE PASAJE
ROBLEDO, COL. CENTRO, C.P. 43600, TULANCINGO,
HGO. TEL.: 775 753 6615 / 775 753 6616
SUCURSAL GUADALAJARA
AV. ADOLFO B. HORN # 6800, COL: SANTA CRUZ DEL
VALLE, C.P.: 45655, TLAJOMULCO DE ZUÑIGA, JAL.
TEL.: 33 3606 5285 AL 90
FIX FERRETERÍAS
AV. PASEO DE LA REPÚBLICA #3140-A, COL.
EX-HACIENDA DE LA HUERTA, C.P. 58050, MORELIA,
MICH. TEL.: 443 334 6858
FIX FERRETERÍAS
CAPITÁN ANZURES #95, ESQ. JOSÉ PERDIZ, COL.
CENTRO, C.P. 62740, CUAUTLA, MOR.
TEL.: 735 352 8931
HERRAMIENTAS DE TEPIC
MAZATLAN #117, COL. CENTRO, C.P. 63000, TEPIC, NAY.
TEL.: 311 258 0540
SUCURSAL MONTERREY
CARRETERA LAREDO #300, 1B MONTERREY PARKS,
COLONIA PUERTA DE ANÁHUAC, C.P. 66052, ESCOBEDO,
NUEVO LEÓN, TEL.: 81 8352 8791 / 81 8352 8790
FIX FERRETERÍAS
AV. 20 DE NOVIEMBRE #910, COL. CENTRO, C.P. 68300,
TUXTEPEC, OAX. TEL.: 287 106 3092
SUCURSAL PUEBLA
AV PERIFÉRICO #2-A, SAN LORENZO ALMECATLA,
C.P. 72710, CUAUTLACINGO, PUE.
TEL.: 222 282 8282 / 84 / 85 / 86
ARU HERRAMIENTAS S.A DE C.V.
AV. PUERTO DE VERACRUZ #110, COL. RANCHO DE
ENMEDIO, C.P. 76842, SAN JUAN DEL RÍO, QRO.
TEL.: 427 268 4544
FIX FERRETERÍAS
CARRETERA FEDERAL MZ. 46 LT. 3 LOCAL 2, COL EJIDAL,
C.P. 77710 PLAYA DEL CARMEN, Q.R.
TEL.: 984 267 3140
FIX FERRETERÍAS
AV. UNIVERSIDAD #1850, COL. EL PASEO, C.P. 78320,
SAN LUIS POTOSÍ, S.L.P. TEL.: 444 822 4341
SUCURSAL CULIACÁN
AV. JESÚS KUMATE SUR #4301, COL. HACIENDA DE LA
MORA, C.P. 80143, CULIACÁN, SIN.
TEL.: 667 173 9139 / 173 8400
FIX FERRETERÍAS
CALLE 5 DE FEBRERO #517, SUR LT. 25 MZ. 10, COL.
CENTRO, C.P. 85000, CD. OBREGÓN, SON.
TEL.: 644 413 2392
SUCURSAL VILLAHERMOSA
CALLE HELIO LOTES 1, 2 Y 3 MZ. #1, COL. INDUSTRIAL,
2A ETAPA, C.P. 86010, VILLAHERMOSA, TAB.
TEL.: 993 353 7244
VM ORINGS Y REFACCIONES
CALLE ROSITA #527 ENTRE 20 DE NOVIEMBRE Y GRAL.
RODRÍGUEZ, FRACC. REYNOSA, C.P. 88780, REYNOSA,
TAMS. TEL.: 899 926 7552
SERVICIOS Y HERRAMIENTAS INDUSTRIALES
PABLO SIDAR #132, COL . BARRIO DE SAN BARTOLOMÉ,
C.P. 90970, SAN PABLO DEL MONTE, TLAX.
TEL.: 222 271 7502
LA CASA DISTRIBUIDORA TRUPER
BLVD. PRIMAVERA. ESQ. HORTENSIA S/N, COL.
PRIMAVERA C.P. 93308, POZA RICA, VER.
TEL.: 782 823 8100 / 826 8484
SUCURSAL MÉRIDA
CALLE 33 #600 Y 602, LOCALIDAD ITZINCAB Y MULSAY,
MPIO. UMÁN, C.P. 97390, MÉRIDA, YUC.
TEL.: 999 912 2451

ENGLISH
12 www.truper.com
04-2023
Stamp of the business. Delivery date:
19320
Warranty
policy
Code
ROEL-50N2
Model Brand
Warranty. Duration: 5 year. Coverage: parts, components and workmanship against manufacturing or
operating defects, except if used under conditions other than normal; when it was not operated in accordance
with the instructive; was altered or repaired by personnel not authorized by Truper®. To make the warranty
valid, only present the product in the establishment where you bought it or in Corregidora 35, Centro,
Cuauhtémoc, CDMX, 06060, where you can also purchase parts, components, consumables and accessories.
The costs of transportation of the product that derive from its fulfillment of its service network are included.
Truper will not require any proof of purchase to make the warranty effective. Phone number 800-018-7873.
Made in China. Imported by Truper, S.A. de C.V. Parque Industrial 1, Parque Industrial Jilotepec, Jilotepec, Edo.
de Méx. C.P. 54257, Phone number 761 782 9100.

12 ESPAÑOL
Póliza de
Garantía
19320
www.truper.com
04-2023
Sello del establecimiento comercial. Fecha de entrega:
Código
ROEL-50N2
Modelo Marca
Garantía. Duración: 5 años. Cobertura: piezas, componentes y mano de obra contra defectos de fabricación
o funcionamiento, excepto si se usó en condiciones distintas a las normales; cuando no fue operado conforme
instructivo; fue alterado o reparado por personal no autorizado por Truper®. Para hacer efectiva la garantía
únicamente presente el producto en el establecimiento donde lo compró o en Corregidora 35, Centro,
Cuauhtémoc, CDMX, 06060, donde también podrá adquirir partes, componentes, consumibles y accesorios.
Incluye los gastos de transportación del producto que deriven de su cumplimiento de su red de servicio.
Truper no solicitará ningún tipo de comprobante de pago para hacer efectiva la garantía. Tel.
800-018-7873. Made in/Hecho en China. Importador Truper, S.A. de C.V. Parque Industrial 1, Parque
Industrial Jilotepec, Jilotepec, Edo. de Méx. C.P. 54257, Tel. 761 782 9100.

Centros de Servicio Autorizados
11
ESPAÑOL
En caso de tener algún problema para contactar un Centro de Servicio Autorizado Truper
®
consulte nuestra página
www.truper.com donde obtendrá un listado actualizado, o llame al: 800 690-6990 ó 800 018-7873 donde le informa-
rán cuál es el Centro de Servicio más cercano.
AGUASCALIENTES
BAJA
CALIFORNIA
BAJA
CALIFORNIA SUR
CAMPECHE
CHIAPAS
CHIHUAHUA
CIUDAD DE
MÉXICO
COAHUILA
COLIMA
DURANGO
ESTADO DE
MÉXICO
GUANAJUATO
GUERRERO
HIDALGO
JALISCO
MICHOACÁN
MORELOS
NAYARIT
NUEVO LEÓN
OAXACA
PUEBLA
QUERÉTARO
QUINTANA ROO
SAN LUIS
POTOSÍ
SINALOA
SONORA
TABASCO
TAMAULIPAS
TLAXCALA
VERACRUZ
YUCATÁN
DE TODO PARA LA CONSTRUCCIÓN
GRAL. BARRAGÁN #1201, COL. GREMIAL, C.P. 20030,
AGUASCALIENTES, AGS. TEL.: 449 994 0537
SUCURSAL TIJUANA
AV. LA ENCANTADA, LOTE #5, PARQUE INDUSTRIAL EL
FLORIDO II, C.P 22244, TIJUANA, B.C.
TEL.: 664 969 5100
FIX FERRETERÍAS
FELIPE ÁNGELES ESQ. RUIZ CORTÍNEZ S/N, COL. PUEBLO
NUEVO, C.P. 23670, CD. CONSTITUCIÓN, B.C.S.
TEL.: 613 132 1115
TORNILLERÍA Y FERRETERÍA AAA
AV. ÁLVARO OBREGÓN #324, COL. ESPERANZA
C.P. 24080 CAMPECHE, CAMP. TEL.: 981 815 2808
FIX FERRETERÍAS
AV. CENTRAL SUR #27, COL. CENTRO, C.P. 30700,
TAPACHULA, CHIS. TEL.: 962 118 4083
SUCURSAL CHIHUAHUA
AV. SILVESTRE TERRAZAS #128-11, PARQUE INDUSTRIAL
BAFAR, CARRETERA MÉXICO CUAUHTÉMOC, C.P. 31415,
CHIHUAHUA, CHIH. TEL. 614 434 0052
FIX FERRETERÍAS
EL MONSTRUO DE CORREGIDORA, CORREGIDORA # 35,
COL. CENTRO, C.P. 06060, CUAUHTÉMOC, CDMX.
TEL: 55 5522 5031 / 5522 4861
SUCURSAL TORREÓN
CALLE METAL MECÁNICA #280, PARQUE INDUSTRIAL
ORIENTE, C.P. 27278, TORREÓN, COAH.
TEL.: 871 209 68 23
BOMBAS Y MOTORES BYMTESA DE MANZANILLO
BLVD. MIGUEL DE LA MADRID #190, COL. 16 DE
SEPTIEMBRE, C.P. 28239, MANZANILLO, COL.
TEL.: 314 332 1986 / 332 8013
TORNILLOS ÁGUILA, S.A. DE C.V.
MAZURIO #200, COL. LUIS ECHEVERRÍA, DURANGO,
DGO.TEL.: 618 817 1946 / 618 818 2844
SUCURSAL CENTRO JILOTEPEC
PARQUE INDUSTRIAL # 1, COL. PARQUE INDUSTRIAL
JILOTEPEC, JILOTEPEC, EDO. DE MÉX. C.P. 54257
TEL: 761 782 9101 EXT. 5728 Y 5102
CÍA. FERRETERA NUEVO MUNDO S.A. DE C.V.
AV. MÉXICO - JAPÓN #225, CD. INDUSTRIAL, C.P. 38010,
CELAYA, GTO. TEL.: 461 617 7578 / 79 / 80 / 88
CENTRO DE SERVICIO ECLIPSE
CALLE PRINCIPAL MZ.1 LT. 1, COL. SANTA FE, C.P. 39010,
CHILPANCINGO, GRO. TEL.: 747 478 5793
FERREPRECIOS S.A. DE C.V.
LIBERTAD ORIENTE #304 LOCAL 30, INTERIOR DE PASAJE
ROBLEDO, COL. CENTRO, C.P. 43600, TULANCINGO,
HGO. TEL.: 775 753 6615 / 775 753 6616
SUCURSAL GUADALAJARA
AV. ADOLFO B. HORN # 6800, COL: SANTA CRUZ DEL
VALLE, C.P.: 45655, TLAJOMULCO DE ZUÑIGA, JAL.
TEL.: 33 3606 5285 AL 90
FIX FERRETERÍAS
AV. PASEO DE LA REPÚBLICA #3140-A, COL.
EX-HACIENDA DE LA HUERTA, C.P. 58050, MORELIA,
MICH. TEL.: 443 334 6858
FIX FERRETERÍAS
CAPITÁN ANZURES #95, ESQ. JOSÉ PERDIZ, COL.
CENTRO, C.P. 62740, CUAUTLA, MOR.
TEL.: 735 352 8931
HERRAMIENTAS DE TEPIC
MAZATLAN #117, COL. CENTRO, C.P. 63000, TEPIC, NAY.
TEL.: 311 258 0540
SUCURSAL MONTERREY
CARRETERA LAREDO #300, 1B MONTERREY PARKS,
COLONIA PUERTA DE ANÁHUAC, C.P. 66052, ESCOBEDO,
NUEVO LEÓN, TEL.: 81 8352 8791 / 81 8352 8790
FIX FERRETERÍAS
AV. 20 DE NOVIEMBRE #910, COL. CENTRO, C.P. 68300,
TUXTEPEC, OAX. TEL.: 287 106 3092
SUCURSAL PUEBLA
AV PERIFÉRICO #2-A, SAN LORENZO ALMECATLA,
C.P. 72710, CUAUTLACINGO, PUE.
TEL.: 222 282 8282 / 84 / 85 / 86
ARU HERRAMIENTAS S.A DE C.V.
AV. PUERTO DE VERACRUZ #110, COL. RANCHO DE
ENMEDIO, C.P. 76842, SAN JUAN DEL RÍO, QRO.
TEL.: 427 268 4544
FIX FERRETERÍAS
CARRETERA FEDERAL MZ. 46 LT. 3 LOCAL 2, COL EJIDAL,
C.P. 77710 PLAYA DEL CARMEN, Q.R.
TEL.: 984 267 3140
FIX FERRETERÍAS
AV. UNIVERSIDAD #1850, COL. EL PASEO, C.P. 78320,
SAN LUIS POTOSÍ, S.L.P. TEL.: 444 822 4341
SUCURSAL CULIACÁN
AV. JESÚS KUMATE SUR #4301, COL. HACIENDA DE LA
MORA, C.P. 80143, CULIACÁN, SIN.
TEL.: 667 173 9139 / 173 8400
FIX FERRETERÍAS
CALLE 5 DE FEBRERO #517, SUR LT. 25 MZ. 10, COL.
CENTRO, C.P. 85000, CD. OBREGÓN, SON.
TEL.: 644 413 2392
SUCURSAL VILLAHERMOSA
CALLE HELIO LOTES 1, 2 Y 3 MZ. #1, COL. INDUSTRIAL,
2A ETAPA, C.P. 86010, VILLAHERMOSA, TAB.
TEL.: 993 353 7244
VM ORINGS Y REFACCIONES
CALLE ROSITA #527 ENTRE 20 DE NOVIEMBRE Y GRAL.
RODRÍGUEZ, FRACC. REYNOSA, C.P. 88780, REYNOSA,
TAMS. TEL.: 899 926 7552
SERVICIOS Y HERRAMIENTAS INDUSTRIALES
PABLO SIDAR #132, COL . BARRIO DE SAN BARTOLOMÉ,
C.P. 90970, SAN PABLO DEL MONTE, TLAX.
TEL.: 222 271 7502
LA CASA DISTRIBUIDORA TRUPER
BLVD. PRIMAVERA. ESQ. HORTENSIA S/N, COL.
PRIMAVERA C.P. 93308, POZA RICA, VER.
TEL.: 782 823 8100 / 826 8484
SUCURSAL MÉRIDA
CALLE 33 #600 Y 602, LOCALIDAD ITZINCAB Y MULSAY,
MPIO. UMÁN, C.P. 97390, MÉRIDA, YUC.
TEL.: 999 912 2451

Mantenimiento
10 ESPAÑOL
A
• Esta herramienta no requiere lubricación diaria o por
hora porque tiene un sistema de lubricación engrasado.
• Se recomienda que la transmisión de la herramienta sea
lubricada cada cambio de carbones en un Centro de
Servicio Autorizado
• Sin embargo el usuario debe agregar grasa de complejo
de Litio, viscosidad ISO 220, Grado N.L.G.I #2 (para
mayor información sobre el tipo de grasa a utilizar, favor
de comunicarse a un Centro de Servicio Autorizado
Truper) de 2 a 3 días si la carga es pesada todos los días o
cuando el efecto de impacto se considera débil. Solo en
este caso proceda de la siguiente manera:
1. Encienda la herramienta durante varios minutos para
calentarla.
2. Desenchufe la herramienta.
3. Retire la tapa del cigüeñal con ayuda de la llave de
2 puntas (A).
4. Descanse la herramienta sobre la mesa con el extremo
de la broca hacia arriba, esto permitirá que la grasa vieja se
acumule dentro de la cubierta.
5. Limpie la grasa vieja del interior y reemplácela con una
nueva grasa (25 g - 30 g), si rellena con más de la cantidad
especificada de grasa puede causar defectos. Rellene solo
con lo especificado.
6. Instale nuevamente la tapa del cigüeñal y apriete con la
llave de 2 puntas. (No apretar excesivamente la tapa del
cigüeñal ya que está sujeta a rotura).
Para mantener la seguridad y garantía del producto,
reparaciones y cualquier otro mantenimiento debe
ser realizado por Centros de Servicio
Autorizado
• Siempre mantenga las ventilas limpias y libres de
obstrucciones para garantizar un enfriamiento adecuado
del motor.
• Inspeccione regularmente todos los tornillos de montaje
y asegúrese de que estén apretados correctamente. En
caso de que alguno de los tornillos esté suelto, apriételo
inmediatamente.
• Los carbones deben revisarse periódicamente, y ser
reemplazados siempre por un Centro de Servicio Autorizado
cuando se hayan desgastado.
• Después de que hayan sido reemplazados, pida que se
inspeccione si los nuevos carbones pueden moverse
libremente en el porta-carbón y solicite que enciendan la
herramienta durante 5 minutos para emparejar el contacto
de los carbones y el conmutador.
• Sólo se deben de usar carbones de repuesto
originales, diseñados específicamente
con la dureza y la resistencia eléctrica adecuadas para cada
tipo de motor. Los carbones fuera de especificaciones
pueden dañar el motor.
• Cuando se haga el cambio de carbones siempre deben
reemplazarse los dos carbones.
• El servicio de las herramientas debe ser realizado
únicamente en un Centro de Servicio Autorizado
. El servicio y mantenimiento realizado
por personas no calificadas puede resultar peligroso y
llegar a ocasionar daños personales además de invalidar la
garantía del producto.
Limpieza y cuidados Cambio de carbones
Servicio
Lubricación

9
ESPAÑOL
• Los accesorios SDS requieren de libertad para moverse dentro del
broquero, lo cual causa excentricidad cuando la herramienta está sin
carga. Sin embargo el accesorio se centra automáticamente durante
la operación, sin afectar la precisión del taladrado.
• Cuando está nueva, la herramienta requiere de un lapso de 5 horas
de trabajo para alcanzar su máxima eficiencia.
• Al utilizar la herramienta en el modo taladro o rotomartillo primero
se debe colocar la punta de la broca en el punto donde se desea
hacer el orificio y luego presionar el interruptor.
La herramienta cuenta con un embrague de
sobrecarga, que interrumpe la fuerza del eje
(ocasionando un ruido de traqueteo), si el
accesorio se atasca. De presentarse esta
posibilidad:
• Apague la herramienta de inmediato.
• Retire el accesorio atascado.
• Vuelva a encender la herramienta.
Información adicionalEmbrague de sobrecarga
Puesta en marcha
Operación
Taladro con percusión.
• Ajuste la perilla que cambia el modo de accionamiento al símbolo .
• Posicione la broca en el lugar deseado del orificio y luego accione el
interruptor.
• No fuerce la herramienta. Con una presión menor, obtiene mejores
resultados. Mantenga la herramienta en la posición adecuada y evite que
se resbale del orificio.
• No haga más presión cuando el orificio esté obstruido con partículas o
virutas. Por el contrario, accione la herramienta en vacío y luego retire la
broca parcialmente del orificio. Si repite esta acción varias veces, el
orificio se limpiará y se reanudará la preformación normal.
• En el momento de realizar un agujero, cuando este se atasca con viruta
y partículas, o cuando se topa con las varillas de refuerzo del hormigón
armado, se ejerce una fuerza de torsión tremenda y repentina sobre la
herramienta / broca. Utilice siempre la empuñadura lateral (auxiliar) y
sujete la herramienta firmemente de la empuñadura lateral y de la
empuñadura del interruptor durante las operaciones. De no ser así,
podrá ocasionar la pérdida del control de la herramienta y posiblemente
heridas graves.
Cincelado / Tallado / Demolición
• Fije la perilla que cambia el modo de accionamiento al símbolo .
• Sostenga la herramienta firmemente con ambas manos.
• Encienda la herramienta y aplique una leve presión sobre esta para
evitar que la herramienta rebote sin control. Hacer una presión excesiva
con la herramienta no mejorará la eficiencia.
ADVERTENCIA
Uso de guarda polvo
• Deslice el guarda polvos sobre la broca antes de realizar
cualquier perforación verticalmente por encima de su
cabeza.
• El guarda polvo evitara que el polvo caiga sobre la
herramienta y en ti mismo al realizar la perforación.
• La medida de las brocas a la que puede fijarse el guarda
polvo es de 8 mm a 10 mm

8
Puesta en marcha
ESPAÑOL
Puede taladrar metal, madera o plástico
con la herramienta utilizando un broquero de tres mordazas con
adaptador SDS (NO INCLUIDOS).
• Para instalar el broquero de tres mordazas proceda como con
cualquier otro accesorio SDS (página 7, IInstalación o extracción de la
broca /accesorio).
• Introduzca la broca dentro del broquero de tres mordazas hasta que
tope y asegúrela con la llave de broquero apretando en cada uno de sus
orificios alternadamente.
Nunca utilice el broquero de tres mordazas con
el selector de modo de operación en las posiciones
de IMPACTO ( , , ).
Perforacion de madera, metal o plastico
ADVERTENCIA
Cambio de modo de operación
• Gire ambos selectores de función (C) a una de sus 2 posiciones para
determinar una de las cuatro configuraciones dependiendo del trabajo a
realizar.
Nunca cambie la posición de los selectores de función
cuando el motor del rotomartillo esté en marcha.
Rotomartillo
Cincelado
(El cincel no cuenta con
posición 100% fija)
Nota: Solo ajuste el cincel en
modo de ajuste del ángulo,
ajustar en modo cincelado
repercute en un riesgo.
C
ADVERTENCIA
Taladro
Ajuste del ángulo de trabajo del cincel
puede girar el cincel en cualquier posición
Nota: El rotomartillo no genera salida de
rotación o impacto por seguridad del usuario.

1
2
Casquillo de
bloqueo
Broca con
zanco SDS-PLUS
Instalación o extracción de la broca /accesorio
• Limpie y lubrique ligeramente la broca / accesorio
antes de instalarla.
• Empuje el casquillo de bloqueo hacia atrás, mientras
gira y empuja la broca /accesorio hacia el interior hasta
que enganche.
• Suelte el casquillo de bloqueo para que regrese a su posición original,
esto asegurará la broca / accesorio. En caso de que el casquillo de
bloqueo no regrese a su posición original, repita el paso anterior.
• Después de instalarla, siempre asegúrese de que la broca esté firme en
su lugar intentando jalarla hacia fuera.
• Para retirar la broca, jale hacia abajo el casquillo del broquero y empuje
la broca hacia el exterior.
No intente instalar o retirar brocas / accesorios a menos que la herramienta se
encuentre desconectada.
7
ADVERTENCIA
ESPAÑOL
Preparación
Encendido y control de operación
• Operación:
Conecte la clavija al tomacorriente.
Presione el gatillo interruptor (A) para hacer que el rotomartillo empiece a funcionar.
Para interrumpir su uso, simplemente suelte el interruptor.
• Cambio de velocidad:
• La herramienta puede operarse a distintas velocidades. Éstas se seleccionan
ajustando el selector de velocidad (+ y -) (B).
A
B
Botón de
bloqueo de
operación
Mango
auxiliar
Varilla de control
de profundidad
Puesta en marcha
Ajuste de varilla de control de profundidad
• Afloje la perilla de liberacion de la varilla de profundidad en el mango auxiliar.
• Mueva la varilla de profundidad de manera que la distancia entre el extremo de la barra y el extremo de la broca sea
igual a la profundidad de taladrado deseada.
• Apriete la perilla de liberacion de la varilla.
• Cuando taladre con la barra de profundidad, pare cuando el extremo de la barra llegue a la superficie del material.
Velocidad
Alta
Media
Baja
Concreto y Piedra
Metal
Iniciar agujeros
Rotomartillo / Cincelado
Taladro
Rotomartillo / Taladro
Modo de operación Material o Uso

4
5
Pasos 1 & 2 3
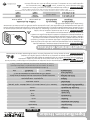
Partes
Mango
Antiderrapante
Amortiguador
de vibración
Mango
auxiliar
360°
Ensamble de mango auxiliar y
varilla de control de profundidad
1. Gire el mango auxiliar en sentido horario
mientras esta libre , para que la apertura
de la montura pase libremente sobre el
broquero.
2. Inserte la cabeza del rotomartillo por
la
montura del mango auxiliar.
3. Afloje el seguro (A) para insertar la
varilla de control de profundidad en el
orificio de la montura.
4. Rote el mango auxiliar junto con su
montura hasta colocarlo en una
posición adecuada para operar la
herramienta.
5. Gire el mango auxiliar para fijar la
montura firmemente a la cabeza del
rotomartillo.
Preparación
Botón de
bloqueo del
selector de
función
Interruptor
Selector de
velocidad
Llave de dos puntas
Doble selector
de función
Varilla de control
de profundidad
Broquero
SDS Plus
6
A
ESPAÑOL
Mango
auxiliar
Montura
Varilla de control
de profundidad
Protector
de cabe
Cable de
alimentación
Guarda polvos
Tapa del cigüeñal

5
Advertencias de Seguridad
para uso de taladros y rotomartillos
• La herramienta está diseñada para
trabajar con brocas o accesorios con zancos SDS-PLUS.
Elija el apropiado para el material a trabajar, esto reduce el
riesgo de lesiones graves y agiliza el trabajo.
• En caso de perforar hormigón o piedra, use brocas
específicas para concreto.
• Para metal, madera o plástico utilice el broquero de 3
mordazas con adaptador SDS (No incluido); las medidas
abarcan un mínimo de 1.5 mm hasta la capacidad maxima del
broquero (13 mm)
• No intente utilizar brocas que excedan la capacidad del
broquero.
• Utilice brocas / accesorios bien afilados y en buenas
condiciones para optimizar el trabajo.
Elija la broca o accesorio apropiados
• Tómese su tiempo para evaluar el trabajo a realizar y
asegúrese de haber respetado todas las precauciones
necesarias antes de comenzar a taladrar.
• Ajuste correctamente la broca al
broquero. Quite la llave del broquero antes de comenzar a
taladrar. Si no se quita la llave, ésta puede salir despedida a
gran velocidad y provocar lesiones graves.
• Antes de perforar en una pared, suelo o
techo, asegúrese de que no haya objetos empotrados,
tales como cables o conducciones eléctricas o tuberías.
• Asegúrese que el interruptor esté
apagado (página 7 Encendido y control de operación)
antes de conectar la herramienta, de lo contrario ésta
comenzará a funcionar inesperadamente, pudiendo
provocar lesiones graves.
• Apague y desconecte la herramienta
antes de invertir el sentido del giro del broquero, así como
de instalar o reemplazar una broca.
Antes de operar el rotomartillo
• Sostenga la herramienta por su mango y por el
mango auxiliar, si es que se proporciona con la
herramienta. Recuerde que la pérdida de control puede
causar lesiones personales.
• Sostenga la herramienta por las superficies aislantes,
sobre todo al realizar trabajos en los que la parte de
corte de la broca pueda hacer contacto con cableados
ocultos o con el propio cable de alimentación de la
herramienta. El contacto con un cable conductor de
corriente hace que las piezas metálicas de la herramienta
también tengan corriente y puedan provocar una descarga
eléctrica al operador.
• No someta la herramienta a esfuerzos excesivos.
• Si la broca se atasca en la pieza de
trabajo, apague el taladro de inmediato. Luego retire la
broca de la pieza de trabajo. No intente retirar las brocas
atoradas encendiendo y apagando la herramienta.
• No ejerza demasiada presión a la herramienta con tal de
acelerar la perforación. De lo contrario la broca se dañaría
y la eficiencia de la herramienta disminuiría al igual que
su vida útil.
• En cuanto más grande sea el
diámetro de la broca, la fuerza reactiva es mayor, lo que
puede provocar una pérdida del control de la herramienta.
Para evitar esta posibilidad sujete firmemente la
herramienta con ambas manos y mantenga una posición
equilibrada sobre ambos pies mientras perfora a 90°.
• Esté atento y preparado para relajar la fuerza en cuanto la
broca atraviese el material. Los movimientos repentinos
pueden romper la broca o dañar el cuerpo de la herramienta.
• No toque la broca ni las perforacio-
nes inmediatamente después de taladrar. Espere a que se
enfríen para manipularlas. No intente enfriarlas con agua
o aceite.
• Evite colocar la herramienta en un sitio con partículas
y/o polvo inmediatamente después de haber sido usada,
estas pueden ser absorbidas dentro del mecanismo de la
herramienta y así dañarla.
• Utilice protectores auriculares, cuando ejecute
servicios que hagan ruidos superiores a 85 dB. La
exposición al ruido puede causar pérdida auditiva.
• Utilice mascarilla antipolvo y un equipo extractor de
polvo si es necesario. Recuerde que trabajar materiales
como asbesto, pinturas con plomo, aditivos, algunos tipos
de madera, metales o minerales es altamente tóxico.
• Utilice gafas de seguridad.
Mientras opera el rotomartillo
ATENCIÓN
ATENCIÓN
ATENCIÓN
ATENCIÓN
ADVERTENCIA
ADVERTENCIA
PELIGRO
PELIGRO
ESPAÑOL

4
Esta herramienta cumple
con la Norma Oficial
Mexicana (NOM).
Área de trabajo
Mantenga el área de trabajo limpia y bien iluminada.
Las áreas desordenadas y obscuras son propensas a accidentes.
No maneje la herramienta en ambientes explosivos, como en
presencia de líquido, gas o polvo inflamables.
Las herramientas eléctricas producen chispas que pueden encender
material inflamable.
Mantenga alejados a los niños y curiosos cuando opere la
herramienta.
Las distracciones pueden hacer que pierda el control.
Seguridad eléctrica
La clavija de la herramienta debe coincidir con el tomacorrien-
te. Nunca modifique una clavija. No use ningún tipo de
adaptador para clavijas de herramientas puestas a tierra.
Clavijas modificadas y enchufes diferentes aumentan el riesgo de
choque eléctrico.
Evite el contacto del cuerpo con superficies puestas a tierra
como tuberías, radiadores, cocinas eléctricas y refrigeradores.
Hay un mayor riesgo de choque eléctrico si el cuerpo está puesto a tierra.
No exponga la herramienta a la lluvia o condiciones de humedad.
El agua que ingresa en la herramienta aumenta el riesgo de choque eléctrico.
No fuerce el cable. Nunca use el cable para transportar,
levantar o desconectar la herramienta. Mantenga el cable
lejos del calor, aceite, orillas afiladas o piezas en movimiento.
Los cables dañados o enredados aumentan el riesgo de choque eléctrico.
Cuando maneje una herramienta en exteriores, use una
extensión especial para uso en exteriores.
El uso de una extensión adecuada para exteriores reduce el riesgo de choque
eléctrico.
Si el uso de la herramienta en un lugar húmedo es inevitable,
use una alimentación protegida por un interruptor de circuito
de falla a tierra (GFCI).
El uso de un GFCI reduce el riesgo de choque eléctrico.
Seguridad personal
Esté alerta, vigile lo que está haciendo y use el sentido común
cuando maneje una herramienta. No la use si está cansado o
bajo la influencia de drogas, alcohol o medicamentos.
Un momento de distracción mientras maneja la herramienta puede
causar un daño personal.
Use equipo de seguridad. Use siempre protección para los ojos.
El uso de equipo de seguridad como lentes de seguridad, mascarilla antipolvo,
zapatos antideslizantes, casco y protección para los oídos en condiciones
apropiadas, reduce de manera significativa los daños personales.
Evite arranques accidentales. Asegúrese de que el interruptor
está en posición “apagado” antes de conectar a la fuente de
alimentación y/o a la batería o transportar la herramienta.
Transportar herramientas eléctricas con el dedo sobre el interruptor o
conectar herramientas eléctricas que tienen el interruptor en posición de
“encendido” puede causar accidentes.
Retire cualquier llave o herramienta de ajuste antes de arrancar
la herramienta eléctrica.
Las llaves o herramientas que quedan en las partes rotativas de la
herramienta pueden causar un daño personal.
No sobrepase su campo de acción. Mantenga ambos pies bien
asentados sobre el suelo y conserve el equilibrio en todo
momento.
Esto permite un mejor control de la herramienta en situaciones inesperadas.
Vista adecuadamente. No vista ropa suelta o joyas. Mantenga
su pelo, su ropa y guantes alejados de las piezas en
movimiento.
La ropa o el pelo sueltos o las joyas pueden quedar atrapados en las piezas en
movimiento.
En caso de contar con dispositivos de extracción y recolección
de polvo conectados a la herramienta, verifique sus conexiones
y úselos correctamente.
El uso de estos dispositivos reduce los riesgos relacionados con el polvo.
Uso y cuidados de la herramienta
No fuerce la herramienta. Use la herramienta adecuada para el
trabajo a realizar.
La herramienta adecuada hace un trabajo mejor y más seguro cuando
se usa al ritmo para el que fue diseñado.
No use la herramienta si el interruptor no funciona.
Cualquier herramienta eléctrica que no pueda encenderse o
apagarse es peligrosa y debe repararse antes de ser operada.
Desconecte la herramienta de la fuente de alimentación
y/o de la batería antes de efectuar cualquier ajuste,
cambiar accesorios o almacenarla.
Estas medidas reducen el riesgo de arrancar la herramienta
accidentalmente.
Almacene las herramientas fuera del alcance de los niños y no
permita su manejo por personas no familiarizadas con las
herramientas o con las instrucciones.
Las herramientas eléctricas son peligrosas en manos no entrenadas.
Déle mantenimiento a la herramienta. Compruebe que las
partes móviles no estén desalineadas o trabadas, que no
haya piezas rotas u otras condiciones que puedan afectar su
operación. Repare cualquier daño antes de usar la herramienta.
Muchos accidentes son causados por el escaso mantenimiento de las
herramientas.
Mantenga los accesorios de corte afilados y limpios.
Los accesorios de corte en buenas condiciones son menos probables de
trabarse y más fáciles de controlar.
Use la herramienta, sus componentes y accesorios de acuerdo
con estas instrucciones y de la manera prevista para el tipo de
herramienta, en condiciones de trabajo adecuadas.
El uso de la herramienta para aplicaciones diferentes para las que
está diseñada podría causar una situación de peligro.
Servicio
Repare la herramienta en un Centro de Servicio Autorizado
usando sólo piezas de repuesto idénticas.
Para mantener la seguridad de la herramienta.
Advertencias generales de seguridad
para herramientas eléctricas
¡ADVERTENCIA! Lea detenidamente todas las advertencias de seguridad y todas las instrucciones que se
enlistan a continuación. La omisión de alguna de ellas puede dar como resultado un choque eléctrico, incendio y/o
daño serio. Conserve las advertencias y las instrucciones para futuras referencias.
ESPAÑOL

ROEL-50N2
19320
SDS Plus
60 Hz
Rotomartillo
11 A
1500 W
Código
Descripción
Porta herramientas
Tensión
Frecuencia
Corriente
Potencia
5 Joules
Energía de impacto
Concreto: 1-1/4” (32 mm) Acero: 1/2” (13 mm) Madera: 1-9/16” (40 mm)
Capacidad de perforación
0 r/min - 800 r/min
Velocidad
127 V~
Especificaciones técnicas
Grado IP IP20
Clase II
16 AWG x 2C con temperatura de aislamiento de 105 °C
50 min de trabajo por 20 min de descanso. Máximo 6 horas diarias.
Ciclo de trabajo
Conductores
Aislamiento
0 golpes/min - 4500 golpes/min
Golpes
3
El cable de alimentación tiene sujeta-cables tipo: Y
La clase de construcción de la herramienta es: Aislamiento reforzado.
La clase de aislamiento térmico de los devanados del motor: Clase H
Requerimientos eléctricos
Si el cable de alimentación se daña, éste debe ser reemplazado por el fabricante o Centro de Servicio
Autorizado , con el fin de evitar algún riesgo de descarga o accidente considerable.
La construcción del aislamiento eléctrico de esta herramienta es alterado por salpicaduras o
derramamiento de líquidos durante su operación. No la exponga a la lluvia, líquidos y/o humedad.
Antes de obtener acceso a las terminales, todos los circuitos de alimentación deben ser desconectados.
ADVERTENCIA
ADVERTENCIA
ESPAÑOL
Las herramientas de doble aislamiento y aislamiento reforzado
están equipadas con una clavija polarizada (una pata es más ancha que la otra). Esta clavija
cabe en cualquier enchufe polarizado y sólo puede conectarse de una forma. Si la clavija no
cabe en el enchufe, voltéelo. Si aún así no cabe, póngase en contacto con un electricista
calificado o instale un enchufe polarizado. No altere la clavija en forma alguna. Ambos tipos
de aislamiento eliminan la necesidad de un cable de corriente de tres partes con conexión a
tierra o de un sistema de corriente eléctrica con conexión a tierra.
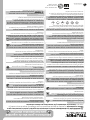
Al usar un cable de extensión, asegúrese de usar el calibre
suficiente para transportar la corriente que consumirá su herramienta. Un cable de un calibre inferior ocasionará caídas de tensión en
la línea, teniendo como resultado pérdida de potencia y sobrecalentamiento del motor. La siguiente tabla muestra el tamaño correcto
que debe usarse dependiendo de la longitud del cable y de la capacidad de amperes indicada en la placa de datos de la herramienta.
Si tiene dudas use el siguiente calibre más alto.
de 0 A hasta 10 A
de 10 A hasta 13 A
de 13 A hasta 15 A
de 15 A hasta 20 A
18 AWG(*)
16 AWG
14 AWG
8 AWG
16 AWG
14 AWG
12 AWG
6 AWG
3 (uno a tierra)
de 1,8 m a 15 m | mayor de 15 m
Capacidad en
Amperes Número de
conductores Calibre de extensión
* Se permite utilizarlo siempre y cuando las extensiones mismas cuenten con un artefacto de protección contra sobrecorriente.
AWG = Calibre de alambre estadounidense (American Wire Gauge). Referencia: NMX-J-195-ANCE
Al operar herramientas eléctricas en exteriores, utilice una extensión
aterrizada marcada como “Uso exterior” marca . Estas extensiones son
especiales para el uso en exteriores y reducen el riesgo de sufrir una descarga eléctrica.
ADVERTENCIA
ADVERTENCIA
ADVERTENCIA

Í
ndice
2
Especificaciones técnicas
Requerimientos eléctricos
Advertencias generales de seguridad
para herramientas eléctricas
Advertencias de Seguridad
para uso de taladros y rotomartillos
Partes
Preparación
Puesta en marcha
Mantenimiento
Centros de Servicio Autorizados
Póliza de Garantía
3
3
4
5
6
6
7
10
11
12
Guarde este Instructivo para futuras referencias.
Los gráficos de este Instructivo son para
referencia, pueden variar del aspecto real de la
herramienta.
Para poder sacar el máximo
provecho de la herramienta,
alargar su vida útil, hacer válida
la garantía en caso de ser
necesario y evitar riesgos o
lesiones graves, es fundamental
leer este Instructivo por
completo antes de usar la
herramienta.
ATENCIÓN
ESPAÑOL
RESPETE LOS CICLOS DE TRABAJO.
50 min de trabajo por 20 min de descanso. Máximo diario 6 horas.
NO CAMBIE EL SELECTOR CON EL EQUIPO FUNCIONANDO.
LIMPIE DESPUÉS DE CADA USO PARA RETIRAR EL EXCESO
DE POLVO.
Realice MANTENIMIENTO periódico a su máquina (página 9).
Recomendaciones de uso y cuidados

ESPAÑOL
ENGLISH
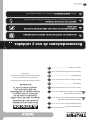
Instructivo de
Rotomartillo
ROEL-50N2 ModeloCódigo
ROEL-50N2
Este Instructivo
es para:
19320
Energía
de impacto Motor
5 Joules 11 A
ATENCIÓN Lea este Instructivo por completo
antes de usar la herramienta.
-
 1
1
-
 2
2
-
 3
3
-
 4
4
-
 5
5
-
 6
6
-
 7
7
-
 8
8
-
 9
9
-
 10
10
-
 11
11
-
 12
12
-
 13
13
-
 14
14
-
 15
15
-
 16
16
-
 17
17
-
 18
18
-
 19
19
-
 20
20
-
 21
21
-
 22
22
-
 23
23
-
 24
24


Truper ROEL-50N2 El manual del propietario
- Categoría
- Herramientas eléctricas
- Tipo
- El manual del propietario
en otros idiomas
- English: Truper ROEL-50N2 Owner's manual
Artículos relacionados
-
Truper ROEL-30N-2 El manual del propietario
-
-
-
-
-
-
-
-
-
Otros documentos
-
 sinmarca ROEL-50N2-2 El manual del propietario
-
PRETUL TALI-20P El manual del propietario
-
-
-
-
 Truper Max MAX-20TS El manual del propietario
-
Surtek TC658B El manual del propietario
-
DeWalt D25313 Manual de usuario
-
-
Volteck MUL-627 El manual del propietario

