
Quick Start Guide

WIRELESS GAME CONTROLLER

EN
C.A.T. 9 ENGLISH
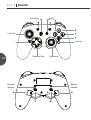
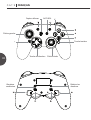
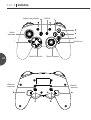
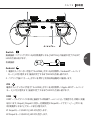
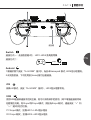
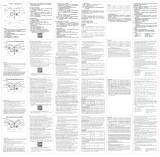
Light key
Right stickDirection Pad
Left stick
Screenshot HOME
Reduce
vibration
Enhance
vibration

C.A.T. 9 ENGLISH
EN
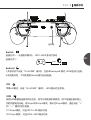
Switch
Press pairing key for 2 seconds, LED indicator flashes until successful connection
to Switch.
Android
1. Press “X+home” key for 2 seconds to enter Android gamepad mode. LED4 indicator
flashes until successful connection.
2. Press [home] key for future reconnection after successful pairing.
iOS
Enter Apple MFI mode, press “B+home” key for 2 seconds, LED3 indicator flashes
until successful connection.
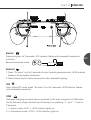
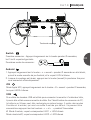
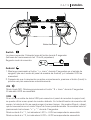
USB
Gamepad charging activated when connected to the host computer via USB cable.
Switch between Xinput (default) and Directinput via pressing “+” and “-” keys for
3 seconds.
1. In Xinput mode: LED1 + LED4 indicator lights on.
2. In Directinput mode: LED2 + LED3 indicator lights on.
Second connection mode: USB Port
Host
USB Charging Cable

EN
Turbo Function
1. Turbo firing: Press (the first time) A / B / X / Y / L1 / L2 / R1 / R2 /
direction key + turbo key.
2. Cancel turbo firing: Press turbo key again. Press and hold turbo key for 5 seconds
to clear all consecutive functions.
3. Press and hold turbo key + a key to clear turbo function of current key.
C.A.T. 9 ENGLISH
Battery
Battery Status Indicator Status
Low power LED indicator flashing
Charging LED4 indicator flashing
Charging complete LED4 indicator on
Lighting control instructions
1. Tap light key to change color from blue, red, green, yellow, cyan, orange, purple,
pink, magic color.
2. Double click light key to turn off lighting.
3. Light key + A: Breathing lighting color. Press light key to change color.
4. Light key + B: Vibration lighting mode, red light will be on.
5. Light key + X: Rocker mode. Click light key to change color.
6. Light key + Y: Gyro mode. 6-axis in motion, all lights on. Up (red), down (yellow),
left (blue), and right (green)
7. Light key + L: Magic color breathing mode. (red/yellow/blue/green/purple/orange)
8. Light Key + Direction key: Change brightness. Press and hold light key + up/down
key to change brightness.
Automatic shutdown
Gamepad enters sleep mode when host screen is closed and no key press within 5 minutes.
In Bluetooth mode, press home key for 3 seconds to disconnect, gamepad will enter
sleep mode.

C.A.T. 9 ENGLISH
EN
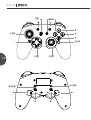
Back key function
1. single key setting: press and hold MR + A (click) vibration occurs
XR key is set to A.
Macro key setting: press and hold MR + keys vibration occurs
XR key is set as macro.
2. Single key setting: press and hold ML + A (click) vibration occurs
XL key is set to A.
Macro key setting: press and hold ML + keys vibration occurs
XL key is set as macro.
Motor vibration regulation
1. Enhance vibration effect
2. Reduce vibration effect

FR
C.A.T. 9 FRANÇAIS
Capture d'écran ACCUEIL
Flèche gauche
Touche de direction Flèche droite
Touche lumière
Vibrations
améliorées
Réduire les
vibrations

C.A.T. 9 FRANÇAIS
FR
Touche de couplage
Switch
Première connexion : Appuyez longuement sur la touche pendant 2 secondes,
led 1-led 4 voyants clignotants
Android
1. Appuyez longuement sur la touche « x + accueil » pendant 2 secondes en état éteint,
qui est le mode manette de jeu Android, et le voyant LED4 s'allume.
2. Lorsque le couplage est réussi, appuyez sur la touche [accueil] la prochaine fois pour
vous connecter automatiquement.
iOS
Mode Apple MFI, appuyez longuement sur la touche « B + accueil » pendant 2 secondes,
le voyant LED3 s'allume.
USB
Si un câble de données USB est utilisé pour connecter la manette à l'ordinateur hôte,
il pourra être utilisé comme manette de câble. Sur l'identification de connexion du PC,
la batterie au lithium peut être rechargée en même temps. Il existe des modes
X-entrée et d-entrée, qui sont en mode X-entrée par défaut. Ils peuvent être
connectés en appuyant sur les touches « + » et « - » pendant 3 secondes.
#1 Mode X-entrée, voyant correspondant LED1 + LED4 allumé
Mode d-entrée #2, voyant correspondant LED2 + LED3 allumé
Deuxième mode de connexion : Port USB
Hôte
Câble de recharge USB

FR
Fonction de Turbo continu
1. Tir continu manuel Appuyez (la première fois) sur A/B/X/Y/L1/L2/R1/R2 + touche turbo
pour régler la fonction de tir continu.
2. Effacez l'envoi continu : appuyez à nouveau sur turbo (la deuxième fois) pour effectuer
la fonction turbo automatique ; Appuyez et maintenez la touche turbo enfoncée
pendant 5 secondes pour effacer toutes les fonctions consécutives.
3. Appuyez d'abord sur la touche turbo + une touche et maintenez-la enfoncée pour
effacer la fonction turbo de la touche actuelle.
C.A.T. 9 FRANÇAIS
Pile
Niveau de recharge Voyant de puissance
Puissance faible Les voyants des canaux clignotent dans le jeu
En recharge Voyant Led 4 clignotant
Recharge terminée Le voyant LED 4 est toujours allumé
Instructions de contrôle de l’éclairage
1. Appuyez sur la touche lumière pour changer de couleur. Ordre de changement : bleu,
rouge, vert, jaune, vert, orange, violet, rose, couleur magique. Transformation cyclique.
2. Double-cliquez sur la touche lumière pour éteindre la lumière
3. Touche lumière + A : cycle de respiration en mode couleur magique cycle de couleur
claire, la couleur claire peut être dans ce mode avec la touche lumière cliquez pour
changer d'autres couleurs
4. ouche lumière + B : mode vibration. Lorsque le moteur vibre, le voyant rouge sera
allumé Luminosité (20mA)
5. Touche lumière + X : mode bascule et index bascule gauche. Plus l'angle de pivotement
est grand, plus la lumière est brillante. Il n'y a pas de scintillement quand il n'y a pas
de pendule. Dans ce mode, vous pouvez cliquer sur la touche lumière pour changer
d'autres couleurs. Luminosité (5-20ma)
6. Touche lumière + Y : mode gyroscope 6 axes en mouvement, toutes les lumières
allumées, haut (rouge), bas (jaune), gauche (bleu), droite (vert)
7. Touche lumière + L : cycle de respiration en mode respiration de couleurs magiques
(rouge/jaune/bleu/vert/violet/orange)
8. Touche lumière + touche de direction : régler la lumière. Appuyez sur la touche
lumière et maintenez-la plus touche directionnelle enfoncée : allumez la lumière.
Appuyez sur la touche lumière et la touche de direction et maintenez-les : il existe
4 niveaux de gradation. 25 %, 50 %, 75 %, 100 %

C.A.T. 9 FRANÇAIS
FR
Arrêt automatique
L'écran hôte est fermé et la manette se met automatiquement en veille.
Si vous n'appuyez sur aucune touche pendant les 5 minutes, il passera
automatiquement en veille.
En mode Bluetooth, appuyez sur la touche d'accueil pendant 3 secondes pour
déconnecter l'hôte et la poignée** passera en veille.
Fonction de touche de retour
1. Réglage à une seule touche: Appuyez et maintenez Mr (touche de réglage) + A (clic)
définissez l'invite de vibration réussie la touche de retour des rayons X est définie sur A.
Paramétrage des touches macro: Appuyez et maintenez MR (touche de réglage) +
action continue ; définissez l'invite de vibration réussie ; définissez la touche de retour
XR comme macro.
2. Réglage à une seule touche : Appuyez et maintenez ML (touche de réglage) + A (clic);
définissez une invite de vibration réussie ; Réglez la touche retour XL sur A.
Paramétrage des touches macro : Appuyez et maintenez ML (touche de réglage)
+ action continue ; définissez une invite de vibration réussie ; Définissez la
touche retour XL comme macro.
Régulation des vibrations du moteur
1. Améliorer l'effet de vibration
2. Réduire l'effet de vibration

DE
C.A.T. 9 DEUTSCH
Screenshot HOME
Linker Stock
Wegweiser Schlüssel Rechter Stock
Leichter
Schlüsse
Verbessert
Vibrationen
Reduzieren
Vibrationen

C.A.T. 9 DEUTSCH
DE
Schlüsselbund
Switch
Die erste Verbindung:Kopplungstaste 2 Sekunden lang drücken,
LED1-LED4 Lauflichter blinken
Android
1. Drücken Sie im ausgeschalteten Zustand, dem Android-Gamepad-Modus, lange die
Taste "x + home" für 2 Sekunden, und die LED4-Anzeige leuchtet.
2. Drücken Sie nach erfolgreicher Kopplung das nächste Mal die Taste [Home], um
eine automatische Verbindung herzustellen.
iOS
Apple MFI-Modus, langes Drücken der Taste "B + Home" für 2 Sekunden, LED3-
Anzei-leuchtet.
USB
Wenn ein USB-Datenkabel verwendet wird, um den Griff mit dem Host-Computer zu
verbinden, kann es als Kabelgriff verwendet werden. Über die Verbindungskennung des
PCs kann gleichzeitig der Lithium-Akku geladen werden. Es gibt XInput- und Dinput-Modi,
die sich standardmäßig im XInput-Modus befinden. Durch 3 Sekunden langes Drücken
der Tasten „+“ und „-“ werden sie aufeinander geschaltet.
#1 XEingangsmodus, entsprechende LED1 + LED4 Kontrollleuchte an
#2 Eingangsmodus, entsprechende LED2 + LED3 Kontrollleuchte an
Zweiter Verbindungsmodus: USB Port
Host
USB Charging Cable

DE
Turbo Continuous function
1. Manuelles Dauerfeuer: Drücken Sie (das erste Mal) a / B / X / Y / L1 / L2 / R1 / r2 /
Kreuztaste + Turbo-Taste, um die Dauerfeuerfunktion einzustellen.
2. Löschen Sie das kontinuierliche Senden: Drücken Sie Turbo erneut (das zweite Mal),
um die Auto-Turbo-Funktion zu realisieren; Halten Sie die Turbo-Taste 5 Sekunden lang
gedrückt, um alle aufeinanderfolgenden Funktionen zu löschen.
3. Drücken und halten Sie zuerst die Turbo-Taste + eine Taste, um die Turbo-Funktion der
aktuellen Taste zu löschen.
C.A.T. 9 DEUTSCH
Batterie
Ladezustand Anzeigestatus
Geringer Strom Kanallichter blinken im Spiel
Aufladen LED 4 Anzeige blinkt
Charging complete LED 4 Anzeige ist immer an
Lighting control instructions
1. Tap the light key to change the color. Change order: blue, red, green, yellow, green,
orange, purple, pink, magic color. Cyclic transformation
2. Double click the light key to turn off the light
3. Light key + A: magic color mode breathing cycle light color cycle, light color can be in
this mode with the light key click to change other colors
4. Light key + B: vibration mode When the motor vibrates, the red light will be on
Brightness (20mA)
5. Light key + X: rocker mode and left rocker swing index. The larger the swing angle,
the brighter the light. There is no shimmer when there is no pendulum. In this mode,
you can click the light key to change other colors. Brightness (5-20ma)
6. Light key + Y: gyro mode 6 axis in motion, all lights on, up (red), down (yellow), left
(blue), right (green)
7. Light key + L: magic color breathing mode (red / yellow / Blue / Green / Purple / orange)
breathing cycle
8. Light key + direction key: adjust the light. Press and hold the light key plus direction
key: turn the light on. Press and hold the light key and direction key: there are 4 levels
of Appuyez sur la touche lumière et la touche de direction et maintenez-les : il existe
dimming. 25 %, 50 %, 75 %, 100 %

C.A.T. 9 DEUTSCH
DE
Automatische Abschaltung
Der Host-Bildschirm wird geschlossen und der Griff schläft automatisch
Wenn innerhalb von 5 Minuten keine Taste gedrückt wird, schaltet es automatisch in den
Ruhezustand.
Drücken Sie im Bluetooth-Modus die Home-Taste 3 Sekunden lang, um den Host zu
trennen, und der Griff wird in den Ruhezustand versetzt.
Back key function
1. Einzeltasten-Einstellung: Mr (Einstelltaste) +A (Klick) drücken und halten
erfolgreiche Vibrationsaufforderung einstellen
Röntgen-Zurück-Taste auf A eingestellt ist.
Makrotasteneinstellung: MR (Einstelltaste) gedrückt halten + kontinuierliche Aktion;
die erfolgreiche Vibrationsaufforderung einstellen; Stellen Sie die XR-Zurück-Taste
als Makro ein.
2. Einzeltasteneinstellung: ML (Einstelltaste) + A (Klick) gedrückt halten;
erfolgreich Vibrationsauf-forderung einstellen; XL-Zurücktaste auf A stellen.
Makrotasteneinstellung: ML (Einstelltaste) gedrückt halten + kontinuierliche Aktion;
erfolgreich Vibrationsaufforderung einstellen; XL-Zurück-Taste als Makro setzen.
Motor vibration regulation
1. Verbessern Sie den Vibrationseffekt
2. Reduzieren Sie den Vibrationseffekt

ES
C.A.T. 9 ESPAÑOL
Captura de pantalla INICIO
Botón
Izquierda
Botón Dirección Botón Derecha
Botón Luz
Vibración
mejorada Reducir
vibración

C.A.T. 9 ESPAÑOL
ES
Botón Asociación
Switch
La primera conexión: Pulsación larga del botón durante 2 segundos
(las luces de funcionamiento led 1 a led 4 parpadean)
Android
1. Mantenga presionado el botón “x + inicio” durante 2 segundos en el estado de
apagado, que es el modo del panel de mandos de Android, y el indicador LED4 se
encenderá.
2. Después de que la asociación se realice correctamente, presione el botón [Inicio] la
próxima vez para conectarse automáticamente.
iOS
Modo Apple MFI. Mantenga presionado el botón “B + Inicio” durante 2 segundos.
El indicador LED3 se encenderá.
USB
Si se utiliza un cable de datos USB para conectar el panel de mandos al equipo host,
se puede utilizar como panel de mando cableado. En la identificación de conexión del
equipo, la batería de litio se puede cargar al mismo tiempo. Hay modos XInput y dinput,
que se encuentran en el modo XInput de forma predeterminada. Se cambian entre sí
presionando los botones “+” y “-” durante 3 segundos.
Modo entrada X n.º 1, luz indicadora LED1 + LED4 correspondiente encendida
Modo entrada d n.º 2, luz indicadora LED2 + LED3 correspondiente encendida
Segundo modo de conexión:
Puerto USB
Host
Cable de carga USB

ES
Función Turbo continua
1. Disparo continuo manual: Presione (la primera vez) A/B/X/Y/L1/L2/R1/R2 + Botón Turbo
para establecer la función de disparo continuo.
2. Borre el envío continuo: presione Turbo de nuevo (la segunda vez) para llevar a cabo la
función Turbo automático. Mantenga presionado el botón Turbo durante 5 segundos
para borrar todas las funciones consecutivas.
3. Mantenga presionado el botón Turbo + un botón primero para borrar la función Turbo
de la tecla actual.
C.A.T. 9 ESPAÑOL
Batería
Estado de carga Estado del indicador
Energía baja Las luces del canal parpadean en el juego
Cargando Indicador Led 4 parpadeando
Carga completada El indicador Led 4 está siempre encendido
Instrucciones del control de iluminación
1. Toque el botón de luz para cambiar el color. Cambio de orden: azul, rojo, verde,
amarillo, verde, naranja, morado, rosa, color mágico. Transformación cíclica.
2. Haga doble clic en la tecla de luz para apagar la luz
3. Botón de luz + A: ciclo de respiración del modo de color mágico, ciclo de color de la luz.
El color de la luz puede estar en este modo con el botón de luz. Haga clic para cambiar
otros colores.
4. Botón de luz + B: modo de vibración. Cuando el motor vibra, la luz roja se
encenderá (20 mA)
5. Botón de luz + X: modo de balancín e índice de oscilación del balancín izquierdo.
Cuanto mayor sea el ángulo de oscilación, más brillante será la luz. No hay brillo cuando
no hay péndulo. En este modo, puede hacer clic en el botón de luz para cambiar otros
colores. Brillo (5-20 ma)
6. Botón de luz + Y: modo giroscopio de 6 ejes en movimiento, todas las luces
encendidas, arriba (rojo), abajo (amarillo), izquierda (azul), derecha (verde).
7. Botón de luz + L: modo de respiración de color mágico. Modo de respiración
(rojo/amarillo/azul/verde/púrpura/naranja).
8. Botón de luz + Botón de dirección: ajustar la luz. Mantenga presionado el botón de luz
más el botón de dirección: encender la luz. Mantenga presionado el botón de luz y el
botón de dirección: hay 4 niveles de atenuación. 25 %, 50 %, 75 % y 100 %

C.A.T. 9 ESPAÑOL
ES
Apagado automático
La pantalla host se cierra y el panel de mandos entra en estado de suspensión.
Si no se presiona ningún botón en 5 minutos, se activará automáticamente el estado
de suspensión.
En el modo Bluetooth, presione el botón Inicio durante 3 segundos para desconectar
el host; el panel de mandos entrará en el modo de suspensión.
Función del botón Atrás
1. Configuración de un solo botón: presione sin soltar Mr (botón de configuración) + A (clic)
establezca la indicación de vibración correcta el botón Atrás de rayos X se establece en A.
Configuración del botón de macro: presione sin soltar MR (botón de configuración) +
Acción continua establezca la indicación de vibración correcta; establezca el botón
Atrás XR como macro.
2. Configuración de un solo botón: presione sin soltar ML (botón de configuración) +
A (clic) establezca la indicación de vibración correcta Establezca el botón
Atrás XL en A.
Configuración del botón de macro: presione sin soltar ML (botón de configuración) +
Acción continua establezca la indicación de vibración correcta; Establezca el
botón Atrás XL como macro.
Regulación de vibraciones del motor
1. Mejorar el efecto de vibración
2. Reducir el efecto de vibración

JP
C.A.T. 9

C.A.T. 9
JP
Switch
Android
iOS
USB
USB
Host
USB

JP
C.A.T. 9

C.A.T. 9
JP

TW
C.A.T. 9 繁體中文
截圖
左搖桿
方向鍵 右搖桿
燈光鍵
增加震動 減小震動

C.A.T. 9 繁體中文
TW
Switch
連接方式一:長按配對鍵2秒,LED1-LED4 跑馬燈閃爍
連接方式二:
Android
1.關機狀態下長按“X+HOME”鍵2秒,為安卓Gamepad 模式 ,LED4指示燈會亮。
2.成功配對後,下次使用按[home]鍵可自動連接。
iOS
蘋果mfi模式,長按“B+HOME”鍵2秒,LED3指示燈會常亮。
USB
使用USB連接線連接手把與主機,則可以做有線手把使用,與PC電腦連接能同時
給鋰電池充電。有Xinput和Dinput模式,預設為Xinput模式,通過長按“+”和
“—”鍵3秒相互切換。
#1 Xinput模式,對應LED1+LED4指示燈亮
#2 Dinput模式,對應LED2+LED3指示燈亮
USB端口
Host
USB充电线
配對鍵

TW
Turbo連發功能
1.手動連擊:按下(第一次)A/B/X/Y/L1/L2/R1/R2/ +TURBO鍵可設置連擊功能。
2.清除連擊:再次(第二次)按下 TURBO 即觸發 AUTO TURBO 功能;
長按Turbo鍵5s,清除所有連擊功能。
3.另外先按住 Turbo 鍵+A 鍵,清除當前 A 按鍵的 Turbo 功能。
C.A.T. 9 繁體中文
電池
電量狀態 指示燈狀態
低電量 遊戲中通道燈閃爍
充電中 LED4指示燈閃爍
充電完成 LED4指示燈常亮
燈光控制說明
1.輕按燈光鍵變換顏色。變換順序:藍、紅、綠、黃、青、橙、紫、粉、幻彩。
循環變換
2.雙擊燈光鍵關閉燈光
3.燈光鍵+A:幻彩模式 呼吸循燈彩色循環,燈光顏色可以在這個模式下用燈光鍵
單擊變換其他顏色
4.燈光鍵+B:震動模式 在馬達震動時,亮紅燈(馬達震多長時間就亮多長時間)
亮度(20MA)
5.燈光鍵+X:搖桿模式 跟左搖桿擺動指數,擺動的角度越大燈光越亮。
無擺動時微光亮。燈光顏色可以在這個模式下用燈光鍵單擊變換其他顏色。
亮度(5-20ma)
6.燈光鍵+Y:陀螺儀模式 6軸在動燈全亮,上(紅),下(黃),左(藍),右(綠)
7.燈光鍵+L:幻彩呼吸模式 (紅/黃/藍/綠/紫/橙)呼吸循環
8.燈光鍵+方向鍵:調節燈光 按住燈光鍵加方向鍵上:提高燈光亮度。
按住燈光鍵加方向鍵下:降低燈光亮度共4個階段。 25%、50%、75%、100%

C.A.T. 9 繁體中文
TW
自動關機
主機畫面關閉,手把自動進入休眠。
5分鐘之內沒有任何按鍵按下則自動進入休眠。
藍牙模式,按下HOME鍵3秒,取消主機連接,手把休眠。
背鍵功能
1.單按鍵設置:①按住MR(設置鍵)+A(單擊)②設置成功震動提示 ③XR背鍵設置為A。
巨集鍵設置:①按住MR(設置鍵)+連貫動作 ②設置成功震動提示 ③XR背鍵設置為宏。
2.單按鍵設置:①按住ML(設置鍵)+A(單擊)②設置成功震動提示 ③XL背鍵設置為A。
巨集鍵設置:①按住ML(設置鍵)+連貫動作 ②設置成功震動提示 ③XL背鍵設置為宏。
馬達振動調節
1. 增強震動效果
2. 降低震動效果

ZH
C.A.T. 9 简体中文
截图
左摇杆
右摇杆方向键
灯光键
增强震动 减小震动

C.A.T. 9 简体中文
ZH
Switch
连接方式一:长按配对键2秒,LED1-LED4 跑马灯快闪
连接方式二:
Android
1.关机状态下长按“X+HOME”键2秒,为安卓Gamepad 模式 ,LED4指示灯会亮。
2.成功配对后,下次使用按[home]键可自动连接。
iOS
苹果mfi模式,长按“B+HOME”键2秒,LED3指示灯会常亮。
USB
使用USB数据线连接手柄与主机,则可以做有线手柄使用,在PC电脑连接识别上,
同时给锂电池充电。有Xinput和Dinput模式,默认为Xinput模式,通过长按“+”
和“—”键3秒相互切换。
#1 Xinput模式,对应LED1+LED4指示灯亮
#2 Dinput模式,对应LED2+LED3指示灯亮
USB端口
Host
USB充电线
配对键

ZH
Turbo连发功能
1.手动连发:按下(第一次)A/B/X/Y/L1/L2/R1/R2/ +TURBO键可设置连发功能。
2.清除连发:再次(第二次)按下 TURBO 即实现 AUTO TURBO 功能;
长按Turbo键5s,清除所有连发功能。
3.另外先按住 Turbo 键+A 键,清除当前 A 按键的 Turbo 功能。
C.A.T. 9 简体中文
电池
电量状态 指示灯状态
低电量 游戏中通道灯闪烁
充电中 LED4指示灯闪烁
充电完成 LED4指示灯常亮
灯光控制说明
1. 轻按灯光键变换颜色。变换顺序:蓝、红、绿、黄、青、橙、紫、粉、幻彩。
循环变换
2. 双击灯光键关闭灯光
3. 灯光键+A:幻彩模式 呼吸循灯彩色循环,灯光颜色可以在这个模式下用灯光键
单击变换其他颜色
4. 灯光键+B:震动模式 在马达震动时,亮红灯(马达震多长时间就亮多长时间)
亮度(20MA)
5. 灯光键+X:摇杆模式 跟左摇杆摇摆指数,摆动的角度越大灯光越亮。没有摆时微光亮。
灯光颜色可以在这个模式下用灯光键单击变换其他颜色。亮度(5-20ma)
6. 灯光键+Y:陀螺仪模式 6轴在动灯全亮,上(红),下(黄),左(蓝),右(绿)
7. 灯光键+L:幻彩呼吸模式 (红/黄/蓝/绿/紫/橙)呼吸循环
8. 灯光键+方向键:调节灯光 按住灯光键加方向键上:灯调亮。按住灯光键加方向键下:
灯调暗共4个级别。25%、50%、75%、100%

C.A.T. 9 简体中文
ZH
自动关机
主机屏幕关闭,手柄自动休眠。
5分钟之内没有任何按键按下则自动休眠。
蓝牙模式,按下HOME键3秒,断开主机连接,手柄休眠。
背键功能
1.单按键设置:①按住MR(设置键)+A(单击)②设置成功震动提示 ③XR背键设置为A。
宏按键设置:①按住MR(设置键)+连贯动作 ②设置成功震动提示 ③XR背键设置为宏。
2.单按键设置:①按住ML(设置键)+A(单击)②设置成功震动提示 ③XL背键设置为A。
宏按键设置:①按住ML(设置键)+连贯动作 ②设置成功震动提示 ③XL背键设置为宏。
马达振动调节
1. 增强震动效果
2. 减轻震动效果

Mad Catz, R.A.T. / B.A.T. / M.O.J.O. / S.T.R.I.K.E. / C.A.T. / E.G.O. / F.R.E.Q. and the Mad Catz logo are trademarks or
registered trademarks of Mad Catz Global Limited, its subsidiaries and affiliates. The shape and design of this product is a
trade dress of Mad Catz Global Limited, its subsidiaries and affiliates.
All other trademarks or registered trademarks are the property of their respective owners. Made in China All rights reserved.
Product features, appearance and specifications may be subject to change without notice.
限用物質含有情況標示聲明書
設備名稱
Equipment name:
無線遊戲手柄
型號(型式)
Type designation (Type): C.A.T. 9
限用物質及其化學符號
Restricted substances and its chemical symbols
單元
Unit 鉛
Lead (Pb)
汞
Mercury (Hg)
鎘
Cadmium (Cd)
六價鉻
Hexavalent
chromium(Cr+6)
多溴聯苯
Polybrominated
biphenyls(PBB)
多溴二苯醚
Polybrominated
diphenyl ethers
(PBDE)
下盖
铁板
轴体
键帽
PCB
其它固定
組件 (螺絲、
夾具、卡榫)
備考1.〝超出0.1 wt %〞及〝超出0.01 wt %〞係指限用物質之百分比含量超出百分比含量基準值。
Note 1: “Exceeding 0.1 wt %” and “exceeding 0.01 wt %” indicate that the percentage content of the
restricted substance exceeds the reference percentage value of presence condition.
備考2.〝○〞係指該項限用物質之百分比含量未超出百分比含量基準值。
Note 2:“”indicates that the percentage content of the restricted substance does not exceed the
percentage of reference value of presence.
備考3.〝-〞係指該項限用物質為排除項目。
Note 3: The “-” indicates that the restricted substance corresponds to the exemption.
— —
⃝⃝⃝
⃝⃝⃝
⃝⃝⃝
⃝⃝⃝
⃝⃝⃝
⃝⃝⃝
⃝
⃝
⃝
⃝
⃝
⃝
⃝ ⃝
⃝ ⃝
⃝ ⃝
⃝ ⃝
⃝ ⃝
© 2021 Mad Catz Global Limited, Office H, Rm. 1606, 16/F, Workingbond Commercial Centre, 162-164 Prince Edward
Road West, Mong Kok, Kowloon, Hong Kong.

FCC STATEMENTS
NOTE: This equipment has been tested and found to comply with the limits for a Class B digital
device, pursuant to part 15 of the FCC Rules. These limits are designed to provide reasonable
protection against harmful interference in a residential installation. This equipment generates uses
and can radiate radio frequency energy and, if not installed and used in accordance with the
instructions, may cause harmful interference to radio communications. However, there is no
guarantee that interference will not occur in a particular installation. If this equipment does
cause harmful interference to radio or television reception, which can be determined by turning
the equipment off and on, the user is encouraged to try to correct the interference by one or more
of the following measures:
- Reorient or relocate the receiving antenna.
- Increase the separation between the equipment and receiver.
-Connect the equipment into an outlet on a circuit different from that to which the receiver is
connected.
-Consult the dealer or an experienced radio/TV technician for help
Changes or modifications not expressly approved by the party responsible for compliance could
void the user's authority to operate the equipment.
This device complies with Part 15 of the FCC Rules. Operation is subject to the following two
conditions:
(1) this device may not cause harmful interference, and (2) this device must accept any
interference received, including interference that may cause undesired operation.
CANADA (IC) STATEMENTS
This device contains licence-exempt transmitter(s)/receiver(s) that comply with Innovation,
Science and Economic Development Canada’s licence-exempt RSS(s). Operation is subject to
the following two conditions:
(1) This device may not cause interference.
(2) This device must accept any interference, including interference that may cause undesired
operation of the device.
L’émetteur/récepteur exempt de licence contenu dans le présent appareil est conforme aux
CNR d’Innovation, Sciences et Développement économique Canada applicables aux
appareils radio exempts de licence. L’exploitation est autorisée aux deux conditions
suivantes :
(1) L' appareil ne doit pas produire de brouillage;
(2) L' appareil doit accepter tout brouillage radioélectrique subi, même si le brouillage est
susceptible d' en compromettre le fonctionnement.

210-177614
CMIIT ID: 2022DJ16600
美加狮全球控股有限公司
Mad Catz Global Limited
M/N : C.A.T. 9
[型號/型号]
FCC ID: 2ASFYGSSWDOINCR002

www.madcatz.com
-
 1
1
-
 2
2
-
 3
3
-
 4
4
-
 5
5
-
 6
6
-
 7
7
-
 8
8
-
 9
9
-
 10
10
-
 11
11
-
 12
12
-
 13
13
-
 14
14
-
 15
15
-
 16
16
-
 17
17
-
 18
18
-
 19
19
-
 20
20
-
 21
21
-
 22
22
-
 23
23
-
 24
24
-
 25
25
-
 26
26
-
 27
27
-
 28
28
-
 29
29
-
 30
30
-
 31
31
-
 32
32
-
 33
33
-
 34
34


en otros idiomas
- français: Mad Catz CAT9 Mode d'emploi
- English: Mad Catz CAT9 User guide
- 日本語: Mad Catz CAT9 ユーザーガイド
Otros documentos
-
 Bakeey C20 Manual de usuario
-
PXN 9607X Manual de usuario
-
KROM Kayros Manual de usuario
-
Lenovo LBC-007 Guía de inicio rápido
-
GameSir T4K Manual de usuario
-
BIGBIG WON Rainbow Lite Manual de usuario
-
FREAKS AND GEEKS PRO DUO Manual de usuario
-
SPEEDLINK TORID Guía de instalación
-
Haier QACT17A Manual de usuario
-
Ravelli FLAT STOVE 900 Manual de usuario
