Kicker KM604 Manual de usuario
- Categoría
- Altavoces de coche
- Tipo
- Manual de usuario
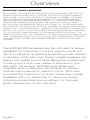
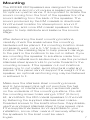
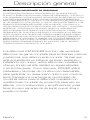
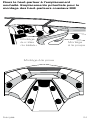
A continuación encontrará información breve para Altavoz KM604. Estos altavoces coaxiales de rango completo están diseñados para entornos marinos y exteriores. Son capaces de producir un sonido de alta calidad y resistir condiciones ambientales adversas. Los altavoces cuentan con materiales avanzados y técnicas de construcción para un rendimiento óptimo, y se pueden combinar con otros productos marinos como subwoofers y amplificadores. Se recomienda utilizar accesorios y cableado KICKER para el mejor rendimiento, y permitir dos semanas de rodaje para alcanzar la calidad de sonido óptima.
A continuación encontrará información breve para Altavoz KM604. Estos altavoces coaxiales de rango completo están diseñados para entornos marinos y exteriores. Son capaces de producir un sonido de alta calidad y resistir condiciones ambientales adversas. Los altavoces cuentan con materiales avanzados y técnicas de construcción para un rendimiento óptimo, y se pueden combinar con otros productos marinos como subwoofers y amplificadores. Se recomienda utilizar accesorios y cableado KICKER para el mejor rendimiento, y permitir dos semanas de rodaje para alcanzar la calidad de sonido óptima.


-
 1
1
-
 2
2
-
 3
3
-
 4
4
-
 5
5
-
 6
6
-
 7
7
-
 8
8
-
 9
9
-
 10
10
-
 11
11
-
 12
12
-
 13
13
-
 14
14
-
 15
15
-
 16
16
-
 17
17
-
 18
18
-
 19
19
-
 20
20
-
 21
21
-
 22
22
-
 23
23
-
 24
24
-
 25
25
-
 26
26
-
 27
27
-
 28
28
-
 29
29
-
 30
30
-
 31
31
-
 32
32
-
 33
33


Kicker KM604 Manual de usuario
- Categoría
- Altavoces de coche
- Tipo
- Manual de usuario
A continuación encontrará información breve para Altavoz KM604. Estos altavoces coaxiales de rango completo están diseñados para entornos marinos y exteriores. Son capaces de producir un sonido de alta calidad y resistir condiciones ambientales adversas. Los altavoces cuentan con materiales avanzados y técnicas de construcción para un rendimiento óptimo, y se pueden combinar con otros productos marinos como subwoofers y amplificadores. Se recomienda utilizar accesorios y cableado KICKER para el mejor rendimiento, y permitir dos semanas de rodaje para alcanzar la calidad de sonido óptima.
en otros idiomas
- français: Kicker KM604 Manuel utilisateur
- English: Kicker KM604 User manual
- Deutsch: Kicker KM604 Benutzerhandbuch
Artículos relacionados
-
Kicker KMXL El manual del propietario
-
Kicker 2014 KM Coaxial Speakers El manual del propietario
-
-
-
Kicker 2014 KM60 Coaxial Speakers El manual del propietario
-
-
-
-
-
Kicker DS68.2 El manual del propietario