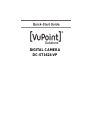
VuPoint DC-ST1624-VP Guía de inicio rápido
- Categoría
- Cámaras de deportes de acción
- Tipo
- Guía de inicio rápido

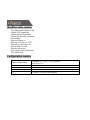
DIGITAL CAMERA
DC-ST1624-VP

Get to know your camera
3M waterproof design
16.0 Mega pixels resolution
Digital still camera
Digital video camcorder
Built-in flash Light
8x digital zoom
2.4" TFT color display
Micro SD card support
2x AAA alkaline batteries
Smile detection
Anti-shaking still capture
720P motion/Jpg
System requirement
Operating system
Windows XP / Vista / 7 / 8 or above
Mac 9.x or X.x
CPU
Pentium III or above
RAM
At least 64MB
Interface
USB port
CD
4x speed CD ROM or above

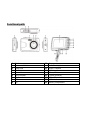
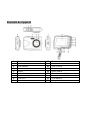
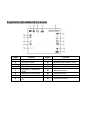
Functional parts
1
Shutter
10
Down
2
Power on/off button
11
Left / Flash light
3
Strap hook
12
Right / Playback
4
Flash light
13
Mode
5
Lens
14
Menu / Delete
6
Busy indicator
15
Tripod connector
7
Macro switch
16
Micro SD card slot
8
LCD screen
17
USB interface
9
Up
18
Battery compartment

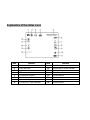
Explanation of the status icons
Item Function Item Function
1
Mode selected
9
Anti-Shaking
2
Flash indicator
10
Normal/Macro mode indicator
3
Self-timer
11
Battery indicator
4
ISO
12
Exposure value
5
Photo/Video counter
13
White Balance
6
Selected resolution
14
Scene mode
7
Picture quality
15
Smile detection
8
The micro SD card indication
16
Zoom indicator

Installing the batteries
1. Open the battery door.
2. Insert 2x AAA alkaline batteries into the camera.
3. Close the battery door.
Inserting a memory card (not included)
Follow the instructions below to insert the optional micro SD memory card into the camera.
1. Turn off the camera first.
2. Open the battery door.
3. Insert the micro SD card into the camera.
Note: There is only one right direction to insert the micro SD memory card into the slot. Do not force the
card into the memory card-slot, it may damage both the camera and the micro SD memory card.
Note: The micro SD memory card must be formatted before taking photographs. See the following
sections for more information.
Formatting the memory or micro SD card
1. Press the menu button ( ) in PHOTO or VIDEO mode.
2. Select the setup mode by press the right button.
3. Select the format icon by press the
W( ) button and press the SHUTTER button to confirm.
4. Select Internal memory or SD card and confirm with the SHUTTER button.
Zoom in and out
The camera can zoom in up to 8 times.
Zoom in or out by pressing the up or down button, a number will appear on the display, 8.x is the
maximum zoom ratio.
Playback photographs
1. Press the( ) button to get into playback mode.
2. The last picture or video clip taken will be displayed. Use the left or right buttons to flip
through the pictures or videos

3. In full screen display, press the T( ) button to zoom in the photo.
4. To view images in thumbnail, press the
W( ) button.
5. To shift the image in zoom-in mode, press the SHUTTER button then use the up/down/left/right
buttons.
6. Press the MENU ( ) button in Playback mode, press again and hold MENU button until the
menu options displayed. Select SLIDE SHOW and select the desired slide show time. Press
the SHUTTER button to confirm. The pictures saved in your camera or your micro SD card
will be displayed in sequence automatically. To stop slide show, press SHUTTER button
again.
Playback video clips
1. When video clips are displayed, press the SHUTTER button to start playing the video and press the
SHUTTER button again to pause the playback.
2. Press right button to fast forward or press left button to rewind.
3. Press the down button to stop.
4. Press the mode button to exit.
Delete photographs and video clips
You can delete a single photograph / video clip, or delete all the photographs / video clips in the
memory.
Follow the instructions below to delete photograph.
1. Press the ( ) button to enter the playback mode.
2. Press left or right button to select photograph/video clip to be delete.
3. Press the MENU/delete button( )and select “Delete This Image(Video)” or “All” .
4. Press the SHUTTER button, then select OK to confirm.
5. Press the mode button to exit.
NOTE: Select “All” and Press the SHUTTER button to confirm, all the pictures and videos will be
deleted.
Connecting to a PC
The unit can be connected to the computer as mass storage device and transfer photo/video files for
storage.

Identifier votre caméra
Conception imperméable de 3M
Capteur 16.0 mégapixels
Caméra statique numérique
Caméscope de vidéo numérique
Flash intégré
Zoom numérique 8x
Affichage en couleur 2.4" TFT
Supporter la carte Micro SD
Piles alcalines 2x AAA
Détection de sourire
Prise statique Anti-tremblement
720P motion/Jpg
Configuration requise
Système d'exploitation
Windows XP / Vista / 7 / 8 ou ultérieur
Mac 9.x ou X.x
Processeur
Pentium III ou supérieur
RAM
64 Mo minimum
Interface
Port USB
CD
Lecteur CD-ROM 4x ou supérieur

Eléments de l'appareil
1
Déclencheur
10
Down
2
Power on/off
11
Gauche / Flash
3
Point d'attache
12
Droit / Lecture
4
Flash
13
Mode
5
Objectif
14
Menu / Effacer
6
Busy indicator
15
Connecteur de trépied
7
Sélecteur macro
16
Compartiment de la carte Micro SD
8
Ecran LCD
17
USB interface
9
Up
18
Compartiment de piles

Explication des icônes
Item Fonction Item Fonction
1
Mode sélectionné
9
Anti-Shaking
2
Indicateur de flash
10
Indicateur mode
Normal / Macro
3
Minuteur automatique
11
Témoin de batterie
4
ISO
12
Valeur d’exposition
5
Compteur photos/vidéo
13
Balance de blanc
6
Résolution sélectionnée
14
Mode de scène
7
Qualité de l'image
15
Détection de sourire
8
Indication de la carte micro
SD card
16
Indicateur de Zoom

Installation des piles
1. Ouvrez le compartiment des piles.
2. Insérez 2 piles alaclines AAA dans l'appareil.
3. Fermer la porte de piles.
Insertion d'une carte mémoire (non fournie)
Respectez les instructions suviant pour insérer la carte optionnelle micro SD memory dans le caméra.
1. Eteignez l'appareil au préalable.
2. Ouvrez la porte de batterie.
3. Insérez la carte SD dans l'appareil.
Note: il y a seulement une direction droite pour insérer la carte SD dans le compartiment. Ne jamais
forcer la carte dans le compartiment, il peut endommager la carte SD.
Note: La carte micro SD doit être formaté avant la prise de photo. Regardez les sections suivantes pour
plus d’informations.
Formatage de la mémoire ou de la carte SD
1. Appuyez sur le bouton menu ( ) en mode PHOTO ou VIDEO.
2. Sélectionnez le mode en appuyant sur le bouton droit..
3. Sélectionnez l’icône format en appuyant sur le bouton
W( ) et appuyez sur le bouton SHUTTER
pour confirmer.
4. Sélectionnez la mémoire interne ou la carte SD et confirmer avec le bouton SHUTTER.
Zoom in et out
Le caméra peut agrandir 8 fois.
Zoom in ou out en appuyant sur le bouton haut ou bas, un nombre sera affiché sur l’afficheur, 8.x est de
rapport maximal.
Lecture de photos
1. Apppuyez sur le bouton ( ) pour entrer dans le mode de lecture.
2. la dernière photo ou vidéo pris sera affichée. Utilisez les boutons gauche ou droit pour défiler la
photo ou le vidéo.
3. en plein écran, appuyez sur le bouton T(
) pour agrandire la photo.
4. Pour voir les images en timbre, appuyez sur le bouton W(
).

5. Pour passer au mode zoom-in, apuyez sur le bouton SHUTTER, puis, utilisez les boutons
haut/pain/gauche/droit.
6. Appuyez sur le bouton MENU ( ) dans le mode de lecture, appuyez encore pour maintenir jusqu’ç
ce que les options de menu s’affichent. Sélectionnez SLIDE SHOW et sélectionnez le temps
d’affichage désiré. Appuyez sur le bouton SHUTTER pour confirmer. Les images sauvegardées
dans votre caméra ou votre carte micro SD seront affichés selon l’ordre automatiquement. Pour
arrêter l’affichage, appuyez sur le bouton SHUTTER encore.
Lecture des vidéo
1. Lors de la lecture de vidéo, appuyez sur le bouton SHUTTER pour démarrer la lecture de vidéo et
appuyez encore pour pause de lecture.
2. Appuyez sur le bouton droit pour avancer rapidement ou appuyez sur le bouton gauche pour
rembobiner.
3. Appuyez sur le bouton pour arrêter.
4. Appuyez sur le bouton mode pour quitter.
Effacer photos et vidéo
Vous pouvez effacer une photo/vidéo, ou effacer toutes les photos/vidéo dans la mémoire.
Respectez les instructions suviantes pour effacer une photo.
1. Appuyez sur le bouton ( ) pour entrer dans le mode de lecture.
2. Appuyez sur le bouton pour sélectionner la photo/video pour effacer.
3. Appuyez sur le bouton MENU/effacer( )et sélectionnez “Effacer cette photo (Video)” ou “Tout” .
4. Appuyez sur le bouton SHUTTER, puis, sélectionnez OK pour confirmer.
5. Appuyez sur le bouton mode pour quitter.
NOTE: Sélectionner “Tout” et appuyez sur le bouton SHUTTER pour confirmer, toutes les photos et
vidéos seront effacés.
Connecter à un PC
L’unité peut être connecté à un ordinateur comme un appareil de stockage compact et transférer des
fichiers photo/video pour stockage.

Conoce tu cámara
Diseño a prueba de agua de 3M
Con resolución de 16.0 Mega pixeles
Cámara de fotos digitales
Cámara de vídeo digital
Luz de flash incorporada
Zoom digital 8x
Pantalla de color de 2.4" TFT
Compatibilidad con tarjetas de micro SD
Dos pilas alcalinas AAA
Detección de sonrisas
Captura anti-agitación
720P motion/Jpg
Requisitos de sistema
Sistema Operativo
Windows XP / Vista / 7 / 8 o superior
Mac 9.x o X.x
CPU
Pentium III o superior
RAM Por lo menos de 64MB
Interfaz
Puerto USB
CD
Velocidad 4x CD ROM o superior

Partes funcionales
1
Obturador
10
Abajo
2
Botón de on/off
11
Izquierda / luz de Flash
3
Gancho de correa
12
Derecho / Reproducción
4
Luz de flash
13
Modo
5
Lente
14
Menú / Eliminar
6
Indicador ocupado
15
Conector de trípode
7
Botón de Macro
16
Ranura para tarjeta de micro SD
8
Pantalla LCD
17
Interfaz USB
9
ARRIBA
18
Compartimento de la batería

Explicación del estado de los iconos
Punto Función Punto Función
1
Modo seleccionado
9
Anti-agitación
2
Indicador de flash
10
Modo indicador Normal / Macro
3
Autodisparador
11
Indicador de la pila
4
ISO
12
Valor de exposición
5
Fotografía / Contador de
vídeo
13
Balance de blanco
6
Resolución Seleccionado
14
Modo de escena
7
Calidad de fotografías
15
Detección de sonrisas
8
Indicación de tarjeta micro
SD
16
Indicador de zoom

Instalando las pilas
1. Abra la cubierta de las pilas.
2. Inserte 2 pilas alcalinas AAA en la cámara.
3. Cierre la puerta de la batería.
Insertando la tarjeta de memoria (no incluida)
Siga las siguientes instrucciones para insertar la tarjeta opcional de memoria de micro SD en la cámara.
1. Primero apague la cámara.
2. Abra la puerta de la batería.
3. Inserte la tarjeta SD en la cámara.
Nota: Sólo hay una dirección correcta para insertar la tarjeta de memoria de micro SD en la ranura. No
fuerce la tarjeta en la ranura de la tarjeta de memoria, es posible que la tarjeta de memoria de
cámara y micro SD.
Nota: La tarjeta de memoria de micro SD debe ser formatada antes de tomar fotografías. Vea las
secciones siguientes para más información.
Formateando la memoria o tarjeta SD
1. Pulse el botón de menú( ) en el modo de FOTO o VÍDEO.
2. Seleccione el modo de configuración pulsando el botón de la derecha.
3. Seleccione el icono de formato pulsando el botón W (
) y pulse el botón OBTURADOR para
confirmarlo.
4. Seleccione la memoria interna o la tarjeta SD y confirme con el botón OBTURADOR.
1280 x 960), 3M (2048 x 1536), 5M (2560 x 1920), 8M (3264x2448), 12M (4032 x 3024)
2. Se mostrará seis diferentes resoluciones. Seleccione la resolución que desee con el botón arriba o
abajo y pulse el botón OBTURADOR para confirmar la selección.
Ampliar y alejar
La cámara se puede ampliar hasta 8 veces.
Acercar o alejar pulsando el botón hacia arriba o abajo, un número aparecerá en la pantalla, 8.x es el
máximo de zoom.
Reproducción de fotografías

1. Pulse el botón ( ) para entrar en modo de reproducción.
2. La última clip de imagen o de vídeo tomada se mostrará. Use los botones izquierda o derecha para
hojear las fotos o vídeos
3. En la visualización a pantalla completa, pulse el botón
T( ) para ampliar la foto.
4. Para ver las imágenes en miniatura, pulse el botón
W( ).
5. ra cambiar la imagen en el modo de ampliar, pulse el botón OBTURADOR, y utilice las flechas
arriba / abajo / izquierda / derecha.
6. Pulse el botón MENU ( ) en el modo de Reproducción, pulse de nuevo y mantiene el botón
MENU hasta que las opciones de menú que aparece.
Seleccione PRESENTACIÓN DE
DIAPOSITIVAS y seleccione el tiempo de presentación de diapositivas.
Pulse el botón
OBTURADOR para confirmar.
Las imágenes guardadas en su cámara o su tarjeta micro SD se
mostrará en la secuencia de forma automática.
Para detener la presentación de diapositivas,
presione nuevamente el botón OBTURADOR.
Reproducción de clips de vídeo
1. Cuando se muestran las clips de vídeo, pulse el botón OBTURADOR para iniciar la reproducción
del vídeo y pulse el botón OBTURADOR para detener la reproducción.
2. Presione el botón derecho para avanzar rápido o presione el botón izquierdo para rebobinar.
3. Pulse el botón de abajo para detener.
4. Pulse el botón de modo para salir.
Eliminar clips de fotografías y video
Puede borrar una sola fotografía / vídeo, o borrar todas las clips de fotografías y vídeo en la memoria.
Siga las siguientes instrucciones para borrar la fotografía.
1. Pulse el botón ( ) para entrar en el modo de reproducción.
2. Pulse el botón izquierdo o derecho para seleccionar la fotografía / vídeo que desee eliminar.
3. Pulse el botón MENU / borrar (
) y seleccione "Eliminar esta imagen (Video)" o "Todo".
4. Pulse el botón OBTURADOR, y seleccione Aceptar para confirmarlo.
5. Pulse el botón de modo para salir.
NOTA: Seleccione "Todos" y presione el botón OBTURADOR para confirmar, todas las fotos y videos
serán eliminados.
Conexión a un PC
La unidad puede ser conectada a la computadora como dispositivo de almacenamiento y transfiere el
archivo de foto o vídeo a su almacenamiento.

FCC (Federal Communications Commission)
This device complies with Part 15 of the FCC Rules.
Operation is subject to the following two conditions:
(1) This device may not cause harmful interference, and
(2) this device must accept any interference received, including interference that may cause
undesired operation.
Windows® and Windows® Vista® are registered trademarks of Microsoft Corporation.
Mac OS® is a registered trademark of Apple Inc. App Store
SM
is a service mark of Apple Inc.
All trademarks are the property of their respective owner.
DC-ST1624-VP_Manual_14-0604
Transcripción de documentos
DIGITAL CAMERA DC-ST1624-VP Get to know your camera 3M waterproof design 16.0 Mega pixels resolution Digital still camera Digital video camcorder Built-in flash Light 8x digital zoom 2.4" TFT color display Micro SD card support 2x AAA alkaline batteries Smile detection Anti-shaking still capture 720P motion/Jpg System requirement Operating system CPU RAM Interface CD Windows XP / Vista / 7 / 8 or above Mac 9.x or X.x Pentium III or above At least 64MB USB port 4x speed CD ROM or above Functional parts 1 2 3 4 5 6 7 8 9 Shutter Power on/off button Strap hook Flash light Lens Busy indicator Macro switch LCD screen Up 10 11 12 13 14 15 16 17 18 Down Left / Flash light Right / Playback Mode Menu / Delete Tripod connector Micro SD card slot USB interface Battery compartment Explanation of the status icons Item 1 2 3 4 5 6 7 8 Function Mode selected Flash indicator Self-timer ISO Photo/Video counter Selected resolution Picture quality The micro SD card indication Item 9 10 11 12 13 14 15 16 Function Anti-Shaking Normal/Macro mode indicator Battery indicator Exposure value White Balance Scene mode Smile detection Zoom indicator Installing the batteries 1. Open the battery door. 2. Insert 2x AAA alkaline batteries into the camera. 3. Close the battery door. Inserting a memory card (not included) Follow the instructions below to insert the optional micro SD memory card into the camera. 1. Turn off the camera first. 2. Open the battery door. 3. Insert the micro SD card into the camera. Note: There is only one right direction to insert the micro SD memory card into the slot. Do not force the card into the memory card-slot, it may damage both the camera and the micro SD memory card. Note: The micro SD memory card must be formatted before taking photographs. See the following sections for more information. Formatting the memory or micro SD card 1. 2. 3. 4. Press the menu button ( ) in PHOTO or VIDEO mode. Select the setup mode by press the right button. Select the format icon by press the W( ) button and press the SHUTTER button to confirm. Select Internal memory or SD card and confirm with the SHUTTER button. Zoom in and out The camera can zoom in up to 8 times. Zoom in or out by pressing the up or down button, a number will appear on the display, 8.x is the maximum zoom ratio. Playback photographs 1. Press the( ) button to get into playback mode. 2. The last picture or video clip taken will be displayed. Use the left or right buttons to flip through the pictures or videos 3. In full screen display, press the T( ) button to zoom in the photo. 4. To view images in thumbnail, press the W( ) button. 5. To shift the image in zoom-in mode, press the SHUTTER button then use the up/down/left/right buttons. 6. Press the MENU ( ) button in Playback mode, press again and hold MENU button until the menu options displayed. Select SLIDE SHOW and select the desired slide show time. Press the SHUTTER button to confirm. The pictures saved in your camera or your micro SD card will be displayed in sequence automatically. To stop slide show, press SHUTTER button again. Playback video clips 1. When video clips are displayed, press the SHUTTER button to start playing the video and press the SHUTTER button again to pause the playback. 2. Press right button to fast forward or press left button to rewind. 3. Press the down button to stop. 4. Press the mode button to exit. Delete photographs and video clips You can delete a single photograph / video clip, or delete all the photographs / video clips in the memory. Follow the instructions below to delete photograph. 1. Press the ( ) button to enter the playback mode. 2. Press left or right button to select photograph/video clip to be delete. 3. Press the MENU/delete button( )and select “Delete This Image(Video)” or “All” . 4. Press the SHUTTER button, then select OK to confirm. 5. Press the mode button to exit. NOTE: Select “All” and Press the SHUTTER button to confirm, all the pictures and videos will be deleted. Connecting to a PC The unit can be connected to the computer as mass storage device and transfer photo/video files for storage. Identifier votre caméra Conception imperméable de 3M Capteur 16.0 mégapixels Caméra statique numérique Caméscope de vidéo numérique Flash intégré Zoom numérique 8x Affichage en couleur 2.4" TFT Supporter la carte Micro SD Piles alcalines 2x AAA Détection de sourire Prise statique Anti-tremblement 720P motion/Jpg Configuration requise Système d'exploitation Processeur RAM Interface CD Windows XP / Vista / 7 / 8 ou ultérieur Mac 9.x ou X.x Pentium III ou supérieur 64 Mo minimum Port USB Lecteur CD-ROM 4x ou supérieur Eléments de l'appareil 1 2 3 4 5 6 7 8 9 Déclencheur Power on/off Point d'attache Flash Objectif Busy indicator Sélecteur macro Ecran LCD Up 10 11 12 13 14 15 16 17 18 Down Gauche / Flash Droit / Lecture Mode Menu / Effacer Connecteur de trépied Compartiment de la carte Micro SD USB interface Compartiment de piles Explication des icônes Item 1 Fonction Mode sélectionné Item 9 2 Indicateur de flash 10 3 4 5 6 7 Minuteur automatique ISO Compteur photos/vidéo Résolution sélectionnée Qualité de l'image Indication de la carte micro SD card 11 12 13 14 15 Fonction Anti-Shaking Indicateur mode Normal / Macro Témoin de batterie Valeur d’exposition Balance de blanc Mode de scène Détection de sourire 16 Indicateur de Zoom 8 Installation des piles 1. 2. 3. Ouvrez le compartiment des piles. Insérez 2 piles alaclines AAA dans l'appareil. Fermer la porte de piles. Insertion d'une carte mémoire (non fournie) Respectez les instructions suviant pour insérer la carte optionnelle micro SD memory dans le caméra. 1. Eteignez l'appareil au préalable. 2. Ouvrez la porte de batterie. 3. Insérez la carte SD dans l'appareil. Note: il y a seulement une direction droite pour insérer la carte SD dans le compartiment. Ne jamais forcer la carte dans le compartiment, il peut endommager la carte SD. Note: La carte micro SD doit être formaté avant la prise de photo. Regardez les sections suivantes pour plus d’informations. Formatage de la mémoire ou de la carte SD 1. Appuyez sur le bouton menu ( ) en mode PHOTO ou VIDEO. 2. Sélectionnez le mode en appuyant sur le bouton droit.. 3. Sélectionnez l’icône format en appuyant sur le bouton W( ) et appuyez sur le bouton SHUTTER pour confirmer. 4. Sélectionnez la mémoire interne ou la carte SD et confirmer avec le bouton SHUTTER. Zoom in et out Le caméra peut agrandir 8 fois. Zoom in ou out en appuyant sur le bouton haut ou bas, un nombre sera affiché sur l’afficheur, 8.x est de rapport maximal. Lecture de photos 1. 2. Apppuyez sur le bouton ( ) pour entrer dans le mode de lecture. la dernière photo ou vidéo pris sera affichée. Utilisez les boutons gauche ou droit pour défiler la photo ou le vidéo. 3. en plein écran, appuyez sur le bouton T( ) pour agrandire la photo. 4. Pour voir les images en timbre, appuyez sur le bouton W( ). 5. Pour passer au mode zoom-in, apuyez sur le bouton SHUTTER, puis, utilisez les boutons haut/pain/gauche/droit. 6. Appuyez sur le bouton MENU ( ) dans le mode de lecture, appuyez encore pour maintenir jusqu’ç ce que les options de menu s’affichent. Sélectionnez SLIDE SHOW et sélectionnez le temps d’affichage désiré. Appuyez sur le bouton SHUTTER pour confirmer. Les images sauvegardées dans votre caméra ou votre carte micro SD seront affichés selon l’ordre automatiquement. Pour arrêter l’affichage, appuyez sur le bouton SHUTTER encore. Lecture des vidéo 1. Lors de la lecture de vidéo, appuyez sur le bouton SHUTTER pour démarrer la lecture de vidéo et appuyez encore pour pause de lecture. 2. Appuyez sur le bouton droit pour avancer rapidement ou appuyez sur le bouton gauche pour rembobiner. 3. Appuyez sur le bouton pour arrêter. 4. Appuyez sur le bouton mode pour quitter. Effacer photos et vidéo Vous pouvez effacer une photo/vidéo, ou effacer toutes les photos/vidéo dans la mémoire. Respectez les instructions suviantes pour effacer une photo. 1. Appuyez sur le bouton ( ) pour entrer dans le mode de lecture. 2. Appuyez sur le bouton pour sélectionner la photo/video pour effacer. 3. Appuyez sur le bouton MENU/effacer( )et sélectionnez “Effacer cette photo (Video)” ou “Tout” . 4. Appuyez sur le bouton SHUTTER, puis, sélectionnez OK pour confirmer. 5. Appuyez sur le bouton mode pour quitter. NOTE: Sélectionner “Tout” et appuyez sur le bouton SHUTTER pour confirmer, toutes les photos et vidéos seront effacés. Connecter à un PC L’unité peut être connecté à un ordinateur comme un appareil de stockage compact et transférer des fichiers photo/video pour stockage. Conoce tu cámara Diseño a prueba de agua de 3M Con resolución de 16.0 Mega pixeles Cámara de fotos digitales Cámara de vídeo digital Luz de flash incorporada Zoom digital 8x Pantalla de color de 2.4" TFT Compatibilidad con tarjetas de micro SD Dos pilas alcalinas AAA Detección de sonrisas Captura anti-agitación 720P motion/Jpg Requisitos de sistema Sistema Operativo CPU RAM Interfaz CD Windows XP / Vista / 7 / 8 o superior Mac 9.x o X.x Pentium III o superior Por lo menos de 64MB Puerto USB Velocidad 4x CD ROM o superior Partes funcionales 1 2 3 4 5 6 7 8 9 Obturador Botón de on/off Gancho de correa Luz de flash Lente Indicador ocupado Botón de Macro Pantalla LCD ARRIBA 10 11 12 13 14 15 16 17 18 Abajo Izquierda / luz de Flash Derecho / Reproducción Modo Menú / Eliminar Conector de trípode Ranura para tarjeta de micro SD Interfaz USB Compartimento de la batería Explicación del estado de los iconos Punto 1 2 3 4 5 6 7 8 Función Modo seleccionado Indicador de flash Autodisparador ISO Fotografía / Contador de vídeo Resolución Seleccionado Calidad de fotografías Indicación de tarjeta micro SD Punto 9 10 11 12 Función Anti-agitación Modo indicador Normal / Macro Indicador de la pila Valor de exposición 13 Balance de blanco 14 15 Modo de escena Detección de sonrisas 16 Indicador de zoom Instalando las pilas 1. 2. 3. Abra la cubierta de las pilas. Inserte 2 pilas alcalinas AAA en la cámara. Cierre la puerta de la batería. Insertando la tarjeta de memoria (no incluida) Siga las siguientes instrucciones para insertar la tarjeta opcional de memoria de micro SD en la cámara. 1. Primero apague la cámara. 2. Abra la puerta de la batería. 3. Inserte la tarjeta SD en la cámara. Nota: Sólo hay una dirección correcta para insertar la tarjeta de memoria de micro SD en la ranura. No fuerce la tarjeta en la ranura de la tarjeta de memoria, es posible que la tarjeta de memoria de cámara y micro SD. Nota: La tarjeta de memoria de micro SD debe ser formatada antes de tomar fotografías. Vea las secciones siguientes para más información. Formateando la memoria o tarjeta SD 1. 2. 3. 4. 2. Pulse el botón de menú( ) en el modo de FOTO o VÍDEO. Seleccione el modo de configuración pulsando el botón de la derecha. Seleccione el icono de formato pulsando el botón W ( ) y pulse el botón OBTURADOR para confirmarlo. Seleccione la memoria interna o la tarjeta SD y confirme con el botón OBTURADOR. 1280 x 960), 3M (2048 x 1536), 5M (2560 x 1920), 8M (3264x2448), 12M (4032 x 3024) Se mostrará seis diferentes resoluciones. Seleccione la resolución que desee con el botón arriba o abajo y pulse el botón OBTURADOR para confirmar la selección. Ampliar y alejar La cámara se puede ampliar hasta 8 veces. Acercar o alejar pulsando el botón hacia arriba o abajo, un número aparecerá en la pantalla, 8.x es el máximo de zoom. Reproducción de fotografías 1. Pulse el botón ( ) para entrar en modo de reproducción. 2. La última clip de imagen o de vídeo tomada se mostrará. Use los botones izquierda o derecha para hojear las fotos o vídeos 3. En la visualización a pantalla completa, pulse el botón T( ) para ampliar la foto. 4. Para ver las imágenes en miniatura, pulse el botón W( ). 5. ra cambiar la imagen en el modo de ampliar, pulse el botón OBTURADOR, y utilice las flechas arriba / abajo / izquierda / derecha. 6. Pulse el botón MENU ( ) en el modo de Reproducción, pulse de nuevo y mantiene el botón MENU hasta que las opciones de menú que aparece. Seleccione PRESENTACIÓN DE DIAPOSITIVAS y seleccione el tiempo de presentación de diapositivas. Pulse el botón OBTURADOR para confirmar. Las imágenes guardadas en su cámara o su tarjeta micro SD se mostrará en la secuencia de forma automática. Para detener la presentación de diapositivas, presione nuevamente el botón OBTURADOR. Reproducción de clips de vídeo 1. 2. 3. 4. Cuando se muestran las clips de vídeo, pulse el botón OBTURADOR para iniciar la reproducción del vídeo y pulse el botón OBTURADOR para detener la reproducción. Presione el botón derecho para avanzar rápido o presione el botón izquierdo para rebobinar. Pulse el botón de abajo para detener. Pulse el botón de modo para salir. Eliminar clips de fotografías y video Puede borrar una sola fotografía / vídeo, o borrar todas las clips de fotografías y vídeo en la memoria. Siga las siguientes instrucciones para borrar la fotografía. 1. Pulse el botón ( ) para entrar en el modo de reproducción. 2. Pulse el botón izquierdo o derecho para seleccionar la fotografía / vídeo que desee eliminar. 3. Pulse el botón MENU / borrar ( ) y seleccione "Eliminar esta imagen (Video)" o "Todo". 4. Pulse el botón OBTURADOR, y seleccione Aceptar para confirmarlo. 5. Pulse el botón de modo para salir. NOTA: Seleccione "Todos" y presione el botón OBTURADOR para confirmar, todas las fotos y videos serán eliminados. Conexión a un PC La unidad puede ser conectada a la computadora como dispositivo de almacenamiento y transfiere el archivo de foto o vídeo a su almacenamiento. FCC (Federal Communications Commission) This device complies with Part 15 of the FCC Rules. Operation is subject to the following two conditions: (1) This device may not cause harmful interference, and (2) this device must accept any interference received, including interference that may cause undesired operation. Windows® and Windows® Vista® are registered trademarks of Microsoft Corporation. Mac OS® is a registered trademark of Apple Inc. App StoreSM is a service mark of Apple Inc. All trademarks are the property of their respective owner. DC-ST1624-VP_Manual_14-0604-
 1
1
-
 2
2
-
 3
3
-
 4
4
-
 5
5
-
 6
6
-
 7
7
-
 8
8
-
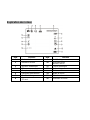 9
9
-
 10
10
-
 11
11
-
 12
12
-
 13
13
-
 14
14
-
 15
15
-
 16
16
-
 17
17


VuPoint DC-ST1624-VP Guía de inicio rápido
- Categoría
- Cámaras de deportes de acción
- Tipo
- Guía de inicio rápido

