
TQZH751
U/V Tuner Board with MATE I/F
Operating Instructions
Before connecting, operating or adjusting this product, please read these
instructions completely. Please keep this manual for future reference.
Español
Tarjeta de sintonizador U/V con MATE I/F
Manual de instrucciones
Antes de conectar, utilizar o ajustar este producto, lea completamente este manual de
instrucciones; y guárdelo para consultarlo en el futuro en caso de ser necesario.
English
Model No.
TY-FB9TU

2
English
Table of Contents
Features
Features .................................................................. 2
FCC STATEMENT ................................................... 2
Safety Precautions ................................................. 3
Handling Cautions ................................................. 3
Accessories ............................................................ 3
Remote Control Batteries..................................... 3
Connection ............................................................. 4
Installation. ........................................................... 4
Antenna Connection ............................................ 4
Connection of external equipment ....................... 5
The remote control................................................. 6
Watching TV programs .......................................... 7
ASPECT mode ........................................................ 8
Changing the initial settings ................................. 9
PICTURE menu ................................................... 9
AUDIO menu........................................................ 9
CHANNELS menu ............................................. 10
TIMER menu ...................................................... 10
LOCK menu ....................................................... 10
SET UP menu .................................................... 11
Replicating the settings - CLONE BOX .............. 13
Selecting the master TV settings ....................... 13
Uploading the master TV’s settings into
the Clone Box (LEARN) ........................... 13
Downloading the settings into another TV (TEACH) ...
14
Switching between the normal TV mode
and the HOTEL mode .............................. 14
Resetting all the settings to Factory Preset ....... 14
Troubleshooting Guide ........................................ 15
Specifications ....................................................... 15
Can receive terrestrial analog broadcasting
You can install the U/V Tuner Board with MATE I/F TY-FB9TU in the slot of the display and receive
terrestrial analog broadcasting.
Can connect various kinds of video equipment
The option board can be installed in the PG, PR Series plasma displays.
* As for the applicable models, refer to the manual of the display.
FCC STATEMENT
FCC STATEMENT
This device is verified to comply with part 15 of the FCC Rules for use with cable television service.
FCC CAUTION:
Pursuant to 47CFR, Part 15.21 of the FCC rules, any changes or modifications to this monitor not expressly
approved by Panasonic Corporation of North America could cause harmful interference and would void
the user’s authority to operate this device.
Model No. TY-FB9TU
Responsible Party: Panasonic Corporation of North America
One Panasonic Way, Secaucus, NJ 07094
Contact Source: Panasonic Broadcast & Television Systems Company
1-800-524-1448
email: [email protected]

3
English
MATE
Safety Precautions (Be sure to observe)
WARNING
• Never attempt to disassemble or modify this product.
To avoid fire, shock, or failure.
• If you sense smoke, an odd odor, or unusual noises while in operation, immediately unplug the display.
Switch off the display and unplug the power cord plug from the supply outlet.
To avoid fire or shock, do not leave the power of the display turned on.
• To avoid shock or other problems, do not leave the power cord plug plugged into the supply outlet.
Handling Cautions
• Do not touch connector contacts with hands directly.
To avoid electrostatic damage to internal parts, before handling this product touch a large metallic object such as a
steel cabinet to discharge yourself.
• Be sure to use the supplied cable or specified parts for interconnection.
To avoid malfunction or failure, do not use parts other than those recommended.
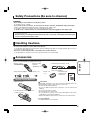
Accessories
Please check and identify the supplied accessories.
• Remote control
N2QAFB000003
• Terminal function label (1 sheet)
(Affix this label to the applicable slot of the rear
panel of the display.)
• F-type antenna adapter • Screw ( × 4)
For 5C ( × 1) For 4C ( × 1)
1. Open the cover.
2. Insert batteries. Note the correct
polarity (+ and
-
).
AA size
Remote Control Batteries
• Ferrite core
( × 1)
• Terminal Board
Replacement
Instructions
• Remote control
batteries
(AA Battery × 2)
Precautions
Mishandling of batteries can cause electrolyte leakage which can
damage items the fluid contacts and may cause a fire.
• Do not mix old and new batteries.
• Do not use different types at the same time. (ex. zinc carbon and
alkaline)
• Do not heat or expose to flame.
• Do not take apart or short circuit.
• Do not attempt to recharge, short-circuit, disassmble, heat or burn
used alkaline or manganese batteries.
• Replace the batteries if the remote control does not work properly.
For your reference
Use alkaline batteries for longer life.
• Please contact our designated service department for installation or change of this Product.
To Service personnel:
Before removing or installing the Terminal Board, be sure to turn power of the display off and unplug the
power cord plug from the supply outlet.

4
English
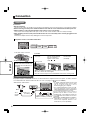
Antenna Connection
VHF Antenna UHF Antenna
75 Ω
Coaxial
Cable
Ferrite core
(included)
Ferrite core
(included)
F-type antenna
adapter (included)
Note
• To obtain optimum quality picture and
sound, an Antenna, the correct cable
(75 Ω coaxial) and the correct
terminating plug are required.
• If a communal Antenna system is used,
you may require the correct connection
cable and plug between the wall Antenna
socket and your television receiver.
• Your local television service center or
dealer may be able to assist you in
obtaining the correct Antenna system for
your particular area and the accessories
required.
• Any matters regarding Antenna installation,
upgrading of existing systems or
accessories required, and the costs
incurred, are your responsibility.
For proper reception of VHF/UHF channels, an external antenna is required. For best reception, an outdoor antenna
is recommended. The antenna mode must be set to “TV” (see page 11, SET UP menu
-
MODE).
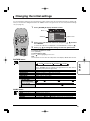
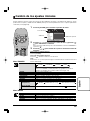
Connection
1.Remove the
slot cover.
2.Insert the terminal board
until it is firmly plugged
into the connector.
Tighten screws in the
order 1
-
4 .
3.Affix the terminal
function label
(included).
To install
75 Ω VHF/UHF
Remove the slot cover. Grip the
handle of the terminal board, and
slowly pull out in the direction of
the arrow.
To remove
• Make sure that the Board does not ride on the two lower claws.
• Be sure to fasten all screws tightly.
•
Have the customer keep the removed Terminal Board for future servicing needs.
Mixer
Securing screw
MATE
Compatible slot Nos. are SLOT2 and SLOT3.
Precautions
• Before installation
T
urn the power switch off and disconnect the plug of the display. Disconnect all the plugs connected to the display.
• Before removing, turn the power off with the tuner board’s remote control and then turn the main power off.
• When installing or removing the terminal board, exercise care to avoid injury.
There may be some sharp-pointed solder joints on the rear side of the board that could cause unexpected injury.
• When installing the board, fully insert the Board into the slot horizontally until it is firmly plugged into the
connector.
N
ote that incomplete insertion may damage the internal components.
Foam mat or thick soft cloth
SERIALPC IN
AUDIO
Installation
SLOT3
3 slots model
SLOT1
SLOT2

5
English
MATE
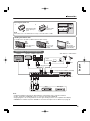
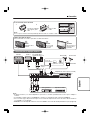
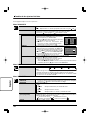
Connection
Note
• Peripheral equipment and optional cables/adapters sold separately unless otherwise indicated.
• S-video signal input (S VIDEO IN) is prior to composite signal input (VIDEO IN).
• A light gun game console using CRT TV’s electron-gun scanning system is not compatible with a display.
• VIDEO OUT is available only when “VIDEO1” is selected as the input source for INPUT 2 (see page 6).
Display
Monitor
VHF Antenna
UHF Antenna
Connection of external equipment
F-type antenna adapter (included)
VCR DVD player
To avoid noise in the video, hold the antenna cable correctly.
Route away from
the display.
Do not route
close to the
display.
Do not pass
around the front
of the display.
Mixer
Handling the antenna cable
Back Back Front
Mate Box Clone Box
Digital
interface port
1
2
Attaching the ferrite core
Pull back the tabs
(in two places) to
open.
Put the cable
and close.
Note
If the ferrite core is not attached, noise may occur in the video or audio.
Less than 10 cm (4”)
Mini-plug (M3) stereo
Amplifier to speaker system

6
English
POWER
MUTE
RECALL
ASPECT
SAP
R-TUNE
TV/VIDEO INPUT
ACTION
CH
CH
VOL VOL
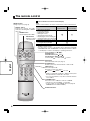
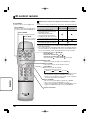
POWER button
Turn the display ON or OFF.
RECALL button
Display the channel, the audio
mode, the remaining time of SLEEP
timer, etc.
ASPECT button
Change aspect (see page 8).
The remote control
Cursor buttons ( , , , ),
ACTION button
Channel buttons (CH , CH )
Volume buttons (VOL , VOL )
Increase (VOL ) or reduce (VOL ) volume.
MUTE button
Mute the sound or
cancel the mute.
TV/VIDEO button
Select the source of INPUT 2 from TV or VIDEO1.
• This does not work for INPUT 1 or PC input.
• To give a label or to skip VIDEO1 input (see page 10,
CHANNELS menu
-
INPUT LABEL)
INPUT button
Select the input mode.
Each time you press the button:
• SLOT 1 corresponds to INPUT 1, SLOT 2 and 3 (Tuner
board) to INPUT 2 and PC IN to PC input.
∗ You can select INPUT 1 only when a terminal board is
set to SLOT 1.
Numbered buttons
SAP button
Select the audio mode (see page 7).
R-TUNE button
Return to previously viewed channel or video mode.
PC inputINPUT 1 INPUT 2
Control reference of Tuner board and Display
Note
For the common features, be sure to use the remote control of Tuner board.
• You cannot select the source of INPUT 2 (TV or VIDEO1) with the
display’s remote control.
• Use the remote control of the display when adjusting “PICTURE
POSITION/SIZE” and “SURROUND” on the display. Refer more details
of the display’s controls to the display’s operating instructions.
• Watching TV programs
• Tuning TV channels
• Adjusting the volume
• Muting the sound
• Selecting the aspect mode
• Displaying the current setting etc.
•
Selecting the input mode of Tuner board
•
Displaying the current setting etc. of Display
•
Selecting the input mode of Display
• Turning the display On/Off
The remote control
of Tuner board
The remote
control of Display

7
English
POWER
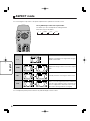
Press [MUTE].
• “MUTE” appears on the display.
• Press [MUTE] again to cancel mute.
Press [SAP].
Each time you press the button:
∗
SAP: Secondary Audio Program
Note
• The setting is available when displayed in red, and not available
when displayed in white.
• To change the external audio input mode, select the setting
on the connected equipment.
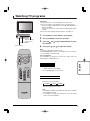
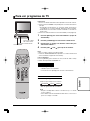
Watching TV programs
Preparation
1. Connect the power cord of the display to the wall socket.
2. Press Power button on the display to turn on the main power.
• The power indicator lights (Green: Power ON, Red: Standby, No
light: Power OFF).
• You can use the remote control when the indicator lights Green
or Red.
3. Select the menu language in SET UP menu (see page 11).
1 Press [INPUT] to select INPUT 2 (tuner board).
2 Press [TV/VIDEO] to select the TV mode.
3 Press [CH , CH ] or the numbered buttons to select
the channel.
4 Press [VOL , VOL ] to adjust the volume.
For your reference
Press [RECALL] to display the channel, the audio mode, the
remaining time of SLEEP timer, etc.
Note
• Lower the volume when howling occurs.
•“AUTO POWER OFF” feature of the display does not work when
you select INPUT 2 (tuner board).
Power button
Power indicator
To mute the sound
To select the audio mode
Remote control
signal sensor
POWER
ASPECT
R-TUNE
TUNER
RECALL
ACTION
CH
CH
VOL VOL
INPUTTV/VIDEO
MUTE
SAP
MONOSTEREO SAP

8
English
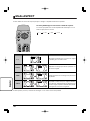
You can change the aspect ratio so the picture expands to the optimum size to fill the screen.
Press [ASPECT] to select the aspect mode.
The modes you can select depend on viewing materials.
Each time you press the button:
ASPECT mode
Displays a 4:3 image in the original ratio with gray
bands on both sides.
Expands an image to fill the screen in the original
ratio.
Laterally stretches a 4:3 image to fill the screen.
The video is enlarged in the horizontal direction to
fill the screen. The original aspect ratio is maintained
near the center, while the video is stretched out
more as it approaches either side of the screen.
The result is an image with less incongruity.
Mode
Picture Explanation
4 : 3
FULL
JUST
ZOOM
Note
You can adjust the picture position and size only with the display’s remote control.
JUST
4
3 9
16
FULL
4
3
16
9
4 : 3
3
4
ZOOM
4
3
16
9
R-TUNE
RECALL
SAP
INPUTTV/VIDEO
ACTION
CH
CH
VOL VOL
MUTE
POWER
ASPECT
JUSTFULLZOOM4 : 3

9
English
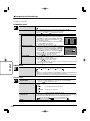
Select the picture mode.
Note
Select “CINEMA” when the side bars (the gray bands on the both sides of
4:3 picture) flash (alternate gray/white).
Adjust the color intensity.
Adjust natural flesh tones.
Adjust the brightness in dark areas of picture.
Adjust white balance of picture.
Adjust clarity of outline detail.
Reset all the picture adjustments to factory preset.
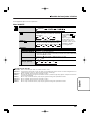
1 Press [ACTION] to display the menu screen.
2 Press [ , ] to select the menu icon, and press [ , ] to select
the submenu.
To select the submenus not displayed, select “OTHER ADJ.” and press [ ].
3 Press [ , ] to change the settings or enter the option menu.
Changing the initial settings
You can change the settings to suit your preferences and to suit the unit to the environment in which it is being used.
Then you can clone the setting and switch to the “HOTEL” mode so the guest users can access the particular settings
only (see page 14).
To return to the previous screen
Press [ACTION].
To exit the menu screen
Press [ ] while highlighting a menu icon.
Note
This feature does not work for the sub picture of the display’s “MULTI PIP” function.
POWER
MUTE
ASPECT
SAP
R-TUNE
RECALL
ACTION
CH
CH
VOL VOL
INPUTTV/VIDEO
PICTURE
PIC MODE
COLOR
TINT
BRIGHTNESS
PICTURE
SHARPNESS
NORMAL
OTHER ADJ.
VIVID
:
EXIT
:
SUB MENU
SET
Submenu
Menu icon
Option menu
AUDIO menu
MODE (see page 7)
BASS
TREBLE
BALANCE
NORMAL
STEREO / SAP / MONO
Adjust the bass response.
Adjust the treble response.
Adjust the left ( )/ right ( )speaker volume balance.
Reset BASS, TREBLE and BALANCE adjustments to factory preset.
PICTURE menu
PIC MODE
COLOR
TINT
BRIGHTNESS
PICTURE
SHARPNESS
NORMAL
OTHER ADJ.
COLOR TEMP
(Color temperature)
3D Y/C FILTER
STANDARD CINEMAVIVID AUTO
NORMAL WARM (Increases red) COOL (Increases blue)
ON
(Minimize noise and cross color in the picture)
OFF

10
English
Changing the initial settings
See page 9 for operation.
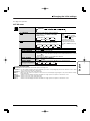
TIMER menu
SLEEP Set the sleep time.
Note
• When you set the sleep time on the display or another installed terminal
board too, the display turns off at the earliest sleep time.
•
The sleep time information may not be displayed when you select another input mode.
NO 30 (min.) 60 (min.) 90 (min.)
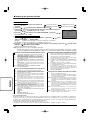
CHANNELS
A&E
AMC
BET
BRAVO
CNBC
CNN/SI
COMEDY
COURT
PRESS ACTION TO RETURN
PRESET CAPTION
ABC
CBS
FOX
NBC
PBS
CNN
ESPN
HBO
PRESS FOR MORE CHANNELS
CHANNELS menu
CH. SCAN
FAVORITES
OTHER ADJ.
PRESET CAPTION
MANUAL CAPTION
INPUT LABEL
FAV : Enter up to 16 favorite channels.
ALL : Scan all channels you can select using [ CH , CH ].
Add or delete the 16 favorite channels.
1. Press the numbered buttons to select the channel.
2. Press [ ] to add or [ ] to delete the channel.
Give preset captions to the channels.
• You have to delete the previously set MANUAL
CAPTION to replace it by PRESET CAPTION.
1. Press [ ] to enter the menu and press [ , ]
to select the caption.
2. Press the numbered buttons to select the channel
corresponding to the caption.
• To delete the channel, press [ ] .
Set channel captions manually (up to 8 charactors).
• You have to delete the previously set PRESET
CAPTION to replace it by MANUAL CAPTION.
1.
Press [ ] to enter the menu and press [ , ]
or the numbered buttons to enter the channel.
2. Press [ , ] to select “ENTER CAPTION”.
3. Press [ , ] to select the character.
• Press [ , ] to move the cursor.
Give the label (up to 8 characters) to VIDEO1 input.
1. Press [ ] to enter the menu.
2. Press [ , ] to select the character.
• Press [ , ] to move the cursor.
• To skip VIDEO1 input, move the cursor to the left-most position and
press [ ] to select “SKIP”.
CHANNELS
ENTER CHANNEL 10
ENTER CAPTION
PRESS ACTION TO RETURN
MANUAL CAPTION
TO MOVE CURSOR
TO SELECT CHARACTER
LOCK menu
CREATE CODE FIRST/
ENTER CODE
LOCK SET
V-CHIP SET
(see page 12)
CODE
Enter the secret code to display LOCK menu. (Do not forget the code.)
Press the numbered buttons to enter the secret code (4 digit).
• Press [ , ] to reenter the code.
Limit viewing.
OFF
GAME : Lock CH3, CH4 and Video input.
CHANNEL : Lock up to 4 channels.
ALL : Lock all channels and video inputs.
The V-CHIP uses the two rating systems, MPAA (MOTION PICTURE) and
TV PARENTAL GUIDELINES, which block out programs following the rating
information in the XDS data packets from broadcasting stations.
Change the secret code.
U.S. TV PROGRAMS
CANADIAN ENGLISH
U.S. MOVIES
CANADIAN FRENCH

11
English
Changing the initial settings
See page 9 for operation.
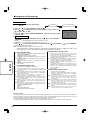
CAPTION OFF Recommended mode when Closed Caption is not being used.
CAPTION C1 For video related information that can be displayed (up to 4 lines of script strategically placed on the television screen so that it
does not obstruct relevant parts of the picture).
CAPTION C2 Another mode used for video related information.
TEXT T1 Blanks out a large portion of the picture on the television screen, and displays program guide or any other information currently
being transmitted.
TEXT T2 Another mode which displays information and blanks out a large portion of the picture on the television screen.
CAPTION C3 Another mode used for video related information.
CAPTION C4 Another mode used for video related information.
TEXT T3 Another mode which displays information and blanks out a large portion of the picture on the television screen.
TEXT T4 Another mode which displays information and blanks out a large portion of the picture on the television screen.
CLOSED CAPTIONS CHART
SET UP menu
IDIOMA / LANGUE
cc ON MUTE
cc MODE
OTHER ADJ.
MODE
AUTO PROGRAM
MANUAL PROGRAM
CHAN BANNER
ENERGY MGMT
(Energy management)
Select the menu language.
Display closed captions when muting the
sound. (Refer to “CLOSED CAPTIONS
CHART” below.)
Display closed captions constantly. (Refer to
“CLOSED CAPTIONS CHART” below.)
CABLE TV
Set the channels automatically.
Set the channels manually.
1. Press [ ] to enter the menu and press the numbered buttons to select
the channel.
2. Press
[ ]
to add or
[ ]
to delete the channel.
Display the CHANNEL BANNER.
ON OFF
Select how long the unit remains On when it is not being used.
ENGLISH
NO (OFF) C1 C2
C4
C3
OFF C1 C2 T1
C4T3T4 C3
T2
12NO ....15
Note
• Set “ cc MODE” to “OFF”
to activate “ cc ON MUTE”.
• Some programs do not
include closed captions.
• Closed captions are not
displayed when ASPECT
mode is “ZOOM” (see page
8).

12
English
Changing the initial settings
1. Press [ , ] to select the option menu.
2. Press [ , ] to select “SETTING” and press [ ].
3. Press [
, ] to highlight the option menu selected in step1, and press [ ,
] to select “ON” or “OFF”.
4. Press [
, ] to select “VIEW NR PROGRAMS?” and press [ , ] to select
“YES” or “NO”.
5. U.S. TV PROGRAMS only
Press [ , ] to select “SETTING” and press [ , ] to select “BASIC” or
“DETAILED”.
BASIC : General ratings such as TV-Y, TV-PG, etc only.
DETAILED : General ratings and content such as V, L, etc.
6. Press [ , ] to select the rating level (see below) and press [ ] to lock (RED) or [ ] to unlock (GREEN).
Repeat Step 6 for each rating.
Note • This function does not work with some movies.
• When the program exceeds the rating level, a blocking message appears. Enter the 4-digit secret code to view
the program. The secret code will be valid again when the display is turned off.
To set V-CHIP SET
Customer Caution
The V-Chip system that is used in this set is capable of blocking “NR” programs (non rated, not applicable and none) per FCC Rules
Section15.120(e)(2). If the option of blocking “NR” programs is chosen “unexpected and possibly confusing results may occur, and
you may not receive emergency bulletins or any of the following types of programming:”
• Emergency Bulletins (Such as EAS messages, weather warnings and others)
• Locally originated programming • News • Political • Public Service Announcements • Religious • Sports • Weather
NR Not Rated. SEE CUSTOMER CAUTION below.
TV-Y All children. The themes and elements in this program are
specifically designed for a very young audience, including children
from ages 2-6.
TV-Y7 Directed to older children. Themes and elements in this program
may include mild physical or comedic violence, or may frighten
children under the age of 7.
TV-G General audience. It contains little or no violence, no strong
language, and little or no sexual dialogue or situations.
TV-PG Parental guidance suggested. The program may contain infrequent
coarse language, limited violence, some suggestive sexual
dialogue and situations.
TV-14 Parents strongly cautioned. This program may contain
sophisticated themes, sexual content, strong language and more
intense violence.
TV-MA Mature audiences only. This program may contain mature themes,
profane language, graphic violence, and explicit sexual content.
FV FANTASY/CARTOON VIOLENCE
V VIOLENCE
S SEX
L OFFENSIVE LANGUAGE
D DIALOGUE WITH SEXUAL CONTENT
U.S. TV PROGRAMS RATINGS CHART
NR CONTAINS NO RATING (NOT RATED) AND NA (NOT
APPLICABLE) PROGRAMS.
G GENERAL AUDIENCES. All ages admitted.
PG PARENTAL GUIDANCE SUGGESTED. Material not be suitable
for children.
PG-13 PARENTS STRONGLY CAUTIONED. Material inappropriate for
children under 13.
R RESTRICTED. Under 17 requires accompanying parent or adult
guardian.
NC-17 NO ONE 17 AND UNDER ADMITTED.
X ADULTS ONLY.
U.S. MOVIES RATINGS CHART
E Exempt - Exempt programming.
G General - Programming intended for audience of all ages.
Contains no violence, or the violence content is minimal or
is depicted appropriately.
8 ANS+ 8+ General - Not recommended for young children.
Programming intended for a broad audience but contains
light or occasional violence. Adult supervision
recommended.
13ANS+ Programming may not be suitable for children under the
age of 13 - Contains either a few violent scenes or one or
more sufficiently violent scenes to affect them. Adult
supervision strongly suggested.
16ANS+ Programming may not be suitable for children under the
age of 16 - Contains frequent scenes of violence or intense
violence.
18ANS+ 18 ans +Programming restricted to adults. Contains
constant violence or scenes of extreme violence.
CANADIAN FRENCH RATINGS CHART
E Exempt - Exempt programming includes: news, sports,
documentaries and other information programming, talk
shows, music videos, and variety programming.
C Programming intended for children under age 8. No offensive
language, nudity or sexual content.
C8+ Programming generally considered acceptable for children
8 years and over. No profanity, nudity or sexual content.
G General programming, suitable for all audiences.
PG Parental Guidance suggested. Some material may not be
suitable for children.
14+ Programming contains themes or content which may not be
suitable for viewers under the age of 14. Parents are strongly
cautioned to exercise discretion in permitting viewing by pre-
teens and early teens.
18+ ADULTS ONLY
CANADIAN ENGLISH RATINGS CHART
VIEW NR PROGRAMS?
PRESS ACTION TO RETURN
U. S MOVIES
LOCK
OFF
YES
G
PG
PG-13
R
NC-17
X
U.S. TV PROGRAMS
CANADIAN ENGLISH
U.S. MOVIES
CANADIAN FRENCH

13
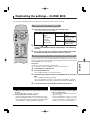
English
Replicating the settings
-
CLONE BOX
The Clone Box (separately purchased) replicates the settings of the master TV into other TVs.
1 Select the settings of the master TV (see pages 9-12).
You can replicate the following settings.
2 Press [ CH , CH ] or the numbered buttons to select the initial
channel you would like to display at power ON (ex. self-advertising
channel).
3 Press [ VOL , VOL ] to select the volume level which will be
the maximum volume in the HOTEL mode (see page 14).
Be sure to set the TV to the normal TV mode before uploading. If not in the normal
TV mode, change the mode referring to “Switching between the normal TV mode
and the HOTEL mode” (see page 14).
Preparation
• Connect the master TV display to the AC outlet.
• Connect the Clone Box to the MATE terminal on the tuner board.
1 Turn the master TV display on.
2 Turn the Clone Box on.
The red and green LEDs on the Clone Box flash.
3 Hold down [ALT] button and press [LEARN] button on the Clone
Box.
• The red LED flashes during uploading.
• The green LED lights for approx. 2 seconds when uploading is completed.
•
After uploading, the master will be automatically switched into the HOTEL mode.
4 Turn the main power of the display and the Clone Box off.
Selecting the master TV settings
Uploading the master TV’s settings into the Clone Box (LEARN)
POWER
ASPECT
R-TUNE
RECALL
ACTION
CH
CH
VOL VOL
INPUTTV/VIDEO
MUTE
SAP
Menu Submenu Menu Submenu
PICTURE PIC MODE AUDIO BASS
COLOR TREBLE
TINT CHANNELS PRESET CAPTION
BRIGHTNESS MANUAL CAPTION
PICTURE INPUT LABEL
SHARPNESS SET UP AUTO PROGRAM
COLOR TEMP MANUAL PROGRAM
ENERGY MGMT
1. Insert a slender tool about 3/4 inch (ex. a paper clip) into
[AMS] hole on the Clone Box to switch the TV to the normal
TV mode.
The green LED lights for approx. 2 seconds.
2. Press [TEST] button on the Clone Box.
• The red and green LED flash alternately during checking.
• The green LED lights for approx. 2 seconds when the settings
replicated in the Clone Box correspond to the master TV settings.
If the red LED does not light, upload the settings again.
1. Turn the Clone Box on.
2. Hold down [ALT] button and press [TEST]
button on the Clone Box.
• The red and green LEDs flash alternately
during checking.
• The green LED lights for approx. 2 seconds
when the battery has enough remaining
power. If the LEDs do not light, replace the
battery to new one (use a 9-volt battery).
To check the settings uploaded into the Clone Box To check the Clone Box’s battery

14
English
Preparation
• Connect the TV display to the AC outlet.
• Connect the Clone Box to the MATE terminal on the tuner board.
Resetting all the settings to Factory Preset
1. Turn the display on.
2. Turn the Clone Box on.
The red and green LEDs on the Clone Box flash.
3. Insert a slender tool about 3/4 inch (ex. a paper clip) into [AMS] hole on the Clone Box.
The green LED lights for approx. 2 seconds.
4. Press [SAP], [ASPECT] and press and hold [TV/VIDEO] for approx. 3 seconds.
All settings will return to the default values.
5. Turn the main power of the display and the Clone Box off.
Replicating the settings
-
CLONE BOX
When you used the Clone Box
Insert a slender tool about 3/4 inch (ex. a paper clip) into [AMS] hole on the Clone Box.
The green LED lights for approx. 2 seconds.
When you switch the mode with the remote control
Press [SAP], [ASPECT], and then press and hold [MUTE] for approx. 3 seconds.
Press the next button within a second.
To enter or exit the HOTEL mode menu
Press [ACTION] to enter and press again to exit.
HOTEL mode menu
SET UP menu
• SLEEP (see page 10)
• cc MODE (see page 11)
• MODE (see page 9)
• VIDEO (see page 11, MODE)
• V-CHIP SET
Does not appear in the initial setting. To display, press
[SAP], [ASPECT] and then press and hold [RECALL]
for approx. 3 seconds.
LOCK menu
To display, press [ ] while highlighting “V-CHIP SET”
in SET UP menu (see left).
• CREATE CODE FIRST / ENTER CODE (see page
10)
• V-CHIP SET (see pages 10, 12)
• CODE (see page 10)
• HOW LONG? : 12HOURS (Fixed)
The settings selected in HOTEL mode returns to the
initial settings after 12 hours.
Switching between the normal TV mode and the HOTEL mode
Downloading the settings into another TV (TEACH)
Be sure to set the TV to the normal TV mode before downloading. If not in the normal TV mode, change the mode
referring to “Switching between the normal TV mode and the HOTEL mode” (see below).
Preparation
• Connect the receiving TV display to the AC outlet.
• Connect the Clone Box to the MATE terminal on the tuner board.
1 Turn the receiving TV display on.
2 Turn the Clone Box on.
The red and green LEDs on the Clone Box flash.
3 Press [TEACH] button on the Clone Box.
• The green LED flashes during downloading.
• The green LED lights for approx. 2 seconds when downloading is completed.
• After downloading, the receiving TV will be automatically switched into the HOTEL mode.
4 Turn the main power of the display and the Clone Box off.
Repeat the steps above to download to other TVs.

15
English
TY-FB9TU
VHF-12 : UHF-56 : Cable-125
AV INPUT VIDEO (RCA PIN JACK TYPE) 1.0 Vp-p (75 Ω)
S VIDEO (Mini DIN 4-pin) Y : 1.0 Vp-p (75 Ω), C : 0.286 Vp-p (75 Ω)
AUDIO L-R (RCA PIN JACK TYPE) 0.5 Vrms
AV OUTPUT VIDEO (RCA PIN JACK TYPE) 1.0 Vp-p (75 Ω)
∗ Cannot output UHF/VHF signals.
AUDIO L-R (M3 JACK TYPE) 0.5 Vrms
Digital interface port (MATE) RJ-11C
N2QAFB000003
approx. 160 g (5.6 oz)(including batteries)
approx. 7 m (23 feet) directly in front of the unit
Specifications
U/V Tuner Board with MATE I/F
Remote control
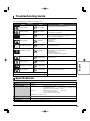
Troubleshooting Guide
Before reguesting service, make the following checks.
Adjust Antenna Location and Connection.
Adjust Antenna Location and Connection.
Check Antenna Lead-in Wire.
Move television away from Electrical Appliances, Lights,
Vehicles and Medical Equipment.
Increase Volume.
Check Mute.
Change Channel.
Set TV or Cable Mode Properly.
Check Antenna Cables.
Check Power Cord is Plugged into Active Outlet.
Adjust Brightness and Audio Controls.
Change Channel.
Check Cable Connections.
Check Second Video Source Operation.
Adjust Color Settings.
Change Channel.
Check Audio is set to stereo or Mono, not to SAP.
Change CC (Closed Captioning).
Replace Remote Control Batteries.
Check if the board is installed in the compatible slot.
Black Box on Screen
Intermittent Remote Control Operation
Snowy Video
Multiple Image
Interference
Normal Video
No Video with Snow
No Video / No PIP
No Color
Normal Video
Normal Video
Noisy Audio
Noisy Audio
Noisy Audio
No Audio
Noisy Audio
No Audio
Normal Audio
Wrong Audio
Normal Audio
Normal Audio
Symptoms
VIDEO AUDIO
Solutions
Model No.
Channel Capability-181
Connection Terminals
Model No.
Mass (weight)
Operating range
No Channel Control

16
Español
Índice
Características
Características ..................................................... 16
Precauciones para su seguridad ........................ 17
Cuidados para el manejo..................................... 17
Accesorios ............................................................ 17
Pilas del control remoto ..................................... 17
Conexión ............................................................... 18
Instalación .......................................................... 18
Conexión de la antena ....................................... 18
Conexión de un equipo externo ......................... 19
El control remoto ................................................. 20
Para ver programas de TV................................... 21
Modo ASPECT ...................................................... 22
Cambio de los ajustes iniciales .......................... 23
Menú IMAGEN ................................................... 23
Menú AUDIO ...................................................... 23
Menú CANALES ................................................ 24
Menú CRONOMETRO....................................... 24
Menú BLOQUEO ............................................... 24
Menú AJUSTE ................................................... 25
Repetición de los ajustes - CAJA DE CLONACIÓN ...
27
Selección de los ajustes del TV maestro ........... 27
Descarga de los ajustes del TV maestro en la
caja de clonación (APRENDER) .............. 27
Descarga de los ajustes a otro TV (ENSEÑAR) ...
28
Cambio entre el modo de TV
normal y el modo HOTEL ........................ 28
Reposición de todos los ajustes a los ajustes de fábrica ...
28
Guía para la solución de problemas .................. 29
Especificaciones .................................................. 29
Puede recibir emisiones analógicas terrestres
Puede instalar la tarjeta de sintonizador U/V con MATE I/F TY-FB9TU en la ranura de la pantalla y
recibir emisiones analógicas terrestres.
Puede conectar varios tipos de equipos de vídeo
La tarjeta opcional se puede instalar en las pantallas de plasma de las series PG y PR.
∗ En cuanto a los modelos aplicables, consulte el manual de la pantalla.

17
Español
MATE
Precauciones para su seguridad (Sígalas siempre)
ADVERTENCIA
• No intente nunca desmontar o modificar este producto.
Para evitar un incendio, descarga eléctrica o fallo.
• Si nota humo, un mal olor o ruidos extraños durante el funcionamiento, desenchufe inmediatamente la
pantalla.
Apague la pantalla y desenchúfela de la toma de corriente.
Para evitar un incendio o una descarga eléctrica, no deje conectada la alimentación de la pantalla.
• Para evitar descargas eléctricas u otros problemas, no deje enchufada la clavija del cable de alimentación
en la toma de corriente.
Cuidados para el manejo
• No toque directamente con las manos los contactos de los conectores.
Para evitar que la electricidad estática estropee las partes internas, antes de manejar este producto, toque un
objeto metálico grande como, por ejemplo, un armario de acero para descargarse usted mismo de la electricidad
estática.
• Asegúrese de utilizar los cables suministrados y las partes especificadas para hacer la interconexión.
Para evitar fallos del funcionamiento y otros problemas, no utilice otras partes diferentes de las recomendadas.
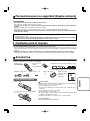
Accesorios
Verifique e identifique los accesorios suministrados.
• Control remoto
N2QAFB000003
• Etiqueta de funciones de terminales (1 hoja)
(
Fije esta etiqueta en el panel trasero de la pantalla.
)
•
Adaptador de antena tipo F
• Tornillo ( × 4)
para 5C ( × 1) para 4C ( × 1)
1. Abra la tapa.
2. Inserte pilas. Fíjese en las polaridades
(+ y
-
).
Tamaño AA
Pilas del control remoto
• Núcleo de ferrita
( × 1)
• Instrucciones de
reemplazo de la
tarjeta de
terminales
• Pilas del control
remoto
(2 × tamaño AA)
Precauciones
Maltratar las pilas puede causar fugas de electrólito, el cual puede dañar
los artículos que toca y causar un incendio.
• No mezcle pilas nuevas y viejas.
• No utilice tipos diferentes al mismo tiempo. (Ej.: carbón de zinc y
alcalinas)
• No las caliente ni acerque a las llamas.
• No las desmonte ni cortocircuite.
• No intente cargar, cortocircuitar, desarmar, calentar o quemar las pilas
alcalinas o de manganeso viejas.
• Reemplace las pilas si el control remoto no funciona bien.
Para su referencia
Use pilas alcalinas de larga duración.
•
Póngase en contacto con nuestro departamento de servicio designado para instalar o cambiar este producto.
Al personal de servicio:
Antes de retirar o instalar la tarjeta de terminales, asegúrese de desconectar la alimentación de la pantalla
y desenchufar la clavija del cable de alimentación de la toma de corriente.

18
Español
Conexión de la antena
Antena VHF Antena UHF
Cable
coaxial
de 75
ohmios
Núcleo de ferrita
(incluida)
Núcleo de ferrita
(incluida)
Adaptador de antena
tipo F (incluida)
Nota
•
Para obtener una imagen y sonido de calidad
óptima se necesita una antena, cable 75 Ω
coaxial) y clavija de terminación correctos.
• Si usa una antena comunal puede que
necesite el cable y la clavija de conexión
correctos entre el zócalo de la pared y su
receptor de televisión.
• Su centro de servicio de televisión o
concesionario puede ayudarle a obtener
el sistema de antena correcto para su zona
particular y los accesorios necesarios.
• Cualquier problema con la instalación de
la antena, mejora de los sistemas
existentes o accesorios adquiridos, y los
gastos incurridos, son su responsabilidad.
Para recibir correctamente los canales de VHF/UHF se necesita una antena externa. Para obtener la mejor recepción se
recomienda una antena exterior. El modo de antena deberá ponerse en “TV” (vea la página 25, MODO en el menú AJUSTE).
Conexión
1. Quite la tapa
de la ranura.
2. Inserte la tarjeta de
terminales hasta que
quede firmemente
enchufada en el conector.
Apriete los tornillos en el
orden 1 - 4 .
3.Fije la etiqueta de
funciones de
terminales
(incluida).
Para instalar
75 ohmios, VHF/UHF
Quite la tapa de la ranura. Sujete
el asa de la tarjeta de terminales
y sáquela lentamente en el
sentido de la flecha.
Para quitar
• Asegúrese de que la tarjeta no se monte en los dos ganchos inferiores.
• Asegúrese de apretar bien todos los tornillos.
•
Pida al cliente que guarde la tarjeta de terminales retirada por si resulta necesarias
para reparaciones futuras.
Mezclador
Tornillo de fijación
Instalación
Las ranuras compatibles son: SLOT2 y SLOT3.
Precauciones
• Antes de instalar
Desconecte la alimentación y desenchufe la pantalla. Desconecte todas las clavijas conectadas a la pantalla.
• Antes de quitar, dé vuelta a la energía apagado con el control del romote del sintonizador board’s y
entonces dé vuelta a la alimentación principal apagado.
• Cuando ponga o quite la tarjeta de terminales, tenga cuidado para no herirse.
En el lado trasero de la tarjeta puede haber uniones de soldadura puntiaguda que podrían causar heridas inesperadas.
•
Cuando instale la tarjeta, insértela horizontalmente a fondo en la ranura hasta que quede bien enchufada en el
conector.
Tenga en cuenta que la inserción incompleta puede dañar los componentes internos.
Estera de espuma o paño blando
SERIALPC IN
AUDIO
Modelo de 3 ranuras
SLOT1 SLOT3SLOT2
MATE

19
Español
MATE
Conexión
Nota
• El equipo periférico y los cables/adaptadores opcionales se venden separadamente a menos que se indique lo
contrario.
• La entrada de señal de vídeo S (S VIDEO IN) es anterior a la entrada de señal compuesta (VIDEO IN).
• Una consola de juegos de pistola de luz que usa un sistema de exploración de cañón electrónico de TV de CRT no
es compatible con una pantalla.
•
VIDEO OUT sólo está disponible cuando se selecciona “VIDEO1” como fuente de entrada para INPUT 2 (vea la página 20).
Pantalla Monitor
Antena VHF Antena UHF
Conexión de un equipo externo
Adaptador de antena tipo F (incluida)
Videograbadora
Reproductor DVD
Para evitar ruido en el vídeo, sujete bien el cable de la antena.
Alejándolo de la
pantalla.
No lo ponga
cerca de la
pantalla.
No lo pase por
delante de la
pantalla.
Mezclador
Manejo del cable de antena
Detrás Detrás Delante
Caja de
acoplamiento
Caja de
clonación
Puerto de
interfaz digital
1
2
Colocación del núcleo de ferrita
Tire de las lengüetas
(dos lugares) para
abrir.
Ponga el cable
y cierre.
Nota
Si no se pone el núcleo de ferrita pueden producirse ruidos en el vídeo o audio.
Menos de 10 cm (4”)
De amplificador a
sistema de altavoces
Miniclavija (M3)
estéreo

20
Español
POWER
MUTE
RECALL
ASPECT
SAP
R-TUNE
TV/VIDEO INPUT
ACTION
CH
CH
VOL VOL
Botón POWER
Enciende o apaga la pantalla.
Botón RECALL
Visualiza el canal, modo de audio, tiempo
restante del temporizador APAGADO, etc.
Botón ASPECT
Cambia el aspecto (vea la página 22).
El control remoto
Botones de cursor ( , , , )
Botón ACTION
Botones de canales (CH , CH )
Botones de volumen (VOL , VOL )
Aumentan (VOL ) o reducen (VOL ) el volumen.
Botón MUTE
Silencia el sonido o
cancela el silenciamiento.
Botón TV/VIDEO
Seleccione la fuente de INPUT 2 desde TV o VIDEO1.
• Esto no sirve para la entrada INPUT 1 o PC.
• Para poner una etiqueta o saltar la entrada VIDEO1 (vea la
página 24, PONGA TÍTULO en el menú CANALES)
Botón INPUT
Selecciona el modo de entrada.
Cada vez que presiona el botón:
• SLOT 1 corresponde a INPUT 1, SLOT 2 y SLOT 3 (tarjeta
de sintonizador) a INPUT 2 y PC IN a la entrada PC.
∗
Puede seleccionar INPUT 1 sólo cuando se ha configurado
una tarjeta de terminales para SLOT 1.
Botones numerados
Botón SAP
Selecciona el modo de audio (vea la página 21).
Botón R-TUNE
Para volver al canal o modo de vídeo anterior.
PC inputINPUT 1 INPUT 2
Referencia de controles de la tarjeta de sintonizador y pantalla
Nota
Para las funciones comunes, asegúrese de usar el control remoto de la tarjeta de sintonizador.
• No puede seleccionar la fuente de INPUT 2 (TV o VIDEO1) con el control
remoto de la pantalla.
• Use el control remoto de la pantalla cuando ajuste “Pos./Tamaño Imagen”
y “Sonido ambiental” en la pantalla. Para conocer más detalles de los
controles de la pantalla, lea el manual de instrucciones de la misma.
• Para ver programas de TV
• Sintonización de canales de TV
• Ajuste del volumen
• Silenciamiento del sonido
• Selección de modo de aspecto
• Visualización de ajuste actual, etc.
•
Selección del modo de entrada de la tarjeta de sintonizador
•
Visualización de ajuste actual, etc. de la pantalla
•
Selección del modo de entrada de la pantalla
• Encendido/Apagado de pantalla
Control remoto de la
tarjeta de sintonizador
Control remoto
de la pantalla

21
Español
Presione [MUTE].
• “MUDO” aparece en la pantalla.
• Presione de nuevo [MUTE] para cancelar el silenciamiento.
Presione [SAP].
Cada vez que usted presiona el botón:
∗
SPA: Programa de Audio Secundario
Nota
• El ajuste está disponible cuando se visualiza en rojo, no cuando
lo hace en blanco.
• Para cambiar al modo de entrada de audio externo, seleccione el
ajuste en el equipo conectado.
Para ver programas de TV
Preparación
1. Conecte el cable de alimentación de la pantalla a la toma de corriente.
2. Presione el botón POWER en la pantalla para conectar la alimentación
principal.
• El indicador de alimentación se enciende (Verde: alimentación
conectada, Rojo: en espera, Apagado: alimentación desconectada).
• Puede utilizar el control remoto cuando el indicador se enciende en
Verde o Rojo.
3. Seleccione el idioma de menú en el menú AJUSTE (vea la página 25).
1 Presione [INPUT] para seleccionar INPUT 2 (tarjeta de
sintonizador).
2 Presione [TV/VIDEO] para seleccionar el modo de TV.
3 Presione [CH , CH ] o los botones numerados para
seleccionar el canal.
4 Presione [VOL , VOL ] para ajustar el volumen.
Para su referencia
Presione [RECALL] para visualizar el canal, modo de audio, tiempo
restante del temporizador APAGADO, etc.
Nota
• Baje el volumen cuando se produzca aullido.
• La función “AUTO APAGADO” de la pantalla no se activa cuando usted
selecciona INPUT 2 (tarjeta de sintonizador).
Botón POWER
Interruptor de la alimentación
Para silenciar el sonido
Para seleccionar el modo de audio
Sensor de señales
del control remoto
POWER
POWER
ASPECT
R-TUNE
TUNER
RECALL
ACTION
CH
CH
VOL VOL
INPUTTV/VIDEO
MUTE
SAP
MONOESTÉREO SPA

22
Español
Puede cambiar la relación de aspecto para que la imagen se expanda hasta llenar la pantalla.
Presione [ASPECT] para seleccionar el modo de aspecto.
Los modos que puede seleccionar dependen del material que va a ver.
Cada vez que presione el botón:
Modo ASPECT
Visualiza una imagen 4:3 con la relación original
y bandas grises en ambos lados.
Expande una imagen para llenar la pantalla con
la relación original.
Alarga lateralmente una imagen 4:3 para llenar
la pantalla.
La imagen se expande en sentido horizontal para llenar
la pantalla. La relación de aspecto original se mantiene
cerca del centro, mientras la imagen se alarga más hacia
el exterior según se aproxima a cada lado de la pantalla.
La imagen tiene así menos incongruencia.
Modo
Imagen Explicación
4 : 3
COMP
JUSTO
ACERC
Nota
Puede ajustar la posición y el tamaño de la imagen con el control remoto de la pantalla.
JUSTO
4
3 9
16
COMP
4
3
16
9
4 : 3
3
4
ACERC
4
3
16
9
R-TUNE
RECALL
SAP
INPUTTV/VIDEO
ACTION
CH
CH
VOL VOL
MUTE
POWER
ASPECT
JUSTOCOMP
ACERC
4 : 3

23
Español
1 Presione [ACTION] para visualizar la pantalla de menú.
2
Presione [ , ] para seleccionar el icono de menú, y presione [ ,
] para seleccionar el submenú.
Para seleccionar submenús que no estén visualizados, seleccione “OTROS AJ.”
y presione [ ].
3 Presione [ , ] para cambiar los ajustes o introducir el menú de
opciones.
Cambio de los ajustes iniciales
Puede cambiar los ajustes según sus preferencias para adaptarlos al aparato y al ambiente de utilización. Luego
podrá clonar los ajustes y cambiar al modo “HOTEL” para que los clientes puedan tener acceso a ajustes particulares
solamente (vea la página 28).
Para volver a la pantalla anterior
Presione [ACTION].
Para salir de la pantalla de menú
Presione [ ] mientras resalta un icono de menú.
Nota
Esta función no se activa para la imagen secundaria de las visualizaciones de la
función “MULTI PIP’’.
POWER
MUTE
ASPECT
SAP
R-TUNE
RECALL
ACTION
CH
CH
VOL VOL
INPUTTV/VIDEO
IMAGEN
MODO
COLOR
TINTE
BRILLO
CONTRASTE
NITIDEZ
NORMAL
OTROS AJ
VIVIDO
:
SALIR
:
SUBMENU
SI
Submenú
Icono de menú
Menú de opciones
Menú AUDIO
MODO (vea la página 21)
BAJOS
ALTOS
BALANCE
NORMAL
ESTÉREO / SPA / MONO
Ajusta la respuesta de los graves.
Ajusta la respuesta de los agudos.
Ajusta el equilibrio del volumen de los altavoces derecho ( )/izquierdo (
)
.
Repone los ajustes de BAJOS, ALTOS y BALANCE a los de fábrica.
Menú IMAGEN
MODO
COLOR
TINTE
BRILLO
CONTRASTE
NITIDEZ
NORMAL
OTROS AJ.
TEMP COLOR
(Temperatura)
3D Y/C FILTRO
Seleccione el modo de imagen.
Nota
Seleccione “CINEMA” cuando parpadeen (en gris/blanco) las barras
laterales (las bandas grises a ambos lados de la imagen 4:3).
Ajusta la intensidad del color.
Ajusta los tonos naturales de la piel.
Ajusta el brillo de las partes oscuras de la imagen.
Ajusta el equilibrio del blanco de la imagen.
Ajusta la claridad de los contornos.
Repone los ajustes de imagen a los de fábrica.
ESTANDAR CINEMAVIVIDO AUTO
NORMAL ROJO (Aumenta el rojo) AZUL (Aumenta el azul)
SI
(Minimiza el ruido y la diafotía cromática en la imagen)
NO

24
Español
Cambio de los ajustes iniciales
Vea la página 23 para conocer la operación.
Menú CRONOMETRO
APAGADO Ponga la hora de apagado.
Nota
•
Cuando ponga la hora de apagado en la pantalla o en otra tarjeta de terminales
instalada, la pantalla se apagará al llegar la primera hora de apagado.
• La información de la hora de apagado puede que no se visualice cuando
se seleccione otro modo de entrada.
NO 30 (min.) 60 (min.) 90 (min.)
CANALES
A&E
AMC
BET
BRAVO
CNBC
CNN/SI
COMEDY
COURT
PRESIONE ACTION PARA REGRESAR
PREFIJADO
ABC
CBS
FOX
NBC
PBS
CNN
ESPN
HBO
PRESIONE
PARA MAS CNLS
Menú CANALES
BUSQUEDA
FAVORITOS
OTROS AJ.
PREFIJADO
MANUAL
PONGA TÍTULO
FAV : Introduzca hasta 16 de sus canales favoritos.
TODO
:
Explore todos los canales que pueda seleccionar con [ CH , CH ].
Agregue o borre los 16 canales favoritos.
1. Presione los botones numerados para seleccionar el canal.
2. Presione [ ] para agregar o [ ] para borrar el canal.
Ponga títulos preajustados a los canales
•
Tiene que borrar el MANUAL puesto anteriormente
para reemplazarlo por PREFIJADO.
1. Presione [ ] para entrar en el menú y presione
[ , ] para seleccionar el título.
2.Presione los botones numerados para
seleccionar el canal correspondiente al título.
• Para borrar el canal, presione [ ] .
Ponga manualmente títulos a los canales (hasta 8 caracteres).
• Tiene que borrar el PREFIJADO puesto
anteriormente para reemplazarlo por MANUAL.
1.
Presione [ ] para entrar en el menú y presione [ ,
] o los botones numerados para introducir el canal.
2.
Presione [ , ] para seleccionar “PONGA IDENTIDAD”.
3. Presione [ , ] para seleccionar el carácter.
• Presione [ , ] para mover el cursor.
Ponga la etiqueta (hasta 8 caracteres) en la entrada VIDEO1.
1. Presione [ ] para entrar en el menú.
2. Presione [ , ] para seleccionar el carácter.
• Presione [ , ] para mover el cursor.
• Para saltar la entrada VIDEO1, mueva el cursor a la posición del extremo
izquierdo y presione [ ] para seleccionar “BRINCAR”.
CANALES
ELIJA CANAL 10
PONGA IDENTIDAD
PRESIONE ACTION PARA REGRESAR
MANUAL
PARA MOVER CURSOR
PARA ESCOGER CANAL
Menú BLOQUEO
CREAR CLAVE/
INGRESAR
BLOQUEO
V-CHIP
(vea la página 26)
CLAVE
Introduzca el código secreto para visualizar el menú BLOQUEO. (No se olvide del código.)
Presione los botones numerados para introducir el código secreto (4 dígitos).
• Presione [ , ] para volver a introducir el código.
Límite de visión.
NO
JUEGO : Bloquea CH3, CH4 y la entrada de vídeo.
CANAL : Bloquea hasta 4 canales.
TODO : Bloquea todos los canales y entradas de vídeo.
V-CHIP usa los dos sistemas de calificación, MPAA (PELICULAS) y GUIA
PATERNAL DE TV, que bloquean programas según la información de los
paquetes de datos XDS de las emisoras.
Cambia el código secreto.
PROGRAMAS DE EEUU
INGLES DE CANADA
PELICULAS DE EEUU
FRANCES DE CANADA

25
Español
Cambio de los ajustes iniciales
Vea la página 23 para conocer la operación.
LISTA DE TÍTULOS OCULTOS
Nota
• Ponga “MODO cc ” en
“NO” para activar “ cc EN
MUDO”.
• Algunos programas no
incluyen títulos ocultos.
• Los títulos ocultos no se
visualizan cuando el modo
ASPECT es “ACERC”
(vea la página 22).
Menú AJUSTE
IDIOMA / LANGUE
cc EN MUDO
MODO cc
OTROS AJ.
MODO
PROGRAMA AUTO
PROGRAMA MANUAL
CANAL INFO.
ENERGÍAMONITOR
(Energía gerencia)
Selecciona el idioma de menús.
Visualiza títulos ocultos cuando se silencia el
sonido. (Consulte la “LISTA DE TÍTULOS
OCULTOS”.)
Visualiza constantemente títulos ocultos.
(Consulte la “LISTA DE TÍTULOS OCULTOS”.)
CABLE TV
Ajuste los canales automáticamente.
Ajuste los canales manualmente.
1. Presione [ ] para entrar en el menú y presione los botones numerados
para seleccionar el canal.
2. Presione
[ ]
para añadir o
[ ]
para borrar el canal.
Visualiza CANAL INFO.
SI NO
Seleccione cuánto tiempo va a estar encendido el aparato cuando no se utilice.
ENGLISH
NO C1 C2
C4
C3
NO C1 C2 T1
C4T3T4 C3
T2
12NO ....15
TÍTULOS NO -
TÍTULOS C1 -
TÍTULOS C2 -
TEXTO T1 -
TEXTO T2 -
TÍTULOS C3 -
TÍTULOS C4 -
TEXTO T3 -
TEXTO T4 -
Modo recomendado para cuando no se utilizan los títulos ocultos.
Para información relacionada con vídeo que puede ser visualizada (hasta 4 líneas de texto colocadas estratégicamente en la
pantalla del televisor para que no tapen las partes importantes de la imagen).
Otro modo utilizado para la información relacionada con vídeo.
Tapa una parte grande de la imagen de la pantalla de televisión y visualiza una guía de programas o cualquier otra información
que esté siendo transmitida.
Otro modo que visualiza información y tapa una parte grande de la imagen de la pantalla de televisión.
Otro modo utilizado para la información relacionada con vídeo.
Otro modo utilizado para la información relacionada con vídeo.
Otro modo que visualiza información y tapa una parte grande de la imagen de la pantalla de televisión.
Otro modo que visualiza información y tapa una parte grande de la imagen de la pantalla de televisión.

26
Español
Cambio de los ajustes iniciales
1. Presione [ , ] para seleccionar el menú de
opciones.
2. Presione [ , ] para seleccionar “AJUSTE” y presione [ ].
3. Presione [ , ] para resaltar el menú de opciones seleccionado en el paso 1,
y presione [ , ] para seleccionar “SI” o “NO”.
4. Presione [ , ] para seleccionar “NO CLASIFICADOS” y presione [ , ]
para seleccionar “ SI” o “NO”.
5. PROGRAMAS DE TV DE LOS EEUU SOLAMENTE
Presione [ , ] para seleccionar “AJUSTE” y presione [ , ] para
seleccionar “BÁSICA ” o “DETALLADA”.
BÁSICA : Calificaciones generales como TV-Y, TV-PG, etc. solamente.
DETALLADA
: Calificaciones generales y contenido como V, L, etc.
6. Presione [ , ] para seleccionar el nivel de calificación (vea abajo) y presione [ ] para bloquear
(ROJO) o [ ] para desbloquear (VERDE).
Repita el paso 6 para cada calificación.
Nota •
Esta función no se activa con algunas películas.
• Cuando un programa exceda el nivel de calificación aparecerá un mensaje de bloqueo. Introduzca el código
secreto de 4 dígitos para ver el programa. El código secreto volverá a tener validez cuando se apague la pantalla.
Para ajustar V-CHIP
Precauciones del cliente
El sistema V-Chip que se utiliza en este aparato es capaz de bloquear los programas “NR” (no clasificados, no aplicables y
ninguno) de acuerdo con las normas de la FCC indicadas en la Sección 15.120(e)(2). Si se elige la opción de bloqueo de
programas “NR”, “podrán producirse resultados inesperados y posiblemente confusos, y usted tal vez no pueda recibir anuncios
de emergencia o ninguno de los tipos de programación siguientes”.
• Anuncios de emergencia (mensajes EAS, avisos del tiempo y otros)
• Programas locales • Noticias • Política • Anuncios de servicios públicos • Religión • Deportes • Tiempo
NR Sin restricción. Consulte Precauciones del cliente abajo.
TV-Y Para todos los niños. Los temas y elementos de este programa
han sido diseñados específicamente para el público joven,
incluyendo niños de 2 a 6 años.
TV-Y7 Para niños mayores. Los temas y elementos de este programa
pueden incluir violencia física moderada, o pueden asustar a
los niños menores de 7 años.
TV-G
Para el público en general. Contiene un poco de violencia o ninguna y
no se emplean palabras malsonantes, y en los diálogos y en las
situaciones no se toca el tema del sexo o éste se menciona sólo un
poco.
TV-PG Se sugiere la supervisión de los padres. El programa puede
tener conversaciones groseras infrecuentes, violencia limitada
y diálogos y situaciones con sexo provocativo.
TV-14 Se recomienda encarecidamente la supervisión de los padres.
Este programa puede contener temas sofisticados, contenido
sexual, lenguaje fuerte y violencia intensa.
TV-MA Para un público adulto solamente. Este programa puede
contener temas para adultos, lenguaje profano, violencia vívida
y un contenido sexual explícito.
FV
VIOLENCIA EN PROGRAMAS DE FANTASÍA/DIBUJOS
ANIMADOS
V VIOLENCIA
S SEXO
L LENGUAJE OFENSIVO
D DIÁLOGO CON CONTENIDO SEXUAL
GRÁFICA DE CALIFICACIONES DE PROGRAMAS DE TV PARA LOS EEUU
NR CONTIENE PROGRAMAS SIN RESTRICCIONES Y
PROGRAMAS NA (NO APLICABLES). Las películas no
tienen restricciones o las restricciones no son aplicables.
G PÚBLICO EN GENERAL. Se admiten a todos los públicos.
PG SE SUGIERE LA SUPERVISIÓN DE LOS PADRES. Material
no adecuado para niños.
PG-13
SE RECOMIENDA ENCARECIDAMENTE LA SUPERVISIÓN DE
LOS PADRES. Material no apropiado para niños menores de 13
años.
R RESTRINGIDAS. Los jóvenes menores de 17 años y los niños
necesitan estar acompañados de sus padres o una persona
adulta que los supervise.
NC-17 NO SE ADMITE AL PÚBLICO MENOR DE 17 AÑOS.
X ADULTOS SOLAMENTE.
GRÁFICA DE CALIFICACIONES DE PELÍCULAS PARA LOS EEUU
E Exenta - La programación exenta.
G General - Programación para público de todas las edades.
No contiene violencia, o el contenido de la misma es mínimo
o se muestra apropiadamente.
8 ANS+ 8+ General - No se recomienda para los niños pequeños.
La programación es para un público diverso, pero contiene
violencia de vez en cuando. Se recomienda la supervisión
de adultos.
13ANS+ La programación tal vez no sea adecuada para niños
menores de 13 años. Contiene pocas escenas de violencia
o una o más escenas suficientemente violentas como para
afectarlos. Se recomienda encarecidamente la supervisión
de personas adultas.
16ANS+ La programación puede que no sea apropiada para
menores de 16 años. Contiene frecuentes escenas de
violencia o de mucha violencia.
18ANS+ Programación limitada a los adultos. Contiene escenas de
violencia constante o de mucha violencia.
GRÁFICA DE CALIFICACIONES PARA FRANCÉS DE CANADÁ
E Exenta - La programación exenta incluye: noticias, deportes,
documentales y otros programas de información, entrevistas,
vídeos musicales y programas de variedades.
C Programación para niños menores de 8 años. Sin lenguaje
ofensivo, desnudos ni contenido sexual.
C8+
Programación considerada generalmente aceptable para niños
de 8 años y menos. Sin blasfemias, desnudos ni contenido
sexual.
G Programación general para todos los públicos.
PG Se sugiere la supervisión de los padres. Algún material puede
no ser apropiado para los niños.
14+ La programación contiene temas que pueden no ser
apropiados para el público menor de 14 años. A los padres
se les avisa que no deben dejar ver estos programas a los
niños ni a los jóvenes menores de 14 años.
18+ ADULTOS SOLAMENTE
GRÁFICA DE CALIFICACIONES PARA INGLÉS DE CANADÁ
NO CLASIFICADOS
PRESIONE ACTION PARA REGRESAR
PELICULAS DE EEUU
BLOQUEO
NO
SI
G
PG
PG-13
R
NC-17
X
PROGRAMAS DE EEUU
INGLES DE CANADA
PELICULAS DE EEUU
FRANCES DE CANADA

27
Español
Repetición de los ajustes - CAJA DE CLONACIÓN
La caja de clonación (adquirida por separado) repite los ajustes del TV maestro en otros TVs.
1 Seleccione los ajustes del TV maestro (vea las páginas 23-26).
Usted puede replegar los ajustes siguientes.
2 Presione [ CH , CH ] o los botones numerados para seleccionar
el canal inicial que quiera ver al conectar la alimentación (ej.: canal
con su propia publicidad).
3 Presione [ VOL , VOL ] para seleccionar el nivel del sonido
que será el mínimo en el modo HOTEL (vea la página 28).
Asegúrese de poner el TV en el modo de TV normal antes de descargar. Si no está
en el modo de TV normal, cambie el modo consultando “Cambio entre el modo de
TV normal y el modo HOTEL” (vea la página 28).
Preparación
• Conecte el TV maestro a una toma de CA.
• Conecte la caja de clonación al terminal MATE de la tarjeta de sintonizador.
1 Encienda la pantalla del TV maestro.
2 Encienda la caja de clonación.
Los LEDs rojo y verde de la caja de clonación parpadearán.
3 Mantenga presionado el botón [ALT] y presione el botón [LEARN]
de la caja de clonación.
• El LED rojo parpadea durante la carga.
• El LED verse se enciende durante unos 2 segundos cuando termina la carga.
• Tras la carga, el TV maestro se pondrá automáticamente en el modo HOTEL.
4
Desconecte la alimentación principal de la pantalla y de la caja de clonación.
Selección de los ajustes del TV maestro
Descarga de los ajustes del TV maestro en la caja de clonación (APRENDER)
POWER
ASPECT
R-TUNE
RECALL
ACTION
CH
CH
VOL VOL
INPUTTV/VIDEO
MUTE
SAP
1. Inserte una herramienta delgada de unos 19 mm (un
clip de papel, por ejemplo) en el agujero [AMS] de la
caja de clonación para poner el TV en el modo de TV
normal.
El LED verde se enciende durante unos 2 segundos.
2. Presione el botón [TEST] de la caja de clonación.
• El LED rojo y el verde parpadean alternativamente durante
la comprobación.
• El LED verde se enciende durante unos 2 segundos
cuando los ajustes repetidos en la caja de clonación
corresponde al ajuste del TV maestro. Si no se enciende
el LED rojo, cargue de nuevo los ajustes.
1. Encienda la caja de clonación.
2. Mantenga presionado el botón [ALT] y presione
el botón [TEST] de la caja de clonación.
• El LED rojo y el verde parpadean alternativamente
durante la comprobación.
• El LED verde se enciende durante unos 2
segundos cuando la pila tiene suficiente carga.
Si no se enciende este LED, reemplace la pila
por otra nueva (use una de 9 voltios).
Para comprobar los ajustes cargados en la caja de clonación
Para comprobar la pila de la caja de clonación
Menú Submenú Menú Submenú
IMAGEN MODO AUDIO BAJOS
COLOR ALTOS
TINTE CANALES
PREFIJADO
BRILLO MANUAL
CONTRASTE PONGA TÍTULO
NITIDEZ
AJUSTE
PROGRAMA AUTO
TEMP COLOR
PROGRAMA MANUAL
ENERGÍAMONITOR

28
Español
Preparación
• Conecte la pantalla de TV a una toma de CA.
• Conecte la caja de clonación al terminal MATE de la tarjeta de sintonizador.
Reposición de todos los ajustes a los ajustes de fábrica
1. Encienda la pantalla.
2. Encienda la caja de clonación.
Los LEDs rojo y verde de la caja de clonación parpadean.
3.
Inserte una herramienta delgada de unos 19 mm (un clip de papel, por ejemplo) en el agujero [AMS] de la caja de
clonación.
El LED verde se enciende durante unos 2 segundos.
4. Presione [SAP], [ASPECT] y mantenga presionado [TV/VIDEO] durante unos 3 segundos.
Todos los ajustes volverán a ser los valores predeterminados.
5. Desconecte la alimentación principal de la pantalla y de la caja de clonación.
Repetición de los ajustes - CAJA DE CLONACIÓN
Cuando utilice la caja de clonación
Inserte una herramienta delgada de unos 19 mm (un clip de papel, por ejemplo) en el agujero [AMS] de la caja de
clonación.
El LED verde se enciende durante unos 2 segundos.
Cuando cambie el modo con el control remoto
Presione [SAP], [ASPECT], y luego mantenga presionado [MUTE] durante unos 3 segundos.
Presione el siguiente botón antes de que pase un segundo.
Presione [ACTION] para entrar y vuelva a presionarlo para salir.
Menú del modo HOTEL
Menú AJUSTE
• APAGADO (vea la página 24)
• MODO cc (vea la página 25)
• MODO (vea la página 23)
• VIDEO (vea la página 25, MODO)
• V-CHIP
No aparece en el ajuste inicial. Para visualizarlo,
presione [SAP], [ASPECT] y luego mantenga
presionado [RECALL] durante unos 3 segundos.
Menú BLOQUEO
Para visualizarlo, presione [ ] mientras resalta “V-CHIP”
en el menú AJUSTE (vea a la izquierda).
• CREAR CLAVE / INGRESAR (vea la página 24)
• V-CHIP (vea la página 24, 26)
• CLAVE (vea la página 24)
• TIEMPO? : 12HORAS (Fija)
Los ajustes seleccionados en el modo HOTEL pasan a
ser los ajustes iniciales tras 12 horas.
Cambio entre el modo de TV normal y el modo HOTEL
1 Encienda el TV receptor.
2 Encienda la caja de clonación.
Los LEDs rojo y verde de la caja de clonación parpadean.
3 Presione el botón [TEACH] en la caja de clonación.
• El LED verde parpadea durante la descarga.
• El LED verse se enciende durante unos 2 segundos cuando termina la descarga.
• Tras la descarga, el TV receptor se pondrá automáticamente en el modo HOTEL.
4 Desconecte la alimentación de la pantalla y de la caja de clonación.
Repita los pasos de arriba para descargar a otros TVs.
Descarga de los ajustes a otro TV (ENSEÑAR)
Asegúrese de poner el TV en el modo de TV normal antes de descargar. Si no está en el modo de TV normal, cambie
el modo consultando “Cambio entre el modo de TV normal y el modo HOTEL” (vea más abajo).
Preparación
• Conecte el TV receptor a una toma de CA.
• Conecte la caja de clonación al terminal MATE de la tarjeta de sintonizador.
Para entrar o salida en el menú del modo HOTEL

29
Español
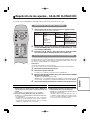
TY-FB9TU
12 de VHF, 56 de UHF y 125 de televisión por cable
AV INPUT VÍDEO (Tipo de clavija RCA) 1,0 Vp-p (75 Ω)
S VÍDEO (Mini DIN de 4 contactos)
Y : 1,0 Vp-p (75 Ω), C : 0,286 Vp-p (75 Ω)
AUDIO L-R (Tipo de clavija RCA) 0,5 Vrms
AV OUTPUT VÍDEO (Tipo de clavija RCA) 1,0 Vp-p (75 Ω)
∗ No puede hacer salir señales de UHF/VHF.
AUDIO L-R (TIPO TOMA M3) 0,5 Vrms
Puerto de interfaz digital (MATE)
RJ-11C
N2QAFB000003
160 g aproximadamente (5,6 onzas) (incluyendo pilas)
7 m aproximadamente (23 pies) directamente enfrente del aparato
Especificaciones
Tarjeta de sintonizador U/V con MATE I/F
Número de modelo
Capacidad de recepción de canales: 181
Terminales de conexión
Número de modelo
Massa (Peso)
Alcance de funcionamiento
Control remoto
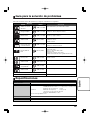
Guía para la solución de problemas
Antes de solicitar el servicio de reparaciones, haga las comprobaciones siguientes.
Solucion
Ajuste la ubicación y la conexión de la antena.
Ajuste la ubicación y la conexión de la antena.
Verifique el cable de baja de la antena.
Separe el televisor de otros aparatos eléctricos, luces,
vehículos y equipos médicos.
Suba el volumen.
Verifique el silencio.
Cambie el canal.
Fije correctamente el modo del televisor o de la televisión por cable.
Verifique los cables de las antenas.
Verifique si el cable de la alimentación está enchufado en un
tomacorriente activo.
Ajuste los controles de brillo y audio.
Cambie el canal.
Verifique las conexiones de los cables.
Verifique el funcionamiento de la segunda fuente de vídeo.
Ajuste las fijaciones de los colores.
Cambie el canal.
Verifique que el audio está en estéreo o mono, no en SAP.
Cambie CC (títulos ocultos).
Reemplace las pilas del control remoto.
Compruebe si la tarjeta está instalada en la ranura compatible.
Síntomas
VÍDEO AUDIO
Soluciones
Operación intermitente del control remoto
Vídeo con efecto
de nieve
Imagen múltiple
Interferencia
Vídeo normal
No hay vídeo pero
sí efecto de nieve
No hay vídeo ni
PIP
No hay color
Vídeo normal
Recuadro negro
en la pantalla
Vídeo normal
Audio con ruido
Audio con ruido
Audio con ruido
No hay audio
Audio con ruido
No hay audio
Audio normal
Audio equivocado
Audio normal
Audio normal
No hay control de canales

30
Memo

31
Memo

Printed in Japan
Impreso en Japón
M0306A0
(Recycled paper)
2006 Matsushita Electric Industrial Co., Ltd. All Rights Reserved.
Customer’s Record
The model number and serial number of this product can be found on its back cover. You should note this
serial number in the space provided below and retain this book, plus your purchase receipt, as a permanent
record of your purchase to aid in identification in the event of theft or loss, and for Warranty Service purposes.
Model Number Serial Number
Anotación del cliente
El modelo y el número de serie de este producto se encuentran en su panel posterior. Deberá anotarlos en
el espacio provisto a continuación y guardar este manual, más el recibo de su compra, como prueba
permanente de su adquisición, para que le sirva de ayuda al identificarlo en el caso de que le sea sustraído
o lo pierda, y también para disponer de los servicios que le ofrece la garantía.
Número de modelo Número de serie
Matsushita Electric Industrial Co., Ltd.
Web Site : http://www.panasonic.co.jp/global/
-
 1
1
-
 2
2
-
 3
3
-
 4
4
-
 5
5
-
 6
6
-
 7
7
-
 8
8
-
 9
9
-
 10
10
-
 11
11
-
 12
12
-
 13
13
-
 14
14
-
 15
15
-
 16
16
-
 17
17
-
 18
18
-
 19
19
-
 20
20
-
 21
21
-
 22
22
-
 23
23
-
 24
24
-
 25
25
-
 26
26
-
 27
27
-
 28
28
-
 29
29
-
 30
30
-
 31
31
-
 32
32


Panasonic TYFB9TU Manual de usuario
- Tipo
- Manual de usuario
- Este manual también es adecuado para
En otros idiomas
- English: Panasonic TYFB9TU User manual
Documentos relacionados
-
Panasonic TY42TM6MA Instrucciones de operación
-
-
-
Panasonic TC20LA5 - 20" LCD COLOR TV Instrucciones de operación
-
-
-
Panasonic TC32LX20 Instrucciones de operación
-
-
-