
Before You Begin
Complete shingle application on roof deck
before applying hip and ridge shingles. Hip
shingles must be applied before applying ridge
shingles. All hip and ridge shingles are applied
with an 8 inch exposure. Note: If a new roof
is being applied over an existing roof, remove
the old hip and ridge shingles to obtain a level
application.
Handling
Use extra care in handling shingles when the
temperature is below 40°F. In cold weather, it is
recommended to warm DURARIDGE
™
shingles
before installing.
Fastener Requirement
Use galvanized steel, stainless steel, or aluminum
nails minimum 12 gauge shank with
3
⁄8" diameter
head. Owens Corning Roong recommends
that fasteners comply with ASTM F 1667.
Check local building codes. All Fasteners must
penetrate at least ¾" into the wood deck or
completely through sheathing.
Note: Owens Corning Roong recommends
the use of nails as the preferred method of
attaching shingles to wood decking or other
nailable surface.
Installing
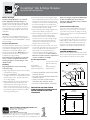
Begin hip application at the eave working
toward the ridge.
1. Begin ridge application opposite the prevailing
wind direction. (Fig. A)
2. Arrange DURARIDGE
™
Hip & Ridge shingles
along the center line so that both halves of the
laminated piece fall on opposite sides of the
hip or ridge. (Fig. B)
3. Begin application by creating a starting piece
using the laminated piece with the 8 inch
exposed portion of the shingle removed.
Fasten starter piece with one nail on each
side 1 inch in from the side edge starting from
the xed side edge placed into the SureNail
®
Technology fastening area.
4. Continue to fasten each full shingle through
the top laminated piece with one nail on each
side placed 9 inches back from the exposed
end and 1 inch in from the side edge starting
from the xed edge of each shingle. Note:
Fasteners must be placed into the SureNail
®
Technology fastening area. (Fig. B)
5. Apply remaining hip and ridge shingles in the
same manner with 8 inch exposure.
6. When nishing the ridge, leave no laminated
portion of the last hip and ridge shingle
exposed. One option is to use the 8 inch
exposure portion of a hip and ridge shingle,
cutting a piece the appropriate length to
extend over the laminated portion of the
shingle to the end of the ridge.
7. Fasten nal piece with two nails, each 1 inch
in from each side edge and 1 inch in from the
end of the ridge. Cover exposed fasteners
with asphalt roof cement. Asphalt roof
cement must meet ASTM D-4586 Type I
or Type II (Asbestos Free). Note: Please be
aware that excessive amounts of asphalt roof
cement could blister the shingle.
Product Specications
Size 12 inches x 10 ¾ inches
(305 mm x 273 mm)
Pieces per Box 30
Application Exposure 8 inches (203 mm)
Lineal Coverage per Box 20 feet (6.49 m)
• STORE IN COVERED, VENTILATED AREA
(UNDER 110F/43C)
• DO NOT STACK OVER EIGHT BUNDLES
HIGH PER PALLET
• AVOID OUTSIDE STORAGE WHEN
TEMPERATURES EXCEED 90F/32C
• DO NOT STORE IN DIRECT SUNLIGHT
FAILURE TO FOLLOW THESE
STORAGE INSTRUCTIONS COULD
CAUSE SHINGLES TO STICK
TOGETHER.
Owens COrning rOOfing and asphalt, llC
ONE OWENS CORNING PARKWAY
TOLEDO, OHIO, USA 43659
1-800-GET-PINK
®
www.owenscorning.com/roofing
Pub. No. 10018909 -A. Printed in U.S. A. July 2014. THE PINK PANTHER
™
& ©19 64 –
2014 Metro-Goldwyn-Mayer Studios Inc. All Rights Reserved. The color PINK is a
registere d trademark of Owens C orning. © 2014 Owens Corning. All Rights Reser ved.
DuraRidge
™
Hip & Ridge Shingles
Installation Instructions
Prepared roong is exempt from OSHA Right-
To-Know standard under its provision for
articles (29 CFR 1910.1200-b-6-IV) as dened
in 29 CFR 1910.1200c
*Limited Lifetime Warranty
This product carries a limited lifetime warranty (for
as long as you own your home). You may obtain a
copy of this roong warranty by visiting our website
at www.owenscorning.com or call 1-800-GET-PINK
®
(1-800-438-7465)
Owens Corning Roong and Asphalt, LLC shall not
be responsible for any damage, loss, cost, expense or
liability relating to failure to follow these instructions.
Failure to follow these installation instructions may
affect Owens Corning Roong and Asphalt, LLC's
obligations under this product's limited warranty.
10-YEAR ALGAE-RESISTANCE
LIMITED WARRANTY**
**Tropic zones outside of the USA and Canada
have a reduced algae resistance limited warranty.
See international warranty for more details.
Fig. A
8˝ Exposure
Nails
Clavos
Prevailing Wind Direction
Dirección del viento predominante
Exposición de 8 pulg.
Top View
Vista superior
Nail
Clavo
1
˝
1
˝
8˝
2
5
/
8
˝
12˝
Centerline
Línea central
SureNailOwens Corning
®
Fig. B

Owens COrning rOOfing and asphalt, llC
ONE OWENS CORNING PARKWAY
TOLEDO, OHIO, USA 43659
1-800-GET-PINK
®
www.owenscorning.com/roofing
pub. No. 10018909 - a. Impreso en Estados Unidos julio de 2014. la Pantera
Rosa ™ & amp; © 1964–2014 metro-goldwyn-mayer studios inc. todos los
derechos reservados. el color rosa es una marca registrada de owens corning.
© 2014 owens corning. todos los derechos reservados.
DuraRidge
™
Hip & Ridge Shingles
Instrucciones de instalación
Antes de comenzar
Finalice la aplicación de las tejas sobre la
plataforma del techo antes de aplicar las tejas de
caballete y cumbrera. Las tejas de caballete tienen
que colocarse antes que las tejas de cumbrera.
Todas las tejas de caballete y cumbrera se aplican
con una exposición de 8 pulgadas. Nota: Si se
aplica un nuevo techo sobre otro existente,
quite las tejas de caballete y cumbrera viejas para
obtener una aplicación nivelada.
Uso
Tenga mucho cuidado al usar y colocar las tejas
cuando la temperatura esté por debajo de los
40°F. Cuando las temperaturas son bajas, se
recomienda calentar las tejas DURARIDGE
™
antes
de la aplicación.
Requisito de sujetador
Use clavos de acero galvanizado, acero inoxidable
o de aluminio, de calibre 12 como mínimo, con un
diámetro de cabeza de 3/8 pulg. Owens Corning
Roong recomienda que los sujetadores cumplan
con la norma ASTM F 1667. Consulte los códigos
de construcción locales.
Todos los sujetadores deben penetrar al menos
¾ pulg. en la plataforma del techo de madera o
atravesar completamente los revestimientos de
madera triplay.
Nota: Owens Corning recomienda el uso de
clavos como método preferido para jar tejas a
plataformas de madera u otras supercies aptas
para clavos.
Instalación
Comience a colocar los caballetes desde el
alero y siga en forma ascendente hasta llegar a la
cumbrera.
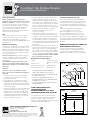
1. Comience a colocar las tejas de cumbrera en
el sentido opuesto a la dirección del viento
preponderante. (Fig. A)
2. Acomode las tejas de caballete y cumbrera
DURARIDGE a lo largo de la línea central, de
manera que ambas mitades de la pieza laminada
caigan sobre los lados opuestos de la cumbrera
o el caballete. (Fig. B)
3. Comience la aplicación creando una pieza inicial
usando la pieza laminada con una parte de 8
pulgadas expuesta de la teja removida. Ajuste
la pieza de inicio con un clavo en cada lado a 1
pulgada desde el borde lateral comenzando por
el borde lateral jado colocado en el área de
ajuste de SureNail
®
Technolog y.
4. Continúe ajustando cada teja completa a través
de la pieza laminada superior con un clavo a
cada lado ubicado a 9 pulgadas del borde de la
parte expuesta y a 1 pulgada del borde lateral
comenzando desde el borde jado de cada teja.
Nota: Los sujetadores deben colocarse en el
área para clavado SureNail
®
Technology. (Fig. B)
5. Coloque las tejas de caballete y cumbrera
restantes de la misma manera con una
exposición de 8 pulg.
6. Cuando haya terminado con la cumbrera, no
deje ningún área laminada en la última teja de
caballete y cumbrera expuesta. Una posibilidad
es utilizar la parte expuesta de 8 pulg. de una
teja de caballete y cumbrera, cortar una parte
de la longitud adecuada para extenderla sobre la
porción laminada de la teja hasta el extremo de
la cumbrera.
7. Sujete la pieza nal con dos clavos, cada uno a 1
pulg. de cada borde lateral y a 1 pulg. del borde
de la cumbrera. Cubra con cemento asfáltico
los sujetadores expuestos. El cemento asfáltico
debe cumplir con la norma ASTM D-4586 Tipo
I ó Tipo II (sin asbestos). Nota: tenga en cuenta
que una cantidad excesiva de cemento asfáltico
para techos puede deformar la teja.
Especicaciones del producto
Tamaño 12 pulg. x 10 ¾ pulg.
(305 mm x 273 mm)
Piezas por caja 30
Exposición de aplicación 8 pulg. (203 mm)
Cobertura lineal por caja 20 pies (6.49 m)
• CONSERVE EN UN ÁREA CUBIERTA Y
VENTILADA (MENOS DE 110 ºF/43 ºC).
• NO APILAR MÁS DE OCHO PAQUETES DE
ALTURA POR PALLET
• EVITE EL ALMACENAMIENTO EN EL
EXTERIOR CUANDO LAS TEMPERATURAS
SUPEREN LOS 90 ºF/32 ºC.
• NO ALMACENE EN UN LUGAR CON LUZ
SOL AR DIREC TA
SI NO CUMPLE CON ESTAS
INSTRUCCIONES DE
ALMACENAMIENTO, LAS TEJAS
PODRÍAN PEGARSE UNAS O OTRAS.
Los productos preparados para techos están
exentos de cumplir con la Norma OSHA del
“Derecho a saber” bajo la provisión de los
artículos (29 CFR 1910.1200-b-6-IV) tal como está
denido en el 29 CFR 1910.1200c.
*Garantía limitada de por vida
Este producto incluye una garantía limitada de
por vida (mientras usted sea el propietario de su
casa). Puede obtener una copia de esta garantía
en nuestro sitio Web www.owenscorning.com o
comunicándose al 1-800-GET-PINK
®
(1-800-438-
7465)
Owens Corning Roong and Asphalt, LLC
no se responsabiliza por las lesiones, los
daños, las pérdidas, los costos, los gastos, ni
las responsabilidades relacionadas con la no
observancia de estas instrucciones. Si no sigue
estas instrucciones de instalación, las obligaciones
de Owens Corning Roong and Asphalt, LLC bajo
la garantía limitada de este producto pueden verse
afectadas.
GARANTÍA LIMITADA DE 10 AÑOS DE
RESISTENCIA A LAS ALGAS**
**Las zonas tropicales fuera de los EE.UU. y
Canadá cuentan con una garantía limitada a
la resistencia a las algas reducida. Consulte la
garantía internacional para conocer más detalles.
Fig. A
8˝ Exposure
Nails
Clavos
Prevailing Wind Direction
Dirección del viento predominante
Exposición de 8 pulg.
Top View
Vista superior
Nail
Clavo
1
˝
1
˝
8˝
2
5
/
8
˝
12˝
Centerline
Línea central
SureNailOwens Corning
®
Fig. B
-
 1
1
-
 2
2


Owens Corning 724549 Guía de instalación
- Tipo
- Guía de instalación
en otros idiomas
Artículos relacionados
-
Owens Corning 724576 Guía de instalación
-
-
-
-
-
-
-
-
-