QUIKCELL Drive Dock Universal 3-in-1 Car Mount Guía del usuario
- Tipo
- Guía del usuario

QUICK START GUIDE
Guía de Inicio Rápido
DRIVE
DOCK
Universal 3-in-1
Car Mount
Soporte universal para auto 3 en 1

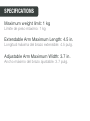
SPECIFICATIONS
Maximum weight limit: 1 kg
Límite de peso máximo: 1 kg
Extendable Arm Maximum Length: 4.5 in.
Longitud máxima del brazo extensible: 4.5 pulg.
Adjustable Arm Maximum Width: 3.7 in.
Ancho máximo del brazo ajustable: 3.7 pulg.

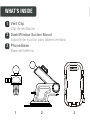
WHAT’S INSIDE
Vent Clip
Clip de ventilación
Dash/Window Suction Mount
Soporte de succión para tablero/ventana
Phone Base
Base del teléfono
1
2
3
2 31

DRIVEDOCK BUTTONS & CONTROLS
3
4
2
1
5

1. Quick Release Button
1. Botón de liberación rápida
2. Adjustable Grips
2. Mangos ajustables
3. Extendable Arm
3. Brazo extensible
4. Adjustment Knobs
4. Perillas de ajuste
5. Suction Lock
5. Bloqueo de succión

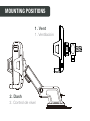
MOUNTING POSITIONS
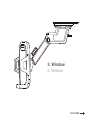
1. Vent
1. Ventilación
2. Dash
2. Control de nivel

FLIP OVER
3. Window
3. Ventana

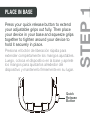
PLACE IN BASE
STEP 1
Press your quick release button to extend
your adjustable grips out fully. Then place
your device in your base and squeeze grips
together to tighten around your device to
hold it securely in place.
Presiona el botón de liberación rápida para
extender completamente los mangos ajustables.
Luego, coloca el dispositivo en la base y apriete
los mangos para ajustarlos alrededor del
dispositivo y mantenerlo rmemente en su lugar.
Quick
Release
Button

STEP 1
STEP 2
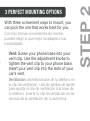
With three convenient ways to mount, you
can pick the one that works best for you.
Con tres formas convenientes de montar,
puedes elegir la que mejor se adapte a sus
necesidades.
Vent: Screw your phone base into your
vent clip. Use the adjustment knobs to
tighten the vent clip to your phone base.
Insert your vent clip into the slots of your
car’s vent.
Ventilación: atornilla la base de tu teléfono en
el clip de ventilación. Usa las perillas de ajuste
para ajustar el clip de ventilación a la base de
tu teléfono. Inserta tu clip de ventilación en las
ranuras de la ventilación de tu automóvil.
3 PERFECT MOUNTING OPTIONS
Dash/Window: Screw your phone base into
your dash/window mount using the
adjustment knobs. Make sure your suction
lock is pulled up. Remove plastic lm from
suction cup base and wipe down the area you
will be mounting your DriveDock. Place the
mount where you’d like it to sit on your dash
or window. Push the suction lock down and
your mount should now be secured in place.
Control de nivel/ventana: atornilla la base de tu
teléfono en el soporte de su tablero/ventana
usando las perillas de ajuste. Asegúrate que tu
bloqueo de succión esté levantado. Retira la
película plástica de la base de la ventosa y limpia el
área donde vas a montar tu DriveDock. Coloca el
soporte donde te gustaría que se sentara en tu
tablero o ventana. Presiona el seguro de succión
hacia abajo y tu soporte ahora debería estar
asegurado en su lugar.

STEP 2
With three convenient ways to mount, you
can pick the one that works best for you.
Con tres formas convenientes de montar,
puedes elegir la que mejor se adapte a sus
necesidades.
Vent: Screw your phone base into your
vent clip. Use the adjustment knobs to
tighten the vent clip to your phone base.
Insert your vent clip into the slots of your
car’s vent.
Ventilación: atornilla la base de tu teléfono en
el clip de ventilación. Usa las perillas de ajuste
para ajustar el clip de ventilación a la base de
tu teléfono. Inserta tu clip de ventilación en las
ranuras de la ventilación de tu automóvil.
Dash/Window: Screw your phone base into
your dash/window mount using the
adjustment knobs. Make sure your suction
lock is pulled up. Remove plastic lm from
suction cup base and wipe down the area you
will be mounting your DriveDock. Place the
mount where you’d like it to sit on your dash
or window. Push the suction lock down and
your mount should now be secured in place.
Control de nivel/ventana: atornilla la base de tu
teléfono en el soporte de su tablero/ventana
usando las perillas de ajuste. Asegúrate que tu
bloqueo de succión esté levantado. Retira la
película plástica de la base de la ventosa y limpia el
área donde vas a montar tu DriveDock. Coloca el
soporte donde te gustaría que se sentara en tu
tablero o ventana. Presiona el seguro de succión
hacia abajo y tu soporte ahora debería estar
asegurado en su lugar.

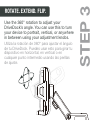
STEP 3
ROTATE. EXTEND. FLIP.
Use the 360° rotation to adjust your
DriveDock’s angle. You can use this to turn
your device to portrait, vertical, or anywhere
in between using your adjustment knobs.
Utiliza la rotación de 360° para ajustar el ángulo
de tu DriveDock. Puedes usar esto para girar tu
dispositivo en horizontal, en vertical o en
cualquier punto intermedio usando las perillas
de ajuste.
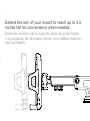
Extend the arm of your mount to reach up to 4.5
inches tall for convenience when needed.
Extiende el brazo de tu soporte para alcanzar hasta
4.5 pulgadas de alto para mayor comodidad cuando
sea necesario.
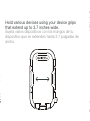
Hold various devices using your device grips
that extend up to 3.7 inches wide.
Sujeta varios dispositivos con los mangos de tu
dispositivo que se extienden hasta 3.7 pulgadas de
ancho.

STEP 3
Use the 360° rotation to adjust your
DriveDock’s angle. You can use this to turn
your device to portrait, vertical, or anywhere
in between using your adjustment knobs.
Utiliza la rotación de 360° para ajustar el ángulo
de tu DriveDock. Puedes usar esto para girar tu
dispositivo en horizontal, en vertical o en
cualquier punto intermedio usando las perillas
de ajuste.
Extend the arm of your mount to reach up to 4.5
inches tall for convenience when needed.
Extiende el brazo de tu soporte para alcanzar hasta
4.5 pulgadas de alto para mayor comodidad cuando
sea necesario.
Hold various devices using your device grips
that extend up to 3.7 inches wide.
Sujeta varios dispositivos con los mangos de tu
dispositivo que se extienden hasta 3.7 pulgadas de
ancho.

© 2021 All rights reserved. Alpha Comm and Quikcell are registered trademarks of Alpha Comm
Enterprises. All other trademarks are the property of their respective owners. Designed by Alpha Comm
Enterprises at 1500 Lakes Parkway; Lawrenceville, GA 30043.
Diseñado por Alpha Comm Enterprises en 1500 Lakes Parkway, Lawrenceville, GA 30043.
ONE YEAR LIMITED WARRANTY
For warranty information, please visit
Para obtener información sobre la garantía, visite
quikcell.com/warranty
-
 1
1
-
 2
2
-
 3
3
-
 4
4
-
 5
5
-
 6
6
-
 7
7
-
 8
8
-
 9
9
-
 10
10
-
 11
11
-
 12
12
-
 13
13
-
 14
14


QUIKCELL Drive Dock Universal 3-in-1 Car Mount Guía del usuario
- Tipo
- Guía del usuario
en otros idiomas
Artículos relacionados

Otros documentos
-
Alpha POWERFUEL Manual de usuario
-
Fulgor Milano F4PGR304S1 El manual del propietario
-
Fulgor Milano F6PGR366S2 El manual del propietario
-
-
Troy-Bilt 31AH8E4V710 Manual de usuario
-
-
MTD Storm 3090 XP Manual de usuario
-
Troy-Bilt 31AS62N2711 Manual de usuario