Control4 Mechanical Switch Guía de instalación
- Tipo
- Guía de instalación

Installation instructions for 120-277VAC/15A 3-way switches
with Pressure-Lock™ (push-in) and screw terminals.
Caution: Pressure-Lock™ terminals for use on 15 A branch circuits
with 14 AWG solid copper conductor only. Do not use on 20A branch
circuit. Screw terminals for use with 14—12 AWG copper wire.
Instructions:
1) Shut off power to the circuit at fuse box or circuit breaker. Remove wall plate
and test to make sure power has been completely disconnected.
2) Remove old switch from wall box and disconnect wires.
Important: Identify the wire to the “common” terminal on the old switch
(different color screw or marked “common” or “com”).
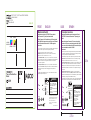
3a) For screw terminals, strip 3/4" (19 mm) of insulation from the ends of the
wires. Reconnect wires to the HOT, DARK (COMMON) and GREEN (GROUND)
terminals of the new switch, forming wire clockwise 3/4 around screw as
shown in the image below.
3b) For push-in terminals, strip 1/2" (13 mm) of insulation and insert into the
push-in terminals. Note: To release push-in wires, insert flat-blade screwdriver
into release slot and pull out wire while applying downward pressure to
screwdriver.
4) Tighten all screw terminals securely to 14 in-lbs. Install switch in wall box.
Replace wall plate. Restore power.
Instrucciones de instalación para los interruptores de 3 vías de
120-277VAC 15 A con bornes Pressure-Lock™ (de encajar) y de
tornillo.
Precaución: los bornes Pressure-Lock™ se usan en circuitos de
derivación de 15 A, solo con conductores de cobre sólido 14 AWG.
No usar en un circuito de derivación de 20 A. Bornes de tornillo para
usarse con alambre de cobre del 14-12 AWG.
Instrucciones:
1) Interrumpa el suministro de energía al circuito desde el panel de fusibles o el
de cortacircuitos. Retire la placa de pared y realice una prueba para confirmar
que se haya desconectado la electricidad totalmente.
2) Retire el interruptor antiguo de la caja de embutir y desconecte los cables.
Importante: identifique el cable del borne “común” en el interruptor antiguo
(tornillo de color diferente o marcado como “common” o “com”).
3a) Para bornes de tornillo: pele 3/4 de pulgada (19 mm) de aislamiento en los
extremos de los cables. Reconecte los cables a los bornes VIVO, OSCURO
(COMÚN) y VERDE (TIERRA) del nuevo interruptor, formando el cable 3/4 de
vuelta alrededor del tornillo en sentido horario, como aparece en la imagen a
continuación.
3b) Para bornes de encajar, pele 1/2 pulgada (13 mm) de aislamiento e
introdúzcalo en los bornes de encajar. Nota: para liberar los cables de encajar,
introduzca el destornillador plano en la ranura de liberación y tire del cable hacia
fuera al tiempo que empuja el destornillador hacia abajo.
4) Apriete bien todos los bornes de tornillo a 14 lbs-pulg. Instale el interruptor en
la caja de embutir. Coloque la placa de la pared. Restablezca la alimentación.
Form wires 3/4
around terminal
screws
(do not overlap)
RISK OF ELECTRIC SHOCK
• SHUT OFF POWER AT FUSE
BOX OR CIRCUIT BREAKER
BEFORE INSTALLATION.
RISK OF FIRE
• DO NOT EXCEED ELECTRICAL
RATINGS.
• USE ONLY COPPER WIRE WITH
THIS DEVICE.
3-WAY:
For two-switch
circuit.
3RMT
Switch
3RMT
interruptor
WARNING
For information on product warranty,
patents, dealer/user documentation,
regulatory, and source code, see
ctrl4.co/product info or call
801-523-3100 (U.S.) to request a
written copy.
REV 10/08/18 KC
C4-MSW
3 VÍAS:
Para un circuito
de dos interruptors
Forme los
cables
3/4 de vuelta
alrededor de
los bornes
(sin solapar).
RIESGO DE DESCARGA
ELÉCTRICA
• CORTE LA ENERGÍA EN LA
CAJA DE FUSIBLES O EN EL
CORTACIRCUITOS ANTES DE
REALIZAR LA INSTALACIÓN.
RIESGO DE INCENDIO
• NO EXCEDA LAS
ESPECIFICACIONES
ELÉCTRICAS.
• UTILICE ÚNICAMENTE CABLE
DE COBRE CON ESTE
DISPOSITIVO.
ADVERTENCIA
Mechanical Switch Interruptor mecánico
HOT
HOT
DARK
(COMMON)
GREEN
(GROUND)
VIVO
VIVO
VERDE
(TIERRA)
OSCURO
(COMÚN)
C4-MSW
ENGLISHFRONT BACK SPANISH
4.25 in
2.75 in
NEW ART
CYAN
MAGENTA
YELLOW
BLACK
4-COLOR
PROCESS
107.95MM
69.85MM
0CM
Tear-off Instruction
Sheet
42572, 42571, 42570 and 42569 MANUAL
Kristen Carroll
10/08/18
Monica Smith
-
 1
1

Control4 Mechanical Switch Guía de instalación
- Tipo
- Guía de instalación
en otros idiomas
Otros documentos
-
Maestro MA-T51MN-PL Manual de usuario
-
Legrand sofTap Dimmer Guía de instalación
-
Legrand ADTH4FBL3PW4 Guía de instalación
-
Lutron SC-3PS-ST Manual de usuario
-
-
Lutron MA-AS-LA Guía de instalación
-
-