Hampton Bay SL18P-R5X-DB-2 Guía de instalación
- Tipo
- Guía de instalación

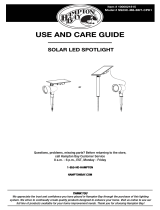
Questions, problems, missing parts? Before returning to the store,
call Hampton Bay Customer Service
8 a.m. - 6 p.m., EST, Monday - Friday
1-855-HD-HAMPTON
HAMPTONBAY.COM
R
Model # SL18P-R5X-DB-2
1-855-HD-HAMPTON
1-855-HD-HAMPTON
HAMPTONBAY.COMHAMPTONBAY.COM
THANK YOU THANK YOU THANK YOU THANK YOU THANK YOU
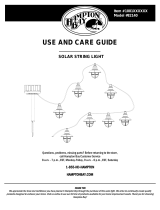
USE AND CARE GUIDE
SOLAR FENCE LIGHT 2PK
Item # 1000000000
We appreciate the trust and condence you have placed in Hampton Bay through the purchase of this solar fence light.
We strive to continually create quality products designed to enhance your home. Visit us online to see our full line of
products available for your home improvement needs. Thank you for choosing Hampton Bay!

Table of Contents
Table of contents................................2
Safety Information..............................2
Warranty..............................................2
Pre-Installation...................................3
Planning Installation.................................3
Package Contents.....................................4
Installation........................................5
Operation..........................................6
Care and Cleaning............................8
Troubleshooting................................8
Service Parts.....................................9
Safety Information
2
Warranty
WHAT IS COVERED
This warranty applies only to the original consumer purchaser and only to products used in normal use and service.
If this product is found to be defective, the manufacturer's only obligation, and your exclusive remedy, is the repair
or replacement of the product at the manufacturer's discretion, provided that the product has not been damaged
through misuse, abuse, accident, modications, alterations, neglect, or mishandling.
WHAT IS NOT COVERED
This warranty shall not apply to any product that is found to have been improperly installed, set-up, or used in any
way not in accordance with the instructions supplied with the product. This warranty shall not apply to a failure of
the product as a result of an accident, misuse, abuse, negligence, alteration, faulty installation, or any other failure
not relating to faulty material or workmanship. This warranty shall not apply to the nish on any portion of the
product, such as surface and/or weathering, as this is considered normal wear and tear.
Contact the Customer Service Team at 1-855-HD-HAMPTON or visit www.Hamptonbay.com.
WHAT IS COVEREDWHAT IS COVEREDWHAT IS COVERED
WHAT IS NOT COVEREDWHAT IS NOT COVEREDWHAT IS NOT COVERED
2 Year Limited Warranty............................2
Tools Required..........................................3
Hardware Included....................................3
Model Type...............................................9
Please read and understand this entire manual before
attempting to assemble, operate or install the product.
For best performance, this solar light should be:
Installed in a location with full and direct
sunlight
Not installed in a shady area
Installed in a location with minimal interference
from other light sources
CAUTION: This product contains Nickel-metal hydride battery.
The battery must be recycled or disposed of properly.
CAUTION:
CAUTION:
CAUTION: Do not dispose of batteries in re or expose to
excessive heat. Recycle all used batteries at a proper recycle
facility.
CAUTION:
CAUTION:
2-YEAR LIMITED WARRANTY
Operation..........................................7
Maintenance.....................................8
NOTICE: Install the solar lights in full sunlight and allow their batteries to
charge for 10-12 hours. It will take 8-12 entire charging and discharging
cycles to reach the batteries' maximum capacity.
NOTICE:NOTICE:
2-YEAR LIMITED WARRANTY2-YEAR LIMITED WARRANTY

HAMPTONBAY.COM
Please contact 1-855-HD-HAMPTON for further assistance.
3
HAMPTONBAY.COMHAMPTONBAY.COM
Pre-Installation
PLANNING INSTALLATIONPLANNING INSTALLATIONPLANNING INSTALLATION
Before beginning installation of product, make sure all parts are present. Compare parts with package contents list.
If any part is missing or damaged, do not attempt to assemble, install or operate the product.
TOOLS REQUIREDTOOLS REQUIREDTOOLS REQUIRED
Screwdriver
Pencil
Electric drill
drill bit size: ø5mm (1/5 in.)
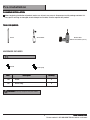
HARDWARE INCLUDED
NOTE: Hardware not shown to actual size.
AA
BB
4
4
Screw
Plastic Plug
PartPart
Part
Part
DescriptionDescriptionDescription
QuantityQuantity
Quantity
IMPORTANT: Please keep small parts away from children.
IMPORTANT:
IMPORTANT:
Plastic plug
Screw

Pre-Installation (continued)
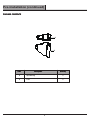
PACKAGE CONTENTS
4
A
B
PACKAGE CONTENTSPACKAGE CONTENTS
A
B
2
2
Top Housing
Lens
PartPart
Part
Part
DescriptionDescriptionDescription
QuantityQuantityQuantity

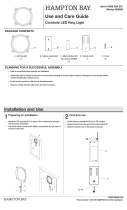
Installation
5
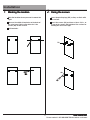
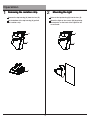
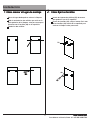
Marking the location
1
Fixing the screws
2
Mark the location where you want to mount the
light.
Drill two holes.
Marking the location
Marking the location
x
x
Fixing the screwsFixing the screws
Measure the width of two holes on the back of
the solar fence light to align holes for 2 the
screws (AA) on the surface.
Insert the plastic plugs (BB) so they are ush with
the surface.
Insert the screws (AA) and leave at least 1/4 in., or
5 mm of the screws (AA) outside of the surface for
holding the solar fence light.
HAMPTONBAY.COM
Please contact 1-855-HD-HAMPTON for further assistance.
HAMPTONBAY.COMHAMPTONBAY.COM
BB
AA

6
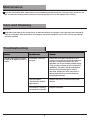
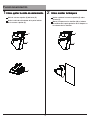
Removing the isolation strip
1
Mounting the light
2
Remove the top housing (A) from the lens (B).
On the bottom of the top housing (A), pull off
the isolation strip.
A
B
A
A
B
Removing the isolation stripRemoving the isolation strip
Reinsert the top housing (A) into the lens (B).
Mount the light on the screws (AA) by placing
the keyholes on the back of the light over the
screw heads.
Mounting the lightMounting the light
AA
Operation
Operation

Operation
7
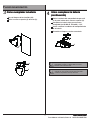
Replacing the battery
3
4
HAMPTONBAY.COM
Please contact 1-855-HD-HAMPTON for further assistance.
Replacing the batteryReplacing the battery
A
B
A
HAMPTONBAY.COMHAMPTONBAY.COM
AA
Remove the light from the screws (AA).
Take the top housing (A) out of the lens (B).
Replacing the battery
(Continued)
Replacing the battery
(Continued)
Replacing the battery
(Continued)
At the bottom of the top housing (A), remove the
compartment cover.
Replace the old battery with a fresh 1.2 V 350mAh
NI-MH rechargeable battery.
Replace the battery compartment cover.
Reassemble the light and mount it back.
CAUTION: This product contains Nickel-metal hydride battery.
The battery must be recycled or disposed of properly.
CAUTION:
CAUTION:
CAUTION: Do not dispose of batteries in re or expose to
excessive heat. Recycle all used batteries at a proper recycle
facility.
CAUTION:
CAUTION:

Troubleshooting
Possible Cause
Solution
The solar light does not turn on
at night or its nightly run time is
shorter.
The battery is not fully
charged.
Ensure the solar light is located in an area
where it can receive the maximum amount of
full, direct sunlight every day. If the solar
light does not receive enough sunlight during
a day (e.g. due to cloudy or overcast weather
conditions), the battery will be recharged on
the next sunny day and resume normal
operation. Keeping the solar panel clean is
equally important to ensure the maximum
charging performance.
The solar light is
installed close to other
light sources.
Relocate the xture or eliminate other light
sources.
The battery is reaching
the end of its useful life.
Replace the battery.
Problem
Solution
Solution
ProblemProblem
Possible Cause
Possible Cause
Care and Cleaning
Winter tips
Keep debris and snow off the solar panel (A) to allow the batteries to recharge. If the lights have been covered by
snow for a long time, allow the batteries to recharge in full, direct sunlight for 10-12 hours, so they can maintain
maximum capacity.
Maintenance
8
Clean the solar module with a damp towel to ensure optimum performance of the solar fence light. Do not use any
type of solvent for cleaning and be careful not to put too much pressure on the module while cleaning.

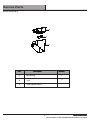
Service Parts
SL18P-R5X-DB-2
HAMPTONBAY.COM
Please contact 1-855-HD-HAMPTON for further assistance.
9
A
B
C
HAMPTONBAY.COM
HAMPTONBAY.COM
Part
A
B
C
Description
Quantity
2
2
2
Top Housing
Lens
Rechargeable battery
PartPart
DescriptionDescription
QuantityQuantity

R
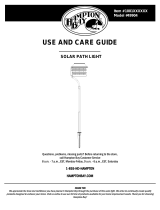
Questions, problems, missing parts? Before returning to the store,
call Hampton Bay Customer Service
8 a.m. - 6 p.m., EST, Monday - Friday
1-855-HD-HAMPTON
HAMPTONBAY.COM
Retain this manual for future use.
1-855-HD-HAMPTON1-855-HD-HAMPTON
HAMPTONBAY.COMHAMPTONBAY.COM

1-855-HD-HAMPTON
HAMPTONBAY.COM
R
1-855-HD-HAMPTON
1-855-HD-HAMPTON
HAMPTONBAY.COMHAMPTONBAY.COM
PAQUETE DE 2 LÁMPARAS SOLARES
PARA CERCA
Modelo núm. SL18P-R5X-DB-2
Artículo núm. 1000000000
GUÍA DE USO Y MANTENIMIENTO
¿Preguntas, problemas o piezas faltantes? Antes de regresar a la tienda,
llama al servicio al cliente de Hampton Bay
de lunes a viernes entre 8:00 a.m. y 6:00 p.m., hora estándar del Este
GRACIAS POR TU COMPRAGRACIAS POR TU COMPRAGRACIAS POR TU COMPRA
Apreciamos la conanza que has depositado en Hampton Bay al comprar esta lámpara solar para cerca. Nos esforzamos
para continuamente crear productos de calidad diseñados para mejorar tu hogar. Visítanos por Internet para ver nuestra
línea completa de productos disponibles para las necesidades de mejoras de tu hogar. ¡Gracias por elegir Hampton Bay!

Información de seguridad..................2
Garantía...............................................2
Preinstalación.....................................3
Planicación de la instalación..................3
Contenido del paquete..............................4
Instalación.........................................5
Funcionamiento................................6
Cuidado y limpieza...........................8
Solución de problemas....................8
Piezas de repuesto...........................9
Información de seguridad
2
Garantía
Esta garantía es válida sólo para el comprador original y sólo cubre productos en uso y funciones normales. Si se
descubre algún defecto en este producto, la única obligación y solución exclusiva del fabricante, a criterio del mismo,
será reparar o reemplazar el producto siempre y cuando el defecto no sea resultado de un mal uso, abuso, accidente,
modicaciones, alteraciones, negligencia o manejo indebido.
Esta garantía no cubre ningún producto instalado, congurado o usado incorrectamente sin seguir las instrucciones
adjuntas al producto. Esta garantía no cubre fallas del producto a consecuencia de un accidente, mal uso, abuso,
negligencia, modicaciones o instalaciones defectuosas, o cualquier otra falla no relacionada con defectos materiales
o de fabricación. Esta garantía no se aplica al acabado de ninguna parte del producto, como por ejemplo el de la
supercie, ni al deterioro por condiciones ambientales, ya que eso se considera un desgaste normal.
Comuníquese con el equipo de servicio al cliente al 1-855-HD-HAMPTON o visite www.Hamptonbay.com.
Garantía limitada de 2 años......................2
Herramientas necesarias..........................3
Herrajes incluidos.....................................3
Tipo de modelo.......................................9
PRECAUCIÓN: No deseches las baterías en elfuego ni las
expongas al calor excesivo. Recicla todas las baterías
usadas en una planta de reciclaje adecuada.
GARANTÍA LIMITADA DE 2 AÑOS
Funcionamiento................................7
Mantenimiento..................................8
Tabla de contenido
Tabla de contenido.............................2
PRECAUCIÓN: Este producto contiene una batería de
níquel-hidruro metálico. La batería debe reciclarse o
desecharse de forma adecuada.
PRECAUCIÓN:
PRECAUCIÓN:
AVISO: Instala las lámparas solares con luz solar total y deja que
las baterías se carguen durante 10 a 12 horas. Tomará de 8 a 12
ciclos completos de carga y descarga alcanzar el máximo de
capacidad de la batería.
AVISO:
AVISO:
QUÉ CUBRE LA GARANTÍAQUÉ CUBRE LA GARANTÍA
QUÉ CUBRE LA GARANTÍA
QUÉ NO CUBRE LA GARANTÍAQUÉ NO CUBRE LA GARANTÍAQUÉ NO CUBRE LA GARANTÍA
Lee y entiende este manual por completo antes de intentar
ensamblar, operar o instalar el producto.
Para un mejor rendimiento, esta lámpara solar debe:
No instalarse en áreas con sombra
Instalarse en un lugar con una interferencia mínima
de otras fuentes de luz
Instalarse en un lugar con luz solar directa y total
PRECAUCIÓN:
PRECAUCIÓN:
GARANTÍA LIMITADA DE 2 AÑOSGARANTÍA LIMITADA DE 2 AÑOS

HAMPTONBAY.COM
Para obtener asistencia, llama al 1-855-HD-HAMPTON.
3
HAMPTONBAY.COMHAMPTONBAY.COM
Preinstalación
Antes de instalar el producto, asegúrate de tener todas las piezas. Compara las piezas con la lista de contenido del
paquete. Si falta alguna pieza o está dañada, no intentes ensamblar, instalar u operar el producto.
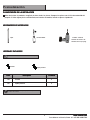
Destornillador
Lápiz
Taladro eléctrico
tamaño de la broca de
taladro: ø5 mm (1/5 plg)
NOTA: No se muestra el tamaño real de los herrajes.
AA
BB
4
4
Tornillo
Tápon plástico
Pieza
Descripción
Cantidad
IMPORTANTE: Mantén las piezas pequeñas alejadas del
alcance de los niños.
Tápon plástico
Tornillo
PLANIFICACIÓN DE LA INSTALACIÓN
PLANIFICACIÓN DE LA INSTALACIÓNPLANIFICACIÓN DE LA INSTALACIÓN
HERRAMIENTAS NECESARIAS
HERRAJES INCLUIDOS
DescripciónDescripción
PiezaPieza
CantidadCantidad
IMPORTANTE:IMPORTANTE:
HERRAMIENTAS NECESARIASHERRAMIENTAS NECESARIAS
HERRAJES INCLUIDOSHERRAJES INCLUIDOS

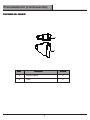
4
A
B
A
B
2
2
Carcasa superior
Lente
Pieza
Descripción
Cantidad
Preinstalación (continuación)
CONTENIDO DEL PAQUETECONTENIDO DEL PAQUETECONTENIDO DEL PAQUETE
PiezaPiezaPieza
DescripciónDescripción
CantidadCantidad

5
1
Cómo jar los tornillos
2
Marca el lugar donde quieras colocar la lámpara.
Taladra los dos oricios.
x
x
HAMPTONBAY.COM
Para obtener asistencia, llama al 1-855-HD-HAMPTON.
HAMPTONBAY.COMHAMPTONBAY.COM
BB
AA
Instalación
Cómo marcar el lugar de montaje
Mide el ancho de los dos oricios que están en la
parte posterior de la lámpara solar para cerca para
alinearlos con 2 tornillos (AA) en la supercie.
Inserta los tapones de plástico (BB) de manera
que queden al ras de la supercie.
Inserta los tornillos (AA) y deja al menos 5 o 6 mm
de los tornillos (AA) afuera de la supercie para
sostener la lámpara solar para cerca.
Cómo marcar el lugar de montajeCómo marcar el lugar de montaje
Cómo jar los tornillosCómo jar los tornillos

6
1
2
Quita la carcasa superior (A) del lente (B).
Retira la cinta de aislamiento de la parte inferior
de la carcasa superior (A).
A
B
A
A
B
AA
Operation
Funcionamiento
Cómo quitar la cinta de aislamientoCómo quitar la cinta de aislamiento
Cómo quitar la cinta de aislamiento
Cómo montar la lámpara
Vuelve a colocar la carcasa superior (A) sobre
el lente (B).
Monta la lámpara en los tornillos (AA) al colocar
los oricios de la parte posterior de la lámpara en
las cabezas de los tornillos.
Cómo montar la lámparaCómo montar la lámpara

7
3
4
HAMPTONBAY.COM
Para obtener asistencia, llama al 1-855-HD-HAMPTON.
A
B
A
HAMPTONBAY.COMHAMPTONBAY.COM
AA
Retira la carcasa superior (A) del lente (B).
Funcionamiento
Cómo reemplazar la bateríaCómo reemplazar la batería
Cómo reemplazar la batería
Cómo reemplazar la batería
(continuación)
Cómo reemplazar la batería
(continuación)
Cómo reemplazar la batería
(continuación)
Saca la lámpara de los tornillos (AA).
Retira la cubierta del compartimiento que está
en la parte inferior de la carcasa superior (A).
Reemplaza la batería vieja por una nueva
recargable tipo NI-MH de 350 mAH y 1.2 V.
Vuelve a colocar la cubierta del compartimiento
de la batería.
Ensambla la lámpara y vuelve a montarla.
PRECAUCIÓN: No arrojes las baterías al fuego ni las
expongas al calor excesivo. Recicla todas las baterías
usadas en una planta de reciclaje adecuada.
PRECAUCIÓN: Este producto contiene una batería de
níquel-hidruro metálico. La batería debe reciclarse o
desecharse de forma adecuada.
PRECAUCIÓN:
PRECAUCIÓN:
PRECAUCIÓN:PRECAUCIÓN:

Limpia los desechos y la nieve del panel solar (A) para permitir la recarga de las baterías. Si la nieve ha cubierto las
lámparas por largo tiempo, deja que las baterías se recarguen con luz solar directa y total por 10 a 12 horas para que
puedan funcionar al máximo de su capacidad.
8
Limpia el módulo solar con una toalla húmeda para asegurar el máximo rendimiento de la lámpara solar para cerca.
No uses ningún tipo de solvente para la limpieza y ten cuidado de no presionar demasiado el módulo mientras lo
limpias.
Mantenimiento
Cuidado y limpieza
Consejos para el invierno
Solución de problemas
Causa posible
Solución
La lámpara solar no se enciende
durante la noche, o su tiempo de
funcionamiento es más corto.
La batería no está
completamente cargada.
Asegúrate de que la luz solar se coloque en una
zona donde puede recibir la cantidad máxima
de luz solar directa y total todos los días. Si la
lámpara solar no recibe la suciente luz solar
durante un día (por ejemplo, días nublados u
oscuros), la batería se volverá a cargar al
siguiente día de sol y se restablecerá el
funcionamiento normal. Mantener el panel
solar limpio es igualmente importante para
garantizar el rendimiento máximo de carga.
La lámpara solar está
instalada cerca de otras
fuentes de luz.
Ubica la lámpara en otro lugar o elimina
otras fuentes de luz.
La batería está llegando
al nal de su vida útil.
Reemplaza la batería.
Problema
ProblemaProblema
Causa posible
Causa posible
SoluciónSolución

SL18P-R5X-DB-2
HAMPTONBAY.COM
Para obtener asistencia, llama al 1-855-HD-HAMPTON.
9
A
B
C
HAMPTONBAY.COM
HAMPTONBAY.COM
Piezas de repuesto
Pieza
A
B
C
Descripción
Cantidad
2
2
2
Carcasa superior
Lente
Batería recargable
PiezaPieza
Descripción
Descripción
CantidadCantidad

R
¿Preguntas, problemas o piezas faltantes? Antes de regresar a la tienda,
llama al servicio al cliente
de lunes a viernes, de 8:00 a.m. a 6:00 p.m., hora estándar del Este al
1-855-HD-HAMPTON
HAMPTONBAY.COM
Conserva este manual para uso en el futuro.
1-855-HD-HAMPTON1-855-HD-HAMPTON
HAMPTONBAY.COMHAMPTONBAY.COM
-
 1
1
-
 2
2
-
 3
3
-
 4
4
-
 5
5
-
 6
6
-
 7
7
-
 8
8
-
 9
9
-
 10
10
-
 11
11
-
 12
12
-
 13
13
-
 14
14
-
 15
15
-
 16
16
-
 17
17
-
 18
18
-
 19
19
-
 20
20


Hampton Bay SL18P-R5X-DB-2 Guía de instalación
- Tipo
- Guía de instalación
En otros idiomas
Documentos relacionados
-
 Hampton Bay 82140 Guía de instalación
-
 Hampton Bay QTP22a-R4-AC-2 Instrucciones de operación
-
 Hampton Bay HD28572BK2 Guía de instalación
-
 Hampton Bay 93008 Guía del usuario
-
 Hampton Bay SS23C-M8-BKT-CPK1 Guía de instalación
-
 Hampton Bay 49904 Guía de instalación
-
 Hampton Bay 68042 Guía de instalación
-
 Hampton Bay 41359 Guía de instalación
-
 Hampton Bay 51353 Guía de instalación
-
 Hampton Bay 26612 Guía de instalación


