iON Video Archiver Guía de inicio rápido
- Categoría
- Dashcam
- Tipo
- Guía de inicio rápido

Quickstart Guide (English)
Box Contents:
V
ideo Archiver Remote Control
1/8" (3,5 mm) to RCA Audio-
V
ideo Cable RCA Audio-
V
ideo Coupler
USB Charging Adapter Mini-USB Cable
Quickstart Guide
Setup
Items not listed under Box Contents are sold separately.
1. Use the included 1/8" (3.5 mm)-to-RCA audio-video cable to connect the output of your video
source (VCR, camcorder, etc.) to the AV In port of Video Archiver. Make sure to match colors
when making connections: yellow for composite video, red (right) and white (left) for stereo
audio.
2. Optional: Use either a standard HDMI cable or a 1/8" (3.5 mm)-to-RCA audio-video cable to
connect the output of Video Archiver to the inputs of your television or monitor.
IMPORTANT: Do not use the HDMI Out and AV Out at the same time. If both are connected,
only the AV Out will work. To resume using HDMI, remove both the HDMI and AV Out cables,
then reattach only the HDMI cable.
3. If the battery is low, connect the mini-USB cable from the mini-USB port to the included
charging adapter.
4. Once all connections have been properly made, power Video Archiver on by pressing and
holding the Power button.
5. Select TV In or Recorder to preview in incoming video or audio, respectively, from Video
Archiver's built-in display and speaker, or from your connected screen.
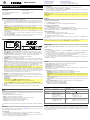
Features
1. Display: Use this display to operate Video Archiver and preview connected video sources.
2. Back: Press this button to return to the previous menu.
3. Power Button: Press and hold this button for 3 seconds to power Video Archiver on and off.
4. Record Button: Press this button to begin recording. Press it again to stop and save the file.
5. Audio Mode Button: Press this button to cycle between 6 different audio playback modes:
Random Play, Random Repeat, Introduction, Sequence, Repeat Once and Repeat All.
6. Cursor Buttons: Use these buttons to navigate the menus and files.
7. OK Button: Press this button to select an option.
8. Mini-USB Port: Use the included mini-USB cable to connect this port to the included DC 5V
charger. You can also connect the mini-USB cable to your computer to manage files or update
firmware.
9. Micro SD Card Slot: For additional storage, insert a micro SD card into this slot until you hear
it "click." When a card is inserted, files will automatically be saved to it instead of the internal
memory. To save and view files from the internal drive, set the Save Path option in the
Settings back to Internal. To remove the card, gently push the card in until it releases.
Note: Micro SD cards must be formatted as either FAT32 or exFAT and less than 32 GB in
size. We also recommend using an empty SD card when recording.
10. AV In: Use the included 1/8" (3.5 mm)-to-RCA audio-video cable to connect this input to the
RCA audio and composite video outputs of your VCR, camcorder or other playback device.
Make sure to match colors when making connections: yellow for composite video, red (right)
and white (left) for stereo audio. You can also connect a 1/8" (3.5 mm) stereo audio cable from
this input to the output of an audio device and record audio only.
11. HDMI Out: Use a standard HDMI cable to connect this output to your television or monitor.
12. AV Out: Use a 1/8" (3.5 mm)-to-RCA audio-video cable to connect this output to the audio
and video inputs of your television or monitor.
13. Headphone Out: Connect this 1/8" (3.5 mm) output to headphones or speakers to monitor
audio playback.
IMPORTANT:
• Do not connect the HDMI Out and AV Out at the same time.
• When either the HDMI Out or AV Out is in use, the display will turn off.
• When the HDMI Out port is being used, no audio will be sent to the Headphone Out.
14. Speaker (rear panel): This internal speaker will play sound from input sources or recorded files
directly.
15. Reset (rear panel): Press this button to reset Video Archiver to factory default settings.
Operation
Menu
When Video Archiver is powered on, the display will show the main menu. From here, you can
access the following functions:
• Videos: Select this to playback recorded videos.
• Music: Select this to play back recorded audio.
• Pictures: Select this to view pictures stored on the inserted micro SD card.
• TV In: Select this to preview and record the video input.
• Recorder: Select this to preview and record audio input only.
• Settings: Select this to change the device settings.
The main menu also shows the current time, micro SD and mini-USB cable connections, and battery
life.
Recording
Before recording, make sure you have followed the Setup directions. When all connections have
been made properly, power on Video Archiver.
Recording Video
1. Select TV In from the main menu to see a preview of your connected device on the display.
2. To start recording, press the Record button or the OK button.
3. To stop recording and save the file, press the Record button again. You can also press the OK
button to stop recording, then press Back to save the file.
Recording Audio
1. Select Recorder from the main menu to hear a preview of your connected audio device.
2. To start recording, press the Record button or the OK button.
3. To stop recording and save the file, press the Record button again. You can also press the OK button
to stop recording, then press Back to save the file.
Note: After 2 hours and 42 minutes of recording, Video Archiver will automatically save the file and start
recording to a new file.
IMPORTANT: Do not connect any audio/video cables while recording is in progress, or you will lose the
recording.
Playback
To play back recorded video files:
1. Select Videos from the main menu.
2. Use the Cursor buttons to select a file, then press OK to begin playback.
To play back recorded audio files:
1. Select Music from the main menu.
2. Use the Cursor buttons to select a file, then press OK to begin playback.
When playing back audio files, press the Audio Mode button to change the audio playback mode:
Random, Random Repeat, Introduction, Sequence, Repeat Once and Repeat All.
When playing back files:
• Use the Up and Down cursors to change the volume.
• Press and hold the Left and Right cursors to rewind and fast-forward.
• Press Back to return to the previous menu.
You can also view pictures stored on the attached micro SD card. To view pictures, select Pictures from
the main menu.
Note: Only files from the selected Save Path will be viewable. To switch between viewing files on the
internal memory and card memory, change the Save Path option in the Settings menu.
Managing Files
To delete a saved video, audio or picture file, select and play the file, then press and hold the Mode
button.
To transfer files:
1. Use the included mini-USB cable to connect the mini-USB Port on Video Archiver to an available USB
port on your computer.
2. On Video Archiver's display, or on the display of a connected screen, select the Power & Data option.
3. You can now access the micro SD card from your computer as an external drive.
4. Files will be automatically saved to the micro SD card using default file names. You can copy these files
to your internal hard drive for viewing in standard media software.
You can also remove the micro SD Card from Video Archiver and insert it directly into your computer or a
compatible SD card reader.
Settings
Select the Settings page from the main menu to adjust the following settings.
• Display: Adjust the backlight timer for saving energy.
• Power Saving: Set the idle and sleep timers for saving energy.
• Date & Time: Sets the current date and time.
• Language: Set the operating language: English, Japanese, Simplified Chinese, Traditional Chinese,
French, German or Spanish.
• Advanced: Enter this menu to adjust the following advanced settings:
o Information: Displays the current firmware version and available internal memory.
o Save Path: Set the default save path, either internal or card memory.
IMPORTANT: The path selected here will be the only path available for saving and viewing files. To
switch between saving and viewing files from the internal path or the card memory path, change this
setting.
o Format Internal Memory: Select this to format the internal memory, erasing all files. This action
cannot be undone.
o Format Card: Select this to format an inserted micro SD card, erasing all files. This action cannot be
undone.
o Reset Default Settings: Select this to return Video Archiver to its factory default settings.
• TV: Enter this menu to adjust the following settings:
o TV In: Set the input encoding to PAL or NTSC.
o TV Out: Set the output encoding to PAL or NTSC.
Technical Specifications (English)
Dimensions
(width x depth x height)
2.4" x 4.9” x 0.8”
61 x 125 x 20 mm
Internal Memory
8 GB
Weight
0.26 lb. / 120 g
Compatible Media
Micro SD, < 32 GB (FAT32 or exFAT format)
Connections Audio-Video Input: 1/8"-to-RCA
composite
Audio-Video Outputs: HDMI,
1/8"-to-RCA composite
Audio Output: 1/8" stereo audio
Record Quality
480, 30 fps.
PAL: 720 x 576
NTSC: 720 x 480
8.5 MB/minute (video, .avi)
1.4 MB/minute (audio, .mp3)
Power
V
ia mini-USB (5 VDC, 1 A)
Via internal battery (950 mAh
lithium ion, about 2 hours
charge)
Playback File
Format
Video: .rm, .rmvb. .avi, .mkv, .wmv, .vob,
.mov, .flv, .asf, .dat, .mp4, .3gp, .mpg,
.mpeg
Audio: .mp3, .wma, .ogg, .ape, .flac, .wav, .aac
Trademarks & Licenses (English)
ION Audio is a trademark of ION Audio, LLC, registered in the U.S. and other countries. The Bluetooth word mark
and logos are owned by the Bluetooth SIG, Inc. and any use of such marks by ION Audio is under license. SD is a
registered trademark of SD-3C, LLC. All other product names, company names, trademarks, or trade names are
those of their respective owners.
ionaudio.com/support
For technical support.
Para so
p
orte técnico.
ionaudio.com/warranty
For complete warranty information.
Para información com
p
leta sobre la
g
arantía.
V
i
deo
Ar
c
hiv
e
r
Manual
V
ersion 1.0
9 8
10 11
12
13
1
2
5
3
4
6
7

Reproducción
Como reproducir los archivos de video grabados:
1. Seleccione Videos en el menú principal.
2. Utilice los botones del cursor para seleccionar un archivo y luego pulse OK para comenzar la reproducción.
Como reproducir los archivos de audio grabados:
1. Seleccione Music en el menú principal.
2. Utilice los botones del cursor para seleccionar un archivo y luego pulse OK para comenzar la reproducción.
Al reproducir archivos de audio, pulse el botón Audio Mode (modo de audio) para modificar el modo de
reproducción de audio: Reproducción aleatoria, repetición aleatoria, introducción, secuencia, repetir uno y repetir
todos.
Al reproducir archivos:
• Utilice los botones de subir y bajar el cursor para ajustar el volumen.
• Mantenga pulsados los botones de mover el cursor a la izquierda y derecha para rebobinar y realizar un
avance rápido.
• Pulse Back para volver al menú anterior.
También puede ver las imágenes almacenadas en la tarjeta micro SD insertada. Para ver las imágenes, seleccione
Pictures en el menú principal.
Nota: Sólo se podrán ver los archivos que se encuentren en la ruta de guardado seleccionada. Para alternar entre
la visualización de los archivos que se encuentran en la memoria interna y los que se encuentran en la tarjeta de
memoria, modifique la opción Save Path (ruta de guardado) en el menú de ajustes.
Administración de archivos
Para eliminar un archivo de video, audio o imagen guardado, seleccione el archivo y reprodúzcalo, y luego
mantenga pulsado el botón Mode.
Cómo transferir archivos:
1. Utilice el cable mini USB incluido para conectar el puerto mini USB del Video Archiver a un puerto USB
disponible en su computadora.
2. En la pantalla del Video Archiver o en la pantalla de su dispositivo conectado, seleccione la opción Power &
Data (alimentación y datos).
3. Ahora podrá acceder a la tarjeta micro SD desde su computadora como si fuera una unidad externa.
4. Los archivos se guardarán automáticamente a la tarjeta micro SD utilizando los nombres de archivo
predeterminados. Puede copiar estos archivos a su disco rígido interno para visualizarlos con software de
medios estándar.
También puede retirar la tarjeta micro SD del Video Archiver e insertarla directamente en su computadora o un
lector de tarjetas SD compatible.
Ajustes
Seleccione la página Settings en el menú principal para modificar los siguientes ajustes.
• Display (Pantalla): Ajuste el temporizador de la retroiluminación para ahorrar energía.
• Power Saving (Ahorro de energía): Ajuste los temporizadores de inactividad y ahorro de energía para ahorrar
energía.
• Date & Time (Fecha y hora): Muestra la fecha y hora actuales.
• Language (Idioma): Ajuste el idioma para la operación: inglés, japonés, chino simplificado, chino tradicional,
francés, alemán o español.
• Advanced (Opciones avanzadas): Entre a este menú para ajustar las siguientes opciones avanzadas:
o Information (Información): Muestra la versión actual del firmware y la memoria interna disponible.
o Save Path (Ruta de guardado): Define la ruta de guardado predeterminada, ya sea en la memoria interna o
en la tarjeta de memoria.
IMPORTANTE: La ruta seleccionada aquí será la única ruta disponible para el guardado y la visualización
de archivos. Para seleccionar entre el guardado y la visualización de archivos en una ruta interna o en una
ruta en la tarjeta de memoria, modifique este ajuste.
o Format Internal Memory (Formatear memoria interna): Seleccione esta opción para formatear la
memoria interna, eliminando todos los archivos. Esta acción no se puede deshacer.
o Format Card (Formatear tarjeta): Seleccione esta opción para formatear la tarjeta micro SD insertada,
eliminando todos los archivos. Esta acción no se puede deshacer.
o Reset Default Settings (Restaurar ajustes predeterminados de fábrica): Seleccione esta opción para
regresar el Video Archiver a sus valores predeterminados de fábrica.
• TV: Entre a este menú para modificar los siguientes ajustes:
o TV In (Entrada de TV): Ajuste la codificación de la entrada a PAL o NTSC.
o TV Out (Salida de TV): Ajuste la codificación de la salida a PAL o NTSC.
Guía de inicio rápido (Español)
Contenido de la caja
Video Archiver, control remoto, cable de audio-video de 3,5 mm (1/8 pulg.) a RCA, adaptador de audio/video
RCA, adaptador de alimentación USB, cable mini-USB, guía de inicio rápido.
Configuración
Los elementos que no se enumeran en Contenido de la caja se venden por separado.
1. Utilice el cable de audio-video de 3,5 mm (1/8 pulg.) a RCA incluido para conectar su fuente de video
(VCR, cámara de vídeo, etc.) al puerto AV In (entrada de audio-video). Asegúrese de hacer coincidir los
colores al realizar las conexiones: amarillo para el video compuesto, rojo (derecha) y blanco (izquierda)
para audio estéreo.
2. Opcional: Utilice un cable HDMI estándar o el cable de audio-video de 3,5 mm (1/8 pulg.) a RCA incluido
para conectar la salida de Video Archiver a las entradas de su televisión o monitor.
IMPORTANTE: No utilice salidas HDMI Out y AV Out al mismo tiempo. Si ambas están conectadas, solo
la salida AV Out funcionará. Para seguir utilizando HDMI, desconecte ambos cables HDMI y AV y vuelva a
conectar solamente el cable HDMI.
3. Si la batería está descargada, conecte el cable mini USB del puerto mini USB al adaptador de carga incluido.
4. Una vez realizadas correctamente todas las conexiones, encienda el Video Archiver manteniendo pulsado
el botón de encendido.
5. Seleccione TV In (entrada de TV) o Recorder (grabadora) para previsualizar el video o audio entrante
respectivamente en la pantalla y altavoz integrados del Video Archiver o en su pantalla conectada.
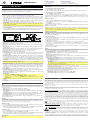
Features
9 8
10 11
12
13
1
2
5
3
4
6
7
1. Pantalla: Utilice esta pantalla para operar el Video Archiver y previsualizar las fuentes de video conectadas.
2. Volver: Pulse este botón para volver al menú anterior.
3. Botón de encendido: Mantenga pulsado este botón durante 3 segundos para encender o apagar el Video
Archiver.
4. Botón de grabación: Pulse este botón para comenzar la grabación. Púlselo nuevamente para parar y
guardar el archivo.
5. Botón de modo de audio: Pulse este botón para alternar entre 6 modos de reproducción de audio diferentes:
Reproducción aleatoria, repetición aleatoria, introducción, secuencia, repetir uno y repetir todos.
6. Botones del cursor: Utilice estos botones para navegar por los menús y los archivos.
7. Botón OK: Pulse este botón para seleccionar una opción.
8. Puerto mini-USB: Utilice el cable mini-USB incluido para conectar este puerto al cargador incluido de 5V
CC. También puede conectar el cable mini USB a su computadora para administrar los archivos o
actualizar el firmware.
9. Ranura para tarjeta micro SD: Para aumentar la capacidad de almacenamiento, inserte una tarjeta micro
SD en esta ranura hasta que oiga un "clic". Cuando se inserta una tarjeta, los archivos se guardarán
automáticamente allí en lugar de en la memoria interna. Para guardar y visualizar los archivos que se
encuentran en el almacenamiento interno, configure la opción Save Path (ruta de guardado) en "Settings"
(ajustes) nuevamente a "Internal" (interna). Para retirar la tarjeta, empújela suavemente para adentro hasta
que se libere.
Nota: Las tarjetas micro SD deben formatearse como FAT32 o exFAT y tener un tamaño menor a 32 GB.
También le recomendamos utilizar una tarjeta SD vacía.
10. Entrada de audio-video: Use el cable de audio-video de 3,5 mm (1/8 pulg.) a RCA incluido para conectar
esta entrada a la salida de audio RCA y video compuesto de su VCR, cámara de vídeo o otro dispositivo
de reproducción. Asegúrese de hacer coincidir los colores al realizar las conexiones: amarillo para el video
compuesto, rojo (derecha) y blanco (izquierda) para audio estéreo. También puede conectar un cable de
audio estéreo de 3,5 mm (1/8 pulg.) desde esta entrada a la salida del dispositivo de audio y grabar el
audio solamente.
11. Salida HDMI: Utilice un cable HDMI estándar para conectar esta salida a su televisión o monitor.
12. Salida de audio-video: Utilice un cable estándar de audio-video de 3,5 mm (1/8 pulg.) a RCA incluido
para conectar esta salida a las entradas de video de su televisión o monitor.
13. Salida para auriculares: Conecte a esta salida de 3,5 mm (1/8 pulg.) auriculares o altavoces para
monitorear la reproducción de audio.
IMPORTANTE:
• No conecte salidas HDMI Out y AV Out al mismo tiempo.
• Cuando esté en uso una de las salidas HDMI Out o AV Out, la pantalla se apagará.
• Cuando esté en uso el puerto de salida HDMI Out, no se emitirá audio a través de la salida
Headphone Out.
14. Altavoz: Este altavoz interno reproducirá sonido directamente desde las fuentes de entrada o los archivos
grabados.
15. Reinicializar: Pulse este botón para regresar el Video Archiver a sus valores predeterminados de fábrica.
Funcionamiento
Menú
Cuando el Video Archiver está encendido, la pantalla muestra el menú principal. Desde aquí podrá acceder a
las siguientes funciones:
• Videos: Seleccione esta opción para reproducir videos grabados.
• Music (Música): Seleccione esta opción para reproducir audio grabado.
• Pictures (Imágenes): Seleccione esta opción para visualizar las imágenes almacenadas en la tarjeta micro
SD insertada.
• TV In (Entrada de TV): Seleccione esta opción para previsualizar y grabar la entrada de video.
• Recorder (Grabadora): Seleccione esta opción para previsualizar y grabar la entrada de audio solamente.
• Settings (Ajustes): Seleccione esta opción para modificar los ajustes del dispositivo.
El menú principal también muestra la hora actual, las conexiones de la tarjeta micro SD y el cable mini USB, y
la carga restante de la batería.
Grabación
Antes de grabar, asegúrese de haber respetado las indicaciones que figuran en Configuración. Una vez
realizadas correctamente todas las conexiones, encienda el Video Archiver.
Grabación de video
1. Seleccione TV In en el menú principal para ver una vista previa de su dispositivo conectado en la pantalla.
2. Para comenzar la grabación, pulse el botón Record o el botón OK.
3. Para detener la grabación y guardar el archivo, pulse nuevamente el botón Record. También puede pulsar
el botón OK para detener la grabación y luego pulsar Back para guardar el archivo.
Grabación de audio
1. Seleccione Recorder en el menú principal para monitorear su dispositivo de audio conectado.
2. Para comenzar la grabación, pulse el botón Record o el botón OK.
3. Para detener la grabación y guardar el archivo, pulse nuevamente el botón Record. También puede pulsar
el botón OK para detener la grabación y luego pulsar Back para guardar el archivo.
IMPORTANTE: No conecte ningún otro cable de audio/video mientras la grabación esté en curso o perderá la
grabación.
Notice Concerning FCC Regulations: You are cautioned that changes or modifications not expressly approved by the part
responsible for compliance could void the user's authority to operate the equipment. This equipment has been tested and
found to comply with the limits for a Class B digital device, pursuant to part 15 of the FCC rules. These limits are designed to
provide reasonable protection against harmful interference in a residential installation. This equipment generates uses and can
radiate radio frequency energy and, if not installed and used in accordance with the instructions, may cause harmful
interference to radio communications. However, there is no guarantee that interference will not occur in a particular installation.
If this equipment does cause harmful interference to radio or television reception, which can be determined by turning the
equipment off and on, the user is encouraged to try to correct the interference by one or more of the following measures: (a)
reorient or relocate the receiving antenna; (b) move this unit; (c) increase the separation between the equipment and receiver;
(d) connect the equipment into an outlet on a circuit different from that to which the receiver is connected; (e) be sure that all
cables are properly shielded, using a choke or ferrite where appropriate; (f) consult the dealer or an experienced radio/television
technician for help.
ESD / EFT Warning: This unit may contain a microcomputer for signal processing and control functions. In very
rare situations, severe interference, noise from an external source, or static electricity may cause it to lock up. In the
unlikely event that this should happen, turn off the unit, wait at least five seconds, and then turn it back on again.
This device complies with part 15 of the FCC rules. Operation is subject to the following two conditions: (1) this
device may not cause harmful interference, and (2) this device must accept any interference received, including
interference that may cause undesired operation.
FCC RF Radiation Exposure Statement: This equipment complies with FCC radiation exposure limits set forth for an
uncontrolled environment. End users must follow the specific operating instructions for satisfying RF exposure compliance.
This transmitter must not be co-located or operating in conjunction with any other antenna or transmitter.
Safety Instructions (English)
Read and follow these instructions, heed all warnings, and keep this document in a safe place for future reference. Clean only
with dry cloth. Refer all servicing to qualified service personnel. Servicing is required when the apparatus has been damaged in
any way, such as power cord or plug is damaged, does not operate normally, or has been dropped. Connect this product to a
power supply only of the type described in these operating instructions, or as marked on the unit. Keep this product away from
direct contact with liquids.
Caution: To reduce the risk of electric shock, do not remove any cover. No user-serviceable parts inside. Refer servicing to
qualified service personnel only.
Note: This product contains a lithium-ion battery. Never dispose of any types of batteries in fire or near excessive heat or direct
sunlight. Overheated batteries can rupture or explode. If you are unsure of how or where to dispose of a battery, refer to your
local ordinances for the proper location, method, etc.
In an environment with radio frequency interference, the unit may malfunction and resume normal operation after removal of
the interference. For best audio quality, avoid using this device in a high RF-radiated environment. This unit does not exceed
the Class B limits for radio noise emission from digital apparatus set out in the radio interference regulations of the Canadian
Department of Communications.
ION Audio is a trademark of ION Audio, LLC, registered in the U.S. and other countries. The Bluetooth word mark and logo are
owned by the Bluetooth SIG, Inc. and any use of such marks by ION Audio is under license. SD is a registered trademark of
SD-3C, LLC. All other product names, company names, trademarks, or trade names are those of their respective owners.
ionaudio.com/support
For technical support.
Para so
p
orte técnico.
ionaudio.com/warranty
For complete warranty information.
Para información com
p
leta sobre la
g
arantía.
V
i
deo
Ar
c
hiv
e
r
Manual Version 1.0
-
 1
1
-
 2
2


iON Video Archiver Guía de inicio rápido
- Categoría
- Dashcam
- Tipo
- Guía de inicio rápido
en otros idiomas
- English: iON Video Archiver Quick start guide