
xepton
2.4 GHz Tour Guide System
DE
EN
User manual
FR
Mode d’emploi
Seite 2
Page 22
Page 12
Bedienungsanleitung
xepton T-1 Stationärer Sender
xepton T-1 Stationary transmitter
xepton T-1 Émetteur stationnaire
NL
Gebruiksaanwijzing Seite 32
xepton T-1 Stationaire zender
IT
Istruzioni per l’uso Pagina 42
xepton T-1 trasmettitore stazionario
ES
Página 52
xepton T-1 transmisor estacionario
Instrucciones de servicio

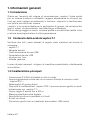
1. Allgemeine Information
1.1 Einführung
Vielen Dank für den Kauf des »xepton« Kommunikationssystems! Sie haben
sich dabei für ein modernes und zuverlässiges System entschieden. Bitte le-
sen Sie diese Bedienungsanleitung aufmerksam durch, um die Geräte richtig
in Betrieb nehmen zu können und mit allen Möglichkeiten des Systems vertraut
zu werden.
»xepton« ist ein ideales System für Gruppenanwendungen - vom einfachen
Dialog bis hin zu Dolmetscher-, Team-Teaching- und Konferenzsystemen.
Leicht und schlank im Design vereint es Qualität und Vielseitigkeit mit Bedie-
nungsfreundlichkeit und dem neuesten Stand der Funktechnologie.
1.2 Lieferumfang xepton T-1
Überprüfen Sie bitte, ob alle nachfolgend aufgeführten Teile enthalten sind:
- xepton T-1
- Aufbewahrungs-Softkoffer
- USB-Netzkabel
- USB-Netzteil
- Bedienungsanleitung
- Garantiekarte
Sollten Teile fehlen, wenden Sie sich bitte an den Fachhändler oder direkt an
den Hersteller.
1.3 Hauptmerkmale
- Weltweit nutzbare 2.4 GHz-Übertragung
- Drahtlose Versorgung einer unbegrenzten Anzahl an mobilen Empfängern –
»xepton RX-1« oder »xepton RX-1U«
- 40 verschiedene anwählbare Gruppen
- Zwei »xepton TRX-1«-Sende-/ Empfangseinheiten können bidirektional mit
dem »xepton T-1« betrieben werden.
- Hohe Reichweite von bis zu 400 m
- Vollständig digitale kristallklare Tonqualität
- Mikrofonempfindlichkeit einstellbar in 5 Stufen
- 9 Lautstärkestufen
- Kann mit einem mobilen USB Akku-Pack betrieben werden
Deutsch 2

1.4 Lieferbares Zubehör
- TRX-1 Transceiver A-5200-0
- RX-1 Empfänger A-5221-0
- RX-1U Kinnbügelempfänger A-5225-0
- HSB-01 Mikrofon-Headset A-5270-0
- EBB-01 Mikrofon-Headset A-5271-0
- EHR-01 Mikrofon-Headset A-5272-0
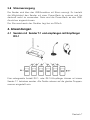
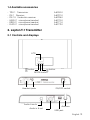
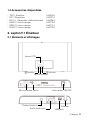
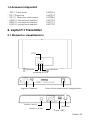
2. xepton T-1 Sender
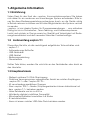
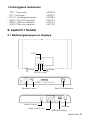
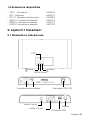
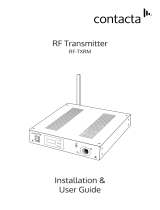
2.1 Elemente und Anzeigen
LCD
-Taste -Taste
MODE-Taste
Headset-Eingänge Ein/Aus-Schalter
Audio-Line-In
Audio in & out USB-Anschluss
Antenne
Deutsch 3

3. Bedienung
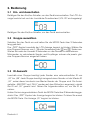
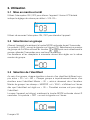
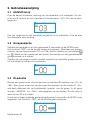
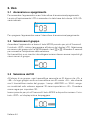
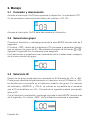
3.1 Ein- und Ausschalten
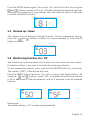
Betätigen Sie den Ein/Aus-Schalter, um das Gerät einzuschalten. Die LCD-An-
zeige leuchtet auf und der Lautstärke-Grundzustand „VOL 03“ wird angezeigt.
Betätigen Sie den Ein/Aus-Schalter, um das Gerät auszuschalten.
3.2 Gruppe auswählen
Schalten Sie das Gerät ein und halten Sie die MODE-Taste über 3 Sekunden
lang gedrückt.
Das „GRP“-Symbol innerhalb der LCD-Anzeige beginnt zu blinken. Wählen Sie
eine Gruppen-Nummer von 0 - 39 unter Verwendung der und -Tasten aus.
Warten Sie nach der Auswahl 3 Sekunden um die Auswahl zu übernehmen.
Miteinander zu verbindende Sender und Empfänger müssen die jeweils glei-
che Gruppen-Nummer eingestellt haben.
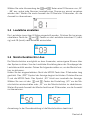
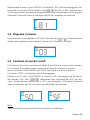
3.3 ID-Auswahl
Innerhalb einer Gruppe benötigt jeder Sender eine unterschiedliche ID von
„00“ bis „99“. Jede Gruppe benötigt zwingend einen Sender mit der Master-ID
„00“, wobei dieser hierdurch zum Master-Sender der Gruppe wird. Die Anzei-
gefelder „MASTER“ und „TALK“ werden auf dem Bildschirm angezeigt, sobald
die ID auf „00“ gesetzt wird. Gehen Sie folgendermaßen vor, um die ID zu
setzen:
Halten Sie bei eingeschaltetem Gerät die MODE-Taste über 3 Sekunden lang ge-
drückt. Das „GRP“-Symbol der Anzeige beginnt zu blinken. Drücken Sie erneut
die MODE-Taste. Die Anzeige „ID“ beginnt zu blinken.
Deutsch 4

Wählen Sie unter Verwendung der und -Tasten eine ID-Nummer von „00“
- „99“ aus, wobei jede Nummer innerhalb einer Gruppe nur einmal vergeben
werden darf. Warten Sie nach Auswahl der ID-Nummer 3 Sekunden, um die
Auswahl zu übernehmen.
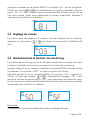
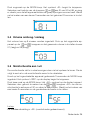
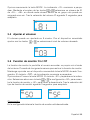
3.4 Lautstärke einstellen
Die Lautstärke kann über 9 Stufen eingestellt werden. Drücken Sie bei einge-
schaltetem Gerät die und -Tasten um die Lautstärke zwischen 01 (nied-
rig) und 09 (hoch) nach Belieben einzustellen.
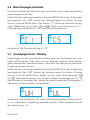
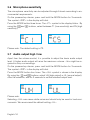
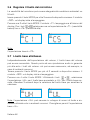
3.5 Monitorfunktion Ein / Aus
Die Monitorfunktion ermöglicht es dem Anwender, seine eigene Stimme über
das System zu hören. Von der Lautstärke-Einstellung kann der Grundpegel der
Lautstärke erhöht werden. Gehen Sie folgendermaßen vor, um die Monitorfunk-
tion zu aktivieren:
Halten Sie bei eingeschaltetem Gerät die MODE-Taste über 3 Sekunden lang
gedrückt. Das „GRP“-Symbol der Anzeige beginnt zu blinken. Drücken Sie nun
2 mal die MODE-Taste. Das Symbol „SO“ blinkt nun innerhalb der Anzeige.
Wählen Sie nun mit den und -Tasten die Einstellung „SO“ um die Mo-
nitorfunktion einzuschalten oder „SF“ um die Monitorfunktion zu deaktivieren.
Warten Sie nach Auswahl der Monitorfunktionsart 3 Sekunden, um die Auswahl
zu übernehmen.
Anmerkung: In der Grundeinstellung ist die Monitorfunktion deaktiviert.
Deutsch 5

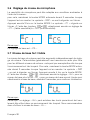
3.6 Mikrofonpegel einstellen
Die Empfindlichkeit des Mikrofons kann auf 5 Stufen den Umgebungsbeding-
ungen angepasst werden:
Halten Sie hierzu bei eingeschaltetem Gerät die MODE-Taste über 3 Sekunden
lang gedrückt. Das „GRP“-Symbol der Anzeige beginnt zu blinken. Drücken
Sie nun 3 mal die MODE-Taste. Das Symbol „C1“ blinkt nun innerhalb der An-
zeige. Wählen Sie nun mit den und -Tasten eine Einstellung von „C1“
(niedrige Empfindlichkeit) bis „C5“ (hohe Empfindlichkeit) aus.
Anmerkung: Die Grundeinstellung ist „C3“.
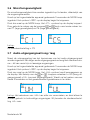
3.7 Grundpegel Hoch / Niedrig
Unabhängig von der Lautstärke-Einstellung kann der Grundpegel der Laut-
stärke erhöht werden. Dies führt zu einer allgemein lauteren Audio-Wieder-
gabe innerhalb der Lautstärke-Stufen - dies kann zum Beispiel bei lautstarker
Umgebung notwendig sein.
Halten Sie hierzu bei eingeschaltetem Gerät die MODE-Taste über 3 Sekunden
lang gedrückt. Das „GRP“-Symbol der Anzeige beginnt zu blinken. Drücken
Sie nun 4 mal die MODE-Taste. Wählen Sie nun unter Verwendung der
und -Tasten die Einstellung „UH“ für den erhöhten Grundpegel und „UL“ für
den normalen Grundpegel aus. Warten Sie nach Auswahl des Grundpegels 3
Sekunden, um die Auswahl zu übernehmen.
Anmerkung: Die Einstellung „UH“ kann zu Nebengeräuschen führen und soll-
te nur in lautstarker Umgebung verwendet werden. Daher empfehlen wir die
Grundeinstellung „UL“.
Deutsch 6

3.8 Stromversorgung
Der Sender wird über den USB-Anschluss mit Strom versorgt. Es besteht
die Möglichkeit den Sender mit einer Power-Bank zu speisen und ihn
dadurch mobil zu verwenden. Dazu wird die Power-Bank an den USB-
Anschluss angeschlossen.
Der Stormverbauch des Gerätes liegt bei ca 200mA.
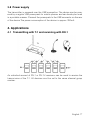
4. Anwendungen
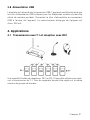
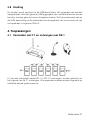
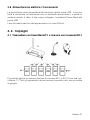
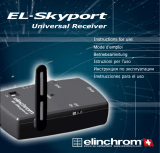
4.1 Senden mit Sender T-1 und empfangen mit Empfänger
RX-1
Eine unbegrenzte Anzahl RX-1- oder RX-1U-Empfänger können mit einem
Sender T-1 betrieben werden. Alle Geräte müssen auf die gleiche Gruppen-
nummer eingestellt sein.
Deutsch 7

Deutsch 8
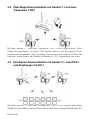
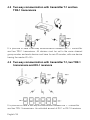
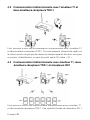
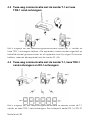
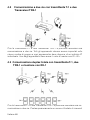
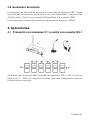
4.2 Zwei-Wege-Kommunikation mit Sender T-1 und zwei
Transceiver TRX-1
Mit dem Sender T-1 und zwei Transceiver TRX-1 ist es möglich eine Zwei-
Wege-Kommunikation zu führen. Alle Geräte müssen auf die gleiche Grup-
pennummer eingestellt sein und jedes Gerät muss eine eigene ID-Nummer
besitzen, wobei einem der Geräte die Master-ID „00“ zugewiesen sein muss.
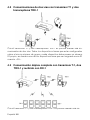
4.3 Voll-duplex Kommunikation mit Sender T-1, zwei TRX-1
und Empfangen mit RX-1
Mit dem Sender T-1 und zwei Transceivern TRX-1 ist es möglich eine Zwei-
Wege-Kommunikation führen. Gleichzeitig kann eine unbegrenzte Menge RX-

Deutsch 9
1- oder RX-1U Empfänger die Übertragung empfangen. Alle Geräte müssen
auf die gleiche Gruppennummer eingestellt sein und jedes Sendegerät muss
eine eigene ID-Nummer besitzen, wobei einem der Sendegeräte die Master-ID
„00“ zugewiesen sein muss.
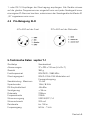
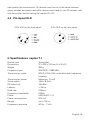
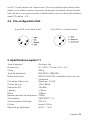
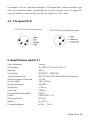
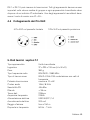
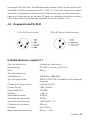
4.3 Pin-Belegung XLR
5. Technische Daten xepton T-1
Gerätetyp Sendeeinheit
Abmessungen 37 x 230 x 124 mm (H x B x T)
Gewicht 390 g
Funkfrequenzart ISM 2403 - 2480 MHz
Übertragungsart ISM 2.4 GHz FSK Modulation mit
Frequenzhopping
Sendeleistung Maximum 10 mW
Sprachcodec 16bit / 8 KHz
RX-Empfindlichkeit -95 dBm
Verzögerung < 35 ms
Datenrate 2 Mbps
Frequenzbreite 2 MHz
Stromversorgung USB 5V/DC / 1A
Stromverbrauch 200 mA
Reichweite bis 150 m
Frequenzgang 50 Hz - 7 kHz
4 Pin XLR auf der Front 3 Pin XLR auf der Rückseite

6. Konformität
Dieses Gerät erfüllt die Anforderungen folgender EU-Richtlinien:
- 2011 / 65 / EG RoHS-Richtlinie
- 2012 / 19 / EG WEEE-Richtlinie
- 2014 / 53 / EG RED-Richtlinie
Die Konformität mit den o. a. Richtlinien wird durch das CE-Zeichen auf dem
Gerät bestätigt. Die vollständige CE Konformitätserklärung steht im Internet
unter www.humantechnik.com zur Verfügung.
Technische Änderungen vorbehalten.
7. Wartung und Pege
Alle »xepton«-Geräte sind wartungsfrei.
Bei Verschmutzung sollten Sie die Geräte gelegentlich mit einem weichen, an-
gefeuchteten Tuch reinigen. Verwenden Sie niemals Alkohol, Verdünner oder
andere organische Lösungsmittel. Setzen Sie die Geräte bitte nicht über län-
gere Zeit direkter Sonneneinstrahlung aus und schützen diese darüber hinaus
vor großer Hitze, Feuchtigkeit oder starker mechanischer Erschütterung.
Achtung: Die Geräte sind nicht gegen Spritzwasser geschützt (Ausnahme:
TRX-1). Stellen Sie keine mit Flüssigkeit gefüllten Gegenstände, z.B. Vasen,
neben die Geräte. Ebenfalls dürfen keine offenen Brandquellen, wie z.B. bren-
nende Kerzen, in die unmittelbare Nähe der Geräte gestellt werden.
8. Garantie
Alle »xepton«-Geräte weisen eine hohe Betriebssicherheit auf. Sollten trotz
sachgerechter Bedienung Störungen auftreten, setzen Sie sich bitte mit Ihrem
Fachhändler in Verbindung oder wenden Sie sich direkt an den Hersteller.
Die Garantieleistung umfasst die kostenlose Reparatur sowie den kostenlosen
Rückversand.
Das Einsenden sollte möglichst in der Originalverpackung erfolgen, werfen
Sie diese daher während der Garantiezeit nicht weg. Die Garantie verfällt bei
Schäden, die durch unsachgemäße Behandlung oder Reparaturversuchen
von nicht autorisierten Personen (Zerstörung des Gerätesiegels) herbeigeführt
wurden.
Garantiereparaturen werden nur bei Einsendung der ausgefüllten Garantiekar-
Deutsch 10

te und einer Kopie der Rechnung/Kassenbeleg des Fachhändlers durchge-
führt. Die Gerätenummer muss in jedem Fall mit angegeben werden.
Entsorgung von gebrauchten elektrischen und elektronischen
Geräten (anzuwenden in den Ländern der Europäischen Union und
anderen europäischen Ländern mit einem separaten Sammelsystem
für diese Geräte). Das Symbol auf dem Produkt oder seiner Verpa-
ckung weist darauf hin, dass dieses Produkt nicht als normaler Haushaltsabfall
zu behandeln ist, sondern an einer Annahmestelle für das Recycling von elek-
trischen und elektronischen Geräten abgegeben werden muss.
Durch Ihren Beitrag zum korrekten Entsorgen dieses Produkts schützen Sie die
Umwelt und die Gesundheit Ihrer Mitmenschen.
Umwelt und Gesundheit werden durch falsches Entsorgen gefährdet. Material-
recycling hilft den Verbrauch von Rohstoffen zu verringern.
Weitere Informationen über das Recycling dieses Produkts erhalten Sie von
Ihrer Gemeinde, den kommunalen Entsorgungsbetrieben oder dem Geschäft,
in welchem Sie das Produkt gekauft haben.
Deutsch 11

1. General information
1.1 Introduction
Thank you very much for purchasing the »xepton« communication system! You
have chosen a modern and reliable system. Please read this manual carefully
to be able to set up the unit correctly and to familiarise yourself with all of the
systems features.
»xepton« is an ideal system for application within groups – ranging from simple
dialogue to interpreter-, team-teaching- and conference systems.
Being slim and light-weight in design, it combines quality and versatility with
easy use and state-of-the-art radio technology.
1.2 Scope of delivery xepton T-1
Please check if all of the following components are included:
- xepton T-1
- Soft storage case
- USB power lead
- USB power supply
- User manual
- Warranty card
Should any parts be missing, please contact your dealer or the manufacturer
directly.
1.3 Main Features
- Worldwide compatibility due to restriction-free 2.4 GHz transmission
- Supports an unlimited amount of receivers »xepton RX-1«
- 40 selectable channel groups
- The »xepton T-1« can be used in two-way communication with two »xepton
TRX-1« transceiver units.
- Large signal range of up to 400 m
- Completely digital crystal-clear sound quality
- Microphone sensitivity adjustable in 5 levels
- 9 selectable levels of volume
- Can be powered with a portable USB power pack
English 12

1.4 Available accessories
- TRX-1 Transceiver A-5200-0
- RX-1 Receiver A-5221-0
- RX-1U Underchin receiver A-5225-0
- HSB-01 microphone-headset A-5270-0
- EBB-01 microphone-headset A-5271-0
- EHR-01 microphone-headset A-5272-0
2. xepton T-1 Transmitter
2.1 Controls and displays
LCD
-button -button
MODE-button
Headset-jacks ON/OFF-switch
Audio-Line-In
Audio in & out USB jack
Antenna
English 13

3. How to use
3.1 Power ON / OFF
Use the ON/OFF switch to switch the device on. The illuminated LC display
indicates the default volume setting »VOL 03«.
Use the ON/OFF switch again to switch the device off.
3.2 Group selection
Switch the device on and press the MODE-button for 3 seconds.
The symbol »GRP« in the display will blink. Select a group number of your choice
between »00« and »39« by pressing the and -buttons. After the selection,
wait for 3 seconds to set the selected group number.
Transmitters and receivers must be set to the same group number if they are to
communicate with each other.
3.3 ID selection
Within a group, each transmitter needs to have a different ID from »00« to
»99«. Every group must have a transmitter set to the master-ID »00«, which
defines it as the master transmitter of the group. In this case, »MASTER« and
»TALK« are indicated on the display. To set the ID, continue as follows:
On the powered-up device, press and hold the MODE-button for 3 seconds.
The symbol »GRP« on the display will blink.
English 14

Press the MODE-button again. The symbol »ID« will start to blink. By using the
and -buttons, select an ID from 00 to 99, while taking care that each de-
vice within the group has its own number. After the selection, wait for 3 seconds
to set the selected ID number.
3.4 Volume up / down
The volume can be adjusted through 9 levels. On the powered-up device,
press the and -buttons to adjust the volume between 01 (low) and 09
(high) as desired.
3.5 Monitoring function On / Off
The monitoring function enables you to hear your own voice over the system.
Proceed as follows if you wish to activate the monitoring function:
On the powered-up device, press and hold the MODE-button for 3 seconds.
The symbol »GRP« in the display will blink.
Press the MODE button two times. The »SO« symbol in the display blinks. By
using the and -buttons, select »SO« to activate the monitoring function
or SF to deactivate it. After the selection, wait for 3 seconds to set the selected
function.
Please note:
The default setting is »SF« (monitoring deactivated).
English 15

3.6 Microphone sensitivity
The microphone sensitivity can be adjusted through 5 levels according to en-
vironmental requirements:
On the powered-up device, press and hold the MODE-button for 3 seconds.
The symbol »GRP« in the display will blink.
Press the MODE button three times. The »C1« symbol in the display blinks. By
using the and -buttons, select between C1 (low sensitivity) and C5 (high
sensitivity).
Please note: The default setting is C3.
3.7 Audio output high / low
Apart from the volume control, it is possible to adjust the basic audio output
level. A higher audio output will raise the maximum volume – this might be re-
quired in noisy surroundings.
On the powered-up device, press and hold the MODE-button for 3 seconds.
The symbol »GRP« in the display will blink.
Press the MODE button four times. The »UH« symbol is shown in the display.
By using the and -buttons, select UH (high output) or UL (normal output).
After the selection, wait for 3 seconds to set the selected output level.
Please note:
Selecting »UH« can cause white noise and should only be used in loud envi-
ronments. We recommend the default setting »UL«.
English 16

3.8 Power supply
The transmitter is powered over the USB connection. The device can be pow-
ered by a regular USB powerpack for mobile phones and can hereby be used
in a portable manner. Connect the powerpack to the USB connector on the rear
of the device.The power consumption of the device is approx. 200mA.
4. Applications
4.1 Transmitting with T-1 and receiving with RX-1
An unlimited amount of RX-1 or RX-1U receivers can be used to receive the
transmission of the T-1. All devices must be set to the same channel group
number.
English 17

English 18
4.2 Two-way communication with transmitter T-1 and two
TRX-1 transceivers
It is possible to have a two-way communication between the T-1 transmitter
and two TRX-1 transceivers. All devices must be set to the same channel
group number and each device must have its own ID number, with one device
having the master-ID »00«.
4.3 Two-way communication with transmitter T-1, two TRX-1
transceivers and RX-1 receivers
It is possible to have a two-way communication between the T-1 transmitter
and two TRX-1 transceivers. An unlimited amount of RX-1 or RX-1U receivers

English 19
can receive the transmission. All devices must be set to the same channel
group number and each transmitter device must have its own ID number, with
one transmitter device having the master-ID »00«.
4.4 Pin-layout XLR
5. Specications xepton T-1
Device type Transmitter
Dimensions 37 x 230 x 124 mm (H x W x D)
Weight 390 g
Frequency type ISM 2403 - 2480 MHz
Transmission mode ISM 2.4 GHz FSK modulation with frequency
hopping
Transmission power Maximum 10 mW
Voice codec 16bit / 8 KHz
RX-sensitivity -95 dBm
Latency < 35 ms
Data rate 2 Mbps
Frequency bandwidth 2 MHz
Power USB 5V/DC / 1A
Power consumption 200 mA
Range up to 150 m
Frequency response 50 Hz - 7 kHz
4 Pin XLR on the front panel 3 Pin XLR on the rear panel

6. Conformity
This device complies with the following EC directives:
- 2011 / 65 / EC RoHS-directive
- 2012 / 19 / EC WEEE-directive
- 2014 / 53 / EC RED-directive
Compliance with the directives listed above is confirmed by the CE seal on
the device. The complete CE compliance declaration is available on the inter-
net at www.humantechnik.com.
Specifications subject to change.
7. Maintenance and care
All »xepton«-devices do not require any maintenance. If they become dirty,
simply wipe them clean with a soft, damp cloth.
Never use spirits, thinners or other organic solvents. Do not expose them to
full sunlight.
In addition, they must be protected against excessive heat, moisture and se-
vere mechanical shocks.
Note: These products are not protected against splash water. Do not place
any containers filled with water, such as flower vases, or anything with an open
flame, such as a lit candle, above or near the products.
8. Warranty
All »xepton«-devices are very reliable products. Should a malfunction occur
despite the unit having been set up and operated correctly, please contact
your dealer or the manufacturer directly.
This warranty covers the repair of the product and returning it to you free of
charge. It is recommended that you send in the product in its original pa-
ckaging, so keep the packaging for the duration of the warranty period. The
warranty does not apply to damage caused by incorrect handling or attempts
to repair the unit by unauthorised persons (destruction of the seal on the unit).
Repairs will only be carried out under warranty if the completed warranty card
is returned accompanied by a copy of the dealer’s invoice/till receipt.
Always specify the product serial number in any event.
English 20

Disposal of used electrical and electronic units (applicable in the
countries of the European Union and other European with a separate
collection system). The symbol on the product or the packaging indicates
that this product is not to be handled as ordinary household waste but
has to be returned to a collecting point for the recycling of electrical and elec-
tronic units. You protect the environment and health of your fellow man by the
correct disposal of this product. Environment and health are endangered by in-
correct disposal.
Material recycling helps to reduce the consumption of raw material. You will re-
ceive further information on the recycling of products from your local community,
our communal disposal company or your local dealer.
English 21

1. Informations générales
1.1 Introduction
Nous vous remercions d’avoir acheté le système de communication « xepton »
! Vous avez opté pour un système moderne et fiable. Veuillez lire attentivement
ce mode d’emploi afin de mettre correctement en service les appareils et de
vous familiariser avec toutes les possibilités du système.
« xepton » est un système idéal pour les applications de groupes - du simple
dialogue jusqu’aux systèmes d’interprétation, de formation en équipe et de
conférence.
Ce système au design épuré et fin associe la qualité et la polyvalence à la faci-
lité d’utilisation et aux progrès les plus récents en matière de technologie radio.
1.2 Équipement standard xepton T-1
Veuillez vérifier si les pièces suivantes sont présentes:
- Émetteur « xepton T-1 »
- Pochette de rangement souple
- Câble d’alimentation USB
- Bloc d’alimentation USB
- Mode d’emploi
- Certificat de garantie
Si des pièces manquent, veuillez vous adresser à votre revendeur ou directe-
ment au fabricant.
1.3 Caractéristiques principales
- Compatibilité mondiale grâce à une transmission 2.4GHz sans restriction
- Supporte une quantité illimitée de récepteurs « xepton RX-1 »
- 40 groupes de canaux sélectionnables
- Le « xepton T-1 » peut être utilisé en communication bidirectionnelle avec
deux émetteurs-récepteurs « xepton TRX-1 »
- Grande plage de signalisation allant jusqu’à 400 m
- Qualité de son cristalline entièrement numérique
- Sensibilité du microphone réglable en 5 niveaux
- 9 niveaux de volume sélectionnables
- Peut être alimenté par un bloc d’alimentation USB portable
Français 22

1.4 Accessoires disponibles
- TRX-1 Émetteur A-5200-0
- RX-1 Récepteur A-5221-0
- RX-1U Récepteur stéthoscopique A-5225-0
- HSB-01 micro-casque A-5270-0
- EBB-01 micro-casque A-5271-0
- EHR-01 micro-casque A-5272-0
2. xepton T-1 Émetteur
2.1 Éléments et affichages
écran LCD
-bouton -bouton
MODE-bouton
Micro-casque -jacks Interrupteur ON/OFF
Entrée Audio-in
Sortie Audio-out USB jack
Français 23
Antenne

3. Utilisation
3.1 Mise en marche et arrêt
Utilisez l’interrupteur ON / OFF pour allumer l’appareil. L’écran LCD éclairé
indique le réglage de volume par défaut « VOL 03 ».
Utilisez de nouveau l’interrupteur ON / OFF pour éteindre l’appareil.
3.2 Sélectionner un groupe
Allumez l’appareil et maintenez la touche MODE enfoncée durant 3 secondes.
Le symbole « GRP » se met à clignoter sur l’écran LCD. Sélectionnez un numéro
de groupe de 0 à 39 en utilisant les touches et . Après avoir sélectionné le
groupe, attendez 3 secondes pour confirmer la sélection.
Les émetteurs et les récepteurs à connecter doivent être réglés sur le même
numéro de groupe.
3.3 Sélection de l’identiant
Au sein d’un groupe, chaque émetteur a besoin d’un identifiant différent com-
pris entre « 00 » et « 99 ». Chaque groupe a impérativement besoin d’un
émetteur avec l’identifiant Master « 00 », celui-ci devenant alors l’émetteur
Master du groupe. Les champs « MASTER » et « TALK » s’affichent sur l’écran
dès que l’identifiant est réglé sur « 00 ». Procédez comme suit pour régler
l’identifiant :
Lorsque l’appareil est allumé, maintenez la touche MODE enfoncée durant 3
secondes. Le symbole « GRP » se met à clignoter sur l’écran.
Français 24

Appuyez à nouveau sur la touche MODE. Le symbole « ID » se met à clignoter.
Utilisez les touches et -pour sélectionner un numéro d’identifiant compris
entre « 00 » et « 99 », chaque numéro ne pouvant être attribué qu’une fois au
sein d’un groupe. Après avoir sélectionné le numéro d’identifiant, attendez 3
secondes pour confirmer la sélection.
3.4 Réglage du volume
Le volume peut être réglé sur 9 niveaux. Lorsque l’appareil est en marche,
appuyez sur les touches et pour régler le volume entre 01 (faible) et 09
(fort).
3.5 Marche/arrêt de la fonction de monitoring
La fonction de monitoring permet à l’utilisateur d’entendre sa propre voix via le
système. Procédez comme suit pour activer la fonction de monitoring :
lorsque l’appareil est en marche, maintenez la touche MODE enfoncée durant
3 secondes. Le symbole « GRP » se met à clignoter sur l’écran.
Appuyez ensuite 2 fois sur la touche MODE. Le symbole « SO » clignote sur
l’écran. À l’aide des touches et , sélectionnez le réglage « SO » pour
activer la fonction de monitoring ou « SF » pour désactiver la fonction de moni-
toring. Après avoir sélectionné l’activation de la fonction de monitoring, attendez
3 secondes pour confirmer la sélection.
Remarque :
La fonction de monitoring est désactivée dans le réglage de base.
Français 25

3.6 Réglage du niveau du microphone
La sensibilité du microphone peut être adaptée aux conditions ambiantes à
l’aide de 5 niveaux :
pour cela, maintenez la touche MODE enfoncée durant 3 secondes lorsque
l’appareil est en marche. Le symbole « GRP » se met à clignoter sur l’écran.
Appuyez ensuite 3 fois sur la touche MODE. Le symbole « C1 » clignote sur
l’écran. À l’aide des touches et , sélectionnez ensuite un réglage de
« C1 » (faible sensibilité) à « C5 » (forte sensibilité).
Remarque :
Le réglage de base est « C3 ».
3.7 Niveau de base fort / faible
Le niveau de base du volume peut être augmenté indépendamment du régla-
ge du volume. Cela entraîne généralement une transmission radio plus forte
pour les différents niveaux de volume - cela peut par exemple être utile lorsque
l’environnement est très bruyant. Pour cela, maintenez la touche MODE enfon-
cée durant 3 secondes lorsque l’appareil est en marche. Le symbole « GRP
» se met à clignoter sur l’écran. Appuyez ensuite 4 fois sur la touche MODE.
À l’aide des touches et , choisissez ensuite le réglage « UH » pour un
niveau de base plus fort et « UL » pour un niveau de base normal. Après avoir
sélectionné le niveau de base, attendez 3 secondes pour confirmer la sélection.
Remarque :
Remarque : Le réglage « UH » peut entraîner des bruits parasites et doit seu-
lement être utilisé dans un environnement très bruyant. Nous recommandons
donc d’utiliser le niveau de base « UL ».
Français 26

3.8 Alimentation USB
L’émetteur est alimenté par la connexion USB. L’appareil peut être alimenté par
un bloc d’alimentation USB ordinaire pour les téléphones mobiles et peut être
utilisé de manière portable. Connectez le bloc d’alimentation au connecteur
USB à l’arrière de l’appareil. La consommation d’énergie de l’appareil est
d’env. 200 mA.
4. Applications
4.1 Transmission avec T-1 et réception avec RX1
Une quantité illimitée de récepteurs RX1 ou RX-1U peut être utilisée pour rece-
voir la transmission du T-1. Tous les appareils doivent être réglés sur le même
numéro de groupe de canaux.
Français 27

Français 28
4.2 Communication bidirectionnelle avec l’émetteur T1 et
deux émetteurs-récepteurs TRX-1
Il est possible d’avoir une communication bidirectionnelle entre l’émetteur T-1
et deux émetteurs-récepteurs TRX-1. Tous les appareils doivent être réglés sur
le même numéro de groupe de canaux et chaque appareil doit avoir son prop-
re numéro d’identification, un seul dispositif ayant l’ID-maître « 00 ».
4.3 Communication bidirectionnelle avec émetteur T1, deux
émetteurs-récepteurs TRX-1 et récepteurs RX1
Il est possible d’avoir une communication bidirectionnelle entre l’émetteur T-1
et deux émetteur-récepteurs TRX-1. Une quantité illimitée de récepteurs RX-1

ou RX-1U peut recevoir la transmission. Tous les périphériques doivent être
réglés sur le même numéro de groupe de canaux et chaque dispositif émet-
teur doit avoir son propre numéro d’identification, avec un dispositif émetteur
ayant l’ID-maître « 00 ».
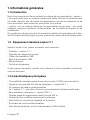
4.4 Pin-conguration XLR
5. Spécications xepton T-1
Type d’appareil Émetteur fixe
Dimensions 37 x 230 x 124 mm (H x L x P)
Poids 390 g
Type de fréquence ISM 2403 - 2480 MHz
Mode d’émission ISM 2.4 GHz FSK modulation avec saut de
fréquence
Puissance d’émission Maximum 10 mW
Codec de voix 16bit / 8KHz
Sensibilité RX -95 dBm
Latence < 35 ms
Débit 2 Mbps
Bande passante de fréquence 2 MHz
Alimentation USB 5V/DC / 1A
Consommation d’énergie 200 mA
Portée jusqu’à 150 m
Réponse en fréquence 50 Hz - 7 kHz
4 pin XLR sur la face avant 3 pin XLR sur la face arrière
Français 29

6. Conformité
Cet appareil est conforme aux exigences des directives communautaires ci-
dessous :
- 2011 / 65 / CE directive RoHS
- 2012 / 19 / CE directive WEEE
- 2014 / 53 / CE directive RED
La conformité avec les directives ci-dessus est attestée par le logo CE apposé
sur l’appareil. Les déclarations de conformité CE sont consultables sur Internet
sur le site www.humantechnik.com.
7. Maintenance et entretien
Tous les appareils « xepton » sont exempts de maintenance. S´il est sale, net-
toyez-le avec un chiffon doux et légèrement humide. N´utilisez jamais d´alcool,
de diluant ni d´autres solvants organiques. Veuillez s.v.p. ne pas exposer les
appareils « xepton » directement au soleil sur une période prolongée et les
protéger en outre contre les températures élevées, l’humidité et les fortes vib-
rations mécaniques.
Les appareils n’est sont pas protégé contre les projections d’eau.
Ne pas poser d’objet rempli d’un liquide, par exemple un vase, près de
l’appareil. De même, ne pas poser près de l’appareil une source de combusti-
on comme par exemple une bougie allumée.
8. Garantie
Tous les appareils « xepton » sont très fiables.
Si en dépit d’un montage et d’un emploi corrects, des dysfonctionnements
apparaissaient, veuillez contacter votre vendeur spécialisé ou vous adresser
directement au fabricant. La garantie comprend la réparation gratuite y com-
pris la réexpédition. Nous recommandons de renvoyer l’appareil dans son em-
ballage d’origine. Ne le jetez donc pas. Cette garantie ne s’applique pas pour
des dommages occasionnés par une mauvaise manipulation ou encore des
tentatives de réparation par des personnes non autorisées (endommagement
ducachet signalétique de l’appareil).
Français 30

Les réparations sous garantie ne sont exécutées qu’après réception du cou-
pon de garantie dûment rempli ou d’une copie de la facture ou du ticket de
caisse du certificat.
Le numéro de l’appareil doit être indiqué dans tous les cas.
Gestion des déchets électriques et électroniques (dans les pays de
l’Union européenne et dans les autres pays européens disposant d’un
système de collecte distinct pour cette classe de déchets). Le symbole
sur le produit ou l’emballage indique que ce produit ne doit pas être jeté
comme les déchets ménagers ordinaires, mais apporté à un point de collecte
pour le recyclage des déchets électriques et électroniques.
En respectant ces règles pour votre équipement usagé, vous apportez une con-
tribution importante à la protection de l’environnement et de votre santé.
Le non-respect de ces règles pour votre équipement usagé constitue une att-
einte à l’environnement et une menace pour votre santé. Le recyclage des ma-
tériaux contribue à réduire la quantité de matières premières utilisées. Pour en
savoir plus sur le recyclage de ce produit, veuillez contacter les autorités locales
compétentes, votre mairie ou le magasin où vous avez effectué votre achat.
Français 31

1. Algemene informatie
1.1 Inleiding
Hartelijk dank voor uw aankoop van het »xepton« communicatiesysteem! U
heeft gekozen voor een modern en betrouwbaar systeem. Lees deze handlei-
ding zorgvuldig door om het apparaat op de juiste wijze in te kunnen stellen en
om bekend te geraken met alle functies van het systeem.
»xepton« is een ideaal systeem voor groepstoepassingen – variërend van een-
voudige dialoogsystemen tot tolk-, cursus- en congressystemen.
Met zijn slanke en lichte ontwerp combineert het systeem kwaliteit en veelzij-
digheid met gebruiksgemak en de modernste radiotechnologie.
1.2 Leveringsomvang xepton T-1
Controleer of alle volgende onderdelen zijn bijgesloten:
- xepton T-1
- Opslag Zachte koffers
- USB-Stroomkabel
- USB-PSU
- Gebruiksaanwijzing
- Garantiekaart
Neem indien er onderdelen ontbreken contact op met uw dealer of met de
fabrikant.
1.3 Belangrijkste functies
- Wereldwijd bruikbare 2,4 GHz transmissie
- Wireless leveren een onbeperkt aantal mobiele ontvangers – »xepton RX-1«
- 40 verschillende selecteerbare groepen
- Twee „xepton TRX-1“ verzenden / ontvangen units kan bidirectioneel met
de „xepton T-1“ bediende.
- Lange bereik tot 400 m
- Volledig digitale kristalhelder geluid
- Gevoeligheid van de microfoon in 5 stappen instelbaar
- 9 volumeniveaus
- Kan een mobiele USB batterij te bedienen
Nederlands 32

1.4 Verkrijgbare toebehoren
- TRX-1 Transceiver A-5200-0
- RX-1 Ontvanger A-5221-0
- RX-1U Kinbeugelontvanger A-5225-0
- HSB-01 Mikrofon-Headset A-5270-0
- EBB-01 Mikrofon-Headset A-5271-0
- EHR-01 Mikrofon-Headset A-5272-0
2. xepton T-1 Sender
2.1 Bedieningsknoppen en displays
LCD
-Knop -Knop
MODE-Knop
Headset-Inputs Aan/Uit-Schakelaar
Audio-Line-In
Audio-Line & Out USB-Verbinding
Antenne
Nederlands 33

3. Gebruiksaanwijzing
3.1 AAN/UIT-knop
Duw de aan/uit-schakelar omhoog om het apparaat in te schakelen. De dis-
play wordt verlicht en het standaard volumeniveau »VOL 03« wordt weer-
gegeven.
Doe het volgende om het apparaat na gebruik uit te schakelen: Duw de aan/
uit-schakelaar weer omlaag.
3.2 Groepsselectie
Schakel het apparaat in en druk gedurende 3 seconden op de MODE-knop.
Het symbool »GRP« op de display begint te knipperen. Selecteer een groeps-
nummer van uw keuze tussen »00« en »39« door te drukken op de knoppen
en . Wacht na het maken van een keuze 3 seconden om het geselecteerde
groepsnummer in te stellen.
Zenders en ontvangers moeten worden ingesteld op hetzelfde groepsnummer
om met elkaar te kunnen communiceren.
3.3 ID-selectie
Binnen een groep moet elke zender een verschillend ID hebben, van »00« tot
»99«. Elke groep moet een zender ingesteld hebben op de master-ID »00«,
wat deze definieert als de hoofdzender (master) van de groep. In dit geval
worden »MASTER« en »TALK« weergegeven op de display. Ga als volgt te
werk om het ID in te stellen:
Houd op het ingeschakelde apparaat gedurende 3 seconden de MODE-knop
ingedrukt. Het symbool »GRP« op de display gaat knipperen.
Nederlands 34

Druk nogmaals op de MODE-knop. Het symbool »ID« begint te knipperen.
Selecteer met behulp van de knoppen en een ID van 00 tot 99, en zorg
er daarbij voor dat elk apparaat binnen de groep zijn eigen nummer heeft. Wacht
na het maken van een keuze 3 seconden om het gekozen ID-nummer in te stel-
len.
3.4 Volume omhoog / omlaag
Het volume kan op 9 niveaus worden ingesteld. Druk op het opgestarte ap-
paraat op de en –knoppen om het gewenste volume in te stellen tussen
01 (laag) en 09 (hoog).
3.5 Monitorfunctie aan / uit
De monitorfunctie stelt u in staat uw eigen stem via het systeem te horen. Ga als
volgt te werk als u de monitorfunctie wenst in te schakelen:
Houd op het ingeschakelde apparaat gedurende 3 seconden de MODE-knop
ingedrukt. Het symbool »GRP« op de display begint te knipperen.
Druk twee maal op de MODE-knop. Het »SO«-symbool op de display knippert.
Selecteer door gebruik te maken van de en -knoppen »SO« om de mo-
nitorfunctie te activeren of SF om deze te deactiveren. Wacht na het maken van
een keuze 3 seconden om de geselecteerde functie in te stellen.
Let op:
De standaardinstelling is »SF« (monitorfunctie gedeactiveerd).
Nederlands 35

3.6 Microfoongevoeligheid
De microfoongevoeligheid kan worden ingesteld op 5 standen, afhankelijk van
de omgevingsvereisten:
Houd op het ingeschakelde apparaat gedurende 3 seconden de MODE-knop
ingedrukt. Het symbool »GRP« op de display begint te knipperen.
Druk drie maal op de MODE-knop. Het »C1« -symbool op de display knippert.
Door gebruik te maken van de knoppen en kunt u een keuze maken tus-
sen C1 (lage gevoeligheid) en C5 (hoge gevoeligheid).
Let op:
De standaardinstelling is C3.
3.7 Audio-uitgangssignaal hoog / laag
Naast de volumeregeling kan het basisniveau van het audio-uitgangssignaal
worden ingesteld. Een hoger audio-uitgangssignaal verhoogt het maximumvolu-
me – dit kan vereist zijn in lawaaiige omgevingen.
Houd op het ingeschakelde apparaat gedurende 3 seconden de MODE-knop
ingedrukt. Het symbool »GRP« op de display begint te knipperen.
Druk vier maal op de MODE-knop. Het »UH«-symbool wordt weergegeven op
de display. Met behulp van de en -knoppen selecteert u UH (hoog uit-
gangssignaal) of UL (normaal uitgangssignaal). Wacht na het maken van een
keuze 3 seconden om het geselecteerde signaalniveau in te stellen.
Let op: Het selecteren van »UH« kan witte ruis veroorzaken, en dient alleen te
worden gebruikt in luidruchtige omgevingen. Wij bevelen de standaardinstel-
ling »UL« aan.
Nederlands 36

3.8 Voeding
De zender wordt gevoed via de USB-aansluiting. Het apparaat kan worden
aangedreven door een gewone USB aggregaat voor mobiele telefoons en kan
hierdoor worden gebruikt in een draagbare manier. Sluit de powerpack aan op
de USB-aansluiting op de achterkant van de apparaat. Het stroomverbruik van
het apparaat is ongeveer 200mA.
4. Toepassingen
4.1 Verzenden met T-1 en ontvangen met RX-1
Er kan een onbeperkt aantal RX-1 of RX-1U ontvangers worden gebruikt om
het signaal van de T-1 ontvangen. Alle apparaten moeten worden ingesteld op
hetzelfde kanaal groepsnummer.
Nederlands 37

4.2 Twee-weg communicatie met de zender T-1 en twee
TRX-1 zend-ontvangers
Het is mogelijk om een tweerichtingscommunicatie tussen de T-1 zender en
twee TRX-1 ontvangers hebben. Alle apparaten moeten worden ingesteld op
hetzelfde kanaal groepsnummer en elk apparaat moet zijn eigen ID-nummer
hebben, waarvan één apparaat met de master-ID »00«.
4.3 Twee-weg communicatie met de zender T-1, twee TRX-1
zend-ontvangers en RX-1-ontvangers
Het is mogelijk om een tweerichtingscommunicatie te hebben tussen de T-1
zender en twee TRX-1 zend-ontvangers. Een onbeperkt aantal RX-1 of RX-1U
Nederlands 38

ontvangers kan het signaal ontvangen. Alle apparaten moeten worden inge-
steld op hetzelfde kanaal groepsnummer en elke zender moet zijn eigen ID-
nummer hebben, waarvan één zender de master-ID »00« heeft.
4.4 Pin-layout XLR
5. Specicaions xepton T-1
Soort apparaat Zender
Afmetingen 37 x 230 x 124 mm (H x B x T)
Gewicht 390 g
Frequentie ISM 2403 - 2480 MHz
Transmissiemodus ISM 2.4 GHz FSK Modulatie met hopping
Zendvermogen maximaal 10 mW
Voice codec 16bit / 8 KHz
RX-gevoeligheid -95 dBm
Vertraging < 35 ms
Data rate 2 Mbps
Frequentiebandbreedte 2 MHz
Power USB 5V/DC / 1A
Stroomverbruik 200 mA
Bereik tot 150 m
Frequentiebereik 50 Hz - 7 kHz
4 Pin XLR op het voorpaneel 3 Pin XLR op het achterpaneel
Nederlands 39

6. Conformiteit
Dit apparaat voldoet aan de eisen van de volgende EU-richtlijnen:
- 2011 / 65 / EU RoHS-richtlijn
- 2012 / 19 / EU WEEE-richtlijn
- 2014 / 53 / EU RED-richtlijn
De conformiteit met de voornoemde richtlijnen wordt bevestigd door het CE-
teken op het apparaat. EG-conformiteitsverklaringen staan online ter beschik-
king onder www.humantechnik.com.
7. Onderhoud en verzorging
Alle »xepton«-apparaten zijn onderhoudsvrij.
Wanneer het apparaat vuil is, hoeft u het enkel met een zachte, vochtige doek
te reinigen. Gebruik nooit alcohol, verdunner of andere organische oplosmid-
delen. »xepton«-apparaten mogen niet gedurende langere tijd blootgesteld
worden aan directe zonnestralen en moeten daarnaast beschermd worden
tegen grote hitte, vocht of sterke mechanische schokken.
Het »xepton«-systeem is niet beschermd tegen spatwater (met uitzondering
van de TRX-1). Plaats geen met vloeistof gevulde voorwerpen, bijv. vazen over
het systeem.
8. Garantie
De »xepton«-systeem is zeer betrouwbaar en veilig. Mochten er ondanks cor-
recte bediening storingen optreden, neem dan contact op met uw audicien of
rechtstreeks met de fabrikant.
De garantie omvat de kostenloze reparatie en het gratis terugsturen van de-
fecte apparaten.
Het wordt aanbevolen dat u het product in de originele verpakking verzendt,
dus bewaar de verpakking voor de duur van de garantieperiode.
De garantie vervalt bij beschadigingen die veroorzaakt werden door onoor-
deelkundig gebruik of bij reparatiepogingen van niet erkende personen (ver-
breking van het garantiezegel op het apparaat).
Reparaties op garantie kunnen alleen worden uitgevoerd als de garantiekaart
samen met een kopie van de rekening/bon van de handelaar wordt ingestuurd.
Het serienummer van het apparaat moet steeds vermeld worden.
Verwijdering van gebruikte elektrische en elektronische apparatuur
Nederlands 40

(toe te passen in de landen van de Europese Unie en andere Europese
landen met een eigen inzamelsysteem voor zulke apparaten). Het sym-
bool op het product en de verpakking wijst erop dat dit product niet als
normaal huisafval mag worden behandeld maar op een verzamelpunt voor de
recyclage van elektrisch en elektronisch moet worden afgegeven.
Door uw bijdrage tot de correcte verwijdering van dit product, beschermt u de
het milieu en de gezondheid van uw medemensen. Milieu en gezondheid wor-
den door foute verwijdering in gevaar gebracht.
Materiaalrecyclage helpt het verbruik van grondstoffen te reduceren. Meer infor-
matie over de recyclage van dit product krijgt u bij uw gemeente, de communale
afvalverwijderingsbedrijven of in de zaak waar u dit product heeft gekocht.
Nederlands 41

1. Informazioni generali
1.1 Introduzione
Grazie per l’acquisto del sistema di comunicazione »xepton«! Avete optato
per un sistema moderno e affidabile. Leggere attentamente le istruzioni per
l’uso per poter mettere correttamente in funzione i dispositivi e familiarizzarsi
con tutte le possibilità del sistema.
»xepton« è un sistema ideale per le applicazioni di gruppo, dal semplice dia-
logo ai sistemi di interpretariato, team-teaching e conferenza.
Con un design leggero e snello, combina qualità e versatilità alla facilità d’uso
e ad una tecnologia wireless di ultima generazione.
1.2 Contenuto della scatola xepton T-1
Verificare che tutti i pezzi elencati di seguito siano contenuti nel volume di
consegna:
- xepton T-1
- Valigetta antiurto
- Cavo alimentatore da rete USB
- Alimentatore da rete USB
- Istruzioni per l’uso
- Scheda garanzia
In caso di pezzi mancanti, rivolgersi al rivenditore specializzato o direttamente
al produttore.
1.3 Caratteristiche principali
- Trasmissione 2.4 GHz utilizzabile in tutto il mondo
- Approvvigionamento senza cavi di un numero illimitato di ricevitori mobili
»xepton RX-1«
- Selezionabili 40 gruppi diversi
- Due unità di ricetrasmittenti »xepton TRX-1«possono essere gestite in modo
bidirezionale con »xepton T-1«.
- Ampio raggio di azione fino a 400 m.
- Massima qualità acustica digitale
- Sensibilità microfono impostabile in 5 livelli
- 9 livelli di volume
- Può essere gestito con un pacchetto accumulatori USB mobile
Italiano 42

1.4 Accessori disponibili
- TRX-1 Transceiver A-5200-0
- RX-1 Ricevitore A-5221-0
- RX-1U Ricevitore stetoscopio A-5225-0
- HSB-01 microphone-headset A-5270-0
- EBB-01 microphone-headset A-5271-0
- EHR-01 microphone-headset A-5272-0
2. xepton T-1 Transmitter
2.1 Elementi e visualizzazioni
LCD
-pulsante -pulsante
pulsante MODE
Ingressi Headset Interruttore accensione /spegnimento
Audio-Line-In
Audio in & out Presa USB
Antenna
Italiano 43

3. Uso
3.1 Accensione e spegnimento
Per accendere l’apparecchio usare l’interruttore di accensione/spegnimento.
La spia di funzionamento LCD si accende e lo stato base del volume »VOL 03«
viene indicato.
Per spegnere l’apparecchio usare l’interruttore di accensione/spegnimento.
3.2 Selezionare il gruppo
Accendere l’apparecchio e tenere il tasto MODE premuto per più di 3 secondi.
Il simbolo »GRP« inizia a lampeggiare all’interno del display LCD. Selezionare
un numero del gruppo da 0 a 39 utilizzando i tasti e . Attendere 3 secondi
per consentire l’acquisizione della selezione.
Sui trasmettitori e sui ricevitori da collegare insieme devono essere impostati gli
stessi numeri di gruppo.
3.3 Selezione dell’ ID
All’interno di un gruppo, ogni trasmetittore necessita un ID diverso da »00« a
»99«. Ad ogni gruppo serve un trasmettitore con ID master »00«, che diventa
così il trasmettitore master del gruppo. I campi »MASTER« e »TALK« vengo-
no visualizzati sullo schermo appena l’ID viene impostato su »00«. Procedere
come segue per impostare l’ID:
tenere premuto per più di 3 secondi il tasto MODE a dispositivo acceso. Il sim-
bolo »GRP« sul display inizia a lampeggiare.
Italiano 44

Schiacciare di nuovo il tasto MODE. L’indicatore »ID« inizia a lampeggiare. Se-
lezionare un numero ID utilizzando i tasti e da »00« a »99«, tenendo con-
to che ogni numero può essere assegnato solo una volta all’interno di un gruppo.
Attendere 3 secondi dopo la selezione dell’ID per accettare la selezione.
3.4 Regolare il volume
Il volume può essere regolato su 9 livelli. Premere i tasti e sull’apparecchio
acceso per regolare a piacimento il volume tra 01 (basso) e 09 (alto).
3.5 Funzione di monitor on/off
La funzione di monitor consente all’utente di ascoltare la propria voce median-
te il sistema. Procedere come segue per attivare la funzione di monitor:
tenere premuto il tasto MODE per oltre 3 secondi a dispositivo acceso.
Il simbolo »GRP« sul display inizia a lampeggiare.
Premere ora 2 volte il tasto MODE. Il simbolo »SO« lampeggia ora all’interno
del display. Con i tasti e , selezionare ora l’impostazione »SO« per atti-
vare il funzionamento del monitor o »SF« per disattivarla. Attendere 3 secondi
dopo la selezione del tipo di monitor per accettare la selezione.
Nota:
nell’impostazione di base la funzione di monitor è disattivata.
Italiano 45

3.6 Regolare il livello del microfono
La sensibilità del microfono può essere adeguata alle condizioni ambientali su
5 livelli:
tenere premuto il tasto MODE per oltre 3 secondi a dispositivo acceso. Il simbolo
»GRP« sul display inizia a lampeggiare.
Premere ora 3 volte il tasto MODE. Il simbolo »C1« lampeggia ora all’interno del
display. Con i tasti e selezionare ora un’impostazione da »C1« (sensibilità
bassa) fino a »C5« (sensibilità alta).
Nota:
l’impostazione base è »C3«.
3.7 Livello base alto/basso
Indipendentemente dall’impostazione del volume, il livello base del volume
può essere aumentato. Questo porta ad una riproduzione audio in generale
più alta entro i livelli del volume: ciò può essere necessario, ad esempio, in
caso di ambienti rumorosi.
Tenere premuto il tasto MODE per più di 3 secondi a dispositivo acceso. Il
simbolo »GRP« sul display inizia a lampeggiare.
Premere ora 4 volte il tasto MODE. Utilizzando i tasti e , selezionare
l’impostazione »UH« per il livello base aumentato e »UL« per il livello base nor-
male. Attendere 3 secondi dopo la selezione del livello base per accettare la
selezione.
Nota: l’impostazione »UH« può causare lo sviluppo di rumori di fondo e an-
drebbe utilizzata solo in ambienti rumorosi. Consigliamo perciò l’impostazione
base »UL«.
Italiano 46

3.8 Alimentazione elettrica / Caricamento
La trasmittente viene alimentata elettricamente tramite presa USB. La possi-
bilità di alimentare la trasmittente con un pacchetto accumulatori, e quindi di
renderla mobile, è data. A tale scopo collegare il pacchetto Power-Bank alla
presa USB.
L’assorbimento elettrico dell’apparecchio è di circa 200mA.
4. 4. Impieghi
4.1 Trasmettere con trasmittente T-1 e ricevere con ricevente RX-1
È possibile gestire un numero illimitato di riceventi RX-1 o RX-1U con una tras-
mittente T-1. Tutti gli apparecchi devono essere impostati sullo stesso codice
di gruppo
Italiano 47

4.2 Comunicazione a due vie con trasmittente T-1 e due
Transceiver TRX-1
Con la trasmittente T-1 e due Transceiver TRX-1 è possibile realizzare una
comunicazione a due vie. Tutti gli apparecchi devono essere impostati sullo
stesso codice di gruppo e ogni apparecchio deve disporre di un indirizzo IP
individuale. Uno degli apparecchi deve avere il ruolo di master con ID »00«.
4.3 Comunicazione duplex totale con trasmittente T-1, due
TRX-1 e ricezione con RX-1
Con la trasmittente T-1 e due Transceiver TRX-1 è possibile realizzare una co-
municazione a due vie. Contemporaneamente un numero illimitato di riceventi
Italiano 48

RX-1 o RX-1U può ricevere le trasmissioni. Tutti gli apparecchi devono essere
impostati sullo stesso codice di gruppo e ogni apparecchio trasmittente deve
disporre di un indirizzo IP individuale. Uno degli apparecchi trasmittenti deve
avere il ruolo di master con ID »00«.
4.4 Collegamento dei Pin XLR
5. Dati tecnici xepton T-1
Tipo apparecchio Unità trasmittente
Ingombro 37 x 230 x 124 mm (H x W x D)
Peso 390 g
Tipo frequenza radio ISM 2403 - 2480 MHz
Tipo di trasmissione ISM 2.4 GHz FSK modulazione con salti di
frequenza
Potenza trasmissione massima 10 mW
Codec audio 16bit / 8 KHz
Sensibilità RX -95 dBm
Ritardo < 35 ms
Tasso dati 2 Mbps
Ampiezza frequenza 2 MHz
Alimentazione elettrica USB 5V/DC / 1A
Assorbimento elettrico 200 mA
Raggio d’azione fino a 150 m
Risposta in frequenza 50 Hz - 7 kHz
4 Pin XLR sul pannello frontale 3 Pin XLR sul pannello posteriore
Italiano 49

6. Conformità
Il presente apparecchio è conforme ai requisiti delle seguenti direttive UE:
- 2011 / 65 / UE direttiva RoHS
- 2012 / 19 / UE direttiva WEEE
- 2014 / 53 / UE direttiva RED
La conformità con le direttive di cui sopra viene confermata dalla marcatura
CE sull’apparecchio. Le dichiarazioni CE di conformità sono disponibili sul
sito Internet www.humantechnik.com.
7. Manutenzione
Tutti gli apparecchi »xepton« non necessitano di manutenzione.
Pulire le possibili impurità con un panno umido e morbido.
Non utilizzare mai alcool, di luenti o altri solventi organici. Evitare una prolunga-
ta esposizione degli apparecchi ai raggi solari e proteggerli da eccessivo ca-
lore, umi dità elevata e da forti scosse meccaniche.
Questi prodotti non sono protetto dagli schizzi. Non appoggiare contenitori di
liquidi (ad esem pio un vaso da fiori), né fiamme libere (ad esempio una can-
dela) nelle vicinanze del prodotto.
8. Garanzia
La systema »xepton« ha un funzionamento estremamente sicuro.
Se si dovessero però presentare dei guasti, nonostante la si sia montata ed
utilizzata correttamente, contattare il rivenditore specializzato o rivolgersi di-
rettamente al produttore. La prestazione di garanzia comprende la riparazione
gratuita e la spedizione di ritorno gratuita. Se possibile, inviare il prodotto nella
confezione originale, si consiglia di non buttarla via.
La garanzia perde validità in caso di danni provocati da un utilizzo improprio o
da tentativi di riparazione da parte di persone non autorizzate (distruzione del
sigillo di garanzia). Le riparazioni saranno eseguite solo durante il periodo di
validità della garanzia, dietro invio dellascheda di garanzia unitamente a una
copia della fattura o dello scontrino di acquisto.
Deve in qualsiasi caso essere indicato anche il numero dell’ apparecchio.
Italiano 50

Smaltimento delle apparecchiature elettriche ed elettroniche (norme
da osservare nei paesi dell’Unione Europea e in altri paesi europei nei
quali sia prevista la raccolta separatadi questo tipo di apparecchiature).
Il simbolo riportato sul prodotto o sulla confezione indica che il’apparechio
non deve essere smaltito attraverso i normali canali di smaltimento dei rifiuti do-
mes tici ma portato a un centro di raccolta per il riciclo delle apparecchiature
elettriche ed elettroniche.
Il corretto smaltimento dell’apparecchio rappresenta un contributo attivo alla
protezione dell’ambiente e della sa lute dei cittadini. Al contrario, uno smalti-
mento non corretto costituisce un pericolo per l’ambiente e la salute dei cittadini.
Il riciclaggio dei materiali contribuisce a ridurre l’utilizzo delle materie prime. Per
ulteriori informazioni sul riciclaggio di questo prodotto rivolgersi alle autorità lo-
cali, al comune o al negozio presso il quale è stato effettuato l’acquisto.
Italiano 51

1. Información general
1.1 Introducción
¡Muchas gracias por la compra del sistema de comunicaciones »xepton«!
Usted se ha decidido por un sistema moderno y fiable. Por favor lea deteni-
damente estas instrucciones de servicio para poner los dispositivos correc-
tamente en servicio y familiarizarse con todas las posibilidades del sistema.
»xepton« es un sistema ideal para aplicaciones en grupos; desde el simple
diálogo hasta sistemas de intérpretes, programación en equipo y de confe-
rencias.
Ligero y delgado en su diseño, reúne calidad y multifuncionalidad con faci-
lidad de manejo y el más actualizado estado de la tecnología radioeléctrica.
1.2 Volumen de suministro xepton T-1
Compruebe por favor si todas las piezas indicadas a continuación están in-
cluidas:
- xepton T-1
- Maleta suave de conservación
- Cable de red USB
- Fuente de alimentación USB
- Instrucciones de manejo
- Tarjeta de garantía
En caso de que falten piezas, diríjase por favor a su revendedor especializado
o directamente al fabricante.
1.3 Características principales
- Utilizable en todo el mundo, transmisión en 2.4 GHz
- Suministro inalámbrico de una cantidad ilimitada de receptores móv-
iles »xepton RX-1«
- 40 grupos seleccionables diferentes
- Dos unidades de transmisión/recepción »xepton TRX-1« pueden ser
operadas bidireccionales con el »xepton T-1«.
- Elevado alcance de hasta 400 m
- Calidad de sonido digital limpia completo
- Sensibilidad de micrófono regulable en 5 niveles
- 9 niveles de volumen
- Puede ser operado con un pack de batería USB móvil.
Español 52

1.4 Accesorios disponibles
- TRX-1 Transceiver A-5200-0
- RX-1 Receptor A-5221-0
- RX-1U Receptor estetoscopio A-5225-0
- HSB-01 microphone-headset A-5270-0
- EBB-01 microphone-headset A-5271-0
- EHR-01 microphone-headset A-5272-0
2. xepton T-1 transmisor
2.1 Elementos e indicaciones
LCD
-Tecla -Tecla
MODE-Tecla
Entradas de auriculares Interruptor ON / OFF
Audio-Line-In
Audio in & out Conexión USB
Antena
Español 53

3. Manejo
3.1 Conexión y desconexión
Accione el interruptor On/Off para conectar el dispositivo. La indicación LCD-
On se enciende e indica el estado básico del volumen »VOL 03«.
Accione el interruptor On/Off para desconectar el dispositivo.
3.2 Seleccionar grupo
Conecte el dispositivo y mantenga oprimida la tecla MODE durante más de 3
segundos.
El símbolo »GRP« dentro de la indicación LCD comienza a parpadear. Selecci-
one un número de grupo de 00 - 39 mediante el empleo de las teclas y .
Aguarde 3 segundos tras la selección para aceptarla.
Los transmisores y receptores a ser conectados entre sí deben tener configura-
do el mismo número de grupo.
3.3 Selección ID
Dentro de un grupo cada transmisor necesita un ID diferente de »00« a »99«.
Cada grupo necesita obligatoriamente un transmisor con el ID-Maestro »00«,
en donde este se convierte en el transmisor maestro del grupo. Los campos
de indicación »MASTER« y »TALK« se indican en la pantalla en el momento
que el ID se establece en »00«. Proceda de la siguiente manera para estab-
lecer el ID:
Con el dispositivo encendido, mantenga oprimida la tecla MODE durante más
de 3 segundos. El símbolo »GRP« de la indicación comienza a parpadear.
Español 54

Oprima nuevamente la tecla MODE. La indicación »ID« comienza a parpa-
dear. Mediante el empleo de las teclas y seleccione un número de ID
de »00« - »99«, en donde cada número dentro de un grupo solo puede ser
asignado una vez. Tras la selección del número ID aguarde 3 segundos para
aceptarlo.
3.4 Ajustar el volumen
El volumen puede ser ajustado en 9 niveles. Con el dispositivo conectado
ajustar con las teclas y se selecciona el nivel de volumen deseado.
3.5 Función de monitor On / Off
La función de monitor le posibilita al usuario escuchar su propia voz a través
del sistema. Proceda de la siguiente manera para activar la función de monitor:
Mantenga oprimida con el dispositivo encendido la tecla MODE durante 3 se-
gundos. El símbolo »GRP« de la indicación comienza a parpadear.
Oprima ahora 2 veces la tecla MODE. El símbolo »SO« parpadea en la indica-
ción. Seleccione ahora con la tecla y la configuración »SO« para conec-
tar la función de monitor y »SF« para volver a desactivarla. Tras la selección del
tipo de función de monitor aguarde 3 segundos para aceptarla.
Observación:
En la configuración básica la función de monitor está desactivada.
Español 55

3.6 Ajustar el nivel del micrófono
La sensibilidad del micrófono puede ser adaptada en 5 niveles a las condicio-
nes del entorno:
Mantenga oprimida con el dispositivo encendido la tecla MODE durante 3 se-
gundos. El símbolo »GRP« de la indicación comienza a parpadear.
Oprima ahora 3 veces la tecla MODE. El símbolo »C1« parpadea dentro de
la indicación. Seleccione ahora con las teclas y la configuración de
»C1«(baja sensibilidad) hasta »C5« (alta sensibilidad).
Observación:
La configuración básica es »C3«.
3.7 Nivel básico alto / bajo
Independientemente del ajuste del volumen se puede incrementar el nivel bá-
sico del volumen. Esto conduce a una reproducción de audio en general más
fuerte dentro de los niveles de volumen esto puede ser necesario por ejemplo
en entornos muy ruidosos.
Mantenga oprimida con el dispositivo encendido la tecla MODE durante 3 se-
gundos. El símbolo »GRP« de la indicación comienza a parpadear.
Oprima ahora 4 veces la tecla MODE. Mediante el empleo de las tecla y
seleccione ahora la configuración »UH« para el nivel básico incrementado
u »UL« para el nivel básico normal. Tras la selección del tipo del nivel básico
aguarde 3 segundos para aceptarla.
Observación: La configuración »UH« puede conducir a ruidos secundarios y
solo debe ser utilizada en entornos ruidosos. Por esta razón recomendamos la
configuración básica »UL«.
Español 56

3.8 Suministro de tensión
El transmisor de alimenta de corriente a través de una conexión USB. Existe
la posibilidad de alimentar el transmisor con una Power-Bank y de ese modo
utilizarlo móvil. Para ello se conecta la Power-Bank a la conexión USB.
El consumo de corriente del dispositivo se encuentra en aprox. 200mA
4. Aplicaciones
4.1 Transmitir con transmisor T-1 y recibir con receptor RX-1
Se puede operar una cantidad ilimitada de receptores RX-1 o RX-1U con un
transmisor T-1. Todos los dispositivos tienen que estar configurados sobre el
mismo número de grupo.
Español 57

4.2 Comunicaciones de dos vías con transmisor T1 y dos
transceptores TRX-1
Con el transmisor T-1 y dos transceptores TRX-1 es posible realizar una co-
municación de dos vías. Todos los dispositivos tienen que estar configurados
sobre el mismo número de grupo y cada dispositivo debe poseer un número
ID propio, en donde a uno de los dispositivos tiene que ser asignado como ID
maestro »00«.
4.3 Comunicación dúplex completa con transmisor T-1, dos
TRX-1 y recibido con RX-1
Con el transmisor T-1 y dos transceptores TRX-1 es posible realizar una co-
Español 58

municación de dos vías. Simultáneamente pueden recibir la transmisión una
cantidad ilimitada de receptores RX-1 o RX-1U. Todos los dispositivos tienen
que estar configurados sobre el mismo número de grupo y cada dispositivo
transmisor debe poseer un número ID propio, en donde a uno de los disposi-
tivos transmisores tiene que ser asignado como ID maestro »00«.
4.4 Ocupación de Pin XLR
5. Datos técnicos xepton T-1
Tipo de dispositivo Unidad de transmisión
Dimensiones 37 x 230 x 124 mm (H x W x D)
Peso 390 g
Tipo de frecuencia
radioeléctrica ISM 2403 - 2480 MHz
Tipo de transmisión ISM 2.4 GHz FSK modulation with frequency
hopping
Potencia de transmisión máxima 10 mW
Codec de voz 16bit / 8 KHz
Sensibilidad RX -95 dBm
Retardo < 35 ms
Velocidad de datos 2 Mbps
Amplitud de frecuencia 2 MHz
Suministro de corriente USB 5V/DC / 1A
Consumo de corriente 200 mA
Alcance up to 150 m
Respuesta de frecuencia 50 Hz - 7 kHz
4 Pin XLR en el frontal 3 Pin XLR en el lado posterior
Español 59

6. Conformidad
Este aparato cumple los requisitos de las siguientes Directivas de la UE:
- 2011 / 65 / UE directiva RoHS
- 2012 / 19 / UE directiva WEEE
- 2014 / 53 / UE directiva RED
La conformidad con las directivas anteriores está avalada por la marca CE
que lleva el aparato. Las declaraciones de conformidad CE están
disponibles en Internet en:
www.humantechnik.com
7. Mantenimiento y cuidado
Todos los aparatos »xepton« son libres de mantenimiento. De haberse ensu-
ciado el aparato, éste se debería limpiar ocasionalmente con un trapo suave
y húmedo.
Nunca se deberán utilizar alcohol, diluyentes u otros disolventes orgánicos.
El aparato no debería exponerse por tiempos prolongados a irradiación solar
directa, y además debería protegerse contra calor intenso, humedad o fuertes
sacudidas mecánicas.
Este producto no está protegido contra derrames o salpicaduras accidenta-
les de agua (excepción: TRX-1). No coloque recipientes con agua (como por
ejemplo floreros) ni objetos que produzcan una llama viva (tales como velas
encendidas) encima o cerca del producto.
8. Garantie
Todos los equipos »xepton« presentan una alta seguridad de funcionamiento.
En caso de que, a pesar de haberse montado y operado de forma adecuada,
se presenten fallos, le rogamos contactar su establecimiento especializado o
directamente el fabricante.
La prestación bajo garantía incluye la reparación gratuita al igual que la expe-
dición de retorno. Si es posible, envíe el producto en su embalaje original. La
Español 60

garantía expira con daños causados por tratamiento incorrecto o intentos de
reparación por personas no autorizadas (destrucción del sello del aparato).
Las reparaciones en garantía solo se llevan a cabo si se remite la tarjeta de
garantía debidamente cumplimentada y una copia de la factura/resguardo de
compra del distribuidor técnico.
En todo caso se deberá indicar el número de aparato.
Eliminación de equipos eléctricos y electrónicos usados (a respetar
en los países de la Unión Europea y otros países europeos con un
sistema de recogida independiente de este tipo de equipos). El símbolo
que aparece en el producto o en su embalaje indica que este producto
no debe eliminar junto con el resto de desechos, sino que debe llevarse a un
centro de recogida de residuos para el reciclado de equipos eléctricos y elec-
trónicos.
Desechando estos equipos correctamente contribuye de manera importante a
la protección del medio ambiente y a su salud. Desechar estos equipos incor-
rectamente pone en peligro el medio ambiente y su salud.
El reciclaje del material ayuda a reducir la cantidad de materias primas utiliz-
adas. Para más información sobre el reciclaje de este producto, póngase en
contacto con las autoridades locales, su ayuntamiento o la tienda en la que
compró el producto.
Español 61


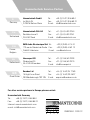
Humantechnik Service-Partner
For other service-partners in Europe please contact:
Humantechnik Germany
Tel.: +49 (0) 76 21/ 9 56 89-0
Fax.: +49 (0) 76 21/ 9 56 89-70
Internet: www.humantechnik.com
e-mail: [email protected]
RM523000 · 2020-12
D
NL
CH
Netherlands
Switzerland
Germany
Humantechnik GmbH
Im Wörth 25
D-79576 Weil am Rhein
F/B
France
Belgium
Humantechnik GHL AG
Rastatterstrasse 9
CH-4057 Basel
SMS Audio Electronique Sàrl
173 rue du Général de Gaulle
F-68440 Habsheim
Hoorexpert BV
Gildenstraat 30
NL-4143 HS Leerdam
Tel.: +49 (0) 76 21/ 9 56 89-0
Fax.: +49 (0) 76 21/ 9 56 89-70
E-mail: [email protected]
GB
Great Britain
Tel.: +41 (0) 61/ 6 93 22 60
Fax.: +41 (0) 61/ 6 93 22 61
E-mail: [email protected]
Tel.: +33 (0) 3 89/ 44 14 00
Fax.: +33 (0) 3 89/ 44 62 13
E-mail: sms@audiofr.com
Tel.: +31 (0) 3 45/ 63 23 93
Fax.: +31 (0) 3 45/ 63 29 19
E-mail: [email protected]
Sarabec Ltd
15 High Force Road
GB-Middlesbrough TS2 1RH
Tel.: +44 (0) 16 42/ 24 77 89
Fax: +44 (0) 16 42/ 23 08 27
E-mail: [email protected]
-
 1
1
-
 2
2
-
 3
3
-
 4
4
-
 5
5
-
 6
6
-
 7
7
-
 8
8
-
 9
9
-
 10
10
-
 11
11
-
 12
12
-
 13
13
-
 14
14
-
 15
15
-
 16
16
-
 17
17
-
 18
18
-
 19
19
-
 20
20
-
 21
21
-
 22
22
-
 23
23
-
 24
24
-
 25
25
-
 26
26
-
 27
27
-
 28
28
-
 29
29
-
 30
30
-
 31
31
-
 32
32
-
 33
33
-
 34
34
-
 35
35
-
 36
36
-
 37
37
-
 38
38
-
 39
39
-
 40
40
-
 41
41
-
 42
42
-
 43
43
-
 44
44
-
 45
45
-
 46
46
-
 47
47
-
 48
48
-
 49
49
-
 50
50
-
 51
51
-
 52
52
-
 53
53
-
 54
54
-
 55
55
-
 56
56
-
 57
57
-
 58
58
-
 59
59
-
 60
60
-
 61
61
-
 62
62
-
 63
63
-
 64
64


En otros idiomas
- français: AUDIOropa xepton T-1 Manuel utilisateur
- italiano: AUDIOropa xepton T-1 Manuale utente
- Deutsch: AUDIOropa xepton T-1 Benutzerhandbuch
- Nederlands: AUDIOropa xepton T-1 Handleiding
Documentos relacionados
Otros documentos
-
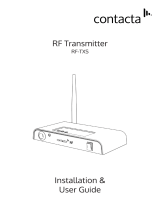 Contacta RF-TXS Guía del usuario
-
 Contacta RF-TXRM Guía del usuario
-
Motorola TLKR T8 El manual del propietario
-
-
AKG SPR 4 User Instructions
-
 Elinchrom SA UV7EL-SKYPORT Manual de usuario
-
-
Elinchrom EL-Skyport Transceiver RX Manual de usuario


