¡CUIDADO! PARA EVITAR DESCARGAS ELÉCTRICAS U OTROS DAÑOS, verifique que la plancha
esté desenchufada antes de llenarla con agua.
ADVERTENCIA: Nunca llene la plancha con acondicionador para la ropa, almidones o cualquier
otro líquido ya que dañarán el mecanismo vaporizador. No use agua contaminada.
¡CUIDADO! PARA EVITAR INCENDIOS, nunca deje la plancha desatendida cuando esté enchufada.
¡CUIDADO! PARA EVITAR DESCARGAS ELÉCTRICAS, nunca use la plancha en un lugar donde
pueda caerse o ser empujada dentro del agua o cualquier otro líquido. Si se cae dentro del agua
o cualquier otro líquido, desenchúfela inmediatamente. NO toque el agua o el líquido.
ADVERTENCIA: Nunca use esponjitas abrasivas, limpiadores químicos o solventes para limpiar
el exterior o la base de la plancha. El hacerlo dañará o rallará la superficie.
¡CUIDADO! NO apunte la plancha hacia la cara, hacia su cuerpo o hacia cualquier otra persona
al usarla o al ajustar el vapor. Podría causar quemaduras o heridas graves.
INSTRUCCIONES ESPECIALES
1. Para evitar la sobrecarga del circuito, no utilice otro artefacto de alta potencia en el mismo
circuito.
2. Si es absolutamente necesario, use un cable de extensión de 15 amperes. Los cables de
capacidad menor pueden recalentarse. Tenga cuidado al colocar el cable para que nadie lo
tironee o se tropiece con él.
ANTES DE USARLA POR PRIMERA VEZ
1 Antes de usar su plancha por primera vez, sáquele todo el material de empaque.
2 Cuando encienda su plancha por primera vez, puede emitir un olor extraño durante los primeros
diez minutos. Esto se debe a que los materiales usados para fabricar esta plancha se están
calentando. El olor es normal y no se producirá luego del calentamiento inicial.
USANDO SU PLANCHA
3 Llene el tanque de agua con cuidado de no sobrepasar la línea de
“Max”. Verifique que la entrada de agua esté cerrada para evitar
derrames mientras la usa.
4 Enchufe la plancha en un tomacorriente polarizado. Se encenderá la
luz LED indicadora del panel de la pantalla.
5 Ajuste la tela/temperatura deseada presionando el botón selector
de tela/temperatura que está en el mango de la plancha.
6 La luz LED indicadora que está junto a la temperatura seleccionada parpadeará en verde y
luego permanecerá encendida cuando haya alcanzado la temperatura seleccionada. Si desea
cambiar la temperatura, presione el botón selector de tela/temperatura y la luz LED indicadora
comenzará a parpadear en verde para indicarle que la plancha está subiendo o bajando su
temperatura. La luz LED indicadora se volverá verde sólida cuando la plancha haya alcanzado la
temperatura seleccionada.
7 Mueva la perilla de control variable de vapor/auto-limpieza para seleccionar “ “ (vapor alto)
o “ “ (vapor bajo). Seleccione “ “ en la perilla de control variable de vapor/auto-limpieza
para planchar a seco. Ahora puede empezar a planchar.
8 Use el botón de ráfaga de vapor para remover arrugas difíciles. Haga una pausa de 3 segundos
entre cada ráfaga. El uso excesivo de la ráfaga de vapor puede hacer que salga agua o reducir
el rendimiento del vapor.
9 La función de ráfaga de vapor también funciona en posición vertical. Esto es especialmente útil
para remover arrugas de prendas colgadas, ropa delicada y otras telas. Sostenga la plancha en
posición vertical a unas pocas pulgadas de la prenda.
10 Use el botón rociador de vapor para humedecer la tela y eliminar arrugas difíciles, si es
necesario.
FUNCIÓN ANTI-GOTEO
11 Esta plancha viene con una función anti-goteo incorporada. Evita que salga agua cuando la
temperatura es demasiado baja.
12 No se puede producir vapor si la base de la plancha no está suficientemente caliente. Podría
causar salpicaduras o pérdidas de agua por la base de la plancha. La función anti-goteo reduce
la pérdida de agua cuando plancha a temperaturas bajas.
ANTI-CALCIO
13 Esta plancha tiene un sistema anti-calcio incorporado que extiende la vida de la plancha.
14 Si tiene agua muy dura, le recomendamos usar agua destilada en lugar de agua del grifo.
APAGADO AUTOMÁTICO ELECTRÓNICO DE
MÚLTIPLES POSICIONES
15 Esta plancha está equipada con una función de apagado automático que apaga
automáticamente la plancha si se la deja en posición vertical por 15 minutos y luego de 30
segundos si se la deja en posición horizontal o de costado.
16 La luz LED indicadora junto al Apagado automático en la pantalla selectora de tela/temperatura
parpadeará en rojo cuando la plancha esté en el modo de apagado automático. Para encender
nuevamente la plancha, sosténgala en posición horizontal y sacúdala suavemente varias veces
hacia los costados hasta que se vuelva a encender la luz de encendido. Vuelva a seleccionar
la temperatura. La plancha puede necesitar calentarse durante unos minutos si la función de
apagado automático estuvo activada durante mucho tiempo.
LIMPIEZA AUTOMÁTICA
17 Llene el tanque de agua hasta el nivel “MAX”. No lo llene de más.
18 Apoye la plancha en posición vertical sobre una superficie protegida y enchúfela en un
tomacorriente.
19 Ajuste el selector de tela/temperatura en Lino/Algodón “ “. Espere a que la luz deje de
parpadear. La plancha está ahora a la temperatura seleccionada.
20 Sostenga la plancha en posición horizontal sobre un lavabo. Gire y mantenga la perilla de control
variable de vapor completamente hacia la posición AUTO LIMPIEZA.
21 Mueva la plancha hacia adelante y hacia atrás. Saldrá agua hirviendo y vapor por los orificios
de la base. Tenga cuidado al hacer esto ya que el agua y el vapor están lo suficientemente
calientes como para causar quemaduras.
22 Repita el paso 19 hasta que las impurezas y el sarro hayan salido.
23 Saque el agua que haya quedado en el tanque. No toque las superficies calientes, el agua o el
vapor ya que podría lastimarse.
24 Suelte la perilla de vapor y volverá automáticamente a la posición de Lino/Algodón “ “.
25 Apoye la plancha en posición vertical y deje que se enfríe.
CONSEJOS ÚTILES
26 Lea todas las etiquetas de cuidado de la prenda antes de plancharla. También puede hacer una
prueba de la temperatura de la plancha en un dobladillo o una costura interna.
27 Planche telas similares al mismo tiempo en la siguiente secuencia de telas: sintéticas, nylon,
seda/lana, poliéster y algodón/lino. Esto reducirá la necesidad de ajustar frecuentemente la
temperatura.
ESPECIFICACIONES TÉCNICAS: 120 V, 60 Hz, 1800 vatios
GUÍA DE PLANCHADO
CARACTERÍSTICAS
ALMACENAMIENTO Y CUIDADO
28 Gire siempre la perilla de control variable de vapor a “ “ luego de vaciar el tanque de agua.
29 Deje que la plancha se enfríe antes de guardarla.
30 Coloque la plancha en posición vertical durante su calentamiento, enfriamiento y almacenamiento.
31 Evite que el contacto de cualquier material filoso con la base de la plancha.
32 Cada dos semanas, limpie el exterior de la plancha con un trapo húmedo y séquela.
33 Si usa almidón en aerosol, limpie la base de vez en cuando con un trapo húmedo para evitar la
acumulación de depósitos.
34 Si no ha usado la plancha por varias semanas, sosténgala horizontalmente y deje que despida
vapor por 2 minutos antes de planchar.
SIEMPRE RECUERDE
35 Girar el selector de tela/temperatura a “Nylon” y luego desenchufar la plancha del tomacorriente
antes de llenarla con agua.
36 Siempre vacíe el agua de la plancha después de usarla.
37 Nunca planche o aplique vapor en las prendas mientras las esté usando.
38 Tenga mucho cuidado al llenar la plancha con agua. Se puede lastimar si toca las partes
metálicas calientes, el agua caliente o el vapor.
SOLUCIÓN DE PROBLEMAS
La plancha no se
calienta.
La plancha nueva
emite un olor
extraño o salen
pequeñas partículas
de la misma.
La plancha no
emite vapor.
Salen gotas de
agua por las
ranuras de vapor.
La plancha debe enchufarse únicamente a un tomacorriente polarizado.
Verifique que esté enchufada correctamente.
El ajuste de temperatura puede estar muy bajo.
Pruebe una temperatura más alta.
Función de apagado automático activada.
Esto es normal.
Siga las instrucciones para usarla por primera vez y deje que emita
vapor durante 2-3 recargas presionando ocasionalmente el botón
de ráfaga de vapor para eliminar las partículas blancas pequeñas.
Tanque de agua vacío o nivel de agua demasiado bajo. Agregue agua.
La perilla de control de vapor está en “ ”.
Verifique que el selector de tela/temperatura y el control variable de vapor
estén ajustados correctamente. Para el máximo de vapor seleccione
“ ” en el control de vapor y el control de temperatura debe estar en
“Lino/Algodón”.
La base de la plancha no está lo suficientemente caliente y la función
anti-goteo desactiva el vapor. Siempre deje que la plancha llegue a la
temperatura seleccionada con el control variable de vapor en “ ”.
Para obtener más vapor, mueva el selector de tela/temperatura a “Lino/
Algodón” y el control variable de vapor a “ “.
Si los ajustes de vapor y temperatura son correctos y no hay vapor, mueva
suavemente la plancha hacia la derecha o la izquierda unas cuantas veces.
Mueva el control variable de vapor desde “ ” hasta “ ” varias veces.
La perilla de control variable de vapor puede estar colocada en la posición
de “AUTO LIMPIEZA”.
Mueva la perilla de ajuste de vapor desde “ “ hasta “ “.
La plancha puede no estar suficientemente caliente. Coloque el selector
de tela/temperatura en la posición “Lino/Algodón”. Siempre espere a que
la plancha se caliente completamente antes de activar el control variable
de vapor.
Puede haber usado mucho el botón de ráfaga de vapor. Espere más
tiempo entre cada ráfaga.
GI510_55_A3_IB_E_S_150306_1
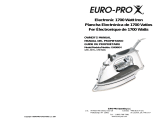
1 Base de acero inoxidable
2 Tapa del tanque de agua
3 Botón atomizador
4 Selector de tela/temperatura
5 Pico rociador
6 Botón de ráfaga de vapor
7 Perilla de control variable de
vapor/auto-limpieza
8 Indicador de nivel de agua
9 Luz LED Indicadora
10 Cable pivotante
11 Función anti goteo (no se muestra)
12 Filtro anti-calcio Incorporado
(no se muestra)
9
1 2 3
5
8
4
6
7
10
7
9
Este manual cubre el modelo:
GI510 55
Euro-Pro Operating LLC
Newton, MA 02459
1-800-798-7398
COPYRIGHT © Euro-Pro Operating LLC 2015
IMPRESO EN CHINA
El dibujo puede no ser igual al producto real. Nosotros nos esforzamos constantemente en mejorar nuestros productos, por
lo tanto las especificaciones aquí indicadas pueden cambiar sin previo aviso.
Euro-Pro y Shark son marcas registradas de Euro-Pro Operating LLC.
I
NSTRUCCIONES IMPORTANTES DE SEGURIDAD
LEA TODAS LAS INSTRUCCIONES ANTES DE USAR SU PLANCHA
Al usar aparatos eléctricos, siempre debe seguir precauciones básicas de seguridad,
incluyendo las siguientes:
1. Use la plancha únicamente en las aplicaciones para las que fue diseñada.
2. Para evitar una descarga eléctrica, no sumerja la plancha en agua o cualquier otro líquido.
3. NO tire del cable para desenchufarlo. Sujete el enchufe y tire para desenchufarlo.
4. NO deje que el cable entre en contacto con superficies calientes. Coloque el selector de tela/
temperatura en “Nylon” antes de desenchufar la plancha. Deje que la plancha se enfríe antes de
guardarla. Enrolle el cable, sin apretar, alrededor de la plancha para guardarla.
5. Siempre desenchufe la plancha del tomacorriente al llenarla con agua o al vaciarla, o cuando no
se use.
6. NO utilice la plancha si el cable o el enchufe están dañados o luego de que se haya caído,
haya sufrido cualquier tipo de daño o tenga fugas. Para reducir el riesgo de sufrir una descarga
eléctrica no desarme esta unidad. Retórnela a EURO-PRO Operating LLC para que sea examinada,
reparada o ajustada. Si se arma incorrectamente puede causar una descarga eléctrica al usarla.
7. IMPORTANTE: Este artefacto no está diseñado para ser usado por personas (incluyendo niños)
con disminuciones físicas, sensoriales o mentales, o con falta de experiencia o conocimiento.
Tenga mucho cuidado al utilizar cualquier artefacto cerca de niños. NO deje la plancha
desatendida mientras esté conectada o sobre una tabla de planchar.
8. El tocar partes metálicas calientes, agua caliente o vapor puede causar quemaduras. Tenga
cuidado al dar vuelta una plancha con vapor ya que puede haber agua caliente en el recipiente.
9. Al colocar la plancha en posición vertical, verifique que esté colocada sobre una superficie
estable. Nunca use o apoye una plancha sobre una superficie inestable.
10. Cuando la plancha esté caliente, nunca la coloque sobre una superficie desprotegida, aunque
esté sobre su base.
11. Guarde siempre su plancha parada, no apoyada sobre su base. Si la guarda apoyada sobre la
base, una pequeña cantidad de humedad hará que la base se oxide y se manche.
12. Este artefacto eléctrico es para uso hogareño solamente.
CONSERVE ESTAS INSTRUCCIONES
GARANTÍA LIMITADA DE UN AÑO
EURO-PRO Operating LLC garantiza este producto contra defectos de materiales y
mano de obra por un término de un (1) año a partir de la fecha de compra original,
siempre que sea utilizado para uso doméstico normal, sujeto a las siguientes
condiciones, exclusiones y excepciones.
La responsabilidad de EURO-PRO Operating LLC se limita únicamente al costo de
reparación o reemplazo de la unidad, a nuestro criterio. Esta garantía no cubre el desgaste
normal de las partes y no cubre ninguna unidad que haya sido alterada o utilizada con
fines comerciales. Esta garantía limitada no cubre daños ocasionados por uso inadecuado,
abuso, negligencia o daños causados por embalaje inapropiado o maltrato durante el
transporte. Esta garantía no cubre daños o defectos causados o resultantes durante el
transporte para su reparación o alteraciones del producto o cualquiera de sus partes,
realizadas por una persona no autorizada por EURO-PRO Operating LLC.
Si su artefacto no funciona correctamente al utilizarlo bajo condiciones domésticas
normales dentro del período de garantía, puede devolver el artefacto completo y los
accesorios, junto con un comprobante de la fecha de compra, pagando los gastos
de envío. Por servicio al cliente, llame al 1-800-798-7398 o visite nuestro sitio Web
www.sharkclean.com.
Si EURO-PRO Operating LLC determina que el artefacto presenta un defecto, lo
reparará o remplazará sin cargo, a su criterio. Debe incluir un comprobante de compra
fechado y un cheque a favor de EURO-PRO Operating LLC por la suma de $12,95 para
cubrir los gastos de envío.
Esta garantía es válida para el comprador original del producto y excluye cualquier otra
garantía legal, implícita y/o convencional. La responsabilidad de EURO-PRO Operating
LLC, de existir, se limita a las obligaciones específicas asumidas expresamente bajo
los términos de esta garantía limitada. Bajo ninguna circunstancia EURO-PRO Operating
LLC será responsable por daños incidentales o indirectos a cualquiera, de ninguna
clase. Algunos estados no permiten la exclusión o limitación de daños consiguientes o
incidentales, por lo tanto lo anterior puede no ser válido para usted.
Esta garantía limitada le otorga derechos legales específicos, y usted puede también
tener otros derechos los que varían de estado a estado o de provincia a provincia.
*IMPORTANTE: Embale el producto cuidadosamente para evitar daños durante
el transporte. Asegúrese de incluir un comprobante de la fecha de compra y de
colocarle una etiqueta al producto con su nombre, dirección completa y número de
teléfono, una nota proporcionando información de la compra, número de modelo y
una descripción del problema. Le recomendamos asegurar el paquete (puesto que
la garantía no cubre daños de envío). Escriba en el exterior del paquete “ATTENTION
CUSTOMER SERVICE”.
Este artefacto tiene un enchufe polarizado (una de las patas es más
ancha que la otra). Como medida de seguridad, este cable entrará
únicamente en un tomacorriente polarizado. Si el enchufe no entra
completamente en el tomacorriente, inviértalo. Si aún no entra, llame a
un electricista calificado. No intente alterar este dispositivo de seguridad.
GUÍA DEL USUARIO
GI510
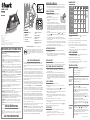
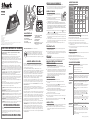
INDICACIÓN DE LA
ETIQUETA
FABRIC TYPE
LABEL
INDICATION
FABRIC/TEMP.
SELECTOR
STEAM
CONTROL
BURST OF
STEAM
SPRAY
Please note
that the symbol
above on the
label
of your garment
means that
THE ARTICLE
CANNOT BE
IRONED
NONO NO YES
YESYES YES YES
NylonWool or Silk Polyester Linen or
Cotton
NylonWool/SilkPolyester Linen/Cotton
FABRIC TYPE
LABEL
INDICATION
FABRIC/TEMP.
SELECTOR
STEAM
CONTROL
BURST OF
STEAM
SPRAY
Please note
that the symbol
above on the
label
of your garment
means that
THE ARTICLE
CANNOT BE
IRONED
NONO NO YES
YESYES YES YES
NylonWool or Silk Polyester Linen or
Cotton
NylonWool/SilkPolyester Linen/Cotton
FABRIC TYPE
LABEL
INDICATION
FABRIC/TEMP.
SELECTOR
STEAM
CONTROL
BURST OF
STEAM
SPRAY
Please note
that the symbol
above on the
label
of your garment
means that
THE ARTICLE
CANNOT BE
IRONED
NONO NO YES
YESYES YES YES
NylonWool or Silk Polyester Linen or
Cotton
NylonWool/SilkPolyester Linen/Cotton
FABRIC TYPE
LABEL
INDICATION
FABRIC/TEMP.
SELECTOR
STEAM
CONTROL
BURST OF
STEAM
SPRAY
Please note
that the symbol
above on the
label
of your garment
means that
THE ARTICLE
CANNOT BE
IRONED
NONO NO YES
YESYES YES YES
NylonWool or Silk Polyester Linen or
Cotton
NylonWool/SilkPolyester Linen/Cotton
FABRIC TYPE
LABEL
INDICATION
FABRIC/TEMP.
SELECTOR
STEAM
CONTROL
BURST OF
STEAM
SPRAY
Please note
that the symbol
above on the
label
of your garment
means that
THE ARTICLE
CANNOT BE
IRONED
NONO NO YES
YESYES YES YES
NylonWool or Silk Polyester Linen or
Cotton
NylonWool/SilkPolyester Linen/Cotton
TIPO DE TELA Nylon Lana o Seda Poliéster Lino o
Algodón
Note que el
símbolo de
arriba en la
etiqueta de
su prenda
significa
que LA
PRENDA NO
SE PUEDE
PLANCHAR
SELECTOR
DE TELA/
TEMPERATURA
Nylon Lana/Seda Poliéster Lino/Algodón
CONTROL DE
VAPOR
FABRIC TYPE
LABEL
INDICATION
FABRIC/TEMP.
SELECTOR
STEAM
CONTROL
BURST OF
STEAM
SPRAY
Please note
that the symbol
above on the
label
of your garment
means that
THE ARTICLE
CANNOT BE
IRONED
NONO NO YES
YESYES YES YES
NylonWool or Silk Polyester Linen or
Cotton
NylonWool/SilkPolyester Linen/Cotton
FABRIC TYPE
LABEL
INDICATION
FABRIC/TEMP.
SELECTOR
STEAM
CONTROL
BURST OF
STEAM
SPRAY
Please note
that the symbol
above on the
label
of your garment
means that
THE ARTICLE
CANNOT BE
IRONED
NONO NO YES
YESYES YES YES
NylonWool or Silk Polyester Linen or
Cotton
NylonWool/SilkPolyester Linen/Cotton
FABRIC TYPE
LABEL
INDICATION
FABRIC/TEMP.
SELECTOR
STEAM
CONTROL
BURST OF
STEAM
SPRAY
Please note
that the symbol
above on the
label
of your garment
means that
THE ARTICLE
CANNOT BE
IRONED
NONO NO YES
YESYES YES YES
NylonWool or Silk Polyester Linen or
Cotton
NylonWool/SilkPolyester Linen/Cotton
FABRIC TYPE
LABEL
INDICATION
FABRIC/TEMP.
SELECTOR
STEAM
CONTROL
BURST OF
STEAM
SPRAY
Please note
that the symbol
above on the
label
of your garment
means that
THE ARTICLE
CANNOT BE
IRONED
NONO NO YES
YESYES YES YES
NylonWool or Silk Polyester Linen or
Cotton
NylonWool/SilkPolyester Linen/Cotton
RÁFAGA DE VAPOR NO NO NO SÍ
ROCIADOR SÍ SÍ SÍ SÍ


 1
1
 2
2