Microlife PF100 El manual del propietario
- Tipo
- El manual del propietario


Digital Peak Flow Meter – Instruction Manual
Table of Contents
1. Introduction
2. Important Information Concerning Intended Use
2.1
Information about the Measurement and Control of Values
2.2. Which values are Normal?
3. Components of your Peak Flow Monitor
4. Using your Monitor for the First Time
4.1. Inserting the Batteries
4.2. Setting Date and Time
5. Measurement procedure
5.1. Measuring Procedure
5.2. Information about the Measurement and Control of
Peak Flow Values
5.3. Self-Assessment with the Traffic Light Indicator
5.4. Stored Readings/Memory
5.5. Battery Replacement
6. Software
7. Error Messages/Troubleshooting
8. Care and Maintenance
8.1. Cleaning / Disinfecting the Mouthpiece & Measuring Tube
8.2. Cleaning the Main Unit
8.3. Maintenance and Safety
9. Limited Warranty
10. Certifications
11. Technical Specifications
12. How to Contact Us
1

2
Dear Customer:
Please use this Traffic Light card following your physician’s (or
licensed health care professional’s) advice. They will help
determine good flow rates and recommend actions when
decreased flow rates are measured.

3
Estimada cliente:
Rogamos utiliza esta tarjeta del indicador tipo semáforo
siguiente las recomendaciones de su médico (ó del profesional
de salud licenciado). Ellos le ayundarán a determinar la razón
de flujo buena y las acciones a seguir cuando la razón de flujo
menores se miden.

4
1. Introduction
Your new Microlife Peak Flow Meter is a high quality medical
device that measures your maximum possible exhalation which is
called peak flow (referred to in medical terms as PEF – Peak
Expiratory Flow) and forced expiratory volume (commonly known
as FEV1) in 1-second. Regular monitoring of your peak flow is
extremely useful for controlling diseases of the airways such as
asthma, C.O.P.D., or chronic bronchitis.*
The Microlife monitor is very simple to use, so measurements
can easily be performed at home. The Peak Flow Meter is
designed for people of all ages and is suitable for all ages.
Additionally, it automatically stores 240 readings so you can take
your daily results with you when you visit your doctor for a
checkup.
Read through this instruction manual carefully before using the
device and then keep it in a safe place.
*A higher value usually means air is moving easily through your lungs. When asthma
attacks occur air cannot move easily through your lungs and lower values will be noted.
2. Important Information Concerning Intended Use
2.1 Information about the Measurement and Control of
Peak Flow Values
This device is intended for monitoring PEF (Peak Expiratory
Flow Rate) and FEV1 (Forced Expiratory Volume in one second)
for patient home use. The device is designed for pediatric to
adult patients, and the simple interface makes it easy to use.
When the device is used to monitor lung conditions such as
asthma and chronic obstructive pulmonary disease (COPD), the
user should be under the care of a licensed health care

5
professional. A licensed health care professional’s advice is
required to understand the meaning and importance of the
measurements reported by the device and how to decide on an
appropriate treatment plan that defines when to measure.
A peak flow meter is used to measure a person’s “peak
expiratory flow,” which is the fastest speed a person can blow
air out of the lungs after taking in as big a breath as possible.
“Peak expiratory flow” is a simple measure of airflow that can
tell you how well you are breathing. It tells you how well air is
moving through the airways in your lungs.
Forced Expiratory Volume (FEV1) is a measure of the volume of
air expelled in 1-second.
If you have a breathing condition such as asthma or C.O.P.D.,
your physician (or other licensed health care professional) may
recommend that you use a peak flow meter to watch for
changes in your airflow.
Your physician (or licensed health care professional) will give
you a treatment plan that will tell you what actions to take
when you have a change in airflow. In addition, you should
record your peak flow measures (see sections 5.4, Stored
Readings/Memory) as recommended by your physician (or
other licensed health care professional). Reviewing peak flow
measures can help you and your physician (or licensed health
care professional) check closely on your asthma or C.O.P.D. to
provide the best treatment for you.
The treatment plan given to you by your physician or other
licensed health care professional will tell you what action to

6
take when there are changes in your peak flow number.
No matter what your peak flow measures are, if you have signs
and symptoms such as chest tightness, shortness of breath,
coughing or wheezing you should follow your licensed health
care professional’s advice for contacting him or her.
Instructions for using peak flow meter must be followed
carefully in order to get a correct measure of airflow.
If you are unable to obtain a reading, and your monitor is
working correctly, you should contact your physician
immediately.
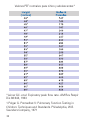
2.2. Which PEF Values are Normal?
Note: Please contact your doctor for FEV1 standards.
Normal PEF Values for Males*

Normal PEF Values for Females*
7

*Leiner GC. et al: Expiratory peak flow rate. AM Rev Respir
Dis 88:644, 1963
1 Polgar G. Promadhat V: Pulmonary Function Testing in
Children: Techniques and Standards. Philadelphia, W.B.
Saunders Company, 1971
8
Normal PEF Values for Children and Adolescents*

9
3. Your Microlife Peak Flow Meter
Memory
Scroll
Battery
Compartment
Mouth
Piece
On/Off
Display
Data
Compartment
Measuring
Tube
Traffic Light
Indicator

4. Preparation for your first Measurement
Before your first use we recommend that
you disinfect the mouthpiece and flow tube
as explained in this manual. (Section 8)
4.1. Inserting the Batteries
1.
Please open the Battery Compartment
from underneath and insert the two
batteries (1.5 V, size AAA).
2. Follow the polarity as indicated by
the symbols in the compartment.
10

4.2. Setting Date and Time
After new batteries have been
inserted, the default time/date display
will blink. You must then re-enter the
current date and time. To do this,
proceed as listed
below. Once set, the
monitor automatically
records the time
and date of each measurement:
1. Lift and open the data compartment
from the side of the device as
indicated by the data symbol.
2. If the year is not blinking in the
display, press the small TIME button
next to the
clock symbol with a paper
clip and the year will start blinking;
release the switch.
3. Using the two arrow keys on the
front of the monitor you can decrease
(left arrow button) or increase (right
arrow button) the number. Release
the arrow button
when the correct
number is reached.
4. To confirm the year and then set the
month, press the TIME button.
5.
You can now set the month using the
arrow buttons. (Example: pressing 2
times the right arrow button advances
to 06 for June). To confirm and then
set the day, press the TIME button.
11

6. Please follow the previous sequence to
set the day, hour and minutes.
7. Once you have set the last minute and
pressed the TIME button, the date and
time are set and the time is displayed.
8. Close the data compartment.
9. If you want to change the date and time,
press the TIME button and repeat steps
3-8.
Please note:
• If you hold down the arrow key for
more than 2 seconds it speeds up.
• Date /time can also be set easily
from computer when you run the
Microlife Analyzer Software.
12

13
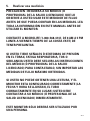
5. Measurement procedure
CAUTION: ASK YOUR PHYSICIAN (OR OTHER LICENSED
HEALTH CARE PROFESSIONAL) TO WATCH YOU USE
THIS PEAK FLOW METER BEFORE YOU RELY ON ANY
MEASUREMENTS.
READ ALL INFORMATION IN THIS INSTRUCTION
BOOKLET BEFORE USING.
CONTACT MICROLIFE AT 866-934-1839 FROM 8 AM – 5 PM
(EASTERN TIME) MONDAY – FRIDAY WITH QUESTIONS.
IF YOU HAVE SIGNS AND SYMPTOMS SUCH AS CHEST
TIGHTNESS, SHORTNESS OF BREATH, COUGHING OR
WHEEZING FOLLOW YOUR PHYSICIAN’S (OR OTHER
LICENSED HEALTH CARE PROFESSIONAL’S) ADVICE FOR
CONTACTING THEM NO MATTER WHAT READINGS YOU
OBTAIN.
IF YOU DO NOT GET A READING, AND YOUR DEVICE IS
SET CORRECTLY (DATE AND TIME ARE SET, TUBE
CORRECTLY IN PLACE) CONTACT YOUR PHYSICIAN
IMMEDIATELY.
THIS MONITOR IS DESIGNED FOR A SINGLE USER.

5.1. Measuring Procedure
1. Press the ON/OFF button to turn the
monitor on. The last result will
appear on the display (0 if there is
no data). The device will sound two
short beeps and arrows will blink to
indicate it is ready for
measurement.
2. You can perform the measurement
while standing or sitting upright.
For better comparison of your data,
you should always perform the
measurement in a similar position.
3. Hold the monitor with both hands
on the two textured compartments.
4. Inhale completely and hold your
breath for a moment.
5. Cover the mouthpiece tightly with
your lips.
6. Blow into the measuring tube as
hard and as fast as you can.
7. A long beep confirms that the result
is recorded. PEF is displayed for
about 3 seconds followed by FEV1.
Then, the monitor will sound two
short beeps indicating that it is
ready for a new measurement.
14

8. It is recommended to perform three
or more measurements sequentially.
9. After each measurement, the actual
reading is shown followed by the
highest reading of your current
measurement session.
10.Press the ON/OFF button again to
switch the monitor off. Before the
monitor switches off, the highest
value of the current measurement
session and its related memory
position MR XX is displayed.
11.Clean the tube and mouthpiece
after use (see section 8).
Please note:
• The monitor only saves the highest reading from a
measurement session (--measurements taken in one
on/off cycle).
• The date and time must be set for the unit to take a
measurement.
• The device stores up to 240 measured values with date and
time. When the memory is full, the oldest values are
automatically erased. Make sure you visit your doctor
in time to analyze your data.
• Please confirm that date and time settings are always actual.
• The performance of the monitor can be affected by
extremes of temperature and humidity. See technical
specifications section for details.
15

16
5.2. Information about the Measurement and Control of
Peak Flow Values
• It is necessary to keep regular control of your peak flow
values. Doctors generally recommend taking one
measurement in the morning and one in the evening, every
day, normally before inhaling your prescribed drugs. Carry
out additional measurements whenever you feel unwell or
perceive shortness of breath.
• Your doctor is interested in the highest peak flow value that
you can achieve during a measurement session. Please
repeat the measurements until you feel you have got the
best possible result for the moment. Take care to have
sufficient relaxation between measurements.In case of
worsening results at each successive measurement session
talk to your doctor. It may be a sign of instable asthma.
• Please note that asthma attacks are indicated in
advance by low peak flow values before you feel it!
Please contact your doctor in cases such as these.
Also contact your doctor if you have signs and
symptoms such as chest tightness, shortness of
breath coughing or wheezing.
• Self-measurement is a means for control, and is not
intended for diagnosis or treatment. In any event,
please be sure to discuss your measured values with
your doctor. Your doctor will also explain which
values are normal for you.
• You should never alter the dosages of any medication
without talking to your doctor

17
5.3. Self-Assessment with the Traffic Light Indicator
The colored bars on the left hand edge of the display are a
quick visual reference to show the range of your measured
values. As your peak flow raises or lowers, the arrow on the
display will show the measurement as either within the normal
(green), borderline (yellow) or danger (red) range.
As you use the monitor, it will automatically record your best
value and use it to determine your traffic light zones.
Determining the Area Limits
The traffic light indicator can be used in one of two ways:
• Default traffic light zones
• Customized traffic light zones.
Default Traffic Light Zones:
1. The green zone ranges between your personal best
measurement (MAX) and 80% of that reading.
To determine the yellow/green border zone, multiply the
MAX value by 0.8 [Example: 500 l/min x 0.8 = 400 l/min].
2. The yellow zone ranges between your personal best
measurement (MAX)and 60% of that reading.
To determine the yellow/red border zone, multiply the MAX
value by 0.6. [Example: 500 l/min x 0.6 = 300 l/min].
3. The red zone ranges below 50% of your best reading.
Customized Traffic Light Zones:
The Traffic Light Indicator zones can be customized with a
computer and the Asthma software. This Windows compatible
software is free for download from our website (See section 6).

18
CAUTION: Setting area limits, creating a
treatment plan and modifying your traffic
light zone
settings should only be done under
direction
of a physician (or other licensed
health care practitioner). If you would like to
use this feature,determine your customized
zones with your doctor and record them on
the traffic light card (enclosed).
Note: Once customized zones are
programmed, default traffic light
measurements will no longer be taken.
Traffic Light Indicator Colors
The traffic light arrow will raise or lower
according to the zones set for the monitor
(default or customized).
Green Zone – OK
•
If your measurement is in the green
zone, your condition appears to be under
control. Continue your treatment plan.
Yellow Zone – Caution
• If your measurement is in the yellow
zone, measure more frequently and
follow your treatment plan.
Red Zone – Danger
• If your measurement is in the red zone,
your condition is serious. Act as
discussed with your physician or seek
emergency medical treatment.

19
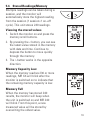
5.4. Stored Readings/Memory
Multiple readings can be taken during a
session, and the monitor will
automatically store the highest reading
from the session (1 session=1 on–off
cycle). This unit stores 240 readings.
Viewing the stored values
1. Switch the monitor on and press the
memory scroll buttons.
2. By pressing the < button, you can see
the latest value stored in the memory
with date and time. Continue to
depress the button to move quickly
through the memory.
3. The > button works in the opposite
direction.
Memory Capacity Low
When the memory reaches 230 or more
readings, MR XX will blink after the
monitor is switched on to indicate that
the remaining memory capacity is low.
Memory Full
When the memory has stored 240
results, the monitor will beep when
the unit is switched on and MR 240
will blink. From this point, a new
measured value will be stored by
overwriting the oldest value.

Clear all Values
To clear all data press the < and the >
buttons simultaneously for 5 seconds,
and release the buttons. CLR will appear
and blink in the display for 3 seconds. To
erase all data from memory, press the
ON/OFF button while CLR is blinking.
Otherwise the monitor moves back to
normal operation and the data remains.
5.5. Battery Replacement
When the battery low symbol appears in the display, the device
is blocked until the batteries have been replaced
Use two 1.5 V Long-Life AAA batteries. If the monitor is left
unused for longer periods, remove the batteries.
Notes:
• During a battery exchange the data stored in the memory of
the monitor is saved and will NOT be lost.
• The use of rechargeable batteries is NOT recommended.
• After a battery change the time/date need to be
reentered so that data can be stored.
20

21
6. Software
This meter can be used in connection with your personal computer
(PC) by connecting the monitor via the included USB cable.
The free downloadable Microlife Asthma Software will enable
you to transfer your monitor’s readings to your PC, and to
customize your traffic light zones (if desired). Once your
readings are transferred, you will be able to print your results,
view graphs and reports of your values and share them with
your doctor.
System Requirements: Before installing your Asthma
Monitoring Software, be sure that your computer meets or
exceeds the system requirements:
Hardware Minimum Recommended
Microprocessor
(CPU speed) 550 MHz 1 GHz or higher
Memory devices
(RAM) 256 MB 512 MB
Hard disk 500 MB 800 MB
Communications
port USB 1.0 USB 1.0 and above
Display 256 colors 65536 colors
Resolution 800 x 600 1024 x 760
Operating system: Microsoft Windows XP, Vista, 7 & 8
Not compatible with macintosh computers.

22
6.1. Installation and data transmission
a. Connect the monitor via USB cable with the PC. Please pay
close attention when connecting the USB cable. Do not
force the cable into the monitor or your computer.
b) Windows OS – Install and launch the software. Please call
customer service at 1-866-934-1839 for assistance.
Microlife’s Asthma Monitoring Software is available for
download free of charge from our website:
https://www.microlife.com/consumer-
products/respiratory-care/asthma-monitor/pf-100/
c) Turn the Peak Flow Meter on.
d) Once connected, three horizontal bars will appear on the
display and last for 3 seconds. The bars will then flash to
indicate that the connection between computer and device
has been successfully made. As long as the cable is
connected, the bars will continue to flash and the screen
will remain disabled.
During the connection, the device is completely controlled
by the computer. Please refer to the "Help" file in the
software for detailed instructions.For more information, or
help with the basic installation and use, please contact
Microlife customer service at 866-934-1839
Notes:
• A detailed software instruction manual is available within
the software. It is accessible through the “help” button.
• Once stored memories have been downloaded from the
monitor to the PC, they will be erased from the monitor’s

23
memory.
• In order to download the data from your device, a user
profile must be created (minimum required data: Family
Name, Given Name, and ID).
• The ID can be any name, or combination of symbols.
7. Error Messages/Troubleshooting
If you get a low reading this could be an early warning sign
your condition is getting worse. You must follow directions
exactly as instructed to obtain accurate results.
Call Microlife with questions at 866-934-1839, M-F 8 AM–8
PM Eastern Time.
If an error occurs one of the following listed error codes is displayed.
Remedy
Please set date and time
(Section 4.2)
Set the time and date and
take a reading.
Unit malfunction, please
repeat the measurement.
Message
Er1
no
Hi
Cause
The result can not be
stored in memory
because date/time is
not set.
There is no data
stored in the Monitor
The result is higher
than 900 ml/min.

24
Other possible errors and their solutions:
If problems occur when using the device, the following points
should be checked
If you have any questions regarding the use of this device,
please ask your health care professional or contact Microlife
directly at 866-934-1839. The Microlife service team will be
happy to help you.
Remedy
1. Check the polarity of the
batteries (+/-)
2. If the display is erratic or
unusual, remove the batteries
and re-install new batteries.
1. Ensure that the measuring tube is
connected correctly
2. Ensure that the wing wheel is
rotating when air is moving
through the tube. Any objects,
dust liquids or mucus may
interfere the rotation of the wing
wheel. In this case clean the tube
as explained.
3. Discuss the values with your
doctor.
1. Ensure Date and Time are set.
(See section 3.2)
Malfunction
The display remains
blank.
Batteries have been
installed.
The instrument
frequently fails to
measure or the values
measured are wrong.
The unit fails to take a
measurement, year is
blinking

25
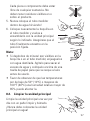
8. Care and Maintenance
8.1. Cleaning the Mouthpiece and the Measuring Tube
Your peak flow mouthpiece and measuring tube should be
cleaned within 30 minutes after each use
1. Separate the air tube and
mouthpiece from the main body.
Disconnect the mouthpiece from
the measuring tube by moving it in
a forward direction.
2. Immerse the mouthpiece in a
prepared soap solution of water
and regular dishwashing soap.
Thoroughly clean by swirling in the
prepared soap solution. Thoroughly
rinse the mouthpiece with water
(distilled water is recommended).
Allow the device to air dry.
Note: Do not tap against hard
surfaces to avoid damage.
3. Now, immerse the measuring tube
in a prepared soap solution and
thoroughly clean by swirling in the
prepared soap solution. For
cleaning the measuring tube it is
best to use distilled water. Use
care not to damage sensitive parts.
Thoroughly rinse the measuring
tube with water. Allow the device
to air dry.
Mouthpiece
Measuring
Tube

26
4. Inspect the device after cleaning
for signs of mucus or debris inside
the air tube. Each component
should be free of any film. There
should be no visible debris in or on
the product. The device must be
visibly clean.
5. Never put the measuring tube into
boiling water!
6. Reconnect the mouthpiece to the
measuring tube and reassemble to
the main unit as shown. When the
tube is pushed completely into the
fixed position, it will engage the
tab on the body and click into
place.
Notes:
• If you have “hard water”, mineral deposits may be visible
on the mouthpiece or measuring tube. Rinse in distilled
water, shake and place on a paper towel and allow to air
dry before using.
• Please note temperatures lower than 50°F (10°C) and
higher than 104°F (40°C) and humidity greater than 85%RH
can affect the accuracy.
8.2. Cleaning the Main Unit
Clean the main unit once a day with a
clean, damp cloth. Never put the main
unit into water.
100 C/212 F

27
8.3. Maintenance and Safety
• Ensure that children do not use this
device unsupervised; some parts are
small enough to be swallowed.
• Do not use this device close to strong
electromagnetic fields such as mobile
telephones or radio installations.
Maintain a minimum distance of 3.3m
from such devices when using this unit.
• Do not expose the device to extreme
temperatures, humidity, dust or direct
sunlight.
• Clean the outside of the device with a
soft, dry cloth. Do not use gasoline,
thinners or similar solvents. The
measuring tube should not be washed
in a dishwasher.
• Do not drop the instrument or treat it
roughly in any way. Avoid strong
vibrations.
• Never attempt to repair the instrument
yourself This invalidates the
manufacturer’s warranty.
• If the device is dropped you may notice
unusual results. Please call customer
service for assistance.
• Do not use the device if you think it is
damaged or if anything appears unusual.
Gasoline

28
9. Limited Warranty
Your Digital Peak Flow Monitor is warranted for 2 years by
Microlife USA Inc, against manufacturer defects for the original
purchaser only, from date of purchase.
The 2 year warranty applies to the monitor. Batteries are not
covered by this warranty. There are no user serviceable parts
inside.
The warranty does not apply to consequential and incidental
damages, or damage caused by batteries, improper handling,
and accidents. Professional use, not following the operating
instructions, and alterations made to the monitor or accessory
by third parties, are also not included in this warranty. Some
states do not allow the exclusion or limitation of incidental or
consequential damages, so the above limitation or exclusion
may not apply to you.
Microlife USA Inc will investigate your concern. A monitor or
accessory as defined by this warranty, determined to be out of
specification, will be replaced and shipped to you at no cost. A
monitor or accessory as defined by this warranty, determined to
be within specification, will be returned to you with a report of
findings, at no cost.
Please use the customer service contact information to reach
Microlife USA Inc. regarding any warranty concerns. We ask
that you please contact us before sending any product back in
order to better identify, and more quickly process, your concern.

29
10. Certifications
Device standard: IEC 60601-1
IEC 60601-1-2
IEC 60601-1-11
ATS Standard 1994 Update
Electromagnetic
compatibility: Device fulfills the stipulations of
the International standard IEC
60601-1-2
Expected Service Life:
Device: 5 years
Battery Life: Approx. 1000 measurements
IP20 Classification: Protected against solid foreign
particles with a diameter of more
than 12.5 mm, no protection
against water. Keep Dry.
The PF100 meets the ATS recommendations for accuracy and
precision in measuring peak flow.
Batteries and electronic instruments must be disposed of in
accordance with the locally applicable regulations,not with
domestic waste.

30
11. Technical Specifications
Measuring range:.................PEF from 50 to 900 l/min.
FEV1 from 0.01 to 9.99
Measuring method:..............Rotating wing wheel
Accuracy:..............................ATS 1994 update ± 25 l/min or
12% of the reading,
whichever is greater
FEV1 ± 0.1 or ± 5% of the reading,
whichever is greater
Measuring resolution:..........PEF: 1 l/min, FEV1: 0.01
Data safety:..........................data re memorized by EEPROM
Memory: ...............................240 measurements with date/time
Size:......................................77 (W) x 144 (L) x 48 (H) mm
Weight:.................................150g (with batteries)
Storage temperature:...........-5 to +50°C or 23 to 122 °F
Storage humidity:.................10 to 90% relative humidity
maximum
Operation temperature:........10 to 40°C or 50 to 104 °F
Operating humidity:..............10 to 85% relative humidity
maximum
Power source:.......................2 batteries of 1.5 V, size AAA
Accessories: .........................3 Mouthpieces, Storage Case
Technical alterations reserved!
Follow instructions of use to avoid hazards.
Type BF applied part.

31
12. How to Contact Us
Toll Free Help Line: 866-934-1839
Fax (727) 451-0492
Distributed by:
Microlife USA, Inc.
1617 Gulf to Bay Blvd
2nd Floor
Clearwater, FL 33755
www.microlifeusa.com
Made in China

32
Monitor Electrónico para Asma
Manual de instrucciones

Tabla de contenidos
1. Introducción
2. Información importante relacionada al uso previsto
2.1 Información de la medición y el control de los valores
2.2. ¿Cuales son los valores normales?
3. Componentes de su Monitor para Asma
4. Utilización del monitor por primera vez
4.1. Colocación de pilas
4.2. Programación de fecha y hora
5. Procedimiento de medición
5.1. Procedimiento de medición
5.2. Información de la medición y el control de los valores de
caudal máximo
5.3. Autoevaluación con el indicador tipo semáforo
5.4. Lecturas guardadas/Memoria
5.5. Reemplazo de pilas
6. Software
7. Mensajes de error/Solución de problemas
8. Cuidado y mantenimiento
8.1. Limpiar y desinfectar la boquilla y el tubo medidor
8.2. Limpiar la unidad principal
8.3. Mantenimiento y seguridad
9. Garantía Limitada
10. Certificaciones
11. Especificaciones técnicas
12. Cómo contactarnos
33

34
1. Introducción
Su nuevo monitor Microlife es un dispositivo médico de alta
calidad que mide su máxima exhalación posible denominada
flujo máximo (llamado en términos médicos PEF – peak
expiratory flow) y el “volumen espiratorio furzado” (llamado en
términos médicos FEV1) en 1 segundo. Especialmente en
patologías de las vías respiratorias tales como el asma o la
bronquitis crónica, un monitoreo regular de su flujo máximo es
extremadamente útil para controlar su enfermedad.*
El monitor Microlife es muy sencillo de usar, lo que las
mediciones se puede realizar fácilmente en casa. El medidor de
flujo máximo está diseñado para personas de todas las edades
y es adecuado para todas las edades. Además, almacena
automáticamente 240 lecturas para que pueda tomar sus
resultados diarios con usted cuando visite a su médico para un
chequeo.
Lea atentamente el manual de instrucciones antes de utilizar
este dispositivo y luego manténgalo en un lugar seguro
*Un valor alto usualmente significa que el aire se está moviendo fácilmente através
de sus pulmones. Cuando un ataque de asma ocurre el aire no puede moverse a
través de los pulmones y valores bajos serán observados.

2. Información importante relacionada al uso previsto
2.1. Información de la medición y el control de los
valores de caudal máximo
Este dispositivo está fabricado para monitorizar el PEF (caudal
espiratorio máximo) y el FEV1 (volumen espiratorio forzado en
un segundo) para uso del paciente en su hogar. El dispositivo
está diseñado para pacientes pediátricos y adultos, y la
interfaz lo hace fácil de usar.
Cuando el dispositivo se usa para monitorizar las condiciones
de los pulmones tales como asma y enfermedad pulmonar
obstructiva crónica (EPOC), el usuario debe estar bajo el
cuidado de un profesional médico certificado. Se necesita la
asesoría de un profesional médico certificado para entender el
significado y la importancia de las medidas reportadas por el
dispositivo y cómo decidir sobre un plan de tratamiento
apropiado que defina cuándo medir.
Este medidor se utiliza para medir el flujo espiratorio máximo
de una persona, lo cual es la velocidad máxima a la cual una
persona puede expeler aire de los pulmones luego de aspirar
lo más mayor posible. “Flujo máximo espiratorio” es una
medida simple de flujo de aire que indica que tan bien usted
está respirando. Nos dice que también el aire se mueve a
través de los pasajes en los pulmones.
El volumen espiratorio forzado (FEV1) es una medida del
volumen de aire que usted expele en un segundo.
Si usted padece de alguna condición respiratoria como el
asma o C.O.P.D., su médico (ó profesional de la salud
licenciado) puede recomendar que usted utiliza el monitor de
35

36
flujo máximo para velar por cambios en la capacidad de fujo
de aire.
Su médico (ó profesional de la salud licenciado) le proveerá un
plan de tratamiento que le dirá a usted las acciones a tomar
cuando usted tenga algún cambio en el flujo de aire. En
adición, usted debe anotar sus medidas de flujo máximo
(sección 5.4, Lecturas guardadas/Memoria) según
recomendado por su médico (ó profesional de la salud
licenciado). Revisando las medidas de flujo máximo puede
ayudar a usted y a su médico (ó profesional de la salud
licenciado) a verificar de cerca su asma o C.O.P.D. para proveer
el mejor tratamiento para usted.
El plan de tratamiento desarrollado por su médico (ó
profesional de la salud licenciado) le dirá a usted las acciones
a tomar cuando existen cambios en su flujo espiratorio
máximo.
Si usted tiene señales ó síntomas de presión en el tórax,
fatiga respiratoria, tos o sibilancia usted debe seguir las
instrucciones del médico (ó profesional de la salud licenciado)
para contactarlo, sin importar las medidas de flujo máximo
obtenidas.
Las instrucciones para usar el monitor electrónico PF100
deben ser seguidas cuidadosamente para poder obtener
medidas correctas del flujo de aire.
Si usted no puede obtener una lectura usted debe contactar a
su médico (ó profesional de la salud licenciado)
inmediatamente.

37
2.2. ¿Cuales son los valores PEF normales?
Nota: Por favor contacte su médico para obtener estándares FEV1.
Valores PEF normales para varones*
Valores PEF normales para fémines*

38
*Leiner GC. et al: Expiratory peak flow rate. AM Rev Respir
Dis 88:644, 1963
1 Polgar G. Promadhat V: Pulmonary Function Testing in
Children: Techniques and Standards. Philadelphia, W.B.
Saunders Company, 1971
Valores PEF normales para niños y adolescentes*

39
3. Su monitor para asma Microlife
La figura muestra el monitor para asma Microlife.
Voluta de
memoria
Compartimient
o de baterías
Boquilla
Encender/apagar
Pantalla
Compartimien
to de datos
Tubo
medidor
Traffic Light
Indicator

40
4. Preparativos para su primera medición
Previo al primer uso se recomienda desinfectar la boquilla
según se indica en este manual. (Sección 8).
4.1. Colocación de pilas
1. Abra el compartimiento para pilas
desde la parte inferior e insertar las
dos pilas (1.5 V, tamaño AAA).
2. Por favor, observe la polaridad según
se indica mediante los símbolos en el
compartimiento.

41
3.2. Programación de fecha y hora
Después de insertar baterías nuevas, la
pantalla con la hora/fecha
predeterminadas parpadea. Usted debe
volver a ingresar la fecha y hora actuales.
Para hacerlo, proceda como se indica a
continuación. Una vez configurado, el
monitor registra automáticamente la fecha
y hora de cada medida:
1. Levante y abra el compartimiento de
datos en el lado del dispositivo tal
como lo indica el símbolo de datos.
2. Si el año no está parpadeando en la
pantalla, presione el pequeño botón
TIME (hora) junto al símbolo de reloj
con un clip y el año comenzará a
parpadear; suelte el interruptor.
3. Con las dos teclas de flecha de la
parte delantera del monitor puede
disminuir (botón de flecha izquierda)
o aumentar (botón de flecha derecha)
el número. Suelte el botón cuando
llegue al número correcto.
4. Para confirmar el año y configurar el
mes, presione el botón TIME.
5. Ahora puede configurar el mes con
los botones de flecha. (Ejemplo: si
presiona 2 veces el botón de flecha

42
derecha el número avanza a 06 para
junio). Para confirmar y luego
configurar el día, presione el botón
TIME.
6. Siga la secuencia anterior para
configurar el día, la hora y los
minutos.
7. Cuando haya configurado el último
minuto y presionado el botón TIME,
la fecha y la hora quedan grabadas y
se puede observar la hora.
8. Cierre el compartimiento de datos.
9. Si desea cambiar la fecha y la hora,
presione el botón TIME y repita los
pasos del 3 a 8.
Nota:
• Por favor observe: Si presiona la
tecla de la flecha por más de dos
segundos, se acelera el cambio.
• La fecha/hora puede fácilmente
programarse a partir de la
computadora mediante el uso del
software Microlife Asthma Analyser.

43
5. Realizar una medición
PRECAUCIÓN : REQUIERA A SU MÉDICO (Ó
PROFESIONAL DE LA SALUD LICENCIADO) QUE LO
OBSERVE A USTED USAR ESTE MEDIDOR DE FLUJO
ANTES DE QUE PUEDA CONFIAR EN LAS MEDIDAS. LEA
TODA LA INFORMACIÓN EN ESTE MANUAL ANTES DE
UTILIZAR EL MONITOR.
CONTACTE A MICROLIFE (1-800-568-4147,
DE 8 AM A 5 PM
LUNES A VIERNES TIEMPO DE LA COSTA ESTE) DE
TENER PREGUNTAS.
SI USTED TIENE SEÑALES Ó SÍNTOMAS DE PRESIÓN
EN EL TÓRAX, FATIGA RESPIRATORIA, TOS O
SIBILANCIA USTED DEBE SEGUIR LAS INSTRUCCIONES
DEL MÉDICO (Ó PROFESIONAL DE LA SALUD
LICENCIADO) PARA CONTACTARLO, SIN IMPORTAR LAS
MEDIDAS DE FLUJO MÁXIMO OBTENIDAS.
SI USTED NO PUEDE OBTENER UNA LECTURA, Y EL
MONITOR ESTA CONFIGURADO CORRECTAMENTE (LA
FECHA Y HORA SE AJUSTAN, EL TUBO
CORRACTAMENTE EN SU LUGAR) USTED DEBE
CONTACTAR A SU MÉDICO (Ó PROFESIONAL DE LA
SALUD LICENCIADO) INMEDIATAMENTE.
ESTE MONITOR SÓLO DEBERÁ SER UTILIZADO POR
UNA PERSONA.

5.1. Procedimiento de medición
1. Presione la tecla ON/OFF para
prender el monitor. El último
resultado aparece en la pantalla (0 si
no hay datos). El dispositivo sonará
dos timbres cortos y las flechas
parpadean para indicar que está listo
para tomar la medida.
2. Puede realizar la medición estando
de pie o sentado de modo erguido.
Para una mejor comparación de los
datos, la medición debe realizarse
siempre en la misma posición.
3. Sostiene el monitor con las dos
manos sobre los dos compartimentos
texturados.
4. Inhale completamente y mantenga la
respiración por un momento.
5. Cubra la boquilla firmemente con los
labios.
6. Sople en el tubo medidor tan fuerte y
rápido como sea posible.
7. Un sonido largo confirma que el
resultado está almacenado, el valor
PEF será visualizado por
aproximadamente 3 segundos,
Seguido par el valor FEV1. Luego el
monitor estará listo para una nueva
44

45
medición, lo que se indica con dos
sonidos breves.
8. Se recomienda realizar tres o más
mediciones sucesivas.
9. Después de cada medición, primero
se indica ésta última en la pantalla,
pasando automáticamente a mostrar
el valor más alto de la sesión actual
de medición.
10.Presione nuevamente la tecla
ON/OFF para desconectar el monitor.
Antes de apagarse el monitor, se
indica el valor más alto de la sesión
actual de medición y su posición en
la memoria (‘MR XX’).
11.Conserve el monitor en un lugar
limpio y libre de polvo (Sección 8).
Notas:
• El monitor solo guarda la lectura más alta de una
sesión de medición (medidas tomadas en un ciclo de
encendido/apagado).
• La fecha y la hora deben estar configuradas para que la
unidad tome una medida.
• Debe tener en cuenta que el dispositivo almacena hasta
240 valores de medición con fecha y hora. Al llenarse la
memoria, los valores más antiguos son eliminados
automáticamente. Asegúrese una consulta con su
médico a tiempo para analizar los datos.

46
• Confirme que los ajustes de fecha y hora siempre estén
actualizados.
• El funcionamiento del monitor puede verse afectado por
temperaturas extremas y humedad. Por favor remítase a las
especificaciones técnicas para más detalles.
5.2. Información de la medición y el control de los
valores de caudal máximo
• Es necesario mantener un control regular de sus valores de
flujo máximo. Por lo general, los médicos recomiendan
realizar una medición diaria matutina y otra vespertina,
normalmente antes de inhalar la medicación recetada. En
ocasión de cada estado de malestar o fatiga respiratoria
deberán realizarse mediciones complementarias.
• Su médico está interesado en el valor de flujo máximo
obtenido en cada sesión de medición. Por favor repita la
medición hasta considerar que obtuvo el mejor resultado
posible por el momento. Deberá estar atento a una
suficiente relajación entre mediciones. En caso de obtener
resultados más pobres en cada sesión sucesiva de
medición, se deberá consultar con su médico; puede ser un
indicio de asma inestable.
• Debe tener presente que los ataques de asma se
anuncian mediante bajos valores de flujo máximo
antes de sentirlos. Deberá contactar a su médico en
tales casos, como así también al presentarse estre -
chez de pecho, fatiga respiratoria, tos o sibilancia.
• La toma de mediciones por el paciente es un medio
de control y no está prevista para un diagnóstico ni

47
un tratamiento. En todos los casos deberá informar a
su médico acerca de los valores obtenidos en las
mediciones. Su médico también le indicará los
valores normales para usted.
• Nunca deberá modificar las dosis de ninguna medicación
sin consultar con su médico.
5.3. Autoevaluación con el indicador tipo semáforo
Las barras de colores a la izquierda de la pantalla son una
referencia visual rápida para mostrar el rango de los valores
medidos. Cuando el caudal máximo sube o baja, la flecha en la
pantalla muestra la medición ya sea dentro del rango normal
(verde), en el límite (amarillo) o peligroso (rojo).
Como se utiliza el monitor, se registrará automáticamente el
mejor valor y utilizarlo para determinar sus zonas de
semáforos.
Determinación de los límites de área
El indicador tipo semáforo se puede usar de una o dos formas:
• Zonas de semáforo predeterminadas.
• Zonas de semáforo personalizadas.
Zonas de semáforo predeterminadas:
1. La zona verde varía entre su mejor medida personal (MÁX)
y el 80% de esa lectura.
Para determinar la zona de borde amarillo / verde,
multiplicar el valor MAX 0,8 (Ejemplo: 500 l/min x 0,8 = 400
l / min).

48
2. La zona amarilla varía entre su mejor medida personal
(MÁX) y el 60% de esa lectura.
Para determinar la zona de borde amarillo / rojo, multiplicar
el valor MAX 0,6. (Ejemplo: 500 l / min x 0,6 = 300 l / min).
3. La zona roja es para los valores del 50% de su mejor
lectura.
Zonas de semáforo personalizadas:
Las zonas del indicador tipo semáforo se pueden personalizar
con una computadora compatible con Windows y el software
Asthma. Este software puede descargarse gratis desde
nuestro sitio web (consulte la Sección 6).
PRECAUCIÓN: Establecer límites de
área, crear un plan de tratamiento y
modificar la configuración de las zonas
del indicador tipo semáforo solo puede
hacerse bajo la supervisión de un
médico (u otro profesional médico
certificado).
Si desea usar esta función, determine
sus zonas personalizadas con su médico
y anótelas en la tarjeta de semáforo
(incluida).
Nota: Una vez que se programan las
zonas personalizadas, ya no se tomarán
las mediciones predeterminadas del
semáforo.

49
Colores del indicador tipo semáforo
La luz flecha tráfico sube o baja en función de las zonas
establecidas para el monitor (por defecto o personalizada).
Zona Verde - OK
• Si su medida está en la zona verde,su condición parece
estar bajo control. Siga su plan de tratamiento.
Zona Amarilla – Precaución
• Si su medida está en la zona amarilla, medir con mayor
frecuencia y siga su plan de tratamiento.
Zona Roja – Peligro
• Si su medida está en la zona roja, su condición es grave.
Hacer lo que haya discutido con su médico o busque
atención médica de emergencia.

50
5.4. Manejo de memoria
Múltiples lecturas se pueden tomar durante una sesión, y el
monitor almacenará automáticamente la lectura más alta
desde el período de sesiones (1 sesión = 1 ciclo de encendido
y apagado). Esta unidad almacena 240 lecturas.
Visualización de los valores
almacenados
1. Conecte el monitor y presione las teclas
de acceso a memoria.
2.
Al presionar la tecla <, puede verse el
último valor almacenado en la memoria con
fecha y hora. Siga presionando el botón
para moverse rápidamente por la memoria.
3. La tecla > actúa en el sentido opuesto.
Baja capacidad de memoria
Cuando la memoria llega a 230 lecturas o
más, MR XX parpadeará después de que el
monitor se enciende para indicar que la
capacidad restante de la memoria está baja.
Memoria completa
Cuando la memoria ha guardado 240
resultados, el monitor emite un sonido
cuando la unidad se enciende, y MR 240
parpadea en la pantalla. A partir de este
punto un valor nuevo medido se almacena al
sobrescribir sobre el valor más antiguo.

51
Borrar Memoria
Para borrar todos los datos presione los botones < y >
simultáneamente por 5 segundos y luego suelte los botones.
CLR aparece y parpadea en la pantalla por 3 segundos. Para
borrar todos los datos de la memoria, presione el botón de
encendido/apagado mientras CLR parpadea. De lo contrario, el
monitor regresa al funcionamiento normal y los datos
permanecen.
5.5. Reemplazo de pilas
En cuanto se visualice el símbolo de batería baja en la
pantalla, se bloquea el dispositivo hasta tanto hayan sido
reemplazadas las pilas.
Rogamos utilizar pilas de 1.5V larga vida o alcalinas, tamaño
AAA. En caso de no utilizar el monitor por períodos más
prolongados, se ruega quitar las pilas.
Notas:
• Durante el recambio de pilas, los datos almacenados en la
memoria están bien protegidos y no se perderán.
• No se recomienda el uso de baterías recargables.
• Después del recambio de pilas (o si la unidad fue
desconectada de cualquier fuente de energía) deben
programarse nuevamente la fecha/hora. De otro
modo no podrán almacenarse los datos.

6. Análisis de datos por computadora
Este medidor se puede usar en conexión con su computadora
personal al conectar el monitor a través del cable USB
incluido.
El software Asma de Microlife que puede descargar gratis le
permite transferir las lecturas del monitor a su computadora y
personalizar las zonas del semáforo (si lo desea). Al transferir
las lecturas, usted podrá imprimir sus resultados, ver gráficas
y reportes de sus valores y compartirlos con su médico.
Requisitos del sistema: Antes de instalar el software Asma de
Microlife, asegúrese de que su computadora cumpla o exceda
los requisitos del sistema:
52
Hardware Mínimo Recommended
Microprocesador
(velocidad del CPU) 550 MHz 1 GHz o superior
Dispositivos de
memoria (RAM) 256 MB 512 MB
Disco duro 500 MB 800 MB
Puertos de
comunicación USB 1.0 USB 1.0 y superior
Pantalla 256 colores 65536 colores
Resolución 800 x 600 1024 x 760
Sistema operativo: Microsoft Windows XP, Vista, 7 y 8
No compatible con computadoras Macintosh.

53
6.1. Instalación y transmisión de los datos
a. Conecte el monitor por medio del cable USB con la
computadora. Preste atención cuando conecte el cable
USB. No fuerce el cable en el monitor ni en la
computadora.
b) Windows OS – Instale e inicie el software. Llame al
atención al cliente al 1-866-934-1839 para solicitar ayuda.
El software de monitorización Asma de Microlife está
disponible para descargarlo gratis de nuestro sitio web:
https://www.microlife.com/consumer-
products/respiratory-care/asthma-monitor/pf-100/
c) Encienda el medidor de caudal máximo.
d) Una vez conectado, aparecen tres barras horizontales en la
pantalla y permanecen allí durante 3 segundos. Luego, las
barras parpadean para indicar que se logró una conexión
exitosa entre la computadora y el dispositivo. Siempre que
el cable esté conectado, las barras seguirán parpadeando y
la pantalla permanecerá inhabilitada.
Durante la conexión, el dispositivo se controla por completo
a través de la computadora. Consulte el archivo de Ayuda
en el software para conocer las instrucciones detalladas.
Para obtener más información o ayuda con la instalación
básica y el uso, por favor póngase en contacto con servicio
de atención al cliente de Microlife al 866-934-1839
Notas:
• El software incluye un manual de instrucciones detalladas
del software. Se puede acceder a través del botón de
ayuda.

54
• Después de descargar las memorias almacenadas del
monitor a la computadora, las mismas se borran de la
memoria del monitor.
• Para poder descargar los datos de su dispositivo, debe
crear un perfil de usuario (datos mínimos requeridos:
apellido, primer nombre e identificación).
• La identificación puede ser cualquier nombre o
combinación de símbolos.
11. Mensajes / fallas de funcionamiento / errores
En caso de presentarse un error, se indicará en la pantalla uno
de los códigos de error de la siguiente lista.
Mensaje
Er1
no
Hi
Remedio
Programe la fecha y la
hora (según sección 4.2)
Programe la fecha y la
hora y toma una lectura.
Falla de funcionamiento.
Por favor, repita la
medición.
Causa
El resultado no puede
ser almacenado en la
memoria porque no se
programó fecha/hora
No hay datos
almacenados en el
monitor
El resultado es mayor
a 900 ml/min.

55
Otras posibles fallas de funcionamiento:
En caso de presentarse dificultados al emplear el dispositivo,
deben controlarse los siguientes putos:
En caso de surgir cualquier duda respecto del uso de este
dispositivo, rogamos preguntar a su distribuidor ó a su
farmacéutico por el representante de Microlife, ó llame a
Microlife al 866-934-1839. El equipo de servicio de Microlife
estará encantado de brindarle asistencia.
Subsanación
1. Verifique la polaridad de las
pilas (+/-)
2. Si la pantalla se presenta
errático o en forma no
habi tual, quite las pilas y
reempla zarlas por pilas nuevas.
1. Asegúrese de que el tubo
medidor está conectado
correctamente.
2. Controle si al soplar en el
tubo, gira la hélice. Cualquier
objeto, polvo, líquido o
mucosidad puede afectar el
giro de la hélice. En ese caso
debe limpiarse el tubo según
se explicó anteriormente.
3. Consulte los valores con su
médico.
Falla de funcionamiento
La pantalla permanece en
blanco.
Las pilas fueron colocadas
El aparato frecuentemente
no realiza la medición o
los valores medidos están
equivocados.

8. Información de cuidado y seguridad
8.1. Limpiar y desinfectar la boquilla y el tubo medidor
La boquilla y el tubo medidor debe ser limpiado dentro de un
periodo de 30 minutos después de cada uso.
1. Desconecte el tubo medidor y la
boquilla de la unidad principal
moviendo el mismo hacia adelante.
2. Sumerja la boquilla en una solución
de agua y de jabón regular de
lavaplatos. Limpie profundamente
agitando la boquilla en la solución.
Enjuague la boquilla con agua (agua
destilada es recomendada). Permita
la boquilla secarse al aire.
Nota: No tocar contra superficies
duras para evitar daños.
3. Ahora, sumerja el tubo medidor en la
solución de jabón preparada y
agítelo en la solución para una mejor
limpieza. Para limpiar el tubo
medidor es mejor utilizar agua
destiladad. Tenga cuidado de no
dañar las partes sensitivas. Enjuague
el tubo medidor con agua. Permita al
tubo medidor secarse al aire.
4. Inspeccione al monitor luego de la
limpieza para señales de mucosidad
o de residuos dentro del tubo de aire.
Boquilla
Tubo medidor
56

Cada pieza o componente debe estar
libre de cualquier sustancia. No
deben tener residuos visibles en o
sobre el producto.
5. Nunca coloque el tubo medidor
dentro de agua hirviendo!
6. Coloque nuevamente la boquilla en
el tubo medidor y vuelva a
ensamblarlo con la unidad principal
según lo indicado. Asegúrese que el
tubo finalmente encastre en la
posición fijada.
Nota:
• Si depósitos de mineral son visibles en la
boquilla o en el tubo medidor, enjuaguelos
con agua destilada. Agítelo para sacar el
exceso de agua y colóquelo encima de una
toalla de papel para que se seque al aire
antes de usarlo.
• Favor de observar de que las temperaturas
por de bajo de 50° (10°C) o mayores de
104°F (40°C) una humedad relative mayor de
85% puede afectar la.
8.2. Limpiar la unidad principal
Limpie la unidad principal una vez por
día con un paño limpio y húmedo.
¡Nunca debe colocarse la unidad
principal en agua!
57
100 C/212 F

58
8.3. Mantenimiento y seguridad
• Asegúrese de que los niños no
utilicen este dispositivo sin
supervisión; Algunas partes son lo
suficientemente pequeñas para ser
tragadas.
• No utilice este dispositivo cerca de
campos electromagnéticos fuertes
como teléfonos móviles o
instalaciones de radio. Mantenga
una distancia mínima de 3,3 m de
dichos dispositivos cuando utilice
esta dispositivo.
• No exponga el dispositivo a
temperaturas extremas, humedad,
polvo o radiación directa de sol.
• Limpie el dispositivo con un paño
suave y seco. No emplee gasolina,
thinner o solventes similares. ¡El
tubo medidor puede ser lavado en un
lavavajillas!
• No arroje el instrumento o propinarle
un tratamiento rudo de ningún tipo.
Evitar las vibraciones fuertes.
•
No intente jamás reparar el
instrumento por sí mismo. ¡Cualquier
apertura no autorizada del instrumento
invalidará todo reclamo por garantía!
Gasoline

59
• Si el dispositivo sufrió cualquier
impacto (caída), reconocerá cualquier
falla de funcionamiento o daño o si
usted obtuviera resultados
sorpresivos, la precisión del
verificado dispositivo deberá ser por
Microlife.
• No utilice este dispositivo si cree que
está dañado o algo le parece inusual.

60
9. Garantía Limitada
Su Monitor digital de caudal máximo tiene una garantía de 2
años de Microlife USA Inc. contra defectos de fábrica
únicamente para el comprador original, a partir de la fecha de
compra.
La garantía de 2 años aplica al monitor y el tubo. Las baterías
no están cubiertas por esta garantía. Dentro del dispositivo no
hay piezas a las que el usuario les pueda dar mantenimiento.
La garantía no aplica a daños consecuentes o incidentales, o
daños causados por las pilas o mal manejo y accidentes. Uso
profesional, no siguiendo el manual de instrucciones, y
alteraciones hechas al monitor o accesorios por terceros,
están también excluidos en esta garantía. Algunos estados no
permiten la exclusión o limitación de los daños consecuentes
o incidentales. Por consiguiente dicha limitación o exclusión
puede que no apliquen en su caso.
Microlife USA Inc., investigará su reclamo. Un monitor o
accesorio definido por esta garantía, que se determine fuera
de especificaciones, será reemplazado y enviado sin costo
para usted. Un monitor o accesorio definido por esta garantía
que se determine estar dentro de las especificaciones, le será
devuelto con su respectivo reporte, sin costo.
Por favor usar la información de servicio al cliente de Microlife
USA Inc., para cualquier reclamo de garantía. Le solicitamos
por favor que nos contacte primero antes de devolver
cualquier producto para así identificar mejor el problema y
procesar más rápido su reclamo.

61
10. Certificaciones
Dispositivo estándar: IEC 60601-1
IEC 60601-1-2
IEC 60601-1-11
Actualización de la Norma ATS
de 1994
Compatibilidad
electromagnética: Este dispositivo cumple con las
estipulaciones Internacionales
IEC60601-1-2
Vida Útil Esperada: Dispositivo: 5 años
Clase IP20: Protegido contra objetos sólidos
extraños de
diámetro superior a 12.5 mm, no
protegido contra agua. Mantener en
lugar seco.
El dispositivo PF100 cumple con las recomendaciones ATS en
cuanto a exactitud y precisión en la medición del caudal
máximo.
Las baterías y los instrumentos electrónicos deben desecharse
de acuerdo con las regulaciones locales correspondientes y no
con la basura doméstica.

62
11. Especificaciones técnicas
Rango de medición: . . . . . . . . .PEF de 50 a 900 l/min.
FEV1 de 0.01 a 9.99
Método de medición: . . . . . . . .hélice en rotación
Exactitud: . . . . . . . . . . . . . . . . .ATS 1994 actualizado
±
25 l/min
ó 12 % de la lectura, lo que sea
mayor
FEV1 ± 0.1 or ± 5%
de la lectura, lo
que sea mayor
Resolución de medición: . . . . .PEF: 1 l/min. FEV1: 0.01
Seguridad de datos: . . . . . . . . .datos almacenados por EEPROM
Memoria: . . . . . . . . . . . . . . . . .240 mediciones con fecha/hora
Tamaño: . . . . . . . . . . . . . . . . . .77(ancho)x 144(long.)x 48(alt.)mm
Peso: . . . . . . . . . . . . . . . . . . . . .150 g (con pilas)
Temperatura de conservación: -5 °C a +50 °C ó 23° a 122 °F
Humedad de conservación: . . .10 a 90 % máxima humedad
relativa
Temperatura operativa: . . . . . .10 a 40 °C ó 50 a 104 °F
Humedad operativa: . . . . . . . . .10 a 85 % máxima humedad
relativa
Fuente de energía: . . . . . . . . . .2 pilas de 1,5 V, tamaño AAA
Accesorios: . . . . . . . . . . . . . . . .3 boquillas, estuche
¡Modificaciones técnicas reservadas!
Siga las instrucciones de uso para evitar riesgos.
Pieza aplicada tipo BF

63
12. Cómo Contactarnos
Teléfono para llamadas libre de cargo: 866-934-1839.
Fax (727) 451-0492
Distribuido por:
Microlife USA, Inc.
1617 Gulf to Bay Blvd
2nd Floor
Clearwater, FL 33755
www.microlifeusa.com
Hecho en China

PLEASE READ ALL INFORMATION IN THIS
INSTRUCTION BOOKLET BEFORE USING THIS
PEAK FLOW METER
If you have questions call Microlife toll free at 866-934-1839
between 8:00am and 8:00pm Eastern Time, Monday through Friday
(except holidays) or contact us at [email protected].
MLUPF-100-0617-3
-
 1
1
-
 2
2
-
 3
3
-
 4
4
-
 5
5
-
 6
6
-
 7
7
-
 8
8
-
 9
9
-
 10
10
-
 11
11
-
 12
12
-
 13
13
-
 14
14
-
 15
15
-
 16
16
-
 17
17
-
 18
18
-
 19
19
-
 20
20
-
 21
21
-
 22
22
-
 23
23
-
 24
24
-
 25
25
-
 26
26
-
 27
27
-
 28
28
-
 29
29
-
 30
30
-
 31
31
-
 32
32
-
 33
33
-
 34
34
-
 35
35
-
 36
36
-
 37
37
-
 38
38
-
 39
39
-
 40
40
-
 41
41
-
 42
42
-
 43
43
-
 44
44
-
 45
45
-
 46
46
-
 47
47
-
 48
48
-
 49
49
-
 50
50
-
 51
51
-
 52
52
-
 53
53
-
 54
54
-
 55
55
-
 56
56
-
 57
57
-
 58
58
-
 59
59
-
 60
60
-
 61
61
-
 62
62
-
 63
63
-
 64
64
-
 65
65


Microlife PF100 El manual del propietario
- Tipo
- El manual del propietario
en otros idiomas
- English: Microlife PF100 Owner's manual
Artículos relacionados
-
Microlife BP3GY1-2N El manual del propietario
-
Microlife BP3GX1-5A El manual del propietario
-
-
-
Microlife BP3GX1-5N Manual de usuario
-
-
Microlife BP3GQ1-3P Manual de usuario
-
Microlife bp3gx1-5x Manual de usuario