PF WaterWorks PF0910 Instrucciones de operación
- Tipo
- Instrucciones de operación

DrainEASY INSTR U C TION S
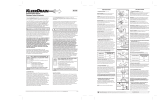
1. Simply unscrew your existing bath tub stopper to install the DrainEASY Bath Tub
Stopper.
2. For best results, clean your drains before installation. Cleaner pipes allow the
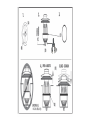
DrainEASY drain to better prevent clog formation. After cleaning the drain, locate, cross
member, hole (A) in drain opening (B).
3. Select screw (C) that best fits hole (A) and screw it in base of device (D).
4. Screw device into the drain opening (B) along with the pre-installed white outer seal
(E). Ensure that device (D) fits snugly in drain opening (B). Only a snug fit will ensure that
all materials are captured on the device’s collection grate (place small bead of shampoo
around outside edge of the O-ring to aid insertion in drain opening).
5. Push device up/down 3 to 5 times when water flow is impeded by collected material.
It is normal to hear and feel the hair ripping on the first push of the device. If device
accumulates too much material at once, unscrew & clean. Replace every five years or as
needed.
ATTENTION: Drains manufactured before 1990 may not have hole (A). If your drain does
not have hole (A), please use the four legged ClickFIT™ attachment (F) included to latch
onto the X in the drain.
ATENCIÓN: Los drenajes fabricados antes de 1990 podrían tener o no un agujero (A). Si
su desagüe no tiene agujero, por favor, utilice el accesorio ClickFit ™ incluido.
DrainEASY INSTR U C CIO N ES
1. Simplemente desenrosque el tapón de su tina de baño e instale el tapón de bañera
DrainEASY.
2. Para mejor resultado, limpie el desagüe antes de la instalación. Las tuberías cuando
están limpias permiten que el dispositivo DrainEASY prevenga mejor la formación
de obstrucciones. Después de limpiar el desagüe, ubique el agujero del “soporte
cruzado” (A) en la abertura del desagüe (B).
3. Seleccione el tornillo (C) que mejor se ajuste al agujero (A), y atorníllelo en la base del
dispositivo (D).
4. Tornillo del dispositivo en la abertura de drenaje ( B ) junto con la junta exterior
preinstalado sello blanco (E). Asegúrese de que el dispositivo ( D ) se ajusta
perfectamente en la abertura de drenaje (B ). Sólo si está colocado con firmeza asegurará
que todos los desechos sean atrapados en la rejilla recolectora del dispositivo (D).
Coloque una pequeña cantidad de champú alrededor del límite exterior del aro-sello para
que permita su inserción en la abertura del desagüe). Atornille el dispositivo (D) en el
lugar.
5. Empuje el dispositivo (D) de arriba hacia abajo unas 3 a 5 veces cuando el flujo de agua
se vea impedido por el desecho recolectado. Es normal escuchar como el cabello
se rompe cuando se empuja hacia abajo. Si el dispositivo (D) acumula demasiado
desecho de una sola vez, desatornille y limpie. Reemplácelo cada 5 años o cuando
sea necesario.

(F)
-
 1
1
-
 2
2


PF WaterWorks PF0910 Instrucciones de operación
- Tipo
- Instrucciones de operación
En otros idiomas
Otros documentos
-
LG WM20WV26 El manual del propietario
-
LG WM22WV26 El manual del propietario
-
LG WD22VTS6M El manual del propietario
-
LG WM2240CS El manual del propietario
-
LG WM2140CW El manual del propietario
-
 VPC KD100 Instrucciones de operación
-
LG WM22VVS6 El manual del propietario
-
LG WM22RV2S6 El manual del propietario
-
LG WM2016CW El manual del propietario
