
HOMEDEPOT.COM/GLACIERBAY
Please contact 1-855-HD-GLACIER for further assistance.
Installation
1
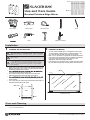
PLANNING THE INSTALLATION
WARNING: Handle the mirrors with care. Wear safety glasses and
only.
WARNING: Do not overtighten the mirror clips as this can cause the
mirror to crack.
WARNING: The screws and clips included with this mirror require
a secure attachment of all screws to wall studs. If you are not able
to attach all screws securely to wall studs, please purchase dry wall
anchors or other hanging hardware appropriate for your installation
(sold separately).
□ Draw a line on the wall to indicate the desired location of the
bottom of the mirror. Use a level to assure the mirror will be
positioned properly when installed.
□
and mark the center point of each stud.
□ Use a tape rule to measure and draw a line on the wall
indicating the location of the top edge of the mirror.
□
mark the center point of each stud approximately 1/2 in.
above the line.
□ Use a tape measure to measure and mark the outer edges of
the desired placement of the mirror.
W
all Studs
Wall
Leve
l
2
HANGING THE MIRROR
□ Use one of the included clips as a template to mark a spot
along the bottom and top lines that is approximately 2-1/2
in. in from the left and right side edges of the mirror.
□ Drill a 3/32 in. pilot hole at each mark and attach the bottom
clips to the wall. If placement does not allow for attachment
to wall stud, stop and purchase wall anchors or the
appropriate alternative hanging hardware.
□ Place the mirror in the bottom clips, support the mirror at the
top, and attach the top clips securely to the wall and mirror.
Mirror
2-1/2 in. 2-1/2 in.
2-1/2 in.
2-1/2 in.
For Reference Only
Care and Cleaning
□ Use a soft cloth and glass cleaner to clean the mirrors.
□ Do not use harsh abrasives.
TOOLS REQUIRED
Safety gloves Safety goggles Measuring tape Level Pencil
Drill Hammer Phillips Screwdriver
Use and Care Guide
Beveled/Polished Edge Mirror
Item # 1001-085-204, 1001-085-205
1001-085-207, 1001-085-210
1001-085-218, 1001-085-220
1001-085-221, 1001-085-224
1001-085-225, 1001-085-227
1001-085-232, 1001-085-237
1001-085-242, 1001-085-244
1001-085-249, 1003-348-767
1003-348-768, 0000-000-000
0000-000-000, 0000-000-000
Model # 81170, 81171, 81172, 81173
81176, 81177, 81178, 81179
81180, 81181, 81182, 81183
81184, 81185, 81186, 47959
47960, 83018, 83019, 83020
.

Núm. de artículo 1001-085-204, 1001-085-205
1001-085-207, 1001-085-210
1001-085-218, 1001-085-220
1001-085-221, 1001-085-224
1001-085-225, 1001-085-227
1001-085-232, 1001-085-237
1001-085-242, 1001-085-244
1001-085-249, 1003-348-767
1003-348-768, 0000-000-000
0000-000-000, 0000-000-000
Núm. de modelo 81170, 81171, 81172, 81173
81176, 81177, 81178, 81179
81180, 81181, 81182, 81183
81184, 81185, 81186, 47959
47960, 83018, 83019, 83020
HOMEDEPOT.COM/GLACIERBAY
Para obtener asistencia, por favor, póngase en contacto llamando al 1-855-HD-GLACIER.
Instalación
1
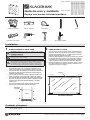
PLANIFICACIÓN DE LA INSTALACIÓN
ADVERTENCIA: Manipule los espejos con cuidado. Use gafas y guantes
de seguridad mientras manipula e instala los espejos. Instale sobre una
ADVERTENCIA: No apriete demasiado los ganchos del espejo ya que
puede hacer que el espejo se agriete.
ADVERTENCIA: Los tornillos y ganchos proporcionados con este
espejo requieren una unión segura de todos los tornillos a los montantes
de pared. Si no puede insertar todos los tornillos con seguridad en
los montantes de pared, compre anclas de pared seca u otro herraje
adecuado para colgar para su instalación (vendidos separadamente).
□ Trace una línea sobre la pared para indicar el lugar deseado
del fondo del espejo. Use un nivel para garantizar que el
espejo estará ubicado adecuadamente cuando se instale.
□ Use un localizador de montantes para localizar los montantes
de pared a lo largo de la línea del fondo y marque el punto
central de cada montante.
□ Use una regla de cinta para medir y dibujar una línea en la
pared que indique el lugar del borde superior del espejo.
□ Use un localizador de montantes para localizar los montantes
de pared a lo largo de esta línea superior y marque el punto
central de cada montante aproximadamente a 1/2 pulg.
sobre la línea.
□ Use una cinta métrica para medir y marcar los bordes
exteriores de la colocación deseada del espejo.
Montantes
de pared
Pared
Nivel
2
CÓMO COLGAR EL ESPEJO
□ Use uno de los ganchos incluidos como una plantilla para
marcar un punto a lo largo de las líneas inferior y superior
que esté aproximadamente a 2-1/2 pulg. desde los bordes
del lado izquierdo y derecho del espejo.
□ Perfore un agujero piloto de 3/32 pulg. en cada marca e instale
los ganchos del fondo a la pared. Si la colocación no permite
la instalación en un montante de pared, deténgase y compre
anclas de pared o el herraje de colgar alternativo apropiado.
□ Coloque el espejo en los ganchos del fondo, apoye el espejo
en la parte superior e instale los ganchos superiores con
seguridad a la pared y el espejo.
Espejo
2-1/2 pulg. 2-1/2 pulg.
2-1/2 pulg.
2-1/2 pulg.
Para referencia únicamente
Para referencia únicamente
Cuidado y limpieza
□ Use un paño suave y limpiador de vidrio para limpiar los espejos.
□ No use abrasivos fuertes.
HERRAMIENTAS REQUERIDAS
Guantes de seguridad Gafas de seguridad Cinta métrica Nivel Lápiz
Localizador de montantes Taladro Martillo Destornillador Phillips
Guía de uso y cuidado
Espejo con bordes biselados/pulidos
L06091R2
-
 1
1
-
 2
2


Glacier Bay 83019 Manual de usuario
- Tipo
- Manual de usuario
en otros idiomas
- English: Glacier Bay 83019 User manual