Home Decorators Collection 81160 Instrucciones de operación
- Tipo
- Instrucciones de operación

HOMEDEPOT.COM/HOMEDECORATORS
Please contact 1-800-986-3460 for further assistance.
Use and Care Guide
Pivot Fog Free Mirror
Installation
1
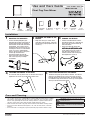
MOUNTING THE BRACKETS
□ Use the mounting template (A) to
determine the location of the holes for
the mounting brackets (B). Mark the
hole locations on the wall and remove
the template. Use a level to ensure
the hole locations are even. If you are
installing this mirror on a wall without
studs, use a 17/64" drill bit to drill
holes in all four locations. Then place
anchors (C) inside the holes.
□ Place the brackets (B) over the
holes and fasten to the wall tightly
with screws (D) using a Phillips
screwdriver.
B
C
D
2
ATTACHING THE ARMS TO THE
MIRROR
□ Align each arm (E) as shown. Then
slide them onto the mirror. Using the
hex wrench (F), lightly tighten the set
screws (1).
1
E
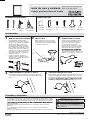
3
HANGING THE MIRROR
□ Lift the assembled mirror onto the
mounting brackets (B). Hook the top
of the arms (E) on the brackets (B)
and rotate down.
□ In the event that the mirror does
adjust the pivot pin (1). Using a
screw driver, loosen the screw (2)
and adjust the sliding pin (1) as
needed, until the arms are aligned.
Then tighten the screw (2).
1
2
E
B
4
SECURING THE MIRROR TO THE WALL
□ To secure the arms (E) to the wall, use the hex wrench (F) to
tighten the set screws (1) on the bottom of the arms.
1
F
E
5
ADJUSTING THE ANGLE OF THE MIRROR
□ The mirror can pivot up and down as desired. Use the hex
wrench (F) to tighten the set screw (1) on each arm (E) to
hold the mirror in the desired position. To rotate the mirror
to a different angle, loosen the set screws (1) and re-tighten
when you achieve the desired angle.
1
F
E
Care and Cleaning
□ Use of a glass cleaner such as Windex®, Zep Commercial® Streak-Free Cleaner, or HDX™
Glass Cleaner. Follow application directions on the spray bottle. Use a soft paper towel or
lint free cloth (preferred) and remove the cleaning solution in a gentle circular motion. If
the mirror surface feels “tacky” while cleaning, simply apply more cleaner.
□ Never clean the mirror with a dry paper towel or lint free cloth without cleaning solution.
□ Do not use cleaners which include fragrances, oils, acids, alcohols, bleach, or abrasive
particles.
□ Do not clean with a scouring pad, rough cloth, abrasive paper towel or window scraper.
WARNING: Handle this mirror with care. Wear
safety glasses and goggles while handling and
installing this mirror.
WARNING:
installing to wall studs, use the dry wall anchors
provided.
TOOLS REQUIRED
Level Pencil
Phillips
screwdriver
Drill with
17/64" drill bit
HARDWARE INCLUDED
A - Mounting
template
B - Mounting
brackets x 2
C - Anchors
x 4
D - Screws
x 4
E - Mounting
arms x 2
F - Hex
wrench x 1
Item #1001-083-707
Model #81160

L06287
HOMEDEPOT.COM/HOMEDECORATORS
Póngase en contacto con el 1-800-986-3460 para recibir más ayuda.
Guía de uso y cuidado
Espejo giratorio libre de niebla
Instalación
1
MONTAJE DE LOS EL SOPORTES
□ Use la plantilla de montaje (A) para
determinar la ubicación de los agujeros
para los soportes de montaje (B). Marque
las ubicaciones de los agujeros en la
pared y retire la plantilla. Use un nivel
para asegurarse de que las ubicaciones
de los agujeros estén uniformes. Si está
instalando este espejo en una pared sin
montantes, use una broca de 17/64 pulg.
para perforar los agujeros en las cuatro
ubicaciones. Luego coloque anclas (C)
dentro de los agujeros.
□ Coloque los soportes (B) sobre los
agujeros y sujete a la pared de forma
apretada con los tornillos (D) usando un
destornillador Phillips.
B
C
D
2
INSTALACIÓN DE LOS BRAZOS
EN EL ESPEJO
□ Alinee cada brazo (E) como se muestra.
Luego deslícelos sobre el espejo. Usando
la llave hexagonal (F), apriete ligeramente
los tornillos prisioneros (1).
1
E
3
CÓMO COLGAR EL ESPEJO
□ Levante el espejo ensamblado sobre los
soportes de montaje (B). Enganche la
parte superior de los brazos (E) en los
soportes (B) y gire hacia abajo.
□ En el caso de que el espejo no se ajuste
fácilmente sobre los soportes de pared,
ajuste el pasador giratorio (1). Usando
ajuste el pasador deslizante (1) según
sea necesario, hasta que los brazos estén
alineados. Luego apriete los tornillos (2).
1
2
E
B
4
CÓMO ASEGURAR EL ESPEJO A LA PARED
□ Para asegurar los brazos (E) a la pared, use la llave hexagonal (F)
para apretar los tornillos prisioneros (1) en el extremo inferior de los
brazos.
1
F
E
5
AJUSTE DEL ÁNGULO DEL ESPEJO
□ El espejo puede girar hacia arriba y hacia abajo según se desee. Use
la llave hexagonal (F) para apretar el tornillo prisionero (1) en cada
brazo (E) para sostener el espejo en la posición deseada. Para girar
apriete de nuevo cuando logre el ángulo deseado.
1
F
E
Cuidado y limpieza
□ Use un limpiador de vidrio que no deja manchas como Windex®, Zep Commercial® o limpiador
de vidrio HDX™. Siga las instrucciones de aplicación de la botella pulverizadora. Use una toalla
de papel suave o libre de pelusa (preferido) y retire la solución de limpieza con un movimiento
aplique más limpiador.
□ Nunca limpie el espejo con una toalla de papel seco o paño libre de pelusa sin solución
limpiadora.
□ No use limpiadores que incluyan fragancias, aceites, ácidos, alcoholes, blanqueador o
partículas abrasivas.
□ No limpie con una almohadilla pulidora, paño áspero, toalla de papel abrasivo o raspador de ventana.
ADVERTENCIA: Manipule este espejo con
cuidado. Use gafas y guantes de seguridad
mientras manipula e instala este espejo.
ADVERTENCIA:
plana únicamente. Si no está instalando en
montantes de pared, use las anclas de pared seca
suministradas.
HERRAMIENTAS REQUERIDAS
Nivel Lápiz
Destornillador
Phillips
Taladrar con broca
de 17/64 pulg.
HERRAJE INCLUIDO
A - Plantilla
de montaje
B - Soportes
de montaje x 2
C - Anclas
x 4
D - Tornillos
x 4
E - Brazos de
montaje x 2
F - Llave
hexagonal x 1
Núm. de artículo 1001-083-707
Núm. de modelo 81160
-
 1
1
-
 2
2


Home Decorators Collection 81160 Instrucciones de operación
- Tipo
- Instrucciones de operación
en otros idiomas
Artículos relacionados
-
Home Decorators Collection 45428 Manual de usuario
-
Home Decorators Collection 81159 Manual de usuario
-
Home Decorators Collection 83011 Guía de instalación
-
-
-
-
-
-
-