Kichler Lighting 15073AZT Manual de usuario
- Tipo
- Manual de usuario

INSTRUCTIONS PERTAINING TO A RISK OF FIRE,OR INJURY TO
PERSONS
IMPORTANT SAFETY INSTRUCTIONS
Lighted lamp is HOT!
WARNING — To reduce the risk of FIRE OR INJURY TO PERSONS.
1) Turn off / unplug and allow to cool before replacing lamp.
2) Lamp gets HOT quickly! Contact only switch / plug when turning on.
3) Do not touch hot lens or cowl.
4) Do not remain in light if skin feels warm. (Light is intense, it may cause
“sunburn”.)
5) Do not look directly at lighted lamp.
6) Keep lamp away from materials that may burn.
7) Useonlywithwattageandlampmarkedonxture.
8) Do not touch the inner glass envelope of the lamp at any time. Use a soft
cloth. Oil from skin may damage lamp.
9) Donotoperatethexturewithadamagedormissinglens.
SAFETY INSTRUCTIONS
READ THIS FIRST
KEEP THESE INSTRUCTIONS
This xture is intended for installation in accordance with the National
Electric Code (NEC) and Local code specications. Failure to adhere to
these codes and instructions may result in serious injury and/or property
damage and will void the warranty.
1) WARNING:Thisxtureisnottobeinstalledwithin10feet(3M)ofapool,
spa or fountain.
2) Thisxtureistobeusedonlywithapowerunit(transformer)rateda
maximumof300W(25AMPS)15volts.
3) The#18ga.xturewireisnotintendedfordirectburial.
4) Direct burial rated wire is to be buried a minimum of 6” (152mm) beneath
the surface of the ground.
NOTE: If additional Direct Burial wire is needed, contact your local Kichler
®
landscape distributor.
•8GAwirecanbepurchasedinlengthof250’(76M),15503-BK.
•10GAwirecanbepurchasedinlengthof250’(76M),15504-BK.
•12GAwirecanbepurchasedinlengthsof100’(30M),15501-BK;250’
(76M),15502-BK;500’(152M),15505-BK;and1000’(304M),15506-BK.
5) Fixtureshallnotuseatungstenhalogenlampunlessthextureismarked
for use with such lamps.
6) Wiringconnectionsmustbemadewithapproved/listedwireconnection
device(s)suitablefortheapplication.Donotexceedmanufacturers’wiring
combinationspecicationsforsizeandquantityofconductors.
For warranty information please visit: http://www.landscapelighting.com/portal/warranty_page
Para informacion de la garantia por favor visite: www.landscapelighting.com/portal/warranty_page
Date Issued: 12/2/11 IS-15073-US
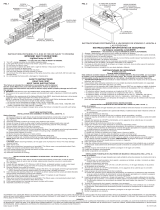
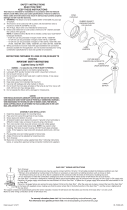
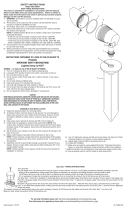
QUIC DISC
™
WIRING INSTRUCTIONS
Turn off power.
Thefulllengthofthe18GAxturewiremaybeusedtoconnectwiththe10GAor12GAcableprovidedthefollowingconditionsaremet:
•Wiringistobeprotectedbyroutingclosetothextureoraccessoryorsecuredtoabuildingstructuresuchashouseordeck.
• 18GAxturewiringistobecutoffsothatitisattachedtotheconnectorwithin6inchesofthextureorbuildingstructure.
• Ifitisnecessarytomaketheconnectionsunderground,thennomorethan6inchesofthe18GAxturewireistobeburied.
The Quic Disc
™
connector is designed to install onextureandaccommodatesone18GAxturewireandone10GAorone12GAsupplywire.
Placethe10gaugesupplywireacrosstheareamarked10GAonQuicDisc
™
orplacethe12gaugesupplywireacrosstheareamarked12GA
on Quic Disc
™
.
Placethe18gaugexturewireacrosstheareamarked18GAontheQuicDisc
™
.Afterthewiresareinplace,connectathetopoftheQuic
Disc
™
tothebasewithsuppliedscrew,makingsurethatthewiresremainatinthebottomportionoftheQuicDisc
™
, and the screw is tightened
all the way down.
Thecoppercontactswillautomaticallypiercethewires’insulation.Excess18GAxturewirethatsticksouttheendoftheQuicDisc
™
is to be cut off.
Makenootherwiringconnectionstothe18GAxturewire.
SAVE THESE INSTRUCTIONS
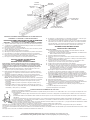
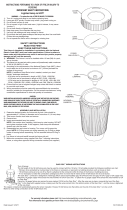
INSTALLATION AND ASSEMBLY
Before Starting:
A)Desiredlocationforeachxtureshouldbedeterminedbefore
construction of wall is started.
B) If access to back of wall is limited, cable/conduit should be run prior to
construction.
1) TURNOFFPOWER.
2) Assemblebracketstobottomofhousingusingwashersandscrews.
3) Knock off corner of brick on either side or below housing for cable/conduit
entryandexit.
4) Screwsupplied1/2NPTplugsintoholesinhousingnotbeingusedfor
wire passage.
5) Remove socket bracket from inside of housing.
6) Mortarhousingintoplacenotingthefollowingitems:
A)Supplywiremayneedtoberunintohousingatthistime,ifsopullsupply
wire through appropriate hole in housing and secure cable/conduit to
housing using a suitable connector.
B)Embedlowerbracketsinmortar.
C)Mortarhousingintoplaceasitifwereabrick.
D)Allowmortartocurebeforewiringandre-assemblingbricklight.
7) Continuebuildingwall,installingremaininghousingasspeciedabove.
NOTE: Before the coarse of brick over housing is laid, attach brackets to top
of housing using washers and screws.
CAUTION:Whensecuringbrackets,donotapplyalotofpressureorforce.
This may damage uncured mortar.
8) Allowwalltocure.
9) Makewireconnections(connectorsnotprovided.)Thisxtureusesa
non-polarizedsocket.Eachsupplywiremaybeconnectedtoeitherxture
wire.
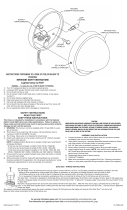
10)Pushsocketbracketintohousingandsecureinplacewithscrews.
11) Insert recommended lamps.
12)Assemblecover/lenstohousing.
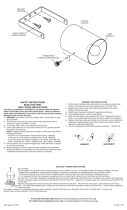
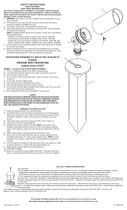
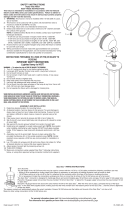
WASHER
ARANDELA
SCREW
TORNILLO
COVER/LENS
TAPA/LENTE
SOCKETBRACKET
APOYODELENCHUFE
BRACKET
APOYO
SCREW
TORNILLO
HOUSING
CUBIERTA

INSTRUCCIONESPERTINENTESAUNRIESGODE
ICENDIOOLESIONALASPERSONAS
INSTRUCCIONES IMPORTANTES DE SEGURIDAD
¡La lámpara encendida es CALIENTE!
ADVERTENCIA — Para disminuir el riesgo de INCENDIO O LESION A LAS PERSONAS.
1) Apague/desenchufeydejequeseenfríeantesdecambiarlalámpara.
2) ¡LalámparaseCALIENTArápidamente!Hagacontactodelconmutador/
enchufe sólo cuando encienda.
3) No toque la lente o la capucha caliente.
4) Nopermanezcaenlaluzsisientetibialapiel.(Laluzesintensa,puede
causar “quemaduras de sol”).
5) Nomiredirectamentealalámparaencendida.
6) Mantengalalámparaalejadadelosmaterialesquepuedanencenderse.
7) Usesolamenteconelvatiajeylalámparamarcadosenelartefacto.
8) Notoqueelvidriodelinteriordelalámparaenningúnmomento.Useun
pañosuave.Elaceitedelcuerpopuededañarlalámpara.
9) No haga funcionar el artefacto con una lente dañada o faltante.
INSTRUCCIONES DE SEGURIDAD
PRIMERO LEA ESTO
GUARDE ESTAS INSTRUCCIONES
Este artefacto se debe instalar de acuerdo con el Código Eléctrico
Nacional (NEC, por sus siglas en inglés) y con las especicaciones del
código local. No cumplir con estos códigos e instrucciones puede
resultar en lesiones graves y/ o en daños a la propiedad y anulará la
garantía.
1) Advertenciaertencia:Esteartefactonodebeinstalarseamenosde
10pies(3m)deunapiscina(alberca),spaofuente.
2) Esteartefactodebeutilizarsesolamenteconunaunidaddepotencia
(tranformador)concapacidadnominalmáximade300vatios(25amp.)
15 voltios.
3) ElalambredelartefactocalibreNo.18noesparasoterradodirecto.
4) Elalambreclasicadoparasoterradodirectosedebeenterrarunmínimo
de6pulgadas(152mm)debajodelasuperciedelterreno.
NOTA:Sinecesitaalambredesoterradodirectoadicional,comuníquese
consudistribuidorlocalKichler®deproductosdejardineríaornamental.
•Elalambrecalibre8puedecomprarseenlongitudde250’(76m.),
15503-BK
•Elalambrecalibre10puedecomprarseenlongitudde250’(76m.),
15504-BK
•Elalambrecalibre12puedecomprarseenlongitudesde75’(22m.),
15550-BK;100’(30m.),15501-BK;250’(76m.),15502-BK;500’(152m.),
15505-BK;y1000’(304m.),15506-BK.
Date Issued: 12/2/11 IS-15073-US
For warranty information please visit: http://www.landscapelighting.com/portal/warranty_page
Para informacion de la garantia por favor visite: www.landscapelighting.com/portal/warranty_page
INSTRUCCIONES DE ALAMBRADO DE QUIC DISC
™
Apaguelaalimentacióndeenergía.
Ellargototaldelalambrecalibre18delartefactosepuedeutilizarparaconectarconuncablecalibre10ó12,contalquesecumplanlascondi-
ciones siguientes:
• Elalambradosedebeprotegerencaminandocercaalartefactooaccesoriooaseguradoalaestructuradeunedicio,talcomounacasao
cubierta.
• Elalambradocalibre18delartefactodebecortarsedemaneraqueseunaalconectordentrodelas6pulgadasdelartefactoodelaestructura
deledicio.
• Sifuerenecesariohacerlasconexionesbajotierra,comomáximo6pulgadasdelalambrecalibre18delartefactosedebeenterrar.
ElconectorQuicDisc
™
estádiseñadoparainstalarunartefactoyacomodarunalambredeartefactodecalibre18yotrodecalibre10,obienun
alambre de alimentación de calibre 12.
Coloqueelalambredealimentacióncalibre10atravésdeláreamarcadacalibre10enelQuicDisc
™
o ponga el alambre de alimentación calibre
12atravésdeláreamarcadacalibre12enelQuicDisc
™
.
Pongaelalambrecalibre18delartefactoatravésdeláreamarcadacalibre18enelQuicDisc
™
.
Despuésquelosalambresesténensulugar,conecteeltopedelQuicDisc
™
alabaseconeltornilloqueseprovee,asegurándosedequelosalambres
permanezcanenlaporcióninferiordelQuicDisc
™
,yeltornilloestétodoapretadohaciaabajo.
Loscontactosautomáticamenteperforaránlaaislacióndelosalambres.Elexcesodealambrecalibre18delartefactoquesobresaledelextremoQuicDisc
™
debe
cortarse.
Nohagaotrasconexionesdecableadoalalambredelartefactodecalibre18.
5) Elartefactonodebeutilizarseconlámparasdehalógeno,amenossque
elartefactoestémarcadoparausarcontaleslámparas.
6) Lasconexionesdecableadosedebenhacerconlasconexionesdel(los)
dispositivos)deconexióndecableadoaprobados/delalista,adecuados
paralaaplicación.Noexcedalasespecicacionesdecombinaciónde
cableado del fabricante para el tamaño y cantidad de conductores.
GUARDE ESTAS INSTRUCCIONES
INSTALACIÓN Y MONTAJE
Antes de empezar:
A)Debedeterminarseellugardeseadoparacadaartefactoantesde
empezarlaconstruccióndelapared.
B)Sielaccesoalaparteposteriordelaparedestálimitado,elcable/conducto
debe instalarse antes de la construcción.
1) Apaguelaalimentacióneléctrica.
2) Montelosapoyosenlaparteinferiordelacubiertausandoarandelasy
tornillos.
3) Saquelaesquinadelladrilloencadaladoodebajodelacubiertaparala
entrada y salida del cable/conducto.
4) Atornillelostaponesde1/2NPTsuministrados,enlosagujerosdela
cubiertaquenoseesténusandoparaelpasodelalambre.
5) Quite el apoyo del enchufe del interior de la cubierta.
6) Instale con mortero en el lugar teniendo en cuenta los siguientes puntos:
A)Puedesernecesarioqueelalambredealimentaciónseinstaleen
lacubiertaenestemomento;siesasí,estireelalambredealimentación
atravésdelagujeroapropiadoenlacubiertayasegureelcable/conducto
a la cubierta usando un conector apropiado.
B)Encajelosapoyosinferioresenelmortero.
C) Instale con mortero la cubierta en el lugar como si fuera un ladrillo.
D)Dejequefragueelmorteroantesdealambraryvolveramontarlaluz.
7) Sigaconstruyendolapared,instalandolacubiertarestantecomoseespecica
másarriba.NOTA: Antesdecolocarlahiladadeladrillosobrelacubierta,
una los apoyos a la parte superior de la cubierta usando arandelas y
tornillos. PRECAUCIÓN:Alasegurarlosapoyos,noapliquemuchapresión
ofuerza.Estopuededañarelmorteronofraguado.
8) Dejequefraguelapared.
9) Hagalasconexionesdealambres(noseproporcionanconectores).
Esteartefactousaunenchufenopolarizado.Cadaalambredealimentación
puede conectarse a cualquiera de los alambres del artefacto.
10)Empujeelapoyodelenchufeenlacubiertayasegureenellugarcon
tornillos.
11) Instalelaslámparasrecomendadas.
12)Montelatapa/lentealacubierta.
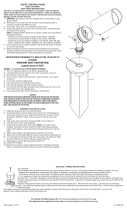
WASHER
ARANDELA
SCREW
TORNILLO
COVER/LENS
TAPA/LENTE
SOCKETBRACKET
APOYODELENCHUFE
BRACKET
APOYO
SCREW
TORNILLO
HOUSING
CUBIERTA
-
 1
1
-
 2
2


Kichler Lighting 15073AZT Manual de usuario
- Tipo
- Manual de usuario
en otros idiomas
Artículos relacionados
-
 Kichler Lighting 15773AZT27R Manual de usuario
-
 Kichler Lighting 15077AZT Manual de usuario
-
 Kichler Lighting 15064BBR Manual de usuario
-
 Kichler Lighting 15309AZT Manual de usuario
-
 Kichler Lighting 15384AZT Manual de usuario
-
 Kichler Lighting 15381AZT Manual de usuario
-
 Kichler Lighting 15398AZT Manual de usuario
-
 Kichler Lighting 15382BK Manual de usuario
-
 Kichler Lighting 15190BK Manual de usuario
-
Kichler Lighting 15087AZT Manual de usuario


