Kenmore 63016303402 El manual del propietario
- Categoría
- Lavaplatos
- Tipo
- El manual del propietario
Este manual también es adecuado para

T
Dishwasher
Lavavaj
Models/Modelos 630,16305, 630,17305
$ = color number, n0mero de color
9000162235 Rev. A Sears, Roebuck and Co., Hoffman Estates, |L, 60179 U.S.A www.sears.corn
697441

CONGRATULATIONS
Thank you for selecting a Kenmore Elite dishwasher. You have joined the many
consumers who demand quiet and superior performance from their
dishwashers.
This Use and Care Guide was written with your safety and convenience in
mind, and the information contained herein is very important. We highly
recommend that you read this manual before you use your dishwasher for the
first time.
Enjoy!
Table of Contents
IMPORTANT SAFETY INSTRUCTIONS ..................... 2
Dishwasher Components ............................................ 3
Features, Accessories, and Options ........................... 3
Materials .................................................................... 4
Dishware Preparation ................................................. 5
Loading the Dishwasher ............................................. 5
Adding Detergent and Rinse Aid ................................. 8
Operating the Dishwasher ........................................... 9
Wash Cycle Options ................................................. 10
Dishware Drying ...................................................... 11
Unloading the Dishwasher ........................................ 11
Maintenance Tasks ................................................... 12
Wash Cycle Information ........................................... 14
Troubleshooting ........................................................ 15
Protection Agreements .............................................. 16
Warranty .................................................................. 16
Spanish Language Section .................................. 17-32
Customer Service ....................................... Back Cover
Table of Contents 1

iMPORTANT SAFETY iNSTRUCTiONS
INJURY/DEATH HAZARD - SERIOUS iNJURY OR DEATH COULD RESULT iF THE
DISHWASHER COVERED iN THiS MANUAL iS OPERATED iNCORRECTLY OR iN A WAY
OTHER THAN ITS iNTENDED PURPOSE. DO NOT USE THE DISHWASHER COVERED iN
THiS MANUAL IN ANY OTHER WAY OR FOR ANY OTHER PURPOSE THAN iS EXPLAINED
IN THiS MANUAL.
1. Use this dishwasher only for its intended function, which is the washing of household dishware and
kitchenware.
2. This dishwasher is provided with two manuals; one Installation Instruction Manual, and one Use and
Care Manual. Read and understand all instructions before using the dishwasher.
3. Use only detergents or wetting agents recommended for use in a dishwasher, and keep them out of
the reach of childen.
4. When loading items to be washed:
a. Locate sharp items so that they are not likely to damage the door seal.
b. Load knives and other sharp utensils with their HANDLES UP to reduce the risk of cut-type
injuries.
5. Do not wash plastic items unless they are marked "dishwasher safe" or the equivalent. For plastic
items not so marked, check the manufacturer's recommendations.
6. Do not operate your dishwasher unless all enclosure panels are in place.
7. Do not tamper with or override controls and interlocks.
8. Do not abuse, sit on, or stand on the door or dish racks of the dishwasher.
9. To reduce the risk of injury, do not allow children to play in or on the dishwasher.
10. Under certain conditions, hydrogen gas may be produced in a hot water system that has not been
used for two weeks or more. Hydrogen gas is explosive. Before using a dishwasher that is
connected to a hot water system that has been unused for two weeks or longer, turn on all hot water
faucets and let the water flow from each for several minutes. This will release any accumulated
hydrogen gas. As the gas is explosive, do not smoke or use an open flame during this time.
11. Remove the door to the washing compartment when removing an old dishwasher from service or
discarding.
12. To avoid floor damage and possible mold growth, do not allow wet areas to remain around or
under the dishwasher.
ELECTRIC SHOCK HAZARD - ELECTRICAL SHOCK COULD RESULT IF THE ELECTRICAL
SUPPLY FOR THE DISHWASHER COVERED iN THiS MANUAL iS iNCORRECTLY
iNSTALLED OR IF THE DISHWASHER HAS BEEN iMPROPERLY GROUNDED. DO NOT USE
THE DISHWASHER COVERED iN THiS MANUAL iF YOU ARE NOT CERTAIN THE
ELECTRICAL SUPPLY HAS BEEN CORRECTLY iNSTALLED OR THE DISHWASHER HAS
BEEN PROPERLY GROUNDED.
GROUNDING INSTRUCTIONS
This appliance must be grounded to a metal, permanent wiring system, or an equipment grounding
conductor must be run with the circuit conductors and connected to the equipment grounding terminal or
lead on the dishwasher. See the Installation Manual included with this dishwasher for more information
on electrical requirements.
2
SAVE THESE iNSTRUCTiONS!
IMPORTANT SAFETY INSTRUCTIONS

Dishwasher Components
Door
Vent
Top Rack
Top Rack Spray
Arm
Bottom Rack
Spray Arm
Bottom Rack
Detergent/Rinse
Dispenser
Filter System
(in dishwasher
floor)
Silverware Basket
Features,
Featu res
Auto SensorTM: Checks water condition and decides
whether a second fresh water fill is necessary.
Quiet Guard TM Supreme: A two-pump motor system, the
Suspended Motor, and triple insulation result in extremely
quiet operation.
Concealed Heating Element: Heats water to a
temperature of up to 161°F.
Condensation Drying: A high temperature final rinse, a
low temperature stainless steel tub, and the sheeting
action of a rinse agent result in drying that is hygienic,
energy efficient, and economical.
Digital Countdown Display: A digital readout that counts
down the time remaining in the cycle. The digital
countdown display is also used to set the dishwasher's
Additional Drying Heat and Delay Start options.
Filter System: Three filters ensure distribution of clean
water and protect the main pump and the drain pump from
foreign material.
Nylon Racks: Eliminate cuts and nicks, and have a five-
year warranty.
"Refill Rinse Aid" Indicator: A message on the control
3anel that comes on when the rinse aid dispenser is needs
to be refilled.
"Sanitized" Indicator: A message on the control panel
certifies that your dishes are sanitized to the standards of
the National Sanitation Foundation.
Stainless Steel Giant TubTM:A rust-free, hygienic interior
surface with a lifetime warranty.
Water Shut-Off: A safety feature that stops the flow of
incoming water if water is detected in the base of the
dishwasher.
Accessories, and Options
Accessories and Options
Additional Drying Heat: Raises the rinse water
temperature, resulting in better drying.
Automatic Adjustability Top Rack: The top rack can be
lowered to accommodate large items in the top rack, and
raised to make room for large items in the bottom rack.
Cup Shelves: Fold-down shelves that hold cups or large
kitchen utensils.
Delay Start: Allows you to delay the start of the wash
cycle for up to 24 hours.
Top Rack and Bottom Rack Flip Tines: Tines that fold
down improve loading versatility.
Top Tier Only TM Cycle: Saves energy, water, and
detergent by washing loads small enough to fill only the top
rack.
Dishwasher Components Features, Accessories, and Options 3

Materials
NOTE: Before you use your dishwasher for the first time, check the information in this section. Some items you may want
to clean are not dishwasher safe and should be hand-washed; others require special loading. Contact the item's manufac-
turer if you are unsure about the item's dishwasher suitability.
Safe Not Recommended
Aluminum: Colored anodized aluminum may fade over time.
Minerals in your water may cause the aluminum to darken or
spot, This can usually be removed by using a soap-filled steel
wool pad.
China, Crystal, Stoneware: Some hand-painted pieces
may discolor, fade, or spot. Hand-wash these pieces.
Position fragile glassware so that itwill not topple over or
contact other pieces during the wash cycle.
Glass: Milk glass may yellow.
Non-Stick Coatings: Apply a light coating of vegetable oil to
non-stick surfaces after drying.
Plastics: Ensure the piece isdishwasher safe.
Stainless Steel, Sterling Silver, and Silver Plate: To
prevent possible corrosion, place items made of different
metals so that they do not contact each other.
Acrylic: Crazing (small cracks throughout the acrylic) may
occur.
Adhesive-Joined Pieces: Adhesives that join materials
such as plastic, wood, bone, steel copper, tin, etc. may
loosen.
Bone-Handled Utensils: Handles may separate.
Iron: Iron will rust, Hand-wash and dry immediately,
Non-Dishware Items: Your dishwasher is intended for use
in cleaning ONLY standard household dishware and
kitchenware.
Pewter, Brass, Bronze: Pewter will tarnish. Hand-wash
and dry immediately.
Tin: Tin will rust. Hand-wash and dry immediately.
Wood: Wooden bowls, wooden utensils, and wood-handled
utensils can crack, warp, and lose their finish.
4 Materials

I. Using your Dishwasher
A. Dishware Preparation
1. General Guidelines
a) Do not pre-wash items having loosely-attached soiling.
b) Remove large food particles, bones, seeds, toothpicks, and
excessive grease.
c) Items having burned-on or hard, stuck-on soiling may
require soaking and hand-scouring before being placed in
the dishwasher.
B. Loading the Dishwasher
1. General Guidelines
DISHWASHER DAMAGE: Loading the dishwasher
with objects such as paper products, plastic bags,
packing materials, or anything other than normal
dishware and kitchenware could damage the
dishwasher. Do not load the dishwasher with anything
other than dishwasher=safe dishware and kitchenware.
a) Check the Materials section of this manual if you are unsure
about an item's dishwasher suitability.
b) Load only dishwasher-safe items into the dishwasher.
c) Load items so that water can reach every part of every item.
d) Place pots, pans, cups, bowls, and glasses upsidedown in
the racks.
e) Separate items of different metals.
2. Top Rack Accessories
Automatic Adjustability Top Rack Height Adjustment
The top rack can be raised to accommodate items up to 8"
(20cm) in the top rack and 14" (36cm) in the bottom rack, or
lowered to accommodate items up to 10" (25cm) in the top
rack and 12" (30cm) in the bottom rack.
To lower the top rack:
a) Pull the top rack out of the dishwasher until it stops rolling.
b) Press the blue Automatic Adjustability handles inward as
shown in Figure 1. The rack will drop to its lowered position.
To raise the top rack:
c) Pull the top rack out of the dishwasher until it stops rolling.
d) Grasp the top of the rack above the Automatic Adjustability
handles and pull it upward as shown in Figure 2 until the
Automatic Adjustability handles lock the rack into position
(you do not need to press the Automatic Adjustability
handles in order raise the rack).
2
NOTE: Before you push the top rack back into the dish-washer,
ensure that the rack height is the same on both sides.
Otherwise, the dishwasher door will not shut and the top rack
spray arm will not connect to the water circuit.
e) Push the top rack back into the dishwasher.
Flip Tines
Flip Tines fold down to make loading the racks easier in some
instances.
t) Grasp the tine stem as shown in Figure 3 and fold the tines
downward.
Cup Shelves
g) Grasp the Cup Shelves as shown in Figure 4 and fold them
down.
4
h) Place cups upside-down on the Cup Shelves. The Cup
Shelves can also hold large cooking utensils.
3. Loading the Top Rack
NOTE: Check the Wash Cycle Options section of this manual
for information on the Top Tier Onty TM cycle.
a) Figure 5 shows a typical mixed load in the top rack.
Dishware Preparation Loading the Dishwasher 5

Using your Dishwasher..continued
5
b) Figure 6 shows the top rack load pattern for 10 place
settings.
]
10 Place
Setting
c) Figure 7 shows the top rack load pattern for 12 place
settings.
7
12 Place
Setting
NOTE: When pushing the top rack into the dishwasher, push it
until it stops against the back of the tub. Otherwise, the top rack
spray arm may not connect to the water supply.
d) When the top rack is loaded, push it into the dishwasher.
4. Bottom Rack Accessories
Flip Tines
Flip Tines fold down to make loading the racks easier in some
instances.
a) Grasp the tines as shown in Figure 8 and fold the tines
downward.
8
5. Loading the Bottom Rack
NOTE: Keep the vent on the tub's right side clear by placing tall
items such as plastic cutting boards and tall baking sheets on
the bottom rack's left side, center, or back.
a) Place large items in the bottom rack. Load pots and pans
upside-down. Figure 9 shows a typical mixed load in the
bottom rack.
b) Figure 10 shows the bottom rack load pattern for 10 place
settings.
10
10 Place
Setting
c) Figure 11 shows the bottom rack load pattern for 12 place
settings.
11
12 Place
Setting
d) When the bottom rack is loaded, push it into the dishwasher.
6 Loading the Dishwasher

Using your Dishwasher..continued
S. Loading Extra Tall items
if an item is too tall to be placed into the bottom rack even with
the top rack in the raised position:
a) Remove the empty top rack by pulling it out of the dishwasher
until it stops rolling.
b) Pull the front of the rack upward and outward until the rollers
are completely free of the roller guides. Set the top rack aside.
c) Push the roller guides back into the dishwasher.
d) Insert the Extra Tall Item Sprinkler into the top rack spray outlet
and turn the sprinkler clockwise to lock it into position as
shown in Figure 12.
Remove the sprinkler and return the dishwasher to its
normal condition:
f) Turn the sprinkler counter-clockwise and remove it from the
top rack spray outlet.
g) Retrieve the top rack.
h) Tilt the top rack upwards and position the top rack rollers
onto the roller guides.
/) Continue pushing the top rack until the rollers are on the
guide.
j) Push the top rack into the dishwasher.
12
NOTE: Keep the vent on the tub's right side clear by placing
tall items such as plastic cutting boards and tall baking
sheets on the bottom rack's left side, center, or back.
e) Place your extra tall item(s) in the bottom rack as shown in
Figure 13.
13
7. Loading the Silverware Basket
INJURY HAZARD: Knives and other sharp utensils placed
with their handles down in the silverware baskets can
cause serious injuries. Whenever possible, do not load
knives and other sharp utensils with their handles down.
Do not allow children to handle or play near knives and
sharp utensils.
a) Keep children away from knives and other sharp utensils.
NOTE: The silverware basket tops can be folded up to
accomodate large or oddly-shaped items.
b) With the silverware basket tops down, load the silverware
basket following a pattern suggested by Figure 14, placing
knives with their handles up, and forks and spoons with
their handles down.
14
DISHWASHER DAMAGE: Reinstalling the top rack without
removing the extra tall item sprinkler can damage the
dishwasher. Do not reinstall the top rack with the
sprinkler installed.
c) If large or oddly-shaped items are to be loaded into the
silverware basket with the tops up, load the items so that
they do not nest together. Load knives and sharp utensils
with their handles up.
d) The basket splits along its length, making two halves that
may be placed in a variety of positions in the lower rack,
greatly increasing the lower rack's loading versatility.
Loading the Dishwasher 7

Using your Dishwasher..continued
To split the Flexible Silverware Basket:
e) Grasp the basket and slide the two halves in opposite
directions as shown in Figure 15A, and pull the two halves
apart as shown in Figure 15B.
15
/) Some suggestions for placing the two halves in the lower
rack are shown in Figure 16.
16
C. Adding Detergent and Rinse Aid
1. Detergents
DISHWASHER DAMAGE: Using hand dishwashing products
in your dishwasher could damage your dishwasher. Do not
use hand dishwasMng products in your dishwasher.
DISHWASHER DAMAGE: Too much detergent in soft water
may cause etching in glassware. Do not use too much
detergent if your water supply is soft.
, #
a) Use only powdered detergents specifically designed for
dishwashers.
b) The detergent dispenser cup has lines that measure
detergent to 15 milliliters (mt) and 25ml. 45mt of detergent
wilt completely fill the detergent dispenser cup.
NOTE: If you do not know the hardness of your water supply, use
15mt (1 Tbsp) of detergent. Increase the amount of detergent, if
necessary, to the least amount required to get your dishware
and kitchenware clean.
c) Use the measuring lines in the detergent dispenser cup as a
guide to measure the amount of detergent recommended in
Table 1.
Table 1 - Recommended Detergent Amount
Wash Unit of
Hard Medium Soft
Cycme Measure
mm 25-45 25 15-25
Normal
Wash
Tbsp 1-3/4 to 3-1/2 1-3/4 1 to 1-3/4
ml 15-25 15 15
Quick
Wash
Tbsp 1 to 1-3/4 1 1
2. Rinse Aids
a) Always use a liquid rinse aid, even if your detergent contains a
rinse aid or drying additive.
3. The Detergent and Rinse Aid Dispenser
Filling the Detergent Dispenser
a) If the dispenser cover is shut, open it by pressing the blue
release tab in the direction of the arrow shown in Figure 17.
17
b) Fill the detergent dispenser cup with the amount of detergent
recommended in Table 1.
8 Loading the Dishwasher Adding Detergent and Rinse Aid

Using your Dishwasher..continued
c) Shut the detergent dispenser cover by sliding the cover to
the left and pressing it down firmly so that it snaps shut as
shown in Figure 18.
18
The cover will open during the cycle to dispense the detergent.
Rinse Aid Dispenser Regulator
The amount of rinse aid dispensed can be regulated to control
spotting and streaking. The Rinse Aid Dispenser Regulator as
shown in Figure 21 is preset at 4.
21
To adjust the amount of rinse aid dispensed:
h) Open the rinse aid dispenser cover.
/) If your dishes are streaked after washing, turn the regulator
to a lower number.
]) If your dishes are spotted after washing, turn the regulator to
a higher number.
Filling the Rinse Aid Dispenser
d) Open the rinse aid dispenser by pressing the star on the
cover with your index finger while lifting the tab with your
thumb as shown in Figure 19.
r
19
e) Add liquid rinse aid to the dispenser as shown in Figure
20A until the rinse aid reservoir is full. Wipe up any excess
rinse aid that puddles when the dispenser reservoir is full.
20
D. Operating the Dishwasher
1. Select the Proper Wash Cycle
a) Items with baked-on or hard, dried-on soiling will require
Scrub Wash and possibly soaking and hand-scouring
before being placed in the dishwasher.
b) The Normal Wash cycle will thoroughly clean large loads
having loosely attached normal soiling.
c) For delicate or heirloom dishware and silverware, or other
special items, select the China Gentle after referring to the
Materials section of this manual. Hand-washing may be
the best treatment of such items.
d) For lightly soiled items try Quick Wash.
e) The Rinse cycle will allow you to keep a small load in your
dishwasher until you have enough items for a full load.
f) A small load can also be placed in the top rack and given
complete washing by the Top Tier OntyTM cycle.
More information on dishwasher cycles is in the Wash Cycle
Information section of this manual.
Check the Wash Cycle Options section of this manual for
information on the Top Tier OnlyTM cycle, Delay Start, and
Additional Drying Heat.
2. Starting the Dishwasher
a) Shut the dishwasher door.
b) Press the On/Off button as shown in Figure 22.
t) Return the rinse aid dispenser cover to its shut position and
press it firmly so that the cover snaps shut.
NOTE: Figure 20B represents a completely empty rinse aid
reservoir.
g) Refill the rinse aid dispenser when the rinse aid reservoir
level indicator as shown in Figure 20B begins to show a
silver background with black lines or when the Refill Rinse
Aid indicator comes on.
NOTE: After filling the Rinse Aid dispenser, the Refill Rinse Aid
Indicator will go out in a few minutes after the dishwasher door
is shut.
c) Press the button for the wash cycle desired.
d) The dishwasher will start and continue operating until the
end of the selected cycle.
Once you start the dishwasher, leave the dishwasher door shut
until it finishes the cycle.
Adding Detergent and Rinse Aid Operating the Dishwasher 9

Using your Dishwasher..continued
3. "Refill Rinse Aid" indicator
Fill the Rinse Aid dispenser when the Refill Rinse Aid message
comes on as shown in Figure 23.
b) Wait at least ten seconds or until water noises stop before
opening the dishwasher door.
c) To resume the cycle, shut the dishwasher door and press
the On/Off button.
23
4. "Sanitized" Indicator
The Sanitized indicator appears on the control panel display as
shown in Figure 24.
.
a)
Canceling or Changing a Cycle
To cancel or change a cycle, press and hold for three
seconds the two buttons labeled "Cancel Drain" as shown in
Figure 25 until the digital readout shows "0".
25
24
When the Sanitized indicator lights, it means that your dishes
have been sanitized according to very strict standards of wash
time and water temperature. The standards for sanitization are
set by the National Sanitation Foundation (NSF) and are
explained in the document ANSl/NSF 184, Residential
Dishwashers. More information on NSF standards is available
at the NSF website http://www.nsfconsumer.org/home/
appliances.asp.
The dishwasher cycles that are NSF certified are Scrub Wash,
Normal Wash, and China Gentle. When these cycles are
complete, the "Sanitized" indicator on your dishwasher control
panel will illuminate.
Note: If your household water supply is too hot, your
dishwasher's heating time may be reduced and the "Sanitized"
light or symbol may not illuminate. Your dishwasher Installation
Manual has information on the recommended temperature for
your household hot water supply.
5. Interrupting a Cycle
NOTE: Should you need to interrupt a cycle (to add or remove an
item, to add detergent, etc.), it is best to do so within the first 30
minutes of the cycle.
a) Press the On/Off button to stop the dishwasher.
b) Wait for approximately one minute, then press the On/Off
button
c) You may now begin a new cycle.
E. Wash Cycle Options
1. Top Tier Only TM Cycle
This option allows you to save energy and water by washing
loads small enough to fill only the top rack.
Note: The Top Tier Only option does not reduce wash time.
To use the Top Tier Only cycle
a) Load the top rack.
b) Press the On/Off button.
c) Press the button for the desired wash cycle.
d) Press the Top Only button.
2. Delay Start
This option allows you to delay the start of the selected wash
cycle for up to 24 hours.
a) Press the On/Off Button
b) Press and hold for three seconds the Delay Start button as
shown in Figure 26 until the LED display shows the number
of hours of delay desired.
26
SCALD HAZARD: You could be seriously scalded if you
open the dishwasher door quickly during a wash or rinse
cycle. Do not fully open the dishwasher door for at least
10 seconds after the dishwasher has stopped, or until
water noises stop.
c) Press the button for the desired wash cycle. You can change
the delay time and/or the cycle at any time during the delay.
1 0 Adding Detergent and Rinse Aid Operating the Dishwasher

Using your Dishwasher..continued
F. Dishware Drying
At the end of the cycle the dishwasher will stop and a period of
condensation drying will follow (more information on
Condensation Drying can be found in the Features,
Accessories, and Options section of this manual.). After 12 - 15
minutes of drying,
= the LED display will show "0",
= the "Sanitized" indicator will light (except in the
Quick Wash and Rinse cycles).
G. Additional Drying Heat
With this option you can raise the temperature of the rinse
water, which will result in better and faster drying.
a) Press and hold the left "Cancel Drain" button as shown in
Figure 27, then press and hold the On/Off button.
27
When the LED display shows a "0" or a "1", release both
buttons.
b) To enable the Additional Drying Heat, press the left "Cancel
Drain" button until the LED display shows a "1".
c) To disable the Additional Drying Heat, press the left "Cancel
Drain" button until the LED display shows a "0".
d) Press the On/Off button. You may now wash dishes as
usual.
H. Unloading the Dishwasher
1. General Guidelines
.........
POSSIBLE BURN INJURY: Dishware is hot
immediately after the wash cycle. Do not handle
dishware immediately after the wash cycle.
a) Unload the bottom rack first.
b) Unload the silverware basket(s).
c) Unload the top rack.
d) If the Extra Tall Item Sprinkler was installed, return the
dishwasher to its normal condition (see the Loading Extra
Tall Items instructions in the "Loading the Dishwasher"
section of this manual).
Dishware Drying Unloading the Dishwasher 1 1

II. Care and Maintenance
Maintenance Tasks
Perform the following maintenance to ensure continued
superior performance from your Kenmore dishwasher:
• Wiping up Spills and Splash-out
• Winterizing Your Dishwasher
• Check/Clean the Spray Arm Nozzles
= Clean the Stainless Steel Inner Door and Tub
= Check/Clean the Filter System
= Clean the Exterior Door Panel
. Clean the Door Gasket
1. Wiping Up Spills and Splash-out
Water may occasionally splash out of your dishwasher,
especially if you interrupt a cycle or open the dishwasher door
during a cycle. Wipe up immediately any water that spills or
splashes out of your dishwasher.
2. Winterizing Your Dishwasher
If your dishwasher will be unused for an extended period of
time in a location that experiences freezing temperatures (e.g.,
in a holiday home or through a vacation period), you must drain
all the water from the dishwasher's interior.
a) Turn off the water supply.
b) Disconnect the drain hose, and allow your dishwasher to
completely drain into a bucket or other appropriate
receptacle.
3. Check/Clean the Spray Arm Nozzles
Occasionally check the spray arms to ensure that the spray
nozzles are unobstructed. You must remove the spray arms to
check them for obstruction.
To remove the top spray arm:
a) Remove the empty top rack from the dishwasher.
b) Turn the rack upside-down. The top spray arm is held in
position by a locking nut as shown in Figure 28A. Turn the
locking nut counter-clockwise 1/8 turn and remove it, as
shown in Figure 28B to release the spray arm.
28
HEALTH HAZARD =MOLD GROWTH: Standing water
around or under the dishwasher can cause mold growth
that can adversely affect human health and damage
household structural materials. To avoid floor damage
and possible mold growth, do not allow water to remain
around or under your dishwasher.
c) Remove the spray arm as shown in Figure 29.
29
d) Look for obstruction in the spray nozzles.
e) If the spray nozzles need cleaning, flush them under running
wate r.
To reinstall the top spray arm:
t) Return the top spray arm to its installed position.
g) Return the locking nut to its installed position and turn it 1/8
turn clockwise.
h) Return the top rack to the top rack roller guides.
To remove the bottom spray arm:
/) Remove the empty bottom rack from the dishwasher tub.
2) Grasp and lift the bottom spray arm as shown in Figure 30.
30
k) Look for obstruction in the spray nozzles.
/) If the spray nozzles need cleaning, flush them under running
wate r.
To reinstall the bottom spray arm:
m) Return the bottom spray arm to its installed position and
press it so that it snaps into place.
n) Return the bottom rack to its installed position.
12 Maintenance Tasks

Care and Nlaintenance...continued
4. Check/Clean the Stainless Steel Inner Door and Tub
a) Clean the outer edges of the inside door panel regularly to
remove debris that might collect there from normal loading.
b) If spots begin to appear on the stainless steel tub or inner
door, make sure the rinse agent reservoir is full.
5. Check/Clean the Filter System
Your dishwasher has a filter system that is made up of a Large
Object Trap/Cylinder Filter assembly and a Fine Filter. The filter
system is located on the dishwasher floor and is easily
accessible.
During normal use the filter system is self-cleaning, but you
should occasionally inspect it for foreign objects and clean it
when necessary.
To Remove the Fine Filter and the Micro Filter:
e) Lift the Fine Filter from the dishwasher floor as shown in
Figure 33 and flush it clean by holding it under running water
33
To Remove the Large Object Trap/Cylinder Filter Assembly:
a) Remove the bottom rack.
b) Grasp the assembly as shown in Figure 31, and turn it
counter-clockwise 1/4" turn.
31
c) Lift out the assembly as shown in Figure 32.
32
,&
iNJURY HAZARD: The large object trap could contain
sharp objects. Do not reach into the large object trap
with your fingers.
d) Carefully examine the assembly. If you find debris in the
Large Object Trap, turn it upside-down and gently tap it on a
surface such as a countertop to dislodge and remove the
debris. Flush the Cylinder Filter clean by holding it under
running water.
To reinstall the filter system:
t) Return the Fine Filter to its installed position
g) Place the Large Object Trap/Fine Filter Assembly into its
installed position in the dishwasher floor.
h) Turn the ring handle clockwise 1/4 turn until it is locked. The
arrow on the ring handle and the arrow on the Fine Filter
should point to each other, as shown by the circle in Figure
34.
34
/) Gently pull the ring handle to ensure that the Assembly is
locked into place.
6. Clean the Exterior Door Panel
POSSIBLE DISHWASHER DAMAGE: Your dishwasher's
exterior door panel can be damaged if you try to clean it
with harsh chemicals, abrasive cleaners, scouring pads
(metal or plastic), or abrasive cloths/paper towels. Do not
use harsh chemicals, abrasive cleaners, scouring pads
(metal or plastic), or abrasive cloths/paper towels to clean
your dishwasher's exterior door panel.
Colored Exterior Doors
a) Use only a soft cloth that is lightly dampened with soapy
wate r.
Stainless Steel Exterior Doors
a) Use a soft cloth with a non-abrasive cleaner made for
cleaning stainless steel. For the best results, apply the
stainless steel cleaner to the cloth, then wipe the surface.
7. Clean the Door Gasket
a) Regularly clean the door gasket with a damp cloth to remove
food particles and other debris.
Maintenance Tasks 13

Wash Cycle information
The NSF Symbol
A dishwasher or a dishwasher cycle that has the NSF
symbol has been certified by the National Sanitation
Foundation (NSF) to meet very strict requirements of wash
time and water temperature to ensure dishware and
kitchenware sanitization. These requirements are
explained in the document ANSI/NSF 184, Residential
Dishwashers. More information on NSF Certification is
available at the
NSF website, http://www.nsfconsumer.org/home/
appliances.asp.
Your dishwasher is NSF Certified. The dishwasher cycles
that are NSF certified are Scrub Wash, Normal Wash, and
China Gentle. When these cycles are complete, the
"Sanitized" indicator on your dishwasher control panel will
illuminate.
NOTE: If your household water supply is too hot, your
dishwasher's heating time may be reduced and the
"Sanitized" light or symbol may not illuminate. Your
Dishwasher Installation Manual has information on the
recommended temperature for your household hot water
supply.
Certified to }ANSI/NSF 184
CERTIFIED CYCLES
Scrub Wash: Removes hardened, baked-on material
from dishware.
Normal Wash: For normal, everyday loads with loosely
attached food.
China Gentle: Saves water and energy while removing
loosely attached food from delicate dishware.
Quick Wash: A 35-minute cycle that cleans lightly
soiled items such as glasses and coffee cups.
Rinse: Rinses and holds smaller loads until you have a
full load.
Cycle Duration/Water Consumption information
NOTE: Cycle duration and water consumption depend
largely upon household water temperature and wash load.
Therefore, the times and quantities in this charts are
approximate.
Scrub Normal China Quick
Rinse
Wash Wash Gentle Wash
Approx.
Cycle ]qme 126 108 90 35 10
in minutes
Approx. Minimum 5.7 3.2 3.3 3.3 1.2
Water
Consumption
in gallons Maximum 7.6 7.6 3.7 3.7 1.4
Approx. Minimum 21 16.8 13.8 11.8 4.8
Water
Consumption
in liters Maximum 28.8 28 14 14 5.3
Water not
Wash Temp -°F 161 o 140 -0 120 -0 120-0
heated
Water not
Rinse Temp -°F 161 o 155 -0 155 -0 140-0
heated
1 4 Wash Cycle Information

Troubleshooting
Please review this troubleshooting chart prior to calling for service,
PROBLEMS SOLUTIONS
Dishes do not dry The rinse aid dispenser may be empty. Check the rinse-aid dispenser and refill it if
necessary. Dishware drying can be accelerated and enhanced by opening the
dishwasher door slightly and propping it open with the top rack.
Indicator light(s) do not A fuse may have blown or a circuit breaker tripped. Check the fuse or circuit breaker
come on at your fuse box/breaker box and replace the fuse or reset the breaker if necessary.
Dishwasher does not The dishwasher door may not be properly shut. Make certain the dishwasher door is
start shut and latched.
Dishwasher runs a long
time
If the dishwasher completes the cycle, but the run time seems exceptionally long, it
may be due to cold incoming water. Before starting the dishwasher, open the hot
water faucet at the sink nearest the dishwasher. Run the water until it runs hot, then
turn off the water and start the dishwasher.
Machine cycle does not
advance to rinse
NOTE: The Installation Manual that came with your dishwasher will help you with the
following instructions.
The water supply line may be shut off. Check the water supply valve and open it if it's
shut. Or, the water inlet may be blocked. Using the Installation Manual that came with
your dishwasher as a guide, shut off the dishwasher's water supply, remove the
dishwasher's toe panel, water supply hose or tubing, and 90° elbow, and look for
debris in the water inlet. If debris is present, try removing it with tweezers. Then,
return the 90 ° elbow, water supply hose or tubing, and toe panel to their installed
positions, and open the dishwasher water supply.
Water not pumped from
dishwasher
Make certain the drain hose isn't kinked, clogged, or improperly installed. Make
certain a portion of the drain hose is at least 20 inches above the dishwasher's
enclosure floor (see the Installation Manual). Filters may be clogged. Make certain the
filter system isn't clogged (see the Care and Maintenance section of this manual).
The kitchen sink drain may be clogged; you may need a plumber rather than a
serviceman for the dishwasher. If an air gap is installed at sink, it may be clogged.
Detergent dispenser
cover will not shut
You may not be correctly shutting the detergent dispenser cover, or a cycle was not
finished and should be cancelled. Go to the Adding Detergent and Rinse Aid section of
this manual for instructions on shutting the detergent dispenser cover. Go to the
Operating the Dishwasher section of this manual for instructions on cancelling a
cycle.
White spots left on More rinse aid is needed. Go to the Adding Detergent and Rinse Aid section of this
dishes manual for instructions on increasing the amount of rinse aid dispensed.
Streaks on glassware Too much rinse aid is being dispensed. Go to the Adding Detergent and Rinse Aid
section of this manual for instructions on decreasing the amount of rinse aid
dispensed.
Rattling noises Utensils may not be properly arranged.
Suds in dishwasher You may have used the wrong type of dishwasher detergent. Use only automatic
dishwasher detergents.
Unsatisfactory washing • Incorrect amount of detergent.
results • Utensils incorrectly arranged or rack overloaded.
• Spray arm rotation blocked by utensils.
• Spray arm nozzles need cleaning.
• Filters not properly fitted into position.
• Unsuitable cycle selected.
Troubleshooting 15

Protection Agreements
in the U.S.A.
Master Protection Agreements
Congratulations on making a smart purchase. Your
new Kenmore® product is designed and manufactured
for years of dependable operation. But like all products,
it may require preventive maintenance or repair from
time to time. That's when having a Master Protection
Agreement can save you money and aggravation.
Purchase a Master Protection Agreement now and
protect yourseff from unexpected hass/e and expense.
The Master Protection Agreement also helps extend
the life of your new product. Here's what's included in
the Agreement:
[] Expert service by our 12,000 professional repair
specialists
[] Unlimited service and no charge for parts and
labor on all covered repairs
[] "No=lemon" guarantee- replacement
of your covered product if four or more product
failures occur within twelve months
[] Product replacement if your covered product
can't be fixed
[] Annual Preventive Maintenance Check at your
request - no extra charge
[] Fast help by phone- phone support from a Sears
technician on products requiring in-home repair, plus
convenient repair scheduling
[] Power surge protection against electrical damage
due to power fluctuations
[] Rental reimbursement if repair of your covered
product takes longer than promised
Once you purchase the Agreement, a simple phone
call is all that it takes for you to schedule service. You
can call anytime day or night, or schedule a service
appointment online.
Sears has over 12,000 professional repair specialists,
who have access to over 4.5 million quality parts and
accessories. That's the kind of professionalism you
can count on to help prolong the life of your new purchase
for years to come. Purchase your Master Protection
Agreement today!
Some limitations and exclusions apply.
For prices and additional information call
1-800-827-6655.
Sears Installation Service
For Sears professional installation of home
appliances, garage door openers, water heaters,
and other major home items, in the U.S.A. call
1-800-4-MY-HOME®
KENMORE ELITE
APPLIANCE WARRANTY
TWO-YEAR LIMITED WARRANTY ON THIS KENMORE
ELITE DISHWASHER
When installed,operated andmaintained accordingto all
instructionssuppliedwith the product, ifthisappliance fails due to
a defectin material orworkmanship withintwo years from the date
ofpurchase,call 1-800-4-MY-HOME@toarrangeforfreerepair.
FIVE-YEAR LIMITED WARRANTY ON UPPER AND
LOWER RACKS
Forfive years from the date ofpurchase, when this dishwasher is
installed,operated and maintained according to all instructions
supplied with the product, Sears will replace parts forthe upper
or lower dishrack ifthe rack rusts due to defective materials or
workmanship. After the second year, customer assumes any
labor costs associated with dishrack replacement.
LIMITED WARRANTY FOR THE LIFE OF THE
DISHWASHER, ON KENMORE ELITE STAINLESS
STEEL TUB MODELS, AGAINST LEAKS IN THE TUB
AND INNER DOOR PANEL
For the lifeof the dishwasher, ifa leakshould occur as a result of
rust-through ofthe stainless steel tub or inner door panel, Sears
willreplace thetub or inner door panel freeof charge.
Ifthis appliance isused for otherthan privatefamily purposes,
this warranty applies for only 90 days from the date of purchase.
THIS WARRANTY COVERS ONLY DEFECTS IN
MATERIAL AND WORKMANSHIR SEARS WILL NOT
PAYFOR:
1. Expendable itemsthat can wear out from normal use,
including but not limited to filters, belts, light bulbs, and bags.
2.A service technician to instruct the user in correct product
installation, operation or maintenance.
3.A service technician to clean or maintain this product.
4. Damage to or failure ofthis product ifit is not installed,
operated or maintained according to all instructionssupplied with
the product.
5. Damage toor failure ofthis product resulting from accident,
abuse, misuse or usefor other than its intended purpose.
6. Damage to or failure ofthis product caused by the use of
detergents, cleaners, chemicals or utensils other than those
recommended in all instructions supplied with the product.
7. Damage to or failure ofparts or systems resulting from
unauthorized modifications made tothis product.
DISCLAIMER OF IMPLIED WARRANTIES; LIMITATION
OF REMEDIES
CustomeCssole and exclusive remedy under this limited
warranty shallbe product repair asprovided herein. Implied
warranties, includingwarranties of merchantability or fitness for a
particular purpose, are limited to one year orthe shortest period
allowed by law. Sears shall not be liablefor incidental or
consequential damages. Some states and provinces do not
allow the exclusion or limitationof incidental or consequential
damages, or limitations on the durationof implied warranties of
merchantability or fitness, so these exclusions or limitations
may not apply to you.
This warranty applies only while this appliance isused inthe
United Statesand Canada. This warranty gives you specific
legal rights, and you may alsohave other rights which vary from
state to state.
Sears,Roebuckand Co.,Dept.817WA,Hoffman Estates,IL60179
Sears Canada Inc., Toronto, Ontario, Canada M5B 2B8
1 6 Protection Agreements Warranty

FELICIDADES
Gracias por haber escogido la lavavajillas Kenmore Elite. Usted se ha unido a muchos
clientes quienes exigen un rendimiento silencioso y excepcionaJ de su lavavajiJJas.
Esta guia de uso y cuidado ha sido escrito tomando en cuenta su seguridad y
comodidad. La informaci6n incluida es muy importante. Le aconsejamos que lea este
manual antes de utilizar su lavavajillas por la primera vez.
!DisfrQtela!
Contenido
INSTRUCCIONES IMPORTANTES PARA REDUCIR RIESGOS ...... 18
Componentes de la Lavavajillas ......................................................... 19
Caracteristicas, Accesorios y Opciones ........................................... 19
Materiales ......................................................................................... 20
Preparaci6n de la Vajilla ................................................................... 21
C6mo Cargar la Lavavajillas .............................................................. 21
C6mo ASadir Detergente y Agente de Enjuague ................................ 24
C6mo Funciona la Lavavajillas .......................................................... 25
C6mo Secar la Vajilla ........................................................................ 27
C6mo Descargar la Lavavajillas ........................................................ 27
Cuidado y Mantenimiento ................................................................. 28
Datos -- Duraci6n de los Ciclos/Consumo de Agua ........................... 30
C6mo Resolver Problemas ................................................................ 31
Contratos de Protecci6n ................................................................... 32
Garantias ......................................................................................... 32
Servicio al Cliente ........................................................... Contraportado
Contenido 17

INSTRUCCIONES INIPORTANTES PARA REDUCIR RIESGOS
PELIGRO DE HERIDAS O MUERTE - HERIDAS GRAVES O HASTA LA MUERTE PODRJAN
RESULTAR Si LA LAVAVAJILLAS DESCRITA EN ESTE MANUAL SE OPERA
INCORRECTAMENTE O DE ALGUN MODO CONTRARIO AL PROPOSITO INTENCIONADO. NO
UTILICE LA LAVAVAJILLAS DESCRITA EN ESTE MANUAL DE CUALQUIER MODO O PARA
CUALQUIER OTRO FIN DIFERENTE DE LOS QUE SE DETALLAN DENTRO DE ESTE MANUAL.
1. Utilice esta lavavajillas Onicamente para realizar la funcidn intencionada que es la de lavar la vajilla y los
utensilios de cocina en su hogar.
2. Esta lavavajillas se distribuyen con dos manuales; el Manual de Instrucciones para la Instalacidn y otro
para su Uso y Cuidado. Lea y comprenda todas las instrucciones antes de utilizar la lavavajillas.
3. Utilice Onicamente detergentes o agentes de enjuague recomendados para uso en lavavajillas y
mantengalos fuera de! alcance de niSos.
4. A medida que cargue los articulos para lavar:
a. Acomode los articulos filosos de modo que no daSen el sello de la puerta.
b. Cargue los cuchillos y otros utensilios filosos CON EL MANGO HACIAARRIBA para reducir el riesgo
de cortarse.
5. No lave articulos de pla.stico a menos de que indiquen "a prueba de lavavajillas" [dishwasher safe]. En
cuanto a los productos de pk4.stico que no Ileven tal aviso, consulte al fabricante para averiguar sus
recomendaciones.
6. No opere su lavavajillas a menos de que todos los paneles del gabinete esten instalados correctamente.
7. No intente alterar, modificar o sobrecontrolar los controles o los interruptores de seguridad electricos.
8. No abuse ni se siente o se pare en la puerta o en las rejillas de la lavavajillas.
9. Con el fin de reducir el riesgo de heridas, no permita que niSos jueguen adentro o encima de la lavavajillas.
10.Bajo ciertas condiciones, el gas hidrdgeno podria acumularse en un sistema de agua caliente que no se
ha usado durante por Io menos dos semanas. El gas hidrdgeno es explosivo. Antes de usar una
lavavajillas conectada a un sistema de agua caliente que no ha sido operada por dos o m_.s semanas,
abra todas las Ilaves de agua caliente y permita que corra el agua por algunos minutos. De este modo se
dispersa el gas hidrdgeno que se acumul6. Ya que el gas podrfa explotar, no fume ni prenda una llama
durante este proceso.
11. Quite la puerta del compartimiento de lavado (la tina) antes de poner la lavavajillas fuera de servicio o
cuando la deseche.
12. Para no daSar el piso y evitar la posible formacidn de moho, no permita Areas hOmedas alrededor o abajo
de la lavadora de platos.
PELIGRO DE CHOQUE ELC:CTRICO - CHOQUES ELC:CTRICOS PODR|AN RESULTAR Si LA
FUENTE ELECTRICA PARA LA LAVAVAJILLAS DESCRITA EN ESTE MANUAL SE INSTALO
INCORRECTAMENTE O Sl LA LAVAVAJILLAS NO ESTA PUESTA A TIERRA
ADECUADAMENTE. NO UTILICE LA LAVAVAJILLAS DESCRITA EN ESTE MANUAL S! NO
ESTA SEGURO/A DE QUE LA ALIMENTACION ELI_CTRICA SE INSTALO CORRECTAMENTE O
QUE LA LAVAVAJILLAS ESTI_ DEBIDAMENTE PUESTA A TIERRA.
INSTRUCCiONES PARA LA PUESTA A TIERRA
Este aparato debe estar puesto a tierra pot medio de un sistema permanente de cableo meta.lico o de un
dispositivo conductor de puesta a tierra instalado con los conductores de circuito y conectado a la borna
de la puesta a tierra del equipo o de la lavavajillas, Consulte el Manual de Instalaci6n que acompa_a esta
lavavajillas para averiguar mas informacion acerca de los requisitos del equipo electrico.
18 INSTRUCCIONES IIVIPORTANTES PARA REDUCIR RIESGOS

Componentes de la Lavavajillas
Sello de la Puerta
Abertura de Ventilacion
Rejilla Superior
Brazo Rociador de
la rejilla Superior
Brazo Rociador de
la Rejilla Inferior
Rejilla Inferior
Surtidor de Detergentey
de Agente de Enjuague
Caracteristicas
Sistema de
Filtracion
(en el piso
interior de la
lavavajillas)
Canasta para los
Cubiertos
r
Placa/Etiqueta con el NOmero
de Modelo y el de Serie
J
Caracteristicas, Accessorios y Opciones
Sensor Automatico TM [Auto Sensor]: Revisa la condici6n
del agua y decide si se necesita un secjundo Ilenado de acjua
dulce.
Sistema de Reducci6n de RuJdoTM [Quiet Guard TM
Supreme]: Un sistema motorizado con dos bombas, el
Motor de Suspensi6n [Suspension Motor] y el aislamiento
triple producen una operaci6n extremadamente silenciosa.
Elemento calefactor oculto: Calienta el agua hasta 161 ° F
[72 ° q.
Secado pot Condensaci6n: El enjuague final realizado a
una temperatura alta, la tina de acero inoxidable a una
temperatura mas baja junto con la acci6n del acjua que se
escurre en forma de laminas gracias al agente del enjuacjue
resulta en un secado hicji_nico, econ6mico y eficiente en el
uso de enercj[a el_ctrica.
Visualizador Numerico Digital: Un visualizador num_rico
de cuenta recjresiva que indica el tiempo que queda para
terminar el ciclo de lavado y que tambi_n se usa para ejecutar
otras opciones.
Sistema de Filtraci6n: Cuatro filtros le asecjuran la
distribuci6n de agua limpia y protecjen la bomba principal y la
bomba de evacuaci6n contra materiales ajenos.
Rejillas de Nailon: Eliminan cortaduras y mellas y los
cjarantizamos por cinco a_os.
Indicador "Llenar con Agente de Enjuague" [Refill Rinse
Agent]: Un sfmbolo en el visualizador Diodo Emisor de Luz
[LED] rotulado como "Refill Rinse Agent" que brilla cuando se
necesita Ilenar de nuevo el surtidor de agente de enjuague.
Indicador "Desinfectado" [Sanitized]: Un indicador "LED"
que certifica que su vajilla esta desinfectada conforme a las
normas de la Organizaci6n Nacional de Sanidad [National
Sanitation Foundation].
Tina Alta de Acero Inoxidable [Stainless Steel Tall
TubTM]: Proporciona una superficie interior inoxidable e
higienica con garanfia de por vida.
Cierre de Agua [Water Shut-Of_: Un dispositivo de
seguridad que interrumpe la circulaci6n del agua de entrada
cuando detecta agua en la base de la lavavajillas.
Accesorios y Opciones
Calor Extra Secante: Aumenta la temperatura del agua de
enjuacjue, Io que resulta en un mejor secado.
Ajuste de Elevaci6n de la rejilla Superior: Le permite
bajar la rejilla superior para que _ste abarque arficulos
grandes, o le facilita elevar la rejilla superior para permitirle
cargar arficulos cjrandes en la rejilla inferior.
Accesorios para las Tazas: Rejillas plecjables para acomoda
tazas o utensilios de cocina cjrandes.
Retardar la Puesta en Marcha [Delay Start]: Le permite
retardar el comienzo del ciclo de lavado por hasta 24 horas.
P_as Plegables en las rejillas Superior e Inferior: Las
pt]as plegables le facilitan la carga.
Ciclo "S61o Rejilla Superior" [Top Tier OnlyTM]: Le ahorra
gastos el_ctricos, de agua y de detergente cuando lava cargas
tan pequeSas que pueden caber totalmente en la rejilla
superior.
Componentes de la Lavadora - Caracteristicas, Accesorios y Opciones 19

Materiales
NOTA: Antes de usar su lavavajillas por primera vez, revise la informacion en esta seccion. Algunos articulos que usted
desea limpiar no estan a prueba de la lavavajillas y deben ser lavados a mano; otros requieren de un acomodo especial.
Pongase en contacto con el fabricante del arficulo si usted tiene dudas acerca de que el uso de la lavavajillas sea
apropiado.
Seguros No Recomendados
Aluminio: El aluminio anodizado de color puede
oscurecerse con el tiempo. Los minerales en su agua
aueden causar que el aluminio se oscurezca o que se
"nanche. Generalmente se pueden quitar estas manchas
usando esponjillas de fibra metalica rellenas de jabon.
Porcelana, Cristal, Cer_mica: Algunas piezas pintadas a
mano pueden perder el color, oscurecerse o mancharse.
Lave estas piezas a mano. Posicione piezas fra.giles de
vidrio de tal modo que no se puedan voltear y que no tengan
contacto con otras piezas durante el ciclo de lavado.
Vidrio: El vidrio opalino puede ponerse amarillo.
Capas antiadherentes: Aplique una ligera capa de aceite
vegetal a las superficies antiadherentes despues del
secado.
Pl_sticos: AsegL]rese que la pieza esta apta para ser usada
en una lavavajillas.
Acero Inoxidable, Plata de Ley, y Plateado: Para evitar
la posible corrosion, coloque las piezas hechas de metales
diferentes de tal modo que no tengan contacto una con la
otra pieza.
Acrilico: Puede ocurrir el craquelado (grietas pequefias en
el acrilico).
Piezas unidas pot adhesivos: Se pueden aflojar los
adhesivos que unen materiales como plastico, madera,
hueso, acero, cobre, estafio, etc.
Utensilios con mango de hueso: Se pueden separar los
mangos.
Hierro: El hierro se oxida. Lave las piezas de hierro a man(;
y sequelas de inmediato.
Piezas no diseSadas para la iavavajillas: Su lavavajillas
esta. disefiada para limpiar SOLO trastes y arficulos de
cocina caseros.
Pewter, Lat6n, Bronce: El pewter se manchara, lave las
piezas de pewter a mano y sequelas de inmediato.
EstaSo: El estafio se oxidar& Lave las piezas de hierro a
mano y sequelas de inmediato.
Madera: Los tazones de madera, utensilios de madera y
piezas con mango de madera pueden agrietarse, doblarse
perder su acabado.
20 Materiales

I. Usando su
A. Preparacion de la Vajilla
1. Instrucciones Generales
a) No haga ningL_n lavado preliminar de los articulos con
suciedad pegada ligeramente.
b) Etimine las particutas grandes de atimentos, los huesos,
semittas, palitlos para los dientes y la grasa excesiva.
c) Usted podrfa tener que poner a remojar y frotar a mano los
articulos con desechos pegados, quemados o
endurecidos.
Como Cargar la Lavavajillas
. Instrucciones Generales
DAhlO A LA LAVAVAJILLAS: Usted corre el riesgo de
da_ar la lavavajillas si introduce objetos o materiales
tal como productos de papel, bolsas de pl_stico,
material de embalaje o cualquier otra cosa que no sea
vajilla o utensilio de cocina normales. No cargue
ning_n articulo en su lavavajillas que no sea vajitla o
utensilio de cocina a prueba de lavavajillas
_) Revise la seccion Materiales de este manual para
asegurarse de que alg0n arficuto en particular se preste a
limpiarse en lavavajillas.
b) Cargue Onicamente articulos a prueba de lavavajillas
[dishwasher-safe] en su lavavajittas.
c) Cargue los articutos de modo que el agua pueda alcanzar
todas las partes de cada articulo.
d) Coloque de modo invertido en las rejillas las ottas,
sartenes, tazas, cuencos y vasos.
e) Separe los arficutos hechos de metales diferentes.
2. Accesorios para la Rejilla Superior
Ajuste Autom_tico de la Attura de la Rejilla Superior
Se puede etevar la rejilta superior para acomodar articulos hasta
de 8" (20cm) en ta rejilla superior y 14" (36cm) en la rejilla inferior,
o se puede bajar para acomodar articulos hasta de 10" (25cm) en
la rejitla superior y 12" (30cm) en la rejitla inferior.
Para bajar la rejilla superior:
a) Jate la rejitta superior hacia afuera de la lavavajillas hasta que
se detenga.
b) Presione las palancas azutes de Ajuste Automatico hacia
adentro como se muestra en la Figura 1. La rejilla bajara a su
posicion inferior.
Para elevar la rejilla superior:
c) Jale la rejilla superior hacia afuera de la lavavajillas hasta
que se detenga.
d) Agarre la rejilla por su oritta superior arriba de las patancas
de Ajuste Automatico y jatela hacia arriba como se muestra
en la Figura 2 hasta que tas palancas de Ajuste Automatico
se traben en su sitio (no se necesita oprimir tas palancas
para poder elevar la rejilla).
Lavavajillas
2
NOTA: Antes de volver a meter la rejitla superior en la lavavajiltas,
aseg0rese que ta altura de la rejilla sea la misma en ambos
lados. De otro modo no cerrara la puerta de la lavavajitlas y no se
conectara el brazo rociador de la rejittasuperior al circuito de agua.
e) Empuje la rejilla superior de vuetta hacia adentro de la
lavavajillas.
P_as Plegables de la Rejilla
Las pOas plegables se doblan hacia abajo para facilitar la carga
en ciertas ocasiones.
f) Agarre la varilla de la pOa como se muestra en la Figura 3 y
dobte las pOas hacia abajo.
Accesorios para las Tazas
a) Agarre los Accesorios para las Tazas como se muestra en
la Figura 4, y dobtelos hacia abajo.
4
b) Acomode las tazas de modo invertido en los Accesorios
para las Tazas. Los estantes pueden acomodar tambien
utensilios grandes para cocinar.
3. Como Cargar la Rejilla Superior
NOTA: Revise la seccion Opciones de la Lavavajillas de este
manual para averiguar informacion acerca del ciclo Soto
Rejilla Superior [Top Tier OnlyTM].
a) La Figura 5 muestra vajilla tipicamente variada y cargada en
la rejitta superior.
Preparaci6n de la Vajilla C6mo Cargar la Lavavajillas 21

Usando su Lavavajillas..conlinuacion
5
b) La Figura 6 muestra un modelo de carga en la rejitla
superior para un juego de vajilla para 10 personas.
c) La Figura 7 muestra un modelo de carga en la rejitla
superior para un juego de vajilla para 12 personas.
Jgo. de Vajilla
para 12
Personas
! t .....................
NOTA: Cuando reintroduzca la rejitla superior hacia adentro de
la lavavajillas, emp0jeto hasta que se detenga contra la pared
trasera de la tina. De otro modo, el brazo rociador de la rejilta
superior podrfa fatlar en conectarse al sistema de
atimentacion de agua.
d) Ya que la rejitta superior este cargado, emp0jelo hacia
adentro de la lavavajitlas.
4. Accessorios de la rejilla Inferior
P_as Plegables de la rejilla
Las p0as plegables se dobtan hacia abajo para facititar la
carga en ciertas ocasiones.
f) Agarre la varitla de la plea como se muestra en la Figura 8 y
dobte las pOas hacia abajo.
8
5. Como Cargar la rejilla Inferior
NOTA: Mantenga libre la abertura de ventilacion en la pared
derecha de la tina por medio de acomodar piezas altas (tat
como las tablas de plastico para cortar alimentos o las
I,_minas para homear gatletas) en el lado izquierdo o en la
parte trasera de la rejilla inferior.
a) Acomode los artfcutos grandes en la rejitla inferior. Cargue
las ollas y cazuelas de modo invertido. La Figura 9 muestra
una carga tfpicamente variada acomodada en la rejitla
inferior.
9
s
J
b) La Figura 10 muestra un modelo de carga de un juego de
vajilla para 10 personas en la rejilla inferior.
10
Jgo. de Vajitta
para 10
Personas
c) La Figura 11 muestra un modelo para la carga de un juego
de vajilla para 12 personas en la rejilla inferior.
11
Jgo. de Vajilta
para 12
Personas
d) Ya que la rejilta superior este cargado, empQjelo hacia
adentro de la lavavajittas.
22 C6mo Cargar la Lavavajillas

Usando su Lavavajillas..continuaci6n
3. C6mo Cargar Articulos Extra Altos
Cuando un art[culo esta muy alto para quedar en la rejilla
inferior a0n con la rejilta superior en la posicion elevada:
a) Extraiga la rejilla superior vac[o por medio de jatarto hacia
afuera de la lavavajiltas hasta que se detenga.
b) Jale hacia arriba y hacia afuera la oritla delantera de la rejitla
hasta que los rodiltos queden comptetamente libres de los
rietes gu[as. Guarde la rejilla al lado.
c) Empuje los rieles gu[as de nuevo hacia adentro de la
lavavajillas.
d) Encaje el Rociador para Arficulos Extra Altos [Extra Tall Item
Sprinkler] en la salida de agua para la rejilla superior y dele
vuelta al sentido det reloj hasta asentarlo en su posicion
como se muestra en la Figura 12.
Para extraer el rociador y restablecer la lavavajillas a su
condici6n normal:
t) Dele vuelta al rociador en el sentido contrario del retoj y
qu[telo de la salida que alimenta agua a la rejilla superior.
g) Busque la rejitla superior.
h) Incline la oritla detantera de la rejilta hacia arriba y acomode
los rodiltos en los deles gu[as.
/) Siga empujando la rejilta hacia adentro hasta que todos los
rodiltos se acomoden en los rieles.
2) Empuje la rejilta superior hacia adentro de la lavavajillas.
7. C6mo Cargar la Canasta para los Cubiertos
12
NOTA" Mantenga libre el paso a la abertura de ventilacion que
se encuentra en la pared derecha de la tina por medio de
acomodar art[culos altos (como las tablas de ptastico para
cortar atimentos y las laminas para hornear galletas) en et
tado izquierdo, el trasero o hacia et centro de la rejilla inferior.
e) Acomode los art[culos extra altos en la rejilla inferior como
se muestra en la Figura 13.
13
DANO A LA LAVAVAJILLAS: Usted puede dafiar la
lavavajillas si intenta reinstalar la rejilla superior antes de
quitar el rociador para articulos extra altos. No trate de
reinstalar la rejilla superior mientras el rociador este
todavia instalado.
PELIGRO DE HERIRSE: Los cuchillos y otros utensilios
filosos pueden causar heridas graves si se acomodan
con el mango hacia abajo. Mientras sea posible, no
acomode los cucMIIos y otros utensilios filosos con el
mango hacia abajo. No permita que los nihos toquen o
jueguen con los cuchillos y otros utensilios filosos.
a) Mantenga los cuchillos y otros utensilios filosos fuera del
alcance de los ni_os.
NOTA: Las tapaderas de las canastas para los cubiertos se
pueden dobtar hacia arriba para poder acomodar art[cutos
grandes o los de forma irregular.
b) Con las tapaderas dobtadas hacia abajo, cargue ta
canasta para los cubiertos seg0n el modelo indicado en ta
Figura 14. Acomode los cuchiltos con el mango hacia arriba
pero los tenedores y cucharas con el mango hacia abajo.
14
5 It 4 II 3
5 II 4 II 3
1
c) En caso de que tenga que cargar art[culos grandes o
algunos de forma irregular en la canasta para los cubiertos
(con la tapadera hacia arriba), acomodetos de modo que
no se aniden y as[ impidan et efecto de los chorritos de
agua. Acomode los cuchillos y otros utensitios fitosos con
el mango hacia arriba.
d) La canasta se parte por Io largo Io que resulta en dos
mitades que se pueden colocar en una variedad de
posiciones en la rejilla inferior y as[ facilitar la carga.
C6mo Cargar la Lavavajillas 23

Usando su Lavavajillas..continuaci6n
Para Partir la Canasta Flexible para los Cubiertos:
e) Agarre la canasta y deslice las dos mitades en direcciones
opuestas como se muestra en la Figura 15A y separe las
dos mitades como se muestra en la Figura 15B.
15
C. Como ASadir Detergente y Agente de
Enjuague
1. Detergentes
DA_IO A LA LAVAVAJILLAS: El uso de productos para lavar
la vajiila a mano podr{a dahar su lavavajillas. No utilice
estos productos en su lavavajillas.
DANO A LA VAJILLA: Demasiado detergente en agua muy
blanda puede rayar la cristaler{a tal como si fuera agua
fuerte. Evite usar demasiado detergente si el agua es
blanda.
a) Use Onicamente detergentes en potvo para uso en
lavavajitlas.
b) La copa para detergente en el surtidor tiene rayas que miden
la cantidad de detergente cada 15 y 25 mitititros. 45 ml de
detergente ltena la copa totatmente.
NOTA: Si usted no sabe si el agua es blanda o dura, empiece
on 15 ml de detergente. Aumente la cantidad de detergente, si
es necesario, hasta la cantidad mfnima que se necesita para
reatizar la limpieza de su vajitla y los utensilios de cocina.
c) Guiese por las rayas de medicion en la copa para detergente
en el surtidor para verter la cantidad adecuada de detergente
recomendada en la Tabta 1.
Tabla 1 =Cantidad Recomendada de Detergente
La Figura 16 muestra atgunas sugerencias de donde
cotocar las dos mitades en la rejilta inferior.
16
Ciclo de Unidad de
Dura Nlediana Suave
Lavado Nledicibn
_3/4
ml 25-45 25 15-25
Lavado
Normal
Cuchara 1-3/4 to 3-1/2 1-3/4 1 to 1-3/4
ml 15-25 15 15
Lavado
R_pido Cuchara 1 to 1-3/4 1 1
2. Agentes de Enjuague [Rinse Agents]
a) Siempre use un agente de enjuague Ifquido, aOn si su
detergente tambien contenga algL_n agente de enjuague o
aditivo para el secado.
3. El Surtidor (Est_ndar [StandardJ) de Detergente y de
Agente de Enjuague
C6mo Llenar el Surtidor de Detergente
a) Si se cierra la tapa det surtidor, ,_brata presionando la pestaSa
azut en la direccion de la fiecha como se muestra en la Figura
17.
17
b) Llene la copa para el detergente como recomienda ta Tabta 1.
C6mo A_adir Detergente y Agente de Enjuague
24 C6mo Cargar la Lavavajillas

Usando su Lavavajillas..continuaci6n
c) Cierre la tapa del surtidor de detergente deslizando la tapa
hacia la izquierda y presionandola firmemente hasta que se
enganche como se muestra en la Figura 18.
18
Se abrira la tapa durante et cicto para surtir et detergente.
Llenar el Surtidor del Agente de Enjuague
d) Abra el surtidor del agente de enjuague presionando sobre la
estrelta en la tapa con su dedo fndice mientras levanta la
pestaRa con su putgar como se muestra en la Fig. 19.
19
e) Ltene et surtidor con agente de enjuague en forma licuida
como se muestra en la Figura 20A hasta que el tanque quede
Ileno.Limpie cualquier exceso del agente de enjuague que
quede como charco cuando el deposito esta Iteno.
2O
A
B
/) Devuetva la tapa del surtidor de agente de enjuague a su
posicion como cerrada y oprimala hasta que se encaje
repentinamente.
NOTA: La Figura 20B representa el tanque de agente de
enjuague completamente vacfo.
g) Ltene de nuevo el surtidor de agente de enjuague cuando el
indicador de nivel del tanque empiece a mostrar un fondo de
color plata con rayas negras como se muestra en la Figura
20B o cuando et indicador de Llenar con Agente de Enjuague
[Refill Rinse Agent] brilte en el panel de control.
NOTA" El Indicador de Llenar con Agente de Enjuague se apaga
dentro de unos pocos minutos despues de que se cierre la
3uerta de la tavavajillas.
C6mo Ahadir Detergente y Agente de Enjuague
Regulador del Surtidor de Agente de Enjuague
La cantidad de agente de enjuague introducida puede controlarse
para evitar manchas redondas yen forma de rayos, El Regutador
del Surtidor de Agente de Enjuague que se muestra en la Figura 1
se despacha de nuestra fabrica calibrado a 4.
21
Para ajustar la cantidad de agente de enjuague introducida:
h) Abra la tapadera det surtidor de agente de enjuague.
/) Si la vajilta resutta con manchas en forma de rayos, ajuste et
regulador a un n0mero mas bajo.
j) Si la vajilla resutta con manchas redondas, ajuste el
regulador a un n0mero mas alto.
D. C6mo Funciona la Lavadora
1. Seleccionar el Ciclo de Lavado Correcto
a) Articulos con residuos endurecidos por et horno o muy
pegados requieren del Lavado de Fregar [Scrub Wash] y
posibtemente deben ser remojados y restregados a mano
antes de colocarlos en la tavavajillas.
b) El ciclo de Lavado Normal [Normal Wash] limpia a fondo
cargas grandes con suciedad ordinaria pegada ligeramente.
c) Para lavar la vajilla, cristaleria o los cubiertos delicados o de
gran valor, u otros articulos especiales, seleccione el cicto
Porcelana/Suave [China/Gentle] despu_s de haber
consultado la secci6n Materiates de este manual. La mejor
manera de limpiar estos arficulos podr[a ser a mano.
d) Para la vajilla con poca suciedad, intente el Lavado R#.pido
[Quick Wash].
e) El ciclo Remojar [Rinse] le permite guardar una carga
pequeRa en la lavavajitlas hasta que la pueda completar con
mas vajilla.
f) O por otra parte, una carga peque_a que cabe totalmente en
la rejitla superior puede lavarse a fondo con el cicto S61o
Rejilla Superior [Top Tier OnlyTM].
Se incluye mas informaci6n referente a los ciclos de lavado de
las lavavajillas en la secci6n Datos Acerca de la Duraci6n de los
Ciclos y del Consumo de Agua en este manual.
Revise la secci6n de las Opciones del Ciclo de Lavado en este
manual para informaci6n sobre el cicto de S61o Rejilla Superior
[Top Tier OnlyTM], Retardar el Inicio, y Calor Adicionat de Secado.
2. C6mo Poner en Marcha a la Lavadora
a) Abra la puerta de la tavavajitlas s61o Io suficiente como para
exponer los botones de control.
b) Pulse et bot6n "On/Off" (Prender/Apagar) como se muestra en
la Figura 22.
c) Pulse el boton que corresponde al ciclo de lavaclo que Ud.
prefiere.
d) Cierre la puerta de la lavavajillas.
e) La lavavajitlas se pondra en marcha y seguira funcionando
hasta que termine et cicto seleccionado.
Ya que la lavavajittas este funcionando, mantenga la puerta de la
tavavajillas cerrada hasta que termine el ciclo de lavado.
C6mo Funciona la Lavavajillas 25

Usando su Lavavajillas..continuaciOn
3. Indicador "Rellenar el Agente de Enjuague"
Llene et surtidor del Agente de Enjuague cuando aparece el
mensaje Reltenar el Agente de Enjuague como se muestra en
la Figura 23.
23
4. Indicador "Desinfectado"
El indicador de Desinfectado aparece en la pantalla del panel
de control como se muestra en la Figura 24.
24
Cuando se ilumina el indicador de Desinfectado, esto quiere decir
que sus trastes han sido desinfectados de acuerdo a normas
muy estrictas del tiempo de lavado y temperatura del agua. Estas
normas para satubridad son impuestas por la Fundacion
Nacional de Salubridad (National Sanitation Foundation) (NSF) y
vienen explicadas en et documento ANSI/NSF 184, Lavavjillas
Domesticas. Ud. puede encontrar mas informacion sobre las
normas NSF en ta pagina Web de NSF en: http://
www. nsfconsume r.o rg/home/appliances.asp.
Los ciclos de la lavavajitlas que estan certificados pot NSF son
Lavado de Fregar [Scrub Wash], Lavado Normal [Normal Wash] y
Porcetana Suave [China Gentle]. AI terminar estos ciclos, se
ituminara el indicador "Desinfectado" en et panel de control de su
lavavajiltas
Nora: Cuando et suministro de agua en su casa esta muy
catiente, se puede reducir et tiempo de calentamiento de su
lavavajitlas y es posibte que no se ilumine et indicador o
sfmboto de "Desinfectado'. Et manual de instalacion de su
lavavajitlas contiene informacion sobre la temperatura
recomendada para el suministro domestico de agua caliente.
3. C6mo Interrumpir un Ciclo
NOTA: En caso de que usted necesite interrumpir un ciclo (tat
como para cargar o sacar alg0n articulo, para aSadir
detergente, etc.), es preferibte que Io haga dentro de los
primeros 30 minutos de la puesta en marcha.
a) Pulse et boton On/Off [Prender/Apagar] para detener la
lavavajillas
PELIGRO DE QUEMARSE: Usted podria sufrir quemaduras
graves si abre la puerta r_pidamente durante el ciclo de
lavado o el de enjuague. Espere por Io menos 10
segundos o hasta que cese el ruido del agua antes de
abrir la puerta cornpletarnente.
......................................................................................
b) Espere pot Io menos diez segundos o hasta que cese el
ruido del agua antes de abrir la puerta de la lavavajillas.
c) Para reactivar el ciclo, cierre la puerta de la lavavajillas. La
lavavajittas se pone en marcha automaticamente y contin0_
el ciclo.
.
a)
C6mo Cancelar o Cambiar un Ciclo
Para cancetar o cambiar un ciclo, mantenga pulsado los
dos botones rotutados "Cancelar Drenaje" pot dos
segundos como se muestra en la Figura 25 hasta que el
indicador digital muestre "0".
25
b) Espere aproximadamente un minuto antes de pulsar el
boton "On/Off" (Prender/Apagar).
c) Ahora usted puede poner otro ciclo en marcha.
E. Opciones del Ciclo de Lavado
1. Ciclo S61o Rejilla Superior [Top Tier Only TM]
Esta opcion le permite ahorrar energia y agua al lavar cargas
suficientemente pequeSas para Ilenar solo la rejilta superior.
Nota: Esta opcion no reduce el tiempo de lavado.
Para usar el cido S61o Rejilla Superior [Top Tier Only]
a) Cargue la rejilla superior.
b) Pulse el bot6n On/Off [Prender/Apagar].
c) Pulse el bot6n det ciclo de tavado deseado.
d) Pulse el boton Soto Rejilla Superior [Top Tier Only].
2.. Retardar la Puesta en Marcha [Delay Start]
Esta opcion le permite retardar la puesta en marcha del ciclo
que seleccion6 pot un plazo maximo de 24 horas.
a) Pulse el boton "On/Off" [Prender/Apagar].
b) Pulse y oprima el boton "Delay Start", como se muestra en I_
Figura 26, hasta que et visualizador LED proyecte el nOmero
de horas de retraso que usted prefiere.
26
c) Pulse el boton que corresponde al ciclo que prefiere. Usted
puede cambiar et plazo del retraso y/o su seleccion de cicto
en cualquier momento durante et curso det retraso.
26 C6mo Afiadir Detergente y Agente de Enjuague C6mo Funciona la Lavavajillas

Usando su Lavavajillas..continuaci6n
F. C6mo Secar la Vajilla
Cuando termina el cicto, la lavavajillas deja de funcionar y
empieza un periodo de secado por condensaci6n (se averigua
mas informacion acerca det Secado por Condensacion
[Condensation Drying] en la seccion Caracter/sticas, Opciones
y Accesorios de este manual). Despues de 12 a 15 minutos
de secado,
= el visuatizador LED indica "0",
= la luz "Sanitized" (Desinfectado) britla (salvo durante
los dos ciclos "Lavado Rapido" y "Remojar y
Retener").
G. Calor Extra Secante
Con esta opcion usted puede elevar la temperatura det agua
de enjuague, Io que resulta en un secado mejor y mas rapido.
a) Pulse y optima el bot6n mas a la izquierda de los dos
rotulados "Cancel Drain" (Cancelar Evacuar), como indica la
Itustracion 27, despues pulse y oprima el boton "On/Off"
(Prender/Apagar).
27
Cuando el visualizador LED indica "0" o "1", quite los dedos de
los dos botones.
b) Para activar el Cator Extra Secante, oprima el bot6n "Cancel
Drain" mas a la izquierda hasta que el visualizador LED
indique "1".
c) Para desactivar el Calor Extra Secante, optima el boton
"Cancel Drain" mas a la izquierda hasta que el visualizador
LED indique "0".
d) Pulse et boton "On/Off". Ahora puede lavar sus trastes
como siempre
H. Como Descargar la Lavadora
1. Instrucciones Generales
POSIBLE QUEIVlADURA: La lavavajillas est_
caliente inmediatamente despues del ciclo de
lavado. No saque la vajilla lavada inmediatamente
despues del ciclo de lavado.
a) Descargue primero la rejilta inferior.
b) Descargue las canastas para los cubiertos. Se pueden
sacar sin esfuerzo para facilitar la descarga de Io dem_Ss.
c) Descargue la rejilla superior.
d) Si instalo el Rociador para los Artfcutos Extra Altos,
restabtezca la lavavajiltas a su condicion normal (consulte
las instrucciones de Como Cargar Articulos Extra Altos en la
seccion "Como Cargar la Lavavajiltas" de este manual).
C6mo Secar la Vajilla C6mo Descargar la Lavavajillas 27

II. Cuidado y Mantenimiento
_. Tareas de Mantenimiento
Reatice et siguiente mantenimiento para asegurar un continuo
funcionamiento superior de su lavavajiltas Kenmore:
, Secar derrames de agua
. Preparar su lavavajillas para el invierno
, Revisar/limpiar las boquillas de los brazos rociadores
. Limpiar la cara interior de ta puerta y de la tina,
fabricadas de acero inoxidable.
, Revisar/timpiar el sistema de filtracion
= Limpiar la cara exterior de la puerta
• Limpiar el setlo de la puerta
1. Secar Derrames de Agua
Ocasionalmente, agua se derrama o se salpica de su
lavavajiltas, particularmente cuando se abre la puerta y se
interrumpe un ciclo de operacion. Seque inmediatamente el
agua que se salpica de su lavavajitlas.
2. C6mo Preparar su Lavavajillas para el Invierno
En caso de que su lavavajiltas quedara sin usarse durante un
plazo largo en un sitio expuesto a temperaturas gtaciales (pot
ejempto en su casa de campo o en su hogar durante un viaje),
usted deberia evacuar toda el agua en el interior de la
lavavajillas.
a) Cierre la alimentaci6n de agua.
b) Desprenda la manguera de evacuacion y permita que toda
et agua en la lavavajitlas se evacL_e en una cubeta u otto
recipiente adecuado.
3. Revisar/Limpiar las Boquillas de los Brazos
Rociadores
De vez en cuando examine los brazos rociadores para verificar
que las boquiltas rociadoras no esten tapadas. Usted debe
extraer los brazos rociadores para poder revisar que no esten
obstruidos.
E×traer el brazo rociador superior:
a) Saque de ta lavavajitlas la rejilta superior vacfo.
b) Invierta la rejitla. Et brazo rociador superior esta sujetado
con una contratuerca como se muestra en la Figura 28A.
Dele a la tuerca 1/8 de la vuetta al sentido contrario del reloj
y quitela, como se muestra en la Figura 28B, para sottar el
brazo rociador.
PELIGRO A LA SALUD =PROPAGACION DE MOHO: El agua
estancada cerca o debajo de la lavavajillas puede
promover la propagaci6n de moho que podr_a perjudicar
la salud y da_ar los materiales estructurales de su
hogar. No permita que et agua derramada permanezca
cerca o debajo de su lavavajillas.
POSIBILIDAD DE DAklAR LA LAVAVAJILLAS: Las
temperaturas glaciales pueden dahar su lavavajillas. No
permita que permanezca agua en el sistema de agua que
alimenta la tavavajillas o en el sistema de evacuaci6n
sujetos a temperaturas congelantes.
c) Desprenda el brazo rociador como se muestra en la Figura
29.
29
d) Revise que las boquillas rociadoras no esten obstruidas.
e) Si se necesita destapar las boquiltas, limpietas bajo un
chorro de agua.
Reinstatar el brazo rociador superior:
t) Reacomode el brazo rociador en su posicion como
instalado.
g) Reacomode ta contratuerca en su posicion como instalada
y dele 1/8 de la vuelta al sentido del reloj.
h) Reacomode los rodiltos de la rejilla superior en los rieles
gufas.
28
E×traer el brazo rociador inferior:
0 Saque de la tina de la lavavajillas la rejitla inferior vacio.
j) Agarre y jate hacia arriba el brazo rociador inferior como se
muestra en ta Figura 30.
3O
k) Revise que las boquitlas rociadoras no esten obstruidas.
/) Si se necesita destapar las boquiltas, limpielas bajo un
chorro de agua.
Reinstalar el brazo rociador inferior:
m) Reacomode et brazo rociador inferior en su posicion como
instalado y oprimelo hasta que se encaje repentinamente.
n) Reacomode la rejilla inferior en su posicion como instalado.
28 Tareas de Mantenimiento

Cuidado y Mantenimiento...continuaci6n
4. Revisar/Lirnpiar ia Cara interior de la Puerta y de ia
Tina Hechas de Acero inoxidable.
a) Limpie las orillas det panel interior habituatmente para
eliminar desechos que se acumulan durante el proceso de
cargar la vajitla.
b) Cuando se forman manchas en la tina o en el panel interior
de la puerta, Ilene el tanque de agente de enjuague.
5. Revisar/Limpiar ei Sisterna de Filtraci6n
Su lavavajiltas cuentan con un sistema de fittracion que se
compone de una ensambladura Separador de Objetos
Grandes/Filtro Citindrico y de un Filtro Fino. Et sistema de
fittracion se instalo en el piso de la lavavajillas para facilitar el
acoeso.
Normalmente el sistema de filtracion se limpia a si mismo, sin
embargo, de vez en cuando usted deberia revisarlo para
eliminar objetos ajenos y limpiarlo cuando sea necesario.
Para Extraer la Ensambladura Separador de Objetos
Grandes/Filtro Cilindrico:
a) Saque la rejilla inferior.
b) Agarre la ensambladura como se muestra en la Figura 31 y
dele 1/4 de la vuelta al sentido contrario del reloj.
31
c) Jate la ensambladura hacia arriba para extraerla tal como
se muestra en la Figura 32.
32
Para Extraer el Filtro Fino y el Microfiltro:
e) Levante et Filtro Fino para quitarto det piso de la lavavajillas
como se muestra en la Figura 33 y Ifmpielo bajo un chorro
de agua.
33
Para reinstalar el sistema de filtraci6n:
t) Reacomode el Filtro Fino en su posicion como instalado.
g) Acomode la Ensambladura Separador de Objetos Grandes/
Filtro Citindrico en su posicion como instalada en el piso de
la lavavajillas.
h) Dele un 1/4 de la vuetta en et sentido del retoj a la
agarradera de anillo hasta que se tranque. La fiecha en la
agarradera de anitlo y la fiecha en et Filtro Fino deben apun-
tarse una a la otra, como muestra el circuto en la Figura 34.
34
/) Delicadamente jale la agarradera para verificar que la
Ensambladura este instalada correctamente.
6. Limpiar la Cara Exterior de la Puerta
POSIBILIDAD DE DAklAR LALAVAVAJILLAS: Productos
quimicos c_usticos, limpiadores abrasivos, estropajos (sean
de metal o de pl_stico), toallas abrasivas de tela o de papel
pueden dahar ia cara exterior de la puerta de la lavavajillas.
No use quimicos c_usticos, limpiadores abrasivos,
estropajos (sean de metal o de pt_stico), toallas abrasivas de
tela o de papel para limpiar el panel exterior de la puerta.
Puertas Pintadas
a) Use 0nicamente un paso suave ligeramente humedecido con
agua enjabonada.
d) Examine cuidadosamente la ensambladura. Si nota
desechos en el Separador de Objetos Grandes, inviertalo y
dele un golpe ligero en alguna superficie tat como una
mesa para desatojar y eliminar los desechos. Limpie el
Fittro Cilfndrico bajo un chorro de agua.
Puertas de Acero Inoxidabte
a) Use un paso suave con un limpiador no abrasivo
(preferiblemente en forma liquida suministrado a traves de un
atomizador) fabricado especialmente para limpiar el acero
inoxidable. Para realizar los mejores resultados, primero moje
et paso con el limpiador de acero inoxidabte para despues
pasarlo pot la superficie.
7. Limpiar el Sello de la Puerta
a) Limpie habituatmente et setlo de la puerta con un paso mojadc
para eliminar las particulas de atimentos y los otros desechos
que sete hayan pegado.
Tareas de Mantenimiento 29

Datos Acerca de la Duraci6n de los Ciclos y del Consumo de Agua
El Simbolo de la NSF
Una lavavajillas o un ciclo de la lavavajillas que exhibe el
simbolo NSF ha sido certificada/o por la Fundacion
Nacional de Salubridad [_N_ationalS_anitation Foundation --
NSF] por haber cumplido con los requisitos muy rigurosos
de tiempo y temperatura para desinfectar la vajilla y los
utensilios de cocina. Estos requisitos se explican en el
documento referente a Lavavajillas para Uso Residendial
ANSl/NSF 184, "Residential Dishwashers". Averig0e ma.s
informacion acerca de la Certificacion NSF en el sitio web:
http://www.nsfconsu mer.org/home/appliances/asp.
Su lavavajillas gano la Certificacion de la NSF. Los ciclos de
la lavavajillas que estan certificados por NSF son Lavado de
Fregar [Scrub Wash], Lavado Normal [Normal Wash] y
Porcelana Suave [China Gentle]. AI terminar estos ciclos, se
iluminara el indicador "Desinfectado" en el panel de control de
su lavavajillas.
NOTA: Cuando el suministro de agua en su casa est#. muy
caliente, se puede reducir el tiempo de calentamiento de su
lavavajillas yes posible que no se ilumine el indicador o
simbolo de "Desinfectado". El manual de instalacion de su
lavavajillas contiene informacion sobre la temperatura
recomendada para el suministro domestico de agua
caliente.
CICLOS CERTIFICADOS
Lavado de Fregar: Quita residuos endurecidos por el
horno o desechos muy pegados de la vajilla.
Lavado Normal: Para cargas normales diarias con
restos alimenticios pegados sin haberse secado.
Porcelana Suave: Ahorra agua y energia mientras quita
restos alimenticios no pegados de vajillas delicadas.
Lavado Rapido: Un ciclo de 35 minutos que limpia
articulos no muy sucios como vasos de vidrio y tazas
para cafe.
Enjuague: Enjuaga y mantiene cargas peque_as hasta
que usted Ilena la maquina.
Certificado por 1
ANSl/NSF 184
Datos Acerca de la Duraci6n de los Ciclos y del Consumo de Agua
NOTA: La duracion de los cictos y et consumo de agua
dependen en gran parte de la temperatura del agua
suministrada por su casa y del tipo de carga para lavarse. Por
consiguiente, las duraciones y cantidades notadas en esta
tabla son aproximadas.
Lavado Lavado Porcelana Lavado
de Fregar Normal Suave Rapido Enjuage
l'l]empo Aprox
de Ciclos en 126 108 90 35 10
minutos
Consumo Minimo 5.7 3.2 3.3 3.3 1.2
Aproximado
de Agua en
galones Maximo 7.6 7.6 3.7 3.7 1.4
Consumo Minimo 21 16.8 13.8 11.8 4.8
Aproximado
de Agua en
litros Maxi mo 28.8 28 14 14 5.3
Temperatura Lavado 9F 1619 1409 1209 1209 Agua no
caliente
Temperatura Enjuague 9F 1619 1559 1559 1409 Agua no
caliente
30 Informaci6n de los Ciclos de Lavado

Como Resoiver Problemas
Pot favor consulte esta tabla para resolver problemas antes de solicitar servicio.
PROBLElVlAS SOLUClONES
La vajilla no se seca Et surtidor de agente de enjuague podria estar vacio. Reviselo y Ilenelo de nuevo si es
necesario. El secado de la vajilta puede acelerarse y mejorarse por medio de abrir la
puerta de la lavavajillas un poquito y detenerla abierta con la rejilla superior.
Las lutes Jndicadoras no Pudo haberse fundido un fusible o un cortacircuitos pudo haber interrumpido la corriente.
britlan Revise los fusibles o los cortacircuitos de su habitacion en la caja de fusibles/
cortacircuitos y cambie el fusible o restabtezca el interruptor si es necesario.
La lavavajillas no se pone Tal vez no se cerro bien la puerta de la lavavajillas. Revise que la puerta de la lavavajiltas
en marcha este bien cerrada y trancada.
La lavavajillas sigue
funcionando mucho tiempo
Si la lavavajitlas termina et cicto pero el tiempo de funcionamiento parece ser demasiado
largo, se puede deber esto a la entrada de agua frfa. Antes de poner en marcha la
lavavajitlas, abra la Itave de agua catiente en el fregadero mas cerca a la lavavajillas. Deje
la Itave abierta hasta que salga agua caliente, luego cierre la Itave del agua y ponga la
lavavajiltas en marcha.
Et ciclo de lavado no avanza
al de enjuague
NOTA: El Manual de Instalaci6n que acompa_a a su lavavajiltas le ayudara con las
instrucciones siguientes:
El conducto de atimentaci6n de agua podria estar cerrado. Revise la valvula de la fuente
de agua y abrala siesta cerrada. O la entrada de agua podrfa estar tapada. Guiandose
pot el Manual de Instalacion que se incluye con su lavavajillas, cierre la alimentacion de
agua a la lavavajillas, quite el panel de pie de ta lavavajitlas, la manguera o el conducto de
atimentacion de agua y el tubo acodado de 90°, y revise que la entrada de agua no este
tapada por alg0n desecho. Si encuentra material ajeno, trate de extraerto con pincitas o
tenacitlas. Despues reinstale et tubo acodado de 90°, la manguera o et conducto de
alimentacion de agua y el panel de pie, y abra la alimentacion de agua a la lavavajilta.
El agua no se evac_a de la
lavavajillas
Revise que la manguera de desagQe no este torcida, obstruida o instalada
incorrectamente. Aseg0rese de que una porcion de la manguera de desagQe este por Io
menos a 20" (50 cm.) arriba det piso del gabinete de la lavavajillas (vease el Manual de
Instatacion). Los fittros podrfan estar obstruidos. AsegOrese de que el sistema de
filtracion no este tapado (vease la seccion Cuidado y Mantenimiento de este manual). El
desagQe de la pila en ta cocina podrfa estar tapado. Usted podrfa tener que acudir a un
plomero mas bien que a un tecnico de reparaciones de lavavajillas. Si se instalo un
dispositivo con espacio de aire [air gap] en la pila, este podrfa estar tapado.
No se cierra la tapa del
surtidor de detergente
Tal vez no cierra bien la tapa det surtidor de detergente, o no se termin6 un ciclo y se
deberfa cancelar este. Consulte la seccion de Como A_adir Detergente y el Agente de
Enjuague en este manual para las instrucciones de como cerrar la tapa del surtidor.
Consutte la seccion de Como Operar la Lavavajiltas de este manual para instrucciones
de como cancelar un ciclo.
Manchas blancas en la Se necesita mas agente de enjuague. Consutte la seccion de Como A5adir Detergente y et
vajilla Agente de Enjuague para instrucciones sobre como aumentar la cantidad det agente de
enjuague.
Rayas en la vajilla de vidrio Se esta aplicando demasiado agente de enjuague. Consutte la seccion Como A_adir
Detergente y el Agente de Enjuague de este manual para las instrucciones de como
aumentar la cantidad de agente de enjuague que surte la lavavajiltas.
Ruido matraqueo Los utensilios no estan acomodados correctamente.
Espurna en la lavavajillas Usted pudo haber utilizado un tipo de detergente incorrecto. Use L_nicamentelos
detergentes fabricados especialmente para uso en lavavajiltas automaticas.
El lavado resulta • Cantidad incorrecta de detergente
insatisfactorio • Los utensilios estan arreglados de modo incorrecto o la rejilla esta sobrecargado
• AIgQn utensilio impide la rotacion del brazo rociador
• Las boquitlas de los brazos rociadores necesitan limpiarse
= Los filtros estan instatados incorrectamente
= Se seleccion6 un cicto inadecuado
C6mo Resolver Problemas 31

Contratos de Protecci6n
En los EE.UU.
Contratos de Protecci6n IVlaestra
_elicidades por esta compra inteligente. Su nuevo producto de
Kenmore® esta diseSado y fabricado para darle muchos aSos
de una operacion confiable. Pero, como es el caso con todos
los productos, puede requerir de un mantenimiento preventivo
o de una reparacion de vez en cuando. Son esos los
momentos, cuando un Contrato de Proteccion Maestra le
puede ahorrar dinero y agravio.
Compre un Contrato de Proteccion Maestra ahora y prot#jase
de molestias y gastos inesperados.
Et Contrato de Proteccion Maestra le ayuda tambien a extender
la vida de su producto nuevo. El contrato incluye Io siguiente:
[] Servicio experto por nuestros 12,000 especialistas
profesionales en reparaciones
[] Servicio ilimitado y sin costo atguno para refacciones y
mano de obra en todas las reparaciones cubiertas por la
garantfa
[] Garant_a "no-lim6n"- se reemptaza su producto cubierto
por la garantfa cuando ocurren cuatro fallas o mas del
producto dentro de doce meses
[] Product replacement if your covered product
can't be fixed
[] Chequeo Anual de Mantenimiento Preventivo a su
peticion - sin costo extra
[] Ayuda r_pida pot telefono - soporte telefonico con un
tecnico de Sears para productos que requieren de la
reparacion en et hogar, ademas programacion
conveniente de la reparacion
[] Protecci6n contra sobretensiones de energfa contra
daRos electricos debido a fiuctuaciones de la corriente
electrica
[] Reembolsos de renta cuando la reparacion de su
producto cubierto por la garantfa toma mas tiempo de Io
prometido.
Una vez que usted compra el Contrato, solo se necesita una
simple Ilamada tetefonica para que usted pueda programar el
servicio. Usted puede Itamar en cuatquier momento de dfa o
noche, o programar una cita de servicio en Ifnea.
Sears cuenta con mas de 12,000 especiatistas profesionales
en reparaciones, que tiene acceso a mas de 4.5 millones de
refacciones y accesorios de calidad. Ese es el tipo de
profesionalismo del cual usted puede depender para
prolongar la vida Otil de su producto nuevo durante muchos
a_os. iCompre el Contrato de Proteccion Maestra ahora!
Aplican algunas limitaciones y exclusiones.
Llame al 1=800=827=6655 para los precios e informaci6n
adicional.
Para la instalacidn profesional de Sears de aparatos
electrodomesticos, abrepuertas del garaje, calentadores de
agua y otros artfculos domesticos en los EE.UU., Itame al 1=
800=4=MY=HOME®
KENMORE ELITEGARANT|A
DEL APARATO
GARANT|A LIMITADA DE DOS AI_IOSPARA ESTA LAVAVAJILLAS
KENMORE EUTE
Cuando se instala, opera y mantiene este producto conforme a
todas las instrucciones incluidas, si este aparato falla debido a
un defecto en material o fabricacion dentro de dos aSos a partir
de la fecha de compra, tlame a 1-800-4-MY-HOME® para
solicitar una reparacion sin costo.
GARANT|A LIMITADA DE CINCO AI_IOSPARA LA REJILLA
INFERIOR Y SUPERIOR
Cuando se instala, opera y mantiene este producto conforme a
todas las instrucciones incluidas, durante cinco aSos a partir de
la fecha de compra, Sears reemplazara, las partes para la rejilla
superior o inferior de la lavavajiltas si la rejitta se oxida debido a
materiales defectuosos o una falla en ta fabricacion. Despues
del segundo aSo los gastos de la mano de obra para
reemplazar una rejilla corren por cuenta det ctiente.
GARANT|A LIMITADA POR LAVIDA DE LA LAVAVAJILLAS EN
MODELOS KENMORE ELITECON TINA DE ACERO INOXIDABLE,
CONTRA FUGAS EN LATINAY EN EL PANEL INTERIOR DE LA
PUERTA
Si durante ta vida t3tilde la lavavajitlas ocurre una fuga como
resultado de ta oxidacion de la tina de acero inoxidable o del
panel interior de la puerta, Sears reemplazara, la tina o el panel
sin costo alguno.
Si se usa este aparato para propositos diferentes que el uso
particular en et hogar, esta garantfa aplica solamente por 90
dfas a partir de la fecha de compra.
ESTA GARANT|A CUBRE SOLAMENTE DEFECTOS EN MATERIAL
YFABRICACI()N. SEARS NO PAGAR._.:
1. Artfculos prescindibtes que se pueden desgastar del uso normal,
incluyendo pero no limitado a filtros, bandas, focos y botsas.
2. Un tecnico de servicio para enseSarle a usted c6mo instalar,
operar o mantener et producto correctamente.
3. Un tecnico de servicio para limpiar o mantener este producto.
4. DaSos causados at producto o la falla de este, si no esta.
instalado, operado o mantenido conforme a todas las
instrucciones incluidas con et producto.
5. DaSos causados al producto o la falla de este, si resutta de
un accidente, abuso, mat uso o uso para un prop6sito diferente
que el prop6sito intencionado.
6. DaSos causados at producto o la falla de este, si fueron
causados por et uso de detergentes, limpiadores, sustancias
qufmicas o utensitios diferentes de los que se recomiendan en
todas las instrucciones incluidas con el producto.
7. DaSos causados a partes o sistemas o la falla de estos, si
resuttan de modificaciones no autorizadas hechas al producto.
DESCARGO DE RESPONSABILIDAD DE I.AS GARANT|AS
IMPLICADAS; LIMITAClON DE REMEDIOS
El L_nicoy exclusivo remedio del cliente bajo esta garantfa
limitada sera la reparaci6n det producto estipulado en la
presente. Las garantfas implicadas, incluyendo garantfas de
comerciabilidad o aptitud para un proposito particular, esta.n
limitadas a un aSo o el perfodo ma.scorto permitido por la ley.
Sears no sera. responsabte de daSos incidentales o
consecuenciales. Atgunos estados y provincias no permiten la
exclusi6n o timitaci6n de daSos incidentales o consecuenciates,
o limitaciones sobre la duraci6n de las garantfas impticadas de
comerciabilidad o aptitud, asf que tal vez estas exclusiones o
limitaciones no aplican para usted.
Esta garantfa aplica solamente mientras se esta. usando et
aparato dentro de los Estados Unidos y Canad& Esta garantfa
le ofrece derechos especfficos, y usted puede tener otros
derechos que varfan de estado a estado.
Sears, Roebuck and Co., Dept. 817WA, Hoffman Estates, IL 60179
Sears Canada Inc., Toronto, Ontario, Canada M5B 2B8
32 Contratos de Protecci6n Garantfa

Your Home
For repair-in your home-of aH major brand app=iances,
lawn and garden equipment, or heating and cooling systems,
no matter who made it, no matter who sold it!
For the replacement parts, accessories and
owner's manuals that you need to do-it-yourself.
For Sears professional installation of home appliances
and items like garage door openers and water heaters.
1-800-4-M Y-H 0 ME® (1-800-469-4663) iiiiiiiiiii
Call anytime, day or night
Our Home
iiiiiiiiiiiiiiiiiiiii
For repair of carry=in items like vacuums, lawn equipment,
and electronics, call or go onqine for the location of your nearest
Sears Parts .& Repair Center.
1 800 488 1222
Call anytime, day or night
www.sears.com
To purchase a protection agreement
on a product serviced by Sears:
1-800-827-6655
Pard pedir servicio de reparacien
domicilio,ypapao deoa piezas:
-888-SU-aOGA s
(1 =888=784=6427)
9000162235 Rev. A
© Sears,Roebuckand Co.
TM SM
® Registered Trademark / Trademark / Service Mark of Sears,Roebuck and Co.
SM
® March Registrada / TM March de F_brica / March de Servicio de Sears, Roebuck and Co.
6/03
Printed in U.S.A.
Impreso en EE. UU.
-
 1
1
-
 2
2
-
 3
3
-
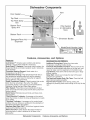 4
4
-
 5
5
-
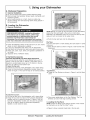 6
6
-
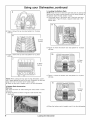 7
7
-
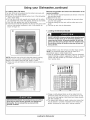 8
8
-
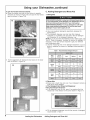 9
9
-
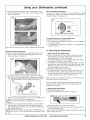 10
10
-
 11
11
-
 12
12
-
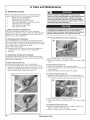 13
13
-
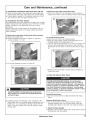 14
14
-
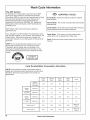 15
15
-
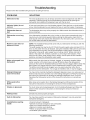 16
16
-
 17
17
-
 18
18
-
 19
19
-
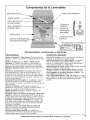 20
20
-
 21
21
-
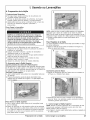 22
22
-
 23
23
-
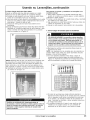 24
24
-
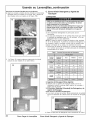 25
25
-
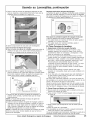 26
26
-
 27
27
-
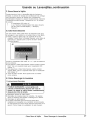 28
28
-
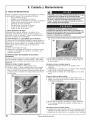 29
29
-
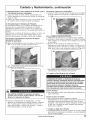 30
30
-
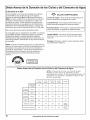 31
31
-
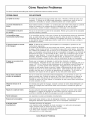 32
32
-
 33
33
-
 34
34


Kenmore 63016303402 El manual del propietario
- Categoría
- Lavaplatos
- Tipo
- El manual del propietario
- Este manual también es adecuado para
en otros idiomas
- English: Kenmore 63016303402 Owner's manual
Artículos relacionados

Otros documentos
-
Bosch SHE43P12UC/56 Guía del usuario
-
 Kenmore Elite 63016303405 El manual del propietario
-
Bosch SHX98M09UC/64 Manual de usuario
-
Thermador DWHD94EP, DWHD94BS, DWHD94BP Manual de usuario
-
-
-
Bosch Appliances Dishwasher SHE47C0 Manual de usuario
-
-
-
Bosch SHE98M02UC/50 Manual de usuario
