
Inflatable Bounce House
USER’S MANUAL
THIS INSTRUCTION BOOKLET CONTAINS IMPORTANT SAFETY INFORMATION. PLEASE READ AND KEEP FOR FUTURE REFERENCE.
EN DE FR ES IT PL

Before You Start
General Warnings:
The product must be installed and used under the supervision of an adult.
Read through each step carefully and follow the proper order.
Remove all packaging, separate and count all parts and hardware.
Please ensure that all parts are correctly installed, incorrect installation can lead to a
danger.
We recommend that, where possible, all items are assembled near the area in
which they will be placed in use, to avoid moving the product unnecessarily once
assembled.
Ensure a secure surface during installation, and place the product always on a flat,
steady and stable surface.
Please check and maintain it regularly, and the most important part needs to be
suspended, fixed, or anchored to the ground.
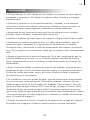
Warnings:
Attention: For home use only.
Attention: The product is not suitable for the children under 3 years
Danger: Keep all small parts and packaging materials for this product away from babies
and children, otherwise they may pose a choking hazard.
Danger: Lack of attachment may cause a risk of tipping or falling hazard.
Please read all instructions carefully and keep it for future reference.
02
EN

INFLATABLE BOUNCER
WARNING!
CAUTION:
KEEP THE INSTALLATION INSTRUCTION FOR FURTHER REFERENCE
PLEASE READ ALL OF THE SAFETY RULES BEFORE SETTING UP
We BELIEVE IN SAFETY FIRST. PLEASE FOLLOW ALL OF THE RULES FOR YOUR
CHILDREN'S SAFETY
ELECTRICALLY OPERATED PRODUCT
ADULT SUPERVISION REQUIRED. OPERATING BLOWER (AIR PUMP) NOT
RECOMMENDED FOR CHILDREN UNDER 12 YEARS OF AGE. AS WITH ALL
ELECTRIC PRODUCTS, PRECAUTIONS SHOULD BE OBSERVED DURING
HANDLING AND USED TO PREVENT ELECTRIC SHOCK.
NOT SUITABLE FOR ADULTS
NOT SUITABL E FOR HIRING OR COMMERCIAL
USE
ADULT SET-UP REQUIRED
ADULT SUPERVISION REQUIRED
WARNUNG!
ONLY FOR DOMESTIC USE. OUTDOOR USE
TO BE USED ON SOFT GROUND ONLY
WARNING!
03
Not suitable for
children under 3 years.
Small parts may be
swallowed.
EN

SET-UP
04
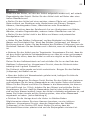
● Check the ground where the product will be set up for any sharp objects or
debris. Do not install the product over concrete or any hard surface.
● Place the product on a soft level surface at least 2 m/ 6.6 ft from any
structure or obstruction such as a fence, garage,and house, overhanging
branches, laundry lines or electrical wires.
● Ensure the play area is free from hazards such as furniture, walls sharp
objects,other hard surfaces, etc.
● Set up the product away from water and any potential fire hazards.
● Keep the blower (air pump) and power cord away from areas of water and
moisture.lf water contacts the blower(air pump), unplug the blower(air
pump)power cord. Do not operate until the blower is completely dry.
● Remove the product from the carry bag. fany, ensure the slide cover coming
with the product is stretched well from top to end.Be sure to place the product
as close to the power source as possible.
● Stretch the inflation tube and attach it to the end of the blower(air pump).
Ensure the iinflation tube is securely attached and in good condition. The
inflation tube should be straight and untwisted. Reposition the blower(air
pump)if necessary.)
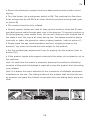
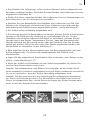
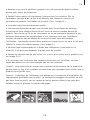
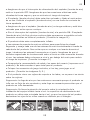
● If the product comes with water bags, please follow the undermentioned
instruction. Otherwise, overleap this point. Spread out the product, place and
fasten the empty water bags on the two sides of the product. Open the stopple
and fill water in the water bags until 80% full ( about 22 kg/ 49 lbs),push and
close the stopple. Make sure water bags are firmly attached to the product and
no water leakage before the product is fully inflated, and never allow children
to play on the slide without installing a water bag. (refer to picture A)
● Push ground stakes through blower base holes. You may need to use a
hammer for proper placement. Make sure the blower(air pump)power switch is
in the OFF position. Ensure the power connections are safely sited and tripping
hazard is minimized.
● The blower(air pump)should be securely sited and affixed to the ground
before use. Plug the blower(air pump)into an approved ground outlet.
EN

05
● Ensure the blower(air pump)is free from debris and securely sited to avoid
tipping.
● Turn the blower (air pump)power switch to ON. The continual air-flow blow-
er(air pump)must be left ON at all times while the product is being used.(refer
to picture B)
● The product should be fully inflated.
● Ground support stakes are used for lawn ground surfaces. Hook and fit each
provided ground stake through each loop in the bouncer. To prevent overturn or
lift during playing, push stakes firmly into the soil. Make sure the hooked end of
the stake is over the loop at all times during use. The stakes should be placed
level with or under the ground to reduce tripping hazards. (refer to picture C)
● Please check the age recommendation and user weights(printed on the
product). You must not exceed the total weight for the product.
● Put the included play accessories if any for playing into the product.(refer to
picture D,E)
● If the product comes with support cushions at the sides, do not stand or sit on
the cushions.
Hint: Air leak from the seams is necessary because the product is inflated by
constant airflow and this leakage is required to stop the product from becoming
over-inflated.
Hint: It is drawn the user's attention to the orientation of inflatable equipment
installation to the sun. The sliding surface of the product shall not face the sun
as sunshine can glare the children's eyes when they are sliding down along the
slide.
EN

TAKE DOWN
MAINTENANCE
06
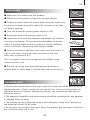
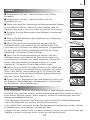
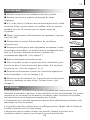
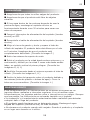
Make sure all children exit the product.
Makes sure the product is free from foreign objects.
If there is water inside the seams after using the water pool
keep the air blower at work for about 30 minutes to dry that
out before packing.
Turn the blower(air pump) power switch to OFF.
Unplug the blower(air pump) power cord.
Loosen the hook and loop fastener and detach the inflation
tube from the blower. The product should deflate on its own
within 5 minutes.Make sure the product is entirely deflated.
(refer to picture F) Remove ground support stakes.
Fold the product in half from both ends, and then fold it in
half 2 more times from both sides,vertically to the first
fold.(refer to picture G,H,I)
Roll it up tightly from the end opposite the inflation tube.
(refer to picture J,K)
Slip the carry bag over the folded product and stakes
(plastic balls or water bags ). Zip the bag.(refer to picture L)
• Checks and maintenance of the main parts of the toys should be carried out of
regular intervals, if these checks are not carried out, the toys could overturn or
otherwise become a hazard. Whenever practical, the instructions shall also be
affixed to the toy.
• The seasonal inspection and maintenance should be conducted for any damage
or leakage of the product.
• The product can be wiped clean with a mild detergent. Keep water away from
the blower(air pump) at all times.
• Do not store the product when wet. Store the product and the blower indoors in
dry conditions when not in use.
EN

REPAIR
07
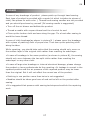
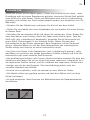
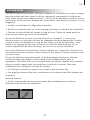
In case of any breakage of productplease patch up through hand sewing.
Each type of product is provided with a repair kit which includes six pieces of
cloth( two pieces for each color ). Threads and sewing needles are not provided
and you should purchase by yourself (3# sewing needle is suggested).
• Turn off the air blower and deflate the product.
• Thread a needle with a spare thread and tie a knot at its end.
• Close up the broken cloth and sew along the gap. Tie a knot after sewing to
avoid the loose thread.
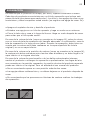
In case of cloth breakage(as shown in picture M ). please cover the breakage
with a piece of patching cloth of proper size. Then sew up the patching cloth
along its sides.
While repairing, you should take notice that the sewing should only occur on
the surface layer of the original cloth rather than reaching its underlayer.
• In case of breakage in the seam position (as shown in picture N), the sewing
should only occur between the two split cloths rather than reaching the
underlayer or any other cloth.
• In case of large-size breakage or internal structural damage, please change
the product or have professionals do the repairing. Air leakage is normal in the
repaired position and the air pressure of the repaired product may be lower
than the original. But it will not affect the normal use of the product.
• Patching in one position more than twice is not suggested.
• Needles should be taken good care of and not be left on the product after
sewing.
• It is suggested that persons with sewing techniques should do the repairing
work.
EN

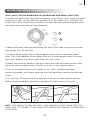
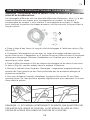
Fig.A1 Fig.A2 Fig.A3
The different water slide has different quantity of sprinklers, thus, there are serial
numbers on each one to match the product. No.1 will match No.1, and No.2 will
match No.2. After confirming the position of each sprinkler,please wrap the water
pipe along with the hook and loop fastener.
NOTE: IT IS NORMAL TO HEAR AND FEEL A FAIR AMOUNT OF AIR ESCAPING FROM THE
SEAM LINES. IT IS NORMAL TO SEE SOME WATER SEEPING OUT AROUND THE SEAM LINES
OF THE POOL.
WATER PIPE SETUP INSTRUCTION
NOTE: ONLY FOR THE BOUNCER WITH WATERSLIDE AND SPRAY FUNC TION.
1
1
1
1
1
1
1
2
1
1
1
08
● Attach the water tube provided along the side of the slide using the hook and
loop straps (Fig. A2 and A3).
● Connect water supply with a regular garden hose with the provided water
tube. The 2-part adaptor of the water tube will fit most garden hoses. Unscrew
the 2-part adaptor to find the right fitting for your hose.
● Attach the sprinkler heads to the arch above the slide and water cannon with
the hook and loop attachment (Fig A1) as shown in the diagram below.
●Turn on the water faucet to the garden hose. Note: Increase the water
pressure gradually until water spraying from the sprinklers reaches the desired
power.
● For wet use, fill the pool with at least 20 cm/8 inch of water before playing.
Water should be added regularly to maintain the water level in the pool.
EN

Please give us a chance to make it right and do better !
Contact our friendly customer service department for help first.
Replacements for missing or damaged parts will be shipped ASAP !
Contact Us !
Do NOT return this item. US:cs.us@costway.com
UK:cs.uk@costway.com
US office: Fontana UK office: Ipswich AU office: Truganina

Hüpfburg
HANDBUCH
DIESE ANLEITUNG ENTHÄLT WICHTIGE SICHERHEITSINFORMATIONEN. BITTE SORGFÄLTIG LESEN UND ZUM SPÄTEREN NACHSCHLAGEN AUFBEWAHREN.
EN DE FR ES IT PL

Bevor Sie beginnen
Allgemeine Warnhinweise
Der Artikel muss unter der Aufsicht eines Erwachsenen montiert und benutzt
werden.
Lesen Sie jeden Schritt sorgfältig durch und befolgen Sie die richtige Reihenfolge.
Entfernen Sie alle Verpackungen, Überprüfen Sie, ob alle Teile und Zubehörteile
vorhanden sind.
Bitte stellen Sie sicher, dass alle Teile richtig montiert sind, eine falsche Montage
kann zu einer Gefahr führen.
Wir empfehlen, alle Teile möglichst in der Nähe des Aufstellungsortes zu
montieren, um unnötige Bewegungen nach der Montage zu vermeiden.
Achten Sie bei der Montage auf einen sicheren Untergrund und stellen Sie den
Artikel immer auf eine ebene, feste und stabile Fläche.
Bitte überprüfen und warten Sie regelmäßig die wichtigsten Teile zur Aufhängung,
Befestigung, Verankerung am Boden.
Warnung!
Achtung! Nur für den Hausgebrauch.
Warnung: Der Artikel ist nicht für Kinder unter 3 Jahren geeignet.
Warnung: Halten Sie alle Kleinteile und Verpackungsmaterialien, die verschluckt
werden können, von Babys und Kindern fern.
Warnung: Unsachgemäße Montage kann zu Kippgefahr führen.
Bitte sorgfältig lesen und zum späteren Nachschlagen aufbewahren.
02
DE

HÜPFBURG
WARNUNG!
VORSICHT!
BEWAHREN SIE DIE AUFBAUANLEITUNG ZUM NACHSCHLAGEN AUF
BITTE LESEN SIE VOR DEM AUFBAU ALLE SICHERHEITSREGELN
SICHERHEIT STEHT BEI UNS AN ERSTER STELLE. BITTE BEFOLGEN SIE ALLE
REGELN FÜR DIE SICHERHEIT IHRER KINDER
ELEKTRISCH BETRIEBENER ARTIKEL ERFORDERT DIE AUFSICHT EINES
ERWACHSENEN. DER BETRIEB DES GEBLÄSES (LUFTPUMPE) WIRD FÜR KINDER
UNTER 12 JAHREN NICHT EMPFOHLEN. WIE BEI ALLEN ELEKTRISCHEN ARTIKEL
SIND BEI DER HANDHABUNG UND VERWENDUNG VORSICHTSMASSNAHMEN ZU
BEACHTEN, UM EINEN STROMSCHLAG ZU VERMEIDEN.
NICHT FÜR ERWACHSENE GEEIGNET
NICHT FÜR DIE VERMIETUNG ODER DEN
GEWERBLICHEN EINSATZ GEEIGNET
EINRICHTUNG DURCH EINEN
ERWACHSENEN ERFORDERLICH
BEAUFSICHTIGUNG DURCH EINEN
ERWACHSENEN ERFORDERLICH
WARNUNG!
NUR FÜR DEN HAUSGEBRAUCH, FÜR
DEN AUSSENBEREICH
NUR AUF WEICHEM BODEN ZU
VERWENDEN
WARNUNG!
Nicht geeignet für Kinder
unter 3 Jahren.
Kleine Teile können
verschluckt werden.
03
DE

AUFBAU
Prüfen Sie den Boden, auf dem der Artikel aufgestellt werden soll, auf scharfe
Gegenstände oder Schutt. Stellen Sie den Artikel nicht auf Beton oder einer
harten Oberfläche auf.
● Stellen Sie den Artikel auf einer weichen, ebenen Fläche auf, mindestens 2
Meter entfernt von Strukturen oder Hindernissen wie Zäunen, Garagen,
Häusern, überhängenden Ästen, Wäscheleinen oder Stromkabeln.
● Stellen Sie sicher, dass der Spielbereich frei von Hindernissen wie Möbeln,
Wänden, scharfen Gegenständen, anderen harten Oberflächen usw. ist.
● Stellen Sie den Artikel nicht in der Nähe von Wasser und potenziellen
Brandgefahren auf.
● Halten Sie das Gebläse (Luftpumpe) und das Netzkabel von Bereichen mit
Wasser und Feuchtigkeit fern. Wenn das Gebläse (Luftpumpe) mit Wasser in
Berührung kommt, ziehen Sie das Netzkabel des Gebläses (Luftpumpe) aus der
Steckdose. Nehmen Sie das Gebläse erst in Betrieb, wenn es vollständig trocken
ist.
● Nehmen Sie den Artikel aus der Tragetasche. Vergewissern Sie sich, dass die
mit dem Artikel gelieferte Schiebeabdeckung von oben bis unten gut gespannt
ist. Stellen Sie sicher, dass der Artikel so nah wie möglich an der Stromquelle
steht.
Ziehen Sie den Aufblasschlauch auf und schließen Sie ihn an das Ende des
Gebläses (Luftpumpe) an. Vergewissern Sie sich, dass der Schlauch sicher
befestigt und in gutem Zustand ist.
Der Schlauch sollte gerade und nicht verdreht sein. Bringen Sie das Gebläse
(Luftpumpe) bei Bedarf neu an.
● Wenn der Artikel mit Wasserbeuteln geliefert wird, befolgen Sie bitte die
nachstehende Anleitung.
Andernfalls übergehen Sie diesen Punkt. Breiten Sie den Artikel aus, platzieren
und befestigen Sie die leeren Wassersäcke an den beiden Seiten des Artikels.
Öffnen Sie den Stöpsel und füllen Sie Wasser in die Wassersäcke, bis diese zu
80% gefüllt sind (ca. 22 kg), drücken Sie den Stöpsel und schließen Sie ihn.
Vergewissern Sie sich, dass die Wassersäcke fest mit dem Artikel verbunden
sind und kein Wasser ausläuft, bevor der Artikel vollständig aufgeblasen ist, und
lassen Sie Kinder niemals auf der Rutsche spielen, ohne einen Wassersack
angebracht zu haben. (siehe Abbildung A)
● Drücken Sie die Heringe durch die Löcher im Gebläse Boden.
Möglicherweise müssen Sie einen Hammer benutzen, um sie richtig zu
platzieren. Vergewissern Sie sich, dass der Netzschalter des Gebläses
(Luftpumpe) in der Position OFF steht. Stellen Sie sicher, dass die
Stromanschlüsse sicher platziert sind und die Stolpergefahr minimiert ist.
04
DE

Kugelloch
● Das Gebläse (die Luftpumpe) sollte vor dem Gebrauch sicher aufgestellt und
am Boden befestigt werden. Schließen Sie das Gebläse (die Luftpumpe) an eine
zugelassene Steckdose an.
● Stellen Sie sicher, dass das Gebläse (die Luftpumpe) frei von Ablagerungen ist
und sicher steht, um ein Umkippen zu vermeiden.
● Schalten Sie den Netzschalter des Gebläses (der Luftpumpe) auf ON. Das
Gebläse (die Luftpumpe) mit kontinuierlichem Luftstrom muss während der
Verwendung des Artikels immer eingeschaltet bleiben. (siehe Abbildung B)
● Der Artikel sollte vollständig aufgeblasen sein.
● Die Heringe werden für Rasenböden verwendet. Hängen Sie die mitgelieferten
Heringe in die Schlaufen der Hüpfburg ein und befestigen Sie sie. Um ein
Umkippen oder Anheben während des Spiels zu verhindern, drücken Sie die
Heringe fest in den Boden. Vergewissern Sie sich, dass das Hakenende des
Herings während der Benutzung immer über der Schlaufe liegt. Die Heringe
sollten auf gleicher Höhe mit oder unter dem Boden angebracht werden, um
Stolperfallen zu vermeiden. (siehe Abbildung C)
● Bitte beachten Sie die Altersempfehlungen und Benutzergewichte (auf dem
Artikel aufgedruckt). Sie dürfen das Gesamtgewicht des Artikels nicht
überschreiten.
● Legen Sie das mitgelieferte Spielzubehör, falls vorhanden, zum Spielen in den
Artikel. (siehe Abbildung D, E)
● Wenn der Artikel mit Stützkissen an den Seiten ausgestattet ist, dürfen Sie
nicht auf den Kissen stehen oder sitzen.
Hinweis: Der Luftaustritt an den Nähten ist notwendig, da der Artikel durch
einen konstanten Luftstrom aufgeblasen wird und dieser Luftaustritt erforderlich
ist, um zu verhindern, dass der Artikel übermäßig aufgeblasen wird.
Hinweis: Der Benutzer wird auf die Ausrichtung der aufblasbaren Ausrüstung
zur Sonne aufmerksam gemacht. Die Rutschfläche des Artikels darf nicht zur
Sonne hin ausgerichtet sein, da die Sonne die Augen der Kinder blenden kann,
wenn sie auf der Rutsche hinunterrutschen.
05
DE

V ergewissern Sie sich, dass alle Kinder den Artikel
verlassen.
V ergewissern Sie sich, dass der Artikel frei von
Fremdkörpern ist.
W enn sich nach der Benutzung des Wasserbeckens Wasser
in den Nähten befindet, lassen Sie das Gebläse etwa 30
Minuten lang laufen, um es vor dem Verpacken zu trocknen.
Schalten Sie den Netzschalter des Gebläses (Luftpumpe)
auf AUS.
Ziehen Sie das Netzkabel des Gebläses (der Luftpumpe)
aus der Steckdose.
Lösen Sie den Klettv erschluss und nehmen Sie den
Aufblasschlauch vom Gebläse ab. Der Artikel sollte sich
innerhalb von 5 Minuten von selbst entleeren. Vergewissern
Sie sich, dass der Artikel vollständig entlüftet ist. (siehe
Abbildung F) Entfernen Sie die Heringe.
Lösen Sie den Klettv erschluss und nehmen Sie den
Aufblasschlauch vom Gebläse ab. Der Artikel sollte sich
innerhalb von 5 Minuten von selbst entleeren. Stellen Sie
sicher, dass den Artikel vollständig entleert ist. (siehe
Abbildung F) Entfernen Sie die Bodenhalterungen.
F alten Sie den Artikel an beiden Enden in der Hälfte und
dann noch zweimal von beiden Seiten senkrecht zur ersten
Falte in der Hälfte. (siehe Abbildung G,H,I) Rollen Sie den
Artikel an dem Ende, das dem Aufblasrohr gegenüberliegt,
fest auf. (siehe Abbildung J,K)
Ziehen Sie die Tragetasche über den gefaltete Artikel und
die Stangen (Plastikbälle oder Wasserbeutel). Verschließen
Sie den Beutel. (siehe Abbildung L)
• Die wichtigsten Teile des Spielzeugs sollten in regelmäßigen Abständen
überprüft und gewartet werden, da das Spielzeug andernfalls umkippen oder zu
einer Gefahr werden könnte. Wenn möglich, sollten die Anweisungen auch am
Spielzeug angebracht werden.
• Die saisonale Inspektion und Wartung sollte im Hinblick auf Beschädigungen
oder Undichtigkeiten des Artikels durchgeführt werden.
• Der Artikel kann mit einem milden Reinigungsmittel abgewischt werden. Halten
Sie Wasser stets vom Gebläse (Luftpumpe) fern.
• Lagern Sie den Artikel nicht in nassem Zustand. Lagern Sie den Artikel und das
Gebläse in einem trockenen Raum, wenn es nicht benutzt wird.
ABBAU
WARTUNG
06
DE

Sollte den Artikel einmal kaputt gehen, flicken Sie es bitte mit der Hand. Jeder
Produkttyp wird mit einem Reparaturset geliefert, das sechs Stücke Stoff enthält
(zwei Stücke für jede Farbe). Fäden und Nähnadeln sind nicht im Lieferumfang
enthalten und müssen von Ihnen selbst gekauft werden (wir empfehlen eine 3#
Nähnadel).
• Schalten Sie das Gebläse aus und lassen Sie die Luft aus dem Artikel.
• Fädeln Sie eine Nadel mit einem Ersatzfaden ein und machen Sie einen Knoten
an dessen Ende.
• Schließen Sie den kaputten Stoff und nähen Sie entlang der Lücke. Binden Sie
nach dem Nähen einen Knoten, damit der Faden nicht verloren geht. Falls der
Stoff reißt (wie in Abbildung M dargestellt), bedecken Sie die Bruchstelle mit
einem Stück Flickenteppich in der richtigen Größe. Nähen Sie dann den
Flickenteppich an den Seiten zusammen. Beim Reparieren sollten Sie darauf
achten, dass das Nähen nur auf der Oberflächenschicht des ursprünglichen
Stoffes erfolgt und nicht bis zu seiner Unterschicht reicht.
• Im Falle eines Risses in der Nahtposition (wie in Abbildung N gezeigt), sollte
das Nähen nur zwischen den beiden gespaltenen Stoffen erfolgen und nicht die
Unterschicht oder einen anderen Stoff erreichen.
• Bei großflächigen Brüchen oder inneren Strukturschäden tauschen Sie bitte den
Artikel aus oder lassen Sie es von einem Fachmann reparieren. Luftaustritt ist in
der reparierten Position normal, und der Luftdruck des reparierten Artikels kann
niedriger sein als der des Originals. Dies beeinträchtigt jedoch nicht den
normalen Gebrauch des Artikels.
• Es wird nicht empfohlen, mehr als zweimal an einer Stelle zu flicken.
• Die Nadeln sollten gut gepflegt werden und nach dem Nähen nicht auf dem
Artikel verbleiben.
• Es wird empfohlen, dass Personen mit Nähkenntnissen die Reparaturarbeiten
durchführen.
REPARATUR
07
DE

Abb.A1 Abb.A2 Abb.A3
Die verschiedenen Wasserrutschen haben eine unterschiedliche Anzahl von
Sprühdüsen, daher sind auf jeder Rutsche Seriennummern angebracht, die dem
Artikel entsprechen. Nr. 1 passt zu Nr. 1, und Nr. 2 passt zu Nr. 2. Nachdem Sie
die Position der einzelnen Sprinkler bestätigt haben, wickeln Sie bitte das
Wasserrohr mit dem Klettband ein.
HINWEIS: ES IST NORMAL, DASS MAN EINE GEWISSE MENGE LUFT AUS DEN
NAHTLEITUNGEN ENTWEICHEN HÖRT UND FÜHLT. ES IST NORMAL, DASS AN
DEN NAHTSTELLEN DES POOLS ETWAS WASSER AUSTRITT.
● Befestigen Sie den mitgelieferten Wasserschlauch mit den Klettbändern an der
Seite der Rutsche (Abb. A2 und A3).
● Verbinden Sie die Wasserversorgung mit einem normalen Gartenschlauch mit
dem mitgelieferten Wasserschlauch. Der zweiteilige Adapter des
Wasserschlauchs passt auf die meisten Gartenschläuche. Schrauben Sie den
2-teiligen Adapter ab, um den richtigen Anschluss für Ihren Schlauch zu finden.
● Befestigen Sie die Sprinklerköpfe am Bogen über der Rutsche und der
Wasserkanone mit der Klettbefestigung (Abb. A1), wie in der Abbildung unten
gezeigt.
●Drehen Sie den Wasserhahn zum Gartenschlauch auf. Hinweis: Erhöhen Sie den
Wasserdruck schrittweise, bis das Wasser aus den Sprinklern die gewünschte
Stärke erreicht.
● Füllen Sie das Schwimmbecken vor dem Spielen mit mindestens 20 cm Wasser.
Es sollte regelmäßig Wasser nachgefüllt werden, um den Wasserstand im Becken
zu halten.
EINRICHTUNG DER WASSERROHRE
ANLEITUNG
HINWEIS: NUR FÜR DIE HÜPFBURG MIT WASSERRUTSCHE UND SPRÜHFUNKTION.
1
1
1
1
1
1
1
1
2
1
1
1
08
DE

Bitte wenden Sie sich bei weiteren Fragen an unseren Kundenservice
Ersatzteile können so schnell wie möglich geliefert werden.
Deutsches Büro: FDS GmbH, Neuer Höltigbaum 36, 22143 Hamburg, Deutschland
Kontaktieren Sie uns !
Schicken Sie diesen Artikel NICHT zurück,
bitte wenden Sie sich an unseren Kundenservice.

Château Gonflable
MANUEL DE L’UTILISATEUR
EN DE FR ES IT PL
CE MANUEL CONTIENT DES INFORMATIONS IMPORTANTES SUR LA SÉCURITÉ. VEUILLEZ LE LIRE ET LE CONSERVER POUR TOUTE RÉFÉRENCE FUTURE.

Avant de Commencer
Avertissements Généraux :
Le produit doit être installé et utilisé sous la surveillance d’un adulte.
Lisez attentivement chaque étape et suivez l’ordre correct.
Retirez tous les emballages, séparez et comptez toutes les pièces et le matériel.
Veuillez vous assurer que toutes les pièces soient correctement installées, une
installation incorrecte peut entraîner un danger.
Nous recommandons que, dans la mesure du possible, tous les articles soient
assemblés à proximité de la zone dans laquelle ils seront utilisés, afin d’éviter de
déplacer inutilement le produit une fois assemblé.
Assurez-vous que la surface soit solide pendant l’assemblage et placez toujours le
produit sur une surface plane et stable.
Veuillez vérifier et entretenir régulièrement les pièces les plus importantes pour la
suspension, la fixation, l’ancrage au sol.
Avertissements :
Attention : Pour l’usage domestique seulement.
Attention : Le produit ne convient pas aux enfants de moins de 3 ans
Danger : Gardez toutes les petites pièces et les matériaux d’emballage de ce produit
hors de portée des bébés et des enfants pour éviter un risque d’étouffement.
Danger : La manque de la fixation pourrait entraîner un risque de basculement ou de
chute.
Veuillez lire attentivement toutes les instructions et les conserver pour la référence
ultérieure.
02
FR

Château Gonflable
ATTENTION !
ATTENTION !
CONSERVEZ LES INSTRUCTIONS D'INSTALLATION POUR RÉFÉRENCE
ULTÉRIEURE.
VEUILLEZ LIRE TOUTES LES INSTRUCTIONS DE SÉCURITÉ AVANT
L'ASSEMBLAGE.
IL FAUT PRIVILÉGIER LA SÉCURITÉ AVANT TOUT. VEUILLEZ SUIVRE TOUTES LES
INSTRUCTIONS POUR GARANTIR LA SÉCURITÉ DE VOS ENFANTS
UTILISEZ CE PRODUIT ÉLECTRIQUE UNIQUEMENT SOUS LA SURVEILLANCE D’UN
ADULTE. IL N’EST PAS CONSEILLÉ D’UTILISER LE VENTILATEUR (POMPE À
AIR)PAR UN ENFANT ÂGÉ DE MOINS DE 12 ANS. COMME POUR TOUS LES
PRODUITS ÉLECTRIQUES, IL FAUT PRENDRE DES PRÉCAUTIONS POUR ÉVITER
LES CHOCS ÉLECTRIQUES.
NE CONVIENT PAS AUX ADULTES.
NE CONVIENT PAS À LA LOCATION OU À
UN USAGE COMMERCIAL.
MONTAGE PAR UN ADULTE REQUIS.
SURVEILLANCE PARENTALE REQUISE.
ATTENTION!
POUR USAGE DOMESTIQUE
UNIQUEMENT. L'UTILISATION À
L'EXTÉRIEUR NE DOIT ÊTRE
EFFECTUÉE QUE SUR UN SOL MOU.
AVERTISSEMENT !
Ne convient pas aux
enfants de moins de 3
ans. Les petites pièces
peuvent être avalées.
03
FR
PRODUIT ÉLECTRIQUE

INSTALLATION
● Vérifiez que le sol où le produit doit être installé est exempt d'objets
tranchants et de débris. N'installez pas le produit sur du béton ou sur une
surface dure.
● Placez le produit sur une surface plane et douce à au moins 2 mètres de toute
structure ou obstacle tel qu’une clôture, un garage, une maison, des branches
en surplomb, des lignes de lavage ou des fils électriques.
● Assurez-vous que l'aire de jeu est exempte de dangers tels que des meubles,
des murs, des objets pointus, d'autres surfaces dures, etc.
● Installez le produit loin de l'eau et de tout risque d'incendie potentiel.
● Gardez le ventilateur (pompe à air) et le cordon d'alimentation loin des zones
d'eau et d'humidité. Si de l'eau entre en contact avec le ventilateur (pompe à
air), débranchez le cordon d'alimentation du ventilateur (pompe à air). Ne le
démarrez pas tant que le ventilateur n'est pas complètement sec.
● Sortez le produit du sac de transport. Si le produit est fourni avec une
couverture de toboggan, veillez à ce qu’elle soit bien tendue de haut en bas.
Placez le produit aussi près que possible de la source d’alimentation.
● Étirez le tube de gonflage et fixez-le à l'extrémité du ventilateur (pompe à
air). Assurez-vous que le tube de gonflage est sécurisé et en bon état. Le tube
de gonflage doit être droit et non tordu. Remplacer le ventilateur (pompe à air)
si nécessaire.
● Si le produit est livré avec des sacs à eau, suivez les instructions
mentionnées. Sinon, sautez ce point. Étalez le produit, placez et fixez les sacs à
eau vides sur les deux côtés du produit. Ouvrez le bouchon et remplissez les
sacs à eau jusqu'à 80% (environ 22 kg) avec de l'eau, poussez et refermez le
bouchon. Assurez-vous que les sacs à eau sont fermement fixés au produit et
qu'il n'y a pas de fuite d'eau avant que le produit ne soit complètement gonflé,
et ne laissez jamais les enfants jouer sur le toboggan sans installer les sacs à
eau. (Voir image A.)
● Poussez les piquets au sol à travers les trous à la base du ventilateur. Vous
devrez peut-être utiliser un marteau pour les placer correctement.
● Assurez-vous que l'interrupteur d'alimentation du ventilateur (pompe à air)
est en position OFF. Assurez-vous que les connexions électriques placées en
toute sécurité et que le risque de trébuchement est réduit au minimum.
● Le ventilateur (pompe à air) doit être solidement installé et fixé au sol avant
utilisation. Branchez le ventilateur (pompe à air) dans une prise de courant au
sol approuvée.
04
FR

Tir de balle
● Assurez-vous que le gonfleur (pompe à air) est exempt de débris et bien
placée pour éviter de trébucher.
● Mettez l'interrupteur du ventilateur (pompe à air) en position ON. Le
ventilateur (pompe à air) à flux d'air continu doit rester en marche en
permanence pendant l'utilisation du produit. (Voir l'image B.)
● Le produit doit être entièrement gonflé.
● Les piquets de soutien au sol sont utilisés pour les surfaces de pelouse.
Accrochez et fixez chaque piquet de sol fourni à travers chaque boucle du
produit. Pour éviter qu’ils ne se renversent ou ne se soulèvent pendant le jeu,
enfoncez fermement les piquets dans le sol. Assurez-vous que l'extrémité
crochue du piquet est au-dessus de la boucle à tout moment pendant
l'utilisation. Les piquets doivent être placés au niveau du sol ou sous le sol pour
réduire le risque de trébuchement. (Voir image C.)
● Vérifiez l'âge recommandé et le poids des utilisateurs (imprimés sur le
produit). Il ne doit pas dépasser le poids total du produit.
● Mettez les accessoires de jeu inclus, s’il y en a, pour jouer sur le produit (voir
les image D, E)
● Si le produit est livré avec des coussins de soutien sur les côtés, ne vous
tenez pas debout ou ne vous asseyez pas sur les coussins.
Conseil : Une fuite d'air au niveau des coutures est nécessaire car le produit se
gonfle avec un flux d'air constant et cette fuite est nécessaire pour éviter que le
produit ne se gonfle trop.
Conseil : L'attention de l'utilisateur est attirée sur l'orientation d'installation de
l'équipement gonflable vers le soleil. La surface de toboggan du produit ne doit
pas faire face au soleil, car les rayons du soleil peuvent éblouir les yeux des
enfants lorsqu'ils glissent le long du toboggan.
05
FR

V eillez à ce que tous les enfants sortent du produit.
Assure z-vous que le produit est exempt de corps
étrangers.
S'il y a de l'eau à l'intérieur des coutures après a voir utilisé
la piscine d'eau, veuillez laisser le souffleur d'air en marche
pendant environ 30 minutes pour le sécher avant de
l'emballer.
Mettez l'interrupteur d'alimentation du ventilateur (pompe
à air) sur OFF.
Déb ranchez le cordon d'alimentation du ventilateur
(pompe à air).
Desserrez la fermeture auto- agrippante et séparez le tube
de gonflage du souffleur. Le produit devrait se dégonfler tout
seul en 5 minutes. Assurez-vous que le produit est
complètement dégonflé. (Voir image F.)
R etirez les piquets de soutien au sol.
Pliez le produit en deux à partir des deux extrémités, puis
pliez-le en deux 2 fois de plus des deux côtés, à la verticale
du premier pli. (Voir les images G, H, I)
Enroulez -le fermement à partir de l'extrémité opposée au
tube de gonflage. ( voir les images J, K)
Glissez le sac de t ransport sur le produit plié et les piquets
(balles en plastique ou sacs d’eau). Fermez le sac. (voir
l’image L)
● Les contrôles et l'entretien des parties principales des jouets doivent être
effectués à intervalles réguliers, si ces contrôles ne sont pas effectués, les jouets
risquent de se renverser ou de devenir un danger. Dans la mesure du possible,
les instructions seront également placées sur le jouet.
● L’inspection et l’entretien saisonniers doivent être effectués pour détecter tout
dommage ou fuite du produit.
● Le produit peut être nettoyé avec un détergent doux. Gardez l'eau à l'écart du
souffleur (pompe à air) en tout temps.
● Ne stockez pas le produit lorsqu'il est mouillé. Rangez le produit et le
ventilateur dans un endroit sec lorsqu'ils ne sont pas utilisés.
DÉMONTAGE
ENTRETIEN
06
FR

En cas de rupture du produit, veuillez le réparer en le cousant à la main. Chaque
type de produit est fourni avec un kit de réparation comprenant six pièces de
tissu (deux pièces pour chaque couleur). Les fils et les aiguilles à coudre ne sont
pas fournis et doivent être achetés par vous-même (une aiguille à coudre 3 # est
suggérée).
•
•
•
•
•
•
Arrêtez le ventilateur et dégonflez le produit.
Enfilez une aiguille avec un fil de rechange et faites un nœud à son extrémité.
Fermez le tissu déchiré et cousez le long du trou. Faites un nœud après la
couture pour éviter que le fil ne se détache.
En cas de déchirure du tissu (comme illustré sur l'image M ), couvrez la
déchirure avec un morceau de tissu de réparation de taille appropriée. Ensuite,
cousez le tissu de réparation le long de ses côtés. Lors de la réparation, vous
devez tenir compte du fait que la couture ne doit être effectuée que sur la
couche superficielle du tissu d'origine, et non sur sa couche inférieure.
En cas de déchirure de la couture (comme indiqué sur l’image N), la couture ne
doit se faire qu’entre les deux tissus fendus et non pas sur la sous-couche ou sur
un autre tissu.
En cas de déchirure de grande taille ou de dommages structurels internes,
veuillez changer de produit ou faire appel à des professionnels pour la
réparation. Les fuites d’air sont normales dans la position réparée et la pression
d’air du produit réparé peut être inférieure à celle de l’original. Mais cela
n’affectera pas l'utilisation normale du produit.
Il n’est pas conseillé de réparer une position plus de deux fois.
Les aiguilles doivent être bien entretenues et ne doivent pas être laissées sur
le produit
après la couture.
Il est recommandé aux personnes ayant des compétences en couture
d'effectuer les travaux de réparation.
RÉPARATION
07
FR

Fig.A1 Fig.A2 Fig.A3
Les toboggans différents ont une quantité différente d’arroseurs, ainsi, il y a des
numéros de série sur chacun pour correspondre au produit. Le numéro 1
correspondra au numéro 1 et le numéro 2 correspondra au numéro 2. Après
avoir confirmé la position de chaque arroseur, veuillez enrouler le tuyau d’eau le
long du velcro.
REMARQUE : IL EST NORMAL D’ENTENDRE ET DE SENTIR UNE QUANTITÉ D’AIR
S’ÉCHAPPER DES LIGNES DE COUTURE. IL EST NORMAL DE VOIR DE L’EAU
S’ÉCOULER AUTOUR DES LIGNES DE COUTURE DE LA PISCINE.
● Fixez le tube d’eau fourni le long du côté de toboggan à l’aide des velcros (Fig.
A2 et A3).
● Connectez l’alimentation en eau avec un tuyau d’arrosage ordinaire avec le
tuyau d’eau fourni. L’adaptateur en 2 parties du tuyau d’eau convient à la plupart
des tuyaux d’arrosage. Dévissez l’adaptateur en 2 parties pour trouver le bon
raccord pour votre tuyau.
● Fixez la tête d’arrosage à l’arc au-dessus de toboggan et du canon à eau avec
le Velcro (Fig A1) comme indiqué dans le schéma ci-dessous.
● Ouvrez le robinet d’eau de jardin. Remarque : augmentez progressivement la
pression de l’eau jusqu’à ce que l’eau pulvérisée par les arroseurs atteigne la
puissance souhaitée.
● Pour une utilisation humide, remplissez la piscine d’au moins 20 cm d’eau
avant de jouer. De l’eau doit être ajoutée régulièrement pour maintenir le niveau
d’eau dans la piscine.
INSTRUCTION D’INSTALLATION DES TUYAUX D’EAU
REMARQUE : UNIQUEMENT POUR LE PRODUIT AVEC LA FONCTION DE TOBOGGAN
D’EAU ET DE PULVÉRISATION.
1
1
1
1
1
1
1
1
2
1
1
1
08
FR

VEUILLEZ NOUS DONNER L’OCCASION DE L’AMÉLIORER !
Contactez notre service à la clientèle pour obtenir de l’aide.
Les remplacements de pièces manquantes ou endommagées seront
expédiés dès que possible !
Contactez-nous !
Ne retournez pas cet article. FR : [email protected]
Contactez notre service à la clientèle pour obtenir de l’aide.
FR office: Saint Vigor d'Ymonville

Castillo Hinchable
MANUAL DEL USUARIO
ESTE MANUAL DE INSTRUCCIONES CONTIENE IMPORTANTES INFORMACIONES DE SEGURIDAD, POR FAVOR, LÉALO Y GUÁRDELO PARA FUTURAS CONSULTAS.
EN DE FR ES IT PL

Antes de Empezar
Advertencias Generales:
El producto debe instalarse y usarse bajo la supervisión de un adulto.
Lea detenidamente cada paso y siga el orden correcto.
Quite todo el embalaje, separe y cuente todas las piezas y los accesorios.
Asegúrese de que todas las piezas estén instaladas correctamente, una instalación
incorrecta puede provocar un peligro.
Recomendamos que, siempre que sea posible, todos los elementos se monten cerca
de la zona en la que se van a utilizar, para evitar mover el producto innecesariamente
una vez montado.
Asegure una superficie segura durante el montaje, y coloque el producto siempre
sobre una superficie plana, firme y estable.
Por favor, revise y mantenga regularmente las piezas más importantes para la
suspensión, la fijación y el anclaje al suelo.
Advertencias:
Atención: Solo para uso doméstico.
Atención: El producto no es adecuado para los niños menores de 3 años.
Peligro: Mantenga todas las piezas pequeñas y los materiales de embalaje de este
producto fuera del alcance de los bebés y los niños, ya que, de lo contrario, pueden
suponer un peligro de asfixia.
Peligro: La falta de fijación puede provocar un riesgo de vuelco o de caída.
Lea todas las instrucciones detenidamente y guárdelas para futuras referencias.
02
ES

CASTILLO HINCHABLE
¡ADVERTENCIA!
PRODUCTO OPERADO ELÉCTRICAMENTE
ATENCIÓN:
CONSERVE LAS INSTRUCCIONES DE INSTALACIÓN PARA FUTURAS CONSULTAS.
LEA TODAS LAS NORMAS DE SEGURIDAD ANTES DE LA INSTALACIÓN.
CREEMOS QUE LA SEGURIDAD ES LO PRIMERO. POR FAVOR, SIGA TODAS LAS
REGLAS PARA LA SEGURIDAD DE LOS NIÑOS.
SE REQUIERE LA SUPERVISIÓN DE UN ADULTO. LA OPERACIÓN DEL SOPLADOR
(BOMBA DE AIRE) NO ESTÁ RECOMENDADA PARA NIÑOS MENORES DE 12 AÑOS.
COMO CON TODOS LOS PRODUCTOS ELÉCTRICOS, SE DEBEN TOMAR
PRECAUCIONES DURANTE LA MANIPULACIÓN Y EL USO PARA EVITAR
DESCARGAS ELÉCTRICAS.
NO ES ADECUADO PARA ADULTOS.
NO ES ADECUADO PARA ALQUILER O
USO COMERCIAL.
SE REQUIERE LA INSTALACIÓN DE UN
ADULTO.
SE REQUIERE LA SUPERVISIÓN DE UN
ADULTO.
¡ADVERTENCIA!
SOLO PARA USO DOMÉSTICO. EL
USO EN EL EXTERIOR DEBE
REALIZARSE ÚNICAMENTE EN
TERRENOS BLANDOS.
¡ADVERTENCIA!
No es adecuado para
niños menores de 3 años.
Las piezas pequeñas
pueden tragarse
accidentalmente.
03
ES

INSTALACIÓN
● Compruebe que el suelo donde se va a instalar el producto no tiene objetos
punzantes ni escombros. No instale el producto sobre hormigón o cualquier
superficie dura.
● Coloque el producto en una superficie blanda y nivelada, a una distancia
mínima de 2 metros de cualquier estructura u obstáculo, como una valla, un
garaje o una casa, ramas colgantes, tendederos o cables eléctricos.
● Asegúrese de que la zona de juego esté libre de peligros como muebles,
paredes, objetos afilados, otras superficies duras, etc.
● Instale el producto lejos del agua y de cualquier peligro potencial de incendio.
● Mantenga el soplador (bomba de aire) y el cable de alimentación lejos de
zonas con agua y humedad. Si el agua entra en contacto con el soplador
(bomba de aire), desenchufe el cable de alimentación del soplador (bomba de
aire). No lo ponga en funcionamiento hasta que el soplador esté completamente
seco.
● Saque el producto de la bolsa de transporte. Si la hay, asegúrese de que la
cubierta deslizante que viene con el producto esté bien estirada de arriba a
abajo. Asegúrese de colocar el producto lo más cerca posible de la fuente de
alimentación.
● Estire el tubo de inflado y acóplelo al extremo del soplador (bomba de aire).
Asegúrese de que el tubo de inflado esté bien sujeto y en buenas condiciones.
El tubo de inflado debe estar recto y sin torcer. Vuelva a colocar el soplador
(bomba de aire) si es necesario.
● Si el producto viene con bolsas de agua, siga las instrucciones mencionadas.
En caso contrario, salte este punto. Extienda el producto, coloque y fije las
bolsas de agua vacías en los dos lados del producto. Abra el tapón y llene de
agua las bolsas de agua hasta el 80% (unos 22 kg), empuje y cierre el tapón.
Asegúrese de que las bolsas de agua están firmemente sujetas al producto y
que no hay fugas de agua antes de que el producto esté completamente inflado,
y nunca permita que los niños jueguen en el tobogán sin instalar las bolsas de
agua. (Consulte la imagen A.)
● Empuje las estacas de tierra a través de los agujeros de la base del soplador.
Es posible que tenga que utilizar un martillo para su correcta colocación.
04
ES

Tiro de bola
● Asegúrese de que el interruptor de alimentación del soplador (bomba de aire)
esté en la posición OFF. Asegúrese de que las conexiones eléctricas estén
situadas de forma segura y que se minimice el riesgo de tropiezo.
● El soplador (bomba de aire) debe estar bien colocado y fijado al suelo antes
de su uso. Enchufe el soplador (bomba de aire) en una toma de corriente de
tierra aprobada.
● Asegúrese de que el soplador (bomba de aire) no tenga residuos y esté bien
colocado para evitar que se vuelque.
● Gire el interruptor del soplador (bomba de aire) a la posición ON. El soplador
(bomba de aire) de flujo de aire continuo debe permanecer encendido en todo
momento mientras se utiliza el producto. (Consulte la imagen B.)
● El producto debe estar completamente inflado.
● Las estacas de soporte de suelo se utilizan para superficies de césped.
Enganche y encaje cada una de las estacas de suelo suministradas a través de
cada bucle del producto. Para evitar que se vuelque o se levante durante el
juego, introduzca las estacas firmemente en el suelo. Asegúrese de que el
extremo enganchado de la estaca esté sobre el bucle en todo momento durante
el uso. Las estacas deben colocarse a nivel o por debajo del suelo para reducir
el riesgo de tropiezos. (Consulte la imagen C.)
● Compruebe la recomendación de edad y los pesos del usuario (impresos en el
producto). No debe exceder el peso total para el producto.
● Coloque los accesorios de juego incluidos, si los hay, para jugar en el
producto. (Consulte las imágenes D, E.)
● Si el producto viene con cojines de soporte a los lados, no se pare ni se siente
sobre los cojines.
Sugerencia: La fuga de aire por las costuras es necesaria porque el producto se
infla con un flujo de aire constante y esta fuga es necesaria para evitar que el
producto se infle demasiado.
Sugerencia: Se llama la atención del usuario sobre la orientación de la
instalación del equipo inflable hacia el sol. La superficie de deslizamiento del
producto no debe estar orientada hacia el sol, ya que los rayos del sol pueden
deslumbrar los ojos de los niños cuando se deslizan por el tobogán.
05
ES

Asegúrese de que todos los niños salgan del producto .
Asegúrese de que el producto esté libre de objetos
extraños.
Si h ay agua dentro de las costuras después de usar la
piscina de agua, mantenga el soplador de aire en
funcionamiento durante unos 30 minutos para secar eso
antes de empacar.
P onga el interruptor de alimentación del soplador (bomba
de aire) en OFF.
Desenchufe el cable de alimentación del soplador (bomba
de aire).
Afloje el cierre de gancho y bucle y separe el tubo de
inflado del soplador. El producto debe desinflarse por sí solo
en 5 minutos. Asegúrese de que el producto esté
completamente desinflado. (Consulte la imagen F.)
R etire las estacas de soporte de suelo.
Doble el producto por la mitad desde ambos extremos y , a
continuación, dóblelo por la mitad 2 veces más desde ambos
lados, en sentido vertical al primer pliegue. (Consulte las
imágenes G, H, I.)
Enróllelo firmemente desde el extremo opuesto al tubo de
inflado. (Consulte las imágenes J, K.)
Deslice la bolsa de t ransporte sobre el producto doblado y
las estacas (bolas de plástico o bolsas de agua). Cierre la
bolsa con una cremallera. (Consulte la imagen L.)
● Las comprobaciones y el mantenimiento de las partes principales de los
juguetes deben realizarse a intervalos regulares, si no se realizan estas
comprobaciones, los juguetes podrían volcar o convertirse en un peligro. Siempre
que sea posible, las instrucciones se colocarán también en el juguete.
● La inspección y el mantenimiento estacionales deben realizarse para detectar
cualquier daño o fuga del producto.
● El producto puede limpiarse con un detergente suave. Mantenga el agua
alejada del soplador (bomba de aire) en todo momento.
● No almacene el producto cuando esté mojado. Guarde el producto y el soplador
en un lugar seco cuando no lo utilice.
DESMONTAJE
MANTENIMIENTO
06
ES

En caso de que el producto se rompa, por favor, repárelo cosiéndolo a mano.
Cada tipo de producto se suministra con un kit de reparación que incluye seis
piezas de tela (dos piezas para cada color). Los hilos y las agujas de coser no se
suministran y debe comprarlos usted mismo (se sugiere una aguja de coser 3#).
● Apague el soplador de aire y desinfle el producto.
● Enhebre una aguja con un hilo de repuesto y haga un nudo en su extremo.
● Cierre la tela rota y cosa a lo largo del hueco. Haga un nudo después de coser
para evitar que el hilo quede suelto.
En caso de la rotura de tela (como se muestra en la imagen M), cubra la rotura
con un trozo de tela de reparación del tamaño adecuado. A continuación, cosa la
tela de reparación a lo largo de sus lados. Durante la reparación, debe tener en
cuenta que la costura solo debe realizarse en la capa superficial de la tela
original y no en su capa inferior.
En caso de la rotura en la posición de costura (como se muestra en la imagen N),
la costura solo debe realizarse entre las dos telas divididas y no debe llegar a la
capa inferior ni a ninguna otra tela.
En caso de la rotura de gran tamaño o de los daños estructurales internos,
cambie el producto o encargue la reparación a profesionales. Las fugas de aire
son normales en la posición reparada y la presión de aire del producto reparado
puede ser inferior a la original. Pero no afectará al uso normal del producto.
● No se recomienda reparar en una posición más de dos veces.
● Las agujas deben cuidarse bien y no deben dejarse en el producto después de
coser.
● Se recomienda que las personas con técnicas de costura realicen los trabajos
de reparación.
REPARACIÓN
07
ES

Fig.A1 Fig.A2 Fig.A3
Los diferentes toboganes de agua tienen diferente cantidad de aspersores, por lo
tanto, hay números de serie en cada uno para que coincida con el producto. El
número 1 corresponderá al número 1, y el número 2 corresponderá al número 2.
Después de confirmar la posición de cada aspersor, por favor envuelva el tubo de
agua junto con el cierre de gancho y bucle.
NOTA: ES NORMAL OÍR Y SENTIR UNA BUENA CANTIDAD DE AIRE QUE SE
ESCAPA DE LAS LÍNEAS DE COSTURA. ES NORMAL QUE SE VEA SALIR ALGO DE
AGUA ALREDEDOR DE LAS LÍNEAS DE COSTURA DE LA PISCINA.
● Fije el tubo de agua suministrado a lo largo del lado del tobogán utilizando las
correas de gancho y bucle (Fig.A2 y A3).
● Conecte el suministro de agua con una manguera de jardín normal con el tubo
de agua suministrado. El adaptador de 2 partes del tubo de agua se adapta a la
mayoría de las mangueras de jardín. Desenrosque el adaptador de 2 partes para
encontrar el accesorio adecuado para su manguera.
● Fije el cabezal del aspersor al arco situado sobre el tobogán y el cañón de agua
con la fijación de gancho y bucle (Fig.A1) como se muestra en el diagrama
siguiente.
● Abra el grifo de agua de la manguera de jardín. Nota: Aumente la presión de
agua gradualmente hasta que la pulverización del agua de los aspersores alcance
la potencia deseada.
● Para el uso en mojado, llene la piscina con al menos 20 cm de agua antes de
jugar. Debe añadirse agua regularmente para mantener el nivel de agua en la
piscina.
INSTRUCCIONES DE MONTAJE DEL TUBO DE AGUA
NOTA: SOLO PARA EL PRODUCTO CON TOBOGÁN DE AGUA Y FUNCIÓN DE ROCIADO.
1
1
1
1
1
1
1
1
2
1
1
1
08
ES

¡Por favor dénos una oportunidad para hacerlo bien y hacerlo mejor!
Primero póngase en contacto con nuestro amable departamento de
servicio al cliente para obtener ayuda. ¡Los reemplazos de piezas
faltantes o dañadas se enviarán lo antes posible!
¡Contáctenos!
NO devuelva este artículo. ES : [email protected]
Primero póngase en contacto con nuestro amable departamento
de servicio al cliente para obtener ayuda.

Castello Gonfiabile
MANUALE UTENTE
QUESTO MANUALE DI ISTRUZIONI CONTIENE IMPORTANTI INFORMAZIONI SULLA SICUREZZA. SI PREGA DI LEGGERE E CONSERVARE PER RIFERIMENTO FUTURO.
EN DE FR ES IT PL

Prima di iniziare
Avvertenze:
Il prodotto deve essere installato e utilizzato sotto la supervisione di un adulto.
Leggere attentamente ogni passo e seguire l'ordine corretto.
Rimuovere tutti gli imballaggi, separare e contare tutte le parti e tutti gli accessori.
Si prega di assicurarsi che tutte le parti siano installate correttamente,
un'installazione errata può portare a un pericolo.
Si consiglia, ove possibile, di montare tutti gli articoli vicino alla zona in cui verranno
posti in uso, per evitare di spostare inutilmente il prodotto una volta assemblato.
Garantire una superficie sicura durante il montaggio e posizionare il prodotto sempre
su una superficie piana, stabile.
Si prega di controllare e manutenere regolarmente, le parti più importanti per la
sospensione, il fissaggio, l'ancoraggio a terra.
Avvertenza
Attenzione: solo per uso domestico.
Attenzione: Il prodotto non è adatto ai bambini sotto i 3 anni.
Pericolo: Tenere tutte le piccole parti e i materiali di imballaggio di questo prodotto
lontano da neonati e bambini, altrimenti potrebbero rappresentare un rischio di
soffocamento.
Pericolo: La mancanza di accessorio può causare un rischio di ribaltamento.
Si prega di leggere attentamente tutte le istruzioni e conservarle per riferimento futuro.
02
IT

CASTELLO GONFIABILE
ATTENZIONE! PRODOTTO ELETTRICO
ATTENZIONE!
CONSERVARE LE ISTRUZIONI DI MONTAGGIO PER LA CONSULTAZIONE FUTURA.
LEGGERE TUTTE LE ISTRUZIONI DI SICUREZZA PRIMA DI MONTARE IL
PRODOTTO.LA SICUREZZA DEVE ESSERE MESSA A FUOCO SOPRA TUTTI.
SEGUIRE TUTTE LE ISTRUZIONI PER ASSICURARE LA SICUREZZA DEI TUOI
BAMBINI.
UTILIZZARE QUESTO PRODOTTO ELETTRICO SOLO SOTTO LA SUPERVISIONE DI
UN ADULTO. NON SI CONSIGLIA DI UTILIZZARE IL GONFIATORE (LA POMPA
AD ARIA) DA UN BAMBINO SOTTO I 12 ANNI. COME TUTTI I PRODOTTI
ELETTRICI,LE PRECAUZIONI DEVONO ESSERE PRESE PER EVITARE SCOSSE
ELETTRICHE.
NON ADATTO A ADULTI.
NON ADATTO A NOLEGGIO O SCOPI
COMMERCIALI.
MONTAGGIO DA ADULTO RICHIESTO.
RICHIESTA DI SUPERVISIONE DEI
GENITORI.
SOLO PER USO DOMESTICO.
ATTENZIONE!
SOLO PER USO DOMESTICO. UTILIZZARE QUESTO
PRODOTTO SOLO SU PAVIMENTO MORBIDO PER
USO ESTERNO.
ATTENZIONE!
Non adatto a bambini di
età inferiore di 3 anni. Le
piccole parti possono
essere ingerite.
03
IT

INSTALLAZIONE
● Assicurarsi che il pavimento su cui verrà installato il prodotto non contenga
oggetti appuntiti o detriti e non installare il prodotto su cemento o superficie
dura.
● Collocare il prodotto su una superficie piana e morbida ad almeno 2 metri da
qualsiasi struttura o ostacolo come recinzione, garage, casa, rami sporgenti,
linee di lavaggio o cavi elettrici.
● Assicurarsi che l'area di gioco sia libera da pericoli come mobili, pareti, oggetti
appuntiti, altre superfici dure, ecc.
● Installare il prodotto lontano da acqua e rischi di incendio.
● Tenere il gonfiatore (pompa dell'aria) e il cavo di alimentazione lontano dalle
aree di acqua e umidità. Se l'acqua viene a contatto con il gonfiatore (pompa
dell'aria), scollegare il cavo di alimentazione del gonfiatore (pompa dell'aria).
Non azionare il gonfiatore fino a quando non è completamente asciutto.
● Rimuovere il prodotto dalla borsa di trasporto. Se il prodotto viene fornito con
un coperchio scorrevole, assicurarsi che sia stretto dall'alto verso il basso.
Posizionare il prodotto il più vicino possibile alla fonte di alimentazione.
● Allungare il tubo di gonfiaggio e fissarlo all'estremità del gonfiatore (pompa
dell'aria). Assicurarsi che il tubo di gonfiaggio sia saldamente fissato e in buone
condizioni. Il tubo di gonfiaggio deve essere dritto e non attorcigliato.
Riposizionare il gonfiatore (pompa dell'aria) se necessario.
● Se il prodotto viene fornito con sacche d'acqua, seguire le istruzioni seguenti,
altrimenti saltare questo punto. Stendere il prodotto, posizionare e fissare le
sacche d'acqua vuote su entrambi i lati del prodotto. Aprire il tappo e riempire
le sacche con acqua fino all'80% (circa 22 kg), spingere e chiudere il tappo.
Assicurarsi che le sacche d'acqua siano ben fissate sul prodotto e che non vi
siano perdite d'acqua prima che il prodotto sia completamente gonfiato e non
lasciare mai che i bambini giochino sullo scivolo senza sacche d'acqua installate
(vedi immagine A).
● Inserire i picchetti nei fori nella base del gonfiatore. Potrebbe essere
necessario utilizzare un martello per posizionarli correttamente. Accertarsi che
l'interruttore del gonfiatore (pompa dell'aria) sia in posizione OFF. Assicurarsi che
i collegamenti elettrici siano posizionati in modo sicuro e che il rischio di
inciampare sia ridotto al minimo.
04
IT

05
IT
Tiro a
pallottola
● Il gonfiatore (pompa dell'aria) deve essere installato in modo sicuro e fissato a
terra prima dell'uso. Collegare il gonfiatore (pompa dell'aria) a una presa a
terra approvata.
● Assicurarsi che il gonfiatore (pompa dell'aria) sia privo di detriti e ben
posizionato per evitare il ribaltamento.
● Impostare l'interruttore del gonfiatore (pompa dell'aria) su ON. II gonfiatore
del flusso d'aria continuo (pompa dell'aria) deve essere sempre acceso durante
l'utilizzo del prodotto (vedi immagine B).
● Il prodotto deve essere completamente gonfiato.
● I picchetti di supporto a terra vengono utilizzati per le superfici del prato.
Agganciare e fissare ogni picchetto a terra fornito attraverso ciascun anello del
prodotto. Per evitare che si ribaltino o si sollevino durante il gioco, spingere
saldamente i picchetti di supporto nel terreno. Assicurarsi che l'estremità ad
uncino del picchetto sia sempre sopra l'anello durante l'uso. I picchetti devono
essere posizionati a livello del terreno o sotto terra per ridurre il rischio di
inciampare. (vedi immagine C)
● Si prega di controllare l’età consigliata e il peso dell'utente (stampato sul
prodotto). Non devi superare il peso totale del prodotto.
● Mettere gli eventuali accessori di gioco inclusi nel prodotto (vedi foto D, E)
● Se il prodotto viene fornito con cuscini di supporto sui lati, non stare o sedersi
su questi cuscini.
Suggerimento: È necessaria una perdita d'aria attraverso le cuciture perché il
prodotto è gonfiato da un flusso d'aria costante e questa perdita È necessaria
per evitare che il prodotto si gonfi troppo.
Suggerimento: Si attira l'attenzione sull'orientamento dell'installazione
dell'attrezzatura gonfiabile verso sole. La superficie dello scivolo del prodotto
non deve essere rivolta verso il sole, poiché la luce solare può abbagliare gli
occhi dei bambini mentre scivolano giù dallo scivolo.

06
IT
Assicur arsi che tutti i bambini escano dal prodotto.
Assicur arsi che il prodotto sia privo di corpi estranei.
Se c'è acqua all'interno delle cuciture dopo l'uso della
piscina d'acqua mantenere il gonfiatore in funzione per circa
30 minuti per asciugarlo prima di imballarlo.
R uotare l'interruttore del gonfiatore (pompa dell'aria) su
OFF.
Scollegare il ca vo di alimentazione del gonfiatore (pompa
dell'aria).
Allentare il velcro e staccare il tubo di gonfiaggio dal
Piegare il prodotto a metà da ent rambe le estremità,
quindi piegarlo a metà altre 2 volte da entrambi i lati, in
verticale rispetto alla prima piega (vedere le immagini G, H, I).
Avvolgerlo saldamente dall'estremità opposta al tubo di
gonfiaggio. (vedi foto J, K)
F ar scorrere la sacca di trasporto sul prodotto piegato e sui
picchetti (palline di plastica o sacche d'acqua). Chiudere il
sacchetto (vedi immagine L)
Le ispezioni e la manutenzione delle parti principali dei giocattoli Le ispezioni e la
manutenzione delle parti principali dei giocattoli devono essere eseguite a
intervalli regolari. Se questi controlli non vengono eseguiti, i giocattoli potrebbero
ribaltarsi o diventare un pericolo. Quando possibile, le istruzioni devono essere
affisse anche sul giocattolo.
Ispezione e manutenzione stagionali devono essere eseguite per rilevare
eventuali danni o perdite di prodotto.
Il prodotto può essere pulito con un detergente delicato. Tenere sempre l'acqua
lontano dal gonfiatore (pompa dell'aria).
Non conservare il prodotto quando è bagnato. Conservare il prodotto e il
gonfiatore in ambienti asciutti quando non in uso.
SMONTAGGIO
MANUTENZIONE
gonfiatore. Il prodotto dovrebbe sgonfiarsi da solo entro 5
minuti. Assicurarsi che il prodotto sia completamente
sgonfiato. (vedi immagine F) Rimuovere i picchetti di
supporto a terra.

07
IT
In caso di rottura del prodotto, si prega di rattoppare tramite cucitura a mano.
Ogni tipo di prodotto viene fornito con un kit di riparazione che comprende sei
pezzi di stoffa (due pezzi per ogni colore). I fili e gli aghi da cucito non sono
forniti e dovresti acquistare da solo (si consiglia l'ago da cucito 3 #).
Spegnere il gonfiatore e sgonfiare il prodotto .
Infilare un ago con un filo di riser va e fare un nodo all'estremità.
Chiudere il tessuto rotto e cucire lungo lo spazio vuoto. Fare un nodo dopo la
cucitura per evitare che il filo si allenti.
In caso di str appo del tessuto (come mostrato nella figura M), coprire lo
strappo con un panno di riparazione delle dimensioni appropriate. Quindi cucire il
pezzo di tessuto di riparazione lungo i suoi lati.
Du rante la riparazione, è necessario notare che la cucitura deve essere
eseguita solo sullo strato superficiale del tessuto originale e non sul suo
sottofondo.
In caso di str appo nella cucitura (come mostrato nella figura N), la cucitura
deve essere eseguita solo tra i due tessuti divisi e non sul sottofondo o su un
altro tessuto.
In caso di gr andi lacerazioni o danni strutturali interni, si prega di cambiare il
prodotto o chiamare i professionisti per la riparazione. Le perdite d'aria sono
normali nella posizione riparata e la pressione dell'aria del prodotto riparato può
essere inferiore di quella dell'originale. Ma ciò non influirà sul normale utilizzo del
prodotto.
Non è consigliabile ripa rare una posizione più di due volte.
Gli aghi de vono essere ben mantenuti e non devono essere lasciati sul
prodotto dopo la cucitura.
Si suggerisce che le persone con la tecnica di cucito eseguano i la vori di
riparazione.
RIPARAZIONE

08
IT
Fig.A1 Fig.A2 Fig.A3
Diversi acquascivoli hanno una diversa quantità di irrigatori, quindi, ci sono
numeri di serie su ciascuno di essi per abbinare il prodotto. Il numero 1
corrisponderà al numero 1 e il numero 2 corrisponderà al numero 2. Dopo aver
confermato la posizione di ogni irrigatore, avvolgere il tubo dell'acqua lungo la
chiusura a strappo.
NOTA: È NORMALE SENTIRE UN PO' D'ARIA FUGARE DALLE LINEE DI
CUCITURA. È NORMALE VEDERE UN PO' D'ACQUA FUORIUSCIRE ATTORNO ALLE
LINEE DI CUCITURA DELLA PISCINA.
●Fissare il tubo dell'acqua fornito lungo il lato dello scivolo utilizzando le cinghie a
strappo (Fig. A2 e A3).
●Collegare l'alimentazione dell'acqua con un normale tubo da giardino con il tubo
dell'acqua fornito. L'adattatore in 2 parti del tubo dell'acqua si adatta alla
maggior parte dei tubi da giardino. Svitare l'adattatore in 2 parti per trovare il
raccordo giusto per il tuo tubo.
●Attaccare le teste degli irrigatori all'arco sopra lo scivolo e il cannone ad acqua
con l'attacco a strappo (Fig. A1) come mostrato nel diagramma sotto.
●Aprire il rubinetto dell'acqua al tubo da giardino. Nota: Aumentare
gradualmente la pressione dell'acqua fino a quando l'acqua spruzzata dagli
irrigatori raggiunge la potenza desiderata.
●Per l'uso bagnato, riempire la piscina con almeno 20 cm di acqua prima di
giocare. L'acqua dovrebbe essere aggiunta regolarmente per mantenere il livello
dell'acqua nella piscina.
ISTRUZIONI PER IL MOMTAGGIO DEL TUBO DELL'ACQUA
NOTA: SOLO PER PRODOTTO CON FUNZIONE SCIVOLO D'ACQUA E SPRUZZO.
1
1
1
1
1
1
1
1
2
1
1
1

Vi preghiamo di darci la possibilità di fare bene e fare di meglio!
Si prega di contattare prima il nostro servizio clienti per assistenza.
Le parti di ricambio per le parti mancanti o danneggiate verranno spedite al più presto!
Contattaci !
NON restituire questo articolo. IT: [email protected]
Si prega di contattare prima il nostro servizio clienti per assistenza.

INSTRUKCJA OBSŁUGI
NINIEJSZA INSTRUKCJA ZAWIERA ISTOTNE INFORMACJE DOTYCZĄCE BEZPIECZEŃSTWA. PROSIMY O ZAPOZNANIE SIĘ Z NIĄ I ZACHOWANIE JEJ DO WGLĄDU W PRZYSZŁOŚCI.
EN DE FR ES IT PL
Dmuchany park wodny

Zanim Zaczniesz
Ogólne ostrzeżenia:
Produkt musi być złożony i używany pod nadzorem osoby dorosłej.
Przeczytaj uważnie każdy krok i postępuj we właściwej kolejności.
Usuń opakowanie i upewnij się, że zestaw zawiera wszystkie części i elementy
montażowe.
Upewnij się, że wszystkie części są poprawnie połączone, nieprawidłowa instalacja
może prowadzić do wypadku.
Zalecamy, aby w miarę możliwości wszystkie elementy były montowane w pobliżu
miejsca, w którym będą używane, aby uniknąć niepotrzebnego przenoszenia produktu
po złożeniu.
Zapewnij bezpieczną przestrzeń roboczą podczas montażu i upewnij się, że produkt
znajduje się na płaskiej i stabilnej powierzchni.
Należy regularnie sprawdzać i konserwować najważniejsze części produktu takie
jak mocowania czy zakotwiczenie do podłoża.
Uwaga!
Uwaga: Produkt wyłącznie do użytku domowego
Uwaga: Produkt nie jest odpowiedni dla dzieci poniżej 3 lat
Niebezpieczeństwo: Trzymaj wszystkie małe części i opakowania tego produktu z dala
od niemowląt i dzieci - w przeciwnym razie mogą stwarzać ryzyko zadławienia.
Niebezpieczeństwo: Brak mocowania może spowodować ryzyko przewrócenia lub
upadku.
Przeczytaj uważnie wszystkie instrukcje i zachowaj je na przyszłość.
02
PL

03
DMUCHANY PARK WODNY
OSTRZEŻENIE!
UWAGA:
PRZED PRZYSTĄPIENIEM DO MONTAŻU ZAPOZNAJ SIĘ Z INSTRUKCJĄ.
ZACHOWAJ INSTRUKCJĘ DO WYKORZYSTANIA W PRZYSZŁOŚCI.
W TROSCE O BEZPIECZEŃSTWO TWOJEGO DZIECKA PROSIMY O STOSOWANIE
SIĘ DO INFORMACJI I OSTRZEŻEŃ ZAWARTYCH W NINIEJSZEJ INSTRUKCJI.
PRODUKT WYMAGA UŻYCIA DMUCHAWY ELEKTRYCZNEJ
WYMAGANY STAŁY NADZÓR OSOBY DOROSŁEJ. DZIECI PONIŻEJ 12 ROKU
ŻYCIA NIE MOGĄ OBSŁUGIWAĆ DMUCHAWY (POMPY POWIETRZA). W
PRZYPADKU WSZYSTKICH URZĄDZEŃ ELEKTRYCZNYCH, PODCZAS OBSŁUGI I
UŻYTKOWANIA NALEŻY PRZESTRZEGAĆ ŚRODKÓW OSTROŻNOŚCI, ABY
UNIKNĄĆ RYZYKA PORAŻENIA PRĄDEM.
PRODUKT PRZEZNACZONY WYŁĄCZNIE DO
UŻYTKU PRZEZ DZIECI
NIE NALEŻY UŻYWAĆ PRODUKTU DO CELÓW
KOMERCYJNYCH
WYMAGANY MONTAŻ PRZEZ OSOBĘ DOROSŁĄ
WYMAGANY STAŁY NADZÓR OSOBY DOROSŁEJ
OSTRZEŻENIE!
PRODUKT PRZEZNACZONY WYŁĄCZNIE DO
UŻYTKU PRYWATNEGO ORAZ NA ZEWNĄTRZ.
PRODUKT NALEŻY UMIEŚCIĆ NA MIĘKKIM
PODŁOŻU.
OSTRZEŻENIE!
Produkt nieodpowiedni dla
dzieci poniżej 3 roku życia.
Ryzyko połknięcia małych
części.
PL

MONTAŻ
04
●Upewnij się, że obszar, na którym chcesz umieścić produkt jest bezpieczny
oraz wolny od kamieni, ostrych przedmiotów lub innych przeszkód. Nie
umieszczaj produktu na twardym podłożu, takim jak beton, asfalt lub drewno.
●Umieść park wodny na miękkim podłożu w odległości co najmniej 2 metrów
od wszelkich innych obiektów, takich jak ogrodzenia, drzewa, zbiorniki wodne,
gałęzie, sznury lub przewody.
●Umieść park wodny z dala od mebli, ścian, ostrych przedmiotów, twardych
powierzchni lub innych przeszkód.
●Umieść produkt z dala od wody i źródeł ognia.
●Trzymaj dmuchawę (pompę powietrza) i przewód zasilający z dala od wody i
wilgoci. W przypadku kontaktu z wodą odłącz dmuchawę od źródła zasilania.
Nie używaj do czasu całkowitego wyschnięcia.
● Po wyjęciu produktu z opakowania upewnij się, że osłona zjeżdżalni jest
odpowiednio naciągnięta. Umieść produkt jak najbliżej źródła zasilania.
●Rozciągnij rurę i umieść dmuchawę (pompę powietrza) na jednym z jej
końców. Upewnij się, że rura nie jest uszkodzona i jest prawidłowo
zamocowana. Rura powinna być prosta. W razie potrzeby zmień położenie
dmuchawy.
●Jeśli produkt jest wyposażony w torby na wodę, postępuj zgodnie z
poniższymi instrukcjami. W przeciwnym wypadku pomiń poniższy krok. Rozłóż
produkt i umieść torby na wodę po obu jego stronach. Otwórz korek i napełnij
każdą z toreb do 80% (ok. 22 kg). Następnie zamknij korek. Przed
przystąpieniem do napompowania produktu upewnij się, że torby na wodę są
prawidłowo zamocowane, a woda nie wycieka. Nie pozwalaj dzieciom na
zabawę, jeśli torby na wodę nie są przymocowane do produktu (patrz rysunek
A).
●Przymocuj dmuchawę (pompę powietrza) do podłoża przy użyciu specjalnych
kołków. Może okazać się konieczne użycie młotka.
●Upewnij się, że wyłącznik zasilania dmuchawy (pompy powietrza) jest w
pozycji „OFF”,a dmuchawa jest prawidłowo podłączona do źródła zasilania.
PL

05
● Przed przystąpieniem do użytkowania dmuchawa (pompa powietrza) musi
zostać prawidłowo zamocowana do podłoża. Podłącz dmuchawę do uziemionego
gniazdka elektrycznego.
● Upewnij się, że dmuchawa (pompa powietrza) jest wolna od zanieczyszczeń i
zabezpieczona przed przewróceniem.
● Włącz dmuchawę (pompę powietrza). Podczas użytkowania produktu dmucha-
wa powinna pozostać włączona, aby stale pompować powietrze (patrz rysunek
B). Ponieważ produkt jest stale dopompowywany, wypływ części powietrza jest
normalny i konieczny.
● Upewnij się, że produkt jest w pełni napompowany, zanim dzieci przystąpią do
użytkowania.
● Zmontuj produkt prawidłowo i zabezpiecz go za pomocą specjalnych kołków.
Aby zapobiec przewróceniu się produktu, wbij kołki w ziemię i regularnie
sprawdzaj czy są mocno osadzone. Kołki powinny być na równi z ziemią lub
wkopane w ziemię, aby zmniejszyć ryzyko potknięcia się o nie (patrz rysunek
C).
● Przed użyciem zapoznaj się z zaleceniami dotyczącymi wieku i wagi użytkown-
ików (nadruk na produkcie). Nie przeciążaj produktu.
● Jeśli do zestawu dołączono akcesoria do zabawy, umieść je wewnątrz produk-
tu (patrz rysunek D i E).
● Nie stawaj ani nie siadaj na poduszkach podpierających, jeśli produkt jest w
nie wyposażony.
Uwaga: Ponieważ produkt jest stale dopompowywany, wypływ części powietrza
jest normalny i konieczny.
Uwaga: Zjeżdżalnia nie powinna być skierowana w stronę słońca, ponieważ
może to wywołać u dzieci zawroty głowy podczas korzystania z produktu.
Rzut piłką
do celu
PL

DEMONTAŻ
KONSERWACJA
06
● Upewnij się, że wszystkie dzieci opuściły park wodny.
● Upewnij się, że w parku wodnym nie znajdują się żadne obce
przedmioty.
● Jeśli na szwach znajduje się woda, uruchom dmuchawę
(pompę powietrza) na około 30 minut, aby wysuszyć produkt
przed złożeniem w celu przechowywania.
● Wyłącz dmuchawę (pompę powietrza).
● Odłącz dmuchawę (pompę powietrza) od źródła zasilania.
● Odepnij rzep i odłącz rurę od dmuchawy (pompy powietrza).
Powietrze powinno samoistnie ulecieć z produktu w ciągu ok.5
minut. Przed złożeniem w celu przechowywania upewnij się, że
całe powietrze zostało spuszczone (patrz rysunek F).
● Usuń kołki zabezpieczające.
● Złóż tkaninę na pół, trzymając za oba jej końce. Następnie
złóż jeszcze dwukrotnie, prostopadle do pierwszego złożenia.
(patrz rysunek G, H, I).
● Zwiń tkaninę, zaczynając od końca znajdującego się po
przeciwnej stronie otworu wlotowego powietrza (patrz rysunek
J i K).
● Umieść produkt i kołki zabezpieczające (lub plastikowe
piłki/torby na wodę) w torbie transportowej. Zapnij torbę
(patrz rysunek L).
● Regularnie sprawdzaj wszystkie elementy parku wodnego. W przeciwnym razie
park wodny może się przewrócić lub stanowić zagrożenie. Zachowaj instrukcję,
aby móc wykorzystać ją w dowolnym czasie podczas użytkowania.
● Sprawdzaj elementy pod kątem ewentualnego uszkodzenia. W przypadku
uszkodzenia tkaniny, bezzwłocznie ją napraw.
● Aby utrzymać produkt w czystości, wycieraj park wodny/dmuchawę suchą
ściereczką lub ściereczką z dodatkiem łagodnego detergentu.
● Pozostaw produkt do całkowitego wyschnięcia przed jego złożeniem w celu
przechowywania. Nieużywany produkt i dmuchawę przechowuj w suchym i
chłodnym miejscu.
PL

NAPRAWA
07
W przypadku uszkodzenia tkaniny, bezzwłocznie ją napraw. Możesz
wykorzystać dołączone do zestawu łatki naprawcze (2 sztuki w 3 kolorach) lub
igłę i nitkę (brak w zestawie). Przed przystąpieniem do naprawy, dokładnie
spuść powietrze i upewnij się, że powierzchnia produktu jest sucha.
● Wyłącz dmuchawę (pompę powietrza) i spuść powietrze z parku wodnego.
● Nawlecz nić na igłę.
● Zszyj tkaninę w miejscu uszkodzenia. Na końcu zawiąż supeł na nici. W
przypadku rozdarcia materiału (patrz rysunek M) naszyj łatkę naprawczą w
odpowiednim rozmiarze. Upewnij się, że zszywasz wyłącznie wierzchnią
warstwę tkaniny.
● W przypadku pęknięcia szwów (patrz rysunek N) zszyj wyłącznie warstwy
tkaniny, które się rozeszły. Uważaj, aby nie zszyć innych warstw tkaniny.
● W przypadku dużych pęknięć lub wewnętrznych uszkodzeń konstrukcji
wymień uszkodzony element lub zleć jego naprawę specjaliście. Wypływ części
powietrza jest normalny, a ciśnienie powietrza naprawianego elementu może
być niższe. Nie wpływa to jednak na prawidłowe użytkowanie produktu.
● Nie zaleca się łatania więcej niż dwa razy w jednym miejscu.
● Po zakończonej naprawie nie zostawiaj igły w pobliżu tkaniny.
● Zaleca się, aby prace naprawcze wykonywały osoby z doświadczeniem w
szyciu.
PL

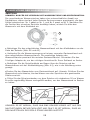
Ryc.A1 Ryc.A2 Ryc.A3
1
1
1
1
1
1
1
2
1
1
1
08
Zjeżdżalnie wodne są wyposażone w różną ilość zraszaczy, dlatego na każdej
końcówce rury znajdują się specjalne oznaczenia. Końcówka rury oznaczona nr 1
będzie pasowała do zraszacza oznaczonego nr 1, a końcówka nr 2 do zraszacza nr
2. Po podłączeniu do odpowiednich zraszaczy zamocuj rury przy użyciu pasków na
rzepy.
UWAGA: WYPŁYW CZĘŚCI POWIETRZA ORAZ WYCIEK CZĘŚCI WODY W
OKOLICACH SZWÓW JEST NORMALNY I KONIECZNY.
PODŁĄCZENIE RURY DOPROWADZAJĄCEJ WODĘ
UWAGA: DOTYCZY WYŁĄCZNIE PRODUKTÓW WYPOSAŻONYCH W ZJEŻDŻALNIĘ
WODNĄ I ZRASZACZ WODNY.
● Przymocuj dołączoną do zestawu rurę z boku zjeżdżalni za pomocą pasków na
rzepy (rys. A2 i A3).
● Podłącz rurę do dopływu wody z wężem ogrodowym. Dwuczęściowy adapter
rury pasuje do większości węży ogrodowych. Odkręć dwuczęściowy adapter, aby
go dopasować i zamocować.
● Przymocuj rurę doprowadzającą wodę do łuku nad zjeżdżalnią i armatką
wodną za pomocą pasków na rzepy, tak jak pokazano na poniższym rysunku.
● Odkręć wodę. Uwaga: stopniowo zwiększaj ciśnienie wody, aż osiągnie żądany
poziom.
● Przed zabawą napełnij basen co najmniej 20 cm wody. Woda powinna być
regularnie uzupełniana, aby utrzymać jej odpowiedni poziom w brodziku.
PL

W razie problemów skontaktuj się z nami!
Jeśli potrzebujesz pomocy, skontaktuj się z naszym przyjaznym działem obsługi klienta.
Wymiana uszkodzonych lub brakujących części zostanie przeprowadzona
tak szybko, jak to możliwe!
Nie zwracaj tego produktu.
Skontaktuj się z naszym działem obsługi klienta, aby uzyskać
pomoc.
Skontaktuj się z nami !
PL office: Gdańsk
-
 1
1
-
 2
2
-
 3
3
-
 4
4
-
 5
5
-
 6
6
-
 7
7
-
 8
8
-
 9
9
-
 10
10
-
 11
11
-
 12
12
-
 13
13
-
 14
14
-
 15
15
-
 16
16
-
 17
17
-
 18
18
-
 19
19
-
 20
20
-
 21
21
-
 22
22
-
 23
23
-
 24
24
-
 25
25
-
 26
26
-
 27
27
-
 28
28
-
 29
29
-
 30
30
-
 31
31
-
 32
32
-
 33
33
-
 34
34
-
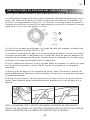 35
35
-
 36
36
-
 37
37
-
 38
38
-
 39
39
-
 40
40
-
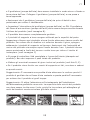 41
41
-
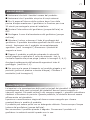 42
42
-
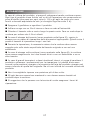 43
43
-
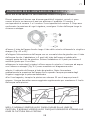 44
44
-
 45
45
-
 46
46
-
 47
47
-
 48
48
-
 49
49
-
 50
50
-
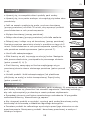 51
51
-
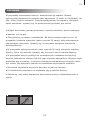 52
52
-
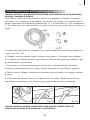 53
53
-
 54
54


en otros idiomas
- français: Costway NP10361 Manuel utilisateur
- italiano: Costway NP10361 Manuale utente
- Deutsch: Costway NP10361 Benutzerhandbuch
- polski: Costway NP10361 Instrukcja obsługi
Artículos relacionados
Otros documentos
-
GYMAX GYM09776 Inflatable Bounce House Manual de usuario
-
Seamax SUP-20D Manual de usuario
-
Aquaglide 16-17 Slide El manual del propietario
-
-
-
Crivit Air Compact Instructions For Use Manual
-
-
-
-