POWERSTIXX SL-8225 Manual de usuario
- Categoría
- Juegos de altavoces
- Tipo
- Manual de usuario
Este manual también es adecuado para
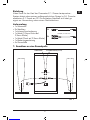
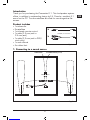
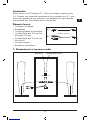
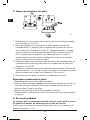
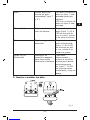
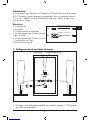
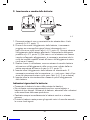
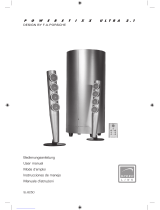
A continuación, encontrará información breve para Powerstixx SL-8225. Este sistema de altavoces 2.1 ofrece un excelente sonido para PC y cuenta con un diseño elegante de F.A. Porsche. Los delgados satélites son ideales para usar junto a un monitor plano. Incluye un subwoofer, dos satélites, un control remoto por infrarrojos, cables y pies de goma. Puede conectar dos fuentes de sonido, cambiar entre ellas con el control remoto y ajustar el volumen y los graves del subwoofer. El sistema cuenta con un indicador LED y se puede apagar por completo con el interruptor en la parte posterior del subwoofer.
A continuación, encontrará información breve para Powerstixx SL-8225. Este sistema de altavoces 2.1 ofrece un excelente sonido para PC y cuenta con un diseño elegante de F.A. Porsche. Los delgados satélites son ideales para usar junto a un monitor plano. Incluye un subwoofer, dos satélites, un control remoto por infrarrojos, cables y pies de goma. Puede conectar dos fuentes de sonido, cambiar entre ellas con el control remoto y ajustar el volumen y los graves del subwoofer. El sistema cuenta con un indicador LED y se puede apagar por completo con el interruptor en la parte posterior del subwoofer.


-
 1
1
-
 2
2
-
 3
3
-
 4
4
-
 5
5
-
 6
6
-
 7
7
-
 8
8
-
 9
9
-
 10
10
-
 11
11
-
 12
12
-
 13
13
-
 14
14
-
 15
15
-
 16
16
-
 17
17
-
 18
18
-
 19
19
-
 20
20
-
 21
21
-
 22
22
-
 23
23
-
 24
24
-
 25
25
-
 26
26
-
 27
27
-
 28
28
-
 29
29
-
 30
30
-
 31
31
-
 32
32


POWERSTIXX SL-8225 Manual de usuario
- Categoría
- Juegos de altavoces
- Tipo
- Manual de usuario
- Este manual también es adecuado para
A continuación, encontrará información breve para Powerstixx SL-8225. Este sistema de altavoces 2.1 ofrece un excelente sonido para PC y cuenta con un diseño elegante de F.A. Porsche. Los delgados satélites son ideales para usar junto a un monitor plano. Incluye un subwoofer, dos satélites, un control remoto por infrarrojos, cables y pies de goma. Puede conectar dos fuentes de sonido, cambiar entre ellas con el control remoto y ajustar el volumen y los graves del subwoofer. El sistema cuenta con un indicador LED y se puede apagar por completo con el interruptor en la parte posterior del subwoofer.
en otros idiomas
- français: POWERSTIXX SL-8225 Manuel utilisateur
- italiano: POWERSTIXX SL-8225 Manuale utente
- Deutsch: POWERSTIXX SL-8225 Benutzerhandbuch
Otros documentos
-
 Speed Link SL-8250 Manual de usuario
-
EDIFIER S550 ENCORE Manual de usuario
-
SPEEDLINK MAJESTY Quick Installation Guide
-
-
-
-
-
-
Hama PR-5120 El manual del propietario
