
User Guide
LG-E976
MFL67861803 (1.0) www.lg.com
ENGLISH


User Guide
• Screen displays and illustrations may differ
from those you see on actual phone.
• Some of the contents of this guide may
not apply to your phone, depending on
the software and your service provider. All
information in this document is subject to
change without notice.
• This handset is not suitable for people who
have a visual impairment due to the touch
screen keyboard.
• Copyright ©2013 LG Electronics, Inc. All
rights reserved. LG and the LG logo are
registered trademarks of LG Group and its
related entities. All other trademarks are the
property of their respective owners.
• Google™, Google Maps™, Gmail™,
YouTube™, Google Talk™ and Play Store™ are
trademarks of Google, Inc.
ENGLISH

2
Table of contents
Important notice .......................................5
Getting to know your phone
...................12
Phone overview.......................................12
Installing the Micro-SIM card..............14
Charging the phone
..............................15
Locking and unlocking the screen ...15
Your Home screen
...................................16
Touch Screen tips
....................................16
Home screen panels ..............................17
Customizing the Home screen .......17
Returning to recently-used
applications ..............................................18
Notication drawer ................................18
Swipe down for notications &
settings ...................................................19
Quick Settings ......................................19
Viewing the status bar ..........................20
On-screen keyboard ..............................21
Entering accented letters .................22
Google account setup
.............................23
Connecting to Networks and Devices
....24
Wi-Fi
.............................................................24
Connecting to Wi-Fi networks ........24
Turning Wi-Fi on and connecting to
a Wi-Fi network ....................................24
Bluetooth ...................................................25
Sharing your phone's data connection
.......................................................................26
To rename or secure your portable
hotspot
.......................................................27
Enabling Wi-Fi Direct to share through
SmartShare ................................................28
SmartShare ................................................29
PC connections with a USB cable .....31
Calls
........................................................33
Making a call
.............................................33
Calling your contacts
.............................33
Answering and rejecting a call ...........33
Adjusting the in-call volume ..............34
Making a second call .............................34
Viewing your call logs
...........................34
Call settings
...............................................35
Contacts
..................................................36
Searching for a contact
.........................36
Adding a new contact ...........................36
Favorite contacts .....................................36
Creating a group .....................................37
Moving contacts from your old device
to your new device .................................37
Messaging
...............................................39
Sending a message
................................39
Threaded box ..........................................40
Changing your message settings .....40
Email
.......................................................41
Managing an email account
...............41
Working with account folders ............41
Composing and sending email ..........42

3
Camera ....................................................43
Getting to know the viewnder
........43
Using the advanced settings ..............44
Taking a quick photo ............................45
Once you've taken a photo .................46
Viewing your saved photos .................47
Video camera
..........................................48
Getting to know the viewnder
........48
Using the advanced settings ..............49
Recording a quick video .......................49
After recording a video .........................50
Watching your saved videos ...............50
Adjusting the volume when viewing a
video
............................................................50
LG Unique Function.................................51
QuickMemo function
............................51
Using the QuickMemo options ......52
Viewing the saved QuickMemo ....53
Notebook function .................................53
Making a note.......................................53
Getting to know the Notebook ......53
Bookshelf ................................................53
Pages-Property panels ......................54
Viewing the saved notebook ..........54
QuickTranslator ........................................55
Live Zooming function .........................56
QSlide function ........................................57
Dual Play function ..................................58
Mirroring ................................................58
Dual Play .................................................59
LG SmartWorld
.........................................59
How to Get to LG SmartWorld from
Your Phone ............................................59
How to use LG SmartWorld
.............60
On-Screen Phone ....................................60
On-Screen Phone icons .....................60
On-Screen Phone features
...............61
How to install On-Screen Phone on
your PC
....................................................61
Multimedia
..............................................62
Gallery
.........................................................62
Viewing pictures ..................................62
Playing videos ......................................63
Editing photos/videos .......................63
Deleting images ..................................63
Setting as wallpaper...........................63
Videos .........................................................63
Playing a video .....................................64
Video Editor ..............................................64
Video Wiz ...................................................66
Music ...........................................................67
Add music les to your phone .......67
Transfer music using Media sync
(MTP) ........................................................67
Playing a song ......................................68
Utilities
....................................................70
Setting your alarm
..................................70
Using your calculator.............................70
Adding an event to your calendar ....70
Voice Recorder .........................................71

4
Recording a sound or voice .............71
Sending the voice recording ...........71
Task Manager ...........................................72
Tasks
............................................................72
Polaris Oce 4 .........................................72
FileShare .....................................................73
Backup
........................................................73
About backing up and restoring
smart phone data
................................73
Backup your smart phone data ......74
Scheduling automatic backups
.....74
Restoring smart phone data
...........75
Google+ .....................................................76
Voice Search..............................................76
Downloads ................................................76
The Web
..................................................77
Internet
.......................................................77
Using the Web toolbar ......................77
Viewing webpages .............................77
Opening a page ...................................78
Searching the web by voice ............78
Bookmarks .............................................78
History .....................................................78
Chrome .......................................................78
Viewing webpages .............................78
Opening a page ...................................79
Searching the web by voice ............79
Syncing with other devices .............79
Settings
...................................................80
Access the Settings menu....................80
WIRELESS & NETWORKS
.......................80
DEVICE ........................................................83
PERSONAL
.................................................85
SYSTEM .......................................................87
Phone software update
..........................89
Phone software update
........................89
About this user guide
.............................91
About this user guide
............................91
Trademarks ................................................92
Accessories
.............................................93
Troubleshooting
......................................94
FAQ
..........................................................98
For your safety
......................................106
Safety instructions
...............................112
Table of contents

5
Important notice
Please check if any problems you encountered with your phone are
described in this section before taking the phone for service or calling a
service representative.
1. Phone memory
When there is less than 10% of space available in your phone memory,
your phone cannot receive new messages. You need to check your phone
memory and delete some data, such as applications or messages, to make
more memory available.
To uninstall applications:
1 Touch > Apps tab > Settings > Apps from the DEVICE.
2 Once all applications appear, scroll to and select the application you
want to uninstall.
3 Touch Uninstall.
2. Optimizing battery life
Extend your battery's life between charges by turning off features that
you don't need to have running constantly in the background. You can
monitor how applications and system resources consume battery power.
Extending your phone's battery life:
• Turn off radio communications you are not using. If you are not using
Wi-Fi, Bluetooth or GPS, turn them off.
• Reduce screen brightness and set a shorter screen timeout.
• Turn off automatic syncing for Gmail, calendar, contacts and other
applications.
• Some applications you have downloaded may reduce battery power.

6
To check the battery power level:
• Touch > Apps tab > Settings > About phone from SYSTEM tab >
Battery.
The battery status (charging or discharging) and battery level (percentage
charged) is displayed at the top of the screen.
To monitor and control how battery power is being used:
• Touch > Apps tab > Settings > About phone from SYSTEM tab >
Battery > Battery use.
Battery usage time is displayed on the screen. It tells you how long it
has been since you last connected your phone to a power source or, if
currently connected, how long the phone was last running on battery
power. The screen shows the applications or services using battery power,
listed in order from the greatest to smallest amount used.
3. Using folders
You can combine several app icons in a folder. Drop one app icon over
another on a home screen, and the two icons will be combined.
4. Before installing an open source application and OS
If you install and use an OS other than the one provided by the
manufacturer it may cause your phone to malfunction. In addition, your
phone will no longer be covered by the warranty.
Important notice

7
WARNING
To protect your phone and personal data, only download applications from
trusted sources, such as Play Store™. If there are improperly installed applications
on your phone, the phone may not work normally or a serious error may occur.
You must uninstall those applications and all associated data and settings from
the phone.
5. Using an unlock pattern
Set an unlock pattern to secure your phone. Touch > Apps tab >
Settings > Lock screen from DEVICE > Select screen lock > Pattern. This
opens a screen that will guide you through how to draw a screen unlock
pattern. You have to create a Backup PIN as a safety measure in case you
forget your unlock pattern.
NOTE: Create a Google account before setting an unlock pattern and remember the
Backup PIN you created when creating your pattern lock.
WARNING
Precautions to take when using pattern lock.
It is very important to remember the unlock pattern you set. You will not be
able to access your phone if you use an incorrect pattern 5 times. You have 5
opportunities to enter your unlock pattern, PIN or password. If you have used all
5 opportunities, you can try again after 30 seconds.
When you can’t recall your unlock pattern:
If you logged in to your Google account on the phone but failed to
enter the correct pattern 5 times, tab the Forgot Pattern option on the
the screen. You will be required to log in with your Google account or
you have to enter the backup PIN which you entered while creating the
pattern lock.

8
If you have not created a Google account on the phone or you forgot the
backup PIN, you have to perform a hard reset.
NOTE: If you have not logged into your Google Account and have forgotten
your Unlock Pattern, you will need to enter your Backup PIN.
6. Using the hard reset (Factory reset)
To restore your phone to its original condition, use a hard reset (Factory
Reset) to initialize it.
Touch
> Apps tab > Settings > Backup & reset from Personal >
Factory data reset.
WARNING
If you perform a hard reset, all user applications, user data and DRM licenses will
be deleted. Please remember to backup any important data before performing
a hard reset.
7. Opening and switching applications
Multi-tasking is easy with Android because you can keep more than
one application running at the same time. There is no need to quit an
application before opening another one. Use and switch between several
open applications. Android manages each application, stopping and
starting them as needed to ensure that idle applications don't consume
resources unnecessarily.
To stop applications:
1 Touch > Apps tab > Settings > Apps from DEVICE > Running.
2 Scroll and touch the desired application and touch Stop to stop it.
Important notice

9
NOTE: For multitasking, press Home key to move to another app while using
an app. This does not stop the previous app running in the background on the
device. Make sure to touch the Back key to exit an app after using it.
8. Installing PC Software (LG PC Suite)
The "LG PC Suite" PC application is a program that helps you connect your
device to a PC using a USB cable and Wi-Fi. Once connected, you can use
the functions of your device from your PC.
Major functions of LG PC Suite:
• Manage and play your media contents (music, movies, photos) on your
PC.
• Send multimedia contents to your device.
• Synchronize data (schedules, contacts, bookmarks) in your device and on
your PC.
• Backup the applications on your device.
• Update the software’s on your device.
• Play multimedia content stored on your PC from your device.
NOTE: You can use the Help menu in the application to find out how to use your
"LG PC Suite" PC application.
Installing the "LG PC Suite" PC Application
The "LG PC Suite" PC application can be downloaded from the LG website.
1 Go to www.lg.com and select the country of your choice.
2 Go to Support section > MOBILE SUPPORT > LG Mobile Phones >
Select the model or Go to Support > mobile > select the model.
3 Click PC Sync option, and download the “LG PC Suite” PC software.

10
System Requirements for "LG PC Suite" PC software
• OS: Windows XP 32 bit (Service pack 2), Windows Vista 32 bit/64 bit,
Windows 7 32 bit/64 bit.
• CPU: 1 GHz or higher processor.
• Memory: 512 MB or higher RAM.
• Graphic card: 1024 x 768 resolution, 32 bit color or higher.
• HDD: 100 MB or more free hard disk space (More free hard disk space
may be needed depending on the volume of data stored.)
• Required software: LG integrated drivers, Windows Media Player 10 or
later.
NOTE: LG Integrated USB Driver
The LG integrated USB driver is required to connect an LG device to a PC, and is
installed automatically when you install "LG PC Suite" PC software.
9. Synchronizing your phone to your computer
Data from your device and PC can be synchronized easily and
conveniently using the "LG PC Suite" PC application. Contacts, schedules,
and bookmarks can all be synchronized.
1 Connect your device to your PC. (Use a USB cable or Wi-Fi connection.)
2 After connection, run the program LG software and select the device
section from the PC.
3 Select the checkbox of contents to synchronize.
NOTE: To synchronize your phone with your PC using the USB cable, you need to
install LG PC Suite on your PC.
Please refer to previous pages to install LG PC Suite.
Important notice

11
To disconnect your phone from the computer:
Open the notification panel and touch
> Charge only to disconnect
your phone from the computer safely.
10. Hold your phone upright
Hold your cell phone vertically, as you would a regular phone. Your phone
has an internal antenna. Be careful not to scratch or damage the back of
the phone, as this may affect performance.
When making/receiving calls or sending/receiving data, avoid holding the
lower part of the phone where the antenna is located. Doing so may affect
call quality.
11. When the screen freezes
If the screen freezes or the phone does not respond when you try to
operate it, press and hold the Power/Lock
key for 10 seconds to turn your
phone off.
If it still does not work, please contact the service center.

12
Phone overview
Earpiece
Front-Facing Camera lens
Proximity / Luminance Sensor
Home key
Return to the Home screen from any screen.
Back key
Return to the previous screen.
Power/Lock key
Switch your phone on/off by pressing and holding
this key
Short press to lock/unlock the screen
Menu key
Check what options are available.
Touch screen
Notification LED
NOTE: When receiving and making calls, the proximity sensor automatically
turns the backlight off and locks the touch screen by sensing when the phone
is near your ear. This extends battery life and prevents you from unintentionally
activating the touch screen during calls.
WARNING
Placing a heavy object on the phone or sitting on it can damage the LCD and
touch screen functions. Do not cover the LCD proximity sensor with protective
film. This could cause the sensor to malfunction.
Getting to know your phone

13
Volume keys
• On the Home screen: It controls ringer volume.
• During a call: It controls your your in-call volume.
• When playing a track: It controls volume continuously.
TIP! QuickMemo function
Press and hold the Volume Up and Volume Down Keys for one second
to use the QuickMemo function.
Power/Lock key
SIM card tray
WARNING
• This part encloses the battery compartment. Please do not open the back cover.
• Be careful not to damage the NFC touch point on the phone, which is part of
the NFC antenna.
Headphone
connector
Flash
Speaker
Charger/USB
connector
Microphone
Camera lens
Microphone
NFC touch
point

14
Installing the Micro-SIM card
Before you start exploring your new phone, you may choose to insert the
Micro-SIM card.
The eject button is a small round aperture just above the tray door. To
install a new Micro-SIM card:
1 Insert the Micro-SIM ejection tool that comes with the phone into the
eject button aperture, and push gently but rmly until the tray pops
out.
2 Remove the tray and place the Micro-SIM card inside it, with the con-
tacts out and the angled corner to the right. There is only one possible
way to t the card snugly into the tray.
3 Carefully reposition the tray in the slot and push it gently back into the
phone.
NOTE: Make sure the golden contact area on the card is facing downwards.
Eject button aperture
Getting to know your phone
Micro-SIM ejection
tool

15
Charging the phone
The charger connector is at the bottom of the phone. Insert one end of the
charging cable into the phone and plug the other end into an electrical
outlet.
NOTE: The battery must be fully charged initially to improve battery lifetime.
Locking and unlocking the screen
If you do not use the phone for a while, the screen will be automatically
turned off and locked. This helps to prevent accidental touches and saves
battery power.
When you are not using the your phone, press the Power/Lock key
to
lock your phone.
If there are any programs running when you lock your screen, they may be
still running in lock mode. It is recommended that you exit all programs
before entering lock mode to avoid unnecessary charges (e.g. phone calls,
web access and data communications).
To wake up your phone, press the Power/Lock key
. The Lock screen will
appear. Touch and slide the lock screen in any direction to unlock your
Home screen. The last screen you viewed will open.

16
Your Home screen
Touch Screen tips
Here are some tips on how to navigate on your phone.
Tap or touch – A single finger tap selects items, links, shortcuts and letters
on the on-screen keyboard.
Touch and hold – Touch and hold an item on the screen by touching it
and not lifting your finger until an action occurs. For example, to open a
contact's available options, touch and hold the contact in the Contacts list
until the context menu opens.
Drag – Touch and hold an item for a moment and then, without lifting
your finger, move your finger on the screen until you reach the target
position. You can drag items on the Home screen to reposition them.
Swipe or slide – To swipe or slide, quickly move your finger across the
surface of the screen, without pausing when you first touch it (so you don’t
drag an item instead). For example, you can slide the screen up or down
to scroll through a list, or browse through the different Home screens by
swiping from left to right (and vice versa).
Double-tap – Double-tap to zoom on a webpage or a map. For example,
quickly double-tap a section of a webpage to adjust that section to fit the
width of the screen. You can also double-tap to zoom in and out when
taking a picture (using the Camera), and when using Maps.
Pinch-to-Zoom – Use your index finger and thumb in a pinching or
spreading motion to zoom in or out when using the browser or Maps, or
when browsing pictures.
Rotate the screen – From many applications and menus, the orientation
of the screen adjusts to the device's physical orientation.

17
NOTES:
• To select an item, touch the center of the icon.
• Do not press too hard; the touch screen is sensitive enough to pick up a light,
yet firm touch.
• Use the tip of your finger to touch the option you want. Be careful not to touch
any other keys.
Home screen panels
Simply swipe your finger to the left or right to view the panels. You can
customize each panel with apps, downloads, widgets and wallpapers.
NOTE: Some screen images may be different depending on your phone provider.
On your Home screen, you can view menu icons at the bottom of the
screen. Menu icons provide easy, one-touch access to the functions you
use the most like making calls, list of contacts and messaging.
Touch the Apps icon
at the bottom of the screen to view all the
installed applications. To open any application, simply touch the icon in
the applications list.
Customizing the Home screen
You can customize your Home screen by adding apps, downloads, widgets
or wallpapers. For more convenience using your phone, add your favorite
apps and widgets to the Home screen.
To add items on your Home screen:
1 Touch and hold the empty part of the Home screen.
Or touch
at the top of the right side.
2 In the Add Mode menu, select the item you wish to add. You will see
this added item on the Home screen.

18
3 Drag it to the desired location and lift your nger.
To remove an item from the Home screen:
On home screen touch and hold the icon you want to remove and drag it
to
.
TIP! To add an application icon to the Home screen from the Apps menu, touch
and hold the application you want to add.
TIP! Using folders
You can combine several app icons in a folder. Drop one app icon over another
one on a Home screen, and the two icons will be combined.
Returning to recently-used applications
1 Touch and hold the Home key. The screen displays a pop-up contain-
ing the icons of applications you used recently.
2 Touch an icon to open the application. Or touch the Back key to return
to your previous screen.
Notification drawer
The notification drawer alerts you to the arrival of new messages, calendar
events, and alarms, as well as to ongoing events, such as video downloads.
From the notifications drawer, you can view your phone’s current status
and pending notifications.
NOTE: The available options may vary depending on the region or service
provider.
Your Home screen

19
Pending
notifications
Bluetooth, Wi-Fi, &
battery status
Swipe down for notifications & settings
Swipe down from the status bar to open the notifications drawer. To close
the notifications drawer, swipe up the bar that is at the bottom of the
screen.
Quick Settings
Use Quick Settings to easily toggle function settings like Wi-Fi, manage
display brightness and more. For Quick Set tings, swipe down from the
status bar to open the notifications drawer and swipe or touch for you
desired setting.
To rearrange Quick Setting items on the notification drawer
Touch
> to rearrange items on the notification drawer.

20
Viewing the status bar
Indicator icons appear on the status bar at the top of the screen to report
missed calls, new messages, calendar events, device status, Bluetooth, data
connections and more.
Below is a table explaining the meaning of icons you're likely to see in the
status bar.
Icon Description Icon Description
No Micro-SIM card Vibrate mode
No signal Battery fully charged
Airplane mode Battery is charging
Connected to a Wi-Fi
network
Downloading data
Wired headset Uploading data
Call in progress GPS is acquiring
Call hold
Receiving location data
from GPS
Speakerphone Data is syncing
Missed call New Gmail
Your Home screen

21
Bluetooth is on
New Google Talk
message
System warning New message
Alarm is set Song is playing
New voicemail
Phone is connected to
PC via USB cable or USB
tethering is active
Ringer is silenced
Portable Wi-Fi hotspot is
active
NFC is on
Both USB tethering and
portable hotspot are
active
Android Beam is on
NOTE: The icons location in the status bar may differ according to the function
or service.
On-screen keyboard
You can enter text using the on-screen keyboard. The on-screen keyboard
appears automatically on the screen when you need to enter text. To
manually display the keyboard, simply touch a text field where you want
to enter text.
Using the keypad & entering text
Tap once to capitalize the next letter you type. Double-tap for all caps.

22
Tap to switch to the numbers and symbols keyboard. You can also
touch and hold this tab to view the Settings menu.
Tap to enter a space.
Tap to create a new line in the message field.
Tap to delete the previous character.
Entering accented letters
When you select Spanish or French as the text entry language, you can
enter special Spanish or French characters (e.g. "á").
For example, to input "á", touch and hold the "a" key until the zoom-in key
grows bigger and displays characters from different languages.
Then select the special character you want.
Your Home screen

23
Google account setup
When you first turn on your phone, you have the opportunity to activate
the network, to sign into your Google Account and select how you want to
use certain Google services.
To set up your Google account:
• Sign into a Google Account from the prompted set-up screen.
OR
• Touch > Apps tab > select a Google application, such as Gmail >
select New to create a new account.
If you have a Google account, touch Existing, enter your email address
and password, then touch
.
Once you have set up your Google account on your phone, your phone
automatically synchronizes with your Google account on the Web.
Your contacts, Gmail messages, calendar events and other information
from these applications and services on the Web are synchronized with
your phone. (This will depend on your synchronization settings.)
After signing in, you can use Gmail™ and take advantage of Google
services on your phone.

24
Connecting to Networks and Devices
Wi-Fi
With Wi-Fi, you can use high-speed Internet access within the coverage of
the wireless access point (AP). Enjoy wireless Internet using Wi-Fi, without
extra charges.
Connecting to Wi-Fi networks
To use Wi-Fi on your phone, you need to access a wireless access point
or ‘hotspot’. Some access points are open and you can simply connect to
them. Others are hidden or use security features; you must configure your
phone to be able to connect to them.
Turn off Wi-Fi when you're not using it to extend the life of your battery.
NOTE: If you are out of the Wi-Fi zone or have set Wi-Fi to OFF, additional
charges may be applied by your mobile operator for mobile data use.
Turning Wi-Fi on and connecting to a Wi-Fi network
1 Touch > Apps tab > Settings > Wi-Fi from WIRELESS & NETWORKS
tab.
2 Activate Wi-Fi and start scanning for available Wi-Fi networks.
3 Tap the Wi-Fi menu again to see a list of active and in-range Wi-Fi
networks.
• Secured networks are indicated by a lock icon.
4 Touch a network to connect to it.
• If the network is secured, you are prompted to enter a password or
other credentials. (Ask your network administrator for details)
5 The status bar displays icons that indicate Wi-Fi status.

25
Bluetooth
You can use Bluetooth to send data by running a corresponding
application, but not from the Bluetooth menu as on most other mobile
phones.
NOTE:
• LG is not responsible for the loss, interception or misuse of data sent or
received via the Bluetooth wireless feature.
• Always ensure that you share and receive data with devices that are trusted
and properly secured. If there are obstacles between the devices, the operating
distance may be reduced.
• Some devices, especially those that are not tested or approved by Bluetooth
SIG, may be incompatible with your device.
Turning on Bluetooth and pairing up your phone with a Bluetooth
device
You must pair your device with another device before you connect to it.
1 Touch > Apps tab > Settings > activate Bluetooth from WIRELESS &
NETWORKS tab.
2 Tap the Bluetooth menu again. You will see the option to make your
phone visible and option to search devices Now tap Search for devices
to view the devices in the bluetooth range.
3 Choose the device you want to pair with from the list.
Once the paring is successful, your device will connect to the device.
NOTE: Some devices, especially headsets or hands-free car kits, may have a fixed
Bluetooth PIN, such as 0000. If the other device has a PIN, you will be asked to
enter it.

26
Send data using the Bluetooth wireless feature
1 Select a file or item, such as a contact, memo, or media file, touch on
image screen or the Menu key on contact's screen > Share > Blue-
tooth.
2 Check whether Bluetooth is on, then select Search for devices.
3 Choose the device you want to send data to from the list.
NOTE: The method for selecting an option may vary by data type.
Receive data using the Bluetooth wireless feature
1 Touch > Apps tab > Settings > activate Bluetooth and touch Make
phone visible to be visible on other devices.
NOTE: To select the length of time that your device will be visible, touch >
Visibility timeout.
2 Select Pair to conrm that you are willing to receive data from the
device.
Sharing your phone's data connection
USB tethering and portable Wi-Fi hotspot are great features when there
are no wireless connections available. You can share your phone's mobile
data connection with a single computer via a USB cable (USB tethering).
You can also share your phone's data connection with more than one
device at a time by turning your phone into a portable Wi-Fi hotspot.
When your phone is sharing its data connection, an icon appears in the
status bar and as an ongoing notification in the notifications drawer.
For the latest information about tethering and portable hotspots,
including supported operating systems and other details, visit http://www.
android.com/tether.
Connecting to Networks and Devices

27
To change Portable Wi-Fi hotspot settings:
Touch
> Apps tab > Settings > More from WIRELESS & NETWORKS
tab > Portable Wi-Fi hotspot > choose options that you want to adjust.
TIP! If your computer is running Windows 7 or a recent distribution of some
versions of Linux (such as Ubuntu), you will not usually need to prepare your
computer for tethering. But, if you are running an earlier version of Windows or
another operating system, you may need to prepare your computer to establish
a network connection via USB. For the most current information about which
operating systems support USB tethering and how to configure them, visit
http://www.android.com/tether.
To rename or secure your portable hotspot
You can change the name of your phone's Wi-Fi network name (SSID) and
secure its Wi-Fi network.
1 On the Home screen, touch > Apps tab > Settings.
2 Touch More from WIRELESS & NETWORKS tab and select Portable Wi-
Fi hotspot.
3 Ensure that Portable Wi-Fi hotspot is checked.
4 Touch Set up Wi-Fi hotspot.
• The Set up Wi-Fi hotspot dialogue box will open.
• You can change the Network SSID (name) that other computers see
when scanning for Wi-Fi networks.
• You can also touch the Security menu to configure the network with
Wi-Fi Protected Access 2 (WPA2) security using a pre-shared key (PSK).
• If you touch the WPA2 PSK security option, a password field is added
to the Set up Wi-Fi hotspot dialogue box. If you enter a password, you
will need to enter that password when you connect to the phone's
hotspot with a computer or other device. You can set Open in the
Security menu to remove security from your Wi-Fi network.

28
5 Touch Save.
ATTENTION! If you set the security option as Open, you cannot prevent
unauthorized usage of online services by other people and additional charges
may be incurred. To avoid unauthorized usage, you are advised to keep the
security option active.
Enabling Wi-Fi Direct to share through SmartShare
Wi-Fi Direct automatically scans nearby Wi-Fi Direct devices and the
searched devices are listed as they are found. This allows you to select a
specific device to share multimedia data with through Smart Share.
NOTE: Wi-Fi Direct cannot be enabled while using other Wi-Fi functions.
1 Touch > Apps tab > Settings > Wi-Fi from WIRELESS & NETWORKS.
2 Activate Wi-Fi and touch the Menu key > Wi-Fi Direct.
3 Select a device to connect with from the scanned device list.
CREATE GROUP
– Touch to activate group owner mode, which enables the
legacy Wi-Fi devices to connect by scanning your phone. In this case you
must enter the password that is set in Password.
NOTE: When your phone becomes a group owner it will consume more battery
power than when it is a client. The Wi-Fi Direct connection does not provide
Internet service. As a result, additional costs may be incurred when connecting
and using online services. Check data charges with your network provider.
Connecting to Networks and Devices

29
SmartShare
SmartShare uses DLNA (Digital Living Network Alliance) technology to
share digital content over a wireless network. Both devices must be DLNA
certified to support this feature.
To turn SmartShare on and allow content sharing
1 Touch > Apps tab > SmartShare.
2 Touch the Menu key > Settings.
3 Touch Discoverable to allow your device to be detected by other
devices.
• Touch Always accept requests if you would like to automatically accept
sharing requests from other devices.
• Touch Receive files if you would like to allow other devices to upload
media files to your phone.
NOTE: Make sure that the DLNA function of your devices is properly configured
and the receive files option in the Settings menu is checked.
4 Under the Shared content section, touch to checkmark the types of
content you would like to share. Choose from Photos, Videos, and
Music.
5 SmartShare is now activated and ready to share content.
To share contents from remote content library to other devices
Let your renderer device (e.g., TV) play multimedia content from your
remote content library (e.g., PC).
NOTE: Make sure that the DLNA function of your devices is properly configured
(e.g., for TV and PC).
1 Touch > Apps tab > SmartShare.
2 Touch the To icon and select the device from the renderer device

30
list.
3 Touch the From icon and select the device for the remote content
library.
4 You can browse the content library.
5 Touch and hold a content thumbnail and ick it to the top area with
your nger or touch the Menu Key
> Play.
To share content from your phone to your renderer device (e.g. TV)
NOTE: Make sure that your renderer device is properly configured.
1 While watching your pictures or videos using the Gallery application,
touch tab
/ / in the Title area.
: Need to be connected to a network.
: Select the device in the network.
: Currently, the content is being shared through SmartShare.
NOTE: Follow the same steps to use the Music Player, Video Player and Polaris
Office to share content.
2 Select the device from renderer lists to play the les.
NOTICE: Make sure that your device is connected to your home network using
Wi-Fi connection to use this application.
Some DLNA enabled devices (e.g. TV) support only the DMP feature of DLNA
and will not appear in the renderer device list.
Your device may not be able to play some content.
To download contents from the remote content library
1 Touch > Apps tab > SmartShare.
2 Touch the From button and select the device for the remote con-
tent library.
3 You can now browse the content library.
Connecting to Networks and Devices

31
4 Touch and hold a content thumbnail and then touch Download.
NOTICE: A few types of content are not supported.
To upload content from the remote content library
1 Touch > Apps tab > SmartShare.
2 Touch the From button and select My phone.
3 You can browse the local content library.
4 Touch and hold a content thumbnail and then touch Upload.
5 Select the device for the remote content library to be uploaded.
NOTICE: Some DLNA enabled devices do not support the DMS upload
functionality and will not upload files. A few types of content are not supported.
PC connections with a USB cable
Learn to connect your device to a PC with a USB cable in USB connection
modes. By connecting the device to a PC you can directly transfer data to
and from your device and use the PC software (LG PC Suite).
Syncing your phone with your computer
To synchronize your phone with your PC using the USB cable, you need to
install the PC software (LG PC Suite) on your PC. Download the program
from the LG website (www.lg.com).
1 Use the USB data cable to connect your phone to the PC. The USB con-
nection type list will appear; select LG software.
2 Run the LG PC Suite program on your PC. Refer to the PC software (LG
PC Suite) help for more information.
NOTE: The LG integrated USB driver is required to connect an LG device to a PC.
It is installed automatically when you install the LG PC Suite software.

32
Transferring music, photos and videos using the USB mass storage
mode
1 Connect your phone to a PC using a USB cable.
2 If you haven't installed the LG Android Platform Driver on your PC, you
will need to manually change the settings. Choose System settings >
PC connection > USB connection type, then select Media sync (MTP).
3 You can now view the mass storage content on your PC and transfer
the les.
Synchronize with Windows Media Player
Ensure that Windows Media Player is installed on your PC.
1 Use the USB cable to connect the phone to a PC on which Windows
Media Player has been installed.
2 Select the Media sync (MTP) option. When connected, a pop-up win-
dow will appear on the PC.
3 Open Windows Media Player to synchronize music les.
4 Edit or enter your device’s name in the pop-up window (if necessary).
5 Select and drag the music les you want to the sync list.
6 Start synchronization.
• The following requirements must be satisfied to synchronize with
Windows Media Player.
Items Requirement
OS Microsoft Windows XP SP2, Vista or higher
Window
Media
Player
version
Windows Media Player 10 or higher
• If the Windows Media Player version is lower than 10, install version 10 or
higher.
Connecting to Networks and Devices

33
Calls
Making a call
1 Touch to open the keypad.
2 Enter the number using the keypad. To delete a digit, touch the .
3 Touch to make a call.
4 To end a call, touch the End icon .
TIP! To enter "+" to make international calls, touch and hold .
Calling your contacts
1 Touch and Contacts to open your contacts.
2 Scroll through the contact list or enter the rst few letters of the con-
tact you want to call by touching Search contacts.
3 In the list, touch the contact twice or touch the you want to call.
Answering and rejecting a call
When you receive a call in Lock state, swipe the in any direction to
Answer the incoming call.
Swipe the
in any direction to Decline an incoming call.
Hold and slide the Decline with message icon from the bottom if you
want to send a message.
TIP! You can send a message quickly using this function. This is useful if you
need to reject a call with message during a meeting.

34
Adjusting the in-call volume
To adjust the in-call volume during a call, use the Volume up and down
keys on the left-hand side of the phone.
Making a second call
1 During your rst call, touch Menu > Add call and dial the number. You
can also go to the recently dialled numbers list by touching
or can
search contacts by touching and selecting the contact you want to
call.
2 Touch to make the call.
3 Both calls are displayed on the call screen. Your initial call is locked and
put on hold.
4 Touch the displayed number to toggle between calls. Or touch
Merge calls to start a conference call.
5 To end active calls, touch End or touch the Home key and slide the
notication bar down and select the End call icon
.
NOTE: You are charged for each call you make.
Viewing your call logs
On the Home screen, touch and choose the Call logs tab .
View a complete list of all dialled, received and missed calls.
TIP! Touch any call log entry to view the date, time and duration of the call.
TIP! Touch the Menu key , then touch Delete all to delete all the recorded
items.
Calls

35
Call settings
You can configure phone call settings such as call forwarding, as well as
other special features offered by your carrier.
1 On the Home screen, touch .
2 Touch .
3 Tap Call settings and choose the options that you wish to adjust.

36
Contacts
Add contacts to your phone and synchronize them with the contacts in
your Google account or other accounts that support contact syncing.
Searching for a contact
On the Home screen
1 Touch and Contacts to open your contacts.
2 Touch Search contacts and enter the contact name using the key-
board.
Adding a new contact
1 Touch , enter the new contact's number, then touch the Menu key
. Touch Add to Contacts > Create new contact.
2 If you want to add a picture to the new contact, touch the image area.
Choose from Take photo or Select from Gallery.
3 Select the contact type by touching .
4 Touch a category of contact information and enter the details about
your contact.
5 Touch Save.
Favorite contacts
You can classify frequently called contacts as favorites.
Adding a contact to your favorites
1 Touch and Contacts to open your contacts.

37
2 Touch a contact to view its details.
3 Touch the star to the right of the contact's name. The star will turn
yellow color.
Removing a contact from your favorites list
1 Touch and Contacts to open your contacts.
2 Touch the tab, and choose a contact to view its details.
3 Touch the yellow color star to the right of the contact's name. The star
turns grey and the contact is removed from your favorites.
Creating a group
1 Touch and Contacts to open your contacts.
2 Touch Groups and touch the Menu key . Select New group.
3 Enter a name for the new group. You can also set a ringtone for the
newly created group.
4 Touch Save to save the group.
NOTE: If you delete a group, the contacts assigned to that group will not be lost.
They will remain in your contacts.
Moving contacts from your old device to your new device
1 Export your contacts as a CSV le from your old device to your PC using
a PC sync program.
2 Install "LG PC Suite" on the PC rst. Run the program and connect your
Android mobile phone to the PC using a USB cable.
3 In the top menu, select Device > Import to device > Import contacts.
4 A pop-up window to select the le type and a le to import will appear.
Click Select a le and Windows Explorer will appear.

38
5 Select the contacts le to import in Windows Explorer and click Open.
6 Click OK.
7 A Field mapping pop-up to link the contacts in your device and new
contact data will appear.
8 If there is a conict between the data in your PC contacts and device
contacts, make the necessary selections or modications in LG PC
Suite.
9 Click OK.
Contacts

39
Messaging
Your phone combines SMS and MMS into one intuitive, easy-to-use menu.
Sending a message
1 Touch on the Home screen and Messaging, touch to open a
blank message.
2 Enter a contact name or contact number in the To eld. As you enter
the contact name, matching contacts will appear. You can touch a sug-
gested recipient. You can add more than one contact.
NOTE: You will be charged for a text message for every person to whom you
send the message.
3 Touch the 'Enter message' eld and begin composing your message.
4 Touch to open the options menu. Choose from Add subject, Quick
messages, Insert smiley, and Discard.
TIP! You can touch the icon to attach the file you want to share to your
message.
5 Touch Send to send your message.
6 Responses will appear on the screen. As you view and send additional
messages, a message thread is created.
WARNING: The 160-character limit may vary from country to country,
depending on the language and how the SMS is coded.
WARNING: If an image, video or audio file is added to an SMS message, it is
automatically converted into an MMS message and you are charged accordingly.

40
Threaded box
Messages (SMS, MMS) exchanged with another party can be displayed in
chronological order so that you can conveniently see an overview of your
conversation.
Changing your message settings
Your phone message settings are pre-defined, so you can send messages
immediately. You can change the settings according to your preferences.
• Touch the Messaging icon on the Home screen, touch and then tap
Settings.
Messaging

41
Email
You can use the Email application to read emails from services like Gmail.
The Email application supports the following account types: POP3, IMAP
and Exchange.
Your service provider or system administrator can provide you with the
account settings you need.
Managing an email account
The first time you open the Email application, a set-up wizard opens to
help you to set up an email account.
After the initial set-up, Email displays the contents of your inbox. If you
have added more than one account, you can switch among accounts.
To add another email account:
• Touch > Apps tab > Email > touch > Accounts > touch > Add
account.
To change an email account's settings:
• Touch > Apps tab > Email > touch > Accounts > touch >
Entire settings.
To delete an email account:
• Touch > Apps tab > Email > touch > Accounts > touch >
Remove account > touch an account you want to delete > Remove >
select Yes.
Working with account folders
Touch > Apps tab > Email, touch and select Folders.
Each account has an Inbox, Outbox, Sent and Drafts folder. Depending on
the features supported by your account's service provider, you may have
additional folders.

42
Composing and sending email
To compose and send a message
1 While in the Email application, touch the .
2 Enter an address for the message's intended recipient. As you enter
text, matching addresses will be proposed from your Contacts. Sepa-
rate multiple addresses using semicolons.
3 Touch the Cc/Bcc eld to add a Cc/Bcc and Touch to attach les, if
required.
4 Enter the text of the message.
5 Touch .
If you aren't connected to a network, for example, if you're working
in airplane mode, the messages that you send will be stored in your
Outbox folder until you connect to a network again. If it contains any
pending messages, the Outbox will be displayed on the Accounts
screen.
TIP! When a new email arrives in your Inbox, you will be notified by a sound or
vibration. Tap the email notification to stop receiving notifications.
Email

43
Camera
To open the Camera application, tap and Camera.
Getting to know the viewfinder
Swap camera – Switch between the rear–facing camera lens and the
front–facing camera lens.
Cheese shutter – To take a photo, say one of the following words:
Cheese, Smile, Whisky, Kimchi or LG.
Time catch shot – Touch this icon to capture the missing moment
before pressing the shutter.
Shot mode – Choose from Normal, HDR, Panorama or Continuous
shot.
Settings – Touch this icon to open the settings menu. See Using the
advanced settings.
Video mode – Touch this icon to switch to video mode.
Taking a photo
Gallery – Touch to view the last photo you captured. This enables you to
access your gallery and view saved photos while in camera mode.

44
NOTE: Please ensure the camera lens is clean before taking pictures.
Using the advanced settings
In the viewfinder, tap to open the advanced options. You can change
the camera settings by scrolling through the list. After selecting the
option, tap the Back key.
Touch if you want to change the viewfinder menu.
Allows you to turn on the flash when taking a photo in dark
conditions.
Zoom in or out.
Defines and controls the amount of sunlight entering the photo.
Focuses on a specific spot.
Selects photo resolution. If you choose high resolution, file size
will increase, which means you will be able to store fewer photos
in the memory.
Finds the appropriate color and light settings for the current
environment.
The ISO rating determines the sensitivity of the camera's light
sensor. The higher the ISO, the more sensitive the camera. This is
useful in darker conditions when you cannot use the flash.
Improves color quality in various lighting conditions.
Applies artistic effects to your pictures.
Camera

45
Sets a delay after the capture button is pressed. This is ideal if you
want to be in the photo.
Activate this to use your phone's location-based services. Take
pictures wherever you are and tag them with the location. If you
upload tagged pictures to a blog that supports geo tagging, you
can see the pictures displayed on a map.
NOTE: This function is only available when the GPS function is active.
Selects a shutter sound.
Automatically shows you the picture you just took.
Restore all camera default settings.
Touch this whenever you want to know how a function works.
This icon will provide you with a quick guide.
TIP!
• When you exit the camera, some settings return to their defaults, such as white
balance, color effect, timer and scene mode. Check these before you take your
next photo.
• The setting menu is superimposed over the viewfinder, so when you change
photo color or quality elements, you will see a preview of the changed image
behind the Settings menu.
Taking a quick photo
1 Open the Camera application.
2 Holding the phone horizontally, point the lens towards the subject you
want to photograph.

46
3 A focus box will appear in the center of the viewnder screen. You can
also tap anywhere on the screen to focus on that spot.
4 When the focus box turns green, the camera has focused on your
subject.
5 Touch to capture the photo.
Once you've taken a photo
Your captured photo will appear on the screen if Auto review is set to On
(refer to Using the advanced settings).
Touch
to view the last photo you took.
Tap to view the Gallery of your saved photos.
Touch to share your photo using the SmartShare function.
Touch to take another photo immediately.
Touch to send your photo to others or share it via social network
services.
Touch to delete the photo.
TIP! If you have an SNS account and set it up on your phone, you can share your
photo with your SNS community.
NOTE: Additional charges may apply when MMS messages are downloaded
while roaming.
Touch the Menu key to open all advanced options.
Set image as – Touch to use the photo as a Contact photo, Home screen
Camera

47
wallpaper or Lock screen wallpaper.
Move – Touch to move the photo to another place.
Copy – Touch to copy the selected photo and save it to another album.
Rename – Touch to edit the name of the selected photo.
Rotate left/right – To rotate left or right.
Crop – Crop your photo. Move your finger across the screen to select the
area to be cropped.
Edit
– View and edit the photo.
Select photo resolution. If you choose high resolution, file size
will increase, which means you will be able to store fewer photos
in the memory.
Improves color quality in various lighting conditions.
Applies artistic effects to your photos.
Applies additional options to your phones.
Slideshow – Automatically shows you the images in the current folder one
after the other.
Details – Find out more information about the contents.
Viewing your saved photos
You can access your saved photos when in camera mode. Just tap the
Gallery icon
and your Gallery will be displayed.
• To view more photos, scroll left or right.
• To zoom in or out, double-tap the screen or place two fingers and spread
them apart (move your fingers closer together to zoom out).

48
Video camera
Getting to know the viewfinder
Swap camera – Switch between the rear–facing camera lens and the
front-facing camera lens.
Video size – Touch to set the size (in pixels) of the video you are
recording.
Live effect – Live effect provides
various visual effects when taking a video.
Flash – Allows you to turn on the flash when taking a video in dark
conditions.
Settings – Touch this icon to open the settings menu.
Camera mode – Touch this icon to switch to camera mode.
Start recording
Gallery – Touch to view the last video you recorded. This enables you to
access your gallery and view your saved videos while in video mode.
TIP!
When recording a video, place two fingers on the screen and pinch to use the
Zoom function.

49
Using the advanced settings
Using the viewfinder, touch to open all the advanced options.
Touch if you want to change the viewfinder menu.
Zoom in or zoom out.
Defines and controls the amount of sunlight entering the video.
Improves color quality in various lighting conditions.
Choose a colour tone to use for your new view.
Activate this to use your phone's location-based services.
Choose Off to record a video without sound.
Auto review automatically shows you the video you just recorded.
Restore all video camera default settings.
Touch this if you want to know how this function works. This icon
will provide you with a quick guide.
Recording a quick video
1 Open the Camera application and touch the Video mode button.
2 The video camera viewnder appears on the screen.
3 Holding the phone, point the lens towards the subject you wish to
capture in your video.
4 Touch once to start recording.
5 A red light will appear at the top left corner of the viewnder with a
timer showing the length of the video.

50
6 Touch on the screen to stop recording.
After recording a video
A still image representing your video will appear on the screen if Auto
review is set to On.
Touch to share your video using the SmartShare function.
Touch to record another video immediately.
Touch to send your video to others or share it via social network
services.
Touch to view the Gallery of your saved videos.
NOTE: Additional charges may apply when MMS messages are downloaded
while roaming.
Watching your saved videos
1 In the viewnder, tap .
2 Your Gallery will appear on the screen.
3 Tap a video to play it automatically.
Adjusting the volume when viewing a video
To adjust the volume of a video while it is playing, use the volume keys on
the left side of the phone.
Video camera

51
LG Unique Function
QuickMemo function
Use the QuickMemo function to practically and efficiently create memos
during a call, with a saved picture or on the current phone screen.
OR
1 Enter the QuickMemo function
screen by pressing both the
Volume up and down keys for
one second on the screen you
want to capture.
OR
Touch and slide the status bar
downward and touch
.
2 Select the desired menu option
from Pen type, Color, Eraser, and
create a memo.

52
3 Touch in the Edit menu and
select it to save the memo with
the current screen.
NOTE: Please use a fingertip while using the QuickMemo function. Do not use
your fingernail.
Using the QuickMemo options
You can easily use the QuickMenu options when using the QuickMemo
function.
Touch to keep the current memo on the screen and use the
phone simultaneously.
Selects whether to use the background screen or not.
Undo or Redo.
Selects the pen type and the colour.
Erases the memo that you created.
Touch to send your memo to others or share it via social network
services.
Saves the memo with the current screen in the Gallery/
Notebook.
LG Unique Function

53
Viewing the saved QuickMemo
Touch Gallery/Notebook and select the QuickMemo album.
Notebook function
With the Notebook application, you can manage and personalize a wide
variety of information. Notebook allows you to create your own special
notes with drawings, images, maps and stickers.
Making a note
1 Touch > Apps tab > Notebook.
2 Touch New note to create a new note.
3 Select the desired mode (Cover, Title, Paper, Paper color) and then tap
on OK.
4 Create a simple note on an empty page.
Getting to know the Notebook
Pages-property panelsBookshelf
Bookshelf

54
Search for pages of notes.
Share as notebook file, a PDF file or image file via email/Gmail.
Delete the saved notebook from the Bookshelf.
Pages-Property panels
Select the Read-only or edit mode.
Undo or Redo.
Tap this button to write.
Select the Pen type, Thickness, Opacity and Color.
Erase the memo that you created.
Touch to attach files to the note.
Touch to send your note to others or share it via social network
services.
Save the note with the current screen.
Select to lock or unlock the Front key.
Tap this button to enlarge the input area.
Viewing the saved notebook
• Saved Notebook memos are on the Bookshelf.
• If you save memos from QuickMemo, a QuickMemo note will be created
and saved on the Bookshelf automatically.
LG Unique Function

55
NOTE: For more information of the Notebook guide, please see Notebook >
Notebook guide.
QuickTranslator
Simply aim the camera of your smart phone at the foreign sentence you
want to understand. You can get the real-time translation anywhere and
anytime.
You can buy additional dictionaries for offline translation from the Google
Play Store.
Home language.
Destination language
Flash.
Translation of block.
Translation of sentence.
Translation of each word.
1 Touch > Apps tab > QuickTranslator.
2 Touch Word, Line or Block.
3 Touch and select the desired language.
4 Hold the phone toward the subject you want to translate for a few
seconds.

56
NOTE: Only one dictionary is provided free of charge. Additional dictionaries
must be purchased. Please select from the list below the dictionary you would
like to install as your complimentary dictionary.
NOTE: There may be a difference in the rate of recognization depending on the
size, font, color, brightness and angle of the letters that need to be translated.
Live Zooming function
Live Zooming allows you to zoom in or zoom out on a portion of a video
that is being played to make the desired scan appear larger or smaller.
When viewing the video, use your index nger and thumb in a pinching
or spreading motion to zoom in or out.
NOTE:
• When in video playback mode, when you pinch in or out or slide the screen up
or down, the screen brightness will be adjusted.
• When in video playback mode, when you slide the screen left or right, the
volume will be adjusted.
NOTE: Do not to press too hard; the touch screen is sensitive enough to pick up
a light, but firm touch.
LG Unique Function

57
QSlide function
The QSlide function enables an overlay on your phone’s display for easy
multi-window viewing.
OR
Touch to exit the QSlide
function and return to full
window.
Tap to adjust transparency.
Tap to end the QSlide
function.
1 Touch and slide the status bar downward > touch QSlide apps or when
using a
function supported by the QSlide function > touch
. The function will
be continuously displayed as a small window on your screen.
2 You can make a call, browse the Web, or choose other phone options.
You can also use and tap the screen of the small windows when the
transparency bar is not full
.
NOTE: The QSlide function can support up to two windows at the same time.
TIP!
Touch and slide the notification panel down with your finger.
Touch
> to manage the "Quick settings" or "QSlide" in the notification
panel.

58
Dual Play function
You can display different screens on the two displays connected wirelessly
or by cable.
1 Dual play mode is executed by tapping the Home key when playing
content on the external display.
2 You can stop playing the content on the external display using the
notication panel.
IMPORTANT:
• Connect your smart phone to a display wirelessly (Miracast) or by cable (MHL
cable).
• You can connect an MHL- or Miracast-enabled TV or monitor to your smart
phone.
• Some video files may not be supported by the dual play function.
• The Shielded LG MHL cable is recommended.
Mirroring
∙∙∙∙∙
LG Unique Function

59
Dual Play
∙∙∙∙∙
NOTE:
• Dual Play is supported by 3 applications - Videos, Media Home (MHL only),
Polaris Office 4.
• The minimum TV resolution required for dual play is 720p (1280x720)
LG SmartWorld
LG SmartWorld offers an assortment of exciting content - games,
applications, wallpaper and ringtones - giving LG phone users the chance
to enjoy richer "Mobile Life" experiences.
How to Get to LG SmartWorld from Your Phone
1 Touch > Apps tab > tap the icon to access LG SmartWorld.
2 Tap Sign in and enter ID/PW for LG SmartWorld. If you have not signed
up yet, tap Register to receive your LG SmartWorld membership.
3 Download the content you want.
NOTE: What if there is no icon?
1 Using a mobile Web browser, access LG SmartWorld (www.lgworld.com) and
select your country.
2 Download the LG SmartWorld App.
3 Run and install the downloaded file.
4 Access LG SmartWorld by tapping the
icon.

60
LG Unique Function
How to use LG SmartWorld
• Participate in monthly LG SmartWorld promotions.
Search content.
Find content by category (e.g. Games, Education, Entertainment
etc).
List of downloaded/to-be updated content.
• Try the easy "Menu" buttons to find what you’re looking for fast.
Apps for you – Recommended content based on your previous choices.
Settings – Set Profile and Display.
Sign in – Set your ID and Password.
• Try other useful functions as well. (Content Detail screen)
NOTE: LG SmartWorld may not be available from all carriers or in all countries.
On-Screen Phone
On-Screen Phone allows you to view your mobile phone screen from a
PC via a USB or Wi-Fi connection. You can also control your mobile phone
from your PC, using the mouse or keyboard.
On-Screen Phone icons
Connects your mobile phone to your PC, or disconnects it.
Changes the On-Screen Phone preferences.
Exits the On-Screen Phone programme.
Maximises the On-Screen Phone window.

61
Minimize the On-Screen Phone window.
On-Screen Phone features
• Real-time transfer and control: displays and controls your mobile phone
screen when connected to your PC.
• Mouse control: allows you to control your mobile phone by using the
mouse to click and drag on your PC screen.
• Text input with keyboard: allows you to compose a text message or note
using your computer keyboard.
• File transfer (mobile phone to PC): sends files from your mobile phone
(e.g. photos, videos, music and Polaris Office files) to your PC. Simply
right-click on the file which you want to send to PC and click on "Save to
PC".
• File transfer (PC to mobile phone): sends files from your PC to your
mobile phone. Just select the files you wish to transfer and drag and
drop them into the On-Screen Phone window. The files sent are stored in
internal SD card.
• Real-time event notifications: prompts a pop-up to inform you of any
incoming calls or text/multimedia messages.
How to install On-Screen Phone on your PC
1 Visit LG Home (www.lg.com) and select a country of your choice.
2 Go to Support > Mobile Phone Support > Select the Model (LG-E976)
> Click OSP ( On-Screen Phone ) to download. You can install the On-
S
creen Phone on your PC.

62
Gallery
You can store multimedia files in internal memory for easy access to all
your multimedia files. Use this application to view multimedia files like
pictures and videos.
1 Touch > Apps tab > Gallery.
You can manage and share all your image and video les with Gallery.
NOTE:
• Some file formats are not supported, depending on the software installed on
the device.
• Some files may not play properly, depending on how they are encoded.
Viewing pictures
Launching Gallery displays your available folders. When another
application, such as Email, saves a picture, the download folder is
automatically created to contain the picture. Likewise, capturing a
screenshot automatically creates the Screenshots folder. Select a folder to
open it.
Pictures are displayed by creation date in a folder. Select a picture to view
it full screen. Scroll left or right to view the next or previous image.
Zooming in and out
Use one of the following methods to zoom in on an image:
• Double-tap anywhere to zoom in.
• Spread two fingers apart on any place to zoom in. Pinch to zoom out, or
double-tap to return.
Multimedia

63
Playing videos
Video files show the icon in the preview. Select a video to watch it and
tap . The Videos application will launch.
Editing photos/videos
When viewing a photo/video, tap the Menu key and use the advanced
editing options.
• Slideshow: start a slideshow with the images in the current folder.
Deleting images
Use one of the following methods:
• In a folder, tap and select photos/videos by ticking, and then tap on
Delete.
• When viewing a photo/video, tap .
Setting as wallpaper
When viewing a photo, touch the Menu key > Set image as to set the
image as wallpaper or to assign it to a contact.
NOTE:
• Some file formats are not supported, depending on the device software.
• If the file size exceeds the available memory, an error can occur when you
open files.
Videos
Your phone has a built-in video player that lets you play all of your favorite
videos. To access the video player, touch
> Apps tab > Videos.

64
Playing a video
1 Touch > Apps tab > Videos.
2 Select the video you want to play.
Touch to pause video playback.
Touch to resume video playback.
Touch to go 10 seconds forward.
Touch to go 10 seconds backward.
Touch to manage the video volume.
Touch to change the ratio of the video screen.
Touch to share your video via the SmartShare function.
To change the volume while watching a video, press the up and down
volume keys on the left-hand side of the phone.
Touch and hold a video in the list. The Share, Trim, Delete and Details
options will be displayed.
Video Editor
You can edit the photos or videos stored on the phone.
NOTE: Video editing function is supported only for photos or videos recorded
using this phone.
Multimedia

65
< Project list screen >
Buttons area
Project list
area
Help
Creat project
Projects should be exported to play in applications such as videos
Play project
Delete project
Share project with application such as YouTube
< Project edit screen >
Timeline area
Viewer area
Move to project list screen. Currently edited project is saved
automatically

66
Split video clip into two portions over the playhead
Add sound effect
Add video, image or audio clip
Undo an action
Redo an action
Add text to video or image clip
Video Wiz
You can make your own movie using your images/videos and music.
1 Touch > Apps tab > Video Wiz.
2 After seeing the brief introduction on the steps to follow, tap OK.
3 Tap to add images or videos to your movie.
4 Tap the desired images or videos, then tap .
• To remove images or videos, tap and select the desired files > .
• To rearrange them, touch and hold an image/video, and drag and drop it
to the desired position.
Multimedia

67
5 Tap Select style to select the desired movie style. Scroll through and
select the style you want. As you scroll through the styles, a preview will
be displayed.
6 Tap Select music to set the background music.
7 Tap to play your movie.
8 Tap to edit the video clip using Text, Sticker or Trim. After editing the
video, tap .
9 Tap to save the video. Tap to view the help information on using
this feature.
Music
Your phone has a built-in music player that lets you play all your favorite
tracks. To access the music player, touch
> Apps tab > Music.
Add music files to your phone
Start by transferring music files to your phone:
• Transfer music using Media sync (MTP).
• Download from the Web.
• Synchronize your phone to a computer.
• Receive files via Bluetooth.
Transfer music using Media sync (MTP)
1 Connect the phone to your PC using the USB cable.
2 Select the Media sync (MTP) option. Your phone will appear as another
hard drive on your computer. Click on the drive to view it. Copy the
les from your PC to the drive folder.
3 When you’re nished transferring les, swipe down on the Status Bar
and touch USB connected > Charge only. You may now safely unplug
your device.

68
Playing a song
1 Touch > Apps tab > Music.
2 Touch Songs.
3 Select the song you want to play.
Touch to find the files with YouTube
Touch to share your music via SmartShare function
Touch to set shuffle mode
Touch to set repeat mode
Touch to manage the music volume
Touch to pause playback
Touch to resume playback
Touch to skip to the next track on the album or in the playlist
Touch to go back to the beginning of the song. Touch twice to
return to the previous song
Touch to set the favorites
Touch to see the current playlist
Touch to set Dolby audio effect when connected with a headset
jack
To change the volume while listening to music, press the up and down
volume keys on the left-hand side of the phone.
Touch and hold any song in the list. The Play, Add to playlist, Share, Set as
ringtone, Delete, Details and Search options will be displayed.
Multimedia

69
NOTE:
• Some file formats are not supported, depending on the device software.
• If the file size exceeds the available memory, an error can occur when you
open files.
NOTE: Music file copyrights may be protected by international treaties and
national copyright laws.
Therefore, it may be necessary to obtain permission or a licence to reproduce or
copy music.
In some countries, national laws prohibit private copying of copyrighted
material. Before downloading or copying the file, check the national laws of the
relevant country concerning the use of such material.

70
Setting your alarm
1 Touch > Apps tab > Alarm/Clock > .
2 After you set the alarm, your phone lets you know how much time is
left before the alarm will go o.
3 Set Repeat, Snooze duration, Vibration, Alarm sound, Alarm volume,
Auto app starter, Puzzle lock and Memo. Touch Save.
NOTE: To change alarm settings in the alarm list screen, touch the Menu key
and select Settings.
Using your calculator
1 Touch > Apps tab > Calculator.
2 Touch the number keys to enter numbers.
3 For simple calculations, touch the function you want to perform (+, –, x
or ÷) followed by =.
4 For more complex calculations, touch , select the Advanced panel,
then choose sin, cos, tan, log etc.
5 To check the history, tap the icon .
Adding an event to your calendar
1 Touch > Apps tab > Calendar.
2 On the screen, you can nd the dierent view types for the calendar
(day, week, month, agenda).
3 Tap on the date for which you wish to add an event and touch .
4 Touch Event name and enter the event name.
5 Touch Location and enter the location. Check the date and enter the
time you wish your event to start and nish.
Utilities

71
6 If you wish to add a note to your event, touch Description and enter
the details.
7 If you wish to repeat the alarm, set REPEAT and set REMINDERS, if
necessary.
8 Touch Save to save the event in the calendar.
Voice Recorder
Use the voice recorder to record voice memos or other audio files.
Recording a sound or voice
1 Touch > the Apps tab and select Voice Recorder.
2 Touch to begin recording.
3 Touch to end the recording.
4 Touch to listen to the recording.
NOTE: Touch to access your album. You can listen to the saved recording.
The available recording time may differ from actual recording time.
Sending the voice recording
1 Once you have nished recording, you can send the audio clip by
touching
.
2 Choose from Bluetooth, Email, FileShare, Gmail, Memo or Messaging.
When you select Bluetooth, email, FileShare, Gmail, memo or messa-
ging, the voice recording is added to the message. You may then write
and send the message as you usually would.

72
Task Manager
You can manage your applications using Task Manager. You can easily
check the number of applications that are currently running and shut
down certain applications. You can also uninstall the applications you have
installed on your device.
Tasks
This task can be synchronized with MS Exchange account. You can create
task, revise it and delete it in MS outlook or MS Office Outlook Web Access.
To Synchronize MS Exchange
1 From the Home Screen, Touch > Settings.
2 Touch Accounts & sync > ADD ACCOUNT.
3 Touch Microsoft Exchange to create email address and password.
4 Make sure you checkmark Sync Tasks.
Polaris Office 4
Polaris Office is a professional mobile office solution that lets users
conveniently view various types of office documents, including Word, Excel
and PowerPoint files, anywhere or anytime, using their mobile devices.
Touch
> Apps tab > Polaris Office 4.
Viewing files
Mobile users can now easily view a wide variety of file types, including
Microsoft Office documents and Adobe PDF, right on their mobile devices.
When viewing documents using Polaris Office, the objects and layout
remain the same as in the original documents.
Utilities

73
FileShare
This feature allows you to share files from your phone.
1 Touch > Apps tab > FileShare.
2 Choose the types of content you would like to share. Choose from
images, videos, music and documents.
Backup
About backing up and restoring smart phone data
It is recommended that you regularly create and save a backup file on the
internal storage, especially before updating any software. Maintaining
a current backup file in storage memory may allow you to recover
smart phone data if your smart phone is lost, stolen, or corrupted by an
unforeseen issue.
This Backup application is supported between LG smart phones, other S/W
versions or OSs. As a result, when you buy a new LG smart phone, you can
backup your current phone data to your new phone.
If you have preloaded Backup application on your smart phone, you
can backup and restore most of your smart phone data, Applications
including unprotected applications, their settings, Applications
(Downloaded), Applications (Pre-installed), Bookmarks, Calendar, Call
log, Contacts, Home screen, Messages and System settings using this
application you may:
• Perform a manual backup of your smart phone data.
• Schedule automatic backups of your smart phone data.
• Restore your smart phone data.

74
NOTE: Please note that the Backup function does not support the backup of
User data & Media data (Picture/Video/Music). Please backup those files using the
Media sync (MTP). Connect your phone to your computer using a USB cable and
touch Media sync (MTP).
WARNING
To protect against unexpected shutoff during backup or restore operations, due to
insufficient battery power, you should always keep your battery fully charged.
Backup your smart phone data
1 Touch > Apps tab > Backup > Backup > Internal Storage.
2 Touch Add new to enter a name for your backup le and select Con-
tinue.
3 Select the check box next to the item you want to backup and select
Continue to backup.
4 When all selected les have been backed up, you will see the message
‘Done’. Select Continue to nish backing up data.
Scheduling automatic backups
You can also program automatic backups for the data on your smart
phone according to your schedule setting. To do this, complete the
following steps:
1 Touch > Apps tab > Backup > Schedule.
2 On the Scheduled Backup Location screen, touch Internal Storage.
3 From the list, select how often you want to backup your device data
and settings, and select Continue.
4 Select the check box next to the data you want to backup, and select
Continue to nish the schedule set.
Utilities

75
Restoring smart phone data
To restore data that is in your on-board device memory, mass storage
mode must be turned off.
NOTE: All files that are stored on your smart phone are deleted before the
backup file is restored.
1 Touch > Apps tab > Backup > Restore > Internal Storage.
2 On the Restore screen, select a backup le that contains the data you
wish to restore.
3 Select the check box next to the item you wish to restore and select
Continue to restore it to your phone.
NOTE: Please note that your phone data will be overwritten with the content of
your backup.
4 If the backup le is encrypted, type the password that you created to
encrypt it.
5 When all selected les have been restored, you will see the message
‘Done’. Select Yes to restart the phone.
NOTE: You can set Enable encryption to encrypt your backup files for extra
protection.
Touch the Menu from the Backup screen, and select Settings >
Security > Enable encryption and select the check box. You must have an
activation password in order to restore synchronized organizer data.
NOTE: You can also schedule automatic delete for old backups and keep only
the most recent backup. Touch the Menu from the Backup screen, and select
Settings > Scheduled backup > Auto delete old backups to select the number
of scheduled backups to keep.

76
Google+
Use this application to stay connected with people via Google’s social
network service.
• Touch > Apps tab > Google +.
NOTE: This application may not be available depending on the region or service
provider.
Voice Search
Use this application to search webpages using voice.
1 Touch > Apps tab > Voice Search.
2 Say a keyword or phrase when Speak now appears on the screen.
Select one of the suggested keywords that appear.
NOTE: This application may not be available depending on the region or service
provider.
Downloads
Use this application to see what files have been downloaded through the
applications.
• Touch > Apps tab > Downloads.
NOTE: This application may not be available depending on the region or service
provider.
Utilities

77
The Web
Internet
Use this application to browse the Internet. Browser gives you a fast, full-
color world of games, music, news, sports, entertainment and much more,
right on your mobile phone wherever you are and whatever you enjoy.
NOTE: Additional charges apply when connecting to these services and
downloading content. Check data charges with your network provider.
Touch > Apps tab > Internet.
Using the Web toolbar
Touch and hold the Web toolbar and slide it upwards with your finger to
open.
Touch to go back one page.
Touch to go forward one page, to the page you connected to
after the current one. This is the opposite of what happens when
you touch the Back key, which takes you to the previous page.
Touch to go to the Home page.
Touch to add a new window.
Touch to access bookmarks.
Viewing webpages
Tap the address field, enter the web address and tap Go.

78
Opening a page
To go to new page, tap
To go to another webpage, tap , scroll up or down, and tap the page to
select it.
Searching the web by voice
Tap the address field, tap , speak a keyword, and then select one of the
suggested keywords that appear.
NOTE: This feature may not be available depending on the region or service
provider.
Bookmarks
To bookmark the current webpage, touch > Save to bookmarks > OK.
To open a bookmarked webpage, tap
and select one.
History
Tap > History to open a webpage from the list of recently-visited
webpages. To clear the history, tap Menu
Clear all history.
Chrome
Use Chrome to search for information and browse webpages.
Touch
> Apps tab > Chrome.
NOTE: This application may not be available, depending on your region and
service provider.
Viewing webpages
Tap the Address field, and then enter a web address or search criteria.
The Web

79
Opening a page
To go to a new page, tab + New tab.
To go to another webpage, tap
, scroll up or down and tap the page to
select it.
Searching the web by voice
Tap the address field, tap , speak a keyword and select one of the
suggested keywords that appear.
Syncing with other devices
Sync open tabs and bookmarks to use with Chrome on another device
when you are logged in with the same Google account.
To view open tabs on other devices, tap Menu
Other devices.
Select a webpage to open.
To view bookmarks, tap
.

80
Settings
Access the Settings menu
1 On the Home screen, touch > Apps tab > Settings. Or on the home
screen, touch
> System settings.
2 Select a setting category and select an option.
WIRELESS & NETWORKS
Here, you can manage Wi-Fi and Bluetooth. You can also set up mobile
networks and switch to airplane mode.
< Wi-Fi >
Wi-Fi – Turns on Wi-Fi to connect to available Wi-Fi networks.
TIP! How to obtain the MAC address
To set up a connection in some wireless networks with MAC filters, you may
need to enter the MAC address of your phone in the router.
You can find the MAC address in the following user interface: touch Apps tab >
Settings > Wi-Fi >
> Advanced > MAC address.
< Bluetooth >
Turn the Bluetooth wireless feature on or off to use Bluetooth.
< Mobile data >
Displays the data usage and set mobile data usage limit.
< Call >
Configure phone call settings such as call forwarding and other special
features offered by your carrier.
Fixed dialing numbers – Turn on and compile a list of numbers that can
be called from your phone. You’ll need your PIN2, which is available from
your operator. Only numbers within the fixed dial list can be called from
your phone.

81
Save unknown numbers – Add unknown numbers to contacts after a call.
Voicemail – Allows you to select your carrier’s voicemail service.
Call reject – Allows you to set the call reject function. Choose from Call
reject mode or Rejection list.
Decline with message – When you want to reject a call, you can send a
quick message using this function. This is useful if you need to reject a call
during a meeting.
Connection vibration – Vibrates your phone when the other party
answers the call.
Privacy keeper – Hides the caller name and number for an incoming call.
Power button ends call – Allows you to select your end call.
Call forwarding – Choose whether to divert all calls when the line is busy,
when there is no answer or when you have no signal.
Call barring – Lock incoming, outgoing or international calls.
Call duration – View the duration of calls including Last call, All calls,
Dialled calls and Received calls.
Additional settings – Allows you to change the following settings:
Caller ID: Choose whether to display your number in an outgoing call.
Call waiting: If call waiting is activated, the handset will notify you of
an incoming call while you are on a call (depending on your network
provider).
< More... >
Airplane mode – After switching to airplane mode, all wireless
connections are disabled.
File networking – Allows you to share folders with other devices via
wireless connection.
Portable Wi-Fi hotspot
– Allows you to share mobile network via Wi-Fi and
you can configure portable Wi-Fi hotspot settings.

82
Miracast – With Miracast, you can wirelessly mirror your phone screen and
sound onto a LG Miracast dongle or TV.
Bluetooth tethering – Allows you to set your phone whether you are
sharing the Internet connection or not.
NFC – Your phone is an NFC-enabled mobile phone. NFC (Near Field
Communication) is a wireless connectivity technology that enables
two-way communication between electronic devices. It operates over a
distance of a few centimeters. You can share your content with an NFC tag
or another NFC support device by simply touching it with your device. If
you touch an NFC tag with your device, it will display the tag content on
your device.
To switch NFC on or off: From the Home screen, touch and slide the
notification panel down with your finger, then select the NFC icon to
turn it on.
NOTE: When airplane mode is activated, the NFC application can be used.
Using NFC: To use NFC, make sure your device is switched on, and
activate NFC if disabled.
Android Beam – When this feature is turned on, you can beam app
content to another NFC-capable device by holding the devices close
together.
Just bring the device together(typically back to back) and then touch your
screen. The app determines what gets beamed.
VPN – Displays the list of Virtual Private Networks (VPNs) that you've
previously configured. Allows you to add different types of VPNs.
Mobile networks – Set options for data roaming, network mode &
operators, access point names (APNs) etc.
NOTE: You must set a lock screen PIN or password before you can use credential
storage.
Settings

83
DEVICE
< Sound >
Sound profile – Choose the Sound, either Vibrate only or Silent.
Volumes – Manage the volume of Phone ringtone, Notification sound,
Touch feedback & system, Music, video, games and other media.
Quiet time – Set times to turn off all sounds except alarm and media.
Ringtone with vibration – Vibration feedback for calls and notifications.
Phone ringtone – Allows you to set your default incoming call ringtone.
Notification sound – Allows you to set your default notification ringtone.
Wise ringtone – Set your phone ringtone's volume up automatically when
ambient noise levels are high.
Dial pad touch tones – Allows you to set the phone to play tones when
using the dialpad to dial numbers.
Touch sounds – Allows you to set your phone to play a sound when you
touch buttons, icons and other onscreen items that react to your touch.
Screen lock sound – Allows you to set your phone to play a sound when
locking and unlocking the screen.
Vibrate on touch – Allows you to set the vibration feedback when the
phone screen is touched.
< Display >
Brightness – Adjust the screen brightness.
Screen timeout – Set the time for screen timeout.
Smart screen – Allows you to keep the screen on when your phone
detects that your face is looking at the screen.
Auto-rotate screen – Set to switch orientation automatically when you
rotate the phone.
Font type – Change the type of display font.
Font size – Change the size of the display font.

84
Front touch key light – Set the front key light duration.
Notification flash – The Notification LED is located to the left of the front
camera. You can see the small LED light on when the phone is charging or
when you receive a notification if LCD screen turns off. You can configure
the Notification flash to turn on/off. You can set the various options from
the list of notification flash items.
Aspect ratio correction – Change the resolution size of downloaded
applications to fit the screen size.
Motion sensor calibration – Allows you to improve the accuracy of the tilt
and speed of the sensor.
< Home screen >
Set the Theme, Animation, Screen swipe effect, Wallpaper or Portrait
view only. Select the option to set Scroll screens circularly and Home
backup & restore.
< Lock screen >
Select screen lock – Set a screen lock type to secure your phone. Opens a
set of screens that guide you through drawing a screen unlock pattern. Set
None, Swipe, Face Unlock, Pattern, PIN or Password.
If you have enabled a Pattern lock type when you turn on your phone
or wake up the screen, you will be asked to draw your unlock pattern to
unlock the screen.
Wallpaper – Select the wallpaper for your lock screen from Gallery or
Wallpaper gallery.
Clocks & shortcuts – Customize clocks & shortcuts on the lock screen.
Screen effect – Select the screen effect.
Owner info – Show owner info on the lock screen.
Lock timer – Set the lock time after screen timeout.
Power button instantly locks – Set the screen lock when the power
button is pressed.
Settings

85
Vibrate on touch – Allows you to set the vibration feedback for phone
screen touch.
< Gestures >
Move Home screen items – Touch and hold an item and tilt the device to
move the item in Home screens or applications.
Tilt sensitivity – Test and adjust the sensitivity of the tilt sensor for the
Home screen and applications.
Silence incoming calls – Flip the device to mute incoming calls.
Snooze or stop alarm – Flip the device to snooze or stop alarm.
Pause video – Flip the device to pause playing video.
Help – Help for gesture functions.
< Storage >
INTERNAL STORAGE – View the internal storage usage.
< Power saver >
Manage the battery and check the power saving items. You can also check
the battery use.
< Apps >
View and manage your applications.
< Quad core control >
Set the Eco mode to extend battery life by dynamically optimizing the CPU
control policy.
PERSONAL
< Accounts & sync >
Permits applications to synchronize data in the background, whether or
not you are actively working in them. Deselecting this setting can save
battery power and lower (but not eliminate) data usage.

86
< Location access >
Access to my location – If you select Google's location service, your phone
determines your approximate location using Wi-Fi and mobile networks.
When you select this option, you're asked whether you consent to
allowing Google to use your location when providing these services.
GPS satellites – If you select GPS satellites, your phone determines your
location to street-level accuracy.
Wi-Fi & mobile network location – Lets apps use data from sources such
as Wi-Fi and mobile networks to determine your approximate location.
< Security >
Set up SIM card lock – Set up Micro-SIM card lock or change the Micro-
SIM PIN.
Password typing visible – Show the last character of the hidden password
as you type.
Phone administrators – View or deactivate phone administrators.
Unknown sources – Default setting to install non-market applications.
Trusted credentials – Display trusted CA certificates.
Install from storage – Choose to install encrypted certificates.
Clear credentials – Remove all certificates.
< Language & input >
Use this function to select the language for the text on your phone and
to configure the on-screen keyboard, including words you've added to its
dictionary.
< Backup & reset >
Change the settings for managing your settings and data.
Backup my data – Set to backup your settings and application data to the
Google server.
Backup account – Set to backup your account.
Settings

87
Automatic restore – Set to restore your settings and application data
when the applications are reinstalled on your device.
Factory data reset – Reset your settings to the factory default values and
delete all your data. If you reset the phone this way, you are prompted to
re-enter the same information as when you first started Android.
SYSTEM
< Date & time >
Use Date & time settings to set how dates will be displayed. You can
also use these settings to set your own time and time zone rather than
obtaining the current time from the mobile network.
< Accessibility >
Use the Accessibility settings to configure accessibility plug-ins you have
installed on your phone.
NOTE: Requires additional plug-ins to become selectable.
< PC connection >
USB connection type – Set the desired mode: Charge only, Media sync
(MTP), USB tethering, LG software or Camera (PTP).
Ask on connection – Ask USB connection mode when connecting to a
computer.
Help – Help for USB connection.
PC Suite – Checkmark this to use LG PC Suite with your Wi-Fi connection.
Please note that Wi-Fi network should be connected to LG PC Suite via a
Wi-Fi connection through WIRELESS & NETWORKS.
On-Screen Phone – Displaying the screen and controlling the phone from
your PC are available via USB, Bluetooth or Wi-Fi connection.

88
Help – Help for LG software.
< Developer options >
Keep in mind that turning on these developer settings may result in
irregular device behavior. The developer options are recommended only
for advanced users.
< About phone >
View legal information and check your phone status and software version.
Settings

89
Phone software update
LG Mobile phone software update from the Internet
For more information about using this function, please visit http://update.
lgmobile.com or http://www.lg.com/common/index.jsp
select your
country and language.
This feature allows you to conveniently update the firmware on your
phone to a newer version from the Internet without needing to visit a
service center. This feature will only be available if and when LG makes a
newer firmware version available for your device.
Because the mobile phone firmware update requires the user's full
attention for the duration of the update process, please make sure
you check all instructions and notes that appear at each step before
proceeding. Please note that removing the USB data cable during the
upgrade may seriously damage your mobile phone.
NOTE: LG reserves the right to make firmware updates available only for selected
models at its own discretion and does not guarantee the availability of the
newer version of the firmware for all handset models.
LG Mobile Phone software update via Over-the-Air (OTA)
This feature allows you to conveniently update your phone's software
to a newer version via OTA, without connecting using a USB data cable.
This feature will only be available if and when LG makes a newer firmware
version available for your device.
You should first check the software version on your mobile phone:
Settings > About phone > Software update > Check now for update.
Phone software update

90
NOTE: Your personal data from internal phone storage—including information
about your Google account and any other accounts, your system/application
data and settings, any downloaded applications and your DRM licence—
might be lost in the process of updating your phone's software. Therefore, LG
recommends that you backup your personal data before updating your phone's
software. LG does not take responsibility for any loss of personal data.
NOTE: This feature depends on your network service provider, region and
country.
Phone software update

91
About this user guide
• Before using your device, please carefully read this manual. This will
ensure that you use your phone safely and correctly.
• Some of the images and screenshots provided in this guide may appear
differently on your phone.
• Your content may differ from the final product, or from software supplied
by service providers or carriers, This content may be subject to change
without prior notice. For the latest version of this manual, please visit the
LG website at www.lg.com.
• Your phone's applications and their functions may vary by country,
region, or hardware specifications. LG cannot be held liable for any
performance issues resulting from the use of applications developed by
providers other than LG.
• LG cannot be held liable for performance or incompatibility issues
resulting from edited registry settings being edited or operating system
software being modified. Any attempt to customize your operating
system may cause the device or its applications to not work as they
should.
• Software, audio, wallpaper, images, and other media supplied with your
device are licensed for limited use. If you extract and use these materials
for commercial or other purposes, you may be infringing copyright laws.
As a user, you are fully entirely responsible for the illegal use of media.
• Additional charges may be applied for data services, such as messaging,
uploading and downloading, auto-syncing, or using location services.
To avoid additional charges, select a data plan that is suitable for your
needs. Contact your service provider to obtain additional details.
About this user guide

92
Trademarks
• LG and the LG logo are registered trademarks of LG Electronics.
• All other trademarks and copyrights are the property of their respective
owners.
DivX HD
ABOUT DIVX VIDEO: DivX
®
is a digital video format created by DivX, LLC, a
subsidiary of Rovi Corporation. This is an official DivX Certified
®
device that
plays DivX video. Visit divx.com for more information and software tools to
convert your files into DivX videos.
ABOUT DIVX VIDEO-ON-DEMAND: This DivX Certified
®
device must be
registered in order to play purchased DivX Video-on-Demand (VOD)
movies. To obtain your registration code, locate the DivX VOD section in
your device setup menu. Go to vod.divx.com for more information on how
to complete your registration.
DivX Certified
®
to play DivX
®
video up to HD 720p, including premium
content.
DivX
®
, DivX Certified
®
and associated logos are trademarks of Rovi
Corporation or its subsidiaries and are used under license.
Dolby Mobile
Manufactured under license from Dolby Laboratories. Dolby and the
double-D symbol are trademarks of Dolby Laboratories.
Notice: Open Source Software
To obtain the corresponding source code under GPL, LGPL, MPL and other open
source licences, please visit http://opensource.lge.com/
All referred licence terms, disclaimers and notices are available for download
with the source code.
About this user guide

93
These accessories are available for use with your phone. (Items described
below may be optional.)
Travel adaptor Stereo headset
Quick Start
Guide
Data cable
Micro-SIM
ejection tool
Accessories
NOTES:
• Always use genuine LG accessories, failure to do this may void your warranty.
• Accessories may vary in different regions.

94
Troubleshooting
This chapter lists some problems you might encounter when using your
phone. Some problems require you to call your service provider, but most
are easy to fix yourself.
Message Possible causes Possible corrective measures
Micro-SIM
error
There is no
Micro-SIM card
in the phone
or it is inserted
incorrectly.
Make sure that the Micro-SIM card is
correctly inserted.
No network
connection/
Dropped
network
Signal is weak or
you are outside the
carrier network.
Move toward a window or into an
open area. Check the network operator
coverage map.
Operator applied
new services.
Check whether the Micro-SIM card
is more than 6~12 months old. If so,
change your Micro-SIM at your network
provider's nearest branch. Contact your
service provider.

95
Message Possible causes Possible corrective measures
Codes do
not match
To change a
security code,
you will need
to confirm the
new code by
re-entering it.
If you forget the code, contact your
service provider.
The two codes you
have entered do
not match.
No
applications
can be set
Not supported by
service provider
or registration
required.
Contact your service provider.
Calls not
available
Dialling error New network not authorized.
New Micro-SIM
card inserted.
Check for new restrictions.
Pre-paid charge
limit reached.
Contact service provider or reset limit
with PIN2.
Phone
cannot be
switched on
On/Off key pressed
too briefly.
Press the On/Off key for at least two
seconds.
Battery is not
charged.
Charge battery. Check the charging
indicator on the display.

96
Message Possible causes Possible corrective measures
Charging
error
Battery is not
charged.
Charge battery.
Outside
temperature is too
hot or cold.
Make sure phone is charging at a normal
temperature.
Contact problem
Check the charger and its connection to
the phone.
No voltage Plug the charger into a different socket.
Charger defective Replace the charger.
Wrong charger Use only original LG accessories.
Number not
allowed
The Fixed dialling
number function
is on.
Check the Settings menu and turn the
function off.
Impossible
to receive /
send SMS &
photos
Memory full
Delete some messages from your
phone.
Files do not
open
Unsupported file
format
Check the supported file formats.
Troubleshooting

97
Message Possible causes Possible corrective measures
The screen
does not
turn on
when I
receive a
call.
Proximity sensor
problem
If you use a protection tape or case,
make sure it has not covered the area
around the proximity sensor. Make
sure that the area around the proximity
sensor is clean.
No sound Vibration mode
Check the settings status in the sound
menu to make sure you are not in
vibration or silent mode.
Hangs up or
freezes
Intermittent
software problem
Try to perform a software update via the
website.

98
Please check to see if any problems you have encountered with your
phone are described in this section before taking the phone in for service
or calling a service representative.
Category
Sub-
Category
Question Answer
BT
Bluetooth
Devices
What are the functions
available via Bluetooth?
You can connect a Bluetooth audio
device such as a Stereo/Mono headset
or Car Kit to share pictures, videos,
contacts, etc. via Gallery/Contacts menu.
Also, when the FTP server is connected
to a compatible device, you can share
content stored on the storage media.
BT
Bluetooth
Headset
If my Bluetooth headset
is connected, can I
listen to my music
through my 3.5 mm
wired headphones?
When a Bluetooth headset is connected,
all system sounds are played over the
headset. As a result, you will not be able
to listen to music through your wired
headphones.
Data
Contacts
Backup
How can I backup
Contacts?
The Contacts data can be synchronized
between your phone and Gmail™.
Data
Synchronization
Is it possible to set up
one-way sync with
Gmail?
Only two-way synchronization is
available.
FAQ

99
Category
Sub-
Category
Question Answer
Data
Synchronization
Is it possible to
synchronize all email
folders?
The Inbox is automatically synchronized.
You can view other folders by touching
the Menu Key
and select Folders to
choose a folder.
Google™
Service
Gmail Log-In
Do I have to log into
Gmail whenever I want
to access Gmail?
Once you have logged into Gmail, you
will not need to log into Gmail again.
Google™
Service
Google
Account
Is it possible to filter
emails?
No, email filtering is not supported via
the phone.
Phone
Function
Email
What happens when
I execute another
application while
writing an email?
Your email will automatically be saved
as a draft.
Phone
Function
Ringtone
Is there a file size
limitation when I want
to use an MP3 file as a
ringtone?
There is no file size limitation.
Phone
Function
Message
Time
My phone does not
display the time of
receipt for messages
older than 24 hrs. How
can I change this?
You will only be able to see the time for
messages received the same day.

100
Category
Sub-
Category
Question Answer
Phone
Function
Navigation
Is it possible to install
another navigation
application on my
phone?
Any application that is available at
Android Market™ and is compatible with
the hardware can be installed and used.
Phone
Function
Synchronisation
Is it possible to
synchronize my
contacts from all my
email accounts?
Only Gmail and MS Exchange server
(company email server) contacts can be
synchronized.
Phone
Function
Wait and
Pause
Is it possible to save a
contact with Wait and
Pause in the numbers?
If you transferred a contact with the W &
P functions saved into the number, you
will not be able to use those features.
You will need to re-save each number.
How to save with Wait and Pause:
1. From the Home screen, touch the
Phone icon.
2. Dial the number, then touch the
Menu Key .
3. Touch Add 2-sec pause or Add wait.
Phone
Function
Security
What are the phone’s
security functions?
You are able to set the phone to require
that an Unlock Pattern be entered
before the phone can be accessed or
used.
FAQ

101
Category
Sub-
Category
Question Answer
Phone
Function
Unlock
Pattern
How do I create the
Unlock Pattern?
1. From the Home screen, touch the
Menu Key .
2. Touch System settings > Lock screen.
3. Touch Select screen lock > Pattern.
The first time you do this, a short
tutorial about creating an Unlock
Pattern will appear.
4. Set up by drawing your pattern once,
and once again for confirmation.
Precautions to take when using the
pattern lock:
It is very important to remember the
unlock pattern you set. You will not be
able to access your phone if you use
an incorrect pattern five times. You
have five chances to enter your unlock
pattern, PIN or password. If you have
used all 5 opportunities, you can try
again after 30 seconds. (Or, if you preset
the backup PIN, you can use the backup
PIN code to unlock the pattern.)

102
Category
Sub-
Category
Question Answer
Phone
Function
Unlock
Pattern
What should I do if
I forget the unlock
pattern and I didn’t
create my Google
account on the phone?
If you have forgotten your pattern:
If you logged into your Google account
on the phone but failed to enter the
correct pattern 5 times, touch the forgot
pattern button. You are then required
to log in with your Google account to
unlock your phone. If you have not
created a Google account on the phone
or you have forgotten it, you will have to
perform a hard reset.
NOTE: If you perform a factory reset, all
user applications and user data will be
deleted. Please remember to backup
any important data before performing a
factory reset.
Phone
Function
Memory
Will I know when my
memory is full?
Yes, you will receive a notification.
Phone
Function
Language
Support
Is it possible to change
my phone's language?
The phone has multilingual capabilities.
To change the language:
1. From the Home screen, touch the
Menu Key and touch System
settings.
2. Touch Language & input > Language.
3. Touch the desired language.
FAQ

103
Category
Sub-
Category
Question Answer
Phone
Function
VPN
How do I set up a VPN?
VPN access configuration is different for
each company. To configure VPN access
from your phone, you must obtain the
details from your company’s network
administrator.
Phone
Function
Screen time
out
My screen turns off
after only 15 seconds.
How can I change the
amount of time for the
backlight to turn off?
1. From the Home screen, press the
Menu Key .
2. Touch System settings > Display.
3. Under Display settings, touch Screen
timeout.
4. Touch the preferred screen backlight
timeout time.
Phone
Function
Wi-Fi & 3G
When Wi-Fi and 3G are
both available, which
service will my phone
use?
When using data, your phone may
default to the Wi-Fi connection (if Wi-Fi
connectivity on your phone is set to On).
However, there will be no notification
when your phone switches from one to
the other.
To know which data connection is being
used, view the 3G or Wi-Fi icon at the
top of your screen.
Phone
Function
Home screen
Is it possible to remove
an application from the
Home screen?
Yes. Just touch and hold the icon until
the dustbin icon appears at the top
and center of the screen. Then, without
lifting your finger, drag the icon to the
trash can.

104
Category
Sub-
Category
Question Answer
Phone
Function
Application
I downloaded an
application and it
causes a lot of errors.
How do I remove it?
1. From the Home screen, press the
Menu Key .
2. Touch App settings > DOWNLOADED.
3. Touch the application, then touch
Uninstall.
Phone
Function
Charger
Is it possible to charge
my phone using a USB
data cable without
installing the necessary
USB driver?
Yes, the phone will be charged by the
USB cable regardless of whether the
necessary drivers are installed or not.
Phone
Function
Alarm
Can I use music files for
my alarm?
Yes. After saving a music file as a
ringtone, you can use it as your alarm.
1. Touch and hold a song in a library list.
In the menu that opens, touch Set as
ringtone.
2. In the alarm clock setting screen,
select the song as a ringtone.
Phone
Function
Alarm
Will my alarm be
audible or will it go off
if the phone is turned
off?
No, this is not supported.
Phone
Function
Alarm
If my ringer volume is
set to Off or Vibrate, will
I hear my alarm?
Your alarm is programmed to be audible
even in these scenarios.
FAQ

105
Category
Sub-
Category
Question Answer
Recovery
Solution
Hard Reset
(Factory
Reset)
How can I perform a
factory reset if I can’t
access the phone’s
setting menu?
If your phone does not restore to its
original condition, use a hard reset
(factory reset) to initialize it.

106
Important Information
This user’s guide contains important information about the use and
operation of this phone. Read all information carefully for optimal
performance and to avoid any damage or misuse of the phone. Any
changes or modifications not expressly approved in this user’s guide could
void your warranty for this equipment.
Safety Guidelines
WARNING!
To reduce the possibility of electric shock, do not expose your product to
high humidity areas, such as bathroom or swimming pool.
Keep the phone away from heat. Never store your phone in environment
that may expose it to temperatures below 0°C or above 40°C, such as
outdoor during snowstorm, or in your car in hot days. Exposure to cold or
heat will result in malfunction, damage or permanent failure. Be careful
when using your phone near other electronic devices. The RF emissions
from mobile phones may affect nearby electronic equipment that not
adequately shielded. You should consult manufacturers of any personal
medical devices, as in the case of pacemakers and hearing aides, to
determine whether they are susceptible to interference from cell phones.
Turn off your phone in medical facilities or at gas stations. Never place
your phone in microwaves, as it will cause the battery to explode.
Important! Before using your phone, please read the SAFETY INFORMATION OF THE
TELECOMMUNICATIONS INDUSTRY ASSOCIATION (TIA).
Safety Information
Read these simple guidelines. Breaking the rules may be illegal or
dangerous.
More detailed information is provided in this user’s guide.
For your safety

107
• Never use an unapproved battery that could cause damages to the
phone or the battery itself, or even explode.
• Never place your phone in a microwave oven, as this will result in an
explosion of the battery.
• Do not dispose of your battery in fire or with hazardous or flammable
materials.
• Make sure the battery does not come into contact with sharp-edged
items, such as animal teeth or claws. This could cause a fire.
• Store the battery in a place out of the reach of children.
• Be careful so that children do not swallow any parts of the phone, such as
rubber plugs (earpiece, parts that connect to the phone, etc.). This could
cause asphyxiation or suffocation.
• Disconnect the plug and charger from the outlet when the phone shows
that the battery has been fully charged, because it may cause electric
shock or fire hazard.
• When in the car, do not leave your phone, or install a hands-free kit,
near the airbag. If wireless equipment is improperly installed, you can be
seriously injured if the airbag is deployed.
• Do not use mobile phone while driving.
• Do not use the phone in areas where its usage is prohibited. (For
example: in airplanes).
• Do not expose the battery charger or adapter to direct sunlight, or use it
in places with high humidity, such as bathroom.
• Never store your phone in temperatures lower than -20°C or higher than
50°C.
• Do not use harsh chemicals (such as alcohol, benzene, solvents, etc.) or
detergents to clean the phone. This could cause fire.
• Do not drop the phone, strike it, or shake it hard.
Such actions may harm the phone’s internal circuit boards.
• Do not use your phone in high explosive areas, as this may generate

108
sparks.
• Do not damage the power cord by bending, twisting, pulling, or heating
it. Do not use the plug if it is loose as it may cause fire or electric shock.
• Do not handle the phone with wet hands while it is charging. This can
cause electric shock or seriously damage your phone.
• Do not disassemble the phone.
• Do not make or answer calls while charging the phone, which can cause
a short circuit, electric shock, or fire.
• Use only batteries and chargers provided by LG. The warranty does not
apply to products provided by other providers.
• Only authorized personnel should service the phone and its accessories.
Installation or service may result in accidents and consequently invalidate
the warranty.
• Do not hold or let the antenna come in contact with your body during a
call.
• Emergency calls can be made only within a service area. To make an
emergency call, make sure you are within a service area and the phone
is on.
• Use your accessories, such as headphones or headsets, with caution,
ensuring that the cables are plugged properly and that they do not touch
the antenna unnecessarily.
Information about the RF exposure from FCC
WARNING!
Read this information before operating the phone.
In August 1996, the Federal Communications Commission (FCC) of the
United States, with its action in Report and Order FCC 96-326, adopted
an updated safety standard for human exposure to radio frequency (RF)
electromagnetic
For your safety

109
energy emitted by FCC regulated transmitters. Those guidelines are
consistent with the safety standard previously set by both international
and U.S. standards.
The design of this phone complies with FCC guidelines and these
international standards.
Caution
Use only the supplied antenna. Use of unauthorized antennas, or
modifications, could impair call quality, damage the phone, void your
warranty, or result in a violation of FCC regulations.
Do not use the phone with a damaged antenna.
A damaged antenna in contact with the skin could cause a singe. Contact
your local dealer for an antenna replacement.
Body effects
This device was tested for typical body operation, keeping a distance of
1 cm (0.39 inch) between the user's body and the back of the phone. To
comply with RF exposure requirements of the FCC standards, a minimum
distance of 1 cm (0.39 inch) between the user's body and the back of the
phone is required.
Belt-clips, holsters, and similar accessories containing metallic components
from others manufacturers should not be used.
Accessories worn close to the body, without keeping a minimum distance
of 1 cm (0.39 inch) between the user's body and the back of the phone,
and that have not been tested for typical body operation, may not comply
with FCC's RF exposure limits and should be avoided.
External antenna mounted on the vehicle (optional, if available)
It must keep a minimum distance of 20 cm (8 inches) between the user /
bystander and the vehicle mounted external antenna, in order to satisfy
FCC's RF exposure requirements.
For more information about RF exposure, visit the FCC Website at www.fcc.
gov

110
Class B Compliance under article 15 of the FCC
This device and its accessories comply with Article 15 of the FCC rules.
The operation is subject to the following conditions:
(1) This device, and its accessories, will not cause harmful interference and
(2) this device and its accessories must accept any interference received,
including interference that could cause an undesired operation.
Battery Precautions
• Do not disassemble.
• Do not short-circuit.
• Do not expose to high temperatures, over 60 °C (140 °F).
• Do not incinerate.
Battery Disposal
• Please dispose of your battery properly, or bring it to your wireless
provider for recycling.
• Do not dispose of your battery in fire or with hazardous or flammable
materials.
Adapter Precautions (Charger)
• Using the wrong battery charger could damage your phone and void
your warranty.
• The adapter or battery charger is only designed for indoor use.
• Do not expose the battery charger or adapter to direct sunlight, or use it
in places with high humidity, such as the bathroom.
Cautions for Battery
• Do not disassemble or open crush, bend or deform, puncture or shred.
• Do not modify or remanufacture, attempt to insert foreign objects into
the battery, immerse or expose to water or other liquids, expose to fire,
explosion or other hazard.
For your safety

111
• Only use the battery for the system for which it is specified.
• Only use the battery with a charging system that has been qualified with
the system per this standard. Use of an unqualified battery or charger
may present a risk of fire, explosion, leakage, or other hazard.
• Do not short circuit a battery or allow metallic conductive objects to
contact battery terminals.
• Replace the battery only with another battery that has been qualified
with the system per this standard, IEEE-Std-1725-200x. Use of an
unqualified battery may present a risk of fire, explosion, leakage or other
hazard.
• Promptly dispose of used batteries in accordance with local regulations.
• Battery usage by children should be supervised.
• Avoid dropping the phone or battery. If the phone or battery is dropped,
especially on a hard surface, and the user suspects damage, take it to a
service center for inspection.
• Improper battery use may result in a fire, explosion or other hazard.
• For those host devices that utilize a USB port as a charging source, the
host device's user manual shall include a statement that the phone
shall only be connected to products that bear the USB-IF logo or have
completed the USB-IF compliance program.
• Always unplug the charger from the wall socket after the phone is fully
charged to save unnecessary power consumption of the charger.
Avoid damage to your ear
• Damage to your hear can occur due to constant exposure to excessive
high sound. We, therefore, recommend that you do not turn on or off the
phone near your ear. We also recommend you be reasonable with the
music and volume level.
• If you listen to music, please ensure that the volume level is adequate,
so that you are aware of your surroundings. This is particularly important
when attempting to cross a street.

112
TIA's Safety Information
This includes complete security information on wireless phones from TIA
(Telecommunications
Industry Association).
It's required, for CTIA Certification, the inclusion in the user manual of
text covering pacemakers, hearing aids and other medical devices. It's
encouraged the use of the remaining TIA language when relevant.
Exposure to Radio Frequency Signal
Your wireless handheld portable telephone is a lowpower radio
transmitter and receiver. When it is ON, it receives and also sends out radio
frequency (RF) signals.
In August, 1996, the Federal Communications Commissions (FCC) adopted
RF exposure guidelines with safety levels for handheld wireless phones.
Those guidelines are consistent with the safety standards previously set by
both U.S. and international standards bodies:
ANSI C95.1 (1992) *
NCRP Report 86 (1986)
ICNIRP (1996)
Those standards were based on comprehensive and periodic evaluations
of the relevant scientific literature. For example, over 120 scientists,
engineers, and physicians from universities, government health agencies,
and industry reviewed the available body of research to develop
the ANSI Standard (C95.1).
* American National Standards Institute; National Council on Radiation
Protection and Measurements; International Commission on Non-
Ionizing Radiation Protection.
The design of your phone complies with the FCC guidelines (and those
standards).
Safety instructions

113
Antenna Care
Use only the supplied or an approved replacement antenna. Unauthorized
antennas, modifications, or attachments could damage the phone and
may violate FCC regulations.
Phone Operation
NORMAL POSITION: Hold the phone as you would any other telephone
with the antenna pointed up and over your shoulder.
Suggestions for a more efficient operation
For your phone to operate most efficiently:
• Do not touch the antenna unnecessarily, when the phone is in use. The
contact with the antenna affects call quality, and may cause the phone to
operate at a higher power level than otherwise would be need.
Driving
Check the laws and regulations related to the use of wireless phones in the
areas where you drive. Always obey these regulations. Also, if using your
phone while driving, make sure to:
• Pay full attention to driving; driving safely is your first responsibility;
• Use hands-free operation, if available;
• Pull off the road and park, before making or answering a call, if driving
conditions demand so.
Electronic Devices
Most modern electronic equipment is shielded from RF signals.
However, certain electronic equipment may not be shielded against the RF
signals from your wireless phone.

114
Pacemaker
The Medical Industry Manufacturers Association recommends a minimum
distance of fifteen (15) centimeters, or six (6) inches, between a handheld
wireless phone and a pacemaker, in order to avoid potential interference
between them.
These advices are consistent with independent researches, and with
recommendations based on wireless technology research.
People with pacemakers should:
• ALWAYS keep the phone at least fifteen centimeters (six inches) from
their pacemaker, whenever the phone is turned on;
• Not carry the phone in a shirt pocket;
• Use the ear opposite to the pacemaker, to minimize the potential
interference;
• If you have any reason to suspect that interference is taking place, switch
off your phone immediately.
Hearing Aids
Some digital wireless phones may interfere with some hearing aids. In the
event of such interference, we recommend that you contact your service
provider.
Other Medical Devices
If you use any other personal medical devices, consult your device
manufacturer to determine if they are adequately shielded from external
RF energy. Your doctor can help you obtain this information.
Health Care Facilities
Turn off your phone in health care facilities, whenever there are signs
asking you to do so. Hospitals or health care facilities may use equipment
that could be sensitive to external RF energy.
Safety instructions

115
Vehicles
RF signals may affect improperly installed or inadequately shielded devices
in motor vehicles.
Check with the manufacturer, or its representative, regarding your vehicle.
You should also consult the manufacturer about any equipment that has
been added to your vehicle.
Facilities with signs
Turn off the phone in any facility where warning signs request you to do
so.
Airplanes
FCC regulations prohibit the use of phones while in the air. Turn off your
phone before boarding an airplane.
Blasting Areas
To avoid interfering with blasting operations, turn your phone off when in
a 'blasting area' or in areas with signs that read: 'Turn off two-way radios' .
Obey all signs and instructions.
Potentially Explosive Atmosphere
Turn off the phone when in an area with a potentially explosive
atmosphere, and obey all signs and instructions.
Sparks in such areas could cause an explosion or fire that could result in
personal injury or death.
Areas with a potentially explosive atmosphere are often clearly marked,
but not always. Among the potentially dangerous areas are:
Fueling areas (such as gas stations), areas below deck on boats, facilities
where chemical products are transferred or stored, vehicles using liquefied
petroleum gas (as propane or butane), areas where the air contains
chemicals or particles (such as grain, dust or metal powders), and any

116
other areas where you would normally be advised to turn off your vehicle
engine.
For vehicles equipped with air bags
Air bags inflate with strong force. Do not place objects in the area over
the air bag or in its deployment area, including wireless equipment, either
installed or portable.
Serious injuries could occur if wireless equipment is improperly installed
into the car when the air bag inflates.
Safety Information
Read and observe the following information for the safe and proper use of
your phone, and to prevent any damage.
Also, keep the user's guide in an accessible place at all times after reading
it.
Charger, Adapter and Battery Security
• The charger and adapter are designed only for indoor use.
• Dispose of your battery properly, or bring it to your wireless provider for
recycling.
• The battery doesn’t need to be fully discharged before recharging.
• Only use LG approved chargers that are specifically made for your phone
model, since they are designed to maximize the battery life.
• Do not disassemble or short-circuit it.
• Keep the metal contacts on the battery clean.
• Replace the battery when it no longer provides acceptable performance.
The battery can be recharged several hundred times before replacement.
• Charge the battery after long periods without use to maximize its life.
Safety instructions

117
• The battery life will vary depending on usage patterns and environmental
conditions.
• Intensive use of backlighting, browser, and packet data connectivity
affect battery life and talk/standby times.
• The role of self-protection interrupts the phone when its operation is
in an abnormal state. In this case, remove the battery from the phone,
reinstall it, and turn on the phone.
Explosion, Shock and Fire Danger
• Do not place the phone in a place exposed to excessive dust, and keep
the minimum required distance between the power cord and heat
sources.
• Unplug the power cord before cleaning the phone, and clean the power
plug whenever it is dirty.
• When using the power plug, make sure it is firmly connected. Otherwise,
it can overheat or start a fire.
• Placing the phone in a pocket or bag without covering the receptacle
(power plug pin), metallic articles (such as a coin, clip or pen) may short-
circuit the phone. Always cover the receptacle when not in use.
• Do not short-circuit the battery. Metal items, such as coins, paper clips, or
pens, in your pocket or bag may cause a shortcircuit between the + and
- terminals of the battery (metal strips on the battery). The short-circuit of
the terminals may damage the battery and cause an explosion.
General Notice
• Using a damaged battery, or inserting it into the mouth can cause serious
injuries.
• Do not place the phone in proximity to items containing magnetic
components, such as credit cards, calling cards, bank books, or subway
tickets. The phone magnetism may damage the data stored in the

118
magnetic strip.
• Talking on the phone for a long period of time may reduce call quality,
because of the heat generated during use.
• When the phone has not been in use for a long time, store it in a safe
place, with the power cord unplugged.
• Using the phone close to a receiving equipment (such as TV or radio) may
cause interference.
• Do not use the phone if the antenna is damaged. If a damaged antenna
contacts skin, it may cause a slight singe. Contact an LG Authorized
Service Facility to replace the damaged antenna.
• Do not immerse your phone in water. If this happens, immediately turn it
off and remove the battery. If your phone does not work, take it to an LG
Authorized Service Facility.
• The power supply contains elements that could be harmful to your
health, if components are handled directly. If this happens, we
recommend immediate hand-washing.
• Do not paint the phone.
• Data stored in your phone might be deleted due to careless use,
hardware repair or software upgrade.
Please backup your important phone numbers (ringtones, text or voice
messages, images, and videos might also get deleted). The manufacturer
is not liable for damages due to loss of data.
• When using the phone in public places, you may set the ringer on vibrate
to avoid disturbing others.
• Do not switch the phone on/off while it is in your ear.
Ambient temperatures
Max: +50°C (discharging), +45°C (charging) Min: -10°C
Safety instructions

Regulatory and Safety
Go to "System settings > About phone > Regulatory and Safety" to get
regulatory and safety information.
Note: Open Source Software
To obtain the corresponding source code under GPL, LGPL, MPL and other open
source licences, please visit http://opensource.lge.com/
All referred licence terms, disclaimers and notices are available for download
with the source code.


Guía del usuario
LG-E976
Antes de operar su teléfono lea atentamente este manual de instrucciones.
MFL67861803 (1.0)
www.lg.com
ESPAÑOL


Guía del usuario
• Las visualizaciones e ilustraciones de la
pantalla pueden variar de las que ve en el
teléfono.
• Es posible que parte del contenido de esta
guía no se aplique al teléfono, en función
del software o del proveedor de servicios.
Toda la información de este documento está
sujeta a cambios sin previo aviso.
• Este teléfono no es adecuado para personas
con alguna discapacidad visual ya que
cuenta con un teclado en pantalla táctil.
• Copyright ©2013 LG Electronics, Inc. Todos
los derechos reservados. LG y el logotipo de
LG son marcas registradas de LG Group y
sus entidades relacionadas. Todas las demás
marcas son propiedad de sus respectivos
titulares.
• Google™, Google Maps™, Gmail™, YouTube™,
Google Talk™ y Play Store™ son marcas
registradas de Google, Inc.
ESPAÑOL

2
Contenido
Aviso importante ....................................5
Características del teléfono
............... 12
Instalación de la tarjeta Micro-SIM
...14
Cargar el teléfono
...................................15
Bloquear y desbloquear la pantalla .15
Pantalla principal
................................. 16
Sugerencias sobre la pantalla táctil
.16
Paneles en la pantalla principal .........17
Personalizar la pantalla principal ......17
Volver a las aplicaciones usadas
recientemente..........................................18
Cuadro de noticaciones .....................18
Vista de la barra de estado ..................19
Teclado en la pantalla............................21
Ingresar letras acentuadas...................22
Ajustes de la cuenta de Google
........ 23
Conectarse a redes y dispositivos
.... 24
Wi-Fi
.............................................................24
Conectarse a redes de Wi-Fi ................24
Activar Wi-Fi y conectarse a una red
Wi-Fi .............................................................24
Bluetooth ...................................................25
Usar Wi-Fi Direct ......................................28
Usar SmartShare ......................................28
Llamadas
............................................... 32
Realizar una llamada
..............................32
Llamar a los contactos ..........................32
Responder y rechazar una llamada ..32
Ajuste del volumen durante la
llamada
.......................................................33
Hacer una segunda llamada ...............33
Ver los registros de llamadas ..............33
Ajustes de llamada .................................34
Contactos
.............................................. 35
Agregar un nuevo contacto
................35
Buscar un contacto ................................36
Contactos favoritos ................................36
Crear un grupo .........................................36
Mensajes
............................................... 37
Enviar un mensaje
..................................37
Lista por remitente ................................37
Usar emoticonos .....................................38
Cambiar los ajustes de su mensaje...38
Correo electrónico
............................... 39
Administración de una cuenta de
e-mail
..........................................................39
Pantalla de la cuenta de email ...........39
Usar las carpetas de las cuentas ........40
Redactar y enviar e-mails .....................40
Cámara
................................................... 41
Uso del visor
.............................................41
Tomar una foto rápida...........................42
Después de que haya tomado la foto ..
.......................................................................42
Opciones de ajustes avanzados ........43
Ver las fotos guardadas .........................44

3
Videocámara......................................... 45
Uso del visor
.............................................45
Grabar un video rápido
........................46
Opciones de ajustes avanzados ........46
Después de grabar un video
...............47
Ver los videos guardados .....................47
Funciones exclusivas de LG
............... 48
QuickMemo
..............................................48
Usar las opciones de QuickMemo ....49
Cuaderno ...................................................50
QuickTranslator ........................................51
Zoom en vivo ...........................................53
QSlide ..........................................................54
Función Reproducción Doble ............55
LG SmartWorld .........................................56
On-Screen Phone ....................................58
Multimedia............................................ 60
Galería
.........................................................60
Ver las fotografías ...................................60
Acercar o alejar una imagen ...............60
Reproducir videos desde la galería ..61
Editar fotos ................................................61
Borrar las fotos y videos de la galería ...
.......................................................................61
Establecer un fondo de pantalla .......61
Reproductor de videos .........................62
Editor de video ........................................63
Asistente de video ..................................64
Música .........................................................65
Utilidades
.............................................. 68
Congurar una alarma
..........................68
Usar la calculadora
.................................68
Agregar un evento al calendario .......68
Grabador de voz
......................................69
Administrador de aplicaciones ..........70
MS Exchange ............................................70
Polaris Oce 4 .........................................70
FileShare
.....................................................71
Copia de seguridad
................................71
Crear copias de seguridad de los
datos del teléfono ...................................72
Programar copias de seguridad
automáticas
..............................................72
Restaurar los datos del teléfono
........73
Google + ....................................................74
Búsqueda por voz ...................................74
Descargas ..................................................75
La Web
................................................... 76
Internet
.......................................................76
Uso de la barra de herramientas Web ..
.......................................................................76
Visualización de páginas web ............77
Chrome .......................................................78
Ajustes
................................................... 79
Acceso al menú de conguración
....79
REDES INALÁMBRICAS ..........................79
DISPOSITIVO .............................................81
SISTEMA .....................................................86

4
Actualización del software del
teléfono ................................................. 88
Accesorios
............................................. 90
Solución de problemas
....................... 91
Preguntas frecuentes
.......................... 95
Para su seguridad
.............................. 103
Instrucciones de seguridad
............111
Contenido

5
Aviso importante
Antes de llevar el teléfono a reparación o llamar a un representante del
servicio técnico, compruebe si alguno de los problemas que presenta el
teléfono se describe en esta sección.
1. Memoria del teléfono
Cuando hay menos de 10% de espacio disponible en la memoria del
teléfono, no será posible recibir nuevos mensajes. Deberá comprobar
la memoria del teléfono y borrar algunos datos, como aplicaciones o
mensajes, para contar con más espacio en la memoria.
Desinstalar aplicaciones:
1 Toque > cha Aplicaciones > Ajustes > Aplicaciones de la ca-
tegoría DISPOSITIVO.
2 Cuando aparezcan todas las aplicaciones, despláce el dedo por la pan-
talla y seleccione la aplicación que desee desinstalar.
3 Toque Desinstalar.
2. Optimizar la vida útil de la batería
Prolongue la vida útil de la batería entre cargas apagando las funciones
que no necesite ejecutar constantemente en segundo plano. Puede
controlar la forma en que las aplicaciones y los recursos consumen la
energía de la batería.
Prolongar la vida útil de la batería
• Desactive las comunicaciones de radio que no use. Si no usa Wi-Fi,
Bluetooth o GPS, desactívelos.
• Disminuya el brillo de la pantalla y fije un límite de tiempo de pantalla
más corto.
• Desactive la sincronización automática de Gmail, Calendario, Contactos y
otras aplicaciones.

6
• Algunas de las aplicaciones descargadas pueden reducir la energía de la
batería.
Comprobar el nivel de energía de la batería:
• Toque > ficha Aplicaciones > Ajustes > Acerca del teléfono en el
menú SISTEMA > Batería.
El estado (cargando o descargando) y el nivel (porcentaje
cargado) de la batería aparecen en la parte superior de la
pantalla.
Supervisar y controlar cómo se está usando la energía de la batería:
• Toque > ficha Aplicaciones > Ajustes > Ahorro de energía en la
categoría DISPOSITIVO > Uso de la batería en INFORMACIÓN SOBRE LA
BATERIA.
• El tiempo de uso de la batería aparece en la pantalla. Le indica cuánto
tiempo ha pasado desde la última vez que conectó el teléfono a una
fuente de alimentación o, si está conectado, cuánto tiempo el teléfono
estuvo por última vez utilizando la batería. La pantalla muestra las
aplicaciones o los servicios que usan la energía de la batería, ordenados
desde los que usan más a los que usan menos.
3. Uso de las carpetas
Puede combinar varios iconos de aplicaciones en una carpeta. Arrastre
un icono de una aplicación sobre otro en la pantalla principal y ambos se
combinarán creando una carpeta.
Aviso importante

7
4.Antes de instalar una aplicación y un sistema operativo
de código abierto
Si instala y usa un sistema operativo (SO) distinto al proporcionado por
el fabricante podría provocar que el teléfono no funcione correctamente.
Además, el teléfono ya no estará cubierto por la garantía.
5. Usar el patrón de desbloqueo
Configure el patrón de desbloqueo para proteger el teléfono. Se abrirá
un conjunto de pantallas que le guiará para que dibuje un patrón de
desbloqueo de pantalla. Debe crear un PIN de seguridad como medida de
seguridad si olvida el patrón de bloqueo.
NOTA: Cree una cuenta Google antes de establecer un patrón de desbloqueo
y recuerde el PIN de seguridad que haya ingresado mientras crea el patrón de
desbloqueo.
ADVERTENCIA
Es muy importante recordar el patrón de desbloqueo que configure. Tiene 5
oportunidades para ingresar el patrón de desbloqueo, el PIN o la contraseña. Si
usa las 5 oportunidades, podrá volver a intentarlo después de 30 segundos.
Si no recuerda el patrón de desbloqueo.
Si inició sesión en la cuenta de Google en el teléfono pero ingresó un
patrón incorrecto 5 veces, toque la opción ¿Has olvidado el patrón? en la
parte inferior de la pantalla. Se le solicitará que inicie sesión con su cuenta
Google o que ingrese su PIN de seguridad, el cual ingresó cuando creó el
patrón de desbloqueo.
Si no creó una cuenta Google en el teléfono o si olvidó el PIN de
seguridad, deberá realizar un restablecimiento de fábrica (reinicio
completo).

8
Nota: Si realiza un reinicio completo, se borrarán todas las aplicaciones y los
datos de usuario. Esta acción no se podrá revertir. Antes de realizar ese tipo de
restablecimiento recuerde que debe hacer una copia de seguridad de todos los
datos que sean importantes.
6. Usar la función de reinicio completo (restablecimiento de
valores de fábrica)
Para restaurar los ajustes originales de su teléfono, efectúe un reinicio
completo (restablecimiento a los valores de fábrica) para inicializarlo.
• Toque > ficha Aplicaciones > Ajustes > Copia de respaldo y
restauración > Restaurar datos de fábrica.
ADVERTENCIA
Si ejecuta un reinicio completo, se eliminarán todas las aplicaciones, los datos del usuario y
las licencias de DRM. Recuerde que debe hacer una copia de seguridad de todos los datos
importantes antes de ejecutar el reinicio completo.
7. Abrir y alternar aplicaciones
Es fácil realizar varias tareas con Android porque puede mantener más
de una aplicación en ejecución al mismo tiempo. No necesita salir de
una aplicación antes de abrir otra. Use y alterne entre varias aplicaciones
abiertas. Android administra cada aplicación, deteniéndolas e iniciándolas
según sea necesario, para garantizar que las aplicaciones inactivas no
consuman recursos innecesariamente.
Detener las aplicaciones:
1 Toque > cha Aplicaciones > Ajustes > Aplicaciones > cha EN
EJECUCIÓN.
Nota: Si no ha iniciado sesión con su cuenta Google y olvidó el patrón de
desbloqueo, debe ingresar el PIN de seguridad.
Aviso importante

9
2 Desplace el dedo por la pantalla, toque la aplicación que desee y toque
Parar.
NOTA: Para usar la función multitarea, toque y mantenga la Tecla de Inicio para
pasar a otra aplicación mientras se utiliza una aplicación. Esto no hace que la
otra aplicación deje de funcionar en segundo plano en el dispositivo. Asegúrese
de tocar la Tecla Volver para salir de la aplicación luego después de usarla.
8. LG PC Suite
El software de PC “LG PC Suite” es un programa que le ayuda a conectar
el teléfono a una PC mediante un cable USB o Wi-Fi. Una vez conectado,
puede usar las funciones del teléfono desde su PC.
Funciones principales de LG PC Suite:
• Administrar y reproducir su contenido multimedia (músicas, películas,
imágenes) en la PC.
• Enviar contenido multimedia a su teléfono.
• Sincronizar datos (programas, contactos) del teléfono y la PC.
• Hacer una copia de seguridad de las aplicaciones del teléfono.
• Actualizar el software del teléfono.
• Reproducir contenido multimedia de la PC desde otro teléfono.
NOTA: Puede usar el menú de Ayuda desde la aplicación para descubrir cómo
usar la aplicación para PC “LG PC Suite”.
Instalar la aplicación para PC "LG PC Suite"
La aplicación para PC “LG PC Suite” se puede descargar desde el sitio web
de LG.
1 Vaya a www.lg.com y seleccione un país de su preferencia.
2 Vaya a la sección de Soporte del teléfono móvil y seleccione el modelo
LG-E976.
3 Haga clic en PC Sync, en la opción para descargar el software LG PC Suite.

10
Requisitos del sistema para el software de PC "LG PC Suite"
• SO: Windows XP de 32 bits (Service pack 2), Windows Vista de
32 bits/64 bits, Windows 7 de 32 bits/64 bits.
• CPU: 1 procesador de 1 GHz o superior.
• Memoria: RAM de 512 MB o superior.
• Tarjeta gráfica: resolución de 1024 x 768, color de 32 bits o superior.
• Disco duro: 100 MB o más de espacio libre en disco duro (es posible que
se necesite más espacio libre en disco duro, dependiendo del volumen
de datos almacenados).
• Software requerido: controladores LG integrados, Windows Media Player
10 o superior.
NOTA: Se requiere controlador USB LG integrado para conectar un dispositivo
LG a una PC y se instala de manera automática al instalar el software de PC "LG
PC Suite".
9. Sincronizar el teléfono con una computadora
Para su comodidad, los datos del teléfono y la PC se pueden sincronizar
fácilmente con la aplicación “LG PC Suite”. Se pueden sincronizar contactos,
favoritos y otros.
1 Conecte el teléfono a la PC (Use un cable USB o una conexión Wi-Fi).
2 Conrme la opción Software de LG y seleccione el teléfono desde la
computadora.
3 Seleccione la casilla de verificación de contenido para sincronizar.
NOTA: Para sincronizar el teléfono con la PC utilizando el cable USB debe instalar
LG PC Suite en la PC. Consulte las páginas anteriores para instalar LG PC Suite.
SUGERENCIA: Para volver a usar la tarjeta microSD en el teléfono, debe abrir el
cuadro de notificaciones y tocar > Solo cargar.
Aviso importante

11
Desconectar el teléfono de la computadora:
Abra el cuadro de notificaciones y toque > Solo cargar para
desconectar el teléfono de la computadora de manera segura.
10. Sostenga el teléfono en posición vertical
Sostenga el teléfono en posición vertical como lo haría con un teléfono
normal. Este teléfono cuenta con una antena interna. Tenga cuidado de no
rayar o dañar la parte posterior del teléfono, ya que eso podría afectar su
rendimiento.
Mientras haga o reciba llamadas, o mientras envíe y reciba datos, evite
colocar la mano sobre la parte inferior del teléfono, donde se encuentra la
antena. Esto podría afectar la calidad de la llamada.
11. Cuando la pantalla se congela
Mantenga presionada la tecla Encender/Apagar/Bloquear durante
10segundos para apagarlo. Si no funciona, comuníquese con el centro de
servicio.

12
Características del teléfono
Auricular
Lente de la cámara
Notificación LED
Tecla Inicio: Regresa a la
pantalla de inicio desde
cualquier pantalla.
Pantalla táctil
Sensor de
proximidad
Características del teléfono
Tecla Encender/Apagar/
Bloquear
Tecla de opciones:
Muestra
las opciones disponibles.
Tecla Volver:
Vuelve a la
pantalla anterior.
Teclas de
volumen
NOTA: Cuando reciba o realice llamadas, el sensor de proximidad apagará
automáticamente la luz de fondo y bloqueará la pantalla táctil al detectar
cuando el teléfono está cerca del oído. Esto aumenta la vida útil de la batería y
evita que active accidentalmente la pantalla táctil durante las llamadas.
ADVERTENCIA
Si coloca un objeto pesado sobre el teléfono o se sienta sobre él, se pueden
dañar la pantalla LCD y las funciones de la pantalla táctil. No cubra el sensor de
proximidad de la pantalla LCD con una película protectora. Eso puede hacer
que el sensor no funcione correctamente.

13
Teclas de volumen
• En la pantalla de inicio: controlan el
volumen del timbre.
• Durante una llamada: controla el
volumen de la llamada.
• Durante la reproducción de música:
controlan el volumen de la música.
ADVERTENCIA
• Esta parte alberga el compartimento de la batería. No abra la tapa posterior.
• Tenga cuidado de no dañar el punto de contacto de NFC en el teléfono, que
forma parte de la antena NFC.
Conector del
auricular
Flash
Altavoz
Conector de
cargador y
cable USB
Micrófono
Micrófono
NFC
SUGERENCIA: Para
usar la función
QuickMemo,
mantenga presionadas
las teclas de volumen
durante un segundo.
Entrada de la
tarjeta Micro-SIM
Tecla Encender/Apagar/Bloquear
Lente de la
cámara

14
Instalación de la tarjeta Micro-SIM
Antes de comenzar a usar el teléfono, debe insertar la tarjeta Micro-SIM.
En la parte frontal de la bandeja de entrada de la Micro-SIM, hay una
apertura pequeña y redonda.
1. Inserte en la apertura la herramienta de extracción de la tarjeta Micro-
SIM (incluida en los accesorios del teléfono) y empuje firmemente, pero
con suavidad, hasta que la bandeja salga.
2. Extraiga la bandeja y coloque la tarjeta Micro-SIM dentro, con la área
de contacto dorada de la tarjeta hacia abajo y la esquina angulada hacia la
derecha.
3. Vuelva a colocar la bandeja en la ranura y empújela con suavidad hacia
el teléfono.
Apertura de la bandeja Micro-SIM
Características del teléfono
NOTA: Asegúrese de que el área de contacto dorada de la tarjeta quede hacia
abajo.
Herramienta
de extracción
Bandeja
de la
Micro-SIM

15
Cargar el teléfono
Bloquear y desbloquear la pantalla
Si no usa el teléfono durante un tiempo, la pantalla se apaga y bloquea
automáticamente. De esta forma, se evita que las teclas e iconos se toquen
por accidente y se ahorra batería.
Cuando no esté usando el teléfono, presione la tecla Encender/Apagar/
Bloquear para bloquear el teléfono.
Si hay programas ejecutándose cuando bloquea la pantalla, es posible que
sigan ejecutándose en modo Bloqueo. Se recomienda que salga de todos
los programas antes de ingresar en el modo de bloqueo para evitar cargos
innecesarios (como llamadas, acceso a la Web y comunicaciones de datos).
Para reactivar el teléfono, presione la tecla Encender/Apagar/Bloquear.
Aparecerá la pantalla de bloqueo. Toque y deslice la pantalla de bloqueo
en cualquier dirección para desbloquear la pantalla principal. Se abrirá la
última pantalla que vio.
NOTA:
• La batería debe cargarse por completo
antes de usar el teléfono por primera
vez para mejorar su vida útil.
El conector del cargador se encuentra en la parte inferior del teléfono.
Inserte el cargador y conéctelo a un tomacorriente.

16
Pantalla principal
Sugerencias sobre la pantalla táctil
A continuación, se incluyen algunos consejos sobre cómo navegar por el
teléfono.
Tocar: para elegir un menú, una opción o abrir una aplicación, toque la
opción correspondiente.
Tocar y mantener presionado: para abrir un menú de opciones o tomar
un objeto que desee mover, tóquelo y manténgalo presionado.
Arrastrar: para desplazarse por una lista o moverse lentamente, arrastre el
dedo por la pantalla táctil
Desplazar o deslizar: para desplazar o deslizar, mueva con rapidez el
dedo por la superficie de la pantalla.
Tocar dos veces: toque dos veces para acercar una página web o un
mapa. Por ejemplo, toque dos veces rápidamente una sección de una
página web para ajustar esa sección de forma que se ajuste al ancho de la
pantalla.
Zoom táctil: Utilice el dedo índice y el pulgar y junte o separe los dedos
para acercar o alejar la pantalla al utilizar el navegador o los mapas, o para
ver las fotos.
Girar la pantalla: la orientación de la pantalla se ajusta a la orientación
física del dispositivo.
NOTAS:
• Para seleccionar un elemento, toque el centro del icono.
• No ejerza demasiada presión; la pantalla táctil es lo suficientemente sensible
para detectar un toque suave, pero firme.
• Utilice la punta del dedo para tocar la opción que desee. Tenga cuidado de no
tocar otras teclas.

17
Paneles en la pantalla principal
Simplemente pase el dedo hacia la izquierda o hacia la derecha para ver
los paneles. Puede personalizar cada panel con aplicaciones, descargas,
widgets y fondos de pantalla.
NOTA: Algunas imágenes de pantalla pueden ser diferentes según el proveedor
de su teléfono.
En la pantalla principal, podrá ver los iconos de menú en la parte inferior
de la pantalla. Los iconos de menú brindan acceso con un solo toque a las
funciones que más utiliza, como hacer llamadas, enviar mensajes y buscar
un contacto.
Personalizar la pantalla principal
Puede personalizar la pantalla principal agregando aplicaciones,
descargas, widgets o fondos de pantalla. Para utilizar el teléfono con
mayor comodidad, agregue sus widgets favoritos a la pantalla principal.
Para agregar elementos de la pantalla principal:
1 Toque y mantenga presionada la parte vacía de la pantalla principal.
O toque
en la parte superior derecha.
2 En el menú Modo agregar, seleccione el elemento que desea agregar.
Luego, verá los elementos agregados en la pantalla principal.
3 Arrástrelo a la ubicación que desea y levante el dedo.
Borrar un elemento de la pantalla de inicio:
• En la pantalla principal, toque y mantenga presionado el icono que
desea borrar y luego, arrástrelo hacia el icono

18
SUGERENCIA: Para agregar un icono de una aplicación a la pantalla principal
desde el menú Aplicaciones, toque y mantenga presionada la aplicación que
desea agregar.
SUGERENCIA: Sobreponga un icono del menú de aplicaciones sobre otro en la
pantalla principal y ambos formarán una carpeta.
Volver a las aplicaciones usadas recientemente
1 Toque y mantenga presionada la tecla de Inicio. La pantalla mostrará
una ventana emergente con iconos de las aplicaciones que ha utilizado
recientemente.
2 Toque un icono para abrir la aplicación. O bien, toque la tecla Volver
para volver a la pantalla anterior.
Cuadro de notificaciones
Las notificaciones le alertan sobre la llegada de nuevos mensajes, eventos
del calendario y alarmas, así como también sobre eventos en curso, como
descargas de video.
Desde el cuadro de notificaciones, puede ver el estado actual de su
teléfono y las notificaciones pendientes.
Notificaciones
pendientes
Bluetooth, Wi-Fi, y
estado de la batería
Pantalla principal

19
NOTA: Las opciones disponibles pueden variar según la región o el proveedor de
servicio.
Ajustes rápidos
Toque el cuadro de notificaciones y desplace el dedo por la pantalla hacia
abajo.
Toque
> para administrar las notificaciones. Aquí podrá revisar y
administrar QuickMemo, perfil de sonido, datos habilitados, NFC, modo
Eco, Bluetooth, GPS, Wi-Fi, pantalla giratoria, cuentas y sincronización,
punto de acceso Wi-Fi, Miracast, ahorro de energía o modo avión.
Vista de la barra de estado
La barra de estado usa diferentes iconos para mostrar la información del
teléfono, como intensidad de la señal, nuevos mensajes, vida útil de la
batería, Bluetooth, conexiones de datos, eventos del calendario, estado del
dispositivo y más.

20
A continuación se muestra una tabla en la que se explica el significado de
los iconos que se pueden ver en la barra de estado.
Icono Descripción Icono Descripción
Sin tarjeta Micro-SIM Modo de vibración
Sin señal
Batería completamente
cargada
Modo avión
Se está cargando la
batería
Conectado a la red Wi-Fi Descargando datos
Auricular conectado Cargando datos
Llamada en curso
El GPS se está
conectando
Llamada en espera
Recibiendo datos de
ubicación de GPS
Altavoz
Se están sincronizando
los datos
Llamada perdida Nuevo correo de Gmail
Bluetooth activado
Nuevo mensaje de
Google Talk
Advertencia del sistema Nuevo mensaje
Pantalla principal

21
Alarma establecida
Se está reproduciendo
una canción
Nuevo correo de voz
El teléfono está
conectado a la PC
mediante un cable USB
o el anclaje de USB está
activo
Timbre silenciado
La zona Wi-Fi portátil se
encuentra activada
NFC está encendido
Tanto el anclaje de USB
como la zona Wi-Fi
portátil.
P2P está encendido
NOTA: La ubicación de los íconos en la barra de estado puede variar según la
función o el servicio.

22
Teclado en la pantalla
Puede ingresar el texto mediante el teclado en la pantalla. El teclado en
la pantalla aparece automáticamente cuando se necesita ingresar texto.
Para mostrarlo en forma manual, toque el campo de texto en donde desea
ingresar texto.
Usar el teclado e ingresar texto
Toque esta tecla una vez para poner en mayúscula la próxima letra
que escriba. Tóquela dos veces para que todas las letras se pongan en
mayúscula.
Toque esta tecla para cambiar al teclado de números y símbolos.
Puede también mantener esta tecla presionada para ver el menú de
Ajustes.
Toque esta tecla para ingresar un espacio.
Toque esta tecla para crear una nueva línea en el campo del mensaje.
Toque esta tecla para borrar el carácter anterior.
Ingresar letras acentuadas
Cuando seleccione francés o español como el idioma de entrada de texto,
podrá ingresar caracteres especiales en francés o español (por ejemplo,
"á").
Por ejemplo, para ingresar "á", toque y mantenga presionada la tecla "a"
hasta que el tamaño de la tecla aumente y muestre los caracteres de los
idiomas diferentes.
A continuación, seleccione el carácter especial que desee.
Pantalla principal

23
Ajustes de la cuenta de Google
La primera vez que abra una aplicación de Google en el teléfono, se le solicitará
que inicie sesión con su cuenta de Google. Si no tiene una cuenta de Google, se
le pedirá que cree una
.
Configurar la cuenta de Google:
• Toque > ficha Aplicaciones > seleccione una aplicación de Google,
como Gmail > seleccione Crear cuenta para crear una cuenta nueva.
Si tiene una cuenta Google, toque Usar cuenta, ingrese su dirección de
correo electrónico y contraseña, y luego toque
.
Una vez que haya configurado su cuenta de Google en su teléfono, el
teléfono se sincronizará automáticamente con su cuenta de Google.
Los contactos, mensajes de Gmail, eventos del calendario y otra información
obtenida desde estas aplicaciones y estos servicios en la web se sincronizan con
el teléfono (Depende de su configuración de sincronización).
Después de iniciar sesión, puede usar Gmail™ y aprovechar los servicios de
Google en el teléfono
.

24
Conectarse a redes y dispositivos
Wi-Fi
Con Wi-Fi, puede utilizar el acceso a Internet de alta velocidad dentro de
la cobertura del punto de acceso (AP) inalámbrico. Disfrute de la conexión
inalámbrica a Internet por Wi-Fi sin cargos extras.
Conectarse a redes de Wi-Fi
Para usar Wi-Fi en el teléfono, necesita acceder al punto de acceso
inalámbrico o "hotspot", su nombre en inglés . Algunos puntos de acceso
están abiertos y puede simplemente conectarse a ellos. Otros están
ocultos o usan otras funciones de seguridad; por lo que debe configurar el
teléfono para poder conectarse a ellos.
Desactive Wi-Fi cuando no la use para prolongar la vida útil de la batería.
NOTA:
Si no está dentro de una zona Wi-Fi o desactivó Wi-Fi, es posible que su
proveedor de servicios aplique cargos adicionales para el uso de datos móviles.
Activar Wi-Fi y conectarse a una red Wi-Fi
1 Toque > cha Aplicaciones > Ajustes > Wi-Fi en la cha REDES
INALÁMBRICAS
2 Mueva el cursor hacia la derecha para activar Wi-Fi y comenzar a detec-
tar las redes Wi-Fi disponibles.
3 Toque una red para conectarse a ella.
• Las redes seguras se indican con un icono de candado.
• Si la red está protegida, se le pedirá que ingrese una contraseña u otras
credenciales. (Consulte con su administrador de red para obtener más
detalles).
Después de conectarse a una red Wi-Fi, la barra de estado muestra un
icono que indica el estado de Wi-Fi.

25
Bluetooth
Puede usar Bluetooth para enviar datos ejecutando la aplicación
correspondiente, pero no desde el menú de Bluetooth como en la mayoría
de los teléfonos móviles.
SUGERENCIA: Con este teléfono puede disfrutar de conexión Bluetooth de alta
velocidad.
Si el dispositivo con el que desea compartir archivos es compatible también
con Bluetooth de alta velocidad, los archivos se transferirán automáticamente
a través de la red de alta velocidad. Para usar la transferencia de datos a través
de Bluetooth de alta velocidad, asegúrese de que Wi-Fi esté desactivado en
los dispositivos antes de usarlos. Los ajustes para Bluetooth de alta velocidad
pueden ser distintos en el dispositivo. Verifique los ajustes del dispositivo con su
proveedor de servicios.
Activar de Bluetooth y vincular el teléfono con un dispositivo Bluetooth
Debe vincular el teléfono con otro dispositivo antes de transferir datos.
1 Toque > cha Aplicaciones > Ajustes > active Bluetooth en el
menú REDES INALÁMBRICAS.
2 Toque el menú Bluetooth y Buscar dispositivos. El teléfono explorará
y mostrará los dispositivos Bluetooth dentro del alcance que estén
disponibles. Si el dispositivo con el cual desea vincular no está en la
lista, asegúrese de que el dispositivo objetivo esté congurado como
visible y, a continuación, vuelva a tocar Buscar dispositivos.
3 Elija el dispositivo de la lista al que desee enviar datos.
Una vez que se complete la vinculación, su teléfono se conectará con el
otro dispositivo.
Envíar datos vía Bluetooth
1 Seleccione un archivo como una imagen o contacto, toque en la
pantalla de la imagen o la tecla de opciones y Compartir en la pantalla

26
de la lista de contactos. Luego elija Bluetooth.
2 Compruebe que Bluetooth esté activado y luego seleccione Buscar
dispositivos.
3 Elija el dispositivo de la lista al que desee enviar datos.
Recibir datos mediante la función inalámbrica Bluetooth
1 Toque > cha Aplicaciones > Ajustes > congure Bluetooth en
ACTIVADO y toque Hacer visible el dispositivo para que sea visible en
otros dispositivos.
2 Seleccione Vincular para conrmar que desea recibir datos del disposi-
tivo.
Compartir la conexión de datos del teléfono
El anclaje de USB y la zona Wi-Fi portátil son excelentes funciones cuando
no hay conexiones inalámbricas disponibles. Puede compartir la conexión
de datos móviles del teléfono con una sola computadora a través de
un cable USB (anclaje de USB). También puede compartir la conexión
de datos del teléfono con más de un dispositivo en cualquier momento
convirtiendo el teléfono en un dispositivo con punto de acceso Wi-Fi.
Cuando el teléfono esté compartiendo la conexión de datos, aparecerá
un icono en la barra de estado y una notificación en el cuadro de
notificaciones.
Para obtener la información más reciente sobre anclaje a red y zonas Wi-Fi
portátiles, incluidos los sistemas operativos admitidos y otros detalles,
visite http://www.android.com/tether.
Cambiar los ajustes del punto de acceso Wi-Fi:
• Toque > ficha Aplicaciones > Ajustes > Más en el menú REDES
INALÁMBRICAS > Punto de acceso Wi-Fi > elija las opciones que desee
ajustar.
Conectarse a redes y dispositivos

27
SUGERENCIA: Si su computadora ejecuta Windows 7 o una distribución reciente
de Linux (como Ubuntu), por lo general, no se necesita preparar su computadora
para el anclaje a red. Sin embargo, si ejecuta una versión anterior de Windows
u otro sistema operativo, es posible que deba preparar la computadora a fin de
establecer una conexión de red mediante USB. Para obtener la información más
reciente sobre los sistemas operativos compatibles con el anclaje de USB y cómo
configurarlos, visite http://www.android.com/tether.
Cambiar el nombre del Punto de acceso Wi-Fi o protegerlo
Puede cambiar el nombre de la red Wi-Fi del teléfono (SSID) y protegerla.
1 En la pantalla principal, toque > cha Aplicaciones > Ajustes
2 Toque Más ... en la cha REDES INALÁMBRICAS y seleccione Punto de
acceso Wi-Fi.
3 Verique que Punto de acceso Wi-Fi esté seleccionado.
4 Toque Congure el Punto de Acceso Wi-Fi.
• Se abrirá el cuadro de diálogo Configure el Punto de Acceso Wi-Fi.
• Puede cambiar el SSID de red (nombre) que otras computadoras
verán cuando busquen redes Wi-Fi.
• También puede tocar el menú Seguridad para configurar la red
con seguridad de acceso protegido Wi-Fi 2 (WPA2) con una clave
compartida (PSK).
• Si toca la opción de seguridad WPA2 PSK, se agrega un campo de
contraseña al cuadro de diálogo Configure el Punto de Acceso Wi-Fi.
Si introduce una contraseña, deberá ingresar esa contraseña cuando
se conecte a la zona con cobertura inalámbrica del teléfono mediante
una computadora u otro dispositivo. Puede escoger Abierta en el
menú Seguridad para remover la seguridad de la red Wi-Fi.
5 Toque Guardar.

28
NOTA: Si establece la opción de seguridad en Abierta, no podrá evitar el uso
no autorizado de servicios en línea por parte de otras personas y podrá incurrir
en cargos adicionales. Para evitar el uso no autorizado, se recomienda que
mantenga la opción de seguridad activada.
Usar Wi-Fi Direct
Wi-Fi Direct busca automáticamente en las cercanías dispositivos con
Wi-Fi Direct, los dispositivos buscados aparecen en una lista en el orden
en que se encontraron y puede seleccionar un dispositivo específico para
compartir datos multimedia a través de SmartShare.
NOTA: Wi-Fi Direct no se puede activar mientras usa otras funciones de Wi-Fi.
1 Toque > cha Aplicaciones > Ajustes > Wi-Fi > conecte Wi-Fi to-
cando el icono a la derecha, toque la Tecla de opciones y Wi-Fi Direct.
2 Seleccione un dispositivo para conectarse en la lista de dispositivos
encontrados.
CREAR GRUPO:le permite a los dispositivos Wi-Fi existentes conectarse
explorando su teléfono.
NOTA: Cuando el teléfono pase al modo propietario de grupo, consumirá
más energía de la batería que en modo cliente. La conexión de Wi-Fi Direct no
proporciona servicio de Internet. El uso y la conexión a servicios en línea pueden
implicar costos adicionales. Consulte con el proveedor de red cuáles son los
gastos por transferencia de datos.
Usar SmartShare
SmartShare usa tecnología DLNA (Digital Living Network Alliance) para
compartir contenido digital a través de una red inalámbrica. Ambos
dispositivos deben tener certificación DLNA para admitir esta función.
Conectarse a redes y dispositivos

29
Activar SmartShare y compartir contenidos
1 Toque > ficha Aplicaciones > SmartShare.
2 Toque la tecla de opciones y seleccione Ajustes.
3 Toque la opción Visible para activar esa función.
• Toque Aceptar siempre las solicitudes si desea aceptar
automáticamente las solicitudes para compartir de otros dispositivos.
• Toque Recibir archivos si desea permitir que otros dispositivos carguen
archivos multimedia a su teléfono.
NOTA: Asegúrese de que la funcionalidad DLNA de sus dispositivos esté
configurada correctamente (por ejemplo, televisor y PC).
4 En la sección MIS CONTENIDOS COMPARTIDOS, toque esta opción para
marcar los tipos de contenido que desea compartir. Seleccione entre
Fotos, Videos y Música.
5 SmartShare ahora queda activado y listo para compartir contenido.
Compartir contenido de la biblioteca de contenido remoto a otros
dispositivos
Permita que su dispositivo reproductor (por ejemplo, un televisor)
reproduzca contenido multimedia desde la biblioteca de contenido
remoto (por ejemplo, una PC).
NOTA: Asegúrese de que la funcionalidad DLNA de sus dispositivos esté
configurada correctamente (por ejemplo, televisor y PC).
1 Toque > ficha Aplicaciones > SmartShare.
2 Toque el icono Para y seleccione el dispositivo desde la lista de
dispositivos reproductores.
3 Toque el icono De y seleccione el dispositivo de la biblioteca de
contenido remoto.

30
4 Explore la biblioteca de contenido.
5 Toque un archivo en miniatura o presione la tecla de opciones y
seleccione Reproducir.
Compartir contenido desde el teléfono al dispositivo reproductor (por
ejemplo, televisor)
1 Mientras explora sus imágenes o videos en la galería, seleccione los
archivos que desea compartir.
2 Toque
3 Seleccione el dispositivo reproductor para reproducir los archivos.
NOTA: Siga los mismos pasos para usar el reproductor de música, la cámara o el
reproductor de video para compartir contenido.
NOTA: Compruebe que el dispositivo esté conectado a la red doméstica
mediante una conexión Wi-Fi para poder usar esta aplicación.
Algunos dispositivos habilitados para DLNA (por ejemplo, el televisor) solamente
admiten la función DMP de DLNA, por lo tanto, no aparecerán en la lista de
dispositivos reproductores.
Es posible que el dispositivo no pueda reproducir ciertos tipos de contenido.
Conectarse a redes y dispositivos

31
Descargar contenido de la biblioteca de contenido remoto
1 Toque > ficha Aplicaciones > SmartShare.
2 Toque el icono De y seleccione el dispositivo de la biblioteca de
contenido remoto.
3 Ahora puede explorar la biblioteca de contenido.
4 Toque y mantenga presionado un contenido en miniatura y luego
toque Descargar.
Cargar contenido desde la biblioteca de contenido remoto
1 Toque > ficha Aplicaciones > SmartShare
2 Toque el icono De y seleccione Mi teléfono.
3 Puede examinar la biblioteca de contenido remoto.
4 Toque y mantenga presionado un contenido en miniatura y luego
toque Cargar.
5 Seleccione el dispositivo de la biblioteca de contenido remoto que va
a cargar.
NOTA: Asegúrese de que el dispositivo reproductor esté configurado
correctamente.
NOTA: Algunos dispositivos habilitados con DLNA no son compatibles con la
funcionalidad de carga de DMS y no se cargarán. Algunos tipos de contenidos
no son compatibles.

32
Llamadas
Realizar una llamada
1 Toque y Teléfono para abrir el teclado.
2 Ingrese el número en el teclado. Para borrar un dígito, toque .
3 Toque para realizar una llamada.
4 Para nalizar una llamada, toque Finalizar .
SUGERENCIA Para ingresar "+" para realizar llamadas internacionales, mantenga
presionada la tecla .
Llamar a los contactos
1 Toque y abra la lista de contactos.
2 Desplace el dedo por la lista de contactos o toque Buscar contactos
para ingresar las primeras letras del contacto al que desea llamar.
3 En la lista, toque el contacto al que desea llamar.
Responder y rechazar una llamada
Cuando reciba una llamada, toque el icono para responder una
llamada o toque para rechazar una llamada recibida.
Toque Mensaje rápido en la parte inferior si desea enviar un mensaje.
SUGERENCIA: La función Mensaje rápido le permite enviar un mensaje cuando
no pueda contestar una llamada.

33
Ajuste del volumen durante la llamada
Para ajustar el volumen durante una llamada, utilice las teclas de volumen
ubicadas en la lateral izquierda del teléfono.
Hacer una segunda llamada
1 Durante la primera llamada, toque la tecla de opciones, Agregar llama-
da y marque el número. Además, también puede ir a la lista de llamadas
realizadas recientemente tocando
o puede buscar en los contactos
tocando y seleccionar el número al que desea llamar.
2 Toque para realizar la llamada.
3 Ambas llamadas se verán en la pantalla de llamada. La primera llamada
se bloqueará y quedará en espera.
4 Toque el número que aparece para alternar entre las llamadas. O bien,
toque
Unir para hacer una llamada de conferencia.
5 Para nalizar las llamadas activas, toque Finalizar.
NOTA: Se le cobrará cada llamada que realice.
Ver los registros de llamadas
En la pantalla principal, toque Teléfono y elija la ficha Registro .
Vea una lista completa de todas las llamadas realizadas, recibidas o
perdidas.
SUGERENCIA: Toque cualquier entrada de registro de llamadas para ver la fecha,
hora y duración de la llamada.

34
SUGERENCIA: Toque la tecla de opciones y, a continuación, toque Borrar todo
para borrar todas las llamadas registradas.
Ajustes de llamada
Puede configurar las opciones de llamada del teléfono, como desvío de
llamadas y otras funciones especiales ofrecidas por su proveedor.
NOTA: Algunas opciones de ajustes de llamadas dependen de su proveedor de
servicios.
1 En la pantalla principal, toque y Teléfono.
2 Toque la tecla de opciones.
3 Toque Ajustes de llamada y elija las opciones que desee ajustar.
Números de marcación fija: para activar y compilar una lista de números
a los que puede llamar desde el teléfono. Necesitará el código PIN2, que
podrá obtener a través de su operadora. Solo puede llamar desde su
teléfono a los números que estén incluidos en la lista de marcación fija.
Buzón de voz: le permite seleccionar el servicio de correo de voz de su
proveedor.
Ajustes de buzón de voz: si está usando el servicio de correo de voz de
su proveedor, esta opción le permite ingresar el número de teléfono que
desea usar para escuchar y administrar el correo de voz.
Guardar números desconocidos: después de una llamada puede agregar
números desconocidos a los contactos.
Rechazo de llamada: permite configurar la función de rechazo de
llamadas. Elija entre las opciones Desactivado, Rechazar llamadas de la
Llamadas

35
Contactos
Puede agregar contactos al teléfono y sincronizarlos con los contactos
de la cuenta de Google u otras cuentas que admitan la sincronización de
contactos.
Agregar un nuevo contacto
1 Ingrese el número del nuevo contacto en el teclado y luego toque la
tecla de opciones. Toque Agregar a contactos y Crear nuevo contacto.
2 Si desea agregar una foto al nuevo contacto, toque el área de imá-
genes. Elija entre Tomar una foto o Seleccionar desde la galería.
3 Seleccione el tipo de contacto tocando .
4 Toque una categoría de información de contacto e ingrese los detalles
acerca del contacto.
5 Toque Guardar.
lista o Rechazar todas las llamadas.
Desvío de llamada: elija si desea desviar las llamadas siempre, cuando la
línea esté ocupada, cuando no responda o cuando no tenga señal.
Restricción de llamadas: seleccione esta opción cuando desee restringir
las llamadas. Ingrese la contraseña para restricción de llamadas.
Duración de llamadas: permite ver la duración de todas las llamadas,
incluidas las llamadas realizadas, las llamadas recibidas y la última llamada.
Ajustes adicionales: le permite cambiar las siguientes opciones de
configuración:
ID de emisor: le permite elegir si desea mostrar su número en las
llamadas salientes.
Llamada en espera: si la función de llamada en espera se encuentra
activada, el teléfono le notificará si tiene una llamada entrante cuando
esté hablando.

36
Buscar un contacto
1 Toque > ficha Aplicaciones > y la opción de contactos para abrir la
lista de contactos.
2 Toque Buscar contactos e ingrese el nombre del contacto con el
teclado.
Contactos favoritos
Puede clasificar contactos frecuentemente llamados como favoritos.
Agregar un contacto a los favoritos
1 Toque un contacto para ver sus detalles.
2 Toque la estrella que aparece a la derecha del nombre del contacto. La
estrella se vuelve amarilla.
Eliminar un contacto de la lista de favoritos
1 En la lista de contactos, toque la cha Favoritos y elija un contacto
para ver los detalles.
2 Toque la estrella amarilla que aparece a la derecha del nombre del con-
tacto. La estrella se pondrá gris y se borrará el contacto de los favoritos.
Crear un grupo
1 Toque > ficha Aplicaciones > y la opción de contactos.
2 Toque Grupos y presione la Tecla de Opciones, seleccione Nuevo
grupo.
3 Ingrese un nombre para el nuevo grupo. También puede establecer un
tono para el grupo creado.
4 Toque Guardar para guardar el grupo.
Contactos

37
Mensajes
Enviar un mensaje
1 Toque > ficha Aplicaciones > Mensajes y luego toque para abrir
un mensaje en blanco.
2 Ingrese el nombre de un contacto o un número de contacto en el
campo Para o toque
. Al ingresar el nombre del contacto, aparecerán
los contactos coincidentes. Seleccione la opción sugerida. También se
pueden agregar varios contactos.
NOTA: Se le cobrará un mensaje de texto por cada persona a la que le envíe el
mensaje.
3 Toque Ingresar mensaje y escriba el mensaje.
4 Toque la tecla de opciones. Elija entre Agregar asunto, Descartar,
Emoticono y Mensajes rápidos.
5 Toque Enviar para enviar el mensaje.
6 Se abrirá la pantalla de mensaje, con su mensaje después del número
de destinatario/nombre. Las respuestas aparecerán en la pantalla. Al
ver y enviar mensajes adicionales, se creará una cadena de mensajes.
Lista por remitente
Los mensajes (SMS, MMS) intercambiados con otra persona pueden
mostrarse en orden cronológico para que pueda ver con comodidad toda
su conversación.
ADVERTENCIA: Si se agrega un archivo de imagen, video o audio a un
mensaje SMS, se convertirá automáticamente en un mensaje MMS y se le
cobrarán los cargos correspondientes.

38
Usar emoticonos
Cuando escriba un nuevo mensaje, toque la tecla de opciones y luego elija
Emoticono.
Cambiar los ajustes de su mensaje
Los ajustes de los mensajes de este teléfono están predefinidos, por lo
tanto, puede enviar mensajes de inmediato. Puede cambiar los ajustes
según sus preferencias.
En la pantalla Mensajes, toque la tecla de opciones y Ajustes.
NOTA: Las opciones de este menú pueden variar según su proveedor de
servicios, país o región.
Mensajes

39
Puede usar la aplicación E-mail para leer los correos electrónicos de otros
servicios diferentes a Gmail.
El proveedor de servicios o el administrador del sistema puede
proporcionarle los datos de configuración de las cuentas que necesita.
Administración de una cuenta de e-mail
La primera vez que abra la aplicación E-mail, se abrirá un asistente de
configuración que le guiará para configurar una cuenta de email.
Agregar una cuenta de e-mail
• Toque > ficha Aplicaciones > E-mail > toque la tecla de opciones
> Cuentas > seleccione la tecla de opciones y, a continuación, toque
Agregar cuenta.
Al finalizar la configuración inicial, la pantalla de E-mail muestra el
contenido del buzón de entrada. Si incluye más de una cuenta, puede
alternar entre una cuenta y otra.
Cambiar la configuración de una cuenta de email:
• Toque > ficha Aplicaciones > E-mail > en la pantalla de la cuenta,
toque la tecla de opciones > Ajustes de cuenta.
Borrar una cuenta de correo electrónico:
• Toque > ficha Aplicaciones > E-mail > en la pantalla de la cuenta,
toque la tecla de opciones > Ajustes de cuenta> toque una cuenta que
desee borrar > Borrar cuenta.
Pantalla de la cuenta de email
Puede tocar una cuenta para ver su bandeja de entrada. La cuenta desde
la cual envía e-mail de forma predeterminada se señala con una marca de
verificación.
Correo electrónico

40
- Toque esta opción para abrir la carpeta Combinación de recibidos
con los mensajes recibidos en todas las cuentas.
Para descargar más e-mails (más antiguos), toque Cargar más e-mails al
final de la lista de e-mails.
Usar las carpetas de las cuentas
- Toque este icono para abrir las carpetas de una cuenta.
Cada cuenta contiene las carpetas Buzón de entrada, Buzón de salida,
Enviados y Borradores. Según las funciones que admita el proveedor de
servicios de la cuenta, puede contar con carpetas adicionales.
Redactar y enviar e-mails
Redactar y enviar un mensaje
1 Mientras está en la aplicación E-mail, toque .
2 Ingrese una dirección para el destinatario del mensaje. Al escribir el
texto, se sugieren direcciones que coinciden con las de los contactos.
Separe las diversas direcciones mediante punto y coma.
3 Agregue Cc/Cco y adjunte los archivos, si desea.
4 Escriba el mensaje.
5 Para enviar el mensaje, toque .
Si no está conectado a una red, por ejemplo, si está trabajando en el
modo de avión, los mensajes que envía se almacenan en la carpeta
Buzón de salida hasta que se vuelva a conectar a una red. Si el buzón
de salida contiene algún mensaje pendiente, aparece en la carpeta de
la cuenta de E-mail.
SUGERENCIA: Cuando reciba un correo electrónico nuevo en el buzón de
entrada, recibirá una notificación por medio de un sonido o de una vibración.
Correo electrónico

41
Cámara
Uso del visor
Cambiar cámara: alterna entre la cámara interna y externa.
Disparo Cheese: diga 'Cheese' cuando esté listo para tomar una foto.
Captura previa de imágenes: toque este icono para capturar
el momento perdido antes de presionar el obturador/Filtro de
imperfección
: corrige imperfecciones de la imagen.
Modo disparo: permite elegir entre Normal, HDR, Panorama o Disparo
continuo.
Ajustes: toque este icono para abrir el menú de ajustes.
Modo videocámara: toque este icono para cambiar al modo de video.
Tomar una foto
Galería: toque esta opción para ver la última foto que tomó. Esta opción
también le permite acceder a la galería.

42
Tomar una foto rápida
1 Abra la aplicación Cámara.
2 Mantenga el teléfono en posición horizontal y apunte la lente hacia el
objetivo que desea fotograar.
3 Toque la pantalla y un cuadro de enfoque aparecerá en la pantalla del
visor.
4 Cuando el cuadro de enfoque se vuelva verde, signicará que la cá-
mara ha enfocado la persona o el objeto que desea fotograar.
5 Haga clic en para capturar la foto.
SUGERENCIA: Si tiene una cuenta de SNS y la configura en el teléfono, podrá
compartir su foto con la comunidad de SNS.
Después de que haya tomado la foto
Abra la foto que tomó para ver las siguientes opciones:
Toque esta opción para ver una galería de fotos guardadas.
Toque para compartir su foto utilizando la función SmartShare.
Toque esta opción para tomar otra foto inmediatamente.
Toque para enviar su foto a otras personas o para compartir
mediante servicios de redes sociales.
Toque esta opción para borrar la foto.
Toque la Tecla de Opciones para abrir las opciones.
Fijar imagen como: toque para usar la imagen como Foto de contacto,
Fondo de la pantalla principal o Pantalla de bloqueo.
Mover: toque para mover la imagen a otro lugar.
Cámara

43
Copiar: Toque para copiar la foto seleccionada y guardarla en otro álbum.
Renombrar: toque esta opción para editar el nombre de la imagen
seleccionada.
Girar a la izquierda/derecha: permite girar a la izquierda o a la derecha.
Recortar: permite recortar la foto. Permite mover el dedo por la pantalla
para seleccionar el área a recortar.
Editar:
permite ver y editar la imagen.
Presentación: Muestra en forma automática las imágenes de la carpeta
actual una tras otra.
Detalles: encuentre más información acerca del contenido.
Opciones de ajustes avanzados
En el visor, toque para abrir las opciones avanzadas.
Toque si desea cambiar el menú del visor.
Le permite encender el flash al tomar una foto en condiciones oscuras.
Permiten acercar y alejar.
Define y controla la cantidad de luz que debe ingresar a la foto.
Se concentra en un punto específico.
Selecciona la resolución de la foto. Si elige una resolución alta, el tamaño
del archivo aumentará, por lo que podrá almacenar menos fotos en la
memoria.
Encuentra los ajustes de color y luz adecuados para el ambiente actual.
La clasificación ISO determina la sensibilidad del sensor de luz de la
cámara. Cuanto más alto sea el valor ISO, más sensible será la cámara. Es
muy útil en condiciones de poca luz cuando no puede usarse el flash.

44
Mejora la calidad del color en distintas condiciones de luz.
Aplica efectos artísticos a imágenes.
Establece un retraso después de presionar el icono Capturar. Esta función
es ideal si quiere formar parte de una foto.
Esta opción le permite usar los servicios basados en la ubicación del
teléfono. Le permite tomar fotos dondequiera que esté y etiquetarlas
con la ubicación. Al cargar las fotos etiquetadas en un blog que admita el
proceso de etiqueta geográfica, podrá ver las fotos en un mapa.
NOTA: Esta función solo está disponible cuando la función GPS está
activada.
Seleccione el sonido del obturador.
Si se activa esta función, se muestra la imagen después de
tomarla.
Restaure los ajustes predeterminados de la cámara.
Muestra la ayuda para la cámara.
NOTA: Es posible que se apliquen cargos adicionales al descargar mensajes MMS
mientras se encuentra en roaming.
Ver las fotos guardadas
Puede acceder a las fotos guardadas desde el modo de cámara,
simplemente toque el icono Galería/Multimedia.
Cámara

45
Videocámara
Uso del visor
Cambiar cámara: Alterna entre la cámara interna y externa.
Tamaño del video: Toque para establecer el tamaño del video (en
pixeles) que está grabando.
Efecto en vivo: el efecto en vivo brinda varios efectos visuales cuando
se graba un video.
Flash: le permite encender el flash al grabar un video en condiciones de
baja luminosidad.
Ajustes: toque este icono para abrir el menú Configuración.
Modo cámara: toque este icono para alternar al modo de cámara.
Iniciar grabación
Galería: toque esta opción para ver el último video grabado. Esta
opción también le permite acceder a la galería y ver los videos
guardados desde el modo de video.
SUGERENCIA: Mientras graba un video, coloque dos dedos sobre la pantalla y
júntelos o sepárelos para usar la función de Zoom.

46
Grabar un video rápido
1 Abra la aplicación Cámara y toque el icono de modo videocámara
2 El visor de la cámara de video aparecerá en la pantalla.
3 Con el teléfono en la mano, apunte la lente hacia el objetivo que desea
capturar en el video.
4 Presione una vez para iniciar la grabación.
5 Aparecerá una luz roja en la esquina superior izquierda del visor, junto
con un temporizador que muestra la duración del video.
6 Toque en la pantalla para detener la grabación.
Opciones de ajustes avanzados
En el visor, toque para abrir todas las opciones avanzadas.
Toque si desea cambiar el menú del visor.
Permite acercar o alejar la imagen.
Define y controla la cantidad de luz que debe ingresar al video.
Mejora la calidad del color en distintas condiciones de luz.
Elija una tonalidad de color para aplicarla en la nueva vista.
Esta opción le permite usar los servicios basados en la ubicación
del teléfono.
Seleccione la opción Desactivar para grabar un video sin sonido.
La Revisión automática muestra el video que acaba de grabar.
Permite restaurar los ajustes predeterminados de la cámara de
video.
Videocámara

47
Toque esta opción para saber cómo opera esta función. Este
ícono fue diseñado para proporcionarle una guía rápida.
Después de grabar un video
Toque para compartir su video utilizando la función SmartShare.
Toque esta opción para grabar otro video inmediatamente.
Toque para enviar su video a otras personas o para compartir
mediante servicios de redes sociales.
Toque esta opción para ver una galería de videos guardados.
Toque esta opción para borrar la foto.
NOTA: Aparecerá una imagen estática que representa el video si está activada la
Revisión automática.
NOTA: Es posible que se apliquen cargos adicionales al descargar mensajes
MMS mientras se encuentra en roaming.
Ver los videos guardados
1 En el visor, toque .
2 La galería aparecerá en la pantalla.
3 Toque un video para reproducirlo automáticamente.
NOTA:
Para ajustar el volumen de un video mientras se está reproduciendo,
utilice las teclas de volumen ubicadas en el lado izquierdo del teléfono.

48
Funciones exclusivas de LG
QuickMemo
Use QuickMemo para crear notas de manera práctica y eficiente, con una
imagen guardada o con la pantalla actual del teléfono.
1 Ingrese a la pantalla de la
QuickMemo manteniendo
presionadas las teclas de volu-
men durante un segundo en la
pantalla que desea capturar.
O bien
Toque y deslice hacia abajo la
Barra de estado y toque
.
2 Seleccione la opción de menú
deseada de Tipo de bolígrafo,
Color, Borrador y cree una nota.

49
3 En el menú Editar, toque y
seleccione una opción para guar-
dar la nota con la pantalla actual.
NOTA: Al usar QuickMemo, use la
punta de su dedo. No utilice las
uñas.
Usar las opciones de QuickMemo
Al utilizar la función QuickMemo, puede usar las siguientes opciones.
Toque para mantener la nota actual en la pantalla y utilizar el
teléfono a la vez.
Selecciona si usar o no la pantalla de fondo.
Deshacer o Rehacer.
Selecciona el tipo de bolígrafo y el color.
Borra la nota que creó.
Toque para enviar su nota a otras personas o para compartir
mediante servicios de redes sociales.
Guarda la nota con la pantalla actual en Galería/Multimedia o
Cuaderno.
Ver el QuickMemo guardado
Toque Galería/Multimedia o Cuaderno y seleccione el álbum
QuickMemo.

50
Cuaderno
La aplicación Cuaderno le permite crear sus propias notas especiales con
dibujos, imágenes, mapas y adhesivos.
Escribir una nota
1 Toque > cha Aplicaciones > Cuaderno.
2 Para crear una nueva nota, toque Nueva nota
3 Seleccione el modo deseado (Portada, Título, Papel, Color del papel) y
luego toque OK.
4 Cree una nota sencilla en una página vacía.
Páginas: panel de propiedadesLibrería
Librería
Busque páginas de notas.
Toque para enviar su nota a otras personas o para compartir
mediante servicios de redes sociales.
Borra la nota guardada desde la Librería.
Funciones exclusivas de LG

51
Páginas: panel de propiedades
Seleccione el modo de sólo lectura o edición.
Deshacer o Rehacer.
Toque para escribir.
Seleccione el Tipo de bolígrafo, Espesor, Opacidad y Color.
Borra las notas que usted creó.
Toque para adjuntar archivos a la nota.
Toque para enviar su nota a otras personas o para compartir
mediante servicios de redes sociales.
Guarda las notas con la pantalla actual.
Seleccione para bloquear o desbloquear la Tecla Frontal.
Toque para ampliar el área de entrada.
Visualizar el cuaderno guardado
• Las notas guardadas aparecen en la Librería.
• Si guarda notas de QuickMemo, se creará una carpeta de QuickMemo en
la Librería automáticamente.
QuickTranslator
Con esta función, podrá usar la traducción instantánea entre muchos
idiomas con/sin conexión a internet. Use la cámara para traducir.
Usted podrá adquirir diccionarios adicionales en Google Play Store para la
opción de traducción sin conexión a internet.

52
Idioma de origen.
Idioma de destino
Flash.
Traducción de párrafo.
Traducción de oraciones.
Traducción de cada palabra.
1 Toque > cha Aplicaciones > QuickTranslator
2 Toque Palabra, Línea o Párrafo.
3 Toque y seleccione el idioma deseado.
4 Apunte el teléfono hacia el elemento que desea traducir durante unos
segundos.
NOTA: Solo se proporciona un diccionario sin cargo.
Los diccionarios adicionales están a la venta. Por favor, seleccione de la lista siguiente el
diccionario que quisiera instalar como diccionario adicional.
NOTA: Puede existir una diferencia en el índice de reconocimiento debido al tamaño, la
fuente, el color, el brillo y el ángulo de las letras que necesitan ser traducidas.
Funciones exclusivas de LG

53
Zoom en vivo
Zoom en vivo le permite aumentar o reducir el video que se produce.
1 Mientras se visualiza un video, use el dedo índice y el pulgar juntándo-
los o separándolos para reducir o aumentar la imagen.
2 Cuando se desliza la pantalla hacia arriba o abajo, se ajustará el brillo
de la pantalla.
NOTA: No presione demasiado la pantalla táctil, ya que es lo suficientemente
sensible para detectar un toque suave, pero firme.

54
QSlide
La función QSlide permite superposición en la pantalla del teléfono para
una práctica visualización hasta dos ventanas al mismo tiempo.
O bien
Toque para salir de la función
QSlide y volver a la pantalla
completa.
Toque para ajustar la
transparencia.
Toque para finalizar la función
QSlide.
1 Toque y deslice la barra de estado hacia abajo, seleccione la aplicación QSlide
o bien, mientras
usa una función compatible por la función
QSlide
, toque
. La función se muestra continuamente como una pequeña ventana
en la pantalla.
2 Puede hacer llamadas, navegar en la red o elegir otras opciones del
teléfono. Además, puede usar y tocar la pantalla de las ventanas más
pequeñas cuando la barra de transparencia no está llena
.
Funciones exclusivas de LG

55
Función Reproducción Doble
Puede visualizar una pantalla diferente en cada una de las dos pantallas
conectadas de forma inalámbrica o por cable.
1 El modo de reproducción doble se ejecuta al tocar la Tecla Inicio
cuando se reproduce contenido en la pantalla externa.
2 Puede dejar de reproducir contenido en la pantalla
externa
utilizando el
panel de noticaciones.
NOTAS
: Conecte su teléfono inteligente a una pantalla en forma inalámbrica
(Miracast) o por cable (cable MHL). También puede conectar un monitor
o televisor.
Replicado
∙∙∙∙∙
Reproducción
Doble
∙∙∙∙∙
NOTAS: - Algunos videos pueden no ser compatibles con la función
Reproducción Doble.
- Se recomienda el cable MHL protegido de LG.
- Hay tres aplicaciones compatibles con Dual Play: Videos, Media Home (solo
MHL) y Polaris Office 4.
- La resolución mínima de TV requerida para Dual Play es 720p (1280x720).

56
LG SmartWorld
LG SmartWorld ofrece una gran variedad de contenido de interés: juegos,
aplicaciones, fondos de pantalla y tonos; lo que le proporciona a los
usuarios de teléfonos LG la oportunidad de disfrutar de experiencias más
enriquecedoras en la "vida móvil".
Acceder a LG SmartWorld desde el teléfono
1 Toque > cha Aplicaciones >Toque el icono para acceder a LG
SmartWorld.
2 Toque Acceder e ingrese la identicación y contraseña para Smart-
World. Si aún no está suscrito, regístrese y obtenga una membresía de
SmartWorld.
3 Descargue el contenido deseado.
NOTAS: ¿Qué sucede si no tengo el icono ?
1 Utilice un navegador de Internet móvil, acceda a LG SmartWorld (www.lgworld.
com) y seleccione su país.
2 Descargue la aplicación LG SmartWorld.
3 Ejecute e instale el archivo descargado.
4 Acceda a LG SmartWorld tocando el icono
.
Usar LG SmartWorld
Participe de las promociones mensuales de LG SmartWorld.
Toque la tecla de opciones para encontrar rápidamente lo que está
buscando.
Categorías: permite encontrar contenido por categoría (por ejemplo,
educación, entretenimiento, juegos, etc.).
Buscar: permite buscar contenido.
Funciones exclusivas de LG

57
Aplicaciones para usted: contenido recomendado basado en las opciones
que seleccionó.
Ajustes: permite configurar el perfil y la pantalla.
Iniciar sesión: permite configurar su identificación y contraseña.
Utilice también otras funciones útiles en la pantalla de detalles del
contenido.
Busque contenido.
Encuentre contenido por categoría (por ejemplo, juegos,
educación, entretenimiento, etc.).
Lista del contenido descargado/a actualizar.
NOTA: Es posible que la función SmartWorld no esté disponible para todos los
proveedores, países y/o regiones.

58
On-Screen Phone
On-Screen Phone le permite ver la pantalla del teléfono celular desde
una PC a través de una conexión USB, Bluetooth o Wi-Fi. También puede
controlar el teléfono celular desde la PC con el mouse o el teclado.
Iconos de On-Screen Phone
Conecta/Desconecta el teléfono celular a la PC.
Cambia las preferencias de On-Screen Phone.
Sale del programa de On-Screen Phone.
Maximiza la ventana de On-Screen Phone.
Minimiza la ventana de On-Screen Phone.
Funciones de On-Screen Phone
Transferencia y control en tiempo real: muestra y controla la pantalla del
teléfono celular cuando se conecta a la PC.
Control del mouse: permite controlar el teléfono celular utilizando el
mouse para hacer clic y arrastrar por la pantalla de la PC.
Insira texto con el teclado: permite redactar un mensaje de texto o una
nota con el teclado de la computadora.
Transferencia de archivos (teléfono celular a PC): envía archivos desde
el teléfono celular (por ejemplo, fotos, videos, música y archivos de Polaris
Office) a la PC.
Transferencia de archivos (PC a teléfono celular): envía archivos de la PC
al teléfono celular. Seleccione los archivos que desea transferir, arrastre
y suéltelos en la ventana de On-Screen Phone. Los archivos enviados se
Funciones exclusivas de LG

59
guardan en la memoria interna.
Notificaciones de eventos en tiempo real: una ventana emergente
aparece para informarle sobre las llamadas recibidas o mensajes de texto/
multimedia.
Instalar On-Screen Phone en la PC
1 Visite el sitio web de LG (www.lg.com).
2 Seleccione el país de su preferencia.
3 Vaya a Soporte > Soporte del teléfono celular.
4 Seleccione el modelo LG-E976.
5 Haga clic en OSP (On-Screen Phone) para descargar.
6 Instale On-Screen Phone en la PC.

60
Galería
Puede almacenar archivos multimedia como fotos y videos en la Galería.
Toque
> cha Aplicaciones > Galería/Multimedia.
NOTAS:
• No se admiten algunos formatos de archivo según el software instalado en el
dispositivo.
• Algunos archivos pueden no reproducirse adecuadamente, según cómo estén
codificados.
Ver las fotografías
1 Al iniciar la Galería, se muestran las carpetas disponibles. Cuando otra
aplicación, como el correo electrónico, guarda una foto, la carpeta de
descargas se crea automáticamente para contener la fotografía.
2 Seleccione una carpeta y ábrala.
3 Las fotos se muestran por fecha de creación en las carpetas.
4 Seleccione una foto para verla en pantalla completa.
5 Deslícese hacia la izquierda o derecha para ver la imagen anterior o
siguiente.
Acercar o alejar una imagen
Use uno de los métodos siguientes para acercar una imagen:
1 Toque dos veces en cualquier lugar para acercar.
2 Use el dedo índice y el pulgar juntándolos o separándolos para reducir
o aumentar la imagen.
Multimedia

61
Reproducir videos desde la galería
1 Los archivos de video muestran el ícono en la previsualización
2 Seleccione un video para mirar y toque .
Editar fotos
Mientras ve una foto, toque la Tecla de Opciones y use las opciones de
edición avanzada.
Borrar las fotos y videos de la galería
Existen dos formas para borrar los archivos:
• En una carpeta, toque y seleccione fotos o videos realizando una
marca de verificación, y luego toque Borrar.
• Mientras vea una foto o video, toque .
Establecer un fondo de pantalla
Mientras ve una foto, toque la Tecla de Opciones >Ficha Fijar imagen
como para establecer la imagen como fondo de la pantalla principal.
NOTAS:
• No se admiten algunos formatos de archivo según el software del dispositivo.
• Si el tamaño del archivo excede el espacio de memoria disponible, es posible
que ocurra un error al abrir los archivos.

62
Reproductor de videos
El teléfono cuenta con un reproductor de video integrado para que pueda
reproducir sus videos favoritos. Para acceder al reproductor de video,
toque
> ficha Aplicaciones > Videos y seleccione el video que desea
reproducir.
Toque esta opción para pausar el video.
Toque esta opción para reanudar el video.
Toque para adelantar 10 segundos.
Toque para retroceder 10 segundos.
Toque para controlar el volumen del video.
Toque para cambiar el radio de la pantalla de video.
Toque para compartir su video utilizando la función SmartShare.
Para cambiar el volumen mientras ve un video, presione las Teclas de
Volumen, ubicadas al lado izquierdo del teléfono.
Mantenga presionado cualquier video en la lista. Se mostrarán las
opciones Compartir, Cortar, Borrar y Detalles.
Multimedia

63
Editor de video
Se puede editar las fotos o los videos almacenados en el teléfono.
< Pantalla de la lista de proyecto >
Área de
botones
Área de la lista
de proyecto
Ayuda
Crear proyecto
Exportar proyecto para reproducir en aplicaciones como videos
Reproducir proyecto
Borrar proyecto
Compartir proyecto con aplicación como YouTube
NOTA: La función de edición de video solo es compatible con fotos o videos
grabados con este teléfono.

64
< Pantalla de edición de proyecto >
Área de
cronología
Área de
visualización
Pasar a la pantalla de la lista de proyecto. El proyecto editado
actualmente se guarda en forma automática
Divida el clip de video en dos bloques con el encabezado de
reproducción
Ingresar efectos de sonido
Ingresar videos, imagenes o clip de audio
Deshaga una acción
Rehaga una acción
Ingresar texto a clip de video o imagen
Asistente de video
Puede grabar su propia película al usar sus imágenes, videos y música.
1 Toque > cha Aplicaciones > Asistente de video.
2 Toque para agregar imágenes o videos a su película.
3 Seleccione las imágenes y videos y toque
4 Para borrar imágenes o videos, toque y seleccione los archivos desea-
Multimedia

65
dos > Toque .
5 Para reorganizarlos, mantenga presionada una imagen/video, arrástrela
y suéltela en la posición deseada.
6 Toque Seleccionar estilo para elegir el estilo deseado para la película.
7 Toque Seleccionar música para ajustar la música de fondo.
8 Toque para reproducir su película.
9 Toque para editar el clip de video usando Texto, Adhesivo o Punto
mágico. Toque
después de editar el video y para guardar el
video.
10 Toque para ver la información de ayuda sobre cómo usar
esta función.
Música
El teléfono cuenta con un reproductor de música integrado para que
pueda reproducir sus temas favoritos. Para acceder al reproductor de
música, toque
> ficha Aplicaciones > Música.
Reproducir una canción
1 En la pantalla principal, toque > cha Aplicaciones > Música.
2 Toque Músicas.
3 Seleccione la canción que desea reproducir.
Transferencia de archivos mediante dispositivos de
almacenamiento masivo USB
1 Conecte el teléfono a la PC con el cable USB.
2 Seleccione la opción Sincronización multimedia (MTP). Su teléfono
aparecerá como otra unidad de disco duro en su computadora. Haga
clic en la unidad para visualizarla. Copie los archivos desde la PC a la

66
carpeta de la unidad.
3 Cuando haya terminado de transferir los archivos, deslícese hacia abajo
en la barra de estado y toque USB conectado > Solo cargar. Ahora
puede desconectar el dispositivo de forma segura.
Toque para encontrar los archivos con YouTube
Toque para compartir su música utilizando la función
SmartShare.
Toque esta opción para ajustar el modo aleatorio.
Toque esta opción para ajustar el modo de repetición.
Toque esta opción para controlar el volumen de la música.
Toque esta opción para pausar la reproducción.
Toque esta opción para reanudar la reproducción.
Toque para pasar a la siguiente pista del álbum o la lista de
reproducción
Toque esta opción para regresar al principio de la canción. Toque
dos veces para regresar a la canción anterior.
Toque para establecer los favoritos
Toque esta opción para ver la lista de reproducción actual.
Toque para ajustar el efecto de audio Dolby cuando esté
conectada la toma para auriculares.
Para cambiar el volumen mientras escucha música, presione las teclas de
volumen, ubicadas en la lateral izquierda del teléfono.
Mantenga presionada cualquier canción en la lista. Aparecerán las
opciones Reproducir, Agregar a la lista de reproducción, Remover de
Multimedia

67
la lista de reproducción, Compartir, Fijar como tono de timbre, Borrar,
Detalles y Buscar.
NOTAS:
• No se admiten algunos formatos de archivo según el software del
dispositivo.
• Si el tamaño del archivo excede el espacio de memoria disponible, es
posible que ocurra un error al abrir los archivos.
NOTA: Es probable que los archivos de música estén protegidos por
leyes de derecho de autor nacionales y tratados internacionales. Por lo
tanto, es posible que sea necesario obtener un permiso o una licencia
para reproducir la música o copiarla.
En algunos países, las leyes nacionales prohíben la realización de copias
de material protegido por derechos de autor. Antes de descargar o
copiar el archivo, compruebe las leyes nacionales del país pertinente
respecto del uso de ese tipo de material.

68
Configurar una alarma
1 Toque > cha Aplicaciones > Reloj/Alarmas > .
2 Establezca la repetición, la duración de la repetición, la vibración, el
tono de alarma, active la opción de rompecabezas e incluya una nota.
Toque Guardar.
3 Después de establecer la hora, el teléfono le informará cuánto tiempo
falta para que suene la alarma.
SUGERENCIA: Cuando empiece a sonar la alarma, voltee el teléfono (con
la pantalla hacia abajo) para posponer la alarma de acuerdo con el tiempo
establecido previamente.
Usar la calculadora
1 Toque > cha Aplicaciones > Calculadora
2 Toque las teclas numéricas para ingresar los números.
3 Para cálculos simples, toque la función que desee (+, –, x o ÷), seguida
del signo (=).
4 Para realizar cálculos más complejos, toque , seleccione el Panel
avanzado y, a continuación, elija seno, coseno, tangente, logaritmo,
etc.
5 Para revisar el historial, toque el icono.
Agregar un evento al calendario
1 Toque > cha Aplicaciones > Calendario/Agenda.
2 Toque para ver los distintos tipos de vistas del calendario (día,
semana, mes o agenda).
Utilidades

69
3 Toque la fecha en la que desea añadir un evento y presione .
4 Toque Nombre del evento y luego ingrese el nombre del evento.
5 Toque Ubicación e ingrese la ubicación. Marque la fecha e ingrese la
hora a la que le gustaría que empiece y termine el evento.
6 Si desea agregar una nota al evento, toque Descripción e ingrese los
detalles.
7 Si desea repetir la alarma, congure REPETIR y RECORDATORIOS, si es
necesario.
8 Toque Guardar para guardar el evento en el calendario.
NOTA: El nombre de esta función puede cambiar según el proveedor de
servicios.
Grabador de voz
Utilice el grabador de voz para grabar notas de voz u otros archivos de
audio.
Grabar un sonido o una voz
1 Toque > la cha Aplicaciones y seleccione Grabador de voz.
2 Toque para iniciar la grabación.
3 Toque para nalizar la grabación.
4 Toque para escuchar la grabación.
NOTA: Toque para acceder al álbum. Podrá escuchar la grabación guardada.
El tiempo disponible de grabación puede variar del tiempo real de grabación.

70
Enviar una grabación de voz
1 Puede enviar el clip de audio al tocar .
2 Elija entre Bluetooth, E-mail, FileShare, Gmail, Notas o Mensajes.
La grabación de voz se agrega al mensaje. Entonces, puede escribir y
enviar el mensaje de manera habitual.
Administrador de aplicaciones
Puede verificar y administrar las aplicaciones que se están ejecutando con
el uso del administrador de aplicaciones. También puede desinstalar las
aplicaciones que ha instalado en el dispositivo.
MS Exchange
Esta función permite accesar, el MS Outlook o MS Office Outlook Web
Access.
Para sincronizar MS Exchange
1 Toque > cha Aplicaciones > Ajustes.
2 Toque Cuentas y sincronización > Marca la casilla de sincronización
automatica de datos y AGREGAR CUENTA.
3 Toque Microsoft Exchange > Insira la Dirección de e-mail y la con-
traseña.
Polaris Office 4
Polaris Office es una solución profesional para office que permite que
sus usuarios puedan ver en sus dispositivos móviles distintos tipos de
documentos de Office, como archivos Word, Excel y PowerPoint, en
Utilidades

71
cualquier lugar, a cualquier hora.
Toque
> ficha Aplicaciones > Polaris Office 4 .
Administrar archivos
Polaris Office ofrece a los usuarios de teléfonos móviles características
convenientes para administrar archivos, como copiar, mover, pegar, borrar
archivos y carpetas directamente en el teléfono.
Ver archivos
Los usuarios de teléfonos móviles ahora pueden ver una amplia gama
de archivos, como documentos de Microsoft Office y Adobe PDF. Al ver
documentos con Polaris Office, se mantienen los objetos y diseños en el
formato original del documento.
FileShare
Esta función le permite compartir archivos desde su teléfono.
1 Toque > cha Aplicaciones > FileShare.
2 Elija los tipos de contenido que desea compartir. Escoja entre Imá-
genes, Videos, Música y Documentos.
Copia de seguridad
Copias de seguridad y restauración de los datos del teléfono
Se le recomienda crear y guardar regularmente archivos de copia de
seguridad en la tarjeta de almacenamiento interna, especialmente
antes de actualizar el software. Esta aplicación Backup es compatible
entre teléfonos LG, otras versiones de software o sistemas operativos.
Por lo tanto, cuando compre el nuevo teléfono LG, puede respaldar la
información del teléfono LG-E976 e
n su nuevo equipo.
Si cargó previamente la aplicación B
ackup, puede crear copias de

72
seguridad y restaurar la mayoría de los datos del teléfono, como
sus ajustes, contactos, calendario, registro de llamadas, aplicaciones
descargadas, mensajes, aplicaciones preinstaladas y configuración del
sistema.
Crear copias de seguridad de los datos del teléfono
1 Toque > cha Aplicaciones > Backup > Hacer copia de respaldo >
Seleccione la ubicación para guardar su copia de seguridad.
2 Toque Agregar nueva para ingresar un nombre para el archivo de
copia de seguridad y luego seleccione Continuar.
3 Seleccione los elementos para los que desea hacer una copia de
seguridad y luego Continuar para hacer la copia de seguridad.
4 Cuando haya hecho copias de seguridad para todos los elementos
seleccionados, verá el mensaje que se ha realizado y seleccione
Continuar para nalizar.
Programar copias de seguridad automáticas
También puede habilitar las copias de seguridad automáticas de los datos
del teléfono según sus ajustes de programación. Para hacerlo, siga estos
pasos:
1 Toque > cha Aplicaciones > Backup > Programar.
2 En la pantalla Ubicación de la copia de respaldo programada, selec-
cione la ubicación donde desea guardar su copia de seguridad.
3 En la lista, seleccione con qué frecuencia desea hacer copias de seguri-
dad de los datos y ajustes del teléfono, y seleccione Continuar.
4 Seleccione los datos para los que desea hacer copias de seguridad y
luego, seleccione Continuar para nalizar el ajuste de la programación.
Utilidades

73
Restaurar los datos del teléfono
NOTA: Todos los archivos que están almacenados en el teléfono se eliminan
antes de restaurar el archivo de copia de seguridad.
1 Toque > cha Aplicaciones > Backup > Restaurar > seleccione la
ubicación donde se encuentra su copia de seguridad.
2 En la pantalla Restaurar datos, seleccione un archivo de copia de segu-
ridad que contenga los datos que desee restaurar.
3 Seleccione los elementos que desea restaurar y luego, seleccione
Continuar para restaurar los datos del teléfono.
NOTA: Tenga en cuenta que los datos del teléfono se sobrescribirán con el
contenido de la copia de seguridad.
4 Si el archivo de la copia de seguridad está encriptado, ingrese la con-
traseña que conguró para encriptar.
NOTAS:
•Mientras esté en el modo de almacenamiento masivo, la aplicación
Backup puede no funcionar. Seleccione la opción Solo cargar cuando el
cable USB esté conectado.
• Se puede habilitar el cifrado para encriptar los archivos de copia de
seguridad para estar más protegido.
Toque la Tecla de opciones en la pantalla Backup, seleccione Ajustes >
Seguridad y marque la opción de habilitar cifrado. Después de habilitar
el cifrado, para restaurar los datos debe recordar la contraseña creada.

74
Google+
Use esta aplicación para permanecer conectado con personas mediante el
servicio de red social de Google.
• Toque > ficha Aplicaciones > Google +.
NOTA: Esta aplicación puede no estar disponible, según la región o el proveedor
de servicio.
Búsqueda por voz
Use esta aplicación para buscar en páginas web mediante el uso de voz.
1 Toque > cha Aplicaciones > Búsqueda por voz.
2 Diga una palabra o frase clave cuando aparezca Habla ahora en la
pantalla.
3 Seleccione una de las palabras clave sugeridas que aparecen.
NOTA: Esta aplicación puede no estar disponible, según la región o el proveedor
de servicio.
NOTA: También puede habilitar la eliminación automática de las
antiguas copias de seguridad y mantener solo la copia de seguridad
más reciente. Toque la Tecla de opciones en la pantalla Backup,
seleccione Ajustes > Copia de respaldo programada > Borrar copias
de respaldo antiguas y seleccione el número de copias de seguridad
programadas que conservará.
Utilidades

75
Descargas
Use esta aplicación para ver los archivos descargados a través de las
aplicaciones.
• Toque > ficha Descargas.
NOTA: Esta aplicación puede no estar disponible, según la región o el proveedor
de servicio.

76
La Web
Internet
El navegador le ofrece un rápido y colorido mundo de juegos, música,
noticias, deportes, entretenimiento y mucho más, al que puede acceder
directamente desde el teléfono móvil. No importa dónde esté ni cuáles
sean sus preferencias.
NOTA: incurrirá en gastos adicionales cuando se conecte a estos servicios y
descargue contenido. Consulte con el proveedor de red cuáles son los gastos
por transferencia de datos.
Toque > cha Aplicaciones > Navegador.
Uso de la barra de herramientas Web
Toque y mantenga presionada la barra de herramientas Web y deslícela
hacia arriba con el dedo para abrirla.
Toque para volver una página.
Toque para avanzar una página, hasta la página a la que se
conectó después de la página actual. Esto es lo contrario a lo que
sucede si presiona la tecla Volver, que pasa a la página a la cual
se conectó antes de la actual.
Toque para ir a la página de Inicio.
Toque para agregar una nueva ventana.
Toque para acceder a los favoritos.

77
Visualización de páginas web
Toque el campo de dirección, ingrese la dirección web y toque Ir.
Abra una página
Para ir a una página nueva, toque
Para ir a otra página web, toque , deslícese hacia arriba o abajo y toque
la página para seleccionarla.
Búsqueda por voz en la web
Toque el campo de dirección, toque , diga en voz alta una palabra clave
y luego seleccione una de las palabras clave sugeridas.
NOTA: Esta característica puede no estar disponible, según la región o el
proveedor de servicio.
Usar opciones
Toque la tecla de opciones para ver las siguientes opciones.
Actualizar: permite actualizar la página web actual.
Guardar en Favoritos: permite agregar la página web actual como
favorita.
Compartir página: permite compartir la página Web.
Buscar en la página: permite encontrar letras o palabras en la página web
actual.
Ver en modo clásico: le permite ver la página web como escritorio.
Guardar para lectura fuera de línea: guarda la página actual para leerla
cuando esté fuera de línea.
Brillo: modifica el brillo de la visualización.
Ajustes: muestra los ajustes del navegador.
Salir: sale del navegador.

78
Historial
Toque > Último(s) acceso(s) para abrir una página web de una lista de
páginas visitadas recientemente.
Para limpiar el historial, toque
Borrar todo el historial.
Chrome
Use Chrome para buscar información y buscar páginas web.
1 Toque > cha Aplicaciones > Chrome.
Visualización de páginas web
Toque el campo Dirección e ingrese una dirección web o un criterio de
búsqueda.
Abra una página
Para ir a una nueva página, toque + Nueva pestaña.
Para ir a otra página web, toque
, deslícese hacia arriba o abajo y toque
la página para seleccionarla.
Búsqueda por voz en la web
Toque el campo de dirección, toque , diga en voz alta una palabra clave
y luego seleccione una de las palabras clave sugeridas.
Sincronización con otros dispositivos
Sincronice fichas y favoritos abiertos para usar con Chrome en otro
dispositivo cuando haya iniciado con la misma cuenta de Google.
Para ver fichas abiertas en otros dispositivos, toque Menú
Otros
dispositivos.
Seleccione una página web para abrir.
Para ver favoritos, toque
.
La Web

79
Ajustes
Acceso al menú de configuración
1 En la pantalla principal, toque > Ajustes del sistema.
2 Seleccione la categoría que desea ajustar.
REDES INALÁMBRICAS
Desde esta opción, puede administrar los servicios de Wi-Fi y Bluetooth.
También puede configurar redes móviles y cambiar al modo avión.
<Wi-Fi>
Wi-Fi: active Wi-Fi para conectarse a las redes Wi-Fi disponibles.
SUGERENCIA: Para configurar una conexión en algunas redes inalámbricas con
filtros MAC, es posible que deba ingresar la dirección MAC del teléfono LG-E976
en el router.
Puede encontrar la dirección MAC mediante los siguientes pasos: Toque la ficha
Aplicaciones > Ajustes > Wi-Fi > toque la Tecla de opciones > Avanzado >
Dirección MAC.
< Bluetooth >
Esta opción activa Bluetooth para conectarse a dispositivos Bluetooth.
< Datos móviles >
Muestra el uso de datos y establece límites de uso de datos móviles.
< Llamadas >
Configure las opciones de llamada del teléfono, como desvío de llamadas,
y otras funciones especiales que ofrece su proveedor.
<Más>
Modo avión: después de activar esta opción, se desactivarán todas las
conexiones inalámbricas.

80
Red de archivos: Permite compartir carpetas con otros dispositivos
mediante una conexión inalámbrica.
Punto de acceso Wi-Fi: Permite compartir una red móvil por Wi-Fi y
configurar los ajustes de zona Wi-Fi portátil.
Miracast: Con Miracast, puede replicar en forma inalámbrica la pantalla y
el sonido de su teléfono en una llave LG Miracast o una TV.
Conexión Bluetooth: Permite fijar el teléfono para compartir la conexión
de Internet a través de Bluetooth.
NFC: Su teléfono es un dispositivo móvil con NFC activado. La tecnología
de comunicación de campo cercano (NFC, por sus siglas en inglés) permite
la comunicación en dos direcciones entre dispositivos electrónicos. Su
distancia de operación es de unos pocos centímetros. Puede compartir su
contenido con una etiqueta NFC u otro dispositivo compatible con NFC al
tocarlo simplemente con su dispositivo. Si toca una etiqueta NFC con su
dispositivo, los contenidos de esta aparecerán en su teléfono.
Para activar o desactivar las funciones NFC: En la pantalla principal,
toque y deslice el panel de notificaciones hacia abajo con su dedo y, a
continuación, seleccione el icono de NFC para activarlo.
NOTA: La aplicación de NFC se puede utilizar incluso si el teléfono está en modo
avión.
Uso de NFC: Para utilizar las funciones NFC, asegúrese de que su
dispositivo está encendido y de que NFC esté habilitado.
Android Beam: Cuando esta función está encendida, puede transferir
el contenido de una aplicación a otro dispositivo con NFC al mantener
ambos dispositivos juntos.
Solo junte los dispositivos (normalmente, ambos lados posteriores) y luego
toque su pantalla. La aplicación determinará el contenido a transferir.
VPN: Muestra la lista de redes privadas virtuales (VPN) que ha configurado
Ajustes

81
anteriormente. Le permite agregar diferentes tipos de VPN.
Redes móviles: Permite establecer opciones para roaming de datos, modo
y operadores de red, nombres de puntos de acceso (APN), etc.
NOTA: Debe configurar un PIN o una contraseña para bloqueo de pantalla antes
de que pueda usar el almacenamiento de credenciales.
DISPOSITIVO
< Sonido >
Perfil de sonido: Puede elegir Sonido, Solamente vibrar o Silencioso.
Volúmenes: puede controlar el volumen del tono de llamada, sonido de
notificación, tono de respuesta del teléfono, música, video, juegos y otros
medios y alarmas.
Período en silencio: Permite configurar horarios en los que se apagarán
todos los sonidos, excepto la alarma y los medios.
Tono de timbre con vibración: Vibra al recibir llamadas o notificaciones.
Tono de llamada: Permite establecer el tono de timbre predeterminado
para las llamadas recibidas.
Sonido de notificaciones: Permite establecer el tono de timbre
predeterminado para las notificaciones.
Tono de llamada inteligente: Programe un aumento en el volumen del
tono de su teléfono cuando suba el ruido del ambiente.
Tonos de marcación del teclado: Le permite configurar el teléfono para
que reproduzca tonos cuando utilice el teclado para marcar los números.
Tono de toque: Le permite establecer el teléfono para que reproduzca un
sonido cuando toque los botones, iconos y otros elementos en pantalla
que reaccionan al tocarlos.
Tono de bloqueo de pantalla: Le permite configurar el teléfono para que

82
reproduzca un sonido al bloquear y desbloquear la pantalla.
Vibrar al tocar: Permite establecer la respuesta de vibración cuando se
toca la pantalla del teléfono.
< Pantalla >
Brillo: Permite ajustar el brillo de la pantalla.
Límite de tiempo de pantalla: Permite configurar el tiempo de espera de
la pantalla.
Pantalla inteligente: Permite mantener la pantalla encendida cuando el
teléfono detecta sus ojos mirando hacia la pantalla.
Pantalla giratoria: Active para rotar la orientación de la pantalla cuando
gire el teléfono.
Tipo de fuente: Cambia el tipo de fuente de la pantalla.
Tamaño de fuente: Cambia el tamaño de la fuente en la pantalla.
Luz de la tecla frontal: Permite fijar el tiempo de iluminación de la tecla
frontal.
Aviso de notificación: El LED de notificación está ubicado a la izquierda
de la cámara frontal. Puede ver una pequeña luz LED encendida cuando el
teléfono se está cargando o cuando recibe una notificación si la pantalla
LCD se apaga. Puede configurar el Aviso de notificación encienda o se
apague. Puede configurar las distintas opciones de la lista de elementos
de notificación por destello.
Corrección de la proporción de la pantalla: Cambie el tamaño de la
resolución de las aplicaciones descargadas para que se adapten al tamaño
de la pantalla.
Calibración del sensor de movimiento: Le permite mejorar la precisión de
la inclinación y la velocidad del sensor.
< Pantalla principal >
Establezca el Tema, Animación, Efectos de la pantalla, Fondo de pantalla
o Solo vista vertical. Seleccione la opción para establecer Desplazar
Ajustes

83
pantallas circularmente y Copia de respaldo y restauración de pantalla.
< Bloqueo de pantalla >
Seleccionar bloqueo de pantalla: Permite fijar un patrón de desbloqueo
para proteger el teléfono. Puede configurar Deslizar, Reconocimiento de
rostro, Patrón, PIN y Contraseña, o puede dejarlo como Ninguno.
La próxima vez que encienda el teléfono o vuelva a activar la pantalla,
se le solicitará que dibuje el patrón de desbloqueo para desbloquear la
pantalla.
Fondo de pantalla: Puede seleccionar el fondo de pantalla desde fondos
de pantalla o desde la galería.
Reloj y atajos: Personalice el reloj y los atajos en la pantalla de bloqueo.
Efecto de la pantalla: Seleccione el efecto de pantalla.
Info. del propietario: Muestra información del propietario en la pantalla
de bloqueo.
Temporizador de bloqueo: Mientras el teléfono está en modo de espera,
el teléfono se bloqueará después de la hora fijada aquí ha transcurrido.
Pero, si se ha seleccionado Ninguno en el menú seleccionar bloqueo de
pantalla, el teléfono no se bloqueará.
El botón Encender/Apagar bloquea inmediatamente:
Independientemente de la configuración de bloqueo automático, el
teléfono se bloquea inmediatamente con la tecla Encender/Apagar/
Bloquear. Pero, si se ha seleccionado Ninguno en el menú Seleccionar
bloqueo de pantalla, el teléfono no se bloqueará.
Vibrar al tocar: Seleccione para establecer la vibración para la pantalla
táctil del teléfono.
< Gestos >
Mover elementos de la pantalla principal: Toque y sostenga un elemento
e incline el dispositivo para mover el elemento en las pantallas o
aplicaciones de Inicio.

84
Sensibilidad de inclinación: Pruebe y ajuste la sensibilidad del sensor de
inclinación para la pantalla principal y las aplicaciones.
Silenciar llamada recibida: Gire el dispositivo para silenciar una llamada
recibida.
Posponer o detener alarma: Gire el dispositivo para posponer o para
detener la alarma.
Detener el video: Gire el dispositivo para pausar un video en
reproducción.
Ayuda: Ayuda para las funciones de gestos.
< Almacenamiento >
Almacenamiento interno: Permite ver el uso del almacenamiento interno.
< Ahorro de energía >
Administre la batería y evalúe los elementos de ahorro de energía.
También puede verificar el uso de batería.
< Aplicaciones >
Vea y administre sus aplicaciones.
< Control de Quad-core >
Establezca el Modo Eco para extender la duración de la batería al optimizar
en forma dinámica la política de control del CPU.
< Cuentas y sincronización >
Esta opción permite que las aplicaciones sincronicen datos en segundo
plano, ya sea que el usuario está trabajando activamente en ellos o no.
Desactivar la selección de esta opción de ajustes puede ahorrar energía de
la batería y reducir (pero no eliminar) el uso de datos.
< Acceso a la ubicación >
Acceder mi a ubicación: Si activa esta función, el teléfono determinará
su ubicación aproximada al usar las redes Wi-Fi y móviles. Al marcar esta
opción, se le pregunta si desea permitir que Google utilice su ubicación al
Ajustes

85
proporcionar estos servicios.
Satélites GPS: Si selecciona Satélites GPS, el teléfono determinará su
ubicación de manera precisa en el nivel de calle.
Wi-Fi y localización de red móvil: Permite que las aplicaciones utilicen
datos de fuentes como el Wi-Fi y redes móviles para determinar su
ubicación aproximada.
< Seguridad >
¿Encriptar el dispositivo?: Codifica todos los datos del teléfono,
incluyendo los datos del sistema. Será necesario un número PIN o
contraseña para decodificar su teléfono cada vez que lo encienda.
Fijar bloqueo de tarjeta Micro-SIM: Permite configurar el bloqueo de la
tarjeta Micro-SIM o cambiar el PIN de la tarjeta Micro-SIM.
Hacer visible la contraseña: Muestra el último carácter de la contraseña
oculta a medida que escribe.
Administradores de dispositivos: Vea o desactive los administradores del
teléfono.
Orígenes desconocidos: Ajustes predeterminados para instalar
aplicaciones distintas de Play Store.
Credenciales de confianza: Muestra los certificados de CA confiables.
Instalar desde el almacenamiento: Elija instalar certificados codificados
desde su almacenamiento interno.
Borrar credenciales: Permite borrar todos los certificados.
< Idioma y teclado >
Utilice los ajustes de Idioma y teclado para seleccionar el idioma del texto
del teléfono y configurar el teclado en pantalla, lo que incluye las palabras
que haya agregado al diccionario.
< Copia de respaldo y restauración >
Cambie la configuración para administrar sus ajustes y datos.

86
Copia de respaldo de datos: Permite configurarlo para hacer una copia de
respaldo de sus ajustes y datos de aplicaciones en el servidor de Google.
Cuenta de copia de respaldo: permite configurarlo para respaldar su
cuenta.
Restauración automática: Permite configurarlo para restaurar sus ajustes
y datos de aplicaciones cuando reinstale las aplicaciones en el teléfono.
Restaurar datos de fábrica: Permite restablecer sus ajustes a los valores
predeterminados de fábrica y borrar todos sus datos. Si restaura el
teléfono de esta manera, se le solicitará que vuelva a ingresar el mismo
tipo de información que introdujo cuando inició Android por primera vez.
SISTEMA
< Fecha y hora >
Use esta función para configurar cómo se mostrarán las fechas. También
puede usar esta opción de ajustes para establecer su propia hora y zona
horaria en lugar de obtener la hora actual de la red de celulares.
< Accesibilidad >
Los ajustes de accesibilidad se usan para configurar cualquier
complemento de accesibilidad que haya instalado en el teléfono
NOTA: Necesita complementos adicionales para ser seleccionable.
< Conexión de PC >
Tipo de conexión USB: Puede fijar el modo deseado.
Preguntar al conectarse: seleccione el modo de conexión USB cuando se
conecte a una PC.
Ayuda: Ayuda para la conexión.
PC Suite: Seleccione esta opción para utilizar LG PC Suite con la conexión
Wi-Fi.
Ajustes

87
Tenga en cuenta que la red Wi-Fi debe estar conectada para LG PC Suite
mediante la conexión Wi-Fi.
On-Screen Phone: la visualización de la pantalla y el control del teléfono
desde la PC están disponibles a través de conexión USB, Bluetooth o Wi-Fi.
Ayuda: Ayuda para software LG.
<Opciones del desarrollador>
Le permite ajustar las opciones avanzadas del sistema.
< Acerca del teléfono >
Permite ver la información legal y comprobar el estado y la versión de
software del teléfono.

88
Actualización del software de los teléfonos móviles LG desde Internet
Para obtener más información sobre el uso de esta función, visite
http://update.lgmobile.com o http://www.lg.com/common/index.jsp y
seleccione un país y un idioma.
Esta función le permite actualizar con comodidad el software del teléfono
a una nueva versión desde Internet sin la necesidad de visitar un centro de
servicio.
Como la actualización del software de los teléfonos móviles requiere
la atención completa del usuario durante el proceso de actualización,
asegúrese de revisar todas las instrucciones y notas que aparecen en cada
paso antes de continuar. Tenga presente que el teléfono móvil puede sufrir
graves daños si se remueve el cable de datos USB.
NOTA: LG se reserva el derecho de poner a disposición las actualizaciones
del firmware solo para modelos seleccionados según su propio criterio y no
garantiza la disponibilidad de la versión más reciente del firmware para todos los
modelos de teléfonos.
Actualización del software de los teléfonos móviles LG por aire (OTA,
Over-The-Air)
Esta función le permite actualizar de manera conveniente el software del
teléfono a una versión más reciente a través de OTA, sin conectar un cable
de datos USB. Esta función solo estará disponible si y cuando LG disponga
de versiones más recientes de firmware para el dispositivo.
Primero, puede comprobar la versión del software en el teléfono móvil:
Ajustes > Acerca del teléfono > Actualización de software > después de
leer y aceptar los términos de uso, compruebe la disponibilidad de nuevo
software.
También puede retardar la actualización en 1 hora, 4horas, 8 horas o un
día. En este caso, la aplicación le avisará que debe realizar la actualización
cuando sea el momento adecuado. También puede cambiar una
actualización manualmente.
Actualización del software del teléfono

89
Marcas registradas
LG y el logotipo de LG son marcas registradas de LG Electronics.
Todas las demás marcas y derechos de autor son propiedad de sus
respectivos titulares.
DivX HD
SOBRE DIVX VIDEO: DivX
®
es un formato digital de video creado por DivX,
LLC, una compañía subsidiaria de Rovi Corporation. Este es un dispositivo
con certificación oficial DivX Certified
®
que permite reproducir el formato
video DivX. Visite www.divx.com si desea obtener más información y
herramientas de software para convertir sus archivos en videos DivX.
ACERCA DE LA FUNCIÓN DE VIDEO A PEDIDO DIVX: este dispositivo con
la certificación DivX Certified
®
debe registrarse para reproducir películas de
video a pedido DivX que se hayan adquirido. Para obtener su código de
registro, busque la sección DivX VOD en el menú de ajustes del dispositivo.
Vaya a vod.divx.com para obtener más información sobre cómo realizar el
registro.
DivX Certified
®
para reproducir video DivX
®
de hasta 720p HD, incluido
contenido de primera calidad.
DivX
®
, DivX Certified
®
y sus logos asociados son marcas registradas de Rovi
Corporation o sus subsidiarios y su uso está protegido bajo licencia.
Dolby Mobile
Fabricado con la licencia de Dolby Laboratories. “Dolby” y el símbolo de las
dos D son marcas comerciales de Dolby Laboratories.

90
Accesorios
Estos accesorios están disponibles para usarlos con el teléfono LG-E976.
(Los artículos descritos a continuación pueden ser opcionales y distintos
d
e acuerdo al país y/o región).
Cargador Auriculares
Guía de inicio
rápido
Obtenga más
información acerca
del teléfono.
Cable de datos
Conecta el teléfono
a la PC
Herramienta de
extracción de la
tarjeta Micro-
SIM
NOTAS:
• Utilice siempre accesorios LG originales. Si no lo hace, la garantía puede quedar
anulada.
• Los accesorios pueden variar de acuerdo con la región y o país.

91
Solución de problemas
En este capítulo se describen algunos de los problemas que puede
experimentar durante el uso del teléfono. Algunos problemas requieren
que llame a su proveedor de servicios, pero en la mayoría de los casos,
puede solucionarlos usted mismo.
Mensaje Causas posibles Medidas correctivas posibles
Error de
Micro-SIM
No hay ninguna
tarjeta Micro-SIM
en el teléfono o
no está insertada
correctamente.
Asegúrese de que la tarjeta Micro-SIM se
ha insertado correctamente.
Sin conexión
de red/
Pérdida de
red
La señal es débil
o se encuentra
fuera de la red del
proveedor.
Acérquese a una ventana o busque un
área abierta. Compruebe la cobertura
del operador de red.
El operador aplica
nuevos servicios.
Compruebe si la tarjeta Micro-SIM tiene
más de 6 a 12 meses de antigüedad. Si
es así, cambie la tarjeta Micro-SIM en la
sucursal más cercana de su proveedor
de red.

92
Mensaje Causas posibles Medidas correctivas posibles
Los
códigos no
coinciden
Para cambiar
un código de
seguridad, deberá
volver a ingresar el
nuevo código para
confirmarlo.
Si olvida el código, contacte a su
proveedor de servicio.
Los dos códigos
introducidos no
coinciden.
No se
pueden
establecer
aplicaciones
El proveedor
de servicios no
admite la función
o usted debe estar
registrado.
Póngase en contacto con su proveedor
de servicios.
Llamadas no
disponibles
Error de marcación La nueva red no está autorizada.
Nueva tarjeta
Micro-SIM
insertada.
Compruebe las nuevas restricciones.
Se alcanzó el límite
de cargo prepago.
Comuníquese con el proveedor de
servicios.
Solución de problemas

93
Mensaje Causas posibles Medidas correctivas posibles
No se puede
encender el
teléfono
La tecla Encender/
Apagar/Bloquear
se presionó muy
rápidamente
Presione la tecla Encender/Apagar/
Bloquear por dos segundos como
mínimo
La batería no está
cargada.
Cargue la batería. Compruebe el
indicador de carga en la pantalla.
Error al
cargar
La batería no está
cargada.
Cargue la batería.
Compruebe el indicador
de carga en la pantalla.
La temperatura
ambiental es
demasiado alta o
baja.
Asegúrese de que la carga del teléfono
se realice a una temperatura normal.
Problema de
contacto
Compruebe el cargador y la conexión
del teléfono.
Sin voltaje
Enchufe el cargador a un tomacorriente
diferente.
Cargador
defectuoso
Reemplace el cargador.
Cargador erróneo Use solo accesorios de LG originales.

94
Mensaje Causas posibles Medidas correctivas posibles
Número no
permitido
Está activada la
función de Número
de marcación fija.
Revise el menú Ajustes y desactive la
función.
No se puede
recibir/
enviar SMS y
fotos.
Memoria llena Elimine algunos mensajes del teléfono.
Los archivos
no se abren
Formato de archivo
no compatible
Verifique los formatos de archivo
admitidos.
La pantalla
no se
enciende al
recibir una
llamada.
Problema del
sensor de
proximidad
Si utiliza una funda o un estuche de
protección, compruebe si el área del
sensor de proximidad está cubierta.
Asegúrese de que el área alrededor del
sensor de proximidad está libre.
Sin sonido Modo de vibración
Verifique el estado de las opciones
de Ajustes del menú de sonidos para
asegurarse de que no esté activado el
modo de vibración o silencio.
El teléfono
se cuelga o
se congela
Problema
intermitente de
software
Intente ejecutar una actualización de
software a través del sitio web.
Solución de problemas

95
Antes de llevar el teléfono a reparación o llamar a un representante del
servicio técnico, compruebe si alguno de los problemas que presenta el
teléfono se describe en esta sección.
Categoría
Subcategoría
Pregunta Respuesta
BT
Bluetooth
Dispositivos
¿Cuáles son las
funciones disponibles
mediante Bluetooth?
Puede conectar un dispositivo de audio
Bluetooth, como un auricular o un kit
para el automóvil, y compartir imágenes,
videos, contactos y otros elementos
a través del menú Galería/Contactos.
Además, cuando el servidor FTP se
conecta con un dispositivo compatible,
puede compartir contenido almacenado
en el medio de almacenamiento.
BT
Bluetooth
Auricular
Si mi auricular
Bluetooth está
conectado, ¿puedo
escuchar música con
mis auriculares con
cable de 3,5 mm?
Cuando el auricular Bluetooth está
conectado, todos los sonidos del sistema
se reproducen en él. Por lo tanto, no
podrá escuchar música si conecta sus
auriculares con cable.
Datos
Contactos
Copia de
seguridad
¿Cómo puedo hacer
una copia de seguridad
de los contactos?
Los datos de los contactos se pueden
sincronizar entre el teléfono y Gmail™.
Datos
Sincronización
¿Se puede configurar
una sincronización en
una sola dirección con
Gmail?
Solo está disponible la sincronización de
dos direcciones.
Preguntas frecuentes

96
Categoría
Subcategoría
Pregunta Respuesta
Datos
Sincronización
¿Se pueden sincronizar
todas las carpetas de
correo electrónico?
El buzón de entrada se sincroniza
automáticamente. Para ver otras
carpetas, presione
y luego Carpetas
para elegir una carpeta.
Servicio de
Google™
Inicio de
sesión en
Gmail
¿Debo iniciar sesión
en Gmail cada vez que
desee acceder a Gmail?
Una vez que haya ingresado a Gmail, no
necesitará volver a hacerlo.
Servicio de
Google™
Cuenta de
Google
¿Se pueden filtrar los
correos electrónicos?
No. El teléfono no admite el filtro de
correos electrónicos.
Función del
teléfono
Correo
electrónico
¿Qué sucede si ejecuto
otra aplicación mientras
escribo un correo
electrónico?
Su correo electrónico se guardará como
borrador automáticamente.
Función del
teléfono
Tono de
timbre
¿Hay un límite de
tamaño de archivos
para cuando quiero
usar un archivo MP3
como tono?
No hay límites para el tamaño de
archivo.
Función del
teléfono
Navegación
¿Es posible instalar
otra aplicación de
navegación en mi
teléfono?
Se puede instalar y utilizar cualquier
aplicación que esté disponible en Play
Store™ y que sea compatible con el
hardware.
Preguntas frecuentes

97
Categoría
Subcategoría
Pregunta Respuesta
Función del
teléfono
Sincronización
¿Puedo sincronizar mis
contactos desde todas
mis cuentas de correo
electrónico?
Solo se pueden sincronizar los contactos
de Gmail y MS Exchange Server (servidor
de email de la empresa).
Función del
teléfono
Esperar y
Pausar
¿Es posible guardar
un contacto con las
funciones Esperar y
Pausar en los números?
Si llegara a transferir un contacto con las
funciones Esperar y Pausar habilitadas
en el número, no podrá usar dichas
funciones. Deberá guardar nuevamente
cada número.
Cómo guardar con Esperar y Pausar:
1. En la pantalla principal, presione el
icono de teléfono.
2. Marque el número y luego presione la
Tecla de Opciones .
3. Toque Agregar pausa de dos seg. o
Agregar espera.
Función del
teléfono
Seguridad
¿Cuáles son las
funciones de seguridad
del teléfono?
Puede configurar el teléfono para
que exija que se ingrese un Patrón de
desbloqueo antes de poder acceder al
teléfono o usarlo.

98
Categoría
Subcategoría
Pregunta Respuesta
Función del
teléfono
Patrón de
desbloqueo
¿Cómo puedo crear el
patrón de desbloqueo?
1. En la pantalla principal, presione la
tecla Menú .
2. Toque Ajustes del sistema > Bloqueo
de pantalla.
3. Toque Seleccionar bloqueo de
pantalla > Patrón. La primera vez que
realice esta acción, aparecerá un breve
tutorial sobre cómo crear un patrón
de desbloqueo.
4. Para configurar, dibuje su patrón una
vez, luego repítalo para confirmarlo.
Precauciones que debe seguir al usar el
patrón de bloqueo.
Es muy importante recordar el patrón
de desbloqueo que configure. Si usa
un patrón incorrecto cinco veces, no
podrá acceder al teléfono. Tiene cinco
oportunidades para ingresar el patrón
de desbloqueo, el PIN o la contraseña.
Si usa las 5 oportunidades, puede volver
a intentarlo después de 30 segundos.
(O si preestablece el PIN de seguridad,
se puede utilizar para desbloquear el
patrón)
Preguntas frecuentes

99
Categoría
Subcategoría
Pregunta Respuesta
Función del
teléfono
Patrón de
desbloqueo
¿Qué debo hacer si
olvidé mi patrón de
desbloqueo y no creé la
cuenta de Google en el
teléfono?
Si olvidó el patrón de desbloqueo:
Si inició sesión en la cuenta de Google
en el teléfono pero ingresó un patrón
incorrecto 5 veces, toque el icono ¿Has
olvidado el patrón? A continuación,
deberá iniciar sesión con la cuenta de
Google para desbloquear el teléfono.
Si no creó una cuenta Google en el
teléfono o si la olvidó, deberá realizar un
restablecimiento de fábrica.
Precaución: Si realiza un
restablecimiento a los valores de fábrica,
se eliminarán todas las aplicaciones y los
datos de usuario. Antes de realizar ese
tipo de restablecimiento, recuerde que
debe hacer una copia de seguridad de
todos los datos que sean importantes.
Función del
teléfono
Memoria
¿Sabré cuando la
memoria esté llena?
Sí. Recibirá una notificación.
Función del
teléfono
Idiomas
compatibles
¿Se puede cambiar el
idioma del teléfono?
El teléfono incluye varios idiomas.
Para cambiar el idioma:
En la pantalla principal, presione la
1.
Tecla de Opciones y luego toque
Ajustes del sistema.
2. Toque Idioma y teclado > Idioma.
3. Seleccione el idioma deseado.

100
Categoría
Subcategoría
Pregunta Respuesta
Función del
teléfono
VPN
¿Cómo configuro una
VPN?
La configuración de acceso a una
VPN varía según cada empresa.
Para configurar el acceso a una VPN
en el teléfono, deberá contactar al
administrador de red de su empresa
para obtener detalles.
Función del
teléfono
Tiempo de
espera de la
pantalla
Mi pantalla se apaga
después de 15
segundos. ¿Cómo
puedo cambiar el
tiempo de espera de la
pantalla?
1. En la pantalla principal, presione la
Tecla de Opciones .
2. Toque Ajustes del sistema > Pantalla,
seleccione Límite de tiempo de
pantalla.
3. Toque el tiempo de espera de la luz de
fondo de la pantalla que desea utilizar.
Función del
teléfono
Wi-Fi y 3G
¿Qué servicio utilizará
mi teléfono si Wi-Fi y 3G
están disponibles?
Cuando utilice datos, es posible que el
teléfono use la conexión Wi-Fi en forma
predeterminada (si la conectividad
Wi-Fi está activada en el teléfono).
No obstante, no recibirá ninguna
notificación cuando el teléfono pase de
una conexión a otra.
Para saber qué conexión de datos se
está utilizando, vea el icono de 3G o
Wi-Fi que se encuentra en la parte
superior de la pantalla.
Preguntas frecuentes

101
Categoría
Subcategoría
Pregunta Respuesta
Función del
teléfono
Pantalla
principal
¿Se puede quitar una
aplicación de la pantalla
principal?
Sí. Simplemente toque y mantenga
presionado el icono hasta que aparezca
el icono de papelera en la parte superior
derecha de la pantalla. A continuación,
sin levantar el dedo, arrastre el icono
hasta la papelera.
Función del
teléfono
Aplicación
Descargué una
aplicación y ocasiona
muchos errores. ¿Cómo
la quito?
1. En la pantalla principal, presione la
Tecla de Opciones .
2. Toque Ajustes de aplicaciones >
DESCARGADO.
3. Toque la aplicación y luego
Desinstalar.
Función del
teléfono
Cargador
¿Es posible cargar mi
teléfono mediante el
cable de datos USB sin
instalar el controlador
USB requerido?
Sí, el teléfono se cargará a través del
cable de datos USB sin importar si los
controladores necesarios están o no
instalados.
Función del
teléfono
Alarma
¿Puedo usar archivos de
música como alarma?
Sí. Después de guardar un archivo de
música como tono de timbre, es posible
utilizarlo como alarma.
1. Mantenga presionada una canción
en una lista de biblioteca. En el menú
que se abre, toque Fijar como tono
de timbre.
2. En la pantalla de ajustes de alarmas,
seleccione la canción como tono de
timbre.

102
Categoría
Subcategoría
Pregunta Respuesta
Función del
teléfono
Alarma
Si apago el teléfono, ¿la
alarma suena o no?
No.
Función del
teléfono
Alarma
Si se establece el
volumen del timbre
en Desactivado o
Vibrar, ¿se escuchará la
alarma?
La alarma está programada para sonar
aún en estas condiciones.
Solución de
recuperación
Reinicio
completo
(restablecimiento
a valores de
fábrica)
¿Cómo puedo realizar
un restablecimiento a
los valores de fábrica
si no puedo acceder al
menú de configuración
del teléfono?
Si el teléfono no se restaura a la
condición original, use Reinicio
completo (Restablecer valores de
fábrica) para inicializarlo.
Preguntas frecuentes

103
Para su seguridad
Información importante
Esta guía del usuario contiene información importante sobre el uso
y funcionamiento de este teléfono. Lea toda la información con
detenimiento para lograr un desempeño óptimo y para evitar cualquier
daño o uso incorrecto del teléfono. Cualquier cambio o modificación no
expresamente aprobados en esta guía del usuario podría anular la garantía
de este equipo.
Antes de comenzar
Indicaciones de seguridad
¡ADVERTENCIA! Para reducir la posibilidad de sufrir descargas eléctricas, no exponga el
producto a áreas de mucha humedad, como el baño o una piscina.
Mantenga el teléfono lejos del calor. Nunca almacene el teléfono en un
entorno donde pueda quedar expuesto a temperaturas bajo 0 °C o sobre
40 °C como en exteriores durante tormentas de nieve o dentro del auto
en días calurosos. La exposición al frío o calor excesivos causará mal
funcionamiento, daños y posiblemente fallas permanentes. Sea cuidadoso
al usar su teléfono cerca de otros dispositivos electrónicos. Las emisiones
de radiofrecuencia de los teléfonos móviles pueden afectar los equipos
electrónicos cercanos que no estén adecuadamente blindados. Debe
consultar con los fabricantes de cualquier dispositivo médico personal,
como sería el caso de marcapasos o audífonos para determinar si son
susceptibles de recibir interferencia del teléfono móvil.
Apague el teléfono cuando esté en instalaciones médicas o gasolineras.
Nunca coloque el teléfono en un microondas, ya que esto haría estallar la
batería.

104
NOTA: Antes de usar el teléfono, lea la INFORMACIÓN DE SEGURIDAD DE LA ASOCIACIÓN DE LA
INDUSTRIA DE LAS TELECOMUNICACIONES (TIA, por sus siglas en inglés).
Información de seguridad
Lea estas sencillas instrucciones. Romper las reglas puede ser ilegal o
peligroso.
Esta guía del usuario ofrece información detallada adicional.
• No use nunca una batería no aprobada que pueda dañar el teléfono o la
batería, o incluso causar que estalle.
• Nunca coloque el teléfono dentro de un horno microondas porque la
batería estallará.
• No deseche la batería cerca del fuego o con materiales peligrosos o
inflamables.
• Asegúrese de que la batería no entre en contacto con elementos
punzantes, como los dientes o las garras de un animal. Podría causar un
incendio.
• Tenga cuidado para que los niños no traguen partes del teléfono, como
los conectores de goma (como un auricular, las partes que se conectan al
teléfono, etc.). Esto podría causar asfixia o ahogo.
• Desconecte el conector y el cargador del tomacorriente cuando el
teléfono indique que la batería está completamente cargada, porque
puede provocar descargas eléctricas o incendios.
• Cuando se encuentre en el auto, no deje el teléfono ni instale un kit
manos libres cerca de una bolsa de aire. Si el equipo inalámbrico está
mal instalado, puede resultar gravemente lesionado al activarse la bolsa
de aire.
• No use el teléfono móvil mientras conduce.
• No use el teléfono en áreas donde esté prohibido hacerlo. (Por ejemplo:
en aviones).
Para su seguridad

105
• No exponga el cargador de baterías o el adaptador a la luz directa del
sol, ni lo utilice en sitios con elevada humedad, como, por ejemplo, el
baño.
• Nunca almacene el teléfono a temperaturas inferiores a -20 °C o
superiores a 50 °C
• No use sustancias químicas fuertes (como alcohol, benceno, solventes,
etc.) o detergentes para limpiar el teléfono. Podría causar un incendio.
• No deje caer el teléfono, ni lo golpee o agite fuertemente.
Tales acciones pueden dañar las tarjetas de circuitos internas del
teléfono.
• No use el teléfono en áreas altamente explosivas, ya que puede generar
chispas.
• No dañe el cable de alimentación doblándolo, retorciéndolo, tirándolo
o calentándolo. No use el conector si está suelto, ya que esto puede
ocasionar incendios o descargas eléctricas.
• No manipule el teléfono con las manos húmedas cuando se esté
cargando. Esto puede provocar descargas eléctricas o dañar gravemente
el teléfono.
• No desarme el teléfono.
• No haga ni conteste llamadas mientras esté cargando el teléfono, ya que
puede causar un cortocircuito, descarga eléctrica o incendio.
• Solo use las baterías y los cargadores provistos por LG. Esta garantía no
se aplica a los productos proporcionados por otros proveedores.
• Solo personal autorizado debe darle servicio al teléfono y sus accesorios.
La instalación o servicio pueden ocasionar accidentes y en consecuencia
invalidar la garantía.
• No sostenga la antena ni permita que entre en contacto con su cuerpo
durante las llamadas.
• Las llamadas de emergencia solo pueden hacerse dentro de un área

106
de servicio. Para hacer una llamada de emergencia, asegúrese de estar
dentro de un área de servicio y que el teléfono esté encendido.
• Use con precaución los accesorios como los auriculares o audífonos,
asegurando que los cables están conectados correctamente y que no
toquen la antena innecesariamente.
Información de la FCC sobre la exposición a las radiofrecuencias
¡ADVERTENCIA! Lea esta información antes de hacer funcionar el teléfono.
En agosto de 1996 la Comisión Federal de Comunicaciones (FCC) de los
Estados Unidos, con su acción en el informe y orden FCC 96-326, adoptó
una norma de seguridad actualizada para la exposición humana a la
energía electromagnética de radiofrecuencias (RF)
que emiten los transmisores regulados por la FCC. Esos lineamientos son
coherentes con la norma de seguridad establecida previamente por las
normas tanto de los EE.UU. como internacionales.
El diseño de este teléfono cumple con los lineamientos de la FCC y esos
normas internacionales.
Precaución
Use solo la antena suministrada. El uso de antenas no autorizadas o
modificaciones no autorizadas puede afectar la calidad de la llamada
telefónica, dañar al teléfono, anular su garantía o dar como resultado una
violación de los reglamentos de la FCC.
No utilice el teléfono con una antena dañada.
Una antena dañada en contacto con la piel puede producir quemaduras.
Comuníquese con su distribuidor local para obtener un reemplazo de
antena.
Para su seguridad

107
Efectos en el cuerpo
Este dispositivo fue probado para el funcionamiento típico de uso en
el cuerpo, manteniendo una distancia de 1 cm (0,39 pulgadas) entre el
cuerpo del usuario y la parte posterior del teléfono. Para cumplir con los
requisitos de exposición a RF de los estándares de la FCC, debe mantenerse
una distancia mínima de 1 cm (0,39 pulgadas) entre el cuerpo del usuario
y la parte posterior del teléfono.
No deben utilizarse clips para cinturón, fundas y accesorios similares que
tengan componentes metálicos.
Es posible que los accesorios que se usen cerca del cuerpo, sin mantener
una distancia de 1 cm (0,39 pulgadas) entre el cuerpo del usuario y
la parte posterior del teléfono y que no hayan sido probados para el
funcionamiento típico de uso en el cuerpo, no cumplan con los límites de
exposición a RF de la FCC, y deben evitarse.
Antena externa montada sobre el vehículo (opcional, en caso de
estar disponible)
Debe mantener una distancia mínima de 20 cm (8 pulgadas) entre el
usuario o transeúnte y la antena externa montada sobre el vehículo para
cumplir con los requisitos de exposición a RF de la FCC.
Para obtener más información sobre la exposición a RF, visite el sitio web
de la FCC en www.fcc.gov
Cumplimiento de clase B según el artículo 15 de la FCC
Este dispositivo y sus accesorios cumplen con el artículo 15 de los
reglamentos de la FCC.
El funcionamiento está sujeto a las siguientes condiciones:
(1) Este dispositivo y sus accesorios no pueden causar interferencia dañina
y (2) este dispositivo y sus accesorios deben aceptar cualquier interferencia
que reciban, incluida la que provoque un funcionamiento no deseado.

108
Precauciones para la batería
• No la desarme
• No le provoque un corto circuito.
• No la exponga a altas temperaturas, sobre 60 °C (140 °F).
• No la incinere.
Desecho de la batería
• Deseche la batería correctamente o llévela a su proveedor de servicios
inalámbricos para que sea reciclada.
• No deseche la batería cerca del fuego o con materiales peligrosos o
inflamables.
Precauciones para el adaptador (cargador)
• El uso del cargador de batería incorrecto podría dañar su teléfono y
anular la garantía.
• El adaptador o cargador de baterías esta diseñado solo para el uso en
interiores.
• No exponga el cargador de baterías o el adaptador a la luz directa del
sol, ni lo utilice en sitios con elevada humedad, como, por ejemplo, el
baño.
Precauciones con la batería
• No desarme, abra, aplaste, doble, deforme, perfore ni ralle la batería.
• No modifique ni vuelva a armar la batería, no intente introducirle
objetos extraños, no la sumerja ni exponga al agua u otros líquidos, no la
exponga al fuego, explosión u otro peligro.
• Solo use la batería para el sistema especificado.
• Solo use la batería con un sistema de carga que haya sido certificado
con el sistema en función de este estándar. El uso de una batería o un
cargador no calificado puede presentar peligro de incendio, explosión,
Para su seguridad

109
escape u otro riesgo.
• No le provoque un cortocircuito a la batería ni permita que objetos
metálicos conductores entren en contacto con los terminales de la
batería.
• Solo reemplace la batería con otra que haya sido certificada con el
sistema según este estándar, IEEE-Std-1725-200x. El uso de una batería
no calificada puede presentar peligro de incendio, explosión, escape u
otro riesgo.
• Deseche de inmediato las baterías usadas conforme las regulaciones
locales.
• Si los niños usan la batería, se los debe supervisar.
• Evite dejar caer el teléfono o la batería. Si el teléfono o la batería se cae,
en especial en una superficie rígida, y el usuario sospecha que se han
ocasionado daños, lleve el teléfono o la batería a un centro de servicio
para revisión.
• El uso inadecuado de la batería puede resultar en un incendio, una
explosión u otro peligro.
• El manual del usuario de los dispositivos host que utilizan un puerto
USB como fuente de carga debe incluir una declaración en la que se
mencione que el teléfono solo debe conectarse a productos que tienen
el logotipo USB-IF o que completaron el programa de conformidad USB-
IF.

110
Evite daños en el oído
• Los daños en los oídos pueden ocurrir debido a la constante exposición
a sonidos demasiado fuertes. Por lo tanto, recomendamos que no
encienda o apague el teléfono cerca del oído. También recomendamos
que la música y el nivel de volumen sean razonables.
• Si escucha música, asegúrese de que el nivel de volumen sea adecuado,
de modo que esté consciente de lo que ocurre a su alrededor. Esto es
particularmente importante cuando intenta cruzar una calle.
Para su seguridad

111
Información de seguridad de TIA
Se incluye información de seguridad completa sobre los teléfonos
inalámbricos de TIA (Asociación de la
industria de las telecomunicaciones).
Para obtener la certificación de la CTIA, es obligatorio incluir en el manual
del usuario el texto referente a marcapasos, audífonos y otros dispositivos
médicos. Se recomienda el uso del lenguaje restante de la TIA cuando
resulte pertinente.
Exposición a las señales de radiofrecuencia
El teléfono inalámbrico manual portátil es un transmisor y receptor de
radio de baja energía. Cuando está encendido, recibe y también envía
señales de radiofrecuencia (RF).
En agosto de 1996 la Comisión federal de comunicaciones (FCC) de los
EE. UU. adoptó lineamientos de exposición a RF con niveles de seguridad
para teléfonos inalámbricos de mano. Esos lineamientos se corresponden
con la norma de seguridad establecida previamente por los organismos de
normas tanto de los EE. UU. como internacionales:
ANSI C95.1 (1992) *
Informe NCRP 86 (1986)
ICNIRP (1996)
Estos estándares se basaron en evaluaciones amplias y periódicas de
la literatura científica pertinente. Por ejemplo, más de 120 científicos,
ingenieros y médicos de universidades, instituciones de salud
gubernamentales y la industria analizaron el corpus de investigación
disponible para desarrollar
el estándar ANSI (C95.1).
* Instituto de estándares nacionales de los EE.UU., Consejo nacional para
las mediciones y la protección contra la radiación, Comisión internacional
Instrucciones de seguridad

112
de protección contra la radiación no ionizante.
El diseño de su teléfono cumple los lineamientos de la FCC (y esas normas
internacionales).
Cuidado de la antena
Utilice solamente la antena incluida o una antena de reemplazo aprobada.
Las antenas, modificaciones o accesorios no autorizados pueden dañar el
teléfono y violar los reglamentos de la FCC.
Funcionamiento del teléfono
POSICIÓN NORMAL: sostenga el teléfono como cualquier otro teléfono
con la antena apuntando hacia arriba por sobre su hombro.
Sugerencias para obtener un funcionamiento más eficiente
Para que su teléfono funcione con la máxima eficiencia:
• No toque la antena innecesariamente cuando esté usando el teléfono. El
contacto con la antena afecta la calidad de la llamada y puede ocasionar
que el teléfono funcione a un nivel de potencia mayor que el que
necesitaría de otro modo.
Manejo
Compruebe las leyes y los reglamentos referidos al uso de teléfonos
inalámbricos en las áreas donde maneja. Obedezca siempre estos
reglamentos. Además, si usa el teléfono mientras maneja, asegúrese de lo
siguiente:
• Preste toda su atención al manejo; manejar con seguridad es su primera
responsabilidad.
• Use la operación de manos libres, si la tiene.
• Salga del camino y estaciónese antes de hacer o recibir una llamada si las
condiciones de manejo así lo demandan.
Instrucciones de seguridad

113
Dispositivos electrónicos
La mayoría del equipo electrónico moderno está blindado contra las
señales de RF.
Sin embargo, algunos equipos electrónicos pueden no estar blindados
contra las señales de RF de su teléfono inalámbrico.
Marcapasos
La Asociación de fabricantes del sector de la salud recomienda mantener
al menos quince (15) centímetros, o seis (6) pulgadas de distancia entre
el teléfono inalámbrico portátil y el marcapasos, para evitar posibles
interferencias entre ambos.
Estos consejos son coherentes con las investigaciones independientes y las
recomendaciones basadas en la investigación en tecnología inalámbrica.
Las personas con marcapasos deben:
• Mantener SIEMPRE al teléfono al menos a quince centímetros (seis
pulgadas) del marcapasos cuando el teléfono esté encendido.
• No deben llevar el teléfono en un bolsillo de la camisa.
• Deben usar el oído opuesto al marcapasos para reducir la posibilidad de
interferencia.
• Si tiene cualquier motivo para sospechar que está ocurriendo una
interferencia, apague el teléfono inmediatamente.
Audífonos
Es posible que algunos teléfonos inalámbricos digitales interfieran con
algunos audífonos. En caso de tal interferencia, recomendamos que se
comunique con el proveedor de servicios.
Otros dispositivos médicos
Si usa cualquier otro dispositivo médico personal, consulte al fabricante
de dicho dispositivo para saber si está adecuadamente blindado contra

114
la energía de RF externa. Su médico puede ayudarlo a obtener esta
información.
Centros de atención médica
Apague el teléfono cuando se encuentre en instalaciones de atención
médica siempre que haya letreros que lo soliciten. Los hospitales o las
instalaciones de atención médica pueden emplear equipos que podrían
ser sensibles a la energía de RF externa.
Vehículos
Las señales de RF pueden afectar a los sistemas electrónicos mal instalados
o blindados de manera inadecuada en los vehículos automotores.
Compruebe con el fabricante o con su representante respecto de su
vehículo.
También debe consultar al fabricante si existe algún equipo que se le haya
agregado a su vehículo.
Instalaciones con letreros
Apague el teléfono en cualquier instalación donde haya letreros que lo
soliciten.
Aviones
Los reglamentos de la FCC prohíben el uso de teléfonos en el aire. Apague
el teléfono antes de abordar un avión.
Áreas de explosivos
Para evitar la interferencia con operaciones de cargas explosivas, apague
el teléfono cuando esté en un "área de explosiones" o en áreas con letreros
que indiquen: "Apague las radios de dos vías". Obedezca todos los letreros
e instrucciones.
Instrucciones de seguridad

115
Atmósfera potencialmente explosiva
Apague el teléfono cuando esté en un área con una atmósfera
potencialmente explosiva y obedezca todos los letreros e instrucciones.
En esos lugares, las chispas podrían ocasionar una explosión o un incendio
y, como consecuencia, lesiones o incluso la muerte.
Por lo general, las áreas con una atmósfera potencialmente explosiva están
claramente marcadas, pero no siempre. Entre las áreas potencialmente
peligrosas están las siguientes:
Áreas de abastecimiento de combustible (como las gasolineras), áreas
bajo cubierta en embarcaciones, instalaciones para transferencia o
almacenamiento de productos químicos, vehículos que usan gas de
petróleo licuado (como propano o butano), áreas donde el aire contiene
sustancias o partículas químicas (como granos, polvo o polvillos metálicos)
y cualquier otra área donde normalmente se le indicaría que apague el
motor del vehículo.
Para vehículos equipados con bolsas de aire
Las bolsas de aire se inflan con gran fuerza. No coloque objetos en el área
que está sobre la bolsa de aire o donde se activa, incluidos los equipos
inalámbricos, ya sean instalados o portátiles.
Pueden producirse lesiones graves si el equipo inalámbrico está mal
instalado en el auto cuando se infla la bolsa de aire.
Información de seguridad
Lea y revise la siguiente información para usar el teléfono de manera
segura y adecuada, y para evitar daños.
Además, después de leer la guía del usuario, manténgala siempre en un
lugar accesible.

116
Seguridad del cargador, el adaptador y la batería
• El cargador y el adaptador están diseñados solo para ser usados en
interiores.
• Deseche la batería correctamente o llévela a su proveedor de servicios
inalámbricos para que sea reciclada.
• La batería no necesita estar totalmente descargada para cargarse.
• Use solo cargadores aprobados por LG y fabricados específicamente para
el modelo del teléfono, ya que están diseñados para maximizar la vida
útil de la batería.
• No la desarme ni le provoque un cortocircuito.
• Reemplace la batería cuando ya no tenga un desempeño aceptable. La
batería puede recargarse varios cientos de veces antes de necesitar ser
reemplazada.
• Cargue la batería después de períodos prolongados sin usarla para
maximizar su vida útil.
• La vida útil de la batería dependerá de los patrones de uso y las
condiciones medioambientales.
• El uso intensivo de la luz de fondo, el navegador y la conectividad de
datos en paquete afectan la vida útil de la batería y los tiempos de
conversación y espera.
• La función de autoprotección interrumpe el funcionamiento del teléfono
cuando se encuentra en un estado anormal. En este caso, apague y
encienda el teléfono.
Peligros de explosión, descargas eléctricas e incendio
• No coloque el teléfono en un lugar expuesto a exceso de polvo, y
mantenga la distancia mínima necesaria entre el cable de alimentación y
las fuentes de calor.
• Desenchufe el cable de alimentación antes de limpiar el teléfono y limpie
Instrucciones de seguridad

117
el conector de alimentación siempre que esté sucio.
• Al usar el conector de alimentación, asegúrese de que esté conectado
firmemente. De lo contrario, puede sobrecalentarse y provocar un
incendio.
• Si se coloca el teléfono en un bolsillo o bolso sin cubrir el receptáculo
(clavija del conector de alimentación), los artículos metálicos (como las
monedas, clips o bolígrafos) pueden provocarle un cortocircuito. Siempre
cubra el receptáculo cuando no se esté usando.
• No le provoque un corto circuito a la batería. Los elementos metálicos
como monedas, clips o bolígrafos en el bolsillo o bolso, al moverse,
pueden causar un cortocircuito en los terminales + y – de la batería (las
tiras de metal de la batería). El cortocircuito de los terminales podría
dañar la batería y ocasionar una explosión.
Aviso general
• Usar una batería dañada o introducirla en la boca puede causar graves
lesiones.
• No coloque el teléfono en la proximidad de elementos con componentes
magnéticos, como tarjetas de crédito, tarjetas telefónicas, libretas de
banco o boletos de metro. El magnetismo del teléfono puede dañar los
datos almacenados en la cinta magnética.
• Hablar por el teléfono durante un período de tiempo prolongado puede
reducir la calidad de la llamada, debido al calor generado durante el uso.
• Cuando el teléfono no se use durante mucho tiempo, almacénelo en un
lugar seguro con el cable de alimentación desconectado.
• Usar el teléfono cerca de un equipo receptor (como un televisor o radio)
puede provocar interferencia.
• No use el teléfono si la antena está dañada. Si una antena dañada toca la
piel, puede causar una ligera quemadura. Comuníquese con un Centro
de servicio autorizado LG para que reemplacen la antena dañada.

118
• No sumerja el teléfono en agua. Si esto ocurre, apáguelo de inmediato. Si
el teléfono no funciona, llévelo a un Centro de servicio autorizado LG.
• La fuente de alimentación contiene elementos que pueden ser dañinos
para la salud, si los componentes se manipulan directamente. Si esto
ocurre, recomendamos lavarse las manos inmediatamente.
• No pinte el teléfono.
• Los datos guardados en el teléfono se pueden borrar al utilizarlo de
manera incorrecta, al reparar el hardware o al actualizar el software.
Realice una copia de seguridad de los números de teléfono importantes
(también podrían borrarse los tonos, mensajes de texto o de voz,
imágenes y videos). El fabricante no se hace responsable de los daños
ocasionados por la pérdida de datos.
• Cuando esté en lugares públicos, puede establecer el tono en vibración
para no molestar a otras personas.
• No encienda ni apague el teléfono cerca del oído.
Temperatura ambiente
Máx: +50°C (descargando),
+45°C (cargando)
Mín: -10°C
NOTA: software de código abierto
Para obtener el correspondiente código fuente de GPL, LGPL, MPL y demás licencias de código
abierto, visite http://opensource.lge.com/
Todos los términos de licencias, las exenciones de responsabilidad y los avisos mencionados están
disponibles para su descarga con el código fuente.
Reglamentación y seguridad
Toque la tecla de opciones, Ajustes
del sistema > Acerca del teléfono >
Reglamentación y Seguridad para obtener
información sobre la reglamentación y
seguridad.
Instrucciones de seguridad
-
 1
1
-
 2
2
-
 3
3
-
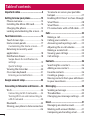 4
4
-
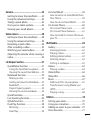 5
5
-
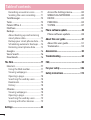 6
6
-
 7
7
-
 8
8
-
 9
9
-
 10
10
-
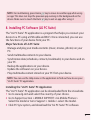 11
11
-
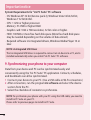 12
12
-
 13
13
-
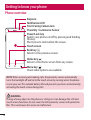 14
14
-
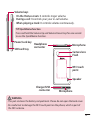 15
15
-
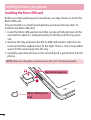 16
16
-
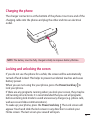 17
17
-
 18
18
-
 19
19
-
 20
20
-
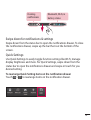 21
21
-
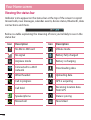 22
22
-
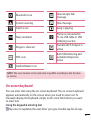 23
23
-
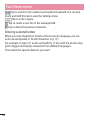 24
24
-
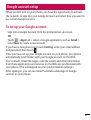 25
25
-
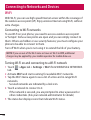 26
26
-
 27
27
-
 28
28
-
 29
29
-
 30
30
-
 31
31
-
 32
32
-
 33
33
-
 34
34
-
 35
35
-
 36
36
-
 37
37
-
 38
38
-
 39
39
-
 40
40
-
 41
41
-
 42
42
-
 43
43
-
 44
44
-
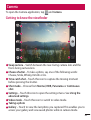 45
45
-
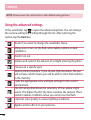 46
46
-
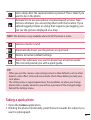 47
47
-
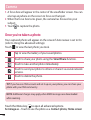 48
48
-
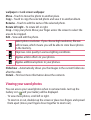 49
49
-
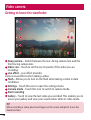 50
50
-
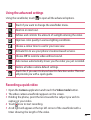 51
51
-
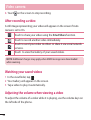 52
52
-
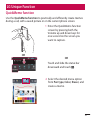 53
53
-
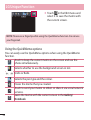 54
54
-
 55
55
-
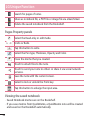 56
56
-
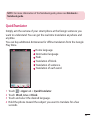 57
57
-
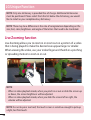 58
58
-
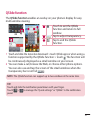 59
59
-
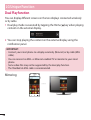 60
60
-
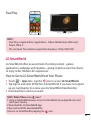 61
61
-
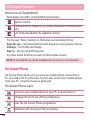 62
62
-
 63
63
-
 64
64
-
 65
65
-
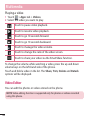 66
66
-
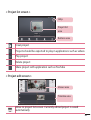 67
67
-
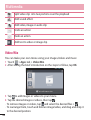 68
68
-
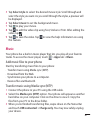 69
69
-
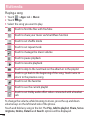 70
70
-
 71
71
-
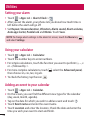 72
72
-
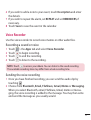 73
73
-
 74
74
-
 75
75
-
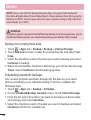 76
76
-
 77
77
-
 78
78
-
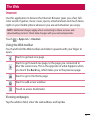 79
79
-
 80
80
-
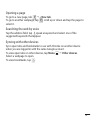 81
81
-
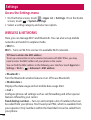 82
82
-
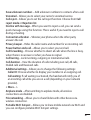 83
83
-
 84
84
-
 85
85
-
 86
86
-
 87
87
-
 88
88
-
 89
89
-
 90
90
-
 91
91
-
 92
92
-
 93
93
-
 94
94
-
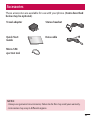 95
95
-
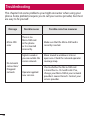 96
96
-
 97
97
-
 98
98
-
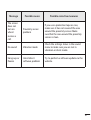 99
99
-
 100
100
-
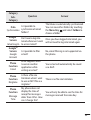 101
101
-
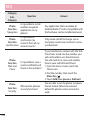 102
102
-
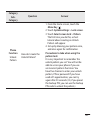 103
103
-
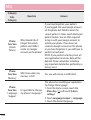 104
104
-
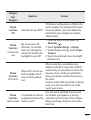 105
105
-
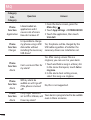 106
106
-
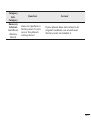 107
107
-
 108
108
-
 109
109
-
 110
110
-
 111
111
-
 112
112
-
 113
113
-
 114
114
-
 115
115
-
 116
116
-
 117
117
-
 118
118
-
 119
119
-
 120
120
-
 121
121
-
 122
122
-
 123
123
-
 124
124
-
 125
125
-
 126
126
-
 127
127
-
 128
128
-
 129
129
-
 130
130
-
 131
131
-
 132
132
-
 133
133
-
 134
134
-
 135
135
-
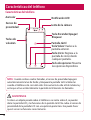 136
136
-
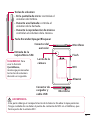 137
137
-
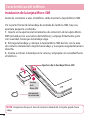 138
138
-
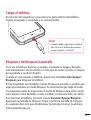 139
139
-
 140
140
-
 141
141
-
 142
142
-
 143
143
-
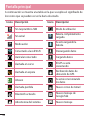 144
144
-
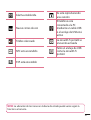 145
145
-
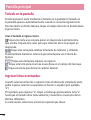 146
146
-
 147
147
-
 148
148
-
 149
149
-
 150
150
-
 151
151
-
 152
152
-
 153
153
-
 154
154
-
 155
155
-
 156
156
-
 157
157
-
 158
158
-
 159
159
-
 160
160
-
 161
161
-
 162
162
-
 163
163
-
 164
164
-
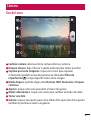 165
165
-
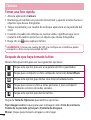 166
166
-
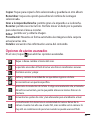 167
167
-
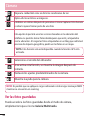 168
168
-
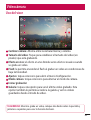 169
169
-
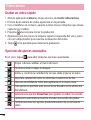 170
170
-
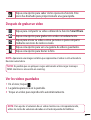 171
171
-
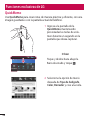 172
172
-
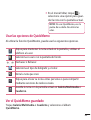 173
173
-
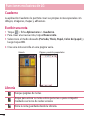 174
174
-
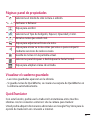 175
175
-
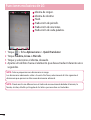 176
176
-
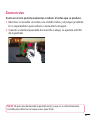 177
177
-
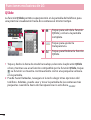 178
178
-
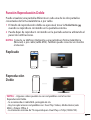 179
179
-
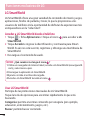 180
180
-
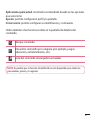 181
181
-
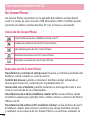 182
182
-
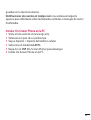 183
183
-
 184
184
-
 185
185
-
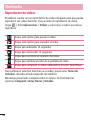 186
186
-
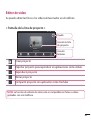 187
187
-
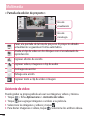 188
188
-
 189
189
-
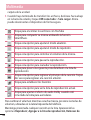 190
190
-
 191
191
-
 192
192
-
 193
193
-
 194
194
-
 195
195
-
 196
196
-
 197
197
-
 198
198
-
 199
199
-
 200
200
-
 201
201
-
 202
202
-
 203
203
-
 204
204
-
 205
205
-
 206
206
-
 207
207
-
 208
208
-
 209
209
-
 210
210
-
 211
211
-
 212
212
-
 213
213
-
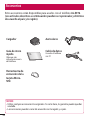 214
214
-
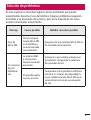 215
215
-
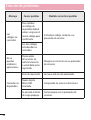 216
216
-
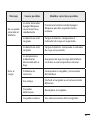 217
217
-
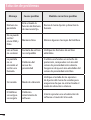 218
218
-
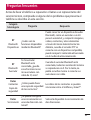 219
219
-
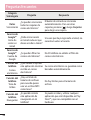 220
220
-
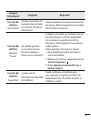 221
221
-
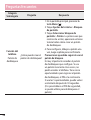 222
222
-
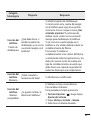 223
223
-
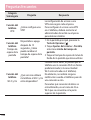 224
224
-
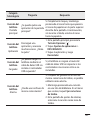 225
225
-
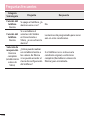 226
226
-
 227
227
-
 228
228
-
 229
229
-
 230
230
-
 231
231
-
 232
232
-
 233
233
-
 234
234
-
 235
235
-
 236
236
-
 237
237
-
 238
238
-
 239
239
-
 240
240
-
 241
241
-
 242
242


en otros idiomas
- English: LG LGE976 User manual
Artículos relacionados
-
LG LBello Dual D331 Manual de usuario
-
LG LGE455G El manual del propietario
-
LG LGE415G El manual del propietario
-
LG LGD722.ACZEKG Manual de usuario
-
LG Série L80 - LG D373EU Manual de usuario
-
-
LG LGD290N.ANEUKT Manual de usuario
-
-
-
