Vantec EZ Swap PRO+ Guía de instalación
- Categoría
- Paneles de bahía de unidad
- Tipo
- Guía de instalación
Este manual también es adecuado para

Installation Guide
Guía de instalación Guide d'installation Installationsanleitung
Guida all’installazione 安裝指南 安装指南
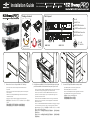
Parts Layout
Package Contents
1
2
3
4 5
6
2
4 5
Lock
Latch Door
HDD LED Indicator
SATA Power Connector
SATA Data Connector
LED Access Port
1
2
3
4
5
6
MRK-310S6 MRK-311S6
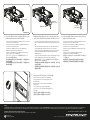
OR
A
B
A
B
Lock
Unlock
Remove the slot cover of any available 5.25” drive bay.
Quite la tapa de la ranura de cualquier bahía de unidad de 5,25”
disponible.
Retirer le couvercle de la fente de n'importe quelle baie de disque dur
5,25" disponible.
Entfernen Sie die Steckplatzabdeckungen sämtlicher freier 5,25-Zoll-
Laufwerkseinschübe.
Rimuovere il coperchio qualsiasi alloggio unità 5,25” disponibile.
5.25
移除电脑面板上任何可用的标准5.25吋安装槽的前盖。
移除電腦面板上任何可用的標準5.25吋安裝槽的前蓋。
1.
Carefully insert the MRK-310S6/311S6 Mobile Rack into the bay and
push it inward until it is ush with the front panel of your chassis.
Inserte con cuidado el bastidor móvil MRK-310S6/311S6 en la bahía y empújelo
hacia adentro hasta que quede pegado al panel frontal del chasis.
Insérez avec précaution le rack mobile MRK-310S6/311S6 dans la baie et
poussez-le vers l'intérieur jusqu'à ce qu'il soit parfaitement aligné avec le
panneau frontal de votre châssis.
Stecken Sie das mobile Rack MRK-310S6/311S6 vorsichtig in den Einschub;
drücken Sie es so weit nach hinten, bis es bündig mit der Frontblende Ihres
Gehäuses abschließt.
Inserire con delicatezza MRK-310S6/311S6 Rack Mobile nell’alloggio e spingerlo
verso l'interno no a quando non è a lo con il pannello frontale del telaio.
MRK-310S6/311S6
将MRK-310S6/311S6抽取盒插入安装槽并且平缓的推入,直到与您的电脑
面板对齐为止。
將MRK-310S6/311S6抽取盒插入安裝槽並且平緩的推入,直到與您的電腦
面板對齊為止。
2.
Secure the EZSwap PRO with the screws provided.
Fije su EZSwap PRO con los tornillos proporcionados.
Fixez le EZSwap PRO avec les vis fournies.
Sichern Sie das EZSwap PRO mit den mitgelieferten Schrauben.
Fissare EZSwap PRO usando le viti fornite in dotazione.
EZSwap PRO
利用附属的螺丝将EZSwap PRO固定。
利用附屬的螺絲將EZSwap PRO固定。
3.
MRK-310S6

Copyright © 2013 Vantec Thermal Technologies. All Right Reserved. | All Registered Trademarks Belong To Their Respective Companies.
Model: MRK-310S6 / MRK-311S6
Information in this document is subject to change without notice.
Reproduction of these materials in any manner whatsoever without written permission is strictly forbidden.
Printed in China
Printed on Recycled Paper.
The EZSwap PRO comes with a 1 year limited warranty (90 day parts). If your unit become defective within that time frame, please go to www.vantecusa.com for information on how to receive warranty exchange or repair. Cosmetic defects and missing parts are not covered under this
warranty. Please check the contents of the unit to make sure you received all parts. Also, check for any cosmetic flaws. If any parts are missing or if there are cosmetic defects, please contact the retailer from which you purchased the unit immediately and ask for a replacement.
Warranty
SATA Data Cable
To Motherboard
Connect the SATA Data cable to an available SATA port on your
motherboard and to the back of the EZSwap PRO.
4.
You may now install 3.5” drive(s) into your EZSwap PRO.
7.
With the provided SATA power Y-cable, connect the female end to
the back of the EZSwap PRO and the 4-pin to the LED Access Port.
5.
Connect an available SATA power connector from your power
supply to the SATA power Y-cable.
6.
SATA Power Y-Cable
4-pin power
(MRK-311S6 Only)
Connect to
Power Supply
4-pin power
(MRK-311S6 Only)
Conecte el cable de datos SATA a un puerto SATA disponible de la placa base
y a la parte posterior de su EZSwap PRO.
Connectez le câble de données SATA à un port SATA disponible de votre
carte mère et à l'arrière du EZSwap PRO.
Schließen Sie das SATA-Datenkabel an einen freien SATA-Port Ihres
Motherboards und der Rückseite des EZSwap PRO an.
Collegare il cavo dati SATA ad una porta SATA disponibile della scheda
madre e alla parte posteriore di PRO EZSwap.
将SATA传输线连接至主机板上可用的SATA插槽,另一端连接至EZSwap
PRO背面SATA插槽。
將SATA傳輸線連接至主機板上可用的SATA插槽,另一端連接至EZSwap
PRO背面SATA插槽。
Con el cable en Y de alimentación SATA, conecte el extremo hembra a la parte
posterior de su EZSwap PRO y el extremo de 4 contactos al puerto de acceso de
LED.
Avec le câble d'alimentation SATA en Y fourni, connectez l'extrémité femelle à
l'arrière du EZSwap PRO et l'extrémité à 4 broches au port d'accès LED.
Nehmen Sie das mitgelieferte SATA-Y-Netzkabel; schließen Sie den weiblichen
Stecker an der Rückseite des EZSwap PRO und den 4-poligen Stecker am
LED-Zugangsport an.
Usando il cavo d’alimentazione SATA a Y, collegare l'estremità femmina alla parte
posteriore di PRO EZSwap e l’estremità a 4 pin alla porta LED Access.
利用附属的Y型SATA电源线将母端连接至EZSwap PRO背后接头,并将4-pin接
头连接至LED插槽。
利用附屬的Y型SATA電源線將母端連接至EZSwap PRO背後接頭,並將4-pin接
頭連接至LED插槽。
Inserte un conector de alimentación SATA disponible desde la fuente de
alimentación al cable en Y de alimentación SATA.
Branchez un connecteur d'alimentation SATA disponible entre votre
alimentation et le câble d'alimentation SATA en Y.
Verbinden Sie einen freien SATA-Netzanschluss Ihres Netzteils mit dem
SATA-Y-Netzkabel.
Collegare un connettore d’alimentazione SATA a disposizione
dall’alimentatore al cavo d'alimentazione SATA a Y.
将电源供应器上可用的SATA电源接头连接至Y型SATA电源线上。
將電源供應器上可用的SATA電源接頭連接至Y型SATA電源線上。
Ahora puede instalar unidades de 3,5” en su EZSwap PRO.
Vous pouvez maintenant installer un (des) disque(s) 3,5” dans
votre EZSwap PRO.
Nun können Sie (ein) 3,5-Zoll-Laufwerk(e) in Ihrem EZSwap
PRO installieren.
Ora è possibile installare le unità 3,5” su EZSwap PRO.
您现在可以开始将3.5吋硬碟放入EZSwap PRO使用。
您現在可以開始將3.5吋硬碟放入EZSwap PRO使用。
Transcripción de documentos
Installation Guide Package Contents Guía de instalación Guide d'installation Installationsanleitung Guida all’installazione 取り付けガイド 安裝指南 安装指南 Parts Layout 1 2 3 4 5 6 1 OR 3 2 2 4 MRK-310S6 1. Remove the slot cover of any available 5.25” drive bay. Quite la tapa de la ranura de cualquier bahía de unidad de 5,25” disponible. Retirer le couvercle de la fente de n'importe quelle baie de disque dur 5,25" disponible. Entfernen Sie die Steckplatzabdeckungen sämtlicher freier 5,25-ZollLaufwerkseinschübe. Rimuovere il coperchio qualsiasi alloggio unità 5,25” disponibile. 使用可能なすべての 5.25 インチドライブベイのスロットカバーを取り外 します。 移除电脑面板上任何可用的标准5.25吋安装槽的前盖。 移除電腦面板上任何可用的標準5.25吋安裝槽的前蓋。 5 4 6 MRK-310S6 5 Lock Latch Door HDD LED Indicator SATA Power Connector SATA Data Connector LED Access Port B MRK-311S6 2. Carefully insert the MRK-310S6/311S6 Mobile Rack into the bay and push it inward until it is flush with the front panel of your chassis. Inserte con cuidado el bastidor móvil MRK-310S6/311S6 en la bahía y empújelo hacia adentro hasta que quede pegado al panel frontal del chasis. Insérez avec précaution le rack mobile MRK-310S6/311S6 dans la baie et poussez-le vers l'intérieur jusqu'à ce qu'il soit parfaitement aligné avec le panneau frontal de votre châssis. Stecken Sie das mobile Rack MRK-310S6/311S6 vorsichtig in den Einschub; drücken Sie es so weit nach hinten, bis es bündig mit der Frontblende Ihres Gehäuses abschließt. Inserire con delicatezza MRK-310S6/311S6 Rack Mobile nell’alloggio e spingerlo verso l'interno fino a quando non è a filo con il pannello frontale del telaio. MRK-310S6/311S6 モバイルラックを慎重にベイに挿入してから、 シャーシの前 面パネルと揃うまで押し込みます。 将MRK-310S6/311S6抽取盒插入安装槽并且平缓的推入,直到与您的电脑 面板对齐为止。 將MRK-310S6/311S6抽取盒插入安裝槽並且平緩的推入,直到與您的電腦 面板對齊為止。 A A Lock B Unlock 3. Secure the EZSwap PRO with the screws provided. Fije su EZSwap PRO con los tornillos proporcionados. Fixez le EZSwap PRO avec les vis fournies. Sichern Sie das EZSwap PRO mit den mitgelieferten Schrauben. Fissare EZSwap PRO usando le viti fornite in dotazione. 付属のねじで EZSwap PRO を固定します。 利用附属的螺丝将EZSwap PRO固定。 利用附屬的螺絲將EZSwap PRO固定。 4-pin power SATA Data Cable (MRK-311S6 Only) 4-pin power (MRK-311S6 Only) Connect to Power Supply SATA Power Y-Cable To Motherboard 4. Connect the SATA Data cable to an available SATA port on your motherboard and to the back of the EZSwap PRO. Conecte el cable de datos SATA a un puerto SATA disponible de la placa base y a la parte posterior de su EZSwap PRO. Connectez le câble de données SATA à un port SATA disponible de votre carte mère et à l'arrière du EZSwap PRO. Schließen Sie das SATA-Datenkabel an einen freien SATA-Port Ihres Motherboards und der Rückseite des EZSwap PRO an. Collegare il cavo dati SATA ad una porta SATA disponibile della scheda madre e alla parte posteriore di PRO EZSwap. SATA データケーブルを、マザーボードの使用可能な SATA ポートと EZSwap PRO の背面に接続します。 将SATA传输线连接至主机板上可用的SATA插槽,另一端连接至EZSwap PRO背面SATA插槽。 將SATA傳輸線連接至主機板上可用的SATA插槽,另一端連接至EZSwap PRO背面SATA插槽。 5. With the provided SATA power Y-cable, connect the female end to the back of the EZSwap PRO and the 4-pin to the LED Access Port. Con el cable en Y de alimentación SATA, conecte el extremo hembra a la parte posterior de su EZSwap PRO y el extremo de 4 contactos al puerto de acceso de LED. Avec le câble d'alimentation SATA en Y fourni, connectez l'extrémité femelle à l'arrière du EZSwap PRO et l'extrémité à 4 broches au port d'accès LED. Nehmen Sie das mitgelieferte SATA-Y-Netzkabel; schließen Sie den weiblichen Stecker an der Rückseite des EZSwap PRO und den 4-poligen Stecker am LED-Zugangsport an. Usando il cavo d’alimentazione SATA a Y, collegare l'estremità femmina alla parte posteriore di PRO EZSwap e l’estremità a 4 pin alla porta LED Access. 付属の SATA 電源 Y ケーブルで、 メス側の端を EZSwap PRO の背面に、4 ピン 側を LED アクセスポートに接続します。 6. Connect an available SATA power connector from your power supply to the SATA power Y-cable. Inserte un conector de alimentación SATA disponible desde la fuente de alimentación al cable en Y de alimentación SATA. Branchez un connecteur d'alimentation SATA disponible entre votre alimentation et le câble d'alimentation SATA en Y. Verbinden Sie einen freien SATA-Netzanschluss Ihres Netzteils mit dem SATA-Y-Netzkabel. Collegare un connettore d’alimentazione SATA a disposizione dall’alimentatore al cavo d'alimentazione SATA a Y. 使用可能な SATA 電源コネクターを、お使いの電源から SATA 電源 Y ケー ブルに接続します。 将电源供应器上可用的SATA电源接头连接至Y型SATA电源线上。 將電源供應器上可用的SATA電源接頭連接至Y型SATA電源線上。 利用附属的Y型SATA电源线将母端连接至EZSwap PRO背后接头,并将4-pin接 头连接至LED插槽。 利用附屬的Y型SATA電源線將母端連接至EZSwap PRO背後接頭,並將4-pin接 頭連接至LED插槽。 7. You may now install 3.5” drive(s) into your EZSwap PRO. Ahora puede instalar unidades de 3,5” en su EZSwap PRO. Vous pouvez maintenant installer un (des) disque(s) 3,5” dans votre EZSwap PRO. Nun können Sie (ein) 3,5-Zoll-Laufwerk(e) in Ihrem EZSwap PRO installieren. Ora è possibile installare le unità 3,5” su EZSwap PRO. これで 3.5 インチドライブを EZSwap PRO に取り付けること ができます。 您现在可以开始将3.5吋硬碟放入EZSwap PRO使用。 您現在可以開始將3.5吋硬碟放入EZSwap PRO使用。 Warranty The EZSwap PRO comes with a 1 year limited warranty (90 day parts). If your unit become defective within that time frame, please go to www.vantecusa.com for information on how to receive warranty exchange or repair. Cosmetic defects and missing parts are not covered under this warranty. Please check the contents of the unit to make sure you received all parts. Also, check for any cosmetic flaws. If any parts are missing or if there are cosmetic defects, please contact the retailer from which you purchased the unit immediately and ask for a replacement. Information in this document is subject to change without notice. Reproduction of these materials in any manner whatsoever without written permission is strictly forbidden. Printed in China Printed on Recycled Paper. Model: MRK-310S6 / MRK-311S6 Copyright © 2013 Vantec Thermal Technologies. All Right Reserved. | All Registered Trademarks Belong To Their Respective Companies.-
 1
1
-
 2
2


Vantec EZ Swap PRO+ Guía de instalación
- Categoría
- Paneles de bahía de unidad
- Tipo
- Guía de instalación
- Este manual también es adecuado para
En otros idiomas
- français: Vantec EZ Swap PRO+ Guide d'installation
- italiano: Vantec EZ Swap PRO+ Guida d'installazione
- English: Vantec EZ Swap PRO+ Installation guide
Documentos relacionados
Otros documentos
-
Thermaltake VN700M6W2N Ficha de datos
-
-
-
-
Thermaltake Urban S71 Manual de usuario
-
-
Thermaltake Level 10 GTS Manual de usuario