Bella 3 Cup Mini Chopper El manual del propietario
- Categoría
- Pequeños electrodomésticos de cocina
- Tipo
- El manual del propietario

3 CUP MINI CHOPPER
MINI PICADORA DE 3 TAZAS
Instruction Manual (Recipe Guide)
Manual de instrucciones (Guía de recetas)
Register your product and get support at:
Para registrar y obtener asistencia de su producto ir:
www.bellahousewares.com
SO-315822_14763_Bella_Mini chopper_BJs_IM_R7.indd 1 2018-11-05 3:27 PM

THANK YOU
For Your Purchase
BellaLifestyle
BellaLife
@
bellahousewares.com
#get inspired
Register
& sign up for special
announcements and trendy
recipes!
Tell us what you think!
Rate, review or ask us a question.
SO-315822_14763_Bella_Mini chopper_BJs_IM_R7.indd 2 2018-11-05 3:27 PM

3
Table of Contents
Important Safeguards ....................................................................................................................................................4
Additional Important Safeguards.................................................................................................................................5
Notes on the Plug ............................................................................................................................................................5
Notes on the Cord ...........................................................................................................................................................5
Plasticizer Warning .........................................................................................................................................................6
Electric Power ..................................................................................................................................................................6
Getting to Know Your Bella 3 Cup Mini Chopper ......................................................................................................6
Before Using for the First Time ....................................................................................................................................7
Operating Instructions ...................................................................................................................................................7
CHOP/PUREE Quick Guide ............................................................................................................................................. 8
Hints for Best Results ..................................................................................................................................................... 8
User Maintenance Instructions ....................................................................................................................................8
Care & Cleaning Instructions ........................................................................................................................................8
Storing Instructions ........................................................................................................................................................ 8
Recipe Guide .............................................................................................................................................................. 9-13
Warranty ......................................................................................................................................................................... 14
Índice
Instrucciones de seguridad importantes ..................................................................................................................15
Instrucciones de seguridad adicionales ....................................................................................................................16
Notas sobre el enchufe ................................................................................................................................................16
Notas sobre el cable .....................................................................................................................................................16
Advertencia sobre el plasticante .............................................................................................................................17
Corriente eléctrica ........................................................................................................................................................17
Conozca su Mini picadora de 3 tazas ......................................................................................................................... 17
Antes del primer uso ....................................................................................................................................................18
Instrucciones de uso .....................................................................................................................................................18
Guía rápida de las funciones “CHOP” y “PUREE” ...................................................................................................19
Consejos para los mejores ...........................................................................................................................................19
Instrucciones de mantenimiento ................................................................................................................................19
Instrucciones de limpieza ............................................................................................................................................19
Instrucciones de almacenamiento .............................................................................................................................19
Recetas ..................................................................................................................................................................... 20-24
Garantía ..........................................................................................................................................................................25
SO-315822_14763_Bella_Mini chopper_BJs_IM_R7.indd 3 2018-11-05 3:27 PM

4
IMPORTANT SAFEGUARDS
When using electrical appliances, basic safety precautions should always be
followed, including the following:
1. READ ALL INSTRUCTIONS before using.
2. To protect against risk of electrical shock do not put cord, plugs, or appliance in
water or other liquid.
3. This appliance is not intended for use by persons (including children) with
reduced physical, sensory or mental capabilities, or lack of experience and
knowledge, unless they have been given supervision or instruction concerning
use of the appliances by a person responsible for their safety.
4. Children should be supervised to ensure that they do not play withthe appliance.
5. Unplug from outlet when not in use, before putting on or taking off parts, and
before cleaning the appliance.
6. Avoid contacting moving parts.
7. Do not operate any appliance with a damaged cord or plug or after the appliance
malfunctions, or has been damaged in any manner. Bring it to a qualied
technician for examination, repair or electrical or mechanical adjustment.
8. The use of attachments not recommended or sold by the manufacturer may
cause re, electric shock or injury.
9. Do not use outdoors.
10. Do not let cord hang over edge of table or counter.
11. Do not let cord contact hot surfaces, including the stove.
12. Keep hands and utensils away from moving blades while processing food to
reduce the risk of severe injury to persons or damage to theMini Chopper.
Ascraper or spatula may be used only when theMini Chopper is not running.
13. Blades are sharp. Handle carefully.
14. To reduce the risk of injury, never place the CHOP/PUREE blade onto the motor
base without rst locking the work bowl properly in place.
15. Be certain lid is securely locked in place before operating thisMini Chopper.
16. Do not attempt to defeat the lid interlock mechanism.
FOR HOUSEHOLD USE ONLY
SAVE THESE INSTRUCTIONS
SO-315822_14763_Bella_Mini chopper_BJs_IM_R7.indd 4 2018-11-05 3:27 PM

5
ADDITIONAL IMPORTANT
SAFEGUARDS
1. All users of this appliance must read and understand this owner’s manual
before operating or cleaning this appliance.
2. The cord to this appliance should be plugged into a 120V AC electrical outletonly.
3. Do not leave this appliance unattended during use.
4. If this appliance begins to malfunction during use, immediately release
theCHOP or PUREE button and unplug the cord. Do not use or attempt to
repair the malfunctioning appliance.
5. If this appliance falls or accidentally becomes immersed in water, unplug
itimmediately. Do not reach into the water! Do not use this appliance after
ithas fallen into or becomes immersed in water.
6. To reduce the risk of injury to persons or property, never use this appliance
inan unstable position.
7. Do not use this appliance for other than its intended use.
8. Use extreme care when handling the blades. Always insert and remove
blade by using the blade stem. Do not touch the blades with your ngers.
Theblades are very sharp and can cause injury if touched.
9. This Mini Chopper is intended for processing small quantities of food.
It is not intended to prepare large quantities of food at one time.
10. Never use for extended periods of time. The Mini Chopper does its work
inseconds.
11. Do not operate the Mini Chopper without food contents in work bowl.
12. Do not use if the work bowl is cracked or chipped.
Notes on the Plug
This appliance has a polarized plug (one blade is wider than the other).
To reduce the risk of electric shock, this plug will t in a polarized outlet only
oneway. If the plug does not t fully into the outlet, reverse the plug. If it still
does not t, contact a qualied electrician. Do not modify the plug in any way.
Notes on the Cord
A. A short power-supply cord (or detachable power-supply cord) is to be
provided to reduce the risk resulting from becoming entangled in or tripping
over a longer cord.
B. Longer detachable power-supply cords or extension cords are available
andmay be used if care is exercised in their use.
C. If a long detachable power-supply cord or extension cord is used :
1. The marked electrical rating of the cord or extension cord should be at
least as great as the electrical rating of the appliance;
2. If the appliance is of the grounded type, the extension cord should be a
grounding-type3-wire cord.
3. The longer cord should be arranged so that it does not drape over the
countertop or table top where it can be pulled on by children or tripped
over unintentionally.
SO-315822_14763_Bella_Mini chopper_BJs_IM_R7.indd 5 2018-11-05 3:27 PM

6
Plasticizer Warning
CAUTION: To prevent Plasticizers from migrating to the nish of the counter top or
table top or other furniture, place NON-PLASTIC coasters or place mats between
the appliance and the nish of the counter top or table top. Failure to do so may
cause the nish to darken; permanent blemishes may occur or stains can appear.
Electric Power
If the electrical circuit is overloaded with other appliances, your appliance may
not operate properly. It should be operated on a separate electrical circuit from
other appliances.
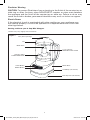
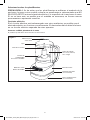
Getting to Know your 3 Cup Mini Chopper
Product may vary slightly from illustration
Figure 1
Lid
Blade Stem
Stainless Steel
CHOP/PUREE Blade
CHOP Button
PUREE Button
Easy Pour Openings
3 Cup (750 ml)
Work Bowl with Handle
Motor Base
Non-Slip Feet (not shown)
Cord Wrap (not shown)
SO-315822_14763_Bella_Mini chopper_BJs_IM_R7.indd 6 2018-11-05 3:27 PM

7
Before Using for the First Time
1. Carefully remove all packaging materials before using.
2. Wash Mini Chopper lid, CHOP/PUREE blade and work bowl in warm soapy water; rinse and dry
thoroughly, see Cleaning Instructions.
CAUTION: Always unplug the appliance from outlet before assembly and before installing or
removingattachments.
CAUTION: BLADES ARE SHARP, HANDLE WITH CARE.
CAUTION: Always insert or remove the CHOP/PUREE blade by grasping the blade stem
whenassembling or disassembling. Do not touch the CHOP/PUREE blade with your ngers.
The blade is very sharp and can cause injury if touched.
CAUTION: DO NOT IMMERSE MOTOR BASE IN WATER OR OTHER LIQUIDS.
Operating Instructions
1. Place the Mini Chopper on a stable, clean, dry and level surface. A small spatula is helpful to remove
processed foods.
2. Place the work bowl (without lid and blade) onto the base, with the handle in the center, facing you.
Turn handle counter-clockwise (to the right side of the unit) until it locks into position.
3. Holding the blade stem, carefully drop the CHOP/PUREE blade over the center drive shaft in the work
bowl, rotating if necessary, until it drops down into place.
CAUTION: NEVER TOUCH THE BLADE ITSELF!
4. Cut food to be processed into uniform pieces no larger than 1/2-inch. Distribute food evenly around the blade.
IMPORTANT: Place no more than 3 cups of food into the work bowl.
5. With the lid faced forward, the word LOCK placed over the work bowl handle, turn the lid counter-
clockwise, in the direction of the imprinted arrow. Slide the lid lock tab into the handle lid lock slot.
Thelid will lock into place.
NOTE: This appliance is equipped with a lid interlock mechanism. The Mini Chopper will not operate
unless the lid lock tab is correctly inserted into the base lid lock slot.
Figure 2
6. Plug into a 120V AC electrical outlet.
7. To start, press either the CHOP or the PUREE button for 3 to 5 seconds and then release; the motor will
stop. Press and quickly release to PULSE for a ner consistency.
NOTE: If the Mini Chopper does not start, check to make sure the work bowl is properly assembled onto
the base and that the lid is properly assembled on the work bowl and is locked to the base.
8. Stream oil or liquids through the lid’s 2 easy-pour openings.
9. When nished chopping, unplug the unit and allow blades to stop rotating before disassembling.
10. Turn the lid handle clockwise to unlock. Lift lid off to remove.
11. Carefully grasp blade stem and lift out of bowl.
12. Turn bowl clockwise to unlock. Release and lift off base.
13. Use a scraper or small spatula to remove processed food from bowl.
SO-315822_14763_Bella_Mini chopper_BJs_IM_R7.indd 7 2018-11-05 3:27 PM

8
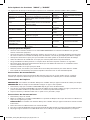
Chop/Puree Quick Guide
Timing suggestions below apply to the Mini Chopper’s CHOP or PUREE speeds.
FOOD FOOD PREPARATION AMOUNT PROCESS
Cheese, hard or soft 1/2-inch pieces Up to 1 cup Press CHOP quickly release
to pulse
Salad Dressings /
Mayonnaise
Place ingredients into work bowl.
Stream oil or liquids through the lid
Up to 2-1/2
cups
PUREE
Fresh Herbs, washed, dried When used with other ingredients
place whole herbs on bottom of
work bowl
Up to 3 cups CHOP
Grind Spices No preparation necessary Up to 2-1/2
cups
CHOP
Raw Fruits & Vegetables
(including onions)
1/2-inch pieces Up to 3 cups CHOP or PUREE
Cooked Fruits & Vegetables 1-inch pieces Up to 3 cups PUREE
Raw Meat/Fish Freeze for 20 minutes.
1-inch pieces
Up to 1/2 cup CHOP or PUREE to
desired consistency
Crackers / Cookies / Bread Break or tear into pieces Up to 3 cups CHOP
Nuts (peanuts, almonds,
walnuts, cashews, etc)
No preparation necessary Up to 2-1/2
cups
Press CHOP quickly
release to pulse to
desired consistency
Nut Butters Add a few drops of oil, if desired Up to 1 cup PUREE to desired
consistency
Hints for Best Results
• Process up to 3 cups of food at a time. DO NOT OVERFILL. If larger quantities are desired, process
inseveral small batches.
• Cut food into uniform sized pieces, no larger than 1/2 to 1-inch. Distribute food evenly in the work bowl
before processing. See the quick guide for optimal results.
• Layer foods so that herbs with stems are on the bottom of the work bowl.
• Use the specially designed easy pour openings on the lid to stream in liquids during processing.
• Be careful not to over-process. Most foods require only 3 to 8 seconds.
• Do not attempt to process extremely hard foods that are difcult to cut with a kitchen knife.
Such as uncooked squash, etc.
• This Mini Chopper is not suitable for chopping ice.
• Remove bones, pits, and hard shells before processing to avoid damage to the unit.
• This unit is not designed for processing liquids or foods with a high liquid content.
User Maintenance Instructions
This appliance requires little maintenance. It contains no user serviceable parts. Do not try to repair it yourself.
Any servicing requiring disassembly must be performed by a qualied appliance repair technician.
Cleaning Instructions
CAUTION: Blades are sharp. Handle carefully. Always grasp the blade stem to clean.
CAUTION: Never place Mini Chopper base in water or other liquids.
1. Unplug and allow CHOP/PUREE blade to stop rotating before disassembling.
2. Wash the lid, CHOP/PUREE blade and the work bowl in warm soapy water; rinse and dry thoroughly.
Removable parts may also be placed on the top shelf of the dishwasher.
3. Clean the exterior and motor base with a soft damp cloth and dry.
Storing Instruction
1. Unplug and clean unit.
2. Assemble unit with CHOP/PUREE blade and lid locked position. Store unit in its box or in a clean, dry place.
CAUTION: Blades are sharp. Handle carefully. Always grasp the blade stem when storing for future use.
3. Never store unit while it is still plugged in.
4. Wrap the cord around the cord storage area located on the bottom of the Mini Chopper.
5. Do not put any stress on the cord where it enters the unit, as it could cause the cord to fray and break.
SO-315822_14763_Bella_Mini chopper_BJs_IM_R7.indd 8 2018-11-05 3:27 PM

9
Recipes
Nice Cream is a healthier alternative frozen treat prepared with creamy blended frozen bananas,
your choice of milk, personalized with your choice of toppings.
Vegan Banana Nice Cream with Blueberries
Serves: 2 - 3
• 2 bananas, frozen
• 2 tablespoons unsweetened vanilla almond
or vanilla cashew milk
• 1/4 teaspoon ground cardamom
• 2 teaspoons maple syrup
• 1 cup fresh or frozen blueberries, defrosted
1. Skin bananas and freeze overnight in an airtight bag or container.
2. Chop each banana into 6 to 8 chunks. Allow frozen bananas to thaw
for at least 30 minutes before processing.
3. Place all ingredients except blueberries into the work bowl.
Press PUREE and release when mixture is creamy.
4. Swirl the half the blueberries into the Nice Cream and serve topped with remaining blueberries.
Carrot Pecan Energy Bites
Yields: 8 balls
• 1 large carrot, chunked
• 1/3 cup toasted pecans
• 3 large Medjool dates, pitted
• 4 dried apricots
• 2 tablespoons axseed meal
• 1/3 cup old-fashioned oats
• 1/2 teaspoon pumpkin pie spice
• pinch ground clove
• 1/2 teaspoon vanilla extract
• 1/4 cup coconut akes for rolling (optional)
1. Add all ingredients except coconut akes to the work bowl.
2. Press PULSE and quickly release to pulse until the mixture blends together.
3. Shape the mixture into 8 even bites. Roll the Carrot Pecan Bites in coconut akes to nish.
4. Refrigerate for at least an hour before serving.
5. Store in an airtight container using parchment or waxed paper to separate.
Pan Seared Crusted Salmon Steaks with Mango Salsa
Serves: 4 - 6
• 4 (6 oz.) salmon steaks
• 2 tablespoons olive oil,
for coating andsearing
• 1 tablespoon butter, for searing
Salmon Crust
• 1/3 cup roasted almonds
• 1/4 cup toasted sesame seeds
• 2 teaspoons garlic salt
• Pepper, freshly ground
SO-315822_14763_Bella_Mini chopper_BJs_IM_R7.indd 9 2018-11-05 3:27 PM

10
Recipes
Mango Salsa
• 1-1/2 cups mangos, diced, divided
• 1 cup tomatoes, chopped, divided
• 1/2 large red onion
• 2 cloves garlic, peeled
• 1 red bell pepper, chopped
• 1 handful fresh cilantro, chopped
• 1 jalapeno pepper, seeded, de-veined
• 1/2 lemon, juiced and zested
1. Prepare Crust. Add roasted almonds to the work bowl.
2. Press CHOP and quickly release to pulse until nuts are ground to the size of sesame seeds.
3. Empty the work bowl onto a plate. Add the remaining crust ingredients and combine with a fork.
4. Lightly brush the salmon steaks with oil. Press the crust ingredients into the salmon to form a
solid coating of nuts and seeds.
5. Sear salmon steaks in olive oil and butter over medium-high heat for 1 minute. Then cover
and lower the heat to medium for up to 3 minutes. Flip steak when crust is lightly browned.
Continue to sear over medium heat for another 2 to 3 minutes. Continue cooking until salmon
easily akes with a fork. Do not overcook!
6. Prepare Mango Salsa. Add half of the mango, half of the tomato, rough chopped onion,
garlic, red bell pepper, cilantro, jalapeno, lemon zest and juice to the work bowl. Press CHOP
until the desired consistency is reached.
7. Heat olive oil in a medium saucepan over medium heat, and sauté chopped ingredients until
heated through, 1 to 2 minutes, then remove from heat. Add the remaining half of the diced
mango and tomato.
8. Spoon Mango Salsa over the salmon steaks to serve.
Serve with chips or vegetables. A nice, sweet and spicy spin on the expected.
Ancho Peach Salsa
Serves: 4 - 6
• 1-1/2 cups ripe peaches, diced
• 1 cup tomato, diced
• 1 cup red onion, chopped
• 1 - 2 jalapeño peppers, seeded, de-veined
• 1 red bell pepper
• 1/2 cup cilantro
• 1 lime, juiced and zested
• 1/2 teaspoon ancho chili powder
• 1 tablespoon brown sugar, packed
• Sea salt and freshly ground pepper to taste
1. Add half of the peaches, half of the tomato, rough chopped onion, jalapeno peppers, red bell
pepper, cilantro, lime zest and juice, chili powder, brown sugar to the work bowl.
2. Press CHOP and quickly release to pulse until ingredients are uniformly chunky. Add the
remaining peaches and tomato. Stir well.
3. Serve immediately, or cover and refrigerate until ready to serve.
SO-315822_14763_Bella_Mini chopper_BJs_IM_R7.indd 10 2018-11-05 3:27 PM

11
Recipes
Guac & Chips
• 2 ripe Haas avocados, chopped
• 1 cup tomatoes, chopped, divided
• 1/2 large red onion
• 2 cloves garlic, peeled
• 1/2 red bell pepper, chopped
• 1 jalapeno pepper, seeded, de-veined
• 1 handful fresh cilantro, chopped
• 2 to 3 dashes hot sauce
• 1/2 lemon, juiced and zested
• Sea salt and freshly ground pepper to taste
1. Add half of the tomato, roughly chopped onion, garlic, red bell pepper, jalapeno pepper,
cilantro, hot sauce, lemon juice and zest, salt and pepper to the work bowl.
2. Press CHOP and quickly release to pulse until ingredients are uniformly chunky.
3. Place chopped ingredients into a serving bowl. Add the remaining chopped tomatoes, and
chopped avocado. Stir well. Sprinkle with fresh cut cilantro.
Chimichurri is a fabulous green sauce that’s been steadily growing in popularity across the
American restaurant scene. This herby, garlicky, tangy, spicy, and very green condiment is great on
all kinds of grilled meats, poultry, or sh.
Grilled Chimichurri Skirt Steak on Grilled Ciabatta
Serves: 2 – 3
• 1 lb. beef skirt steak, tenderized • 2 – 3 ciabatta rolls
Marinade
• 2 cloves garlic
• 2 jalapeno peppers, seeded, de-veined
• 2 tablespoons soy sauce
• 2 tablespoons Dijon mustard
• 2 tablespoons hot sauce
• 2 teaspoons apple cider vinegar
• 2 tablespoons Worcestershire sauce
• 1/4 cup olive oil
• 1 teaspoon onion powder
SO-315822_14763_Bella_Mini chopper_BJs_IM_R7.indd 11 2018-11-05 3:27 PM

12
Recipes
Chimichurri
• 1/2 cup olive oil
• 4 cloves garlic, chopped, or more to taste
• 2 tablespoons shallot or onion, minced
• 3 tablespoons white wine vinegar,
or more to taste
• 1/2 teaspoon salt, or to taste
• 1/4 teaspoon ground cumin
• 1/4 teaspoon red pepper akes
• 1/4 teaspoon freshly ground black pepper
• 1/2 cup fresh cilantro leaves
• 1/4 cup fresh oregano leaves
• 1 bunch at-leaf Italian parsley,
stemsremoved
• 1 lime, juiced and zested
• Sea salt and freshly ground pepper to taste
• Red peppers, roasted, sliced,
for the sandwiches
• Arugula for the sandwiches
1. Prepare Marinade for Steak. Combine all marinade ingredients in the work bowl.
Press to PUREE until garlic and peppers are nely minced. Add marinade to a zipper bag.
2. Cut steak, against the grain, into 1-inch strips. Add steak to marinade; seal and refrigerate for 2
hours to overnight.
3. Grill Steak, preferably on a very hot cast iron skillet, until done to your liking. When nished,
lightly oil ciabatta and place briey on the grill.
4. Prepare Chimichurri. Combine all ingredients in the work bowl.
Press CHOP and quickly release to pulse until herbs form a thick sauce.
5. Assemble Sandwich. Arrange arugula and roasted red peppers onto the toasted ciabatta. Top
with grilled steak strips, and chimichurri.
Quinoa Tabbouleh
This classic Middle Eastern has been transformed by swapping out the quinoa for the bulgur
wheat. Best when prepared a day in advance, Quinoa Tabbouleh is simple to assemble; the perfect
vegetarian side dish.
• 1 cup quinoa, cooked
• 1 large lemon, juiced and zested
• 3 garlic cloves, minced
• 3 tablespoons extra-virgin olive oil
• Black pepper, freshly ground
• 1/2 red onion, chopped
• 2/3 cup chopped arugula
• 2/3 cup chopped at-leaf parsley
• 1/2 - 1 cup chopped fresh mint
• 1/2 teaspoon kosher salt
Toppings
• 2 scallions, thinly sliced
• 1/2 English cucumber, medium diced
• 1/2 large beefsteak tomato, medium diced
• 1/2 cup fresh cilantro, chopped
• sea salt and freshly ground pepper to taste
1. Add all ingredients except quinoa and Toppings to the work bowl.
2. Press CHOP and quickly release to pulse until ingredients are uniformly chopped.
3. Place cooked quinoa into a serving bowl. Add chopped ingredients.
Stir well to combine. Cover and chill before serving.
4. To serve, add your favorite toppings: chopped cucumber, tomatoes, herbs, and scallions to
theQuinoa Tabbouleh. Season to taste with salt and pepper.
SO-315822_14763_Bella_Mini chopper_BJs_IM_R7.indd 12 2018-11-05 3:27 PM

13
Recipes
Falafel Sandwich on Pita with Tahini Dressing
Servings: 2 – 3
• 2 – 3 pita breads
• Shredded lettuce, for the Falafel Sandwich
• Chopped tomatoes, for the Falafel Sandwich
• 1 cup dried roasted chickpeas,
soakedovernight
• 1 small onion, roughly chopped
• 3 - 5 cloves garlic, roasted
• 1/4 cup chopped fresh parsley
• 1 tablespoon olive oil
• 3/4 teaspoon turmeric
• 1 large egg
• 1-3/4 teaspoon salt
• 2 teaspoons cumin
• 1 teaspoon ground coriander
• 1 teaspoon cayenne pepper
• 3 tablespoons dried breadcrumbs
• 2-1/2 tablespoons toasted sesame seeds
• Vegetable oil for frying: grapeseed,
sunower, avocado, canola, or peanut oil
Tahini Dressing
• Juice of 1/4 large lemon
• 1 garlic clove minced
• 1/4 cup water
• 1/4 cup raw tahini
• 1/2 teaspoon honey
• 2 teaspoons apple cider vinegar
• 1 teaspoon tamari soy sauce
• 1/2 teaspoon coriander powder
• 1/2 teaspoon cumin
• 1 tablespoon olive oil
• Sea salt, to taste
• 2 teaspoons raw sesame seeds
1. Soak dried chickpeas overnight, in a large bowl, covered by about 3 inches of cold water.
Chickpeas will grow 150% in volume, expect 1-1/2 cups of tender beans after soaking.
2. Drain chickpeas and rinse well. Add chopped onion, roasted garlic cloves, parsley, olive oil,
turmeric, egg, salt, cumin, ground coriander, cayenne pepper, and breadcrumbs to the work bowl.
3. Press CHOP and release to scrape the mixture from the side of the work bowl. Once a rough,
coarse meal forms, pour it out into a mixing bowl and use a fork to stir in the sesame seeds.
4. Form 10 round falafel balls (or patties) using wet hands and a tablespoon to measure.
Placeonto a plate. Cover the plate and refrigerate for 1 to 2 hours.
5. Prepare Tahini Dressing. Combine all dressing ingredients in the work bowl.
Press to PUREE until garlic is nely minced and the dressing is emulsied.
6. Fry Falafel. Fill a skillet with vegetable oil to a depth of 1 to 1-1/2 inches. Heat the oil slowly over
medium heat, between 360 and 375ºF. Fry falafels in 2 batches, until golden brown on all sides.
7. Remove falafel from the oil using a slotted spoon. Drain falafel on paper towels or brown paper bags.
8. Prepare Falafel Sandwich on Pita. Cut the pita bread in half to form 2 pockets.
Stuff each pita pocket with falafel, shredded lettuce, diced tomatoes. Spoon lots of
TahiniDressing over the falafel.
9. Other favorite toppings include: sliced radishes, Israeli salad, onions, chopped or sliced dill
pickles, hummus, tabbouleh, French fried potatoes. alfalfa sprouts, sliced cucumber, roasted
peppers, roasted sliced eggplant, sunower seeds, and feta cheese.
SO-315822_14763_Bella_Mini chopper_BJs_IM_R7.indd 13 2018-11-05 3:27 PM

14
Limited TWO-YEAR Warranty
SENSIO Inc. hereby warrants that for a period of TWO YEARS from the date
of purchase, this product will be free from mechanical defects in material and
workmanship, and for 90 days in respect to non-mechanical parts. At its sole
discretion, SENSIO Inc. will either repair or replace the product found to be defective,
or issue a refund on the product during the warranty period.
The warranty is only valid for the original retail purchaser from the date of initial
retail purchase and is not transferable. Keep the original sales receipt, as proof of
purchase is required to obtain warranty validation. Retail stores selling this product
do not have the right to alter, modify, or in any way revise the terms and conditions of
the warranty.
EXCLUSIONS:
The warranty does not cover normal wear of parts or damage resulting from
any of the following: negligent use of the product, use of improper voltage or
current, improper routine maintenance, use contrary to the operating instructions,
disassembly, repair, or alteration by anyone other than qualied SENSIO Inc.
personnel. Also, the warranty does not cover Acts of God such as re, oods,
hurricanes, or tornadoes.
SENSIO Inc. shall not be liable for any incidental or consequential damages caused
by the breach of any express or implied warranty. Apart from the extent prohibited
by applicable law, any implied warranty of merchantability or tness for a particular
purpose is limited in time to the duration of the warranty. Some states, provinces or
jurisdictions do not allow the exclusion or limitation of incidental or consequential
damages, or limitations on how long an implied warranty lasts, and therefore, the
above exclusions or limitations may not apply to you. The warranty covers specic
legal rights which may vary by state, province and/or jurisdiction.
HOW TO OBTAIN WARRANTY SERVICE:
You must contact Customer Service at our toll-free number: 1-866-832-4843.
A Customer Service Representative will attempt to resolve warranty issues over
the phone. If the Customer Service Representative is unable to resolve the problem,
you will be provided with a case number and asked to return the product to SENSIO
Inc. Attach a tag to the product that includes: your name, address, daytime contact
telephone number, case number, and description of the problem. Also, include a
copy of the original sales receipt. Carefully package the tagged product with the sales
receipt, and send it (with shipping and insurance prepaid) to SENSIO Inc.’s address.
SENSIO Inc. shall bear no responsibility or liability for the returned product while in
transit to SENSIO Inc.’s Customer Service Center.
SO-315822_14763_Bella_Mini chopper_BJs_IM_R7.indd 14 2018-11-05 3:27 PM

15
INSTRUCCIONES DE SEGURIDAD
IMPORTANTES
Cuando se usan artefactos eléctricos, se deben siempre seguir las precauciones
básicas de seguridad, incluso lo siguiente:
1. READ ALL INSTRUCTIONS before using.
2. Para protegerse del riesgo de descarga eléctrica, no sumerja el cable, el
enchufe ni la unidad en agua ni en ningún otro líquido.
3. Este electrodoméstico no debe ser utilizado por personas (incluidos niños)
con capacidades físicas, sensoriales o mentales reducidas, o con falta de
experiencia y conocimientos, a menos que una persona responsable de su
seguridad les haya brindado supervisión o instrucciones sobre el uso de los
electrodomésticos.
4. Los niños deben ser supervisados para asegurarse de que no juegan con
elaparato.
5. Desenchufe el electrodoméstico del tomacorriente cuando no esté en uso y
antes de limpiarlo.
6. Evite el contacto con partes móviles.
7. No opere ningún artefacto si el cable está dañado o si no funciona
correctamente de alguna manera. Llévelo a un técnico calicado para su
examen, reparación o ajuste eléctrico o mecánico.
8. El uso de accesorios no recomendados o vendidos por el fabricante puede
causar fuego, descarga eléctrica o lesione.
9. No lo utilice en exteriores.
10. No permita que el cable cuelgue del borde de la mesa o encimera.
11. No permita que el cable entre en contacto con las supercies calientes,
incluidala estufa.
12. Mantenga los utensilios alejados de las cuchillas en movimiento mientras
procesa los alimentos para reducir el riesgo de lesiones graves a personas o
daños a la Mini picadora. Se puede usar una rasqueta de goma, pero debe ser
usado solo cuando este electrodoméstico no esté en funcionamiento.
13. Las cuchillas son aladas. Maneje con cuidado.
14. Para reducir el riesgo de lesiones, nunca coloque la cuchilla CHOP/PUREE
enla base del motor sin primero bloquear correctamente el tazón de trabajo
en su lugar.
15. Asegúrese de que la tapa esté bien bloqueada en su lugar antes de operar este
Mini picadora.
16. No intente modicar el mecanismo de bloqueo de la tapa.
SOLO PARA EL USO DOMÉSTICO
GUARDE ESTAS INSTRUCCIONES
SO-315822_14763_Bella_Mini chopper_BJs_IM_R7.indd 15 2018-11-05 3:27 PM

16
OTRAS MEDIDAS DE SEGURIDAD
IMPORTANTE
1. Todos los usuarios de este electrodoméstico deben leer y comprender este
manual de instrucciones antes de poner en funcionamiento o limpiar el aparato.
2. El cable de este aparato debe enchufarse solo a un tomacorriente de 120V CA.
3. No deje este aparato desatendido durante el uso.
4. Si este aparato comienza a funcionar mal durante el uso, suelte
inmediatamente el botón CHOP o PUREE y desenchufe el cable. No utilice ni
intente reparar el aparato que funciona mal.
5. Si este aparato se cae o se sumerge accidentalmente en el agua, desenchúfelo.
de inmediato ¡No ponga la mano en el agua! No utilice este aparato después
de que haya caído o se haya sumergido en agua.
6. Para reducir el riesgo de lesiones a personas o propiedades, nunca use este
aparato en una posición inestable.
7. No use el aparato con nes para los que no fue diseñados.
8 Tenga mucho cuidado al manipular las cuchillas. Siempre coloque y quite la
cuchilla utilizando el tallo de la cuchilla. No toque las cuchillas con los dedos.
Las cuchillas son muy aladas y pueden causar lesiones si se tocan.
9. Este Mini Chopper está diseñado para cortar pequeñas cantidades de alimentos.
No está destinado a preparar grandes cantidades de alimentos a la vez.
10. Nunca utilice durante largos períodos de tiempo. La Mini picadora hace su
trabajo en algunos segundos.
11. No opere la Mini picadora sin alimentos en el tazón de trabajo.
12. No use si el tazón de trabajo está agrietado o astillado.
Notas sobre el enchufe
Este aparato tiene un enchufe polarizado (una hoja es más ancha que la otra).
Para reducir el riesgo de descarga eléctrica, este enchufe encaja en una toma de
corriente polarizada sólo de una manera. Si el enchufe no entra completamente
en el tomacorriente, invierta el enchufe. Si el enchufe no puede encajar en la toma
eléctrica, póngase en contacto con un electricista calicado. No modique el enchufe
de ninguna manera.
Notas sobre el cable
A. Un cable corto de alimentación (o cable de alimentación desmontable) es
suministrado para reducir el riesgo de que se enreden o se tropiecen con
uncable más largo.
B. Cables de alimentación más largos y removibles o las alargadoras son
disponibles y se pueden utilizarlos si se ejerce cuidado.
C. Si un cable largo y removible o una alargadora sea usado:
1. La potencia eléctrica marcada del cordón o de la alargadora debe ser, por
lo menos, tan fuerte como la potencia eléctrica del aparato;
2. Si el aparato es del tipo con conexión a tierra, el cable o la alargadora
debe ser un enchufe de 3 hojas con conexión a tierra.
3. El cordón debe estar dispuesto de manera que no cuelga del borde de la
encimera o la mesa donde pueda ser tirado por niños o donde alguien se
tropiece involuntariamente con el cable.
SO-315822_14763_Bella_Mini chopper_BJs_IM_R7.indd 16 2018-11-05 3:27 PM

17
Advertencia sobre los plasticantes
PRECAUCIÓN: A n de evitar que los plasticantes se adhieran al acabado de la
encimera, la mesa u otro mueble, coloque un posafuentes o salvamanteles que NO
SEA DE PLÁSTICO entre el electrodoméstico y la supercie de la encimera o mesa.
Si no se hace esto, es posible que el acabado se oscurezca, se formen marcas
permanentes o aparezcan manchas
Corriente eléctrica
Si el circuito eléctrico está sobrecargado con otros artefactos, es posible que el
electrodoméstico no funcione correctamente. El electrodoméstico debe funcionar
en un circuito eléctrico separado de otros aparatos.
Conozca su Mini picadora de 3 tazas
El producto puede diferir levemente de las ilustraciones
Figura 1
Tapa
Tallo de la cuchilla
Cuchilla de
CHOP/PUREE
de acero inoxidable
Botón de CHOP
Botón de PUREE
Aberturas para
verter fácil
Tazón de trabajo
de 3 tazas (750 ml)
con mango
Base de motor
Patas antideslizantes
(no mostradas)
Depósito del cable
(no mostrado)
SO-315822_14763_Bella_Mini chopper_BJs_IM_R7.indd 17 2018-11-05 3:27 PM

18
Antes del primer uso
1. Saque con cuidado todos los materiales de embalaje del producto antes de usar.
2. Lave la tapa de la Mini picadora, la cuchilla de CHOP/PURE (PIQUAR/PURÉ) y el tazón de trabajo en agua
tibia y jabonosa; enjuague y seque bien, compruebe con las instrucciones de limpieza.
PRECAUCIÓN: Siempre desenchufe el electrodoméstico del tomacorriente antes de montarlo y antes
deinstalar o quitar los accesorios.
PRECAUCIÓN: LAS CUCHILLAS SON AFILADAS, MANEJES CON CUIDADO.
PRECAUCIÓN: Siempre coloque o quite la cuchilla de CHOP/PURE (PIQUAR/PURÉ) sujetando el tallo
de la cuchilla al montar o desmontar. No toque la cuchilla CHOP/PURE (PIQUAR/PURÉ) con los dedos.
Lacuchilla está muy alada y puede causar lesiones al toque.
PRECAUCIÓN: NO SUMERJA LA BASE DEL MOTOR EN AGUA O EN OTROS LÍQUIDOS.
Instrucciones de uso
1. Coloque el Mini Chopper en una supercie estable, limpia, seca y nivelada. Una pequeña espátula es útil para
sacar los alimentos procesados.
2. Coloque el tazón de trabajo (sin tapa y cuchilla) en la base, con el mango en el centro, mirando hacia usted.
Gire el mango hacia la izquierda (hacia el lado derecho de la unidad) hasta que encaje en su posición.
3. Sosteniendo el tallo de la cuchilla, deje caer con cuidado la cuchilla CHOP/PURE (CORTAR/PURÉ) sobre el
semieje central en el tazón de trabajo, girando si es necesario, hasta que caiga en su lugar.
PRECAUCIÓN: ¡NUNCA TOQUE LA CUCHILLA EN SÍ MISMO!
4. Corte los alimentos para procesar en pedazos uniformes que no tengan más de 1/2 pulgada. Distribuya los
alimentos alrededor de la cuchilla.
IMPORTANTE: No coloque más de 3 tazas de comida en el tazón de trabajo.
5. Con la tapa vista de frente, la palabra LOCK (BLOQUEO) colocada sobre el asa del tazón de trabajo, gire la
tapa hacia la izquierda, en la dirección de la echa impresa. Deslice la pestaña de bloqueo de la tapa en la
ranura de bloqueo de la tapa del asa. La tapa se bloqueará en su lugar.
NOTA: Este aparato está equipado con un mecanismo de bloqueo de la tapa. La Mini picadora no funcionará
a menos que la pestaña de bloqueo de la tapa esté colocada correctamente en la ranura de bloqueo de la
tapa de la base.
Figura 2
6. Enchufe en un tomacorriente de 120V AC.
7. Para comenzar, pulse el botón CHOP o PURE durante 3 a 5 segundos y luego suéltelo; el motor se
detendrá Pulse y suelte rápidamente a PULSE para una consistencia más na.
NOTA: Si la Mini picadora no arranca, verique que el tazón de trabajo esté bien montado en la base y
que la tapa esté correctamente montada en el tazón de trabajo y que esté asegurada a la base.
8. Haga pasar aceite o líquidos por las 2 aberturas de fácil vaciado de la tapa.
9. Cuando termine de cortar, desenchufe la unidad y deje que las cuchillas dejen de girar antes de
desmontarlas.
10. Gire la manija de la tapa hacia la derecha para desbloquear. Levante la tapa para quitarla.
11. Sujete con cuidado el tallo de la cuchilla y sáquelo del tazón.
12. Gire el tazón hacia la derecha para desbloquear. Suelte y levante la base.
13. Use un raspador o una espátula pequeña para retirar los alimentos procesados del tazón.
SO-315822_14763_Bella_Mini chopper_BJs_IM_R7.indd 18 2018-11-05 3:27 PM

19
Guía rápida de las funciones “CHOP” y “PUREE”
Las sugerencias de tiempo a continuación se aplican a las velocidades CHOP o PUREE la Mini picadora.
ALIMENTO PREPARACIÓN DEL ALIMENTO CANTIDAD PROCESO
Quesos, duros o blandos Piezas de 1/2 pulgada No más de
una taza
Pulse CHOP rápidamente,
suelte para cortar en pulsas
Aderezos para ensaladas/
mayonesa
Coloque los ingredientes en el tazón de
trabajo. Vierta aceite o líquidos a través
de la tapa
No más de
2-1/2 tazas
PUREE
Hierbas frescas, lavadas,
secas
Cuando se usa con otros ingredientes,
coloque hierbas enteras en el fondo del
tazón de trabajo
No más de
3 tazas
CHOP
Moler especias No se necesita preparación No más de
2-1/2 tazas
CHOP
Frutas y verduras frescas
(incluidas las cebollas)
Piezas de 1/2 pulgada No más de
3 tazas
CHOP o PUREE
Frutas y verduras cocidas Piezas de 1 pulgada No más de
3 tazas
PUREE
Carne cruda/pescado Congele durante 20 minutos.
Piezas de 1 pulgada
No más de
una media taza
CHOP o PUREE hasta obtener
la consistencia deseada
Galletas saladas/Galletas/
Panes
Corte en pedazos Hasta 3 tazas CHOP
Nueces (cacahuetes,
almendras, nueces,
anacardos, etc.)
No se necesita preparación Hasta
2-1/2 tazas
CHOP o PUREE hasta obtener
la consistencia deseada
Mantequilla de nueces Agregue unas gotas de aceite,
si lo desea
No más de
una taza
PUREE a la consistencia
deseada
Consejos para los mejores
• Corte no más 3 tazas de comida a la vez. NO LLENE DEMASIADO. Si se desean cantidades más grandes,
corte en varios lotes pequeños.
• Corte los alimentos en pedazos de tamaño uniforme, de no más de 1/2 a 1 pulgada. Distribuya los alimentos
de manera uniforme en el tazón de trabajo antes de cortarlos. Consulte la guía rápida para obtener mejores.
• Coloque los alimentos en capas para que las hierbas con tallos queden en el fondo del tazón de trabajo.
• Utilice las aberturas de vertido fácil en la tapa para verter líquidos durante el procesamiento.
• Tenga cuidado de no sobre-procesar. La mayoría de los alimentos requieren solo de 3 a 8 segundos.
• No intente cortar alimentos extremadamente duros que son difíciles de cortar con un cuchillo de cocina.
Como la calabaza sin cocer, etc.
• Esta Mini picadora no es apta para picar hielo.
• Quite los huesos, las semillas y las conchas duras antes del procesamiento para evitar dañar la unidad.
• Esta unidad no está diseñada para procesar líquidos o alimentos con un alto contenido líquido.
Instrucciones de mantenimiento
Este aparato requiere poco mantenimiento. No contiene piezas que el usuario pueda reparar. Cualquier
servicio que requiera el desmontaje que no sea la limpieza debe ser realizada por un técnico calicado.
Instrucciones de limpieza
PRECAUCIÓN: Las cuchillas son aladas. Maneje con cuidado. Siempre agarre el tallo de la cuchilla para limpiar.
PRECAUCIÓN:
Nunca coloque la base del Mini Chopper en agua u otros líquidos.
1. Desenchufe y deje que la cuchilla CHOP/PUREE deje de girar antes de desmontarla.
2. Lave la tapa, la cuchilla CHOP/PUREE y el tazón de trabajo con agua tibia y jabón; enjuague y seque bien. Las
piezas removibles también se pueden colocar en el estante superior del lavavajillas.
3. Limpie el exterior y la base del motor con un paño suave y húmedo y seque.
Instrucciones de almacenamiento
1. Desenchufe y limpie la unidad.
2. Monte la unidad con la cuchilla CHOP/PUREE en la posición de bloqueo de la tapa. Almacene la unidad en su
caja o en un lugar limpio y seco.
PRECAUCIÓN: Las cuchillas son aladas. Maneje con cuidado. Siempre agarre el tallo de la cuchilla cuando
lo almacene.
3. Nunca almacene la unidad mientras aún esté enchufada.
4. Envuelva el cable alrededor del área de almacenamiento del cable situada en la parte inferior de la Mini picadora.
5. No ponga ninguna tensión en el cable donde entra en la unidad, ya que podría deshilacharse y romperse.
SO-315822_14763_Bella_Mini chopper_BJs_IM_R7.indd 19 2018-11-05 3:27 PM

20
Recetas
“Nice Cream” (helado feliz) es un postre congelado alternativo más saludable preparado con plátanos
cremosos y congelados, su elección de leche, personalizado con su selección de ingredientes.
“Nice Cream” vegano con arándanos y bananas
Porciones: 2 - 3
• 2 bananas, congelados
• 2 cucharadas de almendra de vainilla sin
azúcar o leche de anacardo de vainilla
• 1/4 cucharadita de cardamomo molido
• cucharaditas de jarabe de arce
• 1 taza de arándanos frescos o congelados,
descongelados
1. Despelleje los plátanos y congelarlos durante la noche en una bolsa o recipiente hermético.
2. Pique cada plátano en 6 a 8 pedazos. Permita que los plátanos congelados se descongelen por
lo menos 30 minutos antes de procesarlos.
3. Coloque todos los ingredientes excepto los arándanos en el recipiente de trabajo.
Presione PUREE y suelte cuando la mezcla esté cremosa.
4. Agite la mitad de los arándanos sobre el Nice Cream y sirva con los arándanos restantes.
Bolas de zanahoria y pacanas
Porciones: 8 bolas
• 1 zanahoria grande, picada
• 1/3 taza de nueces tostadas
• 3 dátiles grandes, picadas
• 4 albaricoques secos
• 2 cucharadas de harina de linaza
• 1/3 taza de avena pasada de moda
• 1/2 cucharadita de especia de pastel de
calabaza
• pellizco de clavo molido
• 1/2 cucharadita de extracto de vainilla
• 1/4 taza de copos de coco para enrollar
(opcional)
•
1. Agregue todos los ingredientes excepto los copos de coco al tazón de trabajo.
2. Pulse PULSE y suelte rápidamente para pulsar hasta que la mezcla este mezclado.
3. Forme la mezcla en 8 bolas uniformes. Rodé las bolas en copos de coco para terminar.
4. Refrigere por lo menos una hora antes de servir.
5. Almacene en un recipiente hermético usando papel sulfurizado para separar.
Filetes de salmón asados con salsa de mango
Porciones: 4 - 6
• 4 (6 oz.) Filetes de salmón
• 2 cucharadas de aceite de oliva, para recubrir
y dorar.
• 1 cucharada de mantequilla, para dorar
•
Corteza para el salmón
• 1/3 taza de almendras tostadas
• 1/4 taza de semillas de sésamo tostadas
• 2 cucharaditas de sal de ajo
• Pimienta, recién molida
SO-315822_14763_Bella_Mini chopper_BJs_IM_R7.indd 20 2018-11-05 3:27 PM

21
Recetas
Salsa de mango
• 1-1 / 2 tazas de mango, cortado
encubitos,sepárelos
• 1 taza de tomates, picados, sepárelos
• 1/2 cebolla roja grande
• 2 dientes de ajo, pelados
• 1 pimiento rojo, picado
• 1 puñado de cilantro fresco, picado
• 1 chile jalapeño, sin semillas
• 1/2 jugo de limón, rallada
1. Prepare la corteza. Agregue las almendras tostadas al tazón de trabajo.
2. Pulse CHOP y suelte rápidamente para pulsar hasta que las nueces se muelen al tamaño de
las semillas de sésamo.
3. Vacié el tazón de trabajo en un plato. Agregue los ingredientes restantes de la corteza y
combine con un tenedor.
4. Cepille ligeramente los letes de salmón con aceite. Pulse los ingredientes de la corteza en el
salmón para formar una capa de nueces y semillas.
5. Ase los letes de salmón en aceite de oliva y mantequilla a fuego medio-alto durante 1
minuto. Luego cubra y baje el fuego a medio por hasta 3 minutos. Voltee el lete cuando la
corteza esté ligeramente dorada. Siga dorando a fuego medio durante otros 2 a 3 minutos.
Siga cocinando hasta que el salmón se desmenuce fácilmente con un tenedor. ¡No cocines
demasiado!
6. Prepare la salsa de mango. Agregue la mitad del mango, la mitad del tomate, la cebolla
picada, el ajo, el pimiento rojo, el cilantro, el jalapeño, la ralladura de limón y el jugo al tazón de
trabajo. Pulse CHOP hasta alcanzar la consistencia deseada.
7. Caliente el aceite de oliva en una cacerola mediana a fuego medio, y saltee los ingredientes
picados hasta que se caliente, de 1 a 2 minutos, luego quite del fuego. Agregue la mitad
restante del mango y el tomate picados.
8. Coloque la salsa de mango sobre los letes de salmón para servir.
Sirva con pepitas o verduras. Algo dulce y picante y diferente.
Salsa de melocotón
Porciones: 4 - 6
• 1-1 / 2 tazas de melocotones maduros,
cortados en cubitos
• 1 taza de tomate, cortado en cubitos
• 1 taza de cebolla roja, picada
• 1 - 2 chiles jalapeños, sin semillas, sin vetas
• 1 pimiento rojo
• 1/2 taza de cilantro
• 1 lima, jugo y jugo.
• 1/2 cucharadita de chile ancho en polvo
• 1 cucharada de azúcar moreno
• Sal marina y pimienta recién molida algusto.
1. Agregue la mitad de los melocotones, la mitad del tomate, la cebolla picada, los chiles
jalapeños, el pimiento rojo, el cilantro, la ralladura de limón y el jugo, el chile en polvo y el
azúcar moreno en el recipiente de trabajo.
2. Pulse CHOP y suelte rápidamente para pulsar hasta que los ingredientes estén bien gruesos.
Añadir los melocotones y el tomate restantes. Revuelva bien.
3. Sirva inmediatamente, o cubra y refrigere hasta que esté listo para servir.
SO-315822_14763_Bella_Mini chopper_BJs_IM_R7.indd 21 2018-11-05 3:27 PM

22
Recetas
Guacamole y pepitas
• 2 aguacates maduros, picados
• 1 taza de tomates, picados, sepárelos
• 1/2 cebolla roja grande
• 2 dientes de ajo, pelados
• 1/2 pimiento rojo, picado
• 1 chile jalapeño, sin semillas
• 1 puñado de cilantro fresco, picado
• 2 a 3 pizcas de salsa picante
• 1/2 limón, jugo y jugo.
• Sal marina y pimienta recién molida algusto.
1. Agregue la mitad del tomate, la cebolla picada, el ajo, el pimiento rojo, el chile jalapeño, el
cilantro, la salsa picante, el jugo y la ralladura de limón, la sal y la pimienta al recipiente de
trabajo.
2. Pulse CHOP y suelte rápidamente para pulsar hasta que los ingredientes estén bien
gruesos.
3. Coloque los ingredientes picados en un tazón para servir. Añada los tomates picados restantes
y el aguacate picado. Revuelva bien. Aderece con cilantro recién cortado.
Chimichurri es una salsa verde fabulosa que ha ido creciendo en popularidad en los restaurantes
estadounidenses. Este condimento, picante, especiado y muy verde es excelente para todo tipo de
carnes a la parrilla, pollo o pescado.
Bistec asado con chimichurri sobre chapata
Porciones: 2 – 3
• 1 lb. bistec, ablandado • 2 – 3 panecillos chapata
Marinada
• 2 dientes de ajo
• 2 chiles jalapeños, sin semillas
• 2 cucharadas de salsa de soja
• 2 cucharadas de mostaza Dijon
• 2 cucharadas de salsa picante
• 2 cucharaditas de vinagre de manzana
• 2 cucharadas de salsa inglesa
• 1/4 taza de aceite de oliva
• 1 cucharadita de cebolla en polvo
SO-315822_14763_Bella_Mini chopper_BJs_IM_R7.indd 22 2018-11-05 3:27 PM

23
Recetas
Chimichurri
• 1/2 taza de aceite de oliva
• 4 dientes de ajo, picados, o más al gusto
• 2 cucharadas de chalota o cebolla, picada
• 3 cucharadas de vinagre de vino blanco, o
más al gusto
• 1/2 cucharadita de sal, o al gusto
• 1/4 cucharadita de comino molido
• 1/4 cucharadita de copos de pimiento rojo
• 1/4 cucharadita de pimienta recién molida
• 1/2 taza de hojas frescas de cilantro
• 1/4 taza de hojas frescas de orégano
• 1 racimo de perejil italiano de hoja plana, sin
tallos
• 1 lima, jugo y rallado.
• Sal marina y pimienta recién molida al gusto.
• Pimientos rojos, asados, rebanados, para los
sándwiches.
• Arúgula para los sándwiches.
1. Prepare la marinada para bistec. Combine todos los ingredientes de la marinada en el tazón
de trabajo. Pulse PUREE hasta que el ajo y los pimientos estén namente picados. Añada la
marinada a una bolsa con cremallera.
2. Corte el lete, contra el grano, en tiras de 1 pulgada. Agregue el bistec a la marinada; Sellar y
refrigerar durante 2 horas a toda la noche.
3. Cocine el bistec a la parrilla, preferiblemente en una sartén de hierro fundido muy caliente,
hasta que esté hecho a su gusto. Cuando haya terminado, un ponga un poco de aceite a los
panecillos de ciabatta y coloque brevemente en la parrilla.
4. Prepare Chimichurri. Combine all ingredients in the work bowl. Prepare el chimichurri.
Combine todos los ingredientes en el tazón de trabajo.
Pulse CHOP y suelte rápidamente para pulsar hasta que las hierbas formen una salsa
espesa
5. Prepare el sándwich. Coloque la arúgula y los pimientos rojos asados en la chapata tostada.
Cubra con tiras de bistec a la parrilla, y chimichurri.
Quinoa de tabulé
Este clásico del Medio Oriente se ha transformado cambiando la quinua por el trigo bulgur.
Mejor cuando se prepara un día antes, quinua de tabulé es fácil de cocinar; el acompañamiento
vegetariano perfecto.
• 1 taza de quinua, cocida
• 1 limón grande, rallada
• 3 dientes de ajo, picados
• 3 cucharadas de aceite de oliva virgen extra
• Pimienta negra, recién molida
• 1/2 cebolla roja, picada
• 2/3 taza de arúgula picada
• 2/3 taza de perejil picado
• 1/2 - 1 taza de menta fresca picada
• 1/2 cucharadita de sal kosher
Condimentos
• 2 cebolletas, en rodajas nas
• 1/2 pepino inglés, cortado en cubitos
• 1/2 tomate grande, cortado en cubitos
• 1/2 taza de cilantro fresco, picado
• Sal marina y pimienta molida al gusto.
1. Agregue todos los ingredientes excepto la quinua y los condimentos al bol.
2. Pulse CHOP y suelte rápidamente para pulsar hasta que los ingredientes estén cortados.
3. Coloque la quinua cocida en un bol para servir. Añada los ingredientes picados. Revuelva bien
para combinar. Cubra y enfríe antes de servir.
4. Para servir, agregue sus ingredientes favoritos: pepino picado, tomates, hierbas y cebolletas a
la Quinua de tabulé. Sazone al gusto con sal y pimienta.
SO-315822_14763_Bella_Mini chopper_BJs_IM_R7.indd 23 2018-11-05 3:27 PM

24
Recetas
Sándwich de falafel en pita con aderezo de Tahini
Porciones: 2 - 3
• 2 – 3 panes de pita
• Lechuga picada, para el sándwich de falafel
• Tomates picados, para el sándwich defalafel
• 1 taza de garbanzos tostados, remojados
durante la noche
• 1 cebolla pequeña, picada
• 3 - 5 dientes de ajo, asados
• 1/4 taza de perejil fresco picado
• 1 cucharada de aceite de oliva
• 3/4 cucharadita de cúrcuma
• 1 huevo grande
• 1-3/4 cucharadita de sal
• 2 cucharaditas de comino
• 1 cucharadita de cilantro molido
• 1 cucharadita de pimienta de cayena
• 3 cucharadas de migas de pan seco
• 2-1/2 cucharadas de semillas de sésamo
tostadas
• Aceite vegetal para freír: semilla de uva,
girasol, aguacate, canola o aceite de
cacahuete
Aderezo de Tahini
• Jugo de una cuarta parte de un limón grande
• 1 diente de ajo picado
• 1/4 taza de agua
• 1/4 taza de tahini fresco
• 1/2 cucharadita de miel
• 2 cucharaditas de vinagre de manzana
• 1 cucharadita de salsa de soja tamari
• 1/2 cucharadita de cilantro en polvo
• 1/2 cucharadita de comino
• 1 cucharada de aceite de oliva
• Sal marina, al gusto
• 2 cucharaditas de semillas de sésamo
1. Remoje los garbanzos secos durante la noche, en un bol grande, cubierto por aproximadamente
3 pulgadas de agua fría. Los garbanzos crecen un 150% en volumen, espere 1-1/2 tazas de
garbanzos tiernos después de remojar.
2. Escurra los garbanzos y enjuague bien. Agregue la cebolla picada, los dientes de ajo asados, el
perejil, el aceite de oliva, la cúrcuma, el huevo, la sal, el comino, el cilantro molido, la pimienta de
cayena y las migas de pan en el bol para mezclar.
3. Pulse CHOP y suelte para raspar la mezcla del lado del bol. Una vez que se forma una mezcla
áspera y gruesa, viértela en un bol para mezclar y use un tenedor para agregar las semillas de
sésamo.
4. Forme 10 bolas de falafel (o empanadas) con las manos mojadas y una cucharada para medir.
Coloque en un plato. Cubra el plato y refrigere por 1 a 2 horas.
5. Prepare el aderezo de Tahini. Combine todos los ingredientes del aderezo en el bol. Pulse
PURÉ hasta que el ajo esté namente picado y el aderezo esté molido.
6. Fría el falafel. Llene una sartén con aceite vegetal a una profundidad de 1 a 1-1/2 pulgadas.
Calienta el aceite lentamente a fuego medio, entre 360 y 375ºF. Fría los falafels en 2 lotes, hasta
que se doren por todos lados.
7. Retire el falafel del aceite con una cuchara ranurada. Escurra el falafel en toallas de papel o bolsas
de papel.
8. Prepare el sándwich Falafel en pita. Corte el pan de pita por la mitad para formar 2 bolsillos.
Rellene cada bolsillo de pita con falafel, lechuga picada, tomates cortados en cubitos. Cuchare
mucho aderezo de Tahini sobre el falafel.
9. Otros condimentos favoritos incluyen: rábanos rebanados, ensalada israelí, cebollas, pepinillos
picados o rebanados, hummus, tabulé, papas fritas. Brotes de alfalfa, pepino, pimientos asados,
berenjenas asadas, semillas de girasol y queso feta.
SO-315822_14763_Bella_Mini chopper_BJs_IM_R7.indd 24 2018-11-05 3:27 PM

25
Garantía limitada de DOS AÑOS
Mediante la presente, SENSIO Inc. garantiza que, durante el plazo de DOS AÑOS a
partir de la fecha de compra, este producto no presentará defectos mecánicos en el
material ni en la mano de obra, y durante 90 días, no los presentará en las piezas no
mecánicas. A su entera discreción, SENSIO Inc. reparará o reemplazará el producto
que resulte defectuoso, o emitirá un reembolso por el producto durante el plazo de
garantía.
Esta garantía es válida únicamente para el comprador minorista original a partir de la
fecha de compra minorista inicial y no es transferible. Conserve el recibo de compra
original, ya que se exige una prueba de compra para obtener la validación de la
garantía. Las tiendas minoristas no tienen derecho a alterar, modicar ni corregir de
ninguna manera los términos y condiciones de la garantía.
EXCLUSIONES:
La garantía no cubre el desgaste normal de las piezas ni el daño ocasionado por
cualquiera de las siguientes causas: uso negligente del producto, uso de un voltaje
o corriente incorrectos, mantenimiento de rutina inadecuado, uso contrario al de
las instrucciones de funcionamiento, desarmado, reparación o alteración a cargo de
personas que no sean miembros del personal calicado de SENSIO Inc. Asimismo, la
garantía no cubre actos de la naturaleza, como incendios, inundaciones, huracanes o
tornados.
SENSIO Inc. no asumirá responsabilidad por daños incidentales o resultantes
ocasionados por la violación de cualquier garantía expresa o implícita. Salvo en
la medida en que lo prohíban las leyes aplicables, cualquier garantía implícita de
comerciabilidad o aptitud para un propósito particular se limita temporalmente a la
duración de la garantía. Algunos estados, provincias o jurisdicciones no permiten la
exclusión ni la limitación de daños incidentales o resultantes, o limitaciones sobre
la duración de una garantía implícita y, por lo tanto, es posible que las exclusiones o
limitaciones mencionadas no le correspondan. La garantía cubre derechos legales
especícos que pueden variar de un estado, una provincia o una jurisdicción a otros.
CÓMO OBTENER EL SERVICIO DE GARANTÍA:
Debe comunicarse con el Servicio de atención al cliente a nuestro número telefónico
gratuito: 1-866-832-4843. Un representante del Servicio de atención al cliente
intentará resolver los problemas referidos a la garantía por teléfono. Si este no puede
resolver el problema, le proporcionarán un número de caso y le solicitarán que
devuelva el producto a SENSIO Inc. Adhiera una etiqueta al producto que incluya: su
nombre, dirección, número telefónico de contacto durante el día, número de caso y
descripción del problema. Además, incluya una copia del recibo de compra original.
Envuelva cuidadosamente el producto etiquetado con el recibo de compra, y envíelo
(con el envío y el seguro prepagados) a la dirección de SENSIO Inc. SENSIO Inc. no
asumirá obligación ni responsabilidad alguna por el producto devuelto que esté en el
trayecto hacia el Centro de servicio al cliente de SENSIO Inc.
SO-315822_14763_Bella_Mini chopper_BJs_IM_R7.indd 25 2018-11-05 3:27 PM

GRACIAS
Para su compra
BellaLifestyle
BellaLife
@
bellahousewares.com
inspírate
Registrarse
y rmar para arriba para
anuncios especiales y los ingresos
de la moda!
Cuéntanos lo que piensas!
Evaluar, revisar o hacernos una
pregunta.
!
SO-315822_14763_Bella_Mini chopper_BJs_IM_R7.indd 26 2018-11-05 3:27 PM

SO-315822_14763_Bella_Mini chopper_BJs_IM_R7.indd 27 2018-11-05 3:27 PM

SO-315822_14763 Rev. 7
For customer service questions or comments
Dudas o comentarios contactar el departamento de servicio al cliente
1-866-832-4843 / [email protected]
BELLA is a registered trademark of Sensio Inc., Montréal, Canada H3B 3X9.
All rights reserved.
BELLA es una marca registrada de Sensio Inc., Montréal, Canada H3B 3X9.
Todos los derechos reservados.
SO-315822_14763_Bella_Mini chopper_BJs_IM_R7.indd 28 2018-11-05 3:27 PM
-
 1
1
-
 2
2
-
 3
3
-
 4
4
-
 5
5
-
 6
6
-
 7
7
-
 8
8
-
 9
9
-
 10
10
-
 11
11
-
 12
12
-
 13
13
-
 14
14
-
 15
15
-
 16
16
-
 17
17
-
 18
18
-
 19
19
-
 20
20
-
 21
21
-
 22
22
-
 23
23
-
 24
24
-
 25
25
-
 26
26
-
 27
27
-
 28
28


Bella 3 Cup Mini Chopper El manual del propietario
- Categoría
- Pequeños electrodomésticos de cocina
- Tipo
- El manual del propietario
en otros idiomas
Artículos relacionados
Otros documentos
-
Hamilton Beach 72950 Guía de inicio rápido
-
Cuisinart RMC-100 El manual del propietario
-
GE 840091000 Manual de usuario
-
Cuisinart Draadloze staafmixer RHB100E El manual del propietario
-
NuWave 20636 Guía del usuario
-
-
Hamilton Beach 72800 Manual de usuario
-
-
-