ATEN VE810 Guía de inicio rápido
- Categoría
- Extensores AV
- Tipo
- Guía de inicio rápido
Este manual también es adecuado para

VE810 HDMI Extender with IR Control User Guide
Guide de l'utilisateur du prolongateur HDMI avec télécommande infrarouge
HDMI-Verlängerung mit Infrarot-Fernbedienung Benutzerhandbuch
Alargador de HDMI con mando a distancia por infrarrojos Manual del usuario
Requirements
Source Device
• HDMI Type A output connector(s)
Display Device
• A display device or receiver with an HDMI Type A input connector
Cables
• Use Standard HDMI cables to connect the HDMI source and display
device to the VE810L and the VE810R
• Use Cat 5e cable to connect the VE810L to the VE810R
Note: Cables are not included in this package. We strongly recommend that
you purchase high-quality cables of appropriate length since this will
affect the quality of the audio and video display. Contact your dealer to
purchase the correct cable sets.
Maximum cable distances are as follows:
40 m at 1080p
60 m at 1080i
@ 24-bit color depth
Voraussetzungen
Signalquelle
• HDMI Typ A-Ausgang bzw. -Ausgänge
Anzeigegerät
• Anzeigegerät oder Receiver mit HDMI Typ A -Eingang
Kabel
• Verbinden Sie die HDMI-Signalquelle und das Anzeigegerät mit dem
VE810L und dem VE810R. Verwenden Sie dazu zwei Standard-HDMI-
Kabel.
• Verbinden Sie den VE810L mit dem VE810R. Verwenden Sie dazu Kat.
5e-Kabel.
Hinweis: Die Kabel sind nicht im Lieferumfang enthalten. Wir empfehlen
Ihnen, nur hochwertige Kabel geeigneter Länge zu kaufen, da
diese Auswirkungen auf die Ton- und Bildqualität haben. Wenden
Sie sich dazu an Ihren Fachhändler.
Die maximalen Kabellängen sind Folgende:
40 m für 1080p
60 m für 1080i
bei 24 Bit Farbtiefe
Requisitos
Dispositivo fuente
• Conector(es) de salida HDMI de tipo A
Dispositivo de visualización
• Un dispositivo de visualización o un receptor con entrada HDMI de tipo A
Cables
• Conecte la fuente HDMI y el dispositivo de visualización a las unidades
local VE810L y remota VE810R mediante cables HDMI estándar.
• Utilice cables de Cat. 5e para conectar la unidad local VE810L a la unidad
remota VE810R.
Nota: los cables no están incluidos en el paquete. Le recomendamos que
compre cables de alta calidad y de una longitud adecuada, dado que
el cable tiene una infl uencia signifi cativa sobre la calidad de imagen.
Póngase en contacto con su distribuidor para adquirir los juegos de
cables apropiados.
Las longitudes máximas de los cables son las siguientes:
40 m para 1080p
60 m para 1080i
con una profundidad cromática de 24 bits
Confi guration minimale
Périphérique source
• Connecteur(s) de sortie HDMI de type A
Périphérique d’affi chage
• Un périphérique d’affi chage ou un récepteur avec entrée HDMI de type A
Câbles
• Utilisez des câbles HDMI standard pour connecter la source HDMI et le
périphérique d’affi chage aux unités locale VE810L et distante VE810R.
• Utilisez des câbles de catégorie 5e pour connecter l’unité locale VE810L à
l’unité distante VE810R.
Remarque : les câbles ne sont pas fournis avec le produit. Il est vivement
conseillé d’acheter des câbles de haute qualité d’une longueur
appropriée afi n d’éviter que la qualité audio et vidéo n’en soit
affectée. Contactez votre distributeur pour vous procurer les
jeux de câbles corrects.
La longueur maximale des câbles est la suivante :
40 m à 1080p
60 m à 1080i
à une profondeur de couleur de 24 bits
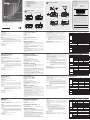
Hardware Review
A
A. VE810L / VE810R Left Side View
1. Power LED (top cover)
2. TMDS Port
3. DDC Port
4. EQ Switch (VE810R only)
B. VE810L / VE810R Right Side View
1. On Line LED (top cover, VE810R only)
2. Power Jack
3. HDMI In Port (VE810L) / HDMI Out Port (VE810R)
4. IR port
Hardware Installation
B
• Before beginning the installation procedure, ensure that all equipment to
be connected is powered off.
• To prevent damage to your installation, make sure that all devices are
properly grounded.
1. Connect one end of the standard HDMI cable to the HDMI Out port on
the source device (e.g. computer or DVD player).
2. Connect the other end of the standard HDMI cable to the HDMI In port
on the VE810L.
3. Use one Cat 5e cable to connect the TMDS port on the VE810L to the
TMDS port on the VE810R.
4. Use a second Cat 5e cable to connect the DDC port on the VE810L to
the DDC port on the VE810R.
5. Plug the monitor’s standard HDMI cable into the HDMI Out port on the
VE810R.
Hardwareübersicht
A
A. VE810L / VE810R – Linke Seite
1. LED-Betriebsanzeige (obere Abdeckung)
2. TMDS-Port
3. DDC-Port
4. EQ-Schalter (nur beim VE810R)
B. VE810L / VE810R – Rechte Seite
1. Online-LED-Anzeige (obere Abdeckung, nur beim VE810R)
2. Stromeingangsbuchse
3. HDMI-Eingang (VE810L) / HDMI-Ausgang (VE810R)
4. Infrarot-Port
Hardware installieren
B
• Schalten Sie vor der Installation alle anzuschließenden Geräte aus.
• Um eine Beschädigung Ihrer Geräte zu vermeiden, müssen alle Geräte
ordnungsgemäß geerdet sein.
1. Verbinden Sie das eine Ende des Standard-HDMI-Kabels mit dem HDMI-
Ausgang der Signalquelle (z.B. Computer oder DVD-Player).
2. Verbinden Sie das andere Ende des Standard-HDMI-Kabels mit dem
HDMI-Eingang am VE810L.
3. Verbinden Sie den TMDS-Port des VE810L mit dem TMDS-Port des
VE810R. Verwenden Sie dazu ein Kat. 5e-Kabel.
4. Verbinden Sie den DDC-Port des VE810L mit dem DDC-Port des
VE810R. Verwenden Sie dazu ein zweites Kat. 5e-Kabel.
5. Verbinden Sie das Standard-HDMI-Kabel des Bildschirms mit dem HDMI-
Ausgang des VE810R.
6. Verbinden Sie das mitgelieferte Netzteil mit dem VE810L und einer
Steckdose**.
Presentación del hardware
A
A. VE810L / VE810R – Lateral izquierdo
1. Indicador de alimentación (tapa superior)
2. Puerto TMDS
3. Puerto DDC
4. Conmutador EQ (VE810R únicamente)
B. VE810L / VE810R – Lateral derecho
1. Indicador LED En línea (tapa superior, VE810R únicamente)
2. Entrada de alimentación
3. Puerto de entrada HDMI (VE810L) / Puerto de salida HDMI (VE810R)
4. Puerto de infrarrojos
Instalar el hardware
B
• Antes de iniciar el proceso de instalación, asegúrese de que todos los
equipos que vaya a conectar estén apagados.
• Para evitar daños en los dispositivos, verifique que todos ellos estén
conectados a tierra correctamente.
1. Conecte un extremo del cable HDMI estándar al puerto de salida HDMI
del dispositivo fuente (p. ej. computadora o reproductor de DVD).
2. Conecte el otro extremo del cable HDMI estándar al puerto de entrada
HDMI de la unidad local VE810L.
3. Utilice un cable de Cat. 5e para conectar el puerto TMDS de la unidad
local VE810L al puerto TMDS de la unidad remota VE810R.
4. Utilice un segundo cable de Cat. 5e para conectar el puerto DDC de la
unidad local VE810L al puerto DDC de la unidad remota VE810R.
Description du matériel
A
A. VE810L / VE810R - Vue latérale gauche
1. Voyant d'alimentation (cache supérieur)
2. Port TMDS
3. Port DDC
4. Bouton EQ (VE810R uniquement)
B. VE810L / VE810R - Vue latérale droite
1. Voyant En ligne (cache supérieur, VE810R uniquement)
2. Prise d’alimentation
3. Port d'entrée HDMI (VE810L) / Port de sortie HDMI (VE810R)
4. Port infrarouge
Installation du matériel
B
• Avant de démarrer la procédure d’installation, assurez-vous que tous les
périphériques à connecter sont éteints.
• Afin d’éviter d’endommager votre installation, vérifiez que tous les
périphériques sont correctement reliés à la terre.
1. Reliez l’une des extrémités du câble HDMI standard au port de sortie
HDMI du périphérique source (ordinateur ou lecteur DVD, par exemple).
2. Reliez l’autre extrémité du câble HDMI standard au port d’entrée HDMI
de l’unité locale VE810L.
3. Utilisez un câble de catégorie 5e pour connecter le port TMDS de l’unité
locale VE810L au port TMDS de l’unité distante VE810R.
4. Utilisez un second câble de catégorie 5e pour connecter le port DDC de
l’unité locale VE810L au port DDC de l’unité distante VE810R.
5. Branchez le câble HDMI standard du moniteur sur le port de sortie HDMI
de l’unité distante VE810R.
6. Using the power adapter supplied with this package, connect the VE810L
to an AC power outlet**.
7. Connect the IR Transmitter or IR Receiver to the VE810L IR port*.
8. Connect the IR Receiver or IR Transmitter to the VE810R IR port*.
9. Turn on the source and display devices.
*Note: The IR Transmitter and IR Receiver can be plugged either into the
VE810L or the VE810R unit depending on the device you want to
control remotely.
**Note: The VE810R unit will get power from the VE810L unit. If the elec-
trical outlet doesn’t provide suffi cient power to supply both units
power, please purchase an additional power adapter from your local
dealer.
Picture Adjustment
Use the EQ switch to adjust the equalization strength to improve a fl ickering
or blinking image. 7 = strongest EQ; 0 = weakest EQ
7. Verbinden Sie den Infrarot-Sender bzw. Infrarot-Empfänger mit dem
Infrarot-Port am VE810L *.
8. Verbinden Sie den Infrarot-Empfänger bzw. Infrarot-Sender mit dem
Infrarot-Port am VE810R *.
9. Schalten Sie die Signalquelle und das Anzeigegerät ein.
*Hinweis: Sie können den Infrarot-Sender bzw. -Empfänger entweder mit
dem VE810L oder dem VE810R verbinden, je nachdem, welches
der beiden Geräte Sie über die Fernbedienung steuern möchten.
**Hinweis: Der VE810R wird vom VE810L mit Strom versorgt. Falls die
Steckdose nicht ausreichend Leistung für beide Geräte zur
Verfügung stellt, bestellen Sie ein weiteres Netzteil bei Ihrem
Fachhändler.
Bild einstellen
Mit dem EQ-Schalter können Sie die Verstärkung bzw. Dämpfung justieren,
um ein fl immerndes oder fl ackerndes Bild zu kompensieren. 7 = stärkste
Kompensation; 0 = schwächste Kompensation
5. Conecte el cable HDMI estándar del monitor al puerto de salida HDMI del
VE810R.
6. Conecte el VE810L a una toma eléctrica mediante el adaptador de
alimentación incluido**.
7. Conecte el emisor o el receptor para infrarrojos al puerto de infrarrojos
del VE810L*.
8. Conecte el receptor o el emisor para infrarrojos al puerto de infrarrojos
del VE810R*.
9. Encienda los dispositivos de visualización y fuente.
*Nota: Puede conectar el emisor o el receptor para infrarrojos o bien al
VE810L o bien al VE810R, dependiendo del dispositivo que desee
controlar con el mando a distancia.
**Nota: La unidad VE810R obtiene su energía eléctrica de la unidad
VE810L. Si encuentra que la toma eléctrica no ofrece sufi ciente
potencia para alimentar a ambas unidades, puede adquirir un
adaptador de alimentación adicional en el establecimiento de su
revendedor habitual.
Ajustar la imagen
Utilice el botón EQ para ajustar el nivel de ecualización con el fi n de mejorar
la calidad de una imagen centelleante o intermitente. 7 = nivel EQ más alto;
0 = nivel EQ más bajo
6. Branchez le VE810L sur une prise de courant à l’aide de l’adaptateur
secteur fourni**.
7. Branchez le transmetteur infrarouge ou le récepteur infrarouge au port
infrarouge de l’unité locale VE810L*.
8. Branchez le récepteur infrarouge ou le transmetteur infrarouge au port
infrarouge de l’unité distante VE810R*.
9. Allumez les périphériques d’affi chage et source.
*Remarque : Le transmetteur infrarouge et le récepteur infrarouge peuvent
être branchés sur l’unité locale VE810L ou sur l’unité
distante VE810R, selon le périphérique que vous souhaitez
commander à distance.
**Remarque : L’unité distante VE810R sera alimentée par l’unité locale
VE810L. Si la prise électrique ne fournit pas suffi samment
de courant pour alimenter les deux unités, veuillez acheter
un adaptateur secteur supplémentaire auprès de votre
revendeur local.
Réglage de l’image
Utilisez le bouton EQ pour régler le niveau d’égalisation afi n d’améliorer la
qualité d’une image tremblante ou vacillante. 7 = niveau EQ le plus élevé ; 0
= niveau EQ le plus faible
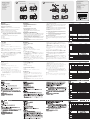
Specifi cations
Function VE810L VE810R
Device Connections 1 N/A
Connectors
Display
HDMI
Out
N/A
1 x HDMI Type A
Female (Black)
Device HDMI In
1 x HDMI Type A
Female (Black)
N/A
Power Jack 1 x DC Jack 1 x DC Jack
Unit to Unit 2 x RJ-45 Female 2 x RJ-45 Female
IR
1 x 3.5 mm phone
jack
1 x 3.5 mm phone
jack
Switches EQ Switch N/A 1 x 8-position switch
LEDs
Power Green Green
On Line N/A Green
HDMI Resolution
HDTV resolutions: 480p, 720p, 1080i.
1080p (1920 x 1080); PC resolutions:
VGA, SVGA, XGA, SXGA, UXGA,
WUXGA (1920 x 1200)
Power Consumption DC5V, 1.52 W DC5V, 1.35W
Transmission Distance Up to 60 m at 1920 x 1080i
Environment
Operation Temp. 0˚–50˚C
Storage Temp. -20˚–60˚C
Humidity 0–80% RH, Non-condensing
Physical
Properties
Housing Metal
Weight 154 g
Dimension 9.00 x 5.50 x 2.50 cm
Technische Daten
Funktion VE810L VE810R
Geräteanschlüsse 1 --
Anschlüsse
Anzeige
HDMI-
Ausgang
--
1 x HDMI Typ A
Weiblein (schwarz)
Gerät HDMI-Eingang
1 x HDMI Typ A
Weiblein (schwarz)
--
Stromeingangs buchse
1 x Stromeingangs-
buchse
1 x Stromeingangs-
buchse
Gerät an Gerät 2 x RJ-45 Weiblein 2 x RJ-45 Weiblein
Infrarot
1 x 3,5-mm-
Klinkenbuchse
1 x 3,5-mm-
Klinkenbuchse
Schalter EQ-Schalter --
1 x Schalter mit 8
Stufen
LED-
Anzeigen
Betrieb Grün Grün
Online -- Grün
HDMI-Aufl ösung
HDTV-Aufl ösungen: 480p, 720p, 1080i.
1080p (1920 x 1080); PC-Aufl ösungen:
VGA, SVGA, XGA, SXGA, UXGA,
WUXGA (1920 x 1200)
Stromverbrauch 5 V=, 1,52 W 5 V=, 1,35 W
Übertragungsweg bis zu 60 m bei 1920 x 1080i
Umgebung
Betriebstempe ratur 0 – 50°C
Lagertemperatur -20 – 60°C
Feuchtigkeit 0 -80% rel. Luftfeuchte, nicht kondensierend
Physische
Eigenschaften
Gehäuse Metall
Gewicht 154 g
Abmessungen 9,00 x 5,50 x 2,50 cm
Especifi caciones
Función VE810L VE810R
Conectores para dispositivos 1 --
Conectores
Dispositivo de
visualización
Salida
HDMI
--
1 HDMI de tipo A
hembra (negro)
Dispositivo
Entrada
HDMI
1 HDMI de tipo A
hembra (negro)
--
Entrada de
alimentación
1 toma de c.c. 1 toma de c.c.
Puerto de unidad a
unidad
2 conectores RJ-45
hembra
2 conectores RJ-45
hembra
Infrarrojos
1 x toma de tipo clavija
de 3,5 mm
1 x toma de tipo clavija
de 3,5 mm
Interrupto-
res
Conmutador EQ --
1 conmutador de 8
posiciones
Indicadores
LED
Alimentación Verde Verde
En línea -- Verde
Resolución HDMI de alta defi nición
Resoluciones HDTV: 480p, 720p, 1080i.
1080p (1920 x 1080); resoluciones PC: VGA,
SVGA, XGA, SXGA, UXGA,
WUXGA (1920 x 1200)
Consumo 5 V de c.c., 1,52 W 5 V de c.c., 1,35 W
Distancia de transmisión Hasta 60 m a 1920 x 1080i
Entorno
Temperatura de
funcionamiento
0 a 50 °C
Temperatura de
almacenamiento
-20 a 60 °C
Humedad 0 a 80% de HR, sin condensar
Propiedades
físicas
Carcasa Metálica
Peso 154 g
Dimensiones 9,00 x 5,50 x 2,50 cm
Caractéristiques techniques
Fonction VE810L VE810R
Connexions des périphériques 1 N/D
Connec teurs
Affi chage
Sortie
HDMI
N/D
1 HDMI de type A
femelle (noir)
Périphé rique
Entrée
HDMI
1 HDMI de type A
femelle (noir)
N/D
Prise d’alimentation
1 prise d’alimentation
CC
1 prise d’alimentation
CC
Connexion d'unité à
unité
2 connecteurs RJ-45
femelle
2 connecteurs RJ-45
femelle
Infrarouge (IR) 1 prise jack 3,5 mm 1 prise jack 3,5 mm
Interrup teurs Bouton EQ N/D
1 commutateur à
8 positions
Voyants
Alimentation Vert Vert
En ligne N/D Vert
Résolution HDMI
Résolutions HDTV : 480p, 720p, 1080i.
1080p (1920 x 1080) ; résolutions PC : VGA,
SVGA, XGA, SXGA, UXGA,
WUXGA (1920 x 1200)
Consommation électrique 5 V CC, 1,52 W 5 V CC, 1,35 W
Distance de transmission Jusqu'à 60 m à 1920 x 1080i
Environnement
Température de
fonctionnement
0 à 50°C
Température de
stockage
-20 à 60°C
Humidité
Humidité relative de 0 à 80 %, sans
condensation
Propriétés
physiques
Boîtier Métallique
Poids 154 g
Dimensions 9,00 x 5,50 x 2,50 cm
Hardware Installation
B
VE810L Left Side View VE810R Left Side View
VE810L Right Side View VE810R Right Side View
Package Contents
1 VE810L (Local Unit) HDMI Extender
1 VE810R (Remote Unit) HDMI Extender
1 Power Adapter (Local Unit)
1 Mounting Kit
1 IR Transmitter
1 IR Receiver
1 User Instructions
DDC TMDS
2
1
3
2
3
4
HDMI IN
2
3
4
1
TMDS
EQ
DDC
2
1
3
4
HDMI OUT
VE810L Right Side View
HDMI Cable
HDMI Cable
VE810R Right Side View
HDMI IN
1
2
5
6
7
DDC
TMDS
EQ
Cat 5e Cable
DDC TMDS
VE810L Left Side View
VE810R Left Side View
HDMI OUT
VE810L Right Side View VE810R Right Side View
HDMI IN
1
2
3
4
5
8
6
7
© Copyright 2015 ATEN
®
International Co., Ltd.
ATEN and the ATEN logo are trademarks of ATEN International Co., Ltd. All rights reserved. All
other trademarks are the property of their respective owners.
This product is RoHS compliant.
Part No. PAPE-1285-451G Printing Date: 02/2015
HDMI Extender with IR Control
Quick Start Guide
VE810
ATEN VanCryst
™
Important Notice
Considering environmental protection, ATEN does not provide a fully
printed user manual for this product. If the information contained in the
Quick Start Guide is not enough for you to confi gure and operate your
product, please visit our website www.aten.com, and download
the full user manual.
Online Registration
http://eservice.aten.com
Technical Phone Support
International:
886-2-86926959
All information, documentation, firmware, software utilities, and
specifi cations contained in this package are subject to change without
prior notification by the manufacturer. Please visit our website http://
www.aten.com/download/?cid=dds for the most up-to-date versions.
이 기기는 업무용(A급) 전자파 적합기기로서 판매자 또는 사용자는 이
점을 주의하시기 바라며, 가정외의 지역에서 사용하는 것을 목적으로
합니다.
EMC Information
FEDERAL COMMUNICATIONS COMMISSION INTERFERENCE STATEMENT:
This equipment has been tested and found to comply with the limits for a Class A
digital device, pursuant to Part 15 of the FCC Rules. These limits are designed to provide
reasonable protection against harmful interference when the equipment is operated
in a commercial environment. This equipment generates, uses, and can radiate radio
frequency energy and, if not installed and used in accordance with the instruction
manual, may cause harmful interference to radio communications. Operation of this
equipment in a residential area is likely to cause harmful interference in which case the
user will be required to correct the interference at his own expense.
FCC Caution: Any changes or modifi cations not expressly approved by the party
responsible for compliance could void the user's authority to operate this equipment.
CE Warning: This is a class A product. In a domestic environment this product may cause
radio interference in which case the user may be required to take adequate measures.
Suggestion: Shielded twisted pair (STP) cables must be used with the unit to ensure
compliance with FCC & CE standards.
This device complies with Part 15 of the FCC Rules. Operation is subject to the following
two conditions:(1) this device mat not cause harmful interference, and(2) this device
must accept any interference received, including interference that may cause undesired
operation.
The following contains information that relates to China:
North America:
1-888-999-ATEN Ext: 4988
United Kingdom:
44-8-4481-58923
www.aten.com
www.aten.com
www.aten.com
www.aten.com
Hardware Review
A
La página se está cargando...
Transcripción de documentos
Package Contents B 1 VE810L (Local Unit) HDMI Extender 1 VE810R (Remote Unit) HDMI Extender 1 Power Adapter (Local Unit) 1 Mounting Kit 1 IR Transmitter 1 IR Receiver 1 User Instructions Important Notice Hardware Installation Considering environmental protection, ATEN does not provide a fully printed user manual for this product. If the information contained in the Quick Start Guide is not enough for you to configure and operate your product, please visit our website www.aten.com, and download the full user manual. Online Registration http://eservice.aten.com Technical Phone Support International: 886-2-86926959 1 North America: 1-888-999-ATEN Ext: 4988 United Kingdom: 44-8-4481-58923 The following contains information that relates to China: A VE810L Left Side View VE810R Left Side View 1 HDMI Cable 2 HDMI Cable Hardware Review 6 1 ATEN VanCryst™ HDMI OUT HDMI IN VE810L Right Side View VE810 HDMI Extender with IR Control Quick Start Guide TMDS DDC TMDS DDC EQ 2 3 2 3 4 VE810L Right Side View 5 7 VE810R Right Side View EMC Information FEDERAL COMMUNICATIONS COMMISSION INTERFERENCE STATEMENT: This equipment has been tested and found to comply with the limits for a Class A digital device, pursuant to Part 15 of the FCC Rules. These limits are designed to provide reasonable protection against harmful interference when the equipment is operated in a commercial environment. This equipment generates, uses, and can radiate radio frequency energy and, if not installed and used in accordance with the instruction manual, may cause harmful interference to radio communications. Operation of this equipment in a residential area is likely to cause harmful interference in which case the user will be required to correct the interference at his own expense. FCC Caution: Any changes or modifications not expressly approved by the party responsible for compliance could void the user's authority to operate this equipment. CE Warning: This is a class A product. In a domestic environment this product may cause radio interference in which case the user may be required to take adequate measures. Suggestion: Shielded twisted pair (STP) cables must be used with the unit to ensure compliance with FCC & CE standards. 8 VE810R Left Side View VE810L Left Side View VE810R Right Side View 1 © Copyright 2015 ATEN® International Co., Ltd. TMDS TMDS DDC DDC This device complies with Part 15 of the FCC Rules. Operation is subject to the following two conditions:(1) this device mat not cause harmful interference, and(2) this device must accept any interference received, including interference that may cause undesired operation. EQ ATEN and the ATEN logo are trademarks of ATEN International Co., Ltd. All rights reserved. All other trademarks are the property of their respective owners. 3 This product is RoHS compliant. Part No. PAPE-1285-451G HDMI IN Printing Date: 02/2015 2 3 HDMI OUT 2 4 3 4 Cat 5e Cable 이 기기는 업무용(A급) 전자파 적합기기로서 판매자 또는 사용자는 이 점을 주의하시기 바라며, 가정외의 지역에서 사용하는 것을 목적으로 합니다. All information, documentation, firmware, software utilities, and specifications contained in this package are subject to change without prior notification by the manufacturer. Please visit our website http:// www.aten.com/download/?cid=dds for the most up-to-date versions. 4 VE810 HDMI Extender with IR Control User Guide www.aten.com Requirements Hardware Review • HDMI Type A output connector(s) • A display device or receiver with an HDMI Type A input connector 1. Power LED (top cover) 2. TMDS Port 3. DDC Port 4. EQ Switch (VE810R only) Cables B. VE810L / VE810R Right Side View Source Device Display Device • Use Standard HDMI cables to connect the HDMI source and display device to the VE810L and the VE810R • Use Cat 5e cable to connect the VE810L to the VE810R Note: Cables are not included in this package. We strongly recommend that you purchase high-quality cables of appropriate length since this will affect the quality of the audio and video display. Contact your dealer to purchase the correct cable sets. Maximum cable distances are as follows: 40 m at 1080p 60 m at 1080i @ 24-bit color depth 6. Using the power adapter supplied with this package, connect the VE810L to an AC power outlet**. 7. Connect the IR Transmitter or IR Receiver to the VE810L IR port*. 8. Connect the IR Receiver or IR Transmitter to the VE810R IR port*. 9. Turn on the source and display devices. A A. VE810L / VE810R Left Side View 1. On Line LED (top cover, VE810R only) 2. Power Jack 3. HDMI In Port (VE810L) / HDMI Out Port (VE810R) 4. IR port *Note: The IR Transmitter and IR Receiver can be plugged either into the VE810L or the VE810R unit depending on the device you want to control remotely. **Note: The VE810R unit will get power from the VE810L unit. If the electrical outlet doesn’t provide sufficient power to supply both units power, please purchase an additional power adapter from your local dealer. Hardware Installation Picture Adjustment B • Before beginning the installation procedure, ensure that all equipment to be connected is powered off. • To prevent damage to your installation, make sure that all devices are properly grounded. Use the EQ switch to adjust the equalization strength to improve a flickering or blinking image. 7 = strongest EQ; 0 = weakest EQ Specifications Function Device Connections Display VE810L 1 HDMI Out Device HDMI In Connectors Power Jack Unit to Unit IR Switches LEDs EQ Switch Power On Line HDMI Resolution Power Consumption Transmission Distance Operation Temp. Environment Storage Temp. Humidity Housing Physical Weight Properties Dimension 1. Connect one end of the standard HDMI cable to the HDMI Out port on the source device (e.g. computer or DVD player). 2. Connect the other end of the standard HDMI cable to the HDMI In port on the VE810L. 3. Use one Cat 5e cable to connect the TMDS port on the VE810L to the TMDS port on the VE810R. 4. Use a second Cat 5e cable to connect the DDC port on the VE810L to the DDC port on the VE810R. 5. Plug the monitor’s standard HDMI cable into the HDMI Out port on the VE810R. VE810R N/A 1 x HDMI Type A Female (Black) N/A 1 x HDMI Type A N/A Female (Black) 1 x DC Jack 1 x DC Jack 2 x RJ-45 Female 2 x RJ-45 Female 1 x 3.5 mm phone 1 x 3.5 mm phone jack jack N/A 1 x 8-position switch Green Green N/A Green HDTV resolutions: 480p, 720p, 1080i. 1080p (1920 x 1080); PC resolutions: VGA, SVGA, XGA, SXGA, UXGA, WUXGA (1920 x 1200) DC5V, 1.52 W DC5V, 1.35W Up to 60 m at 1920 x 1080i 0˚–50˚C -20˚–60˚C 0–80% RH, Non-condensing Metal 154 g 9.00 x 5.50 x 2.50 cm Guide de l'utilisateur du prolongateur HDMI avec télécommande infrarouge www.aten.com Configuration minimale Description du matériel • Connecteur(s) de sortie HDMI de type A • Un périphérique d’affichage ou un récepteur avec entrée HDMI de type A 1. Voyant d'alimentation (cache supérieur) 2. Port TMDS 3. Port DDC 4. Bouton EQ (VE810R uniquement) Câbles B. VE810L / VE810R - Vue latérale droite • Utilisez des câbles HDMI standard pour connecter la source HDMI et le périphérique d’affichage aux unités locale VE810L et distante VE810R. • Utilisez des câbles de catégorie 5e pour connecter l’unité locale VE810L à l’unité distante VE810R. 1. Voyant En ligne (cache supérieur, VE810R uniquement) 2. Prise d’alimentation 3. Port d'entrée HDMI (VE810L) / Port de sortie HDMI (VE810R) 4. Port infrarouge Remarque : les câbles ne sont pas fournis avec le produit. Il est vivement conseillé d’acheter des câbles de haute qualité d’une longueur appropriée afin d’éviter que la qualité audio et vidéo n’en soit affectée. Contactez votre distributeur pour vous procurer les jeux de câbles corrects. Installation du matériel La longueur maximale des câbles est la suivante : 40 m à 1080p 60 m à 1080i à une profondeur de couleur de 24 bits 1. Reliez l’une des extrémités du câble HDMI standard au port de sortie HDMI du périphérique source (ordinateur ou lecteur DVD, par exemple). 2. Reliez l’autre extrémité du câble HDMI standard au port d’entrée HDMI de l’unité locale VE810L. 3. Utilisez un câble de catégorie 5e pour connecter le port TMDS de l’unité locale VE810L au port TMDS de l’unité distante VE810R. 4. Utilisez un second câble de catégorie 5e pour connecter le port DDC de l’unité locale VE810L au port DDC de l’unité distante VE810R. 5. Branchez le câble HDMI standard du moniteur sur le port de sortie HDMI de l’unité distante VE810R. Périphérique source Périphérique d’affichage A A. VE810L / VE810R - Vue latérale gauche B • Avant de démarrer la procédure d’installation, assurez-vous que tous les périphériques à connecter sont éteints. • Afin d’éviter d’endommager votre installation, vérifiez que tous les périphériques sont correctement reliés à la terre. 6. Branchez le VE810L sur une prise de courant à l’aide de l’adaptateur secteur fourni**. 7. Branchez le transmetteur infrarouge ou le récepteur infrarouge au port infrarouge de l’unité locale VE810L*. 8. Branchez le récepteur infrarouge ou le transmetteur infrarouge au port infrarouge de l’unité distante VE810R*. 9. Allumez les périphériques d’affichage et source. *Remarque : Le transmetteur infrarouge et le récepteur infrarouge peuvent être branchés sur l’unité locale VE810L ou sur l’unité distante VE810R, selon le périphérique que vous souhaitez commander à distance. **Remarque : L’unité distante VE810R sera alimentée par l’unité locale VE810L. Si la prise électrique ne fournit pas suffisamment de courant pour alimenter les deux unités, veuillez acheter un adaptateur secteur supplémentaire auprès de votre revendeur local. Réglage de l’image Utilisez le bouton EQ pour régler le niveau d’égalisation afin d’améliorer la qualité d’une image tremblante ou vacillante. 7 = niveau EQ le plus élevé ; 0 = niveau EQ le plus faible Caractéristiques techniques Fonction Connexions des périphériques VE810L 1 VE810R N/D 1 HDMI de type A femelle (noir) Sortie N/D HDMI Entrée 1 HDMI de type A Périphérique N/D HDMI femelle (noir) Connecteurs 1 prise d’alimentation 1 prise d’alimentation Prise d’alimentation CC CC Connexion d'unité à 2 connecteurs RJ-45 2 connecteurs RJ-45 unité femelle femelle Infrarouge (IR) 1 prise jack 3,5 mm 1 prise jack 3,5 mm 1 commutateur à Interrupteurs Bouton EQ N/D 8 positions Alimentation Vert Vert Voyants En ligne N/D Vert Résolutions HDTV : 480p, 720p, 1080i. 1080p (1920 x 1080) ; résolutions PC : VGA, Résolution HDMI SVGA, XGA, SXGA, UXGA, WUXGA (1920 x 1200) Consommation électrique 5 V CC, 1,52 W 5 V CC, 1,35 W Distance de transmission Jusqu'à 60 m à 1920 x 1080i Température de 0 à 50°C fonctionnement Température de Environnement -20 à 60°C stockage Humidité relative de 0 à 80 %, sans Humidité condensation Boîtier Métallique Propriétés Poids 154 g physiques Dimensions 9,00 x 5,50 x 2,50 cm Affichage HDMI-Verlängerung mit Infrarot-Fernbedienung Benutzerhandbuch www.aten.com Voraussetzungen Hardwareübersicht • HDMI Typ A-Ausgang bzw. -Ausgänge 1. LED-Betriebsanzeige (obere Abdeckung) 2. TMDS-Port 3. DDC-Port 4. EQ-Schalter (nur beim VE810R) Signalquelle Anzeigegerät • Anzeigegerät oder Receiver mit HDMI Typ A -Eingang Kabel • Verbinden Sie die HDMI-Signalquelle und das Anzeigegerät mit dem VE810L und dem VE810R. Verwenden Sie dazu zwei Standard-HDMIKabel. • Verbinden Sie den VE810L mit dem VE810R. Verwenden Sie dazu Kat. 5e-Kabel. Hinweis: Die Kabel sind nicht im Lieferumfang enthalten. Wir empfehlen Ihnen, nur hochwertige Kabel geeigneter Länge zu kaufen, da diese Auswirkungen auf die Ton- und Bildqualität haben. Wenden Sie sich dazu an Ihren Fachhändler. Die maximalen Kabellängen sind Folgende: 40 m für 1080p 60 m für 1080i bei 24 Bit Farbtiefe 7. Verbinden Sie den Infrarot-Sender bzw. Infrarot-Empfänger mit dem Infrarot-Port am VE810L *. 8. Verbinden Sie den Infrarot-Empfänger bzw. Infrarot-Sender mit dem Infrarot-Port am VE810R *. 9. Schalten Sie die Signalquelle und das Anzeigegerät ein. A A. VE810L / VE810R – Linke Seite B. VE810L / VE810R – Rechte Seite 1. Online-LED-Anzeige (obere Abdeckung, nur beim VE810R) 2. Stromeingangsbuchse 3. HDMI-Eingang (VE810L) / HDMI-Ausgang (VE810R) 4. Infrarot-Port Hardware installieren B • Schalten Sie vor der Installation alle anzuschließenden Geräte aus. • Um eine Beschädigung Ihrer Geräte zu vermeiden, müssen alle Geräte ordnungsgemäß geerdet sein. *Hinweis: Sie können den Infrarot-Sender bzw. -Empfänger entweder mit dem VE810L oder dem VE810R verbinden, je nachdem, welches der beiden Geräte Sie über die Fernbedienung steuern möchten. **Hinweis: Der VE810R wird vom VE810L mit Strom versorgt. Falls die Steckdose nicht ausreichend Leistung für beide Geräte zur Verfügung stellt, bestellen Sie ein weiteres Netzteil bei Ihrem Fachhändler. Bild einstellen Mit dem EQ-Schalter können Sie die Verstärkung bzw. Dämpfung justieren, um ein flimmerndes oder flackerndes Bild zu kompensieren. 7 = stärkste Kompensation; 0 = schwächste Kompensation 1. Verbinden Sie das eine Ende des Standard-HDMI-Kabels mit dem HDMIAusgang der Signalquelle (z.B. Computer oder DVD-Player). 2. Verbinden Sie das andere Ende des Standard-HDMI-Kabels mit dem HDMI-Eingang am VE810L. 3. Verbinden Sie den TMDS-Port des VE810L mit dem TMDS-Port des VE810R. Verwenden Sie dazu ein Kat. 5e-Kabel. 4. Verbinden Sie den DDC-Port des VE810L mit dem DDC-Port des VE810R. Verwenden Sie dazu ein zweites Kat. 5e-Kabel. 5. Verbinden Sie das Standard-HDMI-Kabel des Bildschirms mit dem HDMIAusgang des VE810R. 6. Verbinden Sie das mitgelieferte Netzteil mit dem VE810L und einer Steckdose**. Technische Daten Funktion Geräteanschlüsse Anzeige Anschlüsse HDMIAusgang VE810L 1 -- 1 x HDMI Typ A Gerät HDMI-Eingang Weiblein (schwarz) 1 x StromeingangsStromeingangsbuchse buchse Gerät an Gerät 2 x RJ-45 Weiblein 1 x 3,5-mmInfrarot Klinkenbuchse Schalter EQ-Schalter LEDAnzeigen Betrieb Online HDMI-Auflösung Stromverbrauch Übertragungsweg Betriebstemperatur Umgebung Lagertemperatur Feuchtigkeit Gehäuse Physische Gewicht Eigenschaften Abmessungen VE810R -1 x HDMI Typ A Weiblein (schwarz) -- 1 x Stromeingangsbuchse 2 x RJ-45 Weiblein 1 x 3,5-mmKlinkenbuchse 1 x Schalter mit 8 -Stufen Grün Grün -Grün HDTV-Auflösungen: 480p, 720p, 1080i. 1080p (1920 x 1080); PC-Auflösungen: VGA, SVGA, XGA, SXGA, UXGA, WUXGA (1920 x 1200) 5 V=, 1,52 W 5 V=, 1,35 W bis zu 60 m bei 1920 x 1080i 0 – 50°C -20 – 60°C 0 -80% rel. Luftfeuchte, nicht kondensierend Metall 154 g 9,00 x 5,50 x 2,50 cm Alargador de HDMI con mando a distancia por infrarrojos Manual del usuario www.aten.com Requisitos Presentación del hardware • Conector(es) de salida HDMI de tipo A • Un dispositivo de visualización o un receptor con entrada HDMI de tipo A 1. Indicador de alimentación (tapa superior) 2. Puerto TMDS 3. Puerto DDC 4. Conmutador EQ (VE810R únicamente) Cables B. VE810L / VE810R – Lateral derecho Dispositivo fuente Dispositivo de visualización • Conecte la fuente HDMI y el dispositivo de visualización a las unidades local VE810L y remota VE810R mediante cables HDMI estándar. • Utilice cables de Cat. 5e para conectar la unidad local VE810L a la unidad remota VE810R. Nota: los cables no están incluidos en el paquete. Le recomendamos que compre cables de alta calidad y de una longitud adecuada, dado que el cable tiene una influencia significativa sobre la calidad de imagen. Póngase en contacto con su distribuidor para adquirir los juegos de cables apropiados. Las longitudes máximas de los cables son las siguientes: 40 m para 1080p 60 m para 1080i con una profundidad cromática de 24 bits A A. VE810L / VE810R – Lateral izquierdo 1. Indicador LED En línea (tapa superior, VE810R únicamente) 2. Entrada de alimentación 3. Puerto de entrada HDMI (VE810L) / Puerto de salida HDMI (VE810R) 4. Puerto de infrarrojos Instalar el hardware B • Antes de iniciar el proceso de instalación, asegúrese de que todos los equipos que vaya a conectar estén apagados. • Para evitar daños en los dispositivos, verifique que todos ellos estén conectados a tierra correctamente. 1. Conecte un extremo del cable HDMI estándar al puerto de salida HDMI del dispositivo fuente (p. ej. computadora o reproductor de DVD). 2. Conecte el otro extremo del cable HDMI estándar al puerto de entrada HDMI de la unidad local VE810L. 3. Utilice un cable de Cat. 5e para conectar el puerto TMDS de la unidad local VE810L al puerto TMDS de la unidad remota VE810R. 4. Utilice un segundo cable de Cat. 5e para conectar el puerto DDC de la unidad local VE810L al puerto DDC de la unidad remota VE810R. 5. Conecte el cable HDMI estándar del monitor al puerto de salida HDMI del VE810R. 6. Conecte el VE810L a una toma eléctrica mediante el adaptador de alimentación incluido**. 7. Conecte el emisor o el receptor para infrarrojos al puerto de infrarrojos del VE810L*. 8. Conecte el receptor o el emisor para infrarrojos al puerto de infrarrojos del VE810R*. 9. Encienda los dispositivos de visualización y fuente. *Nota: Puede conectar el emisor o el receptor para infrarrojos o bien al VE810L o bien al VE810R, dependiendo del dispositivo que desee controlar con el mando a distancia. **Nota: La unidad VE810R obtiene su energía eléctrica de la unidad VE810L. Si encuentra que la toma eléctrica no ofrece suficiente potencia para alimentar a ambas unidades, puede adquirir un adaptador de alimentación adicional en el establecimiento de su revendedor habitual. Ajustar la imagen Utilice el botón EQ para ajustar el nivel de ecualización con el fin de mejorar la calidad de una imagen centelleante o intermitente. 7 = nivel EQ más alto; 0 = nivel EQ más bajo Especificaciones Función Conectores para dispositivos Dispositivo de Salida visualización HDMI Entrada Dispositivo HDMI Conectores Entrada de alimentación Puerto de unidad a unidad Infrarrojos InterruptoConmutador EQ res Indicadores Alimentación LED En línea Resolución HDMI de alta definición Consumo Distancia de transmisión Temperatura de funcionamiento Entorno Temperatura de almacenamiento Humedad Carcasa Propiedades Peso físicas Dimensiones VE810L 1 -1 HDMI de tipo A hembra (negro) VE810R -1 HDMI de tipo A hembra (negro) 1 toma de c.c. -1 toma de c.c. 2 conectores RJ-45 2 conectores RJ-45 hembra hembra 1 x toma de tipo clavija 1 x toma de tipo clavija de 3,5 mm de 3,5 mm 1 conmutador de 8 -posiciones Verde Verde -Verde Resoluciones HDTV: 480p, 720p, 1080i. 1080p (1920 x 1080); resoluciones PC: VGA, SVGA, XGA, SXGA, UXGA, WUXGA (1920 x 1200) 5 V de c.c., 1,52 W 5 V de c.c., 1,35 W Hasta 60 m a 1920 x 1080i 0 a 50 °C -20 a 60 °C 0 a 80% de HR, sin condensar Metálica 154 g 9,00 x 5,50 x 2,50 cm-
 1
1
-
 2
2


ATEN VE810 Guía de inicio rápido
- Categoría
- Extensores AV
- Tipo
- Guía de inicio rápido
- Este manual también es adecuado para
en otros idiomas
- français: ATEN VE810 Guide de démarrage rapide
- italiano: ATEN VE810 Guida Rapida
- English: ATEN VE810 Quick start guide
- Deutsch: ATEN VE810 Schnellstartanleitung
- 日本語: ATEN VE810 クイックスタートガイド
Artículos relacionados
-
ATEN VE800 Guía de inicio rápido
-
ATEN VE600A-AT-U Manual de usuario
-
-
ATEN VE800R Guía del usuario
-
ATEN VE803-AT-U Guía de inicio rápido
-
ATEN VS1808T-AT-U Guía de inicio rápido
-
ATEN VC180 Guía del usuario
-
ATEN VB802 Guía de inicio rápido
-
ATEN VS184 Guía de inicio rápido
-
ATEN VE806R Guía de inicio rápido