
CP-MN031
User Manual

2
CONTENTS
Before Use
Warnings for Safe Use / Precautions for Safe Use
Part Names / Accessories
Matters To Check / How To Use
Water Purification Pipe Layout and Water Purification System /
Expected Replacement Cycle of Filters
Check before Reporting Malfunction / Troubleshooting
Product Specifications / Standards for Settling Consumer Disputes /
On Our Service
3~5
6
7~9
10
11
During Use
Asking for Repairs
Service Guide

3
ENG
Warnings
・
Do not bend, tie or pull the Power Cord by force.
・ If unplugging the product, make sure to hold the Power Plug and not the Power Cord.
・ In case of water leakage or cleaning, please unplug the device first.
・ Make sure the power cord is not under a heavy object or near sharp objects. Take special caution to
ensure that it is not damaged by pets.
・ Please also unplug the product before inspection, repair or replacement of its parts.
・ Stop using the product if the Power Cord or the Power Plug is damaged or the Power Outlet is shaking,
and contact our Customer Service Center.
・ Wipe off any foreign substance on the Power Plug with a dry cloth.
・ Do not use other than the following: U.S.: 120V / 60Hz; Europe: 220V / 50Hz; U.K.: 240V / 50Hz; China:
220V / 50Hz; and Vietnam: 220V / 60Hz.
・ If putting in or pulling out the Power Plug, first remove moisture on your hands and then put in or pull out
the Power Plug by holding the Power Plug.
・ If water enters the power supply area, unplug the product and dry it completely before use.
・ In case of a long period of non-use, pull out the plug and keep it safe after closing the Tap Water Supply
Valve and emptying the remaining water inside the tank.
About the Power Supply
Warnings for Safe Use
•This symbol indicates a potentially dangerous situation
under special circumstances.
•Please read the details carefully and follow the
instructions to avoid dangerous situations.
Potentially dangerous situation that
can cause serious injuries or death if
not avoided.
Potentially dangerous situation that
can cause minor injuries if not
avoided.
P
lease comply with the ‘Warnings for Safe Use’ to ensure safe and proper use of the product and prevent
accidents and dangerous situations.
Warnings
Caution

Warnings for Safe Use
4
・ Do not place the purifier in humid or dusty areas.
・ Do not install the product near the bathroom.
・ Do not place it in a bumpy or slanted area. Please avoid placing it on a rug, cushion or laminated floor.
・ Please make sure to install the device in clean areas.
・ Avoid direct sunlight and high temperature.
・ Make sure that the length of water supply tube doesn’t exceed 5 m from the Tap Water Supply Valve.
・ Do not place any heating device, such as a microwave oven, electric oven or toaster, or inflammables,
such as candles, gas containers, and lighters on top of the product.
・ Be careful with the water leaking into the device.
・ Pay attention for children or anyone not to control the control panel too often.
・ Do not place it in an area where there’s a risk of gas leak or near a cooling or heating device.
・ Make sure to supply the tap water and install the Tap Water Supply Valve towards the cold water pipe.
・ Do not place the device outside or in an area that falls below 0℃?.
・ After completing installation, please keep it clean and well-maintained.
・ If placing the product in a top-sink position, always use cold water or purified water. (Do not use hot
water.)
・ Do not place chemicals, water bottles or small metal materials on top of the product.
・ Do not disassemble or remodel the product.
・ After installing, please make sure that tubes and hoses are firmly connected and that there is no leakage.
Installation Guide
Warnings

Warnings for Safe Use
5
ENG
About How To Use
・ If you find that it is leaking or there is a pool of water around the product, close the Tap Water Supply
Valve first, turn it off and then unplug the product. After that, please contact our Customer Service Center.
・ Do not pull the Power Cord or hose, nor grab the faucet when moving the product.
・ If you smell burning or see smoke arising from the device, unplug it immediately and close the Tap Water
Supply Valve. After that please contact our Customer Service Center.
・ Do not put plates or any metallic materials on the top of the product.
・ Make sure the cover for replacing a filter of the product is completely closed before use.
・ If left idle for a long time, please make sure the water gets dispensed for about 10 minutes before using
the device.
・ Replace the filter according to the replacement cycle.
・ Always use the genuine CUCKOO filters for the product.
・ If you have not used the External Faucet for a long time, it can be polluted.
・ If reusing it, it will start dispensing after draining remaining water for about one to two minutes.
Warnings
Ca
ut
i
o
n
・ Do not clean the product using benzene or thinner.
・ While using the product, do not pull off the tube at the back.
・ Do not move the device while it’s operating.
・ Please avoid using the dispensed water for filling a fish bowl or an aquarium.
Cautio
n

Part Names /Accessories Water Purification Pipe
Layout / Water Purification System
6
Control Panel
< Back >
C
ontrol Panel
Faucet
Cover for Replacing Filter
Power Cord
Tray
※
Actual product may differ from the image shown.
External Outlet
Tap Connector
Tray Grille
Outflow button - To dispense water manually
1
Non-Stop Flow button - To dispense continuously
3
One Cup button - To dispense one cup of water
2
Replacement Filter button - Used to replace filters.
(When a filter needs to be replaced, the Filter LED will be turned on.)
5
Button Lock button - To lock functions of the product for safety (Press the
button for two seconds and the function is set or canceled.)
4
Dispense button
One
Cup
Non-Stop
Flow
Button
Lock
Filter
Replacement
< CP-MN031 Series >
Part names
Accessories
User Manual
Other subsidiary materials for
installation
Water Purification Pipe Layout and Water Purification System
CP-MN031 Series
Level 1
PRE CARBON 2.0 FILTER
NANO POSITIVE PLUS FILTER
MINERALIZER FILTER
It absorbs residual chlorine, trihalomethane, unpleasant tastes and odor.
It removes minute particles, germs (pseudomonas aeruginosa, colon bacillus,
staphylococcus aureus), viruses (Norovirus), and heavy metals (lead, iron, aluminum).
It adds minerals to the water, providing healthier and tastier water.
Level 2
Level 3
※
Filter is a critical component for a water filtration system.
※
Using a non-CUCKOO filter or using a genuine CUCKOO filter for a long time may result in diminished filter performance.
LEVEL Filter Name Filter Function
MINERALIZER
FILTER
Valve
Outlet
NANO
POSITIVE
PLUS FILTER
PRE CARBON
2.0 FILTER
Pressure reducing
valve 3K
※
Actual product may differ from the image shown.
< Front >

Matters To Check / How To Use
7
ENG
Please make sure there’s enough space for installation.
▶
For convenience in replacing the filters, please place the
product 20 cm or further away from the wall, and place the
product where the length of the tap water supply tube is 5m or
shorter from the Tap Water Supply Valve.
Precautions for Place of Installation
Please be careful when you move the product.
▶
Please do not tilt it more than 45 degrees when moving it.
Please also make sure to plug it in at least about 30 minutes
after moving the product and filling the tank.
If you do not use the product for a long time, close the Tap Water Supply Valve and unplug the product.
Do not use other than the following: U.S.: 120V / 60Hz; Europe: 220V / 50Hz; U.K.: 240V / 50Hz; China: 220V
/ 50Hz; and Vietnam: 220V / 60Hz. Please make sure to plug it into a proper outlet.
Caution
Matters To Check before Use
Matters To Check before Installation
❶ Open the Tap Water Supply Valve.
▶
Turn the tap on first to check if the water is properly supplied. After that, open the Tap Water Supply Valve.
❷ Plug in the product.
▶
Check for water disconnection before plug-in.
❸ If it has been left idle for a long time or is newly installed, please leave it to drain for about 10 minutes..
❹ Empty the tray on a regular basis.
❶ Manual Outflow Function
▶
The filtered water will be dispensed manually.
▶
Press the Outflow button in Standby mode to dispense the water.
☞
Water will be dispensed only after pressing the Outflow button.
☞
If you press the Outflow button for more than 30 seconds, it will stop dispensing water.
Take your finger off the button and then press it again to get water.
❷
One Cup Mode (Dispensed quantity varies in accordance with water pressure.)
▶
One-cup quantity will be dispensed.
▶
Press the One Cup button in Standby mode to enter the One Cup Standby mode.
Then press the Outflow button to dispense water.
☞
If left idle for more than 7 seconds in the One Cup Standby mode, it will return to Standby mode.
☞ Pressing any of the buttons in this mode will stop dispensing the water.
☞ The default of dispensed quantity of One Cup is around 150 cc.
❸
Non-Stop Flow mode (Dispensed quantity varies in accordance with water
pressure.)
▶
The water will be dispensed continuously.
▶
Press the Non-Stop Flow button in Standby mode to enter the Non-Stop Flow
Standby mode. Then press the Outflow button to dispense water.
☞
Pressing any of the buttons in the Non-Stop Flow mode will stop dispensing the water.
☞
The default of the Non-Stop Flow time is 1 minute.
How To Use
※
Standby mode :
The Water Purifier is plugged and
ready to be used. The Outflow LED is illuminated.
※
One Cup Standby mode :
The One Cup button is
pressed in Standby mode. The One Cup LED is lit up and
the Outflow LED starts blinking.
※
Non-Stop Flow Standby mode :
The Non-Stop
Flow button is pressed in Standby mode. The Non-Stop
Flow LED is lit up and the Outflow LED starts blinking.
<Standby mode>
TIP
<One Cup Standby Mode>
<Non-Stop Flow Standby Mode>
Precautions on Moving the Product

How To Use / How To Set
8
How To Set One Cup Quantity
❶ Press the One Cup button for 3 seconds in Standby mode to set the quantity for One Cup.
❷
Depending on the selected quantity, one or more of the following LEDs will be lit up: One Cup LED, Non-Stop
Flow LED, Button Lock LED, and Filter Replacement LED.(The default quantity is about 150cc.)
❸ Select your desired quantity for One Cup (about 130cc - 190cc) by pressing the Outflow button.
❹
Select your desired quantity for One Cup and press the One Cup button.
☞
If you press any other button than the Outflow or the One Cup button, it will be canceled and the product will return to Standby mode.
☞
If you fail to press any button for 20 seconds in the settings, it will be canceled and the product will return to Standby mode.
※
The quantity of dispensed water varies in accordance with the place of installation.
Approx. 130 cc
Approx. 150 cc (Default)
Approx. 170 cc
Approx. 190 cc
1
2
3
4
The One Cup LED is illuminated.
The One Cup LED and the Non-Stop Flow LED are illuminated.
The One Cup LED, Non-Stop Flow LED, and Button Lock LED are illuminated.
The One Cup LED, Non-Stop Flow LED, Button Lock LED, and Filter Replacement LED are illuminated.
One Cup QuantityLEVEL Display
How to Set the Time for Non-Stop Flow
❶
Press the Not-Stop Flow button for 3 seconds in Standby mode to set the time for Non-Stop Flow.
❷
Depending on the selected time, one or more of the following LEDs will be lit up: One Cup LED, Non-Stop Flow
LED, Button Lock LED, and Filter Replacement LED. (The default time is about 60 seconds.)
❸
Press the Outflow button to select your desired time for Non-Stop Flow (50 to 80 seconds).
❹
Select your desired time and press the Non-Stop Flow button.
☞
If you press any other button than the Outflow or the Non-Stop Flow button, it will be canceled and the product will return to Standby
mode.
☞
If you fail to press any button for 20 seconds in the settings, it will be canceled and the product will return to Standby mode 8.
50 seconds
60 seconds (Default)
70 seconds
80 seconds
1
2
3
4
The One Cup LED is illuminated.
The One Cup LED and Non-Stop Flow LED are illuminated.
The One Cup LED, Non-Stop Flow LED, and Button Lock LED are illuminated.
The One Cup LED, Non-Stop Flow LED, Button Lock LED, and Filter Replacement LED are illuminated.
Selected TimeLEVEL Display
❹
Button Lock function
▶
I
t is used to lock the buttons to prevent the appliance from false operation when
cleaning or when children touch the buttons.
▶
Press the Button Lock button for 2 seconds in Standby mode to lock the device.
▶
P
ress the Button Lock button again for 2 seconds to unlock the device.
❺
Auto Flow function
▶
This function automatically dispenses purified water.
▶
Hold down the Out Flow button in the Standby mode for 0.3 seconds, and purified
water will be dispensed.
☞ In case of Auto Flow, the flow will stop when the device has dispensed water for 30
seconds.
☞ If you press the "Out Flow" button for 0.3 seconds during Auto Flow, the function
will stop, and the device will enter the Standby mode.

How To Set / How To Remove and Clean Faucet Expected
Filter Replacement Cycle / Recommendations
9
ENG
How to Set Faucet Lighting
❶
Press the One Cup and Not-Stop Flow buttons simultaneously for 3 seconds in Standby mode to access the
settings.
❷
Depending on the selected status, the following LEDs will be lit up: one Cup LED, Non-Stop Flow LED, Button
Lock LED, and Filter Replacement LED. (The default setting is ON.)
❸
Press the Outflow button to select the desired status.
❹
Select your desired status and press the Button Lock button.
☞ If you press any other button than the Outflow or the Button Lock button, it will be canceled and the product will return to Standby mode.
☞
If you fail to press any button for 20 seconds in the settings, it will be canceled and the product will return to Standby mode.
On (Default)
OFF
1
2
The One Cup LED, Non-Stop Flow LED, Button Lock LED, Filter Replacement LED, and the
Faucet Lighting GREEN LED are illuminated.
All the lights will get turned off.
Faucet Lighting
LEVEL
Display
How To Remove and Clean the Faucet
❶
Hold the faucet and turn it clockwise to remove it.
❷
After separation, wipe out the faucet inlet with a clean cloth.
❸
Clean the separated faucet with running water.
(You may easily wipe out the dirt inside the faucet that you cannot reach by using a cotton swab, etc.)
❹
Wipe the faucet dry with a clean cloth.
❺
Insert the faucet by turning it counterclockwise.
Expected Filter Replacement Cycle
▶ The filter replacement cycle is set based on the amount of water filtered at home (10L per day), and
the status of water supply may affect the cycle.
Recommendations
▶
Filtration Capacity
▶
It is to identify the life span of built-in contaminants removers such as filters. It is calculated based on removal rate of
chloroform, etc.
▶
Filter Replacement Cycle
▶
After a close review of filters, it is carefully estimated period during which a filter is expected to display its proper
performance. This is determined based on the amount of tap water filtered for drinking (10L per day for four). Thus the
cycle shortens as the amount used goes up.
PRE CARBON 2.0 FILTER
NANO POSITIVE PLUS FILTER
MINERALIZER FILTER
4 months
12 months
12 months
Filter Name
Expected Replacement Cycle

10
▼
I
f you do not comply with this User Manual, the product may not work properly even if there is no malfunction. Please take the following
m
easures accordingly if there is a problem with the product. If there is still a problem, please contact our Customer Service Center.
Problem Checklist
The water has a bad
taste and/or odor.
・ Was it left idle for a long time?
・ Do you need to replace the filters?
・ Please use it after draining it for about 10 minutes.
・ Replace the Filter. (Do not use a Non-Cuckoo filter.)
W
ater is not dispensed.
・ Is the tap water being supplied properly?
・ H
ave you pressed the Outflow button firmly?
・ Is the power supplied properly?
・ D
o you need to replace the filters?
・ Open the Tap Water Supply Valve.
・ C
heck if the water supply tube is folded.
・ Check if water is cut off.
・ H
ave you pressed the Outflow button firmly?
・ Please check if it’s plugged in.
・ C
ontact our Customer Service Center for filter replacement.
It does not dispense
enough water.
・ H
ave you closed the Locking Valve?
・ Do you need to replace the filters?
・ O
pen the Locking Valve.
・ Replace the Filter. (Do not use a Non-Cuckoo filter.) (The quantity of
dispensed water varies in accordance with water pressure.)
A severe noise is made.
・ Is the floor under the product flat?
・ Does it touch any other stuff?
・ Does it become noisy after dispensing water?
・ Install the product on a flat and solid floor.
・ Make sure it does not touch anything else.
・ It’s directly connected to public water supply and ensures the water is
maintained at a certain level.
The buttons do not work
properly.
・ Did you press the Outflow button for 30 seconds or longer? ・ It is a normal operation that blocks the input of buttons when the
Outflow button is pressed for 30 seconds or longer in order to prevent
a wrong operation caused by foreign substances.
・ Take your hand off the Outflow button, and then press it again.
There are floating
substances on the water.
・ Do you need to replace the filters? ・ Replace the Filter. (Do not use a Non-Cuckoo filter.)
Water is leaking from the
purifier.
・ Isn't your home or the external environment humid?
・ Is the assembled (connecting) part defective?
・ If the cold parts inside the Water Purifier meets humidity, dews can be
made, just as water drops are made on a cup with water.
・ Close the Tap Water Supply Valve and unplug the product. After that,
contact our Customer Service Center for a service.
While the device is
dispensing water, the GREEN
LED of the faucet is not
illuminated.
・ Isn't the Faucet Lighting function turned off? ・ Please turn on the Faucet Lighting function.
(Please refer to page 16 for how to set the function.)
Please check before asking for Support.
Asking for Repairs
It may not work properly due to worn out components that were continuously exposed to heat, moisture, dust and other pollutants.
If any of these symptoms occurs,
▼
Please stop using the product.
- Search for a Customer Service Center near you at www.cuckooworld.com.
❶
“Please check before asking for repairs.”
❷
You can feel electricity when you touch the product with your hands;
❸
Other disorders or malfunctions occur,
Recommendation

11
ENG
Product Specifications
※ Specifications and other details (exterior, design, and specifications) in this User Manual may be subject to change without prior notice for product improvement.
※ As this equipment has undergone EMC registration for household purpose (“B” class), this product can be used in any area and designed to be used mainly in a household.
※ Manufacturer: CUCKOO HOMESYS Co., Ltd.
Product Name Water Treatment
Model
C
P-MN031 Series
CP-MN031W / CP-MN031BK
Rated Voltage
Do not use other than the following: U.S.: 120V / 60Hz; Europe: 220V / 50Hz; U.K.: 240V / 50Hz; China: 220V / 50Hz; and Vietnam: 220V / 60Hz.
Power Consumption
11W / 0.09A
Filtration Electric Filtration & Adsorption
Filter
specifications
S
tep 1
P
RE CARBON 2.0(4Months)
Step 2
Nano Positive Plus (12Months)
Step 3
MINERALIZER Filtration(12Months)
Filtration Capacity 1,900L
Climate Class N (Temperate)
Installation Area For home / office use, and for indoor use
Net Weight Around 3.4Kg
Product Dimension
135(W) × 379(D) × 367(H)
Rated Working Pressure
1.5~6.9bar(0.15~0.69MPa)
Type of Consumer Damages
If a malfunction of
performance or
function has occurred
during normal use
(within the warranty
period)
A malfunction on performance
or function of the product due
to the consumer's intention or
mistake
■
If a malfunction has occurred by a natural disaster (fire, damage from sea wind, gas, earthquake, damage from storm and flood, etc.)
■
If it is needed to replace a consumable part which is normally worn out by use
■
If a malfunction has occurred due to a disorder in the used power supply or a defective connection device
■
If a malfunction has occurred not due to a defect of the product itself but due to an external cause
■
If a malfunction has occurred since a person who is not a service engineer of a CUCKOO agency or CUCKOO Customer Service Center has repaired or remodeled the product
•
With regard to matters not specified above, the damages will be compensated in accordance with the standards for settling consumer disputes according to the Framework Act on Consumers.
•Customer Service : Visit http://www.cuckooworld.com •
Device cleaning, adjustment, guidance for use, etc. are not a malfunction.
If essential repair is required within 10 days from the date of purchase
If an important part requires repair within one month after the date of purchase
If an exchanged product requires essential repair within one month after the exchange
If a defect occurs
If an exchange is impossible
If the same defect has been repaired but the malfunction reoccurs (for the third time)
If the product has been repaired four times due to malfunctions of several parts, but the malfunction reoccurs (for the fifth time)
If the business operator has lost the product for which the consumer had requested for repair
If repair is impossible because the parts for repair are not prepared
Damages that occur during a transport process or product installation when the customer has purchased the product
If repair is possible
If repair is impossible because the parts for repair are not prepared
If repair is impossible
Compensation Details
Within the warranty period
Exchange of the product or refund of the purchase price
Exchange of the product and repair for free
Refund of the purchase price
Repair for free
Exchange of the product or
refund of the purchase
price
Refund of a sum calculated by adding 10% to an
amount obtained by depreciation for a fixed sum
Refund of a sum calculated by adding 5% to an
a
mount obtained by depreciation for a fixed sum
Billed repair Billed repair
Exchange of the product
Payment of the amount for the billed
repair and exchange of the product
Payment of the amount for the billed repair and
exchange of the product by applying a depreciation
Billed repair Billed repair
After the warranty period
Dispute Solution for Consumers
On Our Service
•
Rights of our customers
Our customers have a precious right to receive a service for free for one year from the date of purchase when a malfunction has occurred during use of the product.
But, when a malfunction has occurred by the customer's negligence or natural disaster, the customer can only receive billed service even within the period for service for free.
•
Responsibility for billed service (burden of expenses of the customer)
If a customer requests for a service and it comes under one of the following, the customer can only receive a billed service even within the period for service for free.
1) If a malfunction has occurred as foreign substances (water, beverage, coffee, toys, etc.) had been put into the product
2) If the product is damaged and a malfunction on the functions has occurred as the product had been dropped or due to an impact
3) If the exterior of the product is damaged and/or deformed by an organic solvent such as thinner and benzene
4) If a malfunction has occurred since a part or consumable, which are not a genuine CUCKOO ones, are used (adapter, filter, etc.). Purchase genuine CUCKOO parts and
consumables at a designated Customer Service Center .
5) If a malfunction has occurred since the wrong voltage had been supplied
6) If a component is lost or damaged since the customer had arbitrarily disassembled the product
7) If a malfunction has occurred since a person who is not a service engineer of a CUCKOO Customer Service Center has repaired or remodeled the product
8) If a malfunction has occurred by a natural disaster (lightning, fire, damage from storm and flood, gas, damage from sea wind, earthquake, etc.)
9) If a malfunction has occurred since the customer had not complied with the 'Warnings for Safe Use' in the User Manual (If you comply with the 'Warnings for Safe Use,' you can
use the product for a long time.)
10) If a malfunction has occurred because of any other mistake of the customer

12
ÍNDICE
Antes de usar
Advertencias para un uso seguro/Precauciones para un uso seguro
Nombres de piezas/accesorios
Elementos que comprobar/Cómo usar
Disposición de tuberías de purificación de agua y sistema de
purificación de agua/Ciclo de sustitución de filtros esperado
Compruebe antes de notificar un fallo/Solución de problemas
Especificaciones del producto/Normas para la resolución de litigios con
el consumidor/Sobre nuestro servicio de mantenimiento
13~15
16
17~19
20
21
Durante el uso
Solicitar reparaciones
Guía de servicios

Advertencias para un uso seguro
13
ESP
Advertencias
・
No doble, ate ni tire del cable de alimentación con fuerza.
・ Al desenchufar el producto, asegúrese de sujetar la clavija de alimentación y no el cable de alimentación.
・ En caso de fuga de agua o cuando limpie el producto, desenchufe primero el aparato.
・ Asegúrese de que el cable de alimentación no esté debajo de un objeto pesado o cerca de objetos
afilados. Tome especial precaución para evitar que lo dañe su mascota.
・ Desenchufe también el producto antes de cualquier inspección, reparación o sustitución de sus piezas.
・ Deje de utilizar el producto si el cable de alimentación o la clavija de alimentación están dañados o si la
toma de corriente vibra, y póngase en contacto con nuestro Centro de atención al cliente.
・ Limpie cualquier sustancia extraña de la clavija de alimentación con un paño seco.
・ Utilice únicamente lo siguiente: EE.UU.: 120V/60Hz; Europa: 220V/50Hz; Reino Unido: 240V/50Hz; China:
220V/50Hz; y Vietnam: 220V60Hz.
・ Al introducir o extraer la clavija de alimentación, elimine primero la humedad de las manos y, a
continuación, introduzca o extraiga la clavija de alimentación sujetándola.
・ Si entra agua en la zona de alimentación, desenchufe el producto y séquelo completamente antes de
utilizarlo.
・ En caso de un largo período de inactividad, desconecte el enchufe y guárdelo en un lugar seguro
después de cerrar la válvula de suministro de agua del grifo y vacíe el agua que quede dentro del tanque.
Acerca de la fuente de alimentación
•Este símbolo indica una situación potencialmente
peligrosa bajo circunstancias especiales.
•Lea los detalles atentamente y siga las instrucciones
para evitar situaciones peligrosas.
Situación potencialmente peligrosa
que puede causar lesiones graves o
la muerte si no se evita.
Situación potencialmente peligrosa
que puede causar lesiones leves si
no se evita.
R
espete las «Advertencias para un uso seguro» para garantizar un uso seguro y adecuado del producto y
evitar accidentes y situaciones peligrosas.
Advertencias
Caution

Advertencias para un uso seguro
14
・ No coloque el purificador en zonas húmedas o polvorientas.
・ No instale el producto cerca del baño.
・ No lo coloque en una zona irregular o inclinada. Evite colocarlo sobre una alfombra, cojín o suelo
laminado.
・ Asegúrese de instalar el dispositivo en áreas limpias.
・ Evite la luz solar directa y las altas temperaturas.
・ Asegúrese de que la longitud del tubo de suministro de agua no sobresalga más de 5 m de la válvula de
suministro de agua del grifo.
・ No coloque ningún dispositivo calentador, como un horno de microondas, un horno eléctrico o una
tostadora, ni inflamables, como velas, recipientes de gas y encendedores, encima del producto.
・ Tenga cuidado con las fugas de agua del aparato.
・ Evite que niños o cualquier persona controlen el panel de control con demasiada frecuencia.
・ No lo coloque en una zona donde haya riesgo de fuga de gas o cerca de un dispositivo enfriador o
calentador.
・ Asegúrese de suministrar el agua del grifo e instale la válvula de suministro de agua del grifo hacia la
tubería de agua fría.
・ No coloque el dispositivo al aire libre o en una zona con temperaturas por debajo de 0℃?.
・ Una vez finalizada la instalación, manténgalo limpio y en buen estado.
・ Si coloca el producto encima de un fregadero, utilice siempre agua fría o agua purificada. (DNo utilice
agua caliente.)
・ No coloque productos químicos, botellas de agua o materiales metálicos pequeños sobre el producto.
・ No desmonte ni modifique este producto.
・ Después de la instalación, asegúrese de que los tubos y mangueras estén firmemente conectados y de
que no haya fugas.
Manual de instalación
Advertencias

Instrucciones de uso
15
ESP
Advertencias para un uso seguro
・ Si encuentra una fuga o un charco de agua alrededor del producto, cierre primero la válvula de
suministro de agua del grifo, apague el dispositivo y, a continuación, desenchúfelo. Después de hacerlo,
contacte con nuestro Centro de atención al cliente.
・ No tire del cable de alimentación ni de la manguera, ni agarre el grifo cuando mueva el producto.
・ Si huele a quemado o ve humo saliendo del dispositivo, desenchúfelo inmediatamente y cierre la válvula
de suministro de agua del grifo. Después de hacerlo, contacte a nuestro Centro de atención al cliente.
・ No coloque placas ni materiales metálicos encima del producto.
・ Asegúrese de que la tapa para sustituir el filtro del producto esté completamente cerrada antes utilizarlo.
・ Si se deja inactivo durante mucho tiempo, asegúrese de que el agua se dispensa durante unos 10
minutos antes de utilizar el dispositivo.
・ Sustituya el filtro siguiendo el ciclo de sustitución.
・ Utilice siempre los filtros CUCKOO originales para el producto.
・ Si no ha usado el grifo externo durante mucho tiempo, puede estar contaminado.
・ Si lo vuelve a utilizar, comenzará a dispensar después de drenar el agua que quede durante uno o dos
minutos.
Advertencias
Pre
c
a
uc
i
ó
n
P
recaució
n
・ No limpie el producto con benceno o diluyente.
・ Durante el uso del producto, no tire del tubo por la parte posterior.
・ No mueva el dispositivo mientras esté en funcionamiento.
・ Evite utilizar el agua dispensada para llenar una pecera o un acuario.

Nombres de piezas/Accesorios/Disposición de tuberías de purificación de
agua/Sistema de purificación de agua
16
Panel de control
< Parte trasera >
P
anel de control
Grifo
Cubierta para el
recambio de filtros
Cable de alimentación
Bandeja
※
El producto actual puede diferir de la imagen mostrada.
Toma de corriente
externa
C
onector de grifo
Rejilla de bandeja
Botón Outflow - Dispensa agua manualmente
1
Botón Non-Stop Flow - Dispensa de forma continua
3
Botón One Cup - Dispensa una taza de agua
2
Botón «Replace Filter» - Se utiliza para sustituir los filtros.
(Cuando sea necesario sustituir un filtro, el LED del filtro se encenderá.)
5
Botón de bloqueo de botones - Bloquea las funciones del
producto por motivos de seguridad (Pulse el botón durante
dos segundos y se establecerá o cancelará la función).
4
Botón dispensador
One
Cup
Non-Stop
Flow
Bloqueo
de
botones
Sustitución
de filtros
< CP-MN031 Series >
Nombres de las piezas
Accesorios
Manual de instrucciones
Otros materiales auxiliares
para la instalación
Disposición de tuberías de purificación de agua y sistema de purificación de agua
CP-MN031 Series
NIVEL 1
PRE CARBON 2.0 FILTER
NANO POSITIVE PLUS FILTER
MINERALIZER FILTER
Absorbe el cloro, el trihalometano y los olores y sabores
desagradables residuales.
Elimina partículas diminutas, gérmenes (pseudomonas aeruginosa, bacilo del colon,
estafilococo áureo), virus (Norovirus) y metales pesados (plomo, hierro, aluminio).
ade minerales al agua, proporcionándole un agua más sana y rica.
NIVEL 2
NIVEL 3
※
El filtro es un componente indispensable para un sistema de filtración de agua.
※
El uso de un filtro que no sea de CUCKOO o de un filtro original de CUCKOO durante mucho tiempo puede disminuir el rendimiento del filtro.
NIVEL Nombre del filtro Función del filtro
MINERALIZER
FILTER
Valve
Outlet
NANO
POSITIVE
PLUS FILTER
PRE CARBON
2.0 FILTER
Pressure reducing
valve 3K
※
El producto actual puede diferir de la imagen mostrada.
< Parte delantera >

Elementos que comprobar/Cómo usar
17
ESP
Asegúrese de que haya suficiente espacio para la instalación.
▶
Para facilitar la sustitución de los filtros, coloque el producto a
una distancia de al menos 20 cm de la pared y en una zona
donde la longitud del tubo de suministro de agua del grifo esté
a 5 m o menos de la válvula de suministro de agua del grifo.
Precauciones para el lugar de instalación
Tenga cuidado al mover el producto.
▶
No lo incline m?s de 45 grados cuando lo mueva.
Aseg?rese tambi?n de enchufarlo por lo menos 30 minutos
despu?s de mover el producto y llenar el tanque.
Si no va a utilizar el producto durante mucho tiempo, cierre la válvula de suministro de agua del grifo y
desenchúfelo. Utilice únicamente lo siguiente: EE.UU.: 120V/60Hz; Europa: 220V/50Hz; Reino Unido: 240V/50Hz;
China: 220V/50Hz; y Vietnam: 220V60Hz. Asegúrese de enchufar el dispositivo a un enchufe adecuado.
Precaución
Elementos que comprobar antes de utilizarlo
Elementos que comprobar antes de la instalación
❶ Abra la válvula de suministro de agua del grifo.
▶
Cierre primero el grifo para comprobar que el agua llega correctamente. Después, abra la válvula de suministro de agua del grifo.
❷ Enchufe el producto.
▶
Compruebe si hay desconexión de agua antes de enchufarlo.
❸ Si se ha dejado inactivo durante mucho tiempo o si se ha instalado recientemente, déjelo drenar
durante unos 10 minutos.
❹ Vacíe la bandeja regularmente.
❶ Función Outflow manual
▶
El agua filtrada se dispensará manualmente.
▶
Pulse el botón Outflow en el modo de espera para dispensar el agua.
☞
El agua sólo se dispensará después de pulsar el botón Outflow.
☞
Si pulsa el botón Outflow durante más de 30 segundos, dejará de dispensar agua.
Quite el dedo del botón y vuelva a pulsarlo para obtener agua.
❷
Modo One Cup (La cantidad dispensada varía de acuerdo con la presión del agua.)
▶
Se dispensará la cantidad de una taza.
▶
Pulse el botón One Cup en el modo de espera para entrar en el modo de espera One
Cup. A continuación, pulse el botón Outflow para dispensar el agua.
☞
Si se deja inactivo durante más de 7 segundos en el modo de espera de One Cup, volverá al modo
de espera.
☞ Pressing any of the buttons in this mode will stop dispensing the water.
☞ The default of dispensed quantity of One Cup is around 150 cc.
❸
Modo Non-Stop Flow (La cantidad dispensada varía de acuerdo con la presión del agua.)
▶
El agua se dispensará de forma continua.
▶
Pulse el botón Non-Stop Flow en el modo de espera para entrar en el modo de
espera Non-Stop Flow. A continuación, pulse el botón Outflow para dispensar el
agua.
☞
Si pulsa cualquiera de los botones en el modo Non-Stop Flow, dejará de dispensar agua.
☞
El tiempo predeterminado de Non-Stop Flow es de 1 minuto.
Instrucciones de uso:
※
Modo de espera :
El purificador de agua está
enchufado y listo para ser utilizado. El LED Outflow se ilumina.
※
Modo de espera One Cup :
El botón One Cup se
pulsa en el modo de espera. El LED One Cup se ilumina y
el LED Outflow empieza a parpadear.
※
Modo de espera Non-Stop Flow :
El botón Non-
Stop Flow se pulsa en el modo de espera. El LED de Non-
Stop Flow se ilumina y el LED de Outflow empieza a
parpadear.
<Modo de espera>
CONSEJO
<Modo de espera One Cup>
<Modo de espera Non-Stop Flow>
Precauciones al mover el producto

Cómo usar/Cómo configurar
18
Cómo configurar la cantidad de una taza (One Cup)
❹
Seleccione la cantidad deseada para una taza y pulse el botón One Cup.
☞
Si pulsa cualquier otro botón que no sea el botón Outflow o el botón One Cup, se cancelará y el producto volverá al modo de espera.
☞
Si no pulsa ningún botón durante 20 segundos en los ajustes, se cancelará y el producto volverá al modo de espera.
※
La cantidad de agua dispensada varía según el lugar de instalación. Si necesita medir con precisión la cantidad, utilice un medidor.
Aprox. 130 cc
Aprox. 150 cc (por defecto)
Aprox. 170 cc
Aprox. 190 cc
1
2
3
4
El LED de One Cup se ilumina.
Se iluminan el LED de One Cup y el LED de Non-Stop Flow.
Se iluminan el LED de One Cup, el LED de Non-Stop Flow y el LED de bloque de botones.
Se iluminan el LED de One Cup, el LED de Non-Stop Flow, el LED de bloqueo de botones y el LED Sustitución de filtros
Cantidad de una taza
NIVEL Pantalla
Cómo ajustar el tiempo para el flujo continuo
❹
Seleccione el tiempo deseado y pulse el botón Non-Stop Flow.
☞
Si pulsa cualquier otro botón que no sea el botón Outflow o el botón Non-Stop Flow, se cancelará y el producto volverá al modo de espera.
☞
Si no pulsa ningún botón durante 20 segundos en los ajustes, se cancelará y el producto volverá al modo de espera 8.
50 segundos
60 segundos (por defecto)
70 segundos
80 segundos
1
2
3
4
El LED de One Cup se ilumina.
Se iluminan el LED de One Cup y el LED de Non-Stop Flow.
Se iluminan el LED de One Cup, el LED de Non-Stop Flow y el LED de bloque de botones.
Se iluminan el LED de One Cup, el LED de Non-Stop Flow, el LED de bloqueo de botones y el LED Sustitución de filtros.
Tiempo seleccionado
NIVEL Pantalla
❹
Función de bloqueo de botones
▶
Se utiliza para bloquear los botones evitando que el aparato funcione incorrectamente
durante la limpieza o cuando los niños tocan los botones.
▶
P
ulse el bot?n de bloqueo de botones durante 2 segundos en el modo de espera para
bloquear el dispositivo.
▶
V
uelva a pulsar el bot?n de bloqueo de botones durante 2 segundos para desbloquear el dispositivo.
❺
Función Auto Flow
▶
Esta función dispensa automáticamente agua purificada.
▶
Mantenga pulsado el botón Out Flow en el modo Standby durante 0,3 segundos y se
dispensará agua purificada.
☞ Si se utiliza la función Auto Flow, el flujo se detendrá cuando el dispositivo haya
dispensado agua durante 30 segundos.
☞ Si pulsa el botón «Out Flow» durante 0,3 segundos en Auto Flow, la función se detendrá y
el dispositivo entrará en el modo Standby.
❶
Pulse el botón One Cup durante 3 segundos en el modo de espera para ajustar la cantidad de una taza.
❷
Dependiendo de la cantidad seleccionada, se encenderán uno o más de los siguientes LED:LED de One Cup, LED de Non-
Stop Flow, LED de bloqueo de botones y LED Sustitución de filtros.(La cantidad por defecto es de unos 150 cc.)
❸
Seleccione la cantidad deseada para una taza (aproximadamente 130cc - 190cc) pulsando el botón Outflow.
❶
Pulse el botón One Cup durante 3 segundos en el modo de espera para ajustar el tiempo del flujo continuo (Non-Stop Flow).
❷
Dependiendo del tiempo seleccionado, se encenderán uno o más de los siguientes LED:LED de One Cup, LED de Non-
Stop Flow, LED de bloqueo de botones y LED Sustitución de filtros.(El tiempo por defecto es de unos 60 segundos.)
❸
Pulse el botón Outflow para seleccionar el tiempo deseado de flujo continuo (de 50 a 80 segundos).

Cómo configurar/Cómo quitar y limpiar el grifo
Ciclo de sustitución de filtros esperado/Recomendaciones
19
ESP
Cómo configurar la iluminación del grifo
❶
Pulse los botones One Cup y Non-Stop Flow simultáneamente durante 3 segundos en el modo de espera para
acceder a los ajustes.
❷
Dependiendo del estado seleccionado, se encenderán los siguientes LED: LED One Cup, LED Non-Stop Flow,
LED de bloqueo de botones y LED Sustitución de filtros. (La configuración predeterminada es ON.)
❸
Pulse el botón Outflow para seleccionar el estado deseado.
❹
Seleccione el estado deseado y pulse el botón de bloqueo de botones.
☞ Si pulsa cualquier otro botón que no sea el botón Outflow o el botón de bloqueo de botones, se cancelará y el producto volverá al modo de espera.
☞
Si no pulsa ningún botón durante 20 segundos en los ajustes, se cancelará y el producto volverá al modo de espera.
ON (Predeterminado)
OFF
1
2
Se iluminan el LED de One Cup, el LED de Non-Stop Flow, el LED de bloqueo de botones, el LED
Sustitución de filtros y el LED VERDE de iluminación del grifo.
Todas las luces se apagarán.
Iluminación del grifo
NIVEL
Pantalla
Cómo quitar y limpiar el grifo
❶
Sujete el grifo y gírelo en el sentido de las agujas del reloj para extraerlo.
❷
Después de separarlo, limpie el interior del grifo con un paño limpio.
❸
Limpie el grifo separado con agua corriente. (Usted puede limpiar fácilmente la suciedad del interior del grifo
que no pueda alcanzar con un bastoncillo de algodón, etc.)
❹
Seque el grifo con un paño limpio.
❺
Introduzca el grifo girándolo en sentido contrario a las agujas del reloj.
Ciclo de sustitución de filtros esperado
▶ El ciclo de sustitución de filtros se establece en función de la cantidad de agua filtrada en casa (10
litros al día), y el estado del suministro de agua puede afectar al ciclo.
Recomendaciones
▶
Capacidad de filtración
▶
Se trata de identificar la vida útil de los eliminadores de contaminantes incorporados, como los filtros. Se calcula en base
a la tasa de eliminación de cloroformo, etc.
▶
Ciclo de sustitución de filtros
▶
Después de una revisión minuciosa de los filtros, se estima detenidamente el período durante el cual se espera que un
filtro muestre su rendimiento adecuado. Esto se determina en base a la cantidad de agua del grifo filtrada para beber (10
litros por día para cuatro). De este modo, el ciclo se acorta a medida que aumenta la cantidad utilizada.
PRE CARBON 2.0 FILTER
NANO POSITIVE PLUS FILTER
MINERALIZER FILTER
4 meses
12 meses
12 meses
Nombre del filtro
Ciclo de sustitución esperado

20
▼
S
i no sigue las indicaciones de este Manual de instrucciones, es posible que el producto no funcione correctamente aunque no se
produzca ninguna avería. Si hay algún problema con el producto, siga atentamente las instrucciones que se indican.Si se mantiene
p
roblema, contacte con nuestro Centro de atención al cliente.
Problema Lista de control
El agua tiene mal sabor
y/u olor.
・ Estuvo inactivo durante mucho tiempo?
・ Necesita reemplazar los filtros?
・ Utilícelo después de drenarlo durante unos 10 minutos.
・ Vuelva a poner el filtro. (No utilice un filtro que no sea de Cuckroo.)
E
l agua no se dispensa.
・ Se suministra correctamente el agua del grifo?
・ H
a pulsado el botón Outflow con firmeza?
・ Hay un suministro correcto de corriente eléctrica?
・ N
ecesita reemplazar los filtros?
・ Abra la válvula de suministro de agua del grifo.
・ C
ompruebe si el tubo de suministro de agua está doblado.
・ Compruebe si el agua está cortada.
・ H
a pulsado el botón Outflow con firmeza?
・ Compruebe que está enchufado.
・
C
ontacte con nuestro Centro de atención al cliente para sustituir el filtro.
No dispensa suficiente
agua.
・ H
a cerrado la válvula de bloqueo?
・ Necesita reemplazar los filtros?
・ A
bra la válvula de bloqueo
・ Vuelva a poner el filtro.(No utilice un filtro que no sea de Cuckroo.)
(La cantidad de agua dispensada varía según la presión del agua.)
Emite un ruido fuerte.
・ El suelo debajo del producto es plano?
・ Toca alguna otra cosa?
・ Emite el ruido después de dispensar el agua?
・ Instale el producto en un suelo plano y sólido.
・ Asegúrese de que no toque nada más.
・ Se conecta directamente al suministro público de agua y garantiza
que el agua se mantenga a un cierto nivel. El ruido se produce cuando
el agua fluye hacia el filtro y es normal.
Los botones no
funcionan
correctamente.
・ Pulsó el botón Outflow durante al menos 30 segundos? ・ Es una operación normal que bloquea la entrada de botones cuando
se pulsa el botón Outflow durante al menos 30 segundos para evitar
un funcionamiento incorrecto causado por sustancias extrañas.
・ Quite la mano del botón y vuelva a pulsarlo.
Hay sustancias flotando en
el agua.
・ Necesita sustituir los filtros? ・ Vuelva a poner el filtro.(No utilice un filtro que no sea de Cuckroo.)
Hay una fuga de agua en
el purificador.
・ No hay presencia de humedad en su hogar o en el
ambiente externo?
・ Está defectuosa la pieza montada (de conexión)??
・
Si las partes frías del interior del purificador de agua se encuentran con humedad, se
puede formar rocío, al igual que se forman gotas de agua en un vaso con agua.
・ Cierre la válvula de suministro de agua del grifo y desenchufe el
producto. Después de hacerlo, contacte a nuestro Centro de atención
al cliente para solicitar servicio de mantenimiento.
Mientras el dispositivo
dispensa agua, el LED
VERDE del grifo no se
ilumina.
・ No está apagada la función de iluminación del grifo? ・ Active la función de iluminación del grifo.
(Consulte la página 16 para saber cómo configurar la función).
Compruebe antes de solicitar asistencia.
Solicitar reparaciones
Es posible que no funcione correctamente debido al desgaste de los componentes expuestos continuamente al calor, la
humedad, el polvo y otros contaminantes.
Si se produce alguno de estos síntomas,
▼
Deje de utilizar el producto.
- Busque un Centro de atención al cliente cerca de usted en www.cuckooworld.com.
❶
Realice las comprobaciones correspondientes antes de solicitar reparaciones.
❷
Puede sentir electricidad cuando toca el producto con las manos;
❸
Se producen otras alteraciones o fallos de funcionamiento,
Recomendación

21
ESP
Especificaciones del producto
※
Las especificaciones y otros detalles (exterior, diseño y especificaciones) de este Manual de instrucciones pueden estar sujetos a cambios sin previo aviso para mejorar el producto.
※
Dado que este equipo ha sido registrado con EMC para uso doméstico (clase «B»), este producto puede utilizarse en cualquier área y está diseñado para utilizarse principalmente en un hogar.
※ Fabricante: CUCKOO HOMESYS Co., Ltd.
Nombre del producto TRATAMIENTO DEL AGUA
Modelo
C
P-MN031 Series
CP-MN031W / CP-MN031BK
Tensión nominal
Utilice únicamente lo siguiente: EE.UU.: 120V/60Hz; Europa: 220V/50Hz; Reino Unido: 240V/50Hz; China: 220V/50Hz; y Vietnam: 220V60Hz.
Consumo de energía
11W / 0.09A
Filtración Filtración eléctrica y adsorción
Especificaciones
del
P
aso 1
P
RE CARBON 2.0(4Months)
Paso 2
Nano Positive Plus (12Months)
Paso 3
MINERALIZER Filtration(12Months)
Capacidad de filtración 1,900L
Clase climática N (Templado)
Área de instalación Para uso doméstico/de oficina, y para uso en interiores
Peso neto Alrededor de 3.4kg
Product Dimension
135(A) × 379(P) × 367(A)
Presión de trabajo nominal
1.5~6.9Bar(0.15~0.69MPa)
Tipo de daños al consumidor
Si se ha producido un
fallo de rendimiento o
de funcionamiento
durante el uso normal
(dentro del período de
garantía)
Un fallo de funcionamiento en el
rendimiento o funcionalidad del
producto debido a un intento o a
un error del consumidor.
■
Si se ha producido un fallo de funcionamiento por una catástrofe natural (incendio, daños por viento marino, gas, terremoto, daños por tormenta e inundación, etc.)
■
Si es necesario
sustituir una pieza consumible que normalmente se desgasta con el uso
■
Si se ha producido un fallo de funcionamiento debido a un error en la fuente de alimentación utilizada o a un
dispositivo de conexión defectuoso
■
Si se ha producido un fallo de funcionamiento no debido a un defecto del producto en sí, sino debido a una causa externa
■
If a malfunction has
occurred since a person who is not a service engineer of a CUCKOO agency or CUCKOO Customer Service Center has repaired or remodeled the product
•
En lo que respecta a las cuestiones no especificadas anteriormente, los daños y perjuicios se indemnizarán de conformidad con las normas para la solución de litigios para los consumidores de conformidad con la Ley marco de los
consumidores.
•Servicio de atención al cliente : Visite http://www.cuckooworld.com •
La limpieza, el ajuste, la guía de uso, etc. del dispositivo no se consideran errores de funcionamiento..
Si se requiere una reparación indispensable en un plazo de 10 días a partir de la fecha de compra
Si una pieza importante requiere reparación en el plazo de un mes a partir de la fecha de compra
Si un producto cambiado requiere una reparación indispensable en el plazo de un mes después del cambio
Si se produce un defecto
Si es posible realizar un cambio
Si se ha reparado el mismo defecto pero la avería se repite (por tercera vez)
Si el producto ha sido reparado cuatro veces debido a averías de varias piezas, pero la avería se repite (por quinta vez)
Si el operario de la empresa ha perdido el producto para el que el consumidor había solicitado la reparación
Si la reparación es imposible porque las piezas para la reparación no están preparadas
Daños que se producen durante un proceso de transporte o instalación del producto cuando el cliente ha comprado el producto.
Si la reparación es posible
Si la reparación es imposible porque las piezas para la reparación no están preparadas
Si la reparación es imposible
Detalles de compensación
Dentro del período de garantía
Cambio del producto o reembolso del precio de compra
Cambio del producto y reparación gratuita
Reembolso del precio de compra
Reparación gratuita
Cambio del producto o
reembolso del precio de
compra
Reembolso de un importe calculado añadiendo un 10% a un
importe obtenido de la depreciación para un importe fijo.
Reembolso de un importe calculado añadiendo un 5% a un
i
mporte obtenido de la depreciación para un importe fijo.
Reparación facturada Reparación facturada
Cambio del producto
Pago del importe de la reparación
facturada y cambio del producto
Pago del importe de la reparación facturada y
cambio del producto aplicando una depreciación
Reparación facturada Reparación facturada
Después del período de garantía
Solución de litigios para los consumidores
Sobre nuestro servicio de mantenimiento
•
Derechos de nuestros clientes
Nuestros clientes tienen el preciado derecho de recibir un servicio de mantenimiento gratuito durante un año a partir de la fecha de compra, cuando se haya producido un fallo de
funcionamiento durante el uso del producto.Pero, cuando se ha producido un fallo de funcionamiento por la negligencia del cliente o un desastre natural, el cliente sólo tiene
derecho a recibir el servicio facturado, incluso dentro del período de servicio gratuito.
•
Responsabilidad por el servicio de mantenimiento facturado (carga de gastos del cliente)
Si un cliente solicita un servicio de reparación y se trata de uno de los siguientes, el cliente sólo puede recibir un servicio facturado aunque esté dentro del período de servicio de mantenimiento gratuito.
1) Si se ha producido una avería debido a la introducción de sustancias extrañas (agua, bebidas, café, juguetes, etc.) en el producto.
2) Si el producto está dañado y se ha producido un mal funcionamiento de las funciones debido a una caída o a un impacto.
3) Si el exterior del producto está dañado y/o deformado por un disolvente orgánico como diluyente y benceno.
4) Si se ha producido una avería por utilizar una pieza o consumible que no es original de CUCKOO (adaptador, filtro, etc.).Compre piezas y consumibles originales de CUCKOO en
un Centro de atención al cliente designado .
5) Si se ha producido un fallo de funcionamiento debido a que se ha suministrado una tensión incorrecta
6) Si un componente se pierde o se daña debido a que el cliente ha desmontado arbitrariamente el producto
7) Si se ha producido un fallo de funcionamiento debido a que una persona que no es ingeniero de servicio de mantenimiento de un Centro de atención al cliente CUCKOO ha
reparado o remodelado el producto
8) Si se ha producido un fallo de funcionamiento por un desastre natural (relámpago, incendio, daños por tormenta e inundación, gas, daños por viento marino, terremoto, etc.)
9) Si se ha producido un fallo de funcionamiento debido a que el cliente no ha respetado las «Advertencias para un uso seguro» del Manual de instrucciones (si respeta las
«Advertencias para un uso seguro», puede utilizar el producto durante mucho tiempo).
10) Si se ha producido un fallo de funcionamiento debido a cualquier otro error del cliente

22
SOMMAIRE
Avant l’utilisation
Avertissements pour une utilisation en toute sécurité /
Précautions de sécurité
Nom des pièces / accessoires
Vérifications à effectuer / Guide d'utilisation
Disposition du tuyau de purification d’eau et système de purification
d’eau / Cycle de remplacement des filtres conseillé
À vérifier avant de signaler un dysfonctionnement / Dépannage
Caractéristiques du produit / Normes de règlement des litiges de
consommation / À propos de nos services
23~25
26
27~29
30
31
Pendant l'utilisation
Demander une réparation
Guide des services

Avertissements pour une utilisation en toute sécurité
23
FRA
Avertissements
・
Ne tordez, n'attachez et ne tirez pas sur le Cordon d'alimentation.
・ Lorsque vous souhaitez débrancher l'appareil, assurez-vous de saisir la Fiche secteur et non le Cordon
d'alimentation.
・ En cas de fuite d’eau ou lorsque vous faîtes le ménage, veillez à débrancher l’appareil avant toute chose.
・ Assurez-vous que le Cordon d'alimentation n’est pas écrasé par un objet lourd ou près d'un objet
tranchant. Assurez-vous qu’il ne puisse pas être endommagé par un animal de compagnie.
・ Veuillez également débrancher l'appareil avant de l’inspecter, de le réparer ou de procéder au
changement d'une de ses pièces.
・ N'utilisez pas le produit si le Cordon d'alimentation ou la Fiche secteur sont endommagés ou si le Cordon
d'alimentation tremble et contactez notre Centre de service client.
・ Essuyez toute substance étrangère de la Fiche secteur à l’aide d’un linge sec.
・ Utilisez seulement les tensions nominales suivantes : U.S. : 120 V / 60 Hz ; Europe : 220 V / 50 Hz ; R.U. :
240 V / 50 Hz ; Chine : 220 V / 50 Hz ; et Vietnam : 220 V / 60 Hz.
・ Lorsque vous souhaitez brancher ou débrancher la Fiche secteur, essuyez l’éventuelle humidité sur vos
mains et branchez ou débranchez la Fiche secteur en tenant celle-ci fermement.
・ Si de l’eau s'infiltre dans la zone d'alimentation électrique, débranchez l'appareil et séchez-le
complètement avant utilisation.
・ En cas de longue période d’inutilisation, débranchez la Fiche et mettez l'appareil en sûreté après avoir
fermé la Valve d'alimentation en eau et complètement vidé le réservoir.
À propos du Cordon d'alimentation
•Ce symbole indique une situation potentiellement
dangereuse dans des circonstances particulières.
•Veuillez lire attentivement ces informations et suivre les
instructions qui vous sont données afin d'éviter toute
situation dangereuse.
Situation potentiellement
dangereuse qui peut entraîner
des blessures graves ou la mort
si elle n’est pas évitée.
Situation potentiellement
dangereuse qui peut entraîner
des blessures légères si elle
n’est pas évitée.
V
euillez respecter les « Avertissements pour une utilisation en toute sécurité » afin d'assurer une utilisation en
toute sécurité et d’éviter tout accident ou situation dangereuse.
Avertissements
Attention

Avertissements pour une utilisation en toute sécurité
24
・ Ne placez pas le purificateur dans un endroit humide ou poussiéreux.
・ N'installez pas l’appareil à proximité d'une salle de bain.
・ Ne placez pas l’appareil dans une zone bombée ou inclinée. Évitez de placez l'appareil sur un tapis, un
coussin ou un sol laminé.
・ Assurez-vous d’installer l’appareil dans un endroit propre.
・ Évitez d’exposer l'appareil à la lumière directe du soleil ou à des températures élevées.
・ Assurez-vous que le tube d'alimentation en eau ne soit pas à plus de 5 m de la Valve d'alimentation en
eau du robinet.
・ Ne placez aucun objet chauffant, tel qu'un four à micro-ondes, un four électrique ou un grille-pain, ou
inflammable, tel qu'une bougie, un réservoir de gaz ou un briquet au-dessus de l’appareil.
・ Faîtes attention aux fuites d’eau à l’intérieur de l'appareil.
・ Assurez-vous qu’aucun enfant ou qu'aucun individu ne manipule le panneau de commande trop souvent.
・ Ne placez pas l'appareil dans un endroit qui présente un risque de fuite de gaz ou près d'un appareil
refroidissant ou chauffant.
・ Assurez-vous d'alimenter l’appareil en eau du robinet et installez la Valve d'alimentation en eau du robinet
vers le tuyau d’eau froide.
・ Ne placez pas l'appareil au-dehors ou dans une zone où il fait moins de 0 °C.
・ Une fois l’installation terminée, veuillez penser à nettoyer et à entretenir l’appareil.
・ Si vous décidez de placer l’appareil au-dessus d'un évier, n'utilisez que de l’eau froide ou purifiée.
(N’utilisez pas d’eau chaude).
・ Ne placez aucune substance chimique, aucune bouteille d’eau ou aucun objet métallique sur l'appareil.
・ Ne désassemblez ou ne modifiez pas l'assemblage de l'appareil.
・ Une fois l’appareil installé, assurez-vous que les tubes et tuyaux sont fermement connectés et ne
présentent aucune fuite.
Guide d'installation
Avertissements

Avertissements pour une utilisation en toute sécurité
25
FRA
À propos de l’utilisation
・ Si vous remarquez une fuite ou un flaque d’eau autour de l’appareil, fermez tout d'abord la Valve
d'alimentation en eau du robinet, éteignez-le puis débranchez-le.
Contactez ensuite notre Centre de service client.
・ Ne tirez pas sur le Cordon d'alimentation ou sur le tuyau et n'agrippez pas le robinet lorsque vous
déplacez l'appareil.
・ Si vous sentez une odeur de brûlé ou si vous voyez de la fumée s'échapper de l’appareil, débranchez-le
immédiatement et fermez la Valve d'alimentation en eau du robinet.
Contactez ensuite notre Centre de service client.
・ Ne posez aucune assiette ou aucun objet métallique sur l'appareil.
・ Assurez-vous que le couvercle permettant de remplacer les filtres de l’appareil est correctement fermé
avant utilisation.
・ Si l'appareil n’est pas utilisé pendant une longue période, faîtes couler l’eau pendant environ 10 minutes
avant d'utiliser l’appareil.
・ Remplacez les filtres selon le cycle de remplacement.
・ N'utilisez que les filtres originaux CUCKOO avec cet appareil.
・ Si vous n’avez pas utilisé le robinet extérieur pendant une longue période, il pourrait être contaminé.
・ Si vous souhaitez réutiliser l’appareil, il distribuera l’eau après avoir drainé l’eau restante pendant une ou
deux minutes.
Avertissements
At
t
e
nt
i
o
n
・ Ne nettoyez pas cet appareil avec du benzène ou du diluant.
・ Ne tirez jamais sur le tube présent à l’arrière du produit alors que celui-ci fonctionne.
・ Ne déplacez pas l’appareil pendant qu’il fonctionne.
・ Veuillez éviter d’utiliser l’eau distribuée afin de remplir un bocal à poisson ou un aquarium.
A
ttentio
n

Nom des pièces / Accessoires Disposition du tuyau de
purification d’eau / Système de purification d’eau
26
Panneau de commande
< Arrière >
P
anneau de commande
R
o
bi
ne
t
C
ouvercle pour le
r
emplacement des filtres
Cordon d'alimentation
Plateau
※
Image non-contractuelle.
Sortie d’eau
Connecteur robinet
Grille plateau
Bouton Outflow - Pour servir de l’eau manuellement
1
Touche Non-Stop Flow - Pour servir de l’eau de façon continue.
3
Touche One Cup - Pour servir un verre d’eau.
2
Touche «Replace Filter» - Pour remplacer les filtres.
(Lorsqu’un filtre doit être remplacé, la LED Filtre s'allume.)
5
Touche Lock - Pour verrouiller les diverses fonctions de l’appareil par sécurité
(Appuyez sur le bouton pendant deux secondes et la fonction est activée ou annulée.)
4
Touche Dispense
One
Cup
Non-Stop
Flow
Touche
Lock
Remplacement
de filtre
< CP-MN031 Series >
Nom des pièces
Accessoires
Manuel d'utilisateur
Autre matériel subsidiaire
pour l'installation
Disposition du tuyau de purification d’eau et système de purification d’eau
CP-MN031 Series
NIVEAU 1
PRE CARBON 2.0 FILTER
NANO POSITIVE PLUS FILTER
MINERALIZER FILTER
Il absorbe les résidus de chlorine, de trihalométhane ainsi que les
goûts et odeurs désagréables
Élimine les particules infimes, les germes (pseudomonas aeruginosa, colon bacillus,
staphylocoque doré), les virus (norovirus) et les métaux lourds (plomb, fer, aluminium).
Il ajoute des méniraux à l'eau, offrant une eau plus saine et goûteuse.
NIVEAU 2
NIVEAU 3
※
Le filtre est un élément essentiel d’un système de filtration de l’eau.
※
L’utilisation d'un filtre d'une autre marque que CUCKOO ou l’utilisation prolongée d'un filtre CUCKOO peut réduire les performances de filtration.
NIVEAU Nom du filtre Fonction du filtre
MINERALIZER
FILTER
Valve
Outlet
NANO
POSITIVE
PLUS FILTER
PRE CARBON
2.0 FILTER
Pressure reducing
valve 3K
※
Image non-contractuelle.
< Avant >

Vérifications à effectuer / Guide d'utilisation
27
FRA
Assurez-vous qu’il y a assez de place pour l’installation.
▶
Afin de faciliter le changement de filtres, placez l'appareil à une
distance minium de 20 cm du mur et à un endroit où le tuyau
d'alimentation en eau du robinet ne se trouve pas à plus de 5
m de la Valve d'alimentation en eau du robinet.
Précautions quant au lieu d'installation
Veuillez être précautionneux lorsque vous déplacez l’appareil.
▶
Ne le penchez pas de plus de 45 degrés lorsque vous le
déplacez. Assurez-vous de ne pas le brancher dans les 30
minutes après l’avoir déplacé et avoir rempli le réservoir.
Si vous n’utilisez pas l’appareil pendant une longue période, fermez la Valve d'alimentation en eau
du robinet et débranchez l’appareil. Utilisez seulement les tensions nominales suivantes : U.S. :
120 V / 60 Hz ; Europe : 220 V / 50 Hz ; R.U. : 240 V / 50 Hz ; Chine : 220 V / 50 Hz ; et Vietnam :
220 V / 60 Hz. Assurez-vous que l'appareil soit branché à une prise de courant appropriée.
Attention
Vérifications à effectuer avant l’utilisation
Vérifications à effectuer avant l’installation
❶ Ouvrez la Valve d'alimentation en eau du robinet.
▶
Allumez tout d'abord le robinet afin de vérifier que l’eau s'écoule correctement. Ouvrez ensuite la Valve d'alimentation en eau
du robinet.
❷ Branchez l’appareil.
▶
Vérifiez qu’il n’y a pas de coupure d’eau avant de brancher l’appareil.
❸ Si l’appareil n’a pas été utilisé pendant une longue période ou que vous venez de l’installer, laissez-le se
vider pendant au moins 10 minutes.
❹ Videz le plateau de façon régulière.
❶ Fonction débit manuel
▶
L’eau filtrée sera servie manuellement.
▶
Appuyez sur la touche Outflow en mode Veille pour servir de l’eau.
☞
L’eau ne commencera à couler qu’une fois que vous aurez appuyé sur la touche Outflow..
☞
Si vous appuyez sur la touche Outflow pendant plus de 30 secondes, l'eau arrêtera de
couler. Enlevez votre doigt de la touche et appuyez à nouveau pour faire couler l’eau.
❷
Mode One Cup (La quantité obtenue dépend de la pression de l’eau.)
▶
Une quantité nécessaire à remplir un verre sera servie.
▶
Appuyez sur la touche One Cup en mode Veille pour activer le mode Veille One Cup.
Appuyez ensuite sur la touche Outflow pour faire couler l’eau.
☞
Si vous ne faîtes rien pendant 7 secondes après avoir activé le mode Veille One Cup, l’appareil
repassera en mode Veille.
☞
Appuyer sur n’importe quelle touche pendant l’utilisation de ce mode arrêtera l'écoulement de l’eau.
☞ La quantité d’eau servie par défaut en mode One Cup est d’environ 150 cc.
❸
Mode Non-Stop Flow (La quantité obtenue dépend de la pression de l’eau.)
▶
L’eau filtrée s'écoulera de façon continue.
▶
Appuyez sur la touche Non-Stop Flow en mode Veille pour activer le mode Veille
Non-Stop Flow. Appuyez ensuite sur la touche Outflow pour faire couler l’eau.
☞
Appuyer sur n’importe quelle touche pendant l’utilisation de ce mode arrêtera l'écoulement de l’eau.
☞
La durée par défaut du mode Non-Stop Flow est d’une minute.
Utilisation
※
Mode Veille :
Le Purificateur d’eau est branché et prêt
à être utilisé. La LED du mode Outflow est allumée.
※
Mode Veille One Cup :
La touche One Cup est
enclenchée en mode Veille. La LED du mode One Cup est
allumée et la LED du mode Outflow commence à clignoter.
※
Mode Veille Non-Stop Flow :
La touche Non-Stop
Flow est enclenchée en mode Veille. La LED du mode Non-
Stop Flow est allumée et la LED du mode Outlfow
commence à clignoter.
<Mode Veille>
CONSEIL
<Mode Veille One Cup>
<Mode Veille Non-Stop Flow>
Précautions à prendre lors du déplacement de l'appareil

Utilisation / réglage
28
Comment régler la quantité d’un verre
❹
Sélectionnez la quantité désirée pour le mode One Cup et appuyez sur la touche One Cup.
☞
Si vous appuyez sur une autre touche que la touche Outflow ou Non-Stop Flow, la sélection sera annulée et le produit repassera en mode Veille.
☞
Si vous n’appuyez sur aucune touche dans les 20 secondes, la sélection sera annulée et le produit repassera en mode Veille.
※
La quantité d’eau obtenue dépend de l’endroit où l’appareil est installé.
Environ 130 cc
Environ 150 cc (par défaut)
Environ 170 cc
Environ 190 cc
1
2
3
4
La LED du mode One Cup est allumée.
Les LED du mode One Cup et du mode Non-Stop Flow sont allumées.
Les LED du mode One Cup, du mode Non-Stop Flow et du mode Verrouillage sont allumées.
Les LED du mode One Cup, du mode Non-Stop Flow, du mode Verrouillage et du mode Remplacement de filtre sont allumées.
Quantité One CupNIVEAU Affichage
Comment régler le minuteur du mode Non-Stop Flow
❶
Appuyez sur la touche Non-Stop Flow pendant 3 secondes en mode Veille pour régler la durée du mode Non-Stop Flow.
❷
En fonction de la durée sélectionnée, une ou plusieurs des LED suivantes s'allumeront :LED du mode One Cup, du mode
Non-Stop Flow, du mode Verrouillage et du mode Remplacement de filtre(La durée par défaut est de 60 secondes).
❸
Appuyez sur la touche Outflow pour sélectionner la durée désirée du mode Non-Stop Flow (50 à 80 secondes).
❹
Sélectionnez la durée désirée puis appuyez sur la touche Non-Stop Flow.
☞
Si vous appuyez sur une autre touche que la touche Outflow ou Non-Stop Flow, la sélection sera annulée et le produit repassera en mode
Veille.
☞
Si vous n’appuyez sur aucune touche dans les 20 secondes, la sélection sera annulée et le produit repassera en mode Veille 8.
50 secondes
60 secondes ((Défaut)
70 secondes
80 secondes
1
2
3
4
La LED du mode One Cup est allumée.
Les LED du mode One Cup et du mode Non-Stop Flow sont allumées.
Les LED du mode One Cup, du mode Non-Stop Flow et du mode Verrouillage sont allumées.
Les LED du mode One Cup, du mode Non-Stop Flow, du mode Verrouillage et du mode Remplacement de filtre sont allumées.
Durée sélectionnée
NIVEAU
Affichage
❹
Touche Lock
▶
P
ermet de verrouiller les touches et d'éviter une erreur de manipulation lors du nettoyage ou
lorsqu’un enfant appuie sur une touche.
▶
Appuyez sur la touche Lock pendant 2 secondes en mode Veille pour verrouiller l’appareil.
▶
A
ppuyez de nouveau sur la touche Lock pendant 2 secondes pour déverrouiller l'appareil.
❺
Fonction Auto Flow
▶
Cette fonction permet de servir de l’eau purifiée de façon automatique.
▶
Maintenez la touche Out Flow en mode Veille pendant 0,3secondes et de l’eau purifiée
commencera à s'écouler.
☞ Dans le cas du mode Auto Flow, l’eau s'arrêtera de couler après 30secondes.
☞ Si vous appuyez sur la touche «Out Flow» pendant 0,3secondes en mode Auto Flow, cela
désactivera la fonction et l'appareil entrera en mode Veille.
❶
Appuyez sur la touche One Cup pendant 3 secondes en mode Veille pour régler la quantité d’un verre d’eau.
❷
En fonction de la quantité sélectionnée, une ou plusieurs des LED suivantes s'allumeront: LED du mode One Cup, du mode
Non-Stop Flow, du mode Verrouillage et du mode Remplacement de filtre (La quantité par défaut est de 150 cc).
❸
Sélectionnez la quantité désirée pour un verre d’eau (Entre 130 cc et 190 cc) en appuyant sur la touche Outflow.

Réglages / Comment enlever et nettoyer le robinet Cycle de
remplacement conseillé / Recommandations
29
FRA
Comment régler l’éclairage du robinet
❶
Appuyez sur les touches One Cup et Non-Stop Flow de façon simultanée pendant 3 secondes en mode Veille
pour accéder aux réglages.
❷
Selon le réglage sélectionné, les LED suivantes seront allumées : LED du mode One Cup, du mode Non-Stop
Flow, du mode Verrouillage et du mode Remplacement de filtre. (Le réglage par défaut est ON.)
❸
Appuyez sur la touche Outflow afin de sélectionner le réglage désiré.
❹
Sélectionnez le réglage désiré puis appuyez sur la touche Lock.
☞ Si vous appuyez sur une autre touche que la touche Outflow ou Lock, la sélection sera annulée et le produit repassera en mode Veille.
☞
Si vous n’appuyez sur aucune touche dans les 20 secondes, la sélection sera annulée et le produit repassera en mode Veille 8.
On (par défaut)
OFF
1
2
Les LED du mode One Cup, du mode Non-Stop Flow, du mode Verrouillage, du mode
Remplacement de filtre et la LED VERTE d’Éclairage du robinet sont allumées.
Toutes les lumières s'éteindront.
Éclairage du robinet
NIVEAU
Affichage
Comment enlever et nettoyer le robinet
❶
Maintenez le robinet et faîtes-le tourner dans le sens des aiguilles d'une montre pour l’enlever.
❷
Une fois le robinet enlevé, nettoyez-en l'orifice d’entrée avec un linge propre.
❸
Nettoyez le robinet à l’eau claire. (Vous pourrez facilement essuyer la saleté qui se trouve sur la partie intérieure
du robinet difficile à atteindre en utilisant un coton-tige, etc.)
❹
Essuyez le robinet avec un linge propre.
❺
Réinstallez le robinet en le faisant tourner dans le sens inverse des aiguilles d'une montre.
Cycle de remplacement de filtre conseillé
▶ Le cycle de remplacement de filtre se base sur la quantité d’eau filtrée (10 L par jour) et le mode de
service de l’eau peut affecter celui-ci.
Recommandations
▶
Capacité de filtrage
▶
Il s'agit d’identifier la durée de vie des dispositifs d'élimination des contaminants intégrés tels que les filtres. Elle est
calculée en fonction du taux d'élimination du chlore, etc.
▶
Cycle de remplacement conseillé
▶
Après un examen rigoureux des filtres, une période de performances maximales a été identifiée. Elle a été déterminée sur
la base d’eau filtrée destinée à être bue (10 L par jour pour quatre personnes). Le cycle se raccourcit à mesure que les
utilisateurs augmentent.
PRE CARBON 2.0 FILTER
NANO POSITIVE PLUS FILTER
MINERALIZER FILTER
4 mois
12 mois
12 mois
Nom du filtre
Cycle de remplacement conseillé

30
▼
Si vous ne respectez pas les indications fournies par ce Manuel d'utilisateur, l’appareil pourrait ne pas fonctionner correctement même
s'il ne présente aucun dysfonctionnement. Veuillez prendre les mesures suivantes, selon votre cas, en cas de problème avec votre
appareil. Si le problème persiste, veuillez contacter notre Centre de service client.
Problème Liste de vérifications
L
’
e
a
u
a
u
n
ma
u
va
i
s
g
o
û
t
e
t/
o
u
u
n
e
ma
u
va
i
se
o
d
e
u
r
.
・ L'appareil a-t-il été inutilisé pendant longtemps ?
・ Faut-il changer les filtres ?
・ Laissez l’eau couler pendant 10 minutes avant de réutiliser l’appareil.
・ Remplacez le Filtre.(N'utilisez pas de filtre d'une autre marque que CUCKOO).
L
’eau ne s'écoule pas.
・ L'appareil est-il correctement alimenté en eau du robinet ?
・ A
vez-vous appuyé fermement sur la touche Outflow ?
・ L'alimentation électrique fonctionne-t-elle correctement ?
・ F
aut-il changer les filtres ?
・ Ouvrez la Valve d'alimentation en eau du robinet.
・ V
érifiez que le tuyau d'alimentation n’est pas plié.
・ Vérifiez que l’arrivée d’eau n’est pas coupée.
・ A
vez-vous appuyé fermement sur la touche Outflow?
・ Vérifiez que l’appareil est bien branché.
・
C
ontactez notre Centre de service client pour un remplacement de filtre.
L'appareil ne distribue
pas assez d’eau.
・ A
vez-vous fermé la Valve de verrouillage ?
・ Faut-il changer les filtres ?
・ O
uvrez la Valve de verrouillage.
・ Remplacez le Filtre.(N'utilisez pas de filtre d'une autre marque que
CUCKOO). (La quantité d’eau obtenue dépend de la pression de l’eau).
L'appareil fait beaucoup
de bruit.
・
Le sol sur lequel est install? l'appareil est-il parfaitement plat ?
・ Est-il en contact avec d'autres objets ?
・ Émet-il ce bruit après avoir distribué de l’eau ?
・ Installez l’appareil sur une surface plane et solide.
・ Assurez-vous qu’il n’entre en contact avec aucun autre objet.
・ Assurez-vous qu’il est directement relié à une arrivée d’eau publique
et que la quantité d’eau est maintenue à un certain niveau.Le bruit est
produit lorsque l’eau passe au travers du filtre, c’est parfaitement
normal.
Les touches ne
fonctionnent pas
correctement.
・ Avez-vous appuyé sur la touche Outflow pendant 30
secondes ou plus ?
・ Il est normal que les touches soient bloquées lorsque la touche
Outflow a été enfoncée pendant 30 secondes ou plus afin d'éviter un
problème dû à une quelconque substance étrangère.
・ Enlevez votre doigt de la touche Outflow et appuyez à nouveau.
Des substances étrangères
flottent dans l’eau.
・ Faut-il changer les filtres ? ・ Remplacez le Filtre.(N'utilisez pas de filtre d'une autre marque que
CUCKOO).
De l’eau s'échappe du
purificateur.
・ Votre maison ou l’environnement extérieur sont-ils
humides ?
・ La partie assemblée (connexion) est-il défectueuse ?
・ Si les pièces froides à l'intérieur du Purificateur d’eau entrent en
contact avec l’humidité, de la condensation sera produite, tout comme
des gouttes d’eau se forme sur un verre d’eau.
・ Fermez la Valve d'alimentation en eau du robinet et débranchez
l'appareil. Contactez ensuite notre Centre de service client.
La LED VERTE du robinet ne
s'allume pas alors que
l’appareil distribue de l’eau.
・ L'éclairage du robinet est-il désactivé ? ・ Activez l’éclairage du robinet.(Référez-vous à la page 16 pour savoir
comment régler cette fonction).
Veuillez effectuer ces vérifications avant
de demander de l’aide.
Demander une réparation
L'appareil peut ne peut fonctionner à cause de composants usés qui auraient été exposés de façon continue à la chaleur, à l’humidité,
à la poussière ou autres contaminants.
Si vous constatez l’un de ces problèmes,
▼
Veuillez arrêter d'utiliser l’appareil.
- Recherchez le Centre de service client le plus proche sur www.cuckooworld.com.
❶
« Veuillez effectuer ces vérifications avant de demander de l’aide. »
❷
Vous ressentez un courant électrique lorsque vous touchez l'appareil ;
❸
Un autre problème ou dysfonctionnement se présente,
Recommandations

31
FRA
Caractéristiques du produit
※ Les caractéristiques et autres détails (extérieur, conception et caractéristiques) fournis dans ce Manuel d'utilisateur peuvent faire l'objet de modifications sans avertissement
préalable en vue d'une amélioration du produit.
※ Cet appareil étant en conformité avec la directive CEM pour usage en zone résidentielle (Classe « B »), il peut être utilisé dans n'importe quel endroit et a été conçu pour un
usage principal au sein d'un foyer.
※ Fabricant : CUCKOO HOMESYS Co., Ltd.
N
om du produit
T
RAITEMENT DE L'EAU
Modèle
CP-MN031 Series
C
P-MN031W / CP-MN031BK
Tension nominale
Utilisez seulement les tensions nominales suivantes : U.S. : 120 V / 60 Hz ; Europe : 220 V / 50 Hz ; R.U. : 240 V / 50 Hz ; Chine : 220 V / 50 Hz ; et Vietnam : 220 V / 60 Hz.
Consommation énergétique
11W / 0.09A
Filtrage Filtrage électrique & adsorption
Caractéristique
des filtres
Étape 1
PRE CARBON 2.0(4Months)
Étape 2
Nano Positive Plus (12Months)
Étape 3
MINERALIZER Filtration(12Months)
Capacité de filtrage 1,900L
Classe climatique N (Tempéré)
Zone d'installation Domicile / bureau et intérieur
Poids net Environ 3.4Kg
Dimension du produit
135(L) × 379(P) × 367(H)
Pression opérationnelle nominale
1.5~6.9Bar(0.15~0.69MPa)
Type de dégâts
Si un problème de
performance ou de
fonctionnement s’est
produit après une
utilisation normale
(en cours de garantie)
Problème de performance ou
de fonctionnement dû à un
acte intentionnel ou à une
erreur du consommateur
■
Si un dysfonctionnement survient suite à une catastrophe naturelle (incendie, dommages causés par les vents marins, les gaz, les tremblements de terre, les dégâts causés par les
tempêtes et les inondations, etc.)
■
S'il est nécessaire de remplacer un consommable normalement usé.
■
Si un dysfonctionnement survient en raison d'un dysfonctionnement de
l'alimentation électrique utilisée ou d'un dispositif de connexion défectueux.
■
En cas de dysfonctionnement, non dû à un défaut du produit lui-même, mais à une cause externe.
■
Si, en cas de dysfonctionnement, une personne qui n'est pas technicien de service d'une agence CUCKOO ou d'un Centre de service client CUCKOO a réparé ou modifié le produit.
•
En ce qui concerne les questions non spécifiées ci-dessus, les dommages seront indemnisés conformément aux normes de règlement des litiges de consommation conformément à la loi-cadre sur les consommateurs.
•Service client : Visitez http://www.cuckooworld.com •
Le nettoyage, le réglage, le guidage de l'appareil, etc. ne constituent pas un dysfonctionnement.
S’il est nécessaire d’effectuer la réparation dans les 10 jours suivant la date d'achat
Si une pièce importante doit être réparer dans le mois suivant la date d'achat
Si un produit échanger nécessite une réparation importante dans le mois suivant l’échange
En cas de défaut
Si un échange est possible
Si un défaut a déjà été corrigé mais que le dysfonctionnement persiste (pour le troisième fois)
Si le produit a été réparé quatre fois à cause du dysfonctionnement de certaines pièces mais que le problème persiste (pour la cinquième fois)
Si l’exploitant a perdu le produit que le client lui avait demandé de réparer
Si la réparation est impossible car les pièces nécessaires à celle-ci ne sont pas disponibles
Dommages qui se produisent pendant le processus de transport ou d'installation du produit lorsque le client a acheté le produit
Si la réparation est possible
Si la réparation est impossible car les pièces nécessaires à celle-ci ne sont pas disponibles
Si la réparation est impossible
Détails de la compensation
En cours de garantie
Échange du produit ou remboursement au prix d'achat
Échange du produit et réparation gratuite
Remboursement au prix d'achat
Réparation gratuite
Échange du produit ou
remboursement au prix
d'achat
Remboursement d'une somme calculée en ajoutant 10
% au montant obtenu par dépréciation d'un montant fixe
Remboursement d'une somme calculée en ajoutant 5%
au montant obtenu par dépréciation d'un montant fixe
Réparation facturée Réparation facturée
Échange du produit
Paiement de la facture de
réparation et échange du produit
Paiement de la facture de réparation et échange du
produit après application d'une dépréciation
Réparation facturée Réparation facturée
Après la période de garantie
Règlement des litiges
À propos de nos services
•
Droits du consommateur
Nos consommateurs ont le droit précieux de profiter d’un service gratuit pendant un an à compter de la date d'achat dans le cas où un dysfonctionnement se produirait lors de
l’utilisation du produit. Cependant, si ce dysfonctionnement survient du fait de la négligence du consommateur ou d’une catastrophe naturelle, le service sera facturé au
consommateur même au cours de la période de gratuité.
•
Responsabilité en cas de service facturé (charge des dépenses du consommateur)
Si le consommateur requiert un service qui tombe dans l'une des catégories suivantes, ce service sera facturé au consommateur même au cours de la période de gratuité.
1) Si un dysfonctionnement se produit lorsqu'un corps étranger (eau, boisson, café, jouets, etc.) a été introduit dans l’appareil.
2) Si l'appareil est endommagé et qu’un dysfonctionnement s’est produit lorsque l’appareil est tombé au sol ou après un impact.
3) Si la partie extérieure de l’appareil est endommagée et/ou déformée par un solvant organique tel qu’un diluant ou qu'un benzène.
4) Si un dysfonctionnement s’est produit lorsqu'un consommable d'une marque autre que CUKOO a été utilisé (adaptateur, filtre, etc.)N'achetez que des pièces et consommables
de la marque CUCKOO auprès d'un Centre de service client désigné.
5) Si un dysfonctionnement s’est produit du fait de l’utilisation d'un mauvais voltage
6) Si un composant est perdu ou endommagé lorsque le consommateur démonte arbitrairement l’appareil
7) Si un dysfonctionnement s’est produit car une personne qui n'est pas technicien d'un Centre de service client CUCKOO a réparé ou modifié le produit
8) Si un dysfonctionnement s’est produit à cause d'une catastrophe naturelle (éclair, incendie, dommages causés par les tempêtes et les inondations, les gaz, les dégâts causés
par vents marins, les tremblementsde terre, etc.)
9) Si un dysfonctionnement s’est produit car le consommateur n’a pas respecté les « Avertissements pour une utilisation en toute sécurité » du Manuel d'utilisateur (L'appareil
fonctionnera pendant longtemps si vous respectez les « Avertissements pour une utilisation en toute sécurité ».)
10) Si un dysfonctionnement s’est produit après toute autre erreur du consommateur

32
INHALT
Vor der Verwendung
Warnhinweise für sichere Verwendung / Vorkehrungen für sichere
Verwendung
Bauteilbezeichnungen / Zubehör
Zu prüfende Punkte / Bedienungsanleitung
Rohrleitungsführung der Wasseraufbereitung und
Wasseraufbereitungssystem / Voraussichtlicher Filteraustauschzyklus
Prüfen vor Fehlermeldung / Fehlerbehebung
Produktspezifikationen /
Standards für Beilegung von Kundenbeschwerden /
Über unseren Service
33~35
36
37~39
40
41
Während der Verwendung
Reparaturanfragen
Serviceanleitung

Warnhinweise für sichere Verwendung
33
GER
Warnhinweise
・ Das Stromkabel nicht gewaltsam biegen, ziehen oder knicken.
・ Beim Abstecken des Produkts darauf achten, den Netzstecker und nicht das Stromkabel zu halten.
・ Im Fall eines Wasseraustritts oder bei der Reinigung das Gerät zuerst vom Stromnetz trennen.
・ Stellen Sie sicher, dass sich das Stromkabel nicht unter einem schweren Gegenstand oder in der Nähe
scharfkantiger Objekte befindet. Achten Sie besonders darauf, dass es nicht von Haustieren beschädigt
wird.
・ Bitte trennen Sie das Produkt vor Überprüfung, Reparatur oder dem Austausch von Bauteilen vom
Stromnetz.
・ Hören Sie sofort auf, das Produkt zu verwenden, wenn das Stromkabel oder der Netzstecker beschädigt
sind oder die Steckdose lose befestigt ist, und kontaktieren Sie Ihr Kundendienstcenter.
・ Entfernen Sie Fremdstoffe auf dem Netzstecker mit einem trockenen Tuch.
・ Verwenden Sie ausschließlich folgende Netzanschlüsse: U.S.: 120V / 60Hz; Europa: 220V / 50Hz; UK:
240V / 50Hz; China: 220V / 50Hz; und Vietnam: 220V / 60Hz.
・ Beim Ein- und Ausstecken des Netzsteckers prüfen Sie bitte zuerst, ob Ihre Hände trocken sind und
ziehen/stecken dann den Netzstecker in die Steckdose ein, indem Sie diese festhalten.
・ Wenn Wasser in den Stromspannungsbereich eintritt, das Produkt vom Stromnetz trennen und vor der
weiteren Verwendung vollständig trocknen.
・ Im Fall einer längeren Nichtverwendung trennen Sie den Stecker vom Stromnetz und bewahren das Gerät
auf, nachdem Sie das Wasserzulaufventil geschlossen und das Restwasser im Tank geleert haben.
Über die Stromversorgung
•Dieses Symbol verweist auf eine potenziell gefährliche
Situation unter bestimmten Bedingungen
•Bitte lesen Sie die Hinweise sorgfältig durch und
befolgen Sie die Anweisungen, um gefährliche
Situationen zu vermeiden
Potenziell gefährliche Situation, die
schwerwiegende Verletzungen
verursachen oder zum Tod führen
kann falls sie nicht verhindert wird.
Potenziell gefährliche Situation,
die leichte Verletzungen
verursachen kann falls sie nicht
verhindert wird.
B
itte beachten Sie unsere "Warnhinweise für sichere Verwendung", um die sichere und richtige Verwendung
des Produkts zu gewährleisten und Unfällen sowie Gefahrensituationen vorzubeugen.
Warnhinweise
Vorsicht

Warnhinweise für sichere Verwendung
34
Installationsanleitung
Warnhinweise
・ Stellen Sie den Wasseraufbereiter nicht in feuchte oder staubige Bereiche.
・ Stellen Sie das Produkt nicht in der Nähe des Badezimmers auf.
・ Stellen Sie das Gerät nicht in einem unebenen oder geneigten Bereich ab. Bitte das Gerät nicht auf
Teppichen, Kissen oder Laminatböden abstellen.
・ Bitte stellen Sie das Gerät in einem sauberen Bereich auf.
・ Direkte Sonneneinstrahlung und hohe Temperaturen sind zu vermeiden.
・ Achten Sie darauf, dass der Wasserversorgungsschlauch bis zum Wasserzulaufventil max. 5 m lang ist.
・ Platzieren Sie keine Wärmequellen wie Mikrowellengerät, elektrischer Backofen, Toaster oder
entzündbare Objekte wie Kerzen, Gasbehälter oder Feuerzeuge auf dem Produkt.
・ Überwachen Sie das Eintreten von Wasser in das Gerät
・ Achten Sie darauf, dass Kinder oder andere Personen das Bedienfeld nicht zu oft betätigen.
・ Stellen Sie das Gerät keinesfalls in einem Bereich, in dem die Gefahr eines Gasaustritts besteht, oder in
die Nähe eines Kühl- oder Heizgeräts ab.
・ Achten Sie darauf, das Gerät mit Leitungswasser zu versorgen, und installieren Sie das Wasserzulaufventil
an der Kaltwasserleitung.
・ Platzieren Sie das Gerät nicht im Freien oder in einem Bereich mit einer Temperatur unter 0℃?.
・ Nach Abschluss der Installation das Gerät regelmäßig reinigen und warten.
・ Falls Sie das Gerät über der Spüle positionieren, immer kaltes oder gereinigtes Wasser verwenden.
(Kein heißes Wasser verwenden.)
・ Keine chemischen Produkte, Wasserflaschen oder kleine Metallgegenstände auf dem Produkt abstellen.
・ Das Produkt nicht demontieren oder umbauen.
・ Nach der Installation bitte darauf achten, dass Rohrleitungen und Schläuche fest verbunden sind und kein
Leck vorhanden ist.

Warnhinweise für sichere Verwendung
35
GER
Bedienungsanleitung
・ Wenn Sie ein Leck oder eine Wasseransammlung um das Produkt herum feststellen, schließen Sie zuerst
das Wasserzulaufventil. Schalten Sie dann das Produkt aus und trennen Sie es vom Stromnetz. Bitte
kontaktieren Sie dann unser Kundendienstcenter.
・ Ziehen Sie nicht am Stromkabel oder Schlauch und fassen Sie bei der Bewegung des Produkts nicht den
Wasserhahn an.
・ Wenn Sie einen verbrannten Geruch oder Rauchaustritt am Gerät feststellen, trennen Sie das Gerät sofort
vom Stromnetz und schließen das Wasserzulaufventil. Bitte kontaktieren Sie dann unser
Kundendienstcenter.
・ Stellen Sie keine Teller oder Metallgegenstände auf dem Produkt ab.
・ Achten Sie darauf, dass die Abdeckung für den Filteraustausch des Produkts vor der Verwendung
vollständig geschlossen ist.
・ Bei längerem Nichtgebrauch darauf achten, dass das Gerät zuerst 10 Minuten lang Wasser ausgibt,
bevor Sie es verwenden.
・ Tauschen Sie den Filter entsprechend dem Austauschzyklus aus.
・ Verwenden Sie immer Original CUCKOO Filter für das Produkt.
・ Wenn Sie den externen Wasserhahn längere Zeit nicht verwendet haben, kann er verunreinigt sein.
・ Bei einer erneuten Verwendung beginnt er, Wasser abzugeben, nachdem zuvor ein bis zwei Minuten lang
das Restwasser entleert wurde.
Vo
rsi
c
ht
V
or
sicht
・ Das Produkt nicht mit Benzol oder Verdünnungsmittel reinigen.
・ Bei der Verwendung des Produkts den Schlauch an der Rückseite nicht abziehen.
・ Das Gerät während des Betriebs nicht bewegen.
・ Bitte das ausgegebene Wasser nicht für Fischschalen oder Aquarien verwenden.
Warnhinweise

PBauteilbezeichnungen /Zubehör Rohrleitungsführung
für Wasseraufbereitung / Wasseraufbereitungssystem
36
Bedienfeld
< Rückseite >
B
edienfeld
Wasserhahn
Abdeckung für
Filterwechsel
Stromkabel
Schale
※
Das Produkt kann von der Darstellung abweichen.
Externer Ausgang
A
bzweigklemme
Schalengitter
Taste Abfluss - Manuelle Wasserabgabe
1
Taste Nonstop-Wasserfluss - Um kontinuierlich Wasser auszugeben
3
Taste 1 Tasse - Um eine Tasse Wasser abzufüllen
2
Taste "Replace Filter" - Für den Filteraustausch verwenden
(Wenn ein Filter ausgetauscht werden muss, leuchtet die Filter-LED auf.)
5
Taste Tastensperre - Um Funktionen des Produkts aus Sicherheitsgründen zu sperren (die Taste
zwei Sekunden lang drücken, und die Funktion wird eingestellt oder abgebrochen)
4
Taste Ausgeben
1
Tasse
Nonstop-
Wasserfluss
Tasten
sperre
Filteraustau
sch
< CP-MN031 Series >
Bauteilbezeichnungen
Zubehör
Bedienungsanleitung
Sonstige ergänzende
Materialien für die Installation
Rohrleitungsführung der Wasseraufbereitung und Wasseraufbereitungssystem
CP-MN031 Series
NIVEAU 1
PRE CARBON 2.0 FILTER
NANO POSITIVE PLUS FILTER
MINERALIZER FILTER
Absorbiert Chlorrückstände, Trihalomethane,
unangenehmen Geschmack und Geruch.
Entfernt winzige Partikel, Keime (Pseudomonas aeruginosa, Colon-Bacillus, Staphylococcus
aureus) , Viren (Norovirus) und Schwermetalle (Blei, Eisen, Aluminium)
Fügt dem Wasser Mineralstoffe zu - für gesünderes und geschmackvolleres Wasser.
NIVEAU 2
NIVEAU 3
※
Der Filter ist eine kritische Komponente für das Wasserfiltersystem.
※
Die Verwendung über einen längeren Zeitraum von Filtern eines anderen Herstellers als CUCKOO kann die Filterleistung beeinträchtigen.
NIVEAU Filter Bezeichnung Filter Funktion
MINERALIZER
FILTER
Valve
Outlet
NANO
POSITIVE
PLUS FILTER
PRE CARBON
2.0 FILTER
Pressure reducing
valve 3K
※
Das Produkt kann von der Darstellung abweichen.
< Vorderseite >

Zu prüfende Punkte / Bedienungsanleitung
37
GER
Bitte stellen Sie sicher, dass genügend Platz für den Einbau vorhanden ist.
▶
Für einen einfachen Filteraustausch platzieren Sie das Produkt
20 cm oder mehr von der Wand entfernt. Der
Wasserversorgungsschlauch bis zum Wasserzulaufventil darf
max. 5 m lang sein.
Vorkehrungen beim Einbau des Geräts
Bitte achten Sie darauf, das Produkt vorsichtig zu bewegen.
▶
Bitte neigen Sie das Gerät nicht weiter als 45 Grad Bitte
achten Sie ebenfalls darauf, das Gerät mindestens ca. 30
Minuten an das Stromnetz anzuschließen, nachdem sie es
bewegt und den Tank befüllt haben.
Wenn Sie das Produkt längere Zeit nicht verwenden, schließen Sie bitte das Wasserzulaufventil und ziehen
Sie den Netzstecker aus der Steckdose. Verwenden Sie ausschließlich folgende Netzanschlüsse: U.S.: 120V
/ 60Hz; Europa: 220V / 50Hz; UK: 240V / 50Hz; China: 220V / 50Hz; und Vietnam: 220V / 60Hz. Bitte achten
Sie darauf, den Netzstecker an die richtige Steckdose anzuschließen.
Achtung
Zu prüfende Punkte / Bedienungsanleitung
Zu prüfende Punkte vor dem Einbau
❶ Öffnen Sie das Wasserzulaufventil.
▶
Drehen Sie den Wasserhahn, um zu prüfen, ob das Wasser richtig zugeführt wird. Öffnen Sie dann das Wasserzulaufventil.
❷ Schließen Sie das Produkt an die Stromquelle an.
▶
Prüfen Sie, dass vor dem Anschluss des Netzsteckers die Wasserversorgung unterbrochen wurde.
❸ Wenn das Produkt längere Zeit nicht verwendet bzw. neu installiert wurde, lassen Sie bitte 10 Minuten
lang das Restwasser ablaufen.
❹ Die Schale regelmäßig entleeren.
❶ Bedienungsanleitung Abfluss-Funktion
▶
Das gefilterte Wasser wird manuell ausgegeben.
▶
Die Taste Abfluss im Standby-Modus drücken, um Wasser auszugeben.
☞
Wasser wird nur nach Drücken der Taste Abfluss ausgegeben.
☞
Wenn Sie die Taste Abfluss länger als 30 Sekunden drücken, wird die Wasserausgabe
gestoppt. Nehmen Sie Ihren Finger von der Taste und drücken Sie dann erneut, um
Wasser zu erhalten.
❷ 1 Tasse-Modus (Ausgegebene Menge variiert je nach Wasserdruck)
▶
Die Wassermenge für 1 Tasse wird ausgegeben.
▶
Drücken Sie die Taste 1 Tasse im Standby-Modus, um den 1 Tasse Standby-Modus
einzugeben. Drücken Sie dann die Taste Abfluss, um Wasser auszugeben.
☞
Wenn das Gerät im 1 Tasse Standby-Modus länger als 7 Sekunden nicht bedient wird, kehrt es in
den Standby-Modus zurück.
☞ In diesem Modus können Sie durch Drücken jeder beliebigen Taste die Wasserausgabe stoppen.
☞ Die Standardmenge für 1 Tasse beträgt ca. 150 ml.
❸ Nonstop-Wasserfluss-Modus (Ausgegebene Menge variiert je nach
Wasserdruck)
▶
Das gefilterte Wasser wird kontinuierlich ausgegeben.
▶
Drücken Sie die Taste Nonstop-Wasserfluss im Standby-Modus, um den Nonstop-
Wasserfluss-Standby-Modus einzugeben. Drücken Sie dann die Taste Abfluss, um
Wasser auszugeben.
☞
In diesem Modus können Sie durch Drücken jeder beliebigen Taste die Wasserausgabe stoppen.
☞
Die Standardzeit des Nonstop-Wasserflusses beträgt 1 Minute.
Bedienungsanleitung
※
Standby-Modus :
Der Wasseraufbereiter ist an das
Stromnetz angeschlossen und gebrauchsbereit. Die LED
Abfluss leuchtet auf.
※
1 Tasse Standby-Modus :
Die Taste 1 Tasse wird
im Standby-Modus gedrückt. Die LED 1 Tasse leuchtet auf
und die LED Abfluss beginnt zu blinken.
※
Nonstop-Wasserfluss Standby-Modus
:
Die Taste
Nonstop-Wasserfluss wird im Standby-Modus gedrückt Die
LED Nonstop-Wasserfluss leuchtet auf und die LED Abfluss
beginnt zu blinken.
<Standby-Modus>
TIP
<1 Tasse Standby-Modus>
<Nonstop-Wasserfluss
Standby-Modus>
Vorkehrungen bei der Bewegung des Produkts

Bedienung / Einstellung
38
Einstellung der Ausgabemenge für 1 Tasse
❹
Wählen Sie die gewünschte Menge für 1 Tasse aus und drücken Sie die Taste 1 Tasse.
☞
Durch Drücken jeder beliebigen Taste außer den Tasten Abfluss oder 1 Tasse wird der Vorgang abgebrochen, und das Gerät kehrt in den Standby Modus zurück.
☞
Wenn Sie bei der Einstellung 20 Sekunden lang keine Taste drücken, wird der Vorgang abgebrochen, und das Gerät kehrt in den Standby Modus zurück.
※
Die ausgegebene Wassermenge variiert je nach Aufstellort. Wenn Sie die Menge genau messen möchten, verwenden Sie bitte ein Messgerät.
Ca. 130 ml
Ca. 150 ml (Standard)
Ca. 170 ml
Ca. 190 ml
1
2
3
4
Die LED 1 Tasse leuchtet auf.
Die LED 1 Tasse und die LED Nonstop-Wasserfluss leuchten auf.
Die LED 1 Tasse, die LED Nonstop-Wasserfluss und die LED Tastensperre leuchten auf.
Die LED 1 Tasse, die LED Nonstop-Wasserfluss, die LED Tastensperre und die LED Filteraustausch leuchten auf.
Menge für 1 TasseSTUFE Anzeige
Zeiteinstellung für Nonstop-Wasserfluss
❶
Drücken Sie die Taste Nonstop-Wasserfluss 3 Sekunden lang im Standby-Modus, um die Zeit für den Nonstop-Wasserfluss einzustellen.
❷
Je nach gewählter Zeit leuchten eine oder mehrere der folgenden LEDs auf:LED 1 Tasse, LED Nonstop-
Wasserfluss, LED Tastensperre und LED Filteraustausch(Die Standardzeit beträgt ca. 60 Sekunden.)
❸
Drücken Sie die Taste Abfluss, um die gewünschte Zeit für den Nonstop-Wasserfluss auszuwählen (50 bis 80 Sekunden).
❹
Wählen Sie die gewünschte Zeit aus und drücken Sie die Taste Nonstop-Wasserfluss.
☞
Durch Drücken jeder beliebigen Taste außer den Tasten Abfluss oder Nonstop-Wasserfluss wird der Vorgang abgebrochen, und das Gerät
kehrt in den Standby Modus zurück.
☞
Wenn Sie bei der Einstellung 20 Sekunden lang keine Taste drücken, wird der Vorgang abgebrochen und das Gerät kehrt in den Standby
Modus zurück. 8.
50 Sekunden
60 Sekunden (Standard)
70 Sekunden
80 Sekunden
1
2
3
4
Die LED 1 Tasse leuchtet auf.
Die LED 1 Tasse und die LED Nonstop-Wasserfluss leuchten auf.
Die LED 1 Tasse, die LED Nonstop-Wasserfluss und die LED Tastensperre leuchten auf.
Die LED 1 Tasse, die LED Nonstop-Wasserfluss, die LED Tastensperre und die LED Filteraustausch leuchten auf.
Ausgewählte ZeitNIVEAU Anzeige
❹
Funktion Tastensperre
▶
S
ie löst die Tastensperre aus, um eine unbeabsichtigte Bedienung bei der
Reinigung oder durch Kinder zu verhindern.
▶
Drücken Sie die Taste Tastensperre zwei Sekunden lang im Standby-Modus, um das Gerät zu sperren.
▶
D
rücken Sie die Taste Tastensperre erneut 2 Sekunden lang, um das Gerät zu entsperren.
❺
Funktion Auto Flow
▶
Diese Funktion gibt automatisch Wasser aus.
▶
Drücken Sie die Taste Out Flow 3 Sekunden lang im Standby Modus, um Wasser
auszugeben.
☞ Im Fall von Auto Flow wird der Wasserfluss gestoppt, wenn das Gerät 30
Sekunden lang Wasser ausgegeben hat.
☞ Wenn Sie die Taste "Out Flow" 3 Sekunden lang während Auto Flow drücken,
stoppt die Funktion, und das Gerät wechselt in den Standby Modus.
❶
Drücken Sie die Taste 1 Tasse 3 Sekunden lang im Standby-Modus, um die Ausgabemenge für 1 Tasse einzustellen.
❷
Je nach ausgewählter Menge leuchten eine oder mehrere der folgenden LEDs auf:LED 1 Tasse, LED
Nonstop-Wasserfluss, LED Tastensperre und LED Filteraustausch.(Die Standardmenge beträgt ca. 150 ml.)
❸
Wählen Sie Ihre gewünschte Menge für 1 Tasse (ca. 130 ml - 190 ml), indem Sie die Taste Abfluss drücken.

Einstellung / Entfernung + Reinigung des Wasserhahns
Voraussichtlicher Filteraustauschzyklus / Empfehlungen
39
GER
Einstellung der Wasserhahn-Beleuchtung
❶
Drücken Sie die Tasten 1 Tasse und Nonstop-Wasserfluss 3 Sekunden lang gleichzeitig im Standby-Modus, um
die Einstellungen aufzurufen.
❷
Je nach ausgewähltem Status leuchten die folgenden LEDs auf: 1 Tasse, Nonstop-Wasserfluss, Tastensperre
und Filteraustausch.(Die Standardeinstellung ist EIN.)
❸
Drücken Sie die Taste Abfluss, um den gewünschten Status auszuwählen.
❹
Wählen Sie den gewünschten Status aus und drücken Sie die Taste Tastensperre.
☞ Durch Drücken jeder beliebigen Taste außer den Tasten Abfluss oder Tastensperre wird der Vorgang abgebrochen, und das Gerät kehrt in den
Standby Modus zurück.
☞
Wenn Sie bei der Einstellung 20 Sekunden lang keine Taste drücken, wird der Vorgang abgebrochen, und das Gerät kehrt in den Standby
Modus zurück.
EIN (Standard)
AUS
1
2
Die LED 1 Tasse, die LED Nonstop-Wasserfluss, die LED Tastensperre, die LED
Filteraustausch und die GRÜNE LED Wasserhahn-Beleuchtung leuchten auf.
All the lights will get turned off.
Wasserhahn-Beleuchtung
NIVEAU
Anzeige
Entfernung und Reinigung des Wasserhahns
❶
Halten Sie den Wasserhahn und drehen Sie ihn im Uhrzeigersinn, um ihn abzunehmen.
❷
Nach Abtrennung vom Gerät wischen Sie den Wasserhahneinlass mit einem sauberen Tuch ab.
❸
Reinigen Sie den abgenommenen Wasserhahn unter laufendem Wasser..
(Sie können schwer erreichbaren Schmutz im Wasserhahn einfach mit einem Wattestäbchen etc. entfernen)
❹
Wischen Sie den Wasserhahn mit einem sauberen Tuch trocken.
❺
Setzen Sie den Wasserhahn wieder ein, indem Sie ihn gegen den Uhrzeigersinn drehen.
Voraussichtlicher Filteraustauschzyklus
▶ Der Filteraustauschzyklus basiert auf der Menge des bei Ihnen zu Hause gefilterten Wassers (10
Liter pro Tag), der Status der Wasserversorgung kann den Zyklus beeinflussen.
Empfehlungen
▶
Filterkapazität
▶
Die Lebensdauer von eingebauten Systemen zur Entfernung von Verunreinigungen wie Filtern ist eigens festzulegen. Sie
wird auf Grundlage der Zerspanleistung von Chloroform etc. berechnet.
▶
Filteraustauschzyklus
▶
Nach eingehender Prüfung der Filter wurde der geschätzte Zeitraum, in dem ein Filter richtig funktioniert, sorgfältig
festgelegt. Dies wurde auf Grundlage der gefiltertem Trinkwassermenge (10 Liter pro Tag für vier Personen) bestimmt.
Der Zyklus verkürzt sich mit zunehmender Menge.
PRE CARBON 2.0 FILTER
NANO POSITIVE PLUS FILTER
MINERALIZER FILTER
4 Monate
12 Monate
12 Monate
Filter Name
Voraussichtlicher Filteraustauschzyklus

40
▼
Wenn Sie die Anweisungen in dieser Bedienungsanleitung nicht befolgen, kann es zu Funktionsstörungen des Produkts kommen, auch
wenn kein Fehler vorliegt. Bitte treffen Sie folgende Vorkehrungen, falls ein Problem mit dem Produkt auftritt. Wenn das Problem
weiterhin vorliegt, kontaktieren Sie bitte das Kundendienstcenter.
Problem Prüfliste
Das Wasser hat einen
schlechten Geschmack/Geruch
・ Wurde das Gerät längere Zeit nicht bedient?
・ Müssen Sie die Filter austauschen?
・ Bitte verwenden Sie das Gerät erst nach 10-minütiger Entleerung.
・ Tauschen Sie den Filter aus(Verwenden Sie nur Original Cuckoo Filter)
W
asser wird nicht
ausgegeben
・ Wird das Leitungswasser richtig zugeführt?
・ H
aben Sie die Taste Abfluss fest gedrückt?
・ Ist das Gerät richtig an das Stromnetz angeschlossen?
・ M
üssen Sie die Filter austauschen?
・ Öffnen Sie das Wasserzulaufventil.
・ P
rüfen Sie, ob der Wasserversorgungsschlauch geknickt ist.
・ Prüfen Sie, ob die Wasserzufuhr unterbunden ist.
・ H
aben Sie die Taste Abfluss fest gedrückt?
・
Bitte prüfen Sie, ob das Gerät richtig an das Stromnetz angeschlossen ist.
・ K
ontaktieren Sie Ihr Kundendienstcenter für einen Filteraustausch.
Es wird nicht genügend
Wasser ausgegeben.
・ H
aben Sie das Sperrventil geschlossen?
・ Müssen Sie die Filter austauschen?
・ Ö
ffnen Sie das Sperrventil.
・
Tauschen Sie den Filter aus.(Verwenden Sie nur Original Cuckoo Filter)
(Die Menge des ausgegebenen Wassers variiert je nach Wasserdruck)
Ein lautes Geräusch ertönt.
・ Ist der Boden unter dem Produkt eben?
・ Ist das Gerät mit anderen Objekten in Berührung?
・ Tritt das Geräusch nach der Wasserausgabe auf?
・ Stellen Sie das Produkt auf ebenem und festem Boden auf.
・ Achten Sie darauf, dass es nichts berührt.
・ Es ist direkt an das öffentliche Wassernetz angeschlossen und stellt
sicher, dass das Wasser auf einem bestimmten Niveau gehalten wird.
Das Geräusch ertönt, wenn Wasser in den Filter fließt, das ist normal
Die Tasten funktionieren
nicht richtig.
・ Haben Sie die Taste Abfluss 30 Sekunden oder länger
gedrückt?
・
Das ist ein normaler Vorgang, der die Tasteneingabe sperrt, wenn die
Taste Abfluss 30 Sekunden oder länger gedrückt wird. Dadurch soll ein
falscher Bedienvorgang durch Fremdeinwirkung verhindert werden.
・ Nehmen Sie Ihren Finger von der Taste und drücken Sie dann erneut.
Auf dem Wasser schwimmen
Stoffe.
・ Müssen Sie die Filter austauschen? ・ Tauschen Sie den Filter aus(Verwenden Sie nur Original Cuckoo Filter)
Wasser tritt aus dem
Aufbereitungsgerät aus.
・ Herrscht in Ihrem Haus oder im externen Umfeld starke
Feuchtigkeit?
・ Ist der montierte (angeschlossene) Teil defekt?
・ Wenn die kalten Teile im Wasseraufbereitungsgerät mit Feuchtigkeit
in Kontakt kommen, kann Tau entstehen, so wie Wassertropfen auf
einer Tasse Wasser.
・
Schließen Sie das Wasserzulaufventil und ziehen Sie den Netzstecker aus der
Steckdose. Kontaktieren Sie dann unser Kundendienstcenter für einen Service.
Wenn das Gerät Wasser
ausgibt, leuchtet die GRÜNE
LED des Wasserhahns nicht
auf.
・ Ist die Funktion Wasserhahn-Beleuchtung ausgeschaltet? ・ Bitte schalten Sie die Funktion Wasserhahn-Beleuchtung ein(Siehe
Seite 16 für die Einstellung der Funktion.)
Bitte zuerst prüfen vor Support-Anfrage
Reparaturanfragen
Funktionsstörungen können durch abgenutzte Bauteile verursacht werden, die kontinuierlich Wärme, Staub und anderen Verunreinigungen ausgesetzt wurden.
Falls eines bzw. mehrere dieser
Anzeichen auftreten,
▼
Bitte verwenden Sie das Produkt nicht mehr.
- Suchen Sie ein Kundendienstcenter in Ihrer Nähe unter www.cuckooworld.com.
❶
“prüfen Sie bitte folgende Punkte, bevor Sie eine Reparatur anfordern.”
❷
Sie spüren Elektrizität, wenn Sie das Produkt mit den Händen berühren;
❸
Andere Störungen oder Fehler treten auf
Empfehlung

41
GER
Produktdaten:
※ Produktspezifikationen und andere Angaben (Außengestaltung, Design und Spezifikationen) in dieser Bedienungsanleitung können ohne vorherige Benachrichtigung zum
Zweck der Produktverbesserung geändert werden.
※ Da dieses Gerät die EMC-Registrierung für private Einsatzzwecke (Klasse "B") besitzt, kann es in allen Gebieten, einschließlich Wohngebieten, verwendet werden und ist
hauptsächlich für den Gebrauch im Haushalt vorgesehen.
※ Hersteller: CUCKOO HOMESYS Co., Ltd.
Produktname Wasserbehandlung
Modell
C
P-MN031 Series
CP-MN031W / CP-MN031BK
Nennspannung
Verwenden Sie ausschließlich folgende Netzanschlüsse: U.S.: 120V / 60Hz; Europa: 220V / 50Hz; UK: 240V / 50Hz; China: 220V / 50Hz; und Vietnam: 220V / 60Hz.
Stromverbrauch
11W / 0.09A
Filterung Elektrische Filterung & Adsorption
Filterdaten
S
chritt
1
P
RE CARBON 2.0(4Months)
Schritt
2
Nano Positive Plus (12Months)
Schritt
3
MINERALIZER Filtration(12Months)
Filterkapazität 1,900L
Klimaklasse N (gemäßigt)
Aufstellbereich Für den Haus-/Bürogebrauch und in Innenräumen
Nettogewicht ca. 3.4Kg
Produktabmessungen
135(W) × 379(D) × 367(H)
Arbeitsdruck
1.5~6.9Bar(0.15~0.69MPa)
Art des Kundenschadens
Bei Auftreten von
Störungen oder
Funktionsfehlern bei
normalem Gebrauch
(während der
Garantiefrist)
Ein Fehler beim Betrieb oder
der Funktion des Produkts
aufgrund einer Absicht oder
eines Fehlers des Kunden
■
Falls eine Funktionsstörung durch eine Naturkatastrophe (Brand, Schäden durch Ansteigen des Meeresspiegels, Gas, Erdbeben, Schäden durch Sturm und Überflutung etc.) verursacht
wurde
■
Falls ein Verbrauchsteil ersetzt werden muss, der durch normalen Gebrauch abgenutzt ist.
■
Wenn eine Funktionsstörung aufgrund einer Störung der Stromversorgung oder
eines defekten Anschlusses auftritt
■
Wenn eine Funktionsstörung nicht aufgrund eines Produktfehlers sondern einer externen Ursache auftritt
■
Wenn eine Funktionsstörung auftritt,
nachdem eine Person, bei der es sich nicht um einen Servicetechniker einer CUCKOO Agentur oder eines CUCKOO Kundenservicecenters handelt, das Produkt repariert oder umgebaut hat
•
Bei oben nicht angegebenen Fällen werden Schäden entsprechend den Standards zur Beilegung von Konsumentenbeschwerden im Einklang mit den Verbraucherschutzvorschriften ersetzt.
•Kundendienst : Besuchen Sie http://www.cuckooworld.com •
Gerätereinigung, Anpassung, Anleitung zur Verwendung etc. stellen keine Fehlfunktionen dar
Wenn wesentliche Reparaturen innerhalb von 10 Tagen ab Kaufdateum erforderlich sind
Wenn ein wichtiger Bauteil innerhalb von einem Monat ab Kaufdatum einer Reparatur bedarf
Wenn ein ausgetauschtes Produkt innerhalb von einem Monat nach dem Austausch einer wesentlichen Reparatur bedarf
Wenn ein Defekt auftritt
Wenn ein Austausch nicht möglich ist
Wenn derselbe Defekt behoben wurde, aber der Fehler erneut auftritt (zum dritten Mal)
Wenn das Produkt vier Mal aufgrund von Fehlfunktionen mehrerer Bauteile repariert wurde, aber der Fehler erneut auftritt (zum fünften Mal)
Wenn der Betreiber das Produkt, für das der Konsument eine Reparatur angefordert hat, verloren hat
Falls die Reparatur nicht möglich ist, da die für die Reparatur erforderlichen Teile nicht verfügbar sind
Schäden, die während des Transports oder beim Aufstellen des Produkts nach Erwerb des Produkts durch den Kunden auftreten
Falls die Reparatur nicht möglich ist
Falls die Reparatur nicht möglich ist, da die für die Reparatur erforderlichen Teile nicht verfügbar sind
Falls die Reparatur nicht möglich ist
Angaben zu Schadenersatz
Während der Garantiefrist
Produktaustausch oder Rückerstattung des Kaufpreises
Produktaustausch und kostenlose Reparatur
Rückerstattung des Kaufpreises
Kostenlose Reparatur
Produktaustausch oder
Rückerstattung des
Kaufpreises
Rückerstattung einer Summe berechnet durch Hinzufügen von 10 % zu einem
Betrag, der durch Wertminderung für eine feste Summe erhalten wurde.
Rückerstattung einer Summe berechnet durch Hinzufügen von 5% zu einem
Betrag, der durch Wertminderung für eine feste Summe erhalten wurde.
Kostenpflichtige Reparatur Kostenpflichtige Reparatur
Produktaustausch
Bezahlung des Betrags für die kostenpflichtige
Reparatur und Austausch des Produkts
Bezahlung des Betrags für die kostenpflichtige Reparatur und
Austausch des Produkts durch Anwendung einer Wertminderung
Kostenpflichtige Reparatur Kostenpflichtige Reparatur
Nach der Garantiefrist
Lösungen bei Kundenbeschwerden
Über unseren Service
•
Rechte unsere Kunden
Unsere Kunden haben Anspruch auf einen kostenlosen Service bis zu einem Jahr nach dem Kaufdatum, wenn bei der Verwendung des Produkts ein Fehler auftritt. Wenn aber die
Fehlfunktion durch nachlässiges Verhalten des Kunden oder Naturkatastrophen auftritt, hat der Kunden auch während des Zeitraums des kostenlosen Services nur einen
Anspruch auf kostenpflichtige Serviceleistungen.
•
Verantwortung für kostenpflichtigen Service (Kosten zulasten des Kunden)
Wenn ein Kunde eine Servieanfrage für ein Problem stellt, das unter eines der folgenden Szenarien fällt, hat der Kunden auch während des Zeitraums des kostenlosen Services
nur einen Anspruch auf einen kostenpflichtigen Service,
1) Wenn eine Fehlfunktion auftritt, nachdem Fremdstoffe (Wasser, Getränk, Kaffee, Spielsachen etc.) in das Produkt eingeführt wurden.
2) Wenn das Produkt beschädigt wurde und eine Fehlfunktion aufgetreten ist, nachdem das Produkt fallen gelassen wurde oder als Folge eines Aufpralls.
3) Wenn Äußere des Produkts durch organische Lösungsmittel wie Verdünner oder Benzol beschädigt und/oder verformt wurde.
4) Wenn eine Fehlfunktion aufgetreten ist, nachdem ein Bauteil oder Verbrauchsteil, bei dem es sich nicht um ein Original CUCKOO Teil handelt, verwendet wurde (Adapter, Filter
etc.) Kaufen Sie nur Original CUCKOO Bauteile und Verbrauchsteile in einem zugelassenen Kundendienstcenter.
5) Wenn eine Fehlfunktion aufgrund der falschen Netzspannung aufgetreten ist
6) Wenn ein Bauteil verloren oder beschädigt ist, nachdem der Kunde das Produkt willkürlich demontiert hat.
7) Wenn eine Fehlfunktion auftritt, nachdem eine Person, bei der es sich nicht um einen Servicetechniker einer CUCKOO Agentur oder eines CUCKOO Kundenservicecenters
handelt, das Produkt repariert oder umgebaut hat.
8) Wenn eine Fehlfunktion infolge einer Naturkatastrophe (Blitz, Brand, Sturm- und Flutschäden, Gas, Windbeschädigungen, Erdbeben etc.) auftritt
9) Wenn eine Fehlfunktion auftritt, nachdem der Kunde die Warnhinweise für sichere Verwendung in der Bedienungsanleitung nicht beachtet hat (Wenn Sie die Warnhinweise für
sichere Verwendung beachten, können Sie das Produkt lange verwenden.)
10) Wenn eine Funktionsstörung infolge eines anderen Fehlers des Kunden aufgetreten ist

42
SOMMARIO
Prima dell’uso
Avvertenze per un uso sicuro / Precauzioni per un uso sicuro
Nome dei componenti / Accessori
Elementi da controllare / Modalità di utilizzo
Disposizione del tubo di purificazione dell'acqua e Impianto di
purificazione dell’acqua / Ciclo previsto di sostituzione del filtro
Verificare prima di segnalare un’anomalia di funzionamento /
Guida alla risoluzione dei problemi
Specifiche tecniche del prodotto / Standard per gestire le controversie
con i clienti / Informazioni sul nostro servizio
43~45
46
47~49
50
51
In fase di utilizzo
Richiedere riparazioni
Guida di servizio

Avvertenze per un uso sicuro
43
ITA
Avvertenze
・
Non piegare, legare o tirare con forza eccessiva il Cavo di alimentazione.
・ In caso di scollegamento del prodotto, verificare di tenere in mano la Presa di alimentazione e non il Cavo
di alimentazione.
・ In caso di perdite di acqua o pulizia, si prega come prima cosa di scollegare il dispositivo.
・ Verificare che il cavo di alimentazione non si trovi sotto oggetti pesanti o vicino a oggetti affilati. Prestare
particolare attenzione per verificare che il dispositivo non venga danneggiato da animali domestici.
・ Si prega inoltre di scollegare il dispositivo prima di eventuali ispezioni, riparazione o sostituzione delle
componenti dello stesso.
・ Interrompere l’uso del prodotto qualora il Cavo di alimentazione o la Presa di alimentazione siano
danneggiati o ancora qualora la Presa di corrente sia traballante; successivamente, contattare il nostro
Centro Assistenza Clienti.
・ Pulire le eventuali sostanze estranee presenti sulla Presa di alimentazione servendosi di un panno
asciutto.
・ Non usare elementi diversi rispetto a quanto indicato: Stati Uniti d’America: 120V / 60Hz; Europa: 220V /
50Hz; Regno Unito: 240V / 50Hz; Cina: 220V / 50Hz; e Vietnam: 220V / 60Hz.
・ Qualora venga inserita o estratta la Presa di alimentazione, come prima cosa eliminare l’umidità dalle
mani, quindi inserire o togliere la Presa tenendola saldamente.
・ Qualora entri dell’acqua nell’area di alimentazione, scollegare il prodotto e asciugarlo completamente
prima dell’uso.
・ In caso di lunghi periodi di inutilizzo, estrarre la spina e tenerla al sicuro dopo aver chiuso la valvola di
alimentazione dell’acqua collegata al rubinetto e dopo aver svuotato l’acqua restante all’interno del
serbatoio.
Informazioni sull’alimentazione
•Questo simbolo indica una situazione potenzialmente
pericolosa in circostanze speciali.
•Si prega di leggere con attenzione i dettagli oltre che di
attenersi alle istruzioni al fine di evitare situazioni
pericolose.
Situazione potenzialmente
pericolosa che potrebbe causare
gravi lesioni o decesso se non viene
evitata.
Situazione potenzialmente
pericolosa che potrebbe causare
lesioni di entità minore se non viene
evitata.
S
i prega di attenersi alle “Avvertenze per un uso sicuro” al fine di garantire un uso corretto del prodotto ed
evitare incidenti e situazioni pericolose.
Avvertenze
Caution

Avvertenze per un uso sicuro
44
・ D・ Non mettere il purificatore in aree umide o polverose.
・ Non installare il prodotto vicino al bagno.
・ Non posizionare in aree irregolari o in pendenza. Si prega di evitare di mettere su tappeti, cuscini o
pavimenti laminati.
・ Verificare di installare il dispositivo in aree pulite.
・ Evitare la luce solare diretta e le temperature elevate.
・ Verificare che la lunghezza del tubo di alimentazione non superi i 5 m dalla valvola di alimentazione
dell’acqua collegata al rubinetto.
・ Non mettere dispositivi riscaldanti, quali ad esempio forno a microonde, forno elettrico o tostapane, od
oggetti infiammabili, quali ad esempio candele, contenitori di gas e accendini sulla parte superiore del
prodotto.
・ Fare attenzione alle perdite di acqua all’interno del dispositivo.
・ Fare attenzione e verificare che i bambini o altre persone non tocchino troppo spesso il pannello di
controllo.
・ Non mettere in aree dove vi è il rischio di perdite di gas o nelle immediate vicinanze di dispositivi
riscaldanti.
・ Verificare che fornitura di acqua di rubinetto sia in funzione e installare la valvola di alimentazione
dell’acqua collegata al rubinetto verso il tubo dell’acqua fredda.
・ Non mettere il dispositivo all’esterno oppure in un’area dove la temperatura scende al di sotto dei 0℃?.
・ Dopo aver completato l’installazione, tenerla pulita e in buone condizioni di manutenzione.
・ Qualora il prodotto venga posizionato sopra al lavandino, usare sempre acqua fredda o acqua purificata.
(Non usare acqua calda.)
・ Non mettere sostanze chimiche, bottiglie di acqua o piccoli materiali metallici sopra al prodotto.
・ Non smontare o rimodellare il prodotto.
・ Dopo l’installazione, verificare che i tubi e i flessibili siano saldamente connessi e che non vi siano perdite.
Guida di installazione
Avvertenze

Avvertenze per un uso sicuro
45
ITA
Informazioni sull’uso
・ Qualora riscontriate la presenza di perdite o pozzanghere di acqua nelle immediate vicinanze del
prodotto, come prima cosa chiudere la Valvola di alimentazione dell'acqua collegata al rubinetto,
spegnerla, quindi scollegare il prodotto. Successivamente, contattare il Centro Assistenza Clienti.
・ Non tirare il cavo di alimentazione oppure il tubo flessibile, e afferrare il rubinetto mentre il prodotto è in
funzione.
・ Qualora si avverta odore di bruciato o fumo che fuoriesce dal dispositivo, scollegarlo immediatamente,
quindi chiudere la Valvola di alimentazione dell'acqua collegata al rubinetto.
Successivamente, contattare il Centro Assistenza Clienti.
・ Non mettere piastre o materiali metallici sopra al prodotto.
・ Verificare che la copertura per la sostituzione di un filtro del prodotto sia completamente chiusa prima
dell’uso.
・ Qualora il dispositivo venga lasciato inattivo a lungo, verificare che l’acqua venga erogata per
indicativamente 10 minuti prima di usare il dispositivo.
・ Sostituire il filtro in conformità col ciclo di sostituzione.
・ Usare sempre filtri autentici CUCKOO per il prodotto.
・ Qualora il rubinetto esterno non venga usato a lungo, si potrebbe inquinare.
・ Qualora venga riutilizzato, inizierà a erogare dopo aver scaricato l’acqua restante per indicativamente
uno-due minuti.
・ Non pulire il prodotto con benzene o solvente.
・ In fase di utilizzo del prodotto, non tirare il tubo dalla parte posteriore.
・ Non spostare il dispositivo mentre è in funzione.
・ Si prega di evitare di usare l’acqua erogata per riempire acquari o vasi per pesci.
Avvertenze
Precauzione
Precauzione

Nome delle componenti / Accessori Disposizione del tubo di
purificazione / Sistema di purificazione dell’acqua
46
Pannello di controllo
< Parte posteriore >
P
annello di controllo
Rubinetto
Coperchio per
sostituzione filtro
Cavo di alimentazione
Vassoio
※
Il prodotto effettivo potrebbe differire rispetto all’immagine mostrata.
Presa esterna
Connettore rubinetto
Griglia vassoio
Pulsante Deflusso - Per erogare l’acqua manualmente
1
Pulsante Flusso Non-Stop - Per eseguire un’erogazione continua
3
Pulsante Una tazza - Per erogare una tazza di acqua
2
Pulsante “Replace Filter" - Usato per sostituire i filtri
(Quando un filtro deve essere sostituito, il LED del Filtro si accende.)
5
Pulsante Blocco pulsante - Per bloccare le funzioni del prodotto a fini di sicurezza
(Premere il pulsante per due secondi e la funzione viene impostata o annullata.)
4
Pulsante di erogazione
Una
tazza
Flusso
non-stop
Blocco
pulsante
Sostituzione
filtro
< CP-MN031 Series >
Nome delle componenti
Accessori
Manuale dell’Utente
Altri materiali supplementari
per l’installazione
Disposizione del tubo di purificazione dell’acqua e dell’impianto di purificazione dell’acqua
CP-MN031 Series
Livello 1
PRE CARBON 2.0 FILTER
NANO POSITIVE PLUS FILTER
MINERALIZER FILTER
Assorbe residui di cloro, trialometano, sapori e odori sgradevoli.
Elimina le particelle piccole, i germi (pseudomonas aeruginosa, colon bacillus,
staphylococcus aureus), i virus (Norovirus), e i metalli pesanti (piombo, ferro, alluminio).
Aggiunge minerali all'acqua, rendendola più sana e dal sapore migliore.
Livello 2
Livello 3
※
Il filtro è una componente critica per un impianto di filtraggio dell’acqua.
※
L’uso di un filtro non-CUCKOO oppure l’uso di un filtro autentico CUCKOO per molto tempo potrebbe causare una diminuzione delle riduzioni delle prestazioni del filtro stesso.
LIVELLO Nome del filtro Funzione filtro
MINERALIZER
FILTER
Valve
Outlet
NANO
POSITIVE
PLUS FILTER
PRE CARBON
2.0 FILTER
Pressure reducing
valve 3K
※
Il prodotto effettivo potrebbe differire rispetto all’immagine mostrata.
< Parte anteriore >

Elementi da controllare / Modalità di utilizzo
47
ITA
Verificare che vi sia spazio a sufficienza per eseguire l’installazione.
▶
Per comodità in fase di sostituzione dei filtri, collocare il prodotto a 20 cm o
più lontano dalla parete, quindi collocare il prodotto dove la lunghezza del
tubo di alimentazione dell’acqua collegato al rubinetto è di 5m o meno dalla
valvola di alimentazione dell’acqua collegata al rubinetto.
Precauzioni per il luogo di installazione
Si prega di prestare attenzione in fase di spostamento del prodotto.
▶
Non inclinare di più di 45 gradi in fase di spostamento.
Verificare inoltre di collegare almeno 30 minuti dopo aver
spostato il prodotto e riempito il serbatoio.
Non usare elementi diversi rispetto a quanto indicato: Stati Uniti d’America: 120V / 60Hz;
Europa: 220V / 50Hz; Regno Unito: 240V / 50Hz; Cina: 220V / 50Hz; e Vietnam: 220V / 60Hz.
Verificare di eseguire il collegamento a una presa di corrente adeguata.
Precauzione
Elementi da controllare prima dell’uso
Elementi da controllare prima dell’installazione
❶ Aprire la valvola di alimentazione dell’acqua collegata al rubinetto.
▶
Ruotare come prima cosa il rubinetto per controllare se l’erogazione di acqua avviene in modo adeguato. Quindi, aprire la
valvola di alimentazione dell’acqua collegata al rubinetto.
❷ Collegare il prodotto.
▶
Verificare lo scollegamento dell’acqua prima di eseguire il collegamento.
❸ Qualora il dispositivo sia rimasto inattivo a lungo oppure sia stato installato di recente, lasciarlo
scaricare per almeno 10 minuti.
❹ Svuotare il vassoio su base regolare.
❶ Funzione flusso in uscita manuale
▶
L'acqua filtrata viene erogata manualmente.
▶
Premere il pulsante Deflusso in modalità Standby per erogare acqua.
☞
L'acqua verrà erogata solo dopo aver premuto il pulsante Deflusso.
☞
Qualora venga premuto il pulsante Deflusso per pi? di 30 secondi, l°Øerogazione di acqua
verr? interrotta. Togliere il dito dal pulsante, quindi premerlo nuovamente per erogare
acqua.
❷
Modalità Una tazza (La quantità erogata varia a seconda della pressione dell'acqua)
▶
Verrà erogata la quantità necessaria a riempire una tazza.
▶
Premere il pulsante Una tazza in modalità Standby per accedere alla modalità
Standby Una tazza. Quindi, premere il pulsante Deflusso per erogare acqua.
☞
Qualora il dispositivo venga lasciato inattivo per più di 7 secondi in modalità Standby Una tazza,
tornerà alla modalità Standby.
☞ Premendo uno dei pulsanti in questa modalità verrà interrotta l’erogazione di acqua.
☞ La quantità predefinita di acqua erogata della modalità Una tazza è di circa 150 cc.
❸
Modalità Flusso Non-Stop (La quantità erogata varia a seconda della pressione
dell’acqua.)
▶
L'acqua viene erogata in modalità continua.
▶
Premere il pulsante Flusso Non-Stop in modalità Standby per accedere alla modalità
Standby Flusso Non-Stop. Quindi, premere il pulsante Deflusso per erogare acqua.
☞
Premendo uno dei pulsanti nella modalità Flusso Non-Stop verrà interrotta l’erogazione di acqua.
☞
Il valore predefinito del tempo Flusso Non-Stop è 1 minuto.
Modalità d’uso
※
Modalità Standby :
Il Purificatore dell’acqua è collegato
e pronto per essere usato.Il LED Deflusso è illuminato.
※
Modalità Standby Una tazza :
Il pulsante Una tazza
viene premuto in modalità Standby. Il LED Una tazza si
illumina, e il LED Deflusso inizia a lampeggiare.
※
Modalità Standby Flusso Non-Stop :
Il pulsante
Flusso Non-Stop viene premuto in modalità Standby. Il LED
Flusso Non-Stop è illuminato e il LED Deflusso inizia a
lampeggiare.
<Modalità Standby>
SUGGERIMENTO
<Modalità Standby Una tazza>
<Modalità Standby Flusso Non-Stop>
Precauzioni sullo spostamento del prodotto

Come usare / Come impostare
48
Come impostare la quantità di acqua erogata per una tazza
❶
Premere il pulsante Una tazza per 3 secondi in modalità Standby per impostare la quantità di acqua erogata per una tazza.
❷
A seconda della quantità selezionata, uno o più dei seguenti LED si accende: LED una tazza, LED flusso non-stop,
LED di blocco pulsante e LED Sostituzione filtro. (La quantità predefinita è indicativamente di 150cc.)
❸
Selezionare la quantità desiderata per una tazza (indicativamente 130cc - 190cc) premendo il pulsante Deflusso.
❹
Selezionare la quantità desiderata per Una tazza e premere il pulsante Una tazza.
☞
Qualora venga premuto qualsiasi altro pulsante che non sia il pulsante Deflusso oppure Una tazza, la modalità verrà annullata e il prodotto tornerà in modalità Standby.
☞
Qualora non venga premuto nessun pulsante per 20 secondi nelle impostazioni, la modalità verrà annullata a il prodotto tornerà alla modalità Standby.
※
La quantità di acqua erogata varia a seconda del luogo di installazione. Qualora sia necessario misurare con precisione la quantità, servirsi di un indicatore di livello.
Indicativamente 130 cc
Indicativamente 150 cc
(Valore predefinito)
Indicativamente 170 cc
Indicativamente 190 cc
1
2
3
4
Il LED Una tazza è illuminato.
Il LED Una tazza e il LED Flusso Non-Stop sono illuminati.
Il LED Una tazza, il LED Flusso Non-Stop e il LED Blocco pulsante sono illuminati.
Il LED Una tazza, LED Flusso Non-Stop, il LED Blocco pulsante e il LED Sostituzione filtro sono illuminati.
Quantità una tazza
LIVELLO
Display
Come impostare il tempo per la modalità Non-Stop
❶
Premere il pulsante Flusso Non-Stop per 3 secondi in modalità Standby per impostare il tempo per la modalità Flusso Non-Stop.
❷
A seconda del tempo selezionato, uno o più dei seguenti LED si accende: LED una tazza, LED flusso non-stop,
LED di blocco pulsante e LED Sostituzione filtro. (Il tempo predefinito è indicativamente di 60 secondi.)
❸
Premere il pulsante Deflusso per selezionare il tempo desiderato per la modalità Flusso Non-Stop (da 50 a 80 secondi).
❹
Selezionare il tempo desiderato e premere il pulsante Flusso Non-Stop.
☞
Qualora venga premuto qualsiasi altro pulsante che non sia il pulsante Deflusso oppure Flusso Non-Stop, la modalità verrà annullata e il
prodotto tornerà in modalità Standby.
☞
Qualora non venga premuto nessun pulsante per 20 secondi nelle impostazioni, la modalità verrà annullata a il prodotto tornerà alla
modalità Standby. 8.
50 secondi
60 secondi (Valore predefinito)
70 secondi
80 secondi
1
2
3
4
Il LED Una tazza è illuminato.
Il LED Una tazza e il LED Flusso Non-Stop sono illuminati.
Il LED Una tazza, il LED Flusso Non-Stop e il LED Blocco pulsante sono illuminati.
Il LED Una tazza, LED Flusso Non-Stop, il LED Blocco pulsante e il LED Sostituzione filtro sono illuminati.
Tempo selezionato
LIVELLO
Display
❹
Funzione Blocco pulsante (Blocco pulsante)
▶
V
iene usato per bloccare i pulsanti al fine di evitare che l’apparecchiatura si azioni per
sbaglio in fase di pulizia o quando i bambini toccano i pulsanti.
▶
Premere il pulsante di blocco per 2 secondi in modalità Standby per bloccare il dispositivo.
▶
P
remere nuovamente il pulsante di blocco per 2 secondi per sbloccare il dispositivo.
❺
Funzione Auto Flow
▶
Questa funzione eroga automaticamente acqua purificata.
▶
Tenere premuto il pulsante Out Flow in modalità Standby per 0.3 secondi e verrà
erogata acqua purificata.
☞ In caso di Auto Flow, il flusso si interrompe quando il dispositivo ha erogato acqua per
30 secondi.
☞ Se viene premuto il pulsante "Out Flow" per 0.3 secondi durante l’Auto Flow, la
funzione si ferma e il dispositivo accede alla modalità Standby.

Come impostare / Come rimuovere e pulire il rubinetto
Ciclo previsto di sostituzione del filtro / Indicazioni
49
ITA
Come impostare l’illuminazione del rubinetto
❶
Premere contemporaneamente i pulsanti Una tazza e Flusso Non-Stop per 3 secondi, in modalità Standby, per
accedere alle impostazioni.
❷
A seconda dello stato selezionato, si illuminano i seguenti LED: LED Una tazza, LED Flusso Non-Stop, LED
Blocco pulsante e LED Sostituzione filtro. (L’impostazione predefinita è ON.)
❸
Premere il pulsante Deflusso per selezionare lo stato desiderato.
❹
Selezionare lo stato desiderato e premere il pulsante di blocco.
☞ Qualora venga premuto qualsiasi altro pulsante che non sia il pulsante Deflusso oppure Blocco pulsante, la modalità verrà annullata e il prodotto
tornerà in modalità Standby.
☞
Qualora non venga premuto nessun pulsante per 20 secondi nelle impostazioni, la modalità verrà annullata a il prodotto tornerà alla
modalità Standby.
On (Valore predefinito)
OFF
1
2
Il LED Una tazza, il LED Flusso Non-Stop, il LED Blocco pulsante, il LED Sostituzione
filtro, e il LED VERDE di illuminazione del rubinetto sono illuminati.
Tutte le spie si spengono.
Illuminazione del rubinetto
LIVELLO
Display
Come togliere e pulire il rubinetto
❶
Tenere il rubinetto e ruotarlo in senso orario per toglierlo.
❷
Dopo la separazione, pulire l’ingresso del rubinetto con un panno pulito.
❸
Pulire il rubinetto separato con acqua corrente. (Pulire con facilità la sporcizia all’interno del rubinetto qualora
non sia possibile raggiungerla servendosi di un cotton fioc, ecc.)
❹
Asciugare il rubinetto con un panno pulito.
❺
Inserire il rubinetto girandolo in senso anti-orario.
Ciclo previsto di sostituzione del filtro
▶ Il ciclo di sostituzione del filtro viene impostato sulla base del quantitativo di acqua filtrata a casa
(10L al giorno), e lo stato dell’alimentazione dell’acqua potrebbe influire sul ciclo.
Indicazioni
▶
Capacità di filtraggio
▶
Serve per identificare la durata di vita dei rimuovi-contaminanti integrati quali ad esempio i filtri. Viene calcolato sulla base
del tasso di rimozione del cloroformio, ecc.
▶
Ciclo di sostituzione del filtro
▶
Dopo un'attenta revisione dei filtri viene stimato con attenzione un periodo durante il quale il filtro registra prestazioni
ottimali. Ciò viene determinato sulla base del quantitativo di acqua di rubinetto filtrata per essere bevuta (10L al giorno
per quattro). In questo modo il ciclo si accorcia mano a mano che il quantitativo usato sale.
PRE CARBON 2.0 FILTER
NANO POSITIVE PLUS FILTER
MINERALIZER FILTER
4 mesi
12 mesi
12 mesi
Nome del filtro
Ciclo previsto di sostituzione

50
▼
Qualora non ci si attenga a questo Manuale Utente, il prodotto potrebbe non funzionare correttamente anche qualora non vi siano
a
nomalie di funzionamento. Adottare dunque le seguenti misure qualora vi sia un problema col prodotto. Qualora i problemi persistano,
contattare il nostro Centro Assistenza Clienti.
Problema Elenco di controllo
L’acqua ha un gusto e/o
un odore sgradevole.
・ Il dispositivo è rimasto inattivo troppo a lungo?
・ È necessario provvedere alla sostituzione dei filtri?
・ Usarlo dopo averlo scaricato per circa 10 minuti.
・ Sostituire il filtro.(Non usare un filtro Non-Cuckoo.)
L
'acqua non viene
erogata.
・ IL'acqua di rubinetto viene erogata correttamente?
・ È
stato premuto saldamente il pulsante Deflusso?
・ L’alimentazione viene erogata correttamente?
・ È
necessario provvedere alla sostituzione dei filtri?
・ Aprire la valvola di alimentazione dell’acqua collegata al rubinetto.
・ C
ontrollare che il tubo di alimentazione dell’acqua non sia piegato.
・ Controllare che l’erogazione idrica non sia interrotta.
・ È
stato premuto saldamente il pulsante Deflusso?
・ Controllare che il dispositivo sia collegato.
・
C
ontattare il nostro Centro Assistenza Clienti per provvedere alla sostituzione del filtro.
Non eroga acqua a
sufficienza.
・ È
stata chiusa la valvola di blocco?
・ È necessario provvedere alla sostituzione dei filtri?
・ A
prire la valvola di blocco.
・ (Non usare un filtro Non-Cuckoo.)
(La quantità di acqua erogata varia a seconda della pressione
dell’acqua).
Viene emesso un rumore
forte.
・ Il pavimento sotto al prodotto ? piatto?
・ Entra in contatto con altri materiali?
・ Diventa rumoroso dopo aver erogato acqua?
・ Installare il prodotto su una superficie piatta e solida.
・ Verificare che non entri in contatto con altri oggetti.
・ È direttamente connesso all’alimentazione di acqua pubblica e
garantisce che l’acqua venga mantenuta a un determinato livello.
Il rumore viene emesso quando l’acqua scorre nel filtro; non si tratta
di un’anomalia di funzionamento.
I pulsanti non funzionano
correttamente.
・ È stato premuto il pulsante Deflusso per 30 secondi o più a
lungo?
・
Si tratta di un’operazione normale che blocca l’input dei pulsanti quando
viene premuto il pulsante Deflusso per 30 secondi o più a lungo per evitare
un funzionamento errato causato da sostanze estranee.
・ Togliere la mano dal pulsante Deflusso, quindi premerlo nuovamente.
Ci sono delle sostanze
galleggianti sull’acqua.
・ È necessario provvedere alla sostituzione dei filtri? ・ Sostituire il filtro.(Non usare un filtro Non-Cuckoo.)
Ci sono delle perdite di
acqua dal purificatore.
・ La casa o l’ambiente esterno presentano segni di umidità?
・ La componente assemblata (di collegamento) è difettosa?
・ Qualora le componenti fredde all’interno del Purificatore dell’acqua
entrino in contatto con umidità, si potrebbe formare condensa, proprio
come si formano delle gocce d’acqua su una tazza con acqua.
・
Chiudere la valvola di alimentazione dell’acqua collegata al rubinetto e scollegare il
prodotto.Quindi, contattare il Centro Assistenza Clienti per richiedere un intervento.
Mentre il dispositivo eroga
acqua, il LED VERDE del
rubinetto non è illuminato.
・ La funzione di illuminazione del rubinetto è disattivata? ・ Disattivare la funzione di illuminazione del rubinetto.
(Rimandiamo a pagina 16 per sapere come impostare la funzione.)
Si prega di verificare prima di richiedere
Assistenza.
Richiesta di riparazioni
Potrebbe non funzionare correttamente a causa di componenti usurate, continuamente esposte a calore, umidità, polvere e altri inquinanti.
Qualora si verifichi uno di
questi sintomi,
▼
Si prega di smettere di usare il prodotto.
- Cercare il Centro Assistenza Clienti più vicino a dove ci si trova all’indirizzo www.cuckooworld.com.
❶
“Si prega di verificare prima di richiedere Assistenza.”
❷
Si potrà avvertire una leggera scossa quando il prodotto viene toccato con le mani;
❸
Si possono verificare altri disordini o anomalie di funzionamento.
Indicazione

P
51
ITA
Specifiche tecniche del prodotto
※
Le specifiche tecniche e altri dettagli (esterno, design, e specifiche tecniche) nel presente Manuale dell’Utente potrebbero essere soggette a modifiche senza preavviso a fini di
miglioramento del prodotto.
※ Dato che questa strumentazione è stata sottoposta alla registrazione EMC a fini domestici (“classe B”), questo prodotto può essere usato in qualsiasi area ed è stato
progettato per essere utilizzato principalmente in contesti domestici.
※ Produttore: CUCKOO HOMESYS Co., Ltd.
Nome del prodotto TRATTAMENTO DELLE ACQUE
Modello
S
erie CP-MN031
CP-MN031W / CP-MN031BK
Tensione nominale
Non usare elementi diversi rispetto a quanto indicato: Stati Uniti d’America: 120V / 60Hz; Europa: 220V / 50Hz; Regno Unito: 240V / 50Hz; Cina: 220V / 50Hz; e Vietnam: 220V / 60Hz.
Consumo di corrente
11W / 0.09A
Filtraggio Filtraggio e Assorbimento elettrico
Specifiche
tecniche del filtro
P
assaggio 1
P
RE CARBON 2.0(4Months)
Passaggio 2
Nano Positive Plus (12Months)
Passaggio 3
MINERALIZER Filtration(12Months)
Capacità di filtraggio 1,900L
Classe climatica N (Temperato)
Area di installazione Per un uso a casa / in ufficio e in spazi chiusi
Peso netto Indicativamente 3.4Kg
Product Dimension
135(larghezza) × 379(profondità) × 367(altezza)
Pressione di funzionamento nominale
1.5~6.9Bar (0.15~0.69MPa)
Tipo di danni al consumatore
Qualora si sia
verificata un’anomalia
di funzionamento o a
livello prestazionale
durante il normale
utilizzo
(entro il periodo della
garanzia)
Un’anomalia di funzionamento
o prestazionale del prodotto,
dovuta all’intenzione o
all’errore del consumatore
■
Qualora si sia verificata un’anomalia di funzionamento in seguito a un disastro naturale (fuoco, danni da vento dal mare, gas, terremoto, danni da tempeste e inondazioni, ecc.)
■
Qualora sia
necessario sostituire un consumabile normalmente usurato per utilizzo
■
Qualora si sia verificata un’anomalia di funzionamento a causa di un disturbo nella sorgente di alimentazione usata oppure a
causa di un dispositivo di collegamento difettoso
■
Qualora si sia verificata un’anomalia di funzionamento non dovuta a un difetto del prodotto ma legata a cause esterne
■
Qualora si sia verificata
un'anomalia di funzionamento da quando una persona - non ingegnere di assistenza di un’agenzia CUCKOO oppure di un Centro Assistenza Clienti CUCKOO - ha riparato o rimodellato il prodotto
•
With regard to matters not specified above, the damages will be compensated in accordance with the standards for settling consumer disputes according to the Framework Act on Consumers.
•Customer Service : Visit http://www.cuckooworld.com •
Device cleaning, adjustment, guidance for use, etc. are not a malfunction.
Se è richiesta una riparazione essenziale entro 10 giorni dalla data di acquisto
Qualora una parte importante richieda una riparazione entro un mese dalla data d’acquisto
Qualora un prodotto sostituito richieda una riparazione essenziale entro un mese dopo la sostituzione
Qualora si verifichi un difetto
Qualora una sostituzione risulti impossibile
Qualora lo stesso difetto sia stato riparato la l’anomalia di funzionamento si ri-presenti (per la terza volta)
Qualora il prodotto sia stato riparato quattro volte a causa di anomalie di funzionamento di diverse componenti, ma l’anomalia di funzionamento si ri- presenti (per la quinta volta)
Qualora l’operatore commerciale abbia perso il prodotto per il quale il consumatore ha richiesto la riparazione
Qualora la riparazione sia impossibile in quanto le parti per la riparazione non sono preparate
Danni che si verificano durante il processo di trasporto o in fase di installazione del prodotto quando il cliente ha acquistato il prodotto
Qualora la riparazione sia possibile
Qualora la riparazione sia impossibile in quanto le parti per la riparazione non sono preparate
Qualora la riparazione sia impossibile
Dettagli sul risarcimento
Entro il periodo di garanzia
Sostituzione del prodotto o rimborso del prezzo d’acquisto
Sostituzione del prodotto e riparazione a titolo gratuito
Rimborso del prezzo d’acquisto
Riparazione a titolo gratuito
Sostituzione del prodotto o
rimborso del prezzo
d’acquisto
Rimborso di una somma calcolata aggiungendo il 10%
a
ll’importo ottenuto per deprezzamento per una somma fissata
R
imborso di una somma calcolata aggiungendo il 5%
all’importo ottenuto per deprezzamento per una somma fissata
Riparazione fatturata Riparazione fatturata
Sostituzione del prodotto
Pagamento dell’importo per la riparazione
fatturata e sostituzione del prodotto
Pagamento dell’importo per la riparazione fatturata e
sostituzione del prodotto applicando un deprezzamento
Riparazione fatturata Riparazione fatturata
Successivamente al periodo di garanzia
Soluzione di controversie per i clienti
Informazioni sul nostro servizio
•
Diritti dei nostri clienti
I nostri clienti hanno il prezioso diritto di ricevere un servizio gratuito per un periodo di un anno a partire dalla data di acquisto quando si è verificata un’anomalia di funzionamento in fase di utilizzo del prodotto.
Quando tuttavia si è verificata un’anomalia di funzionamento per negligenza del cliente o per disastro naturale, il cliente può ricevere solo servizi a pagamento, anche se rientra nel periodo di assistenza gratuita.
•
Responsabilità di un servizio a pagamento (onere delle spese per il cliente)
Qualora il cliente richieda un intervento e rientri in uno dei seguenti casi, il cliente stesso può ricevere unicamente un servizio a pagamento anche nel periodo di assistenza gratuita.
1) Qualora si sia verificata un’anomalia di funzionamento se sono entrate sostanze estranee (acqua, bevande, caffè, giocattoli, ecc.) all’interno del prodotto
2) Qualora il prodotto sia danneggiato e si sia verificata un’anomalia di funzionamento sulle funzioni, in quanto il prodotto è caduto o ha subito un impatto.
3) Qualora l’esterno del prodotto sia danneggiato e/o deformato da solventi organici, quali ad esempio solvente e benzene.
4) Qualora si sia verificata un’anomalia di funzionamento in relazione all’uso di una componente o di un consumabile non originali CUCKOO (adattatore, filtro, ecc.).Acquistare
componenti e consumabili originali CUCKOO presso il Centro. Assistenza Clienti designato .
5) Qualora si sia verificata un’anomalia di funzionamento dato che è stata erogata la tensione errata.
6) Qualora un componente venga smarrito o danneggiato dato che il cliente ha arbitrariamente smontato il prodotto.
7)
Qualora si sia verificata un'anomalia di funzionamento da quando una persona che non è un ingegnere di assistenza di un Centro Assistenza Clienti CUCKOO ha riparato o rimodellato il prodotto
8)
Qualora si sia verificata un’anomalia di funzionamento in seguito a un disastro naturale (temporale, incendio, danni da tempesta e inondazione, gas, danni da vento dal mare, terremoto, ecc.etc.)
9) Qualora si sia verificata un’anomalia di funzionamento da quando il cliente non si è attenuto alle “Avvertenze per un uso sicuro” all’interno del Manuale dell’utente (Qualora ci si
attenga alle “Avvertenze per un uso sicuro” sarò possibile usare il prodotto a lungo nel tempo.)
10) Qualora si sia verificata un’anomalia di funzionamento dovuta ad altri errori del cliente.

52
目 录
使用前
安全使用警告 / 安全使用注意事项
零件名称 / 配件名称
检查事项 / 如何使用事项
净水管道布置和净水系统 / 滤芯的计划更换周期
报告故障 / 故障排除之前的检查
产品规格 / 解决消费纠纷标准 / 关于我们的服务
53~55
56
57~59
60
61
故障咨询前
服务指南
使用期间

安全警告
53
CHN
•
该符号表示特殊情况下的潜在危险情况。
•
请仔细阅读详细信息并按照说明操作以避免危险情况的
发生。
潜在危险情况,如果不加
以避免,可造成严重伤害
甚至导致死亡。
潜在危险情况,如果不加以
避免,可导致轻微伤害。
请遵守“安全使用警告”须知,确保产品安全及使用正确,以防事故和危险发生。
警告
・ 不要用力弯曲、捆扎或拉动电源线。
・ 如果要拔出产品电源插头,请务必握住电源插头而不是握住电源线。
・ 如果产品漏水或清洗时,请先拔掉设备的电源插头。
・ 勿将电源线放于重物下或靠近尖锐物品。特别注意不要让宠物损坏电源线。
・ 在检查、维修或更换部件之前,请拔下产品电源插头。
・ 如果电源线或电源插头损坏或电源插座松动,请停止使用本产品,并且尽快联系我们的客户服务中
心。
・ 用干布擦去电源插头上的异物。
・ 请勿使用以下标准以外的其他电源:美国:120V / 60Hz;欧洲:220V / 50Hz;英国:240V /
50Hz;中国:220V / 50Hz;和越南:220V / 60Hz。
・ 若要插入或拔出电源插头,首先双手要保持干燥,然后要在插入或拔出时,握紧电源插头。
・ 如果电源部分进水,请在使用前拔下产品的电源插头并将其完全晾干。
・ 如果长时间不使用产品,请在关闭自来水供水阀并排空储水箱内剩余的水后,拔出电源插头并保证
其安全。
电源信息
警告
注意

安全警告
54
警告
・ 请勿将净水机放置在潮湿或尘土多的地方。
・ 请勿将产品安装在浴室附近。
・ 请勿将产品放置在凹凸不平或倾斜的地面上。避免将产品放置在地毯,垫子或复合地板上。
・ 确保将设备安装在干净的地方。
・ 避免阳光直射和高温。
・ 确保供水管距离自来水供水阀的长度不超过 5 米。
・ 请勿在产品顶部放置任何加热设备,如微波炉、电烤箱或烤箱,或蜡烛、储气罐和打火机等易燃品。
・ 小心泄露的水进入设备。
・ 注意切勿让儿童或任何人频繁使用控制面板。
・ 请勿将设备放置在存在燃气泄漏风险或靠近冷却或加热装置的区域。
・ 确保供应自来水并在安装自来水供水阀时,使其朝向冷水管。
・ 请勿将设备放置在室外或温度低于 0℃ 的区域内。
・ 安装完成后,请保持设备干净,并保养好设备。
・ 如果将产品放置在上槽上位置,请始终使用冷水或净化水。
(请勿使用热水。)
・ 请勿在产品顶部放置化学品、水瓶或细小金属材料。
・ 请勿拆卸或改造产品。
・ 安装后,请确保管子和软管连接牢固,且无泄漏情况出现。
安装指南

安全警告
55
CHN
如何使用
警告
・ 如果发现产品漏水或产品周围有一滩水,请先就近关闭自来水供水阀,然后拔下产品电源插头。
之后,请联系我们的客户服务中心。
・ 移动产品时,请勿拉动电源线或软管,也不要抓住水龙头。
・ 如果闻到一股烧焦味或看到设备冒烟,请立即拔下电源插头并关闭自来水供水阀。
之后,请联系我们的客户服务中心。
・ 请勿在产品顶部放置板材或任何金属材料。
注意
・ 使用前,确保更换产品滤芯的盖子完全关闭。
・ 如果设备处于长时间闲置状态,请确保在设备使用前流水约 10 分钟。
・ 根据更换周期更换滤芯。
・ 始终使用 CUCKOO 滤芯。
・ 如果长时间不使用外接水龙头,则该水龙头可能被污染。
・ 如果重复使用设备,则它会在排空剩余水量约一至两分钟后开始净化水。
注意
・ 请勿使用苯或稀释剂清洗产品。
・ 使用本产品时,请勿拔下后管。
・ 请勿移动工作中的设备。
・ 请避免使用流出的水装填鱼缸或鱼池。

零件 / 配件名称 净化水管道布置 / 净水系统
56
控制面板
<
前
>
<
后
>
控
制面板
插口
电源线
托盘
※
实
际产品可能与所示图像不符。
外接插座
水龙头连接管
托盘格栅
出水按钮 - 手动出水
1
不间断出水按钮 - 连续流水
3
一杯按钮 – 流出一杯水
2
"Replace Filter" 按钮 - 用于更换滤芯。
(当需要更换滤芯时,滤芯 LED 将亮起。)
5
按钮锁定按钮 - 锁定产品的功能以确保其安全
(按住按钮两秒钟,该功能被设置或取消。)
4
出水按钮
一杯 不间断
出水
按钮锁定 滤芯
更换
< CP-MN031 系列 >
零件名称
配 件
用
户手册
安装用到的其他辅助材料
净水管道布局及净水系统
CP-MN031 系列
第 1 级
PRE CARBON 2.0 FILTER
NANO POSITIVE PLUS FILTER
MINERALIZER FILTER
它可以吸收残余的氯、三卤甲烷、令人不快的味道和难闻的气味。
它能滤掉微小颗粒、病菌(铜绿假单胞菌、结肠杆菌、金黄色
葡萄球菌)、病毒(诺如病毒)和重金属(铅、铁、铝)
它可以向水中添加矿物质,从而提供更加健康和可口的水。
第 2 级
第 3 级
※
滤芯是滤水系统的关键部件。
※
使用非 CUCKOO 滤芯或超时间使用 CUCKOO 滤芯可能会致使过滤性能下降。
级别
滤芯名称
过滤功能
更换过滤器用护盖
MINERALIZER
FILTER
Valve
Outlet
NANO
POSITIVE
PLUS FILTER
PRE CARBON
2.0 FILTER
Pressure reducing
valve 3K
※实际产品可能与所示图像不符。

检查 / 如何使用事项
57
CHN
确保安装空间足够大。
▶
为方便更换滤芯,请将产品放置在距离墙壁 20
厘米或更远的位置,且自来水供水管距自来水供
水阀不应超过 5 米。
安装地点注意事项
移动产品时请小心。
▶
移动时请勿倾斜45度以上。
移动产品并装满水箱后,确保至少在 30 分钟
内插上电源插头。
移动产品时的注意事项
如果长时间不使用本产品,请关闭自来水供水阀并拔下产品电源插头。
请勿使用以下标准以外的其他电源插头:美国:120V / 60Hz;欧洲:220V / 50Hz;英国:240V /
50Hz;中国:220V / 50Hz;和越南:220V / 60Hz。确保将产品插头插入合适的插座中。
注 意
使用前检查事项
安装前检查事项
❶
打开自来水供水阀。
▶
首先打开水龙头,检查供水是否正确。之后,打开自来水供水阀。
❷
插上产品插头接通电源。
▶
插上插头前检查水是否断开。
❸
如果产品长时间闲置或刚安装好,请排水约 10 分钟。
❹
定期清空托盘。
❶
手动出水功能
▶
手动流出滤水。
▶
在“待机”模式下按下出水按钮以流出水。
☞
只有在按下“出水”按钮后才会流出水。
☞
如果按下“出水”按钮的时间超过 30 秒,将停止流出水。将手指从按钮上移开,
然后再次按下以获取水。
❷
一杯模式(出水量根据水压而变化。)
▶
将流出一杯量的水。
▶
在“待机”模式下按下“一杯”按钮进入“一杯待机”模式。
然后按“出水”按钮出水。
☞
如果在“一杯待机”模式下待机时间超过7秒,它将返回“待机”模式。
☞
在此模式下按任何按钮将停止出水。
☞
一杯的出水量默认为约 150 cc。
❸
“不间断出水”模式 (出水量根据水压而变化。)
▶
水将连续流出。
▶
在“待机”模式下按“不间断出水”按钮进入“不间断出水待机”模式。
然后按“出水”按钮出水。
☞
按下“不间断出水”模式中的任何按钮都将停止出水。
☞
“不间断出水”默认时间为1分钟。
如何使用
※
“待机”模式:净水机已插上电源并可随时使用。
“出水 LED”指示灯亮起。
※
“一杯待机”模式:在“待机模式”下按下“一
杯”按钮。“一杯 LED”指示灯亮起,“出水
LED”指示灯开始闪烁。
※
“不间断出水待机”模式:在“待机模式”下按下
“不间断出水”按钮。“不间断出水 LED”指示
灯亮起,“出水 LED”指示灯开始闪烁
<
待机模式
>
提示
<
一杯待机
> <
不间断出水待机模式
>

如何使用/如何设置
58
如何设置“一杯水量”
❶
在“待机”模式下按下“一杯”按钮 3 秒钟,设置“一杯”水量。
❷
根据所选水量,将亮起以下一个或多个 LED 指示灯:“一杯”LED 指示灯、“不间断出水”LED 指示
灯、“按钮锁定”LED 指示灯和“滤芯更换”LED 指示灯。(默认水量约为 150 cc。)
❸
按下“出水”按钮,选择“一杯”水的水量(约 130 cc - 190 cc)。
❹
选择“一杯”水所需量,然后按“一杯”按钮。
☞
如果按下“出水”或“一杯”按钮以外的任何其他按钮,它将被取销,产品将返回“待机”模式。
☞
如果在设置中超过20秒未按任何按钮,则它将被取销,产品将返回“待机”模式。
※
出水水量根据安装地点不同而有所不同。如果您需要精确测量出水量,请使用仪表。
约 130 cc
约 150 cc(默认)
约 170 cc
约 190 cc
1
2
3
4
“一杯”LED 指示灯亮起。
“一杯”LED 指示灯和“不间断出水”LED 指示灯亮起。
“一杯”LED 指示灯、“不间断出水”LED 指示灯和“按钮锁定”LED 指示灯亮起。
“一杯”LED 指示灯、“不间断出水”LED 指示灯、“按钮锁定”LED 指示灯和“滤芯更换”LED 指示灯亮起。
一杯水量级别 显示方式
如何设置“不间断出水”的时间
❶
在“待机”模式下按下“不间断出水”按钮3秒钟,设置“不间断出水”的时间。
❷
根据所选时间,以下一个或多个 LED 指示灯将亮起:“一杯”LED 指示灯、“不间断出水”LED 指
示灯、“按钮锁定”LED 指示灯和“滤芯更换”LED 指示灯。(默认时间约为 60 秒。)
❸
按下“出水”按钮选择 “不间断出水”所需时间(50 到 80 秒)。
❹
选择所需时间,然后按下“不间断出水”按钮。
☞
如果按下“出水”或“不间断出水”按钮以外的任何其他按钮,它将被取销,产品将返回“待机”模式。
☞
如果在设置中超过 20 秒未按任何按钮,它将被取销,产品将返回“待机”模式。
50 秒
60 秒(默认)
70 秒
80秒
1
2
3
4
“一杯”LED 指示灯亮起。
“一杯”LED 指示灯和“不间断出水”LED 指示灯亮起。
“一杯”LED 指示灯、“不间断出水”LED 指示灯和“按钮锁定”LED 指示灯亮起。
“一杯”LED 指示灯、“不间断出水”LED 指示灯、“按钮锁定”LED 指示灯和“滤芯更换”LED 指示灯亮起。
所选时间级别 显示方式
❹
“按钮锁定”功能
▶
用于锁定按钮,以防在清洗或儿童触摸按钮时误操作设备。
▶
在“待机”模式下按下“按钮锁定”按钮2秒钟以锁定设备。
▶
再次按下“按钮锁定”按钮2秒钟以解锁设备。
❺
自动流动功能
▶
此功能自动分配净化水。
▶
在待机模式下按住 Out Flow 按钮 0.3 秒 ,将分配净化水。
☞ 在自动流动的情况下,当设备分配水 30 秒后,流动将停止。
☞ 如果在自动流动期间按 "Out Flow" 按钮 0.3 秒,此功能将停用,
且设备进入待机模式。

如何设置/如何卸下并清洗水龙头 计划滤芯更换周期/建议
59
CHN
如何设置水龙头指示灯
❶
在“待机”模式下同时按下“一杯”和“不间断出水”按钮 3 秒以进入设置。
❷
根据所选状态,以下LED 指示灯将亮起:“一杯”LED 指示灯、“不间断出水”LED 指示灯、“按钮
锁定”LED 指示灯和“滤芯更换”LED 指示灯。(默认设置为“亮起”。)
❸
按下“出水”按钮选择所需状态。
❹
选择所需状态,然后按“按钮锁定”按钮。
☞
如果按下“出水”或“按钮锁定”按钮以外的任何其他按钮,它将被取销,产品将返回“待机”模式。
☞
如果在设置中超过20秒未按任何按钮,则它将被取销,产品将返回“待机”模式。
亮起(默认)
熄灭
1
2
“一杯”LED 指示灯、“不间断出水”LED 指示灯、“按钮锁定”LED 指示
灯、“滤芯更换”LED 指示灯和“水龙水照明绿色LED 指示灯”亮起。
所有灯都熄灭。
水龙头指示灯级别 显示方式
如何拆卸和清洗水龙头
❶
抓住水龙头,顺时针旋转将其卸下。
❷
拆下后,用干净的布擦净水龙头入水口。
❸
用流水清洗拆下的水龙头。(您可以使用棉签等轻松擦去水龙头内无法碰到的污垢)
❹
用干净的布擦干水龙头。
❺
逆时针旋转水龙头以将水龙头插入。
计划滤芯更换周期
▶
滤芯更换周期以家庭过滤的水量(每天 10L)为基础来设定,供水情况可能会影响更换周期。
建议
▶ 过滤功能
它旨在确定内置污染物去除剂(如滤芯)的使用寿命。这依据氯仿的去除率等计算得出。
▶ 滤芯更换周期
在仔细检查过滤芯后,仔细估计滤芯预计发挥性能的时间段。
这根据过滤后的自来水饮用量确定(每天 10 L,4 人用量)。
因此,随着使用水量的增大,周期随之缩短。
PRE CARBON 2.0 FILTER
NANO POSITIVE PLUS FILTER
MINERALIZER FILTER
4 个月
12 个月
12 个月
滤芯名称
计划更换周期

60
▼
如果您不遵守本用户手册,即使产品没有出现故障,产品也可能无法正常工作。如果产品有问题,请采取以下措施。如果仍有问
题,请联系我们的客户服务中心。
现象 确认事项
常见故障及处理方法
维修咨询
由于磨损部件不断暴露在高温、潮湿、多尘环境和其他污染物中,它可能无法正常工作。
如果出现以下任何症状,
▼
请停止使用该产品。
-
登录www.cuckooworld.com 搜索您所在位置附近的客户服务中心。
❶ “请在要求进行维修之前给予检查。”
❷ 用手摸产品时,有触电感觉; ❸ 功能发生其他障碍或出现故障,
处理方法
水
有股怪味道和/或异味。
•
它长时间闲置不用吗?
•是否需要更换滤芯?
•
请在放水约 10 分钟后使用。
•更换滤芯。(请勿使用非 Cuckoo 滤芯)。
不出水。
•供水方式是否正确?
•是否用力按下了“出水”按钮?
•电源是否按正确方式供电?
•是否需要更换滤芯?
•打开自来水供水阀。
•
检查供水管是否交叠。
•检查水源是否被切断。
•是否用力按下了“出水”按钮?
•请检查是否已插上电源插头。
•联系我们的客户服务中心更换滤芯。
它没有流出足够的水。
•是否关闭了锁紧阀?
•是否需要更换滤芯?
•打开锁紧阀。
•更换滤芯。(请勿使用非 Cuckoo 滤芯。)
(流出水量根据水压而变化。)
噪音过大。
•产品是否放在平坦的地面上?
•产品是否与任何其他物品接触?
•流出水后是否噪声很大?
•将产品放在在平坦稳固的地面上安装。
•确保产品没有与任何其他物品接触。
•产品与公共自来水供水系统直接相连,确保水保持在一
定高度。当水流入滤芯时会产生噪音,这是正常现象。
按钮无法正常使用。
•您按下“出水”按钮的时间是否是30秒或更久? •当按下“出水”按钮30秒或更久时,阻止输入按钮,这
是正常操作,以防因异物引起错误操作。
•松开按住“出水”按钮的手,然后再次按下。
水中有浮动物质。
•是否需要更换滤芯? •更换滤芯。(请勿使用非 Cuckoo 滤芯。)
是否更换滤芯?
•室内或室外环境是否潮湿?
•组装(连接)零件是否有缺陷?
•如果净水机内冷的部件遇湿,则可以形成露水,就像装
水的水杯上的水滴一样。
•关闭自来水供水阀并拔下产品电源插头。
之后,请联系我们的客户服务中心,以便其提供服务。
当设备正在出水时,水龙头绿
色 LED 指示灯不会亮起。
•水龙头照明功能是否关闭? •请开启水龙头照明功能。
(有关如何设置功能,请参阅第 16 页。)

61
CHN
产品规格
※ 本用户手册中的规格和其他详细信息(外观、设计和规格)如有更改,恕不另行通知。
※ 由于已办理 EMC(电磁兼容性)家用登记(“B”级)手续,本产品可在任何区域使用,主要用于家庭。
※制造商:CUCKOO HOMESYS Co., Ltd.
产品规格 水处理
型号
CP-MN031 系列
C
P-MN031W / CP-MN031BK
额定电压
请勿使用以下标准以外的其他电源插头:美国:120V / 60Hz;欧洲:220V / 50Hz;英国:240V / 50Hz;中国:220V / 50Hz;和越南:220V / 60Hz。
功耗 11W / 0.09A
过
滤
电过滤和吸附
滤芯规格
第 1 步
P
RE CARBON 2.0(4Months)
第 2 步
Nano Positive Plus (12Months)
第 3 步
MINERALIZER Filtration(12Months)
过滤功能 1,900L
气候类型 N(温带)
安装区域 适合家庭 / 办公室室内使用
净重 约 3.4Kg
产品尺寸 135(宽)×379(深)×367(高)
额定工作压力 1.5-6.9Bar (0.15-0.69MPa)
消费者损害赔偿类型
如果在正常使用过程中
出现性能或功能故障
(在保修期内)
由于消费者的意图或错
误致使产品性能或功能
出现故障
■如果因自然灾害而导致故障发生(火灾、海风,气体、地震造成的损坏,或暴雨和洪水造成的损坏等)■如果需要更换使用中正常
磨损的易损件 ■如果因使用过的电源故障或连接设备故障而发生故障 ■如果不是因产品本身缺陷而是因外部原因发生故障
■如果因非 CUCKOO 代理商或 CUCKOO 客户服务中心的服务工程师修理或改造产品而发生故障
•
关于上述未涉及的事项,根据《消费者框架法》,按照消费者纠纷解决标准,对损失进行赔偿
•
客户服务:登录 http://www.cuckooworld.com
•
设备清洗、调整、使用指南等不属于故障。
如果在购买之日起 10 天内需进行必要的维修
如果需要在购买之日起一个月内对重要零件进行维修
如果更换后的产品需要在更换后一个月内进行必要的维修
如果产品有缺陷
如果不能更换
如果对相同的缺陷进行修补后,故障再次发生(第三次)
如果因产品的某些零件故障而对产品进行了四次维修,但故障再次发生(第五次)
如果营业人丢失了消费者要求维修的产品
如果因没有提供修理用的零件而无法修理
客户购买产品后,如在运输过程或产品安装过程中损坏产品
如果可以修理
如果因没有提供修理用的零件而无法修理
如果无法修理
赔偿细节
在保修期内
更换产品或全额退款
免费更换和维修产品
全额退款
免费维修
更换产品或全额退款
将固定金额折旧,按获得的金额再加上 10% 的数额计算出的金额退款
将固定金额折旧,按获得的金额再加上 5% 的数额计算出的金额退款
收费维修 收费维修
更换产品
支付收费维修和更换产品相
关费用
采用折旧法,支付收费维修
和更换产品相关费用
收费维修 收费维修
保修期过后
消费者纠纷解决方案
关于我们的服务
•我们客户的权利
当产品在使用过程中出现故障,自购买之日起一年内可免费进行维修。
但是,对因客户的疏忽或自然灾害而造成产品出现故障进行的修复,即使产品仍处于免费维修服务期,客户也要支付相关修理服务费。
•收费服务方面的责任(客户承担费用)
如果客户要求提供服务并且遇有以下情形之一,则即使产品仍处于免费维修服务期,客户也要支付相关修理服务费。
1)如果因产品中含有异物(水、饮料、咖啡、玩具等)而发生故障
2)如果产品损坏,且由于产品掉落或撞击而导致功能出现故障
3)如果产品表面被稀释剂和苯等有机溶剂损坏和/或导致产品变形
4)如果因使用的零件或耗材不是 CUCKOO 正品(适配器、滤芯等)而导致产品出现故障。在指定的客户服务中心购买 CUCKOO 零件和耗材。
5)如果因供电电压出错而导致产品出现故障
6)如果因为客户任意拆卸了该产品而致使某个部件丢失或损坏
7)如果因非 CUCKOO 客户服务中心的服务工程师修理或改造产品而发生故障
8)如果因自然灾害(雷电、火灾、暴雨洪水造成的破坏,气体,海风破坏,地震等)而发生故障
9)如果因客户未遵守用户手册中的“安全使用警告”而发生故障(如果您遵守“安全使用警告”,则可以长时间使用本产品。)
10)如果因客户的任何其他错误而发生故障

62
MỤC LỤC
Trước khi sử dụng
Cảnh báo / Lưu ý An toàn
Tên Phụ tùng/Bộ phận
Các điểm cần sửa chữa/Cách sử dụng
Sơ đồ bố trí đường ống lọc nước và hệ thống lọc nước /
Chu kỳ thay lõi lọc yêu cầu
Kiểm tra trước khi báo máy hỏng / Xử lý sự cố
Chi tiết kỹ thuật sản phẩm / Quy trình giải quyết khiếu nại của khách
hang / Về bộ phận dịch vụ của chúng tôi
63~65
66
67~69
70
71
Trong quá trình sử dụng
Yêu cầu Sửa chữa
Hướng dẫn Sửa chữa

Cảnh báo an toàn
63
VNM
Cảnh báo
・
Không được uốn, buộc hoặc kéo Dây Nguồn.
・
Phải cầm phích cắm thay vì cầm dây điện khi rút nguồn.
・
Khi rò nước hoặc khi vệ sinh máy lọc phải rút phích cắm nguồn trước.
・
Không để vật nặng nằm đè lên dây nguồn hoặc để dây nguồn gần vật sắc nhọn.
Đặc biệt lưu ý không để thú nuôi làm hỏng dây nguồn.
・
Vui lòng rút phích cắm thiết bị trước khi kiểm tra, sửa chữa hoặc thay thế phụ tùng máy lọc.
・
Không sử dụng máy lọc nước Nếu dây nguồn hoặc Phích cắm bị hỏng hoặc khi Ổ cắm lỏng lẻo, và liên
hệ với Trung tâm dịch vụ khách hàng của chúng tôi.
・
Dùng dẻ khô vệ sinh sạch Phích cắm.
・
Không sử dụng nguồn điện áp khác với tiêu chuẩn sau: Hoa Kỳ: 120V / 60Hz; Châu ÂU: 220V / 50Hz; Anh
Quốc: 240V / 50Hz; Trung Quốc: 220V / 50Hz; và Việt Nam: 220V / 60Hz.
・
Khi cắm rút nguồn, phải lau khô tay trước rồi cắm rút bằng Phích cắm nguồn.
・
Nếu có nước trong khu vực cấp nguồn, rút phích cắm và lau khô hoàn toàn trước khi cắm điện.
・
Nếu không sử dụng máy lọc trong thời gian dài, rút phích cắm và bảo quản cẩn thận sau khi đã đóng Van
Cấp Nước Vào Máy và xả hết nước trong thùng chứa nước.
Về Nguồn điện
•Biểu tượng tình huống có thể gây nguy hiểm trong các
trường hợp đặc biệt.
•Vui lòng nghiên cứu nội dung cẩn thận và làm theo
hướng dẫn để phòng tránh các tình huống nguy hiểm.
Các tình huống có thể gây nguy
hiểm có thể dẫn đến chấn thương
hoặc tử vong nếu không tuân thủ.
Các tình huống có thể gây nguy
hiểm có thể dẫn đến chấn thương
nhẹ nếu không tuân thủ.
V
ui lòng tuân th
ủ ‘
C
ản
h báo An toàn’
đ
ể đả
m
b
ảo
s
ử dụn
g s
ản
ph
ẩm
an toàn nh
ằm
đe
m l
ại
hi
ệu
qu
ả m
ong
mu
ốn cũng như phòng tránh tai nạn và các tình huống nguy hiểm.
Cảnh báo
Thận trọng

Cảnh báo an toàn
64
・
Không để máy lọc trong môi trường ẩm ướt hoặc bụi bẩn.
・ Không lắp đặt máy lọc nước gần phòng tắm.
・
Không để máy lọc nước trên nền lồi lõm hoặc nghiêng. Không đặt máy trên giẻ lau, đệm lót hoặc sàn gỗ.
・
Đảm bảo lắp đặt máy lọc nước trong khu vực sạch sẽ.
・
Tránh ánh nắng trực tiếp hoặc nhiệt độ cao.
・
Đảm bảo chiều dài ống cấp nước từ Van Cấp Nước Vào Máy không quá 5 m.
・
Không để nguồn nhiệt, như lò vi sóng, lò điện hoặc lò nướng, hoặc các vật dễ cháy, như nến, bình ga, và
bật lửa trên máy lọc nước.
・
Không để nước rò rỉ chảy vào máy lọc nước.
・ Lưu ý không để trẻ em hoặc những người khác sử dụng bảng điều khiển quá mức.
・ Không để máy lọc nước trong khu vực có khả năng bị xì ga hoặc gần nguồn nhiệt hoặc nguồn lạnh.
・ Đảm bảo đã cấp nước và lắp Van Cấp Nước Vào Máy về hướng ống nước lạnh.
・ Không đặt máy lọc nước ngoài trời hoặc trong khu vực có nhiệt độ dưới 0℃.
・ Sau khi hoàn thành lắp đặt, giữ vệ sinh và bảo trì tốt cho máy lọc nước.
・
Nếu lắp máy lọc nước ở vị trí phía trên chậu rửa phải luôn phải sử dụng nước lạnh hoặc nước đã lọc.
(Không dùng nước nóng.)
・ Không để hóa chất, chai nước hoặc vật kim loại kích thước nhỏ trên máy lọc nước.
・ Không tháo rời hoặc chỉnh sửa cấu trúc máy lọc nước.
・ Sau khi lắp đặt xong, kiểm tra đảm bảo đường ống đã được kết nối chắc chắn và không bị rò rỉ.
Hướng dẫn lắp đặt
Cảnh báo

Cảnh báo an toàn
65
VNM
Cách sử dụng
・ Nếu phát hiện nước rò rỉ hoặc có nước đọng xung quanh máy lọc, đầu tiên phải đóng Van Cấp Nước
Vào Máy, tắt máy và sau đó rút nguồn. Sau đó, vui lòng liên hệ Trung tâm dịch vụ khách hàng.
・ Không được kéo dây nguồn hoặc ống nước phải không được cầm vòi nước khi di chuyển máy lọc.
・ Nếu ngửi thấy mùi khét hoặc thấy khói bốc ra từ máy lọc phải rút ngay phích cắm và đóng Van Cấp Nước
Vào Máy. Sau đó vui lòng liên hệ Trung tâm dịch vụ khách hàng của chúng tôi.
・ Không để đĩa ăn hoặc các vật kim loại trên máy lọc.
・ Kiểm tra đảm bảo đã đóng lắp thay phần lọc của máy trước khi sử dụng.
・ Nếu để máy không vận hành trong thời gian dài, xả nước từ vòi khoảng 10 phút trước khi sử dụng máy.
・ Thay lõi lọc theo chu kỳ yêu cầu.
・ Luôn sử dụng lõi lọc CUCKOO chính hãng.
・ Vòi nước có thể bịốbẩn nếu không sử dụng trong thời gian dài.
・ Nếu sử dụng lại vòi sau một thời gian dài không sử dụng, nước sẽ xả ra sau khi máy đã xài hết lượng
nước còn lại trong khoảng 1 đến 2 phút.
Cảnh báo
T
hậ
n
t
r
ọ
ng
Th
ậ
n
tr
ọ
ng
・ Không dùng benzen hoặc chất pha loãng để vệ sinh máy lọc.
・ Khi sử dụng máy không được kéo ống phía sau máy.
・ Không di chuyển máy lọc khi máy đang vận hành.
・ Không dùng nước lọc cho bể cá hoặc chậu nuôi cá.

Tên phụ tùng / Sơ đồ bố trí đường ống lọc
nước / Hệ thống lọc nước
66
Bảng điều khiển
< Mặt Sau >
B
ảng điều khiển
V
òi nước
Nắp để thay máy lọc
Dây nguồn
Khay hứng nước
※
Sản phẩm thực tế có thể khác với hình ảnh.
V
òi nước ngoài
Đầu nối vòi nước
L
ưới chắn rác khay hứng nước
Nút xả nước – Để xả nước thủ công
1
Nút xả nước liên tục - để xả nước liên tục
3
Nút ấn một cốc nước – Để lấy một cốc nước
2
Nút “Replace Filter” - Được sử dụng để thay thế các lõi lọc.
(Khi một lõi lọc cần được thay thế, đèn LED Filter (Lõi lọc) đó sẽ sáng.)
5
Nút khóa chức năng - để khóa các chức năng đảm bảo an toàn cho máy
lọc nước (ấn giữ nút hai giây sẽ khóa hoặc bỏ khóa các chức năng.)
4
Nút xả nước
Nút ấn một
cốc nước
Nút ấn xả
nước liên tục
Nút ấn khóa
chức năng máy
Thay thế
Lõi lọc
< Dòng CP-MN031 >
Tên phụ tùng
Phụ tùng
Hướng dẫn Sử dụng
Các phụ tùng lắp đặt khác
Sơ đồ bố trí đường ống lọc nước và hệ thống lọc nước
Dòng CP-MN031
Cấp 1
PRE CARBON 2.0 FILTER
NANO POSITIVE PLUS FILTER
MINERALIZER FILTER
Bộ lọc này hấp thụ clo dư, trihalometan, mùi và vị khó chịu.
L.i lọc này loại bỏ các hạt cỡ nhỏ, các loại vi khuẩn (pseudomonas aeruginosa, colon
bacillus, staphylococcus aureus), virus (Norovirus), và các kim loại nặng (ch., sắt, nhôm).
Bộ lọc này bổ sung khoáng chất cho nước, giúp nước có vị
ngon hơn và có lợi cho sức khỏe hơn.
Cấp 2
Cấp 3
※ Lõi lọc là một thành phần thiết yếu của một hệ thống lọc nước.
※ Nếu sử dụng lõi lọc không phải của CUCKOO hoặc lõi lọc không chính hãng trong thời gian dài có thể làm mất hiệu quả của máy lọc nước.
CẤP LỌC Tên lõi lọc Chức năng lõi lọc
MINERALIZER
FILTER
Valve
Outlet
NANO
POSITIVE
PLUS FILTER
PRE CARBON
2.0 FILTER
Pressure reducing
valve 3K
※
Sản phẩm thực tế có thể khác với hình ảnh.
< Mặt Trước>

Các điểm cần kiểm tra / cách sử dụng
67
VNM
Đảm bảo đủ không gian để Lắp máy.
▶
Để tiện thay lõi lọc, hãy đặt máy cách tường tối thiểu 20 cm,
sao cho chiều dài ống cấp nước tối đa là 5 mét tính từ Van Cấp
Nước Vào Máy.
Các điểm cần cần lưu ý về vị trí lắp đặt
Vui lòng cẩn trọng khi di chuyển máy.
▶
Không nghiêng máy quá 45 độ khi di chuyển. Cắm điện cho
máy ít nhất 30 phút sau khi di chuyển và cấp nguồn nước vào
thùng chứa.
Lưu ý Nếu không sử dụng máy lọc trong thời gian dài phải như phần trên. Không sử dụng nguồn điện
áp khác với tiêu chuẩn sau: Hoa Kỳ: 120V / 60Hz; Châu ÂU: 220V / 50Hz; Anh Quốc: 240V / 50Hz;
Trung Quốc: 220V / 50Hz; và Việt Nam: 220V / 60Hz. Cắm nguồn vào ổ cắm hợp quy chuẩn.
Thận trọng
Các vấn đề cần kiểm tra trước khi sử dụng máy lọc nước
Các điểm cần kiểm tra trước khi lắp đặt
❶Mở Van Cấp Nước Vào Máy.
▶
Đầu tiên mở Van Cấp Nước để xem nước đã cấp chưa. Sau đó, mở Van Cấp Nước Vào Máy.
❷Cắm điện cho máy lọc nước.
▶
Kiểm tra ngắt nguồn nước trước khi cắm nguồn cho máy lọc nước.
❸Nếu để máy không vận hành trong thời gian dài, xả nước từ vòi khoảng 10 phút trước khi sử dụng máy.
❹Thường xuyên đổ nước khay hứng.
❶Chức năng xả nước thủ công
▶
Xả nước thủ công.
▶
Ấn nút xả nước ở chế độ chờ để xả nước.
☞
Sau khi ấn nút xả nước nước sẽ xả ra.
☞
Khi ấn nút xả nước quá 30 giây nước sẽ ngừng xả.
Nhả nút rồi ấn lại để xả nước thêm.
❷
Chế độ xả nước một cốc (lượng nước được xả thay đổi tùy theo áp lực nước.)
▶
Máy sẽ xả một lượng nước bằng với một cốc nước.
▶
Ấn nút xả nước một cốc khi máy đang ở chế độ chờ để vào chế độ chờ xả nước một cốc.
Sau đó ấn nút xả nước để xả nước.
☞
Nếu máy không hoạt động hơn 7 giây sau khi nhập vào chế độ chờ xảy nước một cốc,
máy sẽ quay trở lại chế độ chờ.
☞
Nếu ấn bất kỳ luôn ấn nào trong chế độ này sẽ dừng xả nước.
☞
Lượng nước mặc định khi xả nước một cốc là khoảng 150cc.
❸
Chế độ xả nước liên tục (Lượng nước sẽ thay đổi theo áp lực nước.)
▶
Nước sẽ xả liên tục.
▶
Ấn nút xả nước liên tục trong chế độ chờ sẽ đưa máy vào chế độ chờ xả nước liên tục.
Sau đó ấn nút xả nước để xả nước.
☞
Ấn bất kỳ nút ấn nào trong chế độ xả nước liên tục sẽ dừng xả nước.
☞
Cài đặt mặc định cho thời gian xả nước liên tục là một phút.
Cách sử dụng
※
Chế độ chờ :
Máy lọc nước đã cắm nguồn và sẵn sàng
hoạt động. Đèn LED báo nguồn sáng.
※
Chế độ chờ xả nước một cốc :
Ấn nút xả nước một
cốc trong chế độ chờ. Đèn LED chế độ xả nước một cốc sáng và
đèn LED báo nước nguồn nước cấp bắt đầu nhấp nháy.
※
Chế độ chờ xả nước liên tục :
Ấn nút xả nước
liên tục khi máy đang trong chế độ chờ. Đèn báo xả nước
liên tục sáng và đèn báo nước cấp gia bắt đầu nhấp nháy.
<Chế độ chờ>
Mẹo
<Chế độ chờ xả nước một cốc> <Chế độ chờ xả nước liên tục>
Lưu ý khi di chuyển máy

Cách sử dụng / Cài đặt
68
Cách cài đặt lượng nước xả một cốc
❶Ấn nút xả 1 cốc 3 giây ở chế độ chờ để cài đặt lượng nước xả cho chế độ xả một cốc.
❷Tùy theo lượng nước được chọn, sẽ có một hoặc nhiều đèn LED sáng: Đèn LED chế độ xả nước một cốc, chế
độ xả nước liên tục, khóa chức năng, và Thay thế Lõi lọc. (Lượng nước mặc định vào khoảng 150cc.)
❸Chọn lượng nước mong muốn cho chế độ xả 1 cốc (khoảng 130cc đến 190cc) bằng cách ấn nút ấn xả nước.
❹
Chọn lượng nước mong muốn cho chế độ xả nước một cốc rồi ấn nút xả nước một cốc.
☞
Nếu ấn bất kỳ nút ấn nào không phải nút xả nước hay nút xả nước một cốc, máy sẽ dừng và quay trở về chế độ chờ.
☞
Trong quá trình cài đặt nếu quý khách không ấn bất kỳ nút ấn nào trong vòng 20 giây, máy sẽ dừng và quay trở về chế độ chờ.
※ Lượng nước xả sẽ thay đổi tùy theo vị trí lắp đặt.
Khoảng 130 cc
Khoảng 150 cc (Mặc định)
Khoảng 170 cc
Khoảng 190cc
1
2
3
4
Đèn LED chế độ xả nước một cốc sáng.
Đèn LED chế độ xả nước một cốc và đèn LED chế độ xả nước liên tục sáng.
Đèn LED chế độ xả nước một cốc, chế độ xả nước liên tục và khóa chức năng sáng.
Đèn LED chế độ xả nước một cốc, chế độ xả nước liên tục, khóa chức năng, và Thay thế Lõi lọc sáng.
Chọn lượng nước mong muốn cho chế độ xả 1 cốc
CẤP LỌC
Hiển thị
Cách cài đặt thời gian cho xài nước liên tục
❶
Ấn nút xả nước liên tục và giữ trong 3 giây ở chế độ chờ để cài đặt thời gian xả nước liên tục.
❷
Tùy vào thời gian được chọn, sẽ có một hoặc nhiều Đèn LED sáng: Đèn LED chế độ xả nước một cốc, chế độ xả
nước liên tục, khóa chức năng, và Thay thế Lõi lọc. (Thời gian mặc định vào khoảng 60 giây.)
❸
Ấn Nút ấn xả nước để chọn thời gian xả nước liên tục mong muốn (50 đến 80 giây).
❹
Chọn thời gian mong muốn và ấn chế độ xả nước liên tục.
☞
Nếu ấn bất kỳ nút ấn nào không phải nút xả nước hay nút xả nước liên tục, máy sẽ dừng và quay trở về chế độ chờ.
☞
Trong quá trình cài đặt nếu quý khách không ấn bất kỳ nút ấn nào trong vòng 20 giây, máy sẽ dừng và quay trở về chế độ chờ 8.
50 giây
60 giây (Mặc định)
70 giây
80 giây
1
2
3
4
Đèn LED chế độ xả nước một cốc sáng.
Đèn LED chế độ xả nước một cốc và đèn LED chế độ xả nước liên tục sáng.
Đèn LED chế độ xả nước một cốc, chế độ xả nước liên tục và khóa chức năng sáng.
Đèn LED chế độ xả nước một cốc, chế độ xả nước liên tục, khóa chức năng, và Thay thế Lõi lọc sáng.
Thời gian được chọnCẤP LỌC Hiển thị
❹
Chức năng khóa các nút ấn
▶
C
hức năng này được sử dụng để khóa các nút ấn phòng khi chẳng may chạm phải
khi vệ sinh hoặc khi trẻ em đùa nghịch với các nút ấn.
▶
Ấn giữ nút khóa nút ấn 2 giây ở chế độ chờ sẽ khóa máy.
▶
Ấ
n giữ lại nút khóa nút ấn trong vòng 2 giây để mở khóa máy lọc nước.
❺
Chức năng Auto Flow
▶
Chức năng này tự động xả nước đã lọc.
▶
Nhấn giữ nút Out Flow ở chế độ Standby trong 0,3 giây và nước đã lọc sẽ được xả
ra.
☞ Trong trường hợp Auto Flow (Tự động chảy), dòng chảy sẽ dừng khi thiết bị đã xả
nước được 30 giây.
☞ Nếu bạn nhấn nút “Out Flow” trong 0,3 giây trong lúc chức năng Auto Flow (Tự động
chảy) hoạt động, chức năng sẽ dừng và thiết bị sẽ vào chế độ Standby.

Cách cài đặt / Cách tháo và vệ sinh vòi xả nước Thời
gian thay thế lõi lọc yêu cầu / Khuyến nghị
69
VNM
Cách cài đặt đèn của vòi xả nước
❶
Ấn đồng thời nút ấn xả nước một cốc và xả nước liên tục và giữ trong 3 giây ở chế độ chờ để vào phần cài đặt.
❷
Tùy vào các lựa chọn các đèn LED sau sẽ sáng: đèn LED xả nước một cốc, đèn LED xả nước liên tục, đèn LED khóa
nút ấn, đèn LED Thay thế Lõi lọc. (Cài đặt mặc định là ON.)
❸
Ấn nút ấn xả nước để chọn chế độ mong muốn
❹
Chọn chế độ mong muốn và ấn nút khóa Nút ấn chức năng.
☞
Nếu ấn bất kỳ nút ấn nào không phải nút xả nước hay nút xả nước một cốc, máy sẽ dừng và quay trở về chế độ chờ.
☞
Trong quá trình cài đặt nếu quý khách không ấn bất kỳ nút ấn nào trong vòng 20 giây, máy sẽ dừng và quay trở về chế độ chờ.
Bật (mặc định)
TẮT
1
2
Đèn LED chế độ xả nước một cốc, chế độ xả nước liên tục, khóa chức năng,
Thay thế Lõi lọc, và đèn LED xanh lá của vòi nước sáng.
Toàn bộ đèn sẽ tắt.
Đèn vòi xả nước
CẤP LỌC
Hiển thị
Cách tháo và vệ sinh vòi xả nước
❶
Nắm vòi xả và quay theo chiều kim đồng hồ để tháo vòi.
❷
Sau khi tháo vòi, dùng giẻ sạch lau đường nước vào của vòi xả.
❸
Dùng nước máy vệ sinh vòi xả đã tháo.
(Có thể dùng tăm bông v…v… để dễ dàng loại bỏ vết bẩn trong vòi xả tại các vị trí không thể tiếp cận)
❹
Dùng giẻ sạch lau khô vòi.
❺
Lắp lại vòi xả bằng cách quay ngược chiều kim đồng hồ.
Thời gian thay thế lõi lọc yêu cầu
▶ Thời gian thay thế lõi lọc dựa trên lượng nước được lọc hàng ngày (10 lít mỗi ngày), và tình trạng
nguồn nước cấp cũng có thể ảnh hưởng đến thời gian thay thế lõi lọc.
Khuyến nghị
▶
Công suất lọc
▶
Công suất lọc dùng để xác định vòng đời của thiết bị loại bỏ cặn bẩn lắp trong máy như lõi lọc. Công suất lọc được
tính dựa trên tốc độ lại bỏ chloroform, v.v.
▶
Thời gian thay thế lõi lọc
▶
Sau khi kiểm tra kỹ lõi lọc, cần đánh giá cẩn thận thời gian cần thay thế lõi để đảm bảo lõi lọc hoạt động hiệu quả.
Thời gian thay thế lõi lọc được xác định dựa trên lượng nước được lọc để uống (10 lít mỗi ngày cho gia đình 4
người). Do đó nếu lượng nước được dùng càng nhiều thì thời gian thay thế lõi lọc càng ngắn .
Lõi lọc kiểu lắng
Lõi lọc Natural Plus
Lõi lọc Nano Positive Plus
4 tháng
12 tháng
12 tháng
Tên lõi lọc
Thời gian thay thế lõi lọc yêu cầu

70
▼
Nếu không tuân thủ hướng dẫn sử dụng này, máy lọc nước có thể sẽ không hoạt động như mong muốn ngay cả khi máy không bị hỏng. Vui lòng
t
hực hiện các biện pháp sau nếu máy lọc nước gặp trục trặc. Nếu vẫn chưa khắc phục được, vui lòng liên hệ Trung Tâm Dịch Vụ Khách Hàng.
Vấn đề Vấn đề
N
ước có vị và/hoặc mùi
khó chịu.
• Máy lọc có không làm việc trong thời gian dài?
•
Có cần thay lõi lọc không?
• Sử dụng sau khi xả nước khoảng 10 lần.
•
T
hay lõi lọc.(Không sử dụng lõi lọc không do Cuckoo cung cấp.)
N
ước không ra.
•
Đã cấp nước cho vòi phù hợp chưa?
• Đã ấn chặt nút xả nước chưa?
• Nguồn cấp có vấn đề gì không?
• Có cần thay lõi lọc không?
•
Mở Van Cấp Nước Vào Máy.
• Kiểm tra xem ống cấp nước có bị gập.
• Kiểm tra xem có bị mất nước.
• Đã ấn chặt nút xả nước chưa?
• Kiểm tra xem đã cắm nguồn cho máy chưa.
• Liên hệ trung tâm dịch vụ khách hàng của chúng tôi để thay thế lõi lọc.
Máy không xả đủ nước.
•
Quý khách đã đóng van khóa chưa?
• Có cần thay lõi lọc không?
•
Mở van khóa.
• Thay lõi lọc. (Không sử dụng lõi lọc không do Cuckoo cung cấp.)
(Lượng nước xã sẽ thay đổi theo áp lực nước.)
Có tiếng ồn lớn.
• Sàn lắp máy lọc nước có bằng phẳng hay không?
• Máy lọc nước có nằm đè hay chạm phải vật gì
không?
• Máy phát ra tiếng ồn sau khi xả nước?
• Lắp đặt máy trên sàn phẳng và cứng chắc.
• Kiểm tra xem có vật gì chạm vào máy lọc.
• Đấu nguồn nước công cộng trực tiếp vào máy và đảm bảo nguồn cấp
ở một mức nhất định. Tiếng ồn phát ra khi nước chảy vào lõi lọc và
không có gì bất thường.
Các nút ấn không làm
việc như mong muốn.
• Quý khách đã ấn nút xả nước trong vòng 30
giây hoặc hơn chưa?
• Đây là một quy trình vận hành bình thường khi ấn nút xả nước trong
vòng 30 giây hoặc hơn để tránh việc có dị vật làm cho máy vận hành
không như mong muốn.
• Nhà nút xả nước, và ấn lại.
Có dị vật nổi trong nước.
•Quý khách có cần thay thế lõi lọc hay không?
• Thay lõi lọc.(Không sử dụng lõi lọc không do Cuckoo cung cấp.)
mMy lọc nước bị rò
nước.
• Nhà hoặc môi trường xung quanh nhà của quý
khách có ẩm ướt hay không?
• Các phụ tùng lắp đặt (đấu nối) có bị hỏng hay
không?
• Nếu các bộ phận lạnh trong máy lọc nước gặp phải hơi ẩm, sẽ có thể
hình thành giọt sương, nhưng khi có các giọt nước ngưng đọng trên
cốc nước.
• Đóng Van Cấp Nước Vào Máy và rút nguồn máy lọc. Sau đó, liên hệ
với trung tâm dịch vụ khách hàng của chúng tôi để yêu cầu sửa chữa.
Khi máy lọc đang xả nước
phải đèn LED MÀU XANH LÁ
của vòi nước sẽ không sáng.
• Có phải chức năng đèn vòi nước đã tắt?
• Vui lòng bật chức năng đèn vòi nước.
(Vui lòng xem trang 16 để biết cách cài đặt chức năng này.)
Vui lòng kiểm tra trước khi yêu cầu hỗ trợ.
Yêu cầu sửa chữa
Máy lọc nước có thể không còn làm việc như mong muốn do các bộ phận bị bào mòn vì liên tục phải tiếp xúc với nhiệt phải độ ẩm, bụi bẩn và các chất gây ô nhiễm khác.
Nếu máy có bất kỳ các biểu hiện,
▼
Vui lòng dừng máy lọc.
- Tìm kiếm trung tâm dịch vụ khách hàng gần nơi quý vị sinh sống tại www.cuckooworld.com.
❶
“Vui lòng kiểm tra trước khi yêu cầu sửa chữa.”
❷
Quý khách cảm thấy có điện khi tay chạm vào máy lọc;
❸
máy lọc có các hỏng hóc khác,
Vấn đề

71
VNM
Chi tiết kỹ thuật sản phẩm
※ Chi tiết kỹ thuật và các chi tiết khác (mặt ngoài, thiết kế, và các đặc điểm kỹ thuật) trong hướng dẫn sử dụng này có thể thay đổi mà không báo trước nhằm cải tiến sản phẩm.
※ Sản phẩm đã được đăng ký EMC cho mục đích dùng trong hộ gia đình (cấp “B”), do đó có thể dùng trong bất kỳ khu vực nào và được thiết kế đặc biệt để sử dụng chủ yếu trong
hộ gia đình.
※ Nhà sản xuất:CUCKOO HOMESYS Co., Ltd.
Tên sản phẩm
Xử lý lọc nước
Model
CP-MN031 Series
C
P-MN031W / CP-MN031BK
Điện áp định mức
Không sử dụng nguồn điện áp khác với tiêu chuẩn sau: Hoa Kỳ: 120V / 60Hz; Châu ÂU: 220V / 50Hz;
Công suất tiêu thụ
11W / 0.09A
Chế độ lọc
Lọc & hấp thụ bằng điện
Chi tiết kỹ
thuật lõi lọc
Bước 1
P
RE CARBON 2.0(4Months)
Bước 2
Nano Positive Plus (12Months)
Bước 3
MINERALIZER Filtration(12Months)
Công suất lọc
1,900L
Cấp khí hậu
N (Ôn đới)
Khu vực lắp đặt
Dùng cho gia đình / cơ quan, và dùng trong nhà
Khối lượng tịnh
Khoảng 3.4Kg
Kích thước sản phẩm
135(R) × 379(S) × 367(C)
Áp lực làm việc danh định
1.5-6.9Bar (0.15-0.69MPa)
Các dạng thiệt hại
Nếu máy hỏng hóc hoặc
không có hoạt động như
mong muốn trong quá
trình vận hành bình
thường
(trong thời gian bảo hành)
Máy bị lỗi khi vận hành
hoặc lỗi chức năng do lỗi
của khách hàng
■
Nếu hỏng hóc xảy ra do thiên tai (hỏa hoạn, hư hại do gió biển, khí ga, động đất, bão lụt, v…v…)
■
Nếu cần thay thế vật tư tiêu hao trong quá
trình sử dụng máy lọc
■
Nếu hư hỏng xảy ra do nguồn cấp không như mong muốn hoặc thiết bị kết nối bị hỏng
■
Nếu hư hỏng xảy ra do không
phải ở bản thân máy lọc mà do tác nhân bên ngoài
■
Nếu hư hỏng xảy ra do một nhân viên không phải kỹ sư sửa chữa của đại lý CUCKOO hoặc
trung tâm dịch vụ khách hàng CUCKOO thực hiện sửa chữa hoặc chỉnh sửa sản phẩm
• Đối với các vấn đề không đề cập trên đây chính sách bồi thường thiệt hại sẽ được thực hiện theo quy định giải quyết khiếu nại khách hàng của bộ luật dành cho người tiêu dùng.
• Dịch vụ khách hàng:Ghé thămhttp://www.cuckooworld.com •Vệ sinh, chỉnh sửa,hướng dẫn sử dụng, v…v… không phải là hỏng hóc.
Nếu cần sửa chữa thiết yếu trong vòng 10 ngày từ ngày mua máy
Nếu cần sửa chữa một bộ phận quan trọng trong vòng một tháng kể từ ngày mua máy
u máy lọc nước đã đổi cần sửa chữa thiết yếu trong vòng một tháng kể từ khi đổi máy
Nếu máy có hỏng hóc
Nếu không thể đổi sản phẩm mới
Nếu đã sửa chữa nhưng lại xảy ra lỗi lặp lại (lần thứ 3)
Nếu đã sửa chữa 4 lần và hư hỏng nhiều bộ phận, nhưng máy vẫn gặp lại lỗi cũ (lần thứ 5)
Nếu đại lý đã mất máy mà khách hàng yêu cầu sửa chữa
Nếu không thể sửa chữa vì chưa có phụ tùng để sửa chữa
Hư hỏng xảy ra trong quá trình vận chuyển hoặc lắp đặt khi khách hàng đã mua máy lọc
Nếu có thể sửa chữa
Nếu không thể sửa chữa vì chưa có phụ tùng để sửa chữa
Nếu không thể sửa chữa
Chi tiết về bồi thường
Trong thời gian bảo hành
Đổi sản phẩm mới hoặc bồi thường lại tiền mua
Đổi sản phẩm và sửa chữa miễn phí
Bồi hoàn lại tiền mua máy
Sửa chữa miễn phí
Đổi sản phẩm mới hoặc
bồi thường lại tiền mua
Bồi thường lại tiền cộng với một khoản
1
0% giá trị mất giá của đồng tiền
Bồi thường lại tiền cộng với một khoản
5% giá trị mất giá của đồng tiền
Sửa chữa có tính phí Sửa chữa có tính phí
Đổi mới sản phẩm
Thanh toán cho chi phí sửa
chữa và đổi mới máy lọc
Thanh toán cho chi phí sửa chữa và đổi mới máy
lọc cộng với một khoản bù cho mất giá đồng tiền
Sửa chữa có tính phí Sửa chữa có tính phí
Sau thời gian bảo hành
Giải quyết khiếu nại khách hàng
Mục Dịch vụ của chúng tôi
•
Quyền lợi của khách hàng
Khách hàng được một lần kiểm tra sửa chữa máy lọc miễn phí trong vòng 1 năm kể từ ngày mua máy nếu máy gặp trục trặc trong quá trình sử dụng .
Tuy nhiên nếu lỗi là do sự bất cẩn của quý khách hoặc do thảm họa thiên tai, chúng tôi chỉ có thể thực hiện sửa chữa có tính phí trong thời gian bảo hành.
•
Trách nhiệm thanh toán tiền sửa chữa (chi phí khách hàng phải chịu)
Nếu khách hàng yêu cầu sửa chữa và thuốc một trong các tình trạng sau chúng tôi chỉ thực hiện sửa chữa có tính phí kể cả trong thời gian bảo hành.
1) Nếu hư hỏng xảy ra do có dị vật (nước phải rượu bia cà phê, đồ chơi, v…v…) rơi vào máy lọc
2) Nếu máy lọc bị hỏng hoặc lỗi chức năng do bị rơi hoặc bị va đập
3) Nếu máy lọc bị hư hỏng hoặc biến dạng bề mặt bên ngoài do phải tiếp xúc với dung môi hữu cơ như benzen hoặc chất pha loãng
4) Nếu máy gặp trục trặc do sử dụng một bộ phận phụ tùng hoặc vật tư không phải là hàng chính hãng của CUCKOO (đầu cắm nối, lõi lọc, v…v…).Hãy mua phụ tùng và vật tư chính
hãng của CUCKOO tại trung tâm dịch vụ khách hàng được chỉ định .
5) Nếu hỏng hóc xảy ra do dùng sai cấp điện áp
6) Nếu một bộ phận máy lọc bị mất hoặc bị hỏng Do khách hàng tự ý tháo rời
7) Nếu máy hỏng hóc do nhân viên không phải là kỹ thuật viên của trung tâm dịch vụ khách hàng CUCKOO thực hiện sửa chữa hay chỉnh sửa máy lọc
8) Nếu Hỏng hóc xảy ra do thiên tai (sét đánh, hỏa hoạn, bão lụt, khí ga, gió biển, động đất, v…v…)
9) Nếu hỏng hóc xảy ra do khách hàng không tuân thủ ‘Cảnh báo An toàn’ trong Hướng dẫn Sử dụng (Nếu cách hàng tuân thủ, có thể sử dụng sản phẩm trong thời gian dài.)
10) Nếu hỏng hóc xảy ra do lỗi khác của khách hàng

00383-1000A0 Rev.1
We provide satisfying consultation and services concerning your complaints, suggestions, and recommendations upon receiving your troubled product model name, status, and contact information.
♣
After reading this manual, keep it in a place easily accessible to the user for future reference.
♣
This manual includes the warranty.
♣
Caution: Please read this manual carefully to ensure safety and a longer product lifespan.
http://www.cuckooworld.com
-
 1
1
-
 2
2
-
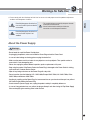 3
3
-
 4
4
-
 5
5
-
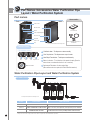 6
6
-
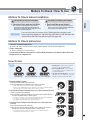 7
7
-
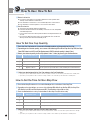 8
8
-
 9
9
-
 10
10
-
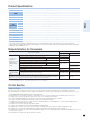 11
11
-
 12
12
-
 13
13
-
 14
14
-
 15
15
-
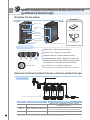 16
16
-
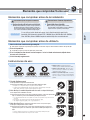 17
17
-
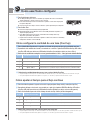 18
18
-
 19
19
-
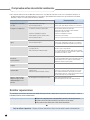 20
20
-
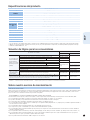 21
21
-
 22
22
-
 23
23
-
 24
24
-
 25
25
-
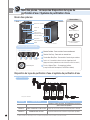 26
26
-
 27
27
-
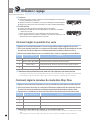 28
28
-
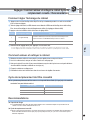 29
29
-
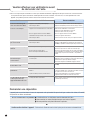 30
30
-
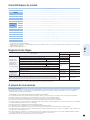 31
31
-
 32
32
-
 33
33
-
 34
34
-
 35
35
-
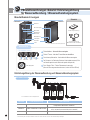 36
36
-
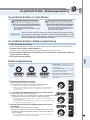 37
37
-
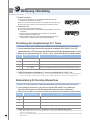 38
38
-
 39
39
-
 40
40
-
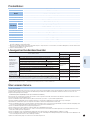 41
41
-
 42
42
-
 43
43
-
 44
44
-
 45
45
-
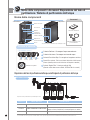 46
46
-
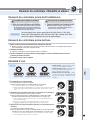 47
47
-
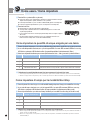 48
48
-
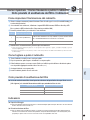 49
49
-
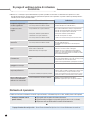 50
50
-
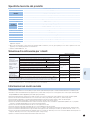 51
51
-
 52
52
-
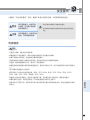 53
53
-
 54
54
-
 55
55
-
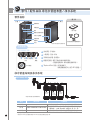 56
56
-
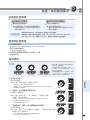 57
57
-
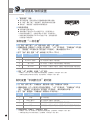 58
58
-
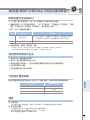 59
59
-
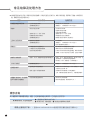 60
60
-
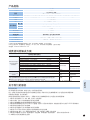 61
61
-
 62
62
-
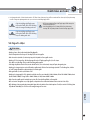 63
63
-
 64
64
-
 65
65
-
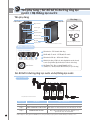 66
66
-
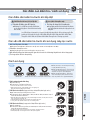 67
67
-
 68
68
-
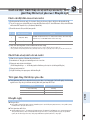 69
69
-
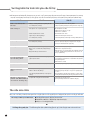 70
70
-
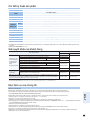 71
71
-
 72
72


en otros idiomas
- français: Cuckoo CP-MN031BK Guide d'installation
- italiano: Cuckoo CP-MN031BK Guida d'installazione
- Deutsch: Cuckoo CP-MN031BK Installationsanleitung
- eesti: Cuckoo CP-MN031BK paigaldusjuhend
- română: Cuckoo CP-MN031BK Ghid de instalare
Otros documentos
-
Toto washlet Guía de instalación
-
Toto MS988CUMFG Guía de instalación
-
LG SIGNATURE WM9500HKA El manual del propietario
-
-
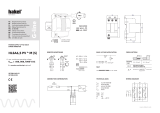 hakel HLSA6 Manual de usuario
-
LG WM9500HKA El manual del propietario
-
Yes WT7200CV DL a5ed3d67c96e2572799bf9d7ada4
-
LG WT7700HWA Owner's Manual Spanish 12898K
-
LG Electronics WT1701CV Guía del usuario
-
