Kenmore 796.8884 El manual del propietario
- Categoría
- Secadoras de ropa eléctricas
- Tipo
- El manual del propietario
Este manual también es adecuado para

Dryers
Use & Care Guide and Installation Instructions
Secadoras
Gufa de uso y cuidado e Instrucciones de instalaci6n
Models/Modelos
Electric/Electrico 796.8884*
Gas/A Gas 796.9884*
* = color number, nt_mero de color
3828EL4001M Sears, Roebuck and Co,, Hoffman Estates, IL 60179 U,S,A, www,sears,com

IMPORTANT SAFETY INSTRUCTIONS
Basic Safety Precautions .................... 3-6
Special Requirements for Manufactured
or Mobile Homes ............................. 6
FEATURES AND BENEFITS
Key Parts and Components .................... 7
INSTALLATION INSTRUCTIONS
Key Dimension and Specifications ............... 8
Location Requirements ........................ 8
Choose the Proper Location .................... 8
Clearances ................................. 8
Gas Requirements ........................... 9
Connecting Gas Dryers ..................... 9, 10
Electrical Requirements ....................... 11
Connecting Electric Dryers ................. 11, 12
Venting Requirements ........................ 13
Venting the Dryer ......................... 13, 14
Leveling the Dryer ........................... 15
Reversing the Door Swing .................... 15
Final Installation Check ....................... 16
HOW TO USE
Control Panel Features ....................... 17
Operating the Dryer .......................... 18
Cycle Guide ................................ 19
Sorting Loads .............................. 20
Loading the Dryer ........................... 20
Check the Lint Screen Before Every Load ........ 20
Time and Status Display ...................... 21
Cycle Modifier Buttons ....................... 22
Cycle Option Buttons ......................... 23
My Cycle .................................. 23
Special Functions ........................... 24
USER-MAINTENANCE INSTRUCTIONS
Regular Cleaning ............................ 25
TROUBLESHOOTING GUIDE
Before Calling for Service .................. 26-28
WARRANTY ............................... 30
In the space below, record the date of purchase, model,
and serial number of your product. You will find the
model and serial number printed on an identification
plate located inside the dryer door. Have these items
of information available whenever you contact Sears
concerning your product.
Model No.
Date of Purchase
Serial No.
Save these instructions and your sales receipt for
future reference.
Master Protection Agreements
Congratulations on making a smart purchase. Your new
Kenmore_ product is designed and manufactured for
years of dependable operation. But like all products, it
may require preventive maintenance or repair from time to
time. That's when having a Master Protection Agreement
can save you money and aggravation.
The Master Protection Agreement also helps extend
the life of your new product. Here's what the Agreement*
includes:
• Parts and labor needed to help keep products
operating properly under normal use, not just defects.
Our coverage goes well beyond the product warranty.
No deductible, no functional failure excluded from
coverage--real protection.
• Expert service by a force of more than 10,000
authorized Sears service technicians, which means
someone you can trust will be working on your product.
• Unlimited service calls and nationwide service,
as often as you want us, whenever you want us.
• "No-lemon" guarantee--replacement of your covered
product if four or more product failures occur within
twelve months.
• Product replacement if your covered product can't
be fixed.
•Annual Preventive Maintenance Check at your
request--no extra charge.
• Fast help by phone--we call it Rapid Resolution.
Phone support from a Sears representative on all
products. Think of us as a '"calkingowner's manual."
• Power surge protection against electrical damage
due to power fluctuations.
• $250 food loss protection annually for any food
spoilage that is the result of mechanical failure of any
covered refrigerator or freezer.
• Rental reimbursement if repair of your covered product
takes longer than promised.
• 10% discount off the regular price of any non-covered
repair service and related installed parts.
Once you purchase the Agreement, a simple phone call
is all that it takes for you to schedule service. You can call
anytime day or night or schedule a service appointment
online.
The Master Protection Agreement is a risk free purchase.
If you cancel for any reason during the product warranty
period, we will provide a full refund, or a prorated refund
anytime after the product warranty period expires.
Purchase your Master Protection Agreement today!
Some limitations and exclusions apply.
For prices and additional information in the U.S.A.
call 1-800-827-6655.
*Coverage in Canada varies on some items.
For full details call Sears Canada at 1-800-361-6665.
Sears Installation Service
For Sears professional installation of home appliances,
garage door openers, water heaters, and other major
home items, in the U.S.A. or Canada, call
1-800-4-MY-HOME_L

Wehaveprovidedmanyimportantsafetymessagesinthismanualandonyourappliance.Alwaysreadandobeyall
safetymessages.
Thisisthesafetyalertsymbol.
Thissymbolalertsyoutopotentialhazardsthatcanresultinpropertydamageand/orseriousbodily
harmordeath.
AllsafetymessageswillfollowthesafetyalertsymbolandeitherthewordDANGERorWARNING.
Thesewordsmean:
Failuretofollowthesesafetyinstructionsmayresultinpropertydamageand/or
seriousbodilyharmordeath.
Failuretofollowthesesafetyinstructionsmayresultinpropertydamageand/or
seriousbodilyharmordeath.
Allsafetymessageswilltellyouwhatthepotentialhazardis,tellyouhowtoreduce
thechanceofinjury,andtellyouwhatcanhappeniftheinstructionsarenotfollowed.
READ ALL INSTRUCTIONS BEFORE USE
Foryoursafety,theinformationin this manualmustbe followed
to minimizethe riskoffire or explosion,electricshock,or to
preventpropertydamage,personalinjury,or lossof life.
To reduce the risk of fire, electric shock, or injury
to persons when using this appliance, follow basic
precautions, including the following:
• Read all instructions before using the dryer.
• Before use, the dryer must be properly installed as
described in this manual.
• Do not place items exposed to cooking oils in your dryer.
Items contaminated with cooking oils may contribute to
a chemical reaction that could cause a load to catch fire.
• Do not dry articles that have been previously cleaned in,
washed in, soaked in, or spotted with gasoline,
dry-cleaning solvents, or other flammable or explosive
substances, as they give off vapors that could ignite
or explode.
• Do not reach into the dryer if the drum or any other part
is moving.
• Do not repair or replace any part of the dryer or attempt
any servicing unless specifically recommended in this
Use and Care Guide or in published user-repair
instructions that you understand and have the skills
to carry out.
• Do not tamper with the controls.
Before the dryer is removed from service or discarded,
remove the door to the drying compartment.
Do not allow children to play on or in the dryer. Close
supervision of children is necessary when the dryer
is used near children.
Do not use fabric softeners or products to eliminate
static unless recommended by the manufacturer of
the fabric softener or product.
Do not use heat to dry articles containing foam rubber
or similarly textured rubber-like materials.
Keep the area around the exhaust opening and adjacent
surrounding areas free from the accumulation of lint,
dust, and dirt.
The interior of the dryer and exhaust vent should be
cleaned periodically by qualified service personnel.
Do not install or store the dryer where it will be exposed
to the weather.
• Always check the inside of the dryer for foreign objects.
• Clean the lint screen before or after each load.
3

For your safety, the information in this manual must be
followed to minimize the risk of fire or explosion, electric
shock, or to prevent property damage, personal injury,
or loss of life.
• Do not store or use gasoline or any other liquid with
flammable vapors in the vicinity of this appliance or
any other appliances.
• Installation and service must be performed by a qualified
installer, service agency, or the gas supplier.
WHAT TO DO IF YOU SMELL GAS:
1. Do not try to light a match or cigarette, or turn on any
gas or electrical appliance.
2. Do not touch any electrical switches. Do not use any
phone in your building.
3. Clear the room, building, or area of all occupants.
4. Immediately call your gas supplier from a neighbor's
phone. Follow the gas supplier's instructions carefully.
5. If you cannot reach your gas supplier, call the fire
department.
CALIFORNIA SAFE DRINKING WATER AND TOXIC ENFORCEMENT ACT
This act requires the governor of California to publish a list of substances known to the state to cause cancer,
birth defects, or other reproductive harm and requires businesses to warn customers of potential exposure
to such substances.
Gas appliances can cause minor exposure to four of these substances, namely benzene, carbon monoxide,
formaldehyde, and soot, caused primarily by the incomplete combustion of natural gas or LP fuels.
Properly adjusted dryers will minimize incomplete combustion. Exposure to these substances can be minimized further
by properly venting the dryer to the outdoors.
To reduce the risk of fire, electric shock, or injury to
persons when using this appliance, follow basic
precautions, including the following:
• Properly ground dryer to conform with all governing
codes and ordinances. Follow details in the installation
instructions. Electrical shock can result if the dryer is not
properly grounded.
• Before use, the dryer must be properly installed as
described in this manual. Electrical shock can result if
the dryer is not properly grounded.
• Install and store the dryer where it will not be
exposed to temperatures below freezing or
exposed to the weather.
• All repairs and servicing must be performed by
an authorized servicer unless specifically
recommended in this Owner's Guide. Use only
authorized factory parts. Failure to follow this warning
can cause serious injury, fire, electrical shock, or death.
• To reduce the risk of electric shock, do not install
the dryer in humid spaces. Failure to follow this
warning can cause serious injury, fire, electrical shock,
or death.
• Connect to a properly rated, protected, and sized
power circuit to avoid electrical overload. Improper
power circuit can melt, creating an electrical shock
and/or a fire hazard.
• Remove all packing items and dispose of all
shipping materials properly. Failure to do so can
result in death, explosion, fire, or burns.
• Place dryer at least 18 in. above the floor for a
garage installation. Failure to do so can result in death,
explosion, fire, or burns.
• Keep all packaging from children. Packaging material
can be dangerous for children. There is a risk of
suffocation.
4

SAFETY INSTRUCTIONS FOR INSTALLATION
Exhaust/Ducting:
• Gas dryers MUST be exhausted to the outside.
Failure to follow these instructions can result in fire
or death,
• The dryer exhaust system must be exhausted to the
outside of the dwelling. If the dryer is not exhausted
outdoors, some fine lint and large amounts of
moisture will be expelled into the laundry area. An
accumulation of lint in any area of the home can create
a health and fire hazard.
• Use only rigid metal or flexible metal 4-in. diameter
ductwork inside the dryer cabinet or for exhausting
to the outside. Use of plastic or other combustible
ductwork can cause a fire. Punctured ductwork can
cause a fire if it collapses or becomes otherwise
restricted in use or during installation.
• Ductwork is not provided with the dryer, and you
should obtain the necessary ductwork locally. The
end cap should have hinged dampers to prevent
backdraft when the dryer is not in use. Failure to
follow these instructions can result in fire or death.
• The exhaust duct must be 4-in. (10 cm) in diameter
with no obstructions. The exhaust duct should be
kept as short as possible. Make sure to clean any
old ducts before installing your new dryer. Failure to
follow these instructions can result in fire or death.
• Rigid or semi-rigid metal ducting is recommended
for use between the dryer and the wall. In special
installations when it is impossible to make a
connection with the above recommendations, a UL-
listed flexible metal transition duct may be used
between the dryer and wall connection only. The use
of this ducting will affect drying time. Failure to follow
these instructions can result in fire or death.
• DO NOT use sheet metal screws or other fasteners
which extend into the duct; they can catch lint and
reduce the efficiency of the exhaust system. Secure
all joints with duct tape. For complete details, follow the
Installation Instructions. Failure to follow these
instructions can result in fire or death.
SAFETY INSTRUCTIONS FOR CONNECTING
ELECTRICITY
To reduce the risk of fire, electric shock, or injury to
persons when using this appliance, follow basic
precautions, including the following:
• Do not, under any circumstances, cut or remove the
ground prong from the power cord. To prevent personal
injury or damage to the dryer, the electrical power cord must
be plugged into a properly grounded outlet.
• For personal safety, this dryer must be properly
grounded. Failure to do so can result in electrical shock
or injury.
• Refer to the installation instructions in this manual for
specific electrical requirements for your model. Failure
to follow these instructions can create an electrical shock
hazard and/or a fire hazard.
• This dryer must be plugged into a properly grounded
outlet. Electrical shock can result ifthe dryer is not
properly grounded. Have the wall outlet and circuit
checked by a qualified electrician to make sure the
outlet is properly grounded. Failure to followthese
instructions can create an electrical shock hazard and/or a
fire hazard.
The dryer should always be plugged into its own
individual electrical outlet which has a voltage rating
that matches the rating plate. This provides the best
performance and also prevents overloading house wiring
circuits which could cause a fire hazard from overheated
wires.
Never unplug your dryer by pulling on the power cord.
Always grip plug firmly and pull straight out from the
outlet. The power cord can be damaged, resulting in a risk
of fire and electrical shock.
• Immediate repair or replace all power cords that have
become frayed or otherwise damaged. Do not use a
cord that shows cracks or abrasion damage along its
length or at either end. A damaged power cord can melt,
creating an electrical shock and/or a fire hazard.
• When installing or moving the dryer, be careful not to
pinch, crush, or damage the power cord. This will prevent
injury and prevent damage to the dryer from fire and
electrical shock.

Foryoursafety,the information in this manualmustbe
followed to minimizethe riskoffire or explosion,electricshock,
or to preventpropertydamage,personalinjury,or lossof life.
Thisappliancemustbe grounded.Inthe eventofmalfunctionor
breakdown,groundingwiltreducetherisk ofelectricshockby
providinga pathofleast resistancefor electriccurrent.This
appliancemustbeequippedwith a cordhavingan equipment-
groundingconductorand a groundingplug.The plug mustbe
pluggedintoan appropriateoutletthatis properlyinstalledand
groundedinaccordancewithall localcodesand ordinances.
Improperconnectionof theequipment-groundingconductor
canresultina riskof electricshock.Checkwitha qualified
electricianor servicepersonifyou are indoubtasto whetherthe
applianceisproperlygrounded.
Do notmodifytheplug providedwiththeappliance.If itdoesnotfit
theoutlet,have a properoutlet installedby a qualifiedelectrician.
This appliancemustbe connectedtoa groundedmetal,permanent
wiringsystemor an equipmentgroundingconductormustbe run
withthe circuitconductorsandconnectedto theequipment
groundingterminalor leadon the appliance.
Electricalshockcanresultifthe dryeris notproperlygrounded.
To reduce the risk of fire, electric shock, or injury to
persons when using this appliance, follow basic
precautions, including the following:
• Any installation in a manufactured or mobile home must
comply with the Manufactured Home Construction and
Safety Standards Title 24 CFR, Part 32-80 or Standard
CAN/CSA0Z240 MH and local codes and ordinances.
If you are uncertain whether your proposed installation
will comply with these standards, please contact a
service and installation professional for assistance.
• A gas dryer must be permanently attached to the floor.
• A 4-wire connection is required for all manufactured
or mobile home installations, as well as all new
construction after January 1, 1996. A 4-wire
connection must be used where local codes do not
permit grounding through the neutral wire. Failure to
do so can result in fire, explosion, or death.
• To reduce the risk of combustion and fire, the dryer
must be vented to the outside.
• DO NOT vent the dryer under a manufactured home or
mobile home.
• Electric dryers may be vented to the outside using
the back, left, right, or bottom panel.
• Gas dryers may be vented to the outside using
the back, left, or bottom panel. Gas dryers may not be
vented to the outside using the right side panel because
of the burner housing.
• The dryer exhaust duct must be affixed securely to the
manufactured or mobile home structure, and the
exhaust duct must be made of a material that will resist
fire and combustion. It is recommended that you use
a rigid or flexible metal duct.
• DO NOT connect the dryer exhaust duct to any other
duct, vent, chimney, or other exhaust duct.
• Make sure the dryer has adequate access to outside
fresh air to ensure proper operation. The opening for
outside fresh air must be at least 25 in2 (163 cm2).
• It is important that the clearance of the duct from any
combustible construction be at least 2 in. (5 cm), and
when venting the dryer to the outdoors, the dryer can
be installed with a clearance of 1 in. (2.5 cm) at the
sides and back of the dryer.
• Please be aware that venting materials are not supplied
with the dryer. You should obtain the venting materials
necessary for proper installation.
SAVE THESE INSTRUCTIONS

KEY PARTS AND COMPONENTS
There are several important components that are
referenced in this manual. Q
O EASY-TO-USE CONTROL PANEL
Rotate the Cycle Selector Knob to select the
desired dry cycle. Add cycle options or adjust
settings with the touch of a button. Press the Cycle
Selector Knob to start the selected dry cycle.
_) TIME AND STATUS DISPLAY
The easy-to-read LED display shows cycle options
and information and provides cycle status during
operation.
(_ CHECK VENT
(Duct Blockage Sensing System)
The Check Vent (Duct blockage sensing system)
detects and alerts you to blockages in the exhaust
system that reduce airflow from the dryer.
Maintaining clean exhaust system ducts
improves operating efficiency and helps
minimize service calls, saving you money.
(_) ULTRA-CAPACITY STAINLESS
STEEL DRUM WITH DRUM LIGHT
The ultra-large stainless steel drum offers superior
durability. The drum is equipped with a light that
illuminates when the dryer door is open and turns
off when the door is closed.
(_ EASY-ACCESS REVERSIBLE DOOR
Wide-opening, see-through glass door provides
easy access for loading and unloading. Door swing
can be reversed to adjust for installation location.
O FRONT-MOUNT LINT SCREEN
Front-mounted lint screen allows for easy access
and cleaning between loads.
(_ LEVELING FEET
Four leveling feet (two in front, and two in back)
adjust to improve dryer stability on uneven floors.
_) DRYING RACK (Included Accessory)
Use the drying rack with the RACK DRY cycle option.
The drying rack allows items such as sweaters,
delicates, and gym shoes to be placed
in a flat position for drying.
For special installation applications, the following
kits are available. Go to www.searspartsdirect.com,
or call 1-800-4-MY-HOME ®for ordering information.
O LP CONVERSION KIT (P/N 383EEL3002A)
This LP conversion kit contains all required parts
to change the dryer gas connections from Natural
Gas (NG) to Liquefied Propane Gas (LP).
_) SIDE VENT KIT (P/N 383EEL9001B)
The side vent kit contains the necessary parts
to change the dryer from a rear vent to a side
vent location.
O
O
O
[Q]o
Terminal Block
Access Panel
(Electric Models)
Power Cord
Location
(Gas Models)
Gas Connection
Location
(Gas Models)
Exhaust Duct
Outlet
Rear of Dryer

KEY DIMENSIONS AND SPECIFICATIONS
Description Dryer (Gas and Electric)
Electrical Requirements Please refer to the rating label.
Gas Requirements* NG: 6-8 in. WC
Gas Requirements* LP: 10-13 in. WC
Dimensions 27"(W) X 30"(D) X 38 11/16"(H), 50" (D with door open)
68.6 cm (W) X 76.1 cm (D) X 98.3 cm (H), 127 cm (D with door open)
Net Weight 126 lb. (57.2 kg)
Drying Capacity IEC 7.3 cu. ft. (22.5 Ibs./lO.2 kg)
*Gas Models only.
LOCATION REQUIREMENTS
IMPORTANT:
Read all installation instructions completely before
installing and operating your dryer!
It is important that you review this entire manual before
installing and using your dryer. Detailed instructions
concerning electrical connections, gas connections,
and exhaust requirements are provided on the
following pages.
CHOOSE THE PROPER LOCATION
• Store and install the dryer where it will not be exposed
to temperatures below freezing or exposed to outdoor
weather conditions.
• Choose a location with a solid, level floor.
• If the dryer is being installed in a garage, place the
dryer at least 18 in. (46 cm) above the floor.
• Properly ground the dryer to conform with all governing
codes and ordinances.
• To reduce the risk of electric shock, do not install
the dryer in damp or wet locations.
IMPORTANT: If you are installing your dryer in a
manufactured or mobile home, please refer to the
section Special Requirements for Manufactured
or Mobile Homes on page 6,
CLEARANCES
• Most installations require a minimum 5 1/2 in.
(14 cm) clearance behind the dryer for
the exhaust ducting.
• Allow minimum clearances of at least 1 in.
(2.5 cm) on the sides and back to minimize
vibration and noise.
• Allowing additional clearance for installation
and servicing is recommended.
• Be sure to allow for wall, door, or floor moldings
that may increase the required clearances.
• Allow at least 21 in. (53.3 cm) in front of the dryer
to open the door.
!
20" 18"
(50.8 cm) (45.7 cm) _/'
L _J _.J
| - _. 4 II
4" _11_ 30" _ I-_ (10cm)
(10 cm) (76.1 cm)
J
50"
(127 cm)
(7.6 cm)
/
/
48 in.2
(310 cm)
0
34 in.2
(155 cm) \...
(7.6 cm)
Closet Door Vent
Requirements
QO
@
1" - - 1"
(2.5 cm)--_l I-,.- 27" ,4 _-- (2.5 cm)
(68.6 cm)
Additional Instructions for
closet installations:
• The closet door must allow
for sufficient airflow. Refer to
the diagram to the left for
minimum vent opening
requirements. Alouvered
door is also acceptable.
• Make sure that there is
at least 18 in. (46 cm) of
clearance above the dryer.
8

GAS REQUIREMENTS (GAS MODELS ONLY)
CONNECTING GAS DRYERS
"_v!l WARNING: To reduce the risk of fire,
electric shock, or injury to persons when using
this appliance, follow basic precautions, including
the following:
• Gas supply requirements:
As shipped from the factory, this dryer is configured
for use with (NG) natural gas. It can be converted
for use with LP (Liquefied Propane) gas. Gas
pressure must not exceed 8-in. water column for
(NG), or 13-in. water column for (LP).
• A qualified service or gas company technician must
connect the dryer to the gas service. Failure to do so
can result in fire, explosion, or death,
• Isolate the dryer from the gas supply system by
closing its individual manual shutoff valve during
any pressure testing of the gas supply. Failure to
do so can result in fire, explosion, or death.
• Supply line requirements:
Your laundry room must have a rigid gas supply
line to your dryer. In the United States, an individual
manual shutoff valve MUST be installed within at
least 6 ft. (1.8 m) of the dryer, in accordance with
the National Fuel Gas Code ANSI Z223.1. A 1/8-in.
NPT pipe plug must be installed. Failure to do so
can result in fire, explosion, or death.
• If using a rigid pipe, the rigid pipe should be 1/2-in.
IPS. If acceptable under local codes and ordinances
and when acceptable to your gas supplier, 3/8-in.
approved tubing may be used where lengths are
less than 20 ft. (6.1 m). Larger tubing should be
used for lengths in excess of 20 ft. (6.1 m). Failure
to do so can result in fire, explosion, or death.
• Connect the dryer to the type of gas shown on
the nameplate. Failure to do so can result in fire,
explosion, or death.
• To prevent contamination of the gas valve,
purge the gas supply of air and sediment before
connecting the gas supply to the dryer. Before
tightening the connection between the gas supply
and the dryer, purge remaining air until the odor
of gas is detected. Failure to do so can result in fire,
explosion, or death.
• DO NOT use an open flame to inspect for gas leaks.
Use a noncorrosive leak detection fluid. Failure to do
so can result in fire, explosion, or death.
• Use only a new AGA- or CSA-certified gas supply
line with flexible stainless steel connectors. Failure
to do so can result in fire, explosion, or death.
• Securely tighten all gas connections. Failure to do so
can result in fire, explosion, or death.
• Use Teflon ®tape or a pipe-joint compound that is
insoluble in Liquefied Petroleum (LP) gas on all pipe
threads. Failure to do so can result in fire, explosion, or
death.
• DO NOT attempt any disassembly of the dryer; any
disassembly requires the attention and tools of an
authorized and qualified service person or company.
Failure to do so can result in fire, explosion, or death.
Electrical Requirements for Gas Models Only
• Do not, under any circumstances, cut or remove the
third (ground) prong from the power cord. Failure to
follow this warning can result in fire, explosion, or death.
• For personal safety, this dryer must be properly
grounded. Failure to follow this warning can result in
fire, explosion, or death.
• The power cord of this dryer is equipped with a
3-prong (grounding) plug which mates with a
standard 3-prong (grounding) wall outlet to
minimize the possibility of electric shock hazard
from this appliance. Failure to follow this warning
can result in fire, explosion, or death.
This dryer must be plugged into a 120-VAC, 60-Hz.
grounded outlet protected by a 15-ampere fuse or
circuit breaker. Failure to follow this warning can result
in fire, explosion, or death.
Where a standard 2-prong wall outlet is
encountered, it is your personal responsibility
and obligation to have it replaced with a properly
grounded 3-prong wall outlet. Failure to follow this
warning can result in fire, explosion, or death.
3-prong
grounding type
3-prong S
grounding
plug
Ensure proper
ground exists
before use.

CONNECTING GAS DRYERS (cont.)
nr!l WARNING: To reduce the risk of fire,
electric shock, or injury to persons when using
this appliance, follow basic precautions, including
the following:
• Installation and service must be performed by a
qualified installer, service agency, or the gas
supplier. Failure to do so can result in fire, explosion,
or death.
• Use only a new stainless steel flexible connector
and a new AGA-certified connector. Failure to do
so can result in fire, explosion, or death.
• Agas shutoff valve must be installed within 6 ft.
(1.8 m) of the dryer. Failure to do so can result in fire,
explosion, or death.
• The dryer is configured for Natural Gas when
shipped from the factory. Make sure that the dryer
is equipped with the correct burner nozzle for the
type of gas being used (Natural Gas or Liquefied
Petroleum). Failure to do so can result in fire,
explosion, or death.
Connecting the Gas Supply
NOTE: This dryer is configured from the factory set for
Natural Gas (NG). If dryer is to be used with LP gas,
it must be converted by a qualified service technician.
1. Make sure that the gas supply to the laundry room is
turned OFF and the dryer is unplugged. Confirm that
the type of gas available in your laundry room is
appropriate for the dryer.
2. Remove the shipping cap from the gas fitting at the
back of the dryer. Be careful not to damage the threads
of the gas connector when removing the shipping cap.
3. Connect the dryer to your laundry room's gas supply
using a new flexible stainless steel connector with a
3/8-in. NPT fitting.
NOTE: DO NOT use old connectors.
4. Securely tighten all connections between the dryer
and your laundry room's gas supply.
5. Turn on your laundry room's gas supply.
6. Check all pipe connections (both internal and external)
for gas leaks with a noncorrosive leak-detection fluid.
7. Proceed to Venting Requirements on page 13.
• If necessary, the correct nozzle (for the LP nozzle
kit, order part number 4948EL4002B) should be
installed by a qualified technician and the change
should be noted on the dryer. Failure to do so can
result in fire, explosion, or death.
• All connections must be in accordance with local
codes and regulations. Failure to do so can result
in fire, explosion, or death.
• Gas dryers MUST exhaust to the outdoors. Failure
to do so can result in fire, explosion, or death.
i ....... Y
__ _1/8" NPT Pipe Plug
3/8" NPT Gas
Connection ,_
Gas Supply
AGA/CSA-Certified Shutoff Valve
Stainless Steel
Flexible Connector
High-Altitude Installations
The BTU rating of this dryer is AGA-certified for
elevations below 10,000 feet.
If your gas dryer is being installed at an elevation
above 10,000 feet, it must be derated by a qualified
technician or gas supplier.
10

ELECTRICAL REQUIREMENTS
CONNECTING ELECTRIC DRYERS
nr!_IWARNING: To help prevent fire, electric
shock, serious injury, or death, the wiring and
grounding must conform to the latest edition of
the National Electrical Code, ANSI/NFPA 70 and
all applicable local regulations. Please contact
a qualified electrician to check your home's wiring
and fuses to ensure that your home has adequate
electrical power to operate the dryer.
Special Electrical Requirements for Mobile
or Manufactured Homes
nr!,WARNING: To reduce the risk of fire,
|
electric shock, or injury to persons when using
this appliance, follow basic precautions, including
the following:
• Any installation in a manufactured or mobile home must
comply with the Manufactured Home Construction and
Safety Standards Title 24 CFR, Part 32-80 or Standard
CAN/CSAOZ240 MH and local codes and ordinances.
• A 4-wire connection is required for all mobile and
manufactured home installations, as well as all new
construction after January 1, 1996. Failure to do so
can result in fire, explosion, or death.
Electrical Requirements for
Electric Models Only
nr!IWARNING : To reduce the risk of fire,
electric shock, or injury to persons when using
this appliance, follow basic precautions, including
the following:
• This dryer must be connected to a grounded
metal, permanent wiring system, or an equipment-
grounding conductor must be run with the circuit
conductors and connected to the equipment-
grounding terminal or lead on the dryer. Failure
to do so can result in fire, explosion, or death.
• The dryer has its own terminal block that must be
connected to a separate 240 VAC, 60-Hertz, single-
phase circuit, fused at 30 amperes. The circuit must
be fused on both sides of the line. ELECTRICAL
SERVICE FOR THE DRYER SHOULD BE OF THE
MAXIMUM RATE VOLTAGE LISTED ON THE
NAMEPLATE. DO NOT CONNECT DRYER TO 110-,
115-, OR 120-VOLT CIRCUIT. Heating elements are
available for field installation in dryers which are to
be connected to an electrical service of a different
voltage than that listed on the rating plate. Failure
to follow these instructions can result in fire, explosion,
or death.
• If branch circuit to dryer is 15 ft. (4.5 m) or less in
length, use UL (Underwriters Laboratories) listed
No.-10 AWG wire (copper wire only), or as required
by local codes. If over 15 ft. (4.50 m), use UL-listed
No.-8 AWG wire (copper wire only), or as required
by local codes. Allow sufficient slack in wiring so
dryer can be moved from its normal location when
necessary. Failure to do so can result in fire, explosion,
or death.
• The power cord (pigtail) connection between wall
receptacle and dryer terminal block IS NOT supplied
with the dryer. Type of pigtail and gauge of wire
must conform to local codes and with instructions
on the following pages. Failure to follow these
instructions can result in fire, explosion, or death.
• A 4-wire connection is required for all new
construction after January 1, 1996. A 4-wire
connection must be used where local codes do
not permit grounding through the neutral wire.
Failure to do so can result in fire, explosion, or death.
11

CONNECTING ELECTRIC DRYERS (cont.)
WARNING
• Connect the power cord to the terminal block. Each
colored wire should be connected to same color
screw. Wire color indicated on manual is connected
to the same color screw in block. Failure to follow
these instructions may result in a short or overload.
• Grounding through the neutral conductor is
prohibited for: (1) new branch-circuit installations,
(2) mobile homes, (3) recreational vehicles, and (4)
areas where local codes prohibit grounding through
the neutral conductor.
Four-Wire Power Cord
I /_--_ I • A 4-wire connection is required for all
mobile and manufactured home instal-
lations, as well as all new construction
after January 1, 1996.
• A UL-listed strain relief is required.
• Use a 30-amp, 240-volt, 4-wire, UL-listed power cord
with #10 AWG-minimum copper conductor and
closed loop or forked terminals with upturned ends.
UL-Listed _ 7 Terminal
4-Wire Block
Power Cord I1_\_÷_o_'_:
ReliefUL-Listed
I Strain
1. Remove the terminal block access cover on the upper
back of the dryer.
2. Install a UL-listed strain relief into the power cord
through-hole.
3. Thread a 30-amp, 240-volt, 4-wire, UL-listed power
cord with #10 AWG-minimum copper conductor
through the strain relief.
Hot -=Neutral Hot
(Btack)_ (White)
Ground
Screw
4. Transfer the dryer's ground wire from behind the green
ground screw to the center screw of the terminal block.
5. Attach the two hot leads of the power cord to the outer
terminal block screws.
6. Attach the white neutral wire to the center screw of the
terminal block.
7. Attach the power cord ground wire to the green
ground screw.
8. TIGHTEN ALL SCREWS SECURELY.
9. Reinstall the terminal block access cover.
Three-Wire Power Cord
• A 3-wire connection is NOT permitted on
new construction after January 1, 1996.
A UL-listed strain relief is required.
• Use a 30-amp, 240-volt, 3-wire, UL-listed power cord
with #10 AWG-minimum copper conductor and
closed loop or forked terminals with upturned ends.
1. Remove the terminal block access cover on the upper
back of the dryer.
2. Install a UL-listed strain relief into the power cord
through-hole.
3. Thread a 30-amp, 240-volt, 3-wire, UL-listed power
cord with #10 AWG-minimum copper conductor
through the strain relief.
_--- Hot _ Neutral Hot
(atack)_J (White) (Red)
Ground
Screw
Ground _
Wire
4.
5.
6.
7.
8.
O
Attach the two hot leads of the power cord to the outer
terminal block screws.
Attach the neutral wire to the center terminal block
screw.
Connect the external ground (if required by local codes)
to the green ground screw.
TIGHTEN ALL SCREWS SECURELY.
Reinstall the terminal block access cover.
12

VENTING REQUIREMENTS
VENTING THE DRYER
"Ir!IWARNING: To reduce the risk of fire,
electric shock, or injury to persons when using
this appliance, follow basic precautions, including
the following:
• Do not crush or collapse ductwork. Failure to follow
these instructions can result in fire or death.
• Do not allow ductwork to rest on or contact sharp
objects. Failure to follow these instructions can result
in fire or death.
• If connecting to existing ductwork, make sure it is
suitable and clean before installing the dryer. Failure
to follow these instructions can result in fire or death.
• Venting must conform to local building codes.
Failure to follow these instructions can result in fire
or death.
• Gas dryers MUST exhaust to the outdoors. Failure
to follow these instructions can result in fire or death.
• Use only 4-in. (10-cm) rigid or flexible metal
ductwork inside the dryer cabinet and for venting
outside. Failure to follow these instructions can result
in fire or death.
• To reduce the risk of fire, combustion, or
accumulation of combustible gases, DO NOT
exhaust dryer air into an enclosed and unventilated
area, such as an attic, wall, ceiling, crawl space,
chimney, gas vent, or concealed space of a
building. Failure to follow these instructions can
result in fire or death.
• To reduce the risk of fire, DO NOT exhaust the dryer
with plastic or thin foil ducting. Failure to follow these
instructions can result in fire or death.
• The exhaust duct must be 4 in. (10 cm) in diameter
with no obstructions. The exhaust duct should be
kept as short as possible. Make sure to clean any
old ducts before installing your new dryer. Failure
to follow these instructions can result in fire or death.
• Rigid or semirigid metal ducting is recommended
for use between the dryer and the wall. In special
installations when it is impossible to make a
connection with the above recommendations,
a UL-listed flexible metal transition duct may
be used between the dryer and wall connection
only. The use of this ducting will affect drying
time. Failure to follow these instructions can result
in fire or death.
• DO NOT use sheet metal screws or other fasteners
which extend into the duct that could catch lint and
reduce the efficiency of the exhaust system. Secure
all joints with duct tape. Failure to follow these
instructions can result in fire or death.
• To maximize operating results, please observe the
duct length limitations noted in the chart below.
Failure to follow these instructions can result in fire
or death.
• Ductwork is not provided with the dryer. You should
obtain the necessary ductwork locally. The end cap
should have hinged dampers to prevent backdraft
when the dryer is not in use. Failure to follow these
instructions can result in fire or death.
Selecting and Verifying Duct Length Chart
Number of
Wall Cap Type 90° Elbows
Recomended
(10.2 cm)
(10.2 cm)
0
1
2
3
4
Max. Length of 4-In. Dia.
Rigid Metal Duct
65 ft. (19.8 m)
55 ft. (16.8 m)
47 ft. (13.7 m)
36 ft. (11.0 m)
28 ft. (8.5 m)
Max. Length of 4-In. Dia.
Flexible Metal Duct
45 ft. (13.7 m)
35 ft. (10.7 m)
30 ft. (9.1 m)
25 ft. (7.6 m)
20 ft. (6.1 m)
Only for Short-Run Installations
(6.35 cm)
0
1
2
3
4
55 ft. (16.8 m)
47 ft. (13.7 m)
41 ft. (12.5 m)
30 ft. (9.1 m)
22 ft. (6.7 m)
35 ft. (10.7 m)
27 ft. (8.1 m)
21 ft. (6.4 m)
17 ft. (5.2 m)
15 ft. (4.5 m)
NOTE: Deduct 6 ft. (1.8 m) for each additional elbow. It is not recommended to use more than four 90 ° elbows.
13

VENTING THE DRYER (cont.)
Using the Selecting and Verifying Duct
Length Chart (page 13)
1. Select the type of wall cap.
2. Select row that matches the number of elbows required
in the dryer duct run.
3. Select the duct type. The length shown in the chart at
this point is the maximum allowable duct length for your
installation. Longer duct length will result in reduced
drying performance, longer dry times and increased
energy consumption.
DO NOT exceed maximum length for the duct type and
Routing and Connecting Ductwork
Follow the guidelines below to maximize drying
performance and reduce lint buildup and condensation
in the ductwork.
NOTE: Ductwork and fittings are NOT included and must
be purchased separately.
• Use 4-in. (10-cm) diameter rigid or semirigid metal
ductwork.
• The exhaust duct run should be as short as possible.
• Use as few elbow joints as possible.
• The male end of each section of exhaust duct must
point away from the dryer.
• Use duct tape on all duct joints.
• Insulate ductwork that runs through unheated areas
in order to reduce condensation and lint buildup
on duct surfaces.
WARNING: Failure to follow these
guidelines will result in poor performance, product
failure, and/or result in fire or death.
IMPORTANT: Failure to exhaust the dryer per the
guidelines included within these instructions may result
in unsatisfactory dryer performance. All venting and
ductwork beyond the exterior of the dryer is the
responsibility of the consumer. Product failure as
a result of improper venting is not covered by the
manufacturer's warranty.
Connecting the Dryer Vent
1. Verify all ducts and elbows are clean and free from any
blockages.
2. Measure duct length. DO NOT exceed the maximum
length listed in the chart on page 13.
3. Connect dryer exhaust to existing ductwork.
• Use duct tape or clamps only.
• DO NOT use screws to secure ductwork.
• Use rigid or semirigid metal duct.
• DO NOT use plastic or thin metal foil tubing
for ductwork.
• The male end of each elbow must always point
in the direction of the airflow.
Correct Venting
Incorrect Venting
Male L_
AI
1
O
14

LEVELING THE DRYER
WARNING
• Wear gloves during installation.
• Failure to follow these instructions can result
in injury.
To ensure that the dryer provides optimal drying
performance, it must be level. To minimize vibration,
noise, and unwanted movement, the floor must be
a level, solid surface.
NOTE: Adjust the leveling feet only as far as necessary
to level the dryer. Extending the leveling feet more than
necessary can cause the dryer to vibrate.
Level
._____--------
Levelng Feet
1. Position the dryer in the final location. Place a level
across the top of the dryer.
• All four leveling feet must rest solidly on the floor.
Gently push on the top corners of the dryer to make
sure that the dryer does not rock from corner to corner.
!
2. Use a wrench to turn the leveling feet. Turning the foot
clockwise lowers the foot and raises the dryer; turning
the foot counterclockwise raises the foot and lowers the
dryer. Raise or lower the leveling feet until the dryer is
level from side-to-side and front-to-back. Make sure
that all 4 leveling feet are in firm contact with the floor.
NOTE: If you are installing the dryer on the optional
pedestal, the dryer leveling feet should be fully retracted.
Use the leveling feet on the pedestal to level the dryer.
REVERSING THE DOOR SWING
The swing of the dryer door can be reversed to fit your
installation location.
Door
Latch
_ Hinge
", Screws
,,_ Latch
_. Screws
1. Open the dryer door.
NOTE: Be sure to support the weight of the door before
removing the hinge screws.
2. Using a Phillips screwdriver, remove the 2 hinge
screws that secure the door hinge to the dryer door
opening.
3. Remove the 2 latch screws and the latch from the dryer
door opening.
4. Remove the two screws above and below the latch.
Door
Latch
Hinge Screws
Screws
Latch
Screws
5. Carefully turn the door up-side-down so the hinge is
reversed. Reattach the door to the opposite side of the
door opening.
6. Reinstall the door latch with the original latch screws.
7. Replace the remaining screws in the open holes.
8. Test the door swing to make sure the door moves
freely and latches securely.
15

FINAL INSTALLATION CHECK
Once you have completed the installation of the dryer and
it is in its final location, confirm proper operation with the
following steps and tests.
1. Is gas turned ON? (Gas Models only)
2. Is dryer plugged in? Dryer should always be plugged in
to the proper outlet.
Gas dryer should use a 120-VAC,
60-Hz. grounded 3-prong outlet.
I@1
Electric dryer should use
a 4-wire connection which is
required for all mobile and
manufactured home
installations, as well as
all new construction after
January 1, 1996.
-- OR --
A 3-wire connection.
NOTE: A 3-wire connection
is NOT permitted on new
construction after
January 1, 1996.
3. Is dryer vent ductwork connected?
4. Is dryer level?
5. Perform the following tests before using the dryer.
Testing Dryer Heating
GAS MODELS
1. Close the dryer door.
2. Press the Power button to turn the dryer on.
3. Turn Cycle Selector Knob to Normal drying cycle.
4. Press the Cycle Selector Knob to start the dryer.
When the dryer starts, the igniter should ignite
the main burner.
NOTE: If all air is not purged from the gas line, the gas
igniter may turn off before the main burner ignites. If this
happens, the igniter will reattempt gas ignition until all
the air is purged from the gas line.
ELECTRIC MODELS
1. Close the dryer door.
2. Press the Power button to turn the dryer on.
3. Turn Cycle Selector Knob to Normal drying cycle.
4. Press the Cycle Selector Knob to start the dryer.
The exhaust air should be warm after the dryer has
been operating for 3 minutes.
Checking Venting
Vent ductwork should be checked for lint buildup
and cleaned at least once per year. If any noticeable
reduction in drying performance occurs, check ductwork
for obstructions and blockages.
Checking Levelness
Once the dryer is in its final location, recheck the dryer
to be sure it is level. Make sure it is level front to back
and side to side, and that all 4 leveling feet rest firmly
on the floor.
16

WARNING: To reduce the risk of fire, electric shock, or injury to persons, read this entire
manual, including the Important Safety Instructions, before operating this dryer.
CONTROL PANEL FEATURES
Q
_) POWER (On/Off) BUTTON
Press to turn the dryer ON. Press again to turn
the dryer OFR
NOTE: Pressing the Power button during a
cycle will cancel that cycle and any load settings
1_) CYCLE SELECTOR KNOB-START/PAUSE
This knob is a dual function knob that is used both to
select a cycle and to start or pause a cycle. Turn this
knob to select the desired cycle. Once the desired
cycle has been selected, the standard presets will be
shown in the display. These settings can be adjusted
using the Cycle Modifier or Option buttons anytime
before starting the cycle. (See the cycle guide on
page 19 for allowable settings. To protect your
fabrics, not all settings are allowed in all cycles.)
Press this knob to START the selected cycle. If the
dryer is running, use this knob to PAUSE the cycle
without losing the current settings.
NOTE: If the dryer is stopped more than 4 minutes,
the dryer will automatically turn off.
1_ OPTION BUTTONS
The option buttons allow you to select additional
cycle options. Certain buttons also allow you to
activate special functions by pressing and holding
the button for 3 seconds.
MORE TIME and LESS TIME options are not
available with sensor dry cycles.
For detailed information about the individual options,
please see the following pages.
_) MY CYCLE BUTTON
Press the MY CYCLE button to select the memorized
cycle. Cycle selections and settings are memorized
by pressing and holding the button for 3 seconds.
(See page 23.)
RACK DRY BUTTON
The RACK DRY button selects preset temperature
and time settings to rack dry items.
CYCLE MODIFIER BUTTONS
Use these buttons to adjust the desired cycle options
for the selected cycle. The lights above the buttons
show the current selection. See page 22 for a
complete discription (NOTE: Some settings are
not allowed on some cycles.).
(_) TIME AND STATUS DISPLAY
The display shows the estimated time remaining and
the cycle status. The display also monitors the vent
and lint screen status. See page 21 for a complete
description.
(_ CANCEL/CYCLE BUTTON
The CANCEL/CYCLE button is used to stop the dryer
and reset the controls.
17

OPERATING THE DRYER
O SORT LAUNDRYAND LOAD DRYER
Refer to page 20.
_t CHECK THE LINT FILTER
Refer to page 20.
Power
O TURN ON DRYER
Press the Power button to turn on the dryer. The
lights around the Cycle Selector Knob will illuminate.
Refer to page 17.
\\
,\
SELECT CYCLE
Turn the Cycle Selector Knob to the desired cycle.
The display will show the preset Dry Level,
Temperature, Time, and Option settings for that cycle.
Manual Dry cycles also allow you to select a Timed
Dry setting. Refer to page 17.
SELECT CYCLE MODIFIERS
Dry Level, Temp Control, Timed Dry and Cycle Signal
Refer to page 22.
OPTIONS
@ @
SELECT CYCLE OPTIONS
More Time, Less Time, Damp Dry Signal,
Wrinkle Guard, My Cycle and Rack Dry
Refer to page 23.
_i_ BEGIN CYCLE
Press the Cycle Selector Knob to begin the cycle.
Pressing the Cycle Selector Knob after the dryer is
running will Pause the dryer and retain the existing
setting up to 4 minutes. Refer to page 17.
When the load is finished, the Cycle Signal (if set) will
sound. If you have set the Wrinkle Guard option,
the dryer will tumble the load periodically for up to
3 hours. Refer to page 23 for Wrinkle Guard details.
Remove items from the dryer immediately after
the end of the cycle to prevent further wrinkling.
Checking and cleaning the lint screen after every
load is essential for dryer performance and preventing
lint buildup and/or vent blockage.
18

CYCLE GUIDE
The cycle guide below shows the options and recommended fabric types for each cycle.
= available option
HeavyDuty Jeans, Normal High 54
heavyweightitems Adjustable
O
Cotton/ Denims, towels, Normal
Medium High 55
Towels heavy cottons Adjustable
Workclothes, Normal
Normal corduroys,etc. Adjustable Medium 41 _
Normal
7_ Casual Permanentpress, Low 36 _
smtheticitems
Adjustable
Delicate Lingerie, sheets, Normal Low 32 _
blouses Adjustable
Work clothes, Very Dry
Sanitary heavy cottons, Non- High 70
corduroys, etc. Adjustable
For small loads High 25
Speed Dry with short Off _
drying times Adjustable Adjustable
Z
FreshenUp
Air Dry
Time Dry
Rack Dry
For removing
light wrinkles
from clothing
For items that
require heat-free
drying such as
)lastics or rubber
For general drying;
time,temperature,
and options can
be set manually
Woolsweaters,
silk,lingerie
Medium High 20
Off _
Adjustable Ad ustable
30
Off No Heat _
Ad ustable
High 60
Off _
Adjustable Ad ustable
Off 50
Off Ultra Low Ultra Low
Low Low
J
Sensor Dry Cycles
Sensor Dry cycles utilize a unique dual sensor system to
detect and compare the moisture level in clothes and
in the air and adjust the drying time as needed to ensure
superior results. The dryer automatically sets the dryness
level and temperature at the recommended setting for
each cycle. The estimated time remaining will be shown
in the display.
NOTE: To protect your garments, not every dry level,
temperature, or option is available with every cycle.
Manual Dry Cycles
Use Manual Dry cycles to select a specific amount of
drying time and a drying temperature. When a Manual
Dry cycle is selected, the ESTIMATED TIME REMAINING
display shows the actual time remaining in your cycle.
You can change the actual time in the cycle by pressing
MORE TIME or LESS TIME. Press and hold the MORE
TIME or LESS TIME buttons to rapidly change the time.
19

WARNING: To reduce the risk of fire, electric shock, or injury to persons, read this entire manual,
including the Important Safety Instructions, before operating this dryer.
SORTING LOADS
Fabric Care Labels
Most articles of clothing feature fabric care labels that
include instructions for proper care.
Tumble [---_ _-------] _-----_
dry
Dry Normal Permanent Press/
wrinkle resistant
Do not dry
Gentle/ Do not tumble dry (used with
delicate do not wash)
Heat _ 0 Q
setting
High Medium Low
Nohea_air
LOADING THE DRYER
WARNING: To reduce the risk of fire,
electric shock, or injury to persons when using this
appliance, follow basic precautions, including the
following:
• Check all pockets to make sure that they are
empty. Items such as clips, pens, coins, and
keys can damage both your dryer and your
clothes. Flammable objects such as lighters or
matches could ignite, causing a fire. Failure to
do so can result in fire, explosion, or death.
• Never dry clothes that have been exposed to
oil, gasoline, or other flammable substances.
Washing clothes will not completely remove oil
residues. Failure to obey this warning can result
in fire, explosion, or death.
Grouping Similar Items
For best results, sort clothes into loads that can be dried
with the same drying cycle.
Different fabrics have different care requirements, and
some fabrics will dry more quickly than others. For best
fabric care results, always dry fabrics with similar care
requirements together.
Loading Tips
• Combine large and small items in a load.
• Damp clothes will expand as they dry. Do not overload
the dryer; clothes require room to tumble dry properly.
• Close zippers, hooks, and drawstrings to prevent these
items from snagging or tangling on other clothes.
CHECK THE LINT SCREEN BEFORE
EVERY LOAD
Always make sure the lint screen is clean before
starting a new load; a clogged lint screen will increase
drying times.
To clean, pull the lint screen straight up and roll any lint
off the screen with your fingers. Do not rinse or wash
the screen to remove lint. Push the lint screen firmly
back into place. See "Regular Cleaning" on page 25
for more information.
Always ensure the lint screen is properly installed before
running the dryer. Running the dryer with a loose or
missing lint screen may damage the dryer and articles
in the dryer.
Lint Screen
20

TIME AND STATUS DISPLAY
The Time and Status Display shows the estimated time
remaining, cycle progress, lint screen status, and vent
status. When the dryer is turned on, the display will
illuminate.
O ESTIMATED TIME REMAINING
When the START/PAUSE button is pressed, the
display will indicate the estimated time remaining for
the selected drying cycle.
O CHECK VENT
(Duct Blockage Sensing System)
The Check Vent (Duct blockage sensing system)
detects and alerts you to blockages in the ductwork
that reduce airflow from the dryer. This improves
operating efficiency and help minimize service calls,
saving you money.
If the Check Vent LED is blinking, the dryer ductwork
has a blockage that needs to be removed
immediately.
If the Check Vent LED is not blinking, the ductwork is
free from blockages.
CYCLE STATUS INDICATOR
This portion of the display shows which stage
of the drying cycle is currently underway
(DRYING, COOLING, or WRINKLE GUARD).
LINT SCREEN INDICATOR
The dryer automatically detects reduced airflow
caused by a full lint screen. The Check Lint Screen
indicator will light before each load as a reminder
to check the lint screen before starting each load.
If the lint screen becomes clogged during a load,
the indicator will come on to let you know that
the screen should be cleaned immediately for
maximum efficiency. Always clean the lint screen
before every cycle.
21

CYCLE MODIFIER BUTTONS
Each cycle has preset settings that are selected
automatically. You may also customize these settings
using the cycle modifier buttons.
SENSOR DRY cycles have preset settings that are
selected automatically and cannot be changed.
MANUAL DRY cycles have default settings, but you may
also customize the settings using the cycle modifier
buttons.
Press the button for the desired modifier until the indicator
light for the desired value is lit.
NOTE: To protect your garments, not every dryness level,
temperature, or option is available with every cycle. See
the Cycle Guide on page 19 for details.
Very Dry
More Dry
Normal Dry
@_ LessDry
Damp Dry
_Level
MODIFIERS
High 80 Min High
Mid High 70 Min
Medium 60 Min Low
Low 50 Min
@ Ultra Low _i,40 Min Off
O DRY LEVEL
Selects the level of dryness for the cycle. Press the
DRY LEVEL button repeatedly to scroll through
available settings.
• This option is only available with MANUAL DRY
cycles.
• The dryer will automatically adjust the cycle time.
Selecting VERY DRY or MORE DRY will increase
the cycle time, while LESS DRY or DAMP DRY will
decrease the cycle time.
• Use a LESS DRY or DAMP DRY setting for items
that you wish to iron.
_) TEMP CONTROL
Adjusts the temperature setting from ULTRA LOW to
HIGH. This allows precise care of your fabrics and
garments. Press the TEMP CONTROL button
repeatedly to scroll through available settings.
TIMED DRY
Allows you to manually select the drying time in
10-minute increments. Use this cycle for small loads
or to remove wrinkles. Use the MORE TIME/LESS
TIME buttons to add or reduce the drying time in
1-minute increments.
CYCLE SIGNAL
Adjusts the volume of the end-of-cycle signal or
turns off the signal. Press button repeatedly until
the desired volume is shown on the display.
22

CYCLE OPTION BUTTONS
Your dryer features several additional cycle options to
customize cycles to meet your individual needs. Certain .....................................
option buttons also feature a special function (see
the following page for details) that can be activated by
pressing and holding that option button for 3 seconds.
To Add Cycle Options to a Cycle:
WRINKLE GUARD
Selecting this option will tumble the load
periodically for a few seconds without heat.
This will continue for up to 3 hours after the
selected cycle, or until the door is opened.
This prevents wrinkling of unremoved dry
items until they can be removed.
1. Turn on the dryer.
2. Turn the Cycle Selector Knob to select the desired
cycle.
3. Use the Cycle Modifier buttons to adjust the settings for
that cycle.
4. Press the Cycle Option button(s) for the option you
would like to add. Aconfirmation message will be
shown in the display.
5. Press the Cycle Selector Knob to start the cycle.
The dryer will start automatically.
DAMP DRY SIGNAL
With this option, the dryer will beep when
the load is approximately 80% dry. This allows
you to remove faster drying lightweight items
or items that you would like to iron or hang
while still slightly damp. This option is only
available with Sensor Dry cycles.
MY CYCLE
MY CYCLE allows you to store any special
combination of settings that you use
frequently. It allows you to save drying levels,
temperatures, times, and options for a cycle,
and then recall them at the touch of a button.
To store MY CYCLE:
1. Turn on the dryer.
2. Select a cycle.
3. Use the cycle modifier buttons to adjust the settings for
that cycle.
4. Set any other desired cycle options.
5. Press and hold the MY CYCLE button for 3 seconds.
You will hear two beeps to confirm the settings have
been stored.
IMPORTANT: You can only save one My Cycle program at
a time. If you press and hold the MY CYCLE button for
3 seconds, you will overwrite any previously stored My
Cycle settings.
To recall MY CYCLE:
1. Press and release the MY CYCLE button. The stored
settings will be displayed.
2. Press and release the Cycle Selector Knob to start
the cycle. The dryer will start automatically.
NOTE: Once My Cycle has been recalled, any of
the memorized modifiers or options can be adjusted.
However, if the Cycle Selector Knob is rotated,
My Cycle will be cancelled.
23

SPECIAL FUNCTIONS
RACK DRY
@ Use RACK DRY with items, such as wool
sweaters, silk, and lingerie, that should dry flat.
RACK DRY can also be used with items that
should not be tumbled, such as gym shoes or
stuffed animals.
NOTE: NEVER use the rack with a tumble dry cycle.
Install the Drying Rack
Z_
1. With the dryer door open, slide the rack into the dryer
drum.
SANITARY CYCLE
When the Sanitary Cycle is selected on the Cycle
Selector Knob, the dryer automatically sets the
temperarue to HIGH and the dryness level to VERY DRY.
NOTE: Do not use this cycle with delicate fabrics.
CHILD LOCK
Use this option to prevent cycle
settings from being changed
while the dryer is operating.
Press and hold the TIMED DRY
and CYCLE SIGNAL for 3
seconds to activate
or deactivate CHILD LOCK. "CL" will be shown
in the display alternately with the estimated time
remaining. All controls will be disabled. The CHILD
LOCK will automatically be cancelled when the dryer
completes the cycle.
2. Make sure it is seated evenly on the edge of the inner
door rim and resting flat on the inside of the dryer.
NOTE: Be sure to remove the drying rack after using
the RACK DRY cycle.
24

WARN ING: To reduce the risk of fire, electric shock, or injury to persons when
using
this appliance, follow basic precautions, including the following:
• Unplug the dryer before cleaning to avoid the risk of electric shock. Failure to follow this warning
can cause serious injury, fire, electrical shock, or death.
• Never use harsh chemicals, abrasive cleaners, or solvents to clean the dryer. They will damage the finish.
REGULAR CLEANING
Cleaning the Exterior
Proper care of your dryer can extend its life. The outside
of the machine can be cleaned with warm water and a
mild, nonabrasive household detergent. Immediately
wipe off any spills with a soft, damp cloth.
IMPORTANT: Do not use methylated spirits, solvents,
or similar products.
NEVER use steel wool or abrasive cleansers because
they can damage the surface.
Cleaning the Lint Screen
Lint
Screen
Cleaning the Interior
Wipe around the door opening and seal with a soft, damp
cloth to remove lint and dust buildup that could damage
the door seal.
Clean the window with a soft cloth dampened with warm
water and a mild, nonabrasive household detergent; then
wipe dry.
NEVER use steel wool or abrasive cleansers; they can
scratch or damage the surface.
Cleaning Around and Under the Dryer
Vacuum lint and dust from around the dryer and
underneath it regularly.
ALWAYS make sure the lint filter is clean before
every cycle. The Check Lint Screen Light on the control
panel will blink before every cycle to remind you.
NOTE: NEVER operate the dryer without the lint screen.
To remove lint between cycles:
1. Open the dryer door.
Maintaining Ductwork
Vent ductwork should be checked for lint buildup
and cleaned at least once per year. If any noticeable
reduction in drying performance occurs, check ductwork
for obstructions and blockages. If the CHECK VENT
indicator illuminates, the exhaust system should be
checked immediately for damage or obstructions. The
CHECK VENT indicator signals a serious reduction in
exhaust airflow which will greatly reduce energy efficiency
and increase drying times. Damaged or restricted exhaust
systems are not covered by the dryer warranty. Damage
to the dryer that is caused by damaged, restricted, or
otherwise inadequate exhaust systems is not covered by
the dryer warranty.
2. Pull the lint screen straight up. Then:
3. Roll any lint off the screen with your fingers.
Periodic thorough cleaning:
Some fabric softeners can buildup on the lint screen over
time. This buildup can restrict the airflow through the
screen reducing dryer efficiency and lengthening dry
times. If the screen looks dark or dirty when held up to the
light, follow these steps to clean:
25
1. Use hot soapy water and a stiff brush to clean the
screen.
2. Make sure the filter is completely dry before reinstaling
and using the dryer.
NOTE: NEVER operate the dryer with a wet lint screen.

BEFORE CALLING FOR SERVICE
Your dryer is equipped with an automatic error-monitoring system to detect and diagnose problems at an early stage. If
your dryer does not function properly or does not function at all, check the following before you call for service.
Dryer will not turn on
Check if...
Power cord is not properly plugged in.
House fuse is blown, circuit breaker has tripped,
or power outage has occurred.
Then...
Make sure that the plug is plugged securely into a grounded
outlet matching the dryer's rating plate.
Reset circuit breaker or replace fuse. Do not increase
fuse capacity. If the problem is a circuit overload,
have it corrected by a qualified electrician.
Dryer does not heat
Check if...
House fuse is blown, circuit breaker has tripped,
or power outage has occurred.
Gas supply or service turned off (gas models only).
Then...
Reset circuit breaker or replace fuse. Do not increase
fuse capacity. If the problem is a circuit overload,
have it corrected by a qualified electrician.
Confirm that the house gas shutoff and the dryer gas
shutoff are both fully open. Even if gas is not supplied to
the dryer, it will run and no error codes will be displayed.
Greasy or dirty spots on clothes
Check if...
Fabric softener used incorrectly.
Clean and dirty clothes being dried together.
Clean and dirty clothes being dried together.
Then...
Confirm and follow the instructions provided with your
fabric softener.
Make sure to use your dryer to dry only clean items,
because dirty items can soil clean clothes placed in the same
or subsequent loads.
Stains on dried clothes are actually stains that weren't
removed during the washing process. Make sure that clothes
are being completely cleaned according to the instructions
for your washer and detergent.
Excess static in clothes after drying
Check if...
Fabric softener not used or used incorrectly.
Clothes dried too long (overdried).
Drying synthetics, permanent press,
or synthetic blends.
Then...
Use a fabric softener to reduce static electricity. Be sure to
follow the manufacturer's instructions.
Overdrying a load of laundry can cause a buildup of static
electricity. Adjust settings and use a shorter drying time, or use
SENSOR DRY cycles.
These fabrics are naturally more prone to static buildup. Try
using fabric softener, LESS DRY dryness level, and/or shorter
TIMED DRY time.
26

BEFORE CALLING FOR SERVICE (cont.)
Drying time is not consistent
Check if...
Heat settings, load size, or dampness
of clothing is not consistent.
Then...
The drying time for a load will vary depending on the type of
heat used (electric, natural, or LP gas), the size of the load,
the type of fabrics, the wetness of the clothes, and the
condition of the exhaust ducts and lint filter. Even an
unbalanced load in the washer can cause poor spinning
resulting in wetter clothes which will take longer to dry.
Clothes take too long to dry
Check if... Then...
Load is not properly sorted.
Large load of heavy fabrics.
Dryer controls are not set properly.
Lint filter needs to be cleaned.
Exhaust ducts blocked, dirty, or duct run is too long.
Separate heavy items from lightweight items. Larger and heavier
items take longer to dry. Light items in a load with heavy items
can fool the sensor because the light items dry faster.
Heavy fabrics take longer to dry because they tend to retain
more moisture. To help reduce and maintain more consistent
drying times for large and heavy fabrics, separate these items
into smaller loads of a consistent size.
Use the appropriate control settings for the type of load you
are drying. Some loads may require an adjustment of the
dryness level for proper drying.
Make sure the lint filter is cleaned before every load. With some
loads that produce high amounts of lint, it may be necessary to
pause the cycle and clean the filter during the cycle.
Blocked vents can add significant drying time to a load.
Confirm that the exhaust ductwork is properly configured
and free of debris, lint, and obstructions. Make sure that
outside wall dampers can open properly and are not blocked,
jammed, or damaged. Refer to the installation instructions at
the beginning of this manual for proper venting guidelines.
House fuse is blown, circuit breaker has tripped, Reset circuit breaker or replace fuse. Do not increase
or power outage has occurred, fuse capacity. If the problem is a circuit overload, have
it corrected by a qualified electrician.
Dryer is overloaded. Divide larger loads into smaller loads for drying.
Dryer is underloaded. If you are drying a very small load, add a few extra items to
ensure proper tumbling action. If the load is too small, the
electronic control cannot properly sense the dryness of the
load and may shut off too soon. Use timed dry or add some
extra wet clothes to the load.
27

BEFORE CALLING FOR SERVICE (cont.)
Clothes are wrinkled
Check if...
Clothes dried too long (overdried).
Clothes left in dryer too long after cycle ends.
Then...
Overdrying a load of laundry can lead to wrinkled clothes.
Try a shorter drying time or LESS DRY setting and remove
items while they still retain a slight amount of moisture.
Removeitems from the dryer immediatelyat the end of thecycle.
Use the WRINKLECARE optionto tumble the clothes briefly at
intervalsat the end of the cycle, for up to 3 hours.
Clothes are shrinking
Check if...
Garment care instructions are not being followed.
Then...
To avoid shrinkage, please carefully follow the fabric care
instructions for your garment, because some fabrics will
naturally shrink when washed. Other fabrics can be washed
but will shrink when dried in a dryer. Use a low or no
heat setting and/or the RACK DRY option.
Check vent indicator is blinking
Check if... Then...
Ductwork is too long or has too many Install a shorter or straighter duct run. See the
turns/restrictions. Installation Instructions for details.
Partial blockage of the ductwork due to lint buildup Ductwork should be checked/cleaned immediately. Dryer
or other foreign object, can be used in this condition, but drying times will be longer
and energy consumption will be increased.
Display shows error code TEl or TE2
Check if...
I Temperature sensing failure.
Then...
Turn off the dryer and call for service.
Lint on clothes
Check if... Then...
Lint filter not cleaned properly. Make sure the lint filter is cleaned before every load. With
some loads that produce high amounts of lint, it may be
necessary to clean the filter during the cycle.
Laundry not sorted properly. Some fabrics are lint producers (i.e., a fuzzy white cotton towel)
and should be dried separately from clothes that are lint trappers
(i.e., a pair of black linen pants).
Excess static in clothes. Static can cause lint to cling to clothing. See Excess Static
in Clothes After Drying section on page 26.
Dryer is overloaded. Divide larger loads into smaller loads for drying.
Tissue, paper, etc., left in pockets. Check pockets thoroughly before washing and drying clothes.
I
28

29

f
One-Year Limited Warranty
When installed, operated and maintained according to all instructions supplied with the product, if this
appliance fails due to a defect in material and workmanship within one year from the date of purchase, call
1-800-4-MY-HOME ®to arrange for free repair.
If this appliance is ever used for other than private family purposes, this warranty applies for only 90 days from
the date of purchase.
This warranty covers only defects in material and workmanship. Sears will NOT pay for:
1.
,
3.
4.
,
,
,
Expendable items that can wear out from normal use, including but not limited to filters, belts, light bulbs,
and bags.
A service technician to instruct the user in correct product installation, operation or maintenance.
A service technician to clean or maintain this product.
Damage to or failure of this product if it is not installed, operated or maintained according to all the
instructions supplied with the product.
Damage to or failure of this product resulting from accident, abuse, misuse or use for other than its
intended purpose.
Damage to or failure of this product caused by the use of detergents, cleaners, chemicals or utensils
other than those recommended in all instructions supplied with the product.
Damage to or failure of parts or systems resulting from unauthorized modifications made to this product.
Disclaimer of implied warranties; limitation of remedies
Customer's sole and exclusive remedy under this limited warranty shall be product repair as provided herein.
Implied warranties, including warranties of merchantability or fitness for a particular purpose, are limited to one
year or the shortest period allowed by law. Sears shall not be liable for incidental or consequential damages.
Some states and provinces do not allow the exclusion or limitation of incidental or consequential damages, or
limitation on the duration of implied warranties of merchantability or fitness, so these exclusions or limitations
may not apply to you.
This warranty applies only while this appliance is used in the United States or Canada.
This warranty gives you specific legal rights, and you may also have other rights which vary from state to state.
Sears, Roebuck and Co., Hoffman Estates, IL 60179
Sears Canada Inc., Toronto, Ontario, Canada M5B 2B8
J
3O

INSTRUCCIONES IMPORTANTE DE SEGURIDAD
Precauciones basicas de seguridad ......... 32-35
Requisitos especiales para viviendas m6viles
o prefabricadas ........................... 35
CARACTER|STICAS Y BENEFIClOS
Piezas y componentes clave ................. 36
INSTRUCClONES PARA LA INSTALAClON
Dimensiones y especificaciones claves .......... 37
Requisitos de ubicaci6n ..................... 37
Escoja el lugar adecuado .................... 37
Espacios de instalaci6n ...................... 37
Requerimientos de gas ...................... 38
Conexi6n de secadoras a gas .............. 38, 39
Requerimientos el_ctricos .................... 40
C6mo conectar las secadoras el_ctricas ...... 40, 41
Requerimientos de ventilaci6n ................. 42
Conexi6n del conducto de ventilaci6n
de la secadora ......................... 42, 43
Nivelaci6n de la secadora .................... 44
C6mo invertir el sentido de la puerta ............ 44
Revisi6n de instalaci6n final .................. 45
COMO USAR
Caracteristicas del panel de control ............ 46
C6mo operar la secadora .................... 47
Guia de ciclos ............................. 48
Clasificaci6n de cargas ...................... 49
C6mo cargar de la secadora .................. 49
Revise el filtro de pelusa antes de cada carga ..... 49
Pantalla de tiempo y estado .................. 50
Botones modificadores de ciclo ................ 51
Botones de opci6n de ciclo ................... 52
Mi ciclo .................................. 52
Funciones especiales ....................... 53
MANTENIMIENTO Y LIMPIEZA
Limpieza regular ........................... 54
RESOLUClON DE PROBLEMAS
Antes de Ilamar a mantenimiento ............ 55-57
GARANT|A ............................... 59
En el espacio de abajo, registre la fecha de compra, modelo
y nt_mero de serie de su producto. Usted encontrar& el
nt_mero de modelo y de serie impreso en una placa de
identificaci6n ubicada dentro de la puerta de la secadora.
Tenga esta informaci6n disponible cuando se comunique con
Sears en relaci6n a su producto.
N° de modelo.
Fecha de compra
N° de serie
Guarde estas instrucciones y su recibo de venta para
referencia futura.
31
Acuerdos Maestros de Proteccibn
Felicitacionespor haber efectuado una compra inteligente.
Su nuevo producto Kenmore®est,. disefiado y fabricado
para brindar afios de funcionamiento confiable. Pero como
con todos los productos, puede requerir mantenimiento
preventivo o reparaciones de vez en cuando. Ahi es
cuando contar con un Acuerdo Maestro de Protecci6n
puede ayudarlo a ahorrar tiempo y dinero.
El Acuerdo Maestro de Protecci6n tambien Io ayuda a
extender la vida t_tilde su nuevo producto. El Acuerdo*
incluye los siguientes puntos:
• Piezas y mano de obra requeridos para mantener los
productosen buen funcionamientobajo un uso normal, no
s61odefectos.Nuestra coberturava mucho mAsalia de la
garantia del producto. Sin deducibles ni fallas funcionales
excluidas de la cobertura--una protecci6n real.
• Servicio experto mediante un grupo de mAs de 10.000
t_cnicos autorizados de Sears, Ioque significa que
alguien en quien confia va a trabajar en su producto.
• Visitas a su domicilio ilimitadas y servicio en todo
el pais, todas lasveces que nos necesite, cuando nos
necesite.
• Garantia por defectos de fabricaci6n--reemplazo
de su producto si se producen cuatro o mAsfallas dentro
de los doce meses.
• Reemplazo del producto si este no puede repararse.
• Control de mantenimiento preventivo anual a pedido,
sin cargos extra.
• Ayuda rapida portel_fono--Lo Ilamamos "resoluci6n
rapida". Soporte telef6nico de un representante de Sears
sobre todos los productos. Piense en nosotros como
un "manual de usuario que habla."
• Protecci6n de picos de tensi6n contra dafios electricos
debido a fluctuaciones de la energia.
• Protecci6n anual de $250 por p_rdida de comida que
se haya producido como resultado una falla mecAnicade
cualquier refrigerador o freezer cubierto.
• Reintegro por alquiler si la reparaci6n de su producto
tarda mAsde Io prometido.
• 10%descuento del precio normalde cualquierservicio
de reparaci6nno cubierto y de piezas relacionadas
instaladas.
Unavez que adquiera el Acuerdo, s61otiene que hacer un
Ilamadotelef6nico para programar el servicio. PuedeIlamar
en cualquier momento de dia o de noche, o coordinar un
servicio tecnico online.
ElAcuerdo Maestro de Protecci6n es una compra libre de
riesgo. Si usted Iocancela por cualquier raz6n durante
el periodo de garantia del producto, le devolveremos
la totalidad del dinero, o una devoluci6n prorrateada en
cualquier momento despues de que expire el periodo de
garantia, iAdquiera hoysu Acuerdo Maestro de Protecci6n!
Se aplican algunas limitaciones y exclusiones.
Para consultar precios e informaci6n adicional
en los EE.UU., Ilame al 1-800-827-6655.
*La cobertura en Canada varia en algunos items. Para
mas detalles, Ilame a Sears Canada a 1-800-361-6665.
Servicio de Instalaci6n Sears
Para la instalaci6n profesional Sears de electrodomesticos,
dispositivos para apertura de puertas de garajes,
calentadores de agua y otros items domesticos
importantes, en los EE.UU. o CanadA, Ilame
al 1-800-4-MY-HOME®.

Enestemanualyen suelectrodomesticofiguranmuchosmensajesimportantesdeseguridad.Leaycumplasiempre
contodoslosmensajesdeseguridad.
€:ste es el simbolo de alerta de seguridad.
Este simbolo Io alerta sobre posibles riesgos que pueden resultar en dafios sobre la propiedad y/o lesiones
fisicas graves o la muerte.
Todos los mensajes de seguridad estar&n a continuacion del simbolo de alerta de seguridad y con
la palabra PELIGRO o ADVERTENClA. Estas palabras significan:
Si no se siguen estas instrucciones de seguridad se pueden producir dafios sobre la
propiedad y/o lesiones graves o la muerte.
Si no se siguen estas instrucciones de seguridad se pueden producir dafios sobre la
propiedad y/o lesiones graves o la muerte.
Todos los mensajes de seguridad le indicar&n cual es el riesgo potencial, le diran
como reducir las posibilidades de sufrir heridas y que puede suceder si no se siguen
las instrucciones.
LEA TODAS LAS INSTRUCCIONES ANTES
DE USAR
Para su seguridad, la informacion de este manual debe
seguirse al pie de la letra a fin de minimizar el riesgo de
incendio o explosion, descarga electrica, o para prevenir
daSos, lesiones personaleso la muerte.
Para minimizar el riesgo de incendio o explosion,
descarga electrica, o para prevenir lesiones personales
cuando use electrodomesticos, se deben seguir
precauciones basicas de seguridad, incluyendo las
siguientes:
• Lea todas las instrucciones antes de usar la secadora.
• Antes de usar, la secadora debe estar correctamente
instalada como se describe en este manual.
• No seque articulos que hayan sido limpiados, lavados,
remojados o salpicados previamente con gasolina,
disolventes de limpieza en seco u otras substancias
inflamables o explosivas, ya que emanan vapores que
podrian encenderse o explotar, incluso despues del lavado.
• No coloque articulos que hayan sido expuestos a aceites,
incluyendo aceites comestibles, en su secadora. Los
articulos contaminados con aceites comestibles podrian
contribuir a la generacion de una reaccion quimica que
podria ocasionar que una carga se incendie.
• No introduzca las manos en la secadora cuando el tambor
o las otras partes esten en movimiento.
No repare o reemplace ninguna parte de la secadora ni
intente reparar la misma a menos que esto se recomiende
en forma especifica en esta Guia de Uso y Cuidado o
en instrucciones de reparacion publicadas las cuales
comprende y sabe aplicar.
No altere los controles.
Antes de que la secadora quede fuera de uso, retire la
puerta del compartimiento de secado.
No deje que los nifios jueguen en la secadora ni dentro
de ella. Cuando se usa la secadora cerca de los nifios,
se necesita una supervision estricta.
Use suavizadores de tela o productos para eliminar
estatica t]nicamente del modo recomendado por
el fabricante.
No use calor para secar articulos que contienen caucho
espumoso o materiales de textura similar al caucho.
Evite la acumulacion de pelusa, polvo o tierra alrededor
del area de la apertura de ventilacion y areas adyacentes.
La parte interior de la secadora y el conducto de
ventilacion se deberan limpiar periodicamente, y la misma
debera ser realizada por personal calificado del servicio.
No instale ni coloque esta secadora en lugares donde
pueda estar expuesta a variables climaticas.
Antes de cargar la secadora, siempre revise que no haya
objetos extrar_os en su interior.
Retire la pelusa del filtro antes o despues de cada carga.
32

Por su seguridad, se debe seguir la informacion
indicada en este manual para minimizar el riesgo de
incendio o explosion, descarga electrica, o para prevenir
da_os a la propiedad, lesiones personales o muerte.
• No almacene o use gasolina ni ningOn otro tipo
de vapores o liquidos inflamables cerca de este
electrodomestico ni de ningQn otro electrodomestico.
• 0nicamente un tecnico calificado de mantenimiento,
agencia de mantenimiento o compafiia de gas deber&n
realizar el mantenimiento y la instalacion.
QUI_ HACER SI HUELE GAS:
.
2.
No intente encender un cigarrillo o fosforo, ni encender
ningQn electrodomestico a gas o electrico.
No toque ningQn interruptor electrico. No use ningQn
telefono en su edificio.
3. No permita que ninguna persona se encuentre en la
habitacion, edificio o area.
.
.
Llame a su compafiia de gas inmediatamente desde
el telefono de un vecino. Siga las instrucciones de su
compafiia de gas al pie de la letra.
Si no puede comunicarse con su compafiia de gas,
Ilame al departamento de bomberos.
LEY EJECUTIVA PARA LA SEGURIDAD DEL AGUA POTABLE Y LOS TOXICOS DE
CALIFORNIA (CALIFORNIA SAFE DRINKING WATER AND TOXIC ENFORCEMENT ACT)
Esta ley requiere que el gobernador de California publique un listado de sustancias conocidas en el estado que
causan cancer, defectos congenitos u otras lesiones reproductivas, y obliga a los negocios a alertar a los clientes
sobre la posible exposicion a tales sustancias.
Los electrodomesticos a gas pueden causar exposicion leve a cuatro de estas sustancias, principalmente benceno,
monoxido de carbono, formaldehido y hollin, generado principalmente por la combustion parcial del gas natural
o los combustibles LP (petroleo liquido).
Las secadoras calibradas adecuadamente minimizaran la combustion parcial. Para minimizar incluso mas la exposicion
a estas sustancias, se puede dotar a la secadora de la ventilacion adecuada al exterior.
Para reducir el riesgo de incendio, descargas
electricas o heridas al usar su electrodom6stico, siga
las precauciones basicas, incluyendo Io siguiente:
• Conecte la secadora adecuadamente a tierra segtin
todos los codigos y las regulaciones vigentes. Siga
los detalles en las instrucciones de instalacion. Si la
secadora no se encuentra adecuadamente conectada
a tierra se pueden producir descargas electricas.
• Antes de usar, la secadora debe estar correctamente
instalada como se describe en este manual. Si la
secadora no se encuentra adecuadamente conectada
a tierra se pueden producir descargas electricas.
• Instale y almacene la secadora en un lugar
no expuesto a temperaturas inferiores al punto
de congelacion ni expuesto a la intemperie.
• Todas las reparaciones y controles deberan ser
realizados por un centro de servicio autorizado
a menos que se den otras recomendaciones
especificas en el Manual del Usuario. Utilice solo
piezas de fabrica autorizadas. Si no se cumple con
esta advertencia se podran producir heridas graves,
incendios, descargas electricas o muerte.
Con el fin de reducir el riesgo de descargas
electricas, no instale la secadora en espacios
h_medos. Si no se cumple con esta advertencia se
podran producir heridas graves, incendios, descargas
electricas o muerte.
• Conecte un circuito electrico clasificado, protegido
y adecuado para evitar sobrecarga electrica. Un
circuito electrico inadecuado se puede fundir, creando
descargas electricas y/o riesgo de incendio.
• Quite todos los elementos de embalaje y deseche
adecuadamente todos los materiales de envio. Si no
se cumple con esto se podra producir una explosion,
incendio, quemaduras o muerte.
• Coloque la secadora a un altura minima de 18
pulgadas encima del piso para una instalacion
en el garaje. Si no se cumple con esto se podr&
producir una explosion, incendio, quemaduras o muerte.
• Mantenga todos los envoltorios alejados de los
ni_os. Los materiales de los envoltorios pueden resultar
peligrosos para los nifios. Existe riesgo de asfixia.
33

INSTRUCCIONES IMPORTANTE PARA
LA INSTALACION
Conducto de escape/Tuberia:
• Conducto de escape/Tuberia. Si no se siguen estas
instrucciones se podr& producir incendio o muerte.
• El sistema de ventilacion de la secadora debe
tener un conducto de ventilacion al exterior de
la habitacion. Si la secadora no tiene un conducto
de ventilacion al exterior, pelusa fina y grandes
cantidades de humedad ingresura en la area de
lavado. La acumulacion de pelusa en cualquier parte
de la casa puede crear riesgos de salud e incendio.
• Use _nicamente sistemas de ventilacion de metal
rigido o flexible de 4 pulgadas de diametro dentro
del gabinete de la secadora o para ventilacion al
exterior. Los sistemas de ventilacion de plastico u
otro material pueden causar incendios. Los sistemas
de ventilacion agujereados pueden causar incendios si
se colapsan o bloquean durante el uso o la instalacion.
• No se provee el sistema de ventilacion con la
secadora; el mismo debera obtenerse Iocalmente.
La tapa terminal debera tener reguladores de tiro
con bisagras para prevenir el retorno de descarga
cuando no se usa la secadora. Si no se siguen estas
instrucciones se podr& producir incendio o muerte.
El conducto de escape debera tener 10 cm (4 pulg.)
de diametro sin obstrucciones. El conducto de
escape debera mantenerse Io mas corto posible.
Asegt_rese de limpiar cualquier tipo de conducto
antiguo antes de instalar su secadora nueva.
Si no se siguen estas instrucciones se podr& producir
incendio o muerte.
• Se recomiendan conductos rigidos o
semirigidos para usar entre la secadora y
la pared. En instalaciones particulares cuando
es imposible realizar una conexion siguiendo
las recomendaciones antes indicadas, _nicamente
se puede utilizar un conducto metalico de transicion
aprobado por UL entre la secadora y la conexion
de pared. Usar este tipo de conducto afectara el
tiempo de secado. Si no se siguen estas instrucciones
se podr& producir incendio o muerte.
• NO utilice tornillos de lamina de metal ni otro tipo
de aseguradores que extiendan dentro del conducto
y puedan atrapar pelusa y reducir la eficiencia del
sistema de escape. Asegure todas las uniones con
cinta adhesiva impermeable. Para m&s detalles, siga
las Instrucciones de Instalacion. Si no se siguen estas
instrucciones se podr& producir incendio o muerte.
INSTRUCCIONES IMPORTANTE PARA
CONECTAR LA ELECTRICIDAD
Parareducirel riesgode incendio,descargasel_'tricasoheridas
al usar suelectrodomestico,siga lasprecaucionesbasicas,
incluyendoIosiguiente:
• Bajo ningunacircunstancia,corteo quitela tercerapata(puesta
a tierra)del cableelectrico.Paraevitarheridasanivetpersonalo
dafiossobrelasecadora,elcabledecorrienteetectricadebeestar
conectadoenunaconexiona tierraencondidonesadecuadas.
Pormotivosde seguridadpersonal,esteelectrodomesticodebe
estar conectadoa tierraadecuadamente.Siestonosecumptese
podranproducirdescargaselectricaso heridas.
Consultelas instruccionesde instalacionde estemanualpara
obtener losrequisitosel_'tricos especificosde su modelo.
Siestasinstruccionesnosecumplensepodranproducirdescargas
etectricasy/oriesgode incendio.
Lasecadoradeberaestarconectadaa un enchufe
adecuadamenteconectadoa tierra.Sila secadorano se
encuentraadecuadamenteconectadaa tierrasepueden producir
descargaselectricas.Contratea un electricistacalificadopara
que controle el tomacorrientey el circuitoelectricoparaasegurar
que el enchufeestecorrectamenteconectadoa tierra.Siestas
instruccionesnosecumptensepodranproducirdescargaselectricas
y/oriesgodeincendio.
• Lasecadorasiempredebeestar enchufadaasutomacorriente
individual,conlaclasificaciondetensioncorrespondientea la
placade datos deservicio.Estoproporcionael mejordesempefioy
previenea tavezsobrecargade loscircuitosde cabteadodelhogar,to
quepodriaproducirunincendiodebidoa loscablessobrecatentados.
• Nuncadesenchufesusecadoraempujandoel cabledecorriente.
Siempretomesuenchufefirmementey empujeel mismohacia
fuerapara retirarlo.Elcabledecorrientesepuedecortardebidoa
cualquiermovimientodesupartecentral,resuttandoen unadescarga
electrica.
Repareo reemplacede inmediatotodoslos cablesde corriente
peladosoconcualquiertipodedaSo.Nouseuncablecon
cortadurasoabrasionsobresuextensionoextremos.Estecable
decorrientesepuedefundir,creandodescargaselcctricasy/oriesgo
deincendio.
• AI instalaro cambiarde lugarlasecadora,evitetodo tipode
cortesu otros daSosen elcablede corriente.Estoevitaraheridas
o dafiosdebidoaincendiosodescargaselectr)cassobre)asecadora.
34

Porsuseguridad,sedebeseguirlainformacionindicadaeneste
manualparaminimizarelriesgodeincendiooexplosion,descarga
electrica,oparaprevenirdafiosa lapropiedad,lesionespersonales
o muerte.
Esteelectrodomesticodebera,estarconectadoa tierra.Encasode
averiao malfuncionamiento,laconexionatierraredudra,etriesgode
descargaselectricasalbrindaruncaminoconunaresistenciamenor
paralacorrienteetectrica.Esteetectrodomesticodebeestarequipado
conuncableconunconductorparalaconexbnatierradetequipoy un
enchufeconconexiona tierra.Elenchufedebera,estarconectadoauna
tomadecorrienteinstaladaenformaadecuadayconconexbna tierra
de acuerdocontodosloscodigosyordenanzaslocales.
Unaconexioninapropiadadelconductordeconexionatierradel
equipopuedeprovocarriesgosdedescargasel_tricas. Consutte
aunetectricistacalificadoo personaldelserviciositienedudasdeque
etelectrodomesticoseencuentreconectadoatierraapropiadamente.
Nomodifiqueelenchufequeseentregaconetetectrodomestico.
Sinocoincideconlatomadecorriente,contratea unetectricista
calificadoparaqueinstaleunatomadecorrienteenformaadecuada.
Esteetectrodomesticodebeestarconectadoa unsistemadecabteado
de metalpermanenteconconexionatierraosedebetenderun
conductoparataconexiona tierradetequipoconlosconductores
detcircuitoyconectadoalterminaldetierradetequipoo alconductor
de suministrodetelectrodomestico.
Sitasecadoranoseencuentraadecuadamenteconectadaatierra,
sepuedenproducirdescargaselectricas.
Para reducir el riesgo de incendio, descarga electrica
o lesiones a personas cuando utilice este artefacto,
deben seguirse precauciones basicas de seguridad,
incluyendo las siguientes:
Cualquier instalacion en una vivienda movil o prefabricada
debe reatizarse de conformidad con los Esta.ndares de
seguridad y construccion de viviendas prefabricadas, Titulo 24
CFR, Parte 32-80 o esta.ndar CAN/CSA0Z240 MH y con los
codigos y regutaciones locales. Si no esta. seguro de si la
instalacion que ha propuesto cumple con estos esta.ndares,
Itame a un tecnico de mantenimiento e instalaci6n para
obtener ayuda.
Una secadora de gas deberia fijarse permanentemente sobre
el piso.
Desde el 1 de enero de 1996, se requiere una conexion
de 4 hilos en todas las instalaciones de casas
prefabricadas o rodantes, como en las construcciones
nuevas. Debe utilizarse una conexion de 4 hilos donde los
codigos locales no permiten la conexion a tierra a trav6s
del cable neutral. No hacerlo puede provocar un incendio,
una explosion o la muerte.
Para reducir el riesgo de combustion e incendio, se debe
ventilar la secadora hacia el exterior.
NO ventile la secadora debajo de una vivienda m6vil
o prefabricada.
Las secadoras electricas deben ventitarse hacia et exterior
usando el panel trasero, izquierdo, derecho o inferior.
• Las secadoras a gas deben ventilarse at exterior usando et
panel trasero, izquierdo o inferior. Las secadoras a gas no
deben ventilarse hacia el exterior usando el panel derecho
debido a ta carcasa del quemador.
• El conducto de escape de ta secadora debe estar bien fijado a
la estructura de la vivienda movil o prefabricada, y et conducto
de escape debe estar fabricado de un material resistente at
fuego y ta combustion. Se recomienda el uso de un conducto
de metal rigido o flexible.
• NO conecte et conducto de escape de la secadora a ningQn
otro conducto, respiradero, chimenea ni a ningQn otro tipo de
conducto de escape.
• AsegQrese de que la secadora disponga de acceso adecuado
al aire fresco del exterior para garantizar un funcionamiento
adecuado. La abertura para la toma de aire fresco exterior
debe ser de por Io menos 25 putgadas 2 (163 cm2).
• Es importante que el espacio tibre del conducto con respecto
a cualquier material combustible de construccion sea de por Io
menos 2 putgadas (5 cm) y que, cuando se ventile la
secadora at exterior, se pueda instatar la secadora dejando un
espacio libre de 1 pulgadas (2,5 cm) a los lados y la parte
trasera de ta secadora.
• Tenga en cuenta que los materiales de ventilacion no se
proveen con la secadora. Debe obtener los materiales de
ventitaci6n necesarios para una instalaci6n adecuada.
GUARDE ESTAS INSTRUCCIONES
35

PIEZAS Y COMPONENTS CLAVE
Hay varios componentes importantes adicionales
a los cuales se hace referencia en este manual.
O
O PANEL DE CONTROL FACE PARA USAR
Gire la perilla selectora de ciclos al ciclo de secado
deseado. Afiada los ajustes de ciclo o programe
las opciones con el toque de un bot6n. Presione
la perilla selectora de ciclo para iniciarel ciclo
de secado seleccionado.
O PANTALLA DE TIEMPO Y ESTADO
La pantalla LED de f&cil lectura muestra las opciones e
informaci6n de ciclo e brinda el estado del ciclo durante
la operaci6n.
(_ VERIFICAR VENTILACION
(Sistema Sensor de Bloqueo de Conducto)
La verificaci6n de ventilaci6n (sistema sensor de bloqueo
de conducto) detecta bloqueos en el sistema de salida
que reducen la corriente de aire desde la secadora y Io
alerta sobre los mismos. Mantener limpios los conductos
del sistema de salida mejora la eficiencia de operaci6n y
ayuda a reducir lasvisitas para efectuar reparaciones, Io
que ahorra dinero.
TAMBOR DE ACERO INOXIDABLE DE
CAPACIDAD SUPERIOR ILUMINADO
El tambor de acero inoxidable de gran capacidad ofrece
durabilidad superior. El tambor esterequipado con una
luz amarilla que se ilumina al abrir la puerta de la secadora y
se apaga cuando se cierra.
PUERTA REVERSIBLE DE FACIL ACCESO
La puerta de vidrio transparente y de amplia apertura ofrece
acceso para carga y descarga. Se puede
invertir el sentido de la puerta para adaptarlo al lugar
de la instalaci6n.
FILTRO DE PELUSA MONTADO AL FRENTE
El filtro de pelusa montado al frente permite un f&cil
acceso y limpieza entre cargas.
PATAS NIVELADORAS
Cuatro patas niveladoras (dos en la parte frontal
y dos en la trasera) ajustables para mejorar la estabilidad de
la secadora en pisos desnivelados.
SECABO EN BANBEJA (Accesorio Incluido)
Use el estante de secado con la opci6n de ciclo RACK DRY
(secado en estante) El estante de secado permite colocar
los articulos como sacos, prendas delicadas, calzado
deportivo, en una posici6n horizontal para secarlos.
Para aplicaciones especiales de instalacibn, los
siguientes kits est_in disponibles. Para solicitar
informacibn, visite www.searspartsdirect.com, o Ilame al 1-
800-4-MY-HOME%
O KIT DE CONVERSION DE GAS LP
(P/N 383EEL3002A)
Este kitde conversi6n de gas LPcontienetodas
las piezas requeridas para cambiar las conexiones
de gas de la secadora de Gas Natural (NG) a Gas Propano
Licuado (LP).
36
O
Panel de acceso
del bloque terminal
(Modelos el_ctricos)
Ubicaci6n del cable
el_ctrico (Modelos a gas)
O
O
o
-_ .................................
Ubicaci6n de la toma
gas (Modelos a gas)
Parte trasera
de la secadora
Salida del conducto
de escape
O KIT DE VENTILACION LATERAL (P/N
383EEL9001B)
El kit de ventilaci6n lateral contiene las piezas necesarias
para cambiar la ventilaci6n trasera de lasecadora
a una lateral.

DIMENSIONES Y ESPECIFICACIONES CLAVES
Descripci6n Secadora (gas y el_ctrica)
Requisitos El_ctricos Consulte la etiqueta de clasificaci6n.
Requisitos de Gas* NG: 6-8 pulg. CA
Requisitos de Gas* LP: 10-13 pulg. CA
Dimensiones 27"(A) X 30"(P) X 38"11/16" (A), 50"(P con la puerta abierta)
68,6 cm (A) X 76,1 cm (P) X 98,3 cm (A), 127 cm (P con la puerta abierta)
Peso Neto 126 lb. (57,2 kg)
Capacidad de Secado IEC 7,3 pies cQbicos (22.5 Ibs./10,2 kg)
*$61o Modelos a Gas.
REQUISITOS DE UBICACION
IMPORTANTE:
iLea todas las instrucciones de instalacion completamente
antes de instalar y hacer funcionar su secadora!
Es importante que revise todo este manual antes
de instalar y usarsu secadora. Se proporcionan instrucciones
detalladas pertinentes alas conexiones electricas, de gas y los
requisitos de escape en las siguientes p&ginas.
ESCOJA EL LUGAR ADECUADO
• Almacene e instale la secadora en un lugar no expuesto
a temperaturas inferiores alas de congelaci6n ni a la
intemperie.
• Escoja una ubicaci6n con un piso rigido y nivelado.
• Siva a instalar la secadora en el garaje, col6quela a una
altura minima de 18 pulgadas (46 cm) por encima del piso.
• Conecte la secadora adecuadamente a tierra segQntodos
los c6digos y las regulaciones vigentes.
• Para reducir el riesgo de descarga electrica, no instale
la secadora en sitios hQmedosni mojados.
IIVlPORTANTE:Si instala la secadora en una vivienda
m6vil o prefabricada, por favor consulte la secci6n de
Requisitos especiales para viviendas mSvileso prefabricadas
en la p&gina 35.
ESPAClOS DE INSTALACl0N
• La mayoria de instalaciones requieren un espacio minimo
de 5 1/2pulgadas (14 cm) detr_tsde la secadora para
la instalaci6n del conducto de escape.
• Deje espacios minimos de por Io menos 1 pulgada
(2,5 cm) a los lados y parte trasera para minimizar
la vibraci6n y el ruido.
• Se recomienda disponer de espacio adicional para
la instalaci6n y el mantenimiento.
• No olvidar prever espacio para las molduras de pared,
puerta o piso que podrian aumentar los espacios
de instalaci6n requeridos.
• Deje por Io menos 21 pulgadas (53,3 cm) al frente
de la secadora para abrir la puerta.
I
20" 18"
(50,80m) (45,70m)_(
. ,, ,, . 4. H
I
i
4" -,-I I_ 30" _ I-,- (lOca)
(10 cm) (76,1cm)
50"
(127 cm)
(7,6 cm)
/
48 in.2 /
(310 cm)
O
34 in.2
(155 cm) "--.
3" Requisitos de ventilaci6n
(7,6 cm) de la puerta del armario
_Io
...... .......
1 ,i
1 ,i
(2,5cm)--,d I-,,- 27" _1I-.--(2,5cm)
(68,6 cm)
Instrucciones adicionales para
las instalaciones en armarios:
• La puerta del closet debe
permitir una corriente de aire
suficiente. Consulte el
diagrama de la izquierda para
requerimientos minimos de
abertura de la ventilaci6n.
Tambi_n se permite una puerta
con persianas.
• Asegt_rese que se dispone de
por Io menos 18 pulgadas (46
cm) de espacio de instalaci6n
sobre la secadora.
37

REQUERIMIENTOS DE GAS (SOLO MODELOS DE GAS)
CONEXION DE SECADORAS A GAS
ADVERTENCIA: Parare uc, e,
riesgo de incendio, descargas electricas o heridas
at usar su electrodomestico, siga las precauciones
b&sicas, incluyendo 1osiguiente:
• Requisitos de suministro de gas:
Como enviado de f_brica, si configura la secadora
para uso con NG (gas natural). Puede convertirse para
usar con gas LP (propano liquido). La presi6n de gas
no debe sobrepasar la columna de agua de 8 pulgadas
NG, o la columna de augua 13 pulgadas LP.
• Un tecnico calificado de mantenimiento o de la compafiia
de gas debe conectar la secadora al suministro de gas. Si
no se cumpte con esto se podra producir una explosi6n,
incendio o muerte.
• Aisle la secadora del sistema de suministro de gas
cerrando su v_lvula de corte individual manual durante
cualquier tipo de prueba de presi6n del suministro de
gas. Si no se cumpte con esto se podra producir una
explosi6n, incendio o muerte.
• Requisitos de la linea de suministro:
Su cuarto de lavado debe tener una linea rigida de
suministro de gas para la secadora. En los EE. UU.,
se debe instalar una v_lvula de corte manual individual
a una distancia de m_xima de 6 pies (1,8 m) de la
secadora, de acuerdo con el C6digo Nacional de Gas
Combustible ANSI Z223.1. Se debe instalar un tap6n de
tuberia de 1/8 pulgadas NPT. Si no se cumpte con esto se
podrb, producir una explosion, incendio o muerte.
• Si se usa tuberia rigida, la tuberia rigida deber_ ser
de 1/2 pulgadas IPS. Si es aceptable segdn los codigos
y las regulaciones locales, y cuando sea aceptable
segdn su compafiia proveedora de gas, se puede usar
tuberia de 3/8 pulgadas aprobada, cuando las longitudes
sean menores de 20 pies (6,1 m). Se debe usar tuberia
m_s larga en caso de longitudes que exceden los
20 pies (6,1 m). Si no se cumple con esto se podra producir
una explosi6n, incendio o muerte.
• Conecte la secadora al tipo de gas indicado en
la placa del nombre. Si no se cumple con esto se podra
producir una explosi6n, incendio o muerte.
• Para prevenir la contaminacion de la v_lvula de gas,
elimine el aire y sedimento del suministro de gas
antes de conectar el suministro de gas a la secadora.
Antes de ajustar la conexion entre el suministro de gas
y la secadora, purgue el aire hasta que se detecte olor
a gas. Si no se cumpte con esto se podra producir una
explosion, incendio o muerte.
• NO use una llama abierta para inspeccionar las fugas
de gas. Use un fluido anticorrosivo para deteccion
de fugas. Si no se cumple con esto se podra producir una
exptosi6n, incendio o muerte.
• Utilice _nicamente una linea de suministro de gas nueva
certificada por AGA o CSA, con conectores flexibles
de acero inoxidable. Si no se cumpte con esto se podr&
producir una exptosi6n, incendio o muerte.
• Ajuste bien todas las conexiones de gas. Si no se cumpte
con esto se podr& producir una explosi6n, incendio o muerte.
• Use cinta de Teflon ®o un compuesto para conexiones
de tuberia insoluble en gas de petroleo liquido (LP) en
todas las roscas de tuberia. Si no se cumpte con esto se
podr& producir una exptosi6n, incendio o muerte.
• NO intente desmontar ning_n componente de la
secadora; cualquier desmontaje requiere de la atencion
y herramientas de un tecnico o compafiia de
mantenimiento autorizado y calificado. Si no se cumpte
con esto se podr& producir una explosi6n, incendio o muerte.
Requisitos electricos para modelos a gas _nicamente
• Bajo ninguna circunstancia, corte o quite la tercera
pata (puesta a tierra) del cable electrico. Si no se
cumple con esto se podr& producir una explosion,
incendio o muerte.
• Por motivos de seguridad personal, la secadora
debe estar conectada a tierra adecuadamente.
Si no se cumple con esto se podr& producir una
explosion, incendio o muerte.
• El cable electrico de esta secadora esta equipado
con un enchufe de 3 patas (conexion a tierra) que
se conecta a un tomacorriente de pared de tres
patas (con conexion a tierra) para minimizar la
posibilidad de peligro de descarga electrica de este
electrodom_stico. Si no se cumple con esto se podra
producir una explosi6n, incendio o muerte.
Se debe enchufar esta secadora a un tomacorriente
conectado a tierra de 120 V CA, 60 Hz protegido
por un fusible o cortacircuitos de 15 amperios. Si no
se cumple con esto se podr& producir una explosion,
incendio o muerte.
En caso de disponer de un tomacorriente de pared
estandar de 2 patas, debe cambiarlo por uno de
3 patas conectado a tierra adecuadamente. Si no
se cumple con esto se podr& producir una explosion,
incendio o muerte.
Enchufe de tres
espigas con
conexi6n a tierra
Tomacorrientede
_ r"'"_/pared de tres espigas
I -I con conexion a tierra
' VerificqoeeqluehatYarra
I_ _iecuadaantesdeluso.
38

CONEXION DE SECADORAS AGAS (cont.)
ADVERTENCIA: Parareducirel
riesgo de incendio, descargas el_ctricas o heridas
al usar su electrodom_stico, siga las precauciones
b&sicas, incluyendo Io siguiente:
• La instalacibn y el mantenimiento deben
proveerse por un instalador calificado, agencia de
mantenimiento o compahia de gas. Si no se cumple
con esto se podr_ producir una explosi6n, incendio
o muerte.
• Use dnicamente un conector de acero inoxidable
nuevo y un conector certificado por AGA nuevo.
Si no se cumple con esto se podr& producir
una explosi6n, incendio o muerte.
• Se debe instalar una v_lvula de corte de gas a una
distancia maxima de 6 pies (1,8 m) de la secadora.
Si no se cumple con esto se podr& producir una
explosi6n, incendio o muerte.
Conexion del suministro de gas
NOTA: Esta secadora se encuentra configurada
de f&brica para funcionar con Gas Natural (NG).
Si la secadora va a utilizarse con las LP, un t_cnico
calificado debe realizar la conversi6n.
1. Verifique que el suministro de gas del cuarto de
lavanderia est_ apagado y que la secadora se
encuentre desenchufada. Confirme que el tipo
de gas disponible en su cuarto de lavanderia sea
el apropiado para la secadora.
2. Quite la tapa de envio de la conexi6n de gas Iocalizada
de la parte trasera de la secadora. AsegQrese de no
dahar la rosca del conector de gas al quitar la tapa
de envio.
3. Conecte la secadora al suministro de gas de su cuarto
de lavado usando un conector de acero inoxidable
flexible nuevo con una conexi6n de 3/8 pulgadas NPT.
NOTE: DO NOT use old connectors.
4. Sujete bien todas las conexiones entre la secadora y
el suministro de gas del cuarto de lavanderia.
5. Encienda el suministro de gas del cuarto de lavanderia.
6. Verifique todas las conexiones de las tuberias (internas
y externas) en busca de p@didas de gas con un fluido
de detecci6n de p@didas no corrosivo.
7. ContinQe con los requerimientos de ventilaci6n
de la p&gina 42.
Instalaciones en lugares de gran altitud
La clasificaci6n BTU para esta secadora es
certificaci6n AGA para elevaciones por debajo de los
10,000 pies.
Siva a instalar su secadora a m&s de 10,000 pies,
debe ser desclasificada por un t_cnico calificado
o compafiia de gas.
La secadora est_ configurada para gas natural
cuando se envia de f_brica. Asegdrese de que
la secadora est_ equipara con la boquilla de
quemador correcta para el tipo de gas que se
usar_ (gas natural o petrbleo liquido, LP). Si no
se cumple con esto se podr_ producir una explosi6n,
incendio o muerte.
De ser necesario, un tdcnico calificado debe instalar
la boquilla correcta (para el kit de boquilla LP,
ordene la pieza de pedido Ndm. 4948EL4002B)
y se debe anotar el cambio en la secadora. Si no
se cumple con esto se podr_ producir una explosi6n,
incendio o muerte.
Se deben realizar todas las conexiones segdn
los cbdigos y las regulaciones locales. Si no se
cumple con esto se podr& producir una explosi6n,
incendio o muerte.
Las secadoras de gas DEBEN ventilar hacia
el exterior. Si no se cumple con esto se podr&
producir una explosi6n, incendio o muerte.
j __
nllIlii
Conexi6n de _ Tap6n de tuberia
de 1/8" NPT
gas
3/8" NPT
Valvula de corte
de suministro
de gas
Conector flexible
de acero inoxidable
certificado por
AGA/CSA
39

REQUERIMIENTOS ELI_CTRICOS
COMO CONECTAR LAS SECADORAS
ELI_CTRICAS
ADVERTENCIA: Paraayu ar
a evitar incendios, descargas electricas, heridas graves o
muerte, et cabteado e instalaci6n a tierra deben cumplir
con ta Qltima edici6n det C6digo Electrico Nacionat,
ANSI/NFPA 70 y todas tas regulaciones locales aplicables.
Por favor comuniquese con un electricista calificado para
que controte et cableado y los fusibtes y asi asegurar que
su casa posee energia electrica adecuada para operar
la secadora.
Requisitos electricos especiales para
viviendas moviles o prefabricadas
ADVERTENCIA: Parareducer
el riesgo de incendio, descargas electricas o heridas at
usar su etectrodom6stico, siga las precauciones basicas,
incluyendo 1osiguiente:
• Cualquier instalaci6n en una vivienda m6vil o prefabricada
debe reatizarse de conformidad con tos Est&ndares de
seguridad y construcci6n de viviendas prefabricadas, Titulo 24
CFR, Parte 32-80 o est&ndar CAN/CSAOZ240 MH y con los
c6digos y regulaciones locales.
• Se requiere una conexion de 4 hilos en todas las
instalaciones de viviendas m6viles y prefabricadas, asi
como en todas las construcciones nuevas posteriores al
1 de enero de 1996. Si no se cumple con esto se podra
producir una explosi6n, incendio o muerte.
Requisitos electricos _nicamente
para modelos electricos
ADVERTENCIA: Para reducir
el riesgo de incendio, descargas el6ctricas o heridas al
usar su etectrodom6stico, siga las precauciones basicas,
incluyendo 1osiguiente:
• Esta secadora debe estar conectada a un sistema de
cableado met_lico permanente conectado a tierra, o se
debe tender un conductor de conexi6n a tierra de equipo
con los conductores de circuito y conectado a la terminal
de conexi6n a tierra del equipo o conductor de la
secadora. Si no se cumpte con esto se podra producir
una explosi6n, incendio o muerte.
• La secadora tiene su propio bloque terminal, el cual
debe conectarse a un circuito de una sola fase de 240 V
CA, de 60 Hz, protegido con fusible de 30 amperios
(el circuito debe tenet protecci6n de fusible a ambos
terminales de la linea). EL SUMINISTRO ELI_OTRICO
DE LA SECADORA DEBERA SER DE LA MAXIMA
CLASIFIOAOION DE VOLTAJE LISTADA EN LA PLAOA
DE CARAOTERJSTIOAS. NO CONECTE LA SECADORA
A UN ClRCUlTO DE 110, 115 0 120 VOLTIOS. Se dispone
de elementos de calentamiento para instalaci6n de campo
en secadoras que deben conectarse a un suministro
el6ctrico de voltaje diferente al listado en la placa de
datos de servicio. Si no se cumple con esto se podra
producir una exptosi6n, incendio o muerte.
• Si un circuito de ramal a la secadora es de 15 pies (4,5 m)
o menos de Iongitud, use alambre listado pot UL
(Underwriters Laboratories) N_m.-10 AWG (_nicamente
alambre de cobre), o segen Io requieran las leyes locales.
Si es m_s largo de 15 pies (4,50 m), use alambre listado
pot UL (Underwriters Laboratories) N_m.-8 AWG
(_nicamente alambre de cobre), o segen Io requieran
las leyes locales. Disponga de suficiente dotaci6n de
cableado, de manera de poder mover la secadora de su
ubicaci6n normal cuando sea necesario. Si no se cumpte
con esto se podra producir una explosi6n, incendio o muerte.
• NO se provee la conexi6n en espiral del cable el6ctrico
entre la caja de pared y el bloque terminal de la secadora
con la misma. El tipo de conexi6n en espiral y el calibre
del alambre deben seguir los c6digos locales y las
instrucciones indicadas en las siguientes p_ginas.
Si no se cumpte con esto se podra producir una explosi6n,
incendio o muerte.
• Desde el 1 de enero de 1996, se requiere una conexi6n de
4 hilos en todas las construcciones nuevas. Debe
utilizarse una conexi6n de 4 hilos donde los c6digos
locales no permiten la conexion a tierra a trav6s del cable
neutral. No hacerlo puede provocar un incendio, una
explosi6n o la muerte.
40

C0MO CONECTAR LAS SECADORAS ELI_CTRICAS (cont.)
ADVERTENCIA:
• Conecte el cable de energia al bloque terminal. Cada
cable de color debe estar conectado a un tornillo del
mismo color. El color del cable indicado en el manual
se conecta al tornillo del mismo color del bloque. No
seguir estas instrucciones puede provocar un
cortocircuito o una sobrecarga.
Cable de energ(a de cuatro hilos
I_ I " Se requiere una conexi6n de 4 hilos para todas las
I
instalaciones de casas rodantes y prefabricadas,
ademas de todas las nuevas construcciones a
partir del 1de enero de 1996.
• Se requiere un alivio de tensi6n aprobado por UL.
• Utilice un cable de energia aprobado pot UL de 30
amperios, 240 V, de 4 hilos con un conductor de cobre
#10 AWG minimo y con terminales de bucle cerrado o de
horquilla con extremos hacia arriba.
Bloque
terminal
Alivio
de tensi6n
a 3robado
)or UL
1. Quite la tapa de acceso del bloque terminal de la parte
trasera superior de la secadora.
2. Instale un alivio de tensi6n aprobado por UL en el orificio
pasante del cable de energia.
3. Pase un cable de energia aprobado por UL de 30
amperios, 240 V, de 4 hilos con un conductor de cobre
#10 AWG minimo a trav6s del alivio de tensi6n.
"= Caliente "- Neutral = Caliente
--===,=,== ======.
Tornillo,de
conexlon II
a tierra -""'__
_ Cable de conexi6n a tierra
4. Transfiera el cable de conexi6n a tierra de la secadora desde
atras del tornillo verde a tierra al tornillo central del bloque
terminal.
5. Sujete los dos cables calientes del cable de energia a los
tornillos exteriores del bloque terminal.
6. Adjunte el cable neutro de color blanco al tornillo central
del bloque terminal.
7. Sujete el cable de conexi6n a tierra del cable de energia al
tornillo verde de conexi6n a tierra.
8. AJUSTE BIEN TODOS LOS TORNILLOS.
9. Vuelva a instalar la tapa de acceso del bloque terminal.
• La conexi6n a tierra a trav6s del conductor neutral
se encuentra prohibido para: (1) instalaciones nuevas
de circuito derivado, (2) casas rodantes, (3) vehiculos
recreativos, y (4) &reas en las que los cbdigos
locales prohiben la conexi6n a tierra a trav6s
del conductor neutral.
Cable de energ(a de tres hilos
I(_1 " Se prohibe una conexibn de 3 cables en
construcciones nuevas luego del 1 de enero
de 1996.
• Se requiere un alivio de tensi6n aprobado por UL.
• Utilice un cable de energia aprobado pot ULde 30
amperios, 240 V, de 3 hilos con un conductor de cobre
#10 AWG minimo y con terminales de bucle cerrado o de
horquilla con extremos hacia arriba.
Bloque
energia de 3 _ _ terminal
hilos aprobado II ,1_-__
por UL __ Alivio
_ e tensi6n
aprobado
por UL
1. Quite la tapa de acceso del bloque terminal de la parte
trasera superior de la secadora.
2. Instale un alivio de tensi6n aprobado por UL en el orificio
pasante del cable de energia.
3. Pase un cable de energia aprobado pot ULde 30
amperios, 240 V, de 3 hilos con un conductor de cobre
#10 AWG minimo a trav6s del alivio de tensi6n.
4. Sujete los dos cables calientes del cable de energfa a los
tornillos exteriores del bloque terminal.
5. Conecte el cable neutral al tornillo central del bloque terminal.
6. Conecte la conexi6n a tierra externa (si Io requieren los
c6digos locales) al tornillo verde de conexi6n a tierra.
7. AJUSTE BIEN TODOS LOS TORNILLOS.
8. Vuelva a instalar la tapa de acceso del bloque terminal.
41

REQUERIMIENTOS DE VENTILACION
CONEXION DEL CONDUCTO DE VENTILAClON DE LA SECADORA
nv;IADVERTENCIA: Parareducire,ries0o,ncen io, escar0 selectricasoheridasal
usar su
electrodomestico, siga las precauciones b&sicas, incluyendo Io siguiente:
• No aplaste ni doble el sistema de conducto. Si no se
siguen estas instrucciones se podra producir incendio o
muerte.
• No permita que el sistema de conducto se asiente sobre
objetos puntiagudos ni entre en contacto con los mismos.
Si no se siguen estas instrucciones se podra producir incendio
o muerte.
• Si conecta a un sistema de conducto existente, asegt_rese
de que sea adecuado y de que este limpio antes de
instalar la secadora. Si no se siguen estas instrucciones se
podra producir incendio o muerte.
• El sistema de ventilacion debe seguir los codigos de
construccion. Si no se siguen estas instrucciones se podra
producir incendio o muerte.
• Las secadoras de gas DEBEN ventilar hacia el exterior.
Si no se siguen estas instrucciones se podra producir incendio
o muerte.
• 0nicamente use un sistema de conducto rigido y de metal
flexible de 10 cm (4 pulg.) dentro del gabinete de la
secadora y para ventilacion al exterior. Si no se siguen
estas instrucciones se podr& producir incendio o muerte.
• Para reducir el riesgo de incendio, combustion o
acumulacion de gases combustibles, NO descargue el
escape de la secadora en un area cerrada o no ventilada,
tal como un desv_n, pared, cielo raso, espacio entre el
cimiento y la tierra, chimenea, conducto de gas o
espacios ocultos de un edificio. Si no se siguen estas
instrucciones se podra producir incendio o muerte.
• Para reducir el riesgo de incendio, NO descargue
el escape de la secadora usando conductos de plbstico ni
de I_mina metblica. Si no se siguen estas instrucciones se
podra producir incendio o muerte.
• El conducto de escape deber_ tener 10 cm (4 pulg.) de
dibmetro sin obstrucciones. El conducto de escape
deber_ mantenerse Io mbs corto posible. Asegerese de
limpiar cualquier tipo de conducto antiguo antes de
instalar su secadora nueva. Si no se siguen estas
instruccionesse podra producirincendioo muerte.
• Se recomiendan conductos rigidoso semirigidospara
usar entre la secadora y la pared. En instalaciones
particulares cuando es imposible realizar una conexion
siguiendo las recomendaciones antes indicadas, se
puede utilizar un conducto met&lico flexible de transicion
aprobado por UL entre la secadora y la conexion de pared
solamente. Usar este tipo de conducto afectar_ el tiempo
de secado. Si no se siguen estas instrucciones se podra
producir incendio o muerte.
• NO utilice tornillos de I_mina de metal ni otro tipo de
aseguradores que extiendan dentro del conducto y
puedan atrapar pelusa y reducir la eficiencia del sistema
de escape. Asegure todas las uniones con cinta adhesiva
impermeable. Si no se siguen estas instrucciones se podra
producir incendio o muerte.
• Para maximizar los resultados de funcionamiento, siga
las limitaciones de Iongitud del conducto indicadas
en el cuadro abajo. Si no se siguen estas instrucciones se
podra producir incendio o muerte.
• No se provee el sistema de ventilacion con la secadora;
el mismo deberb obtenerse Iocalmente. La tapa terminal
deber_ tener reguladores de tiro con bisagras para
prevenir el retorno de descarga cuando no se usa la
secadora. Si no se siguen estas instrucciones se podra
producir incendio o muerte.
Tabla de seleccion y verificacion de la Iongitud del conducto
Tipo de tapa de pared
Recomendado
(10.2 cm) (10.2 cm)
Uso en los instalaciones
de conducto cortos
(6.35 cm)
NOmero de
Codos de 90°
0
1
2
3
4
0
1
2
3
4
Long. m&x. de conducto
met&lico rigido de di&m. 4"
65 ft. (19,8 m)
55 ft. (16,8 m)
47 ft. (13,7 m)
36 ft. (11,0 m)
28 ft. (8,5 m)
55 ft. (16,8 m)
47 ft. (13,7 m)
41 ft. (12,5 m)
30 ft. (9,1 m)
22 ft. (6,7 m)
Long. max. de conducto
met&lico flexible de diam. 4"
45 ft. (13,7 m)
35 ft. (10,7 m)
30 ft. (9,1 m)
25 ft. (7,6 m)
20 ft. (6,1 m)
35 ft. (10,7 m)
27 ft. (8,1 m)
21 ft. (6,4 m)
17 ft. (5,2 m)
15 ft. (4,5 m)
NOTA: Reste 6 pies (1,8 m) por cada codo adicional. No se recomienda usar m&s de cuatro codos de 90°.
42

CONEXION DEL CONDUCTO DE VENTILACION DE LA SECADORA (cont.)
Como utilizar la tabla de seleccion de
verificacion de la Iongitud del conducto
(pagina 42)
1. Seleccione el tipo de cubierta de pared.
2. Seleccione una hilera que coincida con la cantidad de codos
necesarios para el recorrido del conducto de la secadora.
3. Seleccione el tipo de conducto. La Iongitud que aparece en el
cuadro en este punto es la Iongitud m&xima de conducto
permitida para su instalaci6n. Una Iongitud de conducto m&s
larga reducir& el rendimiento del secado, producir& tiempos
de secado m&s prolongados y un mayor consumo de energia.
NO supere la Iongitud m&xima del tipo de conducto y
los codos utilizados.
Ventilacibn de
escape correcta
Direccionamiento y conexion del sistema
de conducto de escape
Siga las pautas indicadas mas abajo para maximizar
el desempeSo de secado y reducir la acumulaci6n
de pelusa en el sistema de conducto.
NOTA: El sistema de conducto y las conexiones NO estan
incluidas y deben adquirirse por separado.
• Use un sistema de conducto metalico rigido
o semirigido de 10 cm (4 pulg.).
• El conducto de escape debera tenderse Io mas corto posible.
• Use la menor cantidad de conexiones de codo que
sea posible.
• El extremo macho de cada secci6n del conducto
de escape deber_ apuntar hacia afuera de la secadora.
• Use cinta adhesiva impermeable en todas las conexiones
de conducto.
• Aisle el sistema de conducto que se tiende a trav_s de areas
sin calefacci6n para reducir la condensaci6n y acumulaci6n
de pelusa en las superficies del conducto.
ADVERTENCIA: Noseguir estas
instrucciones generara un desempeSo pobre, fallas
en el producto y/o provocara un incendio o la muerte.
IMPORTANTE: Si no se agota la secadora de acuerdo con las
pautas incluidas en estas instrucciones, es posible que como
resultado la misma tenga un rendimiento insatisfactorio. Todas
las ventilaciones y conductos no pertenecientes a la secadora
son responsabilidad del consumidor. Una falla del producto
como resultado de una ventilaci6n inadecuada no estara
cubierta dentro de la garantia del fabricante.
Como conectar la ventilacion de la secadora
1. Verifique que todos los conductos y codos esten limpios y
libres de obstrucciones.
2. Mida la Iongitud del conducto. NO supere la Iongitud maxima
indicada en la tabla de la pagina 42.
3. Conecte la salida de la secadora al conducto existente.
• Utilice solamente cinta aislante o abrazaderas.
• NO use tornillos para fijar el conducto.
• Utilice un conducto de metal rigido o semi-rigido.
• NO utilice una tuberia de plastico o de papel metalizado
fino como conducto.
• El extremo macho de cada codo debe siempre debe
apuntar en direcci6n del flujo de aire.
f
©
Ventilacibn de
escape incorrecta
Terminales [
macho ,_
--FLUJO--
43

NIVELACION DE LA SECADORA
ADVERTENCIA
• Utilice guantes durante la instalaci6n.
• No seguir estas instrucciones puede provocar lesiones.
Para asegurar que la secadora brinde un desempefio
6ptimo de secado, debe estar nivelada. Para minimizar
la vibraci6n, el ruido y movimiento no deseados, el piso
deberA set una superficie nivelada y s61ida.
NOTA" Fije las patas niveladoras solo en la medida
necesaria para nivelar la secadora. La extensi6n
de las patas niveladoras mAs de Io necesario puede
causar vibraci6n de la secadora.
Nivel
._____---------
Patas de
nivelaci6n
1. Coloque la secadora en la posici6n final. Coloque
un nivelador sobre la secadora.
• Las 4 patas niveladoras deberan apoyarse firmemente
en el piso. Empuje suavemente las esquinas
superiores de la secadora para asegurarse de que
su secadora no se mece de esquina a esquina.
!
COMO INVERTIR EL SENTIDO
DE LA PUERTA
Se puede invertir el sentido de la puerta para que
se adapte a su lugar de instalaci6n.
Pasador
de la
puerta _
Pasador _ _
Tornillos
de la
bisagra
,_......_ Tornillos del pasador
1. Abra la puerta de la secadora.
NOTA: AsegQrese de sostener el peso de la puerta antes
de quitar los tomillos de la bisagra.
2. Utilizando un destornillador de estrella, quite los 2
tornillos de bisagra que sostienen la bisagra de
la puerta a la abertura de la puerta de la secadora.
3. Quite los 2 tornillos de la traba y la traba de
la abertura de la puerta de la secadora.
4. Quite los dos tornillos ubicados arriba y debajo
de la traba.
Tornillos de la bisagra _'''%
Pasador
de la
puerta
2. Use una Ilave para girar el pie nivelador. Girar el pie 5.
nivelador en direcci6n hacia las agujas del reloj Ileva el
mismo hacia abajo y eleva la secadora; girar el pie en
contra de las agujas del reloj eleva el pie y Ileva la
lavadora hacia abajo. Eleve o Ileve hacia abajo los pies 6.
niveladores hasta que la lavadora est_ nivelada de un
lado a otto y desde el frente hasta atrAs. Asegt3rese
que los cuatro pies niveladores tengan un contacto 7.
firme sobre el piso. 8.
NOTA" Siesta instalando la secadora en el pedestal
opcional, las patas de nivelaci6n deben retraerse pot
completo. Utilice las patas de nivelaci6n sobre el pedestal
para nivelar la secadora.
44
Pasador
Torillos
del
pasador
Con cuidado d_ vuelta la puerta para que la bisagra
quede invertida. Vuelva a sujetar la puerta en la lado
opuesto de la abertura de la puerta.
Reinstale la traba de la puerta con sus tornillos
originales.
Coloque los tornillos restantes en los orificios abiertos.
Controle la abertura de la puerta para asegurarse
de que la puerta se mueve libremente y se traba bien.

REVISION DE INSTALACION FINAL
Una vez que haya completado la instalacion
de la secadora y la misma se encuentre en su ubicacion
final, confirme que funcione correctamente realizando
las siguientes pruebas.
1. _,Est& el gas encendido? (Solo modelos de gas)
2. _,Esta la secadora enchufada? La secadora siempre
debe enchufarse en el tomacorriente adecuado.
La secadora de gas debe utilizar
un tomacorriente de 3 espigas
de 120 VAC, 60 Hz. con conexion
a tierra.
La secadora etectrica debe utilizar
una conexion de 4 hilos, que se
requiere en todas las instalaciones
de casas rodantes y prefabricadas,
como en todas las construcciones
nuevas a partir del 1 de enero de
1996.
"" O ""
Una conexion de 3 hitos.
NOTA: NO se permite una conexion
de 3 hilos en construcciones nuevas
a partir del 1 de enero de 1996.
3. _,Est& conectado el conducto de ventilacion de la
secadora?
4. _.Est& nivelada la secadora?
5. Realice las siguientes pruebas antes de utilizar la
secadora.
Comprobacion del calentamiento
de la secadora
MODELOS A GAS
1. Cierre la puerta de la secadora.
2. Presione el boton de ENCENDIDO/APAGADO para
encender la secadora.
3. Gire la perilla selectora de ciclo al ciclo de secado
normal.
4. Presione la perilla selectora de ciclo para accionar la
secadora. Cuando la secadora se acciona, el
encendedor debe encender el quemador principal.
NOTA: Si no se purga todo el aire de la linea de gas, el
encendedor de gas puede apagarse antes de que se
encienda el quemador principal. Si esto sucede, el
encendedor intentar& volver a encenderse hasta que
todo el aire se purgue de la linea de gas.
MODELOS ELECTRICOS
1. Cierre la puerta de la secadora.
2. Presione el boton de ENCENDIDO/APAGADO para
encender la secadora.
3. Gire la perilla selectora de ciclo al ciclo de secado
normal.
4. Presione la perilla selectora de ciclo para accionar la
secadora. El aire de salida debe estar tibio despues de
que la secadora haya funcionado durante 3 minutos.
Verificacion de la ventilacion
Por Io menos una vez al afio debe controlarse que
el conducto de ventilacion no haya acumulado pelusa
y debe limpiarse. Si se registra una reduccion notable
de la capacidad de secado, verifique que el conducto
no tenga obstrucciones o bloqueos.
Verificacion de la nivelacion
Una vez que la secadora se encuentre en su posicion
final, vuelva a verificar que este nivelada. Controle que
este nivelada del frente hacia atras y de lado a lado,
y que las 4 patas de nivelacion se encuentren bien
apoyadas sobre el piso.
45

ADVERTENCIA: Para reducir el riesgo de incendios, descargas eldctricas
o
heridas,
lea este manual en su totalidad, incluyendo las Instrucciones Importantes de Seguridad, antes de operar
la secadora.
CARACTERiSTICAS DEL PANEL DE CONTROL
O
O BOTON DE ENCENDIDO/APAGADO
(On/Off)
Apriete el bot6n para encender la secadora. Apriete
nuevamente para apagar la secadora.
NOTA: Apretar el bot6n de ENCENDIDO/APAGADO
durante un ciclo cancelar_, ese ciclo y borrar_,cualquier
ajuste de carga.
_) PERILLA SELECTORA DE ClCLOS-
INICIO/PAUSA
Esta perilla posee una funci6n dual y se usa para
seleccionar un ciclo y para comenzar o pausar un ciclo.
Gire la perilla para seleccionar el ciclo deseado. Unavez
que el mismo fue seleccionado, las preconfiguraciones
est_.ndaresaparecer_.nen la pantalla. Dichas
configuraciones se pueden ajustar usando los botones del
Modificador de Ciclo (Cycle Modifier) u Opci6n (Option) en
cualquier momento antes de comenzar el ciclo. (Lea sobre
configuraciones aceptables de la guia del ciclo en la
p_.gina48. Afin de proteger las telas, no se permitir_.n
todas las configuraciones en todos losciclos.) Presione
esta perilla para COMENZAR el ciclo seleccionado. Si la
secadora se encuentra en funcionamiento, use la perilla
para PAUSARel ciclosin actuales.perderlasconfiguraciones
actuales.
NOTA: Si la secadora se detiene durante m_.sde 4
minutos, la misma se apagar_,deforma autom_.tica.
(_ BOTONES DE OPCIONES
Los botones de opciones le permiten seleccionar opciones
de ciclo adicionales.Algunos botones tambien lepermitir&n
activar funciones especiales al apretary mantener
apretado el bot6n durante3 segundos.
Las opciones MORE TIME (m_.stiempo) y LESS TIME
(menos tiempo) no se encuentran disponibles con los
ciclos de secado con sensor.
Para obtener informaci6n detalladasobre las opciones
individuales, consulte las siguientes p_.ginas.
46
_) BOTON MY CICLE
Presione el bot6n MY CYCLE (mi ciclo) para seleccionar
el ciclo memorizado. Las selecciones de ciclo y las
configuraciones se memorizan presionando y sosteniendo
el bot6n durante 3 segundos. (Ver p_.gina52).
BOTON RACK DRY
El bot6n RACK DRY (secado en estante) selecciona la
temperatura predeterminada y lasconfiguracionesde
tiempo para secar los elementosen bandeja.
11j BOTONES MODIFICADORES DE CICLO
Utilice estos botones para ajustar las opciones de ciclo
deseadas para el ciclo seleccionado. Las luces ubicadas
sobre los botones muestran la selecci6n actual. Ver la
p_.gina51 para una descripci6n completa. (NOTA" Algunas
configuraciones no se permiten en algunos ciclos).
(_ PANTALLADE TIEMPO Y ESTADO
La pantalla muestra el tiempo restante estimado y el
estado del ciclo. La pantalla tambien controla la
ventilaci6n y el estado del filtro de pelusa. Ver la p_.gina50
para una descripci6n completa.
(_ BOTON DE CANCELACION/CICLO
El bot6n CANCEL/CYCLE (cancelaci6n/ciclo) se utiliza
para detener la secadora y reconfigurar los controles.

C0MO OPERAR LA SECADORA
0 CLASIFIQUE LA ROPA Y CARGUE LA SECADORA
Consulte la p&gina 49.
O CONTROLE EL FILTRO DE PELUSA
Consulte la p&gina 49.
_t SELECClONE LOS MODIFICADORES DE ClCLO
Para consultar sobre Nivel de Secado (Dry Level),
Control de Temperatura (Temp Control), Secado por
Tiempo (Timed Dry) y SENAL DEL CICLO (CYCLE
SIGNAL) consulte la p&gina 51.
Power
_1 ENCIENDA LA SECADORA
Presione el bot6n de ENCENDIDO/APAGADO para
encender la secadora. Las luces ubicadas alrededor
de la perilla de funci6n doble se iluminar&n. Consulte
la p&gina 46.
\\
\
O SELECClONE UN ClCLO
Gire la perilla selectora de ciclo hasta el ciclo
deseado. La pantalla mostrar& las configuraciones
predeterminadas de nivel de secado, temperatura,
tiempo y opciones para ese ciclo. Los ciclos de
secado manual tambi_n le permitir&n seleccionar una
configuraci6n de secado temporizado. Consulte la
p&gina 46.
_I SELECCIONE LAS OPCIONES DE CICLO
Para consultar sobre Mas Tiempo (More Time),
Menos Tiempo (Less Time), SeSal de Secado
HQmedo (Damp Dry Signal), Protector Antiarrugas
(Wrinkle Guard), Mi Ciclo (My Cycle) y Secado en
estante (Rack Dry) consulte la p&gina 52.
47
COMIENCE ELCICLO
Presione la perilla selectora de ciclo para iniciar el
ciclo. Si se presiona la perilla selectora de ciclo
despu_s de que la secadora haya comenzado a
fincionar, la secadora quefar& pausada y conservar&
la configuraci6n existente durante 4 minutos. Consulte
la p&gina 46.
Cuando la carga haya finalizado, sonar& un pitido (si
fue configurado). Si configur6 la opci6n del Protector
Antiarrugas (Wrinkle Guard), la secadora secara la
carga en forma peri6dica durante hasta 3 horas. Para
m&s detalles sobre el Protector Antiarrugas (Wrinkle
Guard), consulte la p&gina 52.
Quite los elementos de la secadora inmediatamente
despu_s del final de ciclo para que las prendas
no se arruguen m&s.
Controlar y limpiar la pantalla de pelusas luego de
cada carga es esencial para el rendimiento de la
secadora y/o para evitar la acumulaci6n de pelusa y/o
bloqueos en la ventilaci6n.

GUiA DE ClCLOS
La siguiente gufa de ciclos muestra las opciones disponibles y los tipos de telas recomendadas para cada ciclo.
= opciSn disponibles
F
Normal
Pesado Vaquera,articulos Alto 54 @
_esados Adjustable
Z
7
--_
Z
Algod6n/ Vaquera,toaiias, Normal
Media alto 55 @
Toallas algodonespesados Adjustable
Normal Ropa de trabajo, Normal Media 41 @
_ana,etc. Adjustable
Planchado Normal
Casual _ermanente,
(informal) _rendas de tela Adjustable
sintetica
Lenceria, Normal
Delicado sa.banas,blusas
Adjustable
Ropa de trabajo, Muy seco
Sanitario algodones fuertes No
corderoy,etc. ajustable
Bajo 36 _
Bajo 32 _
Alto 70
Para cargas Alto 25
Secado pequeSas con Apagado @ @
veloz tiempos cortos Adjustable Adjustable
de secado
Para quitar Media alto 20
Refrescado
arrugas menores Apagado _
de la ropa Adjustable Adjustable
Paraarticulosque 30
Secado requierensecado
Apagado Sin calor _
con aire sincalor talescomo
31_,sticosocauchos Adjustable
Parasecadogeneral;
Secado pot sepuedenprogramar Alto 60
manualmentelas Apagado _
tiempo operacionesdetiempo Adjustable Adjustable
ytemperatura
Secado en Sueteres de lana Apagado 50
estante sedas, lenceria Apagado Ultra bajo
Bajo Adjustable
J
Ciclos de secado con sensor (sensor dry)
Los ciclos de secado con sensor utilizan el sistema exclusivo
de sensor doble para detectar y comparar el nivel de humedad
en las prendas yen el aire, y programar el tiempo de secado
del modo necesario para asegurar resultados superiores.
La secadora ajusta autom&ticamenteel nivel de sequedad y
temperatura del ajuste recomendado para cada ciclo. El tiempo
restante estimado se mostrar_,en la pantalla.
NOTA: Para proteger sus prendas, no todos los niveles,
temperatura u opciones estan disponible con cada ciclo.
Ciclos de secado manual (manual dry)
Use losciclos de secado manual paraseleccionar una cantidad
espedfica de tiempo y temperatura de secado. Cuando se
selecciona el ciclo de secado manual, la pantalla de tiempo
restante estimado (ESTIMATEDTIME REMAINING) muestra
el tiempo restante real en su ciclo. Presioney sostenga los
botones MORE TIME (m_tstiempo) o LESS TIME (menos
tiempo) para cambiar el tiempo r&pidamente.
48

ADVERTENClA: Parareducire,riesgodeincendios..escargase, ct.caso.eridas.,eaeste
manual en su totalidad, incluyendo las Instrucciones Importantes de Seguridad, antes de operar la secadora.
CLASIFICACION DE CARGAS
Etiquetas de mantenimiento de las telas
La mayoria de las prendas de vestir tienen etiquetas de
mantenimiento de las telas para Iograr un mantenimiento
adecuado.
Agrupamiento de prendas similares
Para obtener los mejores resultados, clasifique las
prendas en cargas que puedan secarse con el mismo
ciclo de secado.
Los diferentes tipos de telas tienen diferentes requisitos
Secad0a D _-'] _- _
mfiquina
Sec0 Normal Planchad0permanente/
antiarrugas
DNtI2
Suave/ Nosecar Nosecar
delicado a m_quina (Utilizadojunto
a 'nolavar")
Ajuste _ ., Q
decalor
Ait0 Median0 Bajo Sincal0r/airn
de cuidado, y algunas telas se secarAn m&s r&pido
que otras. Para mejores resultados en el cuidado
de las telas, siempre seque las prendas con otros
elementos que requieran los mismos cuidados.
COMO CARGAR DE LA SECADORA
ADVERTENCIA: Parareducir
el riesgo de incendio, descargas el_ctricas o
heridas al usar su electrodom_stico, siga las
precauciones b&sicas, incluyendo Io siguiente:
• Revise todos los bolsillos para asegurarse de
que est_n vacios. Los articulos como clips,
fbsforos, plumas, monedas y Ilaves pueden
dahar su secadora o sus prendas. Los objetos
inflamables tales como encendedores o
fbsforos podrian encenderse y provocar un
incendio. Si no se cumple con esto se podr_
producir una explosi6n, incendio o muerte.
• Nunca seque prendas que hayan sido
expuestas a aceite, gasolina u otra
substancias inflamables. Lavar las prendas no
eliminar_ completamente los residuos de
aceite. Si no se cumple con esto se podra
producir una explosi6n, incendio o muerte.
Consejos de Carga
• Combine prendas grandes y pequehas en una carga.
• Las prendas hQmedas se extender&n mientras se
secan. No sobrecargue la secadora; las prendas
necesitan de espacio para girar y secar
adecuadamente.
• Cierre las cremalleras, ganchos y cordones para
prevenir que estos articulos se enganchen o enreden
en otras prendas.
REVISE EL FILTRO DE PELUSA ANTES
DE CADA CARGA
Asegt3rese siempre de que el filtro de pelusa est_ limpio
antes de iniciar una carga nueva; un filtro de pelusa
bloqueado incrementar& los tiempos de secado.
Para limpiarlo, tire del filtro de pelusa verticalmente y,
con los dedos, enrolle cualquier pelusa para retirarla
del filtro. No enjuague ni lave el filtro para eliminar
la pelusa. Empuje el filtro de pelusa firmemente en
su lugar. Para m&s informaci6n, ver "limpieza regular"
en la p&gina 54.
AsegQrese siempre de que el filtro de pelusa
est_ instalado adecuadamente antes de poner en
funcionamiento la secadora. Hacer funcionar la secadora
sin o con un filtro de pelusa suelto podria dahar la
secadora y los articulos en el interior de la misma.
Filtro de
pelusa
49

PANTALLA DE TIEMPO Y ESTADO
La pantalla de tiempo y estado muestra el tiempo
restante estimado, progreso del ciclo, estado del filtro
de pelusa y estado de la ventilaci6n. Cuando se enciende
la secadora, se iluminarA la luz de la pantalla.
O TIEMPO RESTANTE ESTIMADO
(ESTIMATED TIME REMAINING)
Cuando se apriete el bot6n inicio/pausa
(START/PAUSE), la secadora mostrarA el tiempo
estimado de secado con sensor (SENSOR DRY)
o el tiempo programado de secado cronometrado
(TIME DRY) restante, y comenzarA a girar.
VERIFICAR VENTILACION (Sistema
Sensor de Bloqueo de Conducto)
La verificaci6n de ventilaci6n (sistema sensor
de bloqueo de conducto) detecta bloqueos en los
conductos que reducen la corriente de aire desde
la secadora y Io alerta sobre los mismos. Esto
mejora la eficiencia de operaci6n y ayuda a reducir las
visitas para efectuar reparaciones, Io que
ahorra dinero.
Si la verificaci6n de ventilaci6n LED no parpadea,
el conducto se encuentra libre de obstrucciones.
Si la verificaci6n de ventilaci6n LED parpadea,
el conducto de la secadora tiene una obstrucci6n
que debe removerse de inmediato.
INDICADOR DEL ESTADO DEL CICLO
Esta parte de la pantalla muestra qu_ etapa
del ciclo de secado se esta Ilevando a cabo,
DRYING (secado), COOLING (enfriamiento) o
Protector Antiarrugas (Wrinkle Guard).
O INDICADOR DE FILTRO DE PELUSAS
La secadora detecta automAticamente la reducci6n
de corriente de aire provocada pot un filtro de pelusa
Ileno. El indicador de Check Lint Screen (verificar
filtro de pelusas) se encenderA antes de cada carga
como recordatorio de verificar el filtro de pelusas
antes de comenzar cada carga. Si el filtro de pelusas
se obstruye durante una carga, el indicador se
encenderA para sefialar que el filtro debe limpiarse
inmediatamente para una eficiencia maxima. Siempre
limpie el filtro de pelusas antes de cada ciclo.
50

BOTONES MODIFICADORES DE CICLO
Todos los ciclos cuentan con configuraciones
predeterminadas que se seleccionan autom&ticamente.
Usted tambi_n puede personalizar estas configuraciones
utilizando los botones modificadores de ciclo. Los ciclos
SENSOR DRY (secado con sensor) cuentan con
configuraciones predeterminadas que se seleccionan
autom&ticamente y no pueden modificarse.
Los ciclos MANUAL DRY (secado manual) cuentan con
configuraciones predeterminadas, pero tambi_n pueden
modificarse las configuraciones utilizando los botones
modificadores de ciclo.
Presione el bot6n para la modificaci6n deseada hasta que
se encienda la luz indicadora del valor deseado.
NOTA" Para proteger las prendas, no todos los niveles
de secado, temperatura u opci6n est_.ndisponibles en todos
los ciclos. Vea la Gufa de ciclos para obtener m_.sdetalles.
Para m_.sdetalles, ver la Gufa de ciclos de la p_.gina48.
MODIFIERS
Very Dry _ High
More Dry Mid High
Normal Dry Medium
Less Dry Low
Damp Dry @ Ultra Low
80 Min
70 Min
60 Min
50 Min
40 Min
High
Low
® off
O NIVEL DE SECADO (DRY LEVEL) O
Selecciona el nivel de sequedad para el ciclo. Apriete
el bot6n de nivel de secado (DRY LEVEL) varias veces
para navegar por los ajustes disponibles.
• Esta opci6n s61oesta disponible con los ciclos de
SECADO MANUAL (MANUAL DRY).
• La secadora ajustar_ el tiempo de ciclo _l
autom_.ticamente. AI seleccionar muy seco (VERY DRY)
o m_.sseco (MORE DRY) se incrementar_, el tiempo
del ciclo, mientras que menos seco (LESS DRY)
o ht_medo seco (DAMP DRY) disminuir_, el tiempo
del ciclo.
• Use un ajuste menos seco (LESS DRY) o ht_medo
seco (DAMP DRY) en los arficulos que desee planchar.
O
CONTROL DEL TEMPERATURA (TEMP CONTROL)
Regula el ajuste de temperatura desde ultra bajo
(ULTRA LOW) a calor alto (HIGH). Esto permite el
cuidado preciso de sus telas y prendas. Apriete el bot6n
control del temperatura (TEMP CONTROL) varias veces
para navegar por los ajustes disponibles.
SECADO POR TIEMPO (TIMED DRY)
Le permite seleccionar el tiempo de secado
manualmente, en incrementos de 10 minutos. Use esta
opci6n en cargas pequeSas o para eliminar arrugas. Use
los botones de m_.stiempo/menos tiempo (MORE
TIME/LESS TIME) para aSadir o reducir el tiempo de
secado en incrementos de 1 minuto.
SENAL DEL CICLO (CYCLE SIGNAL)
Ajusta el volumen de la sepal de fin de ciclo o apaga la
seSal. Presione el bot6n en forma repetida hasta que el
volumen deseado aparezca en la pantalla.
51

BOTONES DE OPCION DE CICLO
Su secadora dispone de varias opciones de ciclo
adicionales, las cuales personalizan los ciclos para
satisfacer sus necesidades individuales. Ciertos botones
de opci6n tambi_n incorporan una funci6n especial
(vea la siguiente p&gina para obtener mayor informaci6n)
que puede activarse apretando y manteniendo apretado
ese bot6n de opci6n por 3 segundos.
Para a_adir opciones de ciclo al ciclo:
1. Encienda la secadora.
2. Encienda la secadora y gire la perilla selectora
de ciclos para seleccionar el ciclo deseado.
3. Use los botones de programaci6n de ciclo para fijar
los ajustes para ese ciclo.
4. Apriete el(los) bot6n(es) de opci6n de ciclo para
la opci6n que desea afiadir. Aparecer& en la pantalla
un mensaje de confirmaci6n.
5. Apriete el bot6n inicio/pausa (START/PAUSE) para
iniciar el ciclo. La secadora iniciar& autom&ticamente.
PROTECTOR ANTIARRUGAS
(WRINKLE GUARD)
La selecci6n de esta opci6n secar_ la carga
de forma peri6dica durante algunos segundos
sin calor. Esto continuara hasta durante 3
horas luego del ciclo seleccionado o hasta
que la puerta se abra. Esto evita que los
items que ann se encuentran dentro se
arruguen hasta que puedan ser retirados.
BIP DE SECADO HOMEDO (DAMP DRY SIGNAL)
÷ Con esta opci6n, la secadora har& un pitido
cuando la carga est_ seca en
aproximadamente un 80%. Esto le permite
eliminar de forma r&pida los items m&s
livianos que est_n secos o los items que
desee planchar o colgar mientras at3n se
encuentran un poco ht3medos. Esta opci6n
s61oest& disponible con los ciclos del Secado
con sensor(Sensor Dry).
MY CYCLE (MI CICLO)
MY CYCLE le permite almacenar
combinaciones especiales de configuraciones
que utiliza frecuentemente. Le permite
guardar los niveles de secado, las
temperaturas, el tiempo y opciones para un
ciclo, y luego pueden accederse a elias
presionando un bot6n.
Para guardar MY CYCLE:
1. Encienda la secadora.
2. Seleccione un ciclo.
3. Use los botones de programaci6n de ciclo para fijar
los ajustes para ese ciclo.
4. Configure cualquier otra opci6n del ciclo deseado.
5. Presione y mantenga presionado el bot6n MI CICLO (MY
CYCLE) durante 3 segundos. Escuchar_. dos pitidos que
confirmar_.n que las configuraciones se guardaron.
IMPORTANTE: $61o puede guardar un programa
de Mi Ciclo (My Cycle) por vez. Si mantiene presionado
el bot6n MI CICLO (MY CYCLE) durante 3 segundos,
sobrescribir& cualquier configuraci6n guardada
previamente de Mi Ciclo (My Cycle).
Para recordar MY CYCLE:
1. Presione y libere el bot6n MY CYCLE. Podr&n verse
las configuraciones guardadas. CYCLE button. The
stored settings will be displayed.
2. Presione y libere la perilla selectora de ciclo para
iniciar el ciclo. La secadora se encender&
autom&ticamente.
NOTA: Una vez que se ha recordado MY CYCLE,
pueden ajustarse cualquiera de los modificadores
u opciones memorizados. Sin embargo, si se gira
la perilla selectora de ciclo, aparecer& MY CYCLE en
la pantalla.
52

FUNCIONES ESPECIALES
SECADO EN ESTANTE (RACK DRY)
÷ Use el ciclo SECADO EN ESTANTE (RACK
DRY) con articulos tales como su_teres de
lana, sedas y lenceria, que se deberian secar
en posici6n horizontal. Tambi_n se puede usar
SECADO EN ESTANTE (RACK DRY) con
articulos que no deben secarse girando, tales como
calzado deportivo o animales de peluche.
NOTA: NUNCA use el este ciclo en combinaci6n con
un ciclo de secado giratorio.
Para instalar el estante de secado
CICL O SANITARIO
Cuando el Ciclo de Limpieza (Sanitary Cycle) es
seleccionado en la Perilla del Selector de Ciclo (Cycle
Selector Knob), la secadora configurarb, de forma
automAtica la temperatura en ALTO (HIGH) y el nivel de
secado en MUY SECO (VERY DRY).
NOTA" No use este ciclo con telas delicadas.
SEGURO INFANTIL (CHILD LOCK)
Use esta opci6n para evitar el
cambio de configuraciones de
ciclo mientras la secadora est_
en funcionamiento. Mantenga
presionado SECADO POR
TIEMPO (TIMED DRY) y SEI_AL DEL CICLO (CYCLE
SIGNAL) durante 3 segundos para activar o desactivar
el SEGURO INFANTIL (CHILD LOCK). "CL" aparecerA
en la pantalla de forma alternada con el tiempo restante
estimado. Todos los controles quedaran inhabilitados.
el SEGURO INFANTIL (CHILD LOCK) quedar&
cancelado de forma autom&tica cuando la secadora
complete el ciclo.
1. Manteniendo abierta la puerta de la secadora,
deslice el estante en el tambor de la secadora.
2. Asegt3rese de que est_ asentado uniformemente
sobre el borde interior de la puerta y descanse
horizontalmente sobre el interior de la secadora.
NOTA: Asegt3rese de quitar el estante de secado
despu_s de usar el ciclo SECADO EN ESTANTE
(RACK DRY).
53

ADVERTENClA: Parareducire,riesgodeincendio, descargas el_ctricas o heridasal
usar
su electrodom_stico, siga las precauciones bAsicas, incluyendo Io siguiente:
• Desenchufe la secadora antes de limpiar la misma para evitar el riesgo de descargas el_ctricas. Si no
se cumple con esta advertencia se podrAn producir heridas graves, incendios, descargas el_ctricas o muerte.
• AI limpiar la secadora nunca utilice quimicos de corte, limpiadores abrasivos o solventes.
Los mismos da_arAn su aspecto.
LIMPIEZA REGULAR
Limpieza del exterior
El mantenimiento adecuado de su secadora podria
prolongar su vida 0til. El exterior de la unidad puede
limpiarse con agua tibia y un detergente de jab6n medio,
no abrasivo.
Limpie inmediatamente cualquier clase de fuga,
con un trapo suave y hOmedo.
IMPORTANTE" No use alcohol desnaturalizado,
disolventes o productos similares.
NUNCA use limpiadores abrasivos ni estropajos; pueden
rayar o da_ar la supefficie.
Limpieza del filtro de pelusa
Filtro de
pelusa
Limpieza del interior
Limpie con un paso alrededor de la abertura y el sello
de la puerta con un paso suave h0medo para para quitar
la acumulaci6n de pelusa y polvo que podrian da_ar
el sello de la puerta.
Limpie la ventanilla con un paho suave humedecido con
agua caliente y un detergente suave no abrasivo para
el hogar; luego seque con un paso.
NUNCA use limpiadores abrasivos ni de lana metalica;
pueden raspar o da_ar la supefficie.
Limpieza alrededor y debajo de la secadora
Aspire la pelusa y polvo alrededor de la secadora
y debajo de ella con regularidad.
Mantenimiento del sistema de conductos
Se debe revisar que el sistema de conductos
de ventilaci6n no tenga acumulaci6n de pelusa y
se debe limpiar una vez pot a_o. Si se registra una
reducci6n notable de la capacidad de secado, verifique
que el conducto no tenga obstrucciones o bloqueos.
Si el indicador CHECK VENT (verificar ventilaci6n)
se ilumina, el sistema de salida debe verificarse
inmediatamente en busca de da_os u obstrucciones.
El indicador CHECK VENT (verificar ventilaci6n) sehala
una reducci6n importante de la corriente de aire de salida
que reducirA significativamente la eficiencia de energia
e incrementarA los tiempos de secado. Los sistemas
de salida dahados o restringidos no se encuentran
cubiertos pot la garantia de la secadora. Los dahos sobre
la secadora que sean causados pot sistemas de escape
da_ados, restringidos o que sean de algOn otto modo
SIEMPRE asegOrese de que el filtro de pelusas est_
limpio antes de cada ciclo. La luz de verificar filtro de
pelusa del panel de control parpadearA antes de cada
ciclo para recordarle.
NOTA" NUNCA use la secadora sin la pantalla
de pelusas.
Para quitar pelusa entre eieles:
1. Abra la puerta de la secadora.
2. Tire del filtro de pelusas hacia arriba. Luego:
_!_,ii!ii!_i!iiiii_i!i!ii?i_iiiiii_ii_iii
3. Quite las pelusas del filtro con sus dedos.
Limpieza total en forma periodica:
Algunos suavizantes de tela se pueden acumular en
a pantalla de pelusas a Io largo del tiempo. Esta
acumulaci6n puede restringir el flujo de aire a trav_s
de la pantalla, reduciendo la eficiencia de la secadora y
extendiendo los tiempos de secado. Si la pantalla se ve
oscura o sucia cuando est_ frente a una luz, siga estos
pasos para limpiar:
1. Use agua caliente y jab6n y un cepillo duro para impiar
la pantalla.
2. Aseg0rese de que el filtro se encuentre completamente
seco antes de volver a instalar y usar la secadora.
NOTA: NUNCA use la secadora cuando la pantalla de
pelusas est_ h0meda.
54

ANTES DE LLAMAR A MANTENIMIENTO
Su secadora esta equipada con un sistema de monitoreo de errores autom_tticopara la detecci6n y el diagn6stico de problemas
en una etapa temprana. Si su secadora no funciona adecuadamente o no funciona en Io absoluto, revise Iosiguiente antes de Ilamar
a mantenimiento.
LA SECADORA NO SE ENCIENDE
Verifique si...
Luego...
El cable electrico no esta enchufado adecuadamente.
El fusible del hogar esta quemado, el cortacircuitos se,
ha accionado, o ha ocurrido una interrupci6n electrica.
Asegt_resede que el enchufeesteconectadode manerasegura
en un tomacorrienteconconexi6na tierra, que secorresponda
conlaplacade clasificaci6n.
Reactiveel disyuntoro cambieel fusible.Noaumentela capacidad
del fusible.Si el problemase debe a una sobrecargade circuito,
pidaa un electricistacalificadoquesolucioneel problema.
LA SECADORA NO CALIENTA
Verifique si...
El fusible del hogar esterquemado, el cortacircuitos se,
ha accionado, o ha ocurrido una interrupci6n electrica.
Se ha apagado el suministro o servicio de gas
(solo modelos a gas).
Luego...
Reactive el disyuntor o cambie el fusible. No aumente la capacidad
del fusible. Si el problema se debe a una sobrecarga de circuito,
pida a un electricista calificado que solucione el problema.
Confirme que las Ilaves de gas de la casa y de la secadora esten
totalmente abiertas. Incluso si no se suministra gas a la secadora,
funcionar_tsin ning_n c6digo de error en la pantalla.
MANCHAS DE GRASA O SUCIEDAD EN LAS PRENDAS
Verifique si... Luego...
Suavizador de telas usado incorrectamente.
Prendas limpias y sucias secadas juntas.
Prendas limpias y sucias secadas juntas.
Confirme y siga las instrucciones provistas con su suavizador
de telas.
AsegQresede usarsu secadora solo para secar articulos limpios,
ya que los articulos sucios pueden ensuciar las prendas limpias
en la misma carga o en lassubsiguientes.
Las manchas en ropas secas son en realidad manchas que no
se eliminaron durante los procesos de lavado. AsegQresede
que las ropas queden completamente limpias de acuerdo con
las instrucciones de su lavadora y detergentet.
EXCESO DE ESTATICA EN LAS PRENDAS DESPUES DEL SECADO
Verifique si... Luego...
Nose usa suavizador de tela o se usa incorrectamente.
Las prendas se secaron por demasiado tiempo.
(excesivamente secas).
Secado de telassinteticas, planchado permanente
o combinaci6n de materiales sinteticos.
Use un suavizador de telas para reducir la electricidad estatica.
AsegQresede seguir las instrucciones del fabricante.
Sobrecargaruna cargade lavadopuedecausar la acumulaci6nde
electricidadestatica.Programelosajustesy use untiempo de secado
menosprolongado;o uselosciclossecadoconsensor (SENSORDRY).
Estastelas son naturalmentepropensasa la acumulaci6nde est_.tica.
Tratede utilizarsuavizantede telas,un nivelde secado LESSDRY
(menosseco)y/o un tiempomas cortode secadopor tiempo
(TIMEDDRY).
55

ANTES DE LLAMAR A MANTENIMIENTO (cont.)
EL TIEMPO DE SECADO NO ES CONSTANTE
Verifique si...
Luego...
Los ajustes de calor, el tamaSo de la carga
o la humedad de las prendas no son constantes.
El tiempo de secado para una cargavariara dependiendo del tipo
de calor utilizado (electrico, natural, o gas LP), el tama5o de la carga,
el tipo de tela, el nivelde humedadde las prendas y la condici6n
de losconductos de escape y el filtro de pelusa. Inclusouna carga
desequilibrada en la lavadorapuede provocar un centrifugado pobre,
Ioque genera ropasma.shQmedasque tardara.nma.sensecarse.
LAS PRENDAS TARDAN DEMASIADO TIEMPO EN SECARSE
Verifique si... Luego...
La carga no esta correctamente clasificada.
Carga grande de telas pesadas.
Nose han programado adecuadamente los controles
de la secadora.
Se necesita limpiar el filtro de pelusa.
Losconductos de escape estan bloqueados, sucios.
o el tendido de los conductos es demasiado largo
Separelositems pesadosde los livianos.El secadode itemsmas
grandesy pesadostoma mas tiempo.Lositemslivianosen unacarga
con itemspesadospuedenalterarel sensoryaquelos itemslivianosse
secan conmayor rapidez.
Lastelas pesadasrequierende mayortiempode secadoya quetienden
a retenermayorhumedad.Paraayudara reduciry mantenertiemposde
secado m_.sconstantesparatelas pesadasy de mayortama_o,separe
estosarticulosen cargas m_.spequeSasde un tamaSosistem_.tico.
Uselos ajustesdecontroladecuadosparael tipo de carga
que este secando.Algunascargaspuedenrequerirun ajustedel nivel
de secado paraIograrun secadoadecuado.
AsegQresede limpiar el filtro de pelusa antes de cada carga.
Con algunas cargas que producen altas cantidades de pelusa,
puede ser necesario limpiar el filtro durante el ciclo.
Lasventilacionesbloqueadaspuedenagregarun tiempode secado
significativoa la carga.Confirmeque el conductode escapeeste
configuradode forma adecuaday librede escombros,pelusay
obstrucciones.Asegt_resede que losreguladoresde lasparedes
externassepuedanabrir de formaapropiaday que no esten
bloqueados,atoradosni daSados.Consultelas instruccionesde
instalaci6nen elcomienzodel manualparaconocer laspautaspara
unaventilaci6nadecuada.
El fusible del hogar esta quemado, el cortacircuitos Reactive eldisyuntor o cambie el fusible. No aumente la capacidad
se ha accionado, o ha ocurrido una interrupci6n electrica, del fusible. Si el problema se debe a una sobrecarga de circuito,
pida a un electricista calificado que solucione el problema.
La secadora esta sobrecargada. Divida lascargas grandes en cargas m&s pequeSaspara realizar
el secado.
Hay muy poca carga en la secadora. Siesta secando una carga muy pequeSa,aSada algunos articulos
adicionales para asegurar una acci6n de giro apropiada. Si la carga
es muy pequeSa,el control electr6nico no puede detectar la nivel
de secado de la carga y puede apagarse demasiado pronto. Utilice
el secadopor tiempo (TIMEDDRY)o agregue m&s prendas mojadas
a la carga.
56

ANTES DE LLAMAR A MANTENIMIENTO (cont.)
LAS PRENDAS ESTAN ARRUGADAS
Verifique si...
Las prendas se secaron por demasiado tiempo
(excesivamente secas).
Se han dejado las prendas en la secadora
por demasiado tiempo una vez finalizado el ciclo.
Luego...
Secarexcesivamenteunacargade lavanderiapuedeprovocararrugas
en lasprendas.Intentesecar por un periodomenosprolongado
o la configuraci6nLESSDRY(menosseco)y retirelosarticulos
mientrasat_nretienenunacantidadlevede humedad.
Retire inmediatamentetodos losarticulos de la secadora al final
del ciclo. Utilice la opci6nWRINKLE CARE (protectorantiarrugas)
para girar lasprendas brevementea intervalosal final del ciclo,
durantehasta 3 horas.
LAS PRENDAS ENCOGEN
Verifique si...
Luego...
Nose siguen las instrucciones de la etiqueta de la prenda. Para evitar que las prendasencojan,siga cuidadosamentelas
instruccionesde cuidado de telas correspondientea su prenda,ya
que algunastelas encogennaturalmentecuandose lavan.Otras telas
se pueden lavar,pero encogencuandose secan en una secadora.
Use un ajuste de calor bajo o sin calor y/o la opci6n secado en estante
(RACK DRY).
EL INDICADOR DE VERIFICACION DE VENTILACION PARPADEA
Verifique si... Luego...
El conducto es muy largo o tiene demasiadas Instale un conducto m_tscorto o recto.Ver las Instrucciones
vueltas/restricciones, de instalaci6n para obtener detalles.
Obstrucci6n parcial del conducto debido a una El conductodebecontrolarse/limpiarseinmediatamente.La secadora
acumulaci6n de pelusas u otro objeto extraSo puedeutilizarseeneste estado,pero lostiemposde secadoser_.n
m_.sprolongadosy seincrementar_,el consumode energia.
LA PANTALLA MUESTRA LOS ERRORES TEl O TE2
Verifique si... Luego...
I Falla en el sensor de Apague la secadora Ilame a mantenimiento.
temperatura. Y
PELUSA EN LAS PRENDAS
Verifique si...
Nose ha limpiado correctamente el filtro de pelusa.
Luego...
Aseg_rese de limpiar el filtro de pelusa antes de cada carga.
Con algunas cargas que producen altas cantidades de pelusa,
puede ser necesario limpiar el filtro durante el ciclo.
Prendas de lavado no clasificadas adecuadamente. Algunastelasproducenpelusas(porejemplo:una toallade algod6n
peludablanca)y debensecarseapartede lasprendasque
atrapanpelusa(por ejemplo:un par de pantalonesde linonegro).
Exceso de est_.ticaen las prendas. La esta.ticapuede hacer que la ropa posea pelusas. Lea la secci6n
de Excesode Esta.ticaen la Ropa Luego del Secado(Excess Static
in ClothesAfter Drying) en la pa.gina55.
La secadora est,. sobrecargada. Divida las cargas grandes en cargas ma.spequeSaspara realizar
el secado.
PaSuelosde papel, papeles, etc. dejados en los bolsillos. Revise losbolsillos minuciosamenteantes de lavary secar prendas.
57

58

Garantia Limitada de un Aho
Sial instalar, usar y mantener de acuerdo con todas las instrucciones provistas con este producto, el mismo
falla debido a un defecto de material o fabricaci6n dentro del a_o desde su fecha de adquisici6n, Ilame al
1-800-4-MY-HOME ®para programar una reparaci6n gratuita.
Si este electrodom_stico se usa con prop6sitos que exceden el uso familiar, esta garantia s61otendrA una
validez de 90 dias desde la fecha de adquisici6n.
Esta garantia cubre _nicamente defectos de material y fabricacibn. Sears NO cubrirA:
1. ftems no renovables que se gasten fuera del uso normal, incluyendo pero no limitandose a filtros, cinturones,
bombillas de luz y bolsas.
2. Un t_cnico del servicio de reparaci6n, quien instruirA al usuario sobre la correcta instalaci6n, funcionamiento
y mantenimiento del producto.
3. Un t_cnico del servicio que limpiarA o mantendrA este producto.
4. DaSos sobre o fallas del producto si no es instalado, usado o mantenido de acuerdo con todas las
instrucciones suministradas con el producto.
5. Dahos sobre o fallas del producto que resulten de accidentes, abuso, uso inadecuado o uso para prop6sitos
fuera del uso correspondiente.
6. DaSos sobre o fallas del producto causadas pot el uso de detergentes, limpiadores, quimicos o utensilios
que no sean los recomendados en todas las instrucciones suministradas con el producto.
7. DaSos sobre o fallas de partes o sistemas que resulten de modificaciones no autorizadas realizadas sobre
este producto.
Descargo de responsabilidad de las garantias implicitas; limitacibn de reparaciones
La _nica y exclusiva reparaci6n a la cual accederA el cliente bajo esta garantia limitada serA la reparaci6n
del producto aqui provista. Las garantias implicitas, incluyendo garantias de comerciabilidad o conveniencia
sobre un prop6sito particular, se limitan a un aSo o al periodo mAs corto permitido pot la ley. Sears no sera
responsable pot daSos accidentales o consecuentes. Algunos estados y provincias no permiten la exclusi6n o
limitaci6n de daSos accidentales o consecuentes, o la limitaci6n sobre la duraci6n de las garantias implicitas
de comerciabilidad o conveniencia, de modo que es posible que estas exclusiones o limitaciones no se apliquen
en su caso.
Esta garantia tiene vigencia s61ocuando el electrodom_stico se use en Estados Unidos o CanadA.
Esta garantia le da derechos legales especificos y es posible que tenga otros derechos legales que varian entre
un estado y otro.
Sears Roebuck and Co., Hoffman Estates, IL 60179
Sears Canada, Toronto, Ontario, Canada M5B 2B8
59

Your Home
For repair - in your home - of all major brand appliances,
lawn and garden equipment, or heating and cooling systems,
no matter who made it, no matter who sold it!
For the replacement parts, accessories and
owner's manuals that you need to do-it-yourself.
For Sears professional installation of home appliances
and items like garage door openers and water heaters.
1-800-4-MY-HOME ® (1-800-469-4663)
Call anytime, day or night (U.S.A. and Canada)
www.sears.com www.sears.ca
For expert home solutions advice: www.managernyhome,corn
Our Home
For repair of carry-in items like vacuums, lawn equipment,
and electronics, call or go on-line for the location of your nearest
Sears Parts & Repair Service Center
1-800-488-1222 (U.S.A.) 1-800-469-4663 (Canada)
Call anytime, day or night
WWW.Sears.coffi www.sears.c8
To purchase a protection agreement on a product serviced by Sears:
1-800-827-6655 (U.S.A.) 1-800-361-6665 (Canada)
Para pedir servicio de reparaci6n
a domicilio, y para ordenar piezas:
1-888-SU-HOGAR ®
(1=888-784-6427)
Au Canada pour service en fran(;ais:
1-800-LE-FOYER Mc
(1 =800-533-6937)
www.sears.ca
TM SM
® Registered Trademark / Trademark / Service Mark of Sears Brands, LLC
@ Marca Registrada / TMMarca de F&brica / SMMarca de Servicio de Sears Brands, LLC
MCMarque de commerce / MDMarque d6pos6e de Sears Brands, LLC © Sears Brands, LLC
-
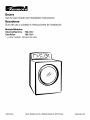 1
1
-
 2
2
-
 3
3
-
 4
4
-
 5
5
-
 6
6
-
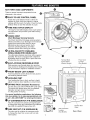 7
7
-
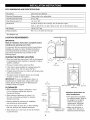 8
8
-
 9
9
-
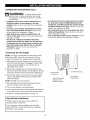 10
10
-
 11
11
-
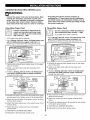 12
12
-
 13
13
-
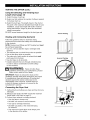 14
14
-
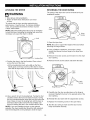 15
15
-
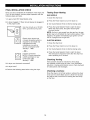 16
16
-
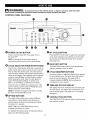 17
17
-
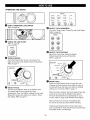 18
18
-
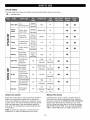 19
19
-
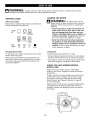 20
20
-
 21
21
-
 22
22
-
 23
23
-
 24
24
-
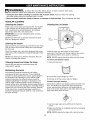 25
25
-
 26
26
-
 27
27
-
 28
28
-
 29
29
-
 30
30
-
 31
31
-
 32
32
-
 33
33
-
 34
34
-
 35
35
-
 36
36
-
 37
37
-
 38
38
-
 39
39
-
 40
40
-
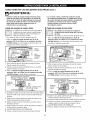 41
41
-
 42
42
-
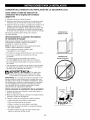 43
43
-
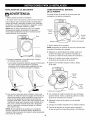 44
44
-
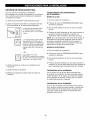 45
45
-
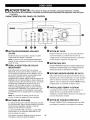 46
46
-
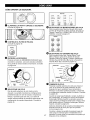 47
47
-
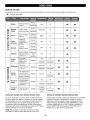 48
48
-
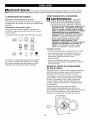 49
49
-
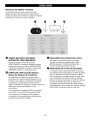 50
50
-
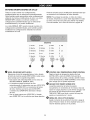 51
51
-
 52
52
-
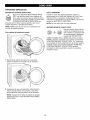 53
53
-
 54
54
-
 55
55
-
 56
56
-
 57
57
-
 58
58
-
 59
59
-
 60
60


Kenmore 796.8884 El manual del propietario
- Categoría
- Secadoras de ropa eléctricas
- Tipo
- El manual del propietario
- Este manual también es adecuado para
en otros idiomas
- English: Kenmore 796.8884 Owner's manual
Artículos relacionados
-
Kenmore Elite 11066924501 Manual de usuario
-
Kenmore 796.8051 Manual de usuario
-
 Kenmore Elite 79679278000 Manual de usuario
-
-
-
Kenmore 79671412310 El manual del propietario
-
 Kenmore Elite 79681028900 El manual del propietario
-
 Kenmore Elite 796.9219 El manual del propietario


