tc electronic Dark Matter El manual del propietario
- Categoría
- Pedal de música
- Tipo
- El manual del propietario
Este manual también es adecuado para

Important Safety Instructions
1 Read these instructions.
2 Keep these instructions.
3 Heed all warnings.
4 Follow all instructions.
5 Do not use this apparatus near water.
6 Clean only with dry cloth.
7 Do not block any ventilation openings. Install in
accordance with the manufacturer’s instructions.
8 Do not install near heat sources such as radiators,
heat registers, stoves, or other apparatus (including
amplifiers) that produce heat.
9 Only use attachments/accessories specified by the
manufacturer.
10 Refer all servicing to qualified service personnel.
Servicing is required when the apparatus has been
damaged in any way, such as power-supply cord or
plug is damaged, liquid has been spilled or objects
have fallen into the apparatus, the apparatus has been
exposed to rain or moisture, does not operate normally,
or has been dropped.
Warning!
• Toreducetheriskoffireorelectricalshock,donot
expose this equipment to dripping or splashing and
ensure that no objects filled with liquids, such as vases,
are placed on the equipment.
• Donotinstallinaconfinedspace.
Service
• Allservicemustbeperformedbyqualifiedpersonnel.
Caution:
You are cautioned that any change or modifications
not expressly approved in this manual could void your
authority to operate this equipment.
When replacing the battery follow the instructions on
battery handling in this manual carefully.
EMC/EMI
Thisequipmenthasbeentestedandfoundtocomplywith
the limits for a Class B Digital device, pursuant to part 15
of the FCC rules.
Theselimitsaredesignedtoprovidereasonableprotection
against harmful interference in residential installations.
Thisequipmentgenerates,usesandcanradiateradio
frequency energy and – if not installed and used in
accordance with the instructions – may cause harmful
interference to radio communications. However, there is
no guarantee that interference will not occur in a particular
installation. If this equipment does cause harmful
interference to radio or television reception – which can
be determined by turning the equipment off and on –, the
user is encouraged to try correcting the interference by
one or more of the following measures:
• Reorientorrelocatethereceivingantenna.
• Increasetheseparationbetweentheequipmentand
the receiver.
• Connecttheequipmenttoanoutletonacircuit
different from the one to which the receiver is
connected.
• Consultthedealeroranexperiencedradio/TV
technician for help.
For the customers in Canada:
ThisClassBdigitalapparatuscomplieswithCanadian
ICES-003. Cet appareil numérique de la classe B est
conforme à la norme NMB-003 du Canada.
¡Precaución!
• Parareducirelriesgodeincendiosodescargas
eléctricas, no permita que este aparato quede
expuesto a salpicaduras y asegúrese de no colocar
sobre él ningún objeto que contenga líquidos, como un
jarrón, para evitar que se pueda derramar.
• Noinstaleesteaparatodentrodeunespacio
confinado, como encastrado en una librería.
Reparaciones
• Cualquierreparacióndebeserrealizadaúnicamente
por personal de un servicio técnico oficial.
Atención:
Le advertimos que cualquier cambio o modificación que
noaparezcaaprobadaexpresamenteenestemanual
puedeanularsuautorizaciónautilizaresteaparato.
Alahoradesustituirlapila,sigacuidadosamentelas
instrucciones sobre manejo de la misma que aparecen en
este manual.
Attention Danger!
• Pourévitertoutrisqued’électrocutionoud’incendie,
ne pas exposer cet appareil à quelque source liquide
(goûtesd’eau,projectionsliquides,etc.)etveillezàne
poser aucun objet contenant un liquide sur l’appareil.
• Donotinstallinaconfinedspace.
Service
• Confieztouteslesopérationsdemaintenanceàun
personnel qualifié.
Attention:
Toutemodificationapportéeàl’appareiletquin’estpas
expressément préconisée dans ce manuel invalide votre
droit à utiliser cet appareil.
Lorsduremplacementdelapile,suivezattentivementles
instructions spécifiées dans ce manuel.
Achtung!
• UmdieGefahreinesFeuersodereineselektrischen
Schlageszuvermeiden,dürfenSiediesesGerät
keinemtropfendemWasseroderSpritzwasser
aussetzen.StellenSiekeinemitFlüssigkeitengefüllten
Behältnisse–wiebeispielsweiseVasen–aufdiesem
Gerätab.
• MontierenSiedasGerätnichtineinemvollständig
geschlossenenBehälteroderGehäuse.
Wartung
• AlleWartungsarbeitenmüssenvoneinemhierfür
qualifiziertenServicetechnikerdurchgeführtwerden.
Achtung:
ÄnderungenandiesemGerät,dieimRahmendieser
Anleitungnichtausdrücklichzugelassenwurden,können
dasErlöschenderBetriebserlaubnisfürdiesesGerätzur
Folge haben.
FolgenSiebeimAuswechselnderBatterieden
AnweisungenzurHandhabungvonBatterienindieser
Bedienungsanleitung.
Attenzione!
• Perridurreilrischiodiincendiooscossaelettrica,non
esporre questo dispositivo allo sgocciolamento o agli
schizzidialcunliquido.Nonposizionaresuldispositivo
oggetti contenenti liquidi, come vasi o bicchieri.
• Noninstallareinunospazioristretto.
Assistenza
• Ogniinterventotecnicodeveessereeffettuatosoloda
personale qualificato.
Cautela:
Si avverte che qualsiasi cambiamento e modifica non
espressamente approvata in questo manuale può
annullarelavostraautoritàdiutilizzodeldispositivo.
Persostituirelabatteria,seguireattentamentele
procedure fornite all’interno di questo manuale.
USER’S MANUAL
BEDIENUNGSANLEITUNG
MANUAL DE INSTRUCCIONES
MANUALE D’USO
MODE D’EMPLOI
www.tcelectronic.com - www.youtube.com/tcelectronic
(EN) Introduction
Congratulations! You have just bought a distortion pedal that personifies rock and represents
all that is good about distorted tones. This pedal will inspire your riffs, licks and leads for years
to come.
Thispedaldefinesinstantgratificationandwillbecomethego-todistortionpedalonyourboard.
Initially, you simply plug it in and start rocking, but its many great sounds will have you playing with it
for years to come. From bluesy crunch to hi-gain, but always very musical distortion sounds, this pedal
was designed for the guitarists who like things a bit (or extremely) dirty. Featuring an all-analog circuit,
dual-band tone controls, level and drive knobs and a voicing switch to tweak both bass response and
distortion, you are set from creamy leads over riff-heavy stadium rock to modern angst-ridden grunge.
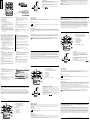
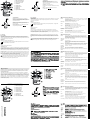
1 - Effect on/off (true bypass)
2 - 1/4 inch mono jack input
3 - 1/4 inch mono jack output
4 - Bass control
5 - Treble control
6 - Gain control
7 - Level control
8 - Voice selector
9 - Power in (9VDC)
Changing battery–Unscrewthethumb-screwonthebackofthepedalanddetachtheback-plate.
Unmounttheoldbatteryandattachthenewbatterytothebatteryclipmakingsurethepolarityis
correct.Thenremounttheback-plate.Tosavebatterylife,removetheinputjackwhenyoudon’tplay.
Batteries must never be heated, taken apart or thrown into fire or water. Only rechargeable
batteries can be recharged. Remove the battery when the pedal is not being used for a longer
period of time. Dispose batteries according to local laws and regulations.
The Controls
BASS & TREBLE
Bass/treblecontrols.Addbassformorepunchorrolloffabitforatightersoundonbigcabinets.Add
treble to cut through a dense mix or reduce to aim for a softer tone.
Gain
Controls the amount of gain.
Lower settings give tight distortion for rhythm parts. Higher settings are ideal for singing leads.
LEVEL
Sets the overall level.
Voice Type selector
TwoVoicetypesareavailable.Withtheswitchin“up”position,thefrequencyresponseistruetothe
inputsignal.Withtheswitchin“down”position,thelow-endfrequenciesarenaturallyboosted.Thisis
excellent where the guitar is allowed to take up a great portion of the sonic spectrum, – e.g. for rhythm
guitar in a trio.
Connecting
Input jack – 1/4 inch mono jack input.
If you run the pedal on battery, we recommend removing the
input jack to preserve battery power when you don’t play.
Output jack – 1/4 inch mono jack output for connecting to
another pedal or directly into an amp or mixer.
Power in–Usea9VDCpowersupplywiththefollowing
symbol:
(DE) Die Regler
BASS und TREBLE
DiessinddieReglerfürdieBass-undHöhenanteiledesSignals.SiekönnendieBässebetonen,umeinenetwas
druckvollerenSoundzuerhalten–odersieetwaszurücknehmen,wennSiemitgroßenBoxenarbeiten.HebenSiedie
Höhenan,damitsichIhreGitarreineinemdichtenMixdurchsetzt,odersenkenSiedenHöhenanteil,damitderSound
etwas weicher wird.
GAIN-Regler
SteuertdieIntensitätderVerzerrung.
FürRhythmusgitarre-PartssolltenSieniedrigereEinstellungenverwenden.HöhereEinstellungeneignensich
für„singende“Leadsounds.
LEVEL-Regler
MitdiesemReglerlegenSiedenAusgangspegelfest.
Voice Type-Wähler
EsstehenzweiVoice-VariantenzurVerfügung:WennderSchalternichtgedrücktist,entsprichtderFrequenzgang
desEffektsdemdesEingangssignals.WennderSchaltergedrücktist,werdendieBassfrequenzenangehoben.Diese
EinstellungempfiehltsichfürSituationen,indenenderGitarreeingrößererAnteildesFrequenzspektrumszugestanden
wird–zumBeispiel,wennessichumdieRhythmusgitarreineinemTriohandelt.
www.tcelectronic.com - www.youtube.com/tcelectronic
(DE) Einleitung
Herzlichen Glückwunsch! Sie haben ein Distortion-Pedal erworben, das die Idee von „Rock“ und großartig
klingender Verzerrung verkörpert. Dieses Pedal wird Sie viele Jahre lang zu Riffs, Licks und Leads inspirieren.
DiesesPedalliefertohneUmwegediegewünschtenSoundsundlässtinSachenVerzerrungkeineWünscheoffen.
AnfangswerdenSieeswahrscheinlicheinfachnureinstöpselnundloslegen.SpäterwerdenSiefeststellen,dasses
klanglichauchüberdenerstenTaghinausvielzubietenhat.
VombluesigenCrunchsoundbiszu„HighGain“,aberstetsmusikalischenSounds:DiesesPedalbietetjedemetwas,ob
es nun ein bisschen oder verdammt dreckig klingen soll. Mit seinen rein analogen Schaltkreisen, der Zweiband-Klangre-
gelung,denPegel-undDrive-ReglernsowieeinemVoicing-Schalter,mitdemSiedieBasswiedergabeundVerzerrung
anpassenkönnendecktdiesesPedaldasvolleSpektrumab–vonseidigenLeadsoundsüberriff-lastigenStadionrock
biszudüster-morbidemGrunge.
Anschlüsse vornehmen
Audioeingang: Eingang (6,3 mm-Klinkenbuchse / mono). Wenn Sie
dasGerätperBatteriemitStromversorgen,empfehlenwirIhnen,
dasAudiokabelausderEingangsbuchseabzuziehen,wennSienicht
spielen.
WennSiedasGerätperBatteriemitStromversorgen,empfehlenwir
Ihnen,dasAudiokabelausderMONO-Eingangsbuchseabzuziehen,
wenn Sie nicht spielen.
Audioausgang:VerbindenSiediese6,3mm-Buchseüberein
MonoklinkenkabelmitdemnächstenPedalimSignalwegoderdirekt
mitIhremVerstärkeroderMischpult.
Netzeingang:VerwendenSieeinNetzteil(9VGleichspannung)mit
dem folgenden Symbol:
1 – Effekt an/aus (True Bypass)
2 – Eingang (6,3 mm-Klinkenbuchse / mono)
3 – Ausgang (6,3 mm-Klinkenbuchse / mono)
4 – BASS-Regler
5 – TREBLE-Regler
6 – GAIN-Regler
7 – LEVEL-Regler
8 – Voice-Wähler
9 – Netzeingang (9 V Gleichspannung)
Batteriewechsel:LösenSiedieBatteriefachschraubeaufderUnterseitedesPedalsundentfernenSiedieBodenplatte.
EntnehmenSiediealteBatterieundsetzenSiedieneueBatterieein.AchtenSiedabeiaufdiekorrektePolarität.
SchraubenSiediePlattewiederan.UmdieBatteriezuschonen,solltenSiedasKabelvomAudioeingangentfernen,
wenn Sie nicht spielen.
Batteriendürfenniemalserhitzt,inFeueroderWassergeworfenoderauseinandergenommenwerden.Nur
Akkumulatorendürfenwiederaufgeladenwerden.WennSiedasPedalfürlängereZeitnichtverwenden,
entnehmenSiedieBatterie.BeachtenSiebeimEntsorgenvonBatterienbittediediesbezüglichenGesetzeund
Bestimmungen in Ihrem Land.
Sustitución de la pila - Quite el gran tornillo del panel trasero del pedal y extráigalo. Quite la pila
gastadaycoloquelanuevapilaenlapinzadesujecióndelamisma,asegurándosedecolocarlaconla
polaridadcorrecta.Vuelvaainstalarelpaneltrasero.Paraahorrarcargaenlapila,quitelaclavijadela
toma de entrada cuando no toque.
Nunca caliente, ni tire al fuego o al agua una pila. Solo pueden ser recargadas las pilas
recargables. Extraiga la pila cuando no vaya a usar el pedal durante un período de tiempo largo.
Deshágase de las pilas de acuerdo a las normativas vigentes.
Los controles
BASS y TREBLE
Controlesdegravesyagudos.Añadagravesparaunamayorpegadaoredúzcalosunpocoparaun
sonidomáscompactoenlosgrandesrecintosacústicos.Añadaagudosparaunsonidomáscortante
enunamezclamuydensaoredúzcalosparaconseguirunsonidomássuave.
GAIN
Controla la cantidad de distorsión.
Los ajustes bajos le ofrecen una distorsión más compacta para partes rítmicas. Los más altos
son perfectos para solos y punteos.
LEVEL
Le permite ajustar el nivel global.
Selector Voicing
Disponededostiposdeajustedevozdistintos.Cuandoelinterruptorestéenlaposiciónde“arriba”,larespuesta
defrecuenciaserálamismaqueladelaseñaldeentrada,mientrasquecuandoestéenlaposiciónde“abajo”se
realzaránlosgravesdeunaformatotalmentenatural.Estoresultaperfectocuandoquieraquelaguitarraocupe
unagranpartedelespectrosónico.Porejemploparaunaguitarrarítmicaenuntrío.
www.tcelectronic.com - www.youtube.com/tcelectronic
(ESP) Introducción
¡Felicidades! Acaba de adquirir un pedal de distorsión que personifica el sonido rock y
representa todo lo bueno en los sonidos distorsionados. Este pedal le inspirará sus riffs,
punteos y solos en el futuro.
Este pedal le ofrece la felicidad al instante y se convertirá en su pedal de distorsión de cabecera.
Inicialmente,notendrámásqueconectarloscablesyempezaratocar,perosugrancantidadde
impresionantes sonidos harán que muy pronto esté adentrándose en sus profundidades. Desde
sonidos blues a otros de alta ganancia, pero todos ellos con distorsiones muy musicales, este pedal
hasidodiseñadoparalosguitarristasquelesgustanlascosasconuntoque(oextremadamente)
distorsionado. Con una circuitería completamente analógica, controles de tono de doble banda,
mandos de nivel y saturación y un interruptor de voicing que le permite retocar tanto la respuesta en
graves como la distorsión, todo lo tiene a su alcance desde los riffs de música heavy para hacer que
se levante todo un estadio hasta el sonido grunge más íntimo.
Conexión
Toma de entrada - Entrada mono de 6.3 mm para la
conexióndesuinstrumentoofuentedeseñal.
Si le queda poca carga a la pila le recomendamos que
extraiga el conector de esta toma para ahorrar carga
mientras no toque.
Toma de salida - Salida mono de 6.3 mm para la
conexión a otro pedal o directamente a un amplificador o
mesademezclas.
Toma de corriente-useunadaptadordecorriente9V
DC que tenga el siguiente tipo de conexión:
1 - On/off de efecto (bypass real)
2 - Toma de entrada en 6.3 mm mono
3 - Toma de salida en 6.3 mm mono
4 - Control de graves
5 - Control de agudos
6 - Control de ganancia
7 - Control de nivel
8 - Selector Voice
9 - Entrada de corriente (9 V DC)
www.tcelectronic.com - www.youtube.com/tcelectronic
(IT) Introduzione
Congratulazioni! Sei appena entrato in possesso di un pedale distorsore che personifica il rock
e rappresenta tutto il buono che c’è nel suono distorto. Dark Matter saprà ispirare i tuoi riff, i
lick e gli assoli per molti anni a venire.
Questopedalerestituisceunagratificazioneistantaneaecostituiràildistorsoredefinitivoperlatua
pedaliera.All’iniziotilimiteraiacollegareilpedaleediniziarearockeggiare,malesuediversesonorità
sapranno accompagnarti per sempre. Dai suoni bluesy-crunch agli effetti high-gain, ma sempre con
una distorsione davvero musicale: questo pedale è stato progettato per i chitarristi che amano le cose
leggermente (o estremamente) sporche. Dotato di un circuito interamente analogico, controlli di tono
dual-band,manopoleLeveleDriveedunselettoreVoiceutileperottimizzarelarispostadellebasse
frequenzeedelladistorsione,DarkMattersapràdotartideisuonisolisticicreamy-leadpiùtravolgenti,
passandodaaccattivantiheavy-riffdastadiofinoallepiùdrammatichesonoritàgrungemoderne.
La página se está cargando...
Transcripción de documentos
Connecting Input jack – 1/4 inch mono jack input. If you run the pedal on battery, we recommend removing the input jack to preserve battery power when you don’t play. Output jack – 1/4 inch mono jack output for connecting to another pedal or directly into an amp or mixer. Batteriewechsel: Lösen Sie die Batteriefachschraube auf der Unterseite des Pedals und entfernen Sie die Bodenplatte. Entnehmen Sie die alte Batterie und setzen Sie die neue Batterie ein. Achten Sie dabei auf die korrekte Polarität. Schrauben Sie die Platte wieder an. Um die Batterie zu schonen, sollten Sie das Kabel vom Audioeingang entfernen, wenn Sie nicht spielen. Batterien dürfen niemals erhitzt, in Feuer oder Wasser geworfen oder auseinandergenommen werden. Nur Akkumulatoren dürfen wieder aufgeladen werden. Wenn Sie das Pedal für längere Zeit nicht verwenden, entnehmen Sie die Batterie. Beachten Sie beim Entsorgen von Batterien bitte die diesbezüglichen Gesetze und Bestimmungen in Ihrem Land. Power in – Use a 9 VDC power supply with the following symbol: USER’S MANUAL BEDIENUNGSANLEITUNG MANUAL DE INSTRUCCIONES MANUALE D’USO MODE D’EMPLOI Important Safety Instructions 1 2 3 4 5 6 7 Read these instructions. Keep these instructions. Heed all warnings. Follow all instructions. Do not use this apparatus near water. Clean only with dry cloth. Do not block any ventilation openings. Install in accordance with the manufacturer’s instructions. 8 Do not install near heat sources such as radiators, heat registers, stoves, or other apparatus (including amplifiers) that produce heat. 9 Only use attachments/accessories specified by the manufacturer. 10 Refer all servicing to qualified service personnel. Servicing is required when the apparatus has been damaged in any way, such as power-supply cord or plug is damaged, liquid has been spilled or objects have fallen into the apparatus, the apparatus has been exposed to rain or moisture, does not operate normally, or has been dropped. These limits are designed to provide reasonable protection against harmful interference in residential installations. This equipment generates, uses and can radiate radio frequency energy and – if not installed and used in accordance with the instructions – may cause harmful interference to radio communications. However, there is no guarantee that interference will not occur in a particular installation. If this equipment does cause harmful interference to radio or television reception – which can be determined by turning the equipment off and on –, the user is encouraged to try correcting the interference by one or more of the following measures: • • • • Reorient or relocate the receiving antenna. Increase the separation between the equipment and the receiver. Connect the equipment to an outlet on a circuit different from the one to which the receiver is connected. Consult the dealer or an experienced radio/TV technician for help. Warning! • To reduce the risk of fire or electrical shock, do not expose this equipment to dripping or splashing and ensure that no objects filled with liquids, such as vases, are placed on the equipment. • Do not install in a confined space. Service • All service must be performed by qualified personnel. Caution: You are cautioned that any change or modifications not expressly approved in this manual could void your authority to operate this equipment. When replacing the battery follow the instructions on battery handling in this manual carefully. EMC/EMI This equipment has been tested and found to comply with the limits for a Class B Digital device, pursuant to part 15 of the FCC rules. Achtung! • Um die Gefahr eines Feuers oder eines elektrischen Schlages zu vermeiden, dürfen Sie dieses Gerät keinem tropfendem Wasser oder Spritzwasser aussetzen. Stellen Sie keine mit Flüssigkeiten gefüllten Behältnisse – wie beispielsweise Vasen – auf diesem Gerät ab. • Montieren Sie das Gerät nicht in einem vollständig geschlossenen Behälter oder Gehäuse. The Controls (ESP) Introducción BASS & TREBLE Bass/treble controls. Add bass for more punch or roll off a bit for a tighter sound on big cabinets. Add treble to cut through a dense mix or reduce to aim for a softer tone. ¡Felicidades! Acaba de adquirir un pedal de distorsión que personifica el sonido rock y representa todo lo bueno en los sonidos distorsionados. Este pedal le inspirará sus riffs, punteos y solos en el futuro. Gain Controls the amount of gain. Este pedal le ofrece la felicidad al instante y se convertirá en su pedal de distorsión de cabecera. Inicialmente, no tendrá más que conectar los cables y empezar a tocar, pero su gran cantidad de impresionantes sonidos harán que muy pronto esté adentrándose en sus profundidades. Desde sonidos blues a otros de alta ganancia, pero todos ellos con distorsiones muy musicales, este pedal ha sido diseñado para los guitarristas que les gustan las cosas con un toque (o extremadamente) distorsionado. Con una circuitería completamente analógica, controles de tono de doble banda, mandos de nivel y saturación y un interruptor de voicing que le permite retocar tanto la respuesta en graves como la distorsión, todo lo tiene a su alcance desde los riffs de música heavy para hacer que se levante todo un estadio hasta el sonido grunge más íntimo. Lower settings give tight distortion for rhythm parts. Higher settings are ideal for singing leads. LEVEL Sets the overall level. Voice Type selector Two Voice types are available. With the switch in “up” position, the frequency response is true to the input signal. With the switch in “down” position, the low-end frequencies are naturally boosted. This is excellent where the guitar is allowed to take up a great portion of the sonic spectrum, – e.g. for rhythm guitar in a trio. www.tcelectronic.com - www.youtube.com/tcelectronic 1 - On/off de efecto (bypass real) Changing battery – Unscrew the thumb-screw on the back of the pedal and detach the back-plate. Unmount the old battery and attach the new battery to the battery clip making sure the polarity is correct. Then remount the back-plate. To save battery life, remove the input jack when you don’t play. 2 - Toma de entrada en 6.3 mm mono 3 - Toma de salida en 6.3 mm mono Batteries must never be heated, taken apart or thrown into fire or water. Only rechargeable batteries can be recharged. Remove the battery when the pedal is not being used for a longer period of time. Dispose batteries according to local laws and regulations. 4 - Control de graves 5 - Control de agudos 6 - Control de ganancia Wartung • Alle Wartungsarbeiten müssen von einem hierfür 7 - Control de nivel qualifizierten Servicetechniker durchgeführt werden. 8 - Selector Voice Achtung: Änderungen an diesem Gerät, die im Rahmen dieser Anleitung nicht ausdrücklich zugelassen wurden, können das Erlöschen der Betriebserlaubnis für dieses Gerät zur Folge haben. For the customers in Canada: This Class B digital apparatus complies with Canadian ICES-003. Cet appareil numérique de la classe B est conforme à la norme NMB-003 du Canada. Folgen Sie beim Auswechseln der Batterie den Anweisungen zur Handhabung von Batterien in dieser Bedienungsanleitung. ¡Precaución! • Para reducir el riesgo de incendios o descargas eléctricas, no permita que este aparato quede expuesto a salpicaduras y asegúrese de no colocar sobre él ningún objeto que contenga líquidos, como un jarrón, para evitar que se pueda derramar. • No instale este aparato dentro de un espacio confinado, como encastrado en una librería. Attenzione! • Per ridurre il rischio di incendio o scossa elettrica, non esporre questo dispositivo allo sgocciolamento o agli schizzi di alcun liquido. Non posizionare sul dispositivo oggetti contenenti liquidi, come vasi o bicchieri. • Non installare in uno spazio ristretto. Reparaciones • Cualquier reparación debe ser realizada únicamente por personal de un servicio técnico oficial. Assistenza • Ogni intervento tecnico deve essere effettuato solo da personale qualificato. Cautela: Si avverte che qualsiasi cambiamento e modifica non espressamente approvata in questo manuale può annullare la vostra autorità di utilizzo del dispositivo. Atención: Le advertimos que cualquier cambio o modificación que no aparezca aprobada expresamente en este manual puede anular su autorización a utilizar este aparato. A la hora de sustituir la pila, siga cuidadosamente las instrucciones sobre manejo de la misma que aparecen en este manual. 9 - Entrada de corriente (9 V DC) (DE) Einleitung Conexión Herzlichen Glückwunsch! Sie haben ein Distortion-Pedal erworben, das die Idee von „Rock“ und großartig klingender Verzerrung verkörpert. Dieses Pedal wird Sie viele Jahre lang zu Riffs, Licks und Leads inspirieren. Toma de entrada - Entrada mono de 6.3 mm para la conexión de su instrumento o fuente de señal. Si le queda poca carga a la pila le recomendamos que extraiga el conector de esta toma para ahorrar carga mientras no toque. Dieses Pedal liefert ohne Umwege die gewünschten Sounds und lässt in Sachen Verzerrung keine Wünsche offen. Anfangs werden Sie es wahrscheinlich einfach nur einstöpseln und loslegen. Später werden Sie feststellen, dass es klanglich auch über den ersten Tag hinaus viel zu bieten hat. Vom bluesigen Crunchsound bis zu „High Gain“, aber stets musikalischen Sounds: Dieses Pedal bietet jedem etwas, ob es nun ein bisschen oder verdammt dreckig klingen soll. Mit seinen rein analogen Schaltkreisen, der Zweiband-Klangregelung, den Pegel- und Drive-Reglern sowie einem Voicing-Schalter, mit dem Sie die Basswiedergabe und Verzerrung anpassen können deckt dieses Pedal das volle Spektrum ab – von seidigen Leadsounds über riff-lastigen Stadionrock bis zu düster-morbidem Grunge. Toma de salida - Salida mono de 6.3 mm para la conexión a otro pedal o directamente a un amplificador o mesa de mezclas. Toma de corriente - use un adaptador de corriente 9 V DC que tenga el siguiente tipo de conexión: Per sostituire la batteria, seguire attentamente le procedure fornite all’interno di questo manuale. www.tcelectronic.com - www.youtube.com/tcelectronic Attention Danger! • Pour éviter tout risque d’électrocution ou d’incendie, ne pas exposer cet appareil à quelque source liquide (goûtes d’eau, projections liquides,etc.) et veillez à ne poser aucun objet contenant un liquide sur l’appareil. • Do not install in a confined space. 1 – Effekt an/aus (True Bypass) Los controles 2 – Eingang (6,3 mm-Klinkenbuchse / mono) BASS y TREBLE Controles de graves y agudos. Añada graves para una mayor pegada o redúzcalos un poco para un sonido más compacto en los grandes recintos acústicos. Añada agudos para un sonido más cortante en una mezcla muy densa o redúzcalos para conseguir un sonido más suave. Service • Confiez toutes les opérations de maintenance à un personnel qualifié. 5 – TREBLE-Regler 3 – Ausgang (6,3 mm-Klinkenbuchse / mono) 4 – BASS-Regler 6 – GAIN-Regler 7 – LEVEL-Regler Attention: Toute modification apportée à l’appareil et qui n’est pas expressément préconisée dans ce manuel invalide votre droit à utiliser cet appareil. 8 – Voice-Wähler 9 – Netzeingang (9 V Gleichspannung) Lors du remplacement de la pile, suivez attentivement les instructions spécifiées dans ce manuel. GAIN Controla la cantidad de distorsión. Los ajustes bajos le ofrecen una distorsión más compacta para partes rítmicas. Los más altos son perfectos para solos y punteos. LEVEL Le permite ajustar el nivel global. Selector Voicing Dispone de dos tipos de ajuste de voz distintos. Cuando el interruptor esté en la posición de “arriba”, la respuesta de frecuencia será la misma que la de la señal de entrada, mientras que cuando esté en la posición de “abajo” se realzarán los graves de una forma totalmente natural. Esto resulta perfecto cuando quiera que la guitarra ocupe una gran parte del espectro sónico. Por ejemplo para una guitarra rítmica en un trío. (EN) Introduction Anschlüsse vornehmen Congratulations! You have just bought a distortion pedal that personifies rock and represents all that is good about distorted tones. This pedal will inspire your riffs, licks and leads for years to come. Audioeingang: Eingang (6,3 mm-Klinkenbuchse / mono). Wenn Sie das Gerät per Batterie mit Strom versorgen, empfehlen wir Ihnen, das Audiokabel aus der Eingangsbuchse abzuziehen, wenn Sie nicht spielen. This pedal defines instant gratification and will become the go-to distortion pedal on your board. Initially, you simply plug it in and start rocking, but its many great sounds will have you playing with it for years to come. From bluesy crunch to hi-gain, but always very musical distortion sounds, this pedal was designed for the guitarists who like things a bit (or extremely) dirty. Featuring an all-analog circuit, dual-band tone controls, level and drive knobs and a voicing switch to tweak both bass response and distortion, you are set from creamy leads over riff-heavy stadium rock to modern angst-ridden grunge. Wenn Sie das Gerät per Batterie mit Strom versorgen, empfehlen wir Ihnen, das Audiokabel aus der MONO-Eingangsbuchse abzuziehen, wenn Sie nicht spielen. Audioausgang: Verbinden Sie diese 6,3 mm-Buchse über ein Monoklinkenkabel mit dem nächsten Pedal im Signalweg oder direkt mit Ihrem Verstärker oder Mischpult. Sustitución de la pila - Quite el gran tornillo del panel trasero del pedal y extráigalo. Quite la pila gastada y coloque la nueva pila en la pinza de sujeción de la misma, asegurándose de colocarla con la polaridad correcta. Vuelva a instalar el panel trasero. Para ahorrar carga en la pila, quite la clavija de la toma de entrada cuando no toque. Nunca caliente, ni tire al fuego o al agua una pila. Solo pueden ser recargadas las pilas recargables. Extraiga la pila cuando no vaya a usar el pedal durante un período de tiempo largo. Deshágase de las pilas de acuerdo a las normativas vigentes. Netzeingang: Verwenden Sie ein Netzteil (9 V Gleichspannung) mit dem folgenden Symbol: www.tcelectronic.com - www.youtube.com/tcelectronic 1 - Effect on/off (true bypass) (DE) Die Regler (IT) Introduzione 2 - 1/4 inch mono jack input BASS und TREBLE Congratulazioni! Sei appena entrato in possesso di un pedale distorsore che personifica il rock e rappresenta tutto il buono che c’è nel suono distorto. Dark Matter saprà ispirare i tuoi riff, i lick e gli assoli per molti anni a venire. 4 - Bass control Dies sind die Regler für die Bass- und Höhenanteile des Signals. Sie können die Bässe betonen, um einen etwas druckvolleren Sound zu erhalten – oder sie etwas zurücknehmen, wenn Sie mit großen Boxen arbeiten. Heben Sie die Höhen an, damit sich Ihre Gitarre in einem dichten Mix durchsetzt, oder senken Sie den Höhenanteil, damit der Sound etwas weicher wird. 5 - Treble control GAIN-Regler 3 - 1/4 inch mono jack output 6 - Gain control 7 - Level control 8 - Voice selector 9 - Power in (9VDC) Steuert die Intensität der Verzerrung. Für Rhythmusgitarre-Parts sollten Sie niedrigere Einstellungen verwenden. Höhere Einstellungen eignen sich für „singende“ Leadsounds. Questo pedale restituisce una gratificazione istantanea e costituirà il distorsore definitivo per la tua pedaliera. All’inizio ti limiterai a collegare il pedale ed iniziare a rockeggiare, ma le sue diverse sonorità sapranno accompagnarti per sempre. Dai suoni bluesy-crunch agli effetti high-gain, ma sempre con una distorsione davvero musicale: questo pedale è stato progettato per i chitarristi che amano le cose leggermente (o estremamente) sporche. Dotato di un circuito interamente analogico, controlli di tono dual-band, manopole Level e Drive ed un selettore Voice utile per ottimizzare la risposta delle basse frequenze e della distorsione, Dark Matter saprà dotarti dei suoni solistici creamy-lead più travolgenti, passando da accattivanti heavy-riff da stadio fino alle più drammatiche sonorità grunge moderne. LEVEL-Regler Mit diesem Regler legen Sie den Ausgangspegel fest. Voice Type-Wähler Es stehen zwei Voice-Varianten zur Verfügung: Wenn der Schalter nicht gedrückt ist, entspricht der Frequenzgang des Effekts dem des Eingangssignals. Wenn der Schalter gedrückt ist, werden die Bassfrequenzen angehoben. Diese Einstellung empfiehlt sich für Situationen, in denen der Gitarre ein größerer Anteil des Frequenzspektrums zugestanden wird – zum Beispiel, wenn es sich um die Rhythmusgitarre in einem Trio handelt. www.tcelectronic.com - www.youtube.com/tcelectronic-
 1
1
-
 2
2


tc electronic Dark Matter El manual del propietario
- Categoría
- Pedal de música
- Tipo
- El manual del propietario
- Este manual también es adecuado para