
1

2

3
.17 .18
. 7
. 6
. 5
. 4
. 3
. 2
.1
Cyborg
®
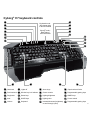
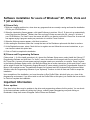
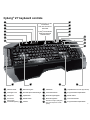
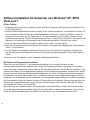
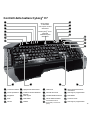
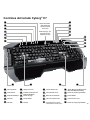
V.7 keyboard controls
Keyboard mode :
Only human side
of face illuminated
Cyborg
®
mode :
Both sides of
face illuminated
. 20 .19
.12
.11
.10
. 9
. 8
.16
.15
.14
.13
. 5
. 4
. 3
. 2
.1
Next track
Previous track
Play/pause
Mute
Volume
.10
. 9
. 8
. 7
. 6
Lights off
Window key lock indicator
Game keys
WASD keys
Keyboard
.15
.14
.13
.12
.11
Arrow keys
Cursor controls
Lighting brightness
Lighting color
Increase/decrease (brightness)
or scroll through (color)
. 20
.19
.18
.17
.16
Caps/num/scroll locks
Programmable gaming keys
WASD keys
Cursor contols
Programmable gaming keys

4
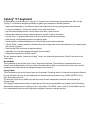
Cyborg
®
V.7 keyboard
Congratulations on purchasing your Cyborg
®
V.7 keyboard. As well as being a high performance ofce tool the
Cyborg
®
V.7 keyboard is designed specically for gaming and includes the following features:
Independent backlighting - set different colours and brightness for the key gaming areas of the keyboard•
Tri-colour backlighting - choose from shades of red, green and amber•
Key illumination settings ensure colours remain even after a system reboot•
Enhanced multiple key presses in gaming areas for complex in-game commands•
Cyborg•
®
keys - 12 programmable keys for all your favourite macros and commands
Hard wearing, metal-plated key caps in key gaming areas•
Touch-sensitive, backlit dashboard panel to control lighting and media commands•
Cyborg•
®
Mode - instantly disable the Windows keys and congure the colour and brightness of your gaming keys
at the touch of a button
Pass-through USB, audio and microphone sockets •
Adjustable wrist rest and keyboard rake angle (front and back)•
Gold-plated connectors for USB and audio•
The two keyboard modes - Normal and Cyborg
®
mode - are selected by pressing the Cyborg
®
head icon on the
control panel.
Normal Mode
This is indicated by the left half of the Cyborg
®
head icon illuminated. The media keys, brightness and colour
controls, and keyboard lights on/off icon are also illuminated dimly. When in normal mode only the colour and the
brightness of the keyboard can be changed and game keys are not lit.
Cyborg
®
Mode
This is indicated by the whole Cyborg
®
head icon illuminated. Everything that is lit in Normal mode plus the Widows
key lock indicator and icons to select lighting for the individual key areas (Game keys, WASD, QWERTY, Arrow
keys, Num-pad) are also lit.
The Num pad, Game keys, WASD keys and Arrow keys all have independent controlled coloured lighting in
Cyborg
®
mode.
The Cyborg® keyboard also includes 12 gaming keys which are programmable using Cyborg
®
Smart Technology
software and media keys for controlling music or video tracks. The WASD, cursor, Cyborg
®
and NumPad keys can
be lit independently from the rest of keyboard to highlight commonly used gaming keys.

5
Installing your Cyborg
®
V.7 keyboard
First plug the USB cable marked “K/B” into one of your PC’s free USB ports. If you intend to use headphones, 1.
speakers, headset or microphone, also plug the pink and green mini jackplugs into the corresponding audio in
and out sockets of your PC. Now plug your headset, speaker cables etc into the pink audio in and green audio
out sockets at the rear right side of your keyboard.
The Cyborg2.
®
keyboard’s second USB cable marked “Ext” functions as a USB extension. Plug the cable into one
of your PC’s free USB ports and then plug a USB device directly into the USB port on the rear right side of the
keyboard. The USB device will now communicate directly with your PC.
To change the lighting settings of your Cyborg3.
®
keyboard, rst select either Normal mode or Cyborg
®
mode by
pressing the Cyborg
®
face on the keyboard’s control panel. In Normal mode you can only change the colour
and the brightness of the whole keyboard (Game keys are not lit). To change the colour of the lighting, press the
colour icon and then press “+” or “-” to scroll through the colours. To change the brightness of the lighting, press
the brightness icon and then increase or decrease the brightness by pressing “+” or “-”.
In Cyborg
®
mode, you can change the lighting colour and brightness of specic areas of your keyboard. Select
Cyborg
®
mode by pressing the Cyborg
®
face. Now, select the part of the keyboard for which you want to change
the lighting effects and change the colour by pressing the colour icon on the control panel and then pressing
“+” or “-” to scroll through the colours. To change the brightness of the lighting, press the brightness icon and
then increase or decrease the brightness by pressing “+” or “-”. Each time you want to change the brightness of
a particular area of the keyboard, select the area by pressing the control panel, and then repeating the above
steps to change colour or brightness. The colour settings you choose will remain even after a system reboot or
unplugging the keyboard.
Please note:
The Cyborg
®
keyboard’s 12 programmable keys and volume light indicators will not function until you have
installed the keyboard drivers. Please install the Cyborg
®
keyboard drivers and Smart Technology software for
complete functionality.
System Compatibility
PC running Windows XP/XP64/Vista/7 (all versions)

6
Software installation for users of Windows
®
XP, XP64, Vista and
7 (all versions)
A) Drivers Only
With your computer switched on, close down any programs that are currently running and insert the Installation 1.
CD into your CD-ROM drive.
When the Introduction Screen appears, click Install Software to continue. If the C D does not run automatically, 2.
select Start from the Windows
®
Taskbar, then Run and type D:\Setup.exe and click OK - where D:\ is letter of
your CD-ROM drive. For Vista/7 users, the screen will ask Do you want to run this le? Press Run. A screen will
now appear saying A program needs your permission to continue. Press Continue.
When the Welcome screen appears, click Next to continue. 3.
After reading the Disclaimer, select the I accept the terms of the Disclaimer option and click Next to continue. 4.
At the Registration screen, select Check this box to register now and follow the on-screen instructions, or you 5.
can choose to select this option later.
Click on Finish to complete the installation. 6.
B) Drivers and Programming Software
Follow points 1 - 6 of the install procedure in A), then at the Software Setup screen, select Install the Cyborg
®
ST
Programming Software and click Next. For Vista/ 7 users, the screen will once again ask Do you want to run this
file? Press Run. A screen will now appear saying A program needs your permission to continue. Press Continue.
In the following Software Setup screen, click Next and follow the on-screen instructions. At this point Vista/7 users
will be asked to install the Programming Support Bus and XP users asked to install the Programmable Support for
Mouse, HID-compliant mouse, Programmable Support for Keyboard and HID Keyboard Device (these are what
Windows calls the Programming elements of your keyboard). Continue to click on Next and Finish to accept the
installation.
Upon completion of the installation, you have the option to Run Profile Editor, which will give you a view of the
programming environment. If you do not wish to see the Profile Editor at this point, just uncheck the box and click
on Finish to complete the installation.
Important Information
Driver updates
From time to time there may be updates to the driver and programming software for this product. You can check
for the latest software updates by visiting the Cyborg
®
website (www.cyborggaming.com) and clicking on
Downloads. A drop down menu will appear. Select Drivers and Software.

7
.17 .18
. 7
. 6
. 5
. 4
. 3
. 2
.1
. 5
. 4
. 3
. 2
.1
Cyborg
®
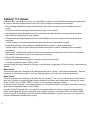
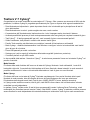
V.7 keyboard controls
Nächster Track
Vorheriger Track
Play/pause
Ton an/aus
(Stummtaste)
Lautstärkeregelung
.10
. 9
. 8
. 7
. 6
Beleuchtung aus
Tastaturmodus: Nur die
menschliche
Seite des Gesichts ist
beleuchtet
Cyborg
®
Modus: Beide
Seiten des Gesichts
sind beleuchtet
Windows-Sperrtastenanzeiger
Spieletasten
WASD-Tasten
Tastatur
.15
.14
.13
.12
.11
Pfeiltasten
Cursorsteuertasten
Beleuchtungshelligkeit
Beleuchtungsfarbe
Erhöhen/verringern (Helligkeit)
oder durch Optionen scrollen
(Farbe)
. 20
. 20 .19
.19
.18
.17
.16
Caps/Num/Scroll-Locks (Sperrtasten)
Programmierbare Spieletasten
WASD-Tasten
Cursorsteuertasten
Programmierbare Spieletasten
.12
.11
.10
. 9
. 8
.16
.15
.14
.13

8
Cyborg
®
V.7 Tastatur
Herzlichen Glückwunsch zum Kauf Ihres Cyborg
®
V.7 Keyboards. Die Cyborg
®
-Tastatur ist nicht nur ein
leistungsstarkes Büro-Tool, sondern wurde auch speziell für die Verwendung bei Spielen konzipiert und verfügt
über die folgenden Funktionen:
Unabhängige Hintergrundbeleuchtung - Sie können verschiedene Farben und Helligkeiten für die •
Hauptspielbereiche der Tastatur einstellen
Dreifarbige Hintergrundbeleuchtung - Wählen Sie aus Rot-, Grün- und Orangeschattierungen aus•
Beleuchtungseinstellungen der Tasten stellen sicher, dass die Farben sogar nach einem Systemneustart gleich •
bleiben
Verbesserte multiple Tastendruckfunktionen in Spielbereichen für komplexe Befehle während des Spielens•
Cyborg•
®
-Tasten - 12 programmierbare Tasten für alle Ihre Lieblingsmakros und -befehle
Robuste Tasten mit Metallüberzug in Hauptspielbereichen •
Berührungsempndliche, hintergrundbeleuchtete Dashboard-Konsole zur Steuerung der Beleuchtung und der •
Medienbefehle
Cyborg•
®
-Modus - umgehende Deaktivierung der Windows-Tasten und Kongurierung der Farben und Helligkeit
Ihrer Spieletasten per Knopfdruck
Durchlauf-USB, Audio- und Mikrofonstecker•
Verstellbare Handballenauage und Tastatur-Neigungswinkel (vorne und hinten)•
USB- und Audio-Anschlüsse mit Goldüberzug •
Die zwei Tastaturmodi - Normalmodus und Cyborg
®
-Modus - werden durch Drücken des Cyborg
®
kopf-Symbols auf
der Systemsteuerung ausgewählt.
Normalmodus
Der Normalmodus wird dadurch angezeigt, dass die linke Hälfte des Cyborg
®
kopf-Symbols beleuchtet ist. Die
Medientasten, Helligkeits- und Farbsteuerungen und das Ein/Aus-Symbol für die Tastaturbeleuchtung sind
ebenfalls schwach beleuchtet. Im Normalmodus können nur die Farbe und Helligkeit der Tastatur geändert werden.
Die Spieletasten sind nicht beleuchtet.
Cyborg
®
-Modus
Der Cyborg
®
-Modus wird dadurch angezeigt, dass der gesamte Cyborg
®
kopf beleuchtet ist. Alle Funktionen,
die im Normalmodus beleuchtet sind, plus der Windows-Sperrtastenanzeiger und Symbole zur Auswahl von
Beleuchtungseinstellungen für individuelle Tastenbereiche (Spieletasten, WASD, QWERTY/QWERTZ, Pfeiltasten,
Ziffernblock) sind beleuchtet.
Der Ziffernblock, die Spieletasten, WASD-Tasten und Pfeiltasten verfügen alle über unabhängig gesteuerte, farbige
Beleuchtung im Cyborg
®
-Modus.
Die Cyborg
®
-Tastatur bietet außerdem 12 programmierbare Tasten, die unter Verwendung der Smart Technology
Software programmiert werden können, sowie Medientasten für die Steuerung von Musik- oder Video-Tracks. Die

9
WASD-, Cursor-, Cyborg
®
- und Zifferntasten können unabhängig vom Rest der Tastatur beleuchtet werden, um
häug verwendete Spieletasten hervorzuheben.
Installierung Ihrer Cyborg
®
-Tastatur
Stecken Sie zuerst das USB-Kabel mit der Markierung “K/B” in einen freien USB-Port Ihres PCs. Wenn 1.
Sie beabsichtigen, Kopfhörer, Lautsprecher, Headsets oder Mikrofone zu verwenden, stecken Sie bitte die
pinkfarbenen und grünen Miniklinkenbuchsen in die entsprechenden Audio-Eingabe/Ausgabe-Stecker Ihres
PCs. Stecken Sie jetzt Ihre Headset-, Lautsprecherkabel etc. in die pinkfarbenen Audio-Eingabestecker und
grünen Audio-Ausgabestecker an der hinteren rechten Seite Ihrer Tastatur.
Das zweite USB-Kabel der Cyborg2.
®
-Tastatur mit der Markierung “Ext” fungiert als USB-Erweiterung. Stecken Sie
das Kabel in einen freien USB-Port Ihres PCs und schließen Sie dann ein USB-Gerät direkt an den USB-Port an
der hinteren rechten Seite der Tastatur an. Das USB-Gerät wird jetzt direkt mit Ihrem PC kommunizieren.
Um die Beleuchtungseinstellungen Ihrer Cyborg3.
®
-Tastatur zu ändern, wählen Sie zuerst entweder den
Normalmodus oder den Cyborg
®
-Modus, indem Sie auf das Cyborg
®
-Gesicht auf der Systemsteuerung der
Tastatur drücken. Im Normalmodus können Sie nur die Farbe und Helligkeit der gesamten Tastatur ändern
(Spieletasten sind nicht beleuchtet). Um die Beleuchtungsfarbe zu ändern, drücken Sie auf das Farbsymbol
und dann auf “+” oder “-”, um durch die Farboptionen zu scrollen. Um die Helligkeit der Beleuchtung zu ändern,
klicken Sie auf das Kontrastsymbol und erhöhen bzw. verringern Sie die Helligkeit durch Drücken von “+” oder
“-”.
Im Cyborg
®
-Modus können Sie die Beleuchtungsfarbe und -helligkeit von bestimmten Bereichen Ihrer Tastatur
verändern. Wählen Sie den Cyborg
®
-Modus, indem Sie auf das Cyborg
®
-Gesicht drücken. Wählen Sie jetzt
den Teil der Tastatur aus, für den Sie die Beleuchtungseffekte ändern möchten, und ändern Sie die Farbe,
indem Sie auf das Farbsymbol auf der Systemsteuerung drücken und dann “+” oder “-” drücken oder durch
die Farboptionen scrollen. Um die Helligkeit der Beleuchtung zu ändern, klicken Sie auf das Kontrastsymbol
und erhöhen bzw. verringern Sie die Helligkeit durch Drücken von “+” oder “-”. Jedes Mal, wenn Sie die
Helligkeit eines bestimmten Tastaturbereiches ändern möchten, wählen Sie den Bereich durch Drücken der
Systemsteuerung aus und wiederholen Sie dann die oben genannten Schritte zur Änderung von Farb- oder
Kontrasteinstellungen. Die Farbeinstellungen, die Sie auswählen, bleiben sogar nach einem Systemneustart
oder Herausziehen des Tastaturkabels unverändert.
Bitte beachten Sie:
Die 12 programmierbaren Tasten und Lautstärke-Lichtanzeiger der Cyborg
®
-Tastatur funktionieren erst dann, wenn
Sie die Tastatur-Treiber installiert haben. Bitte installieren Sie die Cyborg
®
-Tastatur-Treiber und Cyborg
®
Smart
Technology Software, um vollständige Funktionalität zu erzielen.
Systemkompatibilität
PC unter Windows XP/XP64/Vista/7

10
Softwareinstallation für Anwender von Windows
®
XP, XP64
Vista und 7
A) Nur Treiber
Schalten Sie den Computer ein, schließen Sie alle laufenden Programme und legen Sie die Installations-CD in 1.
Ihr CD-ROM-Laufwerk.
Wenn der Einführungsbildschirm erscheint, klicken Sie auf “Software installieren”, um fortzufahren. Falls die CD 2.
nicht automatisch anläuft, wählen Sie die Start-Schaltäche von Windows
®
und dann “Ausführen”, tippen “D:\
Setup.exe” ein und klicken auf OK. Dabei steht “D:\” für den Buchstaben Ihres CD-ROM-Laufwerks. Vista/7-
Anwender werden gefragt: “Möchten Sie diese Datei ausführen?” Klicken Sie auf “Ausführen”. Jetzt erscheint die
Meldung “Zur Fortsetzung des Programms ist Ihre Zustimmung erforderlich”. Klicken Sie auf “Weiter”.
Wenn der Willkommensbildschirm erscheint, klicken Sie auf “Weiter”, um fortzufahren. 3.
Nach dem Lesen des Rechtsverzichts wählen Sie die Option “Ich akzeptiere die Bedingungen” und klicken auf 4.
“Weiter”, um fortzufahren.
Auf dem Registrierungsbildschirm wählen Sie “Klicken Sie hier, um sich jetzt zu registrieren” und folgen Sie 5.
den Anweisungen auf dem Bildschirm; Sie können sich jedoch auch dafür entscheiden, diese Option später zu
wählen.
Klicken Sie auf “Fertigstellen”, um die Installation vollständig durchzuführen. 6.
B) Treiber und Programmiersoftware
Gehen Sie nach den Punkten 1 - 6 des Installationsverfahrens in A) vor, wählen Sie dann auf dem
Softwareinstallationsbildschirm “Installieren der Cyborg
®
ST-Programmiersoftware” und klicken Sie auf “Weiter”.
Vista/7-Anwender werden wieder gefragt: “Möchten Sie diese Datei ausführen?” Klicken Sie auf “Ausführen”. Jetzt
erscheint die Meldung “Zur Fortsetzung des Programms ist Ihre Zustimmung erforderlich”. Klicken Sie auf “Weiter”.
Klicken Sie auf dem folgenden Softwareinstallationsbildschirm auf “Weiter” und folgen Sie den Anweisungen auf
dem Bildschirm. An dieser Stelle werden Vista/ 7-Anwender aufgefordert, den Programmable Support for Bus zu
installieren, und XP-Anwender werden aufgefordert, die Programmable Support für Maus, die HID-konforme Maus,
das Programmable Support für Tastatur und das HID Tastatur Device zu installieren. (Dies sind Komponenten, die
Windows die “Programmierelemente” Ihres Cybrog®-Controllers nennt.) Fahren Sie fort, indem Sie auf “Weiter”
und “Abschließen” klicken, um die Installation.
Nach Abschluss der Installation erhalten Sie die Möglichkeit, den Prole Editor zu starten, der Ihnen einen Blick
auf die Programmierumgebung gestattet. Wenn Sie den Prole Editor zu diesem Zeitpunkt nicht sehen möchten,
heben Sie einfach die Markierung auf und klicken auf “Abschließen”, um die Installation fertig zu stellen.

11
.17 .18
. 7
. 6
. 5
. 4
. 3
. 2
.1
. 5
. 4
. 3
. 2
.1
Cyborg
®
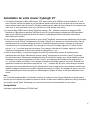
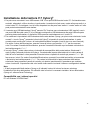
V.7 keyboard controls
Piste suivante
Piste précédente
Play/pause
Muet
Volume
.10
. 9
. 8
. 7
. 6
Lumières éteintes
Mode Clavier : Coté
humain du visage
illuminé seulement.
Mode Cyborg
®
: Les
deux cotés
sont illuminés
Indicateur de verrouillage des
touches Windows
Touches de Jeu
Touches ZQSD
Clavier
.15
.14
.13
.12
.11
Touches de directions
Contrôles du curseur
Intensité de l'éclairage
Couleur de l'éclairage
Augmenter/réduire (intensité)
ou défiler (couleur)
. 20
. 20 .19
.19
.18
.17
.16
Maj/num/scroll locks
Touches de jeu programmables
Touches ZQSD
Contrôles du curseur
Touches de jeu programmables
.12
.11
.10
. 9
. 8
.16
.15
.14
.13

12
Cyborg
®
V.7 clavier
Félicitation pour votre achat du Cyborg
®
V.7 Keybord.Bien qu’étant un outil de bureautique hautement performant,
le Cyborg
®
keyboard est spécialement conçu pour le jeu et intègre les caractéristiques suivantes :
Rétro éclairage indépendant (règle l’intensité et les couleurs pour les zones de touches dédiées au jeu du •
clavier)
Trois couleurs de rétro éclairage (choisissez parmi rouge, vert ou ambre)•
Les réglages de rétro éclairage des touches vous assurent la conservation de vos paramètres de couleurs •
même après le redémarrage de votre système
Raccourcis clavier étendus dans les zones du clavier dédiées au jeu pour exécuter des commandes de jeu •
complexes
Touches Cyborg•
®
(12 touches programmables pour vos macros et commandes favorites)
Revêtement renforcé, touches plaquées métalliques dans les zones du clavier dédiées au jeu•
Toucher sensitif, fenêtre de rétro éclairage du tableau de bord pour contrôler l’éclairage et les commandes •
multimédias
Mode Cyborg•
®
(Désactivation instantanée des touches Windows et conguration de la couleur et de l’intensité
lumineuse de vos touches de jeu sur un simple appui de touche)
Entrée USB, audio et microphone•
Repose poignet ajustable et réglage du l’angle du clavier (avant et arrière)•
Connecteurs plaqués or pour l’USB et l’audio•
Les deux modes du clavier (Normal et Cyborg
®
) se sélectionnent en appuyant sur l’icône ‘Cyborg
®
’ du panneau de
contrôle.
Mode Normal
Ce mode est indiqué par l’éclairage de la partie gauche de l’icône ‘Cyborg
®
’. Les touches ‘multimédias’, ‘intensité
lumineuse’ et ‘contrôle des couleurs’, et l’icône ‘éclairage clavier on/off’ sont aussi éclairées légèrement.
Mode Cyborg
®
Ce mode est indiqué par l’éclairage de la totalité de l’icône Cyborg
®
. Tout ce qui est allumé dans le mode Normal,
ainsi que l’indicateur de vérrouillage des touches Windows et les icônes pour sélectionner l’éclairage des ‘zones
de jeu’ (Touches de jeu, ZQSD, AZERTY, Flèches, Pavé numérique) sont aussi éclairés.
La touche ‘pavée numérique’, les touches dédiées au jeu, les touches ZQSD et les flèches, ont toutes un contrôle
des couleurs indépendant dans le mode Cyborg
®
.
Le clavier Cyborg
®
comporte aussi 12 touches de jeu programmables en utilisant le logiciel de programmation
Smart Technology et les touches multimédias pour contrôler la musique et les pistes vidéo. Les touches ZQSD,
Curseur, Cyborg
®
et NumPad peuvent être éclairées indépendamment du reste du clavier pour faire ressortir les
touches communément utilisées dans les jeux.

13
Installation de votre clavier Cyborg® V.7
Tout d’abord, branchez le câble USB marqué “ K/B “ dans un des ports USB libre de votre ordinateur. Si vous 1.
avez l’intention d’utiliser un casque ou un microphone, branchez aussi les deux mini jacks vert et rose dans les
prises entrée et sortie audio de votre PC. Branchez maintenant les câbles de votre casque et micro dans la prise
audio rose ‘in’ et la sortie audio verte ‘out’ à l’arrière sur le coté droit de votre clavier.
Le second câble USB de votre Cyborg2.
®
Keyboard, marqué “ Ext “, fonctionne comme une extension USB.
Branchez le Câble dans un des ports USB libre de votre PC puis branchez un périphérique USB directement
dans le port USB situé à l’arrière et à droite du clavier. Le périphérique USB va maintenant communiqué
directement avec votre PC.
Pour modier les réglages de luminosités de votre Cyborg3.
®
Keyboard, commencez par sélectionner soit le mode
Normal ou le mode Cyborg
®
en appuyant sur le bouton Cyborg
®
sur le panneau de contrôle du clavier. Dans le
mode Normal vous ne pouvez changer la couleur et l’intensité lumineuse que pour l’ensemble du clavier (les
Touches de Jeu ne sont pas allumées). Pour changer la couleur de l’éclairage, appuyez sur l’icône ‘Couleur’
puis sur ‘+’ ou ‘-’ pour faire permuter les couleurs. Pour changer l’intensité de l’éclairage, appuyez sur l’icône
‘Intensité’ puis augmentez ou diminuez l’intensité en appuyant sur ‘+’ ou ‘-’.
Dans le mode Cyborg4.
®
, vous pouvez changer la couleur et l’intensité de la couleur de certaines zones
spéciques de votre clavier. Sélectionnez le mode Cyborg
®
en appuyant sur le bouton Cyborg
®
du panneau
de contrôle du clavier. Sélectionnez maintenant la zone du clavier pour laquelle vous voulez modier les effets
d’éclairage et la couleur en appuyant sur l’icône ‘Couleur’ sur le panneau de contrôle puis en appuyant sur ‘+’
ou ‘-’ pour faire déler les couleurs. Pour changer l’intensité de l’éclairage, appuyez sur l’icône ‘Intensité’ puis
augmentez ou diminuez l’intensité en appuyant sur ‘+’ ou ‘-’. A chaque fois que vous voulez changer l’intensité
lumineuse d’une zone particulière du clavier, sélectionnez la zone en appuyant sur le panneau de contrôle, puis
répétez les étapes ci-dessus pour modier l’intensité lumineuse et la couleur. Les réglages de couleur que vous
avez paramétrés seront conservés après un redémarrage du système et même si vous avez débranché votre
clavier.
Note :
Les 12 touches programmables et l’indicateur lumineux de volume de votre Cyborg
®
Keyboard ne fonctionneront
pas tant que vous n’aurez pas installé les pilotes du clavier. Veuillez donc installer les pilotes du Cyborg
®
Keyboard
et le logiciel Cyborg
®
Smart Technologie pour avoir accès à toutes les fonctionnalités de votre clavier.
Compatibilité
Ordinateur exploitant Windows XP/XP64/Vista/7

14
Installation sous Windows
®
XP, XP64 Vista et 7
A) Drivers
Votre ordinateur allumé, fermez tous les programmes en cours et insérez le CD d’installation dans votre lecteur 1.
CD-ROM.
Quand l’écran d’introduction apparaît, cliquez sur Installer le Logiciel pour continuer. Si le CD ne tourne pas 2.
automatiquement, cliquez sur Démarrer dans la barre des tâches Windows
®
, et tapez D:\Setup.exe puis cliquez
sur OK (la lettre D correspond généralement à votre lecteur Cd-rom). Sous Vista/7, la question Voulez-vous
exécuter ce chier ? s’afche à l’écran. Appuyez sur Exécuter. Un écran apparaît alors disant qu’un programme
a besoin de votre permission pour continuer. Cliquez sur Continuer.
Quand l’écran de Bienvenue apparaît, cliquez sur Suivant pour continuer.3.
Après avoir lu la Clause de responsabilité, sélectionnez J’accepte les termes de la clause et cliquez sur Suivant 4.
pour continuer.
À l’écran d’enregistrement, sélectionnez Cocher la case pour enregistrer maintenant ou vous pouvez choisir de 5.
sélectionner cette option plus tard.
Cliquez sur Terminer pour achever l’installation.6.
B) Drivers et Logiciel de programmation
Suivez les points 1 à 6 de la procédure d’installation du point A), puis, à l’écran Installation du logiciel, sélectionnez
Installer le logiciel de programmation Cyborg
®
ST et cliquez sur Suivant. Sous Vista/7, la question suivante
s’afchera de nouveau à l’écran : Voulez-vous exécuter ce chier? Appuyez sur Entrer. A présent un nouvel écran
va apparaître précisant qu’un programme a besoin de votre permission pour continuer. Appuyez sur Continuer.
A l’écran d’installation logiciel suivant, cliquez sur Suivant et suivez les instructions. A ce moment là, on demande
sous Vista/7 d’installer Programmable Support pour Bus et sous XP d’installer Programmable Support pour souris,
HID-compliant mouse, Programmable Support pour Keyboard and HID keyboard Device (c’est ce que Windows
appelle les éléments de Programmation de vos périphériques). Continuez en cliquant sur Suivant et Terminer pour
achever l’installation.
Une fois l’installation achevée, vous pouvez choisir l’option Afcher l’Editeur de Prol qui vous donnera un aperçu
de l’environnement de programmation. Si vous ne souhaitez pas voir l’Editeur de Prol à ce stade, décochez
simplement la case et cliquez sur Terminer pour achever l’installation.
.17 .18
. 7
. 6
. 5
. 4
. 3
. 2
.1
. 5
. 4
. 3
. 2
.1
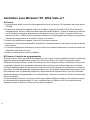
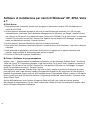
Controlli della tastiera Cyborg
®
V.7
Traccia successiva
Traccia precedente
Play/pausa
Muto
Volume
.10
. 9
. 8
. 7
. 6
Spegnimento illuminazione
Modo Tastiera:
E' illuminata
solo la parte "umana"
della faccia
Modo Cyborg
®
: Sono
illuminate
ambedue le parti
della faccia
Indicatore del tasto Windows
bloccato
Tasti di gioco
Tasti WASD
Tastiera
.15
.14
.13
.12
.11
Tasti frecce
Controlli del cursore
Intensità dell'illuminazione
Colore dell'illuminazione
Aumento/diminuzione
(luminosità) o scorrimento
(colori)
. 20
. 20 .19
.19
.18
.17
.16
Blocco maiuscole/numeri/
scorrimento
Tasti di gioco programmabili
Tasti WASD
Controlli cursore
Tasti di gioco programmabili
.12
.11
.10
. 9
. 8
.16
.15
.14
.13

15
.17 .18
. 7
. 6
. 5
. 4
. 3
. 2
.1
. 5
. 4
. 3
. 2
.1
Controlli della tastiera Cyborg
®
V.7
Traccia successiva
Traccia precedente
Play/pausa
Muto
Volume
.10
. 9
. 8
. 7
. 6
Spegnimento illuminazione
Modo Tastiera:
E' illuminata
solo la parte "umana"
della faccia
Modo Cyborg
®
: Sono
illuminate
ambedue le parti
della faccia
Indicatore del tasto Windows
bloccato
Tasti di gioco
Tasti WASD
Tastiera
.15
.14
.13
.12
.11
Tasti frecce
Controlli del cursore
Intensità dell'illuminazione
Colore dell'illuminazione
Aumento/diminuzione
(luminosità) o scorrimento
(colori)
. 20
. 20 .19
.19
.18
.17
.16
Blocco maiuscole/numeri/
scorrimento
Tasti di gioco programmabili
Tasti WASD
Controlli cursore
Tasti di gioco programmabili
.12
.11
.10
. 9
. 8
.16
.15
.14
.13

16
Tastiera V.7 Cyborg
®
Congratulazioni per avere acquistato la vostra tastiera V.7 Cyborg
®
. Oltre a essere uno strumento d’ufficio ad alte
prestazioni, la tastiera Cyborg
®
è progettata specificamente per il gioco e dispone delle seguenti caratteristiche:
Retroilluminazione indipendente - potete impostare diversi colori e luminosità per le principali aree di tasti di •
gioco della tastiera
Retroilluminazione a tre colori - potete scegliere tra rosso, verde e ambra•
L’impostazione dell’illuminazione dei tasti assicura che i colori rimangano anche riavviando il sistema•
Avanzata possibilità di premere più tasti contemporaneamente nelle aree giochi per complessi comandi di gioco •
Tasti Cyborg•
®
- 12 tasti programmabili per tutti i vostri comandi di gioco e macrocomandi preferiti
Solido rivestimento, tasti placcati in metallo nelle aree dei tasti di gioco •
Panello Touch-sensitive retroilluminato per controllare i comandi di illuminazione e multimediali•
Modo Cyborg•
®
- disabilita istantaneamente i tasti Windows e congura i colori e la luminosità dei vostri tasti di
gioco al tocco di un bottone
Prese USB passanti per audio e microfono •
Sostegno per i polsi e angolo di inclinazione della tastiera regolabili (anteriore e posteriore)•
Connettori placcati oro per USB e audio•
Le due modalità della tastiera - Normale e Cyborg
®
- si selezionano premendo l’icona con la testa del Cyborg
®
sul
panello di controllo.
Modo Normale
E’ indicato dalla metà di sinistra dell’icona con la testa del Cyborg
®
illuminata. I tasti multimediali, i controlli di
luminosità e dei colori, l’icona delle luci della tastiera on/off sono illuminati a bassa intensità. In modo normale è
possibile modicare solo il colore e la luminosità della tastiera e i tasti di gioco non sono illuminati.
Modo Cyborg
®
E’ indicato dall’icona con la testa del Cyborg
®
illuminata completamente. Sono anche illuminate tutte le parti
illuminate in modo normale, oltre all’indicatore di blocco del tasto Windows e alle icone per selezionare
l’illuminazione delle singole aree di tasti (Tasti di gioco, WASD, QWERTY, frecce, tastierina numerica).
In Cyborg
®
mode, tastierina numerica, tasti di gioco, tasti WASD e frecce hanno tutti un’illuminazione colorata
controllata in modo indipendente.
La tastiera Cyborg
®
include anche 12 tasti di gioco programmabili usando il software Smart Technology, e tasti
multimediali per controllare tracce di musica o video. I tasti WASD, cursore, Cyborg
®
e tastierina numerica possono
essere illuminati in modo indipendente dal resto della tastiera per evidenziare i tasti di gioco usati comunemente.

17
Installazione della tastiera V.7 Cyborg
®
Per prima cosa connettete il cavo USB marcato “K/B” in una porta USB libera del vostro PC. Se intendete usare 1.
auricolari, altoparlanti, cufa o microfono, inserite anche i connettori mini jack rosa e verde nelle prese audio in e
out del vostro PC. Ora collegate i cavi di cufa, altoparlanti etc alla presa rosa “audio in” e verde “audio out” nella
parte posteriore destra della vostra tastiera.
Il secondo cavo USB della tastiera Cyborg2.
®
marcato “Ext” funziona come un’estensione USB. Inserite il cavo in
una porta USB libera del vostro PC e poi collegate un dispositivo USB direttamente alla porta USB nella parte
posteriore destra della tastiera. Il dispositivo USB comunica ora direttamente con il vostro PC.
Per modicare le impostazioni dell’illuminazione della vostra tastiera Cyborg3.
®
, per prima cosa selezionate “modo
normale” o “modo Cyborg
®
” premendo la faccia del Cyborg
®
sul panello di controllo della tastiera. In modo
normale potete variare solo il colore e la luminosità della tastiera completa (i tasti di gioco non sono illuminati).
Per variare il colore dell’illuminazione, premete l’icona del colore e poi premete “+” o “-” per fare scorrere i
colori. Per variare l’intensità dell’illuminazione, premete l’icona della luminosità e poi aumentate o diminuite la
luminosità premendo “+” o “-”.
In modo Cyborg4.
®
, potete variare colore e luminosità di aree speciche della vostra tastiera. Selezionate il
modo Cyborg
®
premendo la faccia del Cyborg
®
. Ora selezionate la parte della tastiera di cui volete variare gli
effetti di luce e cambiate il colore premendo l’icona del colore sul panello di controllo poi premete “+” o “-” per
fare scorrere i colori. Per variare l’intensità dell’illuminazione, premete l’icona della luminosità e poi aumentate
o diminuite la luminosità premendo “+” o “-”. Per variare la luminosità di un’area particolare della tastiera,
selezionate l’area premendo il panello di controllo, poi ripetete i passi descritti in precedenza per cambiare
colore o luminosità. L’impostazione dei colori scelta rimane anche riavviando il sistema o scollegando la tastiera
Nota:
I 12 tasti programmabili della tastiera Cyborg
®
e gli indicatori luminosi di volume funzionano solo dopo
l’installazione dei driver della tastiera. Per utilizzare tutte le funzioni è necessario installare i driver della tastiera
Cyborg
®
e il software Smart Technology.
Compatibilità con i sistemi operativi
PC con Windows XP/XP64/Vista/7

18
Software di installazione per utenti di Windows
®
XP, XP64, Vista
e 7
A) Solo driver
Dopo avere acceso il computer, chiudete tutti i programmi in esecuzione e inserite il CD di installazione nel 1.
vostro drive CD-ROM.
Quando appare la schermata introduttiva, fate click su Install Software per continuare. Se il CD non parte 2.
automaticamente, selezionate “Start” dalla barra delle applicazioni di Windows
®
, poi “Esegui”, digitate D:\Setup.
exe e fate clic su OK (dove D:\ è la lettera che indica il vostro drive CD-ROM). Per gli utenti Vista/7, la schermata
chiederà “Do you want to run this le?” Premete Run. Apparirà ora una nestra con il messaggio “A program
needs your permission to continue”. Premete Continue.
Quando appare lo schermo di benvenuto, fate click su Next per continuare. 3.
Dopo avere letto il Disclaimer, selezionate l’opzione “I accept the terms of the Disclaimer” e fate click su Next per 4.
continuare.
Nella schermata di registrazione, selezionate “Check this box to register now” e seguite le istruzioni sullo 5.
schermo, oppure scegliete di selezionare questa opzione in seguito.
Fate click su Finish per completare l’installazione.6.
B) Driver e Software di programmazione
Seguite i punti 1 - 6 della procedura di installazione al punto A), poi alla schermata “Software Setup”, selezionate
“Install the Cyborg
®
ST Programming Software” e fate click su Next. Per gli utenti Vista/7, apparirà nuovamente il
messaggio “Do you want to run this file?” Premete Run. Ora apparirà una finestra con il messaggio “A program
needs your permission to continue”. Premete Continue.
Nella seguente schermata del Software Setup, fate click su Next e seguite le istruzioni sullo schermo. A questo
punto agli utenti Vista/7 sarà chiesto di installare Programmable Support for Bus e agli utenti XP sarà chiesto di
installare Programmable Support e Mouse, HID-compliant mouse, Programmable Support e tastiera e HID tastiera
Device (questi sono quelli che Windows definisce i Programming element del vostro controller). Continuate a fare
click su Next e Finish.
Alla fine dell’installazione, avete l’opzione di eseguire l’Editor dei Profili, che vi darà una visione generale
dell’ambiente di programmazione. Se non volete vedere subito l’Editor dei Profili, de-selezionate la casella e fate
click su Finish per completare l’installazione.

19
.17 .18
. 7
. 6
. 5
. 4
. 3
. 2
.1
. 5
. 4
. 3
. 2
.1
Controles del teclado Cyborg
®
V.7
Pista siguiente
Pista anterior
Reproducir/detener
Silenciar
Volumen
.10
. 9
. 8
. 7
. 6
Apagar las luces
Modo de teclado:
Sólo se ilumina
la parte humana
de la cara
Modo Cyborg
®
: Se
iluminan las dos
partes de la cara
Indicador de bloqueo de
teclas de Windows
Teclas de juego
Teclas WASD
Teclado
.15
.14
.13
.12
.11
Teclas de dirección
Controles del cursor
Brillo de la iluminación
Color de la iluminación
Aumentar/disminuir (brillo)
o desplazarse a través (color)
. 20
. 20 .19
.19
.18
.17
.16
Teclas Bloqueo de Mayúsculas
/Números/Desplazamiento)
Teclas de juego programables
Teclas WASD
Controles del cursor
Teclas de juego programables
.12
.11
.10
. 9
. 8
.16
.15
.14
.13

20
Teclado V.7 Cyborg
®
Enhorabuena por comprar el teclado Cyborg
®
V7.Además de ser una herramienta de ocina de alto rendimiento,
el teclado Cyborg
®
ha sido diseñado especícamente para juegos e incluye las siguientes características:
Retro-iluminación independiente: establezca diferentes colores y brillo para las teclas de las áreas de juego de •
su teclado
Retro-iluminación de tres colores: elija entre tonos de rojo, verde y amarillo •
Las conguraciones de iluminación de las teclas garantizan que los colores permanecerán constantes incluso •
después de reiniciar el sistema
Teclas de pulsación múltiple reforzadas en las áreas de juego para comandos de juego complejos •
Teclas Cyborg•
®
- 12 teclas programables para todos sus macros y comandos favoritos
Tapas de las teclas duraderas y chapadas en metal en las teclas de las áreas de juego•
Panel de consola contra-iluminado y sensible al tacto para controlar la iluminación y los comandos de media •
Modo Cyborg•
®
- desactiva instantáneamente las teclas de Windows y congura el color y el brillo de sus teclas
de juego con sólo presionar un botón
Enchufes de paso directo USB, audio y micrófono •
Soporte para la muñeca y ángulo de inclinación del teclado ajustables (frontal y trasero)•
Conectores chapados en dorado para USB y audio•
Los dos modos de teclado - modo normal y modo Cyborg
®
- se seleccionan al pulsar en el icono principal de
Cyborg
®
en el panel de control.
Modo normal
Se indica por la parte izquierda del icono iluminado de la cabeza Cyborg
®
. Las teclas de media, los controles de
iluminación y color y el icono de luz del teclado encendido/apagado también se iluminan tenuemente. Cuando se
encuentra en el modo normal sólo se puede cambiar el color y la iluminación del teclado y no se iluminan las teclas
de juego.
Modo Cyborg
®
Se indica por el icono de cabeza Cyborg
®
que está completamente iluminado. También se ilumina todo lo que está
iluminado en el modo normal, más el indicador de bloqueo de teclas de Windows y los iconos para seleccionar
la iluminación de áreas de teclado individuales (teclas de juego, WASD, QWERTY, teclas de dirección, teclado
numérico).
El teclado numérico, las teclas de juego, las teclas WASD y las teclas de dirección tienen una iluminación de color
controlada independientemente en el modo Cyborg
®
.
El teclado Cyborg
®
también incluye 12 teclas de juego programables utilizando el software de Smart Technology
y teclas de media para controlar música o videos. Las teclas WASD, del cursor, de Cyborg
®
y del teclado
numérico se pueden iluminar independientemente del resto del teclado para resaltar las teclas de juego utilizadas
normalmente.

21
Instalación de su teclado V.7 Cyborg
®
Primero enchufe el cable USB marcado “K/B” en unos de los puertos USB libres de su PC. Si tiene la intención 1.
de utilizar auriculares, altavoces, cascos o micrófonos, también enchufe las mini-clavijas rosas y verdes en los
correspondientes enchufes de entrada/salida audio de su PC. A continuación enchufe sus cascos, cables del
altavoz, etc. en el enchufe rosa de entrada audio y en el enchufe verde de salida audio en el lado derecho de la
parte trasera de su teclado.
El segundo cable USB del teclado marcado “Ext” funciona como una extensión USB. Enchufe el cable en uno 2.
de los puertos USB libres de su PC y después enchufe un dispositivo USB directamente en el puerto USB de
la parte derecha trasera del teclado. De esta forma el dispositivo USB podrá comunicarse directamente con su
PC.
Para cambiar las conguraciones de iluminación del teclado Cyborg3.
®
, primero seleccione el modo Normal o el
modo Cyborg
®
presionando la cara Cyborg
®
en el panel de control del teclado.
En el modo Normal sólo se puede cambiar el color y la iluminación del teclado entero (las teclas de juego no 4.
se iluminan). Para cambiar el color de la iluminación, presione el icono de color y después pulse “+” o “-” para
desplazarse a través de los colores. Para cambiar el brillo de la iluminación, pulse el icono de brillo y después
aumente o disminuya el brillo presionando “+” o “-”.
En el modo Cyborg5.
®
, puede cambiar el color y el brillo de la iluminación en áreas especicas de su teclado.
Seleccione el modo Cyborg
®
pulsando en la cara Cyborg
®
. Ahora seleccione la parte del teclado en la que
quiere cambiar los efectos de iluminación y cambie el color presionando el icono de color en el panel de
control y pulsando a continuación “+” o “-” para desplazarse a través de los colores. Para cambiar el brillo de
la iluminación, presione el icono de brillo y después aumente o disminuya el brillo pulsando “+” o “-”. Cada vez
que desee cambiar el brillo de un área del teclado en particular, seleccione el área presionando el panel de
control y después repita los pasos anteriores para cambiar el color o el brillo. Las conguraciones de color que
elija permanecerán constantes incluso después de reiniciar el sistema o de desenchufar el teclado.
Tome nota:
Las 12 teclas programables del teclado Cyborg
®
y los indicadores de volumen de luz no funcionarán hasta que
haya instalado los controladores del teclado. Por favor, instale los controladores de teclado Cyborg
®
y el software
de Smart Technology para una completa funcionalidad.
Compatibilidad del sistema
Ordenador con Windows XP/XP64/Vista/7

22
Instalación del software para usuarios de Windows
®
XP, XP64,
Vista y V7
A) Sólo controladores
Con su ordenador encendido, cierre todos los programas que estén en ese momento en funcionamiento e 1.
introduzca el CD de Instalación en su unidad de CD-ROM.
Cuando aparezca la Pantalla de Introducción, haga clic en Instalar Software para continuar. Si el CD no 2.
comienza automáticamente, seleccione Iniciar (Start) desde la Barra de Tareas de Windows
®
, después Activar
(Run) y escriba D:\Setup.exe y haga clic en OK - (si D:\ es la letra que corresponda a su unidad de CD-ROM).
Para usuarios de Vista/7, la pantalla le preguntará ¿Quiere activar este archivo? (Do you want to run this le?)
Pulse en Activar (Run). A continuación aparecerá una pantalla diciendo Un programa necesita su autorización
para continuar. Pulse Continuar.
Cuando aparece la pantalla de Bienvenida (Welcome), haga clic en Siguiente (Next) para continuar. 3.
Después de leer el Descargo de Responsabilidad, seleccione Acepto los términos de la opción Descargo de 4.
Responsabilidad (I accept….) y haga clic en Siguiente (Next) para continuar.
En la pantalla de Registro, seleccione Marque esta casilla (Check this box) para registrarse en ese momento y 5.
siga las instrucciones en la pantalla, o puede elegir el seleccionar esta opción más tarde.
Haga clic en Terminar (Finish) para completar la instalación. 6.
B) Controladores y Software de Programación
Siga los puntos 1 - 6 de los procedimientos de instalación en A), a continuación en la pantalla de Software de
Conguración, seleccione Instalar el Software de Programación Cyborg
®
ST y haga clic en siguiente (Next). Para
los usuarios de Vista/7, la pantalla le preguntará de nuevo ¿Quiere activar este archivo? Pulse Activar (Run).
Aparecerá entonces una pantalla diciendo: Un programa necesita su autorización para continuar. Pulse Continuar.
En la siguiente pantalla de Software de Conguración, haga clic en Siguiente (Next) y siga las instrucciones en
la pantalla. En ese momento se pedirá a los usuarios de Vista/7 que instalen el Programmable Support for Bus
y a los usuarios de XP que instalen el Programmable Support for Mouse, HID-compliant mouse, Programmable
Support for Keyboard y HID Keyboard Device (estos son lo que Windows denomina los elementos de
programación de su controlador). Continúe haciendo clic en Siguiente y Terminar para aceptar la instalación hasta
que aparezca la pantalla de Registro.

23

© 2010 Mad Catz Interactive Asia Limited (MCIA). Cyborg, the Cyborg logo, Mad Catz and the Mad Catz logo are
trademarks or registered trademarks of Mad Catz, Inc and/or its afliated companies. The shape and design of this
product are a trade dress of Mad Catz and/or MCIA. All other trademarks or registered trademarks are the property
of their respective owners. Made in China. All rights reserved. Product features, appearance and specications may
be subject to change without notice. Please retain this information for future reference.
Mad Catz is a publicly traded company on the TSX/AMEX, symbol MCZ.
© 2010 Mad Catz Interactive Asia Limited (MCIA). Cyborg, le logo Cyborg, Mad Catz et le logo Mad Catz sont
des marques decommerce ou des marques déposées de Mad Catz, Inc., et/ou ses sociétés afliées. . La forme
et le design de ce produit sont caractéristiques de la marque Mad Catz et/ou MCIA. Toutes les autres marques
ou marques déposées sont la propriété de leurs propriétaires respectifs. Fabriqué en Chine. Tous droits réservés.
L’aspect, les fonctionnalités et les spécications du produit peuvent changer sans préavis. Veuillez conserver cette
notice pour référence ultérieure.
Les actions de Mad Catz sont cotées en bourse sur le TSX/AMEX sous le symbole MCZ.
© 2010 Mad Catz Interactive Asia Limited (MCIA). Cyborg, y el logotipo de Cyborg, Mad Catz y el logotipo de Mad
Catz son marcas comerciales o marcas comerciales registradas de Mad Catz, Inc., y/o sus compañías aliadas.
La forma y el diseño de este producto es la imagen de marca de Mad Catz y/o MCIA. Todas las demás marcas
o marcas registradas son propiedad de sus respectivos propietarios. Fabricado en China. Reservados todos los
derechos. Las características, el aspecto y las especicaciones del producto pueden ser objeto de modicación sin
previo aviso. Por favor guarde esta información para su consulta en el futuro.
www.madcatz.com
-
 1
1
-
 2
2
-
 3
3
-
 4
4
-
 5
5
-
 6
6
-
 7
7
-
 8
8
-
 9
9
-
 10
10
-
 11
11
-
 12
12
-
 13
13
-
 14
14
-
 15
15
-
 16
16
-
 17
17
-
 18
18
-
 19
19
-
 20
20
-
 21
21
-
 22
22
-
 23
23
-
 24
24


En otros idiomas
- français: Cyborg V7 Manuel utilisateur
- italiano: Cyborg V7 Manuale utente
- English: Cyborg V7 User manual
- Deutsch: Cyborg V7 Benutzerhandbuch
Otros documentos
-
Saitek 107748 Manual de usuario
-
-
-
-
-
-
-
-
Saitek Cyborg evo Manual de usuario
-