Casio LK-127 Manual de usuario

Categoría
Pianos digitales
Tipo
Manual de usuario

Este manual también es adecuado para

LK120ES1A
ES
USER’S GUIDE
GUÍA DEL USUARIO
Please keep all information for future reference.
Guarde toda información para tener como referencia futura.
This recycle mark indicates that the packaging conforms to
the environmental protection legislation in Germany.
Esta marca de reciclaje indica que el empaquetado conforma
a la legislación de protección ambiental en Alemania.
CASIO COMPUTER CO.,LTD.
6-2, Hon-machi 1-chome
Shibuya-ku, Tokyo 151-8543, Japan
MA1004-A Printed in China
LK120ES1A
K
LK120_es_cover1-4.p65 10.4.5, 5:54 PM1
GUIDELINES LAID DOWN BY FCC RULES FOR USE OF THE UNIT IN THE U.S.A. (not applicable to other areas).
NOTICE
This equipment has been tested and found to comply with the limits for a Class B digital device, pursuant to Part 15
of the FCC Rules. These limits are designed to provide reasonable protection against harmful interference in a
residential installation. This equipment generates, uses and can radiate radio frequency energy and, if not installed
and used in accordance with the instructions, may cause harmful interference to radio communications. However,
there is no guarantee that interference will not occur in a particular installation. If this equipment does cause harmful
interference to radio or television reception, which can be determined by turning the equipment off and on, the user
is encouraged to try to correct the interference by one or more of the following measures:
Reorient or relocate the receiving antenna.
Increase the separation between the equipment and receiver.
Connect the equipment into an outlet on a circuit different from that to which the receiver is connected.
Consult the dealer or an experienced radio/TV technician for help.
FCC WARNING
Changes or modifications not expressly approved by the party responsible for compliance could void the users
authority to operate the equipment.
Important!
Please note the following important information before using this product.
Before using the optional AD-E95100L Adaptor to power the unit, be sure to check the AC
Adaptor for any damage first. Carefully check the power cord for breakage, cuts, exposed
wire and other serious damage. Never let children use an AC adaptor that is seriously
damaged.
• Never attempt to recharge batteries.
Do not use rechargeable batteries.
• Never mix old batteries with new ones.
Use recommended batteries or equivalent types.
Always make sure that positive (+) and negative (–) poles are facing correctly as indicated
near the battery compartment.
• Replace batteries as soon as possible after any sign they are getting weak.
• Do not short-circuit the battery terminals.
• The product is not intended for children under 3 years.
• Use only CASIO AD-E95100L adaptor.
• The AC adaptor is not a toy.
• Be sure to disconnect the AC adaptor before cleaning the product.
Manufacturer:
CASIO COMPUTER CO.,LTD.
6-2, Hon-machi 1-chome, Shibuya-ku, Tokyo 151-8543, Japan
Responsible within the European Union:
CASIO EUROPE GmbH
Casio-Platz 1, 22848 Norderstedt, Germany
This mark applies in EU countries only.
LK120_es_cover1-4.p65 10.2.26, 9:40 AM2
E-1
Safety Precautions
Before using the instrument, be sure to
carefully read through the instructions
contained in this manual.
Symbols
Various symbols are used in this users guide
and on the product itself to ensure that the
product is used safely and correctly, and to
prevent injury to the user and other persons
as well as damage to property. Those
symbols along with their meanings are
shown below.
DANGER
This symbol indicates information that, if
ignored or applied incorrectly, creates the
danger of death or serious personal injury.
WARNING
This indication stipulates matters that have
the risk of causing death or serious injury
if the product is operated incorrectly while
ignoring this indication.
CAUTION
This indication stipulates matters that have
the risk of causing injury as well as matters
for which there is the likelihood of
occurrence of physical damage only if the
product is operated incorrectly while
ignoring this indication.
Symbol Examples
This triangle symbol ( ) means
that the user should be careful.
(The example at left indicates
electrical shock caution.)
This circle with a line through it
(
) means that the indicated
action must not be performed.
Indications within or nearby this
symbol are specifically
prohibited. (The example at left
indicates that disassembly is
prohibited.)
The black dot (
) means that the
indicated action must be
performed. Indications within
this symbol are actions that are
specifically instructed to be
performed. (The example at left
indicates that the power plug must
be unplugged from the electrical
socket.)
LK120_e_01-07.p65 10.3.19, 5:27 PM1
E-2
Misuse of the AC adaptors
electric cord can damage or break
it, creating the risk of fire and
electric shock. Always make sure
you observe the following
precautions.
Never place heavy objects on
the cord or subject it to heat.
Never try to modify the cord
or subject it to excessive
bending.
Never twist or stretch the cord.
Should the electric cord or plug
become damaged, contact your
original retailer or authorized
CASIO Service Provider.
Never touch the AC adaptor
while your hands are wet.
Doing so creates the risk of
electric shock.
Use the AC adaptor where it will
not be splashed with water. Water
creates the risk of fire and electric
shock.
Do not place a vase or any other
container filled with liquid on top
of the AC adaptor. Water creates
the risk of fire and electric shock.
Batteries
Misuse of batteries can cause them
to leak, resulting in damage to
nearby objects, or to explode,
creating the risk of fire and personal
injury. Always make sure you
observe the following precautions.
Never try to take batteries apart
or allow them to become shorted.
Never expose batteries to heat or
dispose of them by incineration.
Never mix old batteries with new
ones.
Never mix batteries of different
types.
Do not charge the batteries.
Make sure the positive (+) and
negative () ends of the batteries
are facing correctly.
DANGER
Alkaline Batteries
Perform the following steps
immediately if fluid leaking from
alkaline batteries ever gets into your
eyes.
1. Do not rub your eyes! Rinse them
with water.
2. Contact your physician
immediately.
Leaving alkaline battery fluid in
your eyes can lead to loss of sight.
WARNING
Smoke, Strange Odor, Overheating
Continued use of the product while
it is emitting smoke, a strange odor,
or heat creates the risk of fire and
electric shock. Take the following
steps immediately.
1. Turn off power.
2. If you are using the AC adaptor
for power, unplug it from the wall
outlet.
3. Contact your original retailer or
an authorized CASIO Service
Provider.
AC Adaptor
Misuse of the AC adaptor creates
the risk of fire and electric shock.
Always make sure you observe
the following precautions.
Be sure to use only the AC
adaptor that is specified for this
product.
Use only a power source whose
voltage is within the rating
marked on the AC adaptor.
Do not overload electrical
outlets and extension cords.
LK120_e_01-07.p65 10.3.19, 5:27 PM2
E-3
Plastic Bags
Never place the plastic bag the
product comes in over your head or
in your mouth. Doing so creates the
risk of suffocation.
Particular care concerning this
precaution is required where small
children are present.
Keep off of the product and stand.*
Climbing onto the product or stand
can cause it to tip over or become
damaged. Particular care
concerning this precaution is
required where small children are
present.
Location
Avoid locating the product on an
unstable stand, on an uneven
surface, or any other unstable
location. An unstable location can
cause the product to fall over,
creating the risk of personal injury.
Do not incinerate the product.
Never throw the product into fire.
Doing so can cause it to explode,
creating the risk of fire and personal
injury.
Water and Foreign Matter
Water, other liquids, and foreign
matter (such as pieces of metal,
pencils, etc.) getting into the product
create the risk of fire and electric
shock. Take the following steps
immediately.
1. Turn off power.
2. If you are using the AC adaptor
for power, unplug it from the wall
outlet.
3. Contact your original retailer or
an authorized CASIO Service
Provider.
Disassembly and Modification
Never try to take this product apart
or modify it in any way. Doing so
creates the risk of electric shock,
burn injury, or other personal injury.
Leave all internal inspection,
adjustment, and maintenance up to
your original retailer or authorized
CASIO Service Provider.
Dropping and Impact
Continued use of this product after
it has been damaged by dropping
or subjecting it to strong impact
creates the risk of fire and electric
shock. Take the following steps
immediately.
1. Turn off power.
2. If you are using the AC adaptor
for power, unplug it from the wall
outlet.
3. Contact your original retailer or
an authorized CASIO Service
Provider.
LK120_e_01-07.p65 10.3.19, 5:27 PM3
E-4
Cleaning
Before cleaning the product, always
unplug the AC adaptor from the
wall outlet first. Leaving the AC
adaptor plugged in creates the risk
of damage to the AC adaptor, fire,
and electric shock.
Batteries
Misuse of batteries can cause them
to leak resulting in damage to
nearby objects, or to explode,
creating the risk of fire and personal
injury. Always make sure you
observe the following precautions.
Use only batteries that are
specified for use with this
product.
Remove batteries from the
product if you do not plan to use
it for a long time.
Connectors
Connect only the specified devices
and equipment to the products
connectors. Connection of a non-
specified device or equipment
creates the risk of fire and electric
shock.
Location
Avoid the following locations for
this product. Such locations create
the risk of fire and electric shock.
Areas subject to high humidity
or large amounts of dust.
In food preparation areas or other
areas subject to oil smoke.
Near air conditioning equipment,
on a heated carpet, in areas
exposed to direct sunlight, inside
of a vehicle parked in the sun, or
any other area that subjects the
product to high temperatures.
CAUTION
AC Adaptor
Misuse of the AC adaptor creates
the risk of fire and electric shock.
Always make sure you observe
the following precautions.
Do not locate the electric cord
near a stove or other sources of
heat.
Never pull on the cord when
unplugging from the electrical
outlet. Always grasp the AC
adaptor when unplugging.
Insert the AC adaptor into the
wall outlet as far as it will go.
Unplug the AC adaptor from
the wall outlet during
lightening storms or before
leaving on a trip or other long-
term absence.
At least once a year, unplug
the AC adaptor from the wall
outlet and wipe away any dust
that is built up in the area
around the prongs of the plug.
Never use detergent to clean
the power cord, especially the
plug and jack parts.
Relocating the Product
Before relocating the product,
always unplug the AC adaptor from
the wall outlet and disconnect all
other cables and connecting cords.
Leaving cords connected creates the
risk of damage to the cords, fire,
and electric shock.
LK120_e_01-07.p65 10.3.19, 5:27 PM4
E-5
Heavy Objects
Never place heavy object on top of
the product.
Doing so can make the product top
heavy, causing the product to tip
over or the object to fall from it,
creating the risk of personal injury.
Correct Stand* Assembly
An incorrectly assembled stand can
tip over, causing the product to fall
and creating the risk of personal
injury.
Make sure you assemble the stand
correctly, following the assembly
instructions that come with it. Make
sure you mount the product on the
stand correctly.
* Stand is available as an option.
IMPORTANT!
When using batteries, be sure to replace them or shift to one
of the alternate power sources whenever you notice any of
the following symptoms.
Instrument does not turn on
Display that is flickering, dim, or difficult to read
Abnormally low speaker/headphone volume
Distortion of sound output
Occasional interruption of sound when playing at high
volume
Sudden power failure when playing at high volume
Flickering or dimming of the display when playing at high
volume
Continued sound output even after you release a key
A tone that is totally different from the one that is selected
Abnormal rhythm pattern and Song Bank play
Display Screen
Never push on the display
screens LCD panel or subject it
to strong impact. Doing so can
cause the LCD panels glass to
crack, creating the risk of personal
injury.
Should the LCD panel ever crack
or break, never touch the liquid
inside of the panel. LCD panel
liquid can cause skin irritation.
Should LCD panel liquid ever get
inside your mouth, immediately
wash out your mouth with water
and contact your physician.
Should LCD panel liquid ever get
into your eyes or onto your skin,
rinse with clear water for at least
15 minutes, and then contact a
physician.
Sound Volume
Do not listen to music at very loud
volumes for long periods. Particular
care concerning this precaution is
required when using headphones.
High volume settings can damage
your hearing.
Health Precaution
In extremely rare cases, exposure to
strong sudden light or flashing light
can cause momentary muscle
spasms, loss of consciousness, or
other physical problems with some
individuals.
If you suspect that you might be
susceptible to any condition such
as this, be sure to consult with
your physician before using this
product.
Use this product in an area that is
well illuminated.
Should you ever feel any
symptoms similar to those
described above when using this
product, stop using it immediately
and contact your physician.
LK120_e_01-07.p65 10.3.19, 5:27 PM5
E-6
On-screen fingering and timing indicators
Easy-to-understand on-screen indicators help to simplify keyboard play, even for novices.
100 amazingly realistic tones
Enhanced auto-accompaniment function for greater versatility
50 built in auto-accompaniment patterns.
100 Built-in Song Bank tunes
A total of 100 built-in Song Bank tunes comes built in for playback enjoyment or play-along practice.
3-Step Lesson System
Develop your musical skills by following the keys as they light. First you become familiar with the
timing of the notes by watching the keys light as you playback one of the 100 built-in Song Bank
tunes. Next, practice playing along at a pace thats comfortable for you. Finally, try playing along at the
normal tempo for the Song Bank tune.
A simulated human voice is used during Step 1 or Step 2 play to call out the fingers you should use to
play the required notes (Voice Fingering). The timing of notes is also indicated on the display screen.
Auto Accompaniment
Simply specify a chord and the keyboard automatically produces the matching rhythm, bass, and
chord patterns. One-touch fill-ins make accompaniments sound interesting and natural.
Transpose Function
An easy operation instantly changes the key of the keyboard.
Main Features
LK120_e_01-07.p65 10.3.19, 5:27 PM6
E-7
Contents
Safety Precautions ................E-1
Main Features ........................E-6
General Guide........................E-8
Attachment of Score Stand........................E-9
Quick Reference ..................E-10
Power Supply.......................E-11
Using a Household Power Outlet ............E-11
Using Batteries ........................................E-11
Auto Power Off.........................................E-12
Settings ....................................................E-12
Connections.........................E-13
Phones/Output Jack ................................E-13
Accessories and Options.........................E-13
Basic Operations.................E-14
To switch power on and off ......................E-14
To change tones ......................................E-14
Other Useful Functions............................E-15
Playing the demo tunes ...........................E-16
Playing rhythms .......................................E-17
Using auto-accompaniment.....................E-17
Improvising with the preset patterns........E-19
3-Step Lesson System ........E-20
Using 3-Step Lesson System ..................E-20
Voice Fingering Guide .............................E-22
Timing Indicator .......................................E-22
Step 1: Master the timing.........................E-23
Step 2: Master the melody.......................E-24
Step 3: Play at normal speed ..................E-24
To practice the left hand part ...................E-25
Technical Reference............E-26
Troubleshooting .......................................E-26
Specifications...........................................E-28
Operating Precautions........E-29
Appendix............................... A-1
Tone List.....................................................A-1
Rhythm List ................................................A-2
Fingered Chord Charts ..............................A-3
Song List ....................................................A-5
LK120_e_01-07.p65 10.3.19, 5:27 PM7
E-8
General Guide
1 2 3 4 5 6
7
E F G H
I J K L M N
8 A09 B 8
C D
LK120_e_08-12.p65 10.3.19, 5:27 PM8
E-9
1
POWER/MODE selector
2
VOLUME slider
3
SYNCHRO/FILL-IN button
4
START/STOP button
5
DEMO button
6
KEY LIGHT button
7
TEMPO/VALUE buttons
8
Speakers
9
100 SONG BANK list
0
Display
A
50 RHYTHMS list
B
100 TONES list
C
CHORD root names
D
Percussion instrument list
E
RHYTHM button
F
TONE button
G
SONG BANK button
H
Number buttons
3-STEP LESSON
I
STEP 1 button
J
STEP 2 button
K
STEP 3 button
L
PART SELECT button
M
ONE KEY PLAY buttons
N
SPEAK button
* Attachment of Score Stand
Insert both ends of the music stand provided
with the keyboard into the two holes on the
top surface.
Rear Panel
O P
O
PHONES/OUTPUT jack
For connection of commercially available
headphones. Output from the speakers is
automatically cut when headphones are
connected.
P
DC 9.5V jack
LK120_e_08-12.p65 10.3.19, 5:27 PM9
E-10
1
Set the POWER/MODE selector to NORMAL.
2
Press the SONG BANK button.
3
Find the tune you want to play in the Song Bank
list, and then use the number buttons to input its
two-digit number.
To select 13 TWINKLE TWINKLE LITTLE STAR,
input 1 and then 3.
Not all of the available songs are shown on the song
bank list printed on the keyboard console. For a
complete list, see the Song List on page A-5.
4
Press the STEP 1 button or STEP 2 button.
When you do, the STEP 1 indicator or STEP 2 indicator
appears.
The keyboard sounds a count beat and waits for you
to play something on the keyboard. The keys that you
need to press first flash.
Play in accordance with the fingerings that appear on
the display.
Quick Reference
This section provides a quick overview of keyboard operation using steps one and two of the 3-step lesson feature. See page E-20
for detailed explanations of these steps.
5
Play the melody part on the keyboard.
<If you pressed the STEP 1 button in
4
...>
Play the notes with the ONE KEY PLAY buttons.
The accompaniment tempo automatically adjusts to
play along with your melody.
Play the notes on the keyboard.
A sub-melody (obbligato) plays in time with the
melody.
With Step 1, the correct melody note is played no
matter which keyboard key you press.
<If you pressed the STEP 2 button in
4
...>
Play the notes on the keyboard, pressing keys as
they light.
Keep the key depressed as long as it stays lit.
If you selected any song from number 84 through 99,
the lit key goes out as soon as you press it.
The key that corresponds to the next note you need
to play will flash.
After you press the correct melody key,
accompaniment proceeds to the next note.
Twinkle
1 2 3
4 5 5
kTwin le
Fingering
SONG BANK
indicator appears
LK120_e_08-12.p65 10.3.19, 5:27 PM10
E-11
Power Supply
Prepare a household power outlet or batteries.
IMPORTANT!
Be sure to comply with the “Safety Precautions” provided
in this manual. Incorrect use of this product creates the risk
of electric shock and fire.
Always make sure that the Digital Keyboard is turned off
before plugging in or unplugging the AC adaptor, or before
loading or removing batteries.
Using a Household Power Outlet
Make sure that you use only the AC adaptor specified for
this keyboard. Use of a different type of AC adaptor can cause
malfunction.
Specified AC Adaptor: AD-E95100L (JEITA Standard plug)
IMPORTANT!
The AC adaptor will become warm to the touch after very
long use. This is normal and does not indicate malfunction.
To prevent breaking of the wire, take care to avoid putting
any type of load on the power cord.
Never insert metal, pencils, or any other objects into the
product's 9.5V DC terminal. Doing so creates the risk of
accident.
Using Batteries
You can use six AA-size batteries for power.
Use alkaline or zinc-carbon batteries. Never use oxyride or
any other nickel based batteries.
Open the battery cover on the bottom of the Digital Keyboard,
load the batteries, and then close the cover.
Take care to ensure that the positive (+) and negative (–)
ends of the batteries are facing correctly.
1.
Remove the battery
compartment cover.
2.
Load 6 AA-size batteries
into the battery
compartment.
Make sure that the
positive (+) and negative
(–) ends are facing
correctly.
3.
Insert the tabs on the
battery compartment
cover into the holes
provided and close the
cover.
Important Battery Information
The following shows the approximate battery life.
Alkaline batteries .................................. 4 hours
Zinc-carbon batteries ............................ 1 hour
The above value is standard battery life at normal
temperature, with the keyboard volume at medium
setting. Temperature extremes or playing at very loud
volume settings can shorten battery life.
Any of the following symptoms indicate low battery power.
Replace batteries as soon as possible whenever any of
the following occurs.
• Instrument does not turn on
• Display that is flickering, dim, or difficult to read
• Abnormally low speaker/headphone volume
• Distortion of sound output
Occasional interruption of sound when playing at high
volume
• Sudden power failure when playing at high volume
• Flickering or dimming of the display when playing at
high volume
• Continued sound output even after you release a key
A tone that is totally different from the one that is
selected
• Abnormal rhythm pattern and Song Bank play
No bending! No winding!
Tab
AC adaptor
Household power outlet
DC 9.5V terminal
LK120_e_08-12.p65 10.4.5, 5:56 PM11
E-12
Auto Power Off
The Digital Keyboard will turn off automatically to preserve
power if you do not perform any operation for about six
minutes.
To disable Auto Power Off
Hold down the TONE button while turning on the keyboard
to disable Auto Power Off.
NOTE
When Auto Power Off is disabled, the keyboard does not turn
off automatically no matter how long it is left with no operation
being performed.
Auto Power Off is automatically enabled whenever you turn on
keyboard power.
Settings
All keyboard settings are returned to their initial defaults
whenever keyboard power is turned back on after being
turned off by operation of the POWER/MODE selector or
Auto Power Off.
LK120_e_08-12.p65 10.4.5, 5:56 PM12
E-13
White
Red
PIN plug
Stereo standard plug
PHONES/OUTPUT jack
Keyboard amp,
guitar amp, etc.
Audio connection
1
LEFT
RIGHT
AUX IN or similar terminal
of audio amplifier
2
3
Connections
Phones/Output Jack
Before connecting headphones or other external equipment,
be sure to first turn down the volume settings of the keyboard
and the connected equipment. You can then adjust volume
to the desired level after connections are complete.
[Rear Panel]
Connecting Headphones (Figure
1
)
Connecting headphones cuts off output from the keyboard’s
built-in speakers, so you can play even late at night without
disturbing anyone.
Audio Equipment (Figure
2
)
Connect the keyboard to an audio equipment using a
commercially available connecting cord with a standard plug
on one end and two PIN plugs on the other end. In this
configuration, you normally set the input selector of the audio
equipment to the terminal (usually marked AUX IN or
something similar) where the cord from the keyboard is
connected. See the user documentation that comes with your
audio equipment for full details.
Musical Instrument Amplifier (Figure
3
)
Use a commercially available connecting cord to connect the
keyboard to a musical instrument amplifier.
NOTE
Be sure to use a connecting cord that has standard plugs on
the ends you connect to the keyboard and amplifier.
[Connection Example]
Keyboard or guitar amp
To keyboard’s
PHONES/OUTPUT
jack
Standard plug
INPUT
Accessories and Options
Use only the accessories and options specified for this
keyboard. Use of non-authorized items creates the danger of
fire, electrical shock, and personal injury.
You can get information about accessories that are sold
separately for this product from the CASIO catalog
available from your retailer, and from the CASIO website
at the following URL.
http://world.casio.com/
LK120_e_13-19.p65 10.3.19, 6:05 PM13
E-14
BASS PIANO
PERCUSSION (No.99)
PERCUSSION (Tone 99) assigns 35 percussion sounds to
the keyboard as shown below. The sounds assigned to each
key are indicated above the keyboard.
NOTE
Always enter two digits for the tone number. If you enter only
one digit, the display will automatically return to the previous
tone number setting after a few seconds.
If you change the tone setting while a keyboard key is
depressed, the tone does not change until you release the key
and press a keyboard key again.
With certain tones (such as percussion sounds and sound
effects), there may be very little or no change at all in the pitch,
no matter which keyboard key you press.
If you input the wrong first digit for a tone number, you can
return to the previous setting by pressing the TONE button.
Keyboard split tones
Some of the preset tones split the keyboard and assign two
or more sounds. With such a preset tone, the sound produced
depends on what position of the keyboard you play. For
example, BASS/PIANO (tone 90) puts BASS on the left and
PIANO on the right of the keyboard.
<Example>
BASS/PIANO (No.90)
Basic Operations
This part of the manual provides you with the basic
information you need to use your keyboard.
To switch power on and off
1.
Set the POWER/MODE selector to NORMAL.
2.
Press the keyboard keys.
3.
Use the VOLUME slider to set the volume to a
relatively low level.
4.
To switch power off, set the POWER/MODE
selector to OFF position.
To change tones
1.
Find the tone you want to use in the “Tone List”
(page A-1) and note its tone number.
2.
Press the TONE button.
3.
Use the number buttons to input the 2-digit
number that identifies the tone you want to
select.
Example: To select 26 ACOUSTIC BASS, input 2 and
then 6.
GrandPno
Indicator appears
Aco .Bass
POWER/MODE DEMO
VOLUME TEMPO/VALUE RHYTHM
TONE
Number buttons
START/STOP
SYNCHRO/FILL-IN SONG BANK
LK120_e_13-19.p65 10.3.19, 5:27 PM14
E-15
Other Useful Functions
To change the key of the keyboard
The transpose feature of this keyboard lets you raise or lower
its key in semitone increments. This means you can easily
match to suit someones voice, and you can eliminate sharps
and flats from music making it easier to play.
1.
While in any mode besides the Song Bank Mode
(indicated when the SONG BANK indicator is
lit), hold down the TONE button and press the
RHYTHM button.
Perform step 2 within five seconds after performing
step 1.
2.
Use the TEMPO/VALUE buttons to change the
key of the keyboard.
Example: To change the tuning to B (indicated by -1
since it is one tone below C, which is the
normal tuning of the keyboard).
Trans
Trans
(
)
F
#
G
A
B C D E
F
A
B
C
#
E
Key :
:
Pressing
:
Pressing
Display :
Trans
()
Trans
(
+
)
<Keys and their indicators>
<Note Names>
B (-1) tuningNormal tuning
D
F
G
A
B
C
B
C
E
C
D
EF
GAB
C
B

CDEFGA C
BASS DRUM
SIDE STICK
ACOUSTIC SNARE
HAND CLAP
ELECTRIC SNARE
LOW TOM 2
CLOSED HI-HAT
LOW TOM 1
PEDAL HI-HAT
MID TOM 2
OPEN HI-HAT
MID TOM 1
HIGH TOM 2
CRASH CYMBAL 1
HIGH TOM 1
RIDE CYMBAL 1
CHINESE CYMBAL
RIDE BELL
TAMBOURINE
SPLASH CYMBAL
COWBELL
CRASH CYMBAL 2
CLAVES
RIDE CYMBAL 2
HIGH BONGO
LOW BONGO
MUTE HIGH CONGA
OPEN HIGH CONGA
LOW CONGA
HIGH TIMBALE
LOW TIMBALE
HIGH AGOGO
LOW AGOGO
CABASA
MARACAS
Polyphony
The term polyphony refers to the maximum number of notes
you can play at the same time. This keyboard has 12-note
polyphony, which includes the notes you play as well as the
rhythms and auto-accompaniment patterns that are played
by the keyboard. This means that when a rhythm or auto-
accompaniment pattern is being played by the keyboard, the
number of notes (polyphony) available for keyboard play is
reduced. Also note that some of the tones offer only 6-note
polyphony.
When rhythm or auto accompaniment is playing, the
number of sounds simultaneously played is reduced.
Though you can sound up to 12 notes at one time, only the
last four keyboard keys pressed light up.
LK120_e_13-19.p65 10.3.19, 5:27 PM15
E-16
NOTE
If you leave the tuning screen on the display for about five
seconds without doing anything, the screen is automatically
cleared.
In step 2 of the above procedure, you could also use the number
buttons to input a value from 00 to 50.
Pressing both of the TEMPO/VALUE buttons (
/ ) at the
same time returns the tuning setting to 00.
Pressing the SONG BANK button changes the tuning setting
to 00.
The tuning setting does not affect any of Song Bank tunes.
You can tune the keyboard within a range of approximately
±50 cents (100 cents = 1 semitone).
The tuning setting is automatically set to 00 whenever you turn
the keyboard on.
Pressing the DEMO button changes the tuning setting to 00.
The tuning operation does not affect rhythm (99 PERCUSSION).
Playing the demo tunes
You can set up the keyboard to continually play its 100 built-
in Song Bank tunes.
Keyboard keys light to indicate the melody notes of the demo
tune as it plays.
To start demo tune play
1.
Switch power on and adjust the volume level.
2.
Press the DEMO button.
Demo tune play continues in a sequential endless loop
until you switch it off.
The number and name of the demo tune currently
playing are shown on the display.
You can play along on the keyboard while a demo
tune is playing back.
3.
You can change the demo tune play being played
by pressing the number buttons.
The Song Bank tunes play back in tune number
sequence, starting from the one you select.
To stop demo tune play
Press the DEMO button or START/STOP button again to stop
demo tune play.
NOTE
If you leave the transpose screen on the display for about five
seconds without doing anything, the screen is automatically
cleared.
You cannot change the transpose setting while the keyboard is
in the Song Bank Mode.
In step 2 of the above operation, you could also use the number
buttons 0 to 5 to specify C through F.
Pressing both of the TEMPO/VALUE buttons (
/ ) at the
same time returns the transpose setting to C(0).
The transpose setting is automatically set to C(0) whenever
you turn keyboard power on.
The transpose setting is automatically set to C(0) whenever
you press the SONG BANK button.
The pitch of a transposed note depends on the tone you are
using. If the transpose operation causes a note to exceed the
range of the tone you are using, the same note in the highest
octave of the tones range is substituted.
The transpose operation does not affect tone number 99
(PERCUSSION) or auto-accompaniment rhythms.
Transposing tones 75 through 79 and 90 through 96 changes
the range of keys to which each of the tones is assigned.
The transpose setting is automatically set to C(0) whenever
you press the DEMO button.
To tune the keyboard
A simple operation lets you tune the keyboard to another
musical instrument.
1.
While in any mode besides the Song Bank Mode
(indicated when the SONG BANK indicator is
lit), hold down the TONE button and press the
SONG BANK button.
Perform step 2 within five seconds after performing
step 1.
2.
Use the TEMPO/VALUE buttons to change the
tuning of the keyboard.
Example: To lower tuning by 20
Tune
Tune
(
)
LK120_e_13-19.p65 10.3.19, 5:27 PM16
E-17
6.
Use the TEMPO/VALUE buttons to adjust the
tempo of the rhythm.
Each time you press one of the TEMPO/VALUE
buttons while the tempo value is displayed, the tempo
setting changes one step, within the range of 040 to
255.
The initial default tempo setting when you turn on
power is 120.
After displaying the current tempo setting by pressing
the TEMPO/VALUE button in step 6, you can also
input the tempo setting you want by inputting a three-
digit value with the number buttons.
Holding down either of the TEMPO/VALUE buttons
changes the tempo setting at high speed.
To reset the tempo to the standard value of each
rhythm, press both TEMPO/VALUE buttons.
7.
To stop rhythm play, press the START/STOP
button again.
Using auto-accompaniment
This keyboard features 50 accompaniment patterns that let
you add full accompaniments to your performances
automatically. With auto-accompaniment, part of the
keyboard is reserved as an accompaniment keyboard. As you
play your chords on the accompaniment keyboard, the
accompaniment pattern adjusts automatically to follow the
progression you play.
You get a choice between two different methods for chord
play. FINGERED lets you play chords as you normally do,
while CASIO CHORD makes it possible to play fully formed
chords with one finger.
About the accompaniment keyboard
The lower (left) 1.5 octaves are reserved for use as an
accompaniment keyboard whenever you select CASIO
CHORD or FINGERED with the POWER/MODE selector.
The panel above the accompaniment keyboard keys is marked
with the names of the notes they play. The remainder of the
keyboard (the part that is not included in the accompaniment
keyboard) is called the melody keyboard. Please be sure to
remember these terms, because they will be used throughout
the rest of this manual.
Accompaniment
keyboard
Melody keyboard
The entire keyboard can be used for melody play while
the POWER/MODE selector is set to NORMAL.
( )
NOTE
Only the following buttons are enabled while a Song Bank tune
is being played.
VOLUME slider
Number buttons
START/STOP button
POWER/MODE selector (OFF)
DEMO button
KEY LIGHT button
SPEAK button
You cannot change the tone being used for the melody of a
Song Bank tune.
Playing rhythms
This keyboard features a collection of 50 exciting built-in
rhythm patterns. Each pattern provides percussion back up
for all your performances.
To select and play a rhythm
1.
Set the POWER/MODE selector to NORMAL.
2.
Find the rhythm you want to use in the Rhythm
List (page A-2) and note its rhythm number.
3.
Press the RHYTHM button.
When you do, the RHYTHM indicator appears.
The number and name that appear on the display
indicate the currently selected rhythm.
4.
Use the number buttons to input the 2-digit
rhythm number for the rhythm you want to use.
Example: To select 37 SAMBA, input 3 and then 7.
Be sure to always specify a 2-digit number.
If you discover a mistake before you input the second
digit, press the RHYTHM button to return to the
previously set rhythm number.
You can change to another rhythm even while the
current rhythm is sounding.
5.
Press the START/STOP button to start play of the
rhythm.
When you do, the selected rhythm starts to sound.
Samba
LK120_e_13-19.p65 10.3.19, 5:27 PM17
E-18
C
Caug
(*1)
Cm7
C7
5 (*1)
Cmadd9
Cm
Csus4
CM7
C7sus4
CmM7
Cdim
C7
Cm7
5
Cadd9
Cdim7
(*1)
*1 With this chords, the lowest note in your fingering is
always used as the root. Make sure that your fingering
correctly identifies the root you want to use.
5.
Continue pressing different keys on the
accompaniment keyboard to play your chord
progression.
6.
To stop auto-accompaniment play, press the
START/STOP button again.
Using standard fingerings
The FINGERED mode lets you play a wider variety of chords.
In this mode, you can start play of an accompaniment pattern
by pressing three or four of the accompaniment keyboard
keys.
This keyboard is capable of recognizing 15 different chords.
The following shows the fingerings of these chords with a
root of C. Note that you can omit the fifth notes (which are
shown inside parentheses in the illustrations below) to
produce 7, m7, M7, add9, madd9, and mM7 chords.
Using the CASIO CHORD system
The CASIO CHORD system lets you easily play the four main
types of chords. Play of chords is simplified as shown in the
chart below.
Example
C
(C Major
Chord)
Cm
(C Minor
Chord)
C7
(C Seventh
Chord)
Cm7
(C Minor
Seventh
Chord)
Keys
Pressing one
accompaniment
key
Pressing two
accompaniment
keys
Pressing
three
accompaniment
keys
Pressing four
accompaniment
keys
Type
Major
chord
Minor
chord
Seventh
chord
Minor
seventh
chord
CC DE FF
E GA
ABB
CC DE FE
CC DE FF
E GA
ABB
CC DE FE
CC DE FF
E GA
ABB
CC DE FE
CC DE FF
E GA
ABB
CC DE FE
NOTE
The bottom (leftmost) note that you play determines the name
of the chord. If the bottom note is a C for example, the keyboard
produces a C chord.
When pressing more than one accompaniment key, it makes
no difference whether the keys to the right of the bottom note
are white or black.
To play a CASIO CHORD auto-accompaniment
1.
Use the POWER/MODE selector to select CASIO
CHORD.
2.
Select an auto-rhythm as described under To
select and play a rhythm on page E-17.
3.
Start play of the rhythm.
If you want to start play of the normal rhythm pattern,
press START/STOP.
You can also use synchro start (page E-19) to start
rhythm play.
4.
Press either one or up to four keys on the
accompaniment keyboard, and the
corresponding accompaniment starts to play
automatically.
Chord name
LK120_e_13-19.p65 10.3.19, 5:27 PM18
E-19
Improvising with the preset patterns
Pressing the START/STOP button to start rhythm play causes
the normal version of the pattern to be played. You can also
play a variation of the rhythm using the operation described
below.
Using fill-in rhythm
You can insert a fill-in rhythm by pressing the SYNCHRO/
FILL-IN button while an auto-rhythm plays.
Using Synchro start
You can start the rhythm and accompaniment pattern at the
same time, with your play of the accompaniment keyboard.
To do this, follow the steps below.
1.
Set the POWER/MODE selector to the CASIO
CHORD or FINGERED position.
2.
Select an auto-rhythm.
3.
Press the SYNCHRO/FILL-IN button.
4.
Press the accompaniment keys to play the first
chord. As soon as you do, the auto-
accompaniment pattern begins to play.
5.
To stop the auto-accompaniment pattern play,
press the START/STOP button.
NOTE
If you set the POWER/MODE selector to NORMAL in step 1 on
page E-17, the operation in step 4 starts play of the rhythm
(percussion instruments) only.
IMPORTANT!
If you play one or two notes only in the left hand, or three
notes that do not make up a recognizable chord formation,
no sound will be produced. The FINGERED mode requires
a conventional three or four-note chord formation to
produce an auto-accompaniment. Also, note that auto-
chords only work in conjunction with rhythm patterns, and
not independently of them.
NOTE
The above examples show only one of the possible fingerings
for each chord. Note that you can play the notes that form a
chord in any combination. Each of the following fingerings for
example, produces the same C chord.
Accompaniment
keyboard
See the Fingered Chord Charts on page A-3 for
information on the fingerings of chords for all roots.
To play a FINGERED auto-accompaniment
1.
Use the POWER/MODE selector to select
FINGERED.
2.
Select an auto-rhythm as described under To
select and play a rhythm on page E-17.
3.
Start play of the rhythm.
If you want to start play of the normal rhythm pattern,
press START/STOP.
You can also use synchro start (on this page) to start
rhythm play.
4.
Play a chord on the accompaniment keyboard
to start play of the auto-accompaniment.
5.
Continue pressing keys on the accompaniment
keyboard to play your chord progression.
6.
To stop auto-accompaniment play, press the
START/STOP button again.
Chord name
LK120_e_13-19.p65 10.3.19, 5:27 PM19
E-20
3-Step Lesson System
Using 3-Step Lesson System
Even individuals who cannot play the keyboard at all can
follow along with the 100 built-in Song Bank tunes with the
ONE KEY PLAY buttons. You can also use the 3-Step Lesson
System to learn at your own pace. Play slowly at first until
you are able to play along at normal speed.
Of the 100 built-in tunes, numbers 00 through 83 feature auto-
accompaniment (auto-accompaniment tunes), while 84
through 99 are played using both hands (two-hand tunes).
The 3-Step Lesson System can be used with the following 3-
step lesson plan to master keyboard play.
Step 1: Master the timing
Pressing the ONE KEY PLAY buttons plays the
melody for an auto-accompaniment tune or the right
hand part for two-hand tunes. In both cases, the auto-
accompaniment (the left hand part in the case of two-
hand tunes) is played automatically by the keyboard.
In place of the ONE KEY PLAY buttons, you can also
press any key of the keyboard to play the melody or
right hand part. The purpose of this step is to
familiarize yourself with the timing required to play
melody notes.
Step 2: Master the melody
In this step, you use the display to learn which fingers
you should use to play, and the key light system to
learn which keyboard keys to press. You can play at
the pace you want, because the auto-accompaniment
or left hand part waits until you press the correct key.
Step 3: Play at normal speed
At this level, the keyboards keys still light to indicate
which notes to play, but they no longer wait for you
to press the correct key. The auto-accompaniment or
left hand part is played at normal speed.
NOTE
You may not be able to see the keyboard keys light under direct
sunlight or in other brightly lit areas.
3-Step Lesson System Tempo Setting
You can use the procedure in step 6 of the procedure on page
E-18 to set the tempo of the left-hand part for Song Bank and
3-Step Lesson System play (Step 1 through 3).
This means you can use a slower tempo at the beginning,
and then increase it as you learn. Press both of the TEMPO/
VALUE buttons ( and ) at the same time to return the
tempo to its initial preset setting.
To play a built-in Song Bank tune
1.
Look up the number of the tune you want to play
in the Song Bank list.
Not all of the available songs are shown on the song
bank list printed on the keyboard console. For a
complete list, see the Song List on page A-5.
2.
Press the SONG BANK button until the SONG
BANK indicator appears.
This causes the number and name of the currently
selected Song Bank tune to appear on the display.
3.
Input the two digit number for the tune you want
to play.
Example: To select 13 TWINKLE TWINKLE LITTLE
STAR, input 1 and then 3.
4.
Press the START/STOP button to start play of the
selected tune.
The tune you select plays repeatedly, with the
keyboard keys lighting to indicate the melody notes.
KEY LIGHT
SONG BANK
TONE
ONE KEY PLAY
SPEAK
STEP 1
START/STOP STEP 2
PART SELECT
STEP 3
Twinkle
LK120_e_20-25.p65 10.3.19, 5:28 PM20
E-21
5.
To stop Song Bank tune play, press the START/
STOP button again.
6.
To exit the Song Bank Mode, press the SONG
BANK button again.
When you do, the SONG BANK indicator goes out.
NOTE
Always enter two digits for the Song Bank number.
You can input a Song Bank tune number even while another
Song Bank tune is playing.
If you input the wrong first digit for a Song Bank tune number,
you can return to the previous setting by pressing the SONG
BANK button.
The RHYTHM button is disabled in the Song Bank Mode. If
you want to play a rhythm, press the SONG BANK button to
return to the normal mode first.
Key Lighting System Operation and
Display Contents During Song Bank Play
Keyboard keys light to show the keys that should be pressed
to play along with Song Bank tunes as they play back. At the
same time, the display shows fingerings, chord names, tempo
and other information.
kTwi n l e
FingeringChord name
Tempo value
Crossed Finger Indications
The display also shows when you have to cross fingers to
play notes, and in which direction your fingers should cross.
Example: Display for playing the notes below with the right
hand
C
EDA
B
3311
2
CEDAB
Using the Song Bank
Crossed finger display
B and C indicate that the index finger should cross over
the thumb.
C and D indicate that the thumb should cross under the
index finger.
Key Lighting During Song Bank Play
When you play back a Song Bank tune, keyboard keys light
to show you the notes that are being played.
Auto-accompaniment Song Bank Tune
Chord and melody part keys light.
NOTE
Some Song Bank tunes use chords (such as C6) that cannot
be played with the FINGERED setting (page E-18). In the
FINGERED mode, chords may sound different from the ones
produced by Song Bank tune playback, even if you finger the
chords as indicated by the lit keys.
Two-hand Song Bank Tune
Left hand and right hand part keys light.
Melody note lights.
Chord
The root (the C-note of
a C-chord) and other
notes that make up the
chord alternately light.
Left hand part Right hand part
LK120_e_20-25.p65 10.3.19, 5:28 PM21
E-22
Key Lighting System Operation and Display
Contents During 3-step Lesson Play
Whenever you select an Auto Accompaniment tune (00 to
83) for 3-step lesson play, the key lighting system shows you
which keys to press, while the display shows you the
fingerings.
Note Pitch
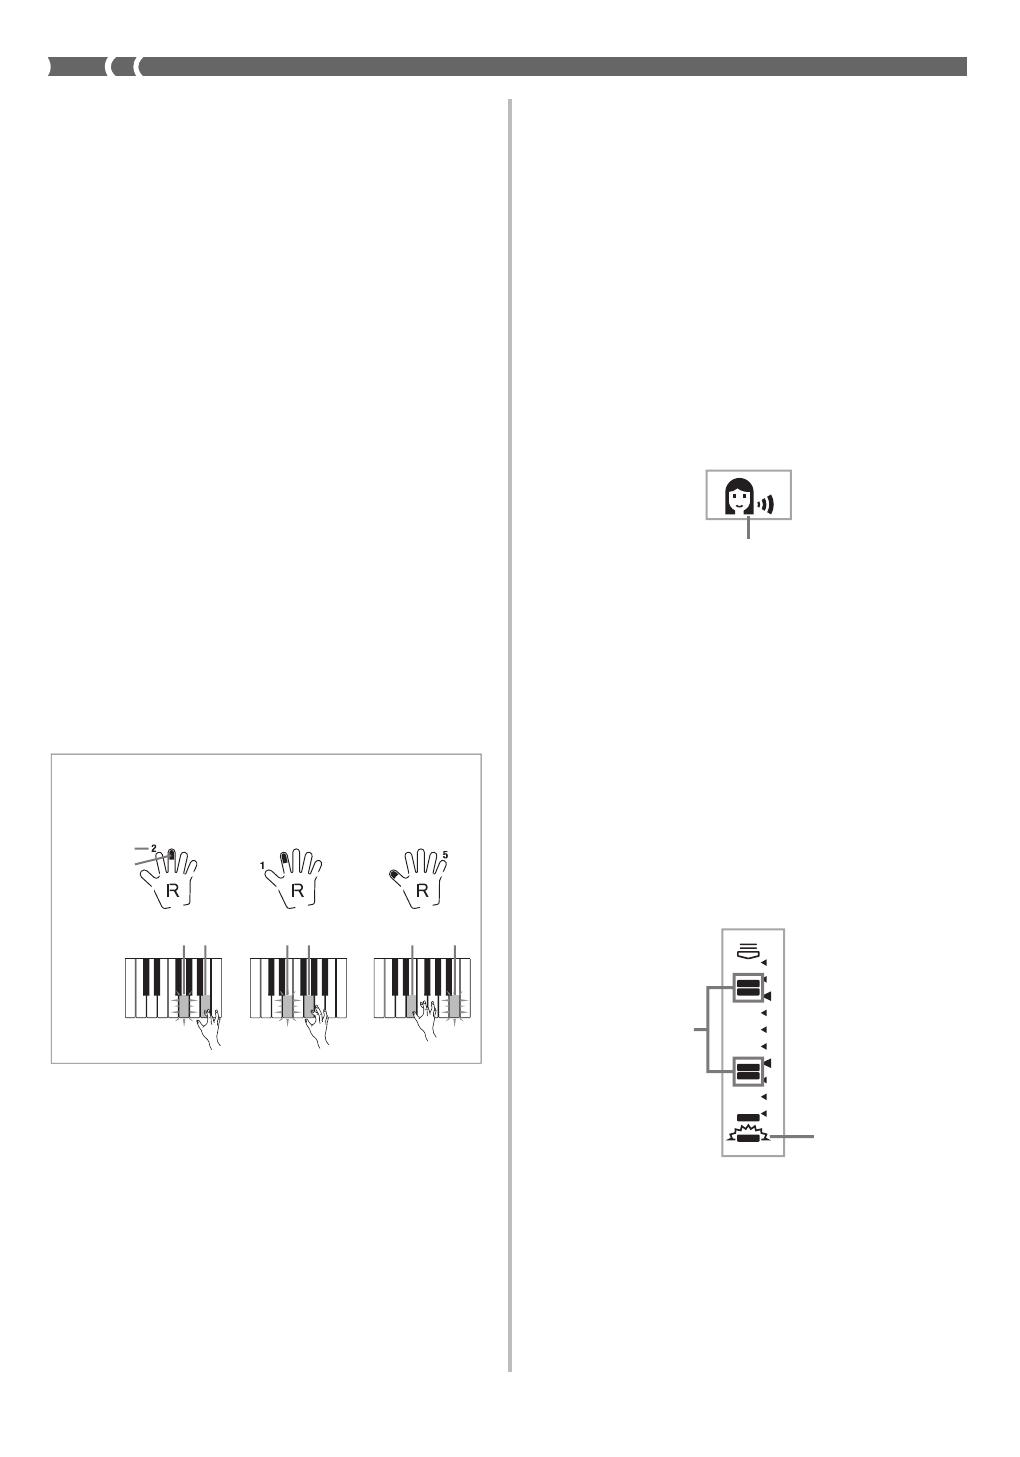
The keyboard key that should be pressed lights. The fingers
you should use to play the notes are also shown on the display.
Note Length
Keyboard keys stay lit for as long as the note should be
played. The fingerings also remain on the display for the
length of the note.
Next Note
The keyboard key for the next note to be played flashes, while
a number appears on the display near the finger you should
use to play the next note.
Series of Same Pitch Notes
The keyboard key light turns off momentarily between the
notes and lights again for each successive note. The fingerings
also turn off and back on again.
Flash
Next note
Current note
Lit
Flash
Lit
Flash
1st Note 2nd Note 3rd Note
Lit
Key light
Example: When play requires pressing keys with fingers
3, 2, and then 1
Voice Fingering Guide
Voice fingering guide uses a simulated human voice to call
out fingering numbers during Step 1 and Step 2 one-hand
part practice. If you need to press a key with your thumb, for
example, voice fingering guide says, One! In the case of a
chord to be played with your thumb, middle and little finger,
voice fingering guide says, One, three, five!
Voice Fingering Guide calls out fingerings only when you do
not press the proper key when you should.
To turn voice fingering guide on and off
Use the SPEAK button to turn voice fingering guide on and
off.
Timing Indicator
The timing indicator helps you become familiar with tunes
you are playing for the first time by indicating the timing of
notes you play on the keyboard. Timing is easier to see when
you use a slow tempo during lesson play.
Using the Timing Indicator
The timing indicator shows the timing of notes contained in
the currently selected part (R or L). Notes are indicated as
two-segment blocks that scroll from the top of the display,
down to the bottom. A note is played when its block reaches
the bottom of the display.
Each two-segment block can indicate one or more notes,
depending on the tune you are playing.
NOTE
The Timing Indicator shows note timing whenever you play back
a Song Bank tune and during a 3-Step Lesson.
Note that the Timing Indicator shows approximate timing only.
Voice fingering guide indicator
NOTE
Note length is not indicated when you are using two-hand tunes
(84 to 99) with 3-Step Lesson Steps 1 and 2. As soon as you
press a lit key, it goes out and the next key to be played starts
to flash.
Note length is indicated by the key light system when you use
a two-hand tune with Step 3. In this case, the next key to be
pressed does not flash when you press a lit key and the next
finger number does not appear on the display. Only the current
finger number is shown.
Upcoming note
timing
Note played
here
LK120_e_20-25.p65 10.3.19, 5:28 PM22
E-23
Turning Off Key Lighting
1.
Press the KEY LIGHT button.
The KEY LIGHT indicator disappears when the key
light system is turned off.
Press the KEY LIGHT button again to turn key lighting
back on.
NOTE
Key lighting turns on automatically in any of the following cases:
When keyboard power is turned on.
When the SONG BANK button is pressed in the normal mode
(page E-20).
Number of Simultaneously Lit Keys
Up to four keyboard keys can be lit at the same time.
To change the tone used for the melody
of a Song Bank tune
1.
Following step 3 of the procedure on page E-20,
press the TONE button.
Both the SONG BANK indicator and TONE indicator
appear, along with the tone number and name of the
tone that is currently assigned to the keyboard.
2.
Input a value to select the tone you want to use.
NOTE
Selecting another Song Bank tune switches the tone setting to
the newly selected tunes preset melody tone.
The tone assigned to the keyboard is the same one specified
for the melody of the Song Bank tune.
The above procedure can be used to change the Song Bank
melody tone before starting play or while play is already in
progress.
You can also change the tone of two-hand tunes (tune numbers
84 to 99). Note however, that selecting a sustainable tone (like
an organ tone) when using 3-Step Lesson Step 1 or Step 2 (in
which accompaniment waits for correct input from you before
proceeding), can cause notes of the auto accompaniment to
be sustained while the keyboard is waiting for your input. If this
happens, play something on the keyboard to stop the sustained
note.
Step 1: Master the timing
1.
Press the STEP 1 button.
When you do, the STEP 1 indicator appears.
After a count sounds, the keyboard stands by and
waits for you to play the first note of the tune. If the
tune includes intro measures, the keyboard enters
standby after the intro measures are complete.
2.
Press the ONE KEY PLAY buttons to play each
note of the tune.
The accompaniment (left hand) part of the tune
follows along as you play the melody (right hand)
part.
The keyboard key that corresponds to the next note
to be played flashes, and lights when you play the
note.
The rhythm (percussion) part does not sound.
3.
Try pressing any one of the keyboard keys in
place of the ONE KEY PLAY buttons.
Pressing any keyboard key plays the correct melody
(right hand part) note.
Pressing more than one key at the same time counts
as a single melody note. Pressing a key while another
key is held down is counted as two melody notes.
4.
To stop play at any time, press the START/STOP
button.
When you do, the STEP 1 indicator goes out.
kTwi n l e
Fingering
The correct note is played even if you do
not press the key that is lit.
KEY LIGHT indicator
LK120_e_20-25.p65 10.3.19, 5:28 PM23
E-24
Step 3: Play at normal speed
1.
Press the STEP 3 button.
When you do, the STEP 3 indicator appears.
Play starts after a count sounds.
2.
Play along on the keyboard, following the keys
as they light.
The accompaniment (left hand) part of the tune plays
at normal speed, regardless of what you play on the
keyboard.
With an auto-accompaniment tune, the keyboard key
that corresponds to the next note to be played flashes,
and lights when the note should be played.
With a two-hand tune, the applicable keyboard key
remains lit as long as its note plays. In this case,
however, the key for the next note to be played does
not flash. Keys light when their notes start to play.
3.
To stop play at any time, press the START/STOP
button.
When you do, the STEP 3 indicator goes out.
Step 2: Master the melody
1.
Press the STEP 2 button.
When you do, the STEP 2 indicator appears.
After a count sounds, the keyboard stands by and
waits for you to play the first note of the tune. If the
tune includes intro measures, the keyboard enters
standby after the intro measures are complete.
2.
Play the notes indicated by the 3-Step Lesson
System.
The accompaniment (left hand) part of the tune
follows along as you play the melody (right hand)
part.
The keyboard key that corresponds to the next note
to be played flashes, and lights when you play the
note.
The rhythm (percussion) part does not sound.
3.
To stop play at any time, press the START/STOP
button.
When you do, the STEP 2 indicator goes out.
Press keyboard keys as they light. More than one
key may light when you are playing a two-hand tune.
Press all keys that light.
Fingering
kTwi n l e
Fingering
kTwi n l e
LK120_e_20-25.p65 10.3.19, 5:28 PM24
E-25
To practice the left hand part
Once you master right hand part play, you can use the two-
hand tunes (numbers 84 through 99) to practice left hand part.
1.
Press the SONG BANK button until the SONG
BANK indicator appears.
This causes the number and name of the currently
selected Song Bank tune to appear on the display.
2.
Input the two digit number for the tune you want
to play.
3.
Press the PART SELECT button to switch the left
hand play.
4.
Press the STEP 1, STEP 2, or STEP 3 button.
When you do, the STEP 1, STEP 2, or STEP 3 indicator
appears.
After a count beat sounds, the right-hand part starts
to play and the keys for the left-hand part notes flash.
5.
Press the PART SELECT button to return the part
selection to its previous setting.
6.
To interrupt play of the melody, press the START/
STOP button.
When you do, the STEP 1, STEP 2, or STEP 3 indicator
disappears.
Lit
LK120_e_20-25.p65 10.3.19, 5:28 PM25
E-26
Technical Reference
Troubleshooting
Be sure to check the following table whenever you experience problems with keyboard operation.
CauseSymptom Action
No sound when keyboard keys
are pressed.
Any of the following symptoms
while using battery power.
Key light stays on.
RHYTHM button does not
work.
1. Power supply problem.
2. Volume setting is too low.
3. Headphones are plugged into
the keyboard.
4. The POWER/MODE selector is
in the CASIO CHORD or
FINGERED position.
5. Tone 99 PERCUSSION is
selected and you are pressing
keys that are not assigned tones.
Low battery power
Keyboard is waiting for play of
the correct note during Step 1
or Step 2 play.
Keyboard is in the Song Bank
Mode.
1. Correctly attach the AC
adaptor, make sure that
batteries (+/) are facing
correctly, and check to make
sure that batteries are not dead.
2. Use the VOLUME slider to
increase volume.
3. Unplug the headphones from
the PHONES/OUTPUT jack.
4. Normal play is not possible on
the accompaniment keyboard
while the POWER/MODE
selector is set to CASIO
CHORD or FINGERED.
Change the POWER/MODE
selector setting to NORMAL.
5. While 99 PERCUSSION is
selected, you can use only keys
that are marked on the console
with illustrations of percussion
instruments.
Replace the batteries with a set
of new ones or use the AC
adaptor.
1. Press the lit key to continue with
Step 1 or Step 2 play.
2. Press the START/STOP button
to quit Step 1 or Step 2 play.
Press the SONG BANK button
to return to the normal mode.
See Page
Page E-11
Page E-14
Page E-13
Page E-17
Page E-14
Page E-11
Pages
E-23, 24
Pages
E-23, 24
Page E-20
Instrument does not turn on
Display that is flickering, dim, or difficult to read
Abnormally low speaker/headphone volume
Distortion of sound output
Occasional interruption of sound when playing at high volume
Sudden power failure when playing at high volume
Flickering or dimming of the display when playing at high volume
Continued sound output even after you release a key
A tone that is totally different from the one that is selected
Abnormal rhythm pattern and Song Bank play
LK120_e_26-29.p65 10.3.19, 5:28 PM26
E-27
CauseSymptom Action
See Page
This is an unavoidable result of the digital sampling process,* and does not indicate
malfunction.
* Multiple digital samples are taken for the low range, middle range, and high range of
the original musical instrument. Because of this, there may be a very slight difference
in tonal quality and volume between sample ranges.
A tones quality and volume
sounds slightly different
depending where it is played on
the keyboard.
Cannot change TRANSPOSE/
TUNE settings.
Keyboard is in the Song Bank
Mode.
Demo tune play is in progress.
Press the SONG BANK button
to return to the normal mode.
Stop demo tune play.
Page E-20
Page E-16
LK120_e_26-29.p65 10.3.19, 5:28 PM27
E-28
Model: LK-120
Keyboard: 61 standard-size keys; 5 octaves
Key Light System: Can be turned on and off (up to 4 keys can be lit at the same time)
Tones: 100 presets
Polyphony: 12 notes maximum
3-Step Lesson System: Number of simultaneosly lit keys; 4
3-Steps
Playback: 1 tune repeat playback
Voice Fingering Guide: On/Off
Auto-accompaniment
Rhythm patterns: 50 presets
Tempo: Adjustable, (216 steps, = 40 to 255), initial value; 120
Chords: Two systems; CASIO CHORD, FINGERED
Other: Fill-in pattern, Synchro start
Song Bank tunes: 100 tunes
Musical Information Function: Tone, Auto Accompaniment, Song Bank numbers and names; tempo, 3 step
lesson display, chord name, fingering, timing indicator, key lighting, voice
fingering
Other Functions
Transpose: F
#
to C to F: half-note
Tuning: Adjustable A4 = Approx. 440 Hz ±50 cents, Initial value: A4 = Approx. 440 Hz
Speakers: 10 cm diameter × 2 (Output: 2W+2W)
I/O Terminals
Power Supply: DC 9.5V jack
Headphones/Output: Stereo standard jack (Output is monaural.)
[output impedance: 78, output voltage: 4V (RMS) MAX]
Power Supply: 2-way
Batteries: 6 AA-size zinc-carbon batteries or alkaline batteries
Battery Life: Approximately 4 hours continuous operation on alkaline batteries
Approximately 1 hour continuous operation on zinc-carbon batteries
AC adaptor : AD-E95100L
Auto Power Off: Approximately 6 minutes after the last operation
Power Consumption: 9.5 V 7.7 W
Dimensions: 94.9 × 30.4 × 9.3 cm (37
3
/
8
× 11
15
/
16
× 3
11
/
16
inch)
Weight: Approximately 3.4 kg (7.5 lbs) (without batteries)
Specifications
* Designs and specifications are subject to change without notice.
LK120_e_26-29.p65 10.4.5, 5:59 PM28
E-29
Be sure to read and observe the following operating precautions.
Location
Avoid the following locations for this product.
Areas exposed to direct sunlight and high humidity
Areas subjected to temperature extremes
Near a radio, TV, video deck, or tuner
The above devices will not cause malfunction of the product, but the product can cause interference in the audio or video of a
nearby device.
User Maintenance
Never use benzine, alcohol, thinner, or other chemical agents to clean the product.
To clean the product or its keyboard, wipe with a soft cloth moistened in a weak solution of water and a mild neutral detergent.
Wring all excess moisture from the cloth before wiping.
Included and Optional Accessories
Use only accessories that are specified for use with this product.
Use of unauthorized accessories creates the risk of fire, electric shock, and personal injury.
AC Adaptor Handling Precautions
Use a power outlet that is easily accessible so you can unplug the AC adaptor when a malfunction occurs or whenever else you
need to do so.
The AC adaptor is intended for indoor use only. Do not use it where it might be exposed to splashing or moisture. Do not place
any container, such as a flower vase, that contains liquid on the AC adaptor.
Store the AC adaptor in a dry place.
Use the AC adaptor in an open, well-ventilated area.
Never cover the AC adaptor with newspaper, a table cloth, a curtain, or any other similar item.
Unplug the AC adaptor from the power outlet if you do not plan to use the product for a long time.
Never try to repair the AC adaptor or modify it in any way.
AC adaptor operating environment
Temperature: 0 to 40°C
Humidity: 10% to 90% RH
Output polarity:
Weld Lines
Lines may be visible on the exterior of the product. These are weld lines that result from the plastic molding process. They are
not cracks or scratches.
Musical Instrument Etiquette
Always be aware of others around you whenever using this product. Be especially careful when playing late at night to keep the
volume at levels that do not disturb others. Other steps you can take when playing late at night are closing windows and using
headphones.
Any reproduction of the contents of this manual, either in part or its entirety, is prohibited. Except for your own, personal
use, any other use of the contents of this manual without the consent of CASIO is prohibited under copyright laws.
IN NO EVENT SHALL CASIO BE LIABLE FOR ANY DAMAGES WHATSOEVER (INCLUDING, WITHOUT LIMITATION,
DAMAGES FOR LOSS OF PROFITS, BUSINESS INTERRUPTION, LOSS OF INFORMATION) ARISING OUT OF THE
USE OF OR INABILITY TO USE THIS MANUAL OR PRODUCT, EVEN IF CASIO HAS BEEN ADVISED OF THE
POSSIBILITY OF SUCH DAMAGES.
The contents of this manual are subject to change without notice.
The actual appearance of the product may be different from that shown in the illustrations in this Users Guide.
Company and product names used in this manual may be registered trademarks of others.
Operating Precautions
LK120_e_26-29.p65 10.3.19, 5:28 PM29
¡Importante!
Tenga en cuenta la información importante antes de usar este producto.
Antes de usar el adaptador de CA AD-E95100L opcional para energizar la unidad, asegúrese
primero de verificar el adaptador de CA por si tiene algún daño. Verifique cuidadosamente
el cable de alimentación por rotura, cortes, alambres expuestos y otros daños serios. No
permita que los niños utilicen un adaptador de CA seriamente dañado.
No intente recargar las pilas.
• No utilice pilas recargables.
• No mezcle pilas usadas con pilas nuevas.
• Utilice las pilas recomendadas u otras de tipo equivalente.
• Asegúrese siempre de que los polos positivo (+) y negativo (–) se orienten correctamente
como se indica cerca del compartimiento de pilas.
• Reemplace las pilas tan pronto como sea posible después de cualquier indicación de que
están débiles.
• No ponga en cortocircuito los terminales de pila.
• El producto no es para ser usado por niños menores de 3 años.
• Utilice solamente el adaptador de CA CASIO AD-E95100L.
El adaptador de CA no es un juguete.
• Asegúrese de desconectar el adaptador de CA antes de limpiar el producto.
Manufacturer:
CASIO COMPUTER CO.,LTD.
6-2, Hon-machi 1-chome, Shibuya-ku, Tokyo 151-8543, Japan
Responsible within the European Union:
CASIO EUROPE GmbH
Casio-Platz 1, 22848 Norderstedt, Germany
Este símbolo es válido sólo en países de la UE.
LK120_s_00.p65 10.3.19, 5:38 PM2
S-1
Ejemplos de símbolos
Este símbolo triangular (
) significa
que el usuario debe tener cuidado.
(El ejemplo de la izquierda indica
precaución de descargas eléctricas.)
Este círculo con una línea
atravesada (
) significa que la
acción indicada no debe ser
realizada. Las indicaciones dentro
o cerca de este símbolo están
específicamente prohibidos. (El
ejemplo de la izquierda indica que
el desarmado está prohibido.)
El punto negro (
) significa que
la acción indicada debe ser
realizada. Las indicaciones dentro
de este símbolo son las acciones
que están específicamente referidas
para ser realizadas. (El ejemplo de
la izquierda indica que el enchufe
de alimentación debe ser
desenchufado del tomacorriente.)
Precauciones de seguridad
Antes de usar el instrumento, asegúrese de
leer cuidadosamente las instrucciones
contenidas en este manual.
Símbolos
En esta guía del usuario y sobre el producto
propiamente dicho, se usan varios símbolos
para asegurar que el producto sea usado de
manera segura y correcta, y para evitar lesiones
al usuario u otras personas, así como también
daños a la propiedad. A continuación se
muestran estos símbolos con sus significados.
PELIGRO
Este símbolo indica información que, si es
ignorado o se aplica incorrectamente, crea
el peligro de muerte o serias lesiones
personales.
ADVERTENCIA
Esta indicación estipula la existencia de
riesgos de muerte o lesiones serias, si el
producto llega a operarse incorrectamente
al ignorarse esta indicación.
PRECAUCIÓN
Esta indicación estipula la existencia de
riesgos de lesiones, así también como la
posibilidad de que ocurran daños físicos,
solamente si el producto se opera
incorrectamente ignorándose esta
indicación.
LK120_s_01-07.p65 10.3.19, 5:39 PM1
S-2
El uso inadecuado del cable eléctrico
del adaptador de CA puede dañarlo
o romperlo, creando el riesgo de
incendios y descargas eléctricas.
Asegúrese siempre de observar las
precauciones siguientes:
No coloque objetivos pesados
sobre el cable ni lo exponga al calor.
No trate de modificar el cable ni
doblarlo excesivamente.
No tuerza ni estire el cable.
Si el cable eléctrico o enchufe
llega a dañarse, comuníquese con
su vendedor original o proveedor
de servicio CASIO autorizado.
No toque el adaptador de CA
mientras sus manos están mojadas.
Haciéndolo crea el riesgo de
descargas eléctricas.
Utilice el adaptador de CA en
donde no será salpicado con agua.
El agua crea el riesgo de incendio y
descargas eléctricas.
No coloque un florero u otro
contenedor lleno de líquido en la
parte superior del adaptador. El
agua crea el riesgo de incendios y
descargas eléctricas.
Pilas
El uso inadecuado de las pilas puede
ocasionar que tengan fugas
resultando en daños a objetos
cercanos, o que exploten, creando el
riesgo de incendios y lesiones
personales. Asegúrese siempre de
observar las precauciones siguientes:
No intente desarmar las pilas ni
permita que se pongan en
cortocircuito.
No exponga las pilas al calor ni las
descarte incinerándolas.
No mezcle pilas usadas con pilas
nuevas.
No mezcle pilas de tipo diferentes.
No cargue las pilas.
Asegúrese de que los extremos
positivo (+) y negativo () de las
pilas se orienten correctamente.
PELIGRO
Pilas alcalinas
Si el fluido que fuga de las pilas
alcalinas llega a ponerse en contacto
con sus ojos, realice los pasos siguientes:
1. ¡No frote sus ojos! Enjuague con
agua.
2. Comuníquese con su médico
inmediatamente.
Dejando el fluido de pilas alcalinas
en sus ojos puede ocasionar la pérdida
de su vista.
ADVERTENCIA
Humo, olores anormales, sobrecalentamientos
El uso continuo del producto mientras
está emitiendo humo u olores
anormales, o mientras está
sobrecalentado o presentando otras
anormalidades, crea el riesgo de
incendios y descargas eléctricas. Realice
de inmediato los pasos siguientes.
1. Desactive la alimentación.
2. Si está usando el adaptador de CA
para energizar el producto,
desenchufe desde el tomacorriente.
3. Comuníquese con su vendedor
original o un proveedor de servicio
CASIO autorizado.
Adaptador de CA
El uso inadecuado del adaptador
de CA crea el riesgo de incendios y
descargas eléctricas. Asegúrese
siempre de observar las
precauciones siguientes.
Asegúrese de usar solamente el
adaptador de CA especificado
para este producto.
Utilice solamente una fuente de
alimentación cuyo voltaje se
encuentre dentro de los límites
marcados en el adaptador de CA.
No sobrecargue las tomas
eléctricas ni los cables de
extensión.
LK120_s_01-07.p65 10.3.19, 5:39 PM2
S-3
Bolsas plásticas
No coloque las bolsas plásticas que
vienen con el producto y sus
accesorios sobre la cabeza, ni se lo
lleve a la boca.
Haciéndolo crea el riesgo de
ocasionar sofocaciones. Se requiere
particular precaución en este asunto
en la presencia de niños pequeños.
No se suba encima del producto o soporte.*
Subiéndose encima del producto o
soporte puede ocasionar que se
vuelque o se dañe. Se requiere
particular precaución en este asunto
en la presencia de niños pequeños.
Ubicación
Evite ubicar el producto sobre una
superficie inestable, o sobre una
superficie sin uniformidad o
cualquier otra ubicación inestable.
Una superficie inestable puede
ocasionar que el producto se caiga,
creando el riesgo de lesiones
personales.
No incinere el producto.
No tire el producto al fuego.
Haciéndolo puede ocasionar que
explote, y crear el riesgo de
incendios y lesiones personales.
Agua y objetos extraños
El agua, otros líquidos y objetos
extraños (tales como objetos
metálicos, lápices, etc.) que ingresan
en el producto crean el riesgo de
incendios y descargas eléctricas.
Realice de inmediato los pasos
siguientes:
1. Desactive la alimentación.
2. Si está usando el adaptador de CA
para energizar el producto,
desenchufe desde el tomacorriente.
3. Comuníquese con su vendedor
original o un proveedor de
servicio CASIO autorizado.
Desarmado y modificación
No intente desarmar este producto
ni modificarlo de ninguna manera.
Haciéndolo crea el riesgo de
descargas eléctricas, lesiones por
quemadura y otras lesiones
personales. Deje toda inspección
interna, ajuste y reparación que sea
realizado por su vendedor original
o un proveedor de servicio CASIO
autorizado.
Caída e impactos
El uso continuado de este producto
después de que ha sido dañado al
dejarlo caer o por impactos externos,
crea el riesgo de incendios o
descargas eléctricas. Realice de
inmediato los pasos siguientes:
1. Desactive la alimentación.
2. Si está usando el adaptador de CA
para energizar el producto,
desenchufe desde el tomacorriente.
3. Comuníquese con su vendedor
original o un proveedor de
servicio CASIO autorizado.
LK120_s_01-07.p65 10.3.19, 5:39 PM3
S-4
Limpieza
Antes de limpiar el producto,
primero siempre desenchufe el
adaptador de CA desde el
tomacorriente. Dejando el
adaptador de CA enchufado crea el
riesgo de daños al adaptador de CA,
incendios y descargas eléctricas.
Pilas
El uso inadecuado de las pilas puede
ocasionar que tengan fugas del
fluido, resultando en daños a objetos
cercanos, o exploten creando el
riesgo de incendios y lesiones
personales. Asegúrese siempre de
observar las precauciones siguientes:
Utilice solamente las pilas
especificadas para usarse con este
producto.
Retire las pilas desde el producto
si tiene pensado no usarlo durante
mucho tiempo.
Conectores
Conecte solamente los dispositivos
y equipos especificados a los
conectores del producto. La
conexión de un dispositivo o equipo
no especificado crea el riesgo de
incendios y lesiones personales.
Ubicación
Evite la ubicación del producto en
los tipos de áreas siguientes. Tales
ubicaciones crean el riesgo de
incendios y descargas eléctricas.
Areas expuestas a una humedad
alta o gran cantidad de polvo.
Cerca de áreas de preparación de
comida, u otras áreas expuestas a
humos de aceite.
Cerca de equipos acondicionadores
de aire, sobre una alfombra caliente,
áreas expuestas a los rayos directos
del sol, dentro de un automóvil
estacionado a los rayos directos del
sol, y en cualquier otra área expuesta
a una temperatura muy alta.
PRECAUCIÓN
Adaptador de CA
El uso inadecuado del adaptador
de CA crea el riesgo de incendios
y descargas eléctricas. Asegúrese
siempre de observar las
precauciones siguientes.
No ubique el cable eléctrico
cerca de una estufa u otras
fuentes de calor.
No tire del cable cuando
desenchufe desde el tomacorriente.
Cuando desenchufe siempre tome
del adaptador de CA.
Inserte el adaptador de CA en
el tomacorriente en toda su
extensión posible.
Desenchufe el adaptador de CA
durante tormentas con
relámpagos o antes de salir de
viaje o durante otra ausencia
larga.
Por lo menos una vez al año,
desenchufe el adaptador de CA
desde el tomacorriente, y limpie
toda la suciedad que se
acumula en el área alrededor
de los contactos del enchufe.
Nunca utilice detergente para
limpiar el cable de alimentación,
especialmente la clavija de
alimentación y la toma.
Cambiando de lugar el producto
Antes de cambiar de lugar el
producto, siempre desenchufe el
adaptador de CA desde el
tomacorriente y desconecte todos
los otros cables y cables de conexión.
Dejando los cables conectados crea
el riesgo de daños a los cables,
incendios y descargas eléctricas.
LK120_s_01-07.p65 10.3.19, 5:39 PM4
S-5
Display
No aplique presión sobre el panel
LCD del display ni lo exponga a
fuertes impactos. Haciéndolo
ocasiona que el vidrio del panel
LCD se raje, creando el peligro
de lesiones personales.
En caso de que el panel LCD se
raje o rompa, no toque el líquido
dentro del panel. El líquido del
panel LCD puede ocasionar
irritación de la piel.
En caso de que el líquido del
panel LCD se ponga en contacto
con su boca, lave de inmediato su
boca con agua y comuníquese de
inmediato con su médico.
En caso de que el líquido del
panel LCD se ponga en contacto
con sus ojos o piel, enjuague de
inmediato con agua potable
durante por lo menos 15 minutos
y comuníquese de inmediato con
su médico.
Volumen del sonido
No escuche música en volúmenes muy
altos durante largos períodos de tiempo.
Esta precaución es especialmente
importante cuando utiliza auriculares.
Los ajustes de volumen muy altos
pueden dañar su audición.
Precaución con la salud
En casos extremadamente raros, la
exposición repentina a una fuente
de luz fuerte o luz destellante, con
algunos individuos pueden
ocasionarse espasmos musculares
momentáneos, pérdida de conciencia
u otros problemas físicos.
Si sospecha que pueda ser
susceptible a cualquier condición
tal como ésta, asegúrese de
consultar a su médico antes de
utilizar este producto.
Utilice este producto en una área
que se encuentre bien iluminada.
En caso de que sienta cualquiera
de los síntomas similares a
aquéllos descritos anteriormente
cuando se utiliza este producto,
pare de usarlo de inmediato y
comuníquese con su médico.
Objetos pesados
No coloque objetos pesados sobre la
parte superior del producto.
Haciéndolo puede ocasionar que el
producto se vuelque o el objeto se
caiga del mismo, creando el riesgo de
lesiones personales.
Arme el soporte* correctamente
Un armado incorrecto del soporte
puede hacer que se vuelque,
ocasionando que el producto se
caiga y creando el riesgo de lesiones
personales.
Asegúrese de armar el soporte
correctamente, siguiendo las
instrucciones de armado que vienen
con el mismo. Asegúrese de montar
el producto sobre el soporte
correctamente.
* El soporte se dispone como una
opción.
¡IMPORTANTE!
Cambie rápidamente las pilas o utilice el adaptador de CA
siempre que observe cualquiera de los síntomas siguientes.
El instrumento no se activa.
Presentación que está parpadeando, oscura o difícil de
leer.
Volumen de altavoz/auricular anormalmente bajo.
Salida de sonido distorsionada.
Interrupción ocasional de sonido cuando se ejecuta en
volúmenes altos.
Falla de alimentación repentina cuando se ejecuta en
volúmenes altos.
Parpadeo u oscurecimiento de la presentación cuando se
ejecuta en volúmenes altos.
La salida de sonido continúa aun después de soltar una
tecla.
Un sonido que es totalmente diferente del que se
selecciona.
Ejecución del banco de canciones y patrón de ritmo
anormal.
LK120_s_01-07.p65 10.3.19, 5:39 PM5
S-6
Indicadores de sincronización y digitación sobre la pantalla
Los indicadores sobre la pantalla fácil de comprender lo asisten a simplificar la ejecución del teclado,
aun a los novicios.
100 sonidos reales asombrosos
Función de acompañamiento automático mejorado para una
mayor versatilidad
50 patrones de acompañamientos automáticos incorporados.
100 melodías incorporadas del banco de canciones
Un total de 100 melodías del banco de canciones vienen incorporadas para que disfrute de la
reproducción o practique junto a la ejecución.
Sistema de lección de 3 pasos
Desarrolle sus capacidades musicales siguiendo las teclas a medida que se iluminan. Primero
familiarícese con el tiempo de sincronización de las notas, observando las teclas que se iluminan a
medida que reproduce una de las 100 melodías incorporadas del banco de canciones. Luego, practique
en conjunto en un ritmo (velocidad) que le sea confortable. Finalmente, trate de tocar la melodía del
banco de canciones en el tempo normal.
Durante la ejecución del paso 1 o paso 2 se utiliza una voz humana simulada para llamar las digitaciones
que debe utilizar para ejecutar las notas requeridas (Digitación por voz). La sincronización de las
notas también se indica sobre el display.
Acompañamiento automático
Simplemente especifique un acorde y el teclado produce automáticamente los patrones de ritmo,
bajo y acordes adecuados. Los rellenos en un toque hacen que los acompañamientos suenen
interesantes y naturales.
Función de transposición de clave
Una fácil operación cambia instantáneamente la clave del teclado.
Características principales
LK120_s_01-07.p65 10.3.19, 5:39 PM6
S-7
Contenido
Precauciones de
seguridad ...............................S-1
Características principales....
S-6
Guía general...........................S-8
Fijación de soporte de partitura musical....S-9
Referencia rápida ................S-10
Fuente de alimentación ...... S-11
Uso de una toma de corriente .................S-11
Uso de las pilas .......................................S-11
Desactivación automática........................S-12
Ajustes .....................................................S-12
Conexiones..........................S-13
Toma PHONES/OUTPUT ........................S-13
Accesorios y opciones.............................S-13
Operaciones básicas ..........S-14
Activación y desactivación de la
alimentación.............................................S-14
Para cambiar los sonidos ........................S-14
Otras funciones prácticas ........................S-15
Reproduciendo las melodías de
demostración ...........................................S-16
Ejecutando los ritmos ..............................S-17
Usando el acompañamiento
automático ...............................................S-17
Improvisando con los patrones de
ritmos programados.................................S-19
Sistema de lección de
3 pasos.................................S-20
Usando el sistema de lección de
3 pasos ....................................................S-20
Guía de digitación por voz.......................S-22
Indicador de sincronización .....................S-22
Paso 1: Aprendiendo la sincronización ...S-23
Paso 2: Aprendiendo la melodía..............S-24
Paso 3: Ejecución a la
velocidad normal......................................S-24
Para practicar la parte de la
mano izquierda ........................................S-25
Referencia técnica...............S-26
Solución de problemas ............................S-26
Especificaciones ......................................S-28
Precauciones
operacionales ......................S-29
Apéndice ............................... A-1
Lista de sonidos.........................................A-1
Lista de ritmos ...........................................A-2
Cuadros de acordes digitados...................A-3
Lista de canciones .....................................A-5
LK120_s_01-07.p65 10.3.19, 5:39 PM7
S-8
Guía general
1 2 3 4 5 6
7
E F G H
I J K L M N
8 A09 B 8
C D
LK120_s_08-12.p65 10.3.19, 5:39 PM8
S-9
1
Selector de alimentación/modo (POWER/MODE)
2
Deslizador de volumen (VOLUME)
3
Botón de sincronización/relleno
(SYNCHRO/FILL-IN)
4
Botón de inicio/parada (START/STOP)
5
Botón de demostración (DEMO)
6
Botón de iluminación de teclas (KEY LIGHT)
7
Botones de tempo/valor (TEMPO/VALUE)
8
Altavoces
9
Lista del banco de 100 canciones (100 SONG BANK)
0
Presentación
A
Lista de 50 ritmos (50 RHYTHMS)
B
Lista de 100 sonidos (100 TONES)
C
Nombres de notas básicas de acordes
D
Lista de instrumentos de percusión
E
Botón de ritmos (RHYTHM)
F
Botón de tono (TONE)
G
Botón del banco de canciones (SONG BANK)
H
Botones numéricos
LECCION EN 3 PASOS (3-STEP LESSON)
I
Botón Paso 1 (STEP 1)
J
Botón Paso 2 (STEP 2)
K
Botón Paso 3 (STEP 3)
L
Botón selector de partes (PART SELECT)
M
Botones de ejecución mediante una sola tecla
(ONE KEY PLAY)
N
Botón de altavoz (SPEAK)
* Fijación de soporte de partitura musical
Inserte ambos extremos del soporte musical provisto
con el teclado en los dos orificios sobre la superficie
superior.
Panel trasero
O
Toma de auriculares/salida
(PHONES/OUTPUT)
Para la conexión de auriculares disponibles
comercialmente. La salida de los altavoces
es automáticamente cortada cuando se
conectan los auriculares.
P
Toma de 9,5 V CC (DC 9.5V)
O P
LK120_s_08-12.p65 10.3.19, 5:39 PM9
S-10
1
Ajuste el selector POWER/MODE
a NORMAL.
2
Presione el botón SONG BANK.
3
Busque la melodía que desea ejecutar en la lista
del banco de canciones, y luego use los botones
numéricos para ingresar su número de dos
dígitos.
Para seleccionar 13 TWINKLE TWINKLE LITTLE
STAR, ingrese 1 y luego 3.
No todas las canciones disponibles se muestran en la
lista del banco de canciones impresa en la consola del
teclado. Para ver una lista completa, consulte Lista
de canciones en la página A-5.
4
Presione el botón STEP 1 o botón STEP 2.
Cuando lo realiza, aparece el indicador STEP 1 o
indicador STEP 2.
El teclado hace sonar un tiempo de cuenta y espera
para que toque algo sobre el teclado. Las teclas que
necesita presionar primero destellan.
Ejecute de acuerdo con las digitaciones que aparecen
sobre el display.
Referencia rápida
Esta sección proporciona un bosquejo rápido de la operación del teclado, usando los pasos uno y dos de la función de lección de
3 pasos. Para las explicaciones detalladas de estos pasos, vea la página S-21.
5
Ejecute la parte de melodía sobre el teclado.
<Si presiona el botón STEP 1 en el paso
4
...>
Ejecute las notas con los botones ONE KEY PLAY.
El tempo de acompañamiento se ajusta
automáticamente para tocar en conjunto con su
melodía.
Ejecute las notas sobre el teclado.
Una submelodía (obbligato) se ejecuta en
sincronización con la melodía.
Con el paso 1, se ejecuta la nota de melodía correcta
sin tener en cuenta la tecla del teclado que presiona.
<Si presiona el botón STEP 2 en el paso
4
...>
Ejecute las notas sobre el teclado, presionando
las teclas a medida que se iluminan.
Mantenga la tecla presionada en tanto permanece
iluminada.
Si selecciona cualquier melodía desde el número 84
al 99, la tecla iluminada se apaga tan pronto como la
presiona.
La tecla que corresponde a la nota siguiente que
necesita tocar destellará.
Luego de presionar la tecla de melodía correcta,
el acompañamiento procede a la nota siguiente.
1 2 3
4 5 5
Aparece el indicador
SONG BANK
Twinkle
kTwin le
Digitaciones
LK120_s_08-12.p65 10.3.19, 5:39 PM10
S-11
Fuente de alimentación
Funciona con una toma de corriente o con pilas.
¡IMPORTANTE!
Asegúrese de observar las Precauciones de seguridad
incluidas en este manual. El uso incorrecto de este
producto puede ocasionar riesgo de incendio o descargas
eléctricas.
Asegúrese de apagar el teclado digital antes de conectar o
desconectar el adaptador de CA, o antes de instalar o
extraer las pilas.
Uso de una toma de corriente
Asegúrese de usar solamente el adaptador de CA especificado
para este teclado. El uso de un adaptador de CA de diferente
tipo puede ocasionar un mal funcionamiento.
Adaptador de CA especificado:
AD-E95100L (clavija de la norma JEITA)
¡IMPORTANTE!
El adaptador de CA estará caliente después de un uso
prolongado. Esto es normal y no es señal de mal
funcionamiento.
Para evitar la rotura del cable, no coloque ningún objeto
encima del cable de alimentación.
Nunca introduzca objetos metálicos, lápices ni ningún otro
objeto en el terminal de 9,5 V CC del producto. Si lo
hiciese, podría existir riesgo de accidente.
Uso de las pilas
Puede utilizar seis pilas de tamaño AA.
Escoja pilas alcalinas o de zinc-carbón.
No utilice pilas Oxyride ni otras pilas a base de níquel.
Abra la tapa del compartimiento de las pilas situada en la
parte inferior del teclado digital, coloque las pilas y cierre la
tapa.
Asegúrese de que los extremos positivo (+) y negativo ()
de las pilas estén correctamente orientados.
1.
Retire la cubierta del
compartimiento de pilas.
2.
Coloque las 6 pilas de
tamaño AA en el
compartimiento de
pilas.
Asegúrese de que los
polos positivo (+) y
negativo () se orientan
correctamente.
3.
Inserte las lengüetas de
la cubierta del
compartimiento de
pilas en los orificios
provistos y cierre la
cubierta.
¡No lo doble! ¡No lo enrolle!
Adaptador de CA
Tomacorriente doméstico
Terminal 9,5 V CC
Lengüeta
LK120_s_08-12.p65 10.3.19, 5:39 PM11
S-12
Desactivación automática
El teclado digital se apagará automáticamente para ahorrar
energía tras un período de inactividad de aproximadamente
seis minutos.
Para inhabilitar la desactivación
automática
Sosteniendo presionado el botón TONE mientras se activa la
alimentación del teclado, inhabilita la desactivación
automática.
NOTA
Cuando la desactivación automática está inhabilitada, el teclado
no se desactiva automáticamente aunque se deje el teclado
sin operar durante un tiempo muy largo.
La desactivación automática queda automáticamente habilitada
cada vez que se conecta la alimentación del teclado.
Ajustes
Siempre que la alimentación del teclado es activada de nuevo
luego de ser desactivada mediante la operación del selector
POWER/MODE o apagado automático, todos los ajustes del
teclado son retornados a sus ajustes por omisión iniciales.
Información importante acerca de las pilas
Lo siguiente muestra la duración de pila aproximada.
Pilas alcalinas.......................................... 4 horas
Pilas de zinc carbón ............................... 1 hora
El valor anterior es la duración de pila estándar a
temperatura normal, con el volumen del teclado ajustado
al medio. Las temperaturas extremas o ejecutando en un
ajuste de volumen muy alto pueden acortar la duración
de las pilas.
Cualquiera de los síntomas siguientes indica alimentación
de pila baja. Cambie las pilas tan pronto como sea posible
siempre que observe cualquiera de los fenómenos
siguientes.
• El instrumento no se activa.
• Presentación que está parpadeando, oscura o difícil de
leer.
• Volumen de altavoz/auricular anormalmente bajo.
• Salida de sonido distorsionada.
• Interrupción ocasional de sonido cuando se ejecuta en
volúmenes altos.
Falla de alimentación repentina cuando se ejecuta en
volúmenes altos.
• Parpadeo u oscurecimiento de la presentación cuando
se ejecuta en volúmenes altos.
La salida de sonido continúa aun después de soltar una
tecla.
Un sonido que es totalmente diferente del que se
selecciona.
Ejecución del banco de canciones y patrón de ritmo
anormal.
LK120_s_08-12.p65 10.4.7, 2:12 PM12
S-13
Conexiones
Toma PHONES/OUTPUT
Antes de conectar auriculares u otro equipo estéreo, asegúrese
primero de disminuir los ajustes de volumen del teclado y
equipo conectado. Luego puede ajustar al nivel deseado una
vez que complete las conexiones.
[Panel trasero]
Conexión de auriculares (Figura
1
)
Conectando los auriculares corta la salida de los altavoces
incorporados del teclado, de modo que puede tocar aun tarde
durante la noche sin molestar a nadie.
Equipo de audio (Figura
2
)
Conecte el teclado a un equipo de audio usando un cable de
conexión disponible comercialmente con un enchufe estándar
en un extremo y dos enchufes PIN en el otro extremo. En
esta configuración, normalmente ajuste el selector de entrada
del equipo de audio al terminal (usualmente marcado AUX
IN o similar) en donde se conecta el cable del teclado. Para
los detalles completos vea la documentación para el usuario
que viene con el equipo de audio.
Amplificador de instrumento musical (Figura
3
)
Para conectar el teclado a un amplificador de instrumento
musical, utilice un cable de conexión disponible
comercialmente.
NOTA
Asegúrese de usar un cable de conexión que tenga enchufes
estándar en los extremos que conectar al teclado y amplificador.
[Ejemplo de conexión]
Terminal AUX IN o similar
del amplificador de audio.
IZQUIERDA
DERECHA
Enchufe estándar estéreo
Toma PHONES/OUTPUT
Conexión de audio
1
2
3
Amplificador de
teclado, amplificador
de guitarra, etc.
Enchufe
PIN
Blanco
Rojo
Accesorios y opciones
Utilice solamente los accesorios y opciones especificados para
este teclado. El uso de ítemes no autorizados crea el peligro
de incendios, descargas eléctricas y lesiones personales.
Solicite el catálogo de CASIO a su vendedor, para encontrar
información acerca de los accesorios vendidos por separado
para este producto, o visite el sitio web de CASIO en la
siguiente URL.
http://world.casio.com/
Amplificador de
teclado o guitarra
A la toma
PHONES/OUTPUT
del teclado
Enchufe estándar
INPUT
LK120_s_13-19.p65 10.3.19, 5:39 PM13
S-14
Esta parte del manual le proporciona la información básica
que necesita para usar el teclado.
Activación y desactivación de la
alimentación
1.
Ajuste el selector POWER/MODE a NORMAL.
2.
Presione las teclas del teclado.
3.
Utilice el deslizador VOLUME para ajustar el
volumen a un nivel relativamente bajo.
4.
Para desactivar la alimentación, ajuste selector
POWER/MODE a la posición OFF.
Para cambiar los sonidos
1.
Encuentre el sonido que desea usar en la Lista
de sonidos (página A-1) y anote su número de
sonido.
2.
Presione el botón TONE.
3.
Utilice los botones numéricos para ingresar el
número de 2 dígitos que identifica el sonido que
desea seleccionar.
Ejemplo: Para seleccionar 26 ACOUSTIC BASS,
ingrese 2 y luego 6.
GrandPno
Aparece el indicador
Aco .Bass
NOTA
Ingrese siempre dos dígitos para el número de sonido. Si
ingresa solamente un dígito, la presentación retorna
automáticamente al ajuste de sonido previo luego de unos
segundos.
Si cambia el ajuste de sonido mientras se presiona una tecla
del teclado, el sonido no cambia hasta que suelta la tecla y
presiona de nuevo una tecla del teclado.
Con ciertos sonidos (tales como sonidos de percusión y efectos
de sonido), puede haber muy poco o ningún cambio en la altura
tonal, cualquiera sea la tecla del teclado que se presiona.
Si ingresa erróneamente el primer dígito para un número de
sonido, puede retornar al ajuste previo presionando el botón
TONE.
Sonidos de la división del teclado
Algunas selecciones del banco de sonido dividen el teclado
y asignan dos o suatro sonidos al teclado. Entonces, el sonido
producido depende en la posición del teclado en el que se
ejecuta. Por ejemplo, BASS/PIANO (sonido 90) coloca BASS
sobre la izquierda y PIANO sobre la derecha del teclado.
<Ejemplo>
BASS/PIANO (Nº 90)
PERCUSSION (Nº 99)
PERCUSSION (sonido 99) asigna 35 sonidos de percusión
al teclado, como se muestra a continuación. Los sonidos
asignados a cada tecla se indican arriba del teclado.
Operaciones básicas
POWER/MODE DEMO
VOLUME TEMPO/VALUE RHYTHM
TONE
Number buttons
START/STOP
SYNCHRO/FILL-IN SONG BANK
Botones numéricos
BASS PIANO
LK120_s_13-19.p65 10.3.19, 5:39 PM14
S-15
Polifonía
El término polifonía se refiere al número máximo de notas
que pueden ejecutarse al mismo tiempo. Este teclado tiene
una polifonía de 12 notas, que incluye las notas que toca así
como también los ritmos y patrones de acompañamiento
automático que se ejecutan en el teclado. Esto significa que
cuando un ritmo o patrón de acompañamiento automático
está siendo ejecutado por el teclado, el número de notas
(polifonías) disponibles para tocar en el teclado se reduce.
También tenga en cuenta que algunos de los sonidos ofrece
solamente una polifonía de 6 notas.
Cuando se ejecuta un ritmo o acompañamiento automático,
se reduce el número de sonidos que se ejecutan
sumultáneamente.
Aunque se pueden generar hasta 12 notas al mismo tiempo,
solamente se iluminan las últimas cuatro teclas del teclado
presionadas.
Otras funciones prácticas
Para cambiar la clave del teclado
La función de transposición de este teclado le permite elevar
o descender la clave en incrementos de semitonos. Esto
significa que puede adaptarse fácilmente a la voz de
cualquiera, y puede eliminar los bemoles y altos de la música
haciéndola más fácil de ejecutar.
1.
Mientras se encuentra en cualquier modo que
no sea el modo banco de canciones (indicado
cuando el indicador SONG BANK se encuentra
iluminado), sostenga presionado el botón TONE
y presione el botón RHYTHM.
Lleve a cabo el paso 2 dentro de los cinco segundos
luego de realizar el paso 1.
2.
Utilice los botones TEMPO/VALUE para cambiar
la clave del teclado.
Ejemplo: Para cambiar la afinación a B (SI) (indicado
por -1 ya que es un tono debajo de C (DO),
que la afinación normal del teclado).
Trans
Trans
(
)
Afinación B (-1)Afinación normal
D
F
G
A
B
C
B
C
E
C
D
EF
GAB
C
<Teclas y sus indicadores>
<Nombres de notas>
B

CDEFGA C
F
#
G
A
B C D E
F
A
B
C
#
E
Tecla :
:
Presionando
:
Presionando
Presentación :
Trans
()
Trans
(
+
)
BASS DRUM
SIDE STICK
ACOUSTIC SNARE
HAND CLAP
ELECTRIC SNARE
LOW TOM 2
CLOSED HI-HAT
LOW TOM 1
PEDAL HI-HAT
MID TOM 2
OPEN HI-HAT
MID TOM 1
HIGH TOM 2
CRASH CYMBAL 1
HIGH TOM 1
RIDE CYMBAL 1
CHINESE CYMBAL
RIDE BELL
TAMBOURINE
SPLASH CYMBAL
COWBELL
CRASH CYMBAL 2
CLAVES
RIDE CYMBAL 2
HIGH BONGO
LOW BONGO
MUTE HIGH CONGA
OPEN HIGH CONGA
LOW CONGA
HIGH TIMBALE
LOW TIMBALE
HIGH AGOGO
LOW AGOGO
CABASA
MARACAS
LK120_s_13-19.p65 10.3.19, 5:39 PM15
S-16
NOTA
Si deja la pantalla de transposición sobre la presentación
durante unos cinco segundos sin realizar ninguna operación,
la pantalla se borra automáticamente.
El ajuste de transposición no puede cambiarse mientras el
teclado se encuentra en el modo de banco de canciones.
En el paso 2 de la operación anterior, también puede usar los
botones numéricos 0 a 5 para especificar C al F.
Presionando ambos botones TEMPO/VALUE (
/ ) al mismo
tiempo retorna el ajuste de transposición a C (0).
El ajuste de la transposición se ajusta automáticamente a
C (0) siempre que activa la alimentación del teclado.
El ajuste de la transposición se ajusta automáticamente a
C (0) siempre que presiona el botón SONG BANK.
La altura tonal de la nota transpuesta depende en el sonido
que está usando. Si la operación de transposición ocasiona
que una nota exceda la gama del sonido que está usando, se
sustituye la misma nota en la octava más alta de la gama de
sonido.
La operación de transposición no afecta el número de sonido
99 (PERCUSSION) o ritmos de acompañamientos.
La transposición de sonidos 75 a 79 y 90 a 96 cambia la gama
de las teclas a las que se ha asignado cada uno de los sonidos.
El ajuste de la transposición se ajusta automáticamente a
C (0) siempre que presiona el botón DEMO.
Para afinar el teclado
Una simple operación le permite afinar el teclado a la gama
de otro instrumento musical.
1.
Mientras se encuentra en cualquier modo que
no sea el modo banco de canciones (indicado
cuando el indicador SONG BANK se encuentra
iluminado), sostenga presionado el botón TONE
y presione el botón SONG BANK.
Lleve a cabo el paso 2 dentro de los cinco segundos
luego de realizar el paso 1.
2.
Utilice los botones TEMPO/VALUE para cambiar
la afinación del teclado.
Ejemplo: Para disminuir la afinación en 20.
Tune
Tune
(
)
NOTA
Si deja la pantalla de afinación sobre la presentación durante
cinco segundos sin realizar ninguna operación, la pantalla se
borra automáticamente.
En el paso 2 del procedimiento anterior, también puede usar
los botones numéricos para ingresar un valor de 00 al 50.
Presionando ambos botones TEMPO/VALUE (
/ ) al mismo
tiempo retorna el ajuste de afinación a 00.
Presionando el botón SONG BANK cambia el ajuste de la
afinación a 00.
El ajuste de afinación no afecta ninguna de melodías del banco
de canciones.
El teclado puede afinarse dentro de una gama de
aproximadamente ±50 centésimas (100 centésimas =
1 semitono).
El ajuste de afinación se ajusta automáticamente a 00 siempre
que activa la alimentación del teclado.
Presionando el botón DEMO cambia el ajuste de afinación a 00.
La operación de afinación no afecta el ritmo (99 PERCUSSION).
Reproduciendo las melodías de
demostración
También puede preparar el teclado para tocar continuamente
las 100 melodías incorporadas del banco de canciones.
Las teclas del teclado se iluminan para indicar las notas de la
parte melódica de la melodía de demostración a medida que
se ejecuta.
Para iniciar la reproducción de la melodía
de demostración
1.
Active la alimentación del teclado y ajuste el
nivel del volumen.
2.
Presione el botón DEMO.
La reproducción de la melodía de demostración
continúa en secuencia y en un ciclo sin fin, hasta que
la desactiva.
El número y nombre de la melodía de demostración
que se reproduce actualmente aparece en el display.
Mientras se reproduce una melodía de demostración,
puede ejecutar en conjunto sobre el teclado.
3.
La melodía de demostración que está siendo
ejecutada puede cambiarse presionando los
botones numéricos.
Las melodías del banco de canciones se reproducen
en la secuencia de número de melodía, comenzando
desde la melodía que selecciona.
Para parar la reproducción de la melodía
de demostración
Para parar la reproducción de la melodía de demostración,
presione nuevamente el botón DEMO o botón START/STOP.
LK120_s_13-19.p65 10.3.19, 5:39 PM16
S-17
NOTA
Mientras una melodía del banco de canciones se encuentra
en ejecución, solamente se pueden usar los siguientes botones.
Deslizador VOLUME
Botones numéricos
Botón START/STOP
Selector POWER/MODE (OFF)
Botón DEMO
Botón KEY LIGHT
Botón SPEAK
El sonido que se está usando para la melodía del banco de
canciones no puede cambiarse.
Ejecutando los ritmos
Este teclado presenta una selección de 50 emocionantes
patrones de ritmos incorporados. Cada patrón proporciona
un fondo de percusión para todas sus ejecuciones.
Selección y ejecución de un ritmo
1.
Ajuste el selector POWER/MODE a NORMAL.
2.
Busque el ritmo que desea usar en la Lista de
ritmos (página A-2) y observe su número de
ritmo.
3.
Presione el botón RHYTHM.
Cuando lo hace, aparece el indicador RHYTHM.
El número que aparece en el display indica el ritmo
seleccionado actualmente.
4.
Utilice los botones numéricos para ingresar el
número de ritmo de 2 dígitos para el sonido que
desea usar.
Ejemplo: Para seleccionar 37 SAMBA, ingrese 3 y
luego 7.
Asegúrese de especificar siempre un número de 2
dígitos.
Si descubre que ha realizado un error antes de ingresar
el segundo dígito, presione el botón RHYTHM para
retornar al número de sonido ajustado previamente.
Puede cambiar a otro ritmo aun mientras el ritmo
actual se encuentra sonando.
5.
Presione el botón START/STOP para iniciar la
ejecución del ritmo.
Al hacerlo, el ritmo seleccionado comienza a sonar.
Samba
6.
Utilice los botones TEMPO/VALUE para ajustar
el tempo del ritmo.
Cada vez que presiona uno de los botones TEMPO/
VALUE mientras se visualiza el valor del tempo, el
ajuste del tempo cambia en un intervalo, dentro de la
gama de 040 a 255.
El ajuste de tempo por omisión inicial cuando activa
la alimentación es 120.
Luego de visualizar el ajuste de tempo actual
presionando un botón TEMPO/VALUE en el paso 6,
también puede ingresar el ajuste de tempo que desea
ingresando un valor de tres dígitos con los botones
numéricos.
Sosteniendo presionado cualquiera de los botones
TEMPO/VALUE el ajuste del tempo cambia en alta
velocidad.
Para reposicionar el tempo al valor estándar de cada
ritmo, presione ambos botones TEMPO/VALUE .
7.
Para parar la ejecución del ritmo, presione
nuevamente el botón START/STOP.
Usando el acompañamiento
automático
Este teclado presenta 50 patrones de acompañamiento que le
permiten agregar automáticamente acompañamientos
completos a sus ejecuciones. Con el acompañamiento
automático, la parte del teclado queda reservada como un
teclado de acompañamiento. A medida que ejecuta sus
acordes en el teclado de acompañamiento, el patrón de
acompañamiento se ajusta automáticamente para seguir las
progresiones que ejecuta.
Para la ejecución de acordes puede elegir entre dos métodos
diferentes. FINGERED le permite ejecutar acordes como lo
haría normalmente, mientras CASIO CHORD (los acordes
CASIO) le permite ejecutar acordes formados completamente
con un solo dedo.
Acerca del teclado de acompañamiento
La 1,5 octava inferior (izquierda) está reservada para usarse
como un teclado de acompañamiento siempre que selecciona
CASIO CHORD o FINGERED con el selector POWER/MODE.
El panel sobre las teclas del teclado de acompañamiento está
marcado con los nombres de las notas que ejecutan. El resto
del teclado (la parte que no está incluida en el teclado de
acompañamiento), es lo que se denomina teclado de melodía.
Recuerde estos términos, debido a que serán usados
frecuentemente a través del resto de este manual.
Teclado de
acompañamiento
Teclado de melodía
( )
El teclado entero puede usarse para la reproducción de
la melodía mientras el selector POWER/MODE se ajusta
a NORMAL.
LK120_s_13-19.p65 10.3.19, 5:39 PM17
S-18
Usando el sistema CASIO CHORD
El sistema de acordes CASIO CHORD le permite ejecutar
fácilmente los cuatro tipos de acordes. La ejecución de los
acordes está simplificada como se muestra en el cuadro
siguiente.
NOTA
La nota inferior (más hacia la izquierda) que ejecuta determina
el nombre del acorde. Si la nota inferior es una C (DO) por
ejemplo, el teclado produce un acorde DO.
Cuando se presiona más de una tecla de acompañamiento,
no hace diferencia en si las teclas a la derecha de la nota inferior
son blancas o negras.
Para ejecutar un acompañamiento
automático CASIO CHORD
1.
Utilice el selector POWER/MODE para
seleccionar CASIO CHORD.
2.
Seleccione un ritmo automático como se
describe en la sección Selección y ejecución
de un ritmo en la página S-17.
3.
Inicie la ejecución del ritmo.
Si desea iniciar la ejecución de un patrón de ritmo,
presione el botón START/STOP.
Para iniciar la ejecución del ritmo también puede usar
el inicio sincrónico (página S-19).
4.
Presione de una a cuatro teclas en el teclado de
acompañamiento, y el acompañamiento
correspondiente comienza a ejecutarse
automáticamente.
5.
Continúe presionando diferentes teclas en el
teclado de acompañamiento para ejecutar su
progresión de acordes.
6.
Para parar la ejecución del acompañamiento
automático, presione nuevamente START/STOP.
Usando las digitaciones normales
El modo FINGERED le permite ejecutar una amplia variedad
de acordes. En este modo, puede iniciar la ejecución de un
patrón de acompañamiento presionando tres o cuatro de las
teclas de acompañamiento.
Este teclado es capaz de reconocer 15 acordes diferentes. Lo
siguiente muestra las digitaciones de estos acordes con una
nota fundamental de C (DO). Tenga en cuenta que puede
omitir las notas quinta (que se muestran entre paréntesis en
la ilustración inferior), para producir los acordes 7, m7, M7,
add9, madd9 y mM7.
Nombre de acorde
*1
Con estos acordes, la nota inferior en su digitación es siempre
usada como la nota fundamental. Compruebe que su digitación
identifica correctamente la nota fundamental que desea usar.
C
Caug
(*1)
Cm7
C7
5 (*1)
Cmadd9
Cm
Csus4
CM7
C7sus4
CmM7
Cdim
C7
Cm7
5
Cadd9
Cdim7
(*1)
Ejemplo
C
(Acorde
DO
mayor)
Cm
(Acorde
DO
menor)
C7
(Acorde
DO en
séptima)
Cm7
(Acorde
DO menor
en
séptima)
Teclas
Presionando
una tecla de
acompaña-
miento
Presionando
dos teclas de
acompaña-
miento
Presionando
tres teclas de
acompaña-
miento
Presionando
cuatro teclas
de acompaña-
miento
Tipo de
acorde
Acorde
mayor
Acorde
menor
Acorde
en
séptima
Acorde
menor en
séptima
CC DE FF
E GA
ABB
CC DE FE
CC DE FF
E GA
ABB
CC DE FE
CC DE FF
E GA
ABB
CC DE FE
CC DE FF
E GA
ABB
CC DE FE
LK120_s_13-19.p65 10.3.19, 5:39 PM18
S-19
¡IMPORTANTE!
Si solamente ejecuta una o dos notas en la parte
izquierda, o tres notas que conforman una formación de
acorde reconocida, no se producirá ningún sonido. El
modo FINGERED requiere una formación de acordes de
tres o cuatro notas convencionales para producir un
acompañamiento automático. También, tenga en cuenta
que los acordes automáticos solamente actúan en
conjunto con los patrones de ritmo, y no
independientemente de ellos.
NOTA
Los ejemplos anteriores muestran solamente una de las
posibles digitaciones para cada acorde. Observe que puede
ejecutar las notas que forman un acorde en cualquier
combinación. Cada una de las digitaciones siguientes por
ejemplo, producen el mismo acorde C (DO).
Teclado de
acompañamiento
Vea los Cuadros de acordes digitados en la página A-3
para informarse sobre las digitaciones de los acordes de
todas las notas fundamentales.
Para ejecutar un acompañamiento
automático FINGERED
1.
Utilice el selector POWER/MODE para
seleccionar FINGERED.
2.
Seleccione un ritmo automático como se
describe en la sección Selección y ejecución
de un ritmo en la página S-17.
3.
Inicie la ejecución del ritmo.
Si desea iniciar la ejecución de un patrón de ritmo,
presione el botón START/STOP.
Para iniciar la ejecución del ritmo también puede usar
el inicio sincrónico (esta página).
4.
Para iniciar la ejecución del acompañamiento
automático, ejecute un acorde en el teclado de
acompañamiento.
5.
Continúe presionando diferentes teclas en el
teclado de acompañamiento para ejecutar su
progresión de acordes.
Improvisando con los patrones de
ritmos programados
Presionando el botón START/STOP para iniciar la ejecución
de ritmo ocasiona la ejecución de la versión normal del patrón.
También puede ejecutar una variación del ritmo usando la
operación que se describe a continuación.
Usando un ritmo de relleno
Mientras se ejecuta un ritmo automático, se puede insertar
un ritmo de relleno presionando el botón SYNCHRO/FILL-
IN.
Usando el inicio sincrónico
Se puede iniciar la ejecución del patrón de acompañamiento
y ritmo al mismo tiempo, con la ejecución del teclado de
acompañamiento. Para hacer esto, siga los pasos siguientes.
1.
Ajuste el selector POWER/MODE a la posición
CASIO CHORD o FINGERED.
2.
Seleccione un ritmo automático.
3.
Presione el botón SYNCHRO/FILL-IN.
4.
Presione las teclas de acompañamiento para
ejecutar el primer acorde. Tan pronto como lo
hace, el patrón de acompañamiento automático
comienza a ejecutarse.
5.
Para parar la ejecución del patrón de
acompañamiento automático, presione el botón
START/STOP.
NOTA
Si ajusta el selector POWER/MODE a NORMAL en el paso 1
en la página S-17, la operación en el paso 4 inicia solamente
la ejecución del ritmo (instrumentos de percusión).
6.
Para parar la ejecución del acompañamiento
automático, presione nuevamente START/STOP.
Nombre de acorde
LK120_s_13-19.p65 10.3.19, 5:39 PM19
S-20
Sistema de lección de 3 pasos
Usando el sistema de lección de 3 pasos
Aun las personas que no sepan tocar el teclado pueden seguir
las 100 melodías incorporadas en el banco de canciones con
los botones ONE KEY PLAY. También puede usar el sistema
de lección de 3 pasos para aprender a tocar en su propia
velocidad. Al principio toque lentamente hasta que pueda
ser capaz de tocar en conjunto a la velocidad normal.
De las 100 melodías incorporadas, las melodías números 00
a 83 presentan acompañamiento automático (melodías de
acompañamiento automático), mientras desde 84 a 99 se
ejecutan usando ambas manos (melodías de ejecución con
dos manos).
El sistema de lección de 3 pasos puede usarse con el siguiente
plan de lección de 3 pasos para aprender a tocar el teclado.
Paso 1: Aprendiendo la sincronización
Presionando los botones ONE KEY PLAY ejecuta la
melodía de una melodía de acompañamiento o la
parte de la mano derecha de las melodías de ejecución
con dos manos. En ambos casos, el acompañamiento
automático (la parte de la mano izquierda en el caso
de las melodías de ejecución con dos manos), es
ejecutada automáticamente por el teclado. En lugar
los botones ONE KEY PLAY, también puede presionar
cualquier tecla del teclado para tocar la melodía o
parte de la mano derecha. El propósito de este paso
es para que se familiarice con el tiempo de
sincronización requerido para tocar las notas de la
melodía.
Paso 2: Aprendiendo la melodía
En este paso, se utiliza el display para aprender qué
dedos deben usarse para tocar, y el sistema de luz de
tecla para aprender qué teclas del teclado presionar.
Puede tocar al ritmo que desee, debido a que el
acompañamiento automático o parte de la mano
izquierda espera hasta que presione la tecla correcta.
Paso 3: Ejecución a la velocidad normal
En este nivel, las teclas del teclado aun se iluminan
para indicarle la nota a tocar, pero no lo esperan hasta
que presione la tecla correcta. El acompañamiento
automático o parte de la mano izquierda se ejecutan
en la velocidad normal.
NOTA
La luz de las teclas del teclado pueden no verse bajo la luz
directa del sol o en otras áreas iluminadas brillantes.
Ajuste del tempo del sistema de lección
de 3 pasos
Puede usar el procedimiento en el paso 6 de la página S-18
para ajustar el tempo de la parte de la mano izquierda para
ejecutar el sistema de lección de 3 pasos y melodía del banco
de canciones (pasos 1 al 3).
Esto significa que puede usar un tempo más lento al principio,
y luego ir aumentando a medida que aprende. Presione
ambos botones TEMPO/VALUE ( y ) al mismo tiempo
para retornar el tempo a sus ajustes preajustados iniciales.
Para ejecutar una melodía incorporada del
banco de canciones
1.
Busque el número de la melodía que desea tocar
en la lista del banco de canciones.
No todas las canciones disponibles se muestran en la
lista del banco de canciones impresa en la consola del
teclado. Para ver una lista completa, consulte Lista
de canciones en la página A-5.
2.
Presione el botón SONG BANK hasta que
aparezca el indicador SONG BANK.
Esto ocasiona que el número y nombre de la melodía
del banco de canciones seleccionados actualmente
aparezcan sobre la presentación.
3.
Ingrese el número de dos dígitos para la melodía
que desea tocar.
Ejemplo: Para seleccionar 13 TWINKLE TWINKLE
LITTLE STAR, ingrese 1 y luego 3.
KEY LIGHT
SONG BANK
TONE
ONE KEY PLAY
SPEAK
STEP 1
START/STOP STEP 2
PART SELECT
STEP 3
Twinkle
LK120_s_20-25.p65 10.3.19, 5:39 PM20
S-21
4.
Presione el botón START/STOP para iniciar la
ejecución de la melodía seleccionada.
La melodía que selecciona se ejecuta repetidamente,
con las teclas del teclado iluminándose para indicar
las notas de la melodía.
5.
Para parar la reproducción de la melodía del
banco de canciones, presione de nuevo el botón
START/STOP.
6.
Para salir del modo del banco de canciones,
presione de nuevo el botón SONG BANK.
Cuando lo hace, el indicador SONG BANK
desaparece.
NOTA
Para el número del banco de canciones ingrese siempre dos
dígitos.
Puede ingresar un número de melodía del banco de canciones
aun mientras se está ejecutando otra melodía del banco de
canciones.
Si ingresa un número erróneo para el primer dígito del número
del banco de canciones, puede retornar al ajuste previo
presionando el botón SONG BANK.
El botón RHYTHM queda inhabilitado en el modo de banco de
canciones. Si desea ejecutar un ritmo, presione el botón SONG
BANK para retornar al primer modo normal.
Operación del sistema de iluminación de
tecla y contenidos de la presentación
durante la ejecución del banco de canciones
Las teclas del teclado se iluminan para mostrar las teclas que
deben presionarse para ejecutar en conjunto con las melodías
del banco de canciones a medida que se reproducen. Al
mismo tiempo, la presentación muestra las digitaciones,
nombres de acordes, tempo y otra información.
Indicaciones de dedos cruzados
La presentación también muestra cuando tiene que cruzar
los dedos para ejecutar las notas, y en qué dirección sus dedos
deben cruzarse.
Ejemplo: Presentación para la ejecución de las notas siguientes
con solamente la mano derecha.
B y C indican que el dedo índice debe cruzarse sobre el
pulgar.
C y D indican que el dedo pulgar debe cruzarse por debajo
del dedo índice.
Iluminación de tecla durante la ejecución
del banco de canciones
Cuando reproduce una melodía del banco de canciones, las
teclas del teclado se iluminan para mostrarle las notas que se
están ejecutando.
Melodía del banco de canciones con
acompañamiento automático
Las teclas de la parte de melodía y acordes se iluminan.
NOTA
Algunas melodías del banco de canciones usan acordes (tales
como C6) que no pueden ejecutarse con el ajuste FINGERED
(página S-18). En el modo FINGERED, los acordes pueden
sonar diferentes a los acordes producidos por la reproducción
de melodía del banco de canciones, aun si ejecuta los acordes
de la manera indicada por las teclas iluminadas.
Melodía del banco de canciones de ejecución con
dos manos
Las teclas de la parte de la mano derecha y mano izquierda
se iluminan.
C
EDA
B
3311
2
CEDAB
Usando el banco de canciones
Presentación de dedos cruzados
Parte de la mano
izquierda
Parte de la mano
derecha
La nota de melodía
se ilumina.
Acorde
La nota principal (nota DO
(C) de un acorde DO) y otras
notas que componen el
acorde se iluminan
alternativamente.
kTwi n l e
DigitacionesNombre de acorde
Valor de tempo
LK120_s_20-25.p65 10.3.19, 5:39 PM21
S-22
Operación del sistema de iluminación de
tecla y contenidos del display durante la
ejecución de lección de 3 pasos
Siempre que selecciona una melodía (00 a la 83) del
acompañamiento automático para la ejecución de la lección
de 3 pasos, el sistema de iluminación de tecla le muestra qué
teclas presionar, mientras el display le muestra la digitación.
Altura tonal de nota
La tecla del teclado que debe presionar se ilumina. Los dedos
que debe usar para ejecutar las notas también se muestran
sobre el display.
Longitud de nota
Las teclas del teclado permanecen iluminada durante el
tiempo en que la nota debe ser ejecutada. Las digitación
también permanecen sobre el display durante la duración de
la nota.
Nota siguiente
La tecla del teclado para la nota siguiente a ser ejecutada
destella, mientras aparece un número sobre el display
próximo al dedo que debe usar para ejecutar la nota siguiente.
Serie de notas con la misma altura tonal
La tecla del teclado se desactiva momentáneamente entre las
notas, y se ilumina de nuevo para cada nota sucesiva. Las
digitaciones también se desactivan y activan de nuevo.
Ejemplo: Cuando la ejecución requiere la presión de las
teclas con los dedos 3, 2 y luego 1
NOTA
La longitud de nota no se indica cuando se utilizan las melodías
con dos manos (84 a 99) con los pasos 1 y 2 de la lección de 3
pasos. Tan pronto como presiona una tecla iluminada, la tecla
se apaga y la tecla siguiente a ser ejecutada comienza a
destellar.
La longitud de nota se indica mediante el sistema de iluminación
de tecla cuando se usa una melodía con dos manos con el
paso 3. En este caso, la tecla siguiente a ser presionada no
destella cuando se presiona una tecla iluminada, y el número
de dedo siguiente no aparece sobre la presentación. Solamente
se muestra el número de dedo actual.
Nota siguiente
Nota actual
1ra. Nota 2da. Nota 3ra. Nota
Destello Iluminado Destello Iluminado DestelloIluminado
Luz de tecla
Guía de digitación por voz
La guía de digitación por voz utliza una voz humana simulada
para llamar los números de la digitación, durante una práctica
de parte de una mano de los pasos 1 y 2. Si necesita presionar
una tecla con su pulgar, por ejemplo, la guía de digitación
por voz dice, “One!” en inglés. En los casos de un acorde a ser
ejecutado con su dedo pulgar, medio y meñique, la guía de
digitación por voz dice, “One, three, five!”.
La guía de digitación por voz llama las digitaciones solamente
cuando no presiona la tecla apropiada cuando debe hacerlo.
Para activar y desactivar la guía de
digitación por voz
Para activar y desactivar la guía de digitación por voz, utilice
el botón SPEAK.
Indicador de sincronización
El indicador de sincronización ayuda a familiarizarse con las
melodías que toca por primera vez, indicando la
sincronización de las notas que ejecuta en el teclado. La
sincronización es más fácil de ver cuando utiliza un tempo
lento durante la ejecución de lección.
Usando el indicador de sincronización
El indicador de sincronización le muestra la sincronización
de las notas contenidas en la parte seleccionada actualmente
(R o L). Las notas se indican como bloques de dos segmentos
que se desplazan desde la parte superior del display, hacia
abajo a la parte inferior. Una nota se ejecuta cuando su bloque
alcanza la parte inferior del display.
Cada bloque de dos segmentos puede indicar una o más
notas, dependiendo en la melodía que está ejecutando.
NOTA
El indicador de sincronización muestra la sincronización de
las notas siempre que se reproduce una melodía del banco de
canciones y durante la lección de 3 pasos.
Tenga en cuenta que el indicador de sincronización muestra
sólo una sincronización aproximada.
Indicador de guía de digitación por voz
Sincronización de
la nota por venir
Nota ejecutada aquí
LK120_s_20-25.p65 10.3.25, 4:37 PM22
S-23
Desactivando la iluminación de tecla
1.
Presione el botón KEY LIGHT.
El indicador KEY LIGHT desaparece cuando el sistema
de iluminación de tecla se encuentra desactivado.
Presione de nuevo el botón KEY LIGHT para activar
la iluminación de tecla.
NOTA
La iluminación de tecla se activa automáticamente en cualquiera
de los casos siguientes:
Cuando se activa la alimentación del teclado.
Cuando el botón SONG BANK se presiona en el modo normal
(página S-20).
Número de teclas iluminadas
simultáneamente
Al mismo tiempo pueden iluminarse hasta cuatro teclas del
teclado.
Para cambiar el sonido usado para la melodía
de una melodía del banco de canciones
1.
Siguiendo el paso 3 del procedimiento de la
página S-20, presione el botón TONE.
El indicador SONG BANK y el indicador TONE se
iluminan, junto con el número de sonido y nombre del
sonido que se encuentra actualmente asignado al teclado.
2.
Ingrese un valor para seleccionar el sonido que
desea usar.
NOTA
Seleccionando otra melodía del banco de canciones cambia
el ajuste de sonido al sonido de melodía preajustado de la
nueva melodía seleccionada.
El sonido asignado al teclado es el mismo que se especifica
para la parte melódica de la melodía del banco de canciones.
El procedimiento anterior puede usarse para cambiar el sonido
de la melodía del banco de canciones antes de comenzar la
ejecución o mientras una ejecución ya se encuentra en
progreso.
También puede cambiar el sonido de las melodías a dos manos
(números de melodía 84 a 99). Tenga en cuenta sin embargo,
que seleccionando una melodía que puede sostenerse (similar
al sonido de un piano), cuando se utiliza el paso 1 o 2 de la
lección de 3 pasos (en el que el acompañamiento espera su
ingreso correcto antes de proceder), puede ocasionar que las
notas del acompañamiento automático, sea sostenida mientras
el teclado espera para su entrada. Si esto llega a suceder,
ejecute algo sobre el teclado para parar la nota sostenida.
Indicador KEY LIGHT
Paso 1: Aprendiendo la sincronización
1.
Presione el botón STEP 1.
Cuando lo hace, aparece el indicador STEP 1.
Luego de que suena una cuenta, el teclado espera para
que ejecute la primera nota de la melodía. Si la
melodía incluye compases de introducción, el teclado
ingresa al modo de espera luego de completarse los
compases de introducción.
2.
Presione los botones ONE KEY PLAY para
ejecutar cada nota de la melodía.
La parte de acompañamiento (mano izquierda) de la
melodía sigue en conjunto a medida que toca la parte
melódica (mano derecha).
La tecla del teclado que corresponde a la nota
siguiente a ser ejecutada destella, y se ilumina al
ejecutarse la nota.
La parte de ritmo (percusión) no suena.
3.
Trate de presionar cualquiera de las teclas del
teclado en lugar de los botones ONE KEY PLAY.
Presionando cualquier tecla del teclado ejecuta la nota
correcta de la melodía (parte de la mano derecha).
Presionando más de una tecla al mismo tiempo se
cuenta como una sola nota de melodía. Presionando
una tecla mientras otra tecla es mantenida presionada
es contada como dos notas de melodía.
kTwi n l e
Digitaciones
4.
Para parar la ejecución en cualquier momento,
presione el botón START/STOP.
Cuando lo hace, el indicador STEP 1 desaparece.
La nota correcta se ejecuta aun si no
presiona la tecla que está iluminada.
LK120_s_20-25.p65 10.3.19, 5:39 PM23
S-24
Paso 3: Ejecución a la velocidad normal
1.
Presione el botón STEP 3.
Cuando lo hace, aparece el indicador STEP 3.
La ejecución comienza luego de que suene un tono
acústico.
2.
Toque en conjunto con el teclado, siguiendo las
teclas a medida que se iluminan.
La parte del acompañamiento (mano izquierda) de la
melodía se ejecuta en la velocidad normal, sin tener
en cuenta qué toca sobre el teclado.
Con una melodía del acompañamiento automático,
la tecla del teclado que corresponde a la siguiente nota
a ser ejecutada destella, y se ilumina cuando la nota
debe ser ejecutada.
Con una melodía de dos manos, la tecla del teclado
permanece iluminada en tanto se ejecutan sus notas.
En este caso, no obstante, la tecla para la siguiente
nota a ser ejecutada no destella. Las teclas se iluminan
cuando las notas comienzan a ejecutarse.
3.
Para parar la ejecución en cualquier momento,
presione el botón START/STOP.
Cuando lo hace, el indicador STEP 3 desaparece.
Paso 2: Aprendiendo la melodía
1.
Presione el botón STEP 2.
Cuando lo hace, aparece el indicador STEP 2.
Luego de que suena una cuenta, el teclado espera para
que ejecute la primera nota de la melodía. Si la
melodía incluye compases de introducción, el teclado
ingresa al modo de espera luego de completarse los
compases de introducción.
2.
Toque las notas indicadas por el sistema de
lección de 3 pasos.
La parte de acompañamiento (mano izquierda) de la
melodía sigue a medida que toca la parte melódica
(mano derecha).
La tecla del teclado que corresponde a la nota
siguiente a ser ejecutada destella, y se ilumina cuando
se ejecuta la nota.
La parte de ritmo (percusión) no suena.
3.
Para parar la ejecución en cualquier momento,
presione el botón START/STOP.
Cuando lo hace, el indicador STEP 2 desaparece.
Presione las teclas del teclado a medida que se
iluminan. Cuando está tocando una melodía con las
dos manos, puede iluminarse más de una tecla.
Presione todas las teclas iluminadas.
Digitaciones
kTwi n l e
Digitaciones
kTwi n l e
LK120_s_20-25.p65 10.3.19, 5:39 PM24
S-25
Para practicar la parte de la mano
izquierda
Una vez que aprende la ejecución de la parte de la mano
derecha, puede usar las melodías de ejecución con las dos
manos (números 84 al 99) para practicar la parte de la mano
izquierda.
1.
Presione el botón SONG BANK hasta que
aparezca el indicador SONG BANK.
Esto ocasiona que el número y nombre de la melodía
del banco de canciones seleccionados actualmente
aparezcan sobre la presentación.
2.
Ingrese el número de dos dígitos para la melodía
que desea tocar.
3.
Presione el botón PART SELECT para cambiar a
la ejecución con la mano izquierda.
4.
Presione el botón STEP 1, STEP 2, o STEP 3.
Cuando lo hace, aparecen los indicadores STEP 1,
STEP 2 y STEP 3.
Luego de que suena un tiempo de cuenta, la parte de
la mano derecha comienza a ejecutarse y las teclas
para las notas de la parte de la mano izquierda
destellan.
5.
Presione el botón PART SELECT para retornar la
selección de parte a sus ajustes previos.
6.
Para interrumpir la ejecución de la melodía,
presione el botón START/STOP.
Cuando lo hace, los indicadores STEP 1, STEP 2 y
STEP 3 desaparecen.
Iluminado
LK120_s_20-25.p65 10.3.19, 5:39 PM25
S-26
No hay sonido cuando se
presionan las teclas del teclado.
Cualquiera de los síntomas
siguientes cuando se usa la
alilmentación mediante pilas.
La luz de tecla permanece
iluminada.
El botón RHYTHM no funciona.
1. Enchufe correctamente el
adaptador de CA, asegúrese de
que las polos de las pilas (+/)
se orientan correctamente, y
verifique para asegurarse de
que las pilas no están agotadas.
2. Utilice los deslizador VOLUME
para aumentar el volumen.
3. Desenchufe los auriculares
desde el la toma PHONES/
OUTPUT.
4. La ejecución normal no es
posible sobre el teclado de
acompañamiento mientras el
selector POWER/MODE se
ajusta a CASIO CHORD o
FINGERED. Cambie el ajuste
del selector POWER/MODE a
NORMAL.
5.
Mientras se encuentra
seleccionado 99 PERCUSSION,
puede usar solamente las teclas
que están marcadas sobre la
consola con ilustraciones de
instrumentos de percusión.
Cambie las pilas usadas por
nuevas o utilice el adaptador de
CA.
1. Presione la tecla de iluminación
para continuar con la ejecución
del paso 1 y paso 2.
2. Presione el botón START/STOP
para salir de la ejecución del
paso 1 y paso 2.
Presione el botón SONG BANK
para retornar al modo normal.
Referencia técnica
Solución de problemas
Cuando tenga problemas con la operación del teclado cerciórese de verificar en la tabla siguiente.
Causas posiblesProblema Acción
Vea la página
Página S-11
Página S-14
Página S-13
Página S-17
Página S-14
Página S-11
Páginas
S-23, 24
Páginas
S-23, 24
Página S-20
1. Problema de fuente de
alimentación.
2. El ajuste del volumen está
demasiado bajo.
3. Los auriculares se enchufan en
el teclado.
4. El selector POWER/MODE se
encuentra en la posición CASIO
CHORD o FINGERED.
5. Se selecciona el sonido 99
PERCUSSION y está
presionando las teclas que no
tienen sonidos asignados.
Alimentación mediante pilas
baja.
El teclado está esperando para
la ejecución de la nota correcta
durante la ejecución del paso 1
o paso 2.
El teclado se encuentra en el
modo de banco de canciones.
El instrumento no se activa.
Presentación que está parpadeando, oscura o difícil de leer.
Volumen de altavoz/auricular anormalmente bajo.
Salida de sonido distorsionada.
Interrupción ocasional de sonido cuando se ejecuta en volúmenes altos.
Falla de alimentación repentina cuando se ejecuta en volúmenes altos.
Parpadeo u oscurecimiento de la presentación cuando se ejecuta en volúmenes altos.
La salida de sonido continúa aun después de soltar una tecla.
Un sonido que es totalmente diferente del que se selecciona.
Ejecución del banco de canciones y patrón de ritmo anormal.
LK120_s_26-29.p65 10.3.19, 5:39 PM26
S-27
Causas posiblesProblema Acción
No se pueden cambiar los
ajustes de TRANSPOSE/TUNE.
Presione el botón SONG BANK
para retornar al modo normal.
Pare la ejecución de la melodía
de demostración.
El teclado se encuentra en el
modo de banco de canciones.
La ejecución de la melodía de
demostración se encuentra en
progreso.
Vea la página
Página S-20
Página S-16
La calidad y el volumen del tono
suenan ligeramente diferentes,
dependiendo de la parte del
teclado donde sea ejecutado.
Este es un resultado inevitable del proceso de sampleado digital*, y no es ningún signo
de anomalía.
*Se toman múltiples muestras digitales para las gamas baja, media y alta del instrumento
musical original. Por tal motivo, pueden presentarse diferencias muy leves en la
calidad y el volumen tonal entre las gamas muestrales.
LK120_s_26-29.p65 10.3.19, 5:39 PM27
S-28
Modelo: LK-120
Teclado: 61 teclas normales; 5 octavas
Sistema de iluminación de tecla: Puede activarse y desactivarse (pueden iluminarse hasta 4 teclas al mismo tiempo)
Sonidos: 100 preajustes
Polifonía: Máximo de 12 notas
Sistema de lección de 3 pasos: Número de teclas iluminadas simultáneamente; 4
3 pasos
Reproducción: 1 reproducción de repetición de melodía
Guía de digitación por voz: Activación/Desactivación.
Acompañamiento automático
Patrones de ritmo: 50 preajustes
Tempo: Ajustable, (216 pasos, = 40 a 255), Valor inicial; 120
Acordes: 2 sistemas; CASIO CHORD, FINGERED
Otros: Patrón de redoble, Inicio sincrónico
Melodías del banco de canciones: 100 melodías
Función de información musical: Sonido, acompañamiento automático, números y nombres del banco de canciones,
tempo, display de lección de 3 pasos, nombre de acorde, digitación, indicador de
sincronización, iluminación de tecla, digitación por voz.
Otras funciones
Transposición: F
a C a F : blanca (media nota)
Afinación: Ajustable A4 =Aprox. 440 Hz ±50 centésimas, Valor inicial: A4 = Aprox. 440 Hz
Altavoces: 10 cm de diámetro × 2 (salida: 2 W + 2 W)
Terminales I/O
Alimentación: Toma de CC de 9,5 V
Auriculares/Salida: Toma estándar estéreo (La salida es monofónica.)
[Impedancia de salida: 78 , tensión de salida: 4 V (eficaz) MAX.]
Alimentación: 2 modos
Pilas: 6 pilas de zinc-carbón o pilas alcalinas de tamaño AA
Vida útil de las pilas: Aproximadamente 4 horas de operación continua con las
pilas alcalinas.
Aproximadamente 1 hora de funcionamiento continuo
con pilas de zinc-carbón
Adaptador de CA: AD-E95100L
Apagado automático: Aproximadamente 6 minutos después de la última operación de tecla
Consumo de energía: 9,5 V 7,7 W
Dimensiones: 94,9 × 30,4 × 9,3 cm
Peso: Aproximadamente 3,4 kg (sin las pilas)
* Los diseños y las especificaciones están sujetos a cambios sin previo aviso.
Especificaciones
LK120_s_26-29.p65 10.4.7, 2:23 PM28
S-29
Asegúrese de leer y observar las siguientes precauciones operacionales.
Emplazamiento
Evite los siguientes emplazamientos para este producto.
•Áreas expuestas a la luz solar directa y alta humedad
•Áreas expuestas a temperaturas extremas
Cerca de una radio, TV, platina de vídeo o sintonizador
Los dispositivos mencionados no causarán el mal funcionamiento del producto, pero el producto puede causar interferencias
de audio o vídeo en dispositivos adyacentes.
Mantenimiento por el usuario
No utilice benceno, alcohol, diluyente u otros agentes químicos para limpiar el producto.
Para limpiar el producto o el teclado, utilice un paño suave humedecido con una solución débil de agua y detergente neutro
suave. Exprima todo exceso de humedad del paño antes de limpiar.
Accesorios incluidos y opcionales
Utilice sólo los accesorios especificados para este producto.
El uso de accesorios no autorizados crea el riesgo de incendio, descarga eléctrica y lesiones personales.
Precauciones sobre el manejo del adaptador de CA
Utilice un tomacorriente de fácil acceso para poder desenchufar el adaptador de CA cuando ocurra una avería o cualquier otro
problema.
El adaptador de CA es sólo para uso en interiores. No lo utilice donde pueda quedar expuesto a salpicaduras o humedad. No
coloque, sobre el adaptador de CA, ningún recipiente que contenga líquido, como un jarrón con flores.
Guarde el adaptador de CA en un lugar seco.
Utilice el adaptador de CA en un lugar abierto y bien ventilado.
Nunca cubra el adaptador de CA con un periódico, mantel, cortina o cualquier otro elemento similar.
Desenchufe el adaptador de CA del tomacorriente de alimentación si no va a utilizar el producto por un lapso prolongado.
Nunca intente reparar el adaptador de CA ni modificarlo de ninguna forma.
Entorno de funcionamiento del adaptador de CA
Temperatura: 0 a 40 °C
Humedad: 10 % a 90 % RH
Polaridad de la clavija de salida:
Líneas de soldadura
El producto puede presentar líneas visibles en su exterior. Estas son líneas de soldadura que resultan del proceso de moldeo de
plástico. No son grietas ni arañazos.
Reglas de cortesía sobre instrumentos musicales
Siempre tenga consideración para con los demás cuando utilice este producto. Preste especial atención cuando toque de noche
para que el nivel de volumen no moleste a sus vecinos. Otras medidas que podría tomar cuando toque en horas avanzadas de la
noche serían cerrar las ventanas y utilizar auriculares.
Se prohíbe la reproducción, total o parcial, del contenido de este manual. De acuerdo con las leyes de derechos de autor, se
prohíbe cualquier uso del contenido de este manual, excepto para su uso personal, sin la previa autorización de CASIO.
CASIO NO SERÁ EN NINGÚN CASO RESPONSABLE POR NINGÚN DAÑO (INCLUYENDO, SIN LIMITACIÓN, DAÑOS
POR LUCRO CESANTE, INTERRUPCIÓN DE NEGOCIOS, PÉRDIDA DE INFORMACIÓN) QUE SURJA COMO
RESULTADO DEL USO O INCAPACIDAD DE USO DE ESTE MANUAL O PRODUCTO, AÚN EN EL CASO DE QUE
CASIO TUVIERA CONOCIMIENTO ACERCA DE LA POSIBILIDAD DE DICHOS DAÑOS.
El contenido de este manual se encuentra sujeto a cambios sin previo aviso.
La apariencia real del producto puede diferir de la mostrada en las ilustraciones de esta Guía del usuario.
Los nombres de compañías y productos usados en este manual pueden ser marcas registradas de terceros.
Precauciones operacionales
LK120_s_26-29.p65 10.3.19, 5:39 PM29












LK120_s_26-29.p65 10.3.19, 5:39 PM30
A-1
Appendix/Apéndice
Tone List
Lista de sonidos
PIANO
00 PIANO 1
01 PIANO 2
02 HONKY-TONK
03 STUDIO PIANO
04 ELEC PIANO 1
05 ELEC PIANO 2
06 ELEC PIANO 3
07 ELEC PIANO 4
08 HARPSICHORD
09 CLAVELECTRO
ORGAN
10 ELEC ORGAN 1
11 ELEC ORGAN 2
12 ELEC ORGAN 3
13 ELEC ORGAN 4
14 CHURCH ORGAN
15 PIPE ORGAN
16 REED ORGAN
17 ACCORDION
18 BANDONEON
19 HARMONICA
GUITAR/BASS
20 GUT GUITAR
21 ACOUS GUITAR
22 JAZZ GUITAR
23 ELEC GUITAR
24 MUTE GUITAR
25 DIST GUITAR
26 WOOD BASS
27 ELEC BASS
28 SLAP BASS
29 BANJO
STRINGS/ENSEMBLE
30 VIOLIN
31 CELLO
32 HARP
33 STRINGS 1
34 STRINGS 2
35 STRINGS 3
36 SYNTH-STR 1
37 SYNTH-STR 2
38 CHOIR
39 VOICE OOH
BRASS/REED/PIPE
40 TRUMPET
41 TUBA
42 BRASS ENS
43 FR.HORN 1
44 FR.HORN 2
45 BRASS 1
46 BRASS 2
47 SYN-BRASS 1
48 SYN-BRASS 2
49 SYN-BRASS 3
50 SOPRANO SAX
51 ALTO SAX
52 TENOR SAX
53 OBOE
54 CLARINET
55 PICCOLO
56 FLUTE
57 RECORDER
58 PAN FLUTE
59 WHISTLE
SYNTH-SOUND
60 SYN-LEAD 1
61 SYN-LEAD 2
62 SYN-LEAD 3
63 SYN-CALLIOPE
64 SYN-PAD 1
65 SYN-PAD 2
66 SYN-PAD 3
67 GLASS HMCA
68 COUNTRY FARM
69 SYN-BASS
70 PEARL DROP
71 COSMIC SOUND
72 SOUNDTRACK
73 SPACE PAD
74 VOICE BASS
75 APPLAUSE
76 SYNTH-SFX
77 VEHICLE
78 PHONE
79 FUNNY
LAYER
80 STR PIANO
81 STR E.PIANO
82 CHOIR E.P
83 CHOIR ORGAN
84 STR GUITAR
85 STR HARP
86 BRASS STR
87 VIB PAD
88 12 STR GTR
89 CHOIR STR
SPLIT/PERCUSSION
90 BASS/PIANO
91 BASS/E.PIANO
92 BASS/VIB
93 BASS/GUT GTR
94 V.BASS/OOH
95 STR/PIANO
96 STR/TRUMPET
97 VIBRAPHONE
98 MARIMBA
99 PERCUSSION
LK120_es_appendix.p65 10.3.19, 5:39 PM1
A-2
POPS I
00 CLUB POP
01 FUNKY POP
02 SOUL BALLAD
03 POP BALLAD
04 LITE POP
POPS II
05 16 BEAT FUNK
06 8 BEAT POP
07 POP ROCK
08 DANCE POP
09 POP FUSION
10 FOLKIE POP
ROCK
11 ROCK WALTZ
12 SLOW ROCK
13 SOFT ROCK
14 50’S ROCK
15 60’S SOUL
16 4 BEAT ROCK
17 ROCK
18 TWIST
19 NEW ORLNS R&R
20 R&B
JAZZ/FUSION
21 BIG BAND
22 SWING
23 FOX TROT
24 JAZZ WALTZ
25 LATIN FUSION
DANCE/FUNK
26 TECHNO
27 TRANCE
28 DISCO
29 FUNK
30 RAP
EUROPEAN
31 POLKA
32 MARCH
33 WALTZ
34 SLOW WALTZ
35 TANGO
LATIN
36 BOSSA NOVA
37 SAMBA
38 MAMBO
39 REGGAE
40 SKA
41 SALSA
42 FOLKLORE
43
RUMBA CATALANA
VARIOUS
44 COUNTRY
45 TOWNSHIP
46 SLOW GOSPEL
47 BALADI
48 BAROQUE
49 NEW AGE
Rhythm List
Lista de ritmos
LK120_es_appendix.p65 10.4.5, 6:02 PM2
A-3
1
2
3
4
5
: Left hand finger
numbers
:Números de los
dedos de la mano
izquierda
Fingered Chord Charts
Cuadros de acordes digitados
This table shows the left-hand fingerings (including inverted forms) for a number of
often-used chords.
Esta tabla muestra las digitaciones (incluyendo las formas invertidas) para varios de
los acordes más a menudo usados.
LK120_es_appendix.p65 10.3.19, 5:39 PM3
A-4
*
Cannot be specified in FINGERED setting because of accompaniment keyboard limitations, but augmented
and diminished (seventh) chords made up of the same component notes (with different base note) can be used
instead.
Chords with same component notes as B
aug ........... D aug, F
aug
Chords with same component notes as B aug ............ E
aug, G aug
Chords with same component notes as A dim7 ......... C dim7, E
dim7, F
dim7
Chords with same component notes as B
dim7 ........ C
dim7, E
dim7, G dim7
Chords with same component notes as B
dim7 .......... D dim7, F
dim7, A
dim7
*
No puede especificarse en el ajuste FINGERED debido a las limitaciones del teclado de acompañamiento, pero
en su lugar pueden usarse los acordes aumentados y disminuídos (séptima) compuestos por las mismas notas
componentes (con diferente nota básica).
Acordes con las mismas notas componentes como B
aumentada........ D aumentada, F
aumentada.
Acordes con las mismas notas componentes como B aumentada ......... E
aumentada, G aumentada.
Acordes con las mismas notas componentes como A dim7 .................... C dim7, E
dim7, F
dim7.
Acordes con las mismas notas componentes como B
dim7 ................... C
dim7, E
dim7, G dim7.
Acordes con las mismas notas componentes como B
dim7 .................... D dim7, F
dim7, A
dim7.
LK120_es_appendix.p65 10.3.19, 5:39 PM4
A-5
Song List / Lista de canciones
SONG BANK / BANCO DE CANCIONES
00 JUPITER FROM THE PLANETS
01 DECK THE HALL
02 WE WISH YOU A MERRY CHRISTMAS
03 JINGLE BELLS
04 SILENT NIGHT
05 JOY TO THE WORLD
06 O CHRISTMAS TREE
07 WHEN THE SAINTS GO MARCHING IN
08 GREENSLEEVES
09 SWING LOW, SWEET CHARIOT
10 AMAZING GRACE
11 JOSHUA FOUGHT THE BATTLE OF JERICHO
12 AULD LANG SYNE
13 TWINKLE TWINKLE LITTLE STAR
14 LIGHTLY ROW
15 SUMM SUMM SUMM
16 THE MUFFIN MAN
17 LONG LONG AGO
18 ACH DU LIEBER AUGUSTIN
19 LONDON BRIDGE
20 SUR LE PONT DAVIGNON
21 UNDER THE SPREADING CHESTNUT TREE
22 SIPPIN CIDER THROUGH A STRAW
23 GRANDFATHERS CLOCK
24 THE NOBLE DUKE OF YORK
25 MICHAEL ROW THE BOAT ASHORE
26 DANNY BOY
27 ANNIE LAURIE
28 MY BONNIE
29
IF YOURE HAPPY AND YOU KNOW IT, CLAP YOUR HANDS
30 MY DARLING CLEMENTINE
31 HOME SWEET HOME
32 MY WILD IRISH ROSE
33 DOWN IN THE VALLEY
34 JAI PERDU LE DO DE MA CLARINETTE
35 IVE BEEN WORKING ON THE RAILROAD
36 LITTLE BROWN JUG
37 ON TOP OF OLD SMOKEY
38 AMERICA THE BEAUTIFUL
39 AURA LEE
40 OH! SUSANNA
41 BEAUTIFUL DREAMER
42 HOUSE OF THE RISING SUN
43 SHE WORE A YELLOW RIBBON
44 WHEN JOHNNY COMES MARCHING HOME
45 CAMPTOWN RACES
46 SWANEE RIVER (OLD FOLKS AT HOME)
47 JEANNIE WITH THE LIGHT BROWN HAIR
48 YANKEE DOODLE
49 RED RIVER VALLEY
50 TURKEY IN THE STRAW
51 MY OLD KENTUCKY HOME
52 HOME ON THE RANGE
53 ALOHA OE
54 JAMAICA FAREWELL
55 SAKURA SAKURA
56 HOLDIRIDIA
57 LA CUCARACHA
58 LA PALOMA
59 SANTA LUCIA
60 CIELITO LINDO
61 TROIKA
62 SZLA DZIEWECZKA
63 WALTZING MATILDA
64 AJO MAMMA
65 RASA SAYANG
66 AIR FROM SUITE no.3
67 SPRING FROM THE FOUR SEASONS
68 TOY SYMPHONY
69 SYMPHONY no.101 CLOCK 2nd Mov.
70 SERENADE FROM EINE KLEINE NACHTMUSIK
71 ODE TO JOY
72 BRIDAL MARCH FROM LOHENGRIN
73 TRIUMPHAL MARCH FROM AIDA
74 BRINDISI FROM LA TRAVIATA
75 LA DONNA É MOBILE FROM RIGOLETTE
76 POLKA FROM THE BARTERED BRIDE
77 CHANSON DU TOREADOR FROM CARMEN
78 HABANERA FROM CARMEN
79 PRELUDE FROM LARLÉSIENNE
80 LE CYGNE FROM LE CARNAVAL DES ANIMAUX
81 MARCH FROM THE NUTCRACKER
82 SCENE FROM SWAN LAKE
83 THAIS MEDITATION
84 THE ENTERTAINER
85 FÜR ELISE
86 PIANO SONATA op.13 PATHÉTIQUE 2nd Mov.
87 PIANO SONATA op.27-2 MOONLIGHT 1st Mov.
88 TURKISH MARCH (MOZART)
89 PIANO SONATA K.545 1st Mov.
90 VALSE op.64-1 PETIT CHIEN
91 CHOPSTICKS
92 FRÖHLICHER LANDMANN
93 AMERICAN PATROL
94 JESUS BLEIBET MEINE FREUDE
95 MINUET IN G MAJOR
96 GAVOTTE (GOSSEC)
97 CANON (PACHELBEL)
98 HUNGARIAN DANCES no.5
99
WEDDING MARCH FROM MIDSUMMER NIGHTS DREAM
LK120_es_appendix.p65 10.3.19, 5:39 PM5
LK120ES1A
ES
USER’S GUIDE
GUÍA DEL USUARIO
Please keep all information for future reference.
Guarde toda información para tener como referencia futura.
This recycle mark indicates that the packaging conforms to
the environmental protection legislation in Germany.
Esta marca de reciclaje indica que el empaquetado conforma
a la legislación de protección ambiental en Alemania.
CASIO COMPUTER CO.,LTD.
6-2, Hon-machi 1-chome
Shibuya-ku, Tokyo 151-8543, Japan
MA1004-A Printed in China
LK120ES1A
K
LK120_es_cover1-4.p65 10.4.5, 5:54 PM1
  • Page 1 1
  • Page 2 2
  • Page 3 3
  • Page 4 4
  • Page 5 5
  • Page 6 6
  • Page 7 7
  • Page 8 8
  • Page 9 9
  • Page 10 10
  • Page 11 11
  • Page 12 12
  • Page 13 13
  • Page 14 14
  • Page 15 15
  • Page 16 16
  • Page 17 17
  • Page 18 18
  • Page 19 19
  • Page 20 20
  • Page 21 21
  • Page 22 22
  • Page 23 23
  • Page 24 24
  • Page 25 25
  • Page 26 26
  • Page 27 27
  • Page 28 28
  • Page 29 29
  • Page 30 30
  • Page 31 31
  • Page 32 32
  • Page 33 33
  • Page 34 34
  • Page 35 35
  • Page 36 36
  • Page 37 37
  • Page 38 38
  • Page 39 39
  • Page 40 40
  • Page 41 41
  • Page 42 42
  • Page 43 43
  • Page 44 44
  • Page 45 45
  • Page 46 46
  • Page 47 47
  • Page 48 48
  • Page 49 49
  • Page 50 50
  • Page 51 51
  • Page 52 52
  • Page 53 53
  • Page 54 54
  • Page 55 55
  • Page 56 56
  • Page 57 57
  • Page 58 58
  • Page 59 59
  • Page 60 60
  • Page 61 61
  • Page 62 62
  • Page 63 63
  • Page 64 64
  • Page 65 65
  • Page 66 66
  • Page 67 67
  • Page 68 68

Casio LK-127 Manual de usuario

Categoría
Pianos digitales
Tipo
Manual de usuario
Este manual también es adecuado para

En otros idiomas