Samsung RF24FSEDBSR El manual del propietario
- Categoría
- Neveras
- Tipo
- El manual del propietario

Frigorifero
manuale dell’utente
immagina le possibilità
Grazie per avere acquistato questo prodotto Samsung.
Apparecchio indipendente
Italiano
DA68-02916G-14.indb 1 2019. 2. 27. 오전 8:26

Informazioni sulla sicurezza
INFORMAZIONI SULLA
SICUREZZA
• Prima di mettere in funzione
l’apparecchio, leggere per
intero questo manuale e
conservarlo in un luogo sicuro
vicino all’apparecchio per futuro
riferimento.
• Utilizzare l’apparecchio solo
per lo scopo per il quale è stato
prodotto, come descritto in
questo manuale. L’apparecchio
non è inteso per l’uso da parte
di persone (bambini inclusi) con
ridotte capacità fisiche, sensoriali
o mentali, inesperte o prive di una
adeguata conoscenza, a meno
che una persona responsabile per
la loro sicurezza fornisca loro una
corretta supervisione e istruzione
all’uso.
• Questo apparecchio può essere
utilizzato da bambini di età
superiore agli 8 anni e da persone
con handicap fisici, sensoriali
o mentali o senza esperienza
o conoscenza del prodotto
solo sotto la supervisione di
una persona responsabile o nel
caso in cui abbiano ricevuto
informazioni specifiche sull’uso
sicuro dell’apparecchio e ne
abbiano compreso i rischi ad esso
associati.
I bambini non devono giocare
con l’apparecchio. La pulizia e la
manutenzione dell’apparecchio
non devono essere eseguite da
bambini senza la supervisione di
un adulto responsabile.
• Le avvertenze e le importanti
istruzioni di sicurezza riportate in
questo manuale non coprono tutte
le possibili condizioni e situazioni
che possono verificarsi. E’
responsabilità dell’utente utilizzare
l’apparecchio con buonsenso,
prestando la massima attenzione
e cura in fase di installazione,
manutenzione e funzionamento.
• Poiché le seguenti istruzioni
operative coprono i vari modelli
disponibili, le caratteristiche del
vostro frigorifero possono dierire
da quelle descritte in questo
manuale e non tutti i simboli
di avvertenza possono essere
applicabili. In caso di domande
o dubbi, rivolgersi al più vicino
centro di assistenza o reperire
le informazioni necessarie online
visitando il sito www.samsung.
com.
AVVERTENZA
;
Rischio di incendio
/ materiali
infiammabili
02_ Informazioni sulla sicurezza
DA68-02916G-14.indb 2 2019. 2. 27. 오전 8:26

Simboli di sicurezza e
precauzioni importanti:
AVVERTENZA
Pericoli o pratiche non
sicure che possono
causare lesioni personali
gravi o mortali.
ATTENZIONE
Pericoli o pratiche non
sicure che possono causare
lesioni personali lievi o
danni alla proprietà.
NON tentare di.
NON disassemblare.
NON toccare.
Seguire le istruzioni fornite.
Estrarre la spina dalla
presa di corrente.
Verificare il collegamento a
massa dell’apparecchio per
evitare scariche elettriche.
In caso di necessità rivolgersi
al centro di assistenza.
Nota.
La simbologia di avvertenza ha
lo scopo di prevenire eventuali
lesioni personali.
Seguire scrupolosamente le
istruzioni.
Una volta letto, si raccomanda
di tenere il manuale in un
luogo sicuro per una futura
consultazione.
SIMBOLI RELATIVI
A IMPORTANTI
AVVERTENZE PER
IL TRASPORTO
E IL LUOGO DI
INSTALLAZIONE
• Durante il trasporto
e l’installazione
dell’apparecchio, prestare
attenzione a che nessuna
parte del circuito di
rareddamento riporti danni.
• Come refrigerante vengono
utilizzati i gas R-600a o
R-134a. Verificare l’etichetta
del compressore sul retro
dell’apparecchio o l’etichetta
energetica all’interno del frigorifero
per controllare il tipo di refrigerante
utilizzato.
• Nel caso il prodotto contenga
gas infiammabile (Refrigerante
R-600a),
- Una perdita di refrigerante dalla
tubazione può accendersi o
causare lesioni oculari. Se si
rileva una perdita, evitare l’uso di
fiamme libere o potenziali fonti di
accensione nei pressi e aerare il
locale per alcuni minuti.
- Per evitare che possa crearsi una
miscela di aria e gas infiammabile
qualora si verificasse una perdita
nel circuito di rareddamento,
la dimensione dell’ambiente
AVVERTENZA
Informazioni sulla sicurezza _03
DA68-02916G-14.indb 3 2019. 2. 27. 오전 8:26

di installazione deve essere
adeguata alla quantità di
refrigerante utilizzato.
- Non attivare mai un apparecchio
che mostri chiari segni di danni.
In caso di dubbi, consultare
il rivenditore. L’ambiente di
installazione deve essere
sucientemente grande da
garantire un rapporto pari a
1m³ per ogni 8 g di refrigerante
R-600a utilizzato all’interno
dell’apparecchio. La quantità
di refrigerante utilizzata nel
frigorifero è indicata nella
piastra identificativa all’interno
dell’apparecchio.
- Se l’apparecchio utilizza
isobutano (R-600a) come
refrigerante, nonostante si tratti
di un gas naturale a basso
impatto ambientale è comunque
combustibile. Durante il trasporto
e l’installazione dell’apparecchio,
prestare attenzione a non
danneggiare alcuna parte del
circuito refrigerante.
SIMBOLI DI
AVVERTENZE
IMPORTANTI PER
L’INSTALLAZIONE
• Non installare l’apparecchio
in un locale soggetto a
AVVERTENZA
umidità, fumi d’olio o polvere,
luce solare diretta o pioggia.
- L’usura del rivestimento isolante
delle parti elettriche può causare
scosse elettriche o incendio.
• Non collocare il frigorifero in
una posizione esposta alla luce
solare diretta o al calore di stufe,
radiatori o altri apparecchi di
riscaldamento.
• Non collegare più apparecchi alla
stessa presa di corrente.
Il frigorifero deve essere sempre
alimentato attraverso una
presa dedicata di voltaggio
corrispondente a quello
specificato sulla targa.
- Ciò consente di ottenere le
migliori prestazioni e previene
il sovraccarico dell’impianto
domestico, che potrebbe
provocare un incendio a causa
del surriscaldamento dei cavi. Se
la presa elettrica risulta lenta, non
inserire la spina.
- Rischio di incendio o scossa
elettrica.
• Non utilizzare un cavo con evidenti
segni di usura o abrasione lungo il
rivestimento o alle estremità.
• Non piegare eccessivamente
il cavo di alimentazione e non
collocare oggetti pesanti sopra di
esso.
• Non utilizzare spray nei pressi del
frigorifero.
04_ Informazioni sulla sicurezza
DA68-02916G-14.indb 4 2019. 2. 27. 오전 8:26

- L’uso di spray vicino al frigorifero
può causare esplosione o incendio.
• Non installare l’apparecchio in un
locale in cui può verificarsi una
perdita di gas.
- La mancata osservanza di questa
precauzione può causare un
incendio o una scarica elettrica.
• L’installazione o eventuali
interventi di manutenzione su
questo apparecchio devono
essere eseguiti da un tecnico
qualificato o da un centro di
assistenza.
- Il mancato rispetto di questa
precauzione può causare scariche
elettriche, incendio, esplosione,
malfunzionamenti o lesioni.
• Prima dell’uso, questo frigorifero
deve essere adeguatamente
installato e posizionato secondo
quanto indicato nel presente
manuale.
• Non installare il frigorifero in un
luogo umido o dove possa entrare
a contatto con l’acqua.
- L’usura del rivestimento isolante
delle parti elettriche può causare
scosse elettriche o incendio.
• Collegare la spina elettrica
inserendola nella posizione
corretta con il cavo rivolto verso il
basso.
- Collegando la spina elettrica
al contrario, il cavo potrebbe
danneggiarsi e causare scariche
elettriche o incendio.
• Non utilizzare un cavo con evidenti
segni di usura o abrasione lungo il
rivestimento o alle estremità.
• Verificare che la spina elettrica non
venga schiacciata o danneggiata
dal retro del frigorifero.
• Spostando il frigorifero, fare
attenzione a non schiacciare
o danneggiare il cavo di
alimentazione.
- Pericolo di incendio.
• L’apparecchio deve essere
posizionato in modo che la
presa risulti accessibile dopo
l’installazione.
• Tenere i materiali di imballaggio
lontano dalla portata dei bambini.
- Se un bambino inserisce la testa
in un sacchetto di plastica, può
rischiare il soocamento e la morte.
• Eseguire un’idonea messa a
terra dell’apparecchio. Non
eettuare la messa a terra
utilizzando una tubatura del
gas, una tubatura dell’acqua
in plastica o una linea
telefonica.
- Per prevenire eventuali dispersioni
di corrente o scosse elettriche
causate dalle dispersioni del
frigorifero, collegare l’apparecchio
alla messa a terra.
- La mancata osservanza di questa
Informazioni sulla sicurezza _05
DA68-02916G-14.indb 5 2019. 2. 27. 오전 8:26

precauzione può causare scariche
elettriche, incendio, esplosione o
malfunzionamenti del prodotto.
- Non collegare mai il cavo di
alimentazione a una presa
non dotata di messa a terra e
controllare sempre che la messa
a terra sia eettuata secondo
quanto previsto dalle normative
locali vigenti.
• Se il cavo di alimentazione
è danneggiato, richiederne
l’immediata sostituzione da
parte del costruttore o di un
centro di assistenza.
• Il fusibile del frigorifero deve essere
sostituito da un tecnico qualificato
o da un Centro di assistenza
autorizzato.
- Il mancato rispetto di questa
precauzione può causare scariche
elettriche o lesioni personali.
SIMBOLI DI
ATTENZIONE PER
L’INSTALLAZIONE
• Mantenere le aperture di
ventilazione dell’apparecchio
o della struttura a incasso
libere da ostruzioni.
• Dopo l’installazione, lasciare
scollegato l’apparecchio per 2 ore.
ATTENZIONE
SIMBOLI RELATIVI
A IMPORTANTI
AVVERTENZE PER
L’USO
• Non toccare la spina elettrica
con le mani bagnate.
• Non riporre articoli sulla
superficie esterna del
frigorifero.
- Durante l’apertura e la chiusura
della porta, gli oggetti all’interno
possono cadere e causare lesioni
personali e/o danni materiali.
• Non collocare recipienti contenenti
acqua sulla superficie del
frigorifero.
- In caso di fuoriuscita, l’acqua
potrebbe causare scariche
elettriche o incendio.
• Non lasciare che i bambini si
appendano alle porte.
- In caso contrario, possono
verificarsi lesioni anche gravi.
• Non lasciare le porte del frigorifero
aperte e non consentire ai
bambini di penetrare all’interno del
frigorifero.
• Non lasciare che neonati o
bambini penetrino all’interno del
vano frigo o dei cassetti.
- Potrebbero verificarsi lesioni
personali o il decesso del bambino
per soocamento.
• Non sedersi sulla porta del freezer.
- La porta potrebbe danneggiarsi e
AVVERTENZA
06_ Informazioni sulla sicurezza
DA68-02916G-14.indb 6 2019. 2. 27. 오전 8:26

causare lesioni personali.
• I bambini devono essere
controllati per evitare che
giochino con l’apparecchio.
Tenere le dita lontane dai
bordi delle porte; lo spazio
che separa le porte dalla
struttura è necessariamente
esiguo. Prestare attenzione
durante l’apertura delle porte
se nei pressi ci sono bambini.
Non lasciare che i bambini
si appendano alle porte. In
caso contrario, potrebbero
riportare gravi lesioni. I bambini
rischiano di restare intrappolati
all’interno dell’apparecchio. Non
permettere ai bambini di entrare
nel frigorifero.
• Per evitare che i bambini
rimangano intrappolati
all’interno, dopo la pulizia
reinstallare il divisore
precedentemente rimosso dal
cassetto per consentirne la
manutenzione.
• Non inserire mai le dita o altri
oggetti nel foro del dispenser.
- In caso contrario, possono
verificarsi lesioni personali o
danni materiali.
• Non conservare nel frigorifero
sostanze volatili o infiammabili
quali benzene, diluenti, alcool,
etere o GPL.
- La conservazione di tali prodotti
può causare una esplosione.
• Non conservare nel frigorifero
prodotti farmaceutici sensibili
alle basse temperature, materiali
scientifici o qualsiasi altro
prodotto che possa deteriorarsi in
condizioni di bassa temperatura.
- I prodotti che richiedono
un rigoroso controllo della
temperatura non devono essere
conservati nel frigorifero.
• Non collocare né attivare
apparecchi elettrici all’interno
del frigorifero, salvo quelli
raccomandati dal produttore.
• Non utilizzare un asciugacapelli
all’interno del frigorifero. Non
collocarvi candele accese per
eliminare i cattivi odori.
- La mancata osservanza di
questa precauzione può causare
un incendio o una scarica
elettrica.
• Non toccare le pareti interne del
freezer o i prodotti surgelati con le
mani bagnate.
- Ciò potrebbe causare il
congelamento delle dita.
• Per accelerare il processo di
sbrinamento, non utilizzare
dispositivi meccanici o altri mezzi
diversi da quelli consigliati dal
produttore.
• Non danneggiare il circuito
refrigerante.
Informazioni sulla sicurezza _07
DA68-02916G-14.indb 7 2019. 2. 27. 오전 8:26

• Questo prodotto è inteso
solo per la conservazione
di alimenti in ambiente
domestico.
• Riporre le bottiglie strettamente
vicine nel medesimo comparto in
modo che non possano cadere
all’apertura della porta.
• In caso di una perdita di gas (per
es. propano, GPL, ecc), ventilare
immediatamente il locale senza
toccare la spina elettrica. Non
toccare né l’apparecchio né il
cavo di alimentazione.
• Non inserire mani, piedi, oggetti
metallici (per esempio spiedini,
ecc.) sul fondo o sul retro del
frigorifero.
- La mancata osservanza di
questa precauzione può causare
scariche elettriche o lesioni.
- I bordi taglienti possono causare
lesioni.
- Non utilizzare ventilatori o
aspiratori elettrici.
- Una scintilla può causare
esplosione o incendio.
• Utilizzare solo lampade LED
fornite dal produttore o da un
centro di assistenza.
• Controllare che i bambini non
giochino con questo apparecchio.
• Non disassemblare o riparare
il frigorifero autonomamente.
- Ciò potrebbe causare incendio,
malfunzionamento e/o
lesioni personali. In caso di
malfunzionamento, contattare il
centro di assistenza.
• Non tentare di
riparare, smontare o
modificare l’apparecchio
autonomamente.
- Non utilizzare fusibili diversi (quali
cavi di rame, acciaio, ecc) diversi
dai fusibili standard.
- In caso di riparazione o
reinstallazione dell’apparecchio,
contattare un centro di
assistenza autorizzato.
- Il mancato rispetto di questa
precauzione può causare
scariche elettriche, incendio,
malfunzionamenti del prodotto o
lesioni.
• Se l’apparecchio genera un
rumore anomalo, odore di
bruciato o fumo, scollegare
immediatamente la spina di
alimentazione e rivolgersi al più
vicino centro di assistenza.
- Il mancato rispetto di questa
precauzione può causare
scariche elettriche o incendio.
• In caso di problemi nella
sostituzione della lampada,
rivolgersi al centro di assistenza.
• Se il prodotto è dotato
di lampada LED, non
disassemblare l’assieme
08_ Informazioni sulla sicurezza
DA68-02916G-14.indb 8 2019. 2. 27. 오전 8:26

coprilampada/lampada
autonomamente.
- Rivolgersi al centro di assistenza.
• Se all’interno del frigorifero è
penetrata polvere o acqua,
scollegare la spina dalla presa di
corrente e rivolgersi al centro di
assistenza Samsung Electronics.
- Rischio di incendio.
SIMBOLI DI
ATTENZIONE PER
L’USO
• Per ottenere le prestazioni
migliori dal prodotto,
- Non collocare alimenti davanti
alle aperture di ventilazione
sul pannello posteriore del
frigorifero per evitare di ostruire
la circolazione dell’aria all’interno
del frigo.
- Avvolgere gli alimenti
adeguatamente o riporli in
contenitori sottovuoto prima di
conservarli nel frigorifero.
- Non aggiungere vicino ad
alimenti già surgelati un nuovo
alimento fresco da surgelare.
• Non collocare bevande gassate
o frizzanti nel congelatore. Non
inserire bottiglie o contenitori di
vetro nel congelatore.
- Durante il surgelamento degli
alimenti, il vetro potrebbe
ATTENZIONE
rompersi e causare lesioni
personali e danni alla proprietà.
• Non cambiare o modificare le
funzioni del frigorifero.
- Eventuali modifiche possono
provocare lesioni personali e/o
danni alla proprietà. Eventuali
modifiche eseguite da terzi su
questo apparecchio non saranno
coperte dalla garanzia Samsung,
inoltre Samsung non potrà
essere ritenuta responsabile per
problemi di sicurezza e danni
risultanti da tali modifiche.
• Non ostruire i fori di ventilazione.
- Se i fori di ventilazione sono
ostruiti, per esempio da
un sacchetto di plastica, il
frigorifero potrebbe rareddarsi
eccessivamente. Se il periodo di
rareddamento è troppo lungo, il
filtro dell’acqua potrebbe rompersi
e causare una perdita d’acqua.
- Non aggiungere vicino ad alimenti
già surgelati un nuovo alimento
fresco da surgelare.
• Rispettare i tempi di
conservazione e le date di
scadenza degli alimenti congelati.
• Riempire il serbatoio dell’acqua e
il cassettino del ghiaccio solo con
acqua potabile.
• Usare solo la macchina del ghiaccio
fornita insieme al frigorifero.
• L’allacciamento idrico di questo
frigorifero deve essere eseguito
Informazioni sulla sicurezza _09
DA68-02916G-14.indb 9 2019. 2. 27. 오전 8:26

solo da un tecnico qualificato e
solo alla linea dell’acqua potabile.
• Per il corretto funzionamento
della macchina del ghiaccio, la
pressione dell’acqua deve essere
compresa tra 138 e 862 kPa
(1,4~8,8 kgf/cm³).
• Non spruzzare sostanze volatili
come per esempio insetticidi sulla
superficie dell’apparecchio.
- Oltre ad essere dannosi per
l’uomo, possono causare
scariche elettriche, incendio o
malfunzionamenti.
• Non applicare una forza eccessiva
né urtare con violenza la
superficie in vetro.
- L
a rottura del vetro può provocare
lesioni personali e/o danni alla
proprietà.
SIMBOLI DI
ATTENZIONE PER
LA PULIZIA E LA
MANUTENZIONE
• Non spruzzare acqua
direttamente sulle superfici
interne o esterne del
frigorifero.
- Pericolo di scariche elettriche o
incendio.
• Non utilizzare né collocare
sostanze sensibili alla
temperatura, come ad esempio
ATTENZIONE
spray e oggetti infiammabili,
ghiaccio secco, farmaci o
sostanze chimiche vicino al
frigorifero. Non conservare
oggetti o sostanze volatili o
infiammabili (benzene, diluenti,
GPL, ecc.) all’interno del
frigorifero.
- Il frigorifero è idoneo solo alla
conservazione di alimenti.
- Il mancato rispetto di questa
precauzione può causare
incendio o esplosione.
• Non spruzzare gas
infiammabile vicino al frigorifero.
- Rischio di esplosione o incendio.
• Non spruzzare prodotti per la
pulizia direttamente sul display.
- Le lettere sul display potrebbero
non essere più visibili.
• Rimuovere eventuali corpi
estranei o polvere dai contatti
della spina. Per pulire la spina
da sostanze estranee o dalla
polvere non utilizzare un panno
bagnato o umido.
- In caso contrario, pericolo di
scariche elettriche o incendio.
• Non inserire mai le dita o altri
oggetti nel foro del dispenser e
sullo scarico del ghiaccio.
- Ciò può causare lesioni personali
o danni materiali.
• Scollegare il frigorifero dalla
presa di corrente prima
10_ Informazioni sulla sicurezza
DA68-02916G-14.indb 10 2019. 2. 27. 오전 8:26

di eseguirne la pulizia o la
manutenzione.
• Inserire saldamente la spina del
cavo di alimentazione alla presa
di corrente. Non usare un cavo
o una spina di alimentazione
danneggiati o una presa
allentata.
- La mancata osservanza di
questa precauzione può causare
un incendio o una scarica
elettrica.
• Non tirare o piegare
eccessivamente il cavo di
alimentazione. Non torcere
o annodare il cavo di
alimentazione. Non appendere il
cavo di alimentazione a oggetti
metallici, posizionarvi sopra
oggetti pesanti, inserirlo tra più
oggetti o spingerlo nello spazio
sul retro dell’apparecchiatura.
- Durante lo spostamento del
frigorifero, prestare attenzione a
non schiacciare o danneggiare il
cavo di alimentazione.
- La mancata osservanza di
questa precauzione può causare
un incendio o una scarica
elettrica.
SIMBOLI DI
AVVERTENZE
IMPORTANTI PER LO
SMALTIMENTO
• Verificare l’integrità
delle tubazioni sul retro
dell’apparecchio prima di
smaltirlo.
• Come refrigerante vengono
utilizzati i gas R-600a o
R-134a. Verificare l’etichetta
del compressore sul retro
dell’apparecchio o l’etichetta
energetica all’interno del
frigorifero per controllare il
tipo di refrigerante utilizzato.
Nel caso il prodotto contenga
gas infiammabile (refrigerante
R-600a), contattare l’ente locale
preposto per lo smaltimento
sicuro di questo prodotto.
Questo prodotto contiene
ciclopentano come gas isolante.
I gas utilizzati per l’isolamento
richiedono speciali procedure
di smaltimento. Contattare
l’autorità locale competente
per informazioni sul corretto
smaltimento di questo prodotto.
Verificare l’integrità delle tubazioni
sul retro dell’apparecchio prima
di smaltirlo. Le tubazioni devono
essere scollegate in uno spazio
aperto.
• Per lo smaltimento di questo
prodotto o di altri frigoriferi,
ATTENZIONE
Informazioni sulla sicurezza _11
DA68-02916G-14.indb 11 2019. 2. 27. 오전 8:26

rimuovere le porte, le guarnizioni
e le chiusure delle porte in modo
che bambini o animali non
possano rimanere intrappolati
all’interno. Lasciare i ripiani al
loro posto in modo che i bambini
non possano entrarvi facilmente.
Controllare che i bambini non
giochino con l’apparecchio
smaltito.
• Si prega di smaltire e riciclare
il materiale utilizzato per
l’imballaggio di questo prodotto
secondo quanto previsto dalle
norme vigenti.
• Tenere tutti i materiali di
imballaggio lontano dalla portata
dei bambini, poiché possono
essere pericolosi.
- Se un bambino infilasse la testa in
un sacchetto, potrebbe soocare.
ULTERIORI CONSIGLI
PER UN USO
CORRETTO DEL
PRODOTTO
• In caso di blackout elettrico,
chiamare la compagnia elettrica
locale e chiedere il tempo previsto
per il ripristino dell’elettricità.
- Generalmente, interruzioni di
corrente di una o due ore non
influiscono sulle temperature del
frigorifero. Tuttavia, durante il
blackout si consiglia di ridurre al
minimo l’apertura degli sportelli.
- Se l’interruzione di corrente
dovesse protrarsi per più di 24
ore, rimuovere tutti gli alimenti
surgelati dal freezer.
• Se dovessero essere fornite
delle chiavi insieme al frigorifero,
tenerle fuori della portata
dei bambini e non nei pressi
dell’apparecchio.
• L’apparecchio potrebbe non
funzionare in modo corretto
(la temperatura interna
potrebbe aumentare) qualora
la temperatura ambiente
permanesse per lungo tempo
al di sotto della temperatura
minima indicata per questo
frigorifero.
• Non conservare alimenti
facilmente deperibili alle basse
temperature, come banane e
meloni.
• Il frigorifero è esente da brina;
ciò significa che non vi è
alcuna esigenza di sbrinarlo
manualmente poiché tale
operazione viene eseguita
automaticamente.
• L’aumento di temperatura
per lo sbrinamento è
conforme ai requisiti ISO.
Tuttavia, per prevenire un
aumento indesiderato della
temperatura dei cibi surgelati
12_ Informazioni sulla sicurezza
DA68-02916G-14.indb 12 2019. 2. 27. 오전 8:26

durante l’autosbrinamento
dell’apparecchio, avvolgere gli
alimenti in appositi contenitori.
• L’aumento della temperatura dei
surgelati durante l’operazione di
sbrinamento può ridurre i tempi
di conservazione.
Consigli per risparmiare
energia
- Installare l’apparecchio in un
luogo fresco, asciutto e dotato di
adeguata ventilazione.
Accertarsi che non sia esposto
a luce solare diretta e non sia
installato vicino a una fonte
diretta di calore (un calorifero, ad
esempio).
- Non ostruire le griglie e le aperture
di ventilazione.
- Lasciare che il cibo caldo
si rareddi prima di riporlo
nell’apparecchio.
- Per scongelare i cibi, collocarli in
frigorifero. Le basse temperature
dei surgelati consentono inoltre
di rinfrescare ulteriormente gli
alimenti presenti in frigorifero.
- Nel riporre o estrarre gli alimenti,
non tenere per molto tempo la
porta aperta. Minore è il tempo di
apertura, minore è il ghiaccio che
si forma nel freezer.
- Pulire il retro del frigorifero
regolarmente. La polvere che si
accumula aumenta il consumo di
corrente.
- Non impostare una temperatura
più bassa del necessario.
- Garantire una ventilazione
suciente alla base e sul retro del
frigorifero.
Non coprire le aperture di
ventilazione.
Informazioni sulla sicurezza _13
DA68-02916G-14.indb 13 2019. 2. 27. 오전 8:26

- Durante l’installazione, lasciare
suciente spazio sui lati, sul
retro e in alto per consentire la
circolazione dell’aria.
Ciò consentirà di ridurre sia il
consumo energetico sia il costo
della bolletta elettrica.
- Per ottenere il miglior rendimento
energetico, lasciare tutti gli
accessori interni (come cestelli,
cassetti, mensole) nelle loro
posizioni originali, come
predisposto dal produttore.
Questa apparecchiatura
è progettata per un uso
domestico o applicazioni
simili quali
- angoli cottura per il personale
in punti vendita, uci e altri
ambienti lavorativi;
- fattorie/aziende agricole e per
l’uso dei clienti in hotel, motel e
altri ambiti residenziali;
- bed and breakfast;
- catering e applicazioni simili
non-retail.
Indice
IMPOSTAZIONE DEL FRIGORIFERO CON PORTE ALLA FRANCESE ……… 15
FUNZIONAMENTO DEL FRIGORIFERO CON PORTE ALLA FRANCESE …… 23
RISOLUZIONE DEI PROBLEMI …………………………………………………… 36
14_ Informazioni sulla sicurezza
DA68-02916G-14.indb 14 2019. 2. 27. 오전 8:26

Impostazione del frigorifero con
porte alla francese
PRIMA DI INSTALLARE IL
FRIGORIFERO
Congratulazioni per l’acquisto di questo nuovo
frigorifero Samsung Frigorifero con porte alla
francese. Speriamo apprezzerete le novità
tecniche e le ecienze oerte da questo prodotto.
Scelta della posizione migliore per
l’installazione del frigorifero
Scegliere:
• Un luogo con facile accesso all’acqua potabile.
• L’apparecchio non deve trovarsi esposto ai
raggi diretti del sole.
• Il pavimento deve essere in piano.
• Lo spazio deve permettere l’apertura agevole
delle porte del frigorifero.
• Lo spazio sui lati, sul retro e in alto deve essere
suciente a garantire una corretta circolazione
dell’aria.
• La collocazione deve consentire di spostare
facilmente il frigorifero per manutenzione o
assistenza.
• Non installare il frigorifero in un ambiente la cui
temperatura può scendere sotto i 10 °C.
• Non collocare il frigorifero dove possa bagnarsi.
Se lo spazio non è suciente, il funzionamento del
sistema di rareddamento potrebbe non essere
adeguato. Se il frigorifero è dotato di macchina
del ghiaccio, lasciare ulteriore spazio sul retro per i
collegamenti del tubo dell’acqua. Quando il frigorifero
viene installato accanto a una parete fissa, è necessario
uno spazio libero minimo di 95 mm tra il frigorifero e la
parete per permettere l’apertura della porta.
Importante:
Verificare che sia possibile posizionare
facilmente il frigorifero nella sua collocazione finale
misurando i vani delle porte (larghezza e altezza),
le soglie, i sotti, le scale, ecc. La seguente
tabella specifica l’altezza e la profondità di questo
frigorifero Samsung con porte alla francese.
AA
B
B
C
C
D
D
E
E
Profondità “A” 726 mm
Larghezza “B” 908 mm
Altezza “C” 1749 mm
Altezza complessiva “D” 1777 mm
Profondità “E” 788 mm
125° 125°
Ogni misura è basata sulla dimensione del
design, pertanto può variare a seconda del
metodo di misurazione.
Impostazione _15
01 IMPOSTAZIONE
DA68-02916G-14.indb 15 2019. 2. 27. 오전 8:26

Durante lo spostamento del frigorifero
Al fine di prevenire danni al pavimento,
accertarsi che i piedini di regolazione
anteriori siano in posizione alzata
(sopra il pavimento). Vedere la sezione
‘Regolazione del livellamento’ (a pagina
19).
Cacciavite a lama
piatta (-)
Piedino di regolazione
POSIZIONAMENTO A PAVIMENTO
Per una corretta installazione, questo frigorifero deve
essere posizionato su una superficie stabile e solida
livellata con il resto del pavimento. La superficie deve
essere sucientemente solida da supportare il peso
del frigorifero a pieno carico. Durante l’installazione,
al fine di proteggere il pavimento, ritagliare un’ampia
lastra di cartone e posizionarla sotto il frigorifero
nella posizione di lavoro. Spostando il frigorifero,
è necessario muoverlo avanti e indietro seguendo
una linea retta. Non spostarlo prima da un lato e poi
dall’altro.
ATTENZIONE
RIMOZIONE DELLE PORTE
DEL FRIGORIFERO
Per alcune installazioni è necessario rimuovere i
cassetti di frigorifero e freezer per spostare il frigorifero
nella sua collocazione finale. Non rimuovere le
porte/i cassetti se non strettamente necessario.
Se non è necessario rimuovere le porte del frigorifero,
passare alla sezione “Regolazione del livellamento”
a pagina 19. Se è necessario rimuovere le porte,
procedere come descritto di seguito. Prima di
rimuovere porte/cassetti, leggere quanto segue:
Prima di rimuovere le porte o i cassetti del
frigorifero, scollegare il cavo di alimentazione.
• Durante la rimozione di porte e cassetti,
prestare attenzione a non danneggiarli,
graarli o farli cadere.
• Prestare la massima attenzione quando si
rimuovono porte/cassetti. Le porte sono
pesanti ed è possibile ferirsi.
• Rimontare porte/cassetti in modo corretto al
fine di evitare:
- Formazione di condensa per ingresso d’aria.
- Disallineamento delle porte.
- Spreco di energia elettrica per una scorretta chiusura
delle porte.
Smontaggio delle porte del frigorifero
Prestare attenzione a non lasciare cadere e
graare le porte durante la loro rimozione.
Strumenti necessari (non forniti)
Per completare l’installazione del frigorifero sono
necessari i seguenti strumenti:
Cacciavite a
croce (+)
Cacciavite a
lama piatta (-)
Chiave a bussola
(10 mm)
Pinze
Chiave a brugola
(5 mm)
AVVERTENZA
AVVERTENZA
16_ Impostazione
DA68-02916G-14.indb 16 2019. 2. 27. 오전 8:26

Con la porta aperta
1. Rimuovere le 3 viti che tengono il PIANO
SUPERIORE (1) e separare i cavi collegati.
1
2. Scollegare i due connettori ( 2 ) sulla porta
di sinistra. Per rimuovere il giunto idrico dalla
cerniera, ruotarlo e separarlo dalla cerniera.
Estrarre il tubo dell’acqua ( 3 ) premendo la parte
contrassegnata ( 4 ) sul giunto del tubo dell’acqua.
2
3
4
3. Staccare e rimuovere la leva della cerniera
( 5 ). Rimuovere la vite di terra ( 6 ) fissata alla
cerniera superiore della porta di sinistra con un
cacciavite a croce (+). Rimuovere la cerniera
superiore della porta sinistra e destra ( 7 ).
5
6
7
4. Per rimuovere la porta, sollevarla verso l’alto
senza inclinarla.
5. Con un cacciavite a croce (+), rimuovere le
viti ( 8 ) fissate alle cerniere inferiori della porta
sinistra e destra. Con una chiave a brugola
(5mm), rimuovere i 2 bulloni a testa esagonale
( 9 ) fissati alle cerniere inferiori della porta
sinistra e destra. Rimuovere le cerniere inferiori
della porta sinistra e destra ( 10 ).
10
8
9
Chiave a brugola
RIMONTAGGIO DELLE PORTE
DEL FRIGORIFERO
Per rimontare le porte del frigorifero dopo avere
spostato il frigorifero nella sua collocazione finale,
montare le parti nell’ordine inverso.
1. Il tubo dell’acqua deve essere completamente
inserito al centro del giunto trasparente (Tipo
A) o delle linee guida (Tipo B) per evitare
perdite d’acqua dal dispenser.
Tipo A Tipo B
Centro del giunto trasparente Le linee guida
Dispenser
Impostazione _17
01 IMPOSTAZIONE
DA68-02916G-14.indb 17 2019. 2. 27. 오전 8:26

SMONTAGGIO DEL CASSETTO
MULTIFUNZIONE
1. Estrarre la Zona multifunzione ( 1 ) sollevandola.
1
2. Rimuovere il coperchio ( 2 ) dal fascio di fili con
un cacciavite a lama piatta (-).
2
3. Premere la leva di sblocco e separare il connettore.
Prima di rimontarlo, connettere il fascio
di fili. Se non è collegato, il comparto
multifunzione non funziona.
4. Con una chiave a bussola (10 mm), rimuovere
1 bullone a testa esagonale da ciascun lato.
ATTENZIONE
5. Sollevare il cassetto multifunzione dalle guide.
Riporre nei cassetti freezer una quantità
eccessiva di alimenti può impedire la
chiusura completa del freezer e provocare
un accumulo di brina.
RIMONTAGGIO DEL
CASSETTO MULTIFUNZIONE
Per fissare di nuovo il cassetto multifunzione,
montare le parti nell’ordine inverso.
Collegare il connettore del cassetto
multifunzione. Se non è collegato, il
comparto multifunzione non funziona.
SMONTAGGIO DELLA PORTA
DEL FREEZER
1. Estrarre il cassetto superiore sollevandolo.
2. Rimuovere il balconcino del comparto
congelatore ( 1 ) sollevandolo.
ATTENZIONE
ATTENZIONE
18_ Impostazione
DA68-02916G-14.indb 18 2019. 2. 27. 오전 8:26

1
3. Estrarre il cestello inferiore ( 2 ) sollevandolo
dalle guide.
2
4. Premere il gancio di fissaggio delle guide.
5. Tenendo la parte superiore del cassetto del
freezer, estrarlo completamente e rimuoverlo
dalle guide.
Prestare attenzione a non graare o
intaccare le guide di scorrimento toccando
il pavimento.
Montare il cestello del freezer nella
posizione giusta quando si rimuove installa
la porta del freezer. Il mancato rispetto
di questa precauzione può causare una
apertura/chiusura scorretta della porta.
Riporre nei cassetti freezer una quantità
eccessiva di alimenti può impedire la
chiusura completa del freezer e provocare
un accumulo di brina.
ATTENZIONE
ATTENZIONE
ATTENZIONE
RIMONTAGGIO DELLA PORTA
DEL FREEZER
Per rimontare il cassetto dopo avere spostato il
frigorifero nella sua collocazione finale, montare le
parti nell’ordine inverso.
REGOLAZIONE DEL LIVELLAMENTO
Assicurarsi che il frigorifero sia in piano per
potere eseguire le ultime regolazioni. Usare
una livella per verificare che il frigorifero sia in
piano sia in orizzontale sia in verticale rispetto
al pavimento. Se il frigorifero non è in piano, le
porte potrebbero non risultare perfettamente pari,
provocando condensa e un aumento delle bollette
dell’elettricità. Le istruzioni seguenti forniscono
un esempio di come livellare il frigorifero se il lato
sinistro è più basso del destro.
Regolare il livellamento
1. Aprire il cassetto del freezer e rimuovere il
cestello inferiore.
2. Inserire un cacciavite a lama piatta (-) nella
tacca piedino di regolazione sinistro e ruotare
in senso antiorario per livellare il frigorifero.
(Ruotare il piedino di regolazione in senso
orario per abbassare il frigorifero e in senso
antiorario per alzarlo.)
Impostazione _19
01 IMPOSTAZIONE
DA68-02916G-14.indb 19 2019. 2. 27. 오전 8:26

cacciavite a lama piatta (-)
piedino di regolazione
Entrambe i piedini di regolazione devono
toccare il pavimento per evitare eventuali lesioni
personali o danni materiali dovuti all’inclinazione.
Se il lato destro è più basso, seguire la stessa
procedura con piedino di regolazione destra.
Rimuovere dal frigorifero il copri piedino
anteriore è dicile, perciò si sconsiglia di
eettuare piccole regolazioni con il piedino
di regolazione. La pagina seguente fornisce
istruzioni sul modo migliore di eettuare
piccole regolazioni delle porte.
EFFETTUARE PICCOLE
REGOLAZIONI DELLA PORTA
ESTERNA O DELLA PORTA
INTERNA
Per ottenere porte perfettamente in pari è necessario
che il frigorifero sia in piano. Per informazioni, rivedere
la sezione precedente sul livellamento del frigorifero.
Parte di
regolazione
Parte fissa
La porta di sinistra è fissa. Per eettuare
piccole regolazioni, regolare solo la porta
di destra.
Distanziali
L’altezza della porta può essere regolata mediante
gli anelli distanziali in dotazione, forniti in 4 diverse
misure (1 mm, 1,5 mm, 2 mm e 2,5 mm).
ATTENZIONE
Per regolare l’altezza di una porta
Controllare la dierenza di altezza tra le porte,
quindi sollevare e trattenere la porta inferiore.
• Inserire l’anello distanziale nello spazio tra la
porta interna e il CARDINE DELLA CERNIERA.
(solo modelli che ne sono dotati).
•
Inserire un solo anello distanziale a
questo scopo. Inserendo infatti due o più
anelli distanziali potrebbero fuoriuscire o
emettere rumore di sfregamento.
• Tenere gli anelli distanziali lontano dalla portata
dei bambini e conservarli per future esigenze.
• Non sollevare eccessivamente la porta.
La porta potrebbe urtare e danneggiare il
coperchio superiore.
EFFETTUARE PICCOLE
REGOLAZIONI TRA LA PORTA
INTERNA E LA PORTA ESTERNA
(SOLO MODELLI CHE NE
SONO DOTATI)
Una volta sollevata la porta esterna, inserire il
distanziale nello spazio tra la PORTA ESTERNA ed
il CARDINE DELLA CERNIERA.
ATTENZIONE
20_ Impostazione
DA68-02916G-14.indb 20 2019. 2. 27. 오전 8:26

Gli anelli distanziali sono forniti in dotazione
con il frigorifero.
Lo spessore del DISTANZIALE 1 mm, 2cad.
Usare il distanziale qualora la maniglia non
si muova perché la porta esterna è troppo
bassa.
INSTALLAZIONE DEL TUBO
DEL DISPENSER DELL’ACQUA
Il dispenser dell’acqua dotato di filtro è una delle funzioni
che caratterizzano il nuovo frigorifero. Per favorire una
salute migliore, il filtro rimuove dall’acqua eventuali
particelle indesiderate. Tuttavia, questo filtro non sterilizza
né neutralizza i microorganismi. Per questo è necessario
acquistare un sistema di depurazione dell’acqua.
Perché la macchina del ghiaccio funzioni in modo
adeguato, la pressione dell’acqua deve essere
compresa tra 20 e 125 psi (138 ~ 862 kPa).
In normali condizioni d’uso, una tazza da 170 cc
viene riempita in circa 10 secondi.
Se il frigorifero è installato in un’area caratterizzata
da bassa pressione dell’acqua (inferiore a 20
psi), per compensare la pressione insuciente è
possibile installare una pompa booster.
Dopo avere collegato il tubo dell’acqua, verificare
che il serbatoio dell’acqua all’interno del frigorifero sia
pieno. Per fare questo, premere la leva del dispenser
dell’acqua fino a far fluire l’acqua dall’erogatore.
I kit di installazione del tubo dell’acqua
possono essere acquistati a parte presso
il rivenditore.
Utilizzare il nuovo set di tubi fornito in
dotazione eliminando il precedente set
senza riutilizzarlo.
Componenti per l’installazione del
tubo dell’acqua
Viti ed elementi di fissaggio
del tubo dell’acqua
Connettore tubo
Tubo dell’acqua
Connessione al tubo di alimentazione
dell’acqua
1. Per prima cosa, chiudere la mandata principale
dell’acqua.
2. Localizzare il tubo dell’acqua fredda potabile
più vicino.
3. Seguire le istruzioni di installazione del tubo
dell’acqua accluse al kit.
Il tubo dell’acqua deve essere collegato al
tubo dell’acqua fredda. Se è collegato a
un tubo dell’acqua calda, può causare il
malfunzionamento del sistema di depurazione.
AVVERTENZA
Chiudere la valvola
dell’acqua principale
Chiudere la valvola
dell’acqua principale
Nessuno
spazio
4. Dopo il collegamento dell’alimentazione idrica
al filtro, riaprire la mandata dell’acqua ed
erogare circa 3 l d’acqua per pulire il filtro.
Collegamento del tubo di
alimentazione dell’acqua al frigorifero
1. Rimuovere il tappo dal tubo dell’acqua
sull’unità e inserirvi il dado di compressione del
tubo dell’acqua fornito nel kit.
2. Collegare i tubi dell’acqua dell’unità e del kit.
3. Serrare il dado di compressione sul raccordo.
Non devono esserci spazi tra (A, B e C )
4. Aprire l’acqua e controllare se vi sono perdite.
Collegare il tubo dell’acqua solo a
una sorgente di acqua potabile. Se è
necessario riparare o smontare il tubo
dell’acqua, tagliare 6,5 mm della tubazione
in plastica per essere certi di ottenere un
collegamento sicuro, privo di perdite.
Impostazione _21
01 IMPOSTAZIONE
DA68-02916G-14.indb 21 2019. 2. 27. 오전 8:26

Nessuno spazio
Allentare a
Rimuovere il
tappo
Tubo dell’acqua
dal kit
Tubo dell’acqua
dall’unità
Prima dell’uso, esaminare queste parti per
rilevare eventuali perdite.
• La garanzia
Samsung
non copre
l’INSTALLAZIONE
DEL TUBO
DELL’ACQUA.
• Questa viene
eseguita a spese del cliente salvo che il prezzo
di vendita includa i costi di installazione.
• Se necessario, rivolgersi a un idraulico o
un installatore autorizzato per far eseguire
l’installazione.
• In caso di perdite d’acqua causate da una
installazione scorretta, rivolgersi all’installatore
che ha eseguito il lavoro.
COMPLETAMENTO
DELL’INSTALLAZIONE
Ora che il frigorifero è installato, è possibile
utilizzare le funzioni e le caratteristiche del
prodotto.
Completando i seguenti passaggi, il frigorifero sarà
pienamente operativo.
1. Verificare che il frigorifero sia installato in un
luogo adeguato e che vi sia spazio suciente
tra l’apparecchio e la parete. Vedere le
istruzioni di installazione riportate in questo
manuale.
2. Una volta collegato il frigorifero, accertarsi che
la luce interna si accenda all’apertura delle
porte.
3. Impostare la temperatura sul valore più
freddo e attendere un’ora. Il freezer si
ATTENZIONE
raredderà moderatamente e il motore girerà
regolarmente. Impostare frigorifero e freezer
sulle temperature desiderate.
4. Una volta acceso il frigorifero, per raggiungere
la temperatura impostata sono necessarie
alcune ore. Una volta raggiunta una
temperatura sucientemente bassa sarà
possibile conservare nel frigorifero alimenti e
bevande.
22_ Impostazione
DA68-02916G-14.indb 22 2019. 2. 27. 오전 8:26

Funzionamento del frigorifero con
porte alla francese
USO DEL PANNELLO DI
CONTROLLO
10 9
1
2
3
5
6
4
7 8
( 1 )
Energy
Saver
(Risparmio
energia)
Toccando questo tasto si attiva e disattiva la
modalità di risparmio energetico. Attivando
la funzione di risparmio energetico, l’icona
si accende. Disattivando la funzione di
risparmio energetico, l’icona si spegne.
L’impostazione di fabbrica della funzione di
risparmio energetico è “ON”. Se sulle porte
compaiono condensa o gocce d’acqua,
disattivare la modalità di risparmio energetico.
( 2 )
Freezer
(Hold 3 sec for
Power Freeze)
(Tenere
premuto
per 3 sec
per attivare
la funzione
Congelamento
rapido)
Il tasto Freezer serve a due scopi:
- Per impostare il freezer sulla
temperatura desiderata.
- Per attivare e disattivare la funzione
Power Freeze (Congelamento rapido).
1) Per impostare la temperatura del freezer
Premere il tasto Freezer per impostare il
freezer sulla temperatura desiderata. E’
possibile impostare la temperatura tra
-15 ºC e -23 ºC.
2) Funzione Power Freeze (Congelamento
rapido)
Tenere premuto questo tasto per 3 secondi
per ridurre il tempo necessario a congelare
gli alimenti nel freezer. Può essere utile se
si ha bisogno di congelare rapidamente
alimenti che si deteriorano facilmente o
se la temperatura nel freezer si è alzata
drasticamente (per esempio, se è stata
lasciata aperta la porta). L’uso di questa
funzione comporta un aumento del consumo
energetico del frigorifero. Disattivarla qualora
non sia necessaria, riportando il freezer alla
temperatura originaria. Attivare la funzione di
congelamento rapido almeno 20 ore prima di
surgelare una grande quantità di alimenti.
( 3 )
Alarm
(Allarme)
(Hold 3 sec
for Filter
Reset)
(Tenere
premuto per
3 sec per
reimpostare
il filtro)
Il tasto Alarm (Allarme) serve a due scopi:
- Attivare e disattivare l’allarme porta
aperta
- Resettare l’indicatore di durata del filtro
dell’acqua.
1) Funzione Door Alarm (Allarme porta)
Se l’allarme porta è attivo, un allarme
suona appena una delle porte del
frigorifero viene lasciata aperta per più
di tre minuti. La chiusura della porta
interrompe l’allarme sonoro. La funzione
di Allarme porta è pre-impostata su
On in fabbrica. E’ possibile disattivarla
premendo e poi lasciando andare il tasto
Allarme. Può essere riattivata nello stesso
modo. L’icona si illumina quando la
funzione è attiva.
Quando la funzione Door Alarm (Allarme
porta) è attiva e scatta l’allarme sonoro,
l’icona Allarme porta lampeggerà mentre
l’allarme suona.
2) Indicatore di durata del filtro dell’acqua
Dopo avere sostituito il filtro dell’acqua,
tenere premuto questo tasto per 3
secondi per resettare l’indicatore di durata
del filtro dell’acqua. Quando si resetta
l’indicatore di durata del filtro dell’acqua,
l’icona Filtro sul panello si spegne. L’icona
Filtro si accende in rosso per segnalare la
necessità di sostituire il filtro dell’acqua,
dopo circa sei mesi (circa 1365 litri). In
alcune zone, l’acqua contiene un’elevata
quantità di calcare che provoca
un’ostruzione più rapida del filtro. In tali
aree è necessario sostituire il filtro più
spesso rispetto alla normale sostituzione
prevista dopo sei mesi.
funzionamento _23
02 FUNZIONAMENTO
DA68-02916G-14.indb 23 2019. 2. 27. 오전 8:26

( 4 )
Lighting
(Illuminazione)
(Tenere
premuto per
3 sec per ºC
↔
ºF)
Il tasto dell’illuminazione serve a due
scopi:
- Accendere o spegnere la luce del
dispenser
- Cambiare l’unità di temperatura da ºC a
ºF e viceversa
1) Funzione Light (Luce)
Toccando il tasto Lighting (Illuminazione),
si accende in modalità continua il LED
del dispenser, che resta quindi sempre
acceso. Anche il tasto si illumina. Se
si desidera che il LED del dispenser si
accenda solo quando si usa il dispenser,
premere il tasto Illuminazione per
disattivare la modalità continua.
2) Per cambiare le unità di temperatura
da ºC a ºF e viceversa, tenere
premuto questo tasto per 3 secondi
per selezionare la visualizzazione di
temperatura desiderata.
Ogni volta che si tiene premuto il tasto,
le modalità di temperatura in ºC e ºF si
alternano e il simbolo ºC o ºF si illumina,
indicando la selezione eettuata.
( 5 )
Fridge (Frigo)
(Hold 3 sec
for Power
Cool) (Tenere
premuto per 3
sec per attivare
la funzione
Power Cool
(Rareddamento
rapido))
Il tasto Fridge (Frigo) serve a due scopi:
- Per impostare il frigorifero sulla
temperatura desiderata.
- Per attivare e disattivare la funzione
Power Cool (Rareddamento rapido).
1) Per impostare la temperatura del
frigorifero
Premere il tasto Fridge (Frigo) per
impostare il frigorifero sulla temperatura
desiderata. E’ possibile impostare la
temperatura tra 7 °C e 1 °C.
2) Funzione Power Cool (Rareddamento
rapido)
Tenere premuto questo tasto per 3
secondi per ridurre il tempo necessario
a rareddare gli alimenti nel frigorifero.
Può essere utile se si ha bisogno di
rareddare in modo rapido alimenti che si
deteriorano facilmente o se la temperatura
nel frigorifero si è alzata drasticamente
(per esempio, se è stata lasciata aperta
la porta).
( 6 )
Ice O
(Disattivazione
ghiaccio)
(Hold 3 sec for
Child Lock)
(Tenere premuto
per 3 sec per
attivare la
funzione Child
Lock (Blocco
di sicurezza))
Il tasto Ice O (Disattivazione ghiaccio)
serve a due scopi:
- Accendere o spegnere la macchina del
ghiaccio
- Attivare e disattivare il blocco di sicurezza.
1) Funzione Disattivazione ghiaccio
Se non si desidera produrre altro ghiaccio,
premere il tasto Ice O (Disattivazione
ghiaccio).
2) Funzione Blocco di sicurezza
Tenere premuto questo tasto per 3 secondi
per bloccare il display, il pannello della
zona multifunzione, e i tasti del dispenser
in modo che i tasti non possano essere
utilizzati. Quando il blocco di sicurezza è
attivo, il frigorifero non distribuisce ghiaccio
o acqua neanche premendo la leva del
dispenser. L’icona del blocco di sicurezza
si illumina per indicare che è stata attivata
la funzione del blocco di sicurezza.
Premere per 3 secondi per sbloccare.
(7)
Cubed Ice
(Ghiaccio a
cubetti)
(8)
Crushed Ice
(Ghiaccio
tritato)
Premere il tasto Cubed Ice (Ghaccio a
cubetti) o Crushed Ice (Ghiaccio tritato)
per selezionare il tipo di ghiaccio che si
desidera produrre.
Ogni volta che si preme il corrispettivo
tasto, le modalità ghiaccio in cubetti e
ghiaccio tritato si alternano e le icone
si illuminano indicando la selezione
eettuata.
(Cubed)
(Crushed)
( 9 )
Ice O
(Disattivazione
ghiaccio)
Se non si desidera produrre altro ghiaccio,
premere il tasto Ice O (Disattivazione
ghiaccio).
L’icona si illumina e la macchina del
ghiaccio si arresta.
Si raccomanda di arrestare la
produzione del ghiaccio nei
seguenti casi:
- Il portaghiaccio è
sucientemente fornito.
- Si desidera risparmiare acqua
ed energia.
- Al frigorifero non viene fornita
acqua.
Se la funzione macchina del
ghiaccio è attiva (ON), e il tubo
dell’acqua non è collegato, è
percepibile il rumore prodotto
dalla valvola dell’acqua dal
retro dell’unità. Se ciò si
verifica, premere il tasto Ice O
(Disattivazione ghiaccio) (Hold
3sec for child lock (Tenere premuto
per 3 sec per attivare la funzione
Child Lock)) per meno di 3 secondi
finché l’indicatore ( ) si illumina.
24_ funzionamento
DA68-02916G-14.indb 24 2019. 2. 27. 오전 8:26

Per risparmiare elettricità, il display si spegne
automaticamente nelle seguenti condizioni: Se
non è stato premuto alcun tasto, non vi sono
porte aperte, o non è stata premuta la leva
del dispenser. Tuttavia, resterà accesa l’icona
indicante la selezione eettuata tra ghiaccio
in cubetti o tritato. Il display si accenderà di
nuovo premendo un tasto, aprendo una porta
o premendo la leva del dispenser. Le funzioni
correlate ai tasti sono operative non appena si
solleva il dito dal tasto premuto.
( 10 )
Filter
(Filtro)
Uso del filtro dell’acqua
Questa icona si illumina quando è
necessario sostituire il filtro, di solito dopo
che il frigorifero ha erogato circa 1364
litri d’acqua (dopo circa 6 mesi). Quando
si apre o si chiude la porta, l’icona
lampeggia in rosso per diversi secondi.
Dopo avere installato il nuovo filtro
dell’acqua, resettare l’indicatore del filtro
tenendo premuto per 3 secondi il tasto
Filter Reset (Reset filtro).
- Se l’acqua non viene erogata
o l’erogazione è lenta, è
necessario sostituire il filtro
dell’acqua perché è ostruito.
- In alcune zone, l’acqua contiene
un’elevata quantità di calcare
che provoca un’ostruzione più
rapida del filtro.
SOSTITUZIONE DEL FILTRO
DELL’ACQUA
Per ridurre il rischio di danni alla proprietà
provocati dall’acqua, NON usare nel
frigorifero SAMSUNG filtri acqua di altre
marche.
USARE SOLO FILTRI ACQUA SAMSUNG.
SAMSUNG non è legalmente responsabile
di eventuali danni, inclusi, a titolo
esemplificativo ma non esaustivo,
i danni alla proprietà causati da
perdite d’acqua dovute all’uso di un
filtro dell’acqua generico. I frigoriferi
SAMSUNG sono progettati per
funzionare SOLO CON filtri dell’acqua SAMSUNG.
La spia rossa Filter (Filtro) si accende per segnalare
quando è tempo di cambiare la cartuccia del filtro
dell’acqua.
Per dare il tempo di procurarsi un nuovo filtro,
la spia rossa si accende appena prima che si
esaurisca la capacità del filtro in uso. Sostituire il
filtro entro i tempi indicati consente al frigorifero di
fornire l’acqua più fresca e pulita.
AVVERTENZA
Per sostituire il filtro dell’acqua, seguire questi passaggi:
1. Chiudere l’alimentazione idrica. Ruotare il filtro
dell’acqua (1) di circa 1/4 di giro, in senso antiorario.
2
1
2. Estrarre il filtro dell’acqua (1) dal portafiltro (2).
• Per sostituire con maggiore facilità il
filtro dell’acqua, chiudere la valvola di
alimentazione dell’acqua.
• A volte smontare il filtro dell’acqua è
dicile perché resta bloccato dalle impurità
nell’acqua. In caso di dicoltà, aerrare con
fermezza il filtro dell’acqua e tirare forte.
• Quando si estrae il filtro dell’acqua, è possibile
che si verifichi una piccola perdita d’acqua
dall’apertura. Ciò è normale. Per ridurre al
minimo le perdite d’acqua, mantenere orizzontale
la cartuccia del filtro
durante l’estrazione.
• Per evitare
traboccamenti, vuotare
la vaschetta del filtro
dell’acqua ( 3 ) e
asciugare intorno al portafiltro ( 2 ).
3. Inserire il nuovo filtro nel portafiltro ( 4 ).
4. Inserire il filtro e ruotarlo in senso orario finché
si blocca.
• In caso di dicoltà nell’inserire il filtro
dell’acqua a causa di un’elevata
pressione idrica, chiudere la valvola di
alimentazione dell’acqua.
• Il simbolo del blocco dovrebbe essere
allineato con la linea dell’indicatore.
4
5. Toccare il tasto “Alarm/
hold 3 sec for Filter
Reset” (
(Reset filtro)
)
per
circa 3 secondi per resettare
il filtro dell’acqua. Il colore
dell’indicatore ( ) passa da rosso a spento.
6. Riaprire l’alimentazione dell’acqua se era stata
chiusa.
(Rosso)
3
2
funzionamento _25
02 FUNZIONAMENTO
DA68-02916G-14.indb 25 2019. 2. 27. 오전 8:26

Per acquistare i filtri dell’acqua, recarsi
presso un punto vendita specializzato
o contattare il distributore di ricambi
Samsung. Per ordinare altre cartucce per
il filtro dell’acqua, contattare un rivenditore
Samsung autorizzato. Verificare che il
filtro dell’acqua di ricambio riporti il logo
SAMSUNG sulla scatola e sul filtro stesso.
Rimozione di residui all’interno del
tubo di alimentazione dell’acqua
dopo l’installazione del filtro.
1. Aprire la mandata
principale dell’acqua e
far arrivare l’acqua dal
tubo di alimentazione
dell’acqua.
2. Far scorrere l’acqua
attraverso il dispenser fino
a quando fluirà pulita (circa 6-7 minuti). Questo
accorgimento consente di pulire il sistema di
mandata dell’acqua ed elimina l’aria dai tubi.
3. Un ulteriore flussaggio può essere necessario
in determinate situazioni.
4. Aprire le porte del frigorifero e accertarsi che
non vi siano perdite d’acqua provenienti dal
filtro dell’acqua.
Eettuare un buon flussaggio del dispenser,
altrimenti l’acqua potrebbe scendere a gocce.
Ciò significa che c’è ancora aria nel tubo.
Alimentazione dell’acqua a osmosi
inversa IMPORTANTE:
La pressione dell’alimentazione dell’acqua che
esce da un sistema a osmosi inversa e arriva alla
valvola di immissione dell’acqua del frigorifero
deve essere compresa tra 35 e 120 psi (241 e
827 kPa). Se un sistema di filtrazione dell’acqua
a osmosi inversa è collegato all’alimentazione
dell’acqua fredda, la pressione dell’acqua che
arriva al sistema a osmosi inversa deve essere
minimo di 40 - 60 psi (276 - 414 kPa.) Se la
pressione idrica che arriva al sistema a osmosi
inversa è inferiore a 40 - 60 psi (276 - 414 kPa):
• Controllare se il filtro sedimenti nel sistema a
osmosi inversa è bloccato. Sostituire il filtro se
necessario.
• Dopo un utilizzo intensivo lasciare che il serbatoio
sul sistema a osmosi inversa si riempia.
• Se il frigorifero ha un filtro dell’acqua, questo
può ridurre la pressione dell’acqua se usato
insieme a un sistema a osmosi inversa.
Rimuovere il filtro dell’acqua.
In caso di domande sulla pressione idrica,
chiamare un idraulico autorizzato e qualificato.
CONTROLLO DELLA
TEMPERATURA
Temperatura base dei comparti
freezer e frigo
La temperatura base e quella consigliata per i
comparti freezer e frigo sono rispettivamente
-19°C e 3°C.
Se la temperatura dei comparti freezer e
frigo è troppo alta o troppo bassa, regolarla
manualmente.
Controllo della temperatura del
freezer
Temp. raccomandata (Freezer): -19 °C
La temperatura del freezer può essere impostata
tra -23 °C e -15 °C per adeguarla alle proprie
esigenze. Premere più volte il tasto Freezer
finché il display della temperatura indicherà la
temperatura desiderata. La temperatura cambierà
di 1°C a ogni pressione. Si veda quanto segue.
Centigradi: -19 °C ➞ -20 °C ➞ -21 °C ➞ -22 °C
➞ -23 °C ➞ -15 °C ➞ -16 °C ➞ -17 °C ➞ -18 °C
➞ -19 °C.
Tenere a mente che alimenti come il gelato
possono sciogliersi a -15,5 °C. Il display della
temperatura passerà in sequenza da -23 °C a
-15°C.
26_ funzionamento
DA68-02916G-14.indb 26 2019. 2. 27. 오전 8:26

Controllo della temperatura del
frigo
Temp. raccomandata (Frigo): 3 °C
La temperatura del frigo può essere impostata tra
1 °C e 7 °C per adeguarla alle proprie esigenze.
Premere più volte il tasto Fridge (Frigo) finché il
display della temperatura indicherà la temperatura
desiderata. La temperatura cambierà di 1 °C a
ogni pressione. Si veda quanto segue.
Centigradi: 3 °C ➞ 2 °C ➞ 1 °C ➞ 7 °C ➞ 6 °C
➞ 5 °C ➞ 4 °C ➞ 3 °C.
Il processo di controllo della temperatura del
frigorifero funziona come quello del freezer.
Premere il tasto Fridge (Frigo) per impostare la
temperatura desiderata. Dopo qualche secondo,
il frigorifero inizierà a regolarsi per raggiungere
la temperatura appena impostata. Questo sarà
riflesso sul display digitale.
- La temperatura del freezer o del
frigorifero può aumentare quando si
aprono le porte troppo spesso, o se si
colloca all’interno una grande quantità
di cibo tiepido o caldo.
- Un aumento della temperatura può far
lampeggiare il display digitale. Non appena
freezer e frigo torneranno alle normali
temperature impostate, il lampeggiamento
cesserà.
- Se il lampeggiamento continua, può essere
necessario “resettare” il frigorifero. Provare a
scollegare l’apparecchio, attendere per circa
10 minuti e poi inserire di nuovo il cavo di
alimentazione.
- Se c’è un errore di comunicazione tra il
display e il controller principale, la spia del
display convertibile potrebbe lampeggiare. Se
continua a lampeggiare per un lungo periodo
di tempo, si prega di contattare un centro di
assistenza Samsung Electronics.
USO DEL DISPENSER
DELL’ACQUA FREDDA
Premere il tasto del ghiaccio che
si desidera erogare.
NIENTE GHIACCIO
Selezionare questo tasto
se si desidera disattivare la
macchina del ghiaccio
Uso del dispenser del
ghiaccio (1)
Premere delicatamente il dispenser
del ghiaccio (1) con il bicchiere. Il
ghiaccio verrà erogato dal dispenser.
Si può scegliere il tipo di ghiaccio
premendo prima il tasto “Cubed”
(Cubetti) o “Crushed” (Tritato).
1
2
Uso del dispenser dell’acqua (2)
Premere delicatamente il dispenser dell’acqua
(2) con il bicchiere. L’acqua verrà erogata dal
dispenser.
Premendo il dispenser dell’acqua
e quello del ghiaccio più o meno
contemporaneamente, si attiverà il
dispenser selezionato o premuto per primo.
Dopo avere erogato l’acqua, attendere 1
secondo prima di rimuovere il bicchiere
per evitare fuoriuscite. Non tirare verso di
sé la leva del dispenser dopo l’erogazione
di ghiaccio o acqua. Tornerà indietro
automaticamente.
Uso del dispenser di ghiaccio e
acqua insieme
Per ottenere ghiaccio e acqua, premere prima
il dispenser del ghiaccio ( 1 ) , poi abbassare il
bicchiere e premere il dispenser per l’acqua ( 2 ).
Manutenzione del portaghiaccio
• Per pulire il contenitore del ghiaccio/
portaghiaccio, lavare con un detergente delicato,
sciacquare bene e asciugare con cura. Non
utilizzare detersivi o solventi corrosivi o abrasivi.
funzionamento _27
02 FUNZIONAMENTO
DA68-02916G-14.indb 27 2019. 2. 27. 오전 8:26

• Il ghiaccio viene prodotto in cubetti.
Selezionando “Crushed” (Tritato), la macchina
del ghiaccio trita i cubetti di ghiaccio
ottenendo ghiaccio tritato.
• Selezionando “Cubed Ice” (Cubetti) dopo
avere usato la modalità “Crushed Ice” (Tritato),
è possibile che si produca una piccola quantità
di ghiaccio tritato residuo.
• I cubetti di ghiaccio prodotti con il processo
rapido appariranno bianchi, a indicare una
produzione normale.
• Poiché la macchina del ghiaccio nel
comparto frigo produce i cubetti di ghiaccio
più rapidamente, se è necessario produrre
dell’altro ghiaccio spostare i cubetti pronti dal
contenitore del frigo a quello del freezer.
• Se non si riesce a estrarre il ghiaccio,
rimuovere il portaghiaccio e premere il tasto
di prova a destra della macchina del ghiaccio.
Vedere l’illustrazione sottostante.
• Non premere continuamente il tasto di prova
quando la vaschetta è piena di ghiaccio o
acqua. L’acqua potrebbe traboccare oppure il
ghiaccio bloccare il portaghiaccio.
Produzione del ghiaccio
• Per riempire il portaghiaccio alla capacità massima
dopo l’installazione, seguire questi passaggi:
1. Lasciare che il frigorifero funzioni e si rareddi
per 24 ore (1 giornata intera).
- Dopo 24 ore la macchina del ghiaccio sarà
adeguatamente fredda.
controllare
il livello
dell’acqua
Tasto di prova
2. Erogare da 4 a 6 cubetti di ghiaccio nel
bicchiere.
3. Dopo 8, e poi 16 ore, erogare un bicchiere
pieno di ghiaccio.
• Per provare la macchina del ghiaccio, premere
il tasto di prova posto sulla macchina stessa.
Il frigorifero emetterà un segnale acustico (din
don). Al suono di questo campanello, lasciare
andare il tasto di prova.
• Il campanello suonerà di nuovo
automaticamente per segnalare che la
macchina del ghiaccio funziona bene.
Per rimuovere i cubetti del ghiaccio
senza usare il portaghiaccio, spegnere
la macchina del ghiaccio e rimuovere il
coperchio anteriore dalla macchina del
ghiaccio. Notare che i cubetti di ghiaccio
nella macchina possono fuoriuscire da
sopra il cassetto.
Non mettere alimenti nel portaghiaccio. Se si
conservano alimenti nel portaghiaccio, il cibo
può toccare la macchina del ghiaccio quando
si apre o si chiude la porta, danneggiandola.
Notare che i cubetti del ghiaccio nel
portaghiaccio possono fuoriuscire da sopra il
cassetto quando si rimuove il portaghiaccio
dal cassetto. Se ciò si verifica, rimuovere il
ghiaccio a cubetti fuoriuscito dal cassetto.
In caso di interruzione di corrente, i cubetti
di ghiaccio possono sciogliersi e congelarsi
in un blocco al riattivarsi dell’alimentazione,
provocando un’interruzione del
funzionamento del dispenser.
Per evitare questo problema, dopo un’interruzione
di corrente estrarre il portaghiaccio ed eliminare il
ghiaccio o l’acqua residui.
Se si usa subito tutto il ghiaccio, è
necessario ripetere i passaggi 2 e 3 per la
produzione del ghiaccio.
Attendere solo 8 ore prima di erogare i
primi 4 - 6 cubetti di ghiaccio. Questo
reintegrerà i cubetti di ghiaccio e garantirà
la massima produzione di ghiaccio.
ATTENZIONE
ATTENZIONE
ATTENZIONE
ATTENZIONE
28_ funzionamento
DA68-02916G-14.indb 28 2019. 2. 27. 오전 8:26

Uso della funzione Ice O
(Disattivazione ghiaccio)
Quando si seleziona la modalità Ice O
(Disattivazione ghiaccio), rimuovere tutto il
ghiaccio.
Lasciando i cubetti di ghiaccio nel portaghiaccio
questi possono fondersi rendendone dicile la
rimozione.
Per rimuovere in modo sicuro il portaghiaccio ed
evitare lesioni, sostenere con una mano il fondo e
con l’altra la parete laterale.
Quindi sollevarlo ed estrarlo.
Per reinserire il portaghiaccio, premerlo con
decisione nel suo alloggiamento.
Se il portaghiaccio non è montato in modo
corretto, il ghiaccio al suo interno potrebbe
fondersi.
Se il portaghiaccio non entra bene, ruotare l’elica
di 90 gradi (vedere l’ultima immagine in basso a
destra) e riprovare.
• Quando il frigorifero è in funzione,
l’interno del portaghiaccio è molto
freddo.
Non introdurre in profondità le mani nel
portaghiaccio.
• Usare solo l’Ice Maker fornito insieme al
frigorifero. L’allacciamento idrico di questo
frigorifero deve essere eseguito solo da un
tecnico qualificato.
Eseguire il collegamento solo alla linea
dell’acqua potabile.
• Perché l’ice maker funzioni correttamente la
pressione dell’acqua deve essere compresa
tra 20 e 125 psi.
ATTENZIONE
Durante le vacanze...
In caso di vacanze lunghe o viaggi d’aari,
quando non si utilizzano i dispenser di acqua e
ghiaccio per un lungo periodo di tempo:
- Chiudere la valvola dell’acqua. In caso
contrario potrebbero verificarsi perdite d’acqua.
- Rimuovere tutti gli alimenti.
- Scollegare il frigorifero dalla presa di corrente.
- Asciugare all’interno l’umidità in eccesso e lasciare
le porte aperte. In caso contrario, all’interno
possono svilupparsi cattivi odori e mue.
Regole di utilizzo della macchina
del ghiaccio
• Non inserire le dita, le mani o altri oggetti
inidonei nel condotto di scarico del ghiaccio o
nel portaghiaccio
- Ciò può causare lesioni personali o danni materiali.
• Non inserire mai le dita o altri oggetti
nell’apertura del dispenser.
- Può provocare lesioni.
• Non tentare di smontare la macchina del ghiaccio.
• Non lavare o spruzzare il portaghiaccio
con acqua mentre si trova nel frigorifero.
Rimuoverlo per pulirlo
Quando si inserisce la vaschetta della
macchina del ghiaccio, assicurarsi che sia
ben centrata all’ingresso.
Altrimenti la vaschetta può incastrarsi.
Fenomeno di intorbidamento dell’acqua
Tutta l’acqua fornita al frigorifero passa per
il filtro centrale che è un filtro alcalino per
l’acqua. Nel processo di filtraggio, la pressione
dell’acqua che passa per il filtro aumenta, e
l’acqua si satura di ossigeno e azoto.
Quando quest’acqua fuoriesce, la pressione
si abbassa bruscamente e l’ossigeno e l’azoto
diventano sovrassaturi, causando bolle di
gas. L’acqua può temporaneamente apparire
intorbidita o torbida a causa di queste bolle
di ossigeno. Dopo qualche secondo, l’acqua
apparirà trasparente.
ATTENZIONE
funzionamento _29
02 FUNZIONAMENTO
DA68-02916G-14.indb 29 2019. 2. 27. 오전 8:26

PARTI E FUNZIONI
Rivedere l’illustrazione sottostante per conoscere meglio le parti e le funzioni del frigorifero.
Luce
Ripiano fisso
Ripiano
pieghevole in 2
passaggi
Cassetto a
estrazione
automatica
Contenitore a
cassetto freezer
Balconcini
Chiusura
automatica
Comparto
convertibile
Macchina del
ghiaccio FF
Ripiano
pieghevole
Ripiano fisso
Sezione verticale
con cerniera
Cassetti verdura
e frutta
Filtro dell’acqua
Luce
Chiusura
automatica
Mensola
Quando si chiude la porta, assicurarsi che la sezione verticale con cerniera sia nella posizione
corretta per evitare di graare l’altra porta.
Se la sezione verticale con cerniera è invertita, riposizionarla correttamente e chiudere la porta.
A volte sulla sezione verticale con cerniera può comparire della condensa.
Col tempo la maniglia della porta può allentarsi. Se questo accade, serrare i bulloni situati
all’interno della porta.
Se si chiude una porta con forza eccessiva, può aprirsi l’altra porta.
Quando la porta si apre, l’interruttore di interblocco spegne automaticamente per motivi di
sicurezza il motore della macchina del ghiaccio.
Se una lampada a LED interna o esterna si brucia, contattare l’assistenza.
30_ funzionamento
DA68-02916G-14.indb 30 2019. 2. 27. 오전 8:26

Balconcini
Il frigorifero viene venduto con diverse forme
e dimensioni di balconcini. Se i balconcini del
frigorifero sono imballati separatamente, usare
la figura sotto per comprenderne il corretto
posizionamento.
Il numero di balconcini può variare in base al
modello.
USO DELLA ZONA MULTIFUNZIONE
La zona multifunzione è un cassetto a tutta
larghezza dotato di controllo regolabile della
temperatura. E’ possibile usare la zona multifunzione
per conservare in fresco grandi vassoi da servire alle
feste, alimenti di gastronomia, vini, pizze, bevande
o cibi vari. E’ dotato di un sensore termico che
permette di regolare la quantità di aria fredda che ha
accesso a questa zona. I tasti controllo sono situati
al centro del bordo superiore del cassetto.
Tasto di selezione della temperatura
Funzioni della cella freezer
• Premere più volte il tasto Temp finché la
modalità desiderata si illumina.
• Ogni volta che si preme il tasto Temp. la
modalità cambia nel seguente ordine: Meat/Fish
(Carne/Pesce) (-1 °C), Cold Drinks (Bevande
fredde) (1 °C), Deli/Snacks (Gastronomia/
Spuntini) (3 °C), Wine/Party Dishes (Vino/
Party) (5 °C). Come modalità preimpostata è
selezionata la modalità Cold Drinks (Bevande
fredde). Il frigorifero regola automaticamente la
temperatura nella zona multifunzione secondo la
selezione eettuata.
• Quando si seleziona la modalità Deli/Snacks
(Gastronomia/Spuntini) (3 °C), Cold Drinks
(Bevande fredde) (1 °C) o Meat/Fish (Carne/
Pesce) (-1 °C), nella cella freezer entrerà in
funzione la zona multifunzione.
• Il display Temp. della zona multifunzione può
cambiare a seconda del numero di alimenti
presenti nel cassetto, della loro collocazione,
della temperatura ambiente e della frequenza
con cui si apre la porta.
Tasto di selezione
1. Quando si seleziona “Wine/Party Dishes”
(Vino/Piatti per le feste), la temperatura della
zona multifunzione sarà mantenuta intorno ai
5°C. Questa funzione aiuta a mantenere il cibo
fresco a lungo.
2. Quando si seleziona “Deli/Snacks”
(Gastronomia/Spuntini), la temperatura della
zona multifunzione sarà mantenuta intorno ai
3°C. Questa funzione aiuta a mantenere il cibo
fresco più a lungo.
3. Quando si seleziona “Cold Drinks”
(Bevande fredde), la temperatura della zona
multifunzione sarà mantenuta intorno a 1 °C.
Questa funzione aiuta a mantenere fresche e
rinfrescanti le bibite.
4. Quando si seleziona “Meat/Fish” (Carne/
Pesce)
, la temperatura della zona
multifunzione sarà mantenuta intorno a -1 °C.
Questa funzione aiuta a mantenere la carne e il
pesce freschi più a lungo.
Quando si conservano cibi altamente
deperibili, selezionare le funzioni della cella
freezer.
Esempi di alimenti che si possono conservare
nella zona multifunzione secondo l’impostazione
della temperatura.
Wine (Vino)
Party Dishes
(Piatti per le feste)
Deli (Gastronomia)
Snacks (Snack)
Cold (Bevande
Drinks fredde)
Meat (Carne)
Fish (Pesce)
• vino • ananas • acqua in
bottiglia
• bistecche
• cocktail • limoni • succo • aettati
• torte • biscotti • analcolici • pancetta
• formaggi • patate • birra
• panini
imbottiti con
carne e chili
funzionamento _31
02 FUNZIONAMENTO
DA68-02916G-14.indb 31 2019. 2. 27. 오전 8:26

Frutta e verdura possono guastarsi se
conservati in modalità “Meat Fish” (Carne/
Pesce). Non conservare lattuga o altri vegetali
a foglia larga nella zona multifunzione.
Non conservare bottiglie di vetro nella zona
multifunzione con l’impostazione “Cold
Drinks” (Bevande fredde) o “Meat/Fish”
(Carne/Pesce). Se congelano, possono
rompersi e causare lesioni personali.
POSIZIONE CONSIGLIATA PER
IL RIPIANO PIEGHEVOLE
Il ripiano pieghevole sopra la parte centrale ore
un’altra area di conservazione per articoli alti
senza la necessità di risistemare i ripiani.
• Installare il ripiano pieghevole sul lato destro
del frigorifero.
• Se si installa il ripiano pieghevole sul lato
sinistro, la macchina del ghiaccio impedirà che
si pieghi completamente.
• Per usarlo, spingere delicatamente indietro
la parte anteriore del ripiano in modo che il
ripiano si pieghi a partire dalla parte centrale.
tocca
Posizione
consigliata
RIMOZIONE DEGLI
ACCESSORI FRIGO
1. Balconcini
• Balconcini (1)
Per rimuoverli - Sollevarli ed estrarli.
Per rimontarli - Inserirli dall’alto e premerli
verso il basso fino in fondo.
• Balconcini (2)
Per rimuoverli - Estrarre la parte destra del
balconcino sollevandolo inclinato lungo la guida, e poi
estrarre la parte sinistra tirandola fuori dalla porta.
Per rimontarli -Inserirli nella posizione originale
e premerli verso il basso finché si bloccano.
ATTENZIONE
1
2
Se i balconcini non sono saldamente
fissati alle porte, possono causare lesioni.
Non lasciar giocare i bambini con contenitori e balconcini.
Gli angoli taglienti potrebbero provocare lesioni.
Non regolare il balconcino carico di
alimenti. Prima rimuovere gli alimenti.
Per rimuovere eventuali polvere dai balconcini,
rimuovere la mensola e lavare in acqua.
2. Ripiani di vetro temperato
Per rimuoverli - Sollevare la parte anteriore del ripiano nella
direzione ( 1 ) e sollevare il ripiano ( 2 ). Estrarre il ripiano.
Per rimontarlo - Inclinare la parte anteriore del
ripiano e farla scorrere nelle guide all’altezza
desiderata. Quindi abbassare la parte anteriore del
ripiano in modo da fissarla in posizione.
I ripiani in vetro temperato sono pesanti.
Prestare la massima attenzione nell’estrarli.
1
2
3. Ripiano pieghevole
Per rimuoverlo -
Dopo avere rimosso la parte
anteriore del ripiano, sollevare il ripiano e rimuoverlo.
Per rimontarlo- Agganciare il ripiano al telaio
angolare e rimontare la parte anteriore del ripiano
al ripiano pieghevole.
ATTENZIONE
ATTENZIONE
32_ funzionamento
DA68-02916G-14.indb 32 2019. 2. 27. 오전 8:26

Dopo avere inserito il ripiano pieghevole
facendolo scorrere, la parte anteriore del
ripiano può essere rimossa per comodità.
Se vsi usa il ripiano senza rimuoverla, fare
attenzione alla possibilità che si stacchi.
4. Cassetti per frutta e verdura
Per rimuoverli
• Sollevare il contenitore ed estrarlo.
• Sollevare la parte anteriore del cassetto,
muoverlo leggermente nella direzione della
freccia, quindi estrarlo.
Per rimontarli
• Inserire il cassetto nelle guide e ricollocarlo in
posizione.
• Far scorrere il contenitore sopra la posizione
desiderata e premerlo verso il basso fino in
fondo.
I cassetti devono essere rimossi prima di
potere estrarre il ripiano di vetro soprastante
sollevandolo.
5. Zona multifunzione
Per rimuovere la zona multifunzione – Aprire fino
in fondo il cassetto multifunzione. Sollevare la zona
multifunzione, tirarla verso di sé con entrambe le mani.
Per rimontare la zona multifunzione – Aprire
fino in fondo il cassetto multifunzione. Sollevare
ATTENZIONE
ATTENZIONE
la parte anteriore della zona multifunzione,
posizionarne la parte posteriore sulle guide, quindi
abbassare la parte anteriore finché l’intera zona
poggerà sulle guide.
Quando la zona multifunzione o
l’illuminazione a LED non funziona,
controllare che i connettori [( 1 ), ( 2 )
mostrati di seguito] non presentino segni di
usura o crepe.
1
2
1. Vedere a pagina 18 le istruzioni di
smontaggio.
2. Aprire la copertura della guida con un
cacciavite a lama piatta.
Uso delle porte
Accertarsi che le porte si chiudano bene e siano
ben sigillate. Quando la porta del frigorifero è solo
parzialmente aperta, si chiuderà automaticamente.
Se la porta è aperta oltre lo spazio di chiusura
automatica, resterà aperta. E’ necessario chiudere
manualmente.
funzionamento _33
02 FUNZIONAMENTO
DA68-02916G-14.indb 33 2019. 2. 27. 오전 8:26

RIMOZIONE DEGLI ACCESSORI
DEL FREEZER
1.
Balconcino del comparto congelatore
Per rimuoverlo : Rimuovere il balconcino del
comparto congelatore ( 1 ) sollevandolo.
Per rimontarlo : Spingerlo verso il basso finché
( 1 ) si blocca in posizione.
1
2. Cassetto super esteso
Per rimuoverlo - Aprire fino in fondo il cassetto.
Sollevare la parte posteriore e tirarla fino a estrarlo.
Per rimontarlo - P
osizionare il cassetto sulle guide
( 4 ) sollevandolo. Abbassare il cassetto inserendolo
finché sarà orizzontale e farlo scorrere all’interno ( 3 ).
3
4
3. Cassetto freezer
Per rimuovere il cassetto freezer - Aprire
completamente il cassetto freezer. Sollevare la
parte posteriore e tirarla fino a estrarlo.
Per rimontare il cassetto freezer - Inserire il
contenitore sulle guide.
Durante la rotazione verso sinistra o destra
in fase di montaggio e smontaggio i lati del
contenitore potrebbero graarsi.
Non lasciare che neonati o bambini
accedano al cassetto freezer. In caso
contrario, i bambini potrebbero riportare
gravi lesioni e il frigorifero danneggiarsi.
Non sedersi sulla porta del freezer. La porta
potrebbe rompersi. Non permettere ai
bambini di arrampicarsi sul cassetto freezer.
Non rimuovere il divisore.
ATTENZIONE
ATTENZIONE
ATTENZIONE
Se un bambino giocando rimanesse
intrappolato all’interno potrebbe ferirsi o
morire per soocamento.
E’ possibile conservare i cibi negli spazi
contrassegnati.
Cassetto a estrazione automatica
Contenitore a cassetto freezer
Mensola
PULIZIA DEL FRIGORIFERO
La manutenzione del frigorifero Samsung con
porte alla francese ne prolunga la durata e aiuta a
preservarlo da odori e germi.
Pulizia dell’interno
Pulire le pareti interne e gli accessori con un
detergente delicato, quindi asciugare con un
panno morbido. Per una pulizia più accurata si
possono rimuovere cassetti e ripiani. Verificare che
cassetti e ripiani siano asciutti prima di rimontarli.
AVVERTENZA
34_ funzionamento
DA68-02916G-14.indb 34 2019. 2. 27. 오전 8:26

Pulizia dell’esterno
Passare il pannello di controllo e il display digitale
con un panno umido, pulito e morbido. Non
spruzzare acqua direttamente sulla superficie
del frigorifero. Porte, maniglie e superfici della
struttura dovrebbero essere pulite con un
detergente delicato, quindi asciugate con un
panno morbido. Per mantenere l’apparecchio
nelle migliori condizioni, pulire l’esterno una o due
volte all’anno.
Non spruzzare acqua direttamente sul
frigorifero. Per pulire usare un panno
umido e pulito.
Non usare benzene, diluenti o prodotti
per la pulizia quali Clorox. L’uso di
questi prodotti potrebbe danneggiare la
superficie dell’apparecchio e causare un
incendio.
E’ possibile che le lettere
stampate sul display si
cancellino applicando un
detergente per acciaio
direttamente sulla zona dove
sono stampate.
Pulizia del dispenser del ghiaccio /
dell’acqua
Spingere verso il basso un’estremità della
vaschetta del dispenser e rimuoverla. Passare
con un panno morbido e pulito il dispenser del
ghiaccio / dell’acqua.
Quando si usa la
funzione ghiaccio tritato
del dispenser, un po’
di ghiaccio residuo può
accumularsi sullo scarico
del ghiaccio.
Per evitare che questi residui
di ghiaccio si sciolgano e
l’acqua fuoriesca dallo
scarico, ripulire lo scarico
quando si comincia a notare
un accumulo di residui.
ATTENZIONE
ATTENZIONE
ATTENZIONE
ATTENZIONE
Pulizia delle guarnizioni in gomma
delle porte
Se le guarnizioni in gomma delle porte sono
sporche, le porte potrebbero non chiudersi
correttamente e il frigorifero potrebbe funzionare
in modo poco eciente. Preservare le guarnizioni
da polvere o macchie pulendo le porte con un
detergente delicato e un panno umido. Asciugare
con un panno morbido e pulito.
Non pulire il frigorifero con benzene,
diluente o detersivo per auto. Queste
sostanze potrebbero provocare un
incendio.
Pulizia del retro del frigorifero
Per mantenere i cavi di alimentazione e le parti
esposte liberi da polvere e accumuli di sporcizia,
passare l’aspirapolvere sul retro dell’apparecchio
una o due volte all’anno.
Non rimuovere il coperchio posteriore ( 1 ).
Rischio di scarica elettrica.
1
ATTENZIONE
ATTENZIONE
funzionamento _35
02 FUNZIONAMENTO
DA68-02916G-14.indb 35 2019. 2. 27. 오전 8:26

PROBLEMA SOLUZIONE
Il frigorifero
non funziona o
non raredda a
sucienza.
• Verificare che la spina sia correttamente inserita nella presa.
• Controllare sul display se la temperatura impostata è superiore rispetto
a quella interna del freezer o del frigorifero. In tal caso, impostare una
temperatura inferiore.
• Il frigorifero è esposto a luce solare diretta o è posizionato vicino a una fonte
di calore?
• Il retro dell’apparecchio è troppo vicino alla parete, impedendo una corretta
ventilazione?
Il cibo
all’interno del
frigorifero è
ghiacciato.
• Controllare sul display se la temperatura impostata è troppo bassa.
• Provare a impostare il frigorifero a una temperatura superiore.
• La temperatura nella stanza è troppo bassa? Impostare una temperatura
superiore.
• E’ stato conservato cibo succoso nella parte più fredda del frigorifero?
Provare a spostare il cibo su altri ripiani del frigo anzichè conservarli nelle
aree o nei contenitori a temperatura più bassa.
Si avvertono
rumori o suoni
insoliti.
• Controllare che il frigorifero sia stabile e livellato.
• Il retro dell’apparecchio è troppo vicino alla parete, impedendo una corretta
ventilazione?
Provare ad allontanare il retro del frigorifero di almeno 5 cm dal muro.
• Qualcosa è caduto dietro o sotto al frigorifero?
• Si avverte un ticchettio all’interno del frigorifero. Tale rumore è normale
in quanto i vari accessori si contraggono ed espandono in base alla
temperatura interna del frigorifero.
• Se si avvertono rumori simili ad urti provenire dal frigorifero, ciò è normale. Il
rumore è causato dal funzionamento a elevato regime del compressore.
L’area
adiacente alla
chiusura telaio/
porte è calda
e si verifica
condensa.
• Un po’ di calore è normale in quanto nelle sezioni verticali sono montati
dispositivi anticondensa per evitare la formazione di condensa.
• La porta del frigorifero è rimasta socchiusa? Se una porta rimane aperta per
lungo tempo, può formarsi della condensa.
La macchina
del ghiaccio
non produce
ghiaccio.
• Si sono attese 12 ore dopo l’installazione del tubo di alimentazione
dell’acqua prima di produrre il ghiaccio?
• Il tubo dell’acqua è collegato e la valvola di chiusura aperta?
• E’ stata arrestata manualmente la funzione di produzione del ghiaccio?
• La temperatura del freezer è troppo alta? Provare a impostare una
temperatura più bassa per il freezer.
Si avverte
un gorgoglio
d’acqua nel
frigorifero.
• Ciò è normale. Il gorgoglio proviene dalla circolazione del liquido refrigerante
nel frigorifero.
Risoluzione dei problemi
36_ risoluzione dei problemi
DA68-02916G-14.indb 36 2019. 2. 27. 오전 8:26

PROBLEMA SOLUZIONE
All’interno del
frigo si avverte
cattivo odore.
• Controllare l’eventuale presenza di cibo avariato.
• I cibi con odori forti (ad esempio il pesce) devono essere conservati in
contenitori ermetici.
• Pulire il frigorifero periodicamente e rimuovere eventuali residui di cibo o
alimenti scaduti.
Presenza di
ghiaccio sulle
pareti del
freezer.
• Le aperture di ventilazione sono ostruite? Rimuovere eventuali ostruzioni per
consentire la libera circolazione dell’aria.
• Lasciare spazio suciente tra i cibi per una corretta circolazione dell’aria.
• Il cassetto freezer è correttamente chiuso?
Il dispenser
dell’acqua non
funziona.
• Il tubo dell’acqua è collegato e la valvola di chiusura aperta?
• Il tubo della linea di alimentazione dell’acqua è stato schiacciato o piegato?
• Assicurarsi che il tubo sia libero e non ostruito.
• Il serbatoio dell’acqua è gelato perché la temperatura del frigorifero è troppo
bassa?
Provare a selezionare sul display digitale un’impostazione di temperatura
superiore.
• Il blocco di sicurezza è attivo?
Il sistema
di chiusura
automatica
non funziona
con la porta del
freezer.
• C’è uno sbilanciamento tra i lati destro e sinistro della porta?
• Aprire e chiudere la porta dolcemente 1~2 volte. Fatto questo, di solito il
sistema di chiusura automatica funziona di nuovo in maniera adeguata.
• Provare ad aprire la porta dolcemente ed evitare di sbilanciare i lati destro e
sinistro della porta.
risoluzione dei problemi _37
03 RISOLUZIONE DEI PROBLEMI
DA68-02916G-14.indb 37 2019. 2. 27. 오전 8:26

memo
DA68-02916G-14.indb 38 2019. 2. 27. 오전 8:26

memo
DA68-02916G-14.indb 39 2019. 2. 27. 오전 8:26

Limiti temperatura ambiente
Il frigorifero è progettato per operare alle temperature ambiente specificate per la sua classe e indicate
sull’etichetta.
Classe Simbolo
Intervallo temperatura ambiente (°C)
IEC 62552 (ISO 15502) ISO 8561
Temperata estesa SN da +10 a +32 da +10 a +32
Temperata N da +16 a +32 da +16 a +32
Subtropicale ST da +16 a +38 da +18 a +38
Tropicale T da +16 a +43 da +18 a +43
Le temperature interne possono essere influenzate da molti fattori, come la posizione del
frigorifero/congelatore, la temperatura ambiente e la frequenza con la quale si aprono le porte.
Regolare la temperatura secondo necessità per compensare ognuno di questi fattori.
Italiano
Corretto smaltimento del prodotto
(riuti elettrici ed elettronici)
(Applicabile nei Paesi con sistemi di raccolta differenziata)
Il simbolo riportato sul prodotto, sugli accessori o sulla documentazione indica che il prodotto
e i relativi accessori elettronici (quali caricabatterie, cufa e cavo USB) non devono essere
smaltiti con altri riuti al termine del ciclo di vita. Per evitare eventuali danni all’ambiente o
alla salute causati dallo smaltimento dei riuti non corretto, si invita l’utente a separare il
prodotto e i suddetti accessori da altri tipi di riuti, conferendoli ai soggetti autorizzati secondo
le normative locali.
Gli utenti domestici, in alternativa alla gestione autonoma di cui sopra, potranno consegnare
l’apparecchiatura che si desidera smaltire al rivenditore, al momento dell’acquisto di una
nuova apparecchiatura di tipo equivalente. Presso i rivenditori di prodotti elettronici con
supercie di vendita di almeno 400 m2 è inoltre possibile consegnare gratuitamente, senza
obbligo di acquisto, i prodotti elettronici da smaltire con dimensioni inferiori a 25 cm.
Gli utenti professionali (imprese e professionisti) sono invitati a contattare il proprio fornitore
e vericare i termini e le condizioni del contratto di acquisto. Questo prodotto e i relativi
accessori elettronici non devono essere smaltiti unitamente ad altri riuti commerciali.
Per informazioni sull’impegno di Samsung ai fini della salvaguardia ambientale e sugli obblighi normativi
relativi a ciascun prodotto, come per esempio il REACH, vogliate visitare il sito samsung.com/uk/
aboutsamsung/samsungelectronics/corporatecitizenship/data_corner.html
Contatta SAMSUNG WORLD WIDE
Se hai commenti o domande sui prodotti Samsung, contatta il Servizio Clienti Samsung.
Nazione
Centralino
Sito web
ITALIA 800-SAMSUNG (800.7267864) www.samsung.com/it/support
SPAIN
0034902172678
[HHP] 0034902167267
www.samsung.com/es/support
PORTUGAL 808 207 267 www.samsung.com/pt/support
GREECE
80111-SAMSUNG (80111 726 7864) only from land line
(+30) 210 6897691 from mobile and land line
www.samsung.com/gr/support
CYPRUS 8009 4000 only from landline, toll free www.samsung.com/gr/support
DA68-02916G-14.indb 40 2019. 2. 27. 오전 8:26

Frigorífico
manual del usuario
imagínese las posibilidades
Gracias por adquirir este producto Samsung.
Electrodoméstico independiente
Español
DA68-02916G-14.indb 1 2019. 2. 27. 오전 8:26

Información de seguridad
INFORMACIÓN DE
SEGURIDAD
• Antes de poner en marcha el
aparato, lea atentamente este
manual y consérvelo en un lugar
seguro cerca del aparato para
futuras consultas.
• Utilice este aparato solo
para las funciones propias
que se describen en este
manual de instrucciones. Este
electrodoméstico no está
diseñado para que lo usen
personas (incluidos los niños)
con las capacidades físicas,
sensoriales o mentales reducidas,
o faltas de conocimiento y
experiencia, sin la supervisión o
las indicaciones de una persona
responsable que garanticen un
uso seguro del aparato.
• Este electrodoméstico lo pueden
utilizar niños a partir de los 8 años
y personas con discapacidad
física, mental y sensorial, siempre
y cuando tengan una supervisión
o instrucciones sobre el uso
de estos electrodomésticos
de una forma segura y siendo
consecuentes de los posibles
peligros que este pueda
ocasionar.
Los niños no deben jugar con el
electrodoméstico. La limpieza y el
mantenimiento del aparato deben
estar supervisados por adultos.
• Las advertencias y las
instrucciones de seguridad
importantes de este manual no
abarcan todas las situaciones
posibles que puedan surgir. Es su
responsabilidad usar el sentido
común y actuar con precaución
y cuidado durante la instalación,
el mantenimiento y el uso del
electrodoméstico.
• Ya que las siguientes instrucciones
de funcionamiento se aplican a
varios modelos, las características
de su frigorífico pueden variar
ligeramente de las descritas en
este manual y es posible que
no sean relevantes todos los
símbolos de advertencia. Si
tiene consultas o dudas, puede
ponerse en contacto con el centro
de servicio más cercano o solicitar
ayuda e información en línea en
www.samsung.com.
Warning; Risk of
fire / flammable
materials
02_ Información de seguridad
DA68-02916G-14.indb 2 2019. 2. 27. 오전 8:26

Símbolos y precauciones de
seguridad importantes:
ADVERTENCIA
Prácticas peligrosas o
inseguras que pueden
provocar lesiones
físicas graves o la
muerte.
PRECAUCIÓN
Prácticas peligrosas o
inseguras que pueden
provocar lesiones
físicas leves o daños
en la propiedad.
NO intentarlo.
NO desmontar.
NO tocar.
Seguir las instrucciones
cuidadosamente.
Desconectar el enchufe
de la toma mural.
Comprobar que la
máquina está conectada
a tierra para prevenir una
descarga eléctrica.
Llamar al centro de
servicio técnico.
Nota.
Estos símbolos de
advertencia tienen la
función de prevenir lesiones
personales a usted y a otras
personas.
Debe seguirlos
cuidadosamente.
Después de leer esta
sección, guárdela para
consultas futuras.
SEÑALES DE
ADVERTENCIA
IMPORTANTES
SOBRE EL
TRANSPORTE Y LA
INSTALACIÓN
• Cuando transporte e instale
el electrodoméstico, tenga
cuidado de no dañar
ninguna pieza del circuito de
refrigeración.
• Se utilizan los refrigerantes R-600a
o R-134a. Compruebe la etiqueta
del compresor situada en la parte
posterior del electrodoméstico o
la etiqueta de especificaciones del
interior del frigorífico para ver cuál
es el refrigerante utilizado.
• Cuando este producto contenga
gases inflamables (refrigerante
R-600a).
- Una fuga de refrigerante se
ADVERTENCIA
Información de seguridad _03
DA68-02916G-14.indb 3 2019. 2. 27. 오전 8:26

puede inflamar o causar lesiones
oculares. Si detecta una fuga,
evite la presencia de llamas o
fuentes capaces de provocar una
ignición y ventile durante varios
minutos la habitación donde está
instalado el frigorífico.
- Para evitar que se mezcle el gas
inflamable y el aire en caso de una
fuga en el circuito de refrigeración,
el tamaño de la habitación
donde se pueda instalar el
electrodoméstico dependerá de la
cantidad de refrigerante utilizado.
- Nunca ponga en marcha un
electrodoméstico que presente
indicios de daños. En caso de
duda, póngase en contacto con
el distribuidor. El tamaño de la
habitación donde se instale el
frigorífico debe ser de 1m³ por
cada 8 g de refrigerante R-600a.
La cantidad de refrigerante de
cada electrodoméstico se indica
en la placa de identificación que
se encuentra en el interior.
- Si el electrodoméstico
contiene refrigerante isobutano
(R-600a), un gas natural de alta
compatibilidad medioambiental
que, sin embargo, también es
combustible. Cuando transporte e
instale el electrodoméstico, tenga
cuidado de no dañar ninguna
pieza del circuito de refrigeración.
SEÑALES DE
ADVERTENCIA
IMPORTANTES PARA
LA INSTALACIÓN
• No instale este aparato en un
lugar donde haya humedad,
grasas o polvo, o que esté
expuesto a la luz directa del
sol o al agua de la lluvia.
- Un aislamiento defectuoso de las
partes eléctricas puede causar
una descarga eléctrica o un
incendio.
• No exponga el frigorífico a la luz
directa del sol ni a fuentes de
calor, como por ejemplo estufas,
calentadores y otros aparatos.
• No enchufe más de un aparato en
la misma placa de potencia.
El frigorífico siempre se debe
enchufar en su propia toma de
corriente, que tenga una tensión
nominal que coincida con la de
la placa de especificaciones
eléctricas.
- Así se conseguirá el mejor
rendimiento y se impedirá el
sobrecalentamiento del cableado,
que podría causar un incendio.
Si la toma mural está floja, no
enchufe el cable de alimentación.
- Hay peligro de descarga eléctrica
o incendio.
• No utilice un cable que muestre
ADVERTENCIA
04_ Información de seguridad
DA68-02916G-14.indb 4 2019. 2. 27. 오전 8:26

grietas o signos de abrasión
en toda su longitud o en sus
extremos.
• No doble excesivamente el cable
de alimentación ni coloque sobre
él objetos pesados.
• No utilice aerosoles cerca del
frigorífico.
- Podrían causar una explosión o
un incendio.
• No instale este aparato en un
lugar donde pueda haber fugas
de gas.
- Se podría producir una descarga
eléctrica o un incendio.
• La instalación y las
reparaciones de este
electrodoméstico debe
efectuarlas un técnico o
una empresa de servicios
acreditados.
- De no hacerlo así, se podría
provocar una descarga eléctrica,
un incendio, una explosión,
problemas con el producto o
lesiones personales.
• Antes de su utilización, este
frigorífico debe ubicarse e
instalarse correctamente
siguiendo las instrucciones del
manual.
• No instale el frigorífico en un lugar
con humedad o donde pueda
entrar en contacto con el agua.
- Un aislamiento defectuoso de las
partes eléctricas puede causar
una descarga eléctrica o un
incendio.
• Conecte el cable de alimentación
en la posición adecuada y deje
que cuelgue.
- Si conecta el cable de
alimentación invertido, los hilos
se pueden cortar y provocar una
descarga eléctrica o un incendio.
• No utilice un cable que muestre
grietas o signos de abrasión
en toda su longitud o en sus
extremos.
• Asegúrese de que el cable no
quede aplastado ni lo dañe la
parte posterior del frigorífico.
• Cuando mueva el frigorífico, tenga
cuidado de no enroscar ni dañar
el cable de alimentación.
- Hay riesgo de incendio.
• Este electrodoméstico debe
colocarse de modo que el
enchufe sea accesible después de
la instalación.
• Guarde los materiales del
embalaje fuera del alcance de los
niños.
- Si un niño se los pone en la
cabeza se puede asfixiar.
• Este aparato debe tener una
puesta a tierra correcta. No
conecte el cable de tierra a
Información de seguridad _05
DA68-02916G-14.indb 5 2019. 2. 27. 오전 8:26

una tubería de gas, a una
tubería de plástico del agua
ni a la línea telefónica.
- La puesta a tierra del frigorífico
evita fugas de electricidad o
descargas eléctricas originadas
por una fuga de corriente del
frigorífico.
- Se podría producir una descarga
eléctrica, un incendio, una
explosión o causar problemas con
el funcionamiento del producto.
- No enchufe el cable de
alimentación en una toma mural
sin conexión a tierra correcta o
que no cumpla la normativa local
y nacional.
• Si el cable de alimentación
está dañado, lo debe
reemplazar inmediatamente
el fabricante o el personal de
servicio técnico.
• El fusible del frigorífico lo debe
cambiar un técnico o una
empresa de servicios acreditados.
- De no hacerlo así, se podría
provocar una descarga eléctrica o
lesiones personales.
SEÑALES DE
PRECAUCIÓN PARA
LA INSTALACIÓN
• Procure que nada obstruya
las aberturas de ventilación
de la caja o de la estructura
de montaje.
• Después de la instalación deje el
aparato sin funcionar durante 2
horas.
SEÑALES DE
ADVERTENCIA
IMPORTANTES PARA
EL USO
• No enchufe el cable de
alimentación con las manos
húmedas.
• No deposite objetos encima
del aparato.
- Al abrir o cerrar la puerta, los
objetos se podrían caer y causar
lesiones personales o daños
materiales.
• No ponga objetos que contengan
agua encima del frigorífico.
- Si se derrama agua, hay peligro
de incendio o descarga eléctrica.
• No deje que los niños se cuelguen
de la puerta.
- Podrían lesionarse gravemente.
• No deje las puertas del frigorífico
PRECAUCIÓN
ADVERTENCIA
06_ Información de seguridad
DA68-02916G-14.indb 6 2019. 2. 27. 오전 8:26

abiertas sin supervisión ni
permita que los niños se
introduzcan en el frigorífico.
• No deje que los niños se metan
en el cajón.
- Si quedan atrapados se podrían
asfixiar o sufrir lesiones.
• No se siente en la puerta del
congelador.
- Se puede romper y causar
lesiones personales.
• No deje que los niños jueguen
con el electrodoméstico. Tenga
cuidado de no pillarse los dedos
en los puntos donde existe este
riesgo:
la holgura entre las puertas y
el armario es necesariamente
pequeña. Tenga cuidado
cuando abra la puerta si hay
niños cerca. No deje que los
niños se cuelguen de la puerta.
Hay riesgo de lesiones graves.
Un niño puede quedar atrapado.
No permita que los niños se
introduzcan en el frigorífico.
• Para impedir que los niños
queden atrapados, si ha
desmontado el divisor del
cajón para limpiarlo o por otros
motivos, vuelva a instalarlo con
los tornillos suministrados.
• No introduzca los dedos ni
otros objetos en el orificio del
dispensador.
- Hay riesgo de lesiones
personales o daños materiales.
• No almacene sustancias volátiles
o inflamables, como benceno,
disolventes, alcohol, éter o gas
LP, en el frigorífico.
- Se podría provocar una
explosión.
• No almacene en el frigorífico
productos farmacéuticos,
materiales científicos ni otros
productos sensibles a las bajas
temperaturas.
- No almacene en el frigorífico
productos que requieran un
control estricto de la temperatura.
• No coloque ni utilice aparatos
eléctricos dentro del frigorífico,
a menos que sean de los tipos
recomendados por el fabricante.
• No utilice un secador de
pelo para secar el interior del
frigorífico. No ponga una vela
encendida en el interior del
frigorífico para eliminar los malos
olores.
- Se podría producir una descarga
eléctrica o un incendio.
• No toque las paredes interiores
del congelador ni los productos
guardados en su interior con las
manos húmedas.
- Se podría causar lesiones por
congelación.
• No utilice dispositivos mecánicos
Información de seguridad _07
DA68-02916G-14.indb 7 2019. 2. 27. 오전 8:26

ni otros métodos para acelerar el
proceso de descongelación que
no sean los recomendados por el
fabricante.
• No dañe el circuito de
refrigeración.
• Este producto está diseñado
únicamente para almacenar
alimentos en un entorno
doméstico.
• Las botellas se deben guardar
juntas y sin dejar espacio entre
ellas para evitar que se caigan.
• En caso de escape de gas (como
gas propano, LP, etc.), ventile
la habitación inmediatamente
sin tocar el enchufe. No toque
el aparato ni el cable de
alimentación.
• No introduzca las manos ni los
pies ni objetos de metal (como
varillas, etc.) en la parte inferior o
posterior del frigorífico.
- Se podría producir una descarga
eléctrica o lesiones personales.
- Los bordes afilados pueden
causar lesiones personales.
- No utilice un ventilador.
- Una chispa podría provocar una
explosión o un incendio.
• Utilice solo las lámparas LED
suministradas por el fabricante o
el personal de servicio técnico.
• No deje que los niños jueguen
con el electrodoméstico ni se
suban encima.
• No desmonte ni repare el
frigorífico usted mismo.
- Puede provocar un incendio, un
mal funcionamiento o lesiones
personales. En caso de mal
funcionamiento, póngase en
contacto con el personal de
servicio técnico.
• No repare ni desmonte ni
modifique el frigorífico usted
mismo.
- No utilice un fusible (como cable
de cobre o acero) que no sea el
estándar.
- Para reparar o volver a instalar
el aparato, póngase en contacto
con el centro de servicio técnico
más cercano.
- De no hacerlo así, se podría
provocar una descarga eléctrica,
un incendio, problemas con el
producto o lesiones personales.
• Si el aparato genera ruidos
extraños, olor a quemado
o humo, desconéctelo
inmediatamente y llame al centro
de servicio técnico más cercano.
- De no hacerlo así, se podría
provocar una descarga eléctrica
o un incendio.
• Si tiene problemas para cambiar
08_ Información de seguridad
DA68-02916G-14.indb 8 2019. 2. 27. 오전 8:26

la lámpara, póngase en contacto
con el personal de servicio
técnico.
• Si el producto está equipado
con una lámpara LED, no
desmonte la tapa de la lámpara
ni la lámpara LED usted mismo.
- Póngase en contacto con el
personal de servicio técnico.
• Si hay polvo o agua dentro del
frigorífico, desenchúfelo y póngase
en contacto con su centro de
servicio técnico de Samsung.
- Hay peligro de incendio.
SEÑALES DE
PRECAUCIÓN PARA
EL USO
• Para conseguir el mejor
rendimiento del producto
- No ponga alimentos demasiado
cerca de las salidas de
ventilación de la parte posterior
del aparato ya que podrían
obstruir la circulación del aire del
frigorífico.
- Envuelva los alimentos
adecuadamente o póngalos en
un recipiente hermético antes de
guardarlos en el frigorífico.
- En el congelador no ponga
alimentos sin congelar junto a
otros congelados.
PRECAUCIÓN
• No guarde bebidas carbónicas
ni refrescos en el compartimento
del congelador. No guarde
botellas ni envases de vidrio en el
congelador.
- Al congelarse el contenido
el vidrio se puede romper y
provocar lesiones personales y
daños materiales.
• No cambie ni modifique las
funciones del frigorífico.
- Los cambios o modificaciones
pueden causar lesiones
personales o daños materiales.
El servicio de garantía de
Samsung no cubre los cambios
o modificaciones realizados por
un tercero y Samsung no se hace
responsable de los problemas de
seguridad o daños derivados de
las modificaciones realizadas por
un tercero.
• No bloquee las salidas de
ventilación.
- Si bloquea las salidas, en
especial con bolsas de plástico,
el frigorífico se puede enfriar
en exceso. Si el periodo de
enfriamiento es demasiado largo,
el filtro del agua se puede romper
y provocar fugas de agua.
- En el congelador no ponga
alimentos sin congelar junto a
otros congelados.
• Sea estricto con los tiempos
Información de seguridad _09
DA68-02916G-14.indb 9 2019. 2. 27. 오전 8:26

de almacenamiento máximo y
las fechas de caducidad de los
alimentos congelados.
• Llene el depósito de agua, la
bandeja de hielo y las cubiteras
solo con agua potable.
• Utilice solo la máquina de hielo
proporcionada con el frigorífico.
• El suministro de agua del
frigorífico solo lo debe instalar
o conectar el personal técnico
cualificado y solo se debe
conectar a un suministro de agua
potable.
• Para que la máquina de hielo
funcione correctamente, la
presión del agua debe ser de
138~862 kpa (1,4~8,8 kgf/cm
3
).
• No rocíe materiales volátiles,
como insecticidas, sobre la
superficie del aparato.
- Además de ser perjudiciales
para las personas, se podría
provocar una descarga eléctrica,
un incendio o problemas con el
producto.
• No golpee ni aplique una fuerza
excesiva sobre la superficie de
vidrio.
- La rotura del vidrio puede causar
lesiones personales o daños
materiales.
SEÑALES DE
PRECAUCIÓN PARA
LA LIMPIEZA Y EL
MANTENIMIENTO
• No rocíe agua directamente
ni en el interior ni el exterior
del frigorífico.
- Hay peligro de descarga
eléctrica o incendio.
• No utilice ni deposite sustancias
sensibles a la temperatura, como
pulverizadores u
objetos inflamables, hielo
seco, medicinas ni productos
químicos cerca del frigorífico.
No guarde objetos ni sustancias
volátiles o inflamables (benceno,
disolventes, gas propano, etc)
en el frigorífico.
- En este frigorífico solo se deben
guardar alimentos.
- Se podría producir un incendio o
una explosión.
• No rocíe gas inflamable cerca
del frigorífico.
- Hay peligro de explosión o
incendio.
• No rocíe el panel directamente
con limpiadores en aerosol.
- Los caracteres impresos del
panel se pueden borrar.
• Elimine cualquier resto de
polvo o suciedad del enchufe.
No utilice un paño húmedo o
PRECAUCIÓN
10_ Información de seguridad
DA68-02916G-14.indb 10 2019. 2. 27. 오전 8:26

mojado para eliminar restos de
polvo o suciedad del enchufe.
- Hay peligro de descarga
eléctrica o incendio.
• No introduzca los dedos ni
otros objetos en el orificio del
dispensador ni en el dispensador
de hielo.
- Hay riesgo de lesiones
personales o daños materiales.
• Desenchufe el frigorífico
antes de realizar tareas de
limpieza o mantenimiento.
• Conecte el enchufe firmemente
en la toma mural. No utilice
enchufes o cables dañados, ni
tomas de pared sueltas.
- Se podría producir una descarga
eléctrica o un incendio.
• No tire con excesiva fuerza del
cable de alimentación ni lo doble
demasiado. No retuerza el cable
de alimentación. No cuelgue
el cable de alimentación de
un objeto metálico, no ponga
sobre él objetos pesados, no
lo coloque entre objetos ni lo
introduzca en el espacio que hay
detrás del electrodoméstico.
- Cuando mueva el frigorífico,
tenga cuidado de no volcarlo ni
dañar el cable.
- Se podría producir una descarga
eléctrica o un incendio.
SEÑALES DE
ADVERTENCIA
IMPORTANTES
PARA DESECHAR EL
APARATO
• Compruebe que no estén
dañados los tubos de la
parte posterior del frigorífico
antes de deshacerse de él.
• Se utilizan los refrigerantes R-600a
o R-134a. Compruebe la etiqueta
del compresor situada en la parte
posterior del electrodoméstico o
la etiqueta de especificaciones del
interior del frigorífico para ver cuál
es el refrigerante utilizado. Cuando
este producto contenga gases
inflamables (refrigerante R-600a),
póngase en contacto con las
autoridades locales para eliminar
este aparato de forma segura. El
ciclopentano se utiliza como gas
para expansión en aislantes. Los
gases de los materiales aislantes
requieren un procedimiento
especial de eliminación. Póngase
en contacto con las autoridades
locales para eliminar este aparato
de forma segura para el medio
ambiente. Compruebe que no
estén dañados los tubos de la
parte posterior del frigorífico antes
de deshacerse de él. Los tubos
se podrían romper en un espacio
abierto.
PRECAUCIÓN
Información de seguridad _11
DA68-02916G-14.indb 11 2019. 2. 27. 오전 8:26

• Cuando se deshaga de este
producto o de otros frigoríficos,
quite la puerta o los cierres de la
puerta para que no pueda quedar
atrapado en su interior un niño
pequeño o un animal. Deje los
estantes en su lugar para que
los niños no puedan introducirse
fácilmente en el interior. No deje
que los niños jueguen con el viejo
electrodoméstico.
• Deshágase del embalaje de este
aparato de forma respetuosa con
el medio ambiente.
• Guarde los materiales del
embalaje fuera del alcance de
los niños, ya que puede ser
peligrosos para ellos.
- Si un niño mete la cabeza en una
bolsa, se podría asfixiar.
CONSEJOS
ADICIONALES PARA
UN USO CORRECTO
• En el caso de un fallo de
corriente, llame a la oficina local
de su compañía eléctrica y solicite
información sobre la duración de
la interrupción del suministro.
- La mayoría de los cortes de
electricidad que se solucionan en
una o dos horas no afectan a la
temperatura del refrigerador. Sin
embargo, mientras el aparato
esté sin corriente abra la puerta
lo menos posible.
- Si el fallo de corriente supera
las 24 horas, saque todos los
alimentos congelados.
• Si se proporcionan llaves del
frigorífico, se deben guardar
fuera del alcance de los niños y
lejos del electrodoméstico.
• Es posible que el aparato
no funcione correctamente
(temperatura del frigorífico
demasiado alta) si se ha
mantenido durante un tiempo
excesivo a una temperatura
por debajo del grado de frío
para el que se ha diseñado este
frigorífico.
• No guarde alimentos que se
deterioran fácilmente a baja
temperatura, como plátanos,
melones, etc.
• Este aparato no genera
escarcha y no es necesario
descongelarlo manualmente,
ya que esta función se realiza
automáticamente.
• El aumento de la temperatura
durante la descongelación
puede cumplir con los
requisitos ISO. Pero si desea
evitar un aumento indebido
de la temperatura de los
alimentos congelados durante
12_ Información de seguridad
DA68-02916G-14.indb 12 2019. 2. 27. 오전 8:26

la descongelación del aparato,
envuélvalos con varias capas de
papel de periódico.
• Un incremento de temperatura
de los alimentos congelados
durante la descongelación
puede acortar el tiempo de
almacenamiento.
Consejos para el ahorro de
energía
- Instale el aparato en un lugar
fresco y seco con la ventilación
adecuada.
- No exponga el aparato a la luz
directa del sol ni lo ponga cerca
de fuentes de calor directo (un
radiador, por ejemplo).
- No bloquee las aberturas ni las
rejillas de ventilación del aparato.
- Deje enfriar los alimentos antes de
introducirlos en el aparato.
- Deje descongelar los alimentos
en el frigorífico. De este modo se
utilizan las bajas temperaturas de
los alimentos congelados para
enfriar los alimentos del frigorífico.
- No deje abierta la puerta del
frigorífico demasiado tiempo
cuando introduzca o saque
alimentos. Cuanto menos tiempo
esté abierta la puerta, menos
hielo se formará en el congelador.
- Limpie la parte posterior del
refrigerador regularmente. El
polvo aumenta el consumo de
energía.
- No configure una temperatura
más baja de lo necesario.
- Asegúrese de que haya una salida
de aire suficientemente amplia
en la base y la parte posterior del
frigorífico.
Información de seguridad _13
DA68-02916G-14.indb 13 2019. 2. 27. 오전 8:26

No tape las aperturas de
ventilación.
- Cuando instale el frigorífico deje
espacio suficiente a la derecha,
a la izquierda, detrás y arriba.
Esto ayudará a reducir tanto el
consumo de energía como las
facturas de la electricidad.
- Para lograr un uso de la energía
más eficiente, mantenga los
accesorios interiores como
cestas, cajones y estantes
en la posición indicada por el
fabricante.
Este aparato está diseñado
para utilizarse en entornos
domésticos o similares
como
- cocinas para el personal de
tiendas, oficinas u otros lugares
de trabajo
- albergues rurales y habitaciones
de hoteles, moteles y otros
entornos residenciales
pensiones y casas de huéspedes
- catering y aplicaciones no
minoristas similares.
Índice
INSTALACIÓN DEL FRIGORÍFICO FRENCH DOOR …………………………… 15
FUNCIONAMIENTO DEL FRIGORÍFICO FRENCH DOOR …………………… 23
SOLUCIÓN DE PROBLEMAS …………………………………………………… 36
14_ Información de seguridad
DA68-02916G-14.indb 14 2019. 2. 27. 오전 8:26

Instalación del frigorífico French
Door
PREPARACIÓN PARA
LA INSTALACIÓN DEL
FRIGORÍFICO
Le felicitamos por la compra de este frigorífico
French Door de Samsung.
Esperamos que disfrute de las innovadoras
funciones que ofrece este nuevo
electrodoméstico.
Selección de la mejor ubicación para
el frigorífico
Elija:
• Un lugar con acceso fácil al suministro de agua.
• Un lugar que no esté expuesto a la luz directa del sol.
• Un lugar con el suelo nivelado.
• Un lugar con espacio suficiente para abrir fácilmente
las puertas del frigorífico.
• Un lugar con espacio suficiente a izquierda, derecha,
detrás y arriba para que circule el aire.
• Un lugar que permita mover fácilmente el frigorífico
para realizar el mantenimiento o una reparación.
• No instale el frigorífico en un lugar donde la
temperatura descienda por debajo de los 10 ºC.
• No instale el frigorífico en un lugar donde se pueda
generar humedad.
Si el frigorífico no tiene el espacio suficiente, es
posible que el sistema de enfriamiento interno no
funcione correctamente.
Si su frigorífico tiene una máquina de hielo,
deje más espacio en la parte posterior para las
conducciones de agua.
Cuando instale el frigorífico junto a una pared fija,
debe dejar una distancia mínima de 95 mm entre
el frigorífico y la pared para que se pueda abrir la
puerta.
Importante: Asegúrese de que puede desplazar
el frigorífico fácilmente hasta su ubicación
definitiva midiendo pasillos (anchura y altura),
umbrales, techos, escaleras, etc.
En la siguiente tabla se detalla la altura y la
profundidad exactas de este frigorífico French
Door de Samsung.
AA
B
B
C
C
D
D
E
E
Profundidad “A” 726 mm
Anchura “B” 908 mm
Altura “C” 1749 mm
Altura total “D” 1777 mm
Profundidad “E” 788 mm
125° 125°
Cada medición se basa en el tamaño del
diseño, por lo que puede variar según el
método de medición.
instalación _15
01 INSTALACIÓN
DA68-02916G-14.indb 15 2019. 2. 27. 오전 8:26

Traslado del frigorífico
Para prevenir daños al pavimento, ajuste
las patas frontales en su posición más alta
(sobre el suelo). Consulte ‚Ajuste del nivel‘
en el manual (página 19).
Destornillador de
cabeza plana (-)
palanca de control
PAVIMENTO
Para instalar el frigorífico correctamente colóquelo
sobre una superficie nivelada y resistente que
esté a la misma altura que el suelo restante. Esta
superficie debe ser lo suficientemente resistente
como para soportar el peso de un refrigerador
completamente cargado.
Para proteger el acabado del suelo, corte una
plancha grande de cartón y colóquela debajo del
frigorífico. Mueva el frigorífico empujando hacia
adelante o hacia atrás en línea recta. No lo mueva
de lado a lado.
PRECAUCIÓN
EXTRACCIÓN DE LAS
PUERTAS DEL FRIGORÍFICO
En algunas instalaciones se deben sacar los
cajones del frigorífico y del congelador para
colocar el frigorífico en su ubicación definitiva. No
quite las puertas/el cajón si no es necesario.
Si no necesita quitar las puertas, vaya a Ajuste del
nivel en la página 19. Si necesita quitar las puertas,
siga leyendo.
Antes de quitar la puerta/el cajón, lea estos
apartados:
Desconecte la alimentación del frigorífico
antes de quitar la puerta o el cajón.
•
Tenga cuidado de no dejar caer, dañar o
rayar la puerta/el cajón al quitarlos.
• Tenga cuidado cuando quite las puertas o los
cajones. Las puertas son pesadas y podría
lastimarse.
• Vuelva a montar correctamente las puertas/los
cajones para evitar:
- Que se cree humedad por fugas de aire.
- Que la puerta se desalinee.
- Que se consuma más energía por un mal cierre de la
puerta.
Desmontaje de las puertas del
frigorífico
Tenga cuidado de no dejar caer ni rayar
las puertas al desmontarlas.
Herramientas necesarias (no
suministradas)
Necesita la siguientes herramientas para instalar el
frigorífico:
Destornillador
Philips (+)
Destornillador de
cabeza plana (-)
Llave de tubo
(10 mm)
Alicates
Llave Allen
(5 mm)
ADVERTENCIA
ADVERTENCIA
16_ instalación
DA68-02916G-14.indb 16 2019. 2. 27. 오전 8:26

Con la puerta abierta
1. Quite los 3 tornillos que sujetan la CUBIERTA
SUPERIOR ( 1 ) y separe los cables
conectados.
1
2. Desconecte los dos conectores ( 2 ) de la
puerta izquierda. Para retirar el acoplador
de agua de la bisagra, gírelo y sepárelo de
la bisagra. Quite la conducción de agua (
3 ) presionando la parte marcada ( 4 ) del
acoplador de la conducción de agua.
2
3
4
3. Retire la palanca de la bisagra ( 5 ). Retire el
tornillo de conexión a tierra ( 6 ) montado en
las bisagras superiores de la puerta izquierda
con un destornillador Philips (+). Retire la
bisagra superior de la puerta izquierda y
derecha ( 7 ).
5
6
7
4. Levante la puerta en línea recta para retirarla.
5. Retire el tornillo ( 8 ) montado en la bisagra
inferior de la puerta izquierda y derecha con el
destornillador Philips (+). Retire los 2 pernos
de cabeza hexagonal ( 9 ) montados en las
bisagras inferiores de la puerta izquierda y
derecha con una llave Allen (5 mm). Retire
la bisagra inferior de la puerta izquierda y
derecha ( 10 ).
10
8
9
Llave Allen
MONTAJE DE LAS PUERTAS
DEL FRIGORÍFICO
Para volver a montar las puertas del frigorífico
en su ubicación definitiva, siga el proceso inverso
al del desmontaje.
1. La tubería de agua debe estar totalmente
insertada hasta el centro del acoplador
transparente (tipo A) o las marcas de guía (tipo
B) para evitar fugas de agua del dispensador.
Tipo A Tipo B
Centro del acoplador transparente
Marcas de guía
Dispensador
instalación _17
01 INSTALACIÓN
DA68-02916G-14.indb 17 2019. 2. 27. 오전 8:26

DESMONTAJE DE LA PUERTA
DEL CAJÓN FLEX
1. Levante el cajón Flex Zone ( 1 ) y sáquelo.
1
2. Desmonte la cubierta ( 2 ) con arnés con un
destornillador de cabeza plana (-).
2
3. Presione la pestaña de bloqueo y separe el
conector del cable.
Cuando vuelva a montarlo, asegúrese de
conectar el arnés del cable.
Si no lo conecta, la zona Flex no funciona.
4. Retire 1 perno de cabeza hexagonal de cada
lado con una llave de tubo (10 mm).
PRECAUCIÓN
5. Levante la puerta del cajón Flex de los rieles.
Si se ponen demasiados alimentos en los
cajones del congelador es posible que la
puerta no cierre completamente, lo que
daría lugar a la creación de escarcha.
MONTAJE DE LA PUERTA DEL
CAJÓN FLEX
Para volver a instalar las puertas del cajón flex,
monte las piezas en orden inverso.
No se olvide de volver a conectar el
conector del cable de la puerta del cajón
Flex.
Si no lo conecta, la zona Flex no funciona.
DESMONTAJE DE LA PUERTA
DEL CONGELADOR
1. Levante el cajón superior y sáquelo.
2. Levante la balda del compartimento de
congelación ( 1 ) y extráigala.
PRECAUCIÓN
PRECAUCIÓN
18_ instalación
DA68-02916G-14.indb 18 2019. 2. 27. 오전 8:26

1
3. Saque la cesta inferior ( 2 ) levantándola del
riel.
2
4. Presione el gancho de fijación del riel.
5. Sujetando el cajón del congelador por su parte
superior, extráigalo completamente y retírelo
del riel.
Tenga cuidado de que el riel deslizante
no toque el suelo, ya que podría rayarlo o
abollarlo.
Instale el cesto del congelador en la
posición correcta cuando retire o monte
la puerta del congelador. De no hacerlo,
la puerta no se abrirá ni se cerrará
correctamente.
Si se ponen demasiados alimentos en los
cajones del congelador es posible que la
puerta no cierre completamente, lo que
daría lugar a la creación de escarcha.
PRECAUCIÓN
PRECAUCIÓN
PRECAUCIÓN
MONTAJE DE LA PUERTA DEL
CONGELADOR
Para volver a montar el cajón una vez colocado
el frigorífico en su ubicación definitiva, siga el
proceso inverso al del desmontaje.
AJUSTE DEL NIVEL
Asegúrese de que el frigorífico esté equilibrado
antes de hacer los ajustes finales. Utilice un
nivel para comprobar el equilibrado por todos
los lados. Si el frigorífico no está equilibrado, las
puertas no cerrarán completamente, lo que puede
crear humedad de condensación y aumentar el
consumo de energía. A continuación se explica
cómo equilibrar el frigorífico si el lado izquierdo
está más bajo que el derecho.
Equilibrado del frigorífico
1. Abra el cajón del congelador y saque la cesta
inferior.
2. Inserte un destornillador de cabeza plana (-) en
la muesca de la palanca de control izquierda
y gire hacia la izquierda para equilibrar el
frigorífico. (Gire la palanca hacia la derecha
para bajar el frigorífico y hacia la izquierda para
levantarlo.)
instalación _19
01 INSTALACIÓN
DA68-02916G-14.indb 19 2019. 2. 27. 오전 8:26

destornillador de cabeza plana (-)
palanca de control
Ambas palancas de control deben tocar
el suelo para evitar posibles lesiones
personales o daños materiales a causa de
la inclinación.
Si el lado derecho está más bajo, realice el
mismo procedimiento, pero con la palanca
de control derecha.
Resulta difícil quitar la cubierta frontal de
las patas del frigorífico, por lo que no es
aconsejable realizar pequeños ajustes con
la palanca de control. Si desea realizar
ajustes menores en las puertas, consulte
la página siguiente.
AJUSTES MENORES EN LA
PUERTA O EN LA PUERTA
INTERIOR
Recuerde que el frigorífico debe estar bien
equilibrado para que las puertas cierren
perfectamente. Si necesita ayuda, revise la
sección anterior que trata de la nivelación del
frigorífico.
Zona de
ajuste
Zona fija
La puerta izquierda está fija. Los pequeños
ajustes en las puertas deben realizarse
solo en la puerta derecha.
PRECAUCIÓN
Anillo elástico
La altura de una puerta o de una puerta interior
se puede ajustar con los anillos elásticos
proporcionados, que vienen en 4 tamaños
diferentes (1 mm, 1,5 mm, 2 mm y 2,5 mm).
Para ajustar la altura de una puerta
Compruebe la diferencia de altura entre las
puertas y luego eleve y sostenga la puerta inferior.
• Inserte el anillo elástico en la holgura entre la
puerta interior y el EJE DE LA BISAGRA.
(solo modelos aplicables)
• Inserte solo un anillo elástico para
este fin. Si inserta dos o más anillos
elásticos, puede ocurrir que se deslicen
hacia afuera o provoquen ruido por el
rozamiento.
• Mantenga los anillos elásticos fuera del alcance
de los niños y guárdelos para un posible uso en
el futuro.
• No levante demasiado la puerta. La puerta
puede tocar la cubierta superior y dañarla.
AJUSTES MENORES ENTRE
LA PUERTA EXTERIOR Y LA
PUERTA INTERIOR
(SOLO MODELOS
APLICABLES)
Después de levantar la puerta exterior, inserte el
anillo elástico proporcionado en la holgura entre la
PUERTA EXTERIOR y el EJE DE LA BISAGRA.
PRECAUCIÓN
20_ instalación
DA68-02916G-14.indb 20 2019. 2. 27. 오전 8:26

Se suministran anillos elásticos con el
frigorífico.
El grosor del ANILLO es de 1 mm, 2
unidades.
Utilice el anillo elástico si el tirador no se
mueve debido a que la puerta exterior ha
bajado.
INSTALACIÓN DE LA TUBERÍA
DEL DISPENSADOR DE AGUA
Una de las características útiles de este nuevo
frigorífico es el dispensador de agua con filtro
incorporado. El filtro de agua elimina las partículas
indeseables del agua y ayuda a mejorar la salud.
Sin embargo, no esteriliza el agua ni destruye
microorganismos. Para ello debería adquirir un
sistema de purificación del agua.
Para que la máquina de hielo funcione
correctamente, la presión del agua debe ser de
20~125 psi.
En condiciones normales, en unos 10 segundos
se puede llenar un vaso de 170 cc (5,75 oz.).
Si el frigorífico se instala en una zona donde la
presión del agua sea baja (menos de 20 psi), se
puede instalar una bomba para compensar la baja
presión.
Una vez conectada la conducción de agua,
asegúrese de que el depósito de agua del interior
del frigorífico esté lleno. Para ello, pulse la palanca
del dispensador de agua hasta que salga agua
del grifo.
Los kits de instalación de la conducción
de agua se incluyen con la unidad. Los
encontrará en el cajón del congelador
No reutilice los tubos viejos, utilice los
tubos nuevos suministrados con el
aparato.
Piezas para la instalación de la
conducción de agua
Tornillos y fijadores de la
conducción de agua
Conector del tubo
Conducción de agua
Conexión de la conducción del agua
1. En primer lugar, cierre la llave del suministro de
agua principal.
2. Localice la tubería de agua potable fría más
cercana.
3. Siga las instrucciones de instalación de la
conducción de agua incluidas en el kit de
instalación.
La conducción de agua se debe conectar
a un tubo de agua fría. Si se conecta a un
tubo de agua caliente, el purificador puede
que no funcione correctamente.
PRECAUCIÓN
Cierre el tubo del
agua principal
Cierre el tubo del
agua principal
Sin
holgura
4. Tras conectar el suministro de agua al filtro de
agua, vuelva a abrir la llave del suministro de
agua principal y haga correr unos 3 litros para
limpiar y preparar el filtro de agua.
instalación _21
01 INSTALACIÓN
DA68-02916G-14.indb 21 2019. 2. 27. 오전 8:26

Conexión de la conducción del agua
al frigorífico
1. Retire la tapa de la conducción de agua
de la unidad e inserte en esta la tuerca
de compresión que ha desmontado de la
conducción de agua del kit suministrado.
2. Conecte la conducción de agua de la unidad
con la conducción de agua del kit.
3. Apriete la tuerca de compresión en la junta de
compresión. No debe haber holguras (A, B y C)
4. Abra el grifo del agua para ver si hay fugas.
Conecte la conducción de agua solo a una
fuente de agua potable. Si debe reparar o
desmontar la conducción de agua, corte
6,5 mm del tubo de plástico para realizar
una conexión segura y sin fugas de agua.
Sin holgura
Afloje a
Retire la tapa
Conducción de
agua desde el kit
Conducción de agua
desde la unidad
Antes de usar el aparato, debe comprobar
que no haya fugas en esos puntos.
• La garantía
de Samsung
no cubre la
INSTALACIÓN DE
LA CONDUCCIÓN
DE AGUA.
• Los gastos
correrán a cargo del cliente a menos que el
precio de venta incluya el coste de instalación.
• Para realizar la instalación póngase en
contacto con un fontanero o un instalador
autorizado si es necesario.
• Si debido a una instalación incorrecta se
producen fugas de agua, póngase en contacto
con el instalador.
PRECAUCIÓN
FINALIZACIÓN DE LA
INSTALACIÓN
Ahora que ya tiene instalado el frigorífico en su
lugar, está preparado para configurar y utilizar las
funciones del aparato.
Siga estos pasos para que su frigorífico esté
totalmente operativo.
1. Asegúrese de que el frigorífico esté
colocado en el lugar adecuado a una
distancia razonable de la pared. Consulte las
instrucciones de instalación de este manual.
2. Una vez enchufado el frigorífico, compruebe
que se encienda la luz interior al abrir las
puertas.
3. Establezca el control a la temperatura más
baja y espere una hora. El congelador se
enfriará ligeramente y el motor funcionará con
suavidad. Vuelva a establecer la temperatura
del frigorífico y del congelador que desee.
4. Una vez enchufado el frigorífico, se tardará
unas horas en alcanzarse la temperatura
adecuada. Podrá guardar alimentos y
bebidas en el frigorífico cuando considere
que se ha alcanzado la suficiente
temperatura.
22_ instalación
DA68-02916G-14.indb 22 2019. 2. 27. 오전 8:26

Funcionamiento del frigorífico
French Door
USO DEL PANEL DE CONTROL
10 9
1
2
3
5
6
4
7 8
( 1 )
Energy
Saver
(Ahorro
de
energía)
Con este botón se activa y desactiva el
modo de ahorro de energía. Cuando se
activa el modo de ahorro de energía, se
ilumina el icono de ahorro de energía.
Cuando se desactiva el modo de ahorro
de energía, el icono se apaga. La función
de ahorro de energía viene activada de
fábrica. Si advierte condensación o gotas
de agua en la puerta, desactive el modo
de ahorro de energía.
( 2 )
Freezer
(Congelador)
(Hold 3 sec
for Power
Freeze)
(Pulsar 3
segundos
para
Activador del
congelador)
El botón Freezer (Congelador) tiene dos
funciones:
- Establecer el congelador a la temperatura
deseada.
- Activar y desactivar la función de
activación del congelador.
1) Para establecer la temperatura del
congelador
Pulse el botón Freezer (Congelador) para
establecer el congelador a la temperatura
deseada. Puede establecer la temperatura
entre -15 °C y -23 °C.
2) Función Power Freeze (Activador del
congelador)
Mantenga pulsado este botón durante 3
segundos para reducir el tiempo necesario
para congelar los productos en el
congelador.
Puede ser útil cuando hay prisa para
congelar los alimentos que se echan a
perder fácilmente o si la temperatura del
congelador ha subido demasiado (por
ejemplo, si ha quedado la puerta abierta).
Cuando se utiliza esta función se incrementa
el consumo de energía del frigorífico. No se
olvide de desactivarla cuando no la utilice
y restablezca la configuración original de
la temperatura del congelador. Si necesita
congelar gran cantidad de alimentos, active
la función Power Freeze (Activador del
congelador) al menos 20 horas antes.
( 3 )
Alarm
(Alarma)
(Hold 3 sec
for Filter
Reset)
(Pulsar 3
segundos
para
restablecer
el filtro)
El botón Alarm (Alarma) tiene dos
funciones:
- Activar y desactivar la función de
alarma de puerta abierta.
- Restablecer el indicador de estado del
filtro del agua.
1) Función de alarma de la puerta
Si la alarma de la puerta está activada,
suena una alarma cuando queda abierta
una de las puertas del frigorífico durante
más de tres minutos. La alarma deja
de sonar cuando se cierra la puerta. La
función de alarma de la puerta viene
activada de fábrica. Para desactivarla
pulse y suelte el botón Alarm (Alarma).
Puede volver a activarla de la misma
manera. El icono se ilumina cuando se
activa la función.
Cuando la función de alarma de la puerta
está activada y suena el sonido de aviso,
el icono de alarma de la puerta parpadea.
2) Función del indicador de estado del
filtro de agua
Después de reemplazar el filtro de agua,
mantenga pulsado este botón durante 3
segundos para restablecer el indicador
del estado del filtro de agua. Cuando se
restablece el indicador del estado del
filtro del agua, el icono del filtro del panel
se apaga. El icono se vuelve rojo para
indicar que es el momento de cambiar
el filtro después de seis meses de uso
(aproximadamente 1135 litros). En zonas
donde el agua lleva mucha cal, el filtro se
obstruye más rápidamente. Si este es el
caso en su zona, deberá cambiar el filtro
con una frecuencia superior a seis meses.
funcionamiento _23
02 FUNCIONAMIENTO
DA68-02916G-14.indb 23 2019. 2. 27. 오전 8:26

( 4 )
Lighting
(Luz)
(Hold 3
sec for
ºC ↔ ºF)
(Pulsar 3
segundos
para ºC
↔ ºF)
El botón Lighting (Luz) tiene dos
funciones:
- Encender y apagar la luz del
dispensador
- Cambiar las unidades de temperatura
entre ºC y ºF
1) Función de luz
Con el botón Lighting (Luz) la lámpara
LED del dispensador se enciende en
modo continuo y queda encendida.
El botón también se ilumina. Si desea
que la luz del dispensador se encienda
solo cuando lo utilice, pulse el botón
Lighting (Luz) para desactivar el modo de
iluminación continua.
2) Para cambiar las unidades de
temperatura
entre ºC y ºF mantenga pulsado
este botón durante 3 segundos para
seleccionar la unidad de temperatura que
desea que se muestre.
Con cada pulsación, se alternan los
modos de temperatura ºC y ºF y se
enciende el icono de ºC o ºF para indicar
la opción seleccionada.
( 5 )
Fridge
(Frigorífico)
(Hold 3 sec
for Power
Cool) (Pulsar
3
segundos
para Activar
frío)
El botón Fridge (Frigorífico) tiene dos
funciones:
- Establecer el frigorífico a la temperatura
deseada.
- Activar y desactivar la función de
activación de frío.
1) Para establecer la temperatura del
frigorífico
Pulse el botón Fridge (Frigorífico) para
establecer el frigorífico a la temperatura
que desee. Puede establecer la
temperatura entre 7 °C y 1 °C.
2) Función Power Cool (Activar frío)
Mantenga pulsado este botón durante
3 segundos para reducir el tiempo
necesario para enfriar los productos en el
frigorífico. Puede ser útil cuando hay prisa
para enfriar los alimentos que se echan
a perder fácilmente o si la temperatura
del frigorífico ha subido demasiado (por
ejemplo, si ha quedado la puerta abierta).
( 6 )
Ice O (Hielo
desactivado)
(Hold 3 sec
for Child
Lock) (Pulsar
3 segundos
para bloqueo
para niños)
El botón Ice O (Hielo desactivado) tiene
dos funciones:
- Encender y apagar la máquina de hielo
- Activar y desactivar la función de
bloqueo para niños.
1) Función Ice O (Hielo desactivado)
Si no desea hacer más hielo, pulse el
botón Ice O (Hielo desactivado).
2) Función de bloqueo para niños
Mantenga pulsado este botón durante
3 segundos para bloquear la pantalla,
el panel Flex Zone y los botones del
dispensador para que no puedan
utilizarse.
Cuando se activa la función de bloqueo
para niños, el frigorífico no dispensa hielo
ni agua aunque se pulse la palanca del
dispensador.
Se ilumina el icono Child Lock (Bloqueo
para niños) para indicar que se ha
activado la función de bloqueo para niños.
Para desbloquear pulse 3 segundos.
(7)
Cubed Ice
(Cubitos
de hielo)
(8)
Crushed
Ice (Hielo
picado)
Pulse los botones Cubed Ice (Cubitos de
hielo) o Crushed Ice (Hielo picado) para
seleccionar el tipo de hielo.
Con cada pulsación del botón se alterna
entre cubitos de hielo y hielo picado y
se iluminan los iconos respectivos para
indicar la opción seleccionada.
(Cubitos) (Hielo
picado)
( 9 )
Ice O (Hielo
desactivado)
Si no desea hacer más hielo toque el
botón Ice O (Hielo desactivado).
El icono se enciende y la máquina de hielo
se detiene.
Le recomendamos que apague
la máquina de hielo en estos casos:
- Cuando hay suficientes cubitos
en el depósito del hielo.
- Si desea ahorrar agua y energía.
- Si no se se suministra agua al
frigorífico.
Si la máquina de hielo está encendida
y no se ha conectado el suministro
de agua, se oirá ruido de válvula del
agua procedente de la parte posterior
de la unidad. Si sucede esto, pulse el
botón Ice O 3sec for child lock) (Hielo
desactivado) (Pulsar 3 segundos para
bloqueo para niños) durante menos de
3 segundos) hasta que el indicador de
hielo desactivado
( )
se ilumine.
24_ funcionamiento
DA68-02916G-14.indb 24 2019. 2. 27. 오전 8:26

Para ahorrar electricidad, el panel se apaga
automáticamente en los siguientes casos:
cuando no se ha pulsado ningún botón, no
se han abierto las puertas o no se ha pulsado
la palanca del dispensador. Sin embargo, los
iconos que indican la selección de cubitos
o hielo picado, o de agua con gas, siguen
encendidos. Cuando se pulsa un botón, se
abre una puerta o se pulsa la palanca del
dispensador, el panel se vuelve a encender.
Todas las teclas de función estarán operativas
en el momento en que suelte el dedo del botón
que haya pulsado.
( 10 )
Filter
(Filtro)
Uso del filtro del agua
Este icono se iluminará cuando sea
necesario cambiar el filtro, normalmente
después de que el frigorífico haya
dispensado alrededor de 1135 litros de
agua (después de unos 6 meses). El icono
se pondrá de color rojo y parpadeará
durante varios segundos cuando se abra
o se cierre la puerta.
Después de instalar un nuevo filtro de
agua, puede restablecer el indicador del
filtro manteniendo pulsado el botón Hold
3sec for Filter Reset (Pulsar 3 segundos
para restablecer el filtro) durante 3
segundos.
- Si el agua no sale del
dispensador o lo hace
lentamente, deberá cambiar el
filtro porque está obstruido.
- En zonas donde el agua lleva
mucha cal, el filtro se obstruye
más rápidamente.
CAMBIO DEL FILTRO DE AGUA
Para reducir los riesgos de los daños que
puede causar el agua, NO utilice filtros de
agua de marcas genéricas en
el frigorífico SAMSUNG.
UTILICE SOLO FILTROS DE AGUA
SAMSUNG. SAMSUNG no se hace
responsable legalmente de ningún
daño, incluidos, pero sin limitación,
los daños causados a la propiedad
derivados de fugas de agua por el uso de filtros
de agua genéricos. Los frigoríficos SAMSUNG
están diseñados para funcionar SOLO con filtros
de agua SAMSUNG.
La luz del filtro se ilumina en rojo para indicar que
hay que cambiar el cartucho del filtro de agua.
Para darle tiempo a adquirir un nuevo filtro, la luz
roja se enciende justo antes de que se agote la
capacidad de filtración. Cambiar a tiempo el filtro
del frigorífico proporciona un agua más fresca y
más limpia.
ADVERTENCIA
Para seleccionar el filtro de agua, siga estos pasos:
1. Cierre el suministro de agua. Gire el filtro de
agua ( 1 ) alrededor de 1/4 de vuelta, hacia la
izquierda.
2
1
2. Saque el filtro ( 1 ) de la carcasa ( 2 ).
• Para cambiar el filtro de agua más
fácilmente, cierre la válvula de
suministro de agua.
• A veces cuesta desmontar el filtro porque se
adhiere debido a las impurezas del agua. Si
tiene dificultades, sujete firmemente el filtro y
tire de él con fuerza.
• Al sacar el filtro, se puede verter un poco de
agua. Es normal. Para minimizar la salida de
agua, mantenga el filtro en posición horizontal
cuando lo extraiga.
• Para que no desborde el agua, vacíe la
bandeja del filtro ( 3 ) y seque la carcasa ( 2 ).
3
2
3. Inserte el nuevo filtro en la carcasa del filtro
(4 ).
4. Empuje el filtro y gírelo hacia la derecha hasta
que encaje.
• Si tiene dificultades para insertar el filtro
debido a la alta presión del agua, cierre
la válvula de suministro de agua.
• El símbolo de bloqueado debe estar
alineado con la línea indicadora.
4
(Rojo)
funcionamiento _25
02 FUNCIONAMIENTO
DA68-02916G-14.indb 25 2019. 2. 27. 오전 8:26

5. Toque el botón “Alarm/
hold 3 sec for Filter
Reset” (Alarma/Pulsar
3 segundos para
restablecer el filtro) (
(Restablecer filtro)
) durante unos 3
segundos para restablecer el filtro del agua. El
indicador ( ) de color rojo se apaga.
6. Si ha cerrado el grifo del agua, vuelva a abrirlo.
Para obtener un filtro nuevo puede ir a una
ferretería o ponerse en contacto con el
distribuidor Samsung.
Para solicitar más cartuchos del filtro
del agua póngase en contacto con un
distribuidor Samsung autorizado.
Asegúrese de que el filtro lleve el logotipo
SAMSUNG en la caja y en el filtro.
Eliminación de residuos del interior
de la conducción de agua tras
instalar el filtro.
1. Abra la válvula del
suministro de agua
principal y de la
conducción de agua.
2. Deje correr el agua por
el dispensador hasta
que salga limpia (unos
6 o 7 minutos). Así se limpiará el sistema de
suministro de agua y se purgará el aire de la
tubería.
3. En algunas instalaciones quizás sea necesario
dejar correr el agua más tiempo.
4. Abra la puerta del frigorífico y asegúrese de
que el filtro de agua no gotea.
Haga correr agua abundante por el
dispensador, ya que de lo contrario este
puede gotear.
Esto indica que queda aire en la
conducción de agua.
Suministro de agua por ósmosis
inversa IMPORTANTE
La presión del suministro de agua que llega de un
sistema de ósmosis inversa a la válvula de entrada
de agua del frigorífico tiene que estar entre 35 y
120 psi (241 y 827 kPa).
Si se conecta un sistema de filtración de agua
de ósmosis inversa al suministro de agua fría, la
presión del agua que va al sistema de ósmosis
inversa tiene que ser como mínimo de 40 a 60 psi
(276 a 414 kPa). Si la presión del agua que va al
sistema de ósmosis inversa es menor que 40 a 60
psi (276 a 414 kPa):
• Compruebe si está bloqueado el filtro de
sedimentos del sistema de ósmosis inversa.
Cambie el filtro si es necesario.
• Deje que se llene al depósito de
almacenamiento del sistema de ósmosis
inversa tras un tiempo de uso prolongado.
• Si el frigorífico tiene filtro de agua, se puede
reducir la presión del agua cuando se utiliza
conjuntamente con un sistema de ósmosis
inversa. Retire el filtro de agua.
Si tiene problemas con la presión del agua,
póngase en contacto con un fontanero
cualificado.
CONTROL DE LA
TEMPERATURA
Temperatura básica de los
compartimentos del congelador y
del frigorífico
Las temperaturas básica y recomendada de los
compartimentos del congelador y del frigorífico
son de -19 °C y 3 °C respectivamente.
Si la temperatura de los compartimentos del
congelador y del frigorífico es demasiado alta o
demasiado baja, ajústela manualmente.
Control de la temperatura del
congelador
Temperatura recomendada (congelador): -19 °C
La temperatura del congelador se puede
establecer entre -23 °C y -15 °C según sus
necesidades específicas. Pulse el botón Freezer
(Congelador) repetidamente hasta que la
26_ funcionamiento
DA68-02916G-14.indb 26 2019. 2. 27. 오전 8:27

temperatura deseada se muestre en la pantalla
de la temperatura. La temperatura cambiará 1 °C
con cada pulsación. Vea a continuación.
Centígrados: -19 °C ➞ -20 °C ➞ -21 °C ➞ -22
°C ➞ -23 °C ➞ -15 °C ➞ -16 °C ➞ -17 °C ➞ -18
°C ➞ -19 °C.
Tenga en cuenta que algunos alimentos como
los helados se pueden derretir a -15,5 °C
(4 °F). La pantalla de la temperatura cambia
secuencialmente desde -23 °C a -15 °C.
Control de la temperatura del
frigorífico
Temperatura recomendada (frigorífico): 3 °C
La temperatura del frigorífico se puede establecer
entre 1 °C y 7 °C según sus necesidades
específicas. Pulse el botón Fridge (Frigorífico)
repetidamente hasta que la temperatura deseada
se muestre en la pantalla de la temperatura. La
temperatura cambiará 1 °C con cada pulsación.
Vea a continuación.
Centígrados: 3 °C ➞ 2 °C ➞ 1 °C ➞ 7 °C ➞ 6 °C
➞ 5 °C ➞ 4 °C ➞ 3 °C.
El control de temperatura del frigorífico funciona
como el del congelador. Pulse el botón Fridge
(Frigorífico) para establecer la temperatura que
desee. Después de unos segundos, el frigorífico
empezará a ajustarse a la temperatura que se
acaba de establecer. Esto se refleja en la pantalla
digital.
- La temperatura del congelador y del
frigorífico puede aumentar cuando
las puertas se abren con demasiada
frecuencia o cuando se guarda una
gran cantidad de alimentos tibios o
calientes.
- Una elevación de la temperatura puede hacer
que la pantalla digital parpadee.
Cuando se restablezca la temperatura normal
del congelador y del frigorífico, cesará el
parpadeo.
- Si el parpadeo continua, quizás deba
“reiniciar” el frigorífico. Desenchufe el aparato,
espere unos 10 minutos y vuelva a enchufarlo.
- Si hay un error de comunicación entre la
pantalla y el controlador principal, la pantalla
convertible puede parpadear. Si el parpadeo
continua durante un largo periodo de tiempo,
póngase en contacto con el centro de servicio
de Samsung Electronics.
USO DEL DISPENSADOR DE
AGUA FRÍA;
Pulse el botón adecuado del tipo
de hielo para seleccionar lo que
desea.
SIN HIELO
Seleccione si desea apagar
la máquina de hielo
Uso de la palanca de hielo
( 1 ).
Empuje suavemente la palanca
del dispensador de hielo ( 1 )
con el vaso. El hielo saldrá del
dispensador.
Puede elegir el tipo de hielo
pulsando en primer lugar el botón
de cubitos o de hielo picado.
1
2
Uso de la palanca de agua ( 2 ).
Empuje suavemente la palanca del dispensador
de agua ( 2 ) con el vaso. El agua saldrá del
dispensador.
Si empuja la palanca de agua y la de hielo
al mismo tiempo, el dispensador activa
solo la opción que haya seleccionado o
pulsado en primer lugar.
Espere 1 segundo antes de retirar el
vaso para evitar salpicaduras. No tire de
la palanca del dispensador después de
sacar hielo o agua. La palanca recupera
su posición automáticamente.
funcionamiento _27
02 FUNCIONAMIENTO
DA68-02916G-14.indb 27 2019. 2. 27. 오전 8:27

Uso simultáneo del dispensador de
hielo y agua
Para obtener hielo y agua, primero empuje
la palanca de hielo ( 1 ) para obtener hielo
y a continuación ponga el vaso debajo del
dispensador y pulse la palanca del agua ( 2 ) para
obtener agua.
Mantenimiento del depósito del
hielo
• Para limpiar el depósito de hielo lávelo con
detergente diluido, enjuáguelo bien y séquelo
completamente. No utilice limpiadores
abrasivos ni disolventes.
• El hielo se fabrica en cubitos. Si se selecciona
“Crushed (Hielo picado)”, la máquina de hielo
tritura los cubitos y obtiene hielo picado.
• Cuando se selecciona el modo Cubitos de
hielo tras utilizar el modo Hielo picado, se
puede producir una pequeña cantidad de hielo
picado residual.
• Los cubitos de hielo generados por el proceso
de fabricación de hielo rápido serán de color
blanco, lo que indica que se han generado
con normalidad.
• Dado que la máquina de hielo del
compartimento del frigorífico hace los
cubitos más rápidamente, deberá pasarlos
del depósito de hielo del frigorífico al del
congelador cuando necesite más cubitos.
• Si no sale hielo, saque el depósito del hielo y
pulse el botón de prueba que se encuentra en
el lado derecho de la máquina de hielo. Vea la
siguiente ilustración.
• No mantenga pulsado el botón de prueba
cuando la bandeja está llena de hielo o agua.
Se puede derramar el agua y el hielo atascar
el depósito.
Fabricación de hielo
• Para llenar completamente el depósito de hielo
después de la instalación, siga estos pasos:
1. Ponga en marcha el frigorífico y déjelo
enfriando durante 24 horas (1 día entero).
- Si espera 24 horas la máquina de hielo enfriará
correctamente.
comprobar
nivel del agua
Botón de prueba
2. Vierta de 4 a 6 cubitos en el vaso.
3. Después de 8, y después 16 horas, llene un
vaso completo de hielo.
• Para probar la máquina de hielo, pulse el
botón Test (Prueba) de la máquina de hielo.
Oirá una señal acústica (como una campanilla).
En ese momento suelte el botón Test (Prueba).
• La señal volverá a sonar automáticamente
indicando que la máquina de hielo funciona
correctamente.
Si desea retirar los cubitos de hielo sin
usar el depósito del hielo, apague la
máquina de hielo y retire la cubierta frontal
de esta. Tenga en cuenta que los cubitos
de la máquina de hielo pueden derramarse
sobre el cajón.
No ponga alimentos en el depósito del
hielo. Si pone alimentos en el depósito de
hielo, estos pueden golpear la máquina de
hielo al abrir o cerrar la puerta y dañar la
máquina de hielo.
Tenga en cuenta que los cubitos del
depósito de hielo pueden derramarse
sobre el cajón cuando retire el depósito
de hielo del cajón. Si sucede esto, retire
del cajón los cubitos que se hayan
derramado.
Si se produce un corte de energía, los
cubitos de hielo pueden derretirse y
después congelarse formando un bloque
cuando vuelva la energía, lo que hará que
el dispensador deje de funcionar.
Para evitar este problema, después de un corte
de energía retire el depósito de hielo y deseche el
hielo y el agua residuales.
Si utiliza todo el hielo de una sola vez,
debe repetir los pasos 2 y 3 anteriores.
Sin embargo, espere solo 8 horas antes
de extraer los primeros 4 a 6 cubitos. Este
procedimiento repondrá los cubitos de
hielo y garantizará la máxima producción.
PRECAUCIÓN
PRECAUCIÓN
PRECAUCIÓN
PRECAUCIÓN
28_ funcionamiento
DA68-02916G-14.indb 28 2019. 2. 27. 오전 8:27

Uso de la función de hielo
desactivado
Cuando seleccione el modo de hielo desactivado,
retire todos los cubitos del depósito.
Si deja cubitos en el depósito, es posible que
formen un bloque difícil de retirar.
Para retirar el depósito de hielo con seguridad y
evitar lesionarse, sujete con una mano la parte
inferior del depósito y con la otra uno de los lados.
Levante el depósito y tire de él hacia afuera.
Para volver a colocar el depósito, empújelo
firmemente hasta colocarlo en su lugar.
Si no empuja firmemente el depósito, el
hielo que contiene se puede fundir.
Si el depósito no encaja, gire la hélice 90 grados
(vea la ilustración siguiente a la derecha) y vuelva
a intentarlo.
• El interior del depósito de hielo está
muy frío cuando el frigorífico está
funcionando. No lo toque.
• Utilice solo la máquina de hielo proporcionada
con el frigorífico. El suministro de agua del
frigorífico solo lo debe instalar o conectar el
personal técnico cualificado.
Se debe conectar únicamente a un suministro
de agua potable.
• Para que la máquina de hielo funcione
correctamente, la presión del agua debe ser
de 20 - 125 psi.
PRECAUCIÓN
De vacaciones...
Si se va de vacaciones o de viaje de negocios y
no piensa utilizar el dispensador de hielo y agua
durante mucho tiempo:
- Cierre la válvula del agua. Si no lo hace,
pueden producirse fugas de agua.
- Retire todos los alimentos.
- Desenchufe el frigorífico.
- Elimine el exceso de humedad del interior y
deje las puertas abiertas. De lo contrario, se
podrían generar malos olores y mohos.
Recomendaciones relativas a la
máquina de hielo
• No ponga dedos, manos, ni cualquier otro
objeto inapropiado en el dispensador o el
depósito de la máquina de hielo.
- Hay riesgo de lesiones personales o daños
materiales.
• No ponga nunca los dedos ni otros objetos en
la abertura del dispensador.
- Puede lesionarse.
• No desmonte la máquina de hielo.
• No rocíe agua sobre el depósito de hielo, ni
lo lave con agua, mientras está dentro del
frigorífico. Sáquelo para limpiarlo.
Cuando introduzca la bandeja de la
máquina de hielo, asegúrese de que esté
bien centrada.
De lo contrario, se podría atrancar.
Turbiedad del agua
El agua suministrada al frigorífico pasa
por un filtro de agua alcalino. Durante el
proceso de filtrado, la presión del agua
que ha pasado por el filtro aumenta y el
agua se satura de oxígeno y nitrógeno.
Cuando el agua sale por el grifo, la
presión cae, y el oxígeno y el nitrógeno se
sobresaturan y producen burbujas de gas.
Estas burbujas de oxígeno pueden hacer
que el agua parezca turbia temporalmente.
Después de unos segundos, el agua se
verá clara.
PRECAUCIÓN
funcionamiento _29
02 FUNCIONAMIENTO
DA68-02916G-14.indb 29 2019. 2. 27. 오전 8:27

PARTES Y CARACTERÍSTICAS
Vea la siguiente ilustración para familiarizarse con las partes y características del frigorífico.
Luz
Bandeja fija
Estante abatible
de 2 posiciones
Cajón de extracción
automática
Cajón del
congelador
Compartimentos
de la puerta
Cierre automático
Zona convertible
Máquina de hielo FF
Estante abatible
Bandeja fija
Sección articulada
vertical
Cajones de
frutas y verduras
Filtro del agua
Luz
Cierre automático
Balda
Cuando cierre la puerta asegúrese de que la sección articulada vertical se encuentre en la
posición correcta para evitar rayar la otra puerta.
Si la sección articulada vertical está invertida, vuelva a ponerla en la posición correcta y cierre la
puerta.
A veces puede aparecer humedad en la sección articulada vertical.
Con el tiempo el tirador de la puerta se puede aflojar. Cuando esto suceda, apriete los pernos
que se encuentran en el interior de la puerta.
Si cierra la puerta con una fuerza excesiva, se puede abrir la otra puerta.
Cuando se abre la puerta, el interruptor de bloqueo apaga el motor de engranaje de la máquina
de hielo por motivos de seguridad.
Si se estropea la lámpara LED interior o exterior, póngase en contacto con el personal de
servicio técnico.
30_ funcionamiento
DA68-02916G-14.indb 30 2019. 2. 27. 오전 8:27

Compartimentos de la puerta
Este frigorífico se envía con compartimentos
de la puerta de distintos tipos y tamaños. Si los
compartimentos de la puerta vienen embalados
por separado, consulte la siguiente figura para
montarlos correctamente.
El número de compartimentos de la puerta
proporcionados puede variar según el modelo.
USO DEL FLEX ZONE
El Flex Zone es un cajón de ancho completo que
cuenta con un control de temperatura ajustable.
Este cajón se puede utilizar para guardar
bandejas grandes para fiestas, platos preparados,
pizzas, bebidas, etc. Cuenta con un sensor de
temperatura que ajusta la cantidad de aire frío que
se permite en el interior. Los botones del control
del interior se encuentran en el centro de la puerta
superior.
Botón de selección de la temperatura
Funciones del compartimento de refrigeración
• Pulse el botón Temp (Temperatura)
repetidamente hasta que se ilumine el modo
que desee.
• Cada vez que pulsa el botón Temp.
(Temperatura) el modo cambia en este orden:
modo Meat/Fish (Carne/Pescado) (-1 °C),
modo Cold Drinks (Refrescos) (1 °C), modo
Deli/Snacks (Aperitivos) (3 °C), Wine/Party
Dishes (Vino/Platos para fiestas) (5 °C).
Inicialmente está seleccionado el modo Cold
Drinks (Refrescos). El frigorífico regulará
automáticamente la temperatura del cajón Flex
Zone según la que se haya seleccionado.
• Cuando seleccione el modo Deli/Snacks
(Aperitivos) (3 °C), el modo Cold Drinks
(Refrescos) (1 °C) o el modoMeat/Fish (Carne/
Pescado) (-1 °C), el cajón Flex Zone funcionará
como compartimento de refrigeración.
• La pantalla de la temperatura de la Flex Zone
puede cambiar según la cantidad de alimentos
almacenados y su colocación, la temperatura
ambiente y la frecuencia con la que se abra la
puerta.
Botón de selección
1. Cuando se selecciona “Wine/Party Dishes
(Vino/Platos para fiestas)”, la temperatura
de la Flex Zone se mantiene alrededor de
5 °C. Esta función mantiene los alimentos
frescos largo tiempo.
2. Cuando se selecciona “Deli/Snacks
(Aperitivos)”, la temperatura de la Flex Zone
se mantiene alrededor de 3 °C. Esta función
mantiene los alimentos frescos por más
tiempo.
3. Cuando se selecciona “Cold Drinks
(Refrescos)”, la temperatura de la Flex Zone
se mantiene alrededor de 1 °C. Esta función
mantiene la bebidas frías.
4. Cuando se selecciona “Meat/Fish (Carne/
Pescado)”, la temperatura de la Flex Zone
se mantiene alrededor de -1 °C. Esta función
mantiene carnes y pescados frescos por más
tiempo.
Si va a guardar alimentos que se
conservan poco tiempo, seleccione
las funciones del compartimento de
refrigeración.
Ejemplos de alimentos que se pueden guardar en
la Flex Zone según la temperatura configurada.
Wine Party
Dishes
(Vino/platos
para fiestas)
Deli Snacks
(Aperitivos)
Cold Drinks
(Refrescos)
Meat Fish
(Carne/
pescado)
• vino
• piñas
• agua
• embotellada
• filetes
• cócteles • limones • zumos • embutidos
• pasteles • galletas • refrescos • panceta
• quesos • patatas • cerveza • perritos
calientes
funcionamiento _31
02 FUNCIONAMIENTO
DA68-02916G-14.indb 31 2019. 2. 27. 오전 8:27

Las frutas y verduras se pueden estropear
en el modo “Meat Fish (Carne/Pescado)”.
No guarde lechugas ni otras verduras en
la Flex Zone.
No guarde botellas de cristal en la Flex
Zone con la configuración “Cold Drinks
(Refrescos)” o “Meat/Fish (Carne/
Pescado)”. Si se congelan podrían
romperse y causar lesiones personales.
UBICACIÓN RECOMENDADA
PARA EL ESTANTE ABATIBLE
El estante abatible se pliega desde el centro,
lo que proporciona más espacio para guardar
alimentos de mayor tamaño sin tener que
reorganizar los estantes.
• Instale el estante abatible en la parte derecha
del frigorífico.
• Si lo instala en la parte izquierda, la
máquina de hielo impedirá que se pliegue
completamente.
• Para usarlo, empuje el frente del estante hacia
atrás suavemente de modo que se pliegue
desde el centro.
tocar
Ubicación
recomendada
EXTRACCIÓN DE LOS
ACCESORIOS DEL
FRIGORÍFICO
1. Compartimentos de la puerta
• Compartimentos de la puerta (1)
Extracción - Levante el compartimento y tire
de él.
Colocación - Deslícelo en la posición
deseada y empújelo hasta el final.
• Compartimentos de la puerta (2)
Extracción - Retire el lado derecho del
compartimento levantándolo en ángulo recto
a lo largo de la guía y luego retire el lado
izquierdo tirando de él desde la puerta.
Colocación - Deslícelo en la posición
original y empújelo hasta el final.
PRECAUCIÓN
1
2
Si los compartimentos de las puertas
no están bien fijados pueden dar lugar a
lesiones personales.
No deje que los niños jueguen con los
compartimentos. Las esquinas puntiagudas
pueden causarles lesiones.
No ajuste el compartimento con alimentos
en su interior. Vacíelo antes.
Para eliminar el polvo de los compartimentos,
retire la balda y lave con agua.
2. Estantes de vidrio templado
Extracción - Incline el frontal del estante en
la dirección que se muestra ( 1 ) y levántelo
verticalmente ( 2 ). Extraiga el estante.
Colocación - Incline el frontal del estante hacia
arriba y encare los ganchos del estante en las
ranuras a la altura deseada. Baje el frontal del
estante de modo que los ganchos se introduzcan
en las ranuras.
Los estantes de vidrio templado son
pesados.
Tenga cuidado al extraerlos.
1
2
PRECAUCIÓN
PRECAUCIÓN
32_ funcionamiento
DA68-02916G-14.indb 32 2019. 2. 27. 오전 8:27

3. Estante abatible
Extracción - Después de retirar el estante frontal,
levante el estante abatible y retírelo.
Colocación - Enganche el estante en el marco
y coloque el estante frontal y el estante abatible.
Después de deslizar el estante abatible y
plegarlo, puede retirar el estante frontal
según su conveniencia. Si utiliza el estante
sin retirarlo, tenga cuidado de que no se
separe.
4. Cajones de frutas y verduras
Extracción
• Levante el compartimento y tire de él.
• Incline el frontal del cajón hacia arriba, tire
en línea recta y extraiga el cajón después
de moverlo ligeramente en la dirección de la
flecha.
Colocación
• Inserte el cajón en los rieles del marco y
empújelo hasta el fondo.
• Inserte el compartimento de arriba en la
PRECAUCIÓN
posición deseada y empuje hacia abajo.
Los cajones se deben sacar antes del
estante de vidrio de encima para que este
se pueda extraer.
5. Cajón Flex Zone
Extracción del cajón Flex Zone – Saque
la puerta del cajón Flex en toda su extensión.
Levante el cajón Flex Zone y tire de él con ambas
manos.
Colocación del cajón Flex Zone – Saque
la puerta del cajón Flex en toda su extensión.
Levante el frente del cajón Flex Zone, coloque
la parte posterior sobre los rieles y luego baje el
frente hasta que todo el cajón Flex Zone descanse
sobre los rieles.
Cuando el cajón Flex Zone o el indicador
LED no funcionen, compruebe si los
conectores [( 1 ), ( 2 ) como se explica a
continuación] tienen grietas o fugas.
1
2
PRECAUCIÓN
funcionamiento _33
02 FUNCIONAMIENTO
DA68-02916G-14.indb 33 2019. 2. 27. 오전 8:27

1. Consulte la página 17 para las instrucciones
de desmontaje.
2. Abra la cubierta del riel con un destornillador
de punta plana.
Uso de las puertas
Asegúrese de que las puertas queden bien
cerradas.
Cuando una puerta está parcialmente abierta,
se cierra automáticamente. Si la puerta se abre
más allá del ángulo de cierre automático, quedará
abierta. Deberá cerrarla manualmente.
EXTRACCIÓN DE LOS
ACCESORIOS DEL
CONGELADOR
1. Balda del compartimento del
congelador
Extracción - Levante la balda del compartimento
de congelación ( 1 ) y extráigala.
Colocación - Empuje hasta que la balda ( 1 )
encaje en su lugar.
1
2. Cajón superextensible
Extracción - Saque el cajón en toda su
extensión. Incline hacia arriba la parte posterior
del cajón y tire en línea recta.
Colocación - Ponga el cajón en los rieles ( 4 )
inclinándolo hacia arriba. Baje el cajón hasta que
quede en posición horizontal y deslícelo ( 3 ) hacia
adentro.
3
4
3. Cajón del congelador
Extracción del cajón del congelador - Saque
el cajón completamente. Incline hacia arriba la
parte posterior del compartimento y levántelo para
sacarlo.
Colocación del cajón del congelador -
Coloque el cajón en el montaje de rieles.
Puede rayar el lateral del compartimento si
lo gira a izquierda o derecha al armarlo o
desarmarlo.
No deje que los niños se metan en el
cajón del congelador. Podrían dañar el
frigorífico y causarse lesiones graves. No
se siente en la puerta del congelador. La
puerta se puede romper. No deje que los
niños se suban a la puerta del congelador.
No retire el divisor.
Si un niño queda atrapado dentro se
puede lesionar o morir asfixiado.
Puede guardar alimentos en el espacio
comprendido entre la línea de puntos.
Cajón de extracción automática
Cajón del congelador
Estante
LIMPIEZA DEL FRIGORÍFICO
El cuidado del frigorífico French Door Samsung
prolonga la vida del electrodoméstico y ayuda a
mantenerlo libre de olores y gérmenes.
Limpieza del interior
PRECAUCIÓN
PRECAUCIÓN
PRECAUCIÓN
ADVERTENCIA
34_ funcionamiento
DA68-02916G-14.indb 34 2019. 2. 27. 오전 8:27

Limpie las paredes interiores y los accesorios
con un detergente neutro y seque con un paño
suave. Puede sacar los cajones y los estantes
para limpiarlos convenientemente. Seque bien los
cajones y estantes antes de volver a colocarlos.
Limpieza del exterior
Limpie el panel de control y la pantalla con un
paño suave y limpio humedecido. No rocíe
directamente agua sobre la superficie del
frigorífico.
Las puertas, tiradores y superficies deben
limpiarse con un detergente neutro y secarse con
un paño suave. Para que el aparato conserve un
aspecto inmejorable, abrillante el exterior una o
dos veces al año.
No rocíe directamente agua sobre el
frigorífico. Utilice un paño suave y limpio
humedecido.
No utilice benceno, disolventes ni cloro.
Podría dañar la superficie y provocar un
incendio.
Se podrían borrar los
caracteres impresos de la
pantalla si aplica directamente
un limpiador para acero
inoxidable.
Limpieza del dispensador de hielo y
agua
Empuje hacia abajo un extremo de la bandeja del
dispensador y retírela. Limpie el dispensador de
hielo/agua con un paño limpio y suave.
PRECAUCIÓN
PRECAUCIÓN
PRECAUCIÓN
Cuando se utilice la
selección de hielo picado
del dispensador es posible
que en el recipiente de
hielo se empiecen a
acumular fragmentos de
hielo residual.
Para impedir que este
hielo residual se derrita y
se derrame, debe retirarlo
cuando vea que empieza
a acumularse en
el
dispensador del hielo.
Limpieza de los cierres de goma de
la puerta
Si los cierres de goma de las puertas están
sucios, éstas no cerrarán bien y se resentirá el
buen funcionamiento del frigorífico. Para mantener
los cierres limpios de polvo y manchas, limpie
las puertas con un detergente neutro y un paño
húmedo. Séquelas con un paño suave y limpio.
No limpie el frigorífico con benceno,
disolvente ni detergentes para coches.
Estas sustancias pueden provocar un
incendio.
Limpieza de la parte posterior del
frigorífico
Mantenga los cables y las partes expuestas
limpios de polvo
y suciedad. Aspire la parte posterior del aparato
una o dos veces al año.
No retire la cubierta posterior ( 1 ).
Podría sufrir una descarga eléctrica.
1
PRECAUCIÓN
PRECAUCIÓN
PRECAUCIÓN
funcionamiento _35
02 FUNCIONAMIENTO
DA68-02916G-14.indb 35 2019. 2. 27. 오전 8:27

PROBLEMA SOLUCIÓN
El frigorífico
no funciona
o no enfría lo
suficiente.
• Compruebe que esté correctamente enchufado.
• Compruebe si la temperatura establecida en la pantalla digital es más
elevada que la temperatura interior del congelador o del frigorífico. Si es así,
baje la temperatura del frigorífico.
• ¿Está el frigorífico expuesto a la luz directa del sol o cerca de una fuente de
calor?
• ¿Está la parte posterior del frigorífico muy cerca de la pared e impide una
ventilación adecuada?
Los alimentos
del frigorífico se
congelan.
• Compruebe si la temperatura establecida en la pantalla digital es
demasiado baja.
• Suba la temperatura del frigorífico.
• ¿La temperatura ambiental es demasiado baja? Suba la temperatura del
frigorífico.
• ¿Ha guardado alimentos jugosos en la parte más fría del frigorífico?
Coloque estos alimentos en otro estante del frigorífico en lugar de hacerlo
en las zonas o compartimentos más fríos.
Se oyen ruidos
anormales.
• Compruebe si el frigorífico está equilibrado y estable.
• ¿Está la parte posterior del frigorífico demasiado cerca de la pared e impide
una ventilación adecuada?
• Separe la parte posterior del frigorífico al menos a 50 mm de la pared.
• ¿Ha caído algo detrás o debajo del frigorífico?
• Se oye un “tic- tic” dentro del frigorífico. Es normal y sucede porque
algunos accesorios se contraen o se expanden según la temperatura del
interior del frigorífico.
• El ruido similar al de un objeto que golpea a otro es normal. Lo causa el
compresor que funciona a gran capacidad.
El área de
sellado de
la puerta del
aparato está
caliente y
se produce
condensación.
• Es normal que se produzca algo de calor debido a los anticondensadores
instalados en la sección articulada vertical.
• ¿Ha quedado entreabierta la puerta del frigorífico? Puede producirse
condensación si se deja la puerta abierta mucho tiempo.
La máquina
de hielo no
produce hielo.
• ¿Ha esperado 12 horas desde la instalación de la conducción de agua
antes de fabricar hielo?
• ¿Está la conducción de agua conectada y la válvula de suministro de agua
abierta?
• ¿Ha detenido manualmente la función de fabricar hielo?
• ¿Está demasiado alta la temperatura del congelador? Baje la temperatura
del congelador.
Se puede oír
borboteo de
agua en el
frigorífico.
• Es normal. El borboteo se debe a la circulación del refrigerante por el
frigorífico.
Solución de problemas
36_ solución de problemas
DA68-02916G-14.indb 36 2019. 2. 27. 오전 8:27

PROBLEMA SOLUCIÓN
Hay malos
olores en el
frigorífico.
• Compruebe si hay alimentos en mal estado.
• Los alimentos que tienen un olor fuerte (por ejemplo, el pescado) se deben
envolver bien.
• Limpie el congelador periódicamente y tire los alimentos que puedan estar
en mal estado.
Se forma
escarcha en
las paredes del
congelador.
• ¿Está bloqueada la ventilación? Elimine cualquier posible obstrucción para
que el aire circule libremente.
• Deje suficiente espacio entre los alimentos para que pueda circular el aire.
• ¿Está bien cerrada la puerta del congelador?
El dispensador
de agua no
funciona.
• ¿Está la conducción de agua conectada y la válvula de suministro de agua
abierta?
• ¿Está la conducción de suministro de agua aplastada o doblada?
• Asegúrese de que nada obstruya las tuberías.
• ¿Se ha congelado el depósito de agua porque la temperatura del frigorífico
es demasiado baja?
Seleccione una temperatura más alta en la pantalla digital.
• ¿Está activado el bloqueo para niños?
El sistema
de cierre
automático no
funciona en
la puerta del
congelador.
• ¿Están equilibradas las hojas derecha e izquierda de la puerta?
• Abra y cierre la puerta suavemente 1-2 veces. Después de hacerlo,
generalmente el sistema de cierre automático vuelve a funcionar.
• Abra la puerta con suavidad para evitar que se desequilibren las hojas
derecha e izquierda de la puerta.
solución de problemas _37
03 SOLUCIÓN DE PROBLEMAS
DA68-02916G-14.indb 37 2019. 2. 27. 오전 8:27

comentarios
DA68-02916G-14.indb 38 2019. 2. 27. 오전 8:27

comentarios
DA68-02916G-14.indb 39 2019. 2. 27. 오전 8:27

Límites de la temperatura ambiente de la estancia
Este frigorífico/congelador se ha diseñado para funcionar en las temperaturas ambiente definidas por su
clase de temperatura indicada en la placa de características.
Clase Símbolo
Rango de temperatura ambiente (°C)
IEC 62552 (ISO 15502) ISO 8561
Templado prolongado SN +10 a +32 +10 a +32
Templado N +16 a +32 +16 a +32
Subtropical ST +16 a +38 +18 a +38
Tropical T +16 a +43 +18 a +43
Las temperaturas internas pueden verse afectadas por factores como la ubicación del frigorífico/
congelador, la temperatura ambiente y la frecuencia con la que se abre la puerta.
Ajuste la temperatura según convenga para compensar estos factores.
Español
Eliminación correcta de este producto
(Residuos de aparatos eléctricos y electrónicos)
(Se aplica en países con sistemas de recolección por separado)
La presencia de este símbolo en el producto, accesorios o material informativo que lo acompañan,
indica que al nalizar su vida útil ni el producto ni sus accesorios electrónicos (como el cargador,
cascos, cable USB) deberán eliminarse junto con otros residuos domésticos. Para evitar los
posibles daños al medio ambiente o a la salud humana que representa la eliminación incontrolada
de residuos, separe estos productos de otros tipos de residuos y recíclelos correctamente. De
esta forma se promueve la reutilización sostenible de recursos materiales.
Los usuarios particulares pueden contactar con el establecimiento donde adquirieron el producto
o con las autoridades locales pertinentes para informarse sobre cómo y dónde pueden llevarlo
para que sea sometido a un reciclaje ecológico y seguro.
Los usuarios comerciales pueden contactar con su proveedor y consultar las condiciones del
contrato de compra. Este producto y sus accesorios electrónicos no deben eliminarse junto a
otros residuos comerciales.
Para obtener información sobre los compromisos ambientales de Samsung y las obligaciones
reglamentarias específicas del producto, como REACH, visite: samsung.com/uk/aboutsamsung/
samsungelectronics/corporatecitizenship/data_corner.html
Contacte con SAMSUNG WORLD WIDE
Si tiene alguna pregunta o comentario acerca de productos Samsung, por favor contacte con el servicio
de atención al cliente de SAMSUNG.
País
Centro de contacto
Sitio web
ITALIA 800-SAMSUNG (800.7267864) www.samsung.com/it/support
SPAIN
0034902172678
[HHP] 0034902167267
www.samsung.com/es/support
PORTUGAL 808 207 267 www.samsung.com/pt/support
GREECE
80111-SAMSUNG (80111 726 7864) only from land line
(+30) 210 6897691 from mobile and land line
www.samsung.com/gr/support
CYPRUS 8009 4000 only from landline, toll free www.samsung.com/gr/support
DA68-02916G-14.indb 40 2019. 2. 27. 오전 8:27

Ψυγείο
εγχειρίδιο χρήσης
σκεφτείτε τις δυνατότητες
Σας ευχαριστούμε που αγοράσατε αυτό το προϊόν της Samsung.
Επιδαπέδια Συσκευή
Ελληνικά
DA68-02916G-14.indb 1 2019. 2. 27. 오전 8:27

Πληροφορίες για την ασφάλεια
ΠΛΗΡΟΦΟΡΙΕΣ ΓΙΑ ΤΗΝ
ΑΣΦΑΛΕΙΑ
• Προτού θέσετε τη συσκευή σε
λειτουργία, διαβάστε προσεκτικά
αυτό το εγχειρίδιο και φυλάξτε το σε
ασφαλές σημείο κοντά στη συσκευή
σας για μελλοντική αναφορά.
• Χρησιμοποιείτε αυτή τη συσκευή
μόνο για το σκοπό για τον οποίο
προορίζεται, όπως περιγράφεται στο
παρόν εγχειρίδιο οδηγιών. Αυτή η
συσκευή δεν προορίζεται για χρήση
από άτομα (συμπεριλαμβανομένων
των παιδιών) με περιορισμένες
σωματικές, αισθητηριακές ή νοητικές
ικανότητες ή με έλλειψη εμπειρίας
και γνώσεων, εκτός εάν βρίσκονται
υπό την επίβλεψη ή ακολουθούν
οδηγίες για τη χρήση της συσκευής
ατόμου που είναι υπεύθυνο για την
ασφάλειά τους.
• Αυτή η συσκευή μπορεί να
χρησιμοποιηθεί από παιδιά ηλικίας
8 ετών και άνω και από άτομα
με περιορισμένες σωματικές,
αισθητηριακές ή νοητικές ικανότητες
ή με έλλειψη εμπειρίας και
γνώσεων, εφόσον βρίσκονται υπό
επίβλεψη ή ακολουθούν οδηγίες
σχετικά με τη χρήση της συσκευής
με ασφαλή τρόπο και κατανοούν
τους κινδύνους που ενέχονται.
Τα παιδιά απαγορεύεται να παίζουν
με τη συσκευή. Ο καθαρισμός και
η συντήρηση από τον χρήστη δεν
πρέπει να πραγματοποιούνται από
παιδιά χωρίς επίβλεψη.
• Οι Προειδοποιήσεις και οι
Σημαντικές οδηγίες για την ασφάλεια
που περιλαμβάνονται σε αυτό το
εγχειρίδιο δεν καλύπτουν όλες τις
συνθήκες και περιπτώσεις που
ενδέχεται να προκύψουν. Είναι
δική σας ευθύνη να ακολουθείτε
την κοινή λογική και να είστε
προσεκτικοί κατά την εγκατάσταση,
τη συντήρηση και τη χρήση της
συσκευής.
• Επειδή οι ακόλουθες οδηγίες
λειτουργίας αφορούν διάφορα
μοντέλα, τα χαρακτηριστικά
του ψυγείου σας ενδέχεται να
διαφέρουν ελαφρώς από αυτά που
περιγράφονται σε αυτό το εγχειρίδιο,
ενώ ενδέχεται να μην ισχύουν όλα τα
σήματα προειδοποίησης. Εάν έχετε
ερωτήσεις ή προβληματισμούς,
επικοινωνήστε με το πλησιέστερο
επισκευαστικό κέντρο ή βρείτε
βοήθεια και πληροφορίες στο
διαδίκτυο, στη διεύθυνση www.
samsung.com.
Προειδοποίηση:
Κίνδυνος πυρκαγιάς /
εύφλεκτα υλικά
02_ πληροφορίες για την ασφάλεια
DA68-02916G-14.indb 2 2019. 2. 27. 오전 8:27

Σημαντικά σύμβολα
ασφάλειας και προφυλάξεις:
ΠΡΟΕΙΔΟΠΟΙΗΣΗ
Κίνδυνοι ή μη ασφαλείς
πρακτικές που ενδέχεται
να προκαλέσουν σοβαρό
σωματικό τραυματισμό ή
θάνατο.
ΠΡΟΣΟΧΗ
Κίνδυνοι ή μη ασφαλείς
πρακτικές που ενδέχεται
να προκαλέσουν ελαφρύ
σωματικό τραυματισμό ή
υλικές ζημιές.
ΜΗΝ το επιχειρήσετε.
ΜΗΝ αποσυναρμολογείτε.
ΜΗΝ αγγίζετε.
Ακολουθείτε προσεκτικά τις
οδηγίες.
Αποσυνδέστε το φις
τροφοδοσίας από την πρίζα.
Βεβαιωθείτε ότι η συσκευή
είναι γειωμένη για να
αποφευχθεί ο κίνδυνος
ηλεκτροπληξίας.
Καλέστε το κέντρο
επικοινωνίας για βοήθεια.
Σημείωση.
Σκοπός αυτών των σημάτων
προειδοποίησης είναι να μην
τραυματιστείτε εσείς ή άλλοι
άνθρωποι.
Ακολουθήστε τα σχολαστικά.
Αφού διαβάσετε αυτή την
ενότητα, φυλάξτε την σε ασφαλές
μέρος για μελλοντική αναφορά.
ΑΥΣΤΗΡΑ ΣΗΜΑΤΑ
ΠΡΟΕΙΔΟΠΟΙΗΣΗΣ ΓΙΑ
ΤΗ ΜΕΤΑΦΟΡΑ ΚΑΙ ΤΗΝ
ΤΟΠΟΘΕΤΗΣΗ
• Κατά τη μεταφορά και την
εγκατάσταση της συσκευής,
πρέπει να είστε προσεκτικοί
προκειμένου να μην υποστεί
ζημιά κανένα μέρος του
κυκλώματος ψύξης.
• Ως ψυκτικό μέσο χρησιμοποιείται
το R-600a ή το R-134a. Ελέγξτε την
ετικέτα του συμπιεστή στο πίσω
μέρος της συσκευής ή την ετικέτα
τεχνικών στοιχείων στο εσωτερικό
του ψυγείου για να δείτε ποιο
ψυκτικό μέσο χρησιμοποιείται για το
δικό σας ψυγείο.
• Σε περίπτωση που αυτό το προϊόν
περιέχει εύφλεκτο αέριο (ψυκτικό
μέσο R-600a):
- Η διαρροή ψυκτικού μέσου από
τους σωλήνες μπορεί να προκαλέσει
ανάφλεξη ή τραυματισμό στα μάτια.
Εάν εντοπίσετε διαρροή, αποφύγετε
τυχόν γυμνές φλόγες ή πιθανές
πηγές ανάφλεξης και αερίστε για
μερικά λεπτά το χώρο στον οποίο
βρίσκεται η συσκευή.
- Προκειμένου να αποτραπεί η
δημιουργία ενός εύφλεκτου
συνδυασμού αερίου-αέρα σε
περίπτωση διαρροής στο κύκλωμα
ψύξης, το μέγεθος του χώρου
στον οποίο μπορεί να τοποθετηθεί
η συσκευή εξαρτάται από τη
χρησιμοποιούμενη ποσότητα
ΠΡΟΕΙΔΟΠΟΙΗΣΗ
πληροφορίες για την ασφάλεια _03
DA68-02916G-14.indb 3 2019. 2. 27. 오전 8:27

ψυκτικού μέσου.
- Μην θέτετε ποτέ σε λειτουργία
μια συσκευή που παρουσιάζει
οποιαδήποτε σημάδια ζημιάς. Σε
περίπτωση που έχετε αμφιβολίες,
συμβουλευτείτε τον τοπικό
αντιπρόσωπο. Ο χώρος στον
οποίο θα τοποθετηθεί το ψυγείο
πρέπει να έχει μέγεθος 1 m³ για
κάθε 8 g ψυκτικού μέσου R-600a
που υπάρχουν στο εσωτερικό της
συσκευής. Η ποσότητα ψυκτικού
μέσου που υπάρχει στη δική σας
συσκευή αναγράφεται στην πινακίδα
αναγνώρισης που θα βρείτε στο
εσωτερικό της συσκευής.
- Εάν η συσκευή περιέχει το ψυκτικό
μέσο ισοβουτάνιο (R-600a),
ένα φυσικό αέριο με υψηλή
περιβαλλοντική συμβατότητα,
το οποίο ωστόσο είναι επίσης
αναφλέξιμο. Κατά τη μεταφορά και την
εγκατάσταση της συσκευής, πρέπει
να είστε προσεκτικοί προκειμένου να
μην υποστεί ζημιά κανένα μέρος του
κυκλώματος ψύξης.
ΑΥΣΤΗΡΑ ΣΗΜΑΤΑ
ΠΡΟΕΙΔΟΠΟΙΗΣΗΣ ΓΙΑ
ΤΗΝ ΕΓΚΑΤΑΣΤΑΣΗ
• Μην εγκαθιστάτε τη συσκευή
σε μέρη με υγρασία, λάδια
ή σκόνη ή σε μέρη που είναι
εκτεθειμένα σε άμεση ηλιακή
ακτινοβολία ή νερό (σταγόνες
βροχής).
ΠΡΟΕΙΔΟΠΟΙΗΣΗ
- Η φθαρμένη μόνωση των ηλεκτρικών
μερών μπορεί να προκαλέσει
ηλεκτροπληξία ή πυρκαγιά.
• Μην τοποθετείτε αυτό το ψυγείο
σε μέρος όπου εκτίθεται σε άμεση
ηλιακή ακτινοβολία ή στη θερμότητα
που εκπέμπεται από σόμπες,
καλοριφέρ ή άλλες συσκευές.
• Μην συνδέετε πολλές συσκευές στο
ίδιο πολύπριζο.
Το ψυγείο πρέπει πάντα να είναι
συνδεδεμένο σε δική του πρίζα,
με τιμή τάσης ίδια με αυτήν που
αναγράφεται στην πινακίδα τεχνικών
στοιχείων.
- Με τον τρόπο αυτό εξασφαλίζεται
η καλύτερη δυνατή απόδοση
της συσκευής και αποφεύγεται η
υπερφόρτωση των κυκλωμάτων
καλωδίωσης της κατοικίας σας,
που θα μπορούσε να προκαλέσει
κίνδυνο πυρκαγιάς λόγω
υπερθέρμανσης των καλωδίων. Εάν
η πρίζα είναι χαλαρή, μην συνδέσετε
το φις τροφοδοσίας.
- Υπάρχει κίνδυνος ηλεκτροπληξίας ή
πυρκαγιάς.
• Μην χρησιμοποιείτε καλώδιο που
παρουσιάζει ρωγμές ή ζημιά λόγω
τριβής σε όλο το μήκος του ή σε
οποιοδήποτε από τα άκρα του.
• Μην κάμπτετε υπερβολικά
το καλώδιο ρεύματος και μην
τοποθετείτε βαριά αντικείμενα
επάνω του.
• Μην χρησιμοποιείτε αερολύματα
(αεροζόλ) κοντά στο ψυγείο.
04_ πληροφορίες για την ασφάλεια
DA68-02916G-14.indb 4 2019. 2. 27. 오전 8:27

- Όταν χρησιμοποιούνται αεροζόλ
κοντά στο ψυγείο, ενδέχεται να
προκληθεί έκρηξη ή πυρκαγιά.
• Μην εγκαθιστάτε αυτή τη συσκευή
σε μέρη όπου ενδέχεται να υπάρξει
διαρροή φυσικού αερίου.
- Ενδέχεται να προκληθεί
ηλεκτροπληξία ή πυρκαγιά.
• Η εγκατάσταση αυτής της
συσκευής, καθώς και τυχόν
εργασίες σέρβις, συνιστάται
να γίνονται από εξειδικευμένο
τεχνικό ή εταιρεία σέρβις.
• Σε αντίθετη περίπτωση, ενδέχεται
να προκληθεί ηλεκτροπληξία,
πυρκαγιά, έκρηξη, πρόβλημα με το
προϊόν ή τραυματισμός.
• Πριν από τη χρήση, αυτό το ψυγείο
πρέπει να εγκατασταθεί σωστά και
σε κατάλληλο σημείο, σύμφωνα με
το εγχειρίδιο.
• Μην εγκαθιστάτε το ψυγείο σε χώρο
με υγρασία ή σε χώρο όπου υπάρχει
περίπτωση να έρθει σε επαφή με
νερό.
- Η φθαρμένη μόνωση των
ηλεκτρικών μερών μπορεί να
προκαλέσει ηλεκτροπληξία ή
πυρκαγιά.
• Συνδέστε το φις τροφοδοσίας
σωστά, με το καλώδιο να κρέμεται
προς τα κάτω.
- Εάν συνδέσετε το φις τροφοδοσίας
ανάποδα, μπορεί να κοπεί το
καλώδιο και να προκληθεί πυρκαγιά
ή ηλεκτροπληξία.
• Μην χρησιμοποιείτε καλώδιο που
παρουσιάζει ρωγμές ή ζημιά λόγω
τριβής σε όλο το μήκος του ή σε
οποιοδήποτε από τα άκρα του.
• Βεβαιωθείτε ότι το πίσω μέρος του
ψυγείου δεν συνθλίβει το καλώδιο,
ούτε του προκαλεί ζημιά.
• Όταν μετακινείτε το ψυγείο,
προσέχετε να μην αναποδογυρίσει
ή να μην υποστεί ζημιά το καλώδιο
ρεύματος.
- Υπάρχει κίνδυνος πυρκαγιάς.
• Η συσκευή πρέπει να τοποθετηθεί
με τρόπο που να επιτρέπει την
πρόσβαση στο φις μετά την
εγκατάσταση.
• Φυλάξτε τα υλικά συσκευασίας
μακριά από παιδιά.
- Εάν τα παιδιά βάλουν το κεφάλι τους
μέσα σε αυτά, υπάρχει κίνδυνος
θανάτου λόγω ασφυξίας.
• Αυτή η συσκευή πρέπει να
έχει κατάλληλη γείωση. Μην
γειώνετε τη συσκευή σε
σωλήνες αερίου, πλαστικούς
σωλήνες νερού ή γραμμές
τηλεφώνου.
- Η γείωση του ψυγείου είναι
απαραίτητη, προκειμένου να
αποφευχθεί τυχόν διαρροή
ηλεκτρικής ενέργειας ή
ηλεκτροπληξία λόγω διαρροής
ρεύματος από το ψυγείο.
- Μπορεί να προκληθεί
ηλεκτροπληξία, πυρκαγιά, έκρηξη ή
πρόβλημα με το προϊόν.
πληροφορίες για την ασφάλεια _05
DA68-02916G-14.indb 5 2019. 2. 27. 오전 8:27

- Μην συνδέσετε ποτέ το καλώδιο
ρεύματος σε πρίζα που δεν έχει
σωστή γείωση. Βεβαιωθείτε ότι η
γείωση έχει γίνει σύμφωνα με τους
τοπικούς και εθνικούς κώδικες.
• Εάν το καλώδιο ρεύματος
υποστεί ζημιά, φροντίστε
να αντικατασταθεί αμέσως
από τον κατασκευαστή ή τον
αντιπρόσωπο σέρβις αυτού.
• Η αντικατάσταση της ασφάλειας του
ψυγείου πρέπει να πραγματοποιείται
από εξειδικευμένο τεχνικό ή εταιρεία
σέρβις.
- Σε διαφορετική περίπτωση,
ενδέχεται να προκληθεί
ηλεκτροπληξία ή σωματικός
τραυματισμός.
ΣΗΜΑΤΑ ΠΡΟΣΟΧΗΣ ΓΙΑ
ΤΗΝ ΕΓΚΑΤΑΣΤΑΣΗ
• Διατηρείτε ελεύθερο
από εμπόδια το άνοιγμα
εξαερισμού που βρίσκεται στο
περίβλημα της συσκευής ή
στη βάση της.
• Μετά την εγκατάσταση, αφήστε τη
συσκευή για 2 ώρες χωρίς να τη
θέσετε σε λειτουργία.
ΑΥΣΤΗΡΑ ΣΗΜΑΤΑ
ΠΡΟΕΙΔΟΠΟΙΗΣΗΣ ΓΙΑ
ΤΗ ΧΡΗΣΗ
ΠΡΟΣΟΧΗ
ΠΡΟΕΙΔΟΠΟΙΗΣΗ
• Μην συνδέετε το φις
τροφοδοσίας με υγρά χέρια.
• Μην αποθηκεύετε αντικείμενα
στο επάνω μέρος της
συσκευής.
- Όταν ανοιγοκλείνετε την πόρτα, τα
αντικείμενα ενδέχεται να πέσουν
και να προκαλέσουν σωματικό
τραυματισμό ή/και υλική ζημιά.
• Μην τοποθετείτε αντικείμενα γεμάτα
με νερό επάνω στο ψυγείο.
- Εάν χυθεί το νερό, υπάρχει κίνδυνος
πυρκαγιάς ή ηλεκτροπληξίας.
• Μην αφήνετε τα παιδιά να κρέμονται
από την πόρτα.
- Σε διαφορετική περίπτωση,
ενδέχεται να προκληθεί σοβαρός
σωματικός τραυματισμός.
• Μην αφήνετε ανοικτές τις πόρτες
του ψυγείου ενόσω δεν επιβλέπετε
το ψυγείο, και μην αφήνετε τα παιδιά
να μπαίνουν μέσα στο ψυγείο.
• Μην αφήνετε τα μωρά ή τα παιδιά
να μπαίνουν μέσα στο συρτάρι.
- Μπορεί να προκληθεί θάνατος λόγω
ασφυξίας εξαιτίας της παγίδευσης ή
σωματικός τραυματισμός.
• Μην κάθεστε πάνω στην πόρτα του
καταψύκτη.
- Η πόρτα μπορεί να σπάσει και να
προκληθεί σωματικός τραυματισμός.
• Τα παιδιά θα πρέπει να
επιτηρούνται, ώστε να διασφαλίζεται
ότι δεν παίζουν με τη συσκευή.
Κρατήστε τα δάχτυλά σας μακριά
από σημεία όπου θα μπορούσαν να
πιαστούν:
06_ πληροφορίες για την ασφάλεια
DA68-02916G-14.indb 6 2019. 2. 27. 오전 8:27

τα κενά ανάμεσα στις πόρτες και
στο θάλαμο είναι αναγκαστικά
μικρά. Εάν υπάρχουν παιδιά
στο χώρο, να είστε προσεκτικοί
όταν ανοίγετε τις πόρτες. Μην
αφήνετε τα παιδιά να κρέμονται
από την πόρτα. Διαφορετικά,
μπορεί να προκληθεί σοβαρός
τραυματισμός. Υπάρχει κίνδυνος
να παγιδευτούν τα παιδιά στο
εσωτερικό του ψυγείου. Μην
αφήνεται τα παιδιά να μπαίνουν
μέσα στο ψυγείο.
• Για να μην παγιδευτούν τα παιδιά,
θα πρέπει να επανεγκαταστήσετε
το διαχωριστικό μετά τον
καθαρισμό ή άλλες ενέργειες,
χρησιμοποιώντας τις βίδες που
παρέχονται, σε περίπτωση που
αφαιρέσατε το διαχωριστικό από
το συρτάρι.
• Μην βάζετε ποτέ τα δάχτυλά σας
ή άλλα αντικείμενα στην οπή του
διανεμητή.
- Σε διαφορετική περίπτωση,
ενδέχεται να προκληθεί σωματικός
τραυματισμός ή υλική ζημιά.
• Μην αποθηκεύετε πτητικές ή
εύφλεκτες ουσίες, όπως βενζόλιο,
διαλυτικό, οινόπνευμα, αιθέρα ή
υγραέριο, μέσα στο ψυγείο.
- Η φύλαξη οποιουδήποτε από
αυτά τα προϊόντα ενδέχεται να
προκαλέσει έκρηξη.
• Μην διατηρείτε φαρμακευτικά
προϊόντα ευαίσθητα στις χαμηλές
θερμοκρασίες, επιστημονικά υλικά
ή άλλα προϊόντα ευαίσθητα στις
χαμηλές θερμοκρασίες μέσα στο
ψυγείο.
- Τα προϊόντα που απαιτούν αυστηρό
έλεγχο της θερμοκρασίας δεν
πρέπει να φυλάσσονται στο ψυγείο.
• Μην τοποθετείτε και μην
χρησιμοποιείτε καμία ηλεκτρική
συσκευή μέσα στο ψυγείο,
εκτός εάν πρόκειται για τύπο
συσκευής που συνιστάται από τον
κατασκευαστή.
• Μην χρησιμοποιείτε σεσουάρ
για να στεγνώσετε το εσωτερικό
του ψυγείου. Μην τοποθετείτε
αναμμένα κεριά μέσα στο ψυγείο
για την απομάκρυνση των
δυσάρεστων οσμών.
- Ενδέχεται να προκληθεί
ηλεκτροπληξία ή πυρκαγιά.
• Μην αγγίζετε τα εσωτερικά
τοιχώματα του καταψύκτη ή τα
προϊόντα που φυλάσσονται στον
καταψύκτη με βρεγμένα χέρια.
- Μπορεί να προκληθεί κρυοπάγημα.
• Μην χρησιμοποιείτε μηχανικές
συσκευές ή οποιοδήποτε άλλο μέσο
–εκτός από εκείνα που συνιστά ο
κατασκευαστής– για να επιταχύνετε
τη διαδικασία απόψυξης.
• Μην προκαλείτε ζημιές στο
κύκλωμα του ψυκτικού μέσου.
• Αυτό το προϊόν προορίζεται
αποκλειστικά για τη φύλαξη
τροφίμων σε οικιακό
περιβάλλον.
• Τα μπουκάλια πρέπει να
πληροφορίες για την ασφάλεια _07
DA68-02916G-14.indb 7 2019. 2. 27. 오전 8:27

τοποθετούνται το ένα ακριβώς δίπλα
στο άλλο ώστε να μην πέσουν έξω
από το ψυγείο.
• Σε περίπτωση διαρροής αερίου
(όπως προπάνιο, υγραέριο κ.λπ.),
αερίστε αμέσως το χώρο χωρίς να
αγγίξετε το φις τροφοδοσίας. Μην
αγγίζετε τη συσκευή ή το καλώδιο
ρεύματος.
• Μην τοποθετείτε τα χέρια σας, τα
πόδια σας ή μεταλλικά αντικείμενα
(όπως μεταλλικές ράβδους κ.λπ.)
στο κάτω ή στο πίσω μέρος του
ψυγείου.
- Μπορεί να προκληθεί
ηλεκτροπληξία ή τραυματισμός.
- Τυχόν αιχμηρές άκρες μπορεί
να προκαλέσουν σωματικό
τραυματισμό.
- Μην χρησιμοποιείτε ανεμιστήρα
εξαερισμού.
- Μια σπίθα μπορεί να προκαλέσει
έκρηξη ή πυρκαγιά.
• Χρησιμοποιείτε μόνο τις
λυχνίες LED που παρέχονται
από τον κατασκευαστή ή τους
αντιπροσώπους σέρβις.
• Τα παιδιά θα πρέπει να
επιτηρούνται, ώστε να διασφαλίζεται
ότι δεν παίζουν με τη συσκευή ή/και
δεν σκαρφαλώνουν σε αυτή.
• Μην αποσυναρμολογείτε και
μην επισκευάζετε μόνοι σας το
ψυγείο.
- Διατρέχετε κίνδυνο να προκαλέσετε
πυρκαγιά, βλάβη ή/και σωματικό
τραυματισμό. Σε περίπτωση
βλάβης, επικοινωνήστε με τον
αντιπρόσωπο σέρβις της περιοχής
σας.
• Μην επιχειρήσετε
να επισκευάσετε, να
αποσυναρμολογήσετε ή να
τροποποιήσετε οι ίδιοι τη
συσκευή.
- Μην χρησιμοποιείτε καμία
ασφάλεια (όπως χαλκός,
χαλύβδινο σύρμα κ.λπ.) εκτός από
την κανονική.
- Σε περίπτωση που απαιτείται
επισκευή ή επανεγκατάσταση της
συσκευής, επικοινωνήστε με το
πλησιέστερο επισκευαστικό κέντρο.
- Σε διαφορετική περίπτωση,
ενδέχεται να προκληθεί
ηλεκτροπληξία, πυρκαγιά,
προβλήματα με το προϊόν ή
τραυματισμός.
• Εάν από τη συσκευή ακούγεται
περίεργος θόρυβος ή βγαίνει
μυρωδιά καμένου ή καπνός,
αποσυνδέστε αμέσως το φις
τροφοδοσίας και επικοινωνήστε
με το πλησιέστερο επισκευαστικό
κέντρο.
- Σε διαφορετική περίπτωση,
ενδέχεται να προκληθεί
ηλεκτροπληξία ή πυρκαγιά.
• Εάν αντιμετωπίσετε δυσκολίες
κατά την αλλαγή της λυχνίας,
επικοινωνήστε με τον
αντιπρόσωπο σέρβις.
08_ πληροφορίες για την ασφάλεια
DA68-02916G-14.indb 8 2019. 2. 27. 오전 8:27

• Εάν το προϊόν διαθέτει λυχνία
LED, μην αποσυναρμολογείτε οι
ίδιοι το κάλυμμα της λυχνίας και τη
λυχνία LED.
- Επικοινωνήστε με τον τοπικό
αντιπρόσωπο σέρβις.
• Εάν υπάρχει σκόνη ή νερό μέσα
στο ψυγείο, αποσυνδέστε το φις
τροφοδοσίας και επικοινωνήστε
με το τοπικό επισκευαστικό κέντρο
της Samsung Electronics.
- Υπάρχει κίνδυνος πυρκαγιάς.
ΣΗΜΑΤΑ ΠΡΟΣΟΧΗΣ ΓΙΑ
ΤΗ ΧΡΗΣΗ
• Για την καλύτερη απόδοση
του προϊόντος:
- Μην τοποθετείτε τρόφιμα πολύ
κοντά μπροστά στα ανοίγματα
εξαερισμού που βρίσκονται
στο πίσω μέρος της συσκευής,
καθώς μπορεί να εμποδίσουν την
ελεύθερη κυκλοφορία του αέρα
στο θάλαμο του ψυγείου.
- Τυλίγετε καλά τα τρόφιμα ή
τοποθετείτε τα σε αεροστεγή
δοχεία προτού τα βάλετε στο
ψυγείο.
- Μην τοποθετείτε νωπά τρόφιμα
που θέλετε να καταψύξετε δίπλα
σε ήδη κατεψυγμένα τρόφιμα.
• Μην τοποθετείτε ανθρακούχα ή
αεριούχα ποτά στο θάλαμο του
καταψύκτη. Μην τοποθετείτε
μπουκάλια ή γυάλινα δοχεία στον
καταψύκτη.
ΠΡΟΣΟΧΗ
- Όταν το περιεχόμενο παγώσει,
το γυαλί μπορεί να σπάσει και να
προκαλέσει σωματικό τραυματισμό
και υλικές ζημιές.
• Μην αλλάζετε και μην τροποποιείτε
τη λειτουργία του ψυγείου.
- Οι αλλαγές ή οι τροποποιήσεις
μπορεί να προκαλέσουν σωματικό
τραυματισμό ή/και υλικές ζημιές.
Οποιεσδήποτε αλλαγές ή
τροποποιήσεις που εκτελούνται από
τρίτους σε αυτήν την ολοκληρωμένη
συσκευή δεν καλύπτονται από την
εγγύηση σέρβις της Samsung,
ούτε ευθύνεται η Samsung για
προβλήματα ασφάλειας και βλάβες
που θα προκύψουν εξαιτίας των
τροποποιήσεων από τρίτους.
• Μην φράζετε τις οπές αέρα.
- Εάν οι οπές αέρα είναι φραγμένες,
ιδίως με πλαστική σακούλα, το
ψυγείο θα ψυχθεί υπερβολικά.
Εάν αυτή η περίοδος ψύξης
διαρκέσει για παρατεταμένο
χρονικό διάστημα, το φίλτρο νερού
μπορεί να σπάσει και να προκληθεί
διαρροή νερού.
- Μην τοποθετείτε νωπά τρόφιμα που
θέλετε να καταψύξετε δίπλα σε ήδη
κατεψυγμένα τρόφιμα.
• Τηρείτε τους μέγιστους χρόνους
φύλαξης και τις ημερομηνίες λήξης
των κατεψυγμένων προϊόντων.
• Γεμίζετε το δοχείο νερού, το δίσκο
πάγου και τις παγοθήκες μόνο με
πόσιμο νερό.
• Να χρησιμοποιείτε μόνον τον
πληροφορίες για την ασφάλεια _09
DA68-02916G-14.indb 9 2019. 2. 27. 오전 8:27

παρασκευαστή πάγου που
παρέχεται με το ψυγείο.
• Η παροχή νερού για αυτό το ψυγείο
πρέπει να εγκαθίσταται/συνδέεται
μόνον από κατάλληλα εξειδικευμένο
άτομο και να συνδέεται μόνον με
παροχή πόσιμου νερού.
• Για να λειτουργήσει σωστά ο
παρασκευαστής πάγου, απαιτείται
πίεση νερού 138~862 kpa
(1,4~8,8 kgf/cm
3
).
• Μην ψεκάζετε πτητικά υλικά, όπως
εντομοκτόνα, στην επιφάνεια της
συσκευής.
- Είναι βλαβερά για τους ανθρώπους
και, επιπλέον, ενδέχεται να
προκαλέσουν ηλεκτροπληξία,
πυρκαγιά ή προβλήματα με το προϊόν.
• Μην χτυπάτε δυνατά και μην
ασκείτε υπερβολική δύναμη στις
επιφάνειες από γυαλί.
- Το σπασμένο γυαλί μπορεί να
προκαλέσει σωματικό τραυματισμό
ή/και υλικές ζημιές.
ΣΗΜΑΤΑ ΠΡΟΣΟΧΗΣ ΓΙΑ
ΤΟΝ ΚΑΘΑΡΙΣΜΟ ΚΑΙ ΤΗ
ΣΥΝΤΗΡΗΣΗ
• Μην ψεκάζετε με νερό
απευθείας το εσωτερικό ή το
εξωτερικό του ψυγείου.
- Υπάρχει κίνδυνος πυρκαγιάς ή
ηλεκτροπληξίας.
• Μην χρησιμοποιείτε και μην
τοποθετείτε ουσίες ευαίσθητες
στη θερμοκρασία, όπως εύφλεκτα
ΠΡΟΣΟΧΗ
σπρέι, εύφλεκτα αντικείμενα, ξηρό
πάγο, φάρμακα ή χημικά, κοντά
ψυγείο. Μην διατηρείτε πτητικά
ή εύφλεκτα αντικείμενα ή ουσίες
(βενζόλιο, διαλυτικό, προπάνιο
κ.λπ.) μέσα στο ψυγείο.
- Αυτό το ψυγείο προορίζεται
αποκλειστικά για τη φύλαξη
τροφίμων.
- Μπορεί να προκληθεί πυρκαγιά ή
έκρηξη.
• Μην ψεκάζετε εύφλεκτα αέρια
κοντά στο ψυγείο.
- Υπάρχει κίνδυνος έκρηξης ή
πυρκαγιάς.
• Μην ψεκάζετε καθαριστικά
προϊόντα κατευθείαν πάνω στην
οθόνη.
- Τα γράμματα που υπάρχουν πάνω
στην οθόνη μπορεί να σβηστούν.
• Απομακρύνετε τυχόν ξένα σώματα
ή σκόνη από τις ακίδες του φις
τροφοδοσίας. Μην χρησιμοποιείτε
υγρό ή νοτισμένο πανί κατά
τον καθαρισμό του φις και
απομακρύνετε τυχόν ξένα σώματα
ή σκόνη από τις ακίδες του φις
τροφοδοσίας.
- Σε διαφορετική περίπτωση,
υπάρχει κίνδυνος πυρκαγιάς ή
ηλεκτροπληξίας.
• Μην βάζετε ποτέ τα δάχτυλά σας
ή άλλα αντικείμενα στην οπή του
διανεμητή ή στη χοάνη πάγου.
- Ενδέχεται να προκληθεί
σωματικός τραυματισμός ή υλική
ζημιά.
10_ πληροφορίες για την ασφάλεια
DA68-02916G-14.indb 10 2019. 2. 27. 오전 8:27

• Βγάλτε το ψυγείο από
την πρίζα πριν από τον
καθαρισμό και τις εργασίες
συντήρησης.
• Συνδέστε καλά το φις τροφοδοσίας
στην πρίζα. Μην χρησιμοποιείτε φις
τροφοδοσίας ή καλώδιο ρεύματος
που έχει υποστεί ζημιά ούτε χαλαρή
πρίζα.
- Ενδέχεται να προκληθεί
ηλεκτροπληξία ή πυρκαγιά.
• Μην τραβάτε και μην κάμπτετε
υπερβολικά το καλώδιο ρεύματος.
Μην συστρέφετε και μην δένετε
κόμπο το καλώδιο ρεύματος. Μην
κρεμάτε το καλώδιο ρεύματος
επάνω σε μεταλλικό αντικείμενο,
μην τοποθετείτε βαριά αντικείμενα
επάνω στο καλώδιο ρεύματος, μην
τοποθετείτε το καλώδιο ρεύματος
ανάμεσα σε αντικείμενα και μην
σπρώχνετε το καλώδιο ρεύματος στο
χώρο πίσω από τη συσκευή.
- Όταν μετακινείτε το ψυγείο,
προσέχετε να μην αναποδογυρίσει
ή να μην υποστεί ζημιά το καλώδιο
ρεύματος.
- Ενδέχεται να προκληθεί
ηλεκτροπληξία ή πυρκαγιά.
ΑΥΣΤΗΡΑ ΣΗΜΑΤΑ
ΠΡΟΕΙΔΟΠΟΙΗΣΗΣ ΓΙΑ
ΤΗΝ ΑΠΟΡΡΙΨΗ
• Πριν από την απόρριψη,
βεβαιωθείτε ότι δεν έχει
υποστεί ζημιά κανένας από
τους σωλήνες που βρίσκονται
στο πίσω μέρος της
συσκευής.
• Ως ψυκτικό μέσο χρησιμοποιείται
το R-600a ή το R-134a. Ελέγξτε την
ετικέτα του συμπιεστή στο πίσω
μέρος της συσκευής ή την ετικέτα
τεχνικών στοιχείων στο εσωτερικό
του ψυγείου για να δείτε ποιο
ψυκτικό μέσο χρησιμοποιείται για το
δικό σας ψυγείο. Σε περίπτωση που
αυτό το προϊόν περιέχει εύφλεκτο
αέριο (ψυκτικό μέσο R-600a),
επικοινωνήστε με την αρμόδια
τοπική αρχή για να ενημερωθείτε
σχετικά με τον ασφαλή τρόπο
απόρριψης αυτού του προϊόντος.
Ως διογκωτικό αέριο μόνωσης
χρησιμοποιείται το κυκλοπεντάνιο.
Για τα αέρια που περιέχονται
στο μονωτικό υλικό απαιτείται
ειδική διαδικασία απόρριψης.
Επικοινωνήστε με τις αρμόδιες
τοπικές αρχές για να ενημερωθείτε
σχετικά με τον περιβαλλοντικά
ασφαλή τρόπο απόρριψης αυτού
του προϊόντος. Πριν από την
απόρριψη, βεβαιωθείτε ότι δεν έχει
υποστεί ζημιά κανένας από τους
σωλήνες που βρίσκονται στο πίσω
μέρος της συσκευής. Οι σωλήνες
ΠΡΟΣΟΧΗ
πληροφορίες για την ασφάλεια _11
DA68-02916G-14.indb 11 2019. 2. 27. 오전 8:27

θα πρέπει να καταστρέφονται σε
ανοιχτό χώρο.
• Κατά την απόρριψη αυτού του
προϊόντος ή άλλων ψυγείων,
αφαιρέστε την πόρτα/τα υλικά
στεγανοποίησης της πόρτας και
το σύστημα μανδάλωσης της
πόρτας, έτσι ώστε να μην μπορεί να
παγιδευτεί κάποιο παιδί ή ζώο στο
εσωτερικό του. Αφήστε τα ράφια στη
θέση τους, έτσι ώστε να παιδιά να
μην μπορούν να σκαρφαλώσουν
εύκολα στο εσωτερικό της
συσκευής. Τα παιδιά θα πρέπει να
επιτηρούνται, ώστε να διασφαλίζεται
ότι δεν παίζουν με την παλιά
συσκευή.
• Απορρίψτε τα υλικά συσκευασίας
αυτού του προϊόντος με τρόπο
φιλικό προς το περιβάλλον.
• Φυλάξτε όλα τα υλικά συσκευασίας
μακριά από παιδιά, καθώς μπορούν
να είναι επικίνδυνα για τα παιδιά.
- Εάν ένα παιδί βάλει το κεφάλι του
μέσα σε μια σακούλα, ενδέχεται να
πάθει ασφυξία.
ΕΠΙΠΛΕΟΝ ΣΥΜΒΟΥΛΕΣ
ΓΙΑ ΣΩΣΤΗ ΧΡΗΣΗ
• Σε περίπτωση διακοπής
ρεύματος, καλέστε το τοπικό
γραφείο της εταιρείας παροχής
ηλεκτρικού ρεύματος με την οποία
συνεργάζεστε και ρωτήστε πόσο θα
διαρκέσει η διακοπή.
• Οι περισσότερες διακοπές ρεύματος
που αποκαθίστανται εντός μίας
ή δύο ωρών δεν θα επηρεάσουν
τη θερμοκρασία του ψυγείου σας.
Ωστόσο, κατά τη διάρκεια της
διακοπής ρεύματος, θα πρέπει
να ανοίγετε την πόρτα όσο το
δυνατόν λιγότερο.
- Εάν η διακοπή ρεύματος
διαρκέσει περισσότερο από 24
ώρες, απομακρύνετε όλα τα
κατεψυγμένα τρόφιμα.
• Εάν μαζί με το ψυγείο παρέχονται
κλειδιά, τα κλειδιά πρέπει να
φυλάσσονται μακριά από τα
παιδιά και σε σημείο που να μην
βρίσκεται κοντά στη συσκευή.
• Εάν τοποθετηθεί για παρατεταμένο
χρονικό διάστημα σε θερμοκρασία
χαμηλότερη από εκείνη για την
οποία έχει σχεδιαστεί, η συσκευή
ενδέχεται να μην λειτουργεί
αξιόπιστα (πιθανότητα πολύ
υψηλής θερμοκρασίας στο
ψυγείο).
• Μην αποθηκεύετε στο ψυγείο
τρόφιμα που αλλοιώνονται εύκολα
σε χαμηλές θερμοκρασίες, όπως
μπανάνες και πεπόνια.
• Η συσκευή σας είναι «frost free»,
που σημαίνει ότι δεν χρειάζεται
να κάνετε απόψυξη, καθώς
η διαδικασία αυτή εκτελείται
αυτόματα.
• Η άνοδος της θερμοκρασίας
κατά την απόψυξη μπορεί να
συμμορφώνεται με τις απαιτήσεις
ISO. Εάν όμως θέλετε να
αποτρέψετε τυχόν υπερβολική
12_ πληροφορίες για την ασφάλεια
DA68-02916G-14.indb 12 2019. 2. 27. 오전 8:27

άνοδο στη θερμοκρασία των
κατεψυγμένων τροφίμων κατά την
απόψυξη της συσκευής, τυλίξτε τα
κατεψυγμένα τρόφιμα σε άφθονα
φύλλα εφημερίδας.
• Οποιαδήποτε άνοδος στη
θερμοκρασία των κατεψυγμένων
τροφίμων κατά τη διάρκεια της
απόψυξης μπορεί να μειώσει τον
επιτρεπόμενο χρόνο διατήρησής
τους.
Συμβουλές για
εξοικονόμηση ενέργειας
- Εγκαταστήστε τη συσκευή σε
δροσερό, ξηρό χώρο που διαθέτει
επαρκή εξαερισμό.
Βεβαιωθείτε ότι δεν εκτίθεται σε
άμεση ηλιακή ακτινοβολία και
μην την τοποθετείτε ποτέ κοντά
σε άμεση πηγή θερμότητας (για
παράδειγμα, καλοριφέρ).
- Μην φράζετε ποτέ τα ανοίγματα
εξαερισμού ή τις γρίλιες της
συσκευής.
- Αφήνετε τα ζεστά φαγητά να
κρυώσουν προτού τα βάλετε στο
ψυγείο.
- Βάζετε τα κατεψυγμένα τρόφιμα στο
ψυγείο για να ξεπαγώσουν. Έπειτα,
μπορείτε να χρησιμοποιήστε
τις χαμηλές θερμοκρασίες των
κατεψυγμένων προϊόντων για
να κρυώσετε τα τρόφιμα που
βρίσκονται στο ψυγείο.
- Μην αφήνετε την πόρτα της
συσκευής ανοιχτή για πολλή ώρα
όταν βάζετε ή βγάζετε τρόφιμα από
το ψυγείο. Όσο λιγότερη ώρα μένει
ανοιχτή η πόρτα, τόσο λιγότερος
πάγος θα δημιουργηθεί στον
καταψύκτη.
- Να καθαρίζετε τακτικά το πίσω
μέρος του ψυγείου. Η σκόνη αυξάνει
την κατανάλωση ενέργειας.
- Μην ρυθμίζετε χαμηλότερη
θερμοκρασία απ’ όσο είναι
απαραίτητο.
πληροφορίες για την ασφάλεια _13
DA68-02916G-14.indb 13 2019. 2. 27. 오전 8:27

- Εξασφαλίστε επαρκή έξοδο του αέρα
στη βάση και στο πίσω τοίχωμα του
ψυγείου.
Μην καλύπτετε τα ανοίγματα
εξαερισμού.
- Κατά την εγκατάσταση, να αφήνετε
χώρο στα δεξιά, στα αριστερά, στο
πίσω και στο επάνω μέρος.
Με αυτόν τον τρόπο θα μειωθεί
η κατανάλωση ενέργειας και ο
λογαριασμός του ηλεκτρικού θα
διατηρείται σε χαμηλά επίπεδα.
- Για την πιο αποδοτική χρήση
της ενέργειας, διατηρείτε όλα τα
εσωτερικά μέρη, όπως καλάθια,
συρτάρια και ράφια, στη θέση που
παρέχεται από τον κατασκευαστή.
Αυτή η συσκευή
προορίζεται για οικιακή
χρήση και για άλλες
παρόμοιες χρήσεις όπως:
- χρήση σε χώρους κουζίνας σε
καταστήματα, γραφεία και άλλα
εργασιακά περιβάλλοντα,
- χρήση σε αγροικίες και από
πελάτες σε ξενοδοχεία, μοτέλ και
άλλα οικιστικά περιβάλλοντα,
- χρήση σε πανδοχεία,
- χρήση για κέιτερινγκ και άλλες
παρόμοιες δραστηριότητες που
δεν σχετίζονται με τη λιανική
πώληση.
περιεχόμενα
ΡΥΘΜΙΣΗ ΤΟΥ ΨΥΓΕΙΟΥ ΣΑΣ ΜΕ ΠΟΡΤΑ «ΝΤΟΥΛΑΠΑ» …………………… 15
ΛΕΙΤΟΥΡΓΙΑ ΤΟΥ ΨΥΓΕΙΟΥ ΣΑΣ ΜΕ ΠΟΡΤΑ «ΝΤΟΥΛΑΠΑ» ………………… 23
ΑΝΤΙΜΕΤΩΠΙΣΗ ΠΡΟΒΛΗΜΑΤΩΝ ……………………………………………… 36
14_ πληροφορίες για την ασφάλεια
DA68-02916G-14.indb 14 2019. 2. 27. 오전 8:27

Ρύθμιση του ψυγείου σας με
πόρτα «ντουλάπα»
ΠΡΟΕΤΟΙΜΑΣΙΑ ΓΙΑ ΤΗΝ
ΕΓΚΑΤΑΣΤΑΣΗ ΤΟΥ ΨΥΓΕΙΟΥ
Συγχαρητήρια για την αγορά αυτού του προϊόντος Samsung
Ψυγείο με πόρτα «ντουλάπα».
Ελπίζουμε ότι θα απολαύσετε τις υπερσύγχρονες
δυνατότητες και την απόδοση που προσφέρει αυτή η νέα
συσκευή.
Πώς να επιλέξετε το καλύτερο
σημείο για την τοποθέτηση του
ψυγείου
Επιλέξτε:
• Ένα σημείο με εύκολη πρόσβαση στην παροχή νερού.
• Ένα σημείο χωρίς άμεση έκθεση στο ηλιακό φως.
• Ένα σημείο όπου το δάπεδο είναι επίπεδο.
• Ένα σημείο όπου υπάρχει αρκετός χώρος ώστε να
ανοίγουν εύκολα οι πόρτες του ψυγείου.
• Ένα σημείο που έχει αρκετό χώρο στα δεξιά, στα
αριστερά, στο πίσω και στο επάνω μέρος για την
κυκλοφορία του αέρα.
• Ένα σημείο που σας επιτρέπει να μετακινείτε το ψυγείο
εύκολα εάν χρειαστεί συντήρηση ή επισκευή.
• Μην εγκαθιστάτε το ψυγείο σε σημείο όπου η
θερμοκρασία θα πέσει κάτω από τους 10 °C.
• Μην εγκαθιστάτε το ψυγείο σε σημείο όπου μπορεί να
βραχεί.
Εάν το ψυγείο δεν έχει αρκετό χώρο, το εσωτερικό σύστημα
ψύξης ενδέχεται να μην λειτουργεί σωστά.
Εάν το ψυγείο σας διαθέτει παρασκευαστή πάγου, αφήστε
επιπλέον χώρο στο πίσω μέρος για τις συνδέσεις του
σωλήνα νερού.
Όταν εγκαθιστάτε το ψυγείο δίπλα σε μόνιμη τοιχοποιία,
απαιτείται ελεύθερος χώρος τουλάχιστον 95 mm μεταξύ του
ψυγείου και του τοίχου, προκειμένου η πόρτα να μπορεί να
ανοίγει πλήρως.
Σημαντικό:
Βεβαιωθείτε ότι μπορείτε να μετακινήσετε εύκολα
το ψυγείο σας στο τελικό σημείο τοποθέτησής του μετρώντας τις
πόρτες (ύψος και πλάτος), τα κατώφλια, τις οροφές, τις σκάλες
κ.λπ.
Το παρακάτω διάγραμμα αναφέρει αναλυτικά το ακριβές
ύψος και βάθος αυτού του ψυγείου Samsung με πόρτα
«ντουλάπα».
AA
B
B
C
C
D
D
E
E
Βάθος «A»
726 mm
Πλάτος «B»
908 mm
Ύψος «Γ»
1749 mm
Συνολικό ύψος «Δ»
1777 mm
Βάθος «Ε»
788 mm
125° 125°
Κάθε μέτρηση βασίζεται στις διαστάσεις του
σχεδίου, γι’ αυτό ενδέχεται να υπάρχουν
διαφορές ανάλογα με τη μέθοδο μέτρησης.
προετοιμασία _15
01 ΠΡΟΕΤΟΙΜΑΣΙΑ
DA68-02916G-14.indb 15 2019. 2. 27. 오전 8:27

Κατά τη μετακίνηση του ψυγείου
Για να μην προκληθεί ζημιά στο δάπεδο,
βεβαιωθείτε ότι τα μπροστινά πόδια
ρύθμισης είναι σηκωμένα (πάνω από το
δάπεδο). Ανατρέξτε στην ενότητα «Ρύθμιση
ευθυγράμμισης» στο εγχειρίδιο (στη σελίδα
19).
Κατσαβίδι με επίπεδη
κεφαλή (-)
Μοχλός ελέγχου
ΔΑΠΕΔΟ
Προκειμένου να εγκατασταθεί σωστά, πρέπει να
τοποθετήσετε το ψυγείο σε επίπεδη, σκληρή επιφάνεια
που θα είναι στο ίδιο ύψος με το υπόλοιπο δάπεδο. Αυτή η
επιφάνεια πρέπει να είναι αρκετά ανθεκτική ώστε να μπορεί
να υποστηρίξει ένα γεμάτο ψυγείο.
Για να προστατεύσετε το φινίρισμα του δαπέδου, κόψτε ένα
μεγάλο κομμάτι χαρτόνι και τοποθετήστε το κάτω από το
ψυγείο. Κατά τη μετακίνηση του ψυγείου, θα πρέπει να το
τραβάτε ή να το σπρώχνετε ευθεία είτε προς τα εμπρός είτε
προς τα πίσω. Μην τo κινείτε πέρα-δώθε.
ΠΡΟΣΟΧΗ
ΠΩΣ ΝΑ ΑΦΑΙΡΕΣΕΤΕ ΤΙΣ
ΠΟΡΤΕΣ ΤΟΥ ΨΥΓΕΙΟΥ
Σε ορισμένες περιπτώσεις, θα πρέπει να αφαιρέσετε τα
συρτάρια του ψυγείου και του καταψύκτη για να μετακινήσετε
το ψυγείο στο τελικό σημείο τοποθέτησής του. Μην
αφαιρέσετε τις πόρτες/το συρτάρι εάν δεν χρειάζεται.
Εάν δεν χρειάζεται να αφαιρέσετε τις πόρτες του ψυγείου,
μεταβείτε στην ενότητα «Ρύθμιση ευθυγράμμισης» στη
σελίδα 19. Εάν χρειάζεται να αφαιρέσετε τις πόρτες, συνεχίστε
παρακάτω.
Προτού αφαιρέσετε την πόρτα/το συρτάρι, βεβαιωθείτε ότι
έχετε διαβάσει τα εξής:
Προτού αφαιρέσετε την πόρτα ή το συρτάρι,
αποσυνδέστε το ψυγείο από το ρεύμα.
• Προσέξτε μην ρίξετε, καταστρέψετε ή
γρατζουνίσετε τις πόρτες/τα συρτάρια
κατά την αφαίρεσή τους.
• Να είστε ιδιαίτερα προσεκτικοί όταν αφαιρείτε τις πόρτες/
τα συρτάρια. Οι πόρτες είναι βαριές και μπορεί να
τραυματιστείτε.
• Επανασυνδέστε σωστά τις πόρτες/τα συρτάρια για να
αποφύγετε τα εξής:
- Υγρασία από διαρροή αέρα.
- Ανομοιόμορφη ευθυγράμμιση πόρτας.
- Σπατάλη ενέργειας εξαιτίας λανθασμένης στεγανοποίησης
πόρτας.
Πώς να αποσυναρμολογήσετε τις
πόρτες του ψυγείου
Προσέξτε μην ρίξετε και γρατζουνίσετε τις
πόρτες κατά την αφαίρεσή τους.
Απαιτούμενα εργαλεία (δεν
παρέχονται)
Θα χρειαστείτε τα παρακάτω εργαλεία για να ολοκληρώσετε
την εγκατάσταση του ψυγείου σας:
Κατσαβίδι Philips (+)
Κατσαβίδι με
επίπεδη κεφαλή (-)
Καστάνια (10 mm)
Πένσα
Κλειδί Allen (5 mm)
ΠΡΟΕΙΔΟΠΟΙΗΣΗ
ΠΡΟΕΙΔΟΠΟΙΗΣΗ
16_ προετοιμασία
DA68-02916G-14.indb 16 2019. 2. 27. 오전 8:27

Με την πόρτα ανοικτή
1. Αφαιρέστε τις 3 βίδες που συγκρατούν το ΕΠΑΝΩ
ΜΕΡΟΣ ( 1 ) και διαχωρίστε τα συνδεδεμένα
καλώδια.
1
2. Αποσυνδέστε του δύο συνδέσμους ( 2 ) στην
αριστερή πόρτα. Για να αφαιρέσετε το σύνδεσμο
νερού από το μεντεσέ, περιστρέψτε και τραβήξτε τον
από το μεντεσέ. Αφαιρέστε το σωλήνα νερού ( 3 )
πιέζοντας ταυτόχρονα το σημασμένο τμήμα ( 4 ) του
συνδέσμου του σωλήνα νερού.
2
3
4
3. Τραβήξτε και αφαιρέσετε το μοχλό του μεντεσέ
( 5 ). Αφαιρέστε τη γειωμένη βίδα ( 6 ) που είναι
συνδεδεμένη στους μεντεσέδες στο επάνω μέρος
της αριστερής πόρτας με ένα κατσαβίδι Ρhilips (+).
Αφαιρέστε τους μεντεσέδες από το επάνω μέρος
της αριστερής και της δεξιάς πόρτας ( 7 ).
5
6
7
4. Ανασηκώστε την πόρτα ευθεία προς τα πάνω για να
την αφαιρέσετε.
5. Αφαιρέστε τη βίδα ( 8 ) που είναι συνδεδεμένη στους
μεντεσέδες στο κάτω μέρος της αριστερής και της
δεξιάς πόρτας με ένα κατσαβίδι Ρhilips (+). Αφαιρέστε
τα 2 μπουλόνια με εξαγωνική κεφαλή ( 9 ) που είναι
συνδεδεμένα στους μεντεσέδες στο κάτω μέρος της
αριστερής και της δεξιάς πόρτας με ένα κλειδί Αllen
(5 mm). Αφαιρέστε τους μεντεσέδες από το κάτω
μέρος της αριστερής και της δεξιάς πόρτας ( 10 ).
10
8
9
Κλειδί Allen
ΠΩΣ ΝΑ ΕΠΑΝΑΣΥΝΔΕΣΕΤΕ
ΤΙΣ ΠΟΡΤΕΣ ΤΟΥ ΨΥΓΕΙΟΥ
Για να επανασυνδέσετε τις πόρτες του ψυγείου αφού έχετε
μετακινήσει
το ψυγείο στο τελικό σημείο τοποθέτησής του,
συναρμολογήστε τα μέρη με αντίστροφη σειρά.
1. Ο σωλήνας νερού πρέπει να εισαχθεί πλήρως στο
κέντρο του διαφανούς συνδέσμου (Τύπος Α) ή των
αγωγών σύνδεσης (Τύπος Β), προκειμένου να
αποτραπεί η διαρροή νερού από το διανεμητή.
Τύπος A Τύπος B
Κέντρο του διαφανούς συνδέσμου
Αγωγοί σύνδεσης
Διανεμητής
προετοιμασία _17
01 ΠΡΟΕΤΟΙΜΑΣΙΑ
DA68-02916G-14.indb 17 2019. 2. 27. 오전 8:27

ΠΩΣ ΝΑ
ΑΠΟΣΥΝΑΡΜΟΛΟΓΗΣΕΤΕ
ΤΗΝ ΠΡΟΣΑΡΜΟΖΟΜΕΝΗ
ΠΟΡΤΑ
1. Αφαιρέστε την προσαρμοζόμενη ζώνη ( 1 )
ανασηκώνοντάς την.
1
2. Αφαιρέστε την πλεξούδα καλωδίων από το κάλυμμα
( 2 ) χρησιμοποιώντας ένα κατσαβίδι με επίπεδη
κεφαλή (-).
2
3. Πιέστε τη γλωττίδα κλειδώματος και διαχωρίστε το
σύνδεσμο καλωδίων.
Κατά την επανασυναρμολόγηση, μην ξεχάσετε
να συνδέσετε την πλεξούδα καλωδίων.
Εάν δεν είναι συνδεδεμένος, ο
Προσαρμοζόμενος θάλαμος δεν θα λειτουργεί.
ΠΡΟΣΟΧΗ
4. Αφαιρέστε 1 μπουλόνι με εξαγωνική κεφαλή από
κάθε πλευρά με μια καστάνια (10 mm).
5. Ανασηκώστε την προσαρμοζόμενη πόρτα από τις
ράγες.
Η τοποθέτηση υπερβολικής ποσότητας
τροφίμων μέσα στα συρτάρια του καταψύκτη
μπορεί να τον εμποδίζει να κλείσει πλήρως και
να προκαλέσει συσσώρευση πάγου.
ΠΩΣ ΝΑ
ΕΠΑΝΑΣΥΝΑΡΜΟΛΟΓΗΣΕΤΕ
ΤΗΝ ΠΡΟΣΑΡΜΟΖΟΜΕΝΗ
ΠΟΡΤΑ
Για να επανασυνδέσετε τις προσαρμοζόμενες
πόρτες, συναρμολογήστε τα μέρη με αντίστροφη
σειρά.
Βεβαιωθείτε ότι συνδέσατε το σύνδεσμο
καλωδίων της προσαρμοζόμενης πόρτας.
Εάν δεν είναι συνδεδεμένος, ο
προσαρμοζόμενος θάλαμος δεν θα λειτουργεί.
ΠΡΟΣΟΧΗ
ΠΡΟΣΟΧΗ
18_ προετοιμασία
DA68-02916G-14.indb 18 2019. 2. 27. 오전 8:27

ΠΩΣ ΝΑ
ΑΠΟΣΥΝΑΡΜΟΛΟΓΗΣΕΤΕ
ΤΗΝ ΠΟΡΤΑ ΤΟΥ ΚΑΤΑΨΥΚΤΗ
1. Αφαιρέστε το πάνω συρτάρι ανασηκώνοντάς το.
2. Αφαιρέστε το προστατευτικό του θαλάμου καταψύκτη
( 1 ) ανασηκώνοντάς το.
1
3. Βγάλτε το κάτω καλάθι ( 2 ) ανασηκώνοντάς το από
το σύστημα με τις ράγες.
2
4. Πιέστε το άγκιστρο στερέωσης το συστήματος με τις
ράγες.
5. Κρατώντας το συρτάρι του καταψύκτη από το πάνω
μέρος, τραβήξτε το μέχρι έξω και έπειτα αφαιρέστε το
από το σύστημα με τις ράγες.
Προσέξτε να μην γρατζουνίσετε και να μην
στραβώσετε τη ράγα κύλισης αφήνοντάς τη να
χτυπήσει στο δάπεδο.
Βεβαιωθείτε ότι έχετε τοποθετήσει το καλάθι του
καταψύκτη στη σωστή θέση κατά την αφαίρεση
/ εγκατάσταση της πόρτας του καταψύκτη. Εάν
δεν έχει τοποθετηθεί σωστά, η πόρτα δεν θα
ανοίγει ούτε θα κλείνει σωστά.
Η τοποθέτηση υπερβολικής ποσότητας
τροφίμων μέσα στα συρτάρια του καταψύκτη
μπορεί να τον εμποδίζει να κλείσει πλήρως και
να προκαλέσει συσσώρευση πάγου.
ΠΩΣ ΝΑ
ΕΠΑΝΑΣΥΝΑΡΜΟΛΟΓΗΣΕΤΕ
ΤΗΝ ΠΟΡΤΑ ΤΟΥ ΚΑΤΑΨΥΚΤΗ
Για να επανασυνδέσετε το συρτάρι αφού έχετε μετακινήσει
το ψυγείο στο τελικό σημείο τοποθέτησής του,
συναρμολογήστε τα μέρη με αντίστροφη σειρά.
ΡΥΘΜΙΣΗ ΕΥΘΥΓΡΑΜΜΙΣΗΣ
Βεβαιωθείτε ότι το ψυγείο είναι
ευθυγραμμισμένο, ώστε να κάνετε τις τελικές
ρυθμίσεις. Χρησιμοποιήστε ένα αλφάδι
για να εξακριβώσετε εάν το ψυγείο είναι
ευθυγραμμισμένο από πλευρά σε πλευρά και
από πίσω προς τα εμπρός. Εάν το ψυγείο
δεν είναι ευθυγραμμισμένο, οι πόρτες δεν θα
ισαπέχουν, γεγονός που μπορεί να προκαλέσει
συσσώρευση υγρασίας και αυξημένους
ΠΡΟΣΟΧΗ
ΠΡΟΣΟΧΗ
ΠΡΟΣΟΧΗ
προετοιμασία _19
01 ΠΡΟΕΤΟΙΜΑΣΙΑ
DA68-02916G-14.indb 19 2019. 2. 27. 오전 8:27

λογαριασμούς ηλεκτρικού ρεύματος. Στη
συνέχεια παρατίθεται ένα παράδειγμα πώς
να ευθυγραμμίσετε το ψυγείο εάν η αριστερή
πλευρά του ψυγείου βρίσκεται χαμηλότερα από
τη δεξιά πλευρά.
Πώς να ρυθμίσετε την ευθυγράμμιση
1. Ανοίξτε το συρτάρι του καταψύκτη και αφαιρέστε το
κάτω καλάθι.
2. Εισαγάγετε ένα κατσαβίδι με επίπεδη κεφαλή (-)
στην εγκοπή του αριστερού μοχλού ελέγχου και
γυρίστε το αριστερόστροφα για να ευθυγραμμίσετε
το ψυγείο. (Για να χαμηλώσετε το ψυγείο, στρέψτε
το μοχλό δεξιόστροφα και για να το ανυψώσετε
αριστερόστροφα).
Κατσαβίδι με επίπεδη
κεφαλή (-)
Μοχλός ελέγχου
Και οι δύο μοχλοί ελέγχου πρέπει να αγγίζουν
το δάπεδο, προκειμένου να αποφευχθεί τυχόν
σωματικός τραυματισμός ή υλική ζημιά λόγω
κλίσης του ψυγείου.
Εάν η δεξιά πλευρά βρίσκεται χαμηλότερα,
πραγματοποιήστε την ίδια διαδικασία, αλλά με το
δεξιό μοχλό ελέγχου.
Είναι δύσκολο να αφαιρέσετε το κάλυμμα
του μπροστινού ποδιού από το ψυγείο, γι’
αυτό δεν συνιστούμε την πραγματοποίηση
μικρορυθμίσεων με το μοχλό ελέγχου. Αντίθετα,
ανατρέξτε στην επόμενη σελίδα για τον καλύτερο
τρόπο μικρορυθμίσεων στις πόρτες.
ΠΩΣ ΝΑ
ΠΡΑΓΜΑΤΟΠΟΙΗΣΕΤΕ
ΜΙΚΡΟΡΥΘΜΙΣΕΙΣ ΣΤΗΝ
ΠΟΡΤΑ Η ΣΤΗΝ ΕΣΩΤΕΡΙΚΗ
ΠΟΡΤΑ
Να θυμάστε ότι η ευθυγράμμιση του ψυγείου είναι
απαραίτητη προκειμένου να ισαπέχουν οι πόρτες. Εάν
χρειάζεστε βοήθεια, διαβάστε την προηγούμενη ενότητα
σχετικά με την ευθυγράμμιση του ψυγείου.
ΠΡΟΣΟΧΗ
Προσαρμόσιμο
εξάρτημα
Σταθερό
εξάρτημα
Η αριστερή πόρτα είναι σταθερή. Για να κάνετε
μικρορυθμίσεις στις πόρτες, ρυθμίστε μόνο τη
δεξιά πόρτα.
Δακτύλιος συγκράτησης
Το ύψος της πόρτας ή της εσωτερικής πόρτας μπορεί να
ρυθμιστεί χρησιμοποιώντας τους παρεχόμενους δακτυλίους
συγκράτησης, οι οποίοι διατίθενται σε 4 διαφορετικά μεγέθη (1
mm, 1,5 mm, 2 mm και 2,5 mm).
Για να ρυθμίσετε το ύψος μιας
πόρτας
Ελέγξτε τη διαφορά ύψους μεταξύ των πορτών και, στη
συνέχεια, ανασηκώστε και συγκρατήστε την κάτω πόρτα.
• Εισαγάγετε τον δακτύλιο συγκράτησης στο
κενό ανάμεσα στην εσωτερική πόρτα και τον
ΑΞΟΝΑ ΜΕΝΤΕΣΕ.
(μόνο στα κατάλληλα μοντέλα)
• Εισαγάγετε μόνο έναν δακτύλιο
συγκράτησης για αυτόν τον σκοπό.
Δύο ή περισσότεροι δακτύλιοι
συγκράτησης ενδέχεται να φύγουν από
τη θέση τους ή να προκαλούν έναν ήχο
τριψίματος.
• Διατηρήστε τους δακτυλίους συγκράτησης
σε μέρος που δεν τους φτάνουν τα παιδιά και
φυλάξτε τους για μελλοντική χρήση.
• Μην ανυψώνετε υπερβολικά την πόρτα.
Η πόρτα μπορεί να ακουμπήσει και να
προκαλέσει ζημιά στο επάνω κάλυμμα.
ΠΡΟΣΟΧΗ
20_ προετοιμασία
DA68-02916G-14.indb 20 2019. 2. 27. 오전 8:27

ΠΩΣ ΝΑ
ΠΡΑΓΜΑΤΟΠΟΙΗΣΕΤΕ
ΜΙΚΡΟΡΥΘΜΙΣΕΙΣ ΑΝΑΜΕΣΑ
ΣΤΗΝ ΕΞΩΤΕΡΙΚΗ ΠΟΡΤΑ ΚΑΙ
ΤΗΝ ΕΣΩΤΕΡΙΚΗ ΠΟΡΤΑ
(ΜΟΝΟ ΣΤΑ ΚΑΤΑΛΛΗΛΑ
ΜΟΝΤΕΛΑ)
Αφού ανασηκώσετε την εξωτερική πόρτα, εισαγάγετε τον
παρεχόμενο δακτύλιο συγκράτησης στο κενό ανάμεσα στην
ΕΞΩΤΕΡΙΚΗ ΠΟΡΤΑ και τον ΑΞΟΝΑ ΜΕΝΤΕΣΕ.
Οι δακτύλιοι συγκράτησης παρέχονται μαζί με
το ψυγείο.
Το πάχος του ΔΑΚΤΥΛΙΟΥ είναι 1 mm, 2 τεμάχια.
Χρησιμοποιήστε τον δακτύλιο συγκράτησης σε
περίπτωση που η λαβή δεν μετακινείται επειδή η
εξωτερική πόρτα είναι χαμηλωμένη.
ΠΩΣ ΝΑ ΕΓΚΑΤΑΣΤΗΣΕΤΕ ΤΟ
ΣΩΛΗΝΑ ΤΟΥ ΔΙΑΝΕΜΗΤΗ
ΝΕΡΟΥ
Ο διανεμητής νερού με φίλτρο είναι μία από τις χρήσιμες
δυνατότητες του νέου σας ψυγείου. Με στόχο την προαγωγή
της υγείας, το φίλτρο νερού αφαιρεί τα ανεπιθύμητα
σωματίδια από το νερό σας. Ωστόσο, δεν αποστειρώνει ούτε
καταστρέφει τους μικροοργανισμούς. Μπορεί να χρειαστεί να
αγοράσετε ένα σύστημα καθαρισμού νερού για το λόγο αυτό.
Για να λειτουργήσει σωστά ο παρασκευαστής πάγου,
απαιτείται πίεση νερού 20~125 psi.
Υπό κανονικές συνθήκες, ένα ποτήρι χωρητικότητας 170 cc
μπορεί να γεμίσει σε περίπου 10 δευτερόλεπτα.
Εάν το ψυγείο εγκατασταθεί σε χώρο με χαμηλή πίεση νερού
(κάτω των 20 psi), μπορείτε να εγκαταστήσετε μια αντλία
ενίσχυσης για την αντιστάθμιση της χαμηλής πίεσης.
Αφού συνδέσετε το σωλήνα νερού, βεβαιωθείτε ότι το δοχείο
νερού μέσα στο ψυγείο έχει γεμίσει σωστά. Για να γίνει αυτό,
πιέστε το μοχλό διανεμητή νερού έως ότου αρχίσει να τρέχει
νερό από το στόμιο παροχής νερού.
Με τη συσκευή, παρέχονται και κιτ εγκατάστασης
σωλήνων νερού. Θα τα βρείτε στο συρτάρι του
καταψύκτη.
Χρησιμοποιήστε τα νέα σετ εύκαμπτων
σωλήνων που παρέχονται μαζί με τη συσκευή,
και μην επαναχρησιμοποιήσετε τα παλιά σετ
εύκαμπτων σωλήνων.
Εξαρτήματα για την εγκατάσταση
σωλήνων νερού
Εργαλείο στερέωσης σωλήνα
νερού και βίδες
Εξάρτημα σύνδεσης σωλήνων
Σωλήνας νερού
Σύνδεση με τη γραμμή παροχής
νερού
1. Πρώτα, κλείστε την κεντρική παροχή νερού.
2. Εντοπίστε τoν πλησιέστερo σωλήνα κρύου πόσιμου
νερού.
3. Ακολουθήστε τις Οδηγίες εγκατάστασης του
σωλήνα νερού που θα βρείτε στο κιτ εγκατάστασης.
Ο σωλήνας νερού πρέπει να είναι συνδεδεμένος με
τον αγωγό κρύου πόσιμου νερού. Εάν συνδεθεί με
τον αγωγό του ζεστού νερού, μπορεί να προκαλέσει
βλάβη στο σύστημα καθαρισμού.
ΠΡΟΣΟΧΗ
προετοιμασία _21
01 ΠΡΟΕΤΟΙΜΑΣΙΑ
DA68-02916G-14.indb 21 2019. 2. 27. 오전 8:27

Κλείστε την κεντρική
παροχή νερού
Κλείστε την
κεντρική παροχή
νερού
Χωρίς
κενά
4. Αφού συνδέσετε την παροχή νερού με το φίλτρο
νερού, ανοίξτε και πάλι την κεντρική παροχή νερού
και αφήστε να τρέξουν περίπου 3 λίτρα νερό για να
καθαρίσετε και να προετοιμάσετε το φίλτρο νερού.
Σύνδεση του σωλήνα νερού με το
ψυγείο
1. Αφαιρέστε το πώμα από το σωλήνα νερού στη
συσκευή και τοποθετήστε το παξιμάδι συμπίεσης
στον σωλήνα νερού στη συσκευή, αφού το
αποσυναρμολογήσετε από τον παρεχόμενο σωλήνα
νερού.
2. Συνδέστε τον σωλήνα νερού της συσκευής και το
σωλήνα νερού που θα βρείτε στο κιτ.
3. Σφίξτε το παξιμάδι συμπίεσης στο εξάρτημα
συμπίεσης. Δεν πρέπει να υπάρχουν κενά μεταξύ
τους (A, B και C)
4. Ανοίξτε την παροχή νερού και ελέγξτε για τυχόν
διαρροές.
Συνδέστε το σωλήνα νερού μόνο με πηγή
πόσιμου νερού. Εάν πρέπει να επισκευάσετε
ή να αποσυναρμολογήσετε το σωλήνα νερού,
κόψτε την πλαστική σωλήνωση κατά 6,5 mm,
προκειμένου να διασφαλίσετε ότι θα έχετε μια
στεγανή σύνδεση χωρίς διαρροές.
Χωρίς κενά
Χαλαρώστε το
Αφαιρέστε το
πώμα
Σωλήνας νερού
του κιτ
Σωλήνας νερού
της συσκευής
Πρέπει να εξετάσετε εάν υπάρχει διαρροή
σε αυτά τα σημεία πριν από τη χρήση.
• Η Εγγύηση της
Samsung δεν καλύπτει
την ΕΓΚΑΤΑΣΤΑΣΗ
ΣΩΛΗΝΩΝ ΝΕΡΟΥ.
• Η εγκατάσταση γίνεται
με χρέωση του πελάτη,
εκτός εάν το κόστος
εγκατάστασης περιλαμβάνεται στην τιμή λιανικής.
• Για την εγκατάσταση, επικοινωνήστε, εάν χρειαστεί,
με υδραυλικό ή με Εξουσιοδοτημένο υπεύθυνο
εγκατάστασης.
• Εάν προκύψει διαρροή νερού λόγω λανθασμένης
εγκατάστασης, επικοινωνήστε με τον υπεύθυνο
εγκατάστασης.
ΟΛΟΚΛΗΡΩΣΗ ΤΗΣ
ΡΥΘΜΙΣΗΣ
Αφού εγκαταστήσετε το νέο σας ψυγείο στη θέση του, είστε
έτοιμοι να ρυθμίσετε και να απολαύσετε τις δυνατότητες και
τις λειτουργίες της συσκευής.
Ολοκληρώνοντας τα παρακάτω βήματα, το ψυγείο σας θα
είναι πλήρως λειτουργικό.
1. Βεβαιωθείτε ότι το ψυγείο σας είναι τοποθετημένο σε
κατάλληλο σημείο και σε εύλογη απόσταση από τον
τοίχο. Ανατρέξτε στις οδηγίες εγκατάστασης σε αυτό
το εγχειρίδιο.
2. Αφού συνδέσετε το ψυγείο στην πρίζα, βεβαιωθείτε
ότι το εσωτερικό φως ανάβει όταν ανοίγετε τις πόρτες.
3. Ρυθμίστε το διακόπτη ελέγχου θερμοκρασίας στην
χαμηλότερη θερμοκρασία και περιμένετε για μία ώρα.
Ο καταψύκτης θα αρχίσει να κρυώνει και το μοτέρ θα
λειτουργεί κανονικά. Επαναρρυθμίστε το ψυγείο και
τον καταψύκτη στις θερμοκρασίες που επιθυμείτε.
4. Αφού συνδέσετε το ψυγείο στην πρίζα, θα χρειαστούν
μερικές ώρες μέχρι να φτάσει στην κατάλληλη
θερμοκρασία. Μπορείτε να τοποθετήσετε τρόφιμα και
ποτά στο ψυγείο όταν η θερμοκρασία του είναι αρκετά
χαμηλή.
ΠΡΟΣΟΧΗ
22_ προετοιμασία
DA68-02916G-14.indb 22 2019. 2. 27. 오전 8:27

Λειτουργία του ψυγείου σας
με πόρτα «ντουλάπα»
ΧΡΗΣΗ ΤΟΥ ΠΙΝΑΚΑ
ΕΛΕΓΧΟΥ
10 9
1
2
3
5
6
4
7 8
( 1 )
Energy
Saver
Εάν πατήσετε αυτό το κουμπί, ενεργοποιείτε και
απενεργοποιείτε τη λειτουργία Energy Saver
(Εξοικονόμηση ενέργειας). Όταν ενεργοποιείτε
τη λειτουργία Energy Saver, ανάβει το εικονίδιο
Energy Saver (Εξοικονόμηση ενέργειας). Εάν
απενεργοποιήσετε τη λειτουργία Energy Saver
(Εξοικονόμηση ενέργειας), το εικονίδιο σβήνει. Η
εργοστασιακή ρύθμιση για τη λειτουργία Energy
Saver έχει οριστεί σε «ΕΝΕΡΓΟΠΟΙΗΜΕΝΗ».
Εάν παρουσιαστεί υγρασία ή σταγόνες νερού στις
πόρτες, απενεργοποιήστε τη λειτουργία Energy
Saver (Εξοικονόμηση ενέργειας).
( 2 )
Freezer
(Hold 3 sec
for Power
Freeze)
Το κουμπί Freezer (Καταψύκτης) εξυπηρετεί δύο
σκοπούς:
- Για να ρυθμίσετε τον καταψύκτη στην επιθυμητή
θερμοκρασία.
- Για να ενεργοποιήσετε και να απενεργοποιήσετε τη
λειτουργία του καταψύκτη.
1) Για να ρυθμίσετε τη θερμοκρασία στον καταψύκτη
Πιέστε το κουμπί Freezer για να ορίσετε την επιθυμητή
θερμοκρασία στον καταψύκτη. Μπορείτε να ορίσετε τη
θερμοκρασία από -15 °C έως -23 °C.
2) Λειτουργία Power Freeze (Γρήγορη κατάψυξη)
Πιέστε και κρατήστε πατημένο αυτό το κουμπί
για 3 δευτερόλεπτα, ώστε να μειώσετε το χρόνο
που απαιτείται για να καταψύξετε προϊόντα στον
καταψύκτη.
Είναι χρήσιμο εάν χρειάζεστε να καταψύξετε
γρήγορα τρόφιμα που αλλοιώνονται εύκολα ή εάν η
θερμοκρασία στον καταψύκτη έχει ανέβει δραματικά
(για παράδειγμα, εάν η πόρτα είχε μείνει ανοικτή).
Όταν χρησιμοποιείτε αυτή τη λειτουργία, η
κατανάλωση ενέργειας του ψυγείου αυξάνεται.
Θυμηθείτε να την απενεργοποιήσετε όταν δεν
την χρειάζεστε πλέον και να επαναφέρετε τον
καταψύκτη στην αρχική ρύθμιση θερμοκρασίας. Εάν
θέλετε να καταψύξετε μεγάλη ποσότητα τροφίμων,
ενεργοποιήστε τη λειτουργία Power Freeze (Γρήγορη
κατάψυξη) τουλάχιστον 20 ώρες νωρίτερα.
( 3 )
Alarm
(Hold 3 sec
for Filter
Reset)
Το κουμπί Alarm (Ειδοποίηση) εξυπηρετεί δύο
σκοπούς:
- Για να ενεργοποιείτε και να ενεργοποιείτε την
ειδοποίηση ανοικτής πόρτας
- Για να επαναφέρετε τις ρυθμίσεις ένδειξης
διάρκειας ζωής του φίλτρου νερού.
1) Λειτουργία Door Alarm (Ειδοποίηση
πόρτας)
Εάν η ειδοποίηση πόρτας είναι Ενεργοποιημένη,
ο ήχος της ειδοποίησης ακούγεται όταν
οποιαδήποτε πόρτα του ψυγείου έχει μείνει
ανοικτή για περισσότερο από τρία λεπτά. Ο
ήχος σταματά μόνον όταν κλείσετε την πόρτα.
Η λειτουργία ειδοποίησης πόρτας έχει οριστεί
εργοστασιακά σε Ενεργοποιημένη. Μπορείτε να
την απενεργοποιήσετε πατώντας και αφήνοντας
το κουμπί Alarm (Ειδοποίηση). Μπορείτε να
την
επανενεργοποιήσετε με τον ίδιο τρόπο. Το εικονίδιο
ανάβει όταν η λειτουργία είναι ενεργοποιημένη.
Όταν η λειτουργία Door Alarm (Ειδοποίηση πόρτας)
είναι ενεργοποιημένη και αρχίσει να ακούγεται το
ήχος της ειδοποίησης, το εικονίδιο Door Alarm
(Ειδοποίηση πόρτας) θα αναβοσβήνει ενόσω
ακούγεται ήχος.
2) Λειτουργία Water Filter Life Indicator
(Ένδειξη διάρκειας ζωής του φίλτρου
νερού)
Αφού αντικαταστήσετε το φίλτρο νερού, πιέστε
και κρατήστε πατημένο αυτό το κουμπί για
3 δευτερόλεπτα, ώστε να επαναφέρετε τις
ρυθμίσεις της ένδειξης διάρκειας ζωής του φίλτρου
νερού. Όταν επαναφέρετε τις ρυθμίσεις της
ένδειξης διάρκειας ζωής του φίλτρου νερού, το
εικονίδιο Filter (Φίλτρο) απενεργοποιείται στον
πίνακα. Το εικονίδιο Filter (Φίλτρο) θα γίνει κόκκινο,
προκειμένου να σας ενημερώσει ότι είναι καιρός
να αλλάξετε το φίλτρο νερού μετά από έξι μήνες
(περίπου 300 γαλόνια). Το νερό σε ορισμένες
περιοχές έχει μεγάλη περιεκτικότητα σε οξείδιο του
ασβεστίου, γεγονός που προκαλεί έμφραξη του
φίλτρου νερού πιο σύντομα. Εάν αυτό ισχύει και
στη δική σας περιοχή, θα πρέπει να αλλάζετε το
φίλτρο συχνότερα από τους έξι μήνες.
λειτουργία _23
02 ΛΕΙΤΟΥΡΓΙΑ
DA68-02916G-14.indb 23 2019. 2. 27. 오전 8:27

( 4 )
Lighting
(Hold 3 sec
for ºC ↔ ºF)
Το κουμπί Lighting (Φωτισμός) εξυπηρετεί δύο
σκοπούς:
- Για να ενεργοποιείτε και να ενεργοποιείτε το
φως του διανεμητή
- Για να εναλλάσσετε τις μονάδες μέτρησης
της θερμοκρασίας μεταξύ ºC και ºF
1) Λειτουργία Light (Φως)
Πατώντας το κουμπί Lighting (Φως) ενεργοποιείται
η λυχνία LED του Διανεμητή και τίθεται σε
συνεχή λειτουργία έτσι ώστε να είναι συνεχώς
ενεργοποιημένο. Επίσης, ανάβει το κουμπί. Εάν
θέλετε να ανάβει η λυχνία του Διανεμητή μόνον
όταν κάποιος χρησιμοποιεί το διανεμητή, πατήστε
το κουμπί Lighting (Φως) για να απενεργοποιήσετε
τη συνεχή λειτουργία.
2) Για να αλλάζετε τις μονάδες μέτρησης
της θερμοκρασίας
μεταξύ ºC και ºF, πιέστε και κρατήστε πατημένο το
κουμπί για 3 δευτερόλεπτα, ώστε να επιλέξετε την
προβολή θερμοκρασίας που επιθυμείτε.
Κάθε φορά που πιέζετε και κρατάτε πατημένο το
κουμπί, οι λειτουργίες θερμοκρασίας ºC και ºF
εναλλάσσονται και ανάβει το εικονίδιο ºC ή ºF,
υποδεικνύοντας την επιλογή σας.
( 5 )
Fridge
(Hold 3 sec
for Power
Cool)
Το κουμπί Fridge (Ψυγείο) εξυπηρετεί δύο
σκοπούς:
- Για να ρυθμίσετε το ψυγείο στην επιθυμητή
θερμοκρασία.
- Για να ενεργοποιείτε και να απενεργοποιείτε τη
λειτουργία Power Cool (Γρήγορη ψύξη).
1) Για να ορίσετε τη θερμοκρασία του
ψυγείου
Πατήστε το κουμπί Fridge, για να ρυθμίσετε το
ψυγείο στη θερμοκρασία που θέλετε. Μπορείτε
να ρυθμίσετε τη θερμοκρασία από 7 °C έως 1 °C.
2) Λειτουργία Power Cool (Γρήγορη
ψύξη)
Πιέστε και κρατήστε πατημένο αυτό το κουμπί για
3 δευτερόλεπτα, ώστε να μειώσετε το χρόνο που
απαιτείται για να ψύξετε προϊόντα στο ψυγείο.
Είναι χρήσιμο εάν χρειάζεστε να ψύξετε γρήγορα
τρόφιμα που αλλοιώνονται εύκολα ή εάν η
θερμοκρασία στο
ψυγείο έχει ανέβει δραματικά (για παράδειγμα, εάν
η πόρτα είχε μείνει ανοικτή).
( 6 )
Ice Off
(Hold 3 sec
for Child
Lock)
Το κουμπί Ice Off (Απενεργοποίηση πάγου)
εξυπηρετεί δύο σκοπούς:
- Για να ενεργοποιείτε και να απενεργοποιείτε τον
παρασκευαστή πάγου
- Για να ενεργοποιείτε και να απενεργοποιείτε τη
λειτουργία Child Lock (Γονικό κλείδωμα).
1) Λειτουργία Ice Off (Απενεργοποίηση
πάγου)
Εάν δεν επιθυμείτε την παρασκευή
περισσότερου πάγου, πατήστε το κουμπί Ice Off
(Απενεργοποίηση πάγου).
2) Λειτουργία Child Lock (Γονικό κλείδωμα)
Πιέστε και κρατήστε πατημένο αυτό το κουμπί για
3 δευτερόλεπτα,
ώστε να κλειδώσετε τα κουμπιά της οθόνης, του
πίνακα Flex Zone (Προσαρμοζόμενη ζώνη),
και του διανεμητή και να
μην μπορούν να χρησιμοποιηθούν.
Όταν η λειτουργία Child Lock (Γονικό κλείδωμα)
είναι ενεργοποιημένη, το ψυγείο δεν διανέμει
πάγο ούτε νερό ακόμη και εάν πιέσετε το μοχλό
διανεμητή.
Το εικονίδιο Child Lock ανάβει, προκειμένου να
υποδείξει ότι έχετε ενεργοποιήσει τη λειτουργία
Child Lock (Γονικό κλείδωμα). Για να ξεκλειδώσετε,
πατήστε για 3 δευτερόλεπτα.
(7)
Cubed Ice
(8)Crushed
Ice
Πατήστε το κουμπί Cubed Ice (Πάγος σε κύβους)
ή το Crushed Ice (Θρυμματισμένος πάγος), για
να επιλέξετε τον τύπο πάγου που θέλετε να
διανεμηθεί.
Κάθε φορά που πατάτε το κουμπί, οι λειτουργίες
πάγου σε κύβους ή θρυμματισμένου πάγου
εναλλάσσονται και το εικονίδιο Cubed ice (Πάγος
σε κύβους) ή Crushed ice (Θρυμματισμένος πάγος)
ανάβει, υποδεικνύοντας την επιλογή σας.
(Cubed)
(Crushed)
( 9 )
Ice Off
Εάν δεν επιθυμείτε την παρασκευή περισσότερου
πάγου, πιέστε το κουμπί Ice Off (Απενεργοποίηση
πάγου).
Το εικονίδιο θα ανάψει και ο παρασκευαστής πάγου
θα σταματήσει την παρασκευή πάγου.
Συνιστούμε τη διακοπή παρασκευής
πάγου,
εάν προκύψει κάποιο από τα εξής:
- Υπάρχει αρκετός πάγος στο δοχείο
πάγου.
- Θέλετε να εξοικονομήσετε νερό και
ενέργεια.
- Δεν υπάρχει παροχή νερού στο ψυγείο.
Εάν η λειτουργία παρασκευαστή πάγου
είναι ΕΝΕΡΓΟΠΟΙΗΜΕΝΗ και
ο σωλήνας νερού δεν είναι συνδεδεμένος,
η βαλβίδα νερού θα κάνει θόρυβο
στο πίσω μέρος της μονάδας. Εάν συμβεί
κάτι τέτοιο,
πατήστε το κουμπί Ice Off (Hold
3 sec for child lock) (Απενεργοποίηση
πάγου) (Κρατήστε πατημένο για
3 δευτερόλεπτα για γονικό κλείδωμα) για
λιγότερο από
3 δευτερόλεπτα έως ότου ανάψει η ένδειξη
Ice Off (Απενεργοποίηση πάγου)
( ).
24_ λειτουργία
DA68-02916G-14.indb 24 2019. 2. 27. 오전 8:27

Για να εξοικονομήσετε ηλεκτρική ενέργεια, η Οθόνη ενδείξεων
σβήνει
αυτόματα υπό τις εξής συνθήκες: Όταν δεν έχει πατηθεί
κανένα κουμπί, όταν δεν είναι ανοικτή καμία πόρτα ή
όταν δεν έχει πατηθεί ο μοχλός διανεμητή. Ωστόσο, το
εικονίδιο που υποδεικνύει την επιλογή πάγου σε κύβους,
θρυμματισμένου πάγου ή ανθρακούχου νερού θα παραμείνει
αναμμένο. Όταν πατήσετε ένα κουμπί, ανοίξετε μια πόρτα ή
σπρώξετε το μοχλό διανεμητή, η οθόνη ενδείξεων θα ανάψει
και πάλι. Όλα τα πλήκτρα λειτουργίας θα γίνουν λειτουργικά,
αφού απομακρύνετε το δάχτυλό σας από το κουμπί που
πατήσατε.
( 10 ) Filter
Χρήση φίλτρου νερού
Το εικονίδιο ανάβει όταν πρέπει να
αλλάξετε το φίλτρο, συνήθως αφού το ψυγείο
έχει διανείμει περίπου 300 γαλόνια νερό (μετά από
περίπου 6 μήνες). Το εικονίδιο θα αναβοσβήνει σε
κόκκινο για αρκετά δευτερόλεπτα όταν ανοίγετε ή
κλείνετε την πόρτα
Αφού εγκαταστήσετε το νέο φίλτρο νερού,
επαναφέρετε τις ρυθμίσεις της ένδειξης
φίλτρου πατώντας και κρατώντας πατημένο για
3 δευτερόλεπτα το κουμπί Hold 3 sec for Filter
Reset (Κρατήστε πατημένο για 3 δευτερόλεπτα για
επαναφορά ρυθμίσεων φίλτρου).
- Εάν το νερό δεν τρέχει ή τρέχει αργά,
πρέπει να αντικαταστήσετε το φίλτρο
νερού γιατί έχει φράξει.
- Το νερό σε ορισμένες περιοχές έχει
μεγάλη περιεκτικότητα σε οξείδιο του
ασβεστίου, γεγονός που προκαλεί
έμφραξη του φίλτρου νερού πιο
σύντομα.
ΠΩΣ ΝΑ ΑΛΛΑΞΕΤΕ ΤΟ
ΦΙΛΤΡΟ ΝΕΡΟΥ
Για να μειώσετε τον κίνδυνο υλικών ζημιών
λόγω του νερού, ΜΗΝ χρησιμοποιείτε φίλτρα
νερού γενικής χρήσης στο ψυγείο
SAMSUNG.
ΝΑ ΧΡΗΣΙΜΟΠΟΙΕΙΤΕ ΜΟΝΟΝ ΦΙΛΤΡΑ
ΝΕΡΟΥ ΜΑΡΚΑΣ SAMSUNG. Η SAMSUNG
δεν φέρει καμία νομική ευθύνη για οποιαδήποτε
βλάβη, συμπεριλαμβανομένων, ενδεικτικά αλλά
χωρίς περιορισμό, των υλικών ζημιών που
οφείλονται σε διαρροή νερού από τη χρήση φίλτρου νερού
γενικής χρήσης. Τα ψυγεία SAMSUNG έχουν σχεδιαστεί
ώστε να λειτουργούν ΜΟΝΟ ΜΕ φίλτρα νερού SAMSUNG.
Η λυχνία Filter (Φίλτρο) ανάβει κόκκινη, προκειμένου να
σας ενημερώσει ότι είναι καιρός να αλλάξετε την κασέτα του
φίλτρου νερού.
Προκειμένου να έχετε περιθώριο για να πάρετε νέο φίλτρο,
η λυχνία ανάβει κόκκινη λίγο πριν εξαντληθεί η δυναμικότητα
του φίλτρου. Η έγκαιρη αλλαγή του φίλτρου σάς εξασφαλίζει
εξαιρετικά φρέσκο και καθαρό νερό από το ψυγείο σας.
ΠΡΟΕΙΔΟΠΟΙΗΣΗ
Για αλλάξετε το φίλτρο νερού, ακολουθήστε τα παρακάτω
βήματα:
1. Κλείστε την παροχή νερού. Έπειτα, στρέψτε
αριστερόστροφα το φίλτρο νερού ( 1 ) κατά 45
περίπου.
2
1
2. Τραβήξτε το φίλτρο νερού ( 1 ) από τη θήκη φίλτρου
( 2 ).
• Για να αλλάξετε το φίλτρο νερού πιο
εύκολα, κλείστε τη βαλβίδα παροχής
νερού.
• Μερικές φορές, η αποσυναρμολόγηση του φίλτρου νερού
είναι δύσκολη καθώς κολλάει λόγω των ακαθαρσιών
του νερού. Εάν δυσκολεύεστε, κρατήστε γερά το φίλτρο
νερού και τραβήξτε το δυνατά.
• Μπορεί να τρέξει λίγο νερό από το άνοιγμα, καθώς
τραβάτε το φίλτρο. Αυτό είναι φυσιολογικό. Για να
ελαχιστοποιήσετε τυχόν διαρροή νερού, διατηρήστε την
κασέτα του φίλτρου σε οριζόντια θέση όταν το τραβάτε.
• Για να αποτρέψετε την υπερχείλιση, αδειάστε το δίσκο
του φίλτρου νερού ( 3 ) και σκουπίστε γύρω από τη θήκη
φίλτρου ( 2 ).
3
2
3. Εισαγάγετε το νέο φίλτρο στη θήκη φίλτρου ( 4 ).
4. Πιέστε το φίλτρο και, έπειτα, στρέψτε το δεξιόστροφα
έως ότου ασφαλίσει στη θέση του.
• Εάν δυσκολεύεστε να εισαγάγετε το
φίλτρο νερού λόγω της υψηλής πίεσης
του νερού, κλείστε τη βαλβίδα παροχής
νερού.
• Το σύμβολο κλειδώματος πρέπει να
είναι ευθυγραμμισμένο με τη γραμμή
ένδειξης.
4
(Κόκκινο)
λειτουργία _25
02 ΛΕΙΤΟΥΡΓΙΑ
DA68-02916G-14.indb 25 2019. 2. 27. 오전 8:27

5. Πιέστε το κουμπί «Alarm/hold 3 sec for Filter
Reset» (Ειδοποίηση/κρατήστε πατημένο για
3 δευτερόλεπτα για επαναφορά ρυθμίσεων φίλτρου)
(
(Επαναφορά ρυθμίσεων φίλτρου)
)
για περίπου
3 δευτερόλεπτα ώστε να
επαναφέρετε τις ρυθμίσεις του
φίλτρου νερού. Το χρώμα της
ένδειξης
( )
αλλάζει από
κόκκινο σε απενεργοποιημένο.
6. Εάν έχετε κλείσει την παροχή νερού, ανοίξτε την και
πάλι.
Για να αντικαταστήσετε το φίλτρο νερού,
μπορείτε να επισκεφτείτε το τοπικό κέντρο ειδών
σπιτιού ή να επικοινωνήσετε με τον διανομέα
ανταλλακτικών της Samsung.
Για να παραγγείλετε περισσότερες κασέτες
φίλτρου νερού, επικοινωνήστε με τον τοπικό
εξουσιοδοτημένο αντιπρόσωπο Samsung.
Βεβαιωθείτε ότι το φίλτρο νερού αντικατάστασης
φέρει το λογότυπο SAMSUNG στη συσκευασία
και στο φίλτρο νερού.
Πώς να αφαιρέσετε τυχόν
επικαθίσεις από το εσωτερικό της
γραμμής παροχής νερού μετά την
εγκατάσταση του φίλτρου νερού.
1. Για να ΕΝΕΡΓΟΠΟΙΗΣΕΤΕ
την κεντρική παροχή νερού
και την παροχή νερού από
τη γραμμή παροχής νερού.
2. Αφήστε να τρέξει νερό μέσα
από το διανεμητή έως ότου
το νερό να βγαίνει καθαρό
(περίπου 6 έως 7 λεπτά). Με αυτόν τον τρόπο, το
σύστημα παροχής νερού θα καθαρίσει και οι σωλήνες
θα εξαερωθούν.
3. Σε ορισμένα σπίτια, ενδεχομένως να χρειαστεί να
τρέξει περισσότερο νερό.
4. Ανοίξτε την πόρτα του ψυγείου και βεβαιωθείτε ότι
δεν υπάρχει διαρροή νερού από το φίλτρο νερού.
Βεβαιωθείτε ότι έχετε ξεπλύνει πλήρως το
διανεμητή, διαφορετικά ενδέχεται να στάζει νερό
από αυτόν.
Αυτό σημαίνει ότι υπάρχει ακόμη αέρας στο
σωλήνα.
Παροχή νερού αντίστροφης
ώσμωσης – ΣΗΜΑΝΤΙΚΟ:
Η πίεση της παροχής νερού που εξέρχεται από ένα σύστημα
αντίστροφης ώσμωσης και καταλήγει στη βαλβίδα του
στομίου νερού του ψυγείου πρέπει να κυμαίνεται από 35 έως
120 psi (241 και 827 kPa).
Εάν το σύστημα φιλτραρίσματος νερού αντίστροφης
ώσμωσης είναι συνδεδεμένο με την παροχή κρύου νερού, η
πίεση του νερού στο σύστημα αντίστροφης ώσμωσης πρέπει
να είναι τουλάχιστον 40 έως 60 psi (276 έως 414 kPa.) Εάν
η πίεση του νερού στο σύστημα αντίστροφης ώσμωσης είναι
μικρότερη των 40 έως 60 psi (276 έως 414 kPa):
• Ελέγξτε για να διαπιστώσετε εάν το φίλτρο
ιζήματος του συστήματος αντίστροφης
ώσμωσης έχει φράξει. Αντικαταστήστε το
φίλτρο εάν απαιτείται.
• Αφήστε το δοχείο του συστήματος
αντίστροφης ώσμωσης να ξαναγεμίσει μετά
από εκτεταμένη χρήση.
• Εάν το ψυγείο σας διαθέτει φίλτρο νερού,
μπορεί να μειώσει περαιτέρω την πίεση του
νερού όταν χρησιμοποιείται σε συνδυασμό
με ένα σύστημα αντίστροφης ώσμωσης.
Αφαιρέστε το φίλτρο νερού.
Εάν έχετε ερωτήσεις σχετικά με την πίεση
του νερού στην περιοχή σας, καλέστε έναν
καταρτισμένο, διπλωματούχο υδραυλικό.
ΠΩΣ ΝΑ ΕΛΕΓΧΕΤΕ ΤΗ
ΘΕΡΜΟΚΡΑΣΙΑ
Βασική θερμοκρασία των
θαλάμων καταψύκτη και ψυγείου
Η βασική και η συνιστώμενη θερμοκρασία των θαλάμων του
καταψύκτη και του ψυγείου είναι -19 °C και 3 °C, αντίστοιχα.
Εάν η θερμοκρασία των θαλάμων του καταψύκτη και του
ψυγείου είναι πολύ υψηλή ή πολύ χαμηλή, ρυθμίστε τη
θερμοκρασία με μη αυτόματο τρόπο.
Έλεγχος της θερμοκρασίας του
καταψύκτη
Συνιστώμενη θερμοκρασία (καταψύκτης) : -19 °C
Η θερμοκρασία του καταψύκτη μπορεί να ρυθμιστεί μεταξύ
-23 °C και -15 °C, ώστε να ικανοποιούνται οι δικές σας
συγκεκριμένες ανάγκες. Πατήστε επανειλημμένα το κουμπί
Freezer (Καταψύκτης), έως ότου εμφανιστεί η επιθυμητή
26_ λειτουργία
DA68-02916G-14.indb 26 2019. 2. 27. 오전 8:27

θερμοκρασία στην οθόνη θερμοκρασίας. Η θερμοκρασία
θα μεταβάλλεται κατά 1 °C (ή 1 °F) με κάθε πάτημα. Βλ.
παρακάτω.
Έχετε υπ’ όψιν ότι τρόφιμα, όπως το παγωτό, ενδέχεται να
λιώσουν στους -15,5 °C. Η θερμοκρασία που εμφανίζεται
στην οθόνη μεταβάλλεται διαδοχικά από -23 °C έως -15 °C.
Έλεγχος της θερμοκρασίας του
ψυγείου
Συνιστώμενη θερμοκρασία (ψυγείο): 3 °C
Η θερμοκρασία του ψυγείου μπορεί να ρυθμιστεί
μεταξύ 1 °C και 7 °C, ώστε να ικανοποιούνται
οι δικές σας συγκεκριμένες ανάγκες. Πατήστε
επανειλημμένα το κουμπί Fridge (Ψυγείο), έως
ότου εμφανιστεί η επιθυμητή θερμοκρασία
στην οθόνη θερμοκρασίας. Η θερμοκρασία θα
μεταβάλλεται κατά 1 °C με κάθε πάτημα. Βλ.
παρακάτω.
Βαθμοί Κελσίου: 3 °C ➞ 2 °C ➞ 1 °C ➞ 7 °C ➞
6 °C ➞ 5 °C ➞ 4 °C ➞ 3 °C.
Η διαδικασία για τον έλεγχο της θερμοκρασίας
του ψυγείου είναι ίδια με τη διαδικασία για τον
έλεγχο της θερμοκρασίας του καταψύκτη.
Πατήστε το κουμπί Fridge (Ψυγείο), για να
ορίσετε την επιθυμητή θερμοκρασία. Μετά από
μερικά δευτερόλεπτα, το ψυγείο θα αρχίσει να
προσαρμόζει τη θερμοκρασία ώστε να φτάσει τη
θερμοκρασία που έχει οριστεί. Η διαδικασία αυτή
αντικατοπτρίζεται στην ψηφιακή οθόνη.
- Η θερμοκρασία του καταψύκτη ή του
ψυγείου ενδέχεται να αυξηθεί εάν
ανοίγετε τις πόρτες πολύ συχνά ή εάν
τοποθετήσετε μεγάλη ποσότητα ζεστού
ή καυτού φαγητού στο εσωτερικό τους.
- Η ψηφιακή οθόνη μπορεί να αρχίσει
να αναβοσβήνει λόγω της ανόδου της
θερμοκρασίας. Μόλις η θερμοκρασία του
καταψύκτη και η θερμοκρασία του ψυγείου
επανέλθουν στις κανονικές θερμοκρασίες
που έχουν οριστεί, η οθόνη θα σταματήσει να
αναβοσβήνει.
- Εάν η οθόνη συνεχίζει να αναβοσβήνει,
μπορεί να πρέπει να επαναφέρετε τις
ρυθμίσεις του ψυγείου. Δοκιμάστε να
αποσυνδέσετε τη συσκευή από την πρίζα,
αφήστε να περάσουν περίπου 10 λεπτά και,
στη συνέχεια, συνδέστε ξανά το καλώδιο
ρεύματος στην πρίζα.
- Εάν υπάρχει σφάλμα επικοινωνίας μεταξύ
της οθόνης και της κεντρικής μονάδας
ελέγχου, η λυχνία της μετατρεπόμενης
οθόνης ενδέχεται να αναβοσβήνει. Εάν
η οθόνη συνεχίσει να αναβοσβήνει για
μεγάλο χρονικό διάστημα, επικοινωνήστε
με ένα επισκευαστικό κέντρο της Samsung
Electronics.
ΠΩΣ ΝΑ ΧΡΗΣΙΜΟΠΟΙΕΙΤΕ ΤΟ
ΔΙΑΝΕΜΗΤΗ ΚΡΥΟΥ ΝΕΡΟΥ
Πατήστε το κατάλληλο κουμπί,
για να επιλέξετε τον τύπο πάγου
που θέλετε να διανεμηθεί.
NO ICE (ΟΧΙ ΠΑΓΟΣ)
Select this if you want to turn ice
maker off (Επιλέξτε αυτό το εικονίδιο
εάν θέλετε να απενεργοποιήσετε τον
παρασκευαστή πάγου)
Χρήση του μοχλού πάγου
( 1 )
Πιέστε απαλά το μοχλό του
διανεμητή πάγου ( 1 ) με το
ποτήρι σας. Θα βγει πάγος από το
διανεμητή.
Μπορείτε να επιλέξετε τον τύπο
του πάγου πατώντας πρώτα το
κουμπί cubed (πάγος σε κύβους) ή
το κουμπί crushed (θρυμματισμένος πάγος).
Χρήση του μοχλού νερού ( 2 )
Πιέστε απαλά το μοχλό του διανεμητή νερού
( 2 ) με το ποτήρι σας. Θα βγει νερό από το
διανεμητή.
Εάν πιέσετε το μοχλό νερού και το μοχλό πάγου
περίπου ταυτόχρονα, ενεργοποιείται μόνο ο
μοχλός του διανεμητή που ουσιαστικά επιλέξατε
ή πιέσατε πρώτον.
1
2
λειτουργία _27
02 ΛΕΙΤΟΥΡΓΙΑ
DA68-02916G-14.indb 27 2019. 2. 27. 오전 8:27

Αφού βάλετε νερό από το διανεμητή, περιμένετε
1 δευτερόλεπτο προτού απομακρύνετε το ποτήρι,
για να μην χυθεί νερό. Μην τραβήξετε προς τα
έξω το μοχλό του διανεμητή αφού έχει βγει πάγος
ή νερό. Επανέρχεται αυτόματα στη θέση του.
Ταυτόχρονη χρήση του διανεμητή
πάγου και νερού
Εάν θέλετε πάγο και νερό, πιέστε πρώτα το
μοχλό πάγου ( 1 ) για να βγει πάγος·και, έπειτα,
μετακινήστε το ποτήρι σας προς τα κάτω και πιέστε
το μοχλό του διανεμητή νερού ( 2 ) για να βγει νερό.
Συντήρηση του δοχείου πάγου
• Για να καθαρίσετε το δοχείο πάγου,
πλύνετέ το με ήπιο απορρυπαντικό και
έπειτα ξεπλύνετε και στεγνώστε το καλά.
Μην χρησιμοποιείτε ισχυρά ή αποξεστικά
καθαριστικά ή διαλυτικές ουσίες.
• Ο πάγος δημιουργείται με τη μορφή
κύβων (παγάκια). Όταν επιλέγετε Crushed
(Θρυμματισμένος), ο παρασκευαστής
πάγου θρυμματίζει τα παγάκια, ώστε να
δημιουργηθεί θρυμματισμένος πάγος.
• Όταν επιλέγετε Cubed (Πάγος σε κύβους) αφού
έχετε χρησιμοποιήσει τη λειτουργία Crushed
(Θρυμματισμένος πάγος), μπορεί να εξέλθει μικρή
ποσότητα υπολείμματος θρυμματισμένου πάγου.
• Τα παγάκια που δημιουργούνται μέσω της
διαδικασίας ταχείας δημιουργίας πάγου είναι
λευκά, ένδειξη ότι δημιουργήθηκαν φυσιολογικά.
• Όταν ο παρασκευαστής πάγου που βρίσκεται στο
θάλαμο του ψυγείου δημιουργεί παγάκια σε ακόμα πιο
σύντομο χρονικό διάστημα, μετακινήστε τα παγάκια
από το δοχείο πάγου του ψυγείου στο δοχείο πάγου
του καταψύκτη εάν χρειάζεστε περισσότερα παγάκια.
• Εάν δεν εξέρχεται πάγος, τραβήξτε προς τα
έξω το
δοχείο πάγου και πατήστε το κουμπί test
(δοκιμή) που βρίσκεται στη δεξιά πλευρά του
παρασκευαστή πάγου. Βλ. παρακάτω εικόνα.
• Μην πατάτε το κουμπί test (δοκιμή) συνεχώς
όταν ο δίσκος είναι γεμάτος με πάγο ή νερό.
Το νερό μπορεί να ξεχειλίσει ή ο πάγος
μπορεί να σφηνώσει το δοχείο.
ΠΑΡΑΣΚΕΥΗ ΠΑΓΟΥ
• Για να γεμίσετε το δοχείο πάγου στο μέγιστο
της χωρητικότητάς του μετά την εγκατάσταση,
ακολουθήστε τα παρακάτω βήματα:
1. Αφήστε το ψυγείο σας να λειτουργήσει και να ψυχθεί
για 24 ώρες (1 ολόκληρη ημέρα).
- Εάν αφήσετε να περάσουν 24 ώρες, ο παρασκευαστής
πάγου θα μπορέσει να ψυχθεί σωστά.
ελέγξτε τη
στάθμη
του νερού
Κουμπί Test (δοκιμή)
2. Βάλτε 4-6 παγάκια σε ένα ποτήρι.
3. Μετά από 8 ώρες, και μετά από 16 ώρες, γεμίστε ένα
ποτήρι με πάγο.
• Για να δοκιμάσετε τη λειτουργία του
παρασκευαστή πάγου, πατήστε το κουμπί
Test (δοκιμή) επάνω στον παρασκευαστή
πάγου. Από το ψυγείο θα ακουστεί ένας
ήχος παρόμοιος με το χτύπο μιας καμπάνας
(ντινγκ-ντονγκ). Όταν ακουστεί ο ήχος αυτός,
αφήστε το κουμπί Test (δοκιμή).
• Εάν ο παρασκευαστής πάγου λειτουργεί σωστά,
αυτόματα θα ακουστεί ξανά ο ίδιος ήχος.
Εάν θέλετε να βγάλετε τα παγάκια χωρίς
να χρησιμοποιήσετε το δοχείο πάγου,
απενεργοποιήστε τον παρασκευαστή πάγου
και αφαιρέστε το μπροστινό κάλυμμα του
παρασκευαστή πάγου. Έχετε υπ’ όψιν ότι τα
παγάκια μέσα στον παρασκευαστή πάγου μπορεί
να πέσουν από το συρτάρι.
Μην βάζετε τρόφιμα στο δοχείο πάγου. Εάν
φυλάσσετε τρόφιμα στο δοχείο πάγου, τα τρόφιμα
μπορεί να χτυπήσουν τον παρασκευαστή πάγου
όταν ανοιγοκλείνετε την πόρτα και να προκληθεί
ζημιά στον παρασκευαστή πάγου.
Έχετε υπ’ όψιν ότι τα παγάκια που υπάρχουν στο
δοχείο πάγου μπορεί να πέσουν από το συρτάρι
όταν αφαιρείτε το δοχείο πάγου από το συρτάρι.
Εάν συμβεί αυτό, φροντίστε να απομακρύνετε τα
παγάκια που έπεσαν από το συρτάρι.
Σε περίπτωση διακοπής ρεύματος, τα παγάκια
ενδέχεται να λιώσουν και έπειτα, όταν επανέλθει
το ρεύμα, να παγώσουν ενωμένα, με αποτέλεσμα
να διακόψουν τη λειτουργία του διανεμητή.
Για να αποτραπεί αυτό το πρόβλημα μετά από
διακοπή ρεύματος, βγάλτε το δοχείο πάγου και
απομακρύνετε τα υπολείμματα πάγου ή νερού.
Εάν χρησιμοποιήσετε αμέσως όλο τον πάγο,
θα πρέπει να επαναλάβετε τα βήματα 2 και
3 της διαδικασίας παρασκευής πάγου που
περιγράφεται στην αριστερή σελίδα. Ωστόσο,
θα πρέπει να αφήσετε να περάσουν
μόνο 8 ώρες προτού βγάλετε τα πρώτα
4-6 παγάκια. Με τον τρόπο αυτό, θα
αναπληρωθούν τα παγάκια και θα
διασφαλιστεί η παρασκευή της μέγιστης
δυνατής ποσότητας πάγου.
ΠΡΟΣΟΧΗ
ΠΡΟΣΟΧΗ
ΠΡΟΣΟΧΗ
ΠΡΟΣΟΧΗ
28_ λειτουργία
DA68-02916G-14.indb 28 2019. 2. 27. 오전 8:27

Χρήση της λειτουργίας Ice Off
(Απενεργοποίηση πάγου)
Όταν επιλέγετε τον τρόπο λειτουργίας Ice Off
(Απενεργοποίηση πάγου), να απομακρύνετε όλα
τα παγάκια από το δοχείο.
Εάν αφήσετε τα παγάκια μέσα στο δοχείο,
μπορεί να κολλήσουν μεταξύ τους και μετά θα
είναι δύσκολο να απομακρυνθούν.
Για να αφαιρέσετε το δοχείο πάγου με ασφάλεια
και χωρίς να τραυματιστείτε, κρατήστε το δοχείο
τοποθετώντας το ένα χέρι σας στο κάτω μέρος
και το άλλο στο πλάι.
Στη συνέχεια, ανασηκώστε το δοχείο πάγου και
τραβήξτε το ευθεία προς τα εμπρός.
Για να τοποθετήσετε πάλι το δοχείο πάγου στη
θέση του, σπρώξτε το σταθερά και ευθεία προς
τα πίσω.
Εάν δεν σπρώξετε το δοχείο πάγου
σταθερά για να μπει στη θέση του, ο
πάγος που περιέχει μπορεί να λιώσει.
Εάν το δοχείο δεν εφαρμόζει σωστά στη θέση
του, στρέψτε το σπείρωμα κατά 90 μοίρες (βλ.
κάτω, τελευταία εικόνα δεξιά) και δοκιμάστε ξανά.
• Το εσωτερικό του δοχείου πάγου έχει
εξαιρετικά χαμηλή θερμοκρασία όταν
λειτουργεί το ψυγείο.
Μην βάζετε το χέρι σας μέσα στο
δοχείο πάγου.
• Να χρησιμοποιείτε μόνον τον παρασκευαστή
πάγου που παρέχεται με το ψυγείο.
Η παροχή νερού για αυτό το ψυγείο πρέπει
να εγκαθίσταται/συνδέεται μόνον από
κατάλληλα εκπαιδευμένο άτομο.
Συνδέετε μόνο με παροχή πόσιμου νερού.
• Προκειμένου να λειτουργεί σωστά ο
παρασκευαστής πάγου, η απαιτούμενη πίεση
νερού είναι 20 ~ 125 psi.
ΠΡΟΣΟΧΗ
Εάν πάτε διακοπές...
Εάν πρόκειται να λείψετε για μεγάλο χρονικό
διάστημα σε διακοπές ή σε επαγγελματικό ταξίδι
και δεν θα χρησιμοποιήσετε το διανεμητή νερού
και πάγου για μεγάλο χρονικό διάστημα:
- Κλείστε τη βαλβίδα νερού. Διαφορετικά,
μπορεί να υπάρξει διαρροή νερού.
- Αφαιρέστε όλα τα τρόφιμα.
- Αποσυνδέστε το ψυγείο από την πρίζα.
- Σκουπίστε την υπερβολική υγρασία που έχει
σχηματιστεί στο εσωτερικό του ψυγείου και
αφήστε τις πόρτες ανοικτές. Διαφορετικά,
ενδέχεται να δημιουργηθούν οσμές και να
αναπτυχθεί μούχλα.
Παρασκευαστής πάγου: τι
πρέπει και τι δεν πρέπει να
κάνετε
• Μην βάζετε τα δάχτυλα ή τα χέρια σας ή άλλα
ακατάλληλα αντικείμενα στη χοάνη ή στο
δοχείο του παρασκευαστή πάγου.
- Ενδέχεται να προκληθεί σωματικός
τραυματισμός ή υλική ζημιά.
• Μην βάζετε ποτέ τα δάχτυλά σας ή άλλα
αντικείμενα στην οπή του διανεμητή.
- Μπορεί να προκληθεί τραυματισμός.
• Μην επιχειρήσετε να αποσυναρμολογήσετε
τον παρασκευαστή πάγου.
• Μην πλένετε και μην ψεκάζετε το δοχείο
πάγου με νερό ενώ είναι τοποθετημένο στο
ψυγείο. Για να το καθαρίσετε, αφαιρέσετε το.
Όταν τοποθετείτε το δίσκο του παρασκευαστή
πάγου, φροντίσετε ότι βρίσκεται ακριβώς στο
κέντρο της εισόδου.
Διαφορετικά, ο δίσκος μπορεί να σφηνώσει.
Φαινόμενο θολού νερού
Το νερό που παρέχεται στο ψυγείο διέρχεται
από το βασικό φίλτρο, το οποίο είναι ένα
αλκαλικό φίλτρο νερού. Κατά τη διαδικασία
φιλτραρίσματος, η πίεση του νερού που βγαίνει
από το φίλτρο αυξάνεται, με αποτέλεσμα το νερό
να είναι κορεσμένο σε οξυγόνο και άζωτο. Όταν
το νερό βγαίνει στον αέρα, η πίεση μειώνεται
απότομα, ενώ υπάρχει υπερκορεσμός οξυγόνου
και αζώτου, με αποτέλεσμα να δημιουργούνται
φυσαλίδες αερίου. Το νερό μπορεί να είναι
προσωρινά θαμπό ή θολό λόγω αυτών των
φυσαλίδων οξυγόνου. Μετά από μερικά
δευτερόλεπτα, το νερό θα είναι διαυγές.
ΠΡΟΣΟΧΗ
λειτουργία _29
02 ΛΕΙΤΟΥΡΓΙΑ
DA68-02916G-14.indb 29 2019. 2. 27. 오전 8:27

ΜΕΡΗ ΚΑΙ ΔΥΝΑΤΟΤΗΤΕΣ
Ρίξτε μια ματιά στην παρακάτω εικόνα για να εξοικειωθείτε με τα μέρη και τις δυνατότητες του ψυγείου σας.
Λυχνία
Σταθερό ράφι
Αναδιπλούμενο
ράφι σε 2 κινήσεις
Συρτάρι με
αυτόματο άνοιγμα
Συρτάρι
καταψύκτη
Ράφια πόρτας
Μηχανισμός αυτόματου
κλεισίματος
Μετατρεπόμενος θάλαμος
Παρασκευαστής πάγου FF
Αναδιπλούμενο ράφι
Σταθερό ράφι
Κάθετο τμήμα
με μεντεσέδες
Συρτάρια φρούτων
και λαχανικών
Φίλτρο νερού
Λυχνία
Μηχανισμός
αυτόματου κλεισίματος
Προστατευτικό
Όταν κλείνετε την πόρτα, βεβαιωθείτε ότι το κάθετο τμήμα με μεντεσέδες είναι στη σωστή θέση, ώστε να μην
προκληθούν γρατζουνιές στην άλλη πόρτα.
Εάν το κάθετο τμήμα με μεντεσέδες έχει αντιστραφεί, επαναφέρετέ το στη σωστή θέση και κλείστε την πόρτα.
Κατά καιρούς, ενδέχεται να εμφανίζεται υγρασία στο κάθετο τμήμα με μεντεσέδες.
Με την πάροδο του χρόνου, η λαβή της πόρτας μπορεί να χαλαρώσει. Εάν συμβεί αυτό, σφίξτε τα μπουλόνια
που υπάρχουν στο εσωτερικό μέρος της πόρτας.
Εάν κλείσετε τη μια πόρτα με υπερβολική δύναμη, ενδέχεται να ανοίξει η άλλη πόρτα.
Όταν ανοίγει η πόρτα, το μοτέρ του θρυμματιστή μέσα στον παρασκευαστή πάγου απενεργοποιείται
αυτόματα από το διακόπτη ενδασφάλειας, για λόγους ασφαλείας.
Εάν η εσωτερική ή η εξωτερική λυχνία LED σταματήσει να λειτουργεί, επικοινωνήστε με τον τοπικό
αντιπρόσωπο σέρβις.
30_ λειτουργία
DA68-02916G-14.indb 30 2019. 2. 27. 오전 8:27

Ράφια πόρτας
Το ψυγείο αποστέλλεται με ράφια πόρτας
διαφορετικών τύπων και μεγεθών. Αν τα ράφια
πόρτας του ψυγείου σας είναι συσκευασμένα
ξεχωριστά, χρησιμοποιήστε την παρακάτω
εικόνα για να τοποθετήσετε σωστά τα ράφια.
Ο αριθμός των ραφιών πόρτας που παρέχονται
ενδέχεται να διαφέρει, ανάλογα με το μοντέλο.
ΠΩΣ ΝΑ ΧΡΗΣΙΜΟΠΟΙΕΙΤΕ
ΤΗΝ ΠΡΟΣΑΡΜΟΖΟΜΕΝΗ
ΖΩΝΗ
Η προσαρμοζόμενη ζώνη είναι ένα συρτάρι το οποίο
καταλαμβάνει όλο το πλάτος του ψυγείου και διαθέτει
ρυθμιζόμενο διακόπτη ελέγχου θερμοκρασίας. Στην
προσαρμοζόμενη ζώνη μπορείτε να τοποθετείτε μεγάλες
πιατέλες, προϊόντα ντελικατέσεν, κρασιά, πίτσες, αναψυκτικά
και άλλα πολλά. Διαθέτει αισθητήρα θερμοκρασίας, ο οποίος
σας επιτρέπει να ρυθμίζετε την ποσότητα κρύου αέρα που
εισχωρεί στη ζώνη. Τα κουμπιά ελέγχου βρίσκονται στο
κέντρο της πόρτας του καλύμματος.
Κουμπί επιλογής θερμοκρασίας
Λειτουργίες θαλάμου Ψύξης
• Πατήστε επανειλημμένα το κουμπί Temp (Θερμοκρασία),
έως ότου ανάψει ο επιθυμητός τρόπος λειτουργίας.
• Κάθε φορά που πατάτε το κουμπί Temp. (Θερμοκρασία),
ο τρόπος λειτουργίας αλλάζει με την ακόλουθη σειρά:
τρόπος λειτουργίας Meat/Fish (Κρέας/ψάρι) (-1 °C),
τρόπος λειτουργίας Cold Drinks (Κρύα ποτά) (1 °C),
τρόπος λειτουργίας Deli/Snacks (Ντελικατέσεν/σνακ)
(3 °C), τρόπος λειτουργίας Wine/Party Dishes (Κρασί/
πιατέλες) (5 °C). Αρχικά, είναι επιλεγμένος ο τρόπος
λειτουργίας Cold Drinks (Κρύα ποτά). Το ψυγείο θα
ρυθμίσει αυτόματα τη θερμοκρασία της Flex Zone
(προσαρμοζόμενης ζώνης) στη θερμοκρασία που
επιλέξατε.
• Όταν επιλέγετε τρόπο λειτουργίας Deli/Snacks
(Ντελικατέσεν/σνακ) (3 °C), Cold Drinks (Κρύα ποτά)
(1 °C) ή Meat/Fish (Κρέας/ψάρι) (-1 °C), θα λειτουργεί η
Flex Zone (προσαρμοζόμενη ζώνη) στο θάλαμο Ψύξης.
• Η ένδειξη που εμφανίζεται στην οθόνη Flex Zone Temp.
(Θερμοκρασία προσαρμοζόμενης ζώνης) μπορεί να
αλλάξει ανάλογα με την ποσότητα των τροφίμων που
έχουν τοποθετηθεί σε αυτήν, το σημείο όπου έχουν
τοποθετηθεί, τη θερμοκρασία του περιβάλλοντα χώρου
και τη συχνότητα με την οποία ανοίγει η πόρτα.
Κουμπί επιλογής
1. Όταν επιλέγετε «Wine/Party Dishes» (Κρασί/
πιατέλες), η θερμοκρασία της προσαρμοζόμενης
ζώνης διατηρείται στους 5 °C περίπου. Χάρη σε αυτή
τη δυνατότητα, τα τρόφιμα διατηρούνται φρέσκα για
μεγάλο χρονικό διάστημα.
2. Όταν επιλέγετε «Deli/Snacks» (Ντελικατέσεν/
σνακ), η θερμοκρασία της προσαρμοζόμενης ζώνης
διατηρείται στους 3 °C περίπου. Χάρη σε αυτή τη
δυνατότητα, τα τρόφιμα διατηρούνται φρέσκα για
μεγαλύτερο χρονικό διάστημα.
3. Όταν επιλέγετε «Cold Drinks» (Κρύα ποτά),
η θερμοκρασία της προσαρμοζόμενης ζώνης
διατηρείται στον 1 °C περίπου. Χάρη σε αυτή
τη δυνατότητα, τα ποτά διατηρούνται κρύα και
δροσιστικά.
4. Όταν επιλέγετε «Meat/Fish» (Κρέας/ψάρι), η
θερμοκρασία της προσαρμοζόμενης ζώνης
διατηρείται στον -1 °C περίπου. Χάρη σε αυτή τη
δυνατότητα, το κρέας και το ψάρι διατηρούνται
φρέσκα για μεγαλύτερο χρονικό διάστημα.
Όταν αποθηκεύετε τρόφιμα με υψηλό βαθμό
αλλοίωσης, επιλέγετε τις λειτουργίες του
θαλάμου Ψύξης.
Παραδείγματα τροφίμων που μπορείτε να αποθηκεύετε
στην προσαρμοζόμενη ζώνη, ανάλογα με τη ρύθμιση της
θερμοκρασίας.
Wine
Party Dishes
Deli
Snacks
Cold
Drinks
Meat
Fish
• κρασί
• ανανάς
• εμφιαλωμένο
νερό
• μπριζόλες
• κοκτέιλ • λεμόνια • χυμός • αλλαντικά
• κέικ • μπισκότα
• αναψυκτικά
• μπέικον
• τυριά • πατάτες • μπίρα • λουκάνικα
λειτουργία _31
02 ΛΕΙΤΟΥΡΓΙΑ
DA68-02916G-14.indb 31 2019. 2. 27. 오전 8:27

Τα φρούτα και τα λαχανικά μπορεί να χαλάσουν,
εάν αποθηκευτούν με επιλεγμένη τη ρύθμιση
«Meat Fish» (Κρέας/ψάρι).
Μην αποθηκεύετε μαρούλι ή άλλα φυλλώδη
λαχανικά στην προσαρμοζόμενη ζώνη.
Μην αποθηκεύετε γυάλινα μπουκάλια στην
προσαρμοζόμενη ζώνη με επιλεγμένη τη
ρύθμιση «Cold Drinks» (Κρύα ποτά) ή «Meat/
Fish» (Κρέας/ψάρι). Εάν παγώσουν, μπορεί
να σπάσουν και να προκληθεί σωματικός
τραυματισμός.
ΣΥΝΙΣΤΩΜΕΝΟ ΣΗΜΕΙΟ
ΤΟΠΟΘΕΤΗΣΗΣ ΤΟΥ
ΑΝΑΔΙΠΛΟΥΜΕΝΟΥ ΡΑΦΙΟΥ
Το αναδιπλούμενο ράφι διπλώνει στη μέση, ώστε να έχετε
περισσότερο αποθηκευτικό χώρο για ψηλά αντικείμενα χωρίς
να χρειάζεται να αλλάζετε τη διάταξη των ραφιών.
• Τοποθετήστε το αναδιπλούμενο ράφι στη
δεξιά πλευρά του ψυγείου.
• Εάν τοποθετήσετε το αναδιπλούμενο ράφι
στην αριστερή πλευρά, ο παρασκευαστής
πάγου θα εμποδίζει το ράφι να διπλώσει
πλήρως.
• Για να το χρησιμοποιήσετε, πιέστε απαλά
προς τα πίσω το μπροστινό μέρος του
ραφιού, ώστε να διπλώσει στη μέση.
επαφή
Συνιστώμενο
σημείο
τοποθέτησης
ΠΩΣ ΝΑ ΑΦΑΙΡΕΙΤΕ ΤΑ
ΕΞΑΡΤΗΜΑΤΑ ΤΟΥ ΨΥΓΕΙΟΥ
1. Ράφια πόρτας
• Ράφια πόρτας (1)
Για να το αφαιρέσετε - Ανασηκώστε απλά το ράφι και
τραβήξτε κατευθείαν προς τα έξω.
Για να το επανατοποθετήσετε - Σύρετέ το πάνω
από την επιθυμητή θέση και σπρώξτε προς τα κάτω
έως το τέρμα.
• Ράφια πόρτας (2)
Για να το αφαιρέσετε - Αφαιρέστε τη δεξιά
πλευρά του ραφιού ανασηκώνοντάς την σε
ΠΡΟΣΟΧΗ
γωνία κατά μήκος του οδηγού και, έπειτα,
αφαιρέστε την αριστερή πλευρά τραβώντας
την από την πόρτα.
Για να το επανατοποθετήσετε - Σύρετέ
το στην αρχική θέση και σπρώξτε προς τα
κάτω έως ότου «καθίσει» στη θέση του.
1
2
Ενδέχεται να προκληθούν τραυματισμοί εάν τα
ράφια της πόρτας δεν είναι καλά συνδεδεμένα
στις πόρτες.
Μην επιτρέπετε στα παιδιά να παίζουν με τα
ράφια. Οι αιχμηρές γωνίες των ραφιών μπορεί
να προκαλέσουν τραυματισμό.
Μην ρυθμίζετε το ράφι όταν είναι φορτωμένο με
τρόφιμα. Αφαιρέστε πρώτα τα τρόφιμα.
Για να ξεσκονίσετε τα ράφια, αφαιρέστε το
προστατευτικό και πλύνετε με νερό.
2. Ράφια από γυαλί ασφαλείας
Για να το αφαιρέσετε - Γείρετε προς τα πάνω το μπροστινό
μέρος του ραφιού προς την κατεύθυνση που υποδεικνύεται
( 1 ) και ανασηκώστε το κατακόρυφα ( 2 ). Τραβήξτε το ράφι
προς τα έξω.
Για να το επανατοποθετήσετε - Γείρετε προς τα πάνω
το μπροστινό μέρος του ραφιού και προσανατολίστε τα
άγκιστρα του ραφιού, ώστε να εφαρμόσουν στις υποδοχές
στο επιθυμητό ύψος. Έπειτα, χαμηλώστε το μπροστινό μέρος
του ραφιού, ώστε τα άγκιστρα να εισέλθουν στις υποδοχές.
Τα ράφια από γυαλί ασφαλείας είναι βαριά.
Να είστε ιδιαίτερα προσεκτικοί όταν τα αφαιρείτε.
1
2
ΠΡΟΣΟΧΗ
ΠΡΟΣΟΧΗ
32_ λειτουργία
DA68-02916G-14.indb 32 2019. 2. 27. 오전 8:27

3. Αναδιπλούμενο ράφι
Για να το αφαιρέσετε - Αφού αφαιρέσετε το μπροστινό
μέρος του ραφιού, ανασηκώστε το ράφι και αφαιρέστε το.
Για να το επανατοποθετήσετε - Αγκιστρώστε το ράφι στο
γωνιακό πλαίσιο
και επανασυνδέστε το μπροστινό μέρος του ραφιού στο
αναδιπλούμενο ράφι.
Αφού σύρετε το αναδιπλούμενο ράφι προς τα
μέσα και το διπλώσετε, μπορείτε να αφαιρέσετε
το μπροστινό μέρος του ραφιού για δική σας
διευκόλυνση. Εάν χρησιμοποιείτε το ράφι χωρίς
να έχετε αφαιρέσει το μπροστινό μέρος, να
είστε προσεκτικοί γιατί μπορεί να χωριστεί στα
επιμέρους τμήματα.
4. Συρτάρια φρούτων και λαχανικών
Για να το αφαιρέσετε
• Ανασηκώστε απλά το ράφι και τραβήξτε
κατευθείαν προς τα έξω.
• Γείρετε προς τα πάνω το μπροστινό μέρος
του συρταριού και τραβήξτε κατευθείαν
προς τα έξω και, στη συνέχεια, τραβήξτε το
συρτάρι προς τα έξω αφού το μετακινήσετε
ελαφρώς προς την κατεύθυνση του βέλους.
Για να το επανατοποθετήσετε
• Εισαγάγετε το συρτάρι στις ράγες του
πλαισίου και σπρώξτε το προς τα πίσω για
να επανέλθει στη θέση του.
• Σύρετε το ράφι πάνω από την επιθυμητή
ΠΡΟΣΟΧΗ
θέση και σπρώξτε προς τα κάτω έως το
τέρμα.
Για να μπορέσετε να αφαιρέσετε το γυάλινο ράφι
που βρίσκεται πάνω από τα συρτάρια, πρέπει
πρώτα να αφαιρέσετε τα συρτάρια.
5. Προσαρμοζόμενη ζώνη
Για να αφαιρέσετε την προσαρμοζόμενη ζώνη -
Τραβήξτε την προσαρμοζόμενη πόρτα εντελώς προς τα έξω.
Ανασηκώστε την προσαρμοζόμενη ζώνη, τραβώντας την
προς το σώμα σας και με τα δύο χέρια.
Για να επανατοποθετήσετε την προσαρμοζόμενη ζώνη
-
Ανοίξτε εντελώς την προσαρμοζόμενη πόρτα. Γείρετε προς
τα πάνω το μπροστινό μέρος της προσαρμοζόμενης ζώνης,
τοποθετήστε το πίσω μέρος της προσαρμοζόμενης ζώνης
στις ράγες και, έπειτα, χαμηλώστε το μπροστινό μέρος έως
ότου ολόκληρη η προσαρμοζόμενη ζώνη ακουμπήσει στις
ράγες.
Σε περίπτωση που ο φωτισμός της
προσαρμοζόμενης ζώνης ή ο φωτισμός LED
δεν λειτουργεί, ελέγξτε τους συνδέσμους [
( 1 ), ( 2 ) όπως φαίνονται παρακάτω] για
να βεβαιωθείτε ότι δεν υπάρχουν ρωγμές ή
διαρροές.
1
2
ΠΡΟΣΟΧΗ
λειτουργία _33
02 ΛΕΙΤΟΥΡΓΙΑ
DA68-02916G-14.indb 33 2019. 2. 27. 오전 8:27

1. Ανατρέξτε στη σελίδα 18 για τις οδηγίες
αποσυναρμολόγησης.
2. Ανοίξτε τo πώμα της ράγας του καλύμματος με ένα
κατσαβίδι με επίπεδη κεφαλή.
Πώς να χρησιμοποιείτε τις
πόρτες
Βεβαιωθείτε ότι οι πόρτες κλείνουν εντελώς και είναι σωστά
στεγανοποιημένες.
Όταν η πόρτα του ψυγείου είναι μόνο μερικώς ανοικτή,
κλείνει αυτόματα. Εάν η πόρτα έχει ανοίξει περισσότερο απ’
όσο πρέπει για να κλείνει αυτόματα, παραμένει ανοιχτή.
Πρέπει να την κλείνετε εσείς.
ΠΩΣ ΝΑ ΑΦΑΙΡΕΙΤΕ
ΤΑ ΕΞΑΡΤΗΜΑΤΑ ΤΟΥ
ΚΑΤΑΨΥΚΤΗ
1. Προστατευτικό θαλάμου
καταψύκτη
Για να το αφαιρέσετε – Αφαιρέστε το προστατευτικό του
θαλάμου καταψύκτη ( 1 ) ανασηκώνοντάς το.
Για να το επανατοποθετήσετε – Πιέστε προς τα κάτω, έως
ότου το προστατευτικό ( 1 ) ασφαλίσει στη θέση του.
1
2. Υπερεκτεινόμενο συρτάρι
Για να το αφαιρέσετε – Τραβήξτε το συρτάρι εντελώς προς
τα έξω. Γείρετε προς τα πάνω το πίσω μέρος του συρταριού
και τραβήξτε κατευθείαν προς τα έξω ανασηκώνοντάς το.
Για να το επανατοποθετήσετε – Τοποθετήστε το συρτάρι
στις ράγες ( 4 ) με κλίση προς τα πάνω. Χαμηλώστε το
συρτάρι στη θέση του, έως ότου είναι οριζόντιο και σύρετε το
συρτάρι ( 3 ) στη θέση του.
3
4
3. Συρτάρι καταψύκτη
Για να αφαιρέσετε το συρτάρι καταψύκτη – Τραβήξτε
εντελώς προς τα έξω το συρτάρι του καταψύκτη. Γείρετε
προς τα πάνω το πίσω μέρος του συρταριού για να το
αφαιρέσετε.
Για να επανατοποθετήσετε το συρτάρι καταψύκτη –
Εισαγάγετε το συρτάρι στη διάταξη με τις ράγες.
Μπορεί να γρατζουνίσετε τα πλαϊνά του
δοχείου εάν το στρέψετε αριστερά ή
δεξιά κατά την αποσυναρμολόγηση ή την
επανασυναρμολόγησή του.
Μην αφήνετε τα μωρά ή τα παιδιά να μπαίνουν
μέσα στο συρτάρι του καταψύκτη. Μπορεί
να προκαλέσουν ζημιές στο ψυγείο και να
τραυματιστούν σοβαρά. Μην κάθεστε πάνω
στην πόρτα του καταψύκτη. Η πόρτα μπορεί
να σπάσει. Μην επιτρέπετε στα παιδιά να
σκαρφαλώνουν στο συρτάρι του καταψύκτη.
Μην αφαιρείτε το διαχωριστικό.
Εάν παγιδευτούν μέσα, τα παιδιά ενδέχεται να
τραυματιστούν ή να πεθάνουν από ασφυξία.
Μπορείτε να αποθηκεύετε τρόφιμα στο χώρο με
τις διακεκομμένες γραμμές.
Συρτάρι με αυτόματο άνοιγμα
Συρτάρι καταψύκτη
Προστατευτικό
ΠΡΟΣΟΧΗ
ΠΡΟΣΟΧΗ
ΠΡΟΣΟΧΗ
ΠΡΟΕΙΔΟΠΟΙΗΣΗ
34_ λειτουργία
DA68-02916G-14.indb 34 2019. 2. 27. 오전 8:27

ΚΑΘΑΡΙΣΜΟΣ ΤΟΥ ΨΥΓΕΙΟΥ
Η συντήρηση του ψυγείου Samsung με πόρτα «ντουλάπα»
παρατείνει τη διάρκεια ζωής του και συμβάλλει στην
απομάκρυνση οσμών και μικροβίων.
Καθαρισμός του εσωτερικού
Καθαρίστε τα εσωτερικά τοιχώματα και τα εξαρτήματα με
ήπιο απορρυπαντικό και, έπειτα, σκουπίστε με μαλακό πανί.
Για να το καθαρίσετε καλύτερα, μπορείτε να αφαιρέσετε τα
συρτάρια και τα ράφια. Απλώς φροντίστε να στεγνώσετε τα
συρτάρια και τα ράφια, προτού τα επανατοποθετήσετε στη
θέση τους.
Καθαρισμός του εξωτερικού
Σκουπίστε τον πίνακα ελέγχου και την ψηφιακή οθόνη με
ένα υγρό, καθαρό και μαλακό πανί. Μην ψεκάζετε με νερό
απευθείας επάνω στην επιφάνεια του ψυγείου.
Οι πόρτες, οι λαβές και οι επιφάνειες του θαλάμου πρέπει
να καθαρίζονται με ήπιο απορρυπαντικό και έπειτα να
σκουπίζονται με μαλακό πανί. Για να διατηρείτε όσο το
δυνατόν καλύτερη την εξωτερική όψη της συσκευής σας,
γυαλίζετε το εξωτερικό του μία ή δύο φορές το χρόνο.
Μην ψεκάζετε με νερό απευθείας επάνω στο
ψυγείο. Για τον καθαρισμό, χρησιμοποιείτε ένα
καθαρό, υγρό πανί.
Μην χρησιμοποιείτε βενζόλιο, διαλυτικό
ή
λευκαντικό για να καθαρίσετε το ψυγείο.
Ενδέχεται να προκαλέσουν ζημιά στην επιφάνεια
της συσκευής, καθώς και πυρκαγιά.
Τα γράμματα που υπάρχουν πάνω
στην οθόνη μπορεί να σβηστούν,
εάν χρησιμοποιήσετε καθαριστικό
για ανοξείδωτο ατσάλι απευθείας
πάνω στο σημείο όπου βρίσκονται.
Καθαρισμός του διανεμητή πάγου /
νερού
Σπρώξτε προς τα κάτω το ένα άκρο του δίσκου διανεμητή
και αφαιρέστε τον. Σκουπίστε το διανεμητή πάγου / νερού με
καθαρό, μαλακό πανί.
ΠΡΟΣΟΧΗ
ΠΡΟΣΟΧΗ
ΠΡΟΣΟΧΗ
Όταν χρησιμοποιείτε την
επιλογή θρυμματισμένου
πάγου από το διανεμητή,
μπορεί να αρχίσουν να
μαζεύονται υπολείμματα
κομματιών πάγου στη χοάνη
πάγου. Για να μην λιώσουν
τα υπολείμματα πάγου και να
μην τρέξουν από το αυλάκι
της χοάνης πάγου, πρέπει να
καθαρίζετε τα
υπολείμματα πάγου όταν
βλέπετε ότι αρχίζουν να
συσσωρεύονται στο αυλάκι
του μηχανισμού παροχής
πάγου.
Καθαρισμός των ελαστικών υλικών
στεγανοποίησης της πόρτας
Εάν τα ελαστικά υλικά στεγανοποίησης της
πόρτας είναι βρόμικα, οι πόρτες ενδέχεται
να μην κλείνουν σωστά και το ψυγείο δεν
θα λειτουργεί αποτελεσματικά. Φροντίστε
να απομακρύνετε τη σκόνη και τους λεκέδες
από τα υλικά στεγανοποίησης της πόρτας
χρησιμοποιώντας ήπιο απορρυπαντικό και υγρό
πανί. Σκουπίστε με καθαρό, μαλακό πανί.
Μην καθαρίζετε το ψυγείο με βενζόλιο,
διαλυτικό ή απορρυπαντικό αυτοκινήτου.
Αυτές οι ουσίες μπορεί να προκαλέσουν
πυρκαγιά.
Καθαρισμός της πίσω πλευράς του
ψυγείου
Προκειμένου να απομακρύνετε τη σκόνη και τις
βρομιές που συσσωρεύονται στα καλώδια και
στα εκτεθειμένα μέρη,
καθαρίστε την πίσω πλευρά της συσκευής με
ηλεκτρική σκούπα μία ή δύο φορές το χρόνο.
Μην αφαιρέσετε το πίσω κάλυμμα ( 1 ).
Μπορεί να πάθετε ηλεκτροπληξία.
1
ΠΡΟΣΟΧΗ
ΠΡΟΣΟΧΗ
ΠΡΟΣΟΧΗ
λειτουργία _35
02 ΛΕΙΤΟΥΡΓΙΑ
DA68-02916G-14.indb 35 2019. 2. 27. 오전 8:27

ΠΡΟΒΛΗΜΑ ΛΥΣΗ
Το ψυγείο δεν
λειτουργεί
καθόλου ή
δεν ψύχεται
επαρκώς.
• Ελέγξτε ότι το φις τροφοδοσίας είναι συνδεδεμένο σωστά στην πρίζα.
• Ελέγξτε μήπως η καθορισμένη θερμοκρασία που εμφανίζεται στην ψηφιακή οθόνη είναι
υψηλότερη από την εσωτερική θερμοκρασία του καταψύκτη ή του ψυγείου. Εάν είναι,
ρυθμίστε το ψυγείο σε πιο χαμηλή θερμοκρασία.
• Μήπως το ψυγείο είναι εκτεθειμένο σε άμεσο ηλιακό φως ή βρίσκεται κοντά σε πηγή
θερμότητας;
• Μήπως το πίσω μέρος του ψυγείου είναι πολύ κοντά στον τοίχο και εμποδίζεται ο σωστός
εξαερισμός;
Τα τρόφιμα στο
ψυγείο είναι
παγωμένα.
• Ελέγξτε μήπως η καθορισμένη θερμοκρασία που εμφανίζεται στην ψηφιακή οθόνη είναι
πολύ χαμηλή.
• Δοκιμάστε να ρυθμίσετε πιο ψηλά τη θερμοκρασία του ψυγείου.
• Μήπως η θερμοκρασία δωματίου είναι πολύ χαμηλή; Ρυθμίστε το ψυγείο σε υψηλότερη
θερμοκρασία.
• Μήπως αποθηκεύσατε ζουμερά τρόφιμα στο πιο κρύο μέρος του ψυγείου; Δοκιμάστε να
μεταφέρετε τα τρόφιμα αυτά σε άλλα ράφια του ψυγείου, αντί να τα αφήσετε στις πιο κρύες
περιοχές ή ράφια.
Ακούτε
ασυνήθιστο
θόρυβο ή
ήχους.
• Ελέγξτε ότι το ψυγείο είναι ευθυγραμμισμένο και σταθερό.
• Μήπως το πίσω μέρος του ψυγείου είναι πολύ κοντά στον τοίχο και εμποδίζεται ο σωστός
εξαερισμός;
Δοκιμάστε να μετακινήσετε το ψυγείο, ώστε το πίσω μέρος του να απέχει τουλάχιστον
5.08 cm από τον τοίχο.
• Μήπως έχει πέσει κάτι πίσω ή κάτω από το ψυγείο;
• Ακούγεται ένας ήχος «ρολογιού» από το εσωτερικό του ψυγείου. Είναι φυσιολογικό και
οφείλεται στη συστολή ή στη διαστολή διάφορων εξαρτημάτων ανάλογα με τη θερμοκρασία
στο εσωτερικό του ψυγείου.
• Εάν ακούγεται σαν κάτι να χτυπά κάτι άλλο στο εσωτερικό του ψυγείου, αυτό είναι
φυσιολογικό. Ο ήχος προκαλείται από το συμπιεστή που λειτουργεί σε υψηλή απόδοση.
Η περιοχή
στεγανοποίησης
στην πόρτα
θαλάμου της
συσκευής είναι
ζεστή και έχουν
σχηματιστεί
υδρατμοί.
• Λίγη θερμότητα είναι φυσιολογική, καθώς υπάρχουν συστήματα αποτροπής συμπύκνωσης
υδρατμών στα κάθετα τμήματα με μεντεσέδες του ψυγείου ώστε να αποτρέπεται η
συμπύκνωση υδρατμών.
• Μήπως η πόρτα του ψυγείου είναι μισάνοικτη; Μπορεί να σχηματιστούν υδρατμοί εάν
αφήσετε ανοικτή την πόρτα για πολλή ώρα.
Ο
παρασκευαστής
πάγου δεν
δημιουργεί
πάγο.
• Αφήσατε να περάσουν 12 ώρες μετά την εγκατάσταση του σωλήνα παροχής νερού, προτού
δημιουργηθεί πάγος;
• Είναι ο σωλήνας νερού συνδεδεμένος και η στραγγαλιστική βαλβίδα ανοικτή;
• Μήπως διακόψατε τη λειτουργία παρασκευής πάγου με μη αυτόματο τρόπο;
• Μήπως η θερμοκρασία του καταψύκτη είναι πολύ υψηλή; Δοκιμάστε να ρυθμίσετε πιο
χαμηλά τη θερμοκρασία του καταψύκτη.
Ακούτε νερό να
αφρίζει μέσα
στο ψυγείο.
• Αυτό είναι φυσιολογικό. Ο ήχος προέρχεται από το ψυκτικό μέσο που κυκλοφορεί μέσα το
ψυγείο.
Αντιμετώπιση προβλημάτων
36_ αντιμετώπιση προβλημάτων
DA68-02916G-14.indb 36 2019. 2. 27. 오전 8:27

ΠΡΟΒΛΗΜΑ ΛΥΣΗ
Υπάρχει μια
δυσάρεστη
οσμή στο
εσωτερικό του
ψυγείου.
• Ελέγξτε μήπως υπάρχουν αλλοιωμένα τρόφιμα.
• Τα τρόφιμα με έντονη οσμή (για παράδειγμα, ψάρι) θα πρέπει να είναι αεροστεγώς
κλεισμένα.
• Να καθαρίζετε τακτικά τον καταψύκτη σας και να πετάτε τυχόν αλλοιωμένα ή ύποπτα
τρόφιμα.
Σχηματίζεται
πάγος στα
τοιχώματα του
καταψύκτη.
• Μήπως έχει φράξει το άνοιγμα εξαερισμού; Αφαιρέστε τυχόν εμπόδια, ώστε να κυκλοφορεί
ελεύθερα ο αέρας.
• Να αφήνετε αρκετό χώρο ανάμεσα στα αποθηκευμένα τρόφιμα για την αποτελεσματική
κυκλοφορία του αέρα.
• Έχει κλείσει σωστά το συρτάρι του καταψύκτη;
Ο διανεμητής
νερού δεν
λειτουργεί.
• Είναι ο σωλήνας νερού συνδεδεμένος και η στραγγαλιστική βαλβίδα ανοικτή;
• Μήπως οι σωληνώσεις παροχής νερού έχουν καταστραφεί ή συστραφεί;
• Βεβαιωθείτε ότι οι σωληνώσεις είναι ελεύθερες από εμπόδια και εμφράξεις.
• Μήπως το δοχείο νερού έχει παγώσει γιατί η θερμοκρασία του ψυγείου είναι πολύ χαμηλή;
Δοκιμάστε να ρυθμίσετε πιο ψηλά τη θερμοκρασία από την ψηφιακή οθόνη.
• Μήπως έχετε ενεργοποιήσει τη λειτουργία Child Lock (Γονικό κλείδωμα);
Το σύστημα
αυτόματου
κλεισίματος για
την πόρτα του
καταψύκτη δεν
λειτουργεί.
• Μήπως υπάρχει ανισορροπία μεταξύ της δεξιάς και της αριστερής πλευράς της πόρτας;
• Ανοίξτε και κλείστε απαλά την πόρτα 1-2 φορές. Αφού το κάνετε αυτό, συνήθως το σύστημα
αυτόματου κλεισίματος λειτουργεί και πάλι κανονικά.
• Δοκιμάστε να ανοίξετε την πόρτα απαλά, ώστε να μην υπάρχει ανισορροπία μεταξύ της
δεξιάς και της αριστερής πλευράς της πόρτας.
αντιμετώπιση προβλημάτων _37
03 ΑΝΤΙΜΕΤΩΠΙΣΗ ΠΡΟΒΛΗΜΑΤΩΝ
DA68-02916G-14.indb 37 2019. 2. 27. 오전 8:27

σημειώσεις
DA68-02916G-14.indb 38 2019. 2. 27. 오전 8:27

σημειώσεις
DA68-02916G-14.indb 39 2019. 2. 27. 오전 8:27

Όρια θερμοκρασίας περιβάλλοντος
Αυτό το ψυγείο/καταψύκτης έχει σχεδιαστεί για να λειτουργεί σε θερμοκρασίες περιβάλλοντος που
καθορίζονται από την κλάση θερμοκρασίας που σημειώνεται στην πλακέτα τιμών.
Κατηγορία Σύμβολο
Εύρος θερμοκρασίας περιβάλλοντος (°C)
IEC 62552 (ISO 15502) ISO 8561
Εκτεταμένη εύκρατη SN +10 έως +32 +10 έως +32
Εύκρατη N +16 έως +32 +16 έως +32
Υποτροπική ST +16 έως +38 +18 έως +38
Τροπική T +16 έως +43 +18 έως +43
Οι εσωτερικές θερμοκρασίες μπορούν να επηρεαστούν από παράγοντες όπως η θέση του
ψυγείου/καταψύκτη, η θερμοκρασία περιβάλλοντος και η συχνότητα με την οποία ανοίγετε την
πόρτα. Ρυθμίστε τη θερμοκρασία όπως απαιτείται για την αντιστάθμιση αυτών των παραγόντων.
Greece
Σωστή Απόρριψη αυτού του Προϊόντος
(Απόβλητα Ηλεκτρικού & Ηλεκτρονικού Εξοπλισμού)
(Ισχύει σε χώρες με ξεχωριστά συστήματα συλλογής)
Αυτό το σήμα που εμφανίζεται επάνω στο προϊόν, στα εξαρτήματά του ή στα εγχειρίδια που
το συνοδεύουν, υποδεικνύει ότι το προϊόν και τα ηλεκτρονικά του εξαρτήματα (π.χ. φορτιστής,
ακουστικά, καλώδιο USB) δεν θα πρέπει να ρίπτονται μαζί με τα υπόλοιπα οικιακά απορρίμματα
μετά το τέλος του κύκλου ζωής τους. Προκειμένου να αποφευχθούν ενδεχόμενες βλαβερές
συνέπειες στο περιβάλλον ή την υγεία εξαιτίας της ανεξέλεγκτης διάθεσης απορριμμάτων,
σας παρακαλούμε να διαχωρίσετε αυτά τα προϊόντα από άλλους τύπους απορριμμάτων και
να τα ανακυκλώσετε, ώστε να βοηθήσετε στην βιώσιμη επαναχρησιμοποίηση των υλικών
πόρων.
Οι οικιακοί χρήστες θα πρέπει να έλθουν σε επικοινωνία είτε με το κατάστημα απ’ όπου
αγόρασαν αυτό το προϊόν, είτε με τις κατά τόπους υπηρεσίες, προκειμένου να πληροφορηθούν
τις λεπτομέρειες σχετικά με τον τόπο και τον τρόπο με τον οποίο μπορούν να δώσουν αυτά τα
προϊόντα για ασφαλή προς το περιβάλλον ανακύκλωση.
Οι επιχειρήσεις-χρήστες θα πρέπει να έλθουν σε επαφή με τον προμηθευτή τους και να
ελέγξουν τους όρους και τις προϋποθέσεις του συμβολαίου αγοράς. Αυτό το προϊόν και
τα ηλεκτρονικά του εξαρτήματα δεν θα πρέπει να αναμιγνύονται με άλλα συνηθισμένα
απορρίμματα προς διάθεση.
Για πληροφορίες σχετικά με τις δεσμεύσεις της Samsung αναφορικά με την προστασία του
περιβάλλοντος και τις κανονιστικές υποχρεώσεις που αφορούν τα συγκεκριμένα προϊόντα
π.χ. REACH, επισκεφθείτε την ηλεκτρονική διεύθυνση: samsung.com/uk/aboutsamsung/
samsungelectronics/corporatecitizenship/data_corner.html
Επικοινωνήστε με τη SAMSUNG σε όλο τον κόσμο
Εάν έχετε σχόλια ή ερωτήσεις σχετικά με προϊόντα της Samsung, επικοινωνήστε με το κέντρο
εξυπηρέτησης πελατών της SAMSUNG.
Χώρα Κέντρο εττικοινωνίας Ιστοσελίδα
ITALIA 800-SAMSUNG (800.7267864) www.samsung.com/it/support
SPAIN
0034902172678
[HHP] 0034902167267
www.samsung.com/es/support
PORTUGAL 808 207 267 www.samsung.com/pt/support
GREECE
80111-SAMSUNG (80111 726 7864) only from land line
(+30) 210 6897691 from mobile and land line
www.samsung.com/gr/support
CYPRUS 8009 4000 only from landline, toll free www.samsung.com/gr/support
DA68-02916G-14.indb 40 2019. 2. 27. 오전 8:27

Refrigerator
user manual
imagine the possibilities
Thank you for purchasing this Samsung product.
Free Standing Appliance
English
DA68-02916G-14.indb 1 2019. 2. 27. 오전 8:27

Safety information
SAFETY INFORMATION
• Before operating the
appliance, please read this
manual thoroughly and retain
it at a safe place near the
appliance for your future
reference.
• Use this appliance only for
its intended purpose as
described in this instruction
manual. This appliance is not
intended for use by persons
(including children) with
reduced physical, sensory
or mental capabilities, or
lack of experience and
knowledge, unless they have
been given supervision or
instruction concerning use
of the appliance by a person
responsible for their safety.
• This appliance can be used
by children aged from 8 years
and above and persons with
reduced physical, sensory or
mental capabilities or lack of
experience and knowledge
if they have been given
supervision or instruction
concerning use of the appliance
in a safe way and understand
the hazards involved.
Children shall not play with the
appliance.
• Cleaning and user
maintenance shall not be
made by children without
supervision.
• Warnings and Important Safety
Instructions in this manual
do not cover all possible
conditions and situations
that may occur. It is your
responsibility to use common
sense, caution, and care when
installing, maintaining, and
operating your appliance.
• Because these following
operating instructions
cover various models, the
characteristics of your
refrigerator may dier slightly
from those described in this
manual and not all warning
signs may be applicable.
If you have any questions
or concerns, contact your
nearest service center or find
help and information online at
www.samsung.com.
Warning; Risk of
fire / flammable
materials
02_ Safety information
DA68-02916G-14.indb 2 2019. 2. 27. 오전 8:27

Important safety symbols
and precautions :
WARNING
Hazards or unsafe
practices that may result
in severe personal
injury or death.
CAUTION
Hazards or unsafe
practices that may result
in minor personal injury
or property damage.
Do NOT attempt.
Do NOT disassemble.
Do NOT touch.
Follow directions
carefully.
Unplug the power plug
from the wall socket.
Make sure the machine
is grounded to prevent
electric shock.
Call the contact center
for help.
Note.
These warning signs are
here to prevent injury to you
and others.
Please follow them carefully.
After reading this section,
keep it in a safe place for
future reference.
SEVERE WARNING
SIGNS FOR
TRANSPORTATION
AND SITE
• When transporting
and installing the
appliance,care should be
taken to ensure that no
parts of the refrigerating
circuit are damaged.
• R-600a or R-134a is used
as a refrigerant. Check the
compressor label on the rear
of the appliance or the rating
label inside the refrigerator to
see which refrigerant is used
for your refrigerator.
• When this product contains
flammable gas (Refrigerant
R-600a),
- Refrigerant leaking from the
pipe work could ignite or
cause an eye injury. If a leak
is detected, avoid any naked
WARNING
Safety information _03
DA68-02916G-14.indb 3 2019. 2. 27. 오전 8:27

flames or potential sources
of ignition and air the room
in which the appliance is
standing for several minutes.
- In order to avoid the creation
of a flammable gas-air mixture
if a leak in the refrigerating
circuit occurs, the size of the
room in which the appliance
may be sited depends on the
amount of refrigerant used.
- Never start up an appliance
showing any signs of damage.
If in doubt, consult your
dealer. The room where the
refrigerator will be sited must
be 1m³ in size for every 8g
of R-600a refrigerant inside
the appliance. The amount of
refrigerant in your particular
appliance is shown on the
identification plate inside the
appliance.
- If the appliance contains
isobutane refrigerant
(R-600a), a natural gas
with high environmental
compatibility that is, however,
also combustible. When
transporting and installing the
appliance, care should be
taken to ensure that no parts
of the refrigerating circuit are
damaged.
SEVERE WARNING
SIGNS FOR
INSTALLATION
• Do not install this
appliance in a humid, oily
or dusty location, in a
location exposed to direct
sunlight and water (rain
drops).
- Deteriorated insulation of
electrical parts may cause an
electric shock or fire.
• Do not place this refrigerator
in direct sunlight or expose to
the heat from stoves, room
heaters or other appliances.
• Do not plug several appliances
into the same multiple power
board.
The refrigerator should always
be plugged into its own
individual electrical outlet
which has a voltage rating that
matched the rating plate.
- This provides the best
performance and also
prevents overloading house
wiring circuits, which could
cause a fire hazard from
overheated wires. If the wall
socket is loose, do not insert
the power plug.
- There is a risk of electric shock
or fire.
• Do not use a cord that shows
WARNING
04_ Safety information
DA68-02916G-14.indb 4 2019. 2. 27. 오전 8:27

cracks or abrasion damage
along its length or at either end.
• Do not bend the power cord
excessively or place heavy
articles on it.
• Do not use aerosols near the
refrigerator.
- Aerosols used near the
refrigerator may cause an
explosion or fire.
• Do not install this appliance in
a location where gas may leak.
- This may result in an electric
shock or fire.
• The installation or any
service of this appliance
is recommended by a
qualified technician or
service company.
- Failing to do so may result
in an electric shock, fire,
explosion, problems with the
product, or injury.
• This refrigerator must be
properly installed and located
in accordance with the manual
before it is used.
• Do not install the refrigerator in
a damp place or place where
it may come in contact with
water.
- Deteriorated insulation of
electrical parts may cause an
electric shock or fire.
• Connect the power plug in
proper position with the cord
hanging down.
- If you connect the power plug
upside down, wire can get
cut o and a cause fire or an
electric shock.
• Do not use a cord that shows
cracks or abrasion damage
along its length or at either
end.
• Make sure that the power plug
is not squashed or damaged
by the back of the refrigerator.
• When moving the refrigerator,
be careful not to roll over or
damage the power cord.
- This constitutes a fire hazard.
• The appliance must be
positioned so that the plug is
accessible after installation.
• Keep the packing materials
out of reach of children.
- There is a risk of death from
suocation if children put them
on their head.
• This appliance must be
properly grounded. Do not
ground the appliance to
a gas pipe, plastic water
pipe, or telephone line.
- You must ground the
refrigerator to prevent any
power leakages or electric
Safety information _05
DA68-02916G-14.indb 5 2019. 2. 27. 오전 8:27

shocks caused by current
leakage from the refrigerator.
- This may result in an electric
shock, fire, explosion, or
problems with the product.
- Never plug the power cord into
a socket that is not grounded
correctly and make sure that it
is in accordance with local and
national codes.
•
If the power cord is
damaged, have it replaced
immediately by the
manufacturer or its service
agent.
• The fuse on the refrigerator
must be changed by a
qualified technician or service
company.
- Failing to do so may result in
an electric shock or personal
injury.
CAUTION SIGNS FOR
INSTALLATION
• Keep ventilation opening
in the appliance enclosure
or mounting structure
clear of obstruction.
• Allow the appliance to stand
for 2 hours after installation.
CAUTION
SEVERE WARNING
SIGNS FOR USING
• Do not insert the power
plug with wet hands.
• Do not store articles on
the top of the appliance.
- When you open or close the
door, the articles may fall and
cause a personal injury and/or
material damage.
• Do not put items filled with
water on the refrigerator.
- If spilled, there is a risk of fire
or electric shock.
• Do not let children hang on the
door.
- Failure to do so may cause
serious personal injury.
• Do not leave the doors of the
refrigerator open while the
refrigerator is unattended and
do not let children enter inside
the refrigerator.
• Do not allow babies or children
go inside the drawer.
- It can cause death from
suocation by entrapment or
personal injury.
• Do not sit on the Freezer door.
- The door may be broken and
cause a personal injury.
• Children should be supervised
to ensure that they do not
play with the appliance. Keep
WARNING
06_ Safety information
DA68-02916G-14.indb 6 2019. 2. 27. 오전 8:27

fingers out of “pinch point”
areas :
clearances between the
doors and cabinet are
necessarily small. Be careful
when you open the doors
when children are in the area.
Do not let children hang on
the door. If not, a serious
injury may occur. There is a
Risk of children entrapment.
Do not let children enter
inside the refrigerator.
• To prevent children
entrapment, you must
reinstall the divider using
provided screws after
cleaning or other actions if
you removed the divider from
the drawer.
• Never put fingers or other
objects into the dispenser
hole.
- Failure to do so may cause
personal injury or material
damage.
• Do not store volatile or
flammable substances such
as benzene, thinner, alcohol,
ether or LP gas in the
refrigerator.
- The storage of any of such
products may cause an
explosion.
• Do not store low
temperature-sensitive
pharmaceutical products,
scientific materials or other
low temperature-sensitive
products in the refrigerator.
- Products that require strict
temperature controls must not
be stored in the refrigerator.
• Do not place or use electrical
appliance inside the
refrigerator, unless they are of
a type recommended by the
manufacturer.
• Do not use a hair dryer to dry
the inside of the refrigerator.
Do not place a lighted candle
in the refrigerator for removing
bad odors.
- This may result in an electric
shock or fire.
• Do not touch the inside walls
of the freezer or products
stored in the freezer with wet
hands.
- This may cause frostbite.
• Do not use mechanical
devices or any other means
to accelerate the defrosting
process, other than those
recommended by the
manufacturer.
• Do not damage the refrigerant
circuit.
Safety information _07
DA68-02916G-14.indb 7 2019. 2. 27. 오전 8:27

• This product is intended
only for the storage
of food in a domestic
environment.
• Bottles should be stored
tightly together so that they
do not fall out.
• In the event of a gas leak
(such as propane gas, LP gas,
etc.), ventilate immediately
without touching the power
plug. Do not touch the
appliance or power cord.
• Do not insert hands, feet
or metal objects (such as
chopsticks, etc.) into the bottom
or the back of the refrigerator.
- This may result in an electric
shock or injury.
- Any sharp edges may cause a
personal injury.
- Do not use a ventilating fan.
- A spark may result in an
explosion or fire.
• Use only the LED Lamps
provided by manufacturer or
service agent.
• Children should be supervised
to ensure that they do not
play with and/or climb into the
appliance.
• Do not disassemble or
repair the refrigerator by
yourself.
- You run a risk of causing
a fire, malfunction and/ or
personal injury. In case of
malfunction, please contact
your service agent.
• Do not attempt to repair,
disassemble, or modify
the appliance yourself.
- Do not use any fuse(such as
cooper, steel wire, etc.) other
than the standard fuse.
- When repairing or reinstalling
the appliance is required,
contact your nearest service
center.
- Failing to do so may result
in an electric shock, fire,
problems with the product,
or injury.
• If the appliance generates a
strange noise, a burning or
smell or smoke, unplug the
power plug immediately and
contact your nearest service
center.
- Failing to do so may result in
an electric or fire hazards.
• If you experience diculty
when changing the light,
contact service agent.
• If the products is equipped
with the LED Lamp, do not
disassemble the Lamp Cover
and LED Lamp by yourself.
08_ Safety information
DA68-02916G-14.indb 8 2019. 2. 27. 오전 8:27

- Please contact your service
agent.
• If any dust or water is in the
refrigerator, pull out power
plug and contact your
Samsung Electronics service
center.
- There is a risk of fire.
CAUTION SIGNS
FOR USING
• To get best performance
from the product,
- Do not place foods too
closely in front of the vents
at the rear of the appliance
as it can obstruct free air
circulation in the refrigerator
compartment.
- Wrap the food up properly or
place it in airtight containers
before putting it into the
refrigerator.
- Do not put any newly
introduced food for freezing
near to already existing food.
• Do not place carbonated
or fizzy drinks in the freezer
compartment. Do not put
bottles or glass containers in
the freezer.
- When the contents freeze,
CAUTION
the glass may break and
cause personal injury and
property damage.
• Do not change or modify the
functionality of the refrigerator.
- Changes or modifications
may result in a personal injury
and/or property damage.
Any changes or modifications
performed by a 3rd party on
this completed appliance
are neither covered under
Samsung warranty service,
nor is Samsung responsible
for safety issues and damages
that result from 3rd party
modifications.
• Do not block air holes.
- If the air holes are blocked,
especially with a plastic bag,
the refrigerator can be over
cooled. If this cooling period
lasts too long, the water filter
may break and cause water
leakage.
- Do not put any newly
introduced food for freezing
near to already existing food.
• Please observe maximum
storage times and expiry
dates of frozen goods.
• Fill the water tank, ice tray,
water cubes only with potable
water.
• Use only the ice-maker
Safety information _09
DA68-02916G-14.indb 9 2019. 2. 27. 오전 8:27

provided with the refrigerator.
• The water supply to this
refrigerator must only be
installed/connected by a
suitably qualified person and
connected to a potable water
supply only.
• In order to operate the
ice-maker properly,
water pressure of
138~862 kPa(1.4~8.8 kgf/cm
3
)
is required.
• Do not spray volatile material
such as insecticide onto the
surface of the appliance.
- As well as being harmful to
humans, it may also result
in an electric shock, fire or
problems with the product.
• Do not apply strong shock
or excessive force onto the
surface of glass.
- Broken glass may result in a
personal injury and/or property
damage.
CAUTION SIGNS
FOR CLEANING AND
MAINTENANCE
• Do not directly spray
water inside or outside
the refrigerator.
- There is a risk of fire or
electric shock.
• Do not use or place any
substances sensitive
to temperature such
as inflammable sprays,
inflammable objects, dry
ice, medicine, or chemicals
near the refrigerator. Do not
keep volatile or inflammable
objects or substances
(benzene, thinner, propane
gas, etc.) in the refrigerator.
- This refrigerator is for storing
food only.
- This may result in a fire or an
explosion.
• Do not spray inflammable
gas near the refrigerator.
- There is a risk of explosion or
fire.
• Do not spray cleaning
products directly on the
display.
- Printed letters on the display
may come o.
• Remove any foreign matter
or dust from the power plug
CAUTION
10_ Safety information
DA68-02916G-14.indb 10 2019. 2. 27. 오전 8:27

pins. But do not use a wet
or damp cloth when cleaning
the plug, remove any foreign
material or dust from the
power plug pins.
- Otherwise there is a risk of
fire or electric shock.
• Never put fingers or other
objects into the dispenser
hole and ice chute.
- It may cause a personal injury
or material damage.
• Unplug the refrigerator
before cleaning and
performing maintenance.
• Plug the power plug into the
wall socket firmly. Do not
use a damaged power plug,
damaged power cord or
loose wall socket.
- This may result in an electric
shock or fire.
• Do not pull or excessively
bend the power cord. Do not
twist or tie the power cord.
Do not hook the power cord
over a metal object, place a
heavy object on the power
cord, insert the power cord
between objects, or push the
power cord into the space
behind the appliance.
- When moving the refrigerator,
be careful not to roll over or
damage the power cord
- This may result in an electric
shock or fire.
SEVERE WARNING
SIGNS FOR
DISPOSAL
• Ensure that none of the
pipes on the back of the
appliance are damaged
prior to disposal.
• R-600a or R-134a is used
as a refrigerant. Check the
compressor label on the rear
of the appliance or the rating
label inside the refrigerator to
see which refrigerant is used
for your refrigerator. When this
product contains flammable
gas (Refrigerant R-600a),
contact your local authority
in regard to safe disposal of
this product. Cyclopentane
is used as an insulation
blowing gas. The gases in
insulation material require
special disposal procedure.
Please contact your local
authorities in regard to the
environmentally safe disposal
of this product. Ensure that
none of the pipes on the
back of the appliances are
CAUTION
Safety information _11
DA68-02916G-14.indb 11 2019. 2. 27. 오전 8:27

damaged prior to disposal.
The pipes shall be broken in
the open space.
• It is hazardous for anyone
other than an Authorized
Service Person to service this
appliance. In Queensland –
the authorized Service Person
MUST hold a Gas Work
Authorization or License for
hydrocarbon refrigerants, to
carry out Servicing or repairs
which involve the removal of
covers. (For Australia only)
• When disposing of this
product or other refrigerators,
remove the door/door seals,
door latch so that small
children or animals cannot
become trapped inside. Leave
the shelves in place so that
children may not easily climb
inside. Children should be
supervised to ensure that
they do not play with the old
appliance.
• Please dispose of the
packaging material for this
product in an environmentally
friendly manner.
• Keep all packaging materials
well out of the reach of
children, as packaging
materials can be dangerous to
children.
- If a child places a bag over
its head, it may result in
suocation.
ADDITIONAL TIPS
FOR PROPER
USAGE
• In the event of a power
failure, call the local oce of
your Electricity Company and
ask how long it is going to
last.
- Most power failures that are
corrected within an hour
or two will not aect your
refrigerator temperatures.
However, you should
minimize the number of door
openings while the power is
o.
- Should the power failure last
more than 24 hours, remove
all frozen food.
• If keys are provided with the
refrigerator, the keys should
be kept out of the reach of
children and not be in the
vicinity of the appliance.
• The appliance might
not operate consistently
(possibility of temperature
becoming too warm in the
refrigerator) when sited
12_ Safety information
DA68-02916G-14.indb 12 2019. 2. 27. 오전 8:27

for an extended period of
time below the cold end of
the range of temperature
for which the refrigerating
appliance is designed.
• Do not store food which
spoils easily at low
temperature, such as
bananas, melons.
• Your appliance is frost free,
which means there is no
need to manually defrost
your appliance, as this will be
carried out automatically.
• Temperature rise during
defrosting can comply with
ISO requirements. But if you
want to prevent an undue
rise in the temperature of the
frozen food while defrosting
the appliance, please wrap
the frozen food up in several
layers of newspaper.
• Any increase in temperature
of frozen food during
defrosting can shorten its
storage life.
Saving Energy Tips
- Install the appliance in a
cool, dry room with adequate
ventilation.
Ensure that it is not exposed
to direct sunlight and never put
it near a direct source of heat
(radiator, for example).
- Never block any vents or grilles
on the appliance.
- Allow warm food to cool
down before placing it in the
appliance.
- Put frozen food in the
refrigerator to thaw. You can
then use the low temperatures
of the frozen products to cool
food in the refrigerator.
- Do not keep the door of the
appliance open for too long
when putting food in or taking
food out. The shorter time for
which the door is open, the
less ice will form in the freezer.
- Clean the rear of the refrigerator
regularly. Dust increases energy
consumption.
- Do not set temperature colder
than necessary.
- Ensure sucient air exhaust at
the refrigerator base and at the
back wall of the refrigerator.
Do not cover air vent openings.
- Allow clearance to the right, left,
back and top when installing.
Safety information _13
DA68-02916G-14.indb 13 2019. 2. 27. 오전 8:27

This will help reduce power
consumption and keep your
energy bills lower.
- For the most ecient use
of energy, please keep the
all inner fittings such as
baskets, drawers, shelves
on the position supplied by
manufacturer.
This appliance is intended
to be used in household and
similar applications such as
- sta kitchen areas in shops,
oces and other working
environments;
- farm houses and by clients
in hotels, motels and other
residential type environments;
- bed and breakfast type
environments;
- catering and similar non-retail
applications.
Contents
SETTING UP YOUR FRENCH DOOR REFRIGERATOR ……………………… 15
OPERATING YOUR FRENCH DOOR REFRIGERATOR ………………………… 23
TROUBLESHOOTING ……………………………………………………………… 36
14_ Safety information
DA68-02916G-14.indb 14 2019. 2. 27. 오전 8:27

Setting up your French Door
Refrigerator
GETTING READY TO INSTALL
THE REFRIGERATOR
Congratulations on your purchase of this Samsung
French Door Refrigerator.
We hope you enjoy the state-of-art features and
eciencies that this new appliance oers.
Selecting the best location for the
refrigerator
Choose :
• A location with easy access to a water supply.
• A location without direct exposure to sunlight.
• A location with a level floor.
• A location with enough space for the
refrigerator doors to open easily.
• A location that allows sucient space to the
right, left, back and top for air circulation.
• A location that allows you to move the
refrigerator easily if it needs maintenance or
service.
• Do not install the refrigerator where the
temperature will go below 10 ºC.
• Do not locate the refrigerator where it may
become wet.
If the refrigerator does not have enough space,
the internal cooling system may not work properly.
If your refrigerator has an ice maker, allow extra
space at the back for the water line connections.
When you install the refrigerator next to a fixed
wall, you need a minimum clearance of 95 mm
between the refrigerator and wall to allow the door
to swing open.
Important : Make sure that you can easily move
your refrigerator to its final location by measuring
doorways (both width and height), thresholds,
ceilings, stairways, etc.
The following chart details the exact height and
depth of this Samsung French Door Refrigerator.
AA
B
B
C
C
D
D
E
E
Depth “A” 726 mm
Width “B” 908 mm
Height “C” 1749 mm
Overall Hei ght “D” 1777 mm
Depth “E” 788 mm
125° 125°
Each measurement based on the design
dimension, so it may dier depending on
the measuring method.
setting up _15
01 SETTING UP
DA68-02916G-14.indb 15 2019. 2. 27. 오전 8:27

When moving your refrigerator
To prevent floor damage, be sure the front
adjusting legs are in the up position (above
the floor). Refer to ‘Adjusting the Level’ in
the manual (on page 19).
Flat-blade screw
driver(-)
Control Lever
FLOORING
For proper installation, you must place this
refrigerator on a level, hard surface that is the
same height as the rest of the floor. This surface
should be strong enough to support a fully loaded
refrigerator.
To protect the finish of the flooring, cut a large
section of the cardboard carton and place it under
the refrigerator where you are working. When
moving the refrigerator, you need to pull and push
it straight forwards or back. Do not wiggle it from
side to side.
CAUTION
REMOVING THE
REFRIGERATOR DOORS
For some installations you need to remove the
fridge and freezer drawers so you can move the
refrigerator to its final location. Do not remove
the doors/drawer if you don’t need to. If you
do not need to remove the refrigerator doors, go
to Adjusting the Level on page 19. If you need to
remove the doors. continue below.
Before removing the door/drawer, make sure you
read the following items:
Disconnect power to the refrigerator
before removing the door or drawer.
• Be careful not to drop, damage, or
scratch the doors/drawers while
removing them.
• Use care when you remove the doors/drawers.
The doors are heavy and you could injure
yourself.
• Reattach the doors/drawers properly to avoid:
- Moisture from air leakage.
- Uneven door alignment.
- Wasting energy due to improper door seal.
Disassemble the refrigerator doors
Be careful not to drop and scratch the
doors while removing them.
Required Tools (Not provided)
You need the following tools to complete the
installation of your refrigerator:
Philips
screwdriver (+)
Flat-blade screw
driver (-)
Socket wrench
(10mm)
Pliers
Allen wrench
(5mm)
WARNING
WARNING
16_ setting up
DA68-02916G-14.indb 16 2019. 2. 27. 오전 8:27

With the door opened
1. Remove the 3 screws holding down the TOP
TABLE (1) and separate the connected wires.
1
2. Disconnect the two connectors (2) on the
left side door. To remove the water coupler
from the hinge, twist and pull it from the hinge.
Remove the water line (3) while pressing the
marked part (4) of the water line coupler.
2
3
4
3. Pull and remove the hinge lever (5). Remove
the ground screw (6) attached to the upper
left door hinges with a philips screwdriver (+).
Remove the upper left and right door hinges
(7).
5
6
7
4. Lift the door straight up to remove.
5. Remove the screw (8) attached to the
lower left and right door hinges with a philips
screwdriver (+). Remove the 2 hex head bolts
(9) attached to the lower left and right door
hinges with an allen wrench (5mm). Remove
the lower left and right door hinges (10).
10
8
9
Allen wrench
RE-ATTACHING THE
REFRIGERATOR DOORS
To reattach the fridge doors after you have moved
the fridge to its final location, assemble the parts
in reverse order.
1. The Water Line must be fully inserted into the
center of the transparent coupler (Type A)
or the Guide Lines (Type B) to prevent water
leakage from the dispenser.
Type A Type B
Center of Transparent coupler The Guide Lines
Dispenser
setting up _17
01 SETTING UP
DA68-02916G-14.indb 17 2019. 2. 27. 오전 8:27

DISASSEMBLING THE FLEX
DOOR
1. Take out the Flex Zone (1) by lifting it up.
1
2. Take o the cover (2) w/harness with a flat-
blade screwdriver (-).
2
3. Press the locking tab and separate the Wire
Connector.
When reassembling it, be sure to connect
the wire harness.
If it is not connected, the Flex Room does
not work.
4. Remove 1 hex head bolt from each side with a
socket wrench (10mm).
CAUTION
5. Lift up the Flex door from the rails.
Putting too much food into the freezer
drawers can prevent the freezer from
closing completely and can cause frost
build-up.
RE-ASSEMBLING THE FLEX
DOOR
To reattach the flex doors, assemble parts in
reverse order.
Be sure to connect the Flex Door Wire
Connector.
If it is not connected, the Flex Room does
not work.
DISASSEMBLING THE
FREEZER DOOR
1. Take out the upper drawer by lifting it up.
2. Remove the freeze room guard (1) by lifting
the guard up.
CAUTION
CAUTION
18_ setting up
DA68-02916G-14.indb 18 2019. 2. 27. 오전 8:27

1
3. Take out the lower basket (2) by lifting the
basket up from the rail system.
2
4. Press the fixing hook of the rail system.
5. Holding the top of the Freezer Drawer, pull it
out all the way, and then remove it from the rail
system.
Be careful not to scratch or dent the
sliding rail by letting it strike the floor.
Make sure that you mount the freezer
basket in the right position when removing
/ installing the freezer door. Failing to do
so may result in the door not opening or
closing properly.
Putting too much food into the freezer
drawers can prevent the freezer from
closing completely and can cause frost
build-up.
CAUTION
CAUTION
CAUTION
RE-ASSEMBLING THE
FREEZER DOOR
To reattach the drawer after you have moved the
fridge to its final location, assemble the parts in
reverse order.
ADJUSTING THE LEVEL
Make sure the refrigerator is level so that you can
make final adjustments. Use a level to test if the
refrigerator is level both side to side and back to
front. If the refrigerator is not level, you will not
be able to get the doors perfectly even, which
may cause moisture condensation and increased
energy bills. Below is an example of how to level
the refrigerator if the left side of the refrigerator is
lower than the right side.
How to adjust the level
1. Open the freezer drawer and remove the lower
basket.
2. Insert a flat-blade screwdriver (-) into the notch
on the left control lever, and turn it counter-
clockwise to level the refrigerator. (You turn the
lever clockwise to lower the refrigerator and
counterclockwise to raise it.)
setting up _19
01 SETTING UP
DA68-02916G-14.indb 19 2019. 2. 27. 오전 8:28

flat-blade screwdriver (-)
Control Lever
Both control levers must be touching the
floor to avoid possible personal injury or
property damage because of tipping.
If the right side is lower, perform the same
procedure, but with the right control lever.
It is dicult to remove the cover leg
front from the refrigerator, so we do not
recommend making small adjustments
with the control lever. Instead, refer to the
next page for the best way to make minor
adjustments to the doors.
MAKING MINOR
ADJUSTMENTS TO THE DOOR
OR IN DOOR
Remember, a leveled refrigerator is necessary
for getting the doors perfectly even. If you need
help, review the previous section on leveling the
refrigerator.
Adjustment
part
Fixed part
The left door is fixed. To make minor door
adjustments, adjust only the right door.
Snap ring
The height of a door or in door can be adjusted
using the provided snap rings, which come in 4
dierent sizes (1 mm, 1.5 mm, 2 mm, and 2.5 mm).
CAUTION
To adjust the height of a door
Check the height dierence between the doors,
and then raise and hold the lower door.
• Insert the snap ring in the gap between the in
door and the HINGE-SHAFT.
(applicable models only)
• Insert only one snap ring for this
purpose. Two or more snap rings may
slip out or make a rubbing noise.
• Keep the snap rings out of children’s reach, and
keep them for future use.
• Do not raise the door too much. The door can
contact and damage the top cover.
MAKING MINOR
ADJUSTMENTS BETWEEN
OUT DOOR AND IN DOOR
(APPLICABLE MODELS ONLY)
After raising the out door, insert the supplied snap
ring in the gap between the OUT DOOR and the
HINGE-SHAFT.
CAUTION
20_ setting up
DA68-02916G-14.indb 20 2019. 2. 27. 오전 8:28

Snap ring are enclosed with the
refrigerator.
The thickness of RING is 1 mm, 2 ea.
Use the snap ring in case the handle does
not move because the out door is lowered.
INSTALLING THE WATER
DISPENSER LINE
A water dispenser with a filter is one of the helpful
features on your new refrigerator. To help promote
better health, the water filter removes unwanted
particles from your water. However, it does not
sterilize or destroy microorganisms. You may need
to purchase a water purifying system to do that.
In order for the ice maker to operate properly, a
water pressure of 20~125 psi is required.
Under normal conditions, a 170 cc (5.75 oz.) cup
can be filled in about 10 seconds.
If the refrigerator is installed in an area with low
water pressure (below 20psi), you can install
a booster pump to compensate for the low
pressure.
After you have connected the water line, make
sure the water storage tank inside the refrigerator
is properly filled. To do this, press the water
dispenser lever until the water runs from the water
outlet.
Water line installation kits are include with
unit. You can find it in freezer drawer.
The new hose-sets supplied with the
appliance are to be used and that old
hose-sets should not be reused.
Parts for water line Installation
Water line fixer and screws Pipe connector
Water line
Connecting to the water supply line
1. First, shut o the main water supply line.
2. Locate the nearest cold, drinking water line.
3. Follow the Water line Installation Instructions in
the installation kit.
The water line must be connected to
the cold water pipe. If it is connected
to the hot water pipe, it may cause the
purifier to malfunction.
CAUTION
Close Main
Water pipe
Close Main
Water pipe
No gap
4. After connecting the water supply to the water
filter, turn your main water supply back on
and dispense about 3L to clear and prime the
water filter.
Connecting the water line to the
refrigerator
1. Remove the cap from the water line on the unit
and insert the compression nut of the water
line into the water line on the unit.
2. Connect the water line on the unit with the
water line in the kit .
3. Tighten the compression nut onto the
compression fitting. There should be no gaps
between (A, B & C )
4. Turn water on and check for any leakage.
Only connect the water line to a drinkable
water source. If you have to repair or
disassemble the water line, cut o 6.5mm
of the plastic tubing to make sure you get
a snug, leak-free connection.
setting up _21
01 SETTING UP
DA68-02916G-14.indb 21 2019. 2. 27. 오전 8:28

No gap
Loosen a
Remove
cap
Water Line
from Kit
Water Line
from unit
Before being used, the leakage in these
places should be examined.
• Samsung Warranty
does not cover
WATER LINE
INSTALLATION.
• It will be done at
customer’s charge
unless the retail price includes installation cost.
• Please contact Plumber or Authorized Installer
for the installation if needed.
• If Water leakage occurs due to improper
installation, Please contact installer.
CAUTION
COMPLETING THE SET UP
Now that you have your new refrigerator installed
in place, you are ready to set up and enjoy the
features and functions of the appliance.
By completing the following steps, your refrigerator
should be fully operational.
1. Make sure your refrigerator is in an appropriate
location with reasonable clearance between it
and the wall. Refer to installation instructions in
this manual.
2. Once the refrigerator is plugged in, make sure
the interior light comes on when you open the
doors.
3. Set the Temperature control to the coldest
temperature and wait for an hour. The freezer
will get slightly chilled and the motor will run
smoothly. Reset the refrigerator and freezer to
the temperatures you want.
4. After you plug the refrigerator in, it will
take a few hours to reach the appropriate
temperature. You can store food and drinks
in the refrigerator after the temperature is
suciently cool.
22_ setting up
DA68-02916G-14.indb 22 2019. 2. 27. 오전 8:28

Operating your French Door
Refrigerator
USING THE CONTROL PANEL
10 9
1
2
3
5
6
4
7 8
( 1 )
Energy
Saver
Touching this button turns Energy Saver
mode on and o. When you turn Energy
Saver on, the Energy Saver icon lights.
Turn Energy Saver o and the icon goes
o. The Energy Saver function’s factory
setting is “ON”. If condensation or water
drops appear on the doors, turn the
Energy Saver mode o.
( 2 )
Freezer
(Hold 3
sec for
Power
Freeze)
The Freezer button serves two purposes:
- To set the Freezer to your desired
temperature.
- To turn the power freeze function on
and o.
1) To set the Freezer temperature
Touch the Freezer button to set the
Freezer to your desired temperature. You
can set the temperature between -15 °C
and -23 °C.
2) Power Freeze function
Touch and hold this button for 3 seconds
to decrease the time needed to freeze
products in the Freezer.
It can be helpful if you need to quickly
freeze easily spoiled items or if the
temperature in the freezer has warmed
dramatically (For example, if the door was
left open).
When you use this function the energy
consumption of the refrigerator will
increase. Remember to turn it o when
you don’t need it and return the freezer
to your original temperature setting. If you
need to freeze large amount of food stu,
activate Power Freeze function at least 20
hours before.
( 3 )
Alarm
(Hold 3
sec for
Filter
Reset
The Alarm button serves two purposes:
- To turn the door open alarm on and o
- To reset the water filter life indicator.
1) Door Alarm Function
If the door alarm is set to On, an alarm
beeps if any refrigerator door is left open
for more than three minutes. The beeping
stops when you close the door. The door
alarm function is pre-set to On in the
factory. You can turn it o by pressing and
then releasing the Alarm button. You can
turn it back on in the same fashion. The
icon lights up when the function is on.
When the Door Alarm function is on and
the alarm sound is triggered, the Door
Alarm Icon will blink while the alarm
sounds.
2) Water Filter Life Indicator Function
After you replace the water filter, touch
and hold this button for 3 seconds to
reset the water filter life indicator. When
you reset the water filter life indicator, the
Filter icon on the panel turns O. The
Filter icon will turn red to let you know it
is time to change the water filter after six
months (about 300 gallons). Some areas
have large amounts of lime in their water,
which causes the water filter to clog more
quickly. If this is the case in your area,
you will have to change the filter more
frequently than every six months.
operating _23
02 OPERATING
DA68-02916G-14.indb 23 2019. 2. 27. 오전 8:28

( 4 )
Lighting
(Hold 3
sec for ºC
↔ ºF)
Lighting button serves two purposes:
- To turn the dispenser light on and o
- To switch the temperature units
between ºC and ºF
1) Light Function
Touching the Lighting button turns on
the Dispenser LED lamp in continuous
mode so that it stays on continuously.
The button also lights up. If you want the
Dispenser lamp to come on only when
some one uses the dispenser, press the
Lighting button to turn the continuous
mode o.
2) To switch the temperature units
between ºC and ºF, Touch and hold
this button for 3 seconds to select the
temperature display you want.
Each time you press and hold the button,
the ºC and ºF temperature modes
alternate and the ºC or ºF icon lights up,
indicating your selection.
( 5 )
Fridge
(Hold 3
sec for
Power
Cool)
The Fridge button serves two purposes:
- To set the Fridge to your desired
temperature.
- To turn the Power Cool function on
and o.
1) To set the Fridge temperature
Press the Fridge button to set the
refrigerator to the temperature you want.
You can set the temperature between
7°C and 1 °C.
2) Power Cool function
Touch and hold this button for 3 seconds
to decrease the time needed to cool
products in the Refrigerator. It can be
helpful if you need to quickly cool easily
spoiled items or if the temperature in
the fridge has warmed dramatically (For
example, if the door was left open).
( 6 )
Ice O
(Hold 3
sec for
Child
Lock)
The Ice O button serves two purposes:
- To turn the Ice maker on and o
- To turn the Child Lock Function on
and o.
1) Ice O Function
If you don’t want to make more ice, press
the Ice O button.
2) Child Lock Function
Touch and hold this button for 3 seconds
to lock the display, the Flex Zone panel,
and the dispenser buttons so the buttons
can not be used.
When the Child Lock is on, the refrigerator
does not dispense ice or water even if you
press the Dispenser Lever.
The Child Lock icon lights up to indicate
you’ve activated the Child Lock function.
Press 3 seconds to unlock.
(7)
Cubed Ice
(8)
Crushed
Ice
Press the Cubed Ice or Crushed Ice
button to select the type of ice you want
dispensed.
Each time you press the button, the
cubed and crushed ice modes alternate
and the Cubed or Crushed ice icon lights
up, indicating your selection.
(Cubed)
(Crushed)
( 9 )
Ice O
If you don’t want to make more ice, touch
the Ice O button.
The icon will light up and the Ice-Maker
stops making ice.
We recommend you stop ice
making if the following occur:
- There is enough ice in the ice
bucket.
- You want to save water and
energy.
- Water is not being supplied to
the refrigerator.
If the ice maker function is ON, and
the water line is not connected,
there will be a water valve noise
from the back of the unit. If this
occurs, press the Ice O (Hold
3sec for child lock) button for less
than 3 seconds until the Ice O
Indicator ( ) illuminates.
24_ operating
DA68-02916G-14.indb 24 2019. 2. 27. 오전 8:28

To save electricity, the Panel Display turns o
automatically under the following conditions:
When no button has been pressed, when
no doors are open, or when no Dispenser
Lever has been pushed. However, the icon
indicating your cubed or crushed ice selection,
or sparkling water selection, will stay on.
When you press a button, open a door, or
push a Dispenser Lever, the Panel Display will
turn on again. All function keys will become
operational after you remove your finger from
the button you pressed.
( 10 )
Filter
Water filter usage
This icon lights up when you need
to change the filter, usually after the
refrigerator has dispensed about 300
gallons of water (after about 6 months).
The icon will blink red for several seconds
when you open or close the door.
After you install the new water filter, reset
the filter indicator by touching and holding
the Hold 3sec for Filter Reset button for
3 seconds.
- If water is not dispensing or
dispensing slowly, you need to
replace the water filter because
the water filter is clogged.
- Some areas have large amounts
of lime in their water, which
causes the water filter to clog
more quickly.
CHANGING THE WATER
FILTER
To reduce the risk water damage
to your property DO NOT use generic
brands of water filters in your SAMSUNG
Refrigerator.
USE ONLY SAMSUNG BRAND
WATER FILTERS. SAMSUNG is not
legally responsible for any damage,
including, but not limited to, property
damage caused by water leakage
from the use of a generic water filter.
(Red)
SAMSUNG Refrigerators are designed to work
ONLY WITH SAMSUNG Water Filters.
The Filter light turns red to let you know when it is
time to change your water filter cartridge.
To give you time to get a new filter, the red light
comes on just before the capacity of the current
filter runs out. Changing the filter on time provides
you with the freshest, cleanest water from your
refrigerator.
WARNING
To change the water filter, follow these steps:
1. Shut o the water supply. Then, turn the water
filter (1) about 1/4 turn, counter-clockwise.
2
1
2. Pull the water filter (1) from the case filter (2).
• To change the water filter more easily,
shut o the water supply valve.
• Sometimes, it is hard to disassemble the water
filter because impurities in the water cause it
to stick. If you are having diculties, grip the
water filter firmly and pull it hard.
• When you pull the water filter, a little water
can leak from the opening. This is normal.
To minimize the water leaks, keep the filter
cartridge horizontal when you pull it.
• To prevent overflow,
empty the water
filter tray (3) and
dry around the filter
case (2).
3
2
3. Insert the new filter into the filter case (4).
4. Push the filter, and then turn it clockwise until
it locks.
• If you have trouble inserting the water
filter because of high water pressure,
shut o the water supply valve.
• The locked symbol should be lined up
with the indicator line.
4
5. Touch the “Alarm/hold
3 sec for Filter Reset”
button (
(Filter Reset)
) for
about 3 seconds to reset
the water filter. The color of
the indicator ( ) changes from red to o.
6. If you turned o the water supply, turn it back
on.
operating _25
02 OPERATING
DA68-02916G-14.indb 25 2019. 2. 27. 오전 8:28

For a replacement water filter, you can visit
your local home Improvement center or
contact the Samsung Parts distributor.
To order more water filter cartridges,
contact your authorized Samsung dealer.
Be sure the replacement water filter has
the SAMSUNG logo on the box and on the
water filter.
Removing any residual matter inside
the water supply line after installing
the water filter.
1. Turn ON the main water
supply and supply water
from water supply line.
2. Run water through the
dispenser until the water
runs clear (approx. 6 to 7
minutes). This will clean
the water supply system and remove air from
the lines.
3. Additional flushing may be required in some
households.
4. Open the Refrigerator door and make sure
there are no water leaks coming from the
water filter.
Be sure to flush the dispenser thoroughly,
otherwise water may drip from the
dispenser.
This means that there is still air in the line.
Reverse Osmosis Water Supply
IMPORTANT:
The pressure of the water supply coming out of a
reverse osmosis system going to the water inlet
valve of the refrigerator needs to be between 35
and 120psi (241 and 827kPa).
If a reverse osmosis water filtration system is
connected to your cold water supply, the water
pressure to the reverse osmosis system needs to
be a minimum of 40 to 60 psi (276 to 414kPa). If
the water pressure to the reverse osmosis system
is less than 40 to 60 psi (276 to 414kPa):
• Check to see whether the sediment filter in the
reverse osmosis system is blocked. Replace
the filter if necessary.
• Allow the storage tank on the reverse osmosis
system to refill after heavy usage.
• If your refrigerator has a water filter, it may
further reduce the water pressure when used
in conjunction with a reverse osmosis system.
Remove the water filter.
If you have questions about your water pressure,
call a licensed, qualified plumber.
CONTROLLING THE
TEMPERATURE
Basic temperature of Freezer and
fridge compartments
The basic and recommended temperatures of the
Freezer and Fridge compartments are -19°C and
3°C respectively.
If the temperature of the Freezer and Fridge
compartments are too high or low, adjust the
temperature manually.
Controlling the Freezer
temperature
Recommend Temp (Freezer) : -19°C
The Freezer temperature can be set between
-23°C and -15°C to suit your particular needs.
Press the Freezer button repeatedly until the
desired temperature is shown in the temperature
display. The temperature will change by 1 °C with
each press. See below.
Centigrade : -19°C ➞ -20°C ➞ -21°C ➞ -22°C
➞ -23°C ➞ -15°C ➞ -16°C ➞ -17°C ➞ -18°C
➞-19°C.
Keep in mind that foods like ice cream may melt
at -15.5 °C. The temperature display will move
sequentially from -23 °C to -15 °C.
26_ operating
DA68-02916G-14.indb 26 2019. 2. 27. 오전 8:28

Controlling the fridge temperature
Recommend Temp (Fridge) : 3 °C
The fridge temperature can be set between 1 °C
and 7 °C to suit your particular needs. Press
the Fridge button repeatedly until the desired
temperature is shown in the temperature display.
The temperature will change by 1 °C with each
press. See below.
Centigrade : 3 °C ➞ 2 °C ➞ 1 °C ➞ 7 °C ➞ 6 °C
➞ 5 °C ➞ 4 °C ➞ 3 °C.
The temperature control process for the Fridge
works just like the Freezer process. Press the
Fridge button to set your desired temperature.
After a few seconds, the Fridge will begin
adjusting towards the newly set temperature. This
will be reflected in the digital display.
- The temperature of the Freezer or Fridge
may rise when you open the doors too
frequently, or if a large amount of warm
or hot food is placed inside.
- A rise in temperature may cause the digital
display to blink. Once the Freezer and
Fridge temperature return to their normal set
temperatures, the blinking will stop.
- If the blinking continues, you may need to
“reset” the Refrigerator. Try unplugging the
appliance, wait for around 10 minutes and
then
plug the power cord back in.
- If there is a communication error between the
Display and Main Controller, the Convertible
Display light may blink. If the blinking continues
for a long period of time, please contact a
Samsung Electronics Service Center.
USING THE COLD WATER
DISPENSER
Push the appropriate ice type
button to select what you want
dispensed.
NO ICE
Select this if you want
to turn ice maker o
Using the ice lever (1)
Push the Ice lever dispenser (1)
gently with your glass. Ice will be
released from the dispenser.
You can choose the type of ice
by pushing the cubed or crushed
button first.
1
2
Using the Water lever (2)
Push the Water lever dispenser (2) gently with
your glass. Water will be released from the
dispenser.
If you push the water and Ice lever
at about the same time, the dispenser
operates only the option you actually
selected or pushed first.
Please wait 1 second before removing
the cup after dispensing water to prevent
spills. Do not pull out the lever dispenser
after dispensing ice or water. It comes
back automatically.
Using the Ice & Water Dispenser
together
To get Ice and water, push the Ice lever (1) first
for ice, then move your glass down and press the
water dispenser lever (2) for water.
Maintaining the Ice Bucket
• To clean the ice bin/bucket, wash with a mild
detergent, rinse well, and dry thoroughly it. Do
not use harsh or abrasive cleaners or solvents.
operating _27
02 OPERATING
DA68-02916G-14.indb 27 2019. 2. 27. 오전 8:28

• Ice is made in cubes. When you select
“Crushed”, the ice maker grinds the ice cubes
into crushed ice.
• When you select Cubed Ice after using the
Crushed Ice mode, a small amount of residual
crushed ice might be produced.
• The ice cubes generated by the rapid ice
making process will look white, which indicates
they were generated normally.
• As the ice maker in the refrigerator room
makes ice cubes even faster, move the ice
cubes from the refrigerator ice bin to the
freezer ice bin if you need more ice cubes.
• If ice doesn’t come out, pull out the ice bucket
and press the test button located on the right
side of ice maker. See the illustration below.
• Do not press the test button continuously
when the tray is filled with ice or water. Water
may overflow or ice may jam the bucket.
Making Ice
• To fill the ice bucket to maximum capacity after
installation, follow these steps:
1. Allow your refrigerator to operate and cool
down for 24 hours (or 1 full day).
- Waiting 24 hours will allow your ice maker to
cool properly.
check
the water
level
Test button
2. Dispense 4 to 6 ice cubes into the glass.
3. After 8, and then 16 hours, dispense a full
glass of ice.
• To test the ice maker, press the Test button
on the ice maker. You will hear the refrigerator
chime (ding-dong). When the chime sounds,
release the Test button.
• The chime sounds automatically again to let
you know the ice maker is working well.
If you want to remove the ice cubes
without using the ice bucket, please turn
the ice maker o and remove the ice
maker’s front cover from the ice maker.
Note that the ice cubes in the ice maker
can spill out over the drawer.
Do not put food in the ice bucket.
If you store food in the ice bucket, the
food can strike the ice maker when you
open or close the door, causing damage
to the ice maker.
Note that the ice cubes in the ice bucket
may spill out over the drawer when you
remove the ice bucket from the drawer.
If this occurs, be sure to clear the ice
cubes that spilled out of the drawer.
If a power failure occurs, ice cubes may
melt, and then freeze together when
the power comes back on, causing the
dispenser to stop working.
To prevent this problem, after a power failure, pull
out the ice bucket and discard the residual ice or
water.
If you use all the ice at once, you must
repeat ice making Steps 2 and 3, left.
However, only wait 8 hours before
dispensing the first 4 to 6 ice cubes.
This will replenish the ice cubes and
ensure maximum ice production.
CAUTION
CAUTION
CAUTION
CAUTION
28_ operating
DA68-02916G-14.indb 28 2019. 2. 27. 오전 8:28

Using the ice o Function
When you select the Ice O mode, remove all ice
cubes from the bucket.
If you leave the ice cubes in the bucket, the ice
cubes may clump together, making it dicult to
remove them.
To remove the ice bucket safely and avoid injury,
hold the bottom of the bucket with one hand and
the side of the bucket with the other.
Then, lift up on the ice bucket, and pull it straight
out.
To put the ice bucket back in, push it firmly
straight back.
If the ice bucket is not pushed firmly into
place, ice in the bucket can melt.
If the bucket does not fit, turn the helix 90 degree
(see the last illustration on the right, below) and try
again.
• The inside of the ice bucket is very cold
when the refrigerator is operating.
Do not reach deep inside the ice
bucket.
• Use only the ice maker provided with
the refrigerator. The water supply to this
refrigerator must only be installed/connected
by a suitably qualified person.
Connect to a potable water supply only.
• To operate the ice maker properly, water
pressure of 20 ~ 125 psi is required.
CAUTION
Going on vacation...
If you have a long vacation or business trip and
won’t use the water or ice dispensers for a long
time:
- Close the water valve. Otherwise, water
leakage may occur.
- Remove all food.
- Unplug the refrigerator.
- Wipe excess moisture from inside and leave
the doors open. Otherwise, odor and mold
may develop.
Ice Maker Do’s and Don’ts
• Do not put your fingers, hands or any other
unsuitable objects in the chute or ice-maker
bucket
- It may result in personal injury or material
damage.
• Never put your finger or any other objects in
the dispenser opening.
- It may cause injury.
• Do not try to disassemble the ice maker.
• Do not wash or spray the ice bucket with
water while it is in the refrigerator. Remove it
to clean it
When you insert the Ice maker tray, be
sure that the tray is well centered at the
entrance.
Otherwise, the tray may get stuck.
Water clouding phenomenon
All water provided to the refrigerator flows
through the core filter which is an alkaline
water filter. In the filtering process, the
pressure of the water that has flowed out
of the filter is increased, and the water
becomes saturated with oxygen and
nitrogen. When this water flows out into
the air, the pressure plummets and the
oxygen and nitrogen get supersaturated,
which results in gas bubbles. The water
may temporarily look misty or cloudy due
to these oxygen bubbles. After a few
seconds, the water will look clear.
CAUTION
operating _29
02 OPERATING
DA68-02916G-14.indb 29 2019. 2. 27. 오전 8:28

PARTS AND FEATURES
Review the illustration below to become more familiar with the parts and features of your refrigerator.
Light
Fixed-Shelf
2 Step
Foldable-Shelf
Auto Pull Out
Drawer
Freezer Drawer
Bin
Door Bins
Auto Closer
Convertible Room
FF Ice-Maker
Foldable-Shelf
Fixed-Shelf
Vertical Hinged
Section
Vegetable &
Fruit Drawers
Water Filter
Light
Auto Closer
Guard
When closing the door, make sure the Vertical Hinged Section is in the correct position to avoid
scratching the other door.
If the Vertical Hinged Section is reversed, put it back to the right position and close the door.
Moisture may appear at times on the Vertical Hinged Section.
The door handle may become loose over time. If this happens, tighten the bolts found on the
inside of the door.
If you close one door with too much force, the other door may open.
When the door opens, the interlock switch automatically turns o the auger motor in the ice
maker for safety reasons.
If the interior or exterior LED lamp has gone out, please contact your service agent.
30_ operating
DA68-02916G-14.indb 30 2019. 2. 27. 오전 8:28

Door bins
Your refrigerator ships with door bins of dierent
types and sizes. If the door bins for your
refrigerator were packaged separately, use the
figure below to help you position the bins properly.
The number of door bins provided may dier with
the model.
USING FLEX ZONE
The Flex Zone is a full-width drawer with an
adjustable temperature control. You can use the
Flex Zone for large party trays, deli items, wines,
pizzas, beverages, or miscellaneous items. There
is a temperature sensor which lets you adjust
the amount of cold air allowed into the Zone.
The control buttons are located on the cap door
center.
Temperature Selection Button
Chill compartmnet functions
• Press the Temp button repeatedly until your
desired mode is lit.
• Each time you press the Temp. button, you
change the mode in this order: Meat/Fish
mode (-1 °C), Cold Drinks mode (1 °C), Deli/
Snacks mode (3 °C), Wine/Party Dishes
mode (5 °C). Initially, the Cold Drinks mode
is selected. The refrigerator will adjust the
temperature in the Flex Zone automatically to
the temperature you selected.
• When you select Deli/Snacks mode (3 °C),
Cold Drinks mode (1 °C) or Meat/Fish mode
(-1 °C), the Flex Zone will be operated into Chill
compartment.
• The Flex Zone Temp. Display may change
depending on the number of items inside,
where they are located, the ambient
temperature, and how often the door is
opened.
Selection Button
1. When “Wine/Party Dishes” is selected,
the temperature of the Flex Zone will be kept
around 5 °C. This feature helps keep food
fresh for a long time.
2. When “Deli/Snacks” is selected, the
temperature of the Flex Zone will be kept
around 3 °C. This feature helps keep food
fresh for a longer time.
3. When “Cold Drinks” is selected, the
temperature of the Flex Zone will be kept
around 1°C. This feature helps keep drinks
cold and refreshing.
4. When “Meat/Fish” is selected, the
temperature of the Flex Zone will be kept
around -1 °C. This feature helps keep meat or
fish fresh for a longer time.
When you store the highly perishable
foodstus, select Chill compartment
functions.
Examples of food items you can store in the Flex
Zone by temperature setting.
Wine
Party
Dishes
Deli
Snacks
Cold
Drinks
Meat
Fish
• wine
• pineapples
• bottled
water
• steaks
• cocktails • lemons • juice • cold cuts
• cakes • biscuits • soft drinks • bacon
• cheeses • potatoes • beer • chili dogs
Fruit and vegetables may be damaged if
stored under the “Meat Fish” setting.
Do not store lettuce or other leafy produce
in the Flex Zone.
operating _31
02 OPERATING
DA68-02916G-14.indb 31 2019. 2. 27. 오전 8:28

Do not store glass bottles in the Flex Zone
under the “Cold Drinks” or “Meat/Fish”
setting. If they are frozen, they can break
and cause personal injury.
RECOMMENDED LOCATION
FOR THE FOLDABLE SHELF
The Foldable Shelf up from the center, giving
you more storage area for tall items without your
having to re-arrange the shelves.
• Install the Foldable Shelf on the right side of
the refrigerator.
• If you install the Foldable Shelf on the left side,
the ice maker will prevent the shelf from folding
completely.
• To use, push the front portion of the shelf
back gently so that the shelf folds up from the
middle.
touch
Recommended
Location
REMOVING THE
REFRIGERATOR ACCESSORIES
1. Door Bins
• Door Bins (1)
To remove - Simply lift the bin up and pull
straight out.
To relocate - Slide it in above the desired
location and push down until it stops.
• Door Bins (2)
To remove - Take the right side of the bin
out by lifting it at an angle along the guide,
and then take the left side out by pulling it
from the door.
To relocate - Slide it into the original location
and push down until it sticks.
CAUTION
1
2
Injuries can occur if the door bins are not
firmly connected to the doors.
Do not allow children to play with the bins. Sharp
corners of the bins may cause injury.
Do not adjust a bin full of food. Remove
the food first.
To remove dust from the bins, remove the guard
and wash in water.
2. Tempered Glass shelves
To remove - Tilt up the front of the shelf in the
direction shown (1) and lift it up vertically (2).
Pull the shelf out.
To re-install - Tilt the front of the shelf up and
guide the shelf hooks into the slots at a desired
height. Then lower the front of the shelf so that the
hooks can drop into the slots.
The Tempered Glass shelves are heavy.
Use special care when removing them.
1
2
3. Foldable Shelf
To remove - After removing the Shelf Front, lift
up the Shelf and remove it.
To re-install - Hook the Shelf on the Angle Frame
and re-attach the Shelf Front to the Foldable Shelf.
CAUTION
CAUTION
32_ operating
DA68-02916G-14.indb 32 2019. 2. 27. 오전 8:28

After sliding the foldable shelf in and
folding it, the Shelf Front can be removed
for your convenience. If you use the self
without removing, be careful of its possible
separation.
4. Vegetable & Fruit Drawers
To remove
• Simply lift the bin up and pull straight out.
• Tilt up the front of the drawer and pull straight
out, and pull out the drawer after moving
slightly in the direction of the arrow.
To re-install
• Insert the drawer into the frame rails and push
back into place.
• Slide bin in above the desired location and
push down until it stops.
The drawers need to be removed before
the glass shelf above them can be lifted
out.
CAUTION
CAUTION
5. Flex Zone
To remove the Flex Zone - Pull the Flex door
out to full extension. Lift the Flex Zone up, pulling
it to your body with both hands.
To re-install the Flex Zone - Open the Flex door
to full extension. Tilt the front of the Flex Zone up,
place the back of the Flex Zone onto the rails, and
then lower the front until the whole Zone rests on
the rails.
When the Flex Zone or LED lighting is not
working, check the connectors [ (1), (2)
shown below ] for cracks or leaks.
1
2
1. Refer to page 18 for disassembly
instructions.
2. Open the cap cover rail with a flat-blade
screw driver.
Using the doors
Ensure that the doors close all the way and are
securely sealed.
When the refrigerator door is only partially open, it
operating _33
02 OPERATING
DA68-02916G-14.indb 33 2019. 2. 27. 오전 8:28

will automatically close. If the the door is opened
more than its auto close range, it will remain open.
You must close it manually.
REMOVING THE FREEZER
ACCESSORIES
1. Freezer Room Guard
To remove : Remove the freezer room guard (1)
by lifting the guard up.
To re-install : Push down until the guard (1)
locks into place.
1
2. Super Extended Drawer
To remove - Pull the drawer out to full extension.
Tilt up the rear of the drawer and lift straight out.
To re-install - Place the drawer onto the rails (4)
by tilting it up. Lower the drawer into place until it
is horizontal and slide the Drawer (3) in.
3
4
3. Freezer Drawer
To remove the freezer drawer - Pull the freezer
drawer out fully. Tilt up the rear of the bin and lift it
out to remove.
To re-install the freezer drawer - Place the bin
into the rail assembly.
You can scratch the side of the bin if you
twist it left or right when disassembling or
re-assembling it.
Do not allow babies or children go inside
the freezer drawer. They could damage
the refrigerator and seriously injure
themselves. Do not sit on the freezer door.
The door may break. Do not allow children
to climb into the freezer drawer.
CAUTION
CAUTION
Do not remove the divider.
If trapped inside, children may be injured
or suocate to death.
You can store food in the dotted line
space.
Auto Pull Out Drawer
Freezer Drawer Bin
Guard
CLEANING THE
REFRIGERATOR
Caring for your Samsung French Door Refrigerator
prolongs its life and helps keep it free of odor and
germs.
Cleaning the Interior
Clean the inside walls and accessories with a mild
detergent and then wipe dry with a soft cloth. You
can remove the drawers and shelves for a more
thorough cleaning. Just make sure to dry drawers
and shelves before putting them back into place.
CAUTION
WARNING
34_ operating
DA68-02916G-14.indb 34 2019. 2. 27. 오전 8:28

Cleaning the Exterior
Wipe the control panel and digital display with
a damp, clean, soft cloth. Do not spray water
directly on the surface of the refrigerator.
The doors, handles, and cabinet surfaces should
be cleaned with a mild detergent and then wiped
dry with a soft cloth. To keep your appliance
looking its best, polish the exterior once or twice a
year.
Do not spray water directly on the
refrigerator. Use a clean, damp cloth to
clean.
Do not use benzene, thinner, or Clorox for
cleaning. They may damage the surface of
the appliance and may cause a fire.
You can erase the printed
letters on the display if you
apply stainless cleaner directly
to the area where the letters
are printed.
Cleaning the Ice / Water Dispenser
Push down one end of the tray dispenser and
remove it. Wipe the Ice / Water Dispenser with a
clean, soft cloth.
When using the crushed
ice selection from the
dispenser some residual
ice chips may start to
collect in the ice chute. To
prevent that residual ice
from melting
and running out of the
chute, you should clean
out the residual ice when
you see it start to collect
in the
ice chute.
CAUTION
CAUTION
CAUTION
CAUTION
Cleaning the Rubber door seals
If the rubber door seals are dirty, the doors may
not close properly, and the refrigerator will not
operate eciently. Keep the door seals free of
dust or stains by cleaning the doors using a mild
detergent and damp cloth. Wipe dry with a clean,
soft cloth.
Do not clean the refrigerator with
benzene,
thinner, or car detergent. These
substances could cause a fire.
Cleaning the rear side of the
refrigerator
To keep cords and exposed parts free of dust and
dirt accumulation, vacuum the rear side of the
appliance once or twice a year.
Do not remove the back cover ( 1 ).
You could suer an electric shock.
1
CAUTION
CAUTION
operating _35
02 OPERATING
DA68-02916G-14.indb 35 2019. 2. 27. 오전 8:28

PROBLEM SOLUTION
The refrigerator
does not work
at all or it
does not chill
suciently.
• Check that the power plug is properly connected.
• Check if the set temperature on the digital display is warmer than the
freezer or fridge inner temperature. If it is, set the refrigerator colder.
• Is the refrigerator in direct sunlight or located near a heat source?
• Is the back of the refrigerator too close to the wall, preventing proper
ventilation?
The food in the
fridge is frozen.
• Check if the set temperature on the digital display is too low.
• Try setting the refrigerator to a warmer temperature.
• Is the temperature in the room too low? Set the refrigerator warmer.
• Did you store the food which is juicy in the coldest part of the refrigerator?
Try moving those items to the other shelves in the fridge instead of keeping
them in the colder areas or bins.
You hear
unusual noise
or sounds.
• Check that the refrigerator is level and stable.
• Is the back of the refrigerator too close to the wall, preventing proper
ventilation?
Try moving the back of the refrigerator at least 2 inches from the wall.
• Was anything dropped behind or under the refrigerator?
• A “ticking” sound is heard from inside the refrigerator. It is normal and
occurs because various accessories are contracting or expanding
according to the temperature of the refrigerator interior.
• If it sounds as if something is hitting something else inside the refrigerator,
this is normal. The sound is caused by the compressor operating at high
capacity.
The cabinet-
door sealing
area of the
appliance
is hot and
condensation is
occurring.
• Some heat is normal as anti-condensators are installed in the vertical
hinged section of the refrigerator to prevent condensation.
• Is the refrigerator door ajar? Condensation can occur when you leave the
door open for a long time.
Ice Maker is not
producing ice.
• Did you wait for 12 hours after installing the water supply line before making
ice?
• Is the water line connected and the shut-o valve opened?
• Did you manually stop the ice making function?
• Is the freezer temperature too warm? Try setting the freezer temperature
lower.
You can
hear water
bubbling in the
refrigerator.
• This is normal. The bubbling comes from refrigerant circulating through the
refrigerator.
There is a bad
smell in the
refrigerator.
• Check for spoiled food.
• Foods with strong odors (for example, fish) should be tightly covered.
• Clean out your freezer periodically and throw away any spoiled or
suspicious food.
Troubleshooting
36_ Troubleshooting
DA68-02916G-14.indb 36 2019. 2. 27. 오전 8:28

PROBLEM SOLUTION
Frost forms on
the walls of the
freezer.
• Is the air vent blocked? Remove any obstructions so air can circulate freely.
• Allow sucient space between the stored food for ecient air circulation.
• Is the freezer drawer closed properly?
Water
dispenser is not
functioning.
• Is the water line connected and the shut-o valve opened?
• Has the water supply line tubing been crushed or kinked?
• Make sure the tubing is free and clear of any obstruction.
• Is the water tank frozen because the fridge temperature is too low?
Try selecting a warmer setting on the Digital display.
• Is the Child Lock on?
Auto close
system does
not work with
the freezer
door.
• Is there an imbalance between the right and left parts of the door?
• Open and close the door smoothly 1~2 times. After you do this, the auto
close system usually works properly again.
• Try opening the door smoothly to avoid unbalancing the right part and the
left part of the door.
Troubleshooting _37
03 TROUBLESHOOTING
DA68-02916G-14.indb 37 2019. 2. 27. 오전 8:28

Memo
DA68-02916G-14.indb 38 2019. 2. 27. 오전 8:28

Memo
DA68-02916G-14.indb 39 2019. 2. 27. 오전 8:28

Ambient Room Temperature Limits
This fridge/freezer is designed to operate in ambient temperatures specified by its temperature class
marked on the rating plate.
Class Symbol
Ambient Temperature range(°C)
IEC 62552 (ISO 15502) ISO 8561
Extended Temperate SN +10 to +32 +10 to +32
Temperate N +16 to +32 +16 to +32
Subtropical ST +16 to +38 +18 to +38
Tropical T +16 to +43 +18 to +43
Internal temperatures may be aected by such factors as the location of the fridge/freezer,
ambient temperature and the frequency with which you open the door.
Adjust the temperature as required to compensate for these factors.
English
Correct Disposal of This Product
(Waste Electrical & Electronic Equipment)
(Applicable in countries with separate collection systems)
This marking on the product, accessories or literature indicates that the product and its
electronic accessories (e.g. charger, headset, USB cable) should not be disposed of with
other household waste at the end of their working life. To prevent possible harm to the
environment or human health from uncontrolled waste disposal, please separate these items
from other types of waste and recycle them responsibly to promote the sustainable reuse of
material resources.
Household users should contact either the retailer where they purchased this product, or
their local government ofce, for details of where and how they can take these items for
environmentally safe recycling.
Business users should contact their supplier and check the terms and conditions of the
purchase contract. This product and its electronic accessories should not be mixed with other
commercial wastes for disposal.
For information on Samsung’s environmental commitments and product specific regulatory obligations
e.g. REACH visit: samsung.com/uk/aboutsamsung/samsungelectronics/corporatecitizenship/data_
corner.html
Contact SAMSUNG WORLD WIDE
If you have any questions or comments relating to Samsung products, please contact the SAMSUNG
customer care center.
Country Contact Center Web Site
ITALIA 800-SAMSUNG (800.7267864) www.samsung.com/it/support
SPAIN
0034902172678
[HHP] 0034902167267
www.samsung.com/es/support
PORTUGAL 808 207 267 www.samsung.com/pt/support
GREECE
80111-SAMSUNG (80111 726 7864) only from land line
(+30) 210 6897691 from mobile and land line
www.samsung.com/gr/support
CYPRUS 8009 4000 only from landline, toll free www.samsung.com/gr/support
DA68-02916G-14
DA68-02916G-14.indb 40 2019. 2. 27. 오전 8:28
-
 1
1
-
 2
2
-
 3
3
-
 4
4
-
 5
5
-
 6
6
-
 7
7
-
 8
8
-
 9
9
-
 10
10
-
 11
11
-
 12
12
-
 13
13
-
 14
14
-
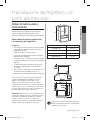 15
15
-
 16
16
-
 17
17
-
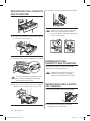 18
18
-
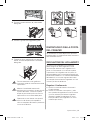 19
19
-
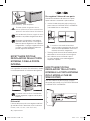 20
20
-
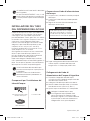 21
21
-
 22
22
-
 23
23
-
 24
24
-
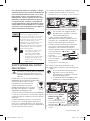 25
25
-
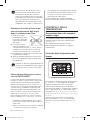 26
26
-
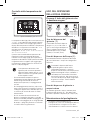 27
27
-
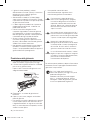 28
28
-
 29
29
-
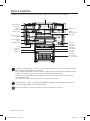 30
30
-
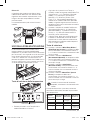 31
31
-
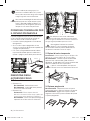 32
32
-
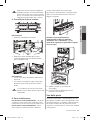 33
33
-
 34
34
-
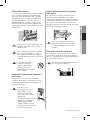 35
35
-
 36
36
-
 37
37
-
 38
38
-
 39
39
-
 40
40
-
 41
41
-
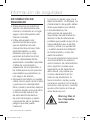 42
42
-
 43
43
-
 44
44
-
 45
45
-
 46
46
-
 47
47
-
 48
48
-
 49
49
-
 50
50
-
 51
51
-
 52
52
-
 53
53
-
 54
54
-
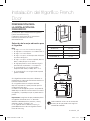 55
55
-
 56
56
-
 57
57
-
 58
58
-
 59
59
-
 60
60
-
 61
61
-
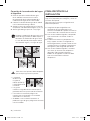 62
62
-
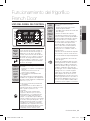 63
63
-
 64
64
-
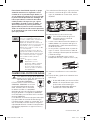 65
65
-
 66
66
-
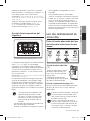 67
67
-
 68
68
-
 69
69
-
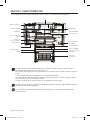 70
70
-
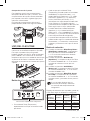 71
71
-
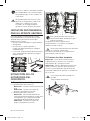 72
72
-
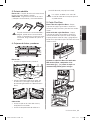 73
73
-
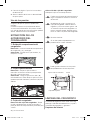 74
74
-
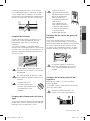 75
75
-
 76
76
-
 77
77
-
 78
78
-
 79
79
-
 80
80
-
 81
81
-
 82
82
-
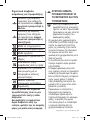 83
83
-
 84
84
-
 85
85
-
 86
86
-
 87
87
-
 88
88
-
 89
89
-
 90
90
-
 91
91
-
 92
92
-
 93
93
-
 94
94
-
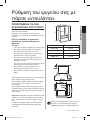 95
95
-
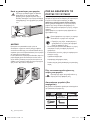 96
96
-
 97
97
-
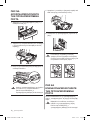 98
98
-
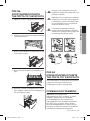 99
99
-
 100
100
-
 101
101
-
 102
102
-
 103
103
-
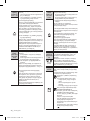 104
104
-
 105
105
-
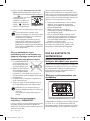 106
106
-
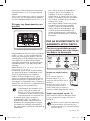 107
107
-
 108
108
-
 109
109
-
 110
110
-
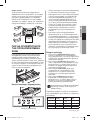 111
111
-
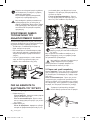 112
112
-
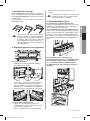 113
113
-
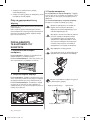 114
114
-
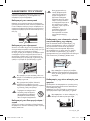 115
115
-
 116
116
-
 117
117
-
 118
118
-
 119
119
-
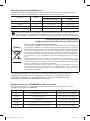 120
120
-
 121
121
-
 122
122
-
 123
123
-
 124
124
-
 125
125
-
 126
126
-
 127
127
-
 128
128
-
 129
129
-
 130
130
-
 131
131
-
 132
132
-
 133
133
-
 134
134
-
 135
135
-
 136
136
-
 137
137
-
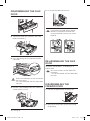 138
138
-
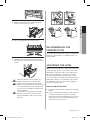 139
139
-
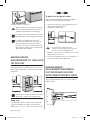 140
140
-
 141
141
-
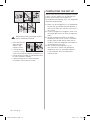 142
142
-
 143
143
-
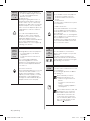 144
144
-
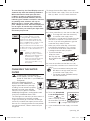 145
145
-
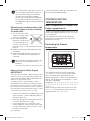 146
146
-
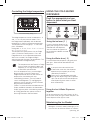 147
147
-
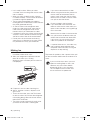 148
148
-
 149
149
-
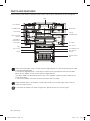 150
150
-
 151
151
-
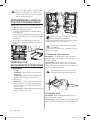 152
152
-
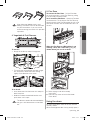 153
153
-
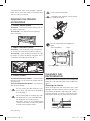 154
154
-
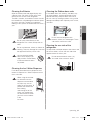 155
155
-
 156
156
-
 157
157
-
 158
158
-
 159
159
-
 160
160


Samsung RF24FSEDBSR El manual del propietario
- Categoría
- Neveras
- Tipo
- El manual del propietario
en otros idiomas
Artículos relacionados
-
Samsung RF24FSEDBSR Manual de usuario
-
Samsung RF220FCTAS8 Manual de usuario
-
-
-
Samsung RS26WUSW Manual de usuario
-
-
Samsung RF56J9040SR Manual de usuario
-
Samsung RF60J9000SL Manual de usuario
-
Samsung RT46H5330EF Manual de usuario
-
Samsung RR35H6000SS Manual de usuario