
English | Deutsch | Español | Français
HD IP Conference Phone
CP920
Quick Start Guide (V84.80)
www.yealink.com
Applies to firmware version 78.84.0.10 or later.


Table of Contents
English ............................................................................ 1
Deutsch............................................................................11
Español ............................................................................21
Français............................................................................31


B
A
AC Power Option
1
Packaging Contents
E
N
G
L
I
S
H
IP Conference Phone Power Adapter
Quick Start Guide
Ethernet Cable
(7.5m CAT5E UTP cable)
Note: We recommend that you use the accessories provided or approved by Yealink. The use of unapproved third-party accessories may
result in reduced performance.
Assembling the Phone
1. Connect the power and wired network.
You have two options for network and power connections. Your system administrator will advise you which one to use.
You can also connect to the wireless network after startup. Refer to Wireless Network Connection mentioned
below in Configuring Your Phone for more information.
Note: The IP phone should be used with Yealink original power adapter (12V/1A) only. If inline power (PoE) is provided, you don’t need to
connect the power adapter. Make sure the hub/switch is PoE-compliant.
PoE (Power over
Ethernet) Option
Internet
DC12V
Power Adapter
IEEE 802.3af compliant
PoE Hub/Switch

E
N
G
L
I
S
H
Mute Key
Speaker
Keypad
Volume(+) Key
Volume(—) Key
Microphone
1
2
3
4
5
7
8
9
LCD Screen
Soft Keys
After the IP phone is connected to the network and supplied with
power, it automatically begins the initialization process. After
startup, the phone is ready for use. You can configure the phone
via web user interface or phone user interface.
1
1
2
10
2
11
12
On-hook Key
6
13
14
2
2. Connect the optional USB flash drive.
Startup
Welcome
Initializing...Please wait
Hardware Component Instructions
Bluetooth Key
OK Key
Welcome
Initializing...Please wait
Up Navigation Key
Microphone
Off-hook Key
Down Navigation Key

Configuring via phone user interface
Network Settings:
1. Tap the Menu soft key, select Settings->Advanced Settings (default password: admin) ->Network->WAN Port/
VLAN/Web Server/802.1x/VPN/LLDP/CDP/NAT to configure the network.
Wireless Network Connection:
1. Tap the Menu soft key, select Settings->Basic Settings->Wi-Fi.
2. Tap the Switch soft key to turn Wi-Fi on.
3. Tap the Save soft key.
The phone will automatically search for available wireless networks in your area.
4. Select an available wireless network from the list of Available Network(s).
Note: The IP phone also supports IPv6, but IPv6 is disabled by default.
The wrong network settings may result in inaccessibility of your phone and may have an impact on the network performance. Contact your
system administrator for more information.
Note: Check with your system administrator if any error appears during the registration process or a specific configuration is required for your
registration.
Configuring via web user interface
Accessing the web user interface:
1. Tap OK to obtain the IP address of the phone.
2. Open a web browser on your computer, enter the IP address into the address bar (for example,
“http://192.168.0.10” or“192.168.0.10”), and then press Enter.
3. Enter the user name (default: admin) and password (default: admin) in the login page and click Login.
Network Settings:
Click on
Network->Basic->IPv4 Config
.
You can configure the network settings in the following ways:
DHCP: By default, the phone attempts to contact a DHCP server in your network to obtain its valid
network settings, for example, IP address, subnet mask, gateway address and DNS address.
Static IP Address: If the phone cannot contact a DHCP server for any reason, you need to configure IP
address, subnet mask, gateway address, primary DNS address and secondary DNS
address for the phone manually.
Configuring Your Phone
Account Settings:
Click on
Account->Register
.
Parameters of the account:
Register Status: It shows the register status of the current account.
Line Active: You can select Enabled/Disabled to enable/disable the account.
Label: It is shown on the LCD screen to identify the account.
Display Name: It is shown as Caller ID when placing a call.
Register Name: It is an authenticated ID for authentication provided by ITSP (required).
User Name: It is provided by ITSP for registration (required).
Password: It is provided by ITSP for registration (required).
Server Host: It is provided by ITSP for registration (required).
Register status icons on the LCD screen:
Registered
No Service Register Failed/Registering
E
N
G
L
I
S
H
3

Placing a Call
Do one of the following:
- Tap .
Enter the phone number, and then tap , , or the Send soft key.
- Enter the phone number.
Tap , , or the Send soft key.
Answering a Call
Tap , , or the Answer soft key.
Ending a Call
Tap or the End Call soft key.
Call Mute and Unmute
To mute a call:
Tap , the mute key LED illuminates solid red.
To unmute a call:
Tap again to unmute the call. The mute key LED illuminates solid green.
Call Hold and Resume
To hold a call:
Tap the Hold soft key during a call.
To resume a call:
Tap the Resume soft key during a call.
Local Conference
You can host a five-way conference with up to four parties.
To create a five-way local conference:
1. Tap the Conf soft key during a active call. The call is placed on hold.
2. Enter the number of the second party, and then tap the Send soft key.
You can also select a contact from Directory to join into a conference.
3. Tap the Conf soft key again when the second party answers.
4. Repeat steps 2 to 3 to join more parties in the conference.
To manage the individual participant:
1. Tap the Manage soft key during the conference.
2. Tap or to select desired participant, do the following:
• Tap the Far Mute soft key to mute the participant. The muted participant can hear everyone, but no one can
hear the muted participant.
• Tap the Remove to soft key remove the participant from the conference.
• Tap the Split All soft key to split the conference call into individual calls on hold.
5. Tap the Connect soft key to connect to the wireless network.
6. If the network is secure, enter its password in the Password field, and then tap the OK soft key.
Account Settings:
Tap the Menu soft key, select Settings->Advanced Settings (default password: admin) ->Accounts to configure
the account.
Basic Call Features
E
N
G
L
I
S
H
4

Call Recording
You can insert a USB flash drive into the USB port on your phone to record active calls.
To record audio calls:
1. Tap the More soft key, and then tap the StartREC soft key during a call.
2. Tap the PauseREC soft key to pause recording, tap the Re REC soft key to resume recording.
3. Tap the StopREC soft key to stop recording. The record file will be saved.
If you end a call during recording, the record file will be saved automatically.
Call Forward
You can forward an incoming call to a contact, or forward all incoming calls to a contact.
To forward an incoming call to a contact:
1. Tap the Forward soft key from the Incoming Call screen.
2. Enter the number you want to forward to.
You can also select a contact from Directory. The call is forwarded to the contact directly.
3. Tap the Send soft key.
To forward all incoming calls to a contact:
1. Tap the Menu soft key.
2. Select Features->Call Forward.
3. Select the desired forwarding type:
Always Forward----Incoming calls are forwarded unconditionally.
Busy Forward----Incoming calls are forwarded when the phone is busy.
No Answer Forward----Incoming calls are forwarded if not answered after a period of time.
4. Turn on the desired forwarding type.
5. Enter the number you want to forward to in the Forward To field.
6. For No Answer Forward, select a desired ring time to wait before forwarding from the After Ring Time field.
7. Tap the Save soft key to accept the change.
Call Transfer
You can transfer a call in the following ways:
Blind Transfer
1. Tap the Transfer soft key during a call. The call is placed on hold.
2. Enter the number you want to transfer to.
You can also select a contact you want to transfer to from Directory.
3. Tap the Transfer soft key.
Semi-Attended Transfer
1. Tap the Transfer soft key during a call. The call is placed on hold.
2. Enter the number you want to transfer to.
3. Tap , or .
4. Tap the Transfer soft key when you hear the ring-back tone.
Attended Transfer
1. Tap the Transfer soft key during a call. The call is placed on hold.
2. Enter the number you want to transfer to.
3. Tap , or .
4. Tap the Transfer soft key when the second party answers.
E
N
G
L
I
S
H
5

Local Directory
To add a contact:
1. Tap the Directory soft key from the Idle screen.
2. Select Local Directory->All Contacts.
3. Tap the Add soft key to add a contact.
4. Enter a unique contact name in the Name field and contact numbers in the corresponding fields.
5. Tap the Save soft key to accept the change.
To edit a contact:
1. Tap the Directory soft key from the Idle screen.
2. Select Local Directory->All Contacts.
3. Select the desired contact, tap the Option soft key and then select Detail.
4. Edit the contact information.
5. Tap the Save soft key to accept the change.
To delete a contact:
1. Tap the Directory soft key from the Idle screen.
2. Select Local Directory->All Contacts.
3. Select the desired contact, tap the Option soft key and then select Delete.
4. Tap OK when the LCD screen prompts “Delete Selected Item?”.
Call History
1. Tap the History soft key from the Idle screen.
2. Select All Calls.
3. Select an entry from the list, you can do the following:
• Tap the Send soft key to call the entry.
• Tap the Delete soft key to delete the entry from the list.
If you tap the Option soft key, you can also do the following:
• Select Detail to view detailed information about the entry.
• Select Move to Contact to add the entry to the local directory.
• Select Move to Blacklist to add the entry to the blacklist.
• Select Delete All to delete all entries from the list.
Volume Adjustment
• Tap or during a call to adjust the receiver volume.
• Tap or when the phone is idle or ringing to adjust the ringer volume.
• Tap or to adjust the media volume in the corresponding screen.
Ring Tones
1. Tap the Menu soft key from the Idle screen, and then select Settings->Basic Settings->Sound->Ring Tones.
2. Tap or to select Common or the desired account.
3. Tap or to select the desired ring tone.
4. Tap the Save soft key to accept the change.
Customizing Your Phone
Note: You can add contacts from call history easily. For more information, refer to Call History.
E
N
G
L
I
S
H
6

7
E
N
G
L
I
S
H
Addr: 309, 3rd Floor, No.16, Yun Ding North Road, Huli District,
Xiamen City, Fujian, P.R.C
Tel: +86-592-5702000
Fax: +86-592-5702455
Regulatory Notices
Operating Ambient Temperatures
Operating temperature: +14 to 122°F (-10 to 50°C)
Relative humidity: 5% to 90%, noncondensing
Storage temperature: -22 to +160°F (-30 to +70°C)
Warranty
Our product warranty is limited only to the unit itself, when used normally in accordance with the operating instructions and the system
environment. We are not liable for damage or loss resulting from the use of this product, or for any claim from a third party. We are not
liable for problems with Yealink device arising from the use of this product; we are not liable for financial damages, lost profits, claims
from third parties, etc., arising from the use of this product.
DC symbol
is the DC voltage symbol.
Restriction of Hazardous Substances Directive (RoHS)
This device complies with the requirements of the EU RoHS Directive. Statements of compliance can be obtained by contacting
suppor[email protected].
Safety Instructions
Save these instructions. Read these safety instructions before use!
The following basic safety precautions should always be followed to reduce risk of fire, electrical shock, and other personal injury.
General Requirements
Before you install and use the device, read the safety instructions carefully and observe the situation during operation.
During the process of storage, transportation, and operation, please always keep the device dry and clean.
During the process of storage, transportation, and operation, please avoid collision and crash of the device.
Please attempt not to dismantle the device by yourself. In case of any discrepancy, please contact the appointed maintenance
center for repair.
Without prior written consent, no organization or individual is permitted to make any change to the structure or the safety design
of the device. Yealink is under no circumstance liable to consequences or legal issues caused by such changes.
lease refer to the relevant laws and statutes while using the device. Legal rights of others should be respected as well.
Environmental Requirements
Place the device at a well-ventilated place. Do not expose the device under direct sunlight.
Keep the device dry and free of dusts.
Place the device on a stable and level platform.
Please place no heavy objects on the device in case of damageand deformation caused by the heavy load.
Keep at least 10 cm between the device and the closest object for heat dissipation.
Do not place the device on or near any inflammable or fire-vulnerable object, such as rubber-made materials.
Keep the device away from any heat source or bare fire, such as a candle or an electric heater.
Keep the device away from any household appliance with strong magnetic field or electromagnetic field, such as a microwave
oven or a refrigerator.
Operating Requirements
Do not let a child operate the device without guidance.
Do not let a child play with the device or any accessory in case of accidental swallowing.
Please use the accessories provided or authorized by the manufacturer only.
The power supply of the device shall meet the requirements of the input voltage of the device. Pleaseusethe provided surge
protection power socket only.
Before plugging or unplugging any cable, make sure that your hands are completely dry.
Do not spill liquid of any kind on the product or use the equipment near water, for example, near a bathtub, washbowl, kitchen
sink, wet basement or near a swimming pool.

Addr: 309, 3rd Floor, No.16, Yun Ding North Road,
Huli District, Xiamen City, Fujian, P.R.C
Addr: 309, 3rd Floor, No.16, Yun Ding North Road,
Huli District, Xiamen City, Fujian, P.R.C
8
Tel: +86-592-5702000
Fax: +86-592-5702455
E
N
G
L
I
S
H
ENVIRONMENTAL RECYCLING
Never dispose of the device with domestic waste
Ask your Town Council about how to dispose of it in an environmentally friendly way. The cardboarc
box, plastic packaging and player components may be recycled in accordance with prevailing
recycling regulations in your country.
Always adhere to prevailing regulations
Those who fail to do so may be fined or prosecuted in accordance with the law. The crossed out
garbage can that appears on the device means that when it has reached the end of its useful life, it
should be taken to a special waste disposal centre and treated separately to general urban waste.
Do not tread on, pull, or over-bend any cable in case of malfunction of the device.
During a thunderstorm, stop using the device and disconnect it from the power supply. Unplug the power plug and the
Asymmetric Digital Subscriber Line (ADSL) twisted pair (the radio frequency cable) to avoid lightning strike.
If the device is left unused for a rather long time, disconnect it from the power supply and unplug the power plug.
When there is smoke emitted from the device, or some abnormal noise or smell, disconnect the device from the power supply,
and unplug the power plug immediately. Contact the specified maintenance center for repair.
Do not insert any object into equipment slots that is not part of the product or auxiliary product.
Before connecting a cable, connect the grounding cable of the device first. Do not disconnect the grounding cable until you
disconnect all other cables.
Cleaning Requirements
Before cleaning the device, stop using it and disconnect it from the power supply.
Use a piece of soft, dry and anti-static cloth to clean the device.
Keep the power plug clean and dry. Using a dirty or wet power plug may lead to electric shock or other perils.
Troubleshooting
The unit cannot supply power to Yealink device.
There is a bad connection with the plug.
1. Clean the plug with a dry cloth.
2. Connect it to another wall outlet.
The usage environment is out of operating temperature range.
1. Use in the operating temperature range.
The cable between the unit and the Yealink device is connected incorrectly.
1. Connect the cable correctly.
You cannot connect the cable properly.
1. You may have connected a wrong Yealink device.
2. Use the correct power supply.
Some dust, etc., may be in the port.
1. Clean the port.
Contact your dealer or authorized service facility for any further questions.
Contact Information
YEALINK NETWORK TECHNOLOGY CO.,LTD.
309, 3rd Floor, No.16, Yun Ding North Road, Huli District, Xiamen City, Fujian, P.R.C
YEALINK (EUROPE) NETWORK TECHNOLOGY B.V.
Strawinskylaan 3127, Atrium Building, 8th floor, 1077ZX Amsterdam, The Netherlands
YEALINK (USA) NETWORK TECHNOLOGY CO., LTD.
999 Peachtree Street Suite 2300, Fulton, Atlanta, GA, 30309, USA
Made in China

YEALINK (XIAMEN) NETWORK TECHNOLOGY CO.,LTD
WWW.YEALINK.COM
Declaration of Conformity
Date of Issue: 20th /July/2019
We: YEALINK (XIAMEN) NETWORK TECHNOLOGY CO., LTD,
Address: 309, 3rd Floor, No.16, Yun Ding North Road, Huli District, Xiamen City, Fujian, P.R.C
Declare that the product
Type: HD IP Conference Phone
Model: CP920
meets the essential requirements and other relevant provisions according to the following EC directive
Directive: 2014/30/EU, 2014/35/EU,
RED 2014/53/EU
Conformity
The product complies with the following standards:
Safety:
EN 60950-1:2006+A11:2009
+A1: 2010+A12:2011+A2:2013
EMC:
EN 55032: 2012/AC:2013
EN 55024: 2010
EN61000-3-2: 2014
EN61000-3-3: 2013
Radio:
ETSI EN 301 489-1 V2.1.1
ETSI EN 301 489-17 V3.1.1
ETSI EN 300 328 V2.1.1
Health:
EN 62311:2008
Directive 2011/65/EU and (EU)2015/863
of the European Parliament and of the Council of 8 June 2011 and 4 June
2015 on the restriction of the use of certain hazardous substances in electrical and
electronic equipment(RoHS 2.0)
Directive 2012/19/EU
of the European Parliament and of the Council of 4.July.2012 on Waste electrical and
electronic equipment (WEEE)
Regulation (EC) No.1907/2006
of the European Parliament and of the Council of 18.December.2006 on Registra-
tion, Evaluation, Authorization, and Restriction of Chemicals (REACH)
YEALINK (EUROPE) NETWORK TECHNOLOGY B.V.
Address: Strawinskylaan 3127, Atrium Building, 8th floor,
1077ZX Amsterdam, the Netherlands
Telephone: +31 (0) 64 61 11 373
Email: [email protected]
Addr: 309, 3rd Floor, No.16, Yun Ding North Road,
Huli District, Xiamen City, Fujian, P.R.C
Tel: +86-592-5702000
Fax: +86-592-5702455
9
NAME: Stone Lu
DATE:
20/July
/2019
TITLE: Vice President

About Yealink
Yealink is a global leading provider of enterprise communication and collaboration solutions, offering video
conferencing service to worldwide enterprises. Focusing on research and development, Yealink also insists on innovation
and creation. With the outstanding technical patents of cloud computing, audio, video and image processing
technology, Yealink has built up a panoramic collaboration solution of audio and video conferencing by merging its
cloud services with a series of endpoints products. As one of the best providers in more than 140 countries and regions
including the US, the UK and Australia, Yealink ranks No.1 in the global market share of SIP phones shipments.
Technical Support
Visit Yealink WIKI (http://support.yealink.com/) for the latest firmware, guides, FAQ, Product documents, and more. For
better service, we sincerely recommend you to use Yealink Ticketing system (https://ticket.yealink.com) to submit all
your technical issues.
YEALINK (XIAMEN) NETWORK TECHNOLOGY CO.,LTD.
Web: www.yealink.com
Addr: 309, 3rd Floor, No.16, Yun Ding North Road, Huli
District, Xiamen City, Fujian, P.R.C
Copyright © 2019 Yealink Inc. All rights reserved.

B
A
AC-Stromversorgung
11
Verpackungsinhalt
D
E
U
T
S
C
H
IP-Konferenztelefon Netzgerät
Erste Schritte
Ethernet-Kabel
(7,5 m CAT5E-UTP-Kabel)
Hinweis: Wir empfehlen, nur von Yealink angebotenes oder zugelassenes Zubehör zu verwenden. Die Verwendung von nicht zugelassenem
Zubehör von Drittanbietern kann sich negativ auf die Leistung auswirken.
Installation des Telefons
1. Schließen Sie sowohl das Netzkabel als auch das Ethernet-Kabel an.
Es gibt zwei Möglichkeiten für die Verbindung des Netzwerks und der Stromversorgung. Ihr Systemadministrator wird
Sie über die entsprechende Methode informieren.
Nach Inbetriebnahme können Sie sich weiterhin auch mit einem Funknetzwerk verbinden. Schlagen Sie für
weitere Informationen in den Ausführungen zu Funknetzwerkverbindungen unter Konfigurieren Ihres
Telefons nach.
Hinweis: Das IP-Telefon darf nur mit dem Original-Netzteil (12V/1A) von Yealink verwendet werden. Bei einer Online-Versorgung (PoE)
muss das Netzgerät nicht angeschlossen werden. Vergewissern Sie sich, dass der Netzwerk-Switch PoE-kompatibel ist.
PoE (Power
over Ethernet)
Internet
12 V DC
Netzgerät
IEEE 802.3af-konformer
PoE-Netzwerk-Switch

Soft Keys
D
E
U
T
S
C
H
Stummtaste
Lautsprecher
Tastenfeld
Lautstärketaste (+)
Lautstärketaste (–)
Mikrofon
1
2
3
4
5
7
8
9
LCD-Bildschirm
Softkeys
Nach der Verbindung mit dem Netzwerk und der Stromversorgung
startet das IP-Telefon automatisch den Initialisierungsprozess. Nach
dem Startvorgang ist das Telefon betriebsbereit. Sie können das
Telefon via Weboberfläche oder Benutzeroberfläche des Telefons
konfigurieren.
1
1
2
10
2
11
12
Taste On-hook
6
13
14
12
2. Anschluss eines optionalen USB-Datenträgers.
Startvorgang
Anweisungen zu Hardwarekomponenten
Bluetoothtaste
OK-Taste
Navigationstaste Aufwärts
Mikrofon
Bildschirmtaste Off-hook
Navigationstaste Abwärts

Konfiguration via Benutzeroberfläche des Telefons
Netzwerkeinstellungen:
1. Tippen Sie zum Konfigurieren des Netzwerks auf die Bildschirmtaste Menü und wählen Sie Einstellungen -> Erw.
Einst (Standardpasswort: admin) ->Netzwerk ->WAN-Port /VLAN /Webserver /802.1x/VPN/LLDP/CDP/NAT.
Funknetzwerkkonfiguration:
1. Tippen Sie auf die Bildschirmtaste Menü und wählen Sie Einstellungen->Menü->WiFi.
2. Tippen Sie zum Einschalten des WiFi auf die Bildschirmtaste Umsch..
3. Tippen Sie im Bildschirm auf Speich..
Das Telefon sucht automatisch nach verfügbaren drahtlosen Netzwerke in ihrer Umgebung.
4. Wählen Sie aus der Liste der Verfügbare(s) Netzwerk(e ) ein verfügbares drahtloses Netzwerk.
Hinweis: Das IP-Telefon unterstützt auch IPv6, dieses Protokoll ist jedoch standardmäßig deaktiviert.
Falsche Netzwerkeinstellungen können den Netzwerkzugang Ihres Telefons blockieren oder zu einer Beeinträchtigung der
Netzwerkleistung führen. Bitte wenden Sie sich für weitere Informationen an Ihren Systemadministrator.
Hinweis: Wenden Sie sich an Ihren Systemadministrator, falls während der Registrierung ein Fehler auftritt oder für Ihre Registrierung eine
bestimmte Konfiguration benötigt wird.
Konfiguration via die Weboberfläche
Zugriff auf die Weboberfläche:
1. Tippen Sie auf die Bildschirmtaste OK, um die IP-Adresse des Telefons zu erhalten.
2. Öffnen Sie einen Webbrowser auf Ihrem Rechner, geben Sie die IP-Adresse des Telefons in die Adressleiste ein
(beispielsweise “http://192.168.0.10” oder “192.168.0.10”) und bestätigen Sie durch Drücken der Enter-Taste.
3. Geben Sie auf der Login-Seite den Benutzernamen (werksseitig: admin) und das Passwort (werksseitig: admin)
ein und klicken Sie auf Login.
Netzwerkeinstellungen:
Klicken Sie auf
Netzwerk->Basic->IPv4 Config
.
Sie können die Netzwerkeinstellungen wie folgt konfigurieren:
DHCP: Per Standardeinstellung kontaktiert das Telefon einen DHCP-Server in Ihrem Netzwerk, um die
gültigen Netzwerkeinstellungen zu beziehen, z. B. IP-Adresse, Subnetzmaske, Gateway-Adresse und
DNS-Adresse.
Statische IP-Adresse: Falls das Telefon aus irgendeinem Grund keinen DHCP-Server kontaktieren kann,
müssen Sie die IP-Adresse, Subnetzmaske, Gateway-Adresse, primäre DNS-Adresse
und sekundäre DNS-Adresse für das Telefon manuell konfigurieren.
Konfiguration Ihres Telefons
Kontoeinstellungen:
Klicken Sie auf
Konto->Registrieren
.
Einstellungen des Kontos:
Registrierungsstatus: Zeigt den Status der Registrierung des aktuellen Kontos an.
Leitung aktiv: Wählen Sie Enabled/Disabled, um das Konto zu aktivieren/deaktivieren.
Label: Dieses wird auf dem LCD-Bildschirm zur Erkennung des Kontos angezeigt.
Anzeigename: Erscheint während eines Anrufs als Anrufer-ID.
Registrierungsname: Dies ist eine von ITSP bereitgestellte bestätigte ID für die Authentifizierung (erforderlich).
Benutzername: Wird von ITSP für die Registrierung bereitgestellt (erforderlich).
Passwort: Wird von ITSP für die Registrierung bereitgestellt (erforderlich).
Server-Host: Wird von ITSP für die Registrierung bereitgestellt (erforderlich).
Icons für die Anzeige des Registrierungsstatus im LCD:
Registriert
Kein Service Anmeldung fehlgeschlagen/läuft
13
D
E
U
T
S
C
H

Anruf tätigen
Sie haben folgende Möglichkeiten:
– Tippen Sie auf .
Geben Sie die Telefonnummer ein und tippen Sie dann auf , , oder die Bildschirmtaste Senden.
– Geben Sie die Telefonnummer ein.
Tippen Sie auf , , oder die Bildschirmtaste Senden.
Anruf entgegennehmen
Tippen Sie auf , oder die Bildschirmtaste Annehm..
Anruf beenden
Tippen Sie auf oder die Bildschirmtaste Aufleg.
Gespräch stummschalten und die Stummschaltung wieder aufheben
Stummschalten eines Anrufs:
Tippen Sie auf , die LED der Stummschalttaste leuchtet dauerhaft rot.
Um die Gesprächsstummschaltung aufzuheben:
Tippen Sie noch einmal auf , um die Stummschaltung aufzuheben. Die LED der Stummschalte-Taste leuchtet
dauerhaft grün.
Anruf halten und fortsetzen
Um einen Anruf zu halten:
Tippen Sie während des Anrufs auf die Bildschirmtaste HlteLtg.
Um den Anruf zurückzuholen:
Tippen Sie während des Anrufs auf die Bildschirmtaste Fortstz.
Vor-Ort-Konferenz
Sie können eine 5-Wege-Konferenz mit bis zu fünf Parteien hosten.
Erstelllen Sie die 5-Wege-Konferenz folgendermaßen:
1. Tippen Sie während eines aktiven Gesprächs auf die Bildschirmtaste Conf. Das Gespräch wird auf die Warteleitung
gelegt.
2. Geben Sie die Nummer des zweiten Teilnehmers ein und tippen Sie dann im Bildschirm auf Senden.
Sie können auch einen Kontakt aus der Verzeichn zur Teilnahme an einer Konferenz wählen.
3. Tippen Sie erneut auf die Bildschirmtaste Conf, sobald der zweite Teilnehmer antwortet.
4. Wiederholen Sie die Schritte 2 und 3, um weitere Teilnehmer in die Konferenz einzubeziehen.
Um einen einzelnen Teilnehmer auszuwählen:
1. Tippen Sie während der Konferenz auf die Bildschirmtaste Leiten.
2. Tippen Sie zur Auswahl des gewünschten Teilnehmers auf oder , danach haben Sie folgende Möglichkeiten:
• Tippen Sie zum Stummschalten des Teilnehmers auf die Bildschirmtaste Fernstm. Der stummgeschaltete
Teilnehmer kann jeden hören, aber niemand kann den stummgeschalteten Teilnehmer hören.
• Tippen Sie zum Entfernen des Teilnehmers von der Konferenz auf die Bildschirmtaste Entf.
• Tippen Sie zum Aufteilen des Konferenzanrufs in einzelne Anrufe im Modus Halten auf die Bildschirmtaste Split
All.
5. Tippen Sie zum Verbinden mit dem drahtlosen Netzwerk auf die Bildschirmtaste Verb..
6. Ist das Netzwerk gesichert, geben Sie das Passwort im Feld Passwort ein und tippen Sie dann auf die Bildschirmtaste OK.
Kontoeinstellungen:
Tippen Sie auf die Bildschirmtaste Menü und wählen Sie zum Konfigurieren des Kontos Einstellungen->Erw. Einst
(werksseitig: admin) ->Konten.
Grundlegende Anruffunktionen
14
D
E
U
T
S
C
H

Anrufaufzeichnung
Zur Aufzeichnung von laufenden Gesprächen können Sie einen USB-Stick in den USB-Anschluss Ihres Telefons stecken.
Um Audiogespräche aufzuzeichnen:
1. Tippen Sie auf die Bildschirmtaste Mehr und dann während des Gesprächs auf die Bildschirmtaste AufzSta.
2. Tippen Sie zum Unterbrechen der Aufnahme auf die Bildschirmtaste AufzPau und zum Fortführen auf die
Bildschirmtaste AufzFortstzn.
3. Tippen Sie zum Beenden der Aufnahme auf die Bildschirmtaste AufzBen. Die Aufnahme wird gespeichert.
Falls Sie einen Anruf während der Aufnahme unterbrechen, wird die Aufnahmedatei automatisch gespeichert.
Anrufweiterleitung
Sie können entweder einen oder alle eingehenden Anrufe zu einem Kontakt weiterleiten.
Um einen eingehenden Anruf zu einem Kontakt weiterzuleiten:
1. Tippen Sie im Bildschirm Eingehende Anrufe auf die Bildschirmtaste Wtltg.
2. Geben Sie die Nummer ein, an die Anrufe umgeleitet werden sollen.
Sie können auch einen Kontakt aus der Verz. wählen. Der Anruf wird direkt zu dem Kontakt weitergeleitet.
3. Tippen Sie auf die Bildschirmtaste Senden.
Um alle eingehenden Anruf zu einem Kontakt weiterzuleiten:
1. Tippen Sie auf die Bildschirmtaste Menü.
2. Wählen Sie Leistungsmerkmale->Anrufumleitung.
3. Wählen Sie die gewünschte Art der Rufumleitung:
Immer weiterleiten----Eingehende Anrufe werden uneingeschränkt weitergeleitet.
Weiterleitung besetzt----Eingehende Anrufe werden weitergeleitet, wenn das Telefon besetzt ist.
Keine Antwort----Eingehende Anrufe werden weitergeleitet, wenn sie nach einem gewissen Zeitraum nicht
beantwortet werden.
4. Aktivieren Sie die gewünschte Weiterleitungsart.
5. Geben Sie in das Feld Weiterltg zu die Nummer ein, zu der Sie eingehende Anrufe weiterleiten lassen möchten.
6. Wenn das Leistungsmerkmal Keine Antwort aktiviert ist, ist im Menüpunkt Verzögerung eine Zeit
auszuwählen, nach der ein eingehender Anruf, wenn er nicht angenommen wird, umgeleitet werden soll.
7. Tippen Sie auf die Bildschirmtaste Speich., um die Änderungen zu übernehmen.
Anrufumleitung
Sie können Anrufe wie folgt umleiten:
Direkte Umleitung
1. Tippen Sie während eines Anrufs auf die Bildschirmtaste Übergeben. Das Gespräch wird auf die Warteleitung gelegt.
2. Geben Sie die Nummer ein, an die der Anruf umgeleitet werden soll.
Sie können auch aus der Verz. einen Kontakt wählen, an den der Anruf umgeleitet werden soll.
3. Tippen Sie auf die Bildschirmtaste Übergeben.
Umleitung ohne Rücksprache
1. Tippen Sie während eines Anrufs auf die Bildschirmtaste Übergeben. Das Gespräch wird auf die Warteleitung gelegt.
2. Geben Sie die Nummer ein, an die der Anruf umgeleitet werden soll.
3. Tippen Sie auf , oder .
4. Tippen Sie auf die Bildschirmtaste Übergeben, wenn Sie den Rückrufton hören.
Übergabe mit Rücksprache
1. Tippen Sie während eines Anrufs auf die Bildschirmtaste Übergeben. Das Gespräch wird auf die Warteleitung gelegt.
2. Geben Sie die Nummer ein, an die der Anruf umgeleitet werden soll.
3. Tippen Sie auf , oder .
4. Tippen Sie auf die Bildschirmtaste Übergeben, wenn der zweite Teilnehmer antwortet.
15
D
E
U
T
S
C
H

Anrufliste
1. Tippen Sie im inaktiven Bildschirm auf die Bildschirmtaste Verlauf.
2. Wählen Sie Alle Anrufe.
3. Wählen Sie einen Eintrag in der Liste. Sie haben dann folgende Möglichkeiten:
• Tippen Sie zum Aufrufen des Eintrags auf die Bildschirmtaste Senden.
• Tippen Sie zum Löschen des Eintrags aus der Liste auf die Bildschirmtaste Löschen.
Falls Sie auf die Bildschirmtaste Option tippen, haben Sie zusätzlich noch folgende Möglichkeiten:
• Wählen Sie die Option Detail, um detaillierte Informationen des Eintrags anzuzeigen.
• Wählen Sie die Option Zum Kontakt addn, um einen Eintrag zum lokalen Verzeichnis hinzuzufügen.
• Wählen Sie die Option Zur Sperrliste hinzufügen, um den Eintrag auf die schwarze Liste zu setzen.
• Wählen Sie AllLö, um alle Einträge in der Liste zu löschen.
Lautstärke einstellen
• Tippen Sie zur Einstellung der Hörerlautstärke während eines Anrufs auf oder .
• Tippen Sie zur Einstellung der Anruftonlautstärke auf oder , wenn das Telefon inaktiv ist oder läutet.
• Tippen Sie zum Einstellen des Medienvolumens in dem entsprechenden Bildschirm auf oder .
Klingeltöne
1. Tippen Sie im inaktiven Bildschirm auf die Bildschirmtaste Menü und wählen Sie dann Einstellungen->
Allgemein->Sound->Klingeltöne.
2. Tippen Sie zur Auswahl von Öffentlich oder des gewünschten Kontos auf oder .
3. Tippen Sie zur Auswahl des gewünschten Klingeltons auf oder .
4. Tippen Sie auf die Bildschirmtaste Speich., um die Änderungen zu übernehmen.
Lokales Verzeichnis
Kontakt hinzufügen:
1. Tippen Sie im inaktiven Bildschirm auf die Bildschirmtaste Verz..
2. Wählen Sie Select Lok. Verz.->Alle Kontakte.
3. Tippen Sie zum Hinzufügen eines neuen Kontakts auf die Bildschirmtaste Hinzufü..
4. Geben Sie in das Feld Name einen unverwechselbaren Namen und in die jeweiligen Felder die Telefonnummern ein.
5. Tippen Sie auf die Bildschirmtaste Speich., um die Änderungen zu übernehmen.
Kontakt bearbeiten:
1. Tippen Sie im inaktiven Bildschirm auf die Bildschirmtaste Verz..
2. Wählen Sie Select Lok. Verz.->Alle Kontakte.
3. Wählen Sie den gewünschten Kontakt, tippen Sie auf die Bildschirmtaste Option und wählen Sie dann Detail.
4. Bearbeiten Sie die Kontaktinformationen.
5. Tippen Sie auf die Bildschirmtaste Speich., um die Änderungen zu übernehmen.
Kontakt löschen:
1. Tippen Sie im inaktiven Bildschirm auf die Bildschirmtaste Verz..
2. Wählen Sie Select Lok. Verz.->Alle Kontakte.
3. Wählen Sie den gewünschten Kontakt, tippen Sie auf die Bildschirmtaste Option und wählen Sie dann Löschen.
4. Tippen Sie auf die Bildschirmtaste OK, wenn der LCD-Bildschirm fragt „Delete Selected Item?”.
Benutzereinstellungen für Ihr Telefon
Hinweis: Es ist außerdem möglich, Kontakte aus der Anrufliste hinzuzufügen. Schlagen Sie für weitere Informationen unter Anrufliste nach.
16
D
E
U
T
S
C
H

17
D
E
U
T
S
C
H
Ausführungshinweise für die Produkte von Yealink mit Akku
Betriebsumgebungstemperaturen
Betriebstemperatur: -10 bis 50 °C
Relative Luftfeuchtigkeit: 5 % bis 90 %, nicht kondensierend
Lagertemperatur: -30 bis + 70 °C
Garantie
Unsere Produktgarantie ist auf das Gerät selbst beschränkt, wenn es normal und gemäß den Betriebsanweisungen und der Systemumgebung
verwendet wird. Wir sind weder für Schäden oder Verluste haftbar, die aus der Verwendung dieses Produkts entstehen, noch für Ansprüche eines
Dritten. Wir sind nicht haftbar für Probleme mit dem Yealink Gerät, die aus der Verwendung dieses Produkts entstehen. Wir sind nicht haftbar für
finanzielle Schäden, Gewinnverluste, Ansprüche Dritter etc., die aufgrund der Verwendung dieses Produkts entstehen.
Symbol DC
ist das Symbol für DC-Spannung.
Richtlinie zur Beschränkung der Verwendung bestimmter gefährlicher Stoffe in Elektro- und Elektronikgeräten (RoHS)
Das Gerät erfüllt die Anforderungen der RoHS-Richtlinie der EU. Für Bestätigungen der Einhaltung können Sie sich an [email protected]
wenden.
Sicherheitshinweise
Bewahren Sie diese Anweisungen auf. Lesen Sie diese Sicherheitshinweise vor der Verwendung!
Die folgenden grundlegenden Vorsichtsmaßnahmen müssen zur Vermeidung von Bränden, Stromschlag und anderen Verletzungen immer
befolgt werden.
Allgemeine Vorschriften
Lesen Sie vor der Installation und Verwendung des Geräts die Sicherheitshinweise sorgfältig durch und beobachten Sie die Situation im
Betrieb.
Halten Sie das Gerät während der Lagerung, dem Transport und dem Betrieb stets sauber und trocken.
Vermeiden Sie während der Lagerung, dem Transport und dem Betrieb stets Zusammenprallen und Stürze des Geräts.
Versuchen Sie nicht das Gerät eigenständig zu demontieren. Wenden Siesich im Falle von Mängeln an das zuständige Wartungscenter für
eine Reparatur.
Ohne vorherige schriftliche Zustimmung dürfen weder Unternehmen noch Einzelperson Änderungen an der Struktur oder dem
Sicherheitskonzept des Geräts vornehmen. Yealink übernimmt unter keinen Umständen die Haftung für Folgen oder Rechtsansprüche, die
auf solche Änderungen zurückzuführen sind.
Beachten Sie bitte die entsprechenden Gesetze und Vorschriften bei der Verwendung des Geräts. Die gesetzlichen Rechte Dritter müssen
ebenfalls beachtet werden.
Umweltvorschriften
Stellen Sie das Gerät an einem gut belüfteten Ort auf. Setzen Sie das Gerät nicht direkter Sonneneinstrahlung aus.
Halten Sie das Gerät trocken und frei von Staub.
Stellen Sie das Gerät auf einen stabilen, ebenen Untergrund.
Bitte legen Sie keine schweren Gegenstände auf das Gerät, da Beschädigung und Verformungen durch zu hohe Last möglich sind.
Halten Sie mindestens 10 cm Abstand zwischen dem Gerät und dem nächsten Objekt ein, um die Wärmeabfuhr zu gewährleisten.
Stellen Sie das Gerät nicht auf oder in der Nähe von entflammbaren oder brandgefährdeten Objekt wie Gummimaterialien auf
Halten Sie das Gerät fern von Hitzequellen und offenem Feuer, wie Kerzen oder einer elektrischen Heizung.
Halten Sie das Gerät fern von jedem Haushaltsgerät mit starkem Magnetfeld oder Elektromagnetfeld, z.B. einem Mikrowellenherd oder
einem Kühlschrank.
Betriebsvorschriften
Lassen Sie das Gerät nicht ohne Aufsicht durch ein Kind verwenden.
Lassen Sie kein Kind mit dem Gerät oder einem Zubehörteil spielen, da Kleinteile verschluckt werden können.
Bitte verwenden Sie ausschließlich Zubehör, das vom Hersteller bereitgestellt oder genehmigt wurde.
Die Stromversorgung des Geräts muss den Anforderungen der Eingangsspannung des Gerätes entsprechen. Bitte verwenden Sie
ausschließlich den bereitgestellten Überspannungsschutz an der Steckdose.
Achten Sie vor dem Anschließen oder Abziehen des Kabels darauf, dass Ihre Hände vollständig trocken sind.
Verschütten Sie keine Flüssigkeiten auf das Gerät und verwenden Sie es nicht in der Nähe von Wasser, beispielsweise in der Nähe
einer Badewanne, Waschschüssel, einem Spülbecken, in einem feuchten Keller oder in der Nähe eines Schwimmbeckens.
Adresse: 309, 3rd Floor, No.16, Yun Ding North Road,
Huli District, Xiamen City, Fujian, P.R.C
Tel: +86-592-5702000
Fax: +86-592-5702455

Adresse: 309, 3rd Floor, No.16, Yun Ding North Road,
Huli District, Xiamen City, Fujian, P.R.C
Adresse: 309, 3rd Floor, No.16, Yun Ding North Road,
Huli District, Xiamen City, Fujian, P.R.C
18
Tel: +86-592-5702000
Fax: +86-592-5702455
D
E
U
T
S
C
H
UMWELTFREUNDLICHE VERWERTUNG
Entsorgen Sie das Gerät nicht mit dem Hausmüll.
Erkundigen Sie sich bei Ihrer Stadtverwaltung, wie Sie das Gerät umweltfreundlich entsorgen können Pappkarton,
Kunststoffverpackung und Bauteile des Gerätes können im Einklang mit den geltenden Vorschriften in Ihrem Land
verwertet werden.
Halten Sie stets die geltenden Vorschriften ein.
Deren Nichtbeachtung kann eine Buße oder Verfolgung gemäß dem geltenden Recht nach sich ziehen Die
durchgestrichene Mülltonne auf dem Gerät bedeutet, dass das Gerät am Ende seiner Nutzungsdauer zu einer
speziellen Elektroschrottsammelstelle gebracht und vom Hausmüll gesondert verarbeitet werden muss.
Treten Sie nicht auf das Kabel, ziehen und verbiegen Sie es nicht, da es dadurch zu einer Fehlfunktion des Geräts kommen kann.
Schalten Sie das Gerät bei Gewitter aus und trennen Sie es von der Stromversorgung. Ziehen Sie das Netzkabel und das
ADSL-Twisted-Pair-Kabel (Festnetzkabel) zurVermeidung eines Blitzschlags.
Wenn das Gerät längere Zeit ungenutzt bleibt, trennen Sie es von der Stromversorgung und ziehen Sie den Netzstecker.
Wenn Rauch oder ungewöhnliche Geräusche oder Gerüche aus dem Gerät austreten, trennen Sie das Gerät sofort von der
Stromversorgung und ziehen Sie das Netzkabel. Wenden Sie sich an das angegebene Wartungscenter für eine Reparatur.
Führen Sie keine Gegenstände in Einschübe oder Anschlussöffnungen des Geräts ein, die kein Bestandteil des Produktes oder ein
Zubehörteil sind.
Schließen Sie zuerst das Erdungskabel des Geräts an, bevor Sie ein Kabel anschließen.Trennen Sie das Erdungskabel nicht, bis
nicht alle anderen Kabel entfernt wurden.
Reinigungsvorschriften
Bevor Sie das Gerät reinigen, schalten Sie es aus und trennen Sie es von der Stromversorgung.
Verwenden Sie ein Stück trockenes, weiches und antistatisches Tuch zum Reinigen des Geräts.
Halten Sie das Netzkabel sauber und trocken. Über einen schmutzigen oder nassen Netzstecker kann es zu einem elektrischen
Schlag oder anderen Gefahren kommen.
Fehlerbehebung
Die Einheit kann das Yealink Gerät nicht mit Strom versorgen.
Es gibt Probleme mit dem Steckeranschluss.
1. Reinigen Sie den Stecker mit einem trockenen Tuch.
2. Schließen Sie ihn an einer anderen Steckdose an.
Die Umgebungstemperatur liegt oberhalb des Betriebstemperaturbereichs.
1. Verwenden Sie die Einheit innerhalb des Betriebstemperaturbereichs.
Das Kabel zwischen der Einheit und dem Yealink Gerät ist nicht richtig angeschlossen.
1. Schließen Sie das Kabel richtig an.
Das Kabel lässt sich nicht richtig anschließen.
1. Sie haben möglicherweise ein falsches Yealink Gerät angeschlossen.
2. Verwenden Sie die richtige Stromversorgung.
Es befindet sich möglicherweise Staub etc. im Port.
1. Reinigen Sie den Port.
Setzen Sie sich bei weiteren Fragen mit Ihrem Händler oder Ihrer anerkannten Servicestelle in Verbindung.
Kontaktdaten des Ansprechpartners
YEALINK NETWORK TECHNOLOGY CO., LTD.
309, 3rd Floor, No. 16, Yun Ding North Road, Huli District, Xiamen City, Fujian, VR China
YEALINK (EUROPE) NETWORK TECHNOLOGY B.V.
Strawinskylaan 3127, Atrium Building, 8th floor, 1077ZX Amsterdam, Niederlande
YEALINK (USA) NETWORK TECHNOLOGY CO., LTD.
999 Peachtree Street Suite 2300, Fulton, Atlanta, GA, 30309, USA
Hergestellt in China

YEALINK (XIAMEN) NETWORK TECHNOLOGY CO.,LTD
WWW.YEALINK.COM
Konformitätserklärung
Datum der Erklärung: 20th /July/2019
Wir: YEALINK(XIAMEN) NETWORK TECHNOLOGY CO.,LTD,
Adresse: 309, 3rd Floor, No.16, Yun Ding North Road, Huli District, Xiamen City, Fujian, P.R.C
Erklären hiermit, dass das Produkt
Typ: HD-IP-Konferenztelefon
Modell: CP920
die grundlegenden Anforderungen und anderen relevanten Bestimmungen der folgenden EG-Richtlinie erfüllt
Richtlinie: 2
014/30/EU, 2014/35/EU, RED 2014/53/EU
Konformität
Das Produkt erfüllt die folgenden Normen:
Sicherheit: EN 60950-1:2006+A11:2009
+A1:2010+A12:2011+A2:2013
EMC: EEN 55032: 2012/AC:2013
EN 55024: 2010
EN61000-3-2: 2014
EN61000-3-3: 2013
Radio:
ETSI EN 301 489-1 V2.1.1
ETSI EN 301 489-17 V3.1.1
ETSI EN 300 328
V2.1.1
Gesundheit: EN 62311:2008
Richtlinie 2011/65/EU des Europäischen Parlaments und des Rates vom 8. Juni 2011 zur Beschränkung der
Verwendung bestimmter gefährlicher Stoffe in Elektro- und Elektronikgeräten“ und
„Delegierte Richtlinie (EU) 2015/863 der Kommission vom 4. Juni 2015 zur Änderung
von Anhang II der Richtlinie 2011/65/EU des Europäischen Parlaments und des Rates
hinsichtlich der Liste der Stoffe, die Beschränkungen unterliegen (RoHS 2.0).
Richtlinie 2012/19/EU des Europäischen Parlaments und des Rates vom 4. Juli 2012 über Elektro- und
Elektronik-Altgeräte (WEEE)
Verordnung (EG) Nr. 1907/2006 des Europäischen Parlaments und des Rates vom 18. Dezember 2006zur
Registrierung, Bewertung, Zulassung und Beschränkung chemischer Stoffe
(REACH)
YEALINK (EUROPE) NETWORK TECHNOLOGY B.V.
Adresse: Strawinskylaan 3127, Atrium Building, 8th floor,
1077ZX Amsterdam, the Netherlands
Telefon: +31 (0) 64 61 11 373
E-Mail: [email protected]
Adresse: 309, 3rd Floor, No.16, Yun Ding North Road,
Huli District, Xiamen City, Fujian, P.R.C
Tel: +86-592-5702000
Fax: +86-592-5702455
19
NAME: Stone Lu
DATE:
20/July
/2019
TITLE: Vice President

Über Yealink
Yealink ist ein weltweit führender Hersteller von Enterprise Communication and Collaboration Solutions, der weltweit
operierenden Unternehmen Video-Konferenz-Services bietet. Fokussiert auf Forschung und Entwicklung zeichnet sich
Yealink durch Innovationen und Kreativität aus. Mit den herausragenden technischen Patenten in den Bereichen Cloud
Computing, Audio, Video und Bildverarbeitungstechnologie hat Yealink eine umfassende Collaboration Solution für
Audio- und Video-Konferenzen geschaffen, indem es seine Cloud Services mit einer Serie von Endpunkt-Produkten
ergänzt hat. Als einer der besten Lieferanten im mehr als 140 Ländern und Regionen, einschließlich der USA,
Großbritanniens und Australiens, steht Yealink hinsichtlich des globalen Marktanteils bei der Lieferung von
SIP-Telefonen an erster Stelle.
Technischer Support
Bitte besuchen Sie für Firmware-Downloads, Produktdokumentationen, Problemlösungen u. v. m. das Yealink-WIKI
(http://support.yealink.com/). Damit Sie den bestmöglichen Service von uns erhalten können, empfehlen wir Ihnen, all
Ihre technischen Probleme über unser Ticketsystem (https://ticket.yealink.com) an uns heranzutragen.
YEALINK (XIAMEN) NETWORK TECHNOLOGY CO.,LTD.
Web: www.yealink.com
Adresse: 309, 3rd Floor, No.16, Yun Ding North Road,
Huli District, Xiamen City, Fujian, P.R.C
Copyright ©2019 Yealink Inc. Alle Rechte vorbehalten.

B
A
Opción de
alimentación CA
21
Contenido del embalaje
E
S
P
A
Ñ
O
L
Teléfono IP para
conferencias
Adaptador de
corriente
Guía rápida de
instalación
Cable Ethernet
(7,5 m de cable de par trenzado
sin blindaje [UTP] de cat. 5e)
Nota: Se recomienda usar los accesorios suministrados o aprobados por Yealink. El uso de accesorios de terceros no aprobados puede afectar
el funcionamiento.
Montaje del teléfono
1. Conectar la alimentación y la red cableada.
Existen dos opciones para las conexiones de red y de alimentación. El administrador de su sistema le recomendará cuál
usar.
Asimismo, puede conectarse a la red inalámbrica tras la puesta en funcionamiento. Consulte el apartado
Conexión de red inalámbrica dentro de Configuración del teléfono para obtener más información.
Nota: Sólo se debe usar el teléfono IP con un alimentador original (12 V/1 A) de Yealink. Si se proporciona alimentación a través de
Ethernet (PoE), no necesita conectar el alimentador. Asegúrese de que el concentrador/conmutador sea compatible con PoE.
Opción PoE
(Alimentación a
través de Ethernet)
Internet
CC 12 V
Adaptador
de corriente
Concentrador/conmutador PoE
conforme con IEEE 802.3af

Softkeys
E
S
P
A
Ñ
O
L
Tecla silenciar
Altavoz
Teclado
Tecla de volumen (+)
Tecla de volumen (–)
Micrófono
1
2
3
4
5
7
8
9
Pantalla LCD
Teclas programables
El proceso de inicialización empezará automáticamente cuando el
teléfono IP esté conectado a la red y reciba alimentación. El
teléfono podrá usarse tras la puesta en funcionamiento. Puede
configurar el teléfono a través de la interfaz de usuario web o la
interfaz de usuario del teléfono.
1
1
2
10
2
11
12
Tecla para colgar
6
13
14
22
2. Conectar la memoria USB opcional.
Puesta en funcionamiento
Instrucciones para los componentes de hardware
Tecla Bluetooth
Tecla OK
Tecla de navegación arriba
Micrófono
Tecla para descolgar
Tecla de navegación abajo

Configuración a través de la interfaz de usuario del teléfono
Configuración de la red:
1. Pulse la tecla programable Menú, seleccione Ajustes->Config. avanzada (contraseña predeterminada: admin) ->
Red->Puerto WAN /VLAN/Servidor Web/802.1x/VPN/LLDP/CDP/NAT para configurar la red.
Conexión a una red inalámbrica:
1. Pulse la tecla programable Menú, seleccione Ajustes->Conf. básica->Wi-Fi.
2. Pulse la tecla programable Cambiar para activar la red Wi-Fi.
3. Pulse la tecla programable Guardar.
El teléfono buscará automáticamente las redes inalámbricas disponibles en la zona.
4. Seleccione una red inalámbrica disponible de la lista de Red(es) disponible(s).
Nota: El teléfono IP también es compatible con IPv6, pero está deshabilitado de forma predeterminada.
Los ajustes incorrectos de la red pueden dar como resultado la inaccesibilidad del teléfono y tener influencia en el comportamiento de la
red. Contacte con el administrador de su sistema para obtener más información.
Nota: Compruebe con el administrador de su sistema si aparece algún error durante el proceso de registro o si se requiere una configuración
específica para registrarse.
Configuración de la interfaz web de usuario
Acceso a la interfaz web de usuario:
1. Pulse OK para obtener la dirección IP del teléfono.
2. Abra un explorador web en su equipo, introduzca la dirección IP en la barra direcciones (por ejemplo,
"http://192.168.0.10" o "192.168.0.10") y, a continuación, pulse Entrar.
3. Introduzca el nombre de usuario (predeterminado: admin) y la contraseña (predeterminada: admin) en la página
de inicio de sesión y haga clic en Iniciar.
Configuración de la red:
Haga clic en
Red->Básico->Config IPv4
.
Puede configurar los ajustes de la red de las formas siguientes:
DHCP: El teléfono intentará contactar con un servidor DHCP de su red para obtener los ajustes de red
válidos, es decir, la dirección IP, la máscara de subred, la dirección de la puerta de enlace y la
dirección DNS.
Dirección IP estática: Si el teléfono no puede contactar con un servidor DHCP por alguna razón, deberá
configurar manualmente la dirección IP, la máscara de subred, la dirección de la
puerta de enlace y la dirección de los DNS primario y secundario del teléfono.
Configuración del teléfono
Ajustes de cuenta:
Haga clic en
Cuenta->Registrar
.
Parámetros de la cuenta:
Estado del registro: Muestra el estado del registro de la cuenta actual.
Línea activa: Puede seleccionar Enabled/Disabled para habilitar/deshabilitar la cuenta.
Etiqueta: Aparece en la pantalla LCD para identificar la cuenta.
Mostrar nombre: Se muestra como id. de la llamada cuando se hace una llamada.
Nombre del registro: Es la id. autentificada para la autentificación proporcionada por el ITSP (requerida).
Nombre de usuario: Proporcionado por el ITSP para registrarse (requerido).
Contraseña: Proporcionado por el ITSP para registrarse (requerido).
Host del servidor: Proporcionado por el ITSP para registrarse (requerido).
Iconos del estado del registro en la pantalla LCD:
Registrado
Sin servicio Registro fallido/registrando
23
E
S
P
A
Ñ
O
L

Hacer una llamada
Ejecute una de las siguientes acciones:
- Pulse .
Introduzca el número de teléfono y pulse , , o la tecla programable Enviar.
- Introduzca el número de teléfono.
Pulse , , o toque la tecla programable Enviar.
Responder a una llamada
Pulse , , o la tecla programable Contes..
Finalizar una llamada
Pulse o la tecla programable Terminar.
Desactivación y reactivación del audio de llamada.
Para desactivar el audio de una llamada:
Pulse , el led de la tecla para desactivar el audio se iluminará en rojo fijo.
Para reactivar el audio de una llamada:
Pulse de nuevo para reactivar el audio de la llamada. El led de la tecla para desactivar el audio se iluminará en
verde fijo.
Llamada en espera y reanudación de llamadas
Para retener una llamada:
Pulse la tecla programable Esperar durante una llamada.
Para reanudar una llamada:
Pulse la tecla programable Reanud durante una llamada.
Conferencia local
Puede establecer una conferencia local de cinco participantes con hasta cuatro personas.
Para establecer una conferencia local de cinco participantes:
1. Pulse la tecla programable Conf durante una llamada activa. La llamada se pone en espera.
2. Introduzca el número del segundo participante y, a continuación, pulse la tecla programable Enviar.
También puede seleccionar un número del Drtrs. para añadirlo a la conferencia.
3. Pulse la tecla programable Conf de nuevo cuando el segundo participante conteste.
4. Repita los pasos 2 y 3 para añadir más participantes a la conferencia.
Para gestionar un participante en concreto:
1. Pulse la tecla programable Gest. durante la conferencia.
2. Pulse o para seleccionar el participante deseado y haga lo siguiente:
• Pulse la tecla de función Silenc. para desactivar el audio del participante. El participante silenciado puede oír a
los demás pero estos no pueden oírle.
• Pulse la tecla programable Eliminar para eliminar al participante de la conferencia.
• Pulse la tecla programable Split All para dividir la llamada de conferencia en llamadas individuales en espera.
5. Pulse la tecla programable Conectar para conectarse a la red inalámbrica.
6. Si la red es segura, introduzca la contraseña en el campo Contraseña y, a continuación, pulse la tecla programable OK.
Ajustes de cuenta:
Pulse la tecla programable Contraseña, seleccione Ajustes->Config. avanzada (contraseña predeterminada: admin)
->Cuentas para configurar la cuenta.
Funcionalidades básicas de llamada
24
E
S
P
A
Ñ
O
L

Grabación de llamadas
Puede grabar llamadas activas insertando una memoria USB en el puerto USB de su teléfono.
Para grabar llamadas de audio:
1. Durante una llamada, pulse la tecla programable Más y después la tecla IniGrab.
2. Pulse la tecla programable PauGrab para pausar la grabación, y la tecla Reanud. grab. para reanudarla.
3. Pulse la tecla programable ParGrab para dejar de grabar. Se guardará el archivo de grabación.
Si finaliza la llamada durante la grabación, el archivo de grabación se guardará automáticamente.
Desvío de Llamadas
Puede desviar una llamada entrante o todas las llamadas entrantes a un contacto.
Para desviar una llamada a un contacto:
1. Pulse la tecla programable Desvío de la pantalla de llamadas entrantes.
2. Introduzca el número al que quiera desviar la llamada.
También puede elegir un contacto del Drtrs.. La llamada se redirigirá directamente al contacto.
3. Pulse la tecla programable Enviar.
Para desviar todas las llamadas entrantes a un contacto:
1. Pulse la tecla programable Menú.
2. Seleccione Funciones->Desvío.
3. Seleccione el tipo de desvío deseado:
Desviar siempre----Las llamadas entrantes se desvían incondicionalmente.
Desviar si ocupado----Las llamadas entrantes se desvían cuando el teléfono está ocupado.
Desviar si no responde----Las llamadas se desvían si no son contestadas en un tiempo determinado.
4. Active el tipo de desvío deseado.
5. Introduzca el número al que quiere desviar las llamadas en el campo Desviar a.
6. Para Desvío si no contesta (desviar si no responde), seleccione el número de tonos que desea que el sistema
espere antes de desviar la llamada en el campo N.o repiques.
7. Pulse la tecla programable Guardar para aplicar el cambio.
Transferencia de llamadas
Puede transferir una llamada de las formas siguientes:
Transferencia ciega
1. Pulse la tecla programable Transf. durante una llamada. La llamada se pone en espera.
2. Introduzca el número al que quiere transferir la llamada.
También puede seleccionar un contacto al que desviar la llamada en el Drtrs..
3. Pulse la tecla programable Transf..
Transferencia semiatendida
1. Pulse la tecla programable Transf. durante una llamada. La llamada se pone en espera.
2. Introduzca el número al que quiere transferir la llamada.
3. Pulse , o .
4. Pulse la tecla programable Transf. al oír el tono de devolución de llamada.
Transferencia atendida
1. Pulse la tecla programable Transf. durante una llamada. La llamada se pone en espera.
2. Introduzca el número al que quiere transferir la llamada.
3. Pulse , o .
4. Pulse la tecla programable Transf. cuando el segundo participante conteste.
25
E
S
P
A
Ñ
O
L

Historial de llamadas
1. Pulse la tecla programable Hist. de la pantalla en suspensión.
2. Seleccione Todas llam..
3. Seleccione una entrada de la lista y podrá hacer lo siguiente:
• Pulse la tecla programable Enviar para recuperar la entrada.
• Pulse la tecla programable Elimin para borrar la entrada de la lista.
Si pulsa la tecla programable Opción, también podrá ejecutar las siguientes acciones:
• Seleccionar Detalles para ver la información detallada relacionada con la entrada.
• Seleccionar Agr. a contacto para añadir la entrada al directorio local.
• Seleccionar Agr. a l. negra para añadir la entrada a la lista negra.
• Seleccionar ElimTdo para eliminar todas las entradas de la lista.
Control de volumen
• Pulse o durante una llamada para ajustar el volumen del receptor.
• Pulse o cuando el teléfono esté inactivo o sonando para ajustar el volumen de timbre.
• Pulse o para ajustar el volumen multimedia en la pantalla correspondiente.
Tonos de timbre
1. Pulse la tecla programable Menú de la pantalla en suspensión y, a continuación, seleccione Ajustes->Conf.
básica->Sonido->Tonos de llamada.
2. Pulse o para seleccionar Común o la cuenta deseada.
3. Pulse o para seleccionar el tono de llamada deseado.
4. Pulse la tecla programable Guardar para aplicar el cambio.
Directorio local
Para añadir un contacto:
1. Pulse la tecla programable Drtrs. de la pantalla en suspensión.
2. Seleccione Directorio local->Todos cont..
3. Pulse la tecla programable Añadir para añadir un contacto.
4. Introduzca un nombre de contacto único en el campo Nombre y los números de contacto en los campos
correspondientes.
5. Pulse la tecla programable Guardar para aplicar el cambio.
Para editar un contacto:
1. Pulse la tecla programable Drtrs. de la pantalla en suspensión.
2. Seleccione Directorio local->Todos cont..
3. Seleccione el contacto deseado, pulse la tecla programable Opción y seleccione Detalles.
4. Edite la información del contacto.
5. Pulse la tecla programable Guardar para aplicar el cambio.
Para eliminar un contacto:
1. Pulse la tecla programable Drtrs. de la pantalla en suspensión.
2. Seleccione LocalDirectorio local->Todos cont..
3. Seleccione el contacto deseado, pulse la tecla programable Opción y seleccione Elimin.
4. Pulse OK cuando en la pantalla LCD aparezca el mensaje "Delete Selected Item?".
Personalización del teléfono
Nota: Puede añadir fácilmente contactos desde el registro de llamadas. Para obtener más información, consulte el historial de llamadas (Call History).
26
E
S
P
A
Ñ
O
L

27
E
S
P
A
Ñ
O
L
Notificaciones Reglamentarias: Productos de Yealink con batería
Temperatura ambiente de funcionamiento
Temperatura de funcionamiento:
+14 to 122°F (-10 to 50°C)
Humedad relativa: 5% to 90%,sin condensación
Temperatura de almacenaje: -22 to +160°F (-30 to +70°C)
Garantía
La garantía del producto está limitada solo a la unidad, cuando se usa normalmente de acuerdo con las instrucciones de operación y el
entorno del sistema. No somos responsables por daños o pérdidas resultantes del uso de este producto, o por cualquier reclamo de un
tercero. No nos hacemos responsables de los problemas con el dispositivo Yealink que surjan del uso de este producto; No nos hacemos
responsables de los daños financieros, pérdidas de beneficios, reclamaciones de terceros, etc., que surjan del uso de este producto.
Símbolo CC
Es el símbolo de voltaje de CC.
Directiva de Restricción de Sustancias Peligrosas (RoHS)
Este dispositivo cumple con los requisitos de la directiva RoHS de la UE. Las declaraciones de
cumplimiento se pueden obtener contactando a suppor[email protected].
Instrucciones de seguridad
Conserve estas instrucciones. ¡Lea estas instrucciones de seguridad antes de usar el dispositivo!
Las siguientes instrucciones básicas de seguridad deben respetarse siempre para reducir el riesgo de incendio, descarga eléctrica y otras
lesiones personales.
Requisitos generales
Lea detenidamente estas instrucciones de seguridad antes de instalar y usar el dispositivo y controle la situación durante el
funcionamiento.
Mantenga siempre el dispositivo seco y limpio durante el proceso de almacenaje, transporte y funcionamiento.
Evite golpes y sacudidas en el dispositivo durante el proceso de almacenaje, transporte y funcionamiento.
No desmonte el dispositivo por su cuenta. En caso de fallos, póngase en contacto con el centro de mantenimiento designado para
su reparación.
No se permite hacer modificaciones en la estructura ni el diseño de seguridad del dispositivo sin previo consentimiento por
escrito. Yealink no será responsable bajo ninguna circunstancia de las consecuencias o problemas legales derivados de dichas
modificaciones.
Consulte las leyes y estatutos pertinentes cuando use el dispositivo. También deben respetarse los derechos legales de terceros.
Requisitos ambientales
Coloque el dispositivo en un lugar bien ventilado. No exponga el dispositivo a la luz del sol directa.
Mantenga el dispositivo seco y libre de polvo.
Coloque el dispositivo sobre una plataforma estable y nivelada.
No coloque objetos pesados sobre el dispositivo para evitar daños o deformaciones causadas por el peso.
Deje al menos 10 cm de distancia entre el dispositivo y los objetos más cercanos para facilitar la disipación del calor.
No coloque el dispositivo encima o cerca de objetos inflamables o vulnerables al fuego, como materiales hechos de goma.
Mantenga el dispositivo alejado de fuentes de calor o fuego vivo, como velas o radiadores eléctricos.
Mantenga el dispositivo alejado de aparatos domésticos con campos magnéticos o electromagnéticos intensos, como hornos
microondas o neveras.
Requisitos de funcionamiento
No permita que los niños utilicen el dispositivo sin supervisión.
No permita que los niños jueguen con el dispositivo ni sus accesorios para evitar asfixia accidental.
Utilice únicamente los accesorios suministrados o autorizados por el fabricante.
La alimentación eléctrica debe cumplir los requisitos de voltaje de entrada del dispositivo. Utilice únicamente una toma de
corriente con protección contra sobretensiones.
Asegúrese de tener las manos completamente secas antes de enchufar o desenchufar los cables.
Dirección: 309, 3rd Floor, No.16, Yun Ding North Road,
Huli District, Xiamen City, Fujian, P.R.C
Tel: +86-592-5702000
Fax: +86-592-5702455

Dirección: 309, 3rd Floor, No.16, Yun Ding North
Road, Huli District, Xiamen City, Fujian,
República Popular China
Dirección: 309, 3rd Floor, No.16, Yun Ding North Road,
Huli District, Xiamen City, Fujian, P.R.C
28
Tel: +86-592-5702000
Fax: +86-592-5702455
E
S
P
A
Ñ
O
L
RECICLAJE AMBIENTAL
Nunca deseche el equipo con los residuos domésticos
Pregunte en su ayuntamiento cómo desecharlo de forma respetuosa con el medio ambiente. Se debe
reciclar la caja de cartón, el embalaje de plástico y los componentes en conformidad con la normativa
de reciclaje vigente en su país.
Respete siempre la normativa vigente
En caso de incumplirla, podría ser multado o procesado en cumplimiento de la ley. El cubo de basura
tachado que aparece en el producto indica que debe llevarse a un centro de eliminación de residuos
especiales y debe tratarse por separado de los residuos urbanos al final de su vida útil.
No derrame líquidos de ningún tipo sobre el producto ni use el equipo cerca de agua, por ejemplo, cerca de una bañera,
palangana, fregadero, sótanos húmedos o piscinas.
No pise, estire ni retuerza los cables para evitar fallos del dispositivo.
En caso de tormenta, deje de usar el aparato y desenchúfelo de la alimentación eléctrica. Desenchufe la clavija eléctrica y el cable
de par trenzado (el cable de radiofrecuencia) de la línea de abonado digital simétrica (ADSL, por sus siglas en inglés) para evitar rayos.
Si deja el dispositivo sin utilizar durante mucho tiempo, desconéctelo de la alimentación eléctrica y desenchufe la clavija eléctrica.
Si sale humo del dispositivo o ruidos u olores anormales, desconecte el dispositivo de la alimentación eléctrica y desenchufe la
clavija eléctrica inmediatamente. Póngase en contacto con el centro de mantenimiento designado para su reparación.
No introduzca ningún objeto que no forme parte del producto o de los accesorios en las ranuras del equipo.
Antes de conectar un cable, conecte el cable de toma de tierra del dispositivo. No desconecte el cable de toma de tierra hasta que
haya desconectado los demás cables.
Requisitos de limpieza
Antes de limpiar el dispositivo, deje de utilizarlo y desconéctelo de la alimentación eléctrica.
Utilice un trapo suave, seco y antiestático para limpiar el dispositivo.
Mantenga el enchufe eléctrico limpio y seco. Si usa un enchufe eléctrico sucio o húmedo podría provocar una descarga eléctrica
y otros peligros.
Problemas y soluciones
La fuente de alimentación no alimentar al dispositivo de Yealink
Hay una mala conexión con el enchufe.
1. Limpie el enchufe con un trapo seco.
2. Conecte a una toma de pared diferente.
La temperatura del entorno está fuera del rango de temperatura de funcionamiento.
1. Asegúrese de que la temperatura del entorno está dentro de los límites permitidos.
El cable entre la unidad y el dispositivo de Yealink no está conectado correctamente.
1. Conecte el cable correctamente.
El cable no se puede conectar correctamente.
1. Es posible que haya conectado un dispositivo incorrecto.
2. Utilice la fuente de alimentación correcta.
El puerto está sucio.
1. Limpie el puerto
Póngase en contacto con su distribuidor o centro de atención autorizado para cualquier consulta.
Información de Contacto
YEALINK NETWORK TECHNOLOGY CO.,LTD.
309, 3rd Floor, No.16, Yun Ding North Road, Huli District, Xiamen City, Fujian, P.R.C
YEALINK (EUROPE) NETWORK TECHNOLOGY B.V.
Strawinskylaan 3127, Atrium Building, 8th floor, 1077ZX Amsterdam, The Netherlands
YEALINK (USA) NETWORK TECHNOLOGY CO., LTD.
999 Peachtree Street Suite 2300, Fulton, Atlanta, GA, 30309, USA
Made in China

YEALINK (XIAMEN) NETWORK TECHNOLOGY CO.,LTD
WWW.YEALINK.COM
Declaración de conformidad
Fecha de CE: 20th /July/2019
Declarante: YEALINK(XIAMEN) NETWORK TECHNOLOGY CO.,LTD,
Dirección: 309, 3rd Floor, No.16, Yun Ding North Road, Huli District, Xiamen City, Fujian, P.R.C
Declara que el producto:
Clase de equipo: Teléfono IP HD para conferencias
Marca: Yealink
Modelo: CP920
cumple con los requisitos esenciales y cualesquiera otras disposiciones aplicables o exigibles de las
directivas :
Directiva: 2
014/30/EU, 2014/35/EU, RED 2014/53/EU
Normas aplicadas
Seguridad: EN 60950-1:2006+A11:2009
+A1: 2010+A12:2011+A2:2013
EMC: EN 55032: 2012/AC:2013
EN 55024: 2010
EN61000-3-2: 2014
EN61000-3-3: 2013
Radio:
ETSI EN 301 489-1 V2.1.1
ETSI EN 301 489-17 V3.1.1
ETSI EN 300 328
V2.1.1
Salud: EN 62311:2008
Directivas 2011/65/UE y (UE)2015/863 del Parlamento Europeo y del Consejo, de 8 de junio de 2011 y de 4
de junio de 2015, sobre restricciones a la utilización de determinadas sustancias
peligrosas en aparatos eléctricos y electrónicos (RoHs 2.0).
Directiva 2012/19/EU del Parlamento Europeo y del Consejo, del 4 de Julio de 2012, sobre residuos de
aparatos eléctricos y electrónicos (RAEE).
Reglamento (CE) No 1907/2006 del Parlamento Europeo y del Consejo, del 18 de Diciembre de 2006, relativo
al registro, la evaluación, la autorización y la restricción de las sustancias y
preparados químicos (REACH).
YEALINK (EUROPE) NETWORK TECHNOLOGY B.V.
Dirección: Strawinskylaan 3127, Atrium Building, 8th floor,
1077ZX Amsterdam, the Netherlands
Teléfono: +31 (0) 64 61 11 373
Correo electrónico: [email protected]
Dirección: 309, 3rd Floor, No.16, Yun Ding North Road,
Huli District, Xiamen City, Fujian, P.R.C
Tel: +86-592-5702000
Fax: +86-592-5702455
29
NAME: Stone Lu
DATE:
20/July
/2019
TITLE: Vice President

Acerca de Yealink
Yealink es el segundo mayor proveedor mundial de teléfonos SIP y el número uno en el mercado chino. Yealink es el
proveedor líder en comunicaciones empresariales y soluciones de colaboración, ofreciendo servicio de videoconferencia
a empresas multinacionales. Centrándose en la investigación y el desarrollo, Yealink también insiste en la innovación y
la creación. Con las excelentes patentes técnicas de computación en la nube, audio, vídeo y tecnología de
procesamiento de imágenes, Yealink ha desarrollado una solución de colaboración panorámica de audio y
videoconferencia combinando sus servicios en la nube con una variedad de terminales. Como uno de los mejores
proveedores en más de 140 países y regiones, incluidos los EE. UU., El Reino Unido y Australia, Yealink ocupa el número
1 en la cuota del mercado global de los envíos de teléfonos SIP.
Asistencia técnica
Visite el Wiki de Yealink (http://support.yealink.com/) para la descarga de firmware, documentación de productos,
preguntas frecuentes, etc. Para beneficiarse de un mejor servicio, le recomendamos que use el sistema de tickets
(http://ticket.yealink.com) a fin de hacernos llegar cualquier problema técnico que se le presente.
YEALINK (XIAMEN) NETWORK TECHNOLOGY CO.,LTD.
Página web: www.yealink.com
Dirección: 309, 3rd Floor, No.16, Yun Ding North Road,
Huli District, Xiamen City, Fujian, P.R.C
Derechos de autor © 2019 Yealink Inc. Todos los
derechos reservados.

B
A
Option
Alimentation
secteur
31
Contenu de la boîte
F
R
A
N
Ç
A
I
S
Téléphone de
conférence IP
Adaptateur secteur
Guide de
démarrage rapide
Câble Ethernet
(câble UTP CAT5E 7,5m)
Remarque : Nous vous recommandons d’utiliser uniquement des accessoires fournis ou approuvés par Yealink. L’utilisation d’accessoires
tiers est susceptible de réduire les performances de l’appareil.
Montage du téléphone
1. Connectez l’alimentation et le réseau filaire.
Vous avez deux options pour les raccordements du réseau et de l’alimentation. Votre administrateur système vous
indiquera laquelle utiliser.
Vous pouvez également vous connecter au réseau sans fil après le démarrage. Consultez la section Connexion
au réseau sans fil mentionnée ci-dessous dans Configurer votre téléphone pour plus d’informations.
Remarque : Le téléphone IP doit uniquement être utilisé avec l’adaptateur d’alimentation Yealink (12V/1A). Si une alimentation en ligne
(PoE) est fournie, vous n’avez pas besoin de raccorder l’adaptateur d’alimentation. Assurez-vous que le
concentrateur/commutateur soit conforme PoE.
Option PoE (Power
over Ethernet)
Internet
12 V CC
Adaptateur secteur
Hub/Interrupteur PoE conforme
à la norme IEEE 802.3af

Teclas programables
F
R
A
N
Ç
A
I
S
Touche Mute
Haut-parleur
Clavier
Touche Volume(+)
Touche Volume(–)
Microphone
1
2
3
4
5
7
8
9
Écran LCD
Touche de fonction
Une fois que le téléphone IP est connecté au réseau et est alimenté
en courant, la procédure d’initialisation démarre automatiquement.
Après le démarrage, le téléphone est prêt à l’utilisation. Vous
pouvez configurer le téléphone via l’interface utilisateur web ou
l’interface utilisateur du téléphone.
1
1
2
10
2
11
12
Touche raccrocher
6
13
14
32
2. Connectez la clé USB facultative.
Démarrage
Instructions concernant les composants matériels
Touche Bluetooth
Touche OK
Touche navigation
vers le haut
Microphone
Touche décrocher
Touche navigation
vers le bas

Configuration via l’interface utilisateur du téléphone
Paramètres du réseau :
1. Appuyez sur la touche programmable Menu, sélectionnez Réglages->Réglages avancés (mot de passe par défaut :
admin) ->Réseau->Port WAN/VLAN/Serveur Web/802.1x/VPN/LLDP/CDP/NAT pour configurer le réseau.
Connexion au réseau sans fil :
1. Appuyez sur la touche programmable Menu, sélectionnez Réglages->Réglages de base->Wifi.
2. Appuyez sur la touche programmable Commut. pour activer le Wifi.
3. Appuyez brièvement sur la touche Sauver pour les sauvegarder.
Le téléphone recherchera automatiquement les réseaux sans fil disponibles dans votre zone.
4. Sélectionnez un réseau sans fil dans la liste des available network(s).
Remarque : Le téléphone IP prend également en charge IPv6, mais IPv6 est désactivé par défaut.
Des paramètres de réseau erronés peuvent faire échouer l’accessibilité de votre téléphone et avoir un impact sur la performance du
réseau. Contactez votre administrateur de système pour plus d’informations.
Remarque : Vérifiez auprès de votre administrateur de système si une erreur apparaît pendant la procédure d’enregistrement ou si une
configuration spécifique est requise pour votre enregistrement.
Configuration via l’interface utilisateur web
Accès à l’interface utilisateur web :
1. Appuyez sur OK pour obtenir l’adresse IP du téléphone.
2. Ouvrez un navigateur web sur votre ordinateur, saisissez l’adresse IP dans la barre d’adresse (par exemple,
« http://192.168.0.10 » ou « 192.168.0.10 »), puis appuyez sur Entrer.
3. Saisissez le nom d’utilisateur (par défaut : admin) ainsi que le mot de passe (par défaut : admin) dans la page de
connexion et cliquez sur Login.
Paramètres du réseau :
Cliquez sur
Réseau->de base->
Configuration IPv4
.
Vous pouvez configurer les paramètres du réseau de l’une des manières suivantes :
DHCP : Par défaut, le téléphone tente de se connecter à un serveur DHCP de votre réseau pour obtenir des
paramètres de réseau valables, par exemple l’adresse IP, le masque de sous-réseau, l’adresse de
passerelle et l’adresse DNS.
Adresse IP statique : Si le téléphone est incapable de se connecter à un serveur DHCP, pour une raison ou
une autre, vous devez configurer manuellement l’adresse IP, le masque de
sous-réseau, l’adresse de passerelle, l’adresse DNS primaire et l’adresse DNS
secondaire pour le téléphone.
Configuration de votre téléphone
Paramètres du compte :
Cliquez sur
Compte->Inscription
.
Paramètres du compte :
État du registre : Affiche l’état du registre du compte actuel.
Ligne active : Vous pouvez sélectionner Enabled/Disabled pour activer/désactiver le compte.
Étiquette : Il s’affiche à l’écran LCD pour identifier le compte.
Afficher le nom : Il s’affiche comme l’ID appelant quand vous passez un appel.
Nom d’enregistrement : Il s’agit de l’ID authentifié pour l’authentification fournie par l’ITSP (requis).
Nom de l’utilisateur : Il est fourni par l’ITSP pour l’enregistrement (requis).
Mot de passe : Il est fourni par l’ITSP pour l’enregistrement (requis).
Serveur hôte : Il est fourni par l’ITSP pour l’enregistrement (requis).
Icônes du statut d’enregistrement sur l’écran LCD :
Enregistré
Pas de réseau Échec de l’enregistrement/enregistrement en cours
33
F
R
A
N
Ç
A
I
S

Passer un appel
Deux méthodes :
- Appuyez sur .
Saisissez le numéro de téléphone, puis appuyez sur , , ou sur la touche programmable Env..
- Saisissez le numéro de téléphone.
Appuyez sur , , ou sur la touche programmable Env..
Répondre à un appel
Appuyez sur , ou sur la touche programmable Répon..
Terminer un appel
Appuyez sur ou sur la touche programmable Fin app.
Couper et réactiver le microphone
Pour mettre un appel en sourdine :
Appuyez sur , le voyant de la touche silencieux passera au rouge fixe.
Pour réactiver le microphone :
Appuyez de nouveau sur pour réactiver le microphone. Le voyant de la touche silencieux passera au vert fixe.
Mise en attente et reprise d’un appel
Pour mettre un appel en attente :
Appuyez sur la touche programmable Attente au cours d’un appel.
Pour reprendre un appel :
Appuyez sur la touche programmable Recom. au cours d’un appel.
Conférence locale
Vous pouvez héberger une conférence à cinq avec quatre autres participants.
Pour créer une conférence locale à cinq participants :
1. Appuyez sur la touche programmable Conf au cours d’un appel actif. L’appel est mis en attente.
2. Saisissez le numéro du second interlocuteur, puis appuyez sur la touche de fonction Env..
Vous pouvez également sélectionner un contact dans Répertoire pour qu’il rejoigne la conférence.
3. Appuyez de nouveau sur la touche programmable Conf lorsque le deuxième participant répond.
4. Répétez les étapes 2 et 3 pour inviter d’autres participants à la conférence.
Pour gérer chaque participant individuel :
1. Appuyez sur la touche programmable Gérer au cours de la conférence.
2. Appuyez sur ou pour sélectionner le participant souhaité, puis faites ce qui suit :
• Appuyez sur la touche programmable MutDist pour mettre le participant en sourdine. Le participant en
sourdine pourra entendre tout le monde, mais personne ne pourra l’entendre.
• Appuyez sur la touche programmable Suppr. pour retirer le participant de la conférence.
• Appuyez sur la touche programmable Split All pour scinder la conférence en plusieurs appels individuels en
attente.
5. Appuyez sur la touche programmable Connec. pour vous connecter au réseau sans fil.
6. Si le réseau est sécurisé, saisissez son mot de passe dans le champ Mot de passe, puis appuyez sur la touche
programmable OK.
Paramètres du compte :
Appuyez sur la touche programmable Menu, sélectionnez Réglages->Réglages de base (mot de passe par défaut
: admin) ->Comptes pour configurer le compte.
Fonctions d’appel de base
34
F
R
A
N
Ç
A
I
S

Enregistrement d’appels
Vous pouvez insérer une clé USB dans le port USB de votre téléphone pour enregistrer les appels actifs.
Pour enregistrer des appels audio :
1. Pendant un appel, appuyez sur la touche programmable Plus, puis appuyez sur la touche programmable DémEnr.
2. Appuyez sur la touche programmable PausEnr pour mettre l’enregistrement en pause, puis appuyez sur la
touche programmable ReprEnreg pour reprendre l’enregistrement.
3. Appuyez sur la touche programmable ArrEnr pour arrêter l’enregistrement. Le fichier d’enregistrement sera
enregistré.
Si vous mettez fin à un appel pendant l’enregistrement, le fichier d’enregistrement sera automatiquement enregistré.
Renvoyer un appel
Vous pouvez renvoyer un appel entrant vers un contact, ou renvoyer tous les appels entrants vers un contact.
Pour renvoyer un appel entrant vers un contact :
1. Appuyez sur la touche programmable Renv. depuis l’écran Appel entrant.
2. Saisissez le numéro vers lequel vous souhaitez renvoyer les appels.
Vous pouvez également choisir un contact dans Répertoire L’appel est directement renvoyé vers le contact.
3. Appuyez sur la touche programmable Env..
Pour renvoyer tous les appels entrants vers un contact :
1. Appuyez sur la touche programmable Menu.
2. Sélectionnez Caractér.->Renvoyer un appel.
3. Sélectionnez le type de renvoi :
Toujours renvoyer----Les appels entrants sont tous transférés sans condition.
Renvoi si occupé----Les appels entrants sont transférés lorsque le téléphone est occupé.
Renvoi si pas de réponse----Les appels entrants sont renvoyés si personne ne répond au bout d’un certain temps.
4. Activez le type de renvoi souhaité.
5. Saisissez le numéro vers lequel vous souhaitez renvoyer les appels dans le champ Renvoyer vers.
6. Pour l’option Renv.NonRép, sélectionnez le délai de sonnerie souhaité avant de renvoyer les appels dans le
champ Après sonnerie.
7. Appuyez brièvement sur la touche de fonction Sauver pour accepter la modification.
Transfert d’appel
Vous pouvez transférer un appel d’une des façons suivantes :
Transfert sans préavis
1. Appuyez sur la touche programmable Transf. au cours d’un appel. L’appel est mis en attente.
2. Saisissez le numéro auquel vous souhaitez transférer l’appel.
Vous pouvez également sélectionner le contact auquel vous souhaitez transférer l’appel dans Répertoire.
3. Appuyez sur la touche programmable Transf..
Transfert semi-supervisé
1. Appuyez sur la touche programmable Transf. au cours d’un appel. L’appel est mis en attente.
2. Saisissez le numéro auquel vous souhaitez transférer l’appel.
3. Appuyez sur , ou .
4. Appuyez sur la touche programmable Transf. lorsque vous entendez la tonalité d’attente.
Transfert supervisé
1. Appuyez sur la touche programmable Transf. au cours d’un appel. L’appel est mis en attente.
2. Saisissez le numéro auquel vous souhaitez transférer l’appel.
3. Appuyez sur , ou .
4. Appuyez sur la touche programmable Transf. lorsque le deuxième participant répond.
35
F
R
A
N
Ç
A
I
S

Historique des appels
1. Appuyez sur la touche programmable Histor. depuis l’écran de veille.
2. Sélectionnez Tous les Appels.
3. Sélectionnez une entrée dans la liste, vous pouvez faire ce qui suit :
• Appuyez sur la touche programmable Env. pour appeler l’entrée.
• Appuyez sur la touche programmable Suppr. pour supprimer l’entrée de la liste.
Si vous appuyez sur la touche programmable Option, vous pouvez également effectuer l’une des actions suivantes :
• Sélectionner Détail pour afficher les informations détaillées de l’entrée.
• Sélectionner Ajouter au contact pour ajouter l’entrée au répertoire local.
• Sélectionner Aj. liste noire pour ajouter l’entrée à la liste noire.
• Sélectionnez TtSuppr pour supprimer toutes les entrées de la liste.
Réglage du volume
• Appuyez sur ou au cours d’un appel pour régler le volume du récepteur.
• Appuyez sur ou lorsque le téléphone est en veille ou sonne pour régler le volume de la sonnerie.
• Appuyez sur ou pour régler le volume de la lecture multimédia sur l’écran correspondant.
Sonneries
1. Appuyez sur la touche programmable Menu depuis l’écran d’accueil, puis sélectionnez Réglages->Réglages de
base->Son->Tonalités.
2. Appuyez sur ou pour sélectionner Commun ou le compte souhaité.
3. Appuyez sur ou pour sélectionner la sonnerie souhaitée.
4. Appuyez brièvement sur la touche de fonction Sauver pour accepter la modification.
Répertoire local
Pour ajouter un contact :
1. Appuyez sur la touche programmable Répertoire depuis l’écran de veille.
2. Sélectionnez Répertoire local->Tous les contacts.
3. Appuyez sur la touche programmable Adresse pour ajouter un contact.
4. Saisissez un nom de contact unique dans le champ Nom ainsi que les numéros de contact dans les champs
correspondants.
5. Appuyez brièvement sur la touche de fonction Sauver pour accepter la modification.
Pour modifier un contact :
1. Appuyez sur la touche programmable Répertoire depuis l’écran de veille.
2. Sélectionnez Répertoire local->Tous les contacts.
3. Sélectionnez le contact souhaité, appuyez sur la touche programmable Option, puis sélectionnez Détail.
4. Modifiez les informations du contact.
5. Appuyez brièvement sur la touche de fonction Sauver pour accepter la modification.
Pour supprimer un contact :
1. Appuyez sur la touche programmable Répertoire depuis l’écran de veille.
2. Sélectionnez Répertoire local->Tous les contacts.
3. Sélectionnez le contact souhaité, appuyez sur la touche programmable Option, puis sélectionnez Suppr..
4. Appuyez sur OK lorsque l’écran LCD vous demande « Delete Selected Item? ».
Personnaliser votre téléphone
Remarque : Vous pouvez facilement ajouter des contacts depuis l’historique d’appel. Pour plus d’informations, consultez Historique des appels.
36
F
R
A
N
Ç
A
I
S

37
F
R
A
N
Ç
A
I
S
Avis réglementaires pour les produits Yealink avec batterie
Températures de fonctionnement ambiantes
Température de fonctionnement : +14 à 122 °F (-10 à 50 °C)
Humidité relative : 5 % à 90 %, sans condensation
Température de stockage : -22 à +160 °F (-30 à +70 °C)
Garantie
Notre garantie produit est limitée à l’appareil lui-même, lorsqu’il est utilisé normalement selon le mode d’emploi et l’environnement
du système. Nous ne sommes pas responsables des dommages ou pertes découlant de l’utilisation de ce produit ou de toute
réclamation d’un tiers. Nous ne sommes pas responsables des problèmes avec les appareils Yealink découlant de l’utilisation de ce
produit. Nous ne sommes pas responsables pour les dommages financiers, pertes de profits, réclamations de tiers, etc. découlant de
l’utilisation de ce produit.
Symbole DC
est le symbole de tension CC.
Directive sur les substances dangereuses (RoHS)
Ce dispositif est conforme aux exigences de la directive RoHS de l’Union européenne. Vous pouvez obtenir les déclarations de
conformité en envoyant un message à l’adresse : [email protected]..
Consignes de sécurité
Gardez ces instructions. Lisez ces consignes de sécurité avant utilisation de l'appareil !
Les précautions de base suivantes doivent toujours être suivies pour réduire le risque d'incendie, d'électrocution et de blessures.
Exigences générales
Avant d'installer et d'utiliser l'appareil, lisez les consignes de sécurité et observez la situation pendant le fonctionnement.
Lorsque l'appareil est rangé, transporté ou utilisé, veuillez le garder toujours propre et sec.
Lorsque l'appareil est rangé, transporté ou utilisé, veuillez éviter tout choc ou toute collision.
Ne tentez pas de désassembler vous-même l'appareil. En cas de mauvais fonctionnement, veuillez contacter le centre de
service désigné.
Sans consentement écrit préalable, aucune organisation ou individu n'est autorisé à apporter des changements à la structure
ou au dispositif de sécurité de l'appareil. Yealink n'est en aucun cas responsable des conséquences ou des problèmesjuridiques
causés par ces changements.
Veuillez vous référer aux lois et règlements pertinents lorsque l'appareil est utilisé. Les droits légaux des tiers doivent également
être respectés.
Exigences environnementales
Placez l'appareil dans un espace correctement ventilé. N'exposez pas l'appareil à la lumière directe du soleil.
Gardez l'appareil propre et sec.
Placez l'appareil sur une surface stable et plate.
Veuillez ne placer aucun objet lourd sur l'appareil risquant d'entraîner dégâts et déformations.
Maintenez une distance d'au moins 10 cm entre l'appareil et l'objet le plus proche afin que la chaleur puisse se dissiper.
Ne placez pas l'appareil sur ou à proximité de tout objet inflammable ou vulnérable au feu, comme des matériaux en
caoutchouc.
Gardez l'appareil loin de toute source de chaleur ou des flammes, comme une bougie ou un radiateur électrique.
Gardez l'appareil loin de tout appareil électroménager avec un fort champ magnétique ou un champ électromagnétique, tel
qu'un four à micro-ondes ou un réfrigérateur.
Exigences d'utilisation
Ne laissez pas des enfants utiliser l'appareil sans surveillance.
Ne laissez pas les enfants jouer avec l'appareil ou ses accessoires pour éviter tout risque d'étouffement.
Veuillez uniquement utiliser les accessoires fournis ou autorisés par le fabricant.
L'alimentation de l'appareil doit satisfaire aux exigences de la tension d'entrée de l'appareil. Veuillez uniquement utiliser la prise
protégée contre les surtensions fournie.
Adresse: 309, 3rd Floor, No.16, Yun Ding North Road,
Huli District, Xiamen City, Fujian, P.R.C
Téléphone: +86-592-5702000
Fax: +86-592-5702455

Adresse: 309, 3rd Floor, No.16, Yun Ding North Road,
Huli District, Xiamen City, Fujian, P.R.C
Adresse: 309, 3rd Floor, No.16, Yun Ding North Road,
Huli District, Xiamen City, Fujian, R.P. Chine
38
Téléphone: +86 -592 -5702000
Fax: +86 -592 -5702455
F
R
A
N
Ç
A
I
S
RECYCLAGE ENVIRONNEMENTAL
Ne jetez pas cet appareil avec les déchets ménagers
Contactez vos collectivités locales pour savoir comment l'éliminer de façon écologique. La boîte en
carton, l'emballage en plastique et les composants de l'appareil peuvent être recyclés conformément
à la réglementation en vigueur dans votre pays.
Respectez toujours la réglementation en vigueur
Les personnes qui l'enfreignent sont passibles de poursuites judiciaires. Le symbole de poubelle
barrée apposé sur l'appareil signifie que lorsque celui-ci a atteint sa fin de vie utile, il doit être amené
à un centre de traitement des déchets spécial et traité séparément des déchets ménagers ordinaires.
Avant de brancher ou de débrancher tout câble, assurez-vous que vos mains sont complètement sèches.
Ne renversez aucun liquide sur le produit et n'utilisez pas l'équipement près de l'eau, par exemple, près d'une baignoire, d'un
lavabo, d'un évier, dans sous-sol humide ou près d'une piscine.
Veuillez à ne pas marcher sur, tirer sur, ou plier les câbles de l'appareil, cela pourrait entraîner son mauvais fonctionnement.
En cas d'orage, n'utilisez pas l'appareil et débranchez-le de son alimentation. Débranchez la prise d'alimentation et l'Asymmetric
Digital Subscriber Line (ADSL) à paire torsadée (le câble de fréquence radio) pour éviter la foudre.
Si l'appareil reste inutilisé pendant une longue période de temps, débranchez-le de l'alimentation électrique et débranchez le
cordon d'alimentation.
Si l'appareil émet de la fumée, des odeurs ou bruits anormaux, débranchez l'appareil de son alimentation et débranchez
immédiatement le cordon d'alimentation. Pour toute réparation, contactez le centre de service spécifié.
N'insérez aucun objet dans les fentes de l'appareil ne faisant pas partie du produit ou n'est pas un produit auxiliaire.
Avant de brancher un câble, connectez d'abord le câble de mise à la terre du de l'appareil. Ne débranchez pas le câble de mise à
la terre jusqu'à ce que tous les autres câbles aient été débranchés.
Exigences de nettoyage
Avant de nettoyer l'appareil, arrêtez de l'utiliser et déconnectez-le de son alimentation.
Utilisez un chiffon doux, sec et antistatique pour nettoyer l'appareil.
Maintenez la prise d'alimentation propre et sèche. Une prise sale ou humide peut causer des chocs électriques et autres dangers.
Dépannage
L’unité ne peut pas alimenter le dispositif de Yealink.
Mauvaise connexion avec la fiche.
1. Nettoyez la fiche avec un chiffon sec.
2. Branchez-la sur une autre prise murale.
L’environnement d’utilisation est hors de la plage de températures de fonctionnement.
1. Utilisez l’appareil dans sa plage de températures de fonctionnement.
Le câble entre l’appareil et le dispositif Yealink est mal branché.
1. Branchez le câble correctement.
Vous ne pouvez pas brancher le câble correctement.
1. Vous avez peut-être branché le mauvais dispositif Yealink.
2. Utilisez une source d’alimentation appropriée.
Le port contient peut être de la poussière.
1. Nettoyez le port.
Contactez votre revendeur ou un réparateur agréé pour toute autre question.
Informations de contact
YEALINK NETWORK TECHNOLOGY CO.,LTD.
309, 3rd Floor, No.16, Yun Ding North Road, Huli District, Xiamen City, Fujian, Chine
YEALINK (EUROPE) NETWORK TECHNOLOGY B.V.
Strawinskylaan 3127, Atrium Building, 8th floor, 1077ZX Amsterdam, Pays-Bas
YEALINK (USA) NETWORK TECHNOLOGY CO., LTD.
999 Peachtree Street Suite 2300, Fulton, Atlanta, GA, 30309, États-Unis
Fabriqué en Chine

YEALINK (XIAMEN) NETWORK TECHNOLOGY CO.,LTD
WWW.YEALINK.COM
Déclaration de conformité
Date d’émission :20th /July/2019
Nous : YEALINK(XIAMEN) NETWORK TECHNOLOGY CO.,LTD,
Adresse : 309, 3rd Floor, No.16, Yun Ding North Road, Huli District, Xiamen City, Fujian, P.R.C
Déclarons que le produit
Type : Téléphone de conférence IP HD
Modèle : CP920
répond aux exigences essentielles et autres dispositions pertinentes conformément à la directive CE
suivante
Directive : 2
014/30/EU, 2014/35/EU, RED 2014/53/EU
Conformité
Le produit répond aux normes suivantes :
Sécurité : EN 60950-1:2006+A11:2009
+A1: 2010+A12:2011+A2:2013
EMC : EN 55032: 2012/AC:2013
EN 55024: 2010
EN61000-3-2: 2014
EN61000-3-3: 2013
Radio :
ETSI EN 301 489-1 V2.1.1
ETSI EN 301 489-17 V3.1.1
ETSI EN 300 328
V2.1.1
Santé : EN 62311:2008
Directive 2011/65/EU et (EU)2015/863 du Parlement européen et du Conseil du 8 Juin 2011 et 4 Juin 2015
sur la restriction restriction de l’utilisation de certaines substances dangereuses dans les
équipements électriques et électroniques (RoHS 2.0).
Directive 2012/19/EU du Parlement et du Conseil Européen du 4 Juillet 2012 sur les déchets d'équipements
électriques et électroniques (DEEE)
Réglement (EC) No.1907/2006 du Parlement et du Conseil Européen du 18 Décembre 2006 relatif à ladéclara-
tion, l'évaluation, l'autorisation et la restriction des substances chimiques
(ECHA)
YEALINK (EUROPE) NETWORK TECHNOLOGY B.V.
Adresse : Strawinskylaan 3127, Atrium Building, 8th floor,
1077ZX Amsterdam, the Netherlands
Téléphone : +31 (0) 64 61 11 373
Courriel : [email protected]
Adresse : 309, 3rd Floor, No.16, Yun Ding North Road,
Huli District, Xiamen City, Fujian, P.R.C
Téléphone : +86-592-5702000
Fax : +86-592-5702455
39
NAME: Stone Lu
DATE:
20/July
/2019
TITLE: Vice President

À propos de Yealink
Yealink est un des constructeurs leader dans le monde de solutions de communication et de collaboration d’entreprises,
offrant des services de vidéo conférence aux entreprises du monde entier. Yealink ne se consacre pas seulement à la
recherche et au développement, mais insiste également sur l’innovation et la création. Avec des brevets techniques
exceptionnels dans le domaine du cloud computing, de la technologie audio, vidéo et du traitement des images, Yealink
a construit une solution de collaboration en conférence audio et vidéo en alliant services cloud et produits à la pointe
de la technologie. En tant que leader dans plus de 140 pays incluant les Etat-Unis, le Royaume-Uni et l’Australie, Yealink
se hisse au premier rang sur le marché mondial des envois de téléphones SIP.
Assistance technique
Consultez Yealink WIKI (http://support.yealink.com/) pour télécharger les derniers micrologiciels, lire la documentation,
les questions fréquemment posées, et plus encore. Pour un meilleur service, nous vous conseillons d’utiliser le système
de tickets d’assistance de Yealink (http://ticket.yealink.com) pour nous faire part de tous vos problèmes techniques.
YEALINK (XIAMEN) NETWORK TECHNOLOGY CO.,LTD.
Site web : www.yealink.com
Adresse : 309, 3rd Floor, No.16, Yun Ding North Road,
Huli District, Xiamen City, Fujian, République
populaire de Chine
Copyright © 2019 Yealink Inc. Tous droits réservés.
CP920 - 4L
-
 1
1
-
 2
2
-
 3
3
-
 4
4
-
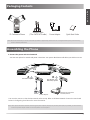 5
5
-
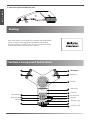 6
6
-
 7
7
-
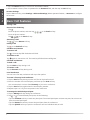 8
8
-
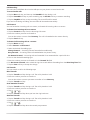 9
9
-
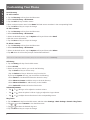 10
10
-
 11
11
-
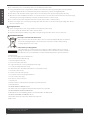 12
12
-
 13
13
-
 14
14
-
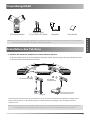 15
15
-
 16
16
-
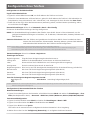 17
17
-
 18
18
-
 19
19
-
 20
20
-
 21
21
-
 22
22
-
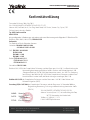 23
23
-
 24
24
-
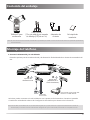 25
25
-
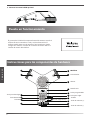 26
26
-
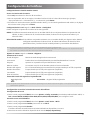 27
27
-
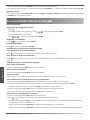 28
28
-
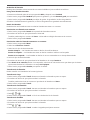 29
29
-
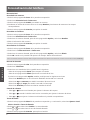 30
30
-
 31
31
-
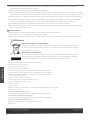 32
32
-
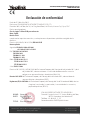 33
33
-
 34
34
-
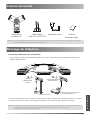 35
35
-
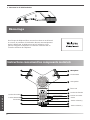 36
36
-
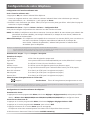 37
37
-
 38
38
-
 39
39
-
 40
40
-
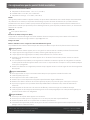 41
41
-
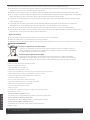 42
42
-
 43
43
-
 44
44


en otros idiomas
- français: Yealink CP920 Guide de démarrage rapide
- English: Yealink CP920 Quick start guide
- Deutsch: Yealink CP920 Schnellstartanleitung
Artículos relacionados
-
Yealink CP920 Guía de inicio rápido
-
-
Yealink SIP-T57W Guía de inicio rápido
-
Yealink SIP-T48S Guía de inicio rápido
-
-
-
-
-
Yealink CP960 Guía de inicio rápido
-