
MRP2
50.0048.02.00 1/7
RELOJ PROGRAMABLE CON 2 CIRCUITOS
MÓDULO MRP2
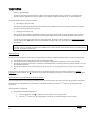
FUNCIÓN
MÓDULO CON RELOJ DIGITAL PROGRAMABLE CON 2 CIRCUITOS DE
PROGRAMACIÓN INDEPENDIENTES.
DESCRIPCIÓN
Reloj digital con posibilidad de 42 maniobras de encendido / apagado asignables a los dos
canales disponibles. Estos disparos pueden ser programados en diferentes grupos de días
de la semana (o solamente en un día, o en un grupo de lunes a viernes, o en un grupo de
sábado y domingo o en un grupo con todos los días de la semana).
El módulo incorpora una batería que se recarga automáticamente con la propia
alimentación del chasis de Enviro cuando éste está en ON. La batería tiene una autonomía
apreciada de 15 días con Enviro en OFF. De esta manera, cuando Enviro esté apagado, el
reloj seguirá funcionando. Si se agotara esta batería, en el momento de encendido del
chasis donde esté instalado este módulo, se volvería a cargar automáticamente y se
debería volver a programar horario y programas. El tiempo mínimo de carga de la batería
es de 48h.
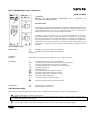
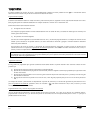
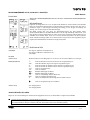
CARACTERÍSTICAS
INDICADORES:
CH1
: Indicador de que el Canal 1 está en funcionamiento.
CH2
: Indicador de que el Canal 2 está en funcionamiento.
Display LCD.
CONEXIÓN
INTERNA:
MJ101:
Insertar un minijumper para alimentar el reloj a través de la batería.
CONTROLES:
: Tecla para poner en hora el reloj y los programas.
DAY:
Tecla para programación del día de la semana en reloj y programas.
h+
: Tecla para programación de la hora en reloj y programas.
m+
: Tecla para programación de los minutos en reloj y programas.
Prog
: Tecla para programación.
Sel:
Tecla para selección.
1
: Tecla para realizar disparo manual en el Canal 1.
2
: Tecla para realizar disparo manual en el Canal 2.
1h:
Tecla para el cambio de horario invierno / verano.
RND:
Tecla para programación aleatoria.
R
: Tecla para realizar un reseteado del reloj.
: Tecla para programación del período de vacaciones.
CONEXIONES:
CH1
: Salida del Canal 1. Contacto seco.
CH2
: Salida del Canal 2. Contacto seco
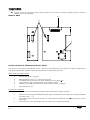
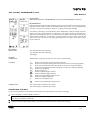
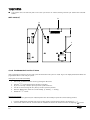
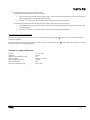
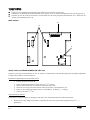
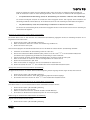
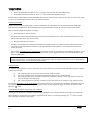
CONEXIONADO MRP2
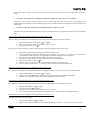
Para realizar la conexión de este módulo se deberán seguir los siguientes pasos indicados en el gráfico de la página siguiente:
Insertar un minijumper en el MJ101, indicación nº 1.
ATENCIÓN: Imprescindible colocar este minijumper. Si no estuviera puesto este minijumper, cuando se apagara el chasis de Enviro
el reloj dejaría de funcionar y se resetearía.
Insertar y atornillar en el chasis el panel frontal y posterior del módulo.
Conectar el bus de datos (cable plano de 20 hilos) en el conector como nº 2 en la figura de la siguiente página.

MRP2
2/7 50.0048.0200
Conectar el cable de unión entre la parte frontal y posterior. En este caso se conectará la siguiente pareja de conectores
señalados como nº 3: J104-WI101.
MÓDULO MRP2
INSTRUCCIONES DE PROGRAMACIÓN DEL RELOJ
La primera vez que se ponga en funcionamiento el reloj, o para borrar la programación y la hora, pulsar con un lápiz u objeto similar la
tecla
“R”
. En el display deberá aparecer “00:00”. El interruptor horario está listo para funcionar.
Ajuste del día de la semana y la hora
1. Presionaremos primero la tecla “R”.
2. Mantenga pulsada la tecla
”” durante todo el proceso.
3. Si actualmente es período horario de verano, pulsaremos una vez la tecla “1h”.
4. Con las teclas “h+” y”m+” ajustaremos la hora y los minutos actuales.
5. Mediante la tecla “DAY” seleccionaremos el día de la semana (1=lunes...7=domingo).
6. Soltaremos la tecla
””.
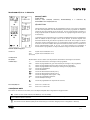
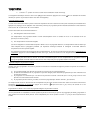
Programación de maniobras
Disponemos de 42 espacios de memoria. Cada maniobra (conexión / desconexión) ocupa un espacio de memoria.
1. Pulsaremos la tecla “Prog” repetidamente hasta que aparezca en pantalla el primer espacio libre de memoria (señalado
en el display como “
--:--“)
2. Seleccionaremos una instrucción de conexión
““ o desconexión “O“ mediante la tecla “ ” para el canal 1 o canal 2
(CH1 o CH2)
3. Con las teclas “h+” y “m+” ajustaremos la hora y el minuto en que se ejecutará la maniobra.
2
3
1

MRP2
50.0048.02.00 3/7
4. Si la maniobra debe ejecutarse cada día de la semana: pulsaremos la tecla “Prog” con lo que la maniobra quedará
almacenada. (Aparece en pantalla el siguiente espacio de memoria libre). En este caso el proceso de programación de
maniobras lo daremos por finalizado.
5. Si la maniobra debe ejecutarse un día, o un grupo de días, de la semana: con la tecla “DAY” seleccionaremos el
día en que no debe ejecutarse la maniobra (el cursor bajo el día parpadea). Confirmaremos mediante la tecla “Sel” (el
día y el cursor parpadean)
6. Presionando la tecla “DAY” de nuevo el día seleccionado se elimina.
7. Repetiremos los pasos 5 y 6 para cada día que deseemos eliminar.
8. Almacenaremos la maniobra pulsando la tecla Prog (aparece en pantalla el siguiente espacio libre en memoria).
9. Finalizaremos el proceso de programación pulsando la tecla
””. El interruptor horario indicará la hora y el estado
actual.
Nota: Si al programar una maniobra nos olvidamos de algún dato, éste parpadea en pantalla hasta que se introduce.
ATENCIÓN: Imprescindible grabar una orden de apagado con cada orden de encendido, de lo contrario el reloj se dispararía y nunca se
apagaría.
Si por error eliminamos un día en que una maniobra debía llevarse a cabo, seguiremos los siguientes pasos:
1. Recuperaremos el día en cuestión mediante la tecla “DAY” (el día y el cursor parpadean).
2. Confirmaremos el día seleccionado mediante la tecla “Sel” (el cursor parpadeará).
3. Pulsando la tecla “DAY” el día queda seleccionado.
4. Almacenaremos la selección pulsando la tecla Prog (aparece en pantalla el siguiente espacio de memoria).
5. Volveremos a visualizar el día y hora actuales mediante la tecla
””.
Modificación o anulación de órdenes
Para modificar o eliminar una maniobra previamente almacenada, deberemos seguir los siguientes pasos:
Para eliminar una maniobra:
1. Seleccionaremos la maniobre pulsando la tecla “Prog” las veces que sean necesarias hasta que aparezca en pantalla.
2. Para eliminarla escribiremos sobre la hora y el minuto
“--:--“ (pulsando “h+” y “m+”
).
3. Pulsaremos la tecla
”” durante 3s. La maniobra queda eliminada.
Para modificar una maniobra:
1. Seleccionaremos la maniobra pulsando la tecla “Prog” las veces que sean necesarias hasta que aparezca en pantalla.
2. Para modificarla, escribiremos sobre la orden los cambios que se deseen en el día, hora, minuto y canal, tal y como se
ha descrito en el punto “Programación de maniobras
”.
3. Pulsaremos la tecla
””: la maniobra queda modificada y el reloj pasa a modo normal de funcionamiento.
Lectura del display
En su posición normal el display indica la hora y el día de la semana, y en la parte inferior para cada canal (CH1 izquierda y CH2 derecha):
Tipo de programa:
: Funciona según el programa registrado y cada canal estará en ON o OFF según sus programas.
[ON]: Encendido permanente de Canal 1 (a la izquierda) o del Canal 2 (a la derecha).
[OFF]: Apagado permanente de Canal 1 (a la izquierda) o del Canal 2 (a la derecha).
: Accionamiento manual del contacto de los 2 canales independientemente. Si estaba en ON pasará a OFF y viceversa.
En esta posición el programa no actuará hasta la siguiente orden que le llegue al canal.

MRP2
4/7 50.0048.0200
RND : Programa de funcionamiento aleatorio.
: Programa de funcionamiento período de vacaciones.
Ejemplo:
Tenemos un programa en el canal 1 que lo dispara cada día a las 10:00h y lo apaga a las 12:00h.
Si el canal muestra el
en el display, cuando sean entre las 10:00h y las 12:00h se pondrá en ON y sino estará en OFF.
Si el display muestra [ON] o [OFF] en el canal, estará en encendido o apagado permanente y no obedecerá al horario
programado.
Si estando en
+ OFF, apretamos el botón de del canal 1, se pondrá en + ON, es decir, en ON hasta la siguiente
orden de encendido o apagado que tengamos programada en el canal.
Si por el contrario, está en
+ ON, y apretamos el botón de del canal 1, se pondrá en + OFF, estará con la orden de
OFF manual hasta la siguiente orden de encendido o apagado que tengamos programada en el canal.
Lectura de órdenes registradas
Pulsando la tecla “Prog” sucesivamente van apareciendo en el display las órdenes que se tienen registradas en memoria.
A continuación aparece en pantalla el primer espacio libre en memoria. Después se indica el número de espacios libres en memoria. Si la
memoria está totalmente llena aparecen en pantalla
“FR00”.
Activación manual de las conexiones / desconexiones
Por medio de la tecla que lleva el símbolo de una mano (“ ”) se hacen las siguientes funciones:
Pulsando una vez: Se cambia la posición del contacto. Si estaba en ON pasará a OFF y viceversa. En esta posición el programa
no actuará hasta la siguiente orden que le llegue al canal.
Pulsando 2 veces: Se bloquea el contacto (y el programa no actúa) en posición de [ON] permanente.
Pulsando 3 veces: Se bloquea el contacto (y el programa no actúa) en posición de [OFF] permanente.
Pulsando otra vez: Vuelve al programa automático (
).
Funciones especiales
Pantalla AM/PM
Presionando a la vez las teclas “1h” y “h+” la pantalla cambia al modo horario AM/PM.
Selección de horario de invierno o verano
Selección manual:
Cambio de invierno a verano: pulsaremos la tecla “1h”. El símbolo se enciende en el display.
Cambio de verano a invierno: pulsar la tecla“1h”. El símbolo se apaga en el display.
Selección automática: Son posibles tres alternativas de cambio.
AU(Automático).
El cambio de horario se realiza en base a un calendario ya programado hasta el año 2079 y que no puede ser modificado
(Normativa de cambio horario de la UE y Suiza).
Comienzo del horario de verano: siempre el último sábado de Marzo, siendo la hora de cambio de 2:00h a 3:00h.
Fin del horario de verano: siempre el último sábado de Octubre, la hora se atrasa de 3:00h a 2:00h.

MRP2
50.0048.02.00 5/7
cHA (cálculo semiautomático). Cambio libremente seleccionado en referencia al día de la semana.
Se selecciona el día de comienzo del horario de verano y el día de su finalización. El programa asigna automáticamente estas
fechas a unos días de la semana y mes. Los años siguientes, el cambio horario se repetirá para las mismas fechas introducidas.
HA (semiautomático). Cambio libremente seleccionado con referencia a la fecha.
Se selecciona las fechas de cambio horario del país. Los años siguientes el cambio se producirá siempre en las mismas fechas.
Activación de la función de cambio automático de horario verano / invierno
.
Previo a la activación de la función de cambio horario deseada, es necesario que introduzcamos la fecha actual. El proceso completo a
seguir es el siguiente:
1. Presionaremos simultáneamente las teclas “1h” y “DAY”.
2. Con las teclas “h+” y “m+” introduciremos el día y el mes actuales respectivamente.
3. A continuación pulsaremos la tecla “1h”.
Una vez introducida la fecha actual, continuaremos el proceso seleccionando el modo de cambio horario de verano / invierno:
4. Seleccionaremos el modo de cambio horario mediante la tecla “m+”
5. En caso de que seleccionemos el modo automático (“AU”), pulsando la tecla “
“ regresaremos al modo normal de
funcionamiento del reloj. El proceso de programación del modo de cambio lo daremos por finalizado.
6. Si se ha seleccionado la variante cHA o HA pulsaremos una vez la tecla “1h”.
7. A continuación introduciremos la fecha de comienzo del horario de verano mediante las teclas “h+” y “m+”.
8. Presionaremos de nuevo una vez la tecla “1h”.
9. Introduciremos la fecha de finalización del horario de verano mediante las teclas “h+” y “m+”.
10. Finalmente pulsaremos la tecla “
“. El reloj pasa a su estado normal de funcionamiento.
Lectura de la fecha seleccionada para el cambio de horario verano / invierno
Siguiendo los siguientes pasos, podremos visualizar en cualquier momento las fechas seleccionadas para el cambio horario de verano /
invierno:
1. Presionaremos a la vez las techas “1h” y “DAY”.
2. Pulsando la tecla “1h” las veces que sea necesarias, veremos los datos seleccionados.
3. La tecla “
“ nos permitirá volver al modo normal de funcionamiento del reloj.
Cambio de la fecha seleccionada para el cambio horario de verano / invierno.
Sólo se permite el cambio de las fechas para los modos de funcionamiento semiautomático cHA y HA.
1. Pulsaremos simultáneamente “1h” y “DAY”.
2. Presionaremos la tecla “1h” dos veces.
3. Mediante la tecla “m+” elegiremos el modo cHA o HA.
4. El proceso de modificación es equivalente al de introducción de la fecha de cambio.
Desactivación de la función automática de cambio horario de verano / invierno
Los pasos a seguir son los siguientes:
1. Pulsaremos simultáneamente “1h” y “DAY”.
2. Presionaremos sucesivamente la tecla “h+” hasta que aparezca en pantalla
“--“ (después del último día del mes).
3. La tecla “
“ nos permitirá volver al modo normal de funcionamiento del reloj.

MRP2
6/7 50.0048.0200
El cambio automático de horario de verano / invierno (AU) puede reponerse de nuevo pulsando la tecla “1h” o introduciendo nuevos
datos como se ha indicado en el proceso de introducción de la fecha de cambio.
Programa aleatorio (RND)
El modo de funcionamiento aleatorio realiza conexiones y desconexiones para ser empleado en luces como elemento disuasor ante robos.
Este programa puede ser cambiado manualmente en cualquier momento a conexión
““ o desconexión “O“.
Existen dos modos de funcionamiento aleatorio:
a) Sin asignar horas de conexión.
Los tiempos de programa aleatorio oscilan automáticamente entre un mínimo de 5min y un máximo de 60min (para la conexión) o de
30 min. (para la desconexión).
b) Con períodos de conexión asignados.
Las horas de conexión asignadas a la función RND marcan el inicio y el final del programa aleatorio. Los tiempos de duración son los
mismos que los indicados en el apartado anterior. Las luces conectadas se encienden y apagan a intervalos aleatorios solamente
dentro del período señalado.
Para introducir las horas de conexión y desconexión del programa aleatorio seguiremos el mismo proceso de introducción de
maniobras descrito en el apartado “Programación de maniobras
” pulsando la tecla “RND” tras haber introducido el día, la hora, el
minuto y el canal correspondientes a la maniobra.
ATENCIÓN: Al finalizar el periodo RND el canal correspondiente puede quedar activado o desactivado. Es por tanto recomendable
que añadamos una orden complementaria al programa estándar para que los aparatos conectados permanezcan en un estado conocido
cada vez que finalice el programa aleatorio.
Programa de vacaciones
El reloj puede ser programado para ejecutar maniobras memorizadas durante un periodo definido como vacacional. Hemos de tener
presente que:
a) El programa de vacaciones tiene prioridad sobre el programa habitual.
b) El modo de funcionamiento del programa de vacaciones solo podrá ser asignado a maniobras programadas para ejecutarse todos
los días de la semana.
c) El programa de vacaciones sólo se activa si se ha fijado la duración del periodo vacacional (entre 1 y 99 días) o bien se ha fijado
éste sin límite de duración.
d) El programa de vacaciones se puede iniciar el día en curso, o bien dejarse preparado para que se inicie en uno de los próximos 6
días.
Los tiempos de conexión y desconexión correspondientes al período de vacaciones, se introducirán siguiendo los pasos descritos en el
punto “Programación de maniobras
” pulsando la tecla con el símbolo “ ” tras haber introducido el día, la hora, el minuto y el canal
correspondientes a la maniobra en cuestión.
Programación del inicio y duración del programa de vacaciones
Una vez introducidas las maniobras a ejecutar durante el periodo de vacaciones, tal y como se ha descrito en el apartado anterior,
programaremos la fecha de inicio y la duración del periodo de vacaciones. Para ello es imprescindible pulsar la tecla “
“ para que la
pantalla muestre la hora actual.

MRP2
50.0048.02.00 7/7
Seguiremos los siguientes pasos:
a) Programación de un período de vacaciones indefinido
1. Pulsaremos la tecla con el símbolo
“ ”: el cursor bajo el día actual parpadeará.
2. Presionaremos una vez la tecla
““. La programación del período de vacaciones indefinido queda almacenada.
b) Programación de un período de vacaciones de un número determinado de días
Si el programa de vacaciones se inicia en el día actual,
1. Introduciremos el número de días que éste dure mediante la tecla “Sel”. Si se deja pulsada más de 2s, los dígitos
avanzan rápidamente. El número máximo de días es de 99.
2. Presionaremos una vez la tecla “
“. Se almacena la información comenzando el programa de vacaciones.
Si deseamos que el programa de vacaciones se inicie en un plazo máximo de 6 días a contar desde el día actual:
1. Usaremos la tecla “DAY” para indicar el día de la semana de comienzo antes de introducir la duración del período de
vacaciones, tal y como se ha descrito en el punto anterior.
2. Presionaremos una vez la tecla “
“. Se almacena la información comenzando el programa de vacaciones.
Cancelación anticipada del programa de vacaciones
Si el programa de vacaciones ya se esta ejecutando, lo desactivaremos pulsando la tecla con el símbolo
“ ” una vez. El aparato vuelve
entonces al programa de funcionamiento habitual.
En caso de que se haya programado el inicio del programa de vacaciones en los próximos días, presionaremos dos veces la tecla con el
símbolo
“ ” y pasará a actuar el programa habitual.
CARATERÍSTICAS TÉCNICAS
Precisión +/- 4 min./año
Autonomía 2 semanas
Número de operaciones programables 42
Contactos 250VAC / 16A máx.
Tiempo mínimo de conmutación 1min.
Alimentación 4VA
Margen de temperaturas de funcionamiento -28Cº/60Cº


MRP2
50.0048.02.00 1/7
TWO CHANNEL PROGRAMMABLE CLOCK
MRP2 MODULE
FUNCTION
MODULE WITH DIGITAL PROGRAMMABLE CLOCK AND TWO INDEPENDENT CIRCUITS
DESCRIPTION
Digital clock featuring 42 start/stop commands on each of the two channels. These triggers can be
programmed inside different groups of weekdays (whether just one day, in a group from Monday
to Friday, in a group from Saturday to Sunday or in a group including each weekday).
The module is powered by an internal battery which automatically recharges through the power
supply on the enviro chassis, whenever it is switched on. The battery has a proven autonomy of 15
days. The clock will therefore still run, even when the enviro system is turned OFF. If the battery
should discharge completely, it would begin to recharge when the enviro system is turned ON
again. In this case, the current time and programming must be set again. The minimum charge
period is 48 hours.
FEATURES
INDICATORS:
CH1:
Indicates that CH1 is operating.
CH2:
Indicates that CH2 is operating.
LCD Display.
INTERNAL
CONNECTION:
MJ101:
Insert a minijumper to power the clock from its internal battery.
CONTROLS:
: Button for setting the current time and the programs.
DAY
: Button for setting the weekday when setting the current time or during programming.
h+:
Button for setting the hours when setting the current time or during programming.
m+
: Button for setting the minutes when setting the current time or during programming.
Prog:
Button for programming
.
Sel:
Button for selecting
.
1
: Button to manually trigger Channel 1.
2
: Button to manually trigger Channel 2.
±1h:
Button for toggling Summer/ Winter mode.
RND:
Button for random programming.
R:
Button for resetting the clock.
: Button for programming the holiday period.
CONNECTIONS:
CH1:
Switch output of Channel 1. Dry contact
CH2:
Switch output of Channel 2. Dry contact
CONNECTING THE MRP2
To carry out the connection of this module you should follow the steps indicated in the figure on next page.
Place a minijumper in position MJ101, indication 1.
ATTENTION: Placing this minijumper is necessary. If the minijumper is not inserted, the clock will stop running and will reset
when the enviro system is switched off.
Insert and screw the module and the chassis together in the front and back panels.
Connect the data bus (Flat 20-way cable) to the connectors marked with nr.2 in the figure on next page.

MRP2
2/7 50.0048.0200
Link together the front and back panel. In this case you will have to connect following connector pair marked with nr.3:J104-
WI101.
MRP2 MODULE
CLOCK PROGRAMMING INSTRUCTIONS
After connecting the clock for the first time, press the
“R”
button with a pencil or similar object. The display should show 00:00. The
programmable switch is now ready to operate.
Setting the current time and weekday
1. First of all, you should reset the device by pressing the “R” button.
2. Keep the
“” button pressed during the entire procedure.
3. If you are currently in Summer period, press the “±1h” button once.
4. Set the current time using the “h+” (hours+) and “m+” (minutes+) buttons.
5. With the “DAY” button, select the current weekday. (1 = Monday .. 7 = Sunday)
6. Release the
“” button.
Command programming
Each channel has 42 memory positions. Each command (Switch ON/ Switch OFF) occupies one of these memory positions.
1. Press the “Prog” Button repeatedly until the first empty memory position appears (shown in the display as “--:--”)
2. Select either a switch ON
““ or switch OFF “O“ command for channel 1 or channel 2 with the corresponding “ ” button.
2
3
1

MRP2
50.0048.02.00 3/7
3. Using the “h+” and “m+” buttons, enter the time in which you want the command to be executed.
4. If the command must be executed each weekday: Press the “Prog” button to store the command (The LCD displays the next
empty memory position) In this case, the programming procedure has finished.
5. If the command must be executed one day, or in a group of days within a week: using the “DAY” button, select the
weekday in which the command must not be executed (the cursor below the weekday flashes). Confirm with the “Sel” button
(The weekday and the cursor flash)
6. By pressing the “DAY” button again, remove the selected weekday.
7. Repeat steps 5 and 6 for each weekday you wish to remove.
8. Press the “Prog” button to store the command (The LCD displays the next empty memory position).
9. The programming procedure ends after pressing the
“” button. The clock now displays the current time and sate.
Note: If you forget to enter certain data during the programming process, the screen flashes until it is entered correctly.
ATTENTION: Always store a switch OFF command after every switch ON command. Otherwise, the clock would trigger and never get
off.
If you accidentally remove a day in which the command should be executed, follow these steps:
1. Using the “DAY” button, place the cursor at the desired weekday (The day and the cursor flash).
2. Confirm the selected day by pressing the “Sel” button (the cursor flashes).
3. By pressing the “DAY” button again, the weekday gets selected.
4. Store the new selection by pressing the “Prog” button (The display shows the next empty memory position)
5. To get back to the current date and time display, press
“” .
Modifying or cancelling commands
In order to modify or cancel a previously stored command, follow these steps:
Cancelling a command:
1. Select the desired command by repeatedly pressing the “Prog” button until it is appears in the display.
2. To cancel the command, write “--:--“ into the hours and minutes fields (using the “h+” and “m+” buttons).
3. Press the
“” button for 3 seconds. The command has now been cancelled.
Modifying a command:
1. Select the desired command by repeatedly pressing the “Prog” button until it is appears in the display.
2. To modify a command, overwrite the stored data with the new data (day, hour, minute, channel) as described in the “Command
programming” section.
3. Press the
“” button. The modified command is stored and the clock returns to normal operation.
Reading the display
In its default position, the display shows the current time and weekday. The lower part shows following information for CH1 (left side)
and CH2 (right side):
Program Type:
: Operates following the stored programming and each channel will be ON or OFF depending on the program.
[ON]: CH1 (left side) or CH2 (right side) is permanently ON
[OFF]: CH1 (left side) or CH2 (right side) is permanently OFF
: Manual triggering of the switch for both channels independently. If it was ON, it will switch to OFF and vice versa.
In this position, the stored programme will not be followed until the next command is reached.
RND: Random operation programme

MRP2
4/7 50.0048.0200
: Holiday period programme
Example:
On CH1 you have a programme which switches to ON every day at 10:00 and turns OFF at 12:00.
If the display shows
, the channel switch will be ON between 10:00 and 12:00 and otherwise OFF.
If the display shows [ON] or [OFF], it will be permanently ON or OFF regardless of the programming.
If it shows
+ OFF and the button on Channel 1 is pressed, the display will show + ON, i.e. ON until the next ON or OFF
command is reached inside the programme.
On the other hand, if the display shows
+ ON and the button on Channel 1 is pressed, the display will show + OFF, i.e. OFF
until the next ON or OFF command is reached inside the programme.
Reading the stored commands
Successively pressing the
“Prog” button shows the stored entries on the display one by one. After the last entry, the first empty
memory position is shown. At last, the display will indicate the number of free memory positions available. If the memory is full, the
display shows “FR00”.
Manual activation of the switches
Using the buttons with the hand symbol (“
“), following actions can be accomplished:
Pressing once: Toggles the switch position. If it was ON, it will change to OFF and vice versa. When set in this position, the
programmed events will not take place until the next command is reached.
Pressing twice: The switch contact gets locked in the [ON] position permanently. The programmed events will not take place.
Pressing three times: The switch contact gets locked in the [OFF] position permanently. The programmed events will not take
place.
Pressing once again: Returns to normal operation mode (automatic programme
)
Special functions
AM/PM display
Pressing both “±1h” and “h+” buttons simultaneously toggles between AM and PM time display modes.
Selecting Summer or Winter time mode
Manual selection:
Changing from Winter to Summer time: Press the ±1h button. The display shows the Summer symbol.
Changing from Summer to Winter time: Press the ±1h button. The Summer symbol disappears.
Automatic selection: Three different alternatives are possible.
AU (Automatic)
The time change is performed according to an established calendar defined up to the year 2079. (EU and Switzerland Summer
/Winter time standard)
Beginning of summer time: Always the last Saturday of March, shifting from 2:00h to 3:00h.
End of summer time: Always the last Saturday of October, shifting from 3:00h to 2:00h.
cHA (Semiautomatic calculation) Freely selected change referenced to weekday
The Summer time period beginning day and end day can be entered. The programme automatically assigns these dates to the
correct weekday and month. During the following years, the time changes will occur at the same dates.

MRP2
50.0048.02.00 5/7
HA (Semiautomatic) Freely selected change referenced to date
The Summer time period beginning date and end date of your country can be entered. During the following years, the time
changes will occur at the same dates.
Activating the automatic Summer/Winter time change function
Before activating the desired automatic Summer/Winter time change operating mode, the current date must be entered. The
complete procedure to do so is:
1. Simultaneously press the “±1h” and “DAY” buttons.
2. Use the “h+” and “m+” buttons to enter the current weekday and month respectively
3. Press the “±h” button
Once the correct date has been entered, the process continues by selecting the desired Summer/Winter time change mode:
4. Select the Summer/Winter time change mode by pressing the “m+” button.
5. If the automatic mode has been selected, press the
“” button to return to normal clock operation. The
programming process for the Summer/winter time change mode has finished.
6. If you selected the cHA or HA modes, press the “±1h” button once
7. Now enter the date of the beginning of the Summer period by using the “h+” and “m+” buttons.
8. Press the “±1h” once again
9. Now enter the date of the end of the Summer period by using the “h+” and “m+” buttons.
10. As the last step, press the
“” button. The clock returns to normal operation.
Reading the selected date for the Summer/Winter time change
By following these steps you can view the selected date for the Summer/Winter time change anytime:
1. Simultaneously press the “±h” and “DAY” buttons.
2. By repeatedly pressing the “±1h” button, the previously entered data can be viewed.
3. The
“” button lets you return to normal clock operation.
Changing the selected date for the Summer/Winter time change
The dates can only be modified for the semiautomatic time change modes cHA and HA
1. Simultaneously press the “±h” and “DAY” buttons.
2. Press the “±1h” button twice.
3. Select the cHA or HA mode with the “m+” button
4. The process for modifying is equivalent to entering the change date.
Deactivating the automatic Summer/Winter time change mode
Following steps must be performed:
1. Simultaneously press the “±h” and “DAY” buttons.
2. Successively press the “h+” button until the display shows “—“ (after the last day of the month)
3. The
“” button lets you return to normal clock operation.
The automatic Summer/winter time change mode can be activated again by pressing the “±1h” or by entering new dates as
described above.

MRP2
6/7 50.0048.0200
Random programme (RND)
This special operation programme performs random connections and disconnections and is intended to use with lights as a
dissuasive measure against thieves. This programme can be manually changed to switched ON ““ or switched OFF “
O“.
Two possible random operation modes are available:
a) Not assigning Switch ON times
The random programming periods automatically oscillate between a minimum of 5 min to a maximum of 60 min (for connection
periods) or 30 min (for disconnection periods).
a) Assigning connection periods
The connection times assigned to the RND function define the beginning and end of the random programme. The connection
periods are the same as described above. The connected lights only switch ON /OFF randomly during the indicated period.
In order to enter the beginning and end of the random programme, the same process as described in “Command programming
”
must be followed. The “RND” button has to be pressed after entering the day, hour, minute and the corresponding channel for
the command.
ATTENTION: When the RND programme ends, the switch of the corresponding channel may be ON or OFF. Therefore, it is
advisable to enter an additional command after the RND period to ensure that the connected devices stay at in a known status
each time the random programme ends.
Holiday programme
The clock can be programmed to execute stored commands during a time period defined as holiday season. It must be considered that:
a) The holiday period has a higher priority than the standard programme
b) The operating mode of the holiday period can only be assigned to programmed commands that execute each weekday
c) The holiday programme only activates if the length of the holiday season (1 to 99 days) has been previously defined or if it has
been defined as unlimited.
d) The holiday programme can be initiated during the current day or it can be programmed to start at one of the six following
days
In order to enter the connection and disconnection times of the holiday programme, the same process as described in “Command
programming” must be followed. The “ ” button has to be pressed after entering the day, hour, minute and the corresponding channel
for the command.
Programming the start and duration of the holiday programme
Once the commands to be executed during the holiday period have been entered as described in the above paragraph, the holiday start
and length have to be programmed. For that purpose it is absolutely necessary to press the
“” button, so the display shows the
current time.
These steps have to be followed:
a) Programming an unlimited holiday period
1. Press the button with the “ “ symbol: the cursor below the current day will flash.
2. Press the
“” button once. The programming procedure for an unlimited holiday period has finished.

MRP2
50.0048.02.00 7/7
b) Programming a holiday period with a defined length
If the holiday programme should start the current day:
1. Enter the length of the holiday period using the “Sel”. If the button is held pressed during more than 2 seconds, the
value increases rapidly. The maximum length is 99 days.
2. Press the
“” button once. The information is stored and the holiday programme starts.
If the holiday period should be started during the next 6 days (counting up from the current day):
1. Use the “DAY” button to indicate the start day before entering the length of the holiday period as described in the
previous paragraph.
2. Press the
“” button once. The information is stored and the holiday programme starts.
Early cancelling of the holiday programme
If the holiday programme has started its execution, it can be disabled by pressing the “ “ button once. The device then returns to
the normal programme.
In case the holiday period has been programmed to start in one of the following days, the “ “ button has to be pressed twice, so that
the device returns to the normal programme.
TECHNICAL CHARACTERISTICS
Precision: +/- 4 min /year
Autonomy: 2 weeks
Number of programmable events: 42
Switch contacts: 250V AC / 16 A max
Minimum programming step: 1 minute
Power requirements: 4VA
Operating Temperature range: -28 C° /60 C°


MRP2
50.0048.02.00 1/7
PROGRAMMATEUR A 2 CIRCUITS
MODULE MRP2
FONCTION
MODULE AVEC HORLOGE DIGITALE PROGRAMMABLE A 2 CIRCUITS DE
PROGRAMMATION INDEPENDANTS.
DESCRIPTION
Horloge digitale avec possibilité de 42 commandes de mise en / hors service assignables
aux deux voies disponibles. Ces déclenchements peuvent être programmés en différents
groupes de jours de la semaine (ou en un seul jour, ou en un groupe de lundi à vendredi, ou
en un groupe de samedi et dimanche ou bien encore en un groupe intégrant tous les jours
de la semaine).
Le module incorpore une batterie qui se recharge automatiquement grâce à l’alimentation
même du châssis de l’Enviro, lorsque celui-ci est en marche. La batterie dispose d’une
autonomie estimée de 15 jours dès lors que l’Enviro est à l’arrêt. Ainsi, lorsque ce dernier
est éteint, l’horloge fonctionne encore. Si cette batterie venait à s’arrêter, au moment
de la mise en service du châssis dans lequel est installé ce module, celle-ci se mettrait en
charge automatiquement. Dans un tel cas, il est alors nécessaire de programmer à
nouveau heure et programmes. Le temps minimum de charge de la batterie est de 48h.
CARACTERISTIQUES
VOYANTS :
CH1
: Voyant de fonctionnement voie 1.
CH2
: Voyant de fonctionnement voie 2.
Ecran LCD.
CONNEXIONS
INTERNES :
MJ101:
Insérer un mini-cavalier afin de permettre l’alimentation de l’horloge via la batterie.
COMMANDES : : Touche de mise à l’heure de l’horloge et des programmes.
DAY:
Touche de programmation du jour de la semaine pour l’horloge et les programmes.
h+
: Touche de programmation de l’heure pour l’horloge et les programmes.
m+
: Touche de programmation des minutes pour l’horloge et les programmes.
Prog
: Touche de programmation.
Sel:
Touche de sélection.
1
: Touche de déclenchement manuel (voie 1).
2
: Touche de déclenchement manuel (voie 2).
1h:
Touche de changement d’heure (hiver / été).
RND:
Touche de programmation aléatoire.
R
: Touche de RAZ de l’horloge.
: Touche de programmation de la période de vacances.
RACCORDEMENTS :
CH1
: Sortie voie 1. Contact sec.
CH2
: Sortie voie 2. Contact sec.
CONNEXION MRP2
Pour réaliser la connexion de ce module, suivre les étapes indiquées dans le diagramme de la page suivante :
Insérer un mini-cavalier dans la fiche MJ101 (nº 1 sur le schéma).
ATTENTION : Il est indispensable d’installer ce mini-cavalier. Si tel n’est pas le cas, l’horloge s’arrête et subit une RAZ dès lors
que le châssis de l’Enviro est éteint.
Insérer et visser dans le châssis les panneaux avant et arrière du module.
Raccorder le bus de données (câble plat 20 conducteurs) au connecteur désigné (nº 2 sur le diagramme ci-dessous).

MRP2
2/7 50.0048.0200
Raccorder la face avant au panneau arrière, à l’aide de la paire de connecteurs signalée ci-dessous
(nº 3 sur le schéma : J104-WI101).
MODULE MRP2
INSTRUCTIONS DE PROGRAMMATION DE L’HORLOGE
Pour la première mise en marche de l’horloge, ou pour effacer la programmation et l’heure, appuyer à l’aide d’un crayon ou d’un objet
similaire sur la touche
“R”
. L’écran affiche “00:00”. L’horloge est prête à l’emploi.
Réglage du jour de la semaine et de l’heure
1. Appuyer d’abord sur la touche “R”.
2. Maintenir enfoncée la touche
”” pendant tout le processus.
3. Si l’heure d’été est en vigueur lors de cette opération, appuyer une fois sur la touche “1h”.
4. Paramétrer l’heure et les minutes à l’aide des touches “h+” y”m+”.
5. Sélectionner le jour de la semaine à l’aide de la touche “DAY”, (1=lundi...7=dimanche).
6. Lâcher la touche
””.
Programmation des commandes
42 espaces mémoire sont disponibles. Chaque commande (marche / arrêt) occupe un espace mémoire.
1. Appuyer sur la touche “Prog” plusieurs fois jusqu’à ce qu’apparaisse à l’écran le premier espace mémoire libre (signalé
par “
--:--“).
2. Sélectionner une instruction de mise en marche
““ ou à l’arrêt “O“ via la touche “ ”, pour la voie 1 ou 2 (CH1 ou
CH2).
3. Régler l’heure (et les minutes) d’exécution de la commande à l’aide des touches “h+” et “m+”.
2
3
1

MRP2
50.0048.02.00 3/7
4. Si la commande doit être exécutée chaque jour de la semaine : appuyer sur la touche “Prog” pour mettre la
commande en mémoire. (L’espace mémoire libre suivant apparaît à l’écran). Dans ce cas le processus de programmation
est terminé.
5. Si la commande doit être exécutée un jour spécifique, ou sur un groupe de jours de la semaine : sélectionner à
l’aide de la touche “DAY” le jour où ne doit pas être exécutée la commande (le curseur clignote sous le jour en
question). Confirmer la sélection à l’aide de la touche “Sel” (le jour et le curseur clignotent).
6. En appuyant à nouveau sur la touche “DAY” le jour sélectionné est supprimé.
7. Répéter les étapes 5 et 6 pour chaque jour à éliminer.
8. Pour mettre la commande en mémoire, appuyer sur la touche “Prog” (l’espace mémoire libre suivant s’affiche à
l’écran).
9. Pour terminer le processus de programmation, appuyer sur la touche
””. L’horloge indique l’heure et l’état actuels.
Note : Si, lors de la programmation d’une commande, une information est omise, cette dernière clignote à l’écran tant que la saisie
requise n’a pas été effectuée.
ATTENTION : Il est indispensable d’enregistrer un ordre d’arrêt avec chaque ordre de mise en service car, dans le cas contraire,
l’horloge se déclencherait pour ne plus s’éteindre.
Si un jour auquel était assigné une commande est éliminé par erreur, suivre les indications suivantes :
1. Récupérer le jour en question avec la touche “DAY” (le jour et le curseur clignotent).
2. Confirmer le jour sélectionné à l’aide de la touche “Sel” (le curseur clignote).
3. Pour sélectionner le jour voulu, appuyer sur la touche “DAY”.
4. Mémoriser la sélection en appuyant sur la touche “Prog” (l’espace mémoire suivant apparaît à l’écran).
5. Visualiser le jour et l’heure à l’aide de la touche
””.
Modification ou annulation d’ordres
Pour modifier ou supprimer une commande enregistrée préalablement, respecter les procédures suivantes :
Pour supprimer une commande :
1. Sélectionner la commande en appuyant sur la touche “Prog” autant que nécessaire, jusqu’à ce que celle-ci s’affiche à
l’écran.
2. Pour l’éliminer, réécrire l’heure et les minutes
“--:--“ (en appuyant sur “h+” y “m+”
).
3. Appuyer sur la touche
”” pendant 3s. La commande est supprimée.
Pour modifier une commande :
1. Sélectionner la commande en appuyant sur la touche “Prog” autant de fois que nécessaire, jusqu’à ce que celle-ci
s’affiche à l’écran.
2. Pour la modifier, réécrire les changements désirés pour le jour, l’heure, les minutes et la voie, en procédant de la
manière décrite au paragraphe “Programmation des commandes
”.
3. Appuyer sur la touche
”” : la commande est modifier et l’horloge passe en mode de fonctionnement normal.
Lecture de l’écran
En temps normal, l’écran indique l’heure et le jour de la semaine et, dans la zone inférieure réservée à chaque voie (CH1 gauche et CH2
droite) :
Type de programme :
: Fonctionne selon le programme enregistré et chaque voie est activée (ON) ou désactivée (OFF) selon les programmes
qui lui sont assignés.
[ON] : Fonctionnement permanent de la voie 1 (gauche) ou de la voie 2 (droite).
[OFF] : Arrêt permanent de la voie 1 (gauche) ou de la voie 2 (droite).

MRP2
4/7 50.0048.0200
: Activation manuelle et autonome du contact des 2 voies. Si la voie était activée (ON), elle est alors désactivée (OFF)
et vice versa. Sur cette position, le programme n’entre en action qu’à réception par la voie de l’ordre suivant.
RND : Programme de fonctionnement aléatoire.
: Programme de fonctionnement assigné à une période de vacances.
Exemple :
Un programme est assigné à la voie 1, qui déclenche cette dernière chaque jour à 10:00h et l’arrête à 12:00h.
Si l’icône
s’affiche à l’écran pour la voie désignée, celle-ci est activée entre 10:00h et 12:00h et désactivée le reste du
temps.
Si l’information [ON] ou [OFF] s’affiche à l’écran pour la voie désignée, cette dernière sera en ou hors service de manière
permanente et ne suivra pas l’horaire programmé.
Si, alors que l’appareil est en mode
+ OFF, le bouton correspondant à la voie 1 est pressé, le mode bascule alors sur
+ ON, c’est-à-dire, sur ON jusqu’au prochain ordre de mise en/hors service programmé pour la voie.
Si, au contraire, l’appareil est en mode
+ ON et que le bouton correspondant à la voie 1 est pressé, le mode bascule alors
sur
+ OFF. L’ordre de mise à l’arrêt (OFF) manuelle est maintenu jusqu’au prochain ordre de mise en/hors service
programmé pour la voie.
Lecture d’ordres enregistrés
En appuyant successivement sur la touche “Prog” les ordres qui sont mis en mémoire défilent à l’écran.
Le premier espace mémoire libre s’affiche ensuite, suivi du nombre d’espaces restants. Si la mémoire est saturée, l’information
“FR00”
apparaît à l’écran.
Activation manuelle des contacts
A l’aide de la touche “ ”, exécuter les fonctions suivantes :
Une pression : la position du contact change. Il passe de ON à OFF et vice versa (selon sa position initiale). Ici, le programme
n’entre en action qu’à réception par la voie de l’ordre suivant.
Deux pressions : le contact est bloqué de manière permanente sur la position [ON] (et le programme n’agit pas).
Trois pressions : le contact est bloqué de manière permanente sur la position [OFF] (et le programme n’agit pas).
Une pression supplémentaire : Retour au programme automatique (
).
Fonctions spéciales
Ecran AM/PM
En appuyant à la fois sur les touches “1h” et “h+” l’écran passe en mode AM/PM.
Sélection de l’heure d’hiver ou d’été
Sélection manuelle :
Changement d’hiver à été : appuyer sur la touche “1h”. Le symbole s’allume à l’écran.
Changement d’été à hiver : appuyer sur la touche “1h”. Le symbole s’éteint à l’écran.
Sélection automatique : trois choix possibles.
AU (Automatique).
Le changement d’heure se fait en fonction d’un calendrier programmé jusqu’à l’an 2079, qui ne peut être modifié
(réglementation relative au changement d’heure, en vigueur au sein de l’UE et en Suisse).
Début de l’heure d’été : toujours le dernier samedi du mois de mars. L’heure change à 2:00h, pour passer à 3:00h.

MRP2
50.0048.02.00 5/7
Fin de l’heure d’été : toujours le dernier samedi du mois d’octobre. On recule d’une heure, pour repasser donc de 3:00h à
2:00h.
cHA (calcul semi-automatique). Changement sélectionné librement par rapport au jour de la semaine.
Sélectionner le jour du début de l’heure d’été et le jour correspondant à la fin de cette période. Le programme assigne
automatiquement ces dates à des jours de la semaine et à un mois. Les années suivantes, le changement d’heure se répétera aux
mêmes dates.
HA (semi-automatique). Changement sélectionné librement par rapport à la date.
Sélectionner les dates de changement de l’heure du pays. Les années suivantes, le changement se produira toujours aux mêmes
dates.
Activation de la fonction de changement automatique de l’heure (été / hiver).
Avant de réaliser cette opération, il est nécessaire de saisir la date actuelle. Procéder de la manière suivante :
1. Appuyer simultanément sur les touches “1h” et “DAY”.
2. Saisir le jour et le mois en cours à l’aide des touches “h+” y “m+”.
3. Appuyer ensuite sur la touche “1h”.
Une fois la date courante entrée, poursuivre en sélectionnant le mode de changement d’heure (été / hiver) :
4. Sélectionner le mode de changement d’heure à l’aide de la touche “m+”.
5. Si le mode automatique (“AU”) est sélectionné, le fait d’appuyer sur la touche “
“ permet de revenir au mode de
fonctionnement normal de l’horloge. La programmation du mode de changement est alors achevée.
6. Si l’option cHA ou HA est sélectionnée, appuyer une fois sur la touche “1h”.
7. Saisir ensuite la date de début de l’heure d’été à l’aide des touches “h+” y “m+”.
8. Appuyer de nouveau sur la touche “1h”.
9. Entrer la date correspondant à la fin de l’horaire d’été, à l’aide des touches “h+” y “m+”.
10. Pour finir, appuyer sur la touche “
“. L’horloge revient à son mode de fonctionnement normal.
Lecture de la date sélectionnée pour le changement de l’heure d’été / hiver
Pour consulter à tout moment les dates sélectionnées pour le changement d’heure (été / hiver), procéder de la manière suivante :
1. Appuyer simultanément sur les touches “1h” et “DAY”.
2. Appuyer sur la touche “1h” autant de fois que nécessaire pour visualiser les données sélectionnées.
3. La touche “
“ permet de revenir au mode de fonctionnement normal de l’horloge.
Changement de la date sélectionnée pour le changement de l’heure d’été / hiver.
Le changement des dates est autorisé uniquement pour les modes de fonctionnement semi-automatique cHA y HA.
1. Appuyer simultanément sur “1h” y “DAY”.
2. Appuyer sur la touche “1h” deux fois.
3. Pour choisir entre le mode cHA ou HA, appuyer sur la touche “m+”.
4. Le processus de modification est identique à celui permettant la saisie de la date du changement d’heure.
Désactivation de la fonction automatique de changement de l’heure d’été / hiver
Les étapes à respecter sont les suivantes :
1. Appuyer simultanément sur “1h” et “DAY”.
2. Appuyer successivement sur la touche “h+” jusqu’à l’affichage sur l’écran de
“--“ (après le dernier jour du mois).

MRP2
6/7 50.0048.0200
3. La touche “
“ permet de revenir au mode de fonctionnement normal de l’horloge.
Le changement automatique de l’heure d’été / hiver (AU) peut être rétabli en appuyant sur la touche “1h” ou en saisissant de nouvelles
données (se reporter au processus de saisie de la date de changement).
Programme aléatoire (RND)
Le mode de fonctionnement aléatoire permet l’exécution d’opérations de mise en marche/à l’arrêt (cette commande peut notamment être
appliquée à un éclairage, afin de dissuader tout cambrioleur potentiel). Ce programme peut être basculé manuellement à tout moment du
mode marche
““ au mode arrêt “O“ et inversement.
Il existe deux modes de fonctionnement aléatoire :
a) Sans assignation d’heures d’activation.
Les temporisations d’un programme aléatoire varient automatiquement entre un minimum de 5 min et un maximum de 60 min
(marche) ou de 30 min. (arrêt).
b) Avec temporisations d’activation assignées.
Les heures assignées à la fonction RND marquent le début et la fin du programme aléatoire. Les temporisations sont les mêmes que
celles indiquées dans le paragraphe précédent. Les dispositifs d’éclairage s’allument et s’éteignent à intervalles aléatoires
uniquement au sein de la période signalée.
Pour paramétrer les heures de marche/arrêt du programme aléatoire, se reporter aux indications du paragraphe “Programmation de
commandes”: appuyer sur la touche “RND” après avoir saisi le jour, l’heure, les minutes et la voie assignés à la commande.
ATTENTION : A la fin d’une période au cours de laquelle le mode de fonctionnement aléatoire (RND) a été en vigueur, la voie
correspondante peut rester active ou inactive. Il est donc recommandé d’ajouter un ordre complémentaire au programme standard
afin que les systèmes connectés demeurent dans un état connu chaque fois que le programme aléatoire est achevé.
Programme assigné à une période de vacances
L’horloge peut être programmée de manière à permettre l’exécution de commandes enregistrées pendant une période de vacances. Il
faut retenir que :
a) Le programme assigné à une période de vacances est prioritaire sur le programme habituel.
b) Le mode de fonctionnement de ce programme ne peut être assigné qu’aux commandes programmées pour être exécutées tous
les jours de la semaine.
c) Ce programme ne se déclenche que si la durée de la période de vacances a été fixée (entre 1 et 99 jours) ou bien si cette
période a été fixée sans limitation de durée.
d) Ce programme peut être initié le jour même, ou bien être programmé pour débuter dans les 6 jours suivants.
Les temporisations de mise en marche/à l’arrêt correspondant à la période de vacances doivent être saisies en suivant les indications du
paragraphe “Programmation de commandes
”: appuyer sur la touche “ ” après avoir saisi le jour, l’heure, les minutes et la voie
correspondant à la commande en question.
Programmation du début et de la durée du programme assigné à une période de vacances
Une fois paramétrée les commandes à exécuter pendant la période de vacances (se reporter au paragraphe précédent), programmer la
date de début et la durée de ladite période. Il est indispensable pour cela de presser la touche “
“ pour que l’écran affiche l’heure
actuelle.

MRP2
50.0048.02.00 7/7
Respecter les étapes suivantes :
a) Programmation d’une période de vacances indéfinie
1. Appuyer sur la touche
“ ” : le curseur localisé sous le jour clignote.
2. Appuyer une fois sur la touche
““. La programmation est conservée en mémoire.
b) Programmation d’une période de vacances comportant un nombre déterminé de jours
Si le programme de vacances commence le jour même,
1. Saisir le nombre de jours auxquels le programme doit s’appliquer, à l’aide de la touche “Sel”. Si cette dernière est
maintenue enfoncée plus de 2s, les chiffres défilent rapidement. Le nombre maximum de jours est de 99.
2. Appuyer une fois sur la touche “
“. L’information est mise en mémoire et le programme commence.
Si l’on désire que celui-ci débute dans un délai maximum de 6 jours à compter du jour actuel :
1. Utiliser la touche “DAY” pour indiquer le jour de la semaine assigné au début du programme, avant de programmer la
durée de la période de vacances (se reporter au paragraphe précédent).
2. Appuyer une fois sur la touche “
“. L’information est mise en mémoire et le programme
débute.
Annulation anticipée du programme
Si le programme est déjà en cours d’exécution, il est possible de le désactiver en appuyant une fois sur la touche
“ ”. Le mode de fonctionnement habituel de l’appareil est alors rétabli.
Si le programme doit débuter dans les jours qui suivent, presser la touche
“ ” deux fois et le programme habituel se déclenchera.
CARACTERISTIQUES TECHNIQUES
Précision +/- 4 min./an
Autonomie 2 semaines
Nombre d’opérations programmables 42
Contacts 250 VAC / 16A max.
Temporisation minimum de commutation 1 min.
Alimentation 4 VA
Températures de fonctionnement Plage comprise entre –28 Cº et +60 Cº


MRP2
50.0048.02.00 1/7
PROGRAMMIERBARE SCHALTUHR MIT 2 KANÄLEN
MRP2 MODUL
FUNKTION
MODUL MIT PROGRAMMIERBARER DIGITALUHR UND 2 UNABHÄNGIG PROGRAMMIERBAREN
KANÄLEN
BESCHREIBUNG
Digitaluhr mit Möglichkeit für bis zu 42 EIN-/AUS-Befehlen an beiden Kanälen. Diese Befehle
können in verschiedenen Gruppierungen von Wochentagen programmiert werden (oder aber auch in
bestimmten Tagen, in einer Gruppe von Montag bis Freitag, in einer Gruppe von Samstag und
Sonntag, oder in einer Gruppe mit allen Wochentagen).
Das Modul verfügt über eine durch die Spannungsversorgung des Enviro-Chassis selbst
wiederaufladende Batterie. Das MRP2-Modul kann bis zu 15 Tage selbständig funktionieren, auch
wenn das Enviro-System ausgeschaltet ist, wobei die Uhr immer weiterläuft. Falls die Batterie sich
schließlich doch entladen sollte, würde sie sich beim nächsten Einschalten des Enviro-systems
wieder aufladen. Allerdings müssen Sie in diesem Fall die richtige Uhrzeit und Programmierung neu
eingeben. Die Mindestladezeit der Batterie beträgt 48 Stunden.
EIGENSCHAFTEN
ANZEIGEN:
CH1
: Zeigt an, daß Kanal 1 einsatzbereit ist.
CH2
: Zeigt an, daß Kanal 2 einsatzbereit ist.
LCD Display.
INTERNE
ANSCHLÜSSE:
MJ101:
Stecken Sie einen Minijumper ein, um die Uhr von der internen Batterie zu versorgen.
BEDIENELEMENTE:
: Stellt die aktuelle Uhrzeit und die Uhrzeit der Programmierung ein.
DAY: S
tellt den aktuellen Tag und den Tag der Programmierung ein.
h+
: Stellt die Stunde der aktuellen Uhrzeit und der Programmierung ein.
m+
: Stellt die Stunde der aktuellen Uhrzeit und der Programmierung ein.
Prog
: Taste zur Programmierung
Sel
: Taste zur Auswahl
1
: Manueller Betätigung des Kanal 1.
2
: Manueller Betätigung des Kanal 2.
±1h:
Taste zur Umschaltung Sommer-Winterzeit.
RND: Taste zur zufälligen Programmierung
R
: Löscht alle Schaltzeiten, Wochentage und die aktuelle Uhrzeit.
: Taste zur Programmierung der Urlaubszeit
ANSCHLÜSSE:
CH1
: Ausgang Kanal 1.
CH2
: Ausgang Kanal 2.
ANSCHLIESSEN DES MRP2
Folgen Sie die in der Abbildung der nächsten Seite angegebenen Schritte, um dieses Modul erfolgreich anzuschließen:
Stecken Sie einen Minijumper in Position MJ101 ein, Pfeil Nr. 1.
ACHTUNG: Dieser Minijumper muß unbedingt gesteckt werden. Falls der Minijumper nicht gesteckt sein sollte, würde die Uhr
nach dem Ausschalten des Enviro-Chassis nicht mehr weiterlaufen und sich auf Null stellen (Reset).

MRP2
2/7 50.0048.0200
Fügen Sie Front- und Rückplatte des Moduls in das Chassis ein und schrauben Sie diese fest.
Schließen Sie den Datenbus (20-poliges Flachkabel) in den Stecker, der in der nächsten Abbildung mit Pfeil Nr. 2 gezeigt wird, an.
Verbinden Sie die den vorderen und hinteren Teil des Moduls mit dem dazu geeignetem Kabel. Benutzen Sie in diesem Fall die
Stecker J104 und WI101 (Pfeil Nr. 3)
MRP2 MODUL
ANLEITUNG ZUR PROGRAMMIERUNG DER UHR
Drücken Sie nach dem ersten Einschalten der Uhr die
R
-Taste mit einem Bleistift oder ähnlichem Gegenstand. Im Display müßte 00:00
erscheinen. Die Schaltuhr ist nun einsatzbereit.
Einstellen des Wochentages und der aktuellen Uhrzeit
1. Drücken Sie zuerst die Taste "R"
2. Halten Sie während der ganzen Prozedur die Taste
“” gedrückt.
3. Wenn es aktuell Sommerzeit ist, drücken Sie einmal die Taste "±1h".
4. Stellen Sie die richtige Uhrzeit mittels der Tasten
h+
(Stunden +) und
m+
(Minuten +) ein.
5. Geben Sie den richtigen Wochentag mittels der Taste
DAY
ein. (1= Montag... 7 = Sonntag)
6. Lassen Sie die Taste
“” los.
Programmierung der Befehle
Es stehen bis zu 42 Speicherplätze zur Verfügung. Jeder EIN- oder AUS-Befehl beansprucht einen Speicherplatz.
1. Drücken Sie die Taste "Prog" so viele Male, bis im Display der erste freie Speicherplatz angezeigt wird (durch "--:--"
symbolisiert)
2
3
1

MRP2
50.0048.02.00 3/7
2. Wählen Sie entweder einen EIN-Befehl "
" oder AUS-Befehl "O" mittels der Taste " " des zu schaltenden Kanals (CH1
oder CH2).
3. Mit den Tasten "h+" und "m+" können Sie nun die Uhrzeit des Befehls eintippen.
4. Wenn der Befehl an jeden Wochentag ausgeführt werden soll: Drücken Sie die Taste "Prog". Somit ist der Befehl
gespeichert und das Display zeigt den nächsten leeren Speicherplatz an. In diesem Fall ist die Programmierung beendet.
5. Wenn der Befehl an einem oder an mehreren Wochentagen ausgeführt werden soll: Selektieren Sie mittels der Taste
"DAY" die Wochentage in deren der Befehl nicht ausgeführt werden soll (Der Cursor unter dem Tag blinkt). Bestätigen Sie die
Auswahl mit der Taste "Sel" (Der Cursor und der Wochentag blinken)
6. Durch drücken der Taste "DAY" wird der Wochentag gelöscht
7. Wiederholen Sie die Schritte 5 und 6 für jeden Wochentag den Sie löschen wollen.
8. Der Schaltbefehl wird mittels der Taste "Prog" Taste gespeichert (Im Display erscheint der nächste leere Speicherplatz).
9. Der Programmierungsprozess beendet nach drücken der Taste
“” . Die Schaltuhr zeigt die aktuelle Uhrzeit und Zustand an.
Bemerkung: Wenn Sie während der Programmierung eine Information vergessen, blinkt diese im Display bis sie korrekt eingegeben wird.
ACHTUNG: Es ist unbedingt notwendig, einen AUS-Befehl nach jedem EIN-Befehl einzugeben. Andernfalls würde die Schaltuhr den
Kontakt zwar schließen, doch niemals öffnen.
Folgen Sie diese Schritte, wenn Sie durch Irrtum einen Tag löschen in dem der Befehl doch ausgeführt werden soll:
1. Selektieren Sie mittels der Taste "DAY" den betroffenen Wochentag (Der Wochentag und der Cursor blinken).
2. Bestätigen Sie den Tag mit der Taste "Sel" (der Cursor blinkt).
3. Durch drücken der Taste "DAY" wird der Tag für den Schaltbefehl eingeschlossen.
4. Speichern Sie die Information, in dem Sie die Taste "Prog" drücken (Im Display erscheint der nächste leere Speicherplatz).
5. Mit der Taste
“” kehren Sie in den normalen Anzeigemodus (aktueller Tag und Uhrzeit) zurück.
Ändern oder löschen der programmierten Schaltbefehle
Folgen Sie diese Schritte, um bereits gespeicherte Schaltbefehle zu modifizieren oder zu löschen.
Löschen eines Schaltbefehls:
1. Drücken Sie die Taste "Prog" so viele Male, bis im Display der betroffenen Schaltbefehl angezeigt wird.
2. Überschreiben Sie die Uhrzeit mit "--:--" (mit den Tasten "h+" und "m+")
3. Halten Sie für 3 Sekunden die Taste
“” gedrückt. Der Schaltbefehl ist nun gelöscht.
Ändern eines Schaltbefehls
1. Drücken Sie die Taste "Prog" so viele Male, bis im Display der betroffene Schaltbefehl angezeigt wird.
2. Überschreiben Sie einfach den alten Befehl mit den neuen Daten für Tag, Stunde, Minute und Kanal, wie im
Abschnitt "Programmierung der Befehle
" beschrieben wird.
3. Drücken Sie die Taste
“” : Der neue Schaltbefehl wird somit gespeichert und die Uhr kehrt in den normalen
Zustand zurück.
Ablesen des Displays
Im normalen Zustand zeigt das Display die aktuelle Uhrzeit und Wochentag an. Der untere Teil des Displays ist in zwei Hälften
eingeteilt (CH1 links und CH2 rechts), wobei in jeder Seite folgende Symbole auftauchen können:
Programm-Betriebsarten:
: Der Schalter wird entsprechend der einprogrammierten Schaltbefehle automatisch geöffnet oder geschlossen.
[ON]: Der Schalter von Kanal 1 (links) oder Kanal 2 (rechts) ist dauernd geschlossen).
[OFF]: Der Schalter von Kanal 1 (links) oder Kanal 2 (rechts) ist dauernd geöffnet).

MRP2
4/7 50.0048.0200
: Manuelle Betätigung der Schalter (Kanal 1 und Kanal 2 unabhängig). Wenn der Kontakt geschlossen war, wird er
geöffnet und umgekehrt. In diesem Zustand werden bis zum nächsten Schaltbefehl die programmierten Daten
ignoriert.
RND: Zufallsprogramm
: Urlaubsprogramm
Beispiel:
Sie haben in Kanal 1 ein Programm gespeichert, welches jeden Tag um 10:00 einschaltet und um 12:00 ausschaltet.
Wenn der Kanal das
Symbol im Display anzeigt, wird der Schalter von 10:00 bis 12:00 geschlossen (ON). Sonst ist
der Schalter offen (OFF).
Wenn der Kanal entweder [ON] oder [OFF] im Display anzeigt, ist der Schalter permanent entsprechend offen oder
geschlossen, wobei die einprogrammierten Daten ignoriert werden.
Wenn der Kanal
+ OFF anzeigt, und Sie die Taste des Kanals 1 drücken, erscheint + ON, d.h. der Kanal ist
EINgeschaltet bis zum nächsten in diesem Kanal programmierten EIN- oder AUS-Befehl.
Wenn der Kanal anderseits
+ ON anzeigt, und Sie die Taste des Kanals 1 drücken, erscheint + OFF, d.h.
der Kanal ist AUSgeschaltet bis zum nächsten in diesem Kanal programmierten EIN- oder AUS-Befehl.
Abfragen der programmierten Schaltzeiten
Die gespeicherten Schaltbefehle für Kanal 1 oder 2 und die zugehörigen Schaltzeiten erscheinen bei schrittweisem Drücken der
„Prog“-
Taste nacheinander im Anzeigefeld. Danach erscheint im Display der erste freie Speicherplatz. Zuletzt zeigt das Display die noch
verfügbaren Speicherplätze an. Wenn der Speiche vollkommen besetzt ist, wird "
FR00" angezeigt.
Manuelle Betätigung der Schalter
Durch schrittweises Drücken des Symbols mit der Hand (
) werden folgende Funktionen ausgeführt:
Einmaliges Drücken: Der Kontakt schaltet um. Wenn er offen war schaltet er auf geschlossen und umgekehrt. In diesem
Zustand werden bis zum nächstem Befehl im Kanal die programmierten Daten ignoriert.
Zweifaches drücken: Der Schalter bleibt permanent im geschlossenem Zustand [ON]; Die Schaltbefehle werden
übersprungen.
Dreifaches drücken: Der Schalter bleibt permanent im offenem Zustand [OFF]; Die Schaltbefehle werden übersprungen.
Noch einmal drücken: Kehrt zum automatischen Programm zurück (
).
Spezielle Funktionen
AM/PM Anzeige
Beim gleichzeitigem Drücken der Tasten "±1h" und "h+" wechselt der Anzeigemodus von PM zu AM.
Einstellung der Sommer- oder Winterzeit
Manuelle Umstellung:
Umstellung auf Sommerzeit: Drücken Sie die Taste "±1h". Das Symbol erscheint im Display.
Umstellung auf Winterzeit: Drücken Sie die Taste "±1h". Das Symbol erlischt vom Display.
Automatische Umstellung: Drei alternativen sind möglich
AU (Automatisch)
Die Umstellung der Uhrzeit erfolgt vollautomatisch in Zusammenhang eines bis zum Jahr 2079 definierten Kalenders.
(Norm für Sommer- und Winterzeit der EU und Schweiz)

MRP2
50.0048.02.00 5/7
Beginn der Sommerzeit: Immer der letzte Samstag im März, wobei die Uhrzeit von 2:00h bis 3:00h vorgestellt wird.
Ende der Sommerzeit: Immer der letzte Samstag im Oktober, wobei die Uhrzeit von 3:00h bis 2:00h zurückgestellt wird.
cHA (halbautomatische Berechnung). Datum der Zeitumstellung frei definierbar in Referenz eines Wochentages
Die Termine des Beginns und Ende der Sommerzeit können eingegeben werden. Das Programm weist automatisch ein
Wochentag und Monat an dieses Datum zu. In den nächsten Jahren wird die Umstellung am selben Datum durchgeführt.
HA (halbautomatisch). Datum der Zeitumstellung frei definierbar in Referenz eines Datums
Die Termine der Zeitumstellung Ihres Landes können eingegeben werden. In den nächsten Jahren wird die Umstellung am
selben Datum durchgeführt.
Aktivieren der automatischen Sommer/Winter Zeitumstellung
Das aktuelle Datum muss vor dem Aktivieren der automatischen Zeitumstellung eingegeben werden. Die vollständige Prozedur wird in
folgenden Schritten beschrieben:
1. Drücken Sie die Tasten "±1h" und "DAY" gleichzeitig.
2. Geben Sie mittels den Tasten "h+" und "m+" den aktuellen Tag und Monat ein.
3. Drücken Sie nun die Taste "±1h".
Nach korrektem Eingeben des aktuellen Datums können Sie nun den Modus der Sommer/Winter-Zeitumstellung auswählen:
4. Selektieren Sie den Modus der Zeitumstellung mittels der Taste "m+".
5. Falls Sie den automatischen Modus auswählen ("AU"), können Sie mit der Taste
“” in den normalen Betriebszustand
zurückkehren. Die Programmierung des Modus der Zeitumstellung ist somit beschlossen.
6. Falls Sie entweder den cHA- oder HA-Modus ausgewählt haben, drücken Sie einmal die Taste "±1h".
7. Geben Sie nun mittels der Tasten "h+" und "m+" das Beginnsdatum der Sommerzeit ein.
8. Drücken Sie erneut einmal die "±1h" Taste
9. Geben Sie nun mittels der Tasten "h+" und "m+" das Enddatum der Sommerzeit ein.
10. Drücken Sie zuletzt die Taste
“” . Die Schaltuhr kehrt in den normalen Betriebszustand zurück.
Abfragen des Datums für die Sommer/Winter Zeitumstellung
Das gespeicherte Datum für die Sommer-Winterzeitumstellung kann jederzeit angezeigt werden. Folgen Sie dazu diese Schritte:
1. Drücken Sie die Tasten "±1h" und "DAY" gleichzeitig.
2. Durch wiederholtes Drücken der Taste "±1h" werden die gespeicherten Daten angezeigt.
3. Die Schaltuhr kehrt nach drücken der Taste
“” in den normalen Betriebszustand zurück.
Modifizieren des gespeicherten Datums für die Sommer/Winter Zeitumstellung
Diese Daten können nur für die halbautomatischen cHA- und HA-Modi modifiziert werden.
1. Drücken Sie die Tasten "±1h" und "DAY" gleichzeitig.
2. Drücken Sie die Taste "±1h" zwei Mal.
3. Wählen Sie mittels der Taste "m+" entweder den cHA- oder HA-Modus aus.
4. Die Prozedur zur Modifikation des Datums entspricht der einen neuen Eingabe.
Deaktivierung der automatischen Sommer/Winter Zeitumstellung
Folgende Schritte müssen beachtet werden:
1. Drücken Sie die Tasten "±1h" und "DAY" gleichzeitig.

MRP2
6/7 50.0048.0200
2. Drücken Sie wiederholt die Taste "h+", bis "--" im Display erscheint (nach dem letzten Monatstag).
3. Die Schaltuhr kehrt nach drücken der Taste
“” in den normalen Betriebszustand zurück.
Die automatische Sommer/Winter Zeitumstellung (AU) kann jederzeit aktiviert werden, indem Sie die Taste "±1h" drücken oder indem
Sie, wie in den vorigen Absätzen beschrieben wird, neue Daten eingeben.
Zufallsprogramm (RND)
Dieses Programm verursacht zufällige EIN- und AUS-Schaltbefehle, die in Zusammenarbeit mit Lampen als Abschreckung gegen
Diebstahl genutzt werden können. Das Zufallsprogramm kann jederzeit manuell auf EIN "
" oder AUS "O" geschaltet werden.
Zwei verschiedene Zufalls-Betriebsmodi sind möglich:
a) Ohne Zuweisung der aktiven Uhrzeiten
Die Schaltzeiten des Zufallsprogramms bewegen sich zwischen der Mindeszeit 5 min. und der maximalen Schaltzeit 60 min. (für
EIN-Perioden) oder 30 min. (für AUS-Perioden).
b) Mit zugewiesenen aktiven Uhrzeiten
Die Beginn- und Endzeiten des Zufallsprogramms können für die RND-Funktion frei zugewiesen werden. Dabei gelten auch die in
dem vorigem Absatz beschriebenen Schaltzeiten. Die angeschlossenen Lampen schalten nur in dem definiertem Zeitintervall
zufällig ein und aus.
Die im Absatz "Programmierung der Schaltbefehle
" beschriebene Prozedur für die Eingabe der Schaltbefehle gilt genauso, um die
Beginn- und Endzeiten des Zufallsprogramms einzugeben. Drücken Sie nach Eingabe des Tages, der Stunde, der Minute und des
Kanals die "RND" Taste.
ACHTUNG: Der Schalter des Kanals kann nach Beendigung des Zufallsprogramms entweder im EIN- oder AUS-Zustand sein. Es ist
deshalb empfehlenswert, einen zusätzlichen Befehl zu programmieren, damit die angeschlossenen Geräte nach der Beendigung des
Zufallsprogramms immer in einem bekanntem Zustand bleiben.
Urlaubsprogramm
Die Schaltuhr kann programmiert werden, um während des als Urlaub definierten Zeitintervalls andere Befehle auszuführen. Folgende
Punkte sind zu beachten:
a) Das Urlaubsprogramm hat eine höhere Priorität als das normale Programm.
b) Die für das Urlaubsprogramm eingegebenen Schaltbefehle gelten stets für alle Wochentage.
c) Das Urlaubsprogramm ist nur aktiv, wenn die Dauer der Urlaubszeit (zwischen 1 und 99 Tage) definiert wurde, oder
diese als unbegrenzt bestimmt wurde.
d) Das Urlaubsprogramm kann entweder im aktuellen Tag oder innerhalb einer der nächsten 6 Tage gestartet werden.
Die im Absatz "Programmierung der Schaltbefehle
" beschriebene Prozedur für die Eingabe der Schaltbefehle gilt genauso, um die für
die Urlaubszeit gültigen EIN- und AUS-Befehle einzugeben. Drücken Sie nach Eingabe des Tages, der Stunde, der Minute und des
Kanals die " " Taste.
Programmierung des Beginns und der Dauer der Urlaubszeit
Nach Eingabe der während der Urlaubszeit auszuführenden Schaltbefehle, wie im vorigem Abschnitt beschrieben wird, müssen das
Datum des Beginns und die Dauer der Urlaubszeit eingegeben werden. Dazu ist es unbedingt notwendig, die
“” Taste zu drücken,
damit das Display die aktuelle Uhrzeit angibt.

MRP2
50.0048.02.00 7/7
Folgende Schritte sind zu beachten:
a) Programmierung eines unbegrenzten Urlaubs
1. Drücken Sie die Taste mit dem " " Symbol: Der Cursor unter dem aktuellen Tag blinkt.
2. Drücken Sie einmal die Taste
“” .Die Programmierung eines unbegrenzten Urlaubs ist beschlossen.
b) Programmierung eines Urlaubs mit definierter Dauer
Wenn das Urlaubsprogramm im aktuellen Tag beginnen soll
1. Geben Sie mittels der Taste "Sel" die Dauer des Urlaubs in Tagen ein. Wenn Sie die Taste länger als 2 Sekunden gedrückt
halten, zählen die Nummern schnell vorwärts. Die maximale Dauer ist 99 Tage.
2. Drücken Sie einmal die Taste
“” . Die Daten sind gespeichert und das Urlaubsprogramm beginnt.
Wenn das Urlaubsprogramm innerhalb einer der nächsten 6 Tage starten soll (ab dem aktuellen Tag)
1. Wählen sie mittels der Taste "DAY" den Wochentag aus, in dem das Urlaubsprogramm starten soll, bevor sie die Dauer
des Urlaubs, wie in dem vorigem Abschnitt beschrieben wird, eingeben.
2. Drücken Sie einmal die Taste
“” . Die Daten sind gespeichert und das Urlaubsprogramm beginnt.
Abbrechen des Urlaubsprogramms
Wenn das Urlaubsprogramm bereits in Gang ist, kann es mittels einmaliges drücken der Taste " " abgebrochen werden. Die Schaltuhr
kehrt in das normale Schaltprogramm zurück.
Falls der Beginn der Urlaubszeit für einen der folgenden Tage programmiert wurde, drücken Sie die Taste " " zwei Mal, um in das
normale Schaltprogramm zurückzukehren.
TECHNISCHE DATEN
Ganggenauigkeit +/- 4 min/Jahr
Gangreserve bei Netzausfall 2 Wochen
Schaltbefehle 42
Schaltleistung 250VAC / 16A max.
kürzester Schaltabstand 1 min
Strombedarf 4VA
Umgebungstemperatur -28°C / +60°C
-
 1
1
-
 2
2
-
 3
3
-
 4
4
-
 5
5
-
 6
6
-
 7
7
-
 8
8
-
 9
9
-
 10
10
-
 11
11
-
 12
12
-
 13
13
-
 14
14
-
 15
15
-
 16
16
-
 17
17
-
 18
18
-
 19
19
-
 20
20
-
 21
21
-
 22
22
-
 23
23
-
 24
24
-
 25
25
-
 26
26
-
 27
27
-
 28
28
-
 29
29
-
 30
30
-
 31
31


en otros idiomas
- français: Ecler MRP2 Manuel utilisateur
- English: Ecler MRP2 User manual
- Deutsch: Ecler MRP2 Benutzerhandbuch
Artículos relacionados
Otros documentos
-
Optimus Z-53 Manual de usuario
-
Xavax 00111909 El manual del propietario
-
Panasonic CZ-02RT11P El manual del propietario
-
Uponor I-35 Manual de usuario
-
KPS KPS-IH-DIGI1MEMORY El manual del propietario
-
Orbis MODUL LOG Manual de usuario
-
Hama 00047677 El manual del propietario
-
Intermatic talentosmartC25 Manual de usuario
-
 Rointe Palaos Radiator ES, PT, FR, EN v4 El manual del propietario
-
Brennenstuhl Primera-Line Digital Weekly Timer DT Especificación
