
ESPAÑOL
Ventilador de pie 16”
INSTRUCCIONES
Por favor lea estas instrucciones antes de usar el producto
INSTRUCCIONES GENERA LES DE SEGURIDAD
Lea detenidamente este manual de instrucciones antes de utilizar el aparato
por primera vez.
1. Para evitar el riesgo de descargas eléctricas, no sumerja el cable, el
enchufe ni cualquier parte de esta unidad en agua u otros líquidos.
2. Es necesario vigilar de cerca la unidad cuando se utiliza cerca de niños.
3. Desenchufe la unidad de la fuente de alimentación cuando no la vaya a
utilizar y antes de limpiarla.
4. No lo utilice si el cable o el enchufe están dañado, o después de que
haya presentado mal funcionamiento, se haya caído o presente algún
tipo de daño. Lleve la unidad al servicio técnico autorizado más cercano
para que lo examinen, reparen o ajusten, según sea necesario.
5. El uso de accesorios no recomendados por el fabricante puede causar
lesiones a las personas.
6. Conecte siempre el enchufe a la unidad y después a la fuente de
alimentación. Para desconectar, coloque los controles en posición
"apagado" y desenchufe la unidad de la fuente de alimentación.
7. No utilice la unidad para ningún fin que no sea el previsto.
8. Nunca utilice la unidad con el cable de alimentación dañado. Si se daña
el cable de alimentación, debe ser sustituido por el fabricante o su
agente de servicio o una persona igualmente calificada para evitar un
peligro.
9. No intente reparar la unidad por su cuenta. Póngase en contacto con
nuestro servicio técnico para que le cambien o le reparen la unidad.
Los aparatos de ventilación no deben ser utilizados por niños o
personas con capacidades físicas, sensoriales o mentales
reducidas, o con falta de experiencia y conocimientos, a menos que

hayan recibido instrucciones o supervisión por parte de un adulto
responsable.
Los menores de 8 años y las personas con capacidades físicas,
sensoriales o mentales reducidas, o las personas sin experiencia o
conocimientos no deberán utilizar la unidad sin supervisión de un
adulto ni sin haber recibido las instrucciones apropiadas con
respecto al uso de la unidad y deben de entender los riesgos
implícitos a la utilización de este. No deje que los niños jueguen
con la unidad. Los niños no deben limpiar ni realizar tareas de
mantenimiento sin la supervisión de un adulto y siempre y cuando
tengan más de 8 años.
Mantenga el aparato y el cable fuera del alcance de los niños.
No introduzca los dedos ni ningún otro elemento a través de la rejilla
protectora mientras el ventilador se encuentra funcionando ya que las aspas
podrían causarle daños severos.
CONSERVE ESTAS INSTRUCCIONES.

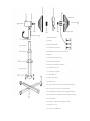
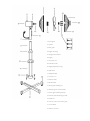
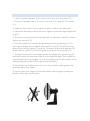
1. Rejilla frontal
2. Aspas
3. Rejilla posterior
4. Carcasa del motor
5. Perilla de control de oscilación
6. Motor
7. Tornillo de ajuste ‘‘B’’
8. Tubo de extensión
9. Anillo de ajuste de altura
10. Tapa cubre pie
11. Tubo de soporte
12. Tornillos ‘‘A’’
13. Eje del motor
14. Botonera
15. Tuerca de sujeción de la rejilla posterior
16. Tuerca de sujeción de las Aspas
17. Grampas de sujeción de la grilla frontal
18. Tornillos de sujeción de la platina central
19. Arandelas
20. Platina central de la grilla frontal
21. Base en cruz
22. Punteros plásticos

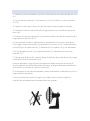
INSTRUCCIONES DE MONTAJE
1. Inserte los punteros plásticos (22) en el extremo de los caños del pie en cruz
(21).
2. Fije el tubo de soporte (11) a la base en cruz (21) utilizan- do los 4 tornillos
‘‘A’’ (12).
3. Inserte el cubre pie (10) por el tubo de soporte hasta la parte más baja.
4. Extienda el tubo de extensión (8) y luego ajústelo con el anillo de ajuste de
altura (9).
5. Coloque el conjunto del motor y la botonera sobre el tubo de extensión (8) y
luego ajuste el tornillo ‘‘B’’ (7).
6. Para finalizar instale la rejilla posterior ajustándola con la tuerca de ajuste
(15), luego coloque las aspas (2) y ajústelas con la tuerca (16). Instale la platina
central (20) en la rejilla frontal (1) utilizando los 3 tornillos (18) y sus arandelas
(19). Fije la rejilla frontal (1) a la rejilla posterior (3) utilizando los cierres de
sujeción (17).
7. Para ajustar la dirección y altura, afloje el anillo de ajuste de altura (9) y luego
extienda el tubo de extensión (8) a
la altura deseada. Luego ajuste nuevamente el anillo de ajuste de altura (9).
Puede también ajustar la inclinación del motor al ángulo deseado mediante la
articulación que posee el conjunto del motor.
8. Si las aspas se sacuden demasiado, intente orientarlas, rotándolas un poco y
luego vuelva a ajustarlas.
9. No introduzca los dedos o ningún otro objeto dentro de las rejillas, la
rotación de las aspas podría causarle lesiones severas.

MANTENIMIENTO Y LIMPIEZA
Antes de limpiar, desconecte el aparato de la corriente. Quita el protector
delantero. Use un paño húmedo. Por favor, no golpee las aspas ni altere sus
ángulos.
DATOS TÉCNICOS
220-240V 40W 50HZ
NORMAS DE PROTECCIÓN DEL ME DIO AMBIENTE
Este aparato no se debe desechar con los residuos domésticos
cuando finalice su durabilidad, sino que se debe ofrecer a un centro
de reciclaje de aparatos eléctricos y electrónicos domésticos. Este
símbolo en el aparato, manual de instrucciones y embalaje le avisa de este
aspecto importante. Los materiales utilizados en este aparato se pueden
reciclar. Mediante el reciclaje de electrodomésticos, usted contribuye a
fomentar la protección del medioambiente. Consulte a sus autoridades locales
para obtener información acerca del punto de recogida.

ENGLISH
16” Stand fan
INSTRUCTION
Before using, please read the instruction carefully.
GENERAL SAFETY INSRTUCTIONS
Read this instruction manual very carefully before operating the fan for the first
time
1. To protect against electric shock do not immerse cord, plugs, or in water or
other liquid.
2. Close supervision is necessary when any fan is used by or near children.
3. Unplug from outlet when not in use and before cleaning. Allow to cool
before putting on or taking off parts, and before cleaning the fan.
4. Do not operate any fan with a damaged cord or plug or after the appliance
malfunctions, or has been damaged in any manner. Return appliance to
the nearest authorized service facility for examination, repair or
adjustment.
5. The use of accessory attachments not recommended by the manufacturer
may cause injuries.
6. Always attach plug to appliance first, then plug cord into the wall outlet. To
disconnect, turn any control to “off”, then remove plug from wall outlet
7. Do not use appliance for other than intended use
8. Never use the fan if the supply cord is damaged, it must be replaced by the
manufacturer, its service agent or similarly persons in order to avoid a
hazard.
9. Do not try to repair the fan on your own. Always contact our service agent
to repaired or changed appliance
The fan not to be used by children or persons with reduced

physical, sensory or mental capabilities, or lack of experience and
knowledge, unless they have been given supervision or instruction
This fan can be used by children aged from 8 years and above and
persons with reduced physical, sensory or mental capabilities or
lack of experience and knowledge if they have been given
supervision or instruction concerning use of the appliance in a safe
way and understand the hazards involved. Children shall not play
with the appliance. Cleaning and user maintenance shall not be
made by children unless they are old than 8 and supervised.
Keep the fan and its cord out of reach of children less than 8 years.
Dot not touch the blades with hand or hard object before the fan comes to a
standstill, in case of accidents happen.
SAVE THIS INSTRUCTIONS.

1. Front grille
2. Quotes
3. Rear grille
4. Engine housing
5. Swing Control Knob
6. Engine
7. Set screw ‘’ B ‘’
8. Extension tube
9. Height adjustment ring
10.Cap cover
11.Support tube
12. Screws ‘’ A ‘’
13. Motor shaft
14. Buttonhole
15. Rear grille holding nut
16. Retaining nut of the blades
17. Front grille holding clamps
18. Center plate fastening screws
19. Washers
20. Center plate of the front grille
21. Cross Base
22. Plastic pointers

ASSEMBLY INSTRUCTIONS
1. Insert the plastic pointers (22) into the end of the cross foot pipes (21).
2. Secure the support tube (11) to the cross base (21) using the 4 “A” screws
(12).
3. Insert the foot cover (10) through the support tube to the lowest part.
4. Extend the extension tube (8) and then tighten it with the height adjustment
ring (9).
5. Place the motor and button assembly over the extension tube (8), and then
tighten the screw “B” (7).
6. To finish, install the rear grille by tightening it with the adjusting nut (15),
then set the blades (2) and tighten them with the nut (16). Install the center
plate (20) on the front grille (1) using the 3 screws (18) and their washers (19).
Attach the front grille (1) to the rear grille (3) using the securing clips (17).
7. To adjust the direction and height, loosen the height ad- justment ring (9)
and then extend the extension tube (8) to the desired height. Then adjust the
height adjustment ring (9) again. You can also adjust the tilt of the motor to the
desired angle by means of the hinged motor assembly.
8. If the blades are shaken too much, try to orient them, rotating them a bit,
and then adjust them again.
9. Do not insert your fingers or any other object into the grids, rotating the
blades could cause severe injury.

CLEANING AND MAINTENACE
Before cleaning disconect from power. Take off the front guard Blade. Use soft
cloth earse oil stains. Please do not bump the Blade or alter their angles.
TECHNICAL DATA:
220-240V 40W 50Hz
IDELINES FOR PROTECTION OF THE ENVIRONME NT
This appliance should not be put into the domestic garbage at the
end of its durability, but must be offered at a central point for the
recycling of electric and electronic domestic appliances. This symbol
on the appliance, instruction manual and packaging puts your
attention to this important issue.
The materials used in this appliance can be recycled. By recycling of used
domestic appliances you contribute an important push to the protection of our
environment. Ask your local authorities for information regarding the point of
recollection.
-
 1
1
-
 2
2
-
 3
3
-
 4
4
-
 5
5
-
 6
6
-
 7
7
-
 8
8
-
 9
9
-
 10
10


Svan SVVE16P4 El manual del propietario
- Tipo
- El manual del propietario
- Este manual también es adecuado para
en otros idiomas
- English: Svan SVVE16P4 Owner's manual
Otros documentos
-
 Star Max STFFS45-3DF El manual del propietario
-
BLACK+DECKER BFSD116B Manual de usuario
-
 Cozy Breeze FS45-A1Z Guía de instalación
-
 Pelonis FS45-3ER El manual del propietario
-
Aigostar 8433325184926 Manual de usuario
-
Orbegozo SF 0246 El manual del propietario
-
-
-
 Inventor FS405B Floor Standing Fan 50W Manual de usuario
-
Domo DO8147 El manual del propietario


