Panasonic SBM01 Instrucciones de operación
- Categoría
- Altavoces
- Tipo
- Instrucciones de operación
La página se está cargando...

2
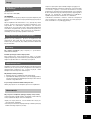
Accessories
Accesorios
Accessoires
Tillbehör
Zubehör
Accessori
Accessoires
Tilbehør
Příslušenství
Принадлежности
Wyposażenie
Dear customer
Thank you for purchasing this product.
For optimum performance and safety, please read these instructions
carefully.
Marking sign is located on bottom of the unit.
Please check and identify the supplied accessories.
Use numbers indicated in parentheses when asking for replacement
parts
Contents
Characteristics .............................................................................. 4
Location ......................................................................................... 4
Attaching the aluminum stand..................................................... 6
Connections .................................................................................. 6
Notes .............................................................................................. 8
Maintenance .................................................................................. 8
Technical specifications ............................................................. 22
Estimado cliente
Muchísimas gracias por haber adquirido este aparato.
Lea con atención estas instrucciones para obtener las máximas
prestaciones y seguridad.
La marca de seguridad se encuentra en la parte inferior de la
unidad.
Verifique e identifique los accesorios suministrados.
Índice
Características .............................................................................. 4
Ubicación ....................................................................................... 4
Colocación de la base de aluminio ............................................. 6
Conexiones .................................................................................... 6
Notas .............................................................................................. 8
Mantenimiento ............................................................................... 8
Especificaciones técnicas ......................................................... 22
Cher client
Nous vous remercions pour votre achat de cet appareil.
Pour en obtenir des performances idéales et pour votre sécurité,
veuillez lire attentivement le présent manuel.
Le symbole d’avertissement se trouve sur le fond de l’appareil.
Cocher les accessoires pour vérifier qu’ils sont bien tous dans
l’emballage.
Table des matières
Caractéristiques ............................................................................ 5
Positionnement ............................................................................. 5
Fixation du support en aluminium .............................................. 7
Raccordements ............................................................................. 7
Remarques..................................................................................... 9
Entretien ........................................................................................ 9
Données techniques ................................................................... 22
Kära kund
Tack för valet av denna apparat.
Läs lgenom bruksanvisningen noga för bästa resultat och för säkerhets
skull.
Kontrollera och identifiera de medföljande tillbehören.
Innehåll
Karaktäristik .................................................................................. 5
Placering ........................................................................................ 5
Att fästa aluminumstället ............................................................. 7
Anslutningar .................................................................................. 7
Anmärkningar ................................................................................ 9
Underhåll ....................................................................................... 9
Tekniska data .............................................................................. 22
Sehr geehrter Kunde
Wir möchten Ihnen dafür danken, daß Sie sich für diese Anlage
entschieden haben.
Für optimale Leistung und Sicherheit lesen Sie bitte diese Bedie-
nungsanleitung aufmerksam durch.
Bitte das mitgelieferte Zubehör auf Vollständigkeit überprüfen.
Inhalt
Merkmale ..................................................................................... 10
Aufstellung .................................................................................. 10
Anbringen des Aluminiumständers .......................................... 12
Anschlüsse .................................................................................. 12
Hinweise ...................................................................................... 14
Pflege und Instandhaltung ......................................................... 14
Technische Daten........................................................................ 22
Caro cliente
La ringraziamo dell’acquisto di questo prodotto.
Per ottenerne le prestazioni migliori e per la sua sicurezza, legga
attentamente queste istruzioni.
Verificare e identificare gli accessori in dotazione.
Sommario
Caratteristiche ............................................................................. 10
Collocazione ................................................................................ 10
Modo di attaccare il supporto in alluminio ............................... 12
Connessioni ................................................................................ 12
Note .............................................................................................. 14
Manutenzione .............................................................................. 14
Dati tecnici ................................................................................... 22
Märkskylten är placerad på apparatens undersida.
Das Markierungszeichen befindet sich an der Unterseite des
Produkts.
Il marchio di avvertimento si trova sul pannello inferiore
dell’apparecchio.
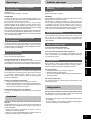
(RFA1138-S) (RGG0157-N)
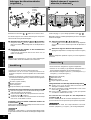
Aluminium stand ............... 2 Insulator cap ....................... 4
Base de aluminio .............. 2 Tapa de aislador ................. 4
Support en aluminium ...... 2 Capuchon isolant ............... 4
Aluminiumställ .................. 2 Hatt för isoleringsfot ........... 4
Aluminiumständer ............. 2 Isolatorkappe ...................... 4
Supporto in alluminio ........ 2 Tappo isolante .................... 4
Aluminiumstaander ........... 2 Isolatorkap .......................... 4
Aluminiumsfod .................. 2 Spike-underlag ................... 4
Hliníkové šasi .................... 2 Tlumicí průchodky .............. 4
Алюминиевая подставка 2
Колпачок изолятора ......... 4
Stojak aluminiowy............. 2 Nakładka izolacyjna ........... 4
La página se está cargando...

4
ENGLISH
ESPAÑOL FRANÇAIS
SVENSKA
Characteristics
Small diameter (8 cm), long stroke unit
•Low stiffness enables a minimum resonance of 80 Hz.
•High linearity enables music input of 100 W.
•Powerful magnetic circuits enable control of vibration even at
high amplitude levels.
Bass sounds are produced clearly at both high and low power.
High performance dome tweeter
The magnet is made from high flux, low distortion neodymium.
Greater clarity of high frequency sounds is achieved.
High grade network
The high-grade electrolytic condensers use non-etched aluminum
boxes and OFC cords.
Current loss is reduced enabling faithful playback.
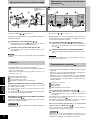
Location
In order to obtain the best acoustic effects possible, we suggest that
you follow the guidelines below as closely as possible.
Place the speaker on a flat, level and secure base.
Face the rear of the speaker toward a wide, solid wall sur-
face.
There is a bass reflex on the rear of the speaker, so place the speaker
so that there is a space of approximately 5 cm between it and the
wall.
Hang a thick curtain or similar material on the wall to-
ward which the speaker is facing.
If the surface facing the speaker is a solid wall or window, hanging a
curtain will prevent sound reflection or resonance from occurring.
Don’t place the speaker too close to a record player.
The speaker may cause the record player to vibrate or howling (a
high-pitched whining sound) may occur. This can be prevented by
keeping sufficient distance between the speaker and the record player,
or by placing some felt underneath the record player.
If color irregularities appear in TV pictures, move the
speaker further away from the TV.
This unit is designed so that it should not cause irregular coloring in
TVs, but it may occur with some types of TVs. If it does occur, switch
the TV off for 15 to 30 minutes. The TV’s demagnetizing function should
correct the problem. If the problem persists, move the speakers further
away from the TV.
Note that a magnetic object near the speakers can cause irregular
coloring in the TV due to the interaction between the speakers and
the object.
Placement notes
Avoid locations such as described below.
•In direct sunlight
•Near heating appliances or other sources of heat
•Where the humidity is high
Características
Unidad de diámetro pequeño (8 cm) y carrera larga
•La baja rigidez permite una resonancia mínima de 80 Hz.
•La alta linealidad permite una entrada musical de 100 W.
•Los potentes circuitos magnéticos permiten controlar la
vibración incluso con altos niveles de amplitud.
Los sonidos graves se producen claramente con potencia alta y baja.
Altavoz de agudos de domo de alto rendimiento
El imán es de neodimio, de flujo alto y distorsión baja.
Se logran sonidos de alta frecuencia mucho más claros.
Red de alta calidad
Los condensadores electrolíticos de alta calidad utilizan cajas
de aluminio sin grabar y cables libres de óxido.
La pérdida de corriente ha sido reducida y la reproducción resulta
más fiel.
Ubicación
Para obtener el mejor efecto acústico posible, sugerimos que se sigan
las instrucciones indicadas a continuación.
Colocar el altavoz en un lugar plano, nivelado y seguro.
La parte trasera del altavoz debe quedar hacia una pared
grande y sólida.
En la parte trasera del altavoz existe un altavoz de reflejo de graves,
por lo tanto se debe dejar una separación de 5 cm aproximadamente
entre el altavoz y la pared.
Colgar una cortina gruesa o un material similar en la pared
hacia la que mira el altavoz.
Si la superficie hacia la que mira el altavoz es una pared sólida o una
ventana, colgando una cortina se impedirán las reflexiones del sonido
o la resonancia.
No colocar el altavoz muy cerca de un tocadiscos.
El altavoz puede hacer que el tocadiscos vibre o produzca aullidos
(un sonido de alta frecuencia). Se debe evitar esto manteniendo
suficiente distancia entre el altavoz y el tocadiscos, o colocando un
paño de fieltro debajo del tocadiscos.
Si el altavoz produce irregularidades en los colores del
televisor, alejarlo del televisor.
Este aparato ha sido diseñado para que no cause colores irregulares
en la imagen de los televisores, pero es posible que éstos ocurran
con algunos tipos de televisor. En este caso, apague el televisor
durante un periodo de 15 a 30 minutos. La función de desmagneti-
zación del televisor deberá corregir el problema. Si éste persiste,
separe más los altavoces del televisor.
Tenga en cuenta que un objeto magnético cerca de los altavoces
puede causar colores irregulares en la imagen del televisor debido a
la interacción entre los altavoces y el objeto.
Notas respecto a la ubicación
Evitar ubicaciones como las indicadas a continuación.
•Expuesto a los rayos solares
•Próximo a dispositivos de calefacción y otras fuentes de calor
•Donde la humedad sea excesiva
La página se está cargando...

6
ENGLISH
ESPAÑOL FRANÇAIS
SVENSKA
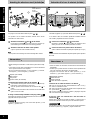
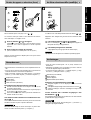
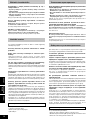
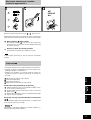
Attaching the aluminum stand (included)
See pages 2 and 3 for details about the parts ( – ).
The speakers will sit steadier and better acoustic effects will be
achieved if the stand is fitted.
Attach the insulators ( and ) to the stand.
Do not attach insulator if you want to face the speakers up-
ward and bring the sound closer to the listening position.
Attach the stand to the base of the speaker.
(Lay the speaker on cloth to avoid scratches.)
Lift the speaker when moving it to avoid scratching floor surfaces.
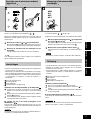
Connections
•Before making the connections, switch OFF the power to the ampli-
fier.
•Check that a speaker with an impedance of 6 Ω can be connected
to the speaker terminals of the amplifier.
•Be sure to connect only positive (+) wires to positive (+) terminals,
and negative (–) wires to negative (–) terminals.
Amplifier (not included)
Right speaker
Left speaker
Speaker cables (not included)
Connecting the speaker cable to the speaker
Strip the outer covering from end of the cable to a length of ap-
proximately 15 mm and twist the center wire.
Turn the speaker terminal knob to the left until the hole ( ) is
visible.
Insert the center wire into the hole, and then turn the knob to the
right to secure the cable.
If using a commercially-available 4-mm plug cable ( )
Fully tighten the speaker terminal knob, and then insert the end of the
plug cable into the top of the knob.
CAUTION
E
To prevent damage to circuitry, never short-circuit positive (+) and
negative (–) speaker wires.
Colocación de la base de aluminio (incluida)
Consultar las páginas 2 y 3 para tener detalles de las piezas ( – ).
Si se coloca la base, los altavoces quedarán instalados de forma
más estable y mejorarán los efectos acústicos.
Colocar los aisladores ( y ) en la base.
No ponga el aislador si desea colocar los altavoces hacia
arriba y acercar más el sonido la posición de escucha.
Colocar la base en la parte inferior del altavoz.
(Poner el altavoz encima de un paño para impedir que se raye.)
Nota
Levantar el altavoz al trasladarlo de sitio para impedir rayar la superficie
del suelo.
Conexiones
•Antes de realizar las conexiones, desconectar la alimentación del
amplificador.
•Verificar que se puede conectar un altavoz de una impedancia de
6 Ω en los terminales de altavoces del amplificador.
•Asegurarse de conectar sólo los cables positivos (+) en los
terminales (+) y los cables negativos (–) en los terminales (–).
Amplificador (opcional)
Altavoz derecho
Altavoz izquierdo
Cables de altavoces (opcional)
Conexión de un cable de altavoz a un altavoz
Pelar el extremo del cable aproximadamente unos 15 mm y
retorcer el conductor central.
Girar la perilla del terminal del altavoz hacia la izquierda hasta
que el orificio ( ) quede a la vista.
Insertar el conductor central en el orificio, y luego girar la perilla
hacia la derecha para asegurarlo.
Si usa un cable con enchufe de 4 mm de venta en
comercios ( )
Apretar bien la perilla del terminal del altavoz, y luego insertar el
extremo del cable con enchufe en la parte de arriba de la perilla.
PRECAUCIÓN
E
Para no dañar el circuito, nunca se debe permitir que los conductores
de altavoces positivo (+) y negativo (–) hagan cortocircuito.
R
L
A
B
R L
Front
Parte delantera
Avant
Framsida
La página se está cargando...

8
ENGLISH
ESPAÑOL FRANÇAIS
SVENSKA
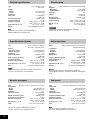
Notes
Speaker impedance and allowed input
Impedance: 6 Ω
Input power: 50 W (DIN)
CAUTION
The only receivers or amplifiers you should connect to these speakers
are those whose rated output does not exceed the above figures.
Using a receiver or amp with higher ratings than listed above can
cause abnormal sounds to occur because of excessive input, damage
to the receiver or speakers, and fire. If equipment is damaged in any
way or unexpected trouble occurs during playback, unplug the system
from its outlet and call a serviceman for help.
Notes with regard to excessive input
Be sure to reduce the volume on the receiver (or amplifier) when the
signal input exceeds the rated allowable input to avoid damage to
circuitry or other malfunctions.
Other notes
Do not touch the diaphragms.
To do so might cause distortion.
Keep magnetized items away
Magnetized cards, bank cards, commuter passes, etc., can be
damaged if allowed too near speaker magnets. Clocks may also be
effected.
Protection circuitry
This unit incorporates speaker protection circuitry to protect the
speaker from damage caused by excessive input or abnormal
signals; when excess input is detected, input is automatically
interrupted.
If sound is interrupted...
1. Reduce the volume of the receiver (or amplifier).
2. Check the sound source and connections for any problems.
If there is no problem, the protection circuitry will reset in a few
minutes.
After the protection circuit is reset...
Take care not to increase the receiver’s volume too high.
Maintenance
To clean this unit, wipe with a soft, dry cloth.
If the surfaces are extremely dirty, use a soft cloth dipped in a soap-
and-water solution or a weak detergent solution.
•Never use alcohol, paint thinner, or benzine to clean this unit.
•Before using chemically impregnated cloth, read the instructions
that came with the cloth carefully.
Notas
Impedancia del altavoz y potencia de entrada
permitida
Impedancia: 6 Ω
Potencia de entrada: 50 W (DIN)
ADVERTENCIA
Los únicos receptores o amplificadores que Ud. deberá conectar a
estos altavoces son aquellos cuya salida nominal no exceda las cifras
de arriba.
Al usar un receptor o un amplificador con características nominales
superiores a las indicadas arriba se pueden producir ruidos anormales
debido a la entrada excesiva, el receptor o los altavoces se pueden
estropear, y además se puede producir un incendio. Si el equipo es
dañado de alguna manera o un problema inespera-do ocurre durante
la reproducción, desenchufe el sistema y llame a su distribuidor para
que envíen una persona que le ayude.
Notas con respecto a una entrada excesiva
Asegurarse de reducir el volumen del receptor (o amplificador) cuando
la señal de entrada exceda la entrada nominal permitida para evitar
dañar la circuitería u otras fallas.
Otras notas
No tocar los diafragmas, de lo contrario se ocasionarán distorsiones.
Alejamiento de objetos magnetizados
Las tarjetas magnetizadas, las tarjetas de bancos, los pases de
viajeros, etc., pueden estropearse si se dejan demasiado cerca de
los imanes de los altavoces. Los relojes también pueden ser afectados.
Circuitería de protección
Este aparato incorpora una circuitería de protección de altavoces para
proteger el altavoz de daños causados por una entrada excesiva o
señales anormales; cuando una entrada excesiva es detectada, la
entrada es automáticamente interrumpida.
Si el sonido se interrumpe...
1. Reducir el volumen del receptor (o amplificador).
2. Verificar si hay problemas en la fuente de sonido y las conexiones.
Si no hay problemas, la circuitería de protección se reajustará en
unos pocos minutos.
Después de que el circuito de protección sea reajustado...
Cuidarse de no incrementar demasiado el volumen del receptor.
Mantenimiento
Utilizar un paño suave y seco para limplar este aparato.
Si las superficies están extremadamente sucias, utilizar un paño suave
humedecido en una solución de agua y jabón o en una solución de
detergente suave.
•Para limpiar este aparato no utilizar nunca alcohol, diluyente de
pintura o bencina.
•Antes de utilizar un paño impregnado químicamente, leer con
atención las instrucciones suministradas con él.
La página se está cargando...
La página se está cargando...
La página se está cargando...
La página se está cargando...
La página se está cargando...
La página se está cargando...
La página se está cargando...
La página se está cargando...
La página se está cargando...
La página se está cargando...
La página se está cargando...
La página se está cargando...
La página se está cargando...

22
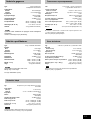
Technical specifications
Type 2 way, 2 speaker system
Bass-reflex
Speaker
Woofer 8 cm cone type
Tweeter 2.5 cm dome type
Impedance 6 Ω
Input power 100 W (Music)
50 W (DIN)
Sound pressure level 79 dB/W (1.0 m)
Crossover frequency 2.5 kHz
Frequency response 58 Hz – 40 kHz (at –16 dB)
68 Hz – 36 kHz (at –10 dB)
Dimensions (W × H × D) 136 × 223.5 × 213 mm
Weight 3.0 kg (Excluding accessories)
Specifications are subject to change without notice.
Weight and dimensions are approximate.
Tekniska data
Typ 2-vägs 2-högtalarsystem med basreflexhögtalare
Högtalare
Baselement 8 cm, kontyp
Diskantelement 2,5 cm, domtyp
Impedans 6 Ω
Ineffekt 100 W (musik)
50 W (DIN)
Ljudtrycksnivå 79 dB/W (1,0 m)
Övergångsfrekvens 2,5 kHz
Frekvensomfång 58 Hz – 40 kHz (vid –16 dB)
68 Hz – 36 kHz (vid –10 dB)
Mått (B × H × D) 136 × 223,5 × 213 mm
Vikt 3,0 kg (utan tillbehör)
Observera
Tekniska data kan ändras utan föregående meddelande.
Angivna mått och vikter är ungefärliga.
Especificaciones técnicas
Tipo 2 vías, sistema de 2 altavoces
Bass-reflex (reflejo de graves)
Altavoz
Altavoz de graves 8 cm tipo de cono
Altavoz de agudos 2,5 cm tipo de domo
Impedancia 6 Ω
Potencia de entrada 100 W (Musicales)
50 W (DIN)
Nivel de presión de sonido 79 dB/W (1,0 m)
Frecuencia de cruce 2,5 kHz
Respuesta de frecuencia 58 Hz – 40 kHz (a –16 dB)
68 Hz – 36 kHz (a –10 dB)
Dimensiones (An. × Al. × Prof.) 136 × 223,5 × 213 mm
Peso 3,0 kg (Excluyendo accesorios)
Nota
Las especificaciones están sujetas a cambios sin previo aviso.
Los pesos y las dimensiones son aproximados.
Données techniques
Type Enceinte à 2 voies, 2 haut-parleurs, bass-reflex
Haut-parleurs
Woofer Type cône de 8 cm
Tweeter Type dôme de 2,5 cm
Impédance 6 Ω
Puissance d’entrée 100 W (musique)
50 W (DIN)
Niveau de pression sonore 79 dB/W (1,0 m)
Fréquence de raccordement 2,5 kHz
Réponse en fréquence 58 Hz – 40 kHz (à –16 dB)
68 Hz – 36 kHz (à –10 dB)
Dimensions (L × H × P) 136 × 223,5 × 213 mm
Poids 3,0 kg (sans les accessoires)
Spécifications sujettes à modifications sans préavis.
Les poids et les dimensions sont approximatifs.
Technische Daten
Bauart 2-Weg-Lautsprechersystem, 2 Lautsprecher,
Baßreflex-Ausführung
Lautsprecher
Tieftöner 8-cm-Konustyp
Hochtöner 2,5-cm-Kalottentyp
Impedanz 6 Ω
Belastbarkeit 100 W (Musik)
50 W (DIN)
Ausgangsschalldruckpegel 79 dB/W (1,0 m)
Übernahmefrequenz 2,5 kHz
Frequenzgang 58 Hz bis 40 kHz (–16 dB)
68 Hz bis 36 kHz (–10 dB)
Abmessungen (B × H × T) 136 × 223,5 × 213 mm
Gewicht 3,0 kg (ausschließlich Zubehör)
Änderungen der technischen Daten jederzeit vorbehalten.
Die angegebenen Gewichts- und Abmessungsdaten sind ungefähre
Werte.
Dati tecnici
Tipo Sistema di 2 altoparlanti a 2 vie bass reflex
Altoparlante
Woofer Tipo a cono di 8 cm
Tweeter Tipo a cupola di 2,5 cm
Impedenza 6 Ω
Potenza di ingresso 100 W (Musica)
50 W (DIN)
Livello di pressione sonora 79 dB/W (1,0 m)
Frequenza d’incrocio 2,5 kHz
Risposta in frequenza 58 Hz – 40 kHz (a –16 dB)
68 Hz – 36 kHz (a –10 dB)
Dimensioni (L × A × P) 136 × 223,5 × 213 mm
Peso 3,0 kg (senza accessori)
Dati tecnici soggetti a modifiche senza avviso.
Il peso e le dimensioni indicati sono approssimativi.
La página se está cargando...
La página se está cargando...
Transcripción de documentos
Kära kund Dear customer Thank you for purchasing this product. For optimum performance and safety, please read these instructions carefully. Marking sign is located on bottom of the unit. Please check and identify the supplied accessories. Use numbers indicated in parentheses when asking for replacement parts Contents Characteristics .............................................................................. 4 Location ......................................................................................... 4 Attaching the aluminum stand ..................................................... 6 Connections .................................................................................. 6 Notes .............................................................................................. 8 Maintenance .................................................................................. 8 Technical specifications ............................................................. 22 Estimado cliente Märkskylten är placerad på apparatens undersida. Kontrollera och identifiera de medföljande tillbehören. Innehåll Karaktäristik .................................................................................. 5 Placering ........................................................................................ 5 Att fästa aluminumstället ............................................................. 7 Anslutningar .................................................................................. 7 Anmärkningar ................................................................................ 9 Underhåll ....................................................................................... 9 Tekniska data .............................................................................. 22 Sehr geehrter Kunde Muchísimas gracias por haber adquirido este aparato. Lea con atención estas instrucciones para obtener las máximas prestaciones y seguridad. La marca de seguridad se encuentra en la parte inferior de la unidad. Verifique e identifique los accesorios suministrados. Wir möchten Ihnen dafür danken, daß Sie sich für diese Anlage entschieden haben. Für optimale Leistung und Sicherheit lesen Sie bitte diese Bedienungsanleitung aufmerksam durch. Das Markierungszeichen befindet sich an der Unterseite des Produkts. Bitte das mitgelieferte Zubehör auf Vollständigkeit überprüfen. Índice Características .............................................................................. 4 Ubicación ....................................................................................... 4 Colocación de la base de aluminio ............................................. 6 Conexiones .................................................................................... 6 Notas .............................................................................................. 8 Mantenimiento ............................................................................... 8 Especificaciones técnicas ......................................................... 22 Cher client Inhalt Merkmale ..................................................................................... 10 Aufstellung .................................................................................. 10 Anbringen des Aluminiumständers .......................................... 12 Anschlüsse .................................................................................. 12 Hinweise ...................................................................................... 14 Pflege und Instandhaltung ......................................................... 14 Technische Daten ........................................................................ 22 Caro cliente Nous vous remercions pour votre achat de cet appareil. Pour en obtenir des performances idéales et pour votre sécurité, veuillez lire attentivement le présent manuel. Le symbole d’avertissement se trouve sur le fond de l’appareil. La ringraziamo dell’acquisto di questo prodotto. Per ottenerne le prestazioni migliori e per la sua sicurezza, legga attentamente queste istruzioni. Il marchio di avvertimento si trova sul pannello inferiore dell’apparecchio. Cocher les accessoires pour vérifier qu’ils sont bien tous dans l’emballage. Verificare e identificare gli accessori in dotazione. Table des matières Sommario Caractéristiques ............................................................................ 5 Positionnement ............................................................................. 5 Fixation du support en aluminium .............................................. 7 Raccordements ............................................................................. 7 Remarques ..................................................................................... 9 Entretien ........................................................................................ 9 Données techniques ................................................................... 22 Caratteristiche ............................................................................. 10 Collocazione ................................................................................ 10 Modo di attaccare il supporto in alluminio ............................... 12 Connessioni ................................................................................ 12 Note .............................................................................................. 14 Manutenzione .............................................................................. 14 Dati tecnici ................................................................................... 22 Accessories Accesorios Accessoires Tillbehör Zubehör Accessori Accessoires Tilbehør Příslušenství Принадлежности Wyposażenie 2 Tack för valet av denna apparat. Läs lgenom bruksanvisningen noga för bästa resultat och för säkerhets skull. (RFA1138-S) Aluminium stand ............... 2 Base de aluminio .............. 2 Support en aluminium ...... 2 Aluminiumställ .................. 2 Aluminiumständer ............. 2 Supporto in alluminio ........ 2 Aluminiumstaander ........... 2 Aluminiumsfod .................. 2 Hliníkové šasi .................... 2 Алюминиевая подставка 2 Stojak aluminiowy ............. 2 (RGG0157-N) Insulator cap ....................... 4 Tapa de aislador ................. 4 Capuchon isolant ............... 4 Hatt för isoleringsfot ........... 4 Isolatorkappe ...................... 4 Tappo isolante .................... 4 Isolatorkap .......................... 4 Spike-underlag ................... 4 Tlumicí průchodky .............. 4 Колпачок изолятора ......... 4 Nakładka izolacyjna ........... 4 Characteristics Características Unidad de diámetro pequeño (8 cm) y carrera larga ENGLISH •Low stiffness enables a minimum resonance of 80 Hz. •High linearity enables music input of 100 W. •Powerful magnetic circuits enable control of vibration even at high amplitude levels. Bass sounds are produced clearly at both high and low power. •La baja rigidez permite una resonancia mínima de 80 Hz. •La alta linealidad permite una entrada musical de 100 W. •Los potentes circuitos magnéticos permiten controlar la vibración incluso con altos niveles de amplitud. Los sonidos graves se producen claramente con potencia alta y baja. ESPAÑOL High performance dome tweeter Altavoz de agudos de domo de alto rendimiento The magnet is made from high flux, low distortion neodymium. Greater clarity of high frequency sounds is achieved. El imán es de neodimio, de flujo alto y distorsión baja. Se logran sonidos de alta frecuencia mucho más claros. High grade network Red de alta calidad The high-grade electrolytic condensers use non-etched aluminum boxes and OFC cords. Current loss is reduced enabling faithful playback. Los condensadores electrolíticos de alta calidad utilizan cajas de aluminio sin grabar y cables libres de óxido. La pérdida de corriente ha sido reducida y la reproducción resulta más fiel. FRANÇAIS Small diameter (8 cm), long stroke unit SVENSKA Location In order to obtain the best acoustic effects possible, we suggest that you follow the guidelines below as closely as possible. Ubicación Para obtener el mejor efecto acústico posible, sugerimos que se sigan las instrucciones indicadas a continuación. Place the speaker on a flat, level and secure base. Colocar el altavoz en un lugar plano, nivelado y seguro. Face the rear of the speaker toward a wide, solid wall surface. There is a bass reflex on the rear of the speaker, so place the speaker so that there is a space of approximately 5 cm between it and the wall. Hang a thick curtain or similar material on the wall toward which the speaker is facing. If the surface facing the speaker is a solid wall or window, hanging a curtain will prevent sound reflection or resonance from occurring. Don’t place the speaker too close to a record player. The speaker may cause the record player to vibrate or howling (a high-pitched whining sound) may occur. This can be prevented by keeping sufficient distance between the speaker and the record player, or by placing some felt underneath the record player. If color irregularities appear in TV pictures, move the speaker further away from the TV. This unit is designed so that it should not cause irregular coloring in TVs, but it may occur with some types of TVs. If it does occur, switch the TV off for 15 to 30 minutes. The TV’s demagnetizing function should correct the problem. If the problem persists, move the speakers further away from the TV. Note that a magnetic object near the speakers can cause irregular coloring in the TV due to the interaction between the speakers and the object. Placement notes Avoid locations such as described below. •In direct sunlight •Near heating appliances or other sources of heat •Where the humidity is high 4 La parte trasera del altavoz debe quedar hacia una pared grande y sólida. En la parte trasera del altavoz existe un altavoz de reflejo de graves, por lo tanto se debe dejar una separación de 5 cm aproximadamente entre el altavoz y la pared. Colgar una cortina gruesa o un material similar en la pared hacia la que mira el altavoz. Si la superficie hacia la que mira el altavoz es una pared sólida o una ventana, colgando una cortina se impedirán las reflexiones del sonido o la resonancia. No colocar el altavoz muy cerca de un tocadiscos. El altavoz puede hacer que el tocadiscos vibre o produzca aullidos (un sonido de alta frecuencia). Se debe evitar esto manteniendo suficiente distancia entre el altavoz y el tocadiscos, o colocando un paño de fieltro debajo del tocadiscos. Si el altavoz produce irregularidades en los colores del televisor, alejarlo del televisor. Este aparato ha sido diseñado para que no cause colores irregulares en la imagen de los televisores, pero es posible que éstos ocurran con algunos tipos de televisor. En este caso, apague el televisor durante un periodo de 15 a 30 minutos. La función de desmagnetización del televisor deberá corregir el problema. Si éste persiste, separe más los altavoces del televisor. Tenga en cuenta que un objeto magnético cerca de los altavoces puede causar colores irregulares en la imagen del televisor debido a la interacción entre los altavoces y el objeto. Notas respecto a la ubicación Evitar ubicaciones como las indicadas a continuación. •Expuesto a los rayos solares •Próximo a dispositivos de calefacción y otras fuentes de calor •Donde la humedad sea excesiva Attaching the aluminum stand (included) Colocación de la base de aluminio (incluida) ENGLISH Front Parte delantera Avant Framsida ESPAÑOL R L A L B R FRANÇAIS SVENSKA See pages 2 and 3 for details about the parts ( – ). Consultar las páginas 2 y 3 para tener detalles de las piezas ( The speakers will sit steadier and better acoustic effects will be achieved if the stand is fitted. Attach the insulators ( and ) to the stand. – ). Si se coloca la base, los altavoces quedarán instalados de forma más estable y mejorarán los efectos acústicos. Colocar los aisladores ( y ) en la base. Do not attach insulator if you want to face the speakers upward and bring the sound closer to the listening position. No ponga el aislador si desea colocar los altavoces hacia arriba y acercar más el sonido la posición de escucha. Attach the stand to the base of the speaker. Colocar la base en la parte inferior del altavoz. (Lay the speaker on cloth to avoid scratches.) (Poner el altavoz encima de un paño para impedir que se raye.) Lift the speaker when moving it to avoid scratching floor surfaces. Connections Nota Levantar el altavoz al trasladarlo de sitio para impedir rayar la superficie del suelo. Conexiones •Before making the connections, switch OFF the power to the amplifier. •Check that a speaker with an impedance of 6 Ω can be connected to the speaker terminals of the amplifier. •Be sure to connect only positive (+) wires to positive (+) terminals, and negative (–) wires to negative (–) terminals. Amplifier (not included) Right speaker Left speaker Speaker cables (not included) •Antes de realizar las conexiones, desconectar la alimentación del amplificador. •Verificar que se puede conectar un altavoz de una impedancia de 6 Ω en los terminales de altavoces del amplificador. •Asegurarse de conectar sólo los cables positivos (+) en los terminales (+) y los cables negativos (–) en los terminales (–). Amplificador (opcional) Altavoz derecho Altavoz izquierdo Cables de altavoces (opcional) Connecting the speaker cable to the speaker Strip the outer covering from end of the cable to a length of approximately 15 mm and twist the center wire. Turn the speaker terminal knob to the left until the hole ( ) is visible. Insert the center wire into the hole, and then turn the knob to the right to secure the cable. If using a commercially-available 4-mm plug cable ( Pelar el extremo del cable aproximadamente unos 15 mm y retorcer el conductor central. Girar la perilla del terminal del altavoz hacia la izquierda hasta que el orificio ( ) quede a la vista. Insertar el conductor central en el orificio, y luego girar la perilla hacia la derecha para asegurarlo. ) Fully tighten the speaker terminal knob, and then insert the end of the plug cable into the top of the knob. Si usa un cable con enchufe de 4 mm de venta en comercios ( ) CAUTION E Apretar bien la perilla del terminal del altavoz, y luego insertar el extremo del cable con enchufe en la parte de arriba de la perilla. To prevent damage to circuitry, never short-circuit positive (+) and negative (–) speaker wires. 6 Conexión de un cable de altavoz a un altavoz PRECAUCIÓN E Para no dañar el circuito, nunca se debe permitir que los conductores de altavoces positivo (+) y negativo (–) hagan cortocircuito. ENGLISH Notes Notas Speaker impedance and allowed input Impedancia del altavoz y potencia de entrada permitida Impedance: 6 Ω Input power: 50 W (DIN) ESPAÑOL FRANÇAIS CAUTION The only receivers or amplifiers you should connect to these speakers are those whose rated output does not exceed the above figures. Using a receiver or amp with higher ratings than listed above can cause abnormal sounds to occur because of excessive input, damage to the receiver or speakers, and fire. If equipment is damaged in any way or unexpected trouble occurs during playback, unplug the system from its outlet and call a serviceman for help. Notes with regard to excessive input SVENSKA Be sure to reduce the volume on the receiver (or amplifier) when the signal input exceeds the rated allowable input to avoid damage to circuitry or other malfunctions. Other notes Do not touch the diaphragms. To do so might cause distortion. Impedancia: 6 Ω Potencia de entrada: 50 W (DIN) ADVERTENCIA Los únicos receptores o amplificadores que Ud. deberá conectar a estos altavoces son aquellos cuya salida nominal no exceda las cifras de arriba. Al usar un receptor o un amplificador con características nominales superiores a las indicadas arriba se pueden producir ruidos anormales debido a la entrada excesiva, el receptor o los altavoces se pueden estropear, y además se puede producir un incendio. Si el equipo es dañado de alguna manera o un problema inespera-do ocurre durante la reproducción, desenchufe el sistema y llame a su distribuidor para que envíen una persona que le ayude. Notas con respecto a una entrada excesiva Asegurarse de reducir el volumen del receptor (o amplificador) cuando la señal de entrada exceda la entrada nominal permitida para evitar dañar la circuitería u otras fallas. Otras notas Keep magnetized items away Magnetized cards, bank cards, commuter passes, etc., can be damaged if allowed too near speaker magnets. Clocks may also be effected. Protection circuitry This unit incorporates speaker protection circuitry to protect the speaker from damage caused by excessive input or abnormal signals; when excess input is detected, input is automatically interrupted. If sound is interrupted... 1. Reduce the volume of the receiver (or amplifier). 2. Check the sound source and connections for any problems. If there is no problem, the protection circuitry will reset in a few minutes. After the protection circuit is reset... Take care not to increase the receiver’s volume too high. Maintenance To clean this unit, wipe with a soft, dry cloth. If the surfaces are extremely dirty, use a soft cloth dipped in a soapand-water solution or a weak detergent solution. •Never use alcohol, paint thinner, or benzine to clean this unit. •Before using chemically impregnated cloth, read the instructions that came with the cloth carefully. No tocar los diafragmas, de lo contrario se ocasionarán distorsiones. Alejamiento de objetos magnetizados Las tarjetas magnetizadas, las tarjetas de bancos, los pases de viajeros, etc., pueden estropearse si se dejan demasiado cerca de los imanes de los altavoces. Los relojes también pueden ser afectados. Circuitería de protección Este aparato incorpora una circuitería de protección de altavoces para proteger el altavoz de daños causados por una entrada excesiva o señales anormales; cuando una entrada excesiva es detectada, la entrada es automáticamente interrumpida. Si el sonido se interrumpe... 1. Reducir el volumen del receptor (o amplificador). 2. Verificar si hay problemas en la fuente de sonido y las conexiones. Si no hay problemas, la circuitería de protección se reajustará en unos pocos minutos. Después de que el circuito de protección sea reajustado... Cuidarse de no incrementar demasiado el volumen del receptor. Mantenimiento Utilizar un paño suave y seco para limplar este aparato. Si las superficies están extremadamente sucias, utilizar un paño suave humedecido en una solución de agua y jabón o en una solución de detergente suave. •Para limpiar este aparato no utilizar nunca alcohol, diluyente de pintura o bencina. •Antes de utilizar un paño impregnado químicamente, leer con atención las instrucciones suministradas con él. 8 Tekniska data Technical specifications Type Speaker Woofer Tweeter Impedance Input power Sound pressure level Crossover frequency Frequency response Dimensions (W × H × D) Weight 2 way, 2 speaker system Bass-reflex 8 cm cone type 2.5 cm dome type 6Ω 100 W (Music) 50 W (DIN) 79 dB/W (1.0 m) 2.5 kHz 58 Hz – 40 kHz (at –16 dB) 68 Hz – 36 kHz (at –10 dB) 136 × 223.5 × 213 mm 3.0 kg (Excluding accessories) Specifications are subject to change without notice. Weight and dimensions are approximate. Especificaciones técnicas Tipo Altavoz Altavoz de graves Altavoz de agudos Impedancia Potencia de entrada Nivel de presión de sonido Frecuencia de cruce Respuesta de frecuencia Dimensiones (An. × Al. × Prof.) Peso 2 vías, sistema de 2 altavoces Bass-reflex (reflejo de graves) 8 cm tipo de cono 2,5 cm tipo de domo 6Ω 100 W (Musicales) 50 W (DIN) 79 dB/W (1,0 m) 2,5 kHz 58 Hz – 40 kHz (a –16 dB) 68 Hz – 36 kHz (a –10 dB) 136 × 223,5 × 213 mm 3,0 kg (Excluyendo accesorios) Nota Las especificaciones están sujetas a cambios sin previo aviso. Los pesos y las dimensiones son aproximados. Données techniques Type Enceinte à 2 voies, 2 haut-parleurs, bass-reflex Haut-parleurs Woofer Type cône de 8 cm Tweeter Type dôme de 2,5 cm Impédance 6Ω Puissance d’entrée 100 W (musique) 50 W (DIN) Niveau de pression sonore 79 dB/W (1,0 m) Fréquence de raccordement 2,5 kHz Réponse en fréquence 58 Hz – 40 kHz (à –16 dB) 68 Hz – 36 kHz (à –10 dB) Dimensions (L × H × P) 136 × 223,5 × 213 mm Poids 3,0 kg (sans les accessoires) Spécifications sujettes à modifications sans préavis. Les poids et les dimensions sont approximatifs. 22 Typ 2-vägs 2-högtalarsystem med basreflexhögtalare Högtalare Baselement 8 cm, kontyp Diskantelement 2,5 cm, domtyp Impedans 6Ω Ineffekt 100 W (musik) 50 W (DIN) Ljudtrycksnivå 79 dB/W (1,0 m) Övergångsfrekvens 2,5 kHz Frekvensomfång 58 Hz – 40 kHz (vid –16 dB) 68 Hz – 36 kHz (vid –10 dB) Mått (B × H × D) 136 × 223,5 × 213 mm Vikt 3,0 kg (utan tillbehör) Observera Tekniska data kan ändras utan föregående meddelande. Angivna mått och vikter är ungefärliga. Technische Daten Bauart 2-Weg-Lautsprechersystem, 2 Lautsprecher, Baßreflex-Ausführung Lautsprecher Tieftöner Hochtöner Impedanz Belastbarkeit Ausgangsschalldruckpegel Übernahmefrequenz Frequenzgang Abmessungen (B × H × T) Gewicht 8-cm-Konustyp 2,5-cm-Kalottentyp 6Ω 100 W (Musik) 50 W (DIN) 79 dB/W (1,0 m) 2,5 kHz 58 Hz bis 40 kHz (–16 dB) 68 Hz bis 36 kHz (–10 dB) 136 × 223,5 × 213 mm 3,0 kg (ausschließlich Zubehör) Änderungen der technischen Daten jederzeit vorbehalten. Die angegebenen Gewichts- und Abmessungsdaten sind ungefähre Werte. Dati tecnici Tipo Altoparlante Woofer Tweeter Impedenza Potenza di ingresso Sistema di 2 altoparlanti a 2 vie bass reflex Livello di pressione sonora Frequenza d’incrocio Risposta in frequenza Dimensioni (L × A × P) Peso Tipo a cono di 8 cm Tipo a cupola di 2,5 cm 6Ω 100 W (Musica) 50 W (DIN) 79 dB/W (1,0 m) 2,5 kHz 58 Hz – 40 kHz (a –16 dB) 68 Hz – 36 kHz (a –10 dB) 136 × 223,5 × 213 mm 3,0 kg (senza accessori) Dati tecnici soggetti a modifiche senza avviso. Il peso e le dimensioni indicati sono approssimativi.-
 1
1
-
 2
2
-
 3
3
-
 4
4
-
 5
5
-
 6
6
-
 7
7
-
 8
8
-
 9
9
-
 10
10
-
 11
11
-
 12
12
-
 13
13
-
 14
14
-
 15
15
-
 16
16
-
 17
17
-
 18
18
-
 19
19
-
 20
20
-
 21
21
-
 22
22
-
 23
23
-
 24
24


Panasonic SBM01 Instrucciones de operación
- Categoría
- Altavoces
- Tipo
- Instrucciones de operación
en otros idiomas
- français: Panasonic SBM01 Mode d'emploi
- italiano: Panasonic SBM01 Istruzioni per l'uso
- English: Panasonic SBM01 Operating instructions
- Deutsch: Panasonic SBM01 Bedienungsanleitung
- русский: Panasonic SBM01 Инструкция по эксплуатации
- Nederlands: Panasonic SBM01 Handleiding
- dansk: Panasonic SBM01 Betjeningsvejledning
- polski: Panasonic SBM01 Instrukcja obsługi
- čeština: Panasonic SBM01 Operativní instrukce
- svenska: Panasonic SBM01 Bruksanvisningar
Artículos relacionados
-
Panasonic SBCA21 El manual del propietario
-
-
-
-
-
-